
Peugeot 205 with 4wd cosworth engine and running gear.
 10-05-2015, 04:19 PM
#401
10K+ Poster!!


This weekends fun: I re fitted the alloy strut brace on the front that would not fit with the efr, a bit of heat and persuasion with a hammer to flat a little section and fits a treat. I got out the da with various grades of wet n dry, 320, 400, 500, 800, 1200 then 2000 before I gotbthe rotary out with auto sol....came up well so did the alloy top mounts too before refitting.
Then the adjustable track control arms and emptied all the water ready for the Evans waterless coolant.
There were a few electric bits I wanted to do in the engine bay.
I think a few more hard days at it and we should be running.
Then the adjustable track control arms and emptied all the water ready for the Evans waterless coolant.
There were a few electric bits I wanted to do in the engine bay.
I think a few more hard days at it and we should be running.
 11-05-2015, 11:52 AM
#403
10K+ Poster!!
11-05-2015, 02:25 PM
#405
10K+ Poster!!

Polished strut brace now clears all of the engine
11-05-2015, 02:26 PM
#406
10K+ Poster!!

Here you can see the cleaned strut tops, the bits of tape etc will be replaced to remove the overspray from poor masking
12-05-2015, 08:03 AM
#408
10K+ Poster!!
Small jobs really mate:
New boost pipes to suit the hart inlet, connect a vacuum pipe from hart inlet to the new servo (just pipe needed), new windscreen washer jet wires and pipes as I have relocated the washer to the boot, new brake lines to suit the new master cylinder, flush the system for the Evans waterless coolant and connect up the ETS pro gearbox controller to the throttle position sensor (1 wire) and then the new throttle cable.
I am sure I will find a few other jobs but it is just fiddly stuff that all takes time.
Lots of bits arriving all the time so should have stuff to get on with this weekend.
13-05-2015, 07:38 AM
#410
10K+ Poster!!
No worries, I think the switches fail a lot from what I read on line. I think the rear most one is the neutral switch and the front is reverse.
Good to speak to you too, thanks for the call.
05-06-2015, 08:14 AM
#411
10K+ Poster!!
The brake lines finally turned up so I can now carry on and try to finish it, not too much left to do.
06-06-2015, 12:59 PM
#413
10K+ Poster!!
Brake lines in today, remade the centre console with new elec window switches, bolted up the pedal box and made new windscreen washers....also fitted new pinch bolts in the track control arms.
06-06-2015, 06:42 PM
#415
10K+ Poster!!
Trying my best. I put a carbon cam cover on today.
I also fitted twin pumps to wash the windscreen, I am really pleased with how neat they plumbed. I need to set up the adjustable track control arms.
I also fitted twin pumps to wash the windscreen, I am really pleased with how neat they plumbed. I need to set up the adjustable track control arms.
07-06-2015, 11:36 AM
#416
10K+ Poster!!
My starter seemed jammed so I took it out, earthed it and it span perfectly so I tried to turn the flywheel and it is locked solid...I wonder if my repair "weld" is too proud and locking? Looks like Box out again to look for witness marks....kind of wished I had gone opplliger long box now lol. I know the end will be better with the 4wd control etc but this really tests my commitment!
Worst of all I have just filled the system with prep fluid for the waterless so if the engine needs to come out then I will need to reuse it as the engine needs to be run up to temp with it in.....oh well, i might just send the bell housing to mk for a better repair and might get Bara to fit a close ratio kit whilst it is out. Just put �100 of shock proof in the box too!
Worst of all I have just filled the system with prep fluid for the waterless so if the engine needs to come out then I will need to reuse it as the engine needs to be run up to temp with it in.....oh well, i might just send the bell housing to mk for a better repair and might get Bara to fit a close ratio kit whilst it is out. Just put �100 of shock proof in the box too!
The following users liked this post:
Caddyshack (08-06-2015)

The following users liked this post:
Caddyshack (08-06-2015)
08-06-2015, 08:36 AM
#420
10K+ Poster!!
It should be pretty good when done, just everything seems to take forever....for instance I am running two washer fluid pumps from the rear of the car to the front, by the time I had neatly attached all the pipework with plastic P clips, wired it all and mounted the tank that was very nearly most of a Saturday on that one little bit. I have now got the neutral light sorted and the reverse light.
08-06-2015, 12:17 PM
#421
PassionFord Post Whore!!
That's the difference in doing it once and doing it right.
Once the car is finished you shouldnt need to do anything other wash it and drive it.
Whereas a car that's thrown together needs constant attention.
I do something in the middle as I'm impatient lol.
Once the car is finished you shouldnt need to do anything other wash it and drive it.
Whereas a car that's thrown together needs constant attention.
I do something in the middle as I'm impatient lol.
10-06-2015, 05:32 PM
#422
10K+ Poster!!
I released off all of the gearbox bolts by 3 turns this afternoon after work and the ring gear freed up so it is either the input shaft being too long and binding or the repair snagging on the ring gear.
Coley thinks it is the input shaft not correctly measured.
Coley thinks it is the input shaft not correctly measured.
 10-06-2015, 07:13 PM
#424
10K+ Poster!!
The following users liked this post:
Caddyshack (10-06-2015)
10-06-2015, 08:46 PM
#426
10K+ Poster!!
10-06-2015, 09:28 PM
#427
PassionFord Post Whore!!
I had to do that on my car,
I have a cossie engine and a Renault un1 gearbox.
I was having clutch problems and I made another plate to sit between the engine/box. I cut it out of 2mm aluminium and left the old tin one in there and it worked a treat.
Just back the box off by a few mm and take the bolts out.
I have a cossie engine and a Renault un1 gearbox.
I was having clutch problems and I made another plate to sit between the engine/box. I cut it out of 2mm aluminium and left the old tin one in there and it worked a treat.
Just back the box off by a few mm and take the bolts out.
The following users liked this post:
Caddyshack (11-06-2015)
11-06-2015, 07:54 AM
#428
10K+ Poster!!
I had to do that on my car,
I have a cossie engine and a Renault un1 gearbox.
I was having clutch problems and I made another plate to sit between the engine/box. I cut it out of 2mm aluminium and left the old tin one in there and it worked a treat.
Just back the box off by a few mm and take the bolts out.
I have a cossie engine and a Renault un1 gearbox.
I was having clutch problems and I made another plate to sit between the engine/box. I cut it out of 2mm aluminium and left the old tin one in there and it worked a treat.
Just back the box off by a few mm and take the bolts out.
I am certainly going to try it. I ordered another Cossie one last night so hopefully here at the weekend. I can see they have a split in them to get past the input shaft so should be straight forward.....even if this is only temporary until I have the box rebuilt with the close ratio kit in it then I will be happy.
11-06-2015, 09:54 AM
#429
PassionFord Post Whore!!
Yea they're split to get past the input shaft but you need to remove the box off the dowels (if you have them) there should be one either side of the engine. The std tin ones are quite thin though, you may need to cut a thicker one like I did.
11-06-2015, 10:02 AM
#430
10K+ Poster!!
Cool Thanks, I will draw around the new one when it turns up as I can get any thickness laser cut for pennies.
Yes, mine does have dowels.
In theory I may be able to get one cut in decent ally and have that welded to my bell housing to add back in the strength.
Thanks for the help
11-06-2015, 03:28 PM
#432
10K+ Poster!!
Thanks, I had decided to cut it in half, plus at the bottom my one had just 2 bolts but there is provision for 4 so I studded the other two with studs on the block side so I will need to allow for them to slot in as would need to move the box back about 4 inches to allow for them and I would rather move it as little as poss.
The following users liked this post:
Caddyshack (12-06-2015)
12-06-2015, 11:58 AM
#434
PassionFord Post Whore!!
Thanks, I had decided to cut it in half, plus at the bottom my one had just 2 bolts but there is provision for 4 so I studded the other two with studs on the block side so I will need to allow for them to slot in as would need to move the box back about 4 inches to allow for them and I would rather move it as little as poss.
Obviously not around the outside, but in the middle near the input shaft, unless you cut a 5mm gap maybe? But it may still rattle against the other plate?
I know it won't be much but could be very annoying.
I don't think it's neccisarry to cut tbh.
As the gap is at the top you can just slide it up from below.
13-06-2015, 11:55 AM
#435
10K+ Poster!!
My only concern with doing that is would it rattle on the joint?
Obviously not around the outside, but in the middle near the input shaft, unless you cut a 5mm gap maybe? But it may still rattle against the other plate?
I know it won't be much but could be very annoying.
I don't think it's neccisarry to cut tbh.
As the gap is at the top you can just slide it up from below.
The following users liked this post:
Caddyshack (14-06-2015)
13-06-2015, 02:53 PM
#437
I've found that life I needed.. It's HERE!!
Well in that case cut it to the shape of the bell housing only use it as 1 big washer. ????
Last edited by ossie cossie; 15-06-2015 at 11:37 PM.
The following users liked this post:
Caddyshack (14-06-2015)
14-06-2015, 10:25 AM
#438
10K+ Poster!!
I have done it as a washer now, thanks to you lot for the input. I have got it all loose fitted and will slowly torque it down next week as have to go out later. I will test the ring gear for movement at each stage but it seems to have done the trick.
The project feels soooo close to finish but I still have a list of jobs as long as my arm.
I added the prep fluid for the waterless and it seems to have created a tiny drip that I cannot locate the source of. I wonder if the prep fluid is thinner than water in terms of cold viscosity and therefore it's finding a weak point....I will have to fix that first after speaking to their technical help desk later in the week.
15-06-2015, 11:39 PM
#439
I've found that life I needed.. It's HERE!!
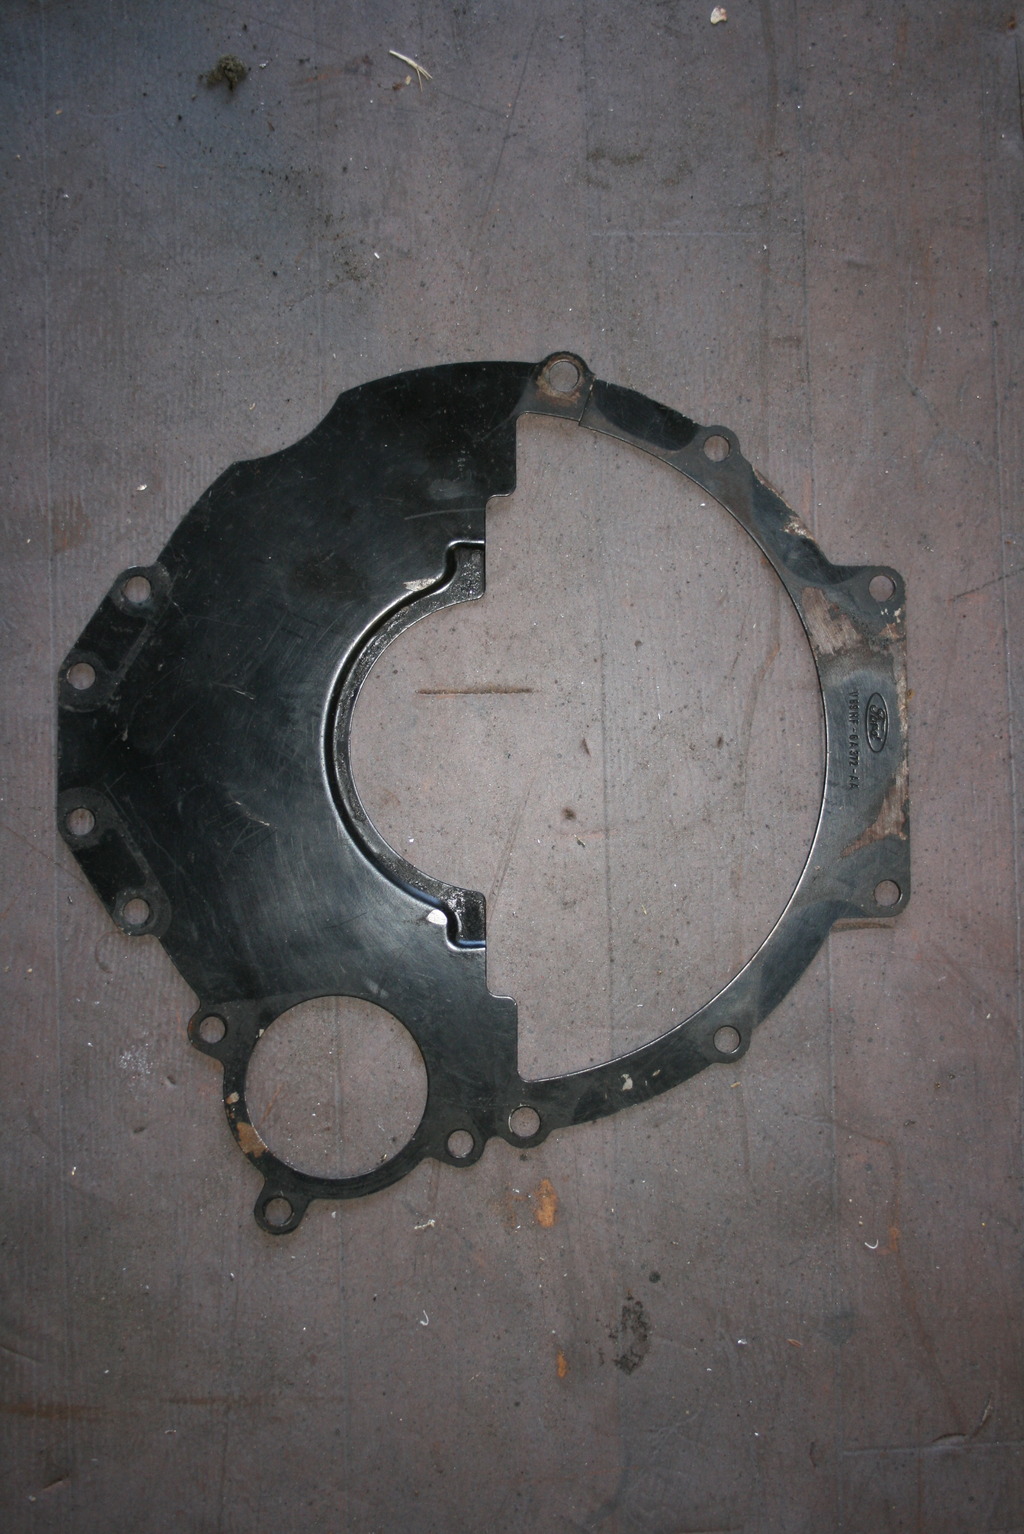
This is what one looks like.
can you show me where you cut it just in case i have to do it as well.
Thanks.

can you show me where you cut it just in case i have to do it as well.
Thanks.
Last edited by ossie cossie; 15-06-2015 at 11:40 PM.
15-06-2015, 11:51 PM
#440
Hi Toby
How much did you pay for your ETS-Pro controller delivered to the uk mate
I'm looking at getting the same for the fiesta but not sure on added tax and shipping costs ect, want to see if somebody can send me as a gift instead to save import duty
How much did you pay for your ETS-Pro controller delivered to the uk mate
I'm looking at getting the same for the fiesta but not sure on added tax and shipping costs ect, want to see if somebody can send me as a gift instead to save import duty