
ZX10R turbo kit car build - update 10-08-13
 02-03-2012, 10:25 AM
#481
10K+ Poster!!
Thread Starter

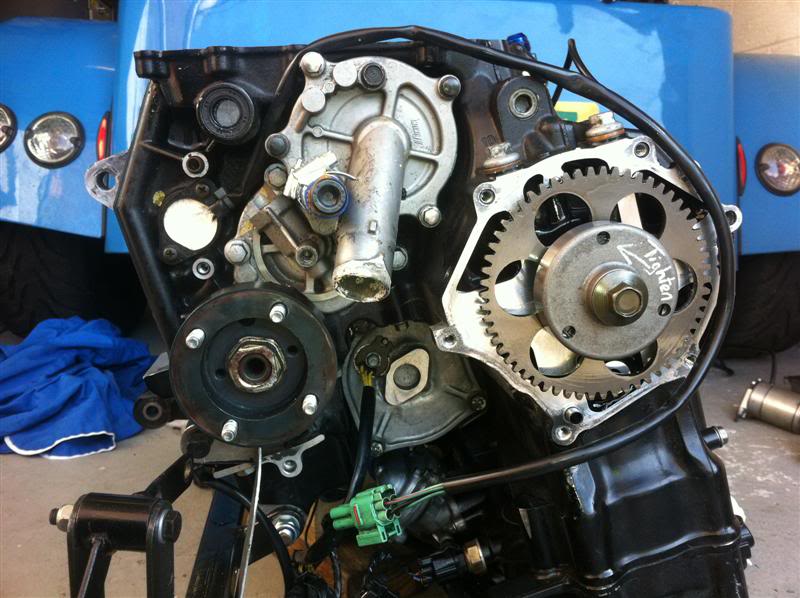
Removed the covers and idler gear from the starter motor assembly
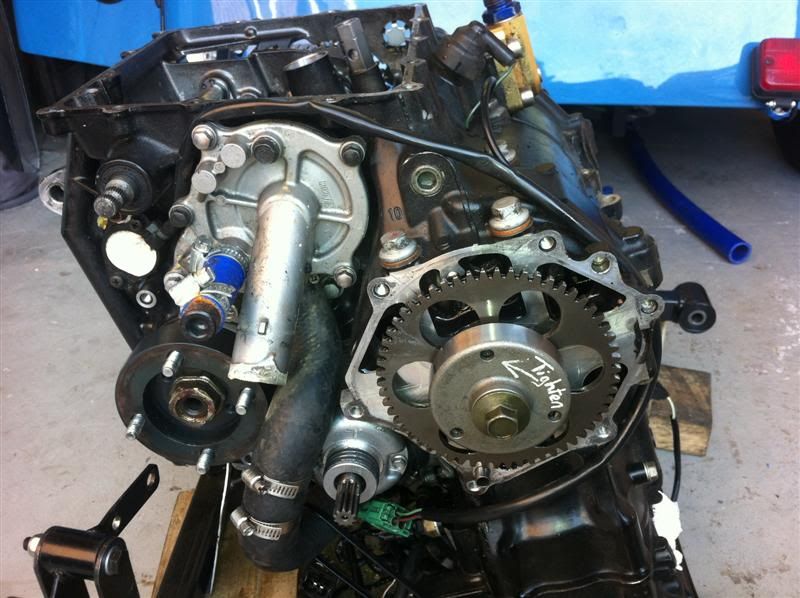
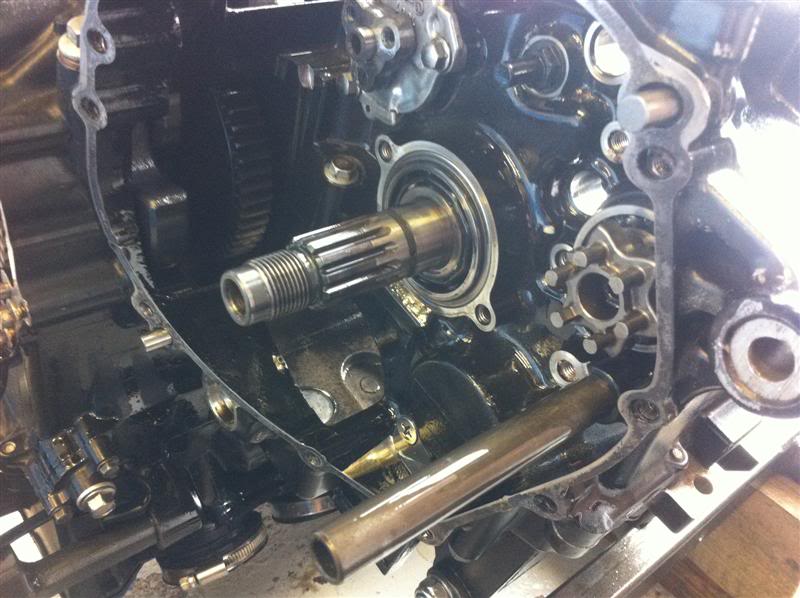
Crank position sensor cover and clutch plates removed

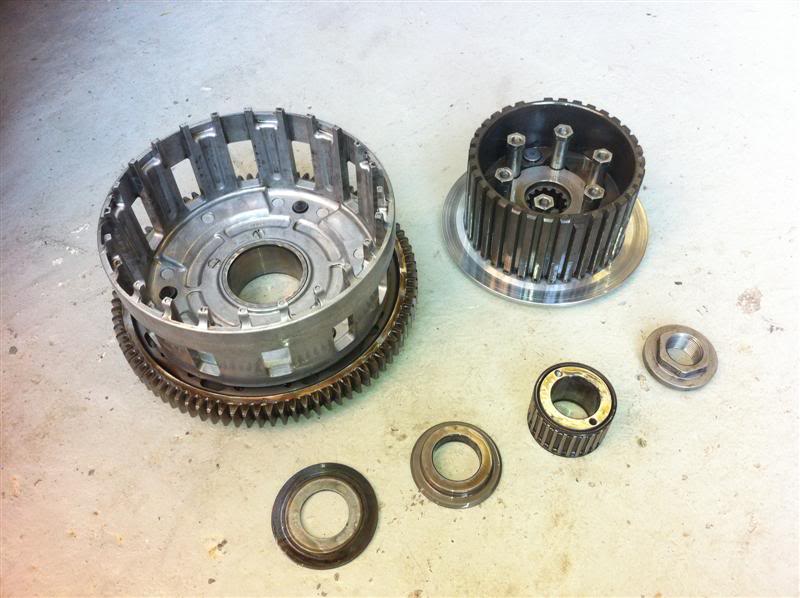
Clutch basket taken off
Clutch basket assembly
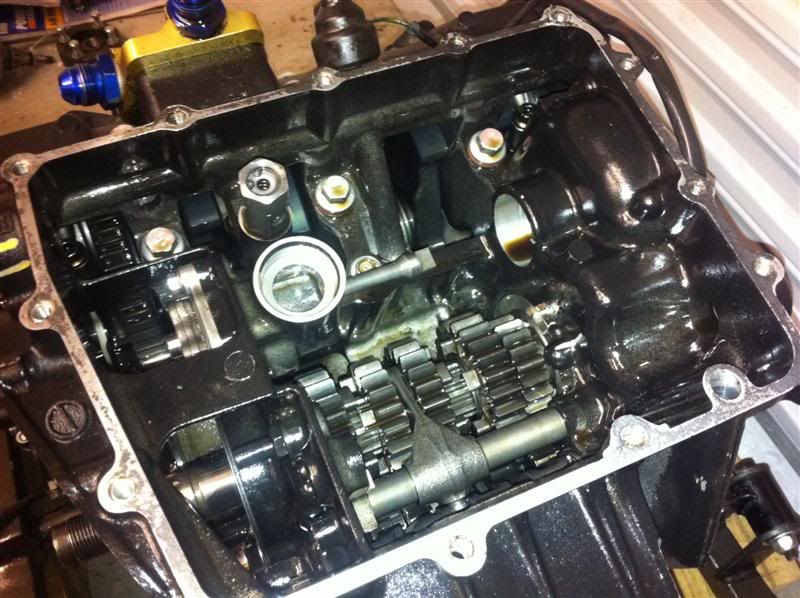
Remove this circlip from the gear selector shaft, then it can be slid out of the transmission casing

With the selector shaft removed, things look like this inside

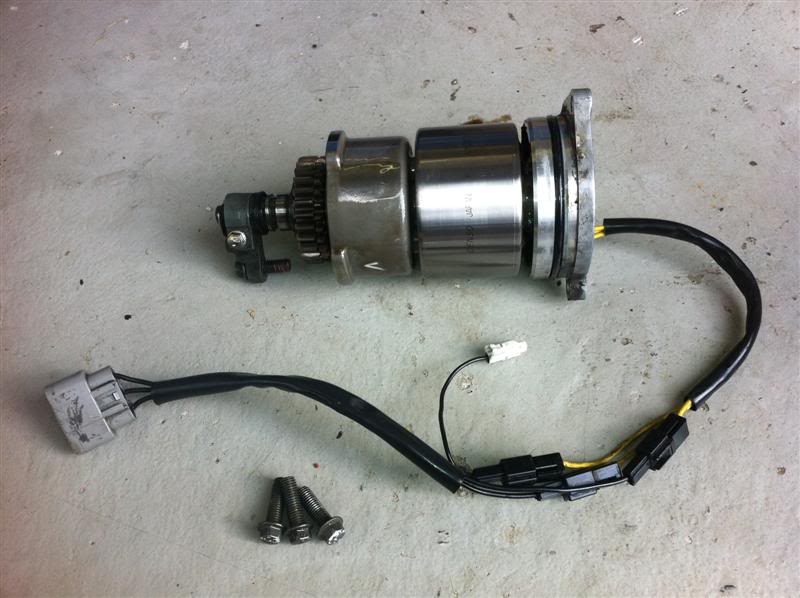
Starter motor removed which gives access to the generator cover
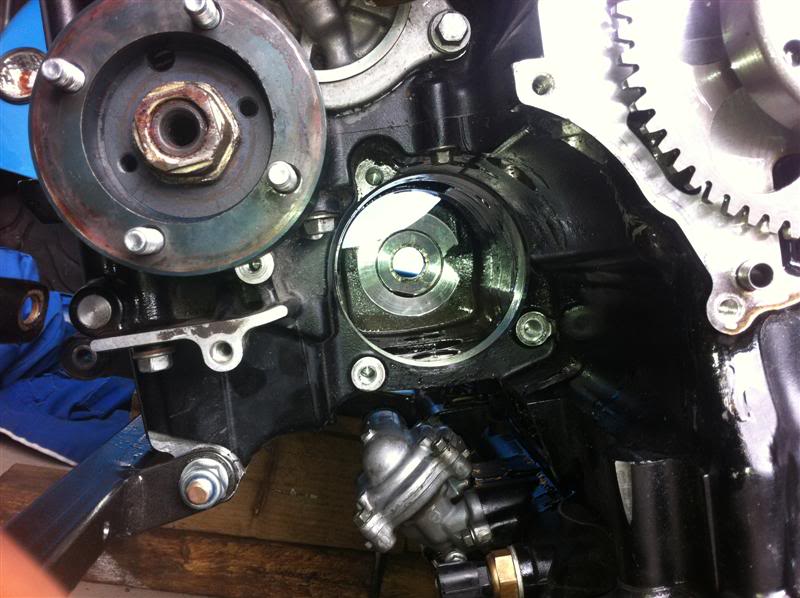
Generator assembly removed
Big hole where the generator lives
Sprocket adaptor and water pump removed
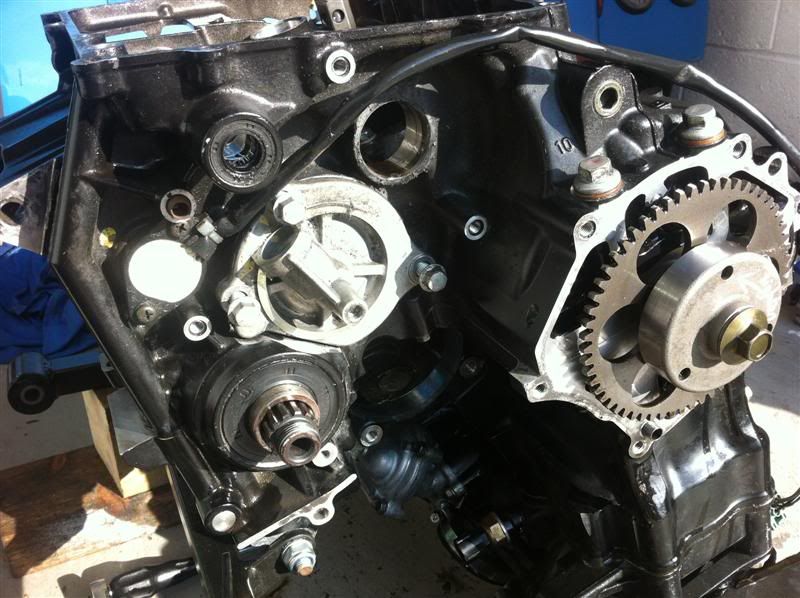
Oil pump drive gear removed

Lower gear selector fork shaft being withdrawn
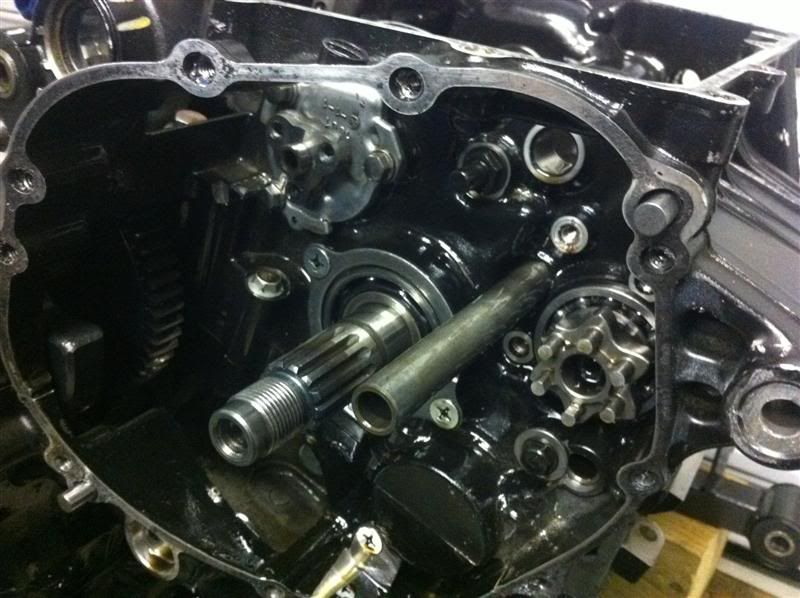
Lower selector and shaft
Crank position sensor cover and clutch plates removed
Clutch basket taken off
Clutch basket assembly
Remove this circlip from the gear selector shaft, then it can be slid out of the transmission casing
With the selector shaft removed, things look like this inside
Starter motor removed which gives access to the generator cover
Generator assembly removed
Big hole where the generator lives
Sprocket adaptor and water pump removed
Oil pump drive gear removed
Lower gear selector fork shaft being withdrawn
Lower selector and shaft
Last edited by Red16; 02-03-2012 at 10:36 AM.
 02-03-2012, 10:57 AM
#482
10K+ Poster!!
Thread Starter
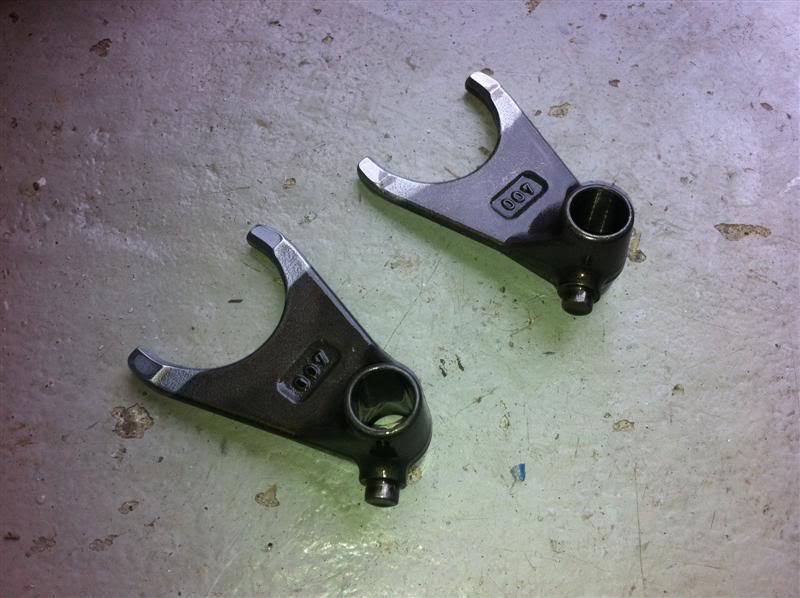
Upper selector fork shaft being withdrawn
Gear selector drum being withdrawn
Gear selector drum assembly
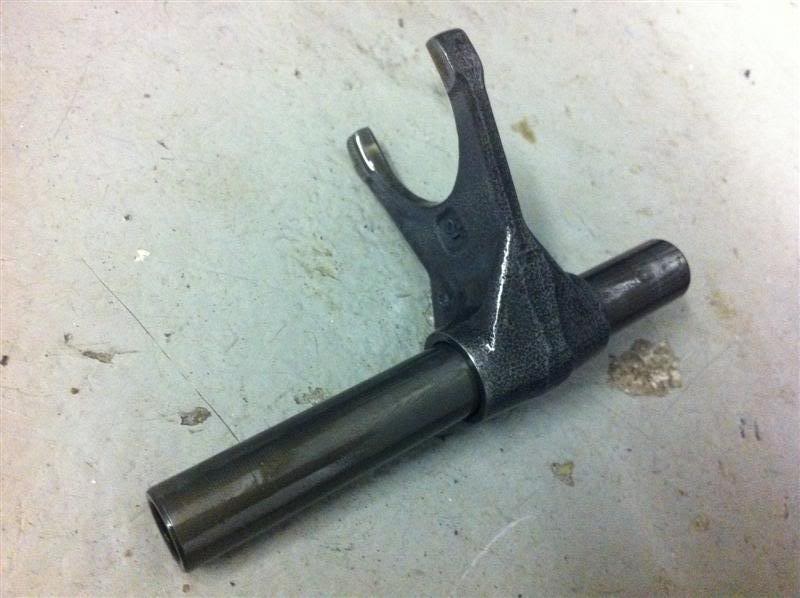
Selector fork shafts and drum removed but upper selector forks still in position
Upper selector forks
Oil pump
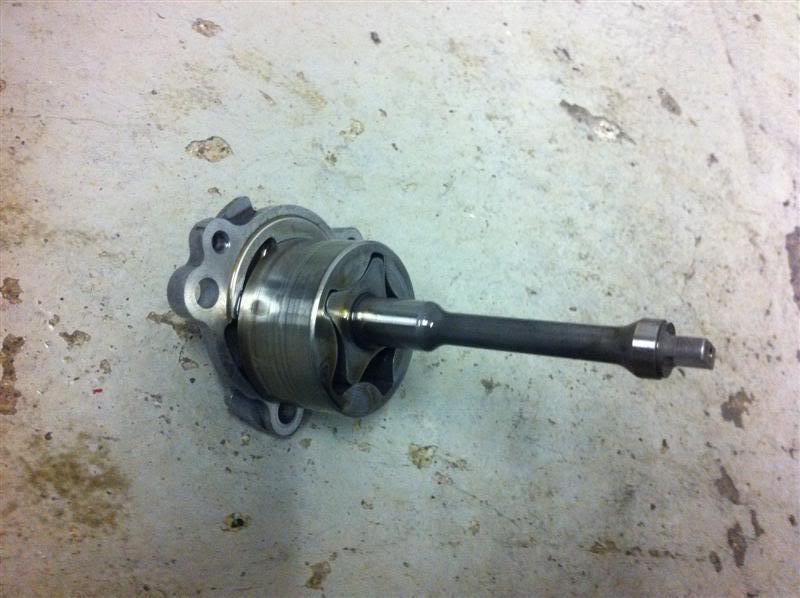
Oil pump housing

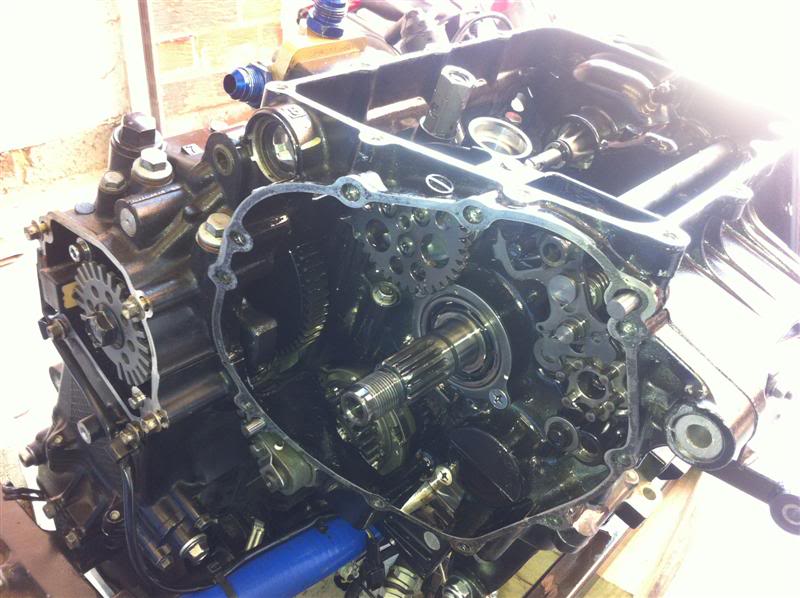
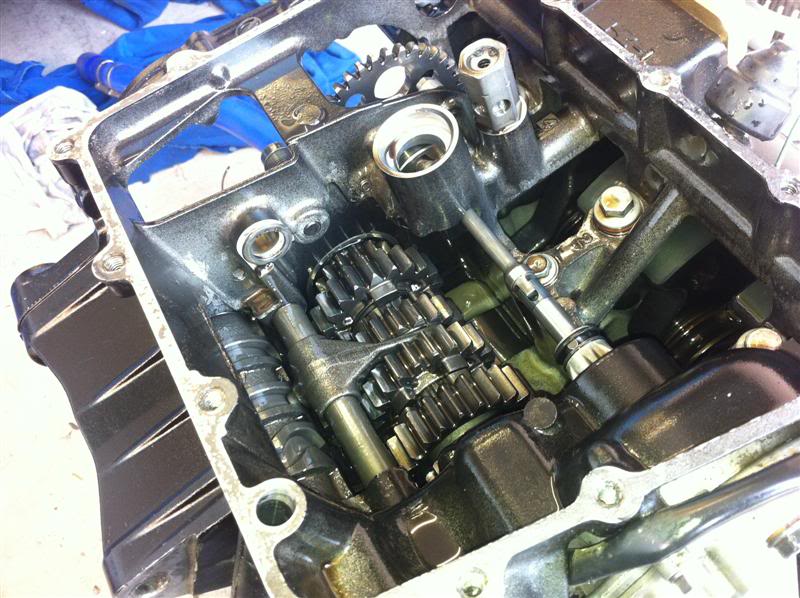
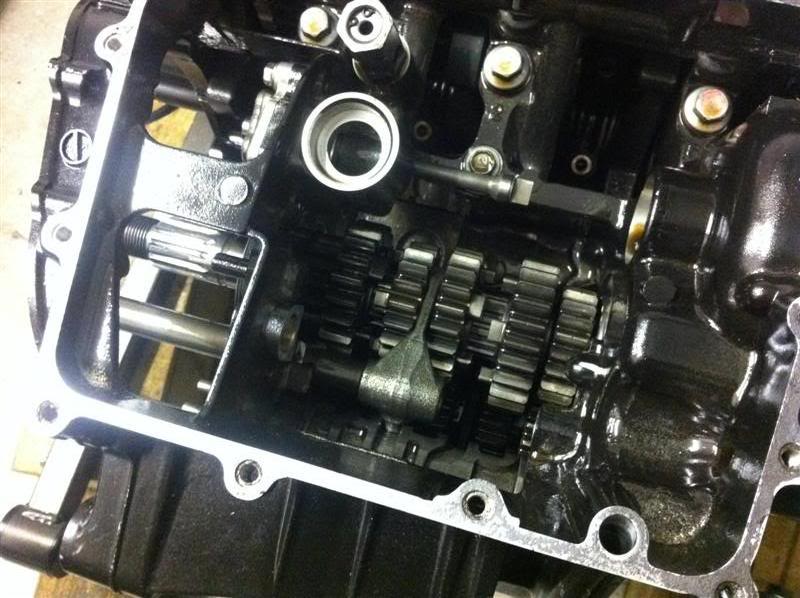
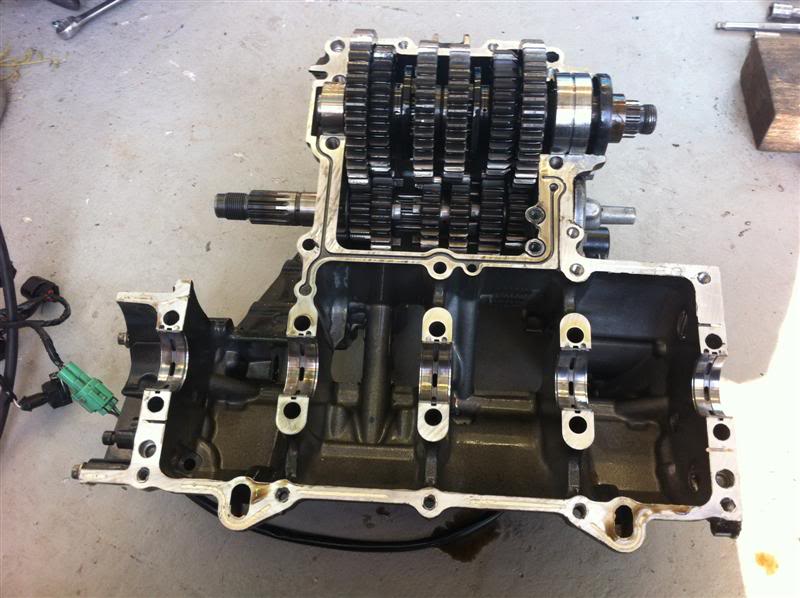
Engine casing split and the transmission removed
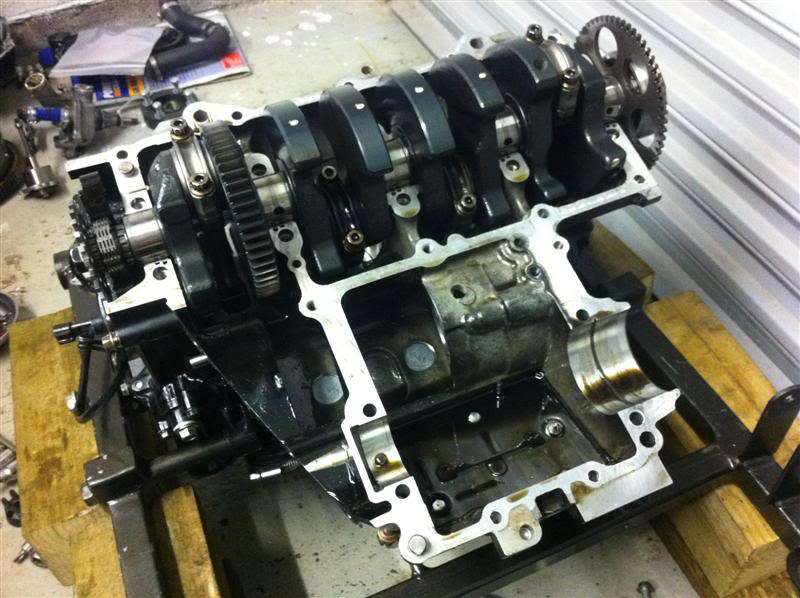
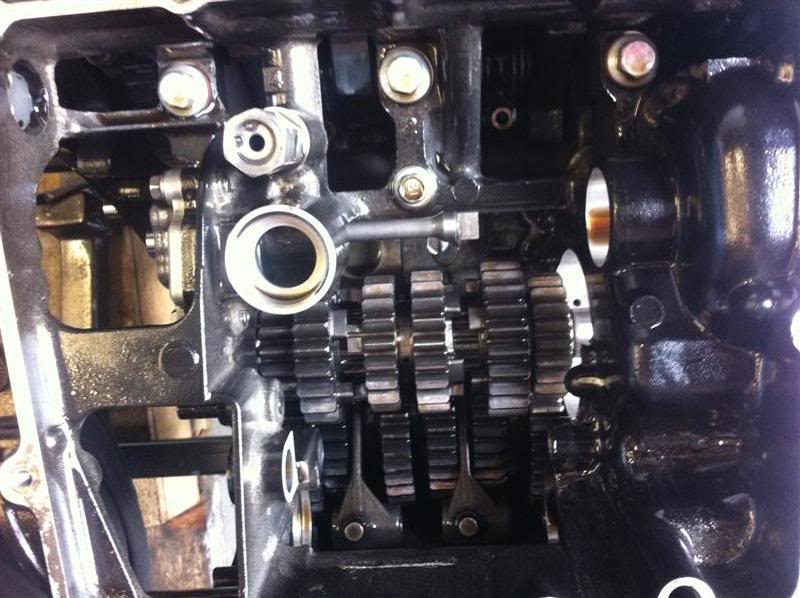
Transmission
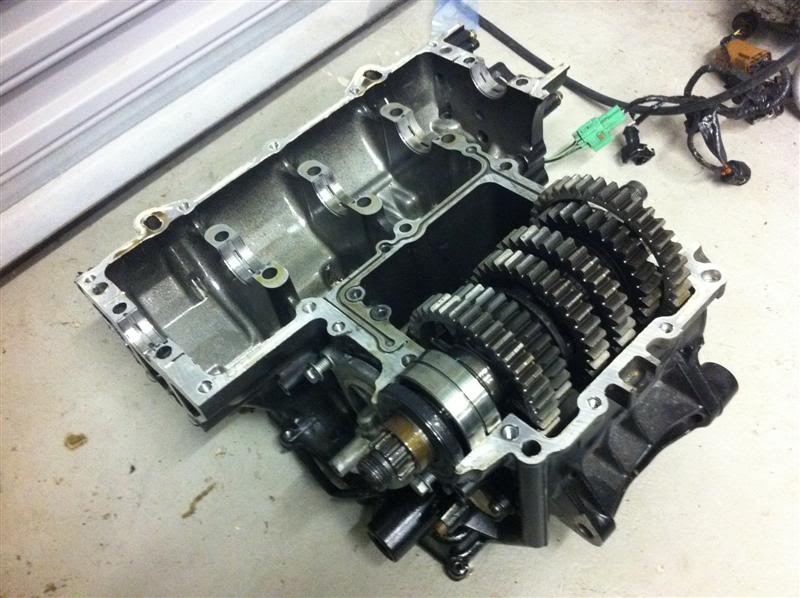
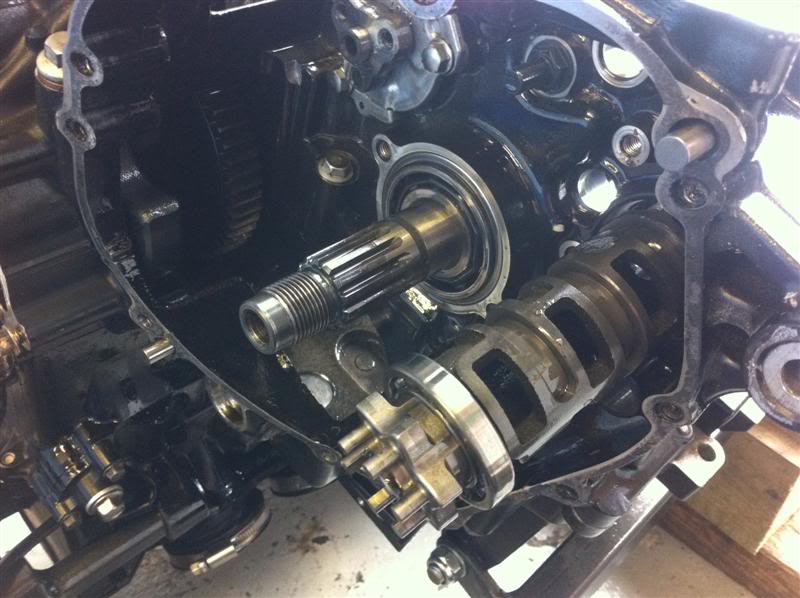
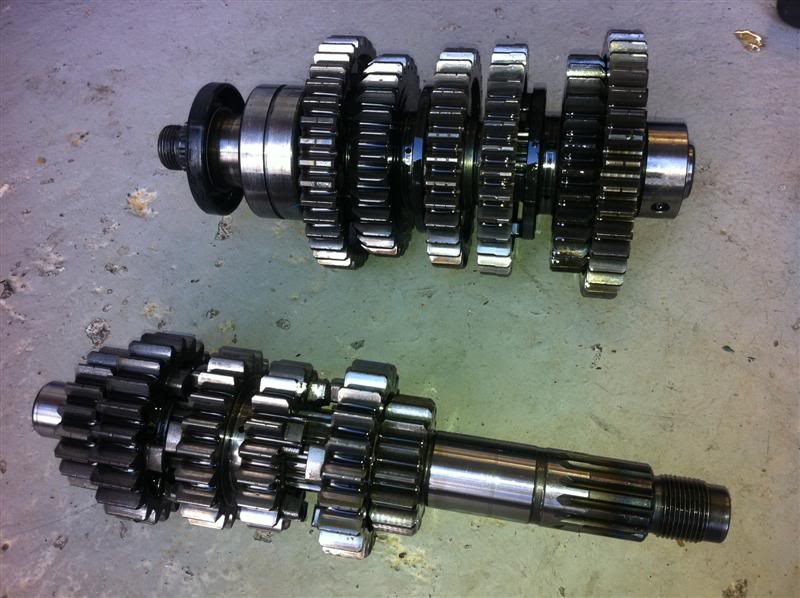
Transmission output shaft removed
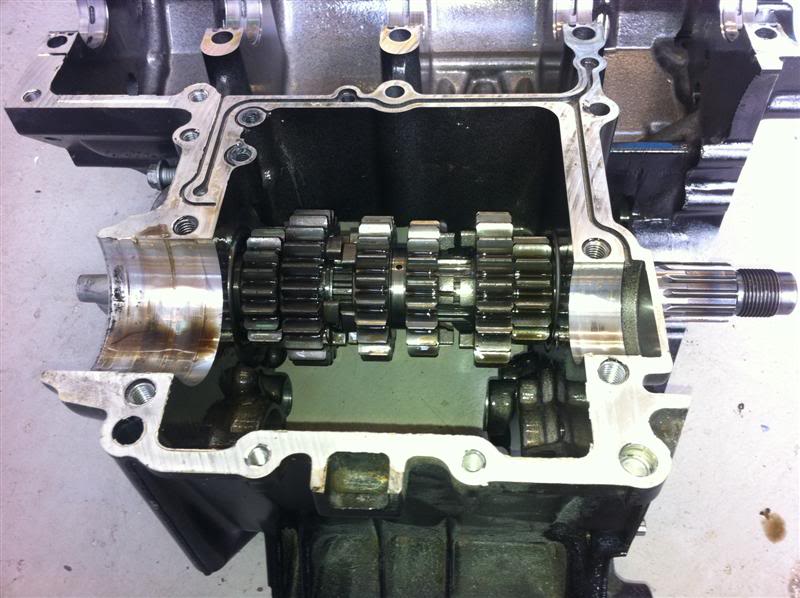
Transmission shafts
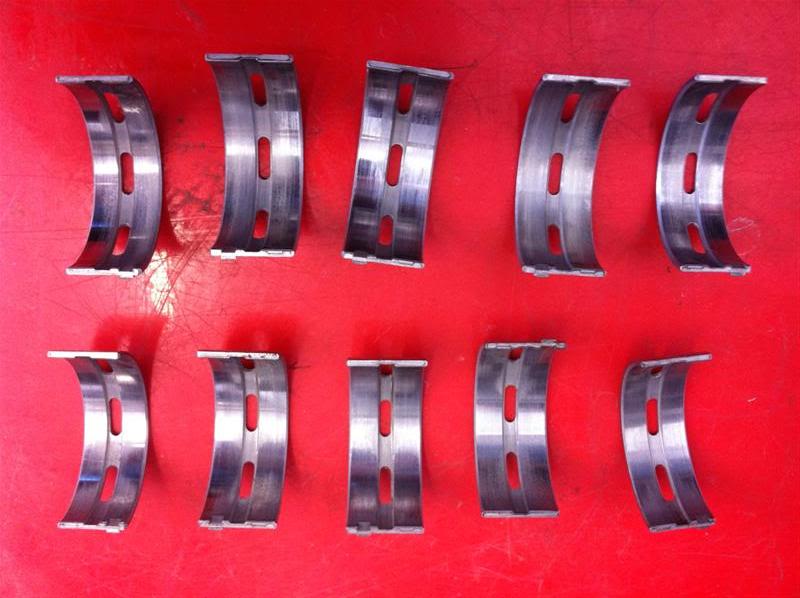
Having got to this stage of the stripdown and not found anything obvious wrong I was getting a bit concerned, due the large pieces of debris in the sump it had to be something fairly sizeable and obvious which had gone wrong, the issue turned out to be a damaged big end shell.
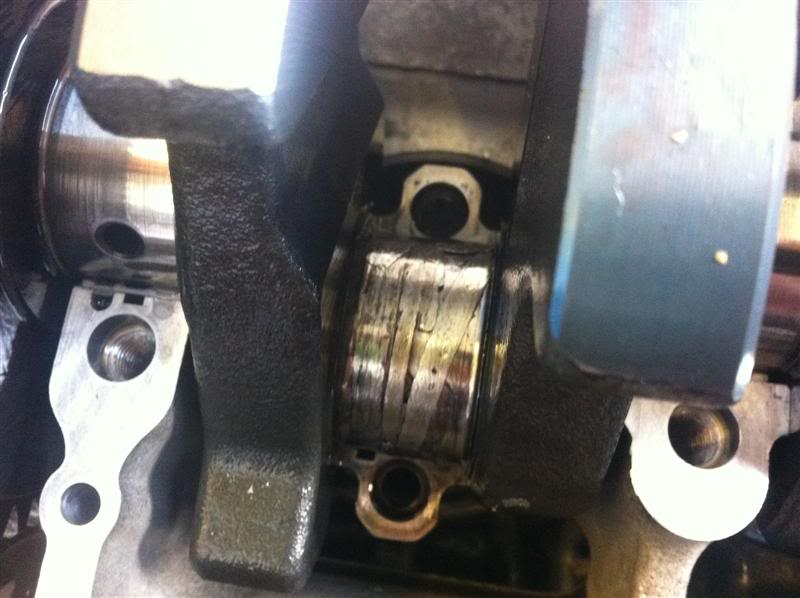
As you can see here, the big end shell isn't in great shape and the rod cap appears to be scored
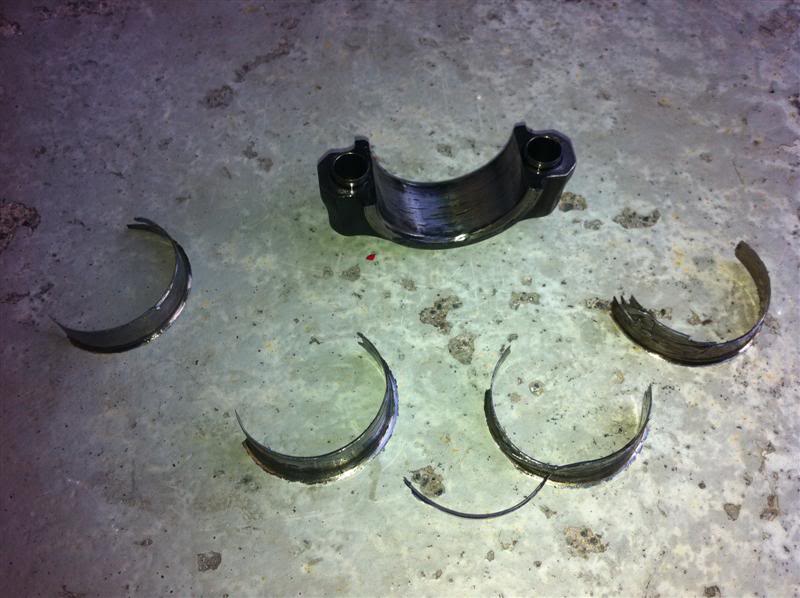
Hopefully the rod will be able to be salvaged, but that can't be ascertained until it it cleaned up and measured.
I'm very suprised that with the big end fault I have found that there was no excess noise/vibration while the engine was idling
On a positive note, the problem has been found and can therefore now be rectified
Gear selector drum being withdrawn
Gear selector drum assembly
Selector fork shafts and drum removed but upper selector forks still in position
Upper selector forks
Oil pump
Oil pump housing
Engine casing split and the transmission removed
Transmission
Transmission output shaft removed
Transmission shafts
Having got to this stage of the stripdown and not found anything obvious wrong I was getting a bit concerned, due the large pieces of debris in the sump it had to be something fairly sizeable and obvious which had gone wrong, the issue turned out to be a damaged big end shell.
As you can see here, the big end shell isn't in great shape and the rod cap appears to be scored
Hopefully the rod will be able to be salvaged, but that can't be ascertained until it it cleaned up and measured.
I'm very suprised that with the big end fault I have found that there was no excess noise/vibration while the engine was idling
On a positive note, the problem has been found and can therefore now be rectified
 02-03-2012, 07:41 PM
#485
10K+ Poster!!
Thread Starter
LOL
Thanks
Cheers smit
Yeah I'm another member of the offshore club. I'm a service engineer for National Oilwell Varco, consequently I don't have a set rotation on a regular rig, I work predominantly in Europe and Africa, but can be worldwide. I worked in Holland last year on a rig in dry dock, it's a lovely place.
Thanks
Yeah I'm another member of the offshore club. I'm a service engineer for National Oilwell Varco, consequently I don't have a set rotation on a regular rig, I work predominantly in Europe and Africa, but can be worldwide. I worked in Holland last year on a rig in dry dock, it's a lovely place.
02-03-2012, 07:48 PM
#486
10K+ Poster!!
Thread Starter
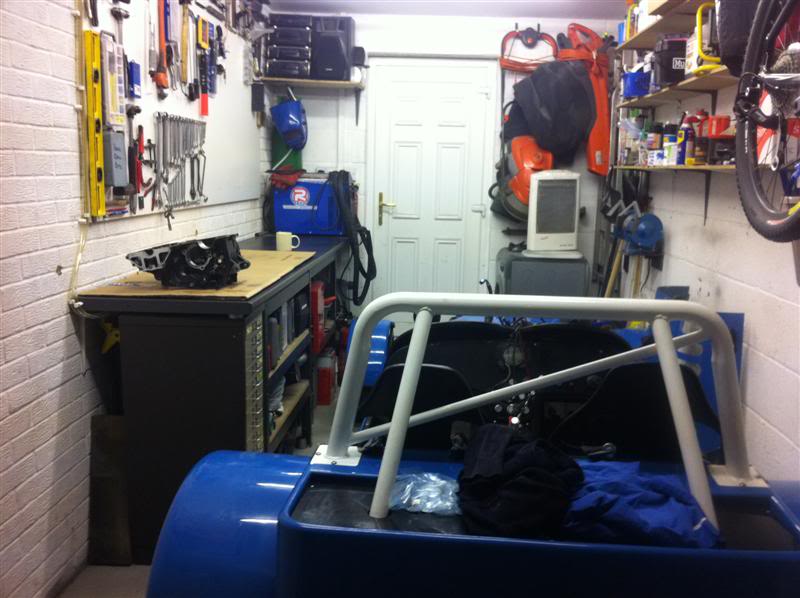
This afternoon I gave the garage a tidy up to make some decent workspace to progress the engine overhaul
Removed the cam chain tensioner

Cam chain tensioner
Cam cover removed, exposing the cams
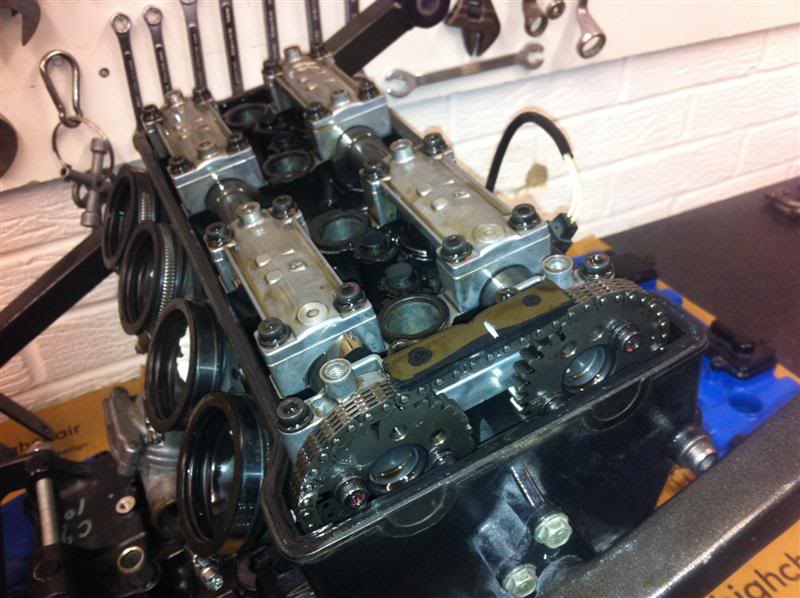
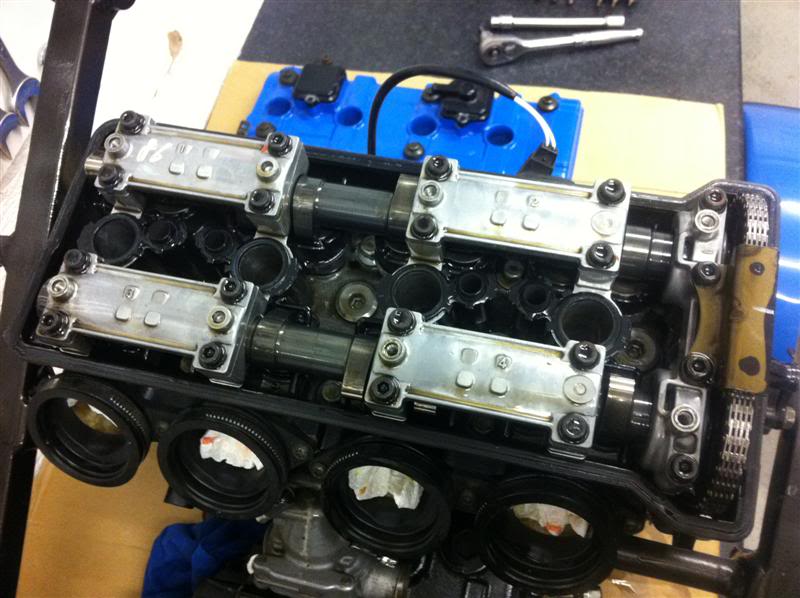
Camshaft retainer caps, camshafts and followers.
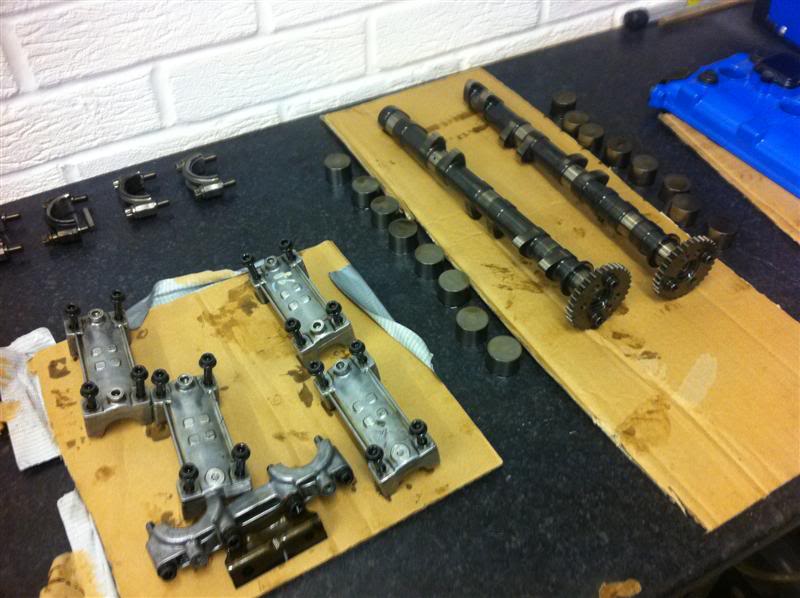
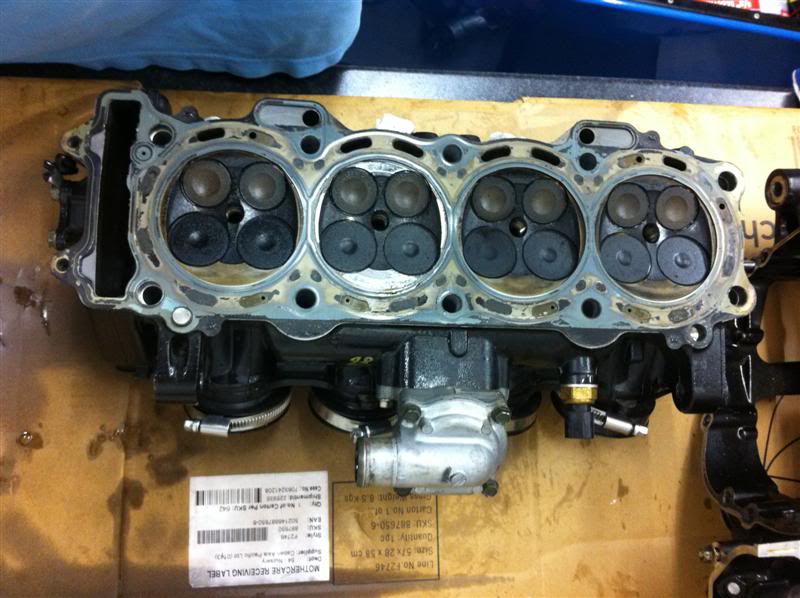
Cylinder head without camshafts and followers.

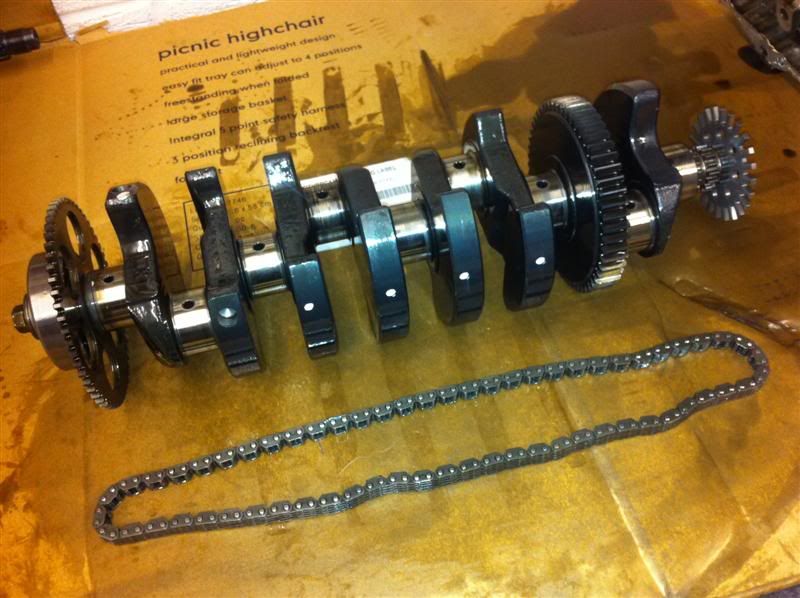
With the camshafts removed the crank was then pulled out the bottom of the engine.
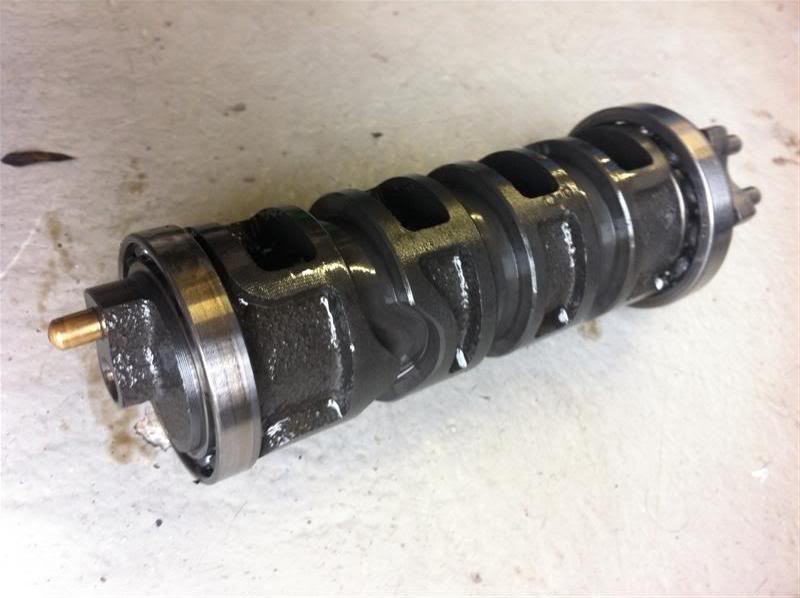
Crankshaft and cam chain.
Removed the cam chain tensioner
Cam chain tensioner
Cam cover removed, exposing the cams
Camshaft retainer caps, camshafts and followers.
Cylinder head without camshafts and followers.
With the camshafts removed the crank was then pulled out the bottom of the engine.
Crankshaft and cam chain.
04-03-2012, 02:52 PM
#489
Regular Contributor
While since i have taken a look at progress. Car looks awesome, and sounds it too!!!
Shame about the engine, sure you will have it sorted in no time, you havent hung around stripping it down!!
Shame about the engine, sure you will have it sorted in no time, you havent hung around stripping it down!!
04-03-2012, 06:27 PM
#490
10K+ Poster!!
Thread Starter
It'll be built back up soon enough, providing I get adequate time off work to crack on with it once the parts are here.
04-03-2012, 06:29 PM
#491
10K+ Poster!!
Thread Starter
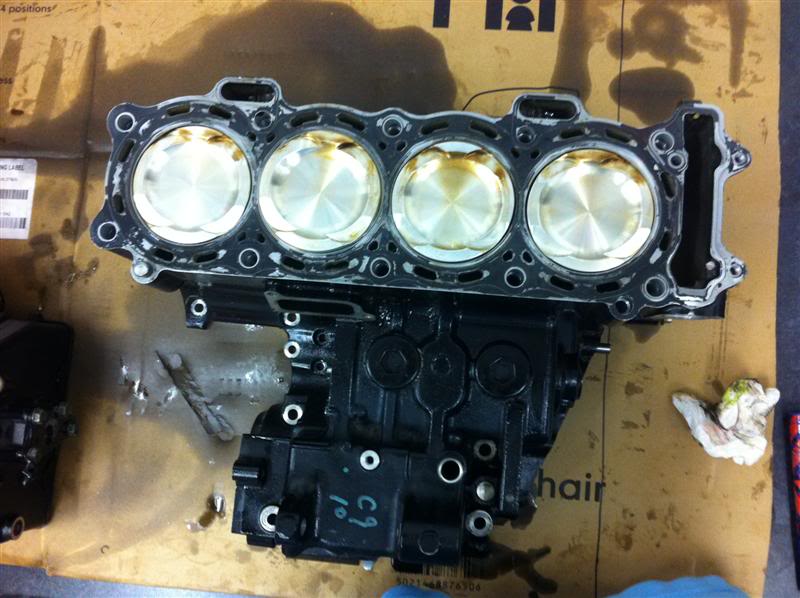
Pulled the head of it this afternoon.  Here it is sitting on the bench
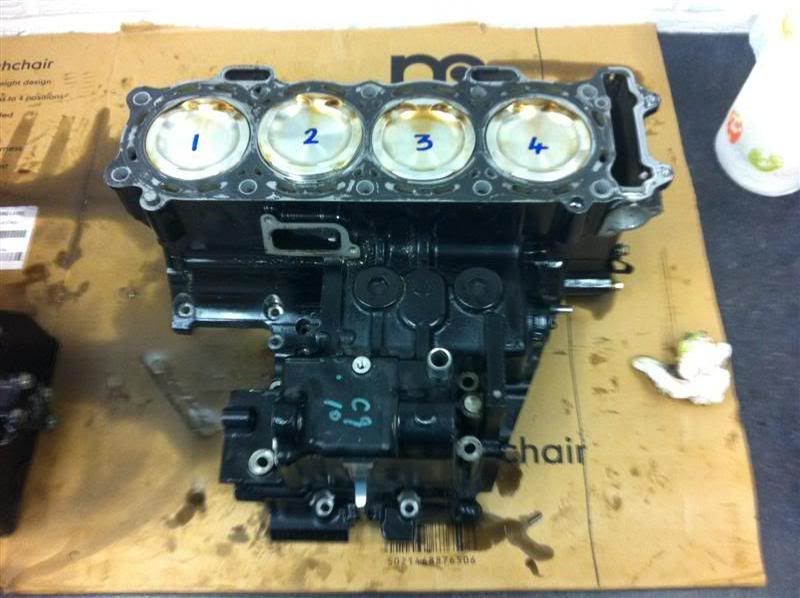
Bottom end and the shiney JE pistons
Numbered up so they go back in the correct positions
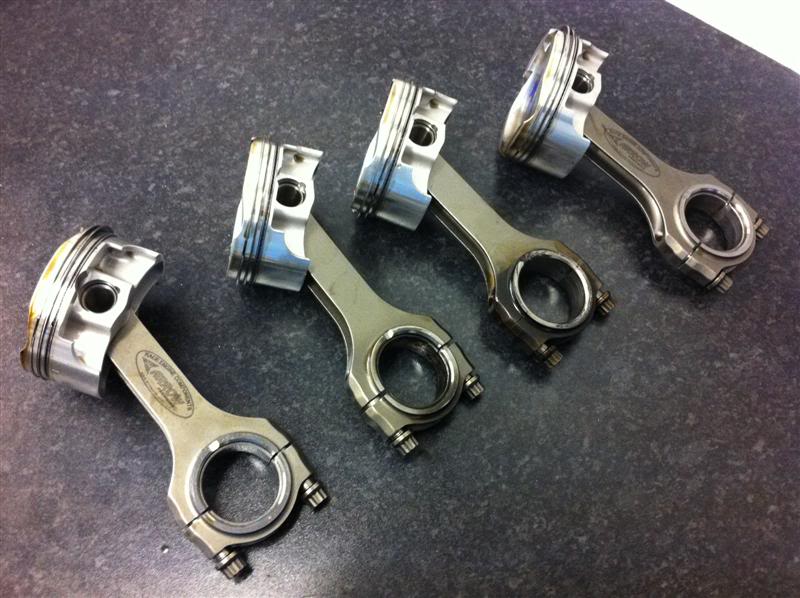
Arrow con rods and JE pistons laid out on the bench
The crankshaft main bearings showing slight signs of wear
Here it is sitting on the benchBottom end and the shiney JE pistons
Numbered up so they go back in the correct positions
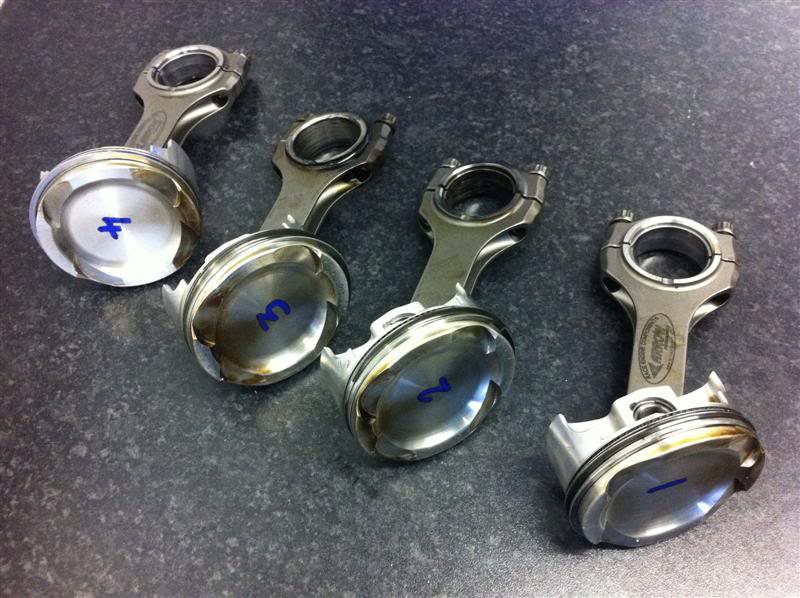
Arrow con rods and JE pistons laid out on the bench
The crankshaft main bearings showing slight signs of wear
 13-03-2012, 09:04 PM
#494
10K+ Poster!!
Thread Starter
The crank is now at Chris Applebee Engineering being checked over, reground and then sent back to me with oversize bearing shells.
I've also ordered a gasket set, set of Carrillo con rods, some bolts/washers, chain tensioner and oil pump.
Thanks
I've also ordered a gasket set, set of Carrillo con rods, some bolts/washers, chain tensioner and oil pump.
Thanks
Last edited by Red16; 13-03-2012 at 10:23 PM.
13-03-2012, 09:08 PM
#495
Ben

How can you tell the bearings have worn? Be useful to know
13-03-2012, 09:20 PM
#496
10K+ Poster!!
Thread Starter
I've not heard of anyone else running a ZX10R engine in a car having issues with oil starvation, so no reason to think my car is any different, but with it being substantially more powerful due to it being turbocharged, the big ends would experience more load and they may have prematurely worn.
So when the engine is reassembled it will have a new oil pump to replace the old internally scored one, a reground crank with suitably matched bearing shells, new steel con rods and a modified sump with internal baffles and new pickup, so any potential issues will have been taken care of. Hopefully a summer of trouble free motoring
13-03-2012, 09:23 PM
#497
Regular Contributor

Join Date: Jul 2008
Location: magor, south wales
Posts: 205
Likes: 0
Received 0 Likes
on
0 Posts
Not sure, nothing particularly obvious as to one specific reason, possibly lubrication, but oil level was not low, this happened in a straight line, so all the oil was at the rear of the sump where the pickup sits, never had an oil pressure light come on, no blocked oil galleries etc.
I've not heard of anyone else running a ZX10R engine in a car having issues with oil starvation, so no reason to think my car is any different, but with it being substantially more powerful due to it being turbocharged, the big ends would experience more load and they may have prematurely worn.
So when the engine is reassembled it will have a new oil pump to replace the old internally scored one, a reground crank with suitably matched bearing shells, new steel con rods and a modified sump with internal baffles and new pickup, so any potential issues will have been taken care of. Hopefully a summer of trouble free motoring
13-03-2012, 09:32 PM
#499
10K+ Poster!!
Thread Starter
It was easy in this case as you could feel a large amount of movement on the big end of conrod number 3, then when the cap was removed from the rod pieces of bearing fell out!
But usually you'd tell by looking for surface imperfections, scores or abnormal colouring etc, if everything looks fine then you'd need to measure the clearance between the bearing and the crankshaft journal and compare the reading to manufacturers specification, an easy method of doing that is using something called Plastigauge, a small strip of plastigauge is rested across the crankshaft journal or bearing shell, then the conrod/main bearing cap is fitted and tourqued to spec, this crushes the plastigauge material, the assembly is stripped down and the width of the plastigauge strip is matched on the plastigauge supplied chart, this chart will tell you the corresponding bearing clearance, this can then be compared to manufacturers recommendations to see if it is too large or too small.
Hope that helps.
13-03-2012, 09:34 PM
#500
I've found that life I needed.. It's HERE!!
love this build and was gutted about the engine failure 
good to see its coming back together nicely and fingers crossed it stays in one piece this time
good to see its coming back together nicely and fingers crossed it stays in one piece this time
13-03-2012, 09:56 PM
#501
10K+ Poster!!
Thread Starter
ZX6R is a quick bike... my mate's just bought one so will be able to find out how the two compare
I'm using a filtered atmospheric crankcase breather.

It'll be back soon
 16-03-2012, 09:50 PM
#503
10K+ Poster!!
Thread Starter
16-03-2012, 09:56 PM
#504
10K+ Poster!!
Thread Starter
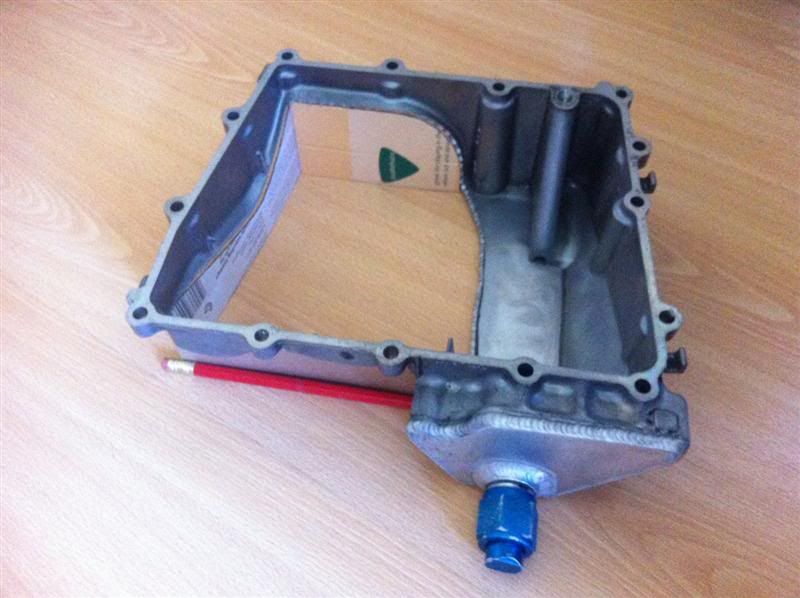
I butchered the standard sump this afternoon, with the aim of giving it more capacity and also some baffles to stop the oil from moving around during braking/acceleration/cornering.
Here it is, in the early stages of modification
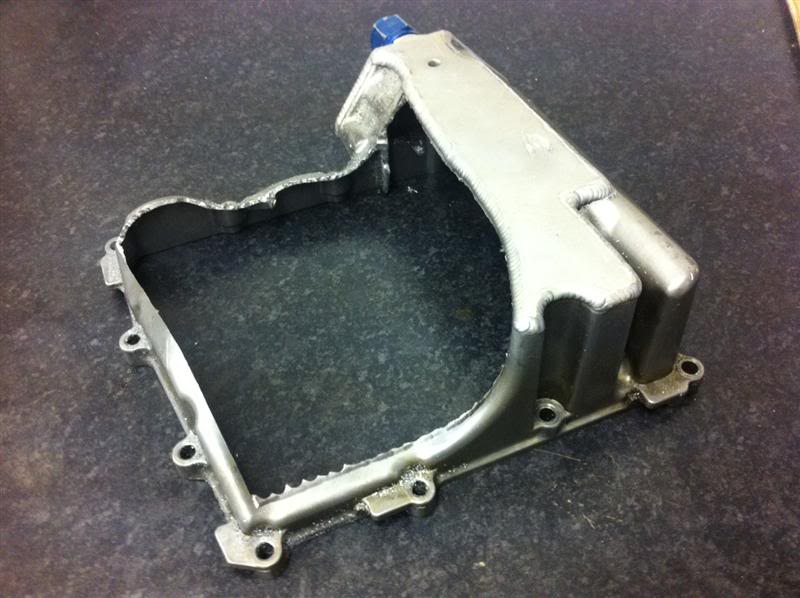
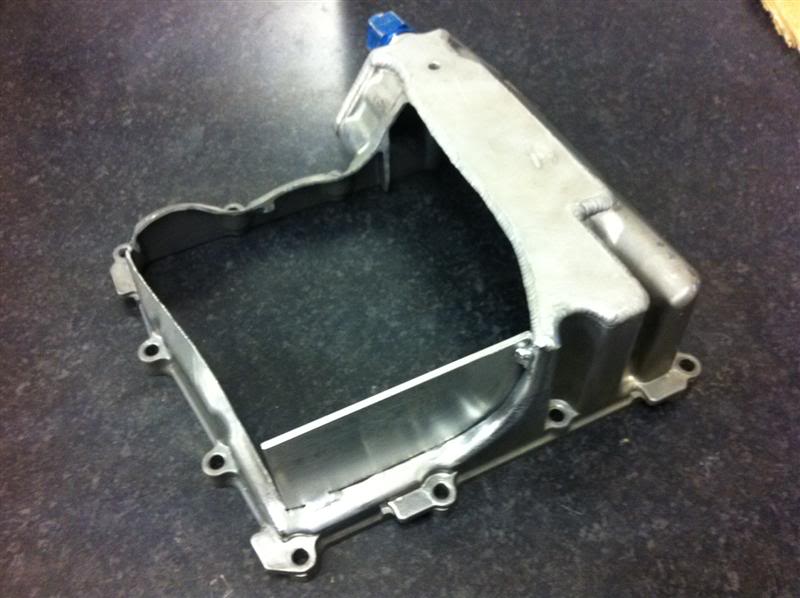
With aluminium plates welded to the sump to make it square shaped it should hold substantially more oil.
Here it is, in the early stages of modification
With aluminium plates welded to the sump to make it square shaped it should hold substantially more oil.
 18-03-2012, 10:48 AM
#507
10K+ Poster!!
Thread Starter
A dry sump would be brilliant but i've only found one company that sells them online (or used to sell them) and they're far from reasonably priced!
I've only recently encountered the accusump, from what I can gather it's a bit like an electrically controlled hydaulic accumulator, to assist in keeping constant oil pressure even during times of the oil pickup being starved of oil. It could be an option as an extra measure on top of the baffled sump.
18-03-2012, 10:48 AM
#508
10K+ Poster!!
Thread Starter
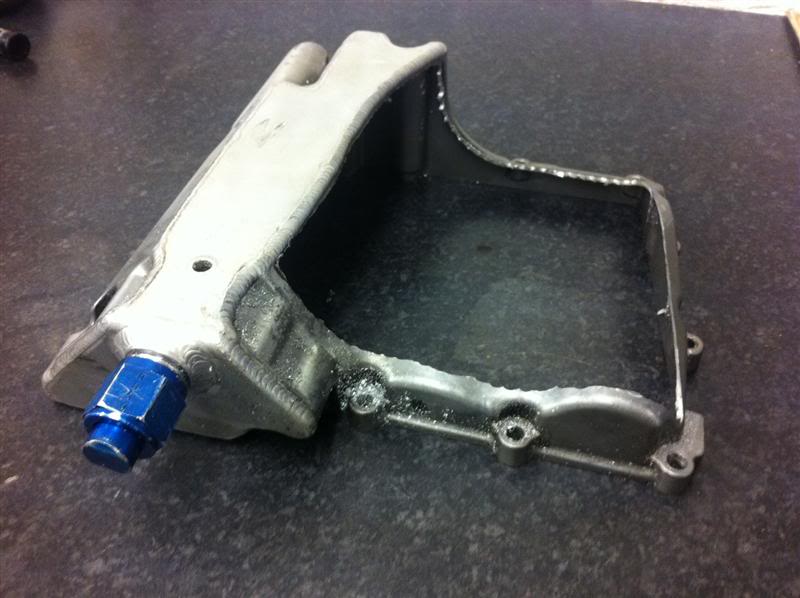
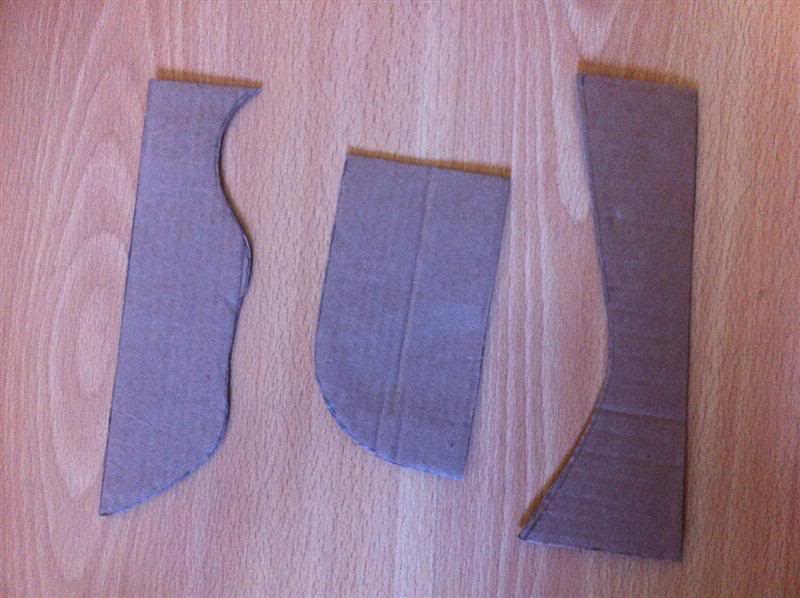
After having a decent cup of coffee to wake me up this morning, I began making cardboard templates to transfer onto the 3mm aluminium plate I bought yesterday.

The templates for the sump sides look like this
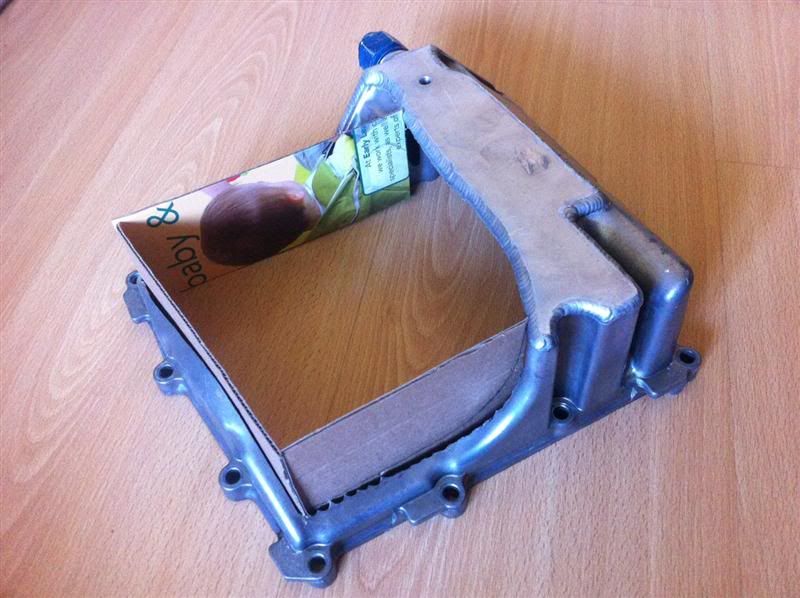
When rested in position the sump looks like it holds a lot more oil than the standard one

Once all my Mothers Day duties are out of the way, I'll hopefully get time to fire up the TIG set in the garage and get the sump welded up.
The templates for the sump sides look like this
When rested in position the sump looks like it holds a lot more oil than the standard one
Once all my Mothers Day duties are out of the way, I'll hopefully get time to fire up the TIG set in the garage and get the sump welded up.
18-03-2012, 11:41 AM
#509
Regular Contributor
Join Date: Jul 2008
Location: magor, south wales
Posts: 205
Likes: 0
Received 0 Likes
on
0 Posts
After having a decent cup of coffee to wake me up this morning, I began making cardboard templates to transfer onto the 3mm aluminium plate I bought yesterday.
The templates for the sump sides look like this

When rested in position the sump looks like it holds a lot more oil than the standard one
Once all my Mothers Day duties are out of the way, I'll hopefully get time to fire up the TIG set in the garage and get the sump welded up.
The templates for the sump sides look like this
When rested in position the sump looks like it holds a lot more oil than the standard one
Once all my Mothers Day duties are out of the way, I'll hopefully get time to fire up the TIG set in the garage and get the sump welded up.
18-03-2012, 12:00 PM
#510
10K+ Poster!!
Thread Starter
I've got an R-Tech TIG 201, it's a 240V, 200A AC/DC output
 http://www.r-techwelding.co.uk/weldi..._R-Tech_Tig201
18-03-2012, 12:12 PM
http://www.r-techwelding.co.uk/weldi..._R-Tech_Tig201
18-03-2012, 12:12 PM
#511
Regular Contributor
Join Date: Jul 2008
Location: magor, south wales
Posts: 205
Likes: 0
Received 0 Likes
on
0 Posts
Yeah, I'm the same, hate paying for it but most of all hate having to wait for things to be done, which are never done when you want/need them to be!
I've got an R-Tech TIG 201, it's a 240V, 200A AC/DC output
http://www.r-techwelding.co.uk/weldi..._R-Tech_Tig201
I've got an R-Tech TIG 201, it's a 240V, 200A AC/DC output
http://www.r-techwelding.co.uk/weldi..._R-Tech_Tig201Will have to get me one of these
18-03-2012, 12:21 PM
#512
10K+ Poster!!
Thread Starter
When I phoned R-Tech to buy my welder I asked about running it on it's own designated supply or using a standard domestic 3 pin plug, they said it's fine to use on a 13 amp plug but you will only be able to use it up to around 160 Amps like that, to use the full 200A it needs a 16A supply, but for the small price difference between the 160A and 200A welders I thought it best to get this one and at least have the extra welding capacity if actually needed at some point, aswell as not having the smaller welder and running it near max output regularly.
Last edited by Red16; 18-03-2012 at 12:33 PM.
18-03-2012, 12:35 PM
#513
Regular Contributor
Join Date: Jul 2008
Location: magor, south wales
Posts: 205
Likes: 0
Received 0 Likes
on
0 Posts
When I phoned R-Tech to buy my welder I asked about running it on it's own designated supply or using a standard domestic 3 pin plug, they said it's fine to use on a 13 amp plug but you will only be able to use it up to around 160 Amps like that, to use the full 200A it needs a 16A supply, but for the small price difference between the 160A and 200A welders I thought it best to get this one and at least have the extra welding capacity if actually needed at some point, aswell as not having the smaller welder and running it near max output regularly.
18-03-2012, 12:44 PM
#514
10K+ Poster!!
Thread Starter
18-03-2012, 03:48 PM
#515
Advanced PassionFord User
Join Date: May 2004
Location: Essex & Kent
Posts: 1,824
Likes: 0
Received 0 Likes
on
0 Posts
Don't think that sump will last long with the sump being cupboard lol
After having a decent cup of coffee to wake me up this morning, I began making cardboard templates to transfer onto the 3mm aluminium plate I bought yesterday.
The templates for the sump sides look like this
When rested in position the sump looks like it holds a lot more oil than the standard one
Once all my Mothers Day duties are out of the way, I'll hopefully get time to fire up the TIG set in the garage and get the sump welded up.
The templates for the sump sides look like this
When rested in position the sump looks like it holds a lot more oil than the standard one
Once all my Mothers Day duties are out of the way, I'll hopefully get time to fire up the TIG set in the garage and get the sump welded up.
18-03-2012, 10:00 PM
#516
10K+ Poster!!
Thread Starter
18-03-2012, 10:03 PM
#517
10K+ Poster!!
Thread Starter
I've not done a lot more to the sump today, most of the day was taken up with Mothers Day stuff, but managed an hour to myself and made one aluminium plate and tacked it in place.
19-03-2012, 08:27 PM
#518
10K+ Poster!!
Thread Starter
You've done the one thing I really can't wait to do, play with the bikes, be good to suprise them now and again, in a straight line and on the twisties!
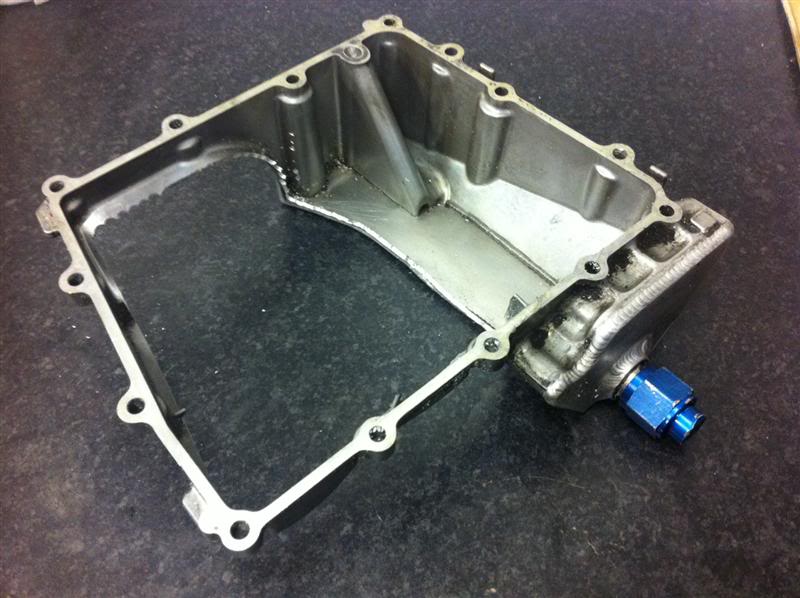
I've made a bit of progress this afternoon on the sump, it's now looking like this
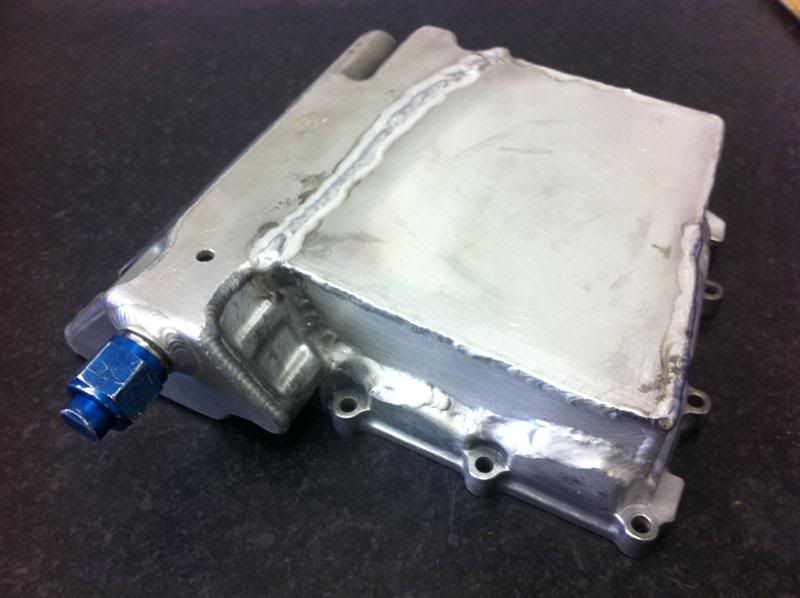

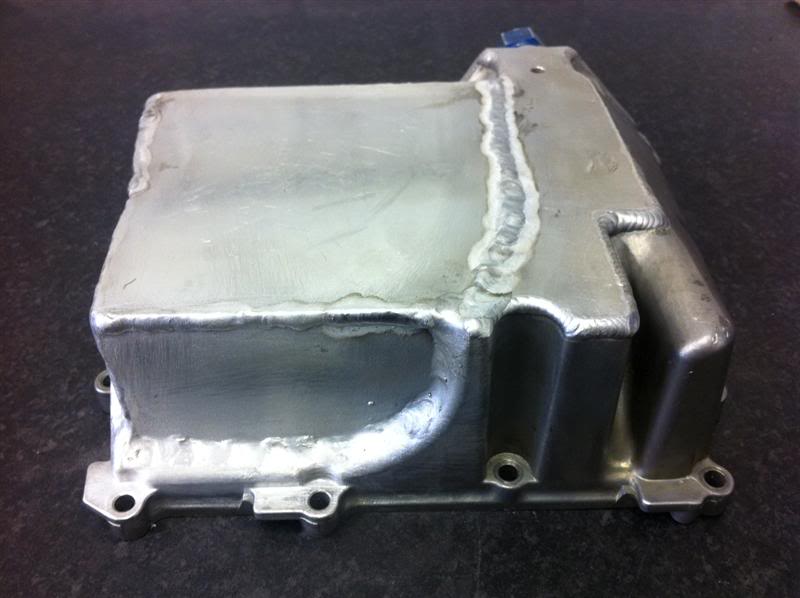
It's all water tight, as i found when i filled it to see what volume of water it held, it now holds 2.8 litres, which is definitely more than the standard sump, unfortunately i didnt fill the standard sump before cutting it up, would've been nice to know the difference! Doh!
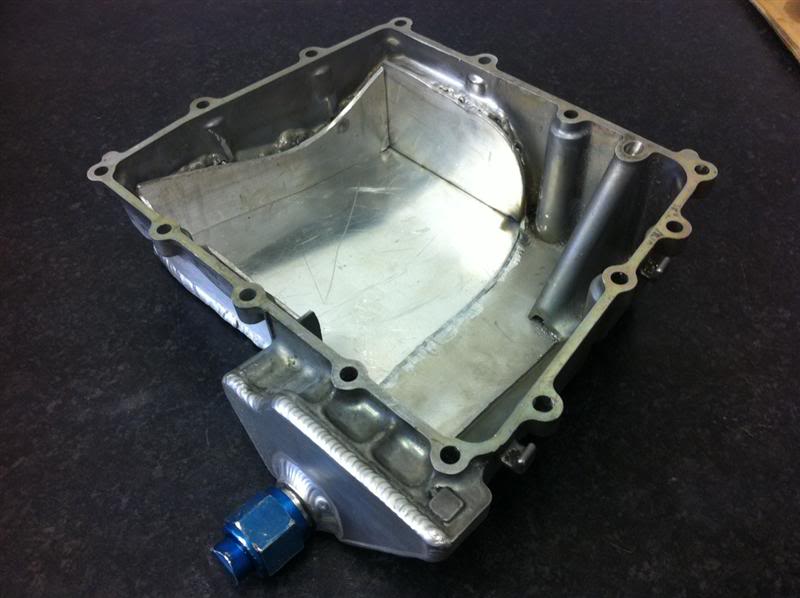
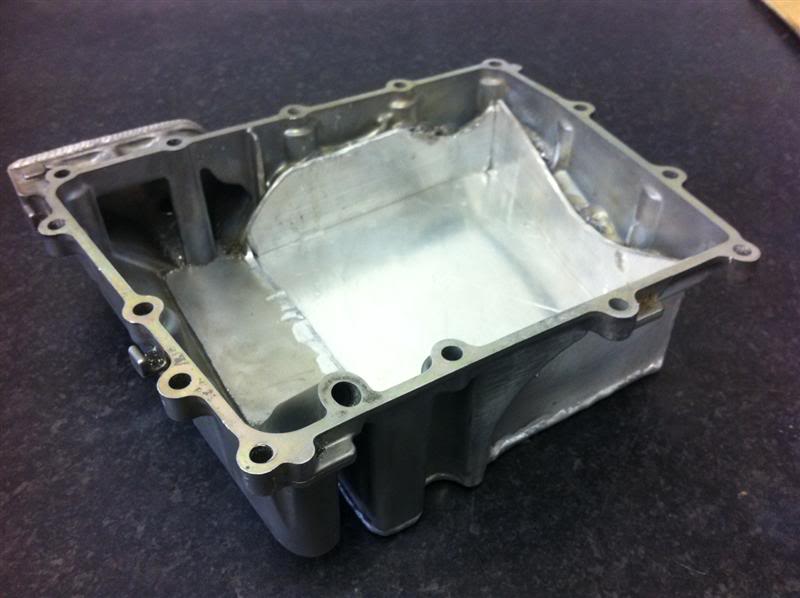
Here's the internal view, it's not baffled yet, as I'm still waiting on an oil pickup being delivered, once I have that in my possession I can make the baffles accordingly.
I've made a bit of progress this afternoon on the sump, it's now looking like this
It's all water tight, as i found when i filled it to see what volume of water it held, it now holds 2.8 litres, which is definitely more than the standard sump, unfortunately i didnt fill the standard sump before cutting it up, would've been nice to know the difference! Doh!
Here's the internal view, it's not baffled yet, as I'm still waiting on an oil pickup being delivered, once I have that in my possession I can make the baffles accordingly.
Last edited by Red16; 19-03-2012 at 09:05 PM.
19-03-2012, 09:14 PM
#520
10K+ Poster!!
Thread Starter
Cheers Gary, it's not the best welding you'll ever see, but it's done what I wanted it to and it's not too bad for my second attempt at aluminium welding.
Aluminium feels nice to weld, it flows lovely when you get started on a run, but it goes pear shaped so much more quickly than stainless/mild steel.
I need more welding jobs to get some practice in, it's one of those things I find really enjoyable, it'd be even better if the welds looked perfect every time!