
S1 Rebuild - Pre Mapping Work


Thread Starter
PassionFord Post Whore!!
iTrader: (1)
Joined: Jun 2003
Posts: 4,449
Likes: 0
From: Hertfordshire
Here�s the start of my Series One Restoration. It had been on my mind for a while as to whether to bother to strip it and sell the bits on E bay and call it quits as it�s not exactly cheap when you restore a car 
After some hard saving over the past 6 months and with going away with work to Central America till next January I thought I�d bite the bullet as there�s hardly any S1�s left after reading the post on the RS Owners Club website
Over the past few months I have been searching and bidding on E Bay and searching for all new genuine panels and parts. I now have the following parts in my possession or on their way to me.
Front panel
Rear panel with black rubber gromits
Front x member
Headlights
Front indicators
Front and rear bumpers
Bonnet
2 x Doors
2 x Sills
2 x Rear chassis rails
2 x Floor pans
Front wings
Petrol tank
Before I start the pictures I would like to say a massive thanks to Gary Chamberlain aka Gadget for all the work in putting the car together of which he has had a hand in virtually everything that has been done to the car, from the brakes to the engine, gearbox, cossie management and all the other little things
I asked Gary to come round and help me strip the car ( tell a lie , he knows what I am like mechanically and feared for my life so said he�d do it with me as his Bitch )
)
Making a start


With all the sensors etc disconnected it was time to put the crane on so we could take the bottom pulley off.


Everything disconnected and the gearbox and engine mounts undone it was time for the moment of truth.


It came out with no trouble at all

A nice oil leak judging by the amount of crap around the gearbox and clutch area. Could be the very reason my clutch was slipping like a bitch after the Beds Track Day

Engine to it�s final resting place for quite some time or should I say when I can afford to put the steel rods and forged pistons in it.

Gearbox out

Looks a bit bare


Rear end stripped down

Seats ,harnesses and door bars out

Time for the cage out. This was a fookin tight fit!


Dash out and time to crack on with the wiring loom.


Very bare now, thoughts of whether I had done the right thing now by taking it apart and by the look on my face Gary said.

Didin�t realise how much crap there was behind the dash!


I have to say I am quite happy with the condition of the bodywork considering it�s 20 years old. However the kit hasn�t come off yet.

 .
.
Once again a massive thanks to Gadget for the work as it was a very organised and swift strip down. Spadge would have been proud of us.
However I am concerned about Gary�s mental stability after having a Sunday lunch with my parents and the amount of food that was passed his way.
Need to get hold of a trailer and something to tow it with to the bodyshop in Essex if anyone knows anyone with one
Will update when it goes to the bodyshop
After some hard saving over the past 6 months and with going away with work to Central America till next January I thought I�d bite the bullet as there�s hardly any S1�s left after reading the post on the RS Owners Club website
Over the past few months I have been searching and bidding on E Bay and searching for all new genuine panels and parts. I now have the following parts in my possession or on their way to me.
Front panel
Rear panel with black rubber gromits
Front x member
Headlights
Front indicators
Front and rear bumpers
Bonnet
2 x Doors
2 x Sills
2 x Rear chassis rails
2 x Floor pans
Front wings
Petrol tank
Before I start the pictures I would like to say a massive thanks to Gary Chamberlain aka Gadget for all the work in putting the car together of which he has had a hand in virtually everything that has been done to the car, from the brakes to the engine, gearbox, cossie management and all the other little things
I asked Gary to come round and help me strip the car ( tell a lie , he knows what I am like mechanically and feared for my life so said he�d do it with me as his Bitch
)Making a start
With all the sensors etc disconnected it was time to put the crane on so we could take the bottom pulley off.
Everything disconnected and the gearbox and engine mounts undone it was time for the moment of truth.
It came out with no trouble at all
A nice oil leak judging by the amount of crap around the gearbox and clutch area. Could be the very reason my clutch was slipping like a bitch after the Beds Track Day
Engine to it�s final resting place for quite some time or should I say when I can afford to put the steel rods and forged pistons in it.
Gearbox out
Looks a bit bare
Rear end stripped down
Seats ,harnesses and door bars out
Time for the cage out. This was a fookin tight fit!
Dash out and time to crack on with the wiring loom.
Very bare now, thoughts of whether I had done the right thing now by taking it apart and by the look on my face Gary said.
Didin�t realise how much crap there was behind the dash!
I have to say I am quite happy with the condition of the bodywork considering it�s 20 years old. However the kit hasn�t come off yet.
.Once again a massive thanks to Gadget for the work as it was a very organised and swift strip down. Spadge would have been proud of us.
However I am concerned about Gary�s mental stability after having a Sunday lunch with my parents and the amount of food that was passed his way.
Need to get hold of a trailer and something to tow it with to the bodyshop in Essex if anyone knows anyone with one
Will update when it goes to the bodyshop
Last edited by CliffRS4; Jul 14, 2008 at 11:39 AM.

Spanner monkey
Joined: May 2003
Posts: 3,556
Likes: 14
From: Peterborough
Good post Dave!! Thanks for the lunch, my waistline is still recovering and for the lunchtime entertainment
Hope you remeber where it all goes though cos i will have slept by the time it needs to go back together
and for the lunchtime entertainment Hope you remeber where it all goes though cos i will have slept by the time it needs to go back together

Trending Topics
Thread Starter
PassionFord Post Whore!!
iTrader: (1)
Joined: Jun 2003
Posts: 4,449
Likes: 0
From: Hertfordshire
Armed myself with these today
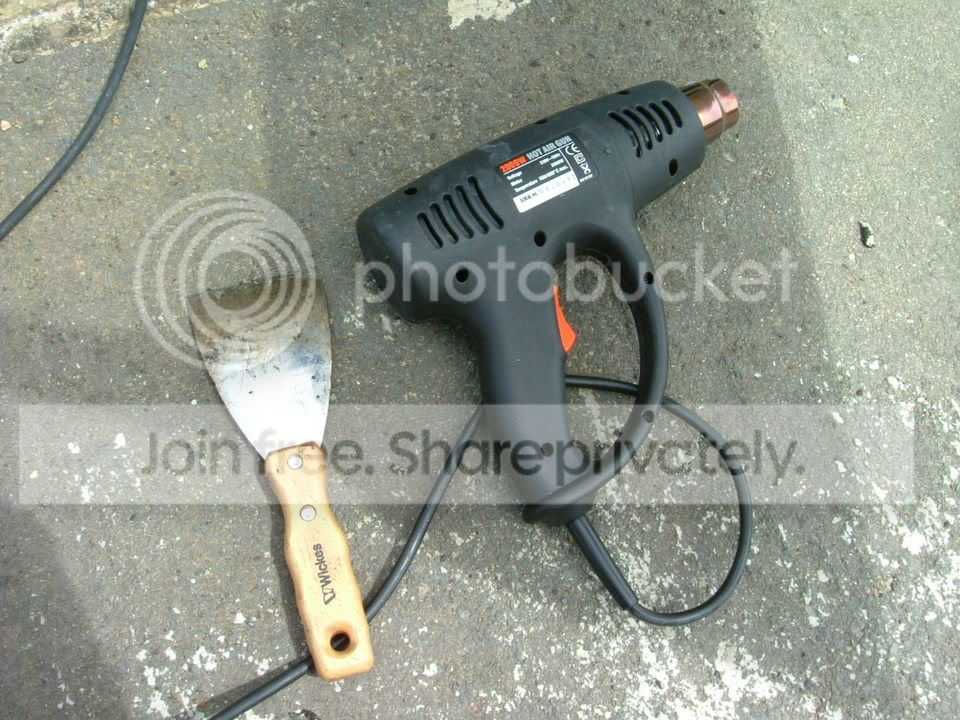
Time for some of the sound deadening to be removed from the floor and boot.
You can see most of it here.


A start and it's a bitch to get off

Getting there

All I wanted out

Then just to be a tart I thought I would put it on the scales

Nthorpey (Nick?)
I am getting a bodyshop in Wickford Essex to do the work. They are called Supreme Motor Bodies Ltd. They came upon recommendation from a few people on here such as Grant (Cossienuts) , Nikki and her brother have all had their cars painted there. I took my car down there and spoke to Gary the proprieter a few weeks ago and was impressed with his knowledge.
He also had his own mk2 rs2000 there which he is restoring. From what I can gather and have seen he does quality work and has a genuine interest in RS cars
Time for some of the sound deadening to be removed from the floor and boot.
You can see most of it here.
A start and it's a bitch to get off
Getting there
All I wanted out
Then just to be a tart I thought I would put it on the scales
Nthorpey (Nick?)
I am getting a bodyshop in Wickford Essex to do the work. They are called Supreme Motor Bodies Ltd. They came upon recommendation from a few people on here such as Grant (Cossienuts) , Nikki and her brother have all had their cars painted there. I took my car down there and spoke to Gary the proprieter a few weeks ago and was impressed with his knowledge.
He also had his own mk2 rs2000 there which he is restoring. From what I can gather and have seen he does quality work and has a genuine interest in RS cars
10K+ Poster!!
iTrader: (1)
Joined: Jun 2003
Posts: 13,450
Likes: 2
From: Dartford, Kent - Home of the two way one way system.
Originally Posted by Cliff S1
Need to get hold of a trailer and something to tow it with to the bodyshop in Essex if anyone knows anyone with one


PassionFord Post Whore!!
Joined: May 2004
Posts: 8,968
Likes: 2
From: Smogsville
do you know that shit that you scrapped of the floor i scrapped all mine off and will need it replacing eventually, you have any idea where toi get it from. If so could you please pm me where

Too many posts.. I need a life!!
Joined: Sep 2003
Posts: 536
Likes: 0
From: Belgium
wow, a full resto project, sad it isn't winter otherwise with a good cup o' coffee, would ave been fun reading this post.
Good luck, can't wait in seeing what's behind those arches after 20 yrs???
Good luck, can't wait in seeing what's behind those arches after 20 yrs???

10K+ Poster!!
Joined: Jun 2003
Posts: 10,788
Likes: 2
From: South Shields
looking good mate, just doing the same to my rs1600i at the moment, have a looksy https://passionford.com/forum/viewtopic.php?t=130905
for removing the sound deadening an electric scraper from lidl could be just what the doc order, especially for a tenner
for removing the sound deadening an electric scraper from lidl could be just what the doc order, especially for a tenner

Thread Starter
PassionFord Post Whore!!
iTrader: (1)
Joined: Jun 2003
Posts: 4,449
Likes: 0
From: Hertfordshire
Cliff S1, what intercooler you been using?
GRS Twin Pass cooler.
Watching this with avid interest mate
TBH, it dont look NEARLY as bad as you have suggested it might be IMO...
Are the front panel/wings original?? do they need replacing
You're right Damo it doesn't look too bad but little bits of which your keen eye can see were really annoying me. I just didn't want to be continually chasing rust all it's life as I intend to keep it for good.
The bodyshop that is doing the work have said that the front panel and wings are original and they wouldn't like to spoil the nice welds. But can they do the inner wings properly without taking the wings off?
I don't want to chase rust again and all the parts i have acquired are genuine ford parts. I would be grateful of your advice Damo

PassionFord Post Whore!!
Joined: May 2003
Posts: 9,226
Likes: 0
From: SE
Dont look to me like the "inner wings" need anything doing ... I mean usually they go along the joinbetween bonnet hinge area and where the suspension turret joins wing, you know along that seam, they crack... I would have it seam welded down there at the very least, this can be done from under the arches, or within the bay..
whats the battery tray/bulkheaad like if you look up at them from inside the car?
I'm of the firm opinion as little panel replacement should be done as possible, welding creates heat... heat accelerates corrosion... either way, you can replace numerous panels etc and still have rust creep back a t a later date, all you can try to do is slow the process down... ok the floor is a bit tatty, but again I wouldnt want complete sections put in, unless the inner sills are �cuked also...
Be nice to see the front crossmember from below and with the front kit off... but I wouldnt �cuk about replacing that based upon what I can see there... so long as they spend a good bit of time cleaning it all up properly the paint will stick nicely , then give it all penty if waxoil (especially seeing as you aint gooing all bufty).... should be good for another few years
Thread Starter
PassionFord Post Whore!!
iTrader: (1)
Joined: Jun 2003
Posts: 4,449
Likes: 0
From: Hertfordshire
I'll take a few pictures of the above areas you have mentioned tomorrow. However the kit is not coming off yet. The bodyshop have been instructed to take loads of digital pictures for me. The car gets trailered tomorrow to the bodyshop and they have been asked totake their time over the car as i am away for 6 months. They are more than happy with this.
Thread Starter
PassionFord Post Whore!!
iTrader: (1)
Joined: Jun 2003
Posts: 4,449
Likes: 0
From: Hertfordshire
Car went to the bodyshop today.
A few picture of the genuine panels that I have.
The rest are on the way.
Front wings

Front panel

Back panel

This is supposed to be a boot floor for a mk3 but looking at it the tow bar
doesn't line up with the mk3
However the boot floor is fine and doesn't need replacing.
May possibly be a mk4 boot floor.
Anyone shed any light on what they think it is?

Time to make it's way to the body shop


I went with the car just to make sure it did get dropped off to the right place,
not someones house.
On Saturday the it's getting stripped down to see the exactly what sort of state
it is in underneath the kit etc.
I am going to pop down there on Monday and will discuss with the bodyshop what needs replacing etc.
I will take plenty of pics whilst down there and put them up Monday afternoon
A few picture of the genuine panels that I have.
The rest are on the way.
Front wings
Front panel
Back panel
This is supposed to be a boot floor for a mk3 but looking at it the tow bar
doesn't line up with the mk3
However the boot floor is fine and doesn't need replacing.
May possibly be a mk4 boot floor.
Anyone shed any light on what they think it is?
Time to make it's way to the body shop
I went with the car just to make sure it did get dropped off to the right place,
not someones house.
On Saturday the it's getting stripped down to see the exactly what sort of state
it is in underneath the kit etc.
I am going to pop down there on Monday and will discuss with the bodyshop what needs replacing etc.
I will take plenty of pics whilst down there and put them up Monday afternoon

Thread Starter
PassionFord Post Whore!!
iTrader: (1)
Joined: Jun 2003
Posts: 4,449
Likes: 0
From: Hertfordshire
I have decided to go the full Zetec route when the restoration is done.
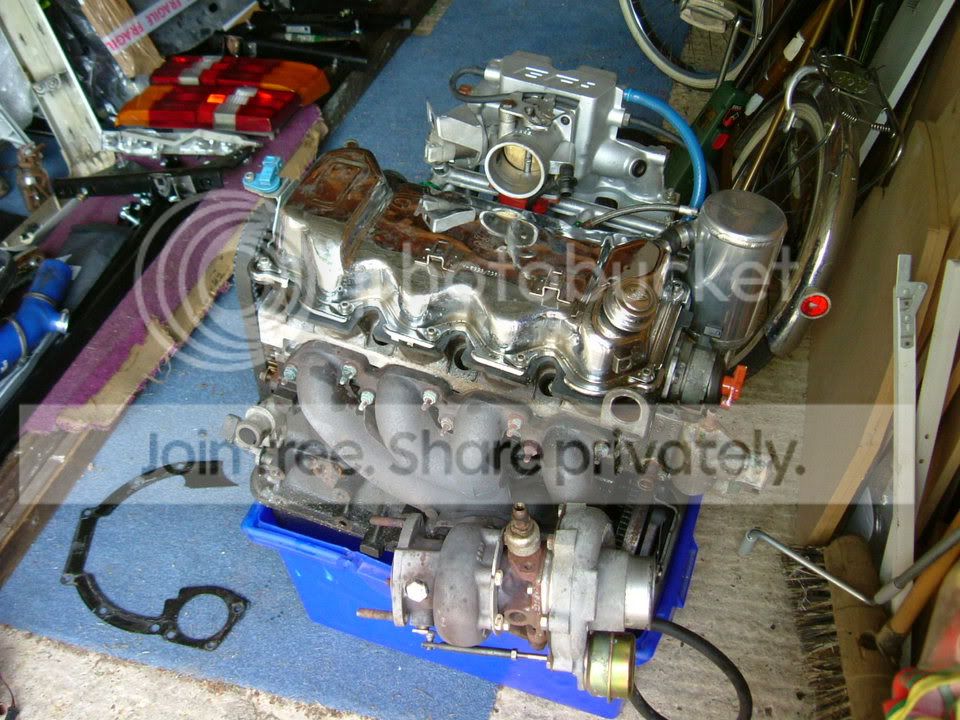
So the 1,9 lump came apart today as am selling certain bits such as the inlet manifold, head with cam and vernier pulley. The cam cover is going too.
Exhaust manifold off

My T34 with .63 cossie housing, 6 degree cut back blades, 360 degree thrust bearing and maram shaft is staying with me

Head off time and I really am not mechanically minded but thought it really can't be that hard to take bits apart. Out came the Haynes manual to make sure I did bits in the right order
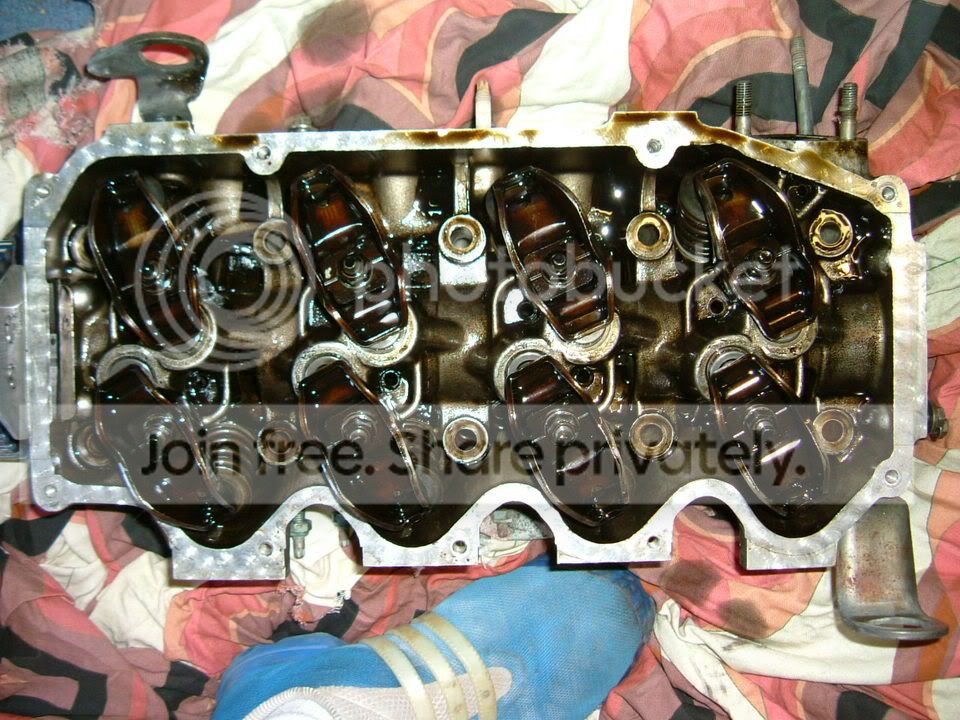


As you can see in this picture one of the valves is white as the headgasket has survived but there is a small gap just below it on the 2nd bore from the right.
Thought I had a suspected head gasket failure but was close. It was the block


Guess this will be going in the bin then
These bits are for sale as a whole if you or anyone knows of someone who wants them.
Bits are all modified for cossie management and have been running on my car.
Fiesta turbo inlet manifold
Cossie throttle body & Throttle pos sensor
Cossie Idle speed control valve
Colant and charge temperature sensors
Fuel pressure and regulator
Efi to Mfi Spacer plate
Accelerator cable bracket
�200 the lot


So the 1,9 lump came apart today as am selling certain bits such as the inlet manifold, head with cam and vernier pulley. The cam cover is going too.
Exhaust manifold off
My T34 with .63 cossie housing, 6 degree cut back blades, 360 degree thrust bearing and maram shaft is staying with me
Head off time and I really am not mechanically minded but thought it really can't be that hard to take bits apart. Out came the Haynes manual to make sure I did bits in the right order
As you can see in this picture one of the valves is white as the headgasket has survived but there is a small gap just below it on the 2nd bore from the right.
Thought I had a suspected head gasket failure but was close. It was the block
Guess this will be going in the bin then
These bits are for sale as a whole if you or anyone knows of someone who wants them.
Bits are all modified for cossie management and have been running on my car.
Fiesta turbo inlet manifold
Cossie throttle body & Throttle pos sensor
Cossie Idle speed control valve
Colant and charge temperature sensors
Fuel pressure and regulator
Efi to Mfi Spacer plate
Accelerator cable bracket
�200 the lot

Too many posts.. I need a life!!
Joined: Aug 2003
Posts: 985
Likes: 2
From: Northamptonshire
Looking good! To be honest though, like people have said, rot wise the car looks good considering its age!!
Nice one not breaking it though, I want one of these one day!!!
Zetec Turbo, will be mental,
Best of luck and keep it up 
Scary stuff though, taking a car apart like that, got to do the same to my RSi soon which will be very scary
Nice one not breaking it though, I want one of these one day!!!
Zetec Turbo, will be mental,
Best of luck and keep it up
Scary stuff though, taking a car apart like that, got to do the same to my RSi soon which will be very scary
Thread Starter
PassionFord Post Whore!!
iTrader: (1)
Joined: Jun 2003
Posts: 4,449
Likes: 0
From: Hertfordshire
Originally Posted by AD-RS1600i
Looking good! To be honest though, like people have said, rot wise the car looks good considering its age!!
Nice one not breaking it though, I want one of these one day!!!
Zetec Turbo, will be mental,
Best of luck and keep it up
Scary stuff though, taking a car apart like that, got to do the same to my RSi soon which will be very scary
Nice one not breaking it though, I want one of these one day!!!
Zetec Turbo, will be mental,
Best of luck and keep it up
Scary stuff though, taking a car apart like that, got to do the same to my RSi soon which will be very scary
Thread Starter
PassionFord Post Whore!!
iTrader: (1)
Joined: Jun 2003
Posts: 4,449
Likes: 0
From: Hertfordshire
Originally Posted by Red16
full on Zetec, thats the way Cliff just the thing to top off your restore
how did you find the t34 lag wise? what sorta revs did it make full boost?
just the thing to top off your restore how did you find the t34 lag wise? what sorta revs did it make full boost?
I ran it at 15 psi all the time as I didn't have it remapped from the stage 3 T3 and it ripped on the Beds Track Day. It pulled just before 4k and pulled extremely strongly up to 6.5k as I didn't want to take it any higher as I would probably blow the engine
Made such a difference the boost coming in later on, less wheel spin and much better traction
10K+ Poster!!
Joined: Jun 2003
Posts: 10,788
Likes: 2
From: South Shields
Originally Posted by Cliff S1
Originally Posted by Red16
full on Zetec, thats the way Cliff just the thing to top off your restore
how did you find the t34 lag wise? what sorta revs did it make full boost?
just the thing to top off your restore how did you find the t34 lag wise? what sorta revs did it make full boost?
I ran it at 15 psi all the time as I didn't have it remapped from the stage 3 T3 and it ripped on the Beds Track Day. It pulled just before 4k and pulled extremely strongly up to 6.5k as I didn't want to take it any higher as I would probably blow the engine
Made such a difference the boost coming in later on, less wheel spin and much better traction

Professional Waffler
Joined: Aug 2003
Posts: 25,425
Likes: 41
From: HertFORDshire
Fook me mate you have been busy
If you want a hand nailing it back together at all give me a shout as I'm only 10 minutes down the road from you. May have to chat about some of your for sale items as they may be good for my new toy
If you want a hand nailing it back together at all give me a shout as I'm only 10 minutes down the road from you. May have to chat about some of your for sale items as they may be good for my new toy

Originally Posted by Cliff S1
A start and it's a bitch to get off
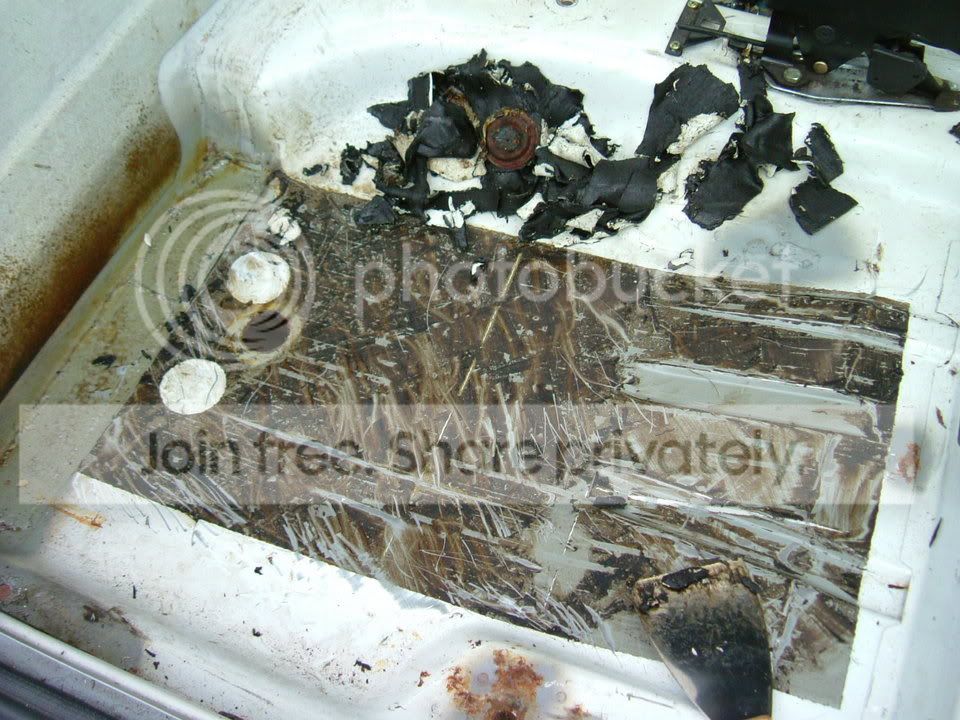
It's the underseal under the floor pan which is the c unt to get off, in which case I advise warming the inside of the floor pan while scraping the outside.