
C&B's 350bhp CVH RST BREAKING - See for sale section
 07-07-2008, 08:03 PM
#841
Nice one Christian, At the end of the day its a Mk4 Escort, not a Bentley. Function over form and all that 
Missed you on MSN, Been away alot lately and my home PC signs me in when turned on, and others in the house use it.
Will send the other part asap
Missed you on MSN, Been away alot lately and my home PC signs me in when turned on, and others in the house use it.
Will send the other part asap


 07-07-2008, 10:52 PM
#847
DEYTUKURJERBS
 07-07-2008, 11:05 PM
#848
Fucking superstar........
Join Date: May 2004
Location: Argyll.... It's lonely...
Posts: 13,240
Likes: 0
Received 0 Likes
on
0 Posts
Good stuff mate! Glad you got a fix on it. And I've seen Jacko's work up close and it's first rate!!! 
Get out and enjoy the fantastic sunshine we've been having recently
Get out and enjoy the fantastic sunshine we've been having recently
07-07-2008, 11:17 PM
#850
PassionFord Regular

Join Date: Aug 2004
Location: Aberdeen, abroad or offshore.
Posts: 373
Likes: 0
Received 0 Likes
on
0 Posts
Well done C&B. I know what its like to find rust (check my resto link!) and feel like throwing in the towel. But it would have been a shame to let the car go.
 08-07-2008, 01:14 PM
#852
www.ctuceilings.co.uk
Join Date: May 2003
Location: Kent
Posts: 9,370
Likes: 0
Received 0 Likes
on
0 Posts
You have done a very good job there mate, very good indeed. When you told me, I was like  and now I have seen the pictures, I'm like
Can't wait to see it for myself.
and now I have seen the pictures, I'm like Can't wait to see it for myself.

 09-07-2008, 04:45 PM
#856
PassionFord Post Whore!!
the only thing i will say it that stainless steel will rot mild steel when in contact with it ,mite of been an idea to use ally and its a fare bit lighter so would be better for what you use the car for .
12-07-2008, 10:13 PM
#857
Virgin

Join Date: Jul 2008
Posts: 6
Likes: 0
Received 0 Likes
on
0 Posts
You only get rot between dis simular metals when in close contact with each other and have to have some form of electrolite (dirty water will do). It's a chemical reaction, basicaly the same as a battery. I think christian will be fiane as all surfaces are painted and sealed.
Personaly I have seen what hes done close up and its a fine job, Well done mate.
Personaly I have seen what hes done close up and its a fine job, Well done mate.
 24-08-2008, 09:52 PM
#864
Part of the Furniture

Join Date: Feb 2007
Location: Dunfermline
Posts: 181
Likes: 0
Received 0 Likes
on
0 Posts
Yeh no need to use stainless here, it's heavier and more expensive. Did you think about cutting it flush with the roof skin and welding it in? Those rivets make it look like it's built from meccano.
24-08-2008, 10:47 PM
#865
Believe me, I'm far more concerned with whats under the bonnet.
24-08-2008, 11:50 PM
#867
Norris Motorsport

Good to see you're back at it C! Tim told me my comments I made to you on your "I'm giving up post" have done the trick..................you're still fighting for the top speed record, good man!! See you at the daddy thrash, Tim and ollie both have new power plants for this year!
21-10-2008, 10:24 PM
#869
Well, it's me! Just thought I'd update my thread with my lifes work! LOL.
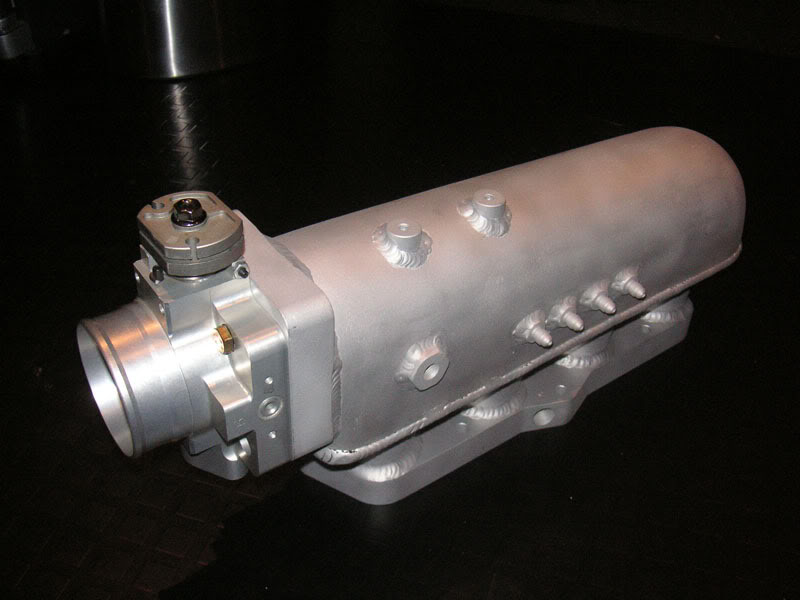
Having run the plenum as seen on earlier pages and deciding that I want to keep with it, I set about improving the design and making it more 'proper'. However, this did entail more work than I ever imagined!
This involved removing the Throttle Body mounting flange and the Head flange and basically starting again.
All work seen here was to my design and after having a few failed attempts at getting it just so. The actual machining and welding was carried out by DC Developments, who have been SO helpful with so many aspects of the work on my car. Thanks Matt!
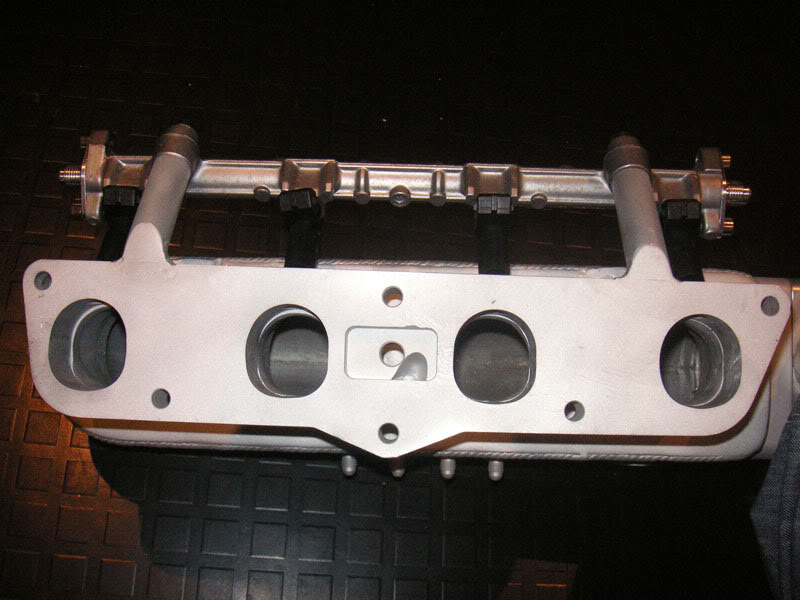
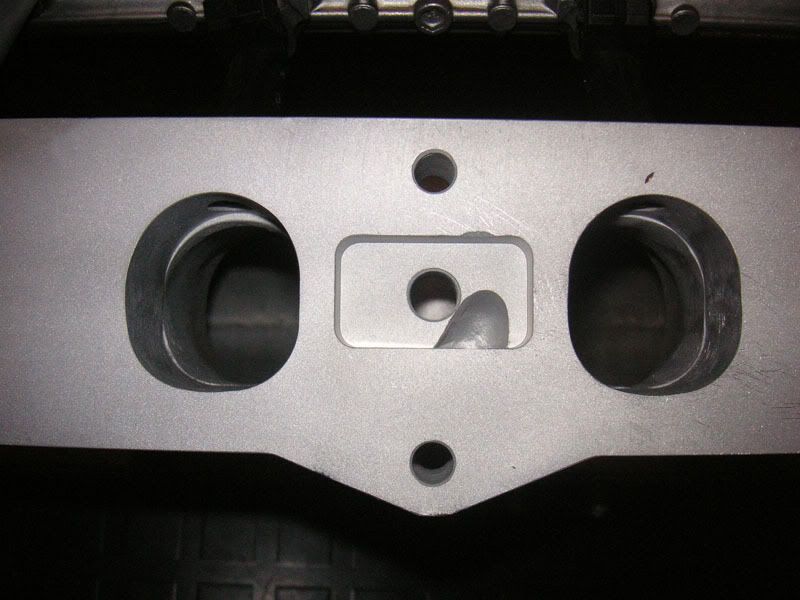
Anyway, I have done away with the original injector mounting flange and opted for one that is built into the plenum itself. I am using a different fuel rail with AN adaptors on the ends, ready to take Aeroquip style connectors.
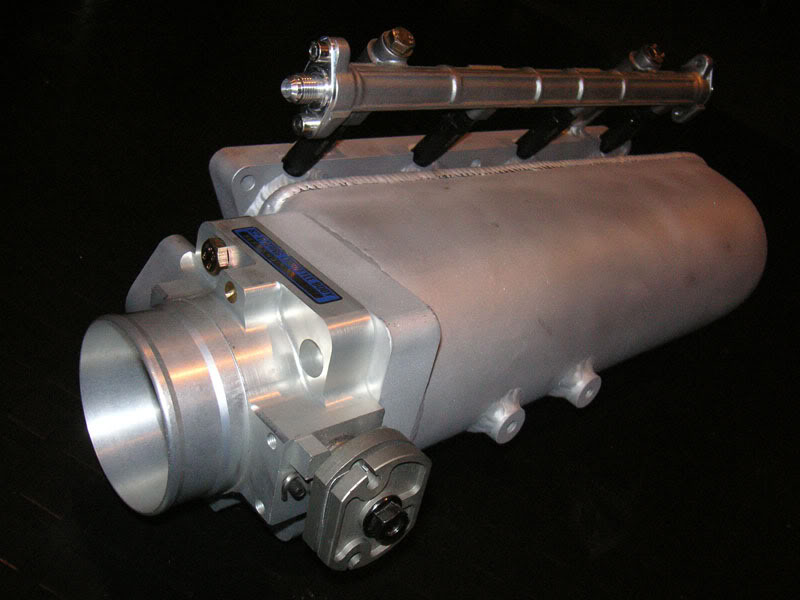
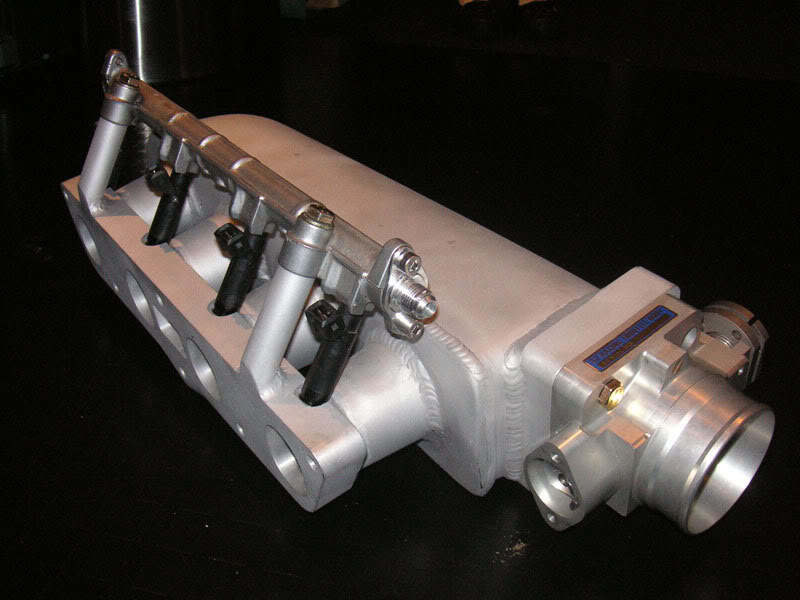
However, of course it needs to carry the waterways down to the oil modine. This was taken care of by making the flange quite thick and having a waterway machined into it. This waterway also has a mount for the water temperature sensor in it. I have begun to port match this flange to the rest of the plenum, but this is yet to be completed, as you can see.
Next up was to throw the Cossie throttle body away and get something a bit nicer. I went for a Skunk2 Billet Alloy one. The main reason for this is that there aren't many nice throttle bodies on the market that are small enough! I didn't want anything huge and its a struggle to get something like this under 80mm, which is of course massively too big for a l'il RST! The flange has again been made thick because the inside face of it is profiled to aid airflow to the trumpets, particularly the closest one. Excuse the bolts, of course they are temporary!
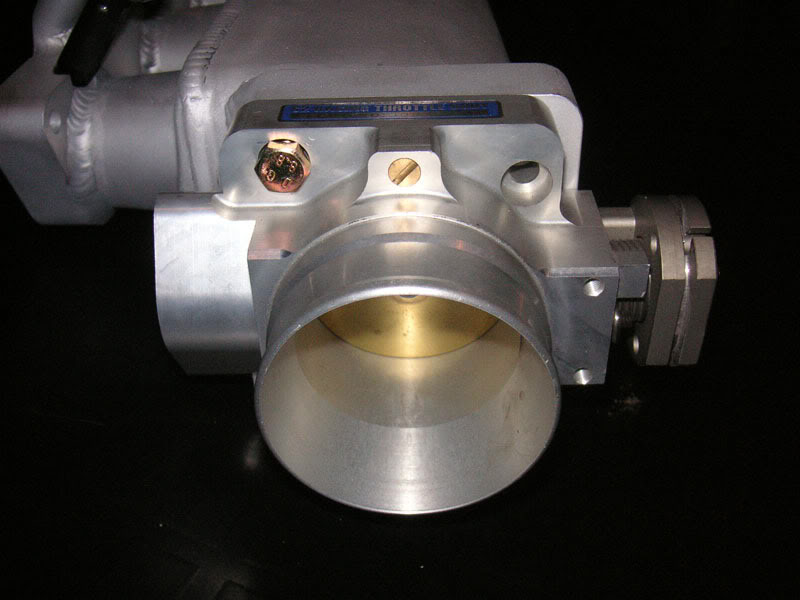
This throttle body is fantastic in the sense that it allows the map sensor to be mounted directly on it, removing the need for a vacuum connection and pipework for it. I also had DC Developments add mounting bosses for the Throttle Cable bracket, which I am yet to make.
I have also had four -3 male connectors added. These will be used for the Fuel pressure regulator and wastgate. There will be a special adaptor made also for connection to the map sensor on the dyno, as this usually uses a push-on hose. This will leave 1 spare at this stage, which will be blanked off with a proper blanking cap. Hopefully gone are the days of vacuum system leaks! There is also a threaded boss there for use as an air by-pass should I need an idle valve, but since swapping to the new ECU, I haven't had one yet.
I hope you like it. You're seeing it here in its raw bead-blasted state, I haven't yet decided what colour it will end up.
Having run the plenum as seen on earlier pages and deciding that I want to keep with it, I set about improving the design and making it more 'proper'. However, this did entail more work than I ever imagined!
This involved removing the Throttle Body mounting flange and the Head flange and basically starting again.
All work seen here was to my design and after having a few failed attempts at getting it just so. The actual machining and welding was carried out by DC Developments, who have been SO helpful with so many aspects of the work on my car. Thanks Matt!
Anyway, I have done away with the original injector mounting flange and opted for one that is built into the plenum itself. I am using a different fuel rail with AN adaptors on the ends, ready to take Aeroquip style connectors.
However, of course it needs to carry the waterways down to the oil modine. This was taken care of by making the flange quite thick and having a waterway machined into it. This waterway also has a mount for the water temperature sensor in it. I have begun to port match this flange to the rest of the plenum, but this is yet to be completed, as you can see.
Next up was to throw the Cossie throttle body away and get something a bit nicer. I went for a Skunk2 Billet Alloy one. The main reason for this is that there aren't many nice throttle bodies on the market that are small enough! I didn't want anything huge and its a struggle to get something like this under 80mm, which is of course massively too big for a l'il RST! The flange has again been made thick because the inside face of it is profiled to aid airflow to the trumpets, particularly the closest one. Excuse the bolts, of course they are temporary!
This throttle body is fantastic in the sense that it allows the map sensor to be mounted directly on it, removing the need for a vacuum connection and pipework for it. I also had DC Developments add mounting bosses for the Throttle Cable bracket, which I am yet to make.
I have also had four -3 male connectors added. These will be used for the Fuel pressure regulator and wastgate. There will be a special adaptor made also for connection to the map sensor on the dyno, as this usually uses a push-on hose. This will leave 1 spare at this stage, which will be blanked off with a proper blanking cap. Hopefully gone are the days of vacuum system leaks! There is also a threaded boss there for use as an air by-pass should I need an idle valve, but since swapping to the new ECU, I haven't had one yet.
I hope you like it. You're seeing it here in its raw bead-blasted state, I haven't yet decided what colour it will end up.

 21-10-2008, 10:43 PM
#872
Can you not put a wedge onto the throttle plate to improve (ie lessen) throttle response at low openings?
Nicely made manifold that by the looks of it, although you'll need 10bhp more to carry the weight, lol
Love custom stuff like this
Nicely made manifold that by the looks of it, although you'll need 10bhp more to carry the weight, lol
Love custom stuff like this

