
1967 Lotus White Beetle Restoration

 09-08-2009, 09:34 PM
#42
I've found that life I needed.. It's HERE!!

Join Date: Feb 2006
Location: wakefield
Posts: 1,007
Likes: 0
Received 0 Likes
on
0 Posts
getting on i see, i might be buying a 67 in the next few months, ill get some pics next time im up at the unit, need a little work but is a stunner
09-08-2009, 09:34 PM
#43
Shizzle My Nizzle
Thread Starter
iTrader: (1)
Join Date: Aug 2006
Location: ESSEX
Posts: 3,755
Likes: 0
Received 0 Likes
on
0 Posts
Yeh do love the randars, nice wheels, not to everyones tastes tho. Id have personally gone for the porsche fuchs from the 911. same as what i have but 5 stud rather than 4.
I did think about changing the hubs and brakes, but its another �800-1000 and simply doesnt justifiy it for me. Anyway my 914 fuchs are cool and are uber rare compared to the 911 fuchs.
That bug is on air ride, think its an airkwelds kit.
Am starting the welding tommrow........ cant wait
I did think about changing the hubs and brakes, but its another �800-1000 and simply doesnt justifiy it for me. Anyway my 914 fuchs are cool and are uber rare compared to the 911 fuchs.
That bug is on air ride, think its an airkwelds kit.
Am starting the welding tommrow........ cant wait

 10-08-2009, 05:48 PM
#47
Shizzle My Nizzle
Thread Starter
iTrader: (1)
Join Date: Aug 2006
Location: ESSEX
Posts: 3,755
Likes: 0
Received 0 Likes
on
0 Posts
Am starting at the front and working back.
The bug was obviously given a healthy coat of waxoil when it was new over 40 years ago.


Massive mess and a pain to get off, but it has preserved the metal as if it were only a month old!!!!


After scarping and melting with a paint gun, i gave it a wipe with lots of thinners, just look at how clean it is thats 42 year old paint on an inner wheel arch

My good old favorite, stone chip paint

After some sanding applied a few coats.


same other side

The stone chip is wonderful stuff and is ready to paint straight over, tho ill probably give it a coat of primer first when the time comes
The spare wheel well was also coated in the wax', theres an id plate under there somewhere


The only rust is about a 6" patch in the spare wheel well, so im waiting for a new panel to arrive so I can graft this in, hopefully tommrow.
Have also began to prep the inside of the inner wings and boot, i want to get them as smooth as possible, not that anyones going to see them, but I know they are there so want them to be spot on.
The bug was obviously given a healthy coat of waxoil when it was new over 40 years ago.
Massive mess and a pain to get off, but it has preserved the metal as if it were only a month old!!!!
After scarping and melting with a paint gun, i gave it a wipe with lots of thinners, just look at how clean it is
thats 42 year old paint on an inner wheel archMy good old favorite, stone chip paint
After some sanding applied a few coats.
same other side
The stone chip is wonderful stuff and is ready to paint straight over, tho ill probably give it a coat of primer first when the time comes
The spare wheel well was also coated in the wax', theres an id plate under there somewhere
The only rust is about a 6" patch in the spare wheel well, so im waiting for a new panel to arrive so I can graft this in, hopefully tommrow.
Have also began to prep the inside of the inner wings and boot, i want to get them as smooth as possible, not that anyones going to see them, but I know they are there so want them to be spot on.
10-08-2009, 10:14 PM
#50
i'd love to do a beetle one day, the deepest gloss black you've ever seen, ghosted flames, white leather interior and these wheels

 11-08-2009, 09:11 AM
#52
Shizzle My Nizzle
Thread Starter
iTrader: (1)
Join Date: Aug 2006
Location: ESSEX
Posts: 3,755
Likes: 0
Received 0 Likes
on
0 Posts
Cool. My orion Has one previous lady owner, 38k when i had it, waxoyled from new, german shell. it had everything going for it really, but there was still the "standard" fuse box rust to deal with and also a few bubbles on the front inner arch under the plastic covers. i know nothing to keep you awake at night after seeing some of the RS' on here but its refreshing to see a 40 year old car in such good condition... if you know what i mean 
i'd love to do a beetle one day, the deepest gloss black you've ever seen, ghosted flames, white leather interior and these wheels But i need a mk1 escort first iot has to wait its turn!
i'd love to do a beetle one day, the deepest gloss black you've ever seen, ghosted flames, white leather interior and these wheels


They are soooooo wrong
I had a mk1 2dr escort about 3 years ago, was a very very solid 1968, turned it into a mexico rep. Lovley car


Elvis is you want a bug, defo get a split screen, my 1949 Vw beetle was the nuts


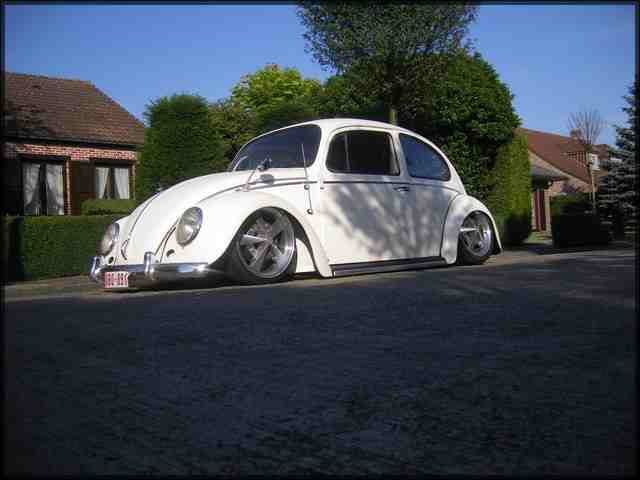
This is where it all started...with my 1st bug. I bought it at 14 and spent 3 years restoring it, here is a picture from when I sold it. Not bad for my first spray job, cold have been an immense car if i wernt so stoned and playing guitar
Not bad for a 14-15 year old tho hey.My 1971 Vw beetle

sold it to buy this


I wont bore you with the escos, aston, vr6, vw camper and 16i resto pics.
Missed my old bug soooo much I bought this one in january (YES JAN 2009


!


The wheel arch area:


Note new kunifer and flexi


Fido dido sticker, i believe its been there since the early 90's, didnt have the heart to remove it!

sold in feb 2009 to buy the rs16i
Bonus points for anyone who also noticed my landrover change colour.
oh and a 1303 to answer your question, Vw always updated their bugs right from 1938 Mr F Porsche and Mr Hitler made changes,(yes the beetle is actually a porshce but hitler decided to "steal" it and called it KDF, the british army took over in 1947 and rebranded the KDF with a new name= Volkswagon) there were sometimes almost monthly changes to the cars (pain in the arse if doing concourse) the late bugs 1974 onwards were "IMPROVED" (that is questionable) with mc pherson struts up front instead of torsion bars, this made the car ugly as it and a wide fat nose. And ugly "elephant" rear lights for better saftey.
And even worse VW always wanted to improve visibality. hence
1949-1953 splitscreen rear
1953-1957 oval rear
1957-1967 larger windows all round
1968-1973 even bigger windows
1974-on ie 1303
they did the stupid thing of changing the flat screen front to panoramic/bay window and it looks hideous
There you started me off and I gave a nerds answer
Last edited by Lee Ivatt; 11-08-2009 at 09:25 AM.
11-08-2009, 04:44 PM
#54
I dont exactly want a rep, but it will be white with cibies, roll top beta cloth bucket seats and the 6pod dash though. i dont know about stripes. some 13" rs4 spokes to finish off the package
 12-08-2009, 07:53 AM
#55
Shizzle My Nizzle
Thread Starter
iTrader: (1)
Join Date: Aug 2006
Location: ESSEX
Posts: 3,755
Likes: 0
Received 0 Likes
on
0 Posts
More of the same... rear end now


No welding here either, there were 2 repair patches, one each side which were ok, just needed a light grinding as who ever did them had left a bit too much weld on for my puropses.
Only tool ive had to use really is my good old hammer and dolly


Starting on the boot/inner wings and engine bay now. Again a lot of this (90%) wont be seen, but I know the effort will be worth it, its the little details what you dont actually see that make the car stand out when its finished.

anyone want a 16i

No welding here either, there were 2 repair patches, one each side which were ok, just needed a light grinding as who ever did them had left a bit too much weld on for my puropses.
Only tool ive had to use really is my good old hammer and dolly
Starting on the boot/inner wings and engine bay now. Again a lot of this (90%) wont be seen, but I know the effort will be worth it, its the little details what you dont actually see that make the car stand out when its finished.
anyone want a 16i
 12-08-2009, 09:50 PM
#58
I've found that life I needed.. It's HERE!!
Join Date: Feb 2006
Location: wakefield
Posts: 1,007
Likes: 0
Received 0 Likes
on
0 Posts
12-08-2009, 09:58 PM
#59
Borg Warner EFR Equipped!

Join Date: Apr 2005
Location: In the unit, building a 450bhp Time Attack Focus!
Posts: 5,810
Likes: 0
Received 2 Likes
on
2 Posts
Might just be an off the wall comment here Lee, but what about Porsche Riviera Blue??
Looks another top job though - i admire the speed you turn them round!
Looks another top job though - i admire the speed you turn them round!
12-08-2009, 10:21 PM
#60
Professional Waffler


 15-08-2009, 09:15 AM
#63
Shizzle My Nizzle
Thread Starter
iTrader: (1)
Join Date: Aug 2006
Location: ESSEX
Posts: 3,755
Likes: 0
Received 0 Likes
on
0 Posts
I used Machine 7 back in the late 90's when they were a new company and there was a sudden rise in intrest for aircooled Vw's , They had some ground breaking stuff at the time. The business has really taken of the last 10 years!!
Got any pics of homer (haha one of our kissing fish is caller homer)

Right Sorry for lack of pics people, have been flat out with work and far to many commitments
So only managed to get a few pics when I rememberedHave spent a solid 3 days on body work welding, hammering and a tiny bit of dolphin glaze.
Rushed around yesterday to get the bug in a guide coat of primer to show up any deviations in the metal work.
This was the only bad bit on the car the front well.

New panel

After the best part of 30 hours, the car was ready for a good all over rub down and wet and dry

And here she is in primer


 17-08-2009, 08:20 PM
#67
Shizzle My Nizzle
Thread Starter
iTrader: (1)
Join Date: Aug 2006
Location: ESSEX
Posts: 3,755
Likes: 0
Received 0 Likes
on
0 Posts
Finally got the bug painted after another 3 days of prepping
Body work was really good, here it is with just some dolphin paste on some low bits


Wet and dry 400, 600 & 800 tedious but this it where the actual paint finish is made


3 liters of lotus white and 1.5 activator


Air fed mask

And also treaded my self to a new gun as my last one is well over 10 years old and past it. Got on really well with the new one. Just took some getting used to with the gravity as there no delay like mt old suction gun.

tack drying after hanger coat


Body work was really good, here it is with just some dolphin paste on some low bits
Wet and dry 400, 600 & 800 tedious but this it where the actual paint finish is made
3 liters of lotus white and 1.5 activator
Air fed mask
And also treaded my self to a new gun as my last one is well over 10 years old and past it. Got on really well with the new one. Just took some getting used to with the gravity as there no delay like mt old suction gun.
tack drying after hanger coat
17-08-2009, 08:49 PM
#68
Virgin

Join Date: Jun 2009
Location: Bournemouth
Posts: 5
Likes: 0
Received 0 Likes
on
0 Posts
Good work fella Had my fair share of aircooled VW's in the past and its nice to see someone else getting stuck into a resto..
You also missed the 1302s from you list of models..
Had my fair share of aircooled VW's in the past and its nice to see someone else getting stuck into a resto..You also missed the 1302s from you list of models..
17-08-2009, 10:08 PM
#70
Shizzle My Nizzle
Thread Starter
iTrader: (1)
Join Date: Aug 2006
Location: ESSEX
Posts: 3,755
Likes: 0
Received 0 Likes
on
0 Posts
Sorry last post was cut short due to photobucket spaz out
.......................
Hanger coat cont...

And here she is in top coat


Been along day


 18-08-2009, 09:42 PM
#75
Shizzle My Nizzle
Thread Starter
iTrader: (1)
Join Date: Aug 2006
Location: ESSEX
Posts: 3,755
Likes: 0
Received 0 Likes
on
0 Posts
Im cream crackered been on the bug for 15 hours solid , but met my target, Just got the doors left now
The wings I picked up last week, all NOS but have been sitting for years so not as new

Much easier to work on them when theyre fixed to something

Bonnet and engine lid, some ones been at them with the filler so this has all got to come out.

Bonnet- removal of filler


This is just one of the lumps of filler that was in the bonnet, It amazes me that people put this much in, just asking for trouble.


Hammer and dolly time again

Here as good as i can get with the hammer as theres just too many curves. but 20 times better than 1/4" of filler!

Now just needs a thin film of dolphin paste, this is like a filler but is a self leveling paste and goes off about 3 time harder than filler, its perfect for getting things spot on

Engine lid was the same, some tool had made a crap job of covering up the "1500" badge holes with some shit filler
Small dent to hammer out

and as for the lid catch well over 1/2" of filler here pic of it half cut back

all off


Here it is after hammering, again will need a film of dolphin as there is a catch brakcet on the rear of the lid preventing the hammer from a clean hit. But again 20 time better than filler

After god know how many hours of sanding, beating and leveling. It all treated to 2 high build coats of primer


then a normal primer (which just happens to be cream so not ideal for spraying over, but hey ho)

And then after again many hours of wet and dry and final fetteling (as you can see its dark out side now) The Lotus White goes on.


Inside/indersides as well


What a day
The wings I picked up last week, all NOS but have been sitting for years so not as new
Much easier to work on them when theyre fixed to something
Bonnet and engine lid, some ones been at them with the filler so this has all got to come out.
Bonnet- removal of filler
This is just one of the lumps of filler that was in the bonnet, It amazes me that people put this much in, just asking for trouble.
Hammer and dolly time again
Here as good as i can get with the hammer as theres just too many curves. but 20 times better than 1/4" of filler!
Now just needs a thin film of dolphin paste, this is like a filler but is a self leveling paste and goes off about 3 time harder than filler, its perfect for getting things spot on
Engine lid was the same, some tool had made a crap job of covering up the "1500" badge holes with some shit filler
Small dent to hammer out
and as for the lid catch well over 1/2" of filler here
pic of it half cut backall off
Here it is after hammering, again will need a film of dolphin as there is a catch brakcet on the rear of the lid preventing the hammer from a clean hit. But again 20 time better than filler
After god know how many hours of sanding, beating and leveling. It all treated to 2 high build coats of primer
then a normal primer (which just happens to be cream so not ideal for spraying over, but hey ho)
And then after again many hours of wet and dry and final fetteling (as you can see its dark out side now) The Lotus White goes on.
Inside/indersides as well
What a day
 19-08-2009, 10:08 PM
#77
Shizzle My Nizzle
Thread Starter
iTrader: (1)
Join Date: Aug 2006
Location: ESSEX
Posts: 3,755
Likes: 0
Received 0 Likes
on
0 Posts
Youd think so, but I guess the Pf crowd arnt that keen on bugs  ??
??
Had a heavy session again tonight
Last nights efforts


Bonnet on


Wings, loosley fitted as im waiting for wing beading


Engine lid brackets


Ran out of time with the doors, have spent hours prepping and sanding them. managed to get them in primer and wet and dryed, but at 10:45pm and after 3 pints of broadside, i have decided to call it a night

Had a heavy session again tonight
Last nights efforts
Bonnet on
Wings, loosley fitted as im waiting for wing beading
Engine lid brackets
Ran out of time with the doors, have spent hours prepping and sanding them. managed to get them in primer and wet and dryed, but at 10:45pm and after 3 pints of broadside, i have decided to call it a night
19-08-2009, 10:17 PM
#78
I'm Finding My Feet Here Now

Join Date: May 2009
Location: southampton
Posts: 127
Likes: 0
Received 0 Likes
on
0 Posts
the quality of your work is fantastic and that bug is going to be awesome! i have major respect for your skills!
ps i want your workshop! its better then the workshop i work in lol!
keep up the good work!
stunning thread as usual!
ps i want your workshop! its better then the workshop i work in lol!
keep up the good work!
stunning thread as usual!
20-08-2009, 07:56 AM
#80
Shizzle My Nizzle
Thread Starter
iTrader: (1)
Join Date: Aug 2006
Location: ESSEX
Posts: 3,755
Likes: 0
Received 0 Likes
on
0 Posts
Its just time and paitience, nothing else mate.
Right got up extra early today to finish off doors.
Im flat out with work at the mo so finding it hard to get time on the bug, (cossie, 16i....)
Anyway....im off to work now


Right got up extra early today to finish off doors.
Im flat out with work at the mo so finding it hard to get time on the bug, (cossie, 16i....
)Anyway....im off to work now
Last edited by Lee Ivatt; 20-08-2009 at 07:59 AM.