my Moonstone 3 Door ...


 14-11-2007, 09:07 AM
#43
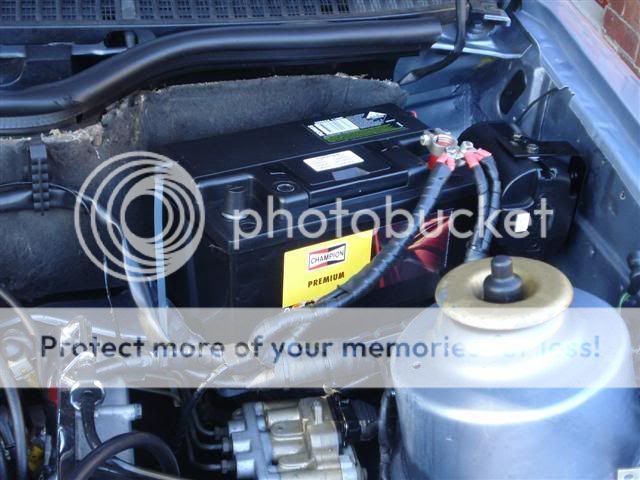
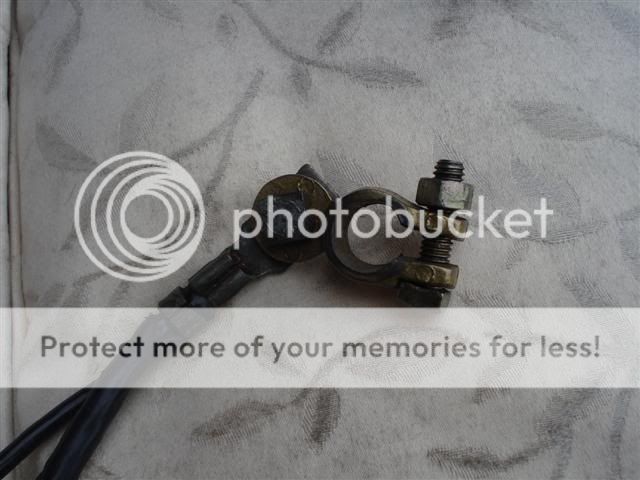
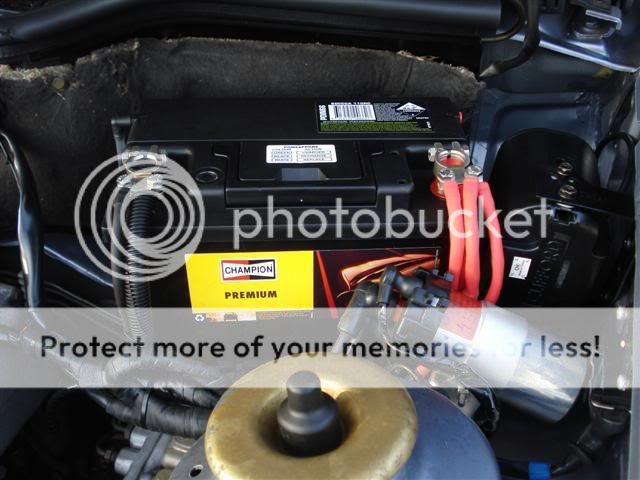
Well at the battery here is what I was faced with ...
I have decided to replace all the end terminal fittings, reprotect the wiring with red heatshrink and wrap the harness in black rubber tape this way the wiring will get more protection and hopefully the black wiring (with black hoses) wont stand out so much in the engine bay for a neater finish
  .
.
Sorry for a lot of photos for the one job but it took me ages to do
  and I thought it was worth sharing seeing that I've read cosworths seem to have wiring/electrical issues
  ... remember I want to build a realiable car here
so first I laid out my wiring (I would love to have cut this out of the main harness and lined it all up vertically with the batterys postive terminal ... but that seemed a little drastic
  ) ...
) ...
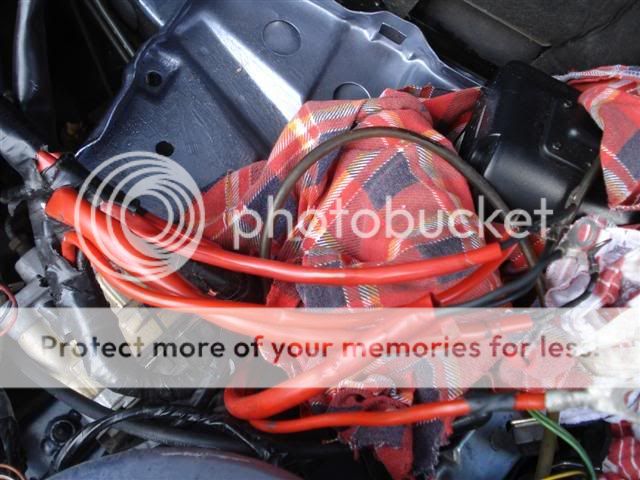
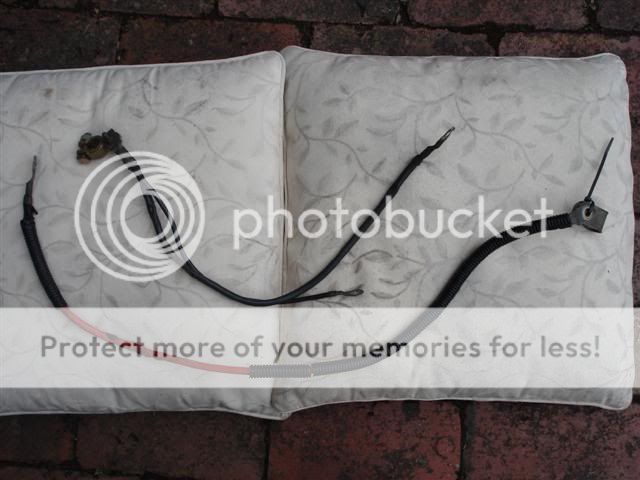
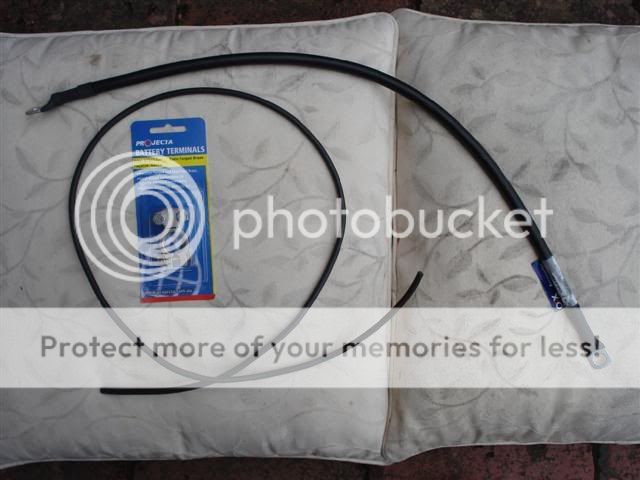
heres a work in progress photo ... I had to cut off each terminal because the exposed wiring was showing signs of corrosion (a little restance goes a long way ) ... so I exposed some new wire, cleaned it and crimped on a new ring terminal for my new battery connection
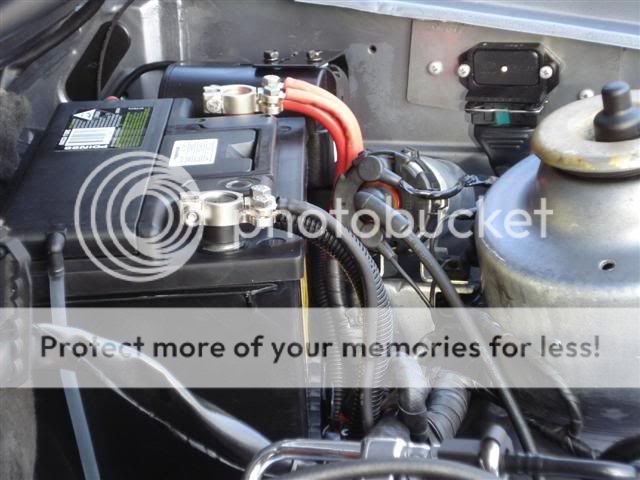
I deided to 'black out' the wiring, but I left the terminal connectors red heatshrink exposed so if someone else (other than me ) disconnects anything they know what is positive
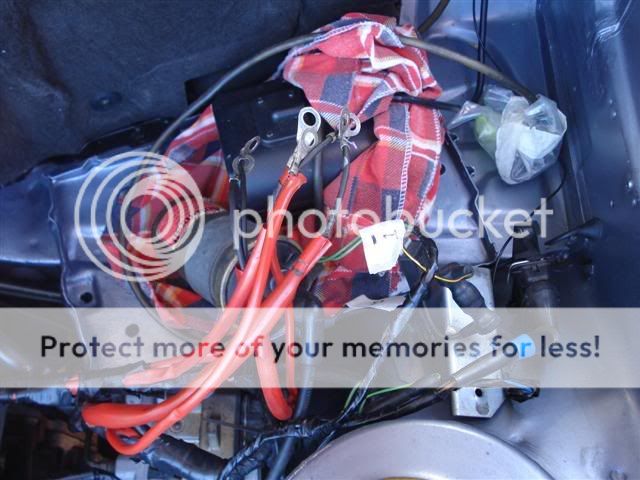
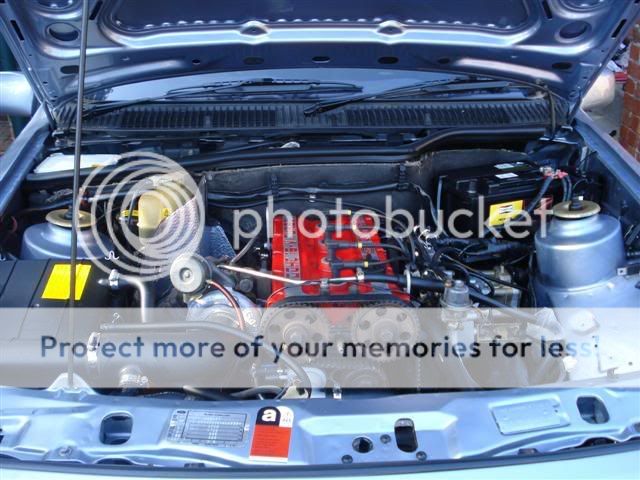
heres a distant shot ... even thought there is still heaps of harness wiring hopefully it looks neater ...
I have decided to replace all the end terminal fittings, reprotect the wiring with red heatshrink and wrap the harness in black rubber tape
Sorry for a lot of photos for the one job
... remember I want to build a realiable car here so first I laid out my wiring (I would love to have cut this out of the main harness and lined it all up vertically with the batterys postive terminal
) ...heres a work in progress photo ... I had to cut off each terminal because the exposed wiring was showing signs of corrosion
) ... so I exposed some new wire, cleaned it and crimped on a new ring terminal for my new battery connection I deided to 'black out' the wiring, but I left the terminal connectors red heatshrink exposed so if someone else (other than me
heres a distant shot ... even thought there is still heaps of harness wiring hopefully it looks neater ...
 15-11-2007, 01:45 AM
#46
182 blue and Brian cheers lads
lamp chops yeah the dry weather is good for the cars ... except I cant wash it at home  (due water restrictions) ...
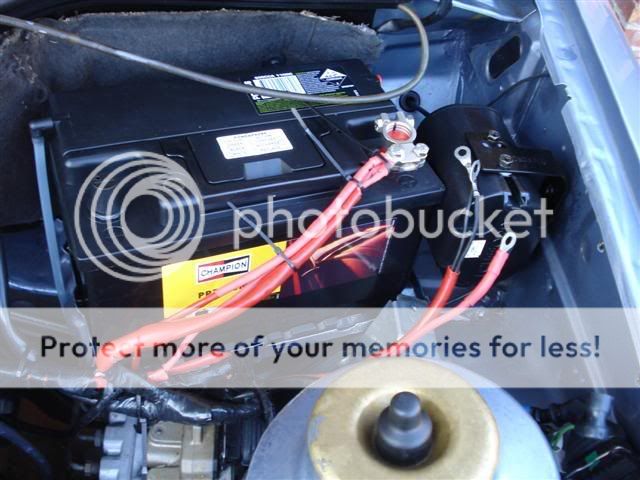
Ryan v good idea ... looking back now I wish I had joined the wires to make less terminals at the battery but I'll make it a little neater by having some of the connections on top and some under the battery terminal (as opposed to having them all 'spread' from the one bolt like in the photo) Some of the wire insultion was very soft ... it was like a rubber ... a bit crap IMHO
I had bought 'gold' battery terminals but I decided at the last minute they might look a bit 'trashy' ... so I bought these you beat 'platnium series' ones ... I hadn't seen them before but I think they look good ('stockish' but shiney )
lamp chops yeah the dry weather is good for the cars ... except I cant wash it at home
(due water restrictions) ...Ryan v good idea
... looking back now I wish I had joined the wires to make less terminals at the battery ... it was like a rubber ... a bit crap IMHO I had bought 'gold' battery terminals but I decided at the last minute they might look a bit 'trashy'
 22-11-2007, 04:22 PM
#51
rich frst, Marsey RS, SteveW, 182 blue thanks boys 
Anyway time for some carnage shots
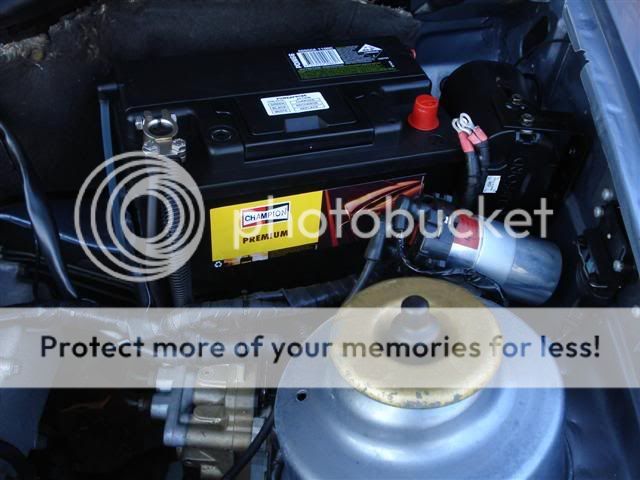
A while ago I had an issue with starting my car ... I'd turn the key and there'd by nothing After a search on PF I cleaned the electrical contacts on the starter solenoid (one of which is the main positive lead from the battery ...) and starts have been good every since One of the recommendations i read was to also clean the main earth connection, the lead that goes down from the battery to the transmission housing ... I didn't need to but I noticed the wiring was in pretty bad nic and had chaffed through to expose wiring this is one of the jobs I wanted to do now Whilst I was cleaning up wiring I decided to remove and inspect the main positive lead that had been the cause of my first problem and ...
.... and oh my god
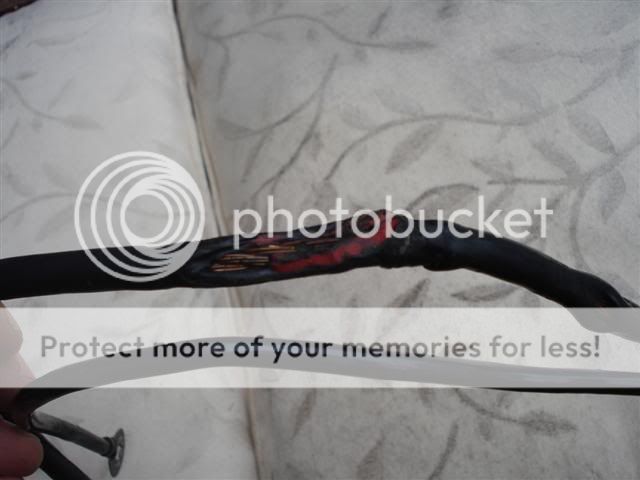
The protective condiut was brittle and broken away and there was exposed (positive) wiring where the insulation had melted and chaffed away ... this s@#t causes short circuits and engine fires or could have fried my engine computer


Like I said, the main earth wasn't to much better ...
and I wasn't happy with the 'piggyback' battery terminals ...
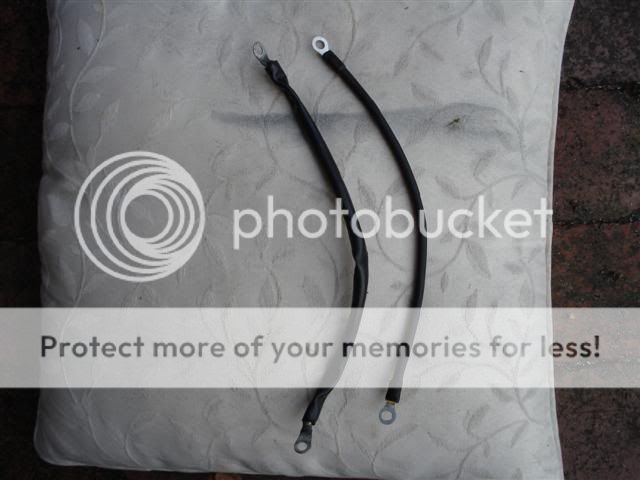
So for the postive lead I'm making a new one with this little lot ...
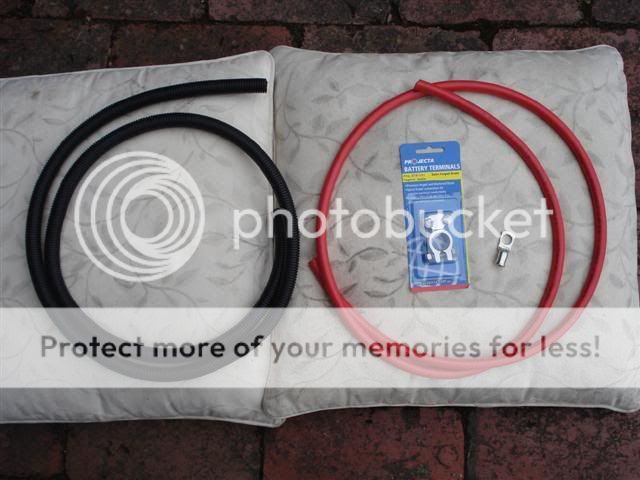
New condiut (extra wire protection), better quality cable for super strong starts
And new uprated earth leads for the battery ... slight modification needed to the premade cable but it will come up well
Anyway time for some carnage shots
A while ago I had an issue with starting my car ... I'd turn the key and there'd by nothing
After a search on PF I cleaned the electrical contacts on the starter solenoid (one of which is the main positive lead from the battery ...) and starts have been good every since this is one of the jobs I wanted to do now .... and oh my god
The protective condiut was brittle and broken away and there was exposed (positive) wiring where the insulation had melted and chaffed away ... this s@#t causes short circuits and engine fires
or could have fried my engine computer Like I said, the main earth wasn't to much better ...
and I wasn't happy with the 'piggyback' battery terminals ...
So for the postive lead I'm making a new one with this little lot ...
New condiut (extra wire protection), better quality cable for super strong starts
And new uprated earth leads for the battery ... slight modification needed to the premade cable


 30-11-2007, 05:21 AM
#56
I've found that life I needed.. It's HERE!!
Just found this post good work keep it up. i saw the car at the all ford day in perth i was there with my mallard escos. WILL HAVE TO CATCH UP SOMEDAY, are you a member of the RS owners club in WA? there is a meeting on the 5th of dec. may see you there , my missis said that your wife will kill you putting those dirty battery leads all over here nice pillows.
 07-12-2007, 08:55 AM
#58
Moonstone Mart thanks mate good luck with your wiring ... its a time consuming job but well worth doing right i'll enjoy watching your progress
R4N SS cheers bud, I've got a lot more work to go
Kitchy yeah I only had the car a short time (and hardly drove it) and electrical issues almost had me stuck (lucky I was at work ) ... but no more I'm doing this once and I'm doing it properly (unless I replace the whole harness later ).
MattPym yeah turbos a little overkill ... but imagine the sound when the blow off valve goes
ossie cossie thanks for enjoying my thread ... sorry bud it wasn't me (or my car) at Perth ... I'm on the other side of Aus . But your right ... if your mates missus saw what I did to those pillows she'd probably kill me anyway
carlo cheers man ... its getting better but there is still some room for improvement
A proper update coming soon ... I've been a bit busy lately but I got out there today and got a fair bit done ... oh and I've changed the wiring AGAIN ...
good luck with your wiring ... its a time consuming job but well worth doing right R4N SS cheers bud, I've got a lot more work to go
Kitchy yeah I only had the car a short time (and hardly drove it) and electrical issues almost had me stuck
(lucky I was at work MattPym
yeah turbos a little overkill ... but imagine the sound when the blow off valve goes ossie cossie thanks for enjoying my thread ... sorry bud it wasn't me (or my car) at Perth
carlo cheers man ... its getting better but there is still some room for improvement
A proper update coming soon ... I've been a bit busy lately but I got out there today and got a fair bit done
... oh and I've changed the wiring AGAIN
08-12-2007, 07:29 AM
#59
Whilst I was doing wiring this lead from the bonnet to the firewall always annoyed me the worst thing about it was the rusty staple being used to tighten the outer plastic (may not see in the photo) ...
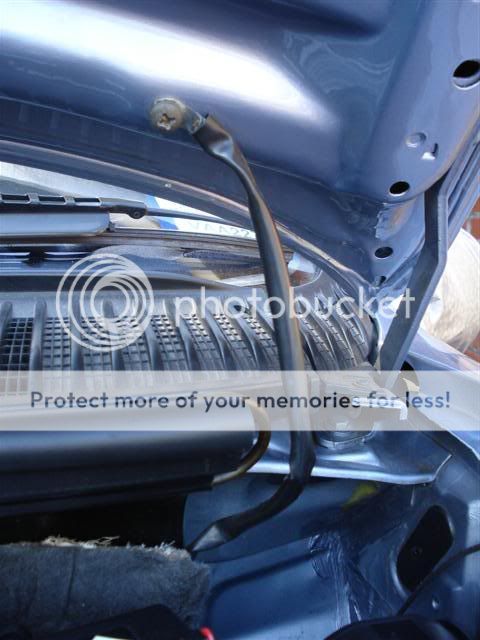
so with some spare wire, some ring terminal ends from my kit and some black heat shrink I made a newy ...
... and installed it nice and neatly

(may not see in the photo) ...so with some spare wire, some ring terminal ends from my kit and some black heat shrink I made a newy ...
... and installed it nice and neatly
08-12-2007, 08:08 AM
#60
Well with my main earth lead (new parts illustrated earlier ) I cut the end of the prefabricated lead and stripped it for the battery terminal to clamp onto ... hint after I had stripped it I used a little solder to hold the exposed wires together (and in shape) so that the clamping of the terminal doesn't 'spray' the wires everywhere .
Then this little lot is threaded through the plastic flexible condiut ... not stock but I felt it was neccessary after the damage I found on the old one this then got bolted onto the tranmission case.
Then I made up (just like above) a smaller black lead to go down to the battery tray from the terminal ... I didn't take a photo of it not installed but here it all is in position ...
This photo is responsible for me realising that my harness wiring could be neater ... and those who know me will not be surprised that I have gone back and done it again ... this time I joined the fuse wires together where possible (cheers Ryan ), extended them and reprotected them. I have chosen to keep them red this time to look a little more 'factory' Oh and it took me AGES
here is some work in progress shots of the fuse wires being joined and extended (cable tyes hold everything in place whist I'm working ) and when I joined two wires together I went up in wire size to be safe to make it neat I simply looped the top bunch of wires under the main harness and lead them up to the battery

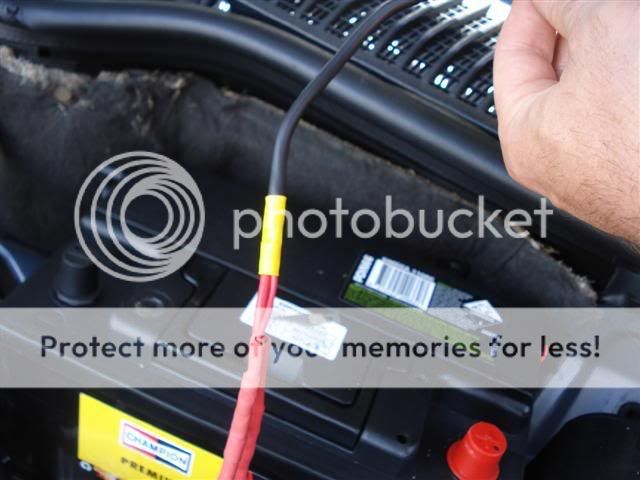
Then with one end of my you-beaut red battery cable crimped (and then threaded through the protective condiut) ...

... I connected it to the starter solenoid, passed it through the clamp on the engine (so it doesn't touch anything and chafe or melt again ) and threaded it through to the battery ...
I then cut it to length, removed a bit of the condiut (to keep it all red ) stripped the end and clamped on the terminal plus the fuse wires ...
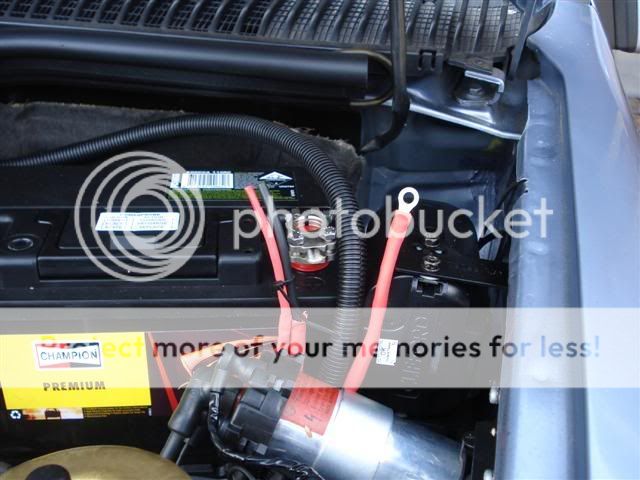
Heres another shot to show how much neater it now is and my polished ignition amp bracket is installed ...
Finally a distant shot (sorry about the crap photo it was getting dark) to show the end result Much better IMHO

I was never really happy with my first attempt but now I can say ...
... that's the wiring finished for now .
Then this little lot is threaded through the plastic flexible condiut ... not stock but I felt it was neccessary after the damage I found on the old one
Then I made up (just like above) a smaller black lead to go down to the battery tray from the terminal ... I didn't take a photo of it not installed but here it all is in position ...
This photo is responsible for me realising that my harness wiring could be neater
... and those who know me will not be surprised that I have gone back and done it again ), extended them and reprotected them. I have chosen to keep them red this time to look a little more 'factory' here is some work in progress shots of the fuse wires being joined and extended (cable tyes hold everything in place whist I'm working
to make it neat I simply looped the top bunch of wires under the main harness and lead them up to the battery Then with one end of my you-beaut red battery cable crimped (and then threaded through the protective condiut) ...
... I connected it to the starter solenoid, passed it through the clamp on the engine (so it doesn't touch anything and chafe or melt again
I then cut it to length, removed a bit of the condiut (to keep it all red
Heres another shot to show how much neater it now is
...Finally a distant shot (sorry about the crap photo it was getting dark) to show the end result
I was never really happy with my first attempt
... that's the wiring finished

 14-12-2007, 09:27 AM
#67
coswurv no good with the black one on either
Moonstone Mart I agree ... it looks heaps better
NORTH YORKS RS SPARES cheers Paul ... even better with a when I order those bits from you
Staffi, Ryan, R5COS thanks for the comments boys
Found time to get these bits together ...
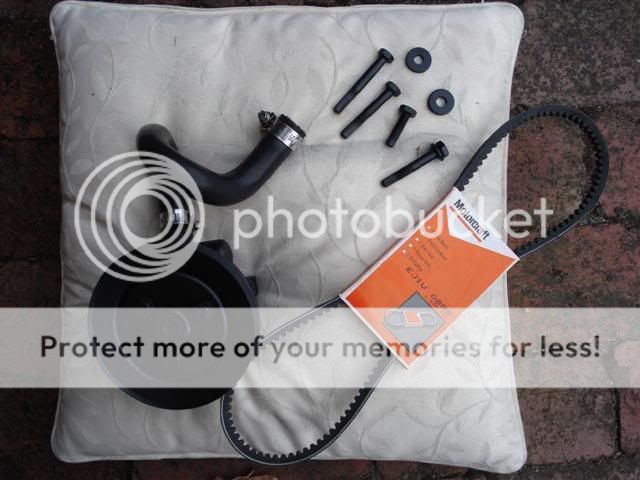
... and bang them into position.
Now thats the PAS system sorted ... a new drive belt and all new hoses with super duper (shiny stainless steel) hose clamps ... at last time to add some fluid.
no good with the black one on either Moonstone Mart I agree ... it looks heaps better
NORTH YORKS RS SPARES cheers Paul ... even better with a when I order those bits from you
Staffi, Ryan, R5COS thanks for the comments boys
Found time to get these bits together ...
... and bang them into position.
Now thats the PAS system sorted ... a new drive belt and all new hoses with super duper (shiny stainless steel) hose clamps
... at last time to add some fluid.
14-12-2007, 10:02 AM
#68
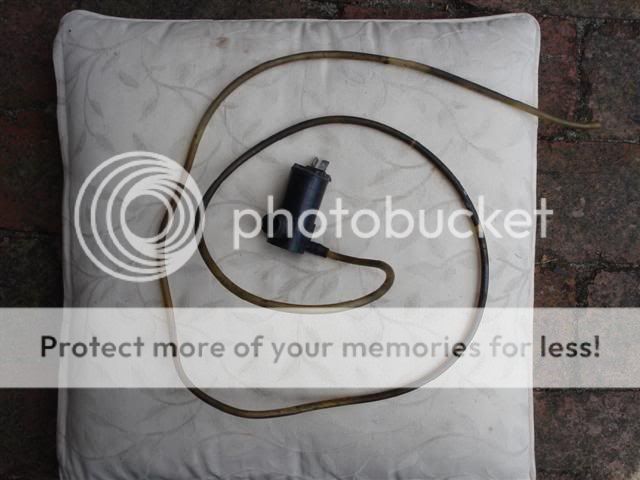
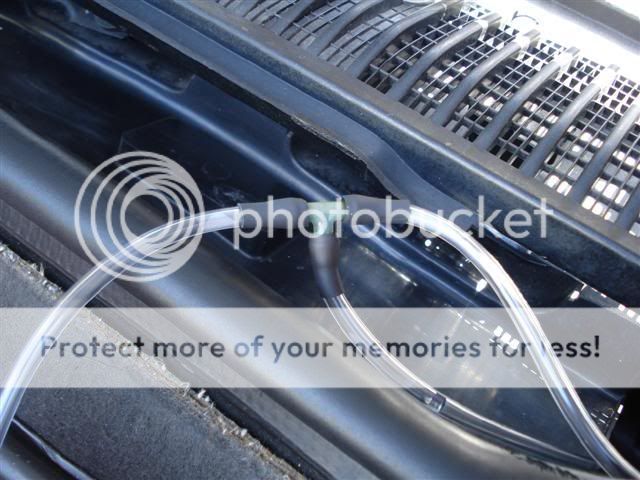
i thought whilst I had the inner wing apart I might as well replace the washer fluid hose that was looking old/cooked/sh*t
Heres the washer pump and hose to show you what I mean ...
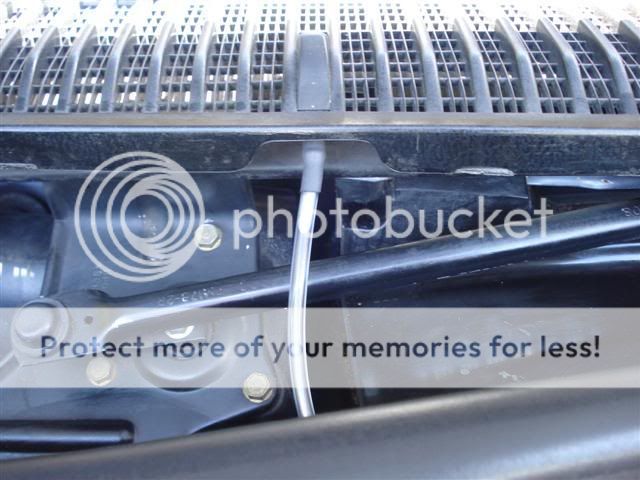
So the plan was to replace the old tubing by useing some new clear PVC hose (4mm by the way ... surprisingly hard to find) and some left over black heatshrink from my electrical jobs to produce a factory finish ...
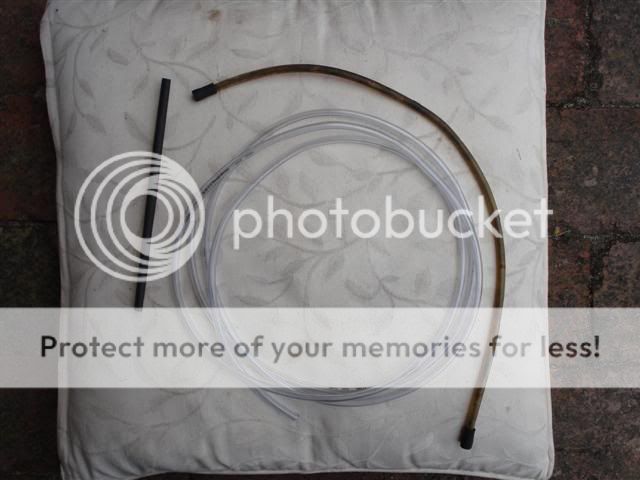
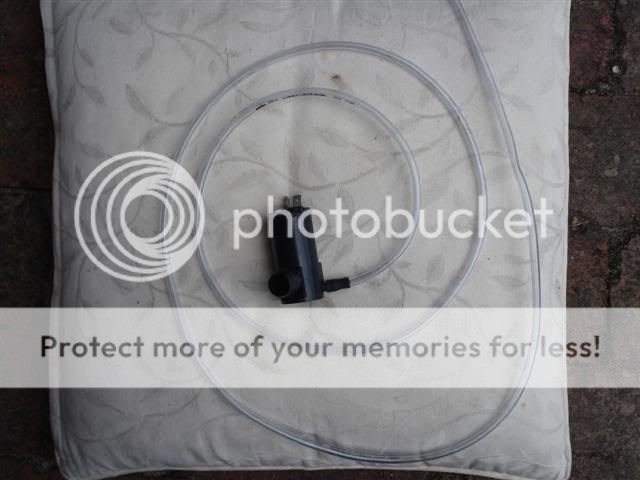
Its come up well I think ... now to do under the scuttle panel at the washer jets.
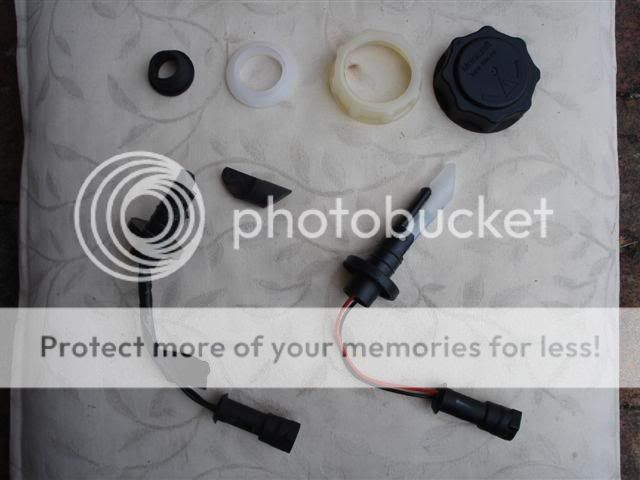
Now that the washer bottle was in and the electrical wiring to the pump and sensor was tidyed up it was time to install the header tank but first I neaded to replace the sensor seal (it had been cooked and hardened over the years) and when i took out the sensor to clean the bottle I found that it to had fallen apart ... so a new sensor was in order ...
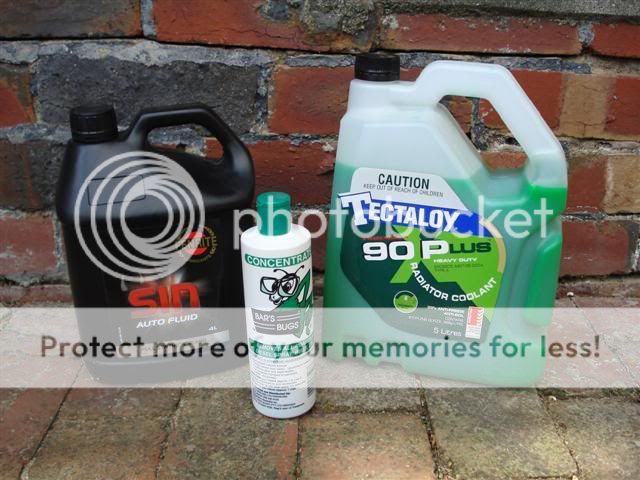
and some you beaut fluids for the cleaned fluid reservoirs ...
Heres the header tank fitted, filled and sporting a new sticker ...

But after filling the header tank and letting it sit ... I noticed a coolant leak already ... the one hose I did not replace from the water pump ( 'cause I'm going to order a full set of silicone coolant hoses from Roose ... black no stickers ) and replace it soon anyway ... so I've got another hose today but I still need to fit it.
At least I haven't run it and bleed the system already
I'm getting there ...
Heres the washer pump and hose to show you what I mean ...
So the plan was to replace the old tubing by useing some new clear PVC hose (4mm by the way ... surprisingly hard to find
) and some left over black heatshrink from my electrical jobs to produce a factory finish ...Its come up well I think ... now to do under the scuttle panel at the washer jets.
Now that the washer bottle was in and the electrical wiring to the pump and sensor was tidyed up it was time to install the header tank but first I neaded to replace the sensor seal (it had been cooked and hardened over the years) and when i took out the sensor to clean the bottle I found that it to had fallen apart
and some you beaut fluids for the cleaned fluid reservoirs ...
Heres the header tank fitted, filled and sporting a new sticker
But after filling the header tank and letting it sit ... I noticed a coolant leak already
... the one hose I did not replace from the water pump ( 'cause I'm going to order a full set of silicone coolant hoses from Roose ... black no stickers At least I haven't run it and bleed the system already
I'm getting there

 04-01-2008, 01:07 AM
#72
Jumbo yeah the condition of the electrical leads (positive and negatve) gave me a fright ... I've heard of Cossies catching fire and those leads could have caused one on mine .
I'm thinking about a quick post in the Sierra room to warn/show people ... its quick to check and mine is an original car in otherwise pretty good condition ... I'd hate to see an 'ignored' car
So after finding the damaged wiring I decided it was a good idea to go out and buy/fit one of these Cheap insurance
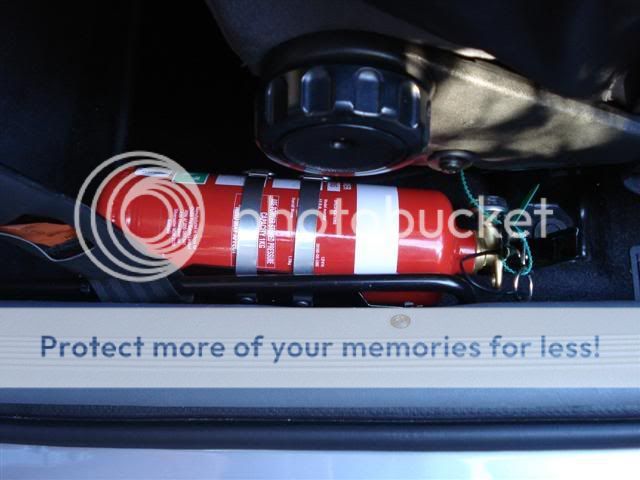
and those leads could have caused one on mine . I'm thinking about a quick post in the Sierra room to warn/show people ... its quick to check and mine is an original car in otherwise pretty good condition ... I'd hate to see an 'ignored' car
So after finding the damaged wiring I decided it was a good idea to go out and buy/fit one of these
Cheap insurance
04-01-2008, 01:27 AM
#73
It was then time to finish off the tubing for the windshield jets.
I used the same technique as above, PVC tubing and a little heat shrink (cooked on with my new pyropen ) for a 'factory' look ...
and then the washer jet ...
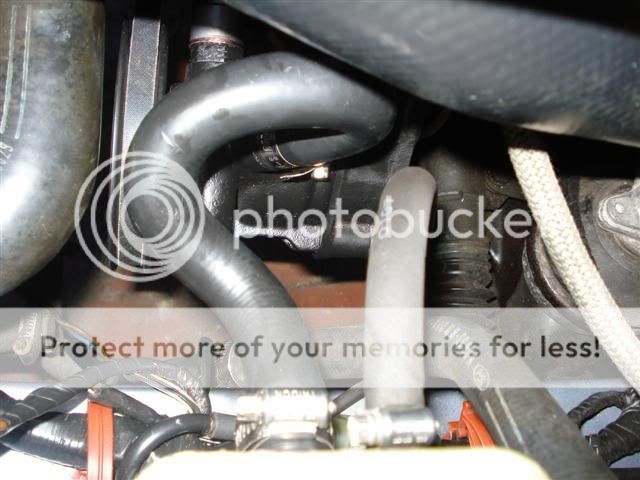
This is the hose on the water pump that leaked (static) when I added coolant to the header tank ...
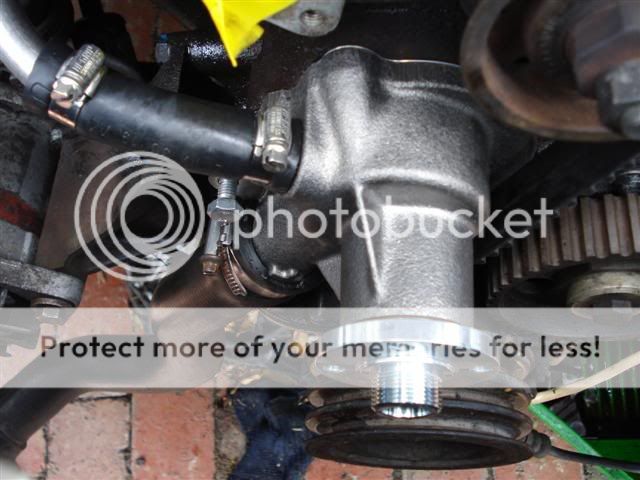
as i said I didn't replace it at the time and now I had to get a new hose (cut to length) and replace it in-situ I thought it looked a bit 'soft' and I replaced the other hoses that seemed dodgy so its my own fault.
Anyway job done .
I then gave the fuse box lid a clean and gave it a new sticker ...

and to finish off the sticker kit the brake components got a clean and new stickers as well ...
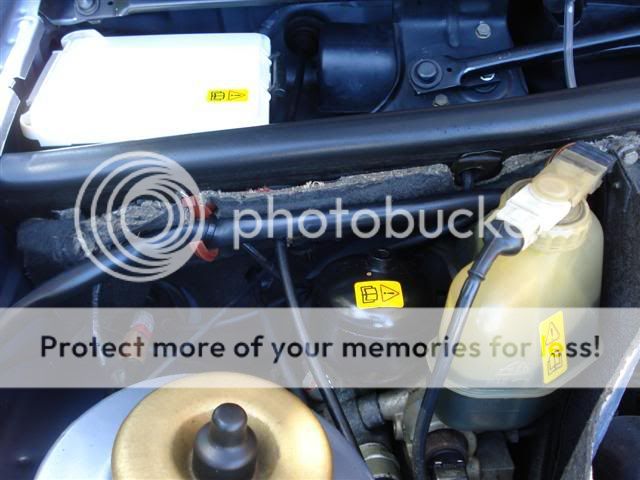
So here we go ... all parts back in place (many replaced/upgraded) and ready for me to crank it over (bleed the PAS system, get some oil moving), start it and bleed the coolant system (from the bleed at the thermostst housing ) and give it a test drive
the drivers side of the bay ready ...

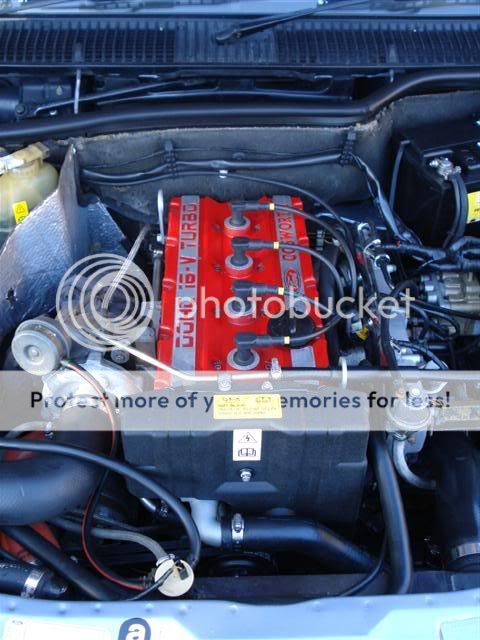
the heart and soul ...
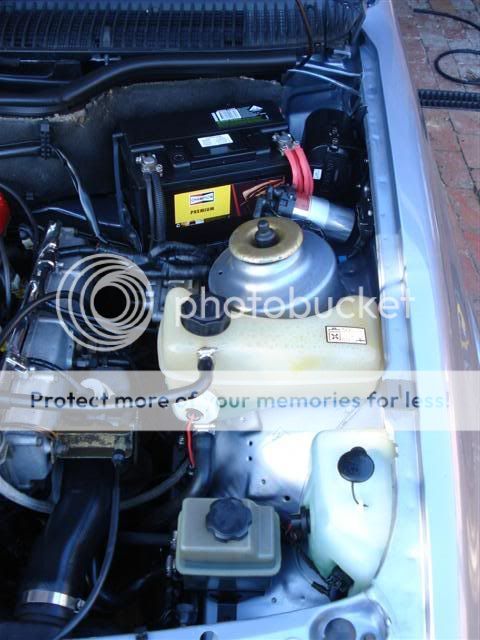
and where the most work was done ... all back together and fluids filled (oh and a new ignition coil which got a bit of a polish) ...
Almost there ...
I used the same technique as above, PVC tubing and a little heat shrink (cooked on with my new pyropen
) for a 'factory' look and then the washer jet ...
This is the hose on the water pump that leaked (static) when I added coolant to the header tank
...as i said I didn't replace it at the time
Anyway job done
I then gave the fuse box lid a clean and gave it a new sticker ...
and to finish off the sticker kit the brake components got a clean and new stickers as well
So here we go ... all parts back in place (many replaced/upgraded) and ready for me to crank it over (bleed the PAS system, get some oil moving), start it and bleed the coolant system (from the bleed at the thermostst housing
the drivers side of the bay ready ...
the heart and soul ...
and where the most work was done ... all back together and fluids filled (oh and a new ignition coil which got a bit of a polish)
Almost there ...
