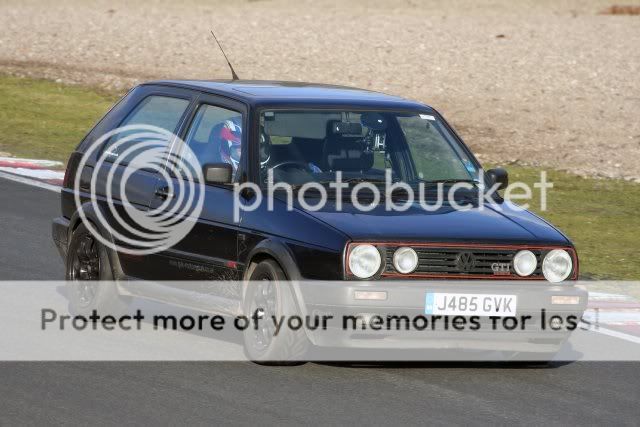
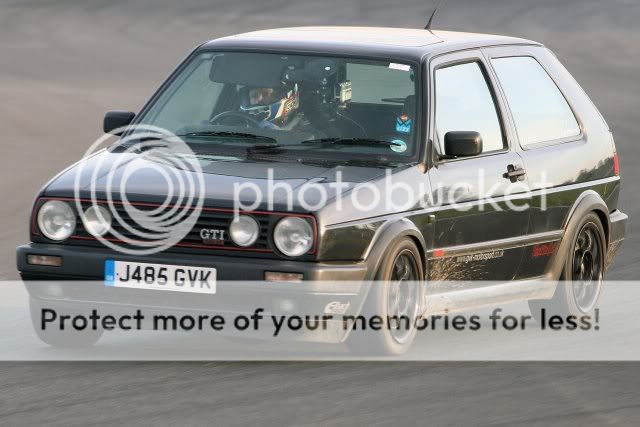
mk2 Golf track car
 27-12-2005, 08:38 AM
#1
Regular Contributor
Thread Starter
Join Date: Jul 2004
Posts: 218
Likes: 0
Received 0 Likes
on
0 Posts
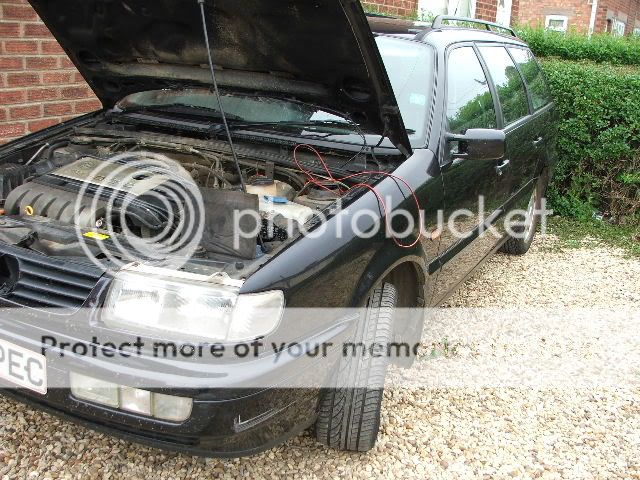
Thought i'd put up a post. 

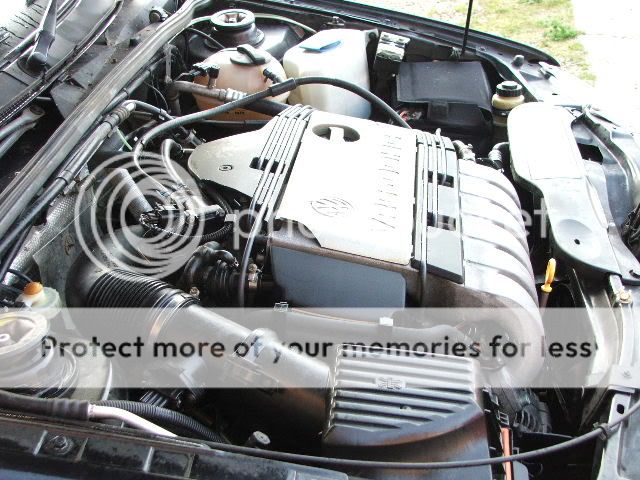
Engine
2 litre 9A 16v
Dave Crisell cylinder head
Twin exhaust cams
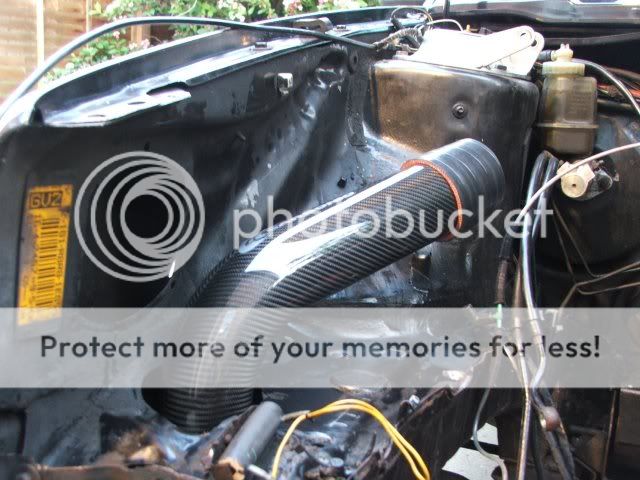
50mm inlet manifold
WUR mod and set up by Stealth racing
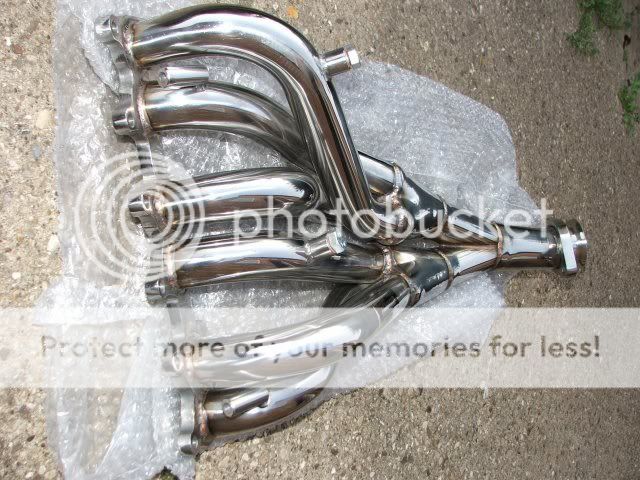
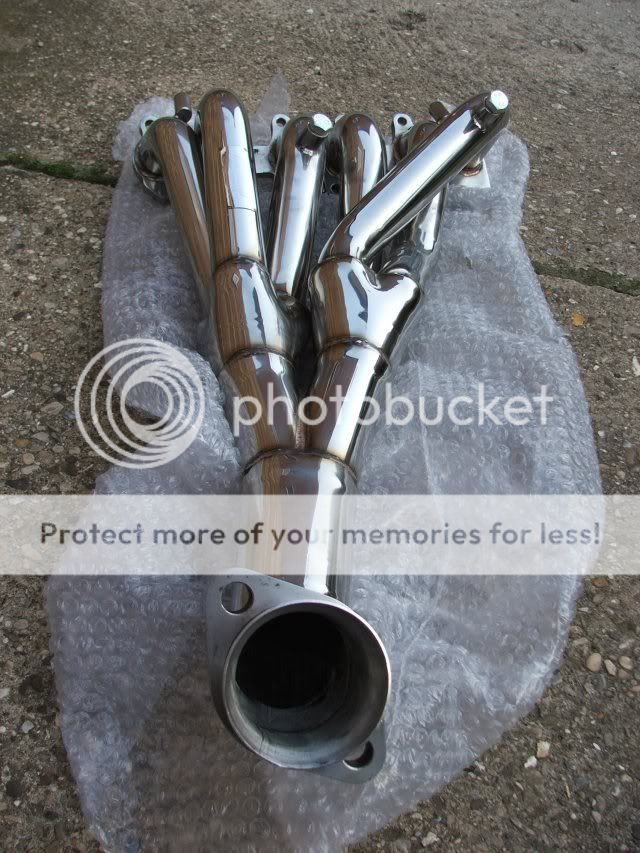
Jetex 2.5" stainless system with twin 80mm round tail pipes
K&N filter in 'modified' airbox
HotGolf lightened and balanced flywheel
Mocal 13 row 235mm oil cooler
184bhp/145 lb/ft
Power dynoplot
Torque dynoplot
Gearbox
2Y mk2 16v gearbox built by HotGolf
Quaife ATB differential
3.89:1 final drive
0.89 ACD 8v 5th gear
Neuspeed quickshift
mk3 weighted gearchange rod
EIP Tuning solid front engine mount
VW Racing rear engine mount in 65 shore hardness
Chassis
Widetrack conversion
FK koniggsport (sp) top adjustable coil overs
Eibach anti-roll bars
Eibach front strut brace
Allard alloy rear strut brace
Funtech (lol!) front lower strut brace
Polysport rear beam bushes
Prothane wishbone bushes
Prothane rear top mounts
Brakes
280mm front brakes
16v calipers with modified sliders
Genuine VAG plain 280mm discs
Ferodo DS3000 race pads for track use
Goodridge hoses
mk3 rear calipers
standard rear discs and Pagid fast road pads
Wheels/tyres
Team Dynamics DTM 7"x15" painted Black with Yokohama AO48R road legal competition tyres for track use
O-Z Super Turismo 7x15 for road use 195/50x15 Uniroyal Rainsport/Good-Year F1 GSD3...
Other bits
OMP RS FIA approved race seat
LUKE 3" 4 point harness
MOMO model 78 steering wheel
OMP alloy steering wheel spacer
VDO gauges in radio slot
Uprated headlamp loom
Audi TT pedal set
Quaife nylon gearknob
Shift light
Wheel stud and nut conversion
In action at Cadwell

Hassling c_w
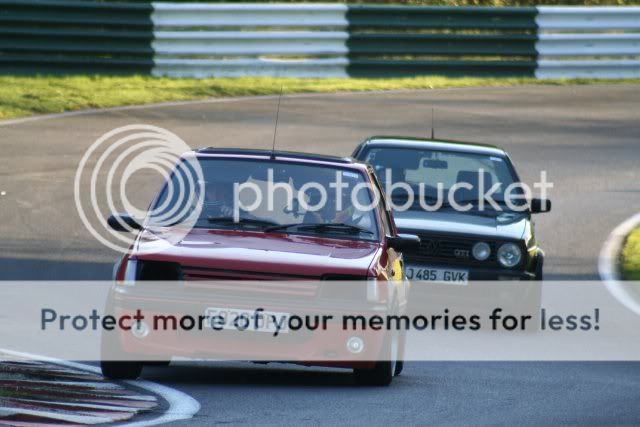
At the 'ring in '04

(gf driving)


On track at Donny.
http://video.google.com/videosearch?...G=Search+Video
And Cadwell
http://video.google.com/videoplay?do...4624&q=cadwell
Engine
2 litre 9A 16v
Dave Crisell cylinder head
Twin exhaust cams
50mm inlet manifold
WUR mod and set up by Stealth racing
Jetex 2.5" stainless system with twin 80mm round tail pipes
K&N filter in 'modified' airbox
HotGolf lightened and balanced flywheel
Mocal 13 row 235mm oil cooler
184bhp/145 lb/ft
Power dynoplot
Torque dynoplot
Gearbox
2Y mk2 16v gearbox built by HotGolf
Quaife ATB differential
3.89:1 final drive
0.89 ACD 8v 5th gear
Neuspeed quickshift
mk3 weighted gearchange rod
EIP Tuning solid front engine mount
VW Racing rear engine mount in 65 shore hardness
Chassis
Widetrack conversion
FK koniggsport (sp) top adjustable coil overs
Eibach anti-roll bars
Eibach front strut brace
Allard alloy rear strut brace
Funtech (lol!) front lower strut brace
Polysport rear beam bushes
Prothane wishbone bushes
Prothane rear top mounts
Brakes
280mm front brakes
16v calipers with modified sliders
Genuine VAG plain 280mm discs
Ferodo DS3000 race pads for track use
Goodridge hoses
mk3 rear calipers
standard rear discs and Pagid fast road pads
Wheels/tyres
Team Dynamics DTM 7"x15" painted Black with Yokohama AO48R road legal competition tyres for track use
O-Z Super Turismo 7x15 for road use 195/50x15 Uniroyal Rainsport/Good-Year F1 GSD3...
Other bits
OMP RS FIA approved race seat
LUKE 3" 4 point harness
MOMO model 78 steering wheel
OMP alloy steering wheel spacer
VDO gauges in radio slot
Uprated headlamp loom
Audi TT pedal set
Quaife nylon gearknob
Shift light
Wheel stud and nut conversion
In action at Cadwell
Hassling c_w
At the 'ring in '04
(gf driving)
On track at Donny.
http://video.google.com/videosearch?...G=Search+Video
And Cadwell
http://video.google.com/videoplay?do...4624&q=cadwell


 27-12-2005, 10:39 AM
#7
Regular Contributor
Thread Starter
Join Date: Jul 2004
Posts: 218
Likes: 0
Received 0 Likes
on
0 Posts
Cheers guys 
Tiff, it's quicker now as I've done a few different things since the vid, but not been back to Donny to test it.
I went to Cadwell in March, and never been back to Donny since
Getting a cage in the near future and have ordered some bigger H&R anti roll bars (25mm front and 28mm rear adjustable)
Tiff, it's quicker now as I've done a few different things since the vid, but not been back to Donny to test it.
I went to Cadwell in March, and never been back to Donny since
Getting a cage in the near future and have ordered some bigger H&R anti roll bars (25mm front and 28mm rear adjustable)
Trending Topics
27-12-2005, 04:50 PM
#9
Regular Contributor
Thread Starter
Join Date: Jul 2004
Posts: 218
Likes: 0
Received 0 Likes
on
0 Posts
Gav, it runs ancient k-jet mech fuel system and the WUR is abbreviation for warm up regulator (which is vacumn controlled)
Basically, on the back of the WUR there's a brass globe, drill thru it and there's an adjusting screw in there - what Stealth racing ( VW tuners Southam, Warks) do is adjust the control pressure so it allows more fuel delivery under load as the mk2 16v commonly ran lean flat out.
It's basically something you have to do to stop pinking when you fit a 2 litre block on these cars along with raising the system pressure.
Exhaust cam mod - It's a KR exhaust cam with the end cut off used as inlet cam, with a modified chainwheel to get the inter cam timing right ( the inlet cam is chain driven inside the cam cover from the ex cam which is belt driven )
Can't think exactly what the duration is, but from memory the ex cam has 10.2 mm lift rather than 9.6 for the normal KR cams.
I bought mine from a mate that had it done properly at Stealth but plenty of people 'have a go' at doing it.
On mine, the mid range is not as good as with KR cams, but it does rev further.
29-12-2005, 05:41 PM
#10
Cheers matey
I am thinking of building a 2.0L 16v
I already have a 1.8 KR engine
What is the best route to take???
9A
6A
etc etc??
A mate of mine has a GTI Engineering Mk2 and i want similar performance to that.
His will beat another of my mates 20vT Mk3 all day long and thats running 200+bhp but they are heavy cars though.

 29-12-2005, 09:26 PM
#12
Regular Contributor
Thread Starter
Join Date: Jul 2004
Posts: 218
Likes: 0
Received 0 Likes
on
0 Posts
9A is the easiest swap as it just bolts in in place of the KR, it's the same height and everything. Some say fit the KR head, but there's no point. All you need to do is fit the inlet cam from the KR and get it set up properly at it's about 170bhp on Stealths rollers - the head on mine gained the extra 10bhp.
Dave who does the VW heads did the head on the first UK mk2 16v that was modded by GTI engineering in '86 and has been doing them since.
6A is the Audi bubble block but you have to change the oil pick up pipe and sump to fit in a mk2 - it's the same height block as a KR too.
ABF is the tall block mk3 16v engine which you can fit in the mk2 using the KR injection to keep it simple, the extra height can sometimes mean the down pipe is a pain in the ass and the throttle quadrant can foul the bonnet - slight adjustment needed there
Hope that helps, anything you need to know just yell, will help where I can.
25-01-2006, 12:10 AM
#15
Regular Contributor
Thread Starter
Join Date: Jul 2004
Posts: 218
Likes: 0
Received 0 Likes
on
0 Posts
Some vids from Oulton on Saturday.
http://s49.yousendit.com/d.aspx?id=0...I0TF76D348MP67 35mb
http://s37.yousendit.com/d.aspx?id=2...S0YAH5DZP7XKFE
http://s50.yousendit.com/d.aspx?id=1...41O7ZX543SC0OB
http://s37.yousendit.com/d.aspx?id=2...Z0ESJZL2M8OBCY
http://s41.yousendit.com/d.aspx?id=3...G1ZKD39WO47ANX
http://s49.yousendit.com/d.aspx?id=0...I0TF76D348MP67 35mb
http://s37.yousendit.com/d.aspx?id=2...S0YAH5DZP7XKFE
http://s50.yousendit.com/d.aspx?id=1...41O7ZX543SC0OB
http://s37.yousendit.com/d.aspx?id=2...Z0ESJZL2M8OBCY
http://s41.yousendit.com/d.aspx?id=3...G1ZKD39WO47ANX
 29-01-2006, 01:29 AM
#18
Regular Contributor
Thread Starter
Join Date: Jul 2004
Posts: 218
Likes: 0
Received 0 Likes
on
0 Posts
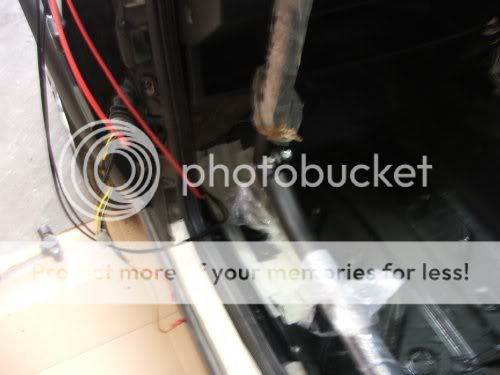
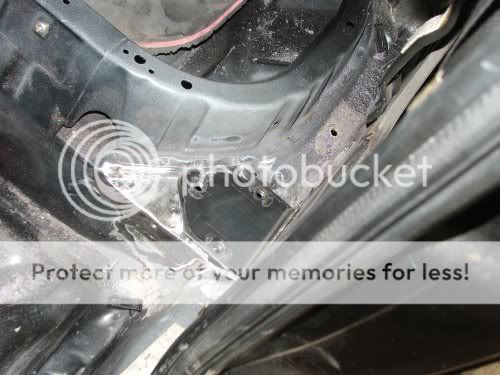
Started on the cage install Sat afternoon, I'd already stripped out most of the interior during the last few evenings, so saved us (Dan from our bodyshop is giving me a hand) a bit of time, we removed both the front doors which makes it a lot easier to get the rear cage in, and get to work in the footwells, a mk2 door takes only a few mins to remove, it's well worth doing when fitting a cage. Door trim off, wiring/central locking pipes out, check strap bolt and 2x15mm bolts and it's off!
Removed the red piping for the central locking pump and the redundant rear speaker wires, also shifted the wiring loom from the OS and cable tied it out of the way.
Where the cage is going to be bolted in and over the sills I stuck a load of 2" masking tape on these areas, so it's easy to mark out for drilling, and stops the car getting any more scratched than it already is .
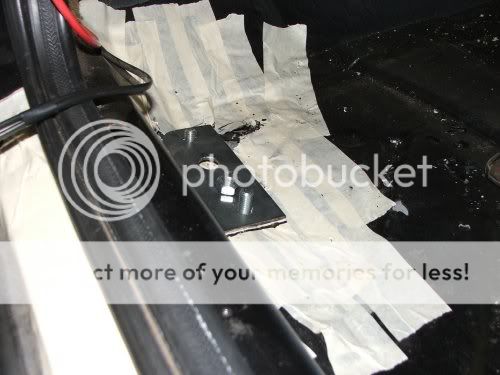
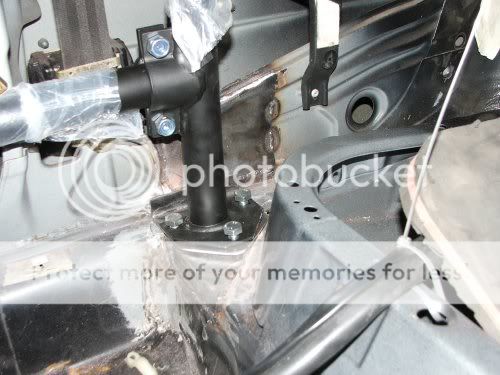
We assembled the cage inside the car, and loosly bolted it all together to mark out the holes for the foot plates. We measured from the corners of the cage feet to inner sill and where the flange is for the rear 1/4 panel to keep it all square.
Marked out where the supplied plates need to be welded in for the B posts and Dan's making up some plates to 'flatten' the area so the plates can be seam welded in, we're going to weld in some plates on the vertical panels on the B post, for a bit more strength, and again so the SD foot plates can be welded all the way around, not just where they fit. Marked out the holes for the rear stays and front feet, and drilled some of them, and that's how far we've got at the mo.
Making up the plates for the front feet in the morning and they'll be welded in from inner sill to floor pan.
Few pics
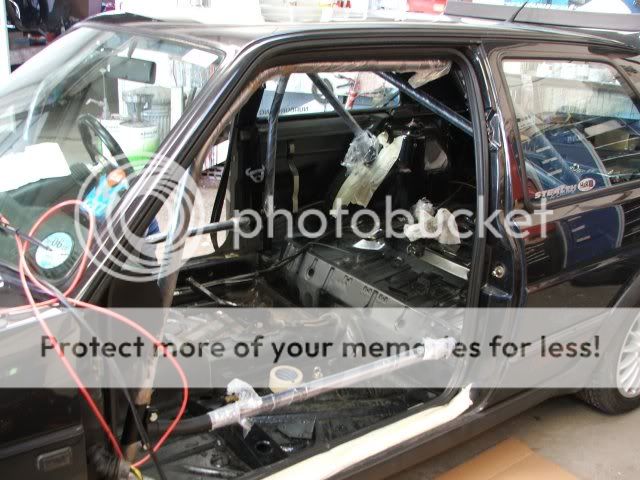
Big hammer is required for this job

Removed the red piping for the central locking pump and the redundant rear speaker wires, also shifted the wiring loom from the OS and cable tied it out of the way.
Where the cage is going to be bolted in and over the sills I stuck a load of 2" masking tape on these areas, so it's easy to mark out for drilling, and stops the car getting any more scratched than it already is .
We assembled the cage inside the car, and loosly bolted it all together to mark out the holes for the foot plates. We measured from the corners of the cage feet to inner sill and where the flange is for the rear 1/4 panel to keep it all square.
Marked out where the supplied plates need to be welded in for the B posts and Dan's making up some plates to 'flatten' the area so the plates can be seam welded in, we're going to weld in some plates on the vertical panels on the B post, for a bit more strength, and again so the SD foot plates can be welded all the way around, not just where they fit. Marked out the holes for the rear stays and front feet, and drilled some of them, and that's how far we've got at the mo.
Making up the plates for the front feet in the morning and they'll be welded in from inner sill to floor pan.
Few pics
Big hammer is required for this job

 31-01-2006, 04:18 AM
#20
Regular Contributor
Thread Starter
Join Date: Jul 2004
Posts: 218
Likes: 0
Received 0 Likes
on
0 Posts
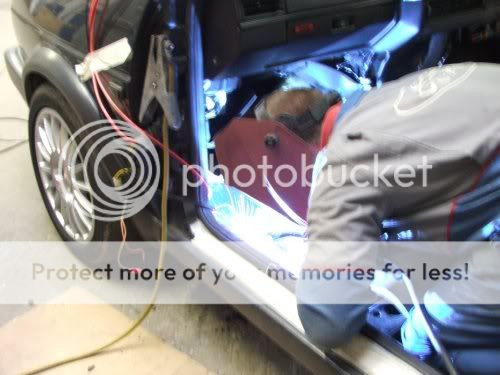
Massive thanks to Dan Wright from our bodyshop for giving up his Sunday to give me a hand and drive the Mig welder.

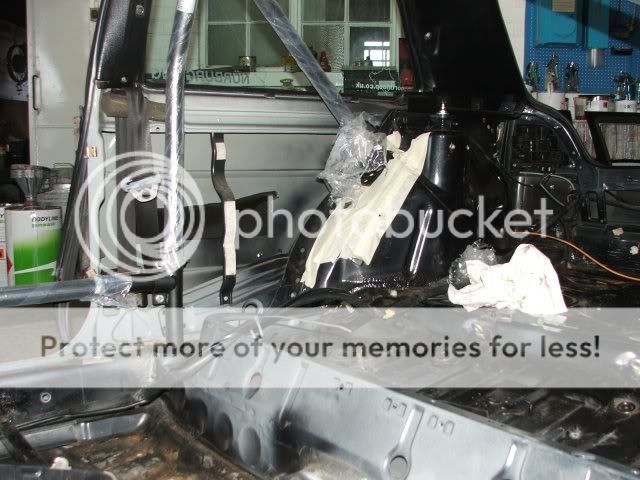
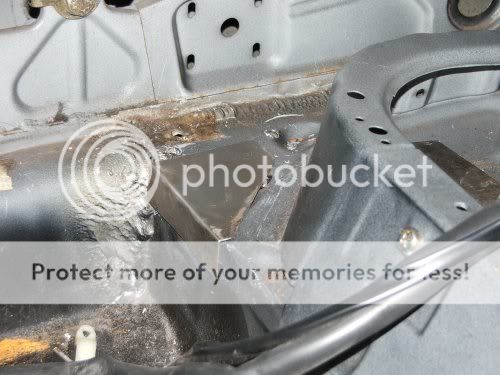
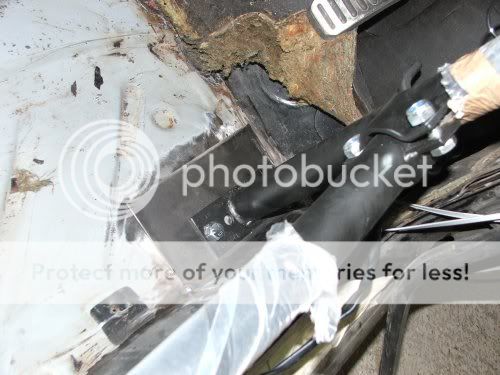
You have to butcher the floor to get the M10 nuts on the B post feet to sit flush, Dan made up a couple of plates to flatten the area.It sits on the edge of a box section which makes it a c**t to drill, we opened out the holes with a carbide bit in a die grinder.

Arc eye anyone !!???

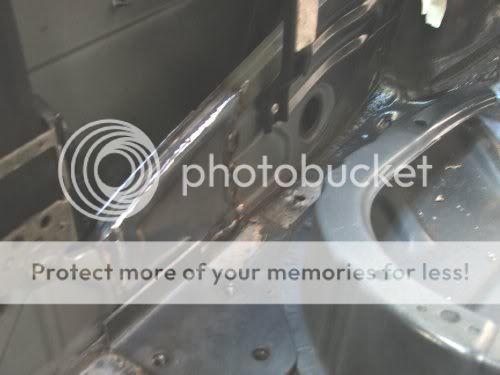
Trial fit B post - note : plate added to vertical section to allow a nice seam weld around the foot plates..
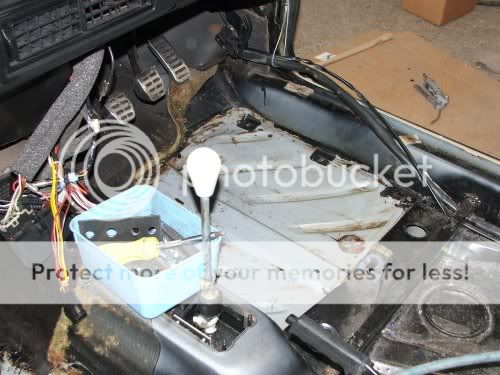
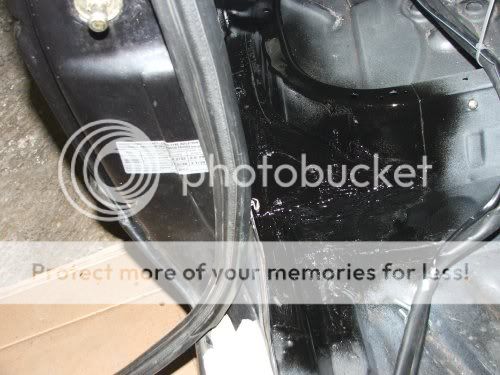
I've taken out the tar from front footwell, one sides was pealing off anyway, so got the heat gun, scraper and thinners on a rag and took it out.
Not going to do the bulkhead, but might do the rear footwells if I can be a r s e d .
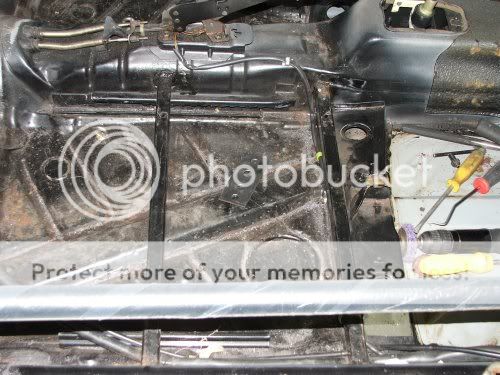
2mm plate welded into front floor well and up inner sill to spread the load - we trusted our measuring and marking and used the pillar drill to drill through the 2mm plate.
Serious business cheese toastie time!!
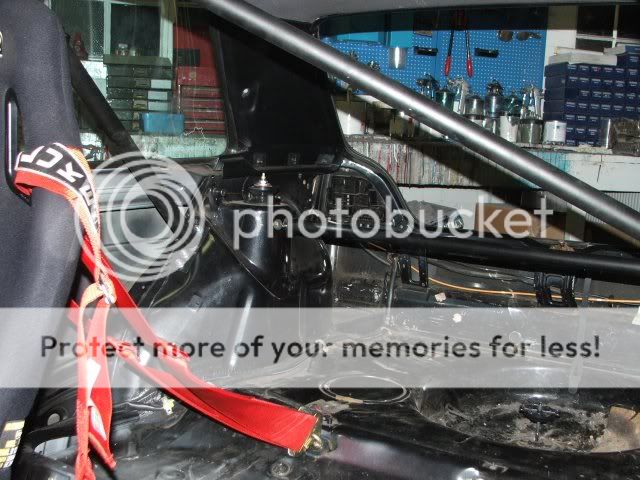
Side mount seat rails,just thought I'd add a pic of those.
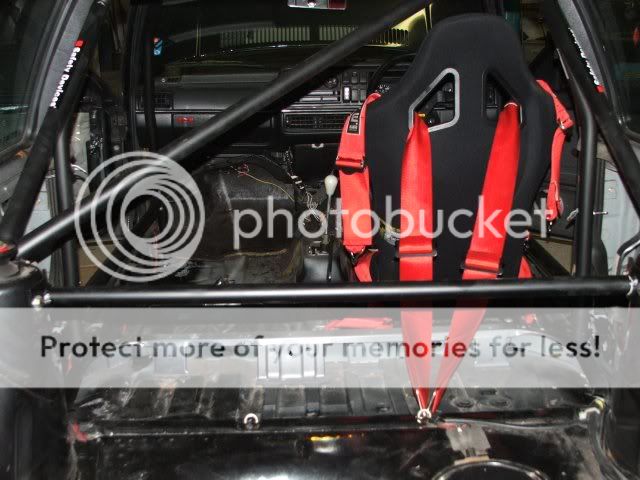
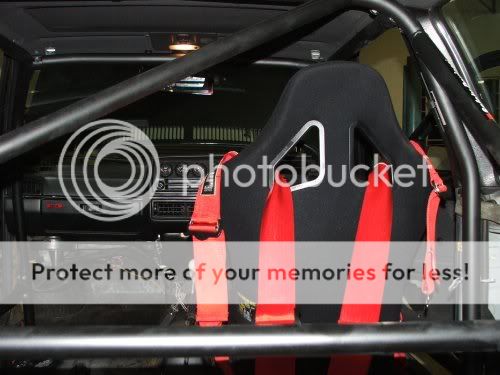
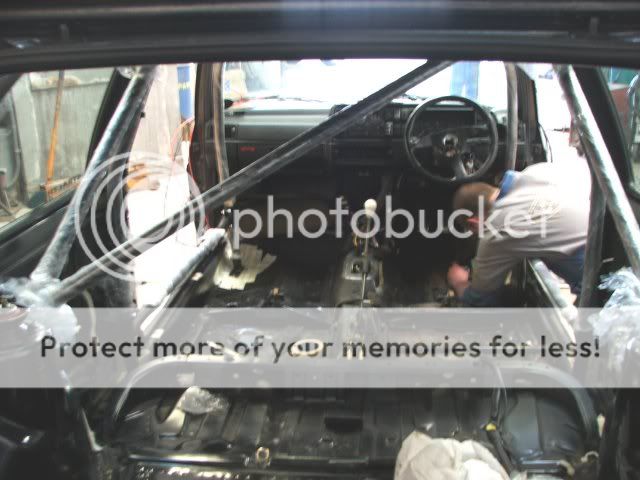
All caged up! - Old bling alloy Allard strut brace now matt black.
Needs carpet trimming and refitting and a few bits tidying up and padding fitted properly and cable tied on.. Which I can do at my leisure this week.
Also need to put another eye bolt in each side for the shoulder straps on the harnesses, never been happy with both straps on one eyelet.
You have to butcher the floor to get the M10 nuts on the B post feet to sit flush, Dan made up a couple of plates to flatten the area.It sits on the edge of a box section which makes it a c**t to drill, we opened out the holes with a carbide bit in a die grinder.
Arc eye anyone !!???
Trial fit B post - note : plate added to vertical section to allow a nice seam weld around the foot plates..
I've taken out the tar from front footwell, one sides was pealing off anyway, so got the heat gun, scraper and thinners on a rag and took it out.
Not going to do the bulkhead, but might do the rear footwells if I can be a r s e d .
2mm plate welded into front floor well and up inner sill to spread the load - we trusted our measuring and marking and used the pillar drill to drill through the 2mm plate.
Serious business cheese toastie time!!
Side mount seat rails,just thought I'd add a pic of those.
All caged up! - Old bling alloy Allard strut brace now matt black.
Needs carpet trimming and refitting and a few bits tidying up and padding fitted properly and cable tied on.. Which I can do at my leisure this week.
Also need to put another eye bolt in each side for the shoulder straps on the harnesses, never been happy with both straps on one eyelet.
19-03-2006, 02:29 AM
#23
PassionFord Post Whore!!
Had to re-register, BT stopped my account as it hadn't been active since I got broadband ...guess where the PF activation mail was with my password... Yep, BT Yahoo web mail... 
Anyway.
The 9A 16v engine that's been in my mk2 for the last nearly 4 years has come to the end of it's active life, the crank is growling ( rod bearings ) and it's used 2 litres of oil in as many weeks.
It was a �300 UKP second hand engine out of a fire damaged car with unknown mileage/history, so it's done well to last 55,000 miles in the mk2 with the amount of track days and stuff it's done.
I have babbled on about going VR6, but to be honest I like the simplicity of the 16v and it's a well tried and tested unit for track use, so with that in mind I started looking for a replacement 9A/6A short 16v block to build up.
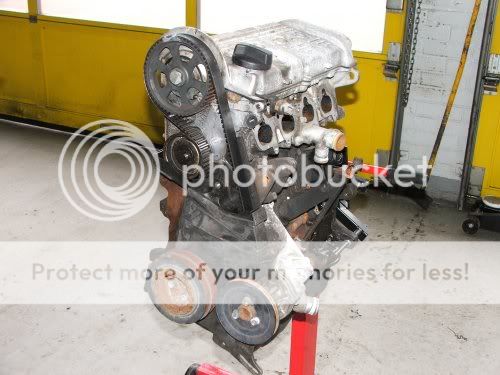
Manky old Audi 6A 2.0 16v rescued from a mate's garden.
On the engine stand at work Saturday lunchtime
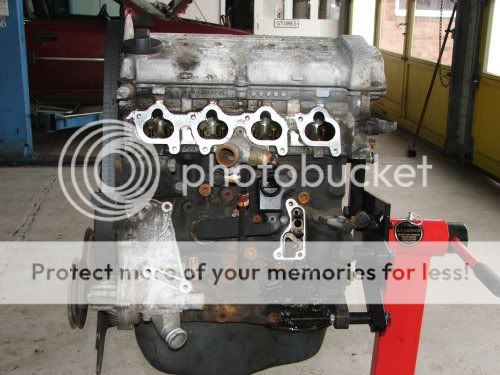
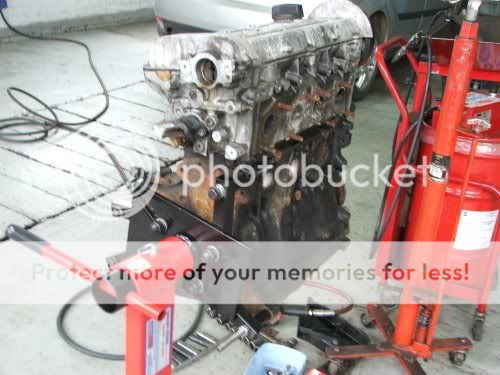
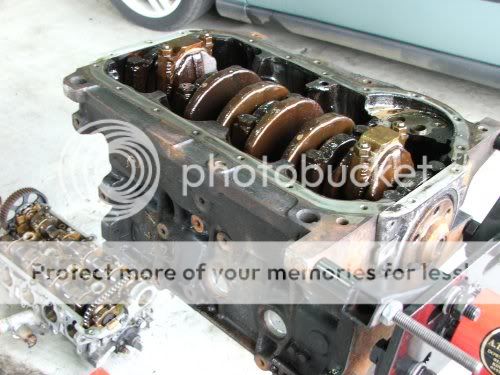
Head off sump removed
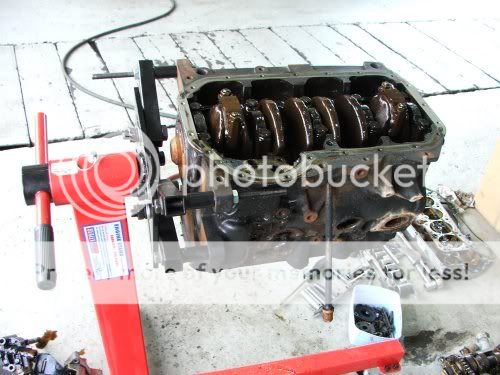
Bore pic, hmmm could do with an 83.5mm rebore methinks
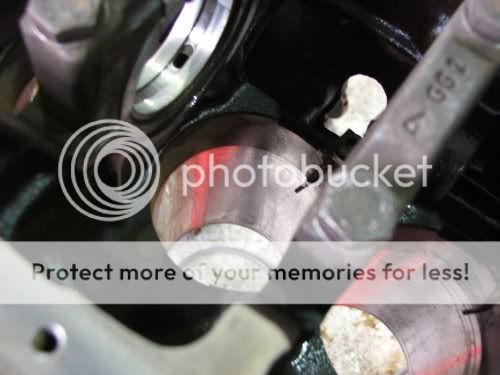
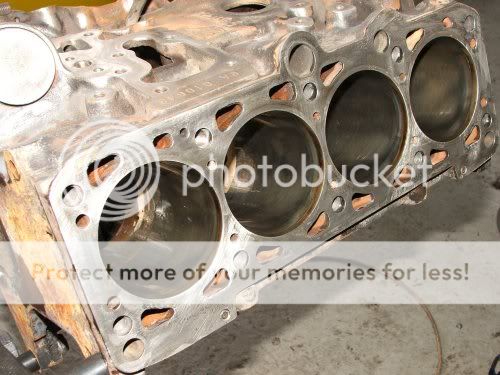
Hmmm,those piston rings have been blowing by...

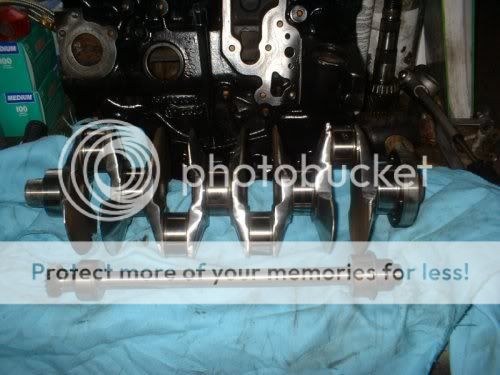
That 92.8mm crank looks a bit heavy....
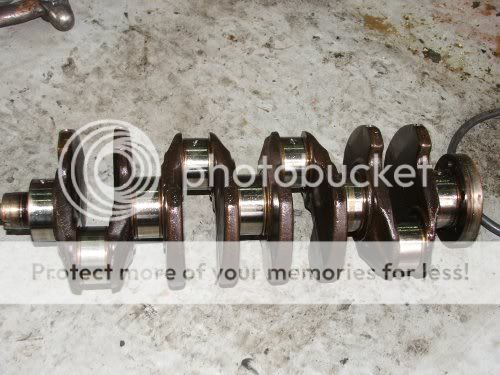
Taken the crank and block down to 'Hotgolf 'he's lightening and knife-edging the crank and intermediate shaft and getting it all balanced, the intermediate shaft bearings are fecked so he's got to sort those out.
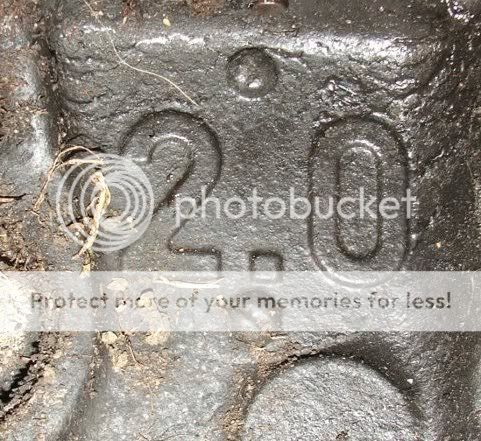
Block is going to be bored +40 (83.5mm) and with the 92.8mm crank 2035cc
I've ordered from the USA a set of JE racing pistons with 10.8:1 CR and rod bolts from ARP as I can't wait for those cheap Scat rods sadly...
Hopefully should be a nice strong bottom end when we're finished all being well..
Going to use the same head It's an 1800 'KR' head that's been fettled by a guy who first did a VW 16v head in '87 when GTI engineering bought a car to the UK from Germany, it's been on the car since '04.
The higher compression and larger CC should gain torque and hopefully power, but until it's running who knows....


Dull sundries to build it up...
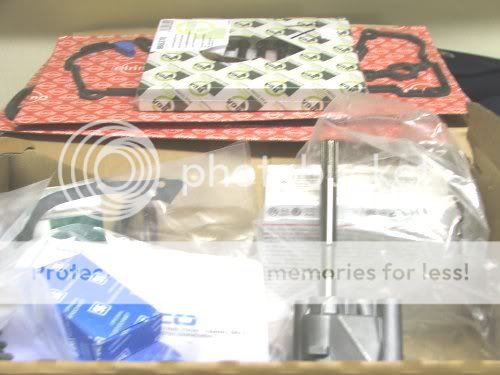
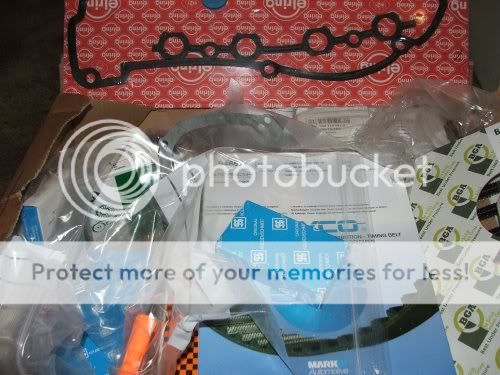
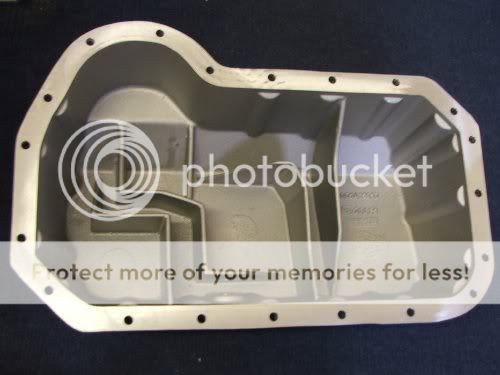
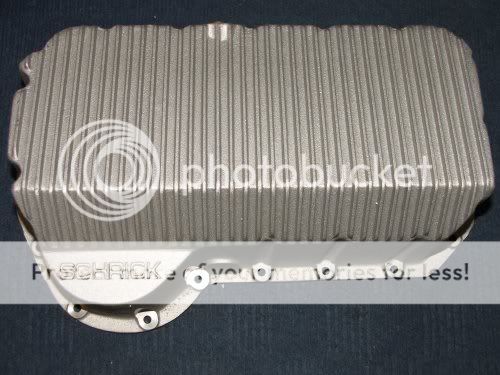
Schrick sump (oil pan?)
Crank and IM shaft
Ordered a set of Newman 272� cams for a bit more top end urge..
That's about it for now, just waiting for the pistons and rod bolts from the US and then we can get it built up.
Yep, BT Yahoo web mail... Anyway.
The 9A 16v engine that's been in my mk2 for the last nearly 4 years has come to the end of it's active life, the crank is growling ( rod bearings ) and it's used 2 litres of oil in as many weeks.
It was a �300 UKP second hand engine out of a fire damaged car with unknown mileage/history, so it's done well to last 55,000 miles in the mk2 with the amount of track days and stuff it's done.
I have babbled on about going VR6, but to be honest I like the simplicity of the 16v and it's a well tried and tested unit for track use, so with that in mind I started looking for a replacement 9A/6A short 16v block to build up.
Manky old Audi 6A 2.0 16v rescued from a mate's garden.
On the engine stand at work Saturday lunchtime
Head off sump removed
Bore pic, hmmm could do with an 83.5mm rebore methinks
Hmmm,those piston rings have been blowing by...
That 92.8mm crank looks a bit heavy....
Taken the crank and block down to 'Hotgolf 'he's lightening and knife-edging the crank and intermediate shaft and getting it all balanced, the intermediate shaft bearings are fecked so he's got to sort those out.
Block is going to be bored +40 (83.5mm) and with the 92.8mm crank 2035cc
I've ordered from the USA a set of JE racing pistons with 10.8:1 CR and rod bolts from ARP as I can't wait for those cheap Scat rods sadly...
Hopefully should be a nice strong bottom end when we're finished all being well..
Going to use the same head It's an 1800 'KR' head that's been fettled by a guy who first did a VW 16v head in '87 when GTI engineering bought a car to the UK from Germany, it's been on the car since '04.
The higher compression and larger CC should gain torque and hopefully power, but until it's running who knows....
Dull sundries to build it up...
Schrick sump (oil pan?)
Crank and IM shaft
Ordered a set of Newman 272� cams for a bit more top end urge..
That's about it for now, just waiting for the pistons and rod bolts from the US and then we can get it built up.
03-10-2006, 11:32 AM
#24
PassionFord Post Whore!!
That lasted a fortnight so....
we're in the process converting my mk2 Golf track day car to VR6 power. Using an OBD2 2.8 lump from a Passat barge estate.

More progress last weekend.
Starting Saturday am, stripped engine, to replace all timing chains,tensioners and guides (guides were worn through to rivets and upper guide was broken ), new thinner steel head gasket, fitted 268� cams + new tappets, *light* Unorthodox racing alloy flywheel,new VAG clutch then slipped on the rebuilt 'box with 3.68 fd and Peloquin ATB (after taking it off again to fit the release bearing and clutch fork.. lol!)
Fitted engine/box into car after chassis rail got 'adjusted' .... Fitted 02J shift tower in O2A 'box, R32 shifter lever etc and shift cables all fitted and adjusted ok. Clutch pipework connected. Air-Oil cooler (with new cooler rad) connected up in same place as it was on the 16v (used the same Mocal sandwich plate and braided lines) with a bit of jiggery pokery. 'Rado VR6 rad fitted in place.
Engine is pretty much wired up, needs manifold wrapping and fitting, and a few other bits and bobs sorting and it can be started.
Oh,flywheel porn pic..
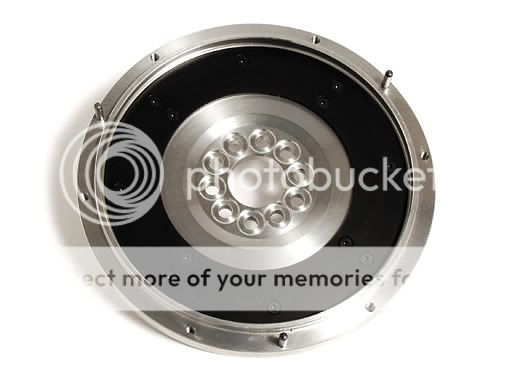
Weighs about as much as a fart... 6lb (3kg?) stock one weighs 18 lb I believe!
Should rev like a strimmer!
we're in the process converting my mk2 Golf track day car to VR6 power. Using an OBD2 2.8 lump from a Passat barge estate.
More progress last weekend.
Starting Saturday am, stripped engine, to replace all timing chains,tensioners and guides (guides were worn through to rivets and upper guide was broken ), new thinner steel head gasket, fitted 268� cams + new tappets, *light* Unorthodox racing alloy flywheel,new VAG clutch then slipped on the rebuilt 'box with 3.68 fd and Peloquin ATB (after taking it off again to fit the release bearing and clutch fork.. lol!)
Fitted engine/box into car after chassis rail got 'adjusted' .... Fitted 02J shift tower in O2A 'box, R32 shifter lever etc and shift cables all fitted and adjusted ok. Clutch pipework connected. Air-Oil cooler (with new cooler rad) connected up in same place as it was on the 16v (used the same Mocal sandwich plate and braided lines) with a bit of jiggery pokery. 'Rado VR6 rad fitted in place.
Engine is pretty much wired up, needs manifold wrapping and fitting, and a few other bits and bobs sorting and it can be started.
Oh,flywheel porn pic..
Weighs about as much as a fart... 6lb (3kg?) stock one weighs 18 lb I believe!
Should rev like a strimmer!

Thread
Thread Starter
Forum
Replies
Last Post
saph in dorset
General Car Related Discussion.
0
14-08-2015 10:10 AM
RIB1122
Ford RS Cosworth Parts for Sale
1
13-08-2015 09:09 PM
track.focus'd
Restorations, Rebuilds & Projects.
26
12-08-2015 05:53 PM
Versus_Creations
Pictures, video & Photoshop Forum
24
05-08-2015 09:32 PM