
fitting guide wanted s2 charge cooler


what you want with the water pipes is
bottle to pump
pump to rad
rad to chargecooler
cheargcooler to bottle
wiring just needs to be a switched igntion and earth
bottle needs to be higher than chargecooler
cargecooler fits in original place as std intercooler
chargecooler rad fits in front and underneath rad fan
bottle to pump
pump to rad
rad to chargecooler
cheargcooler to bottle
wiring just needs to be a switched igntion and earth
bottle needs to be higher than chargecooler
cargecooler fits in original place as std intercooler
chargecooler rad fits in front and underneath rad fan
10K+ Poster!!
Joined: May 2003
Posts: 10,089
Likes: 2
From: Handcuffed to the Mrs' Bed ;-)
Taken from Escortrsturbo.co.uk 
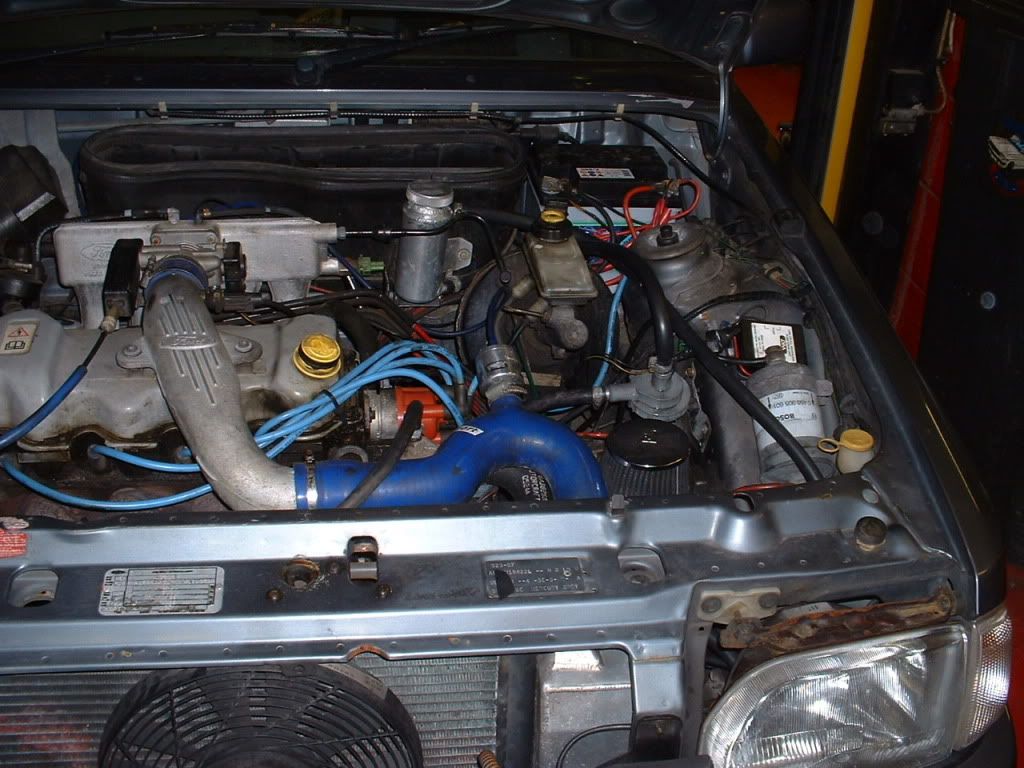
SECTION 35 - CHARGE COOLER � FITTING INSTRUCTIONS
Instead of using the rubbish Pace supply you with, or if you have bought one second hand, here is one way to fit it all. I am assuming you have all the kit and that nothing is missing here.
The first thing to mount, and by far the easiest too is the header tank. This fits onto the black heater box cover, at the right hand side. Make sure you grease the inside of the cap up as over time they tend to seize.
Time for the front bumper to come off!
Next up is the pre radiator, and this can go in a number of places, but I mounted mine behind the front bumper below the fan as per Paces recommendations. Some people mount them in the front bumper itself or cut the bumper to get extra air flow to the pre radiator. It�s all down to personal choice.
Next up is the charge cooler unit itself. This sits where the factory inter cooler lives, so you have to remove the factory inter cooler first, which is a pain as the bolts that join the radiator to the inter cooler always rot away. Once in place use new bolts to join the two parts together and grease the top of them up to stop rust.
Finally the water pump itself needs to be mounted. According to Pace it you should remove you air liner on the driver side and push your air flow meter back and other vague suggestions. I mounted my pump behind my battery on the bulkhead, as my arch liner is staying where it belongs, plus it will be easier to remove the pump if it�s behind the battery.
You should then add all the hoses to connect the four items up. They connect as follows.
Right side of pre radiator to lower left on charge cooler unit
Right side of charge cooler to top of header tank
Bottom of header tank to in on water pump
Out of water pump to left of pre radiator
You should then wire up the two stage pump controller to the ignition barrel. The way I connected mine up was so that I could run the pump without the engine being on, but I still needed the ignition on, so there would be no chance of the pump staying on whilst the car was stood still without my knowing about it.
Once it�s all wired in I filled the system up with anti freeze, right to top. Then switched the pump on. I then kept on adding anti freeze until I had used about 2 litres of the stuff. I then added water until all the air was removed. This will take sometime as you will be surprised as to how much fluid this system holds. You should then start the car up and watch the fluid in the header tank until the water level is OK.
One trick I have learned from this system is that if you get an air lock, and the header tank sounds like it is bubbling away, is to connect a hose pipe with a gun on the end of it and to blast water through the system. This will remove all the air locks!

Thread Starter
Regular Contributor
Joined: Jun 2005
Posts: 294
Likes: 0
thanks guys thats big help my main concern is where the rad go s as it looks larger than others i have seen mine is square rather than rectangle any pics be great all the rest of kit seems the same.
Thread Starter
Regular Contributor
Joined: Jun 2005
Posts: 294
Likes: 0
i realise that but just wanted to find a place away from charge cooler and engine rad etc for pre rad as mine is quite large and square unlike otheres i seen fitted to other peoples cars.i think may be a fabricated upgrade some one had made thts why i was wondereing if anyone had pics of their pre rad on or off car.thanks for help guys.

Thread
Thread Starter
Forum
Replies
Last Post
marky_g
General Car Related Discussion.
10
Aug 15, 2015 10:43 AM