
Peugeot 205 2.0 gti


Thread Starter
BANNED
Joined: Jun 2010
Posts: 76
Likes: 0
From: leicester
I thought a few of you may be interested in a project i did a few years ago.
Well some of you may know at the beginning of the year (2009) i bought a very nice example of a 1.9 205 gti finished in miami blue, i have always wanted to buy a 205 and fit the gti6 engine to it, well the car has been sat in the corner of my garage now for months collecting dust due to not having any time to start it, well that all changed yesterday as work was slack and the lad i have who works with me had nothing to do so it all started.
The car itself is a 1994 205 1.9 gti with the later engine and ecu setup so only produces 122bhp which back in the day was good but by todays standard is no match for anything really.
How it was when i bought it-


The engine bay as it looked-
Then after a couple of hours this is what we managed (in the back of my head i was thinking what have i done!)-

With the old engine completely removed, it looks a nice and dry engine to be fair and so it should really after only covering 66k-


With the engine removed the bay looked a little grubby-

After a good clean with the hot washer and some elbow grease it came out like this-

The only bit thats going to need a fettle is the battery tray, looks like a battery must have leaked some acid in the past and done this-

Well one of these lumps should fit it i guess :lol-

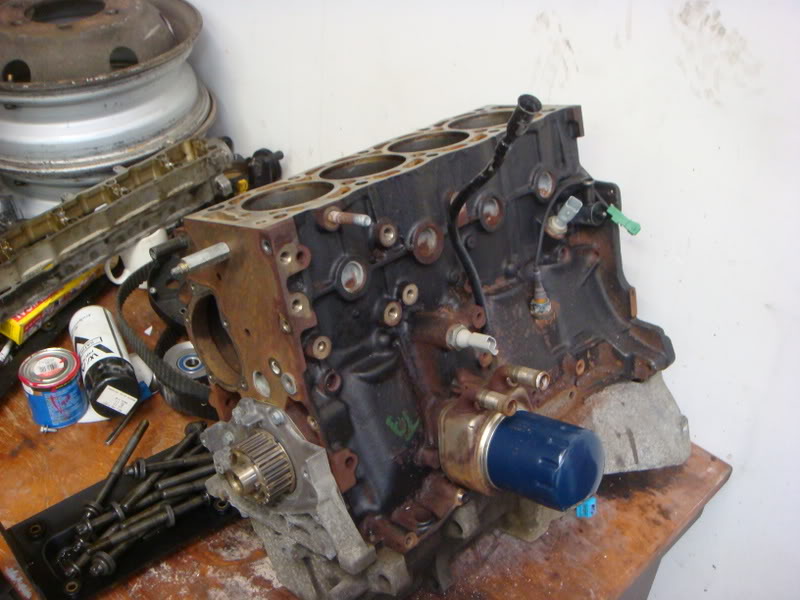
Not really, i had a block and head to pieces and have started to rebuild it as once the lump is fitted i want to forget about it and jsut be able to use the car when i want without any hassles.
Heres the block, all reassembled, just going to give the block a good rub down and apply some engine laquer to it-
The cylinder head is all fully rebuilt and i had the clever idea of painting it again with engine laquer but in red, well once applied it looked a bit pink to me, what do you think?-


Well some of you may know at the beginning of the year (2009) i bought a very nice example of a 1.9 205 gti finished in miami blue, i have always wanted to buy a 205 and fit the gti6 engine to it, well the car has been sat in the corner of my garage now for months collecting dust due to not having any time to start it, well that all changed yesterday as work was slack and the lad i have who works with me had nothing to do so it all started.
The car itself is a 1994 205 1.9 gti with the later engine and ecu setup so only produces 122bhp which back in the day was good but by todays standard is no match for anything really.
How it was when i bought it-
The engine bay as it looked-
Then after a couple of hours this is what we managed (in the back of my head i was thinking what have i done!)-
With the old engine completely removed, it looks a nice and dry engine to be fair and so it should really after only covering 66k-
With the engine removed the bay looked a little grubby-
After a good clean with the hot washer and some elbow grease it came out like this-
The only bit thats going to need a fettle is the battery tray, looks like a battery must have leaked some acid in the past and done this-
Well one of these lumps should fit it i guess :lol-
Not really, i had a block and head to pieces and have started to rebuild it as once the lump is fitted i want to forget about it and jsut be able to use the car when i want without any hassles.
Heres the block, all reassembled, just going to give the block a good rub down and apply some engine laquer to it-
The cylinder head is all fully rebuilt and i had the clever idea of painting it again with engine laquer but in red, well once applied it looked a bit pink to me, what do you think?-
Thread Starter
BANNED
Joined: Jun 2010
Posts: 76
Likes: 0
From: leicester
Well done a little more today, cleaned back the block with the wire wool adapter in the drill, acid etch primed the block and then sprayed over it with high temperature black paint.
Then fitted the head, have to say this may be the most colourfull engine bay i have seen once this is all back together-


Not much more to up date as i am waiting for some parts to be delivered (sent them away to be made pretty :lol).
Just been messing with the exhaust manifold and this envolved cutting it and making the angle a few degress tighter so hopefully this will clear the bulk head and make it a tidier install, i set about the manifold with a grinder and cut almost through it then bent the manifold down and re welded it back up.
Here are a few pictures so you can understand my dribble.
This is the manifold once the cut and bend down had been applied and then re welded up, i never though about taking a before photo. :crazy


A pic of it fitted to the lump, its angle is slightly tighter to the back of the block-


Should get more of my parts back this week so can continue with the progress, will keep you all updated as the build grows.
Thanks, Carl
Then fitted the head, have to say this may be the most colourfull engine bay i have seen once this is all back together-
Not much more to up date as i am waiting for some parts to be delivered (sent them away to be made pretty :lol).
Just been messing with the exhaust manifold and this envolved cutting it and making the angle a few degress tighter so hopefully this will clear the bulk head and make it a tidier install, i set about the manifold with a grinder and cut almost through it then bent the manifold down and re welded it back up.
Here are a few pictures so you can understand my dribble.
This is the manifold once the cut and bend down had been applied and then re welded up, i never though about taking a before photo. :crazy
A pic of it fitted to the lump, its angle is slightly tighter to the back of the block-
Should get more of my parts back this week so can continue with the progress, will keep you all updated as the build grows.
Thanks, Carl
Thread Starter
BANNED
Joined: Jun 2010
Posts: 76
Likes: 0
From: leicester
Well got my shiney bits back so i can put a bit more of it back together-
rocker cover and cam carriers-


Varoius brackets re painted black, heres one of them-

Exhaust manifold heat sheild-

Here's all the bits fitted to the engine, made up with them as they fit so well and look better than new-


Well thats the engine coming along nicely, just waiting for a few more bits to arrive so i changed my engine for the gearbox and stripped down a five speed Citroen Xsara box and checked it over, it looks really good and considering its done over 100k has no real marks to it at all.
Thinking about sending the casing off to be powder coatedB)
Box of bits :lol


Not really done a great deal more to this project at the minute as i am waiting for various parts to arrive.
Although i did receive a fly wheel and a few bits back from the powder coaters, manganed to fit all the pullies, new water pump etc and fit my modified engine block bracket for the engine mount.
A few teasers, starting to look very pretty-


Heres the bracket i modified with a rather large stil saw, cut the brackets off for the power steering pump, a bit the same way you would if you were fitting the supercharger kit, once this was done i sent the bracket away to be powder coated (its an addiction i tell you:lol)
Obviously you dont cut the brackets off if you car is equipt with pas, mine isnt.

Just waiting for the gear box casing to come back from the powder coaters then the engine and box are ready to be mated back to the engine bay.
Once the engine is sat in the bay i have another sump that has been........ yes wait for it..... powder coated :lol Not fitted that yet as i fear it would get mangled as the engine is slid along the floor whilst fitting it.
Still undecided as to whether i should have the bay re painted as in some places there is the odd mark/scratch and dare i say it some surface rust:angry
Carl
rocker cover and cam carriers-
Varoius brackets re painted black, heres one of them-
Exhaust manifold heat sheild-
Here's all the bits fitted to the engine, made up with them as they fit so well and look better than new-
Well thats the engine coming along nicely, just waiting for a few more bits to arrive so i changed my engine for the gearbox and stripped down a five speed Citroen Xsara box and checked it over, it looks really good and considering its done over 100k has no real marks to it at all.
Thinking about sending the casing off to be powder coatedB)
Box of bits :lol
Not really done a great deal more to this project at the minute as i am waiting for various parts to arrive.
Although i did receive a fly wheel and a few bits back from the powder coaters, manganed to fit all the pullies, new water pump etc and fit my modified engine block bracket for the engine mount.
A few teasers, starting to look very pretty-
Heres the bracket i modified with a rather large stil saw, cut the brackets off for the power steering pump, a bit the same way you would if you were fitting the supercharger kit, once this was done i sent the bracket away to be powder coated (its an addiction i tell you:lol)
Obviously you dont cut the brackets off if you car is equipt with pas, mine isnt.
Just waiting for the gear box casing to come back from the powder coaters then the engine and box are ready to be mated back to the engine bay.
Once the engine is sat in the bay i have another sump that has been........ yes wait for it..... powder coated :lol Not fitted that yet as i fear it would get mangled as the engine is slid along the floor whilst fitting it.
Still undecided as to whether i should have the bay re painted as in some places there is the odd mark/scratch and dare i say it some surface rust:angry
Carl
Thread Starter
BANNED
Joined: Jun 2010
Posts: 76
Likes: 0
From: leicester
I have not really done a great deal to this but i have put the gearbox back together sealed it all up and mated it to the engine-


Also got the subframe back from the powder coaters and it looks great, had the antiroll bar and brackets done too-

Just got to do a few little bits now to finish the engine off and get the engine bay painted.
Well fter not touching the car for some time i decided to get Dave to do some work so i could carry on stripping down the engine bay.

Moved on a little bit, the car has now come off the axle stands and now is supported by an engine crane and a block of wood, totally stripped now and ready for paint-

All washed off and rid of all the grime and gunge that builds up, took me ages and i think the grime that came off the car landed on me!!
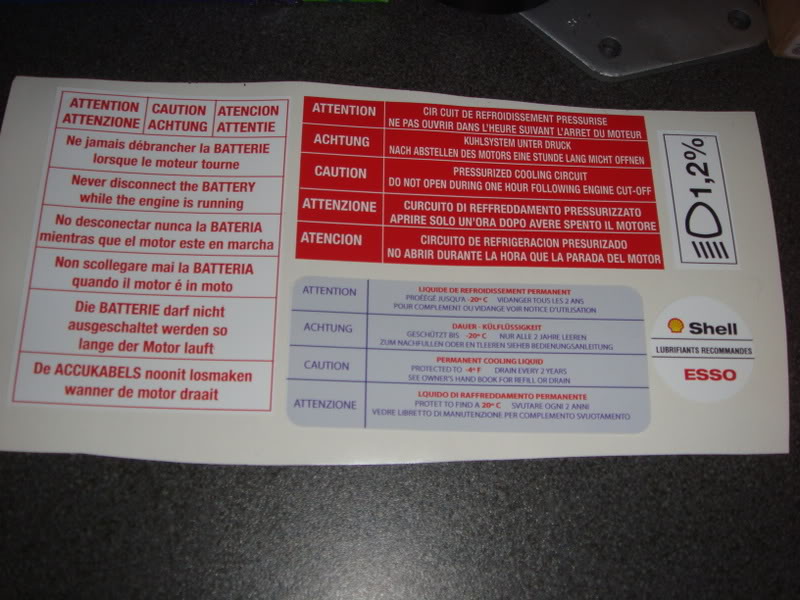
Also picked up my new engine bay sticker set-
Carl
Also got the subframe back from the powder coaters and it looks great, had the antiroll bar and brackets done too-
Just got to do a few little bits now to finish the engine off and get the engine bay painted.
Well fter not touching the car for some time i decided to get Dave to do some work so i could carry on stripping down the engine bay.
Moved on a little bit, the car has now come off the axle stands and now is supported by an engine crane and a block of wood, totally stripped now and ready for paint-
All washed off and rid of all the grime and gunge that builds up, took me ages and i think the grime that came off the car landed on me!!
Also picked up my new engine bay sticker set-
Carl
Thread Starter
BANNED
Joined: Jun 2010
Posts: 76
Likes: 0
From: leicester
Got back on to this again today,
Started by putting the suspension back together, using a few bits that are not meant for the 205 so i am keeping it quiet at the minute untill i know its going to work, coimplete new top mount kit and new springs putting all together with new shocks-


Was a real arse to do as they are a little special but once fitted to the car look good and seem to clear ok, looking spankly too-

Then i started to slowly put all the bits back from where they origianally came from, most of the bits removed have been powder coated so look like new, even went to the local fixing's shop and got new nuts and bolts :lol-

Come to a bit of a stand still again as i forgot to get the servo powder coated and cant do much more untill this is refitted.
Well on saturday i received the final bits i needed back from the powder coaters (it's a desease) so hopefully this will be finished pretty soon.
Had a pair of hub carriers painted black-

Fitted the wheel bearings, trying not to damage the paint-

The servo came back looking great in anthracite, much better than the rusty crap it looked like before.
Ordered the last few bits i need so i am hoping by the end of the week to have a six lump sitting in the bay looking very pretty.
I have my fingers crossed that the master cylinder will clear and that i have no issues with the exhaust manifold. Time will tell.
The calipers i have had powder coated too-

Brakes all built back up and fitted, painted the centre of the disc's, once the car has been driven it will remove the over spray and will leave a nice coated centre that wont look horrible when the metal corrodes-


This is what it is looking like now-

Well the day is getting close to the car being finished, had a really good session with it today and managed to get the engine in (yay)
Lining it up to fit, it does look like it wont fit-

A bit closer, to me to you-

Lining it up to the engine and gearbox mount, had a little mishap with this when i decided to put the gearbox stud in the wrong hole in the gear box, it made the clutch arm hit the bottom of the battery tray, felt a bit of a tit when i realised what i had done.
A bit further in, as you can see it is sitting happily on the mounts, just hope it clears in all the necessary places-

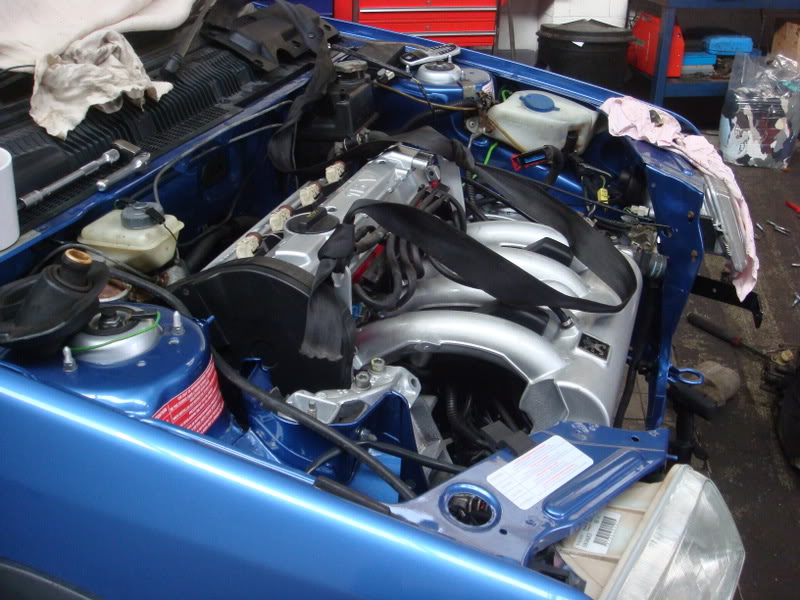
Well as you can see the lump is in and guess what i am chuffed to bits as all the places people struggle with i seem to have been lucky, its close to the master cylinder but the exhaust and the front panel are fine (dont worry the master cylinder is going to be replaced, and sohas the fuel filter now:lol)-


Well up up up, car goes up on the ramp and i fit the subframe, i had to say finding all the bolts was a mission, i had forgot which ones were which, just got to fit my shiney new sump, yes i know but you could'nt leave it looking like it is now:lol-

Well thats about as far as i can go now, just fitted all the subframe and ancillaries, bolted all the driveshafts back in and put the wheels back on, it was great to see the car standing on its own feet again-

Its a shane the inlet manifold is covered up by the front panel but ho hum, all thats left to do now is get it all wired up and connect the coolant hoses, managed to put all the fuel lines on and have just fitted the bonnet too. From the bay looking like this-

To this-

Started by putting the suspension back together, using a few bits that are not meant for the 205 so i am keeping it quiet at the minute untill i know its going to work, coimplete new top mount kit and new springs putting all together with new shocks-
Was a real arse to do as they are a little special but once fitted to the car look good and seem to clear ok, looking spankly too-
Then i started to slowly put all the bits back from where they origianally came from, most of the bits removed have been powder coated so look like new, even went to the local fixing's shop and got new nuts and bolts :lol-
Come to a bit of a stand still again as i forgot to get the servo powder coated and cant do much more untill this is refitted.
Well on saturday i received the final bits i needed back from the powder coaters (it's a desease) so hopefully this will be finished pretty soon.
Had a pair of hub carriers painted black-
Fitted the wheel bearings, trying not to damage the paint-
The servo came back looking great in anthracite, much better than the rusty crap it looked like before.
Ordered the last few bits i need so i am hoping by the end of the week to have a six lump sitting in the bay looking very pretty.
I have my fingers crossed that the master cylinder will clear and that i have no issues with the exhaust manifold. Time will tell.
The calipers i have had powder coated too-
Brakes all built back up and fitted, painted the centre of the disc's, once the car has been driven it will remove the over spray and will leave a nice coated centre that wont look horrible when the metal corrodes-
This is what it is looking like now-
Well the day is getting close to the car being finished, had a really good session with it today and managed to get the engine in (yay)
Lining it up to fit, it does look like it wont fit-
A bit closer, to me to you-
Lining it up to the engine and gearbox mount, had a little mishap with this when i decided to put the gearbox stud in the wrong hole in the gear box, it made the clutch arm hit the bottom of the battery tray, felt a bit of a tit when i realised what i had done.
A bit further in, as you can see it is sitting happily on the mounts, just hope it clears in all the necessary places-
Well as you can see the lump is in and guess what i am chuffed to bits as all the places people struggle with i seem to have been lucky, its close to the master cylinder but the exhaust and the front panel are fine (dont worry the master cylinder is going to be replaced, and sohas the fuel filter now:lol)-
Well up up up, car goes up on the ramp and i fit the subframe, i had to say finding all the bolts was a mission, i had forgot which ones were which, just got to fit my shiney new sump, yes i know but you could'nt leave it looking like it is now:lol-
Well thats about as far as i can go now, just fitted all the subframe and ancillaries, bolted all the driveshafts back in and put the wheels back on, it was great to see the car standing on its own feet again-
Its a shane the inlet manifold is covered up by the front panel but ho hum, all thats left to do now is get it all wired up and connect the coolant hoses, managed to put all the fuel lines on and have just fitted the bonnet too. From the bay looking like this-
To this-
Thread Starter
BANNED
Joined: Jun 2010
Posts: 76
Likes: 0
From: leicester
Well the day is getting close to the car being finished, had a really good session with it today and managed to get the engine in (yay)
Lining it up to fit, it does look like it wont fit-

A bit closer, to me to you-

Lining it up to the engine and gearbox mount, had a little mishap with this when i decided to put the gearbox stud in the wrong hole in the gear box, it made the clutch arm hit the bottom of the battery tray, felt a bit of a tit when i realised what i had done.
A bit further in, as you can see it is sitting happily on the mounts, just hope it clears in all the necessary places-


Well as you can see the lump is in and guess what i am chuffed to bits as all the places people struggle with i seem to have been lucky, its close to the master cylinder but the exhaust and the front panel are fine (dont worry the master cylinder is going to be replaced, and sohas the fuel filter now:lol)-


Well up up up, car goes up on the ramp and i fit the subframe, i had to say finding all the bolts was a mission, i had forgot which ones were which, just got to fit my shiney new sump, yes i know but you could'nt leave it looking like it is now:lol-

Well thats about as far as i can go now, just fitted all the subframe and ancillaries, bolted all the driveshafts back in and put the wheels back on, it was great to see the car standing on its own feet again-

Its a shane the inlet manifold is covered up by the front panel but ho hum, all thats left to do now is get it all wired up and connect the coolant hoses, managed to put all the fuel lines on and have just fitted the bonnet too. From the bay looking like this-

To this-

Well done a few more bits to it today, to be fair a couple of hours more work and it will be completed.
Fitted the coliover suspension to the car, i had initially fitted 306 struts and shocks hoping it would be ok but it made the ride heigh unreal, the coilovers fitted, now sits perfect although seems a little rough on the road-

This is how she looks when lowered on the ground (ignore the masking tape, i seem to have lost the clips to the arches :lol)

Had to go to the pst office and thought i would go in this, first run so all a little unknown, first fault i found was the brakes need bleeding a bit more
But oh my it sure shifts, after i had done my bits and bobs i pulled onto the main road and floored it, i was met with a great induction roar and we just took off, the ride seems a little stiff, i hope this will settle down but other than that it drove great. Scared myself a little when i realised the front indicators werent working.
Few little niggles-
Something in the heater fan motor, makes a noise when switching it on possibly leaves etc.
Sort the brakes, should just need bleeding.
Find some arch clips.
Then just a general check over, oh and sort out why the front indicators dont work.
Carl
Lining it up to fit, it does look like it wont fit-
A bit closer, to me to you-
Lining it up to the engine and gearbox mount, had a little mishap with this when i decided to put the gearbox stud in the wrong hole in the gear box, it made the clutch arm hit the bottom of the battery tray, felt a bit of a tit when i realised what i had done.
A bit further in, as you can see it is sitting happily on the mounts, just hope it clears in all the necessary places-
Well as you can see the lump is in and guess what i am chuffed to bits as all the places people struggle with i seem to have been lucky, its close to the master cylinder but the exhaust and the front panel are fine (dont worry the master cylinder is going to be replaced, and sohas the fuel filter now:lol)-
Well up up up, car goes up on the ramp and i fit the subframe, i had to say finding all the bolts was a mission, i had forgot which ones were which, just got to fit my shiney new sump, yes i know but you could'nt leave it looking like it is now:lol-
Well thats about as far as i can go now, just fitted all the subframe and ancillaries, bolted all the driveshafts back in and put the wheels back on, it was great to see the car standing on its own feet again-
Its a shane the inlet manifold is covered up by the front panel but ho hum, all thats left to do now is get it all wired up and connect the coolant hoses, managed to put all the fuel lines on and have just fitted the bonnet too. From the bay looking like this-
To this-
Well done a few more bits to it today, to be fair a couple of hours more work and it will be completed.
Fitted the coliover suspension to the car, i had initially fitted 306 struts and shocks hoping it would be ok but it made the ride heigh unreal, the coilovers fitted, now sits perfect although seems a little rough on the road-
This is how she looks when lowered on the ground (ignore the masking tape, i seem to have lost the clips to the arches :lol)
Had to go to the pst office and thought i would go in this, first run so all a little unknown, first fault i found was the brakes need bleeding a bit more
But oh my it sure shifts, after i had done my bits and bobs i pulled onto the main road and floored it, i was met with a great induction roar and we just took off, the ride seems a little stiff, i hope this will settle down but other than that it drove great. Scared myself a little when i realised the front indicators werent working.
Few little niggles-
Something in the heater fan motor, makes a noise when switching it on possibly leaves etc.
Sort the brakes, should just need bleeding.
Find some arch clips.
Then just a general check over, oh and sort out why the front indicators dont work.
Carl
Trending Topics
Thread Starter
BANNED
Joined: Jun 2010
Posts: 76
Likes: 0
From: leicester
Well as of today she is more or less done, all the hard work has payed off and i took it up and down the street where the unit is, it certainly feels quick! Will be waiting for the nicer weather before it comes out to play all the time, will be taking it to a few shows etc (thats if the rear of it doesnt let the front down, that will be this years winter project come october).
Thanks for all the comments along the way, most good a few not happy that i messed with a last of the line 1.9 205.
Fitted my new wheels today, sorted out a few hoses and cables where they needed to be re routed and generaly tidied her up. Just need to sort out an air filter.
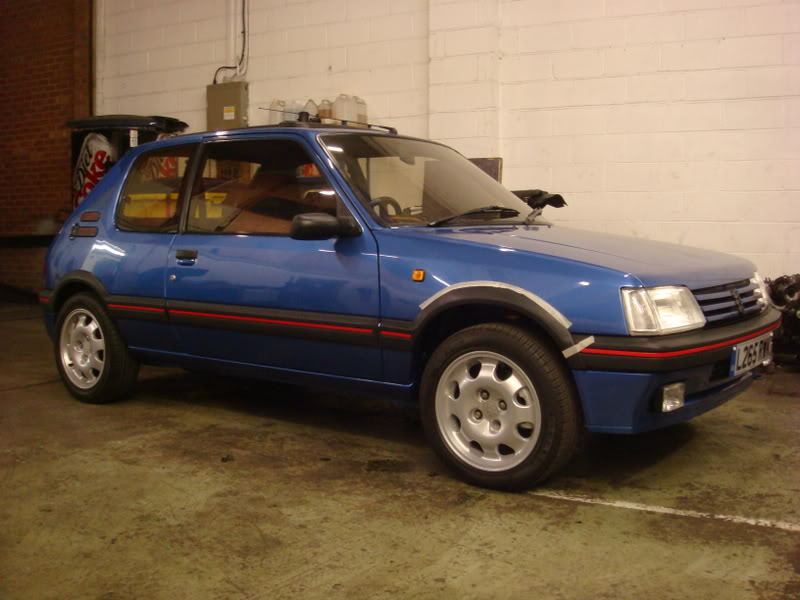
A few pictures of her as she stands today-


The wheels which i think make the car look stunning-

Many thanks to everyone who helped me along the way with tips and hints as to what helped the conversion. Especially my painter for all the help making the bay look as smart as it does.
Heres to a nice standard looking toy in the garage next to it brother my rallye.
Well a great update to add today, as i went away for a few days i decided to come home a day early so i could get at least one of the cars working, got up this morning at 10 and set at the 205, started with this, covered in dust and general garage crap-

As you can see the dash needs putting back together all the wires needed clipping back together and tidying up-

After an hour or so i had managed this-

I then decided to give it a wash, as i was washing it i noticed the paintwork felt very rough, out popped the clay bar and i clayed the complete car to reveal it was covered in alot of red stuff, perhaps overspray, unsure where it has come from.-

After a clean and a wipe down i set about removing the snapped bolt in the drivers lower wing so i can attach my mudflap, with this all done i though it was worth a photo outside the garage-


I then went on a hundred mile drive, went into local villages then out towrds Coventry, it's amazing what buildings seem to pop up out of nowhere.
I then have just pulled up outside home and took a few snaps, need a few little niggly bits sorted then it is well and truly finished, have to say it has a great punch to it and it all seems worth the one year build.


Photos will be added later.
Carl
Thanks for all the comments along the way, most good a few not happy that i messed with a last of the line 1.9 205.
Fitted my new wheels today, sorted out a few hoses and cables where they needed to be re routed and generaly tidied her up. Just need to sort out an air filter.
A few pictures of her as she stands today-
The wheels which i think make the car look stunning-
Many thanks to everyone who helped me along the way with tips and hints as to what helped the conversion. Especially my painter for all the help making the bay look as smart as it does.
Heres to a nice standard looking toy in the garage next to it brother my rallye.
Well a great update to add today, as i went away for a few days i decided to come home a day early so i could get at least one of the cars working, got up this morning at 10 and set at the 205, started with this, covered in dust and general garage crap-
As you can see the dash needs putting back together all the wires needed clipping back together and tidying up-
After an hour or so i had managed this-
I then decided to give it a wash, as i was washing it i noticed the paintwork felt very rough, out popped the clay bar and i clayed the complete car to reveal it was covered in alot of red stuff, perhaps overspray, unsure where it has come from.-
After a clean and a wipe down i set about removing the snapped bolt in the drivers lower wing so i can attach my mudflap, with this all done i though it was worth a photo outside the garage-
I then went on a hundred mile drive, went into local villages then out towrds Coventry, it's amazing what buildings seem to pop up out of nowhere.
I then have just pulled up outside home and took a few snaps, need a few little niggly bits sorted then it is well and truly finished, have to say it has a great punch to it and it all seems worth the one year build.
Photos will be added later.
Carl


Nice project! i love 205's!! i done a gti6 conversion in my white L reg 1.9 back in 2009 which was fun! i then sold the car to one of my mates who converted it to turbo :0 fairly shifts now lol


Thread
Thread Starter
Forum
Replies
Last Post
mk3ste
Restorations, Rebuilds & Projects.
19
Oct 17, 2021 10:09 AM
The Enigma
General Car Related Discussion.
6
Sep 29, 2015 10:31 AM
liamT74
General Car Related Discussion.
10
Sep 23, 2015 10:24 PM
cossirob
General Car Related Discussion.
10
Sep 16, 2015 07:39 PM