LOG IN
REGISTER
Forums
Main area
General Car Related Discussion.
Pictures, video & Photoshop Forum
Restorations, Rebuilds & Projects.
Shows & Track Days
Regional Groups
Was It You?
Concours d'élégance.
Insurance
Wheels and Tyres
Garage / Workshop & Tools Section.
Modellers Corner.
Tuning, FAQ & Post Archive's.
Technical help Q & A
Technical essay Archives
PassionFord FAQs
Ford car Forums listed by Model.
Ford Escort RS Cosworth
Ford Escort RS Turbo
Escort Range
Ford Sierra/Sapphire/RS500 Cosworth
Ford Focus Range
Ford Fiesta
Ford Range
Alternate Car Brands (Non Ford)
For Sale & Wanted
Trader Contact Area
Trader Parts for Sale.
Trader Group Buys
Cars for Sale
Ford RS Cosworth Parts for Sale
Ford RS Turbo Parts for Sale
Ford Focus RS Parts for Sale.
Ford Focus ST Parts for Sale
Ford Fiesta ST & Mondeo ST Parts For Sale.
Ford Non RS / XR / ST parts for sale.
Ford Rs Parts For Sale (Not cosworth, or Cvh Turbo)
Ford XR Parts For Sale
Non Ford parts & other stuff for sale
Alloy wheels and ICE for sale
Cars & Parts Wanted.
PassionFord Swap Shop.
Problem Resolution, Bug Report & Feature Discussion
Bug Reports & Feature Suggestions
Infraction / Moderation Queries
Marketplace
Vendor Directory
Become a Vendor
New Posts
Tools
Car Payment Calculator
Tire Rim Calculator
Vin Decoder
Recalls
Technical Service Bulletins (TSBs)
Members List
Live Feed
Gallery
View Dark Mode
Please register or login to enable Dark Mode.
Log In
Register
Threads
Google
Threads
Posts
Advanced
Dark Mode
Please register or login to enable Dark Mode.
Log In
Forgot your Password?
By logging into your account, you agree to our
Terms of Use
and
Privacy Policy
, and to the use of cookies as described therein.
or
Login with Facebook
Recent
Commented
Albums
My Pictures
Caddyshack's Photos
View Profile
Sort:
Commented
Most Recent
Most Comments
Albums
Photos
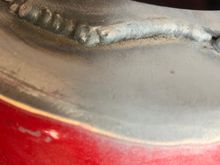
I cut back the overhang as I welded, it isn’t perfect as was hard not to blow through, I will seal over them anyway and it is stronger than it was.
0
2022/05/13 08:57:25
Caddyshack
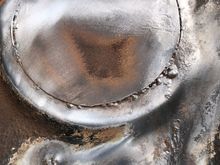
These circles were put in from above and you can see the welds have penetrated through fine but I wanted to go over from below before I l dress them back and paint over.
0
2022/05/13 08:57:09
Caddyshack
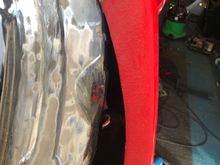
I have started to clean up each area. This seam was flapping around open so needed attaching to the new floor.
0
2022/05/13 08:56:46
Caddyshack
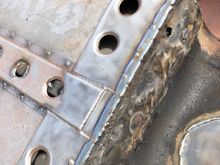
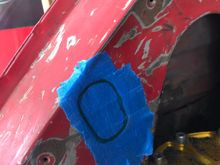
If you look at where the new metal meets the old (highlighted) I will need to consider how to finish these. Either with a plate or a seam seal…suspect it needs a plate welding over. I will back fill any cavities with a rust proofer….like a pump in wax as there are quite a lot of bare metal panels on the reverse that you cannot get to.
0
2022/05/12 14:08:43
Caddyshack
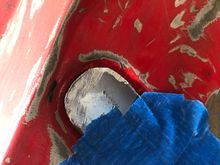
Found some old patches under the under seal which need doing properly so these will come out tomorrow.
0
2022/05/12 14:04:27
Caddyshack
0
2022/05/12 14:04:04
Caddyshack
Stripped nearly 2 kilos of under seal from this one front wheel arch.
0
2022/05/12 14:03:51
Caddyshack
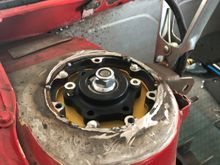
Welded in the strength plate on top. I have welded from underneath as well so I am confident these won’t come off.
0
2022/05/12 13:51:37
Caddyshack
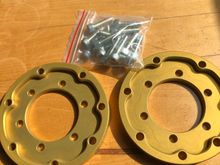
The top mounts that came from Anembo, they really helped me as I needed them for mock up and ordered one day, arrived the next with enough bolts for my bearings too,
0
2022/05/12 13:51:06
Caddyshack
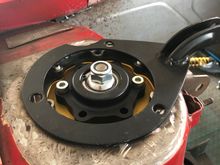
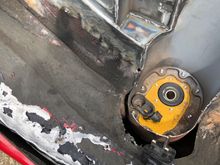
Making up a ring that will add strength to the top mount.
0
2022/05/12 13:50:38
Caddyshack
I have chopped off the new top mounts and re-welded them under the strut top.
0
2022/05/12 13:50:18
Caddyshack
Mocked up the front end and had a small issue getting the bonnet to close.
0
2022/05/12 13:50:07
Caddyshack
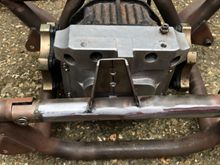
Diff fits the cradle now that I have notched it with 3mm plate to re-enforce it. You can see the cross member notch to allow the diff to fit as it was hitting the boot floor, 2mm steel will go back in to close the notch, I am not too worried as the cage above ties it all together.
0
2022/05/12 13:37:19
Caddyshack
Bits of the cage gone now. Some more will be going back in.
0
2022/05/12 13:35:55
Caddyshack
0
2022/05/12 13:34:34
Caddyshack
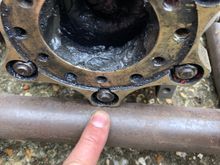
The adapter hits the tube so the diff doesn’t fit straight.
0
2022/05/12 13:34:25
Caddyshack
Bit of an issue on the diff in the cradle.
0
2022/05/12 13:34:18
Caddyshack
3d printed notch shape with a toilet roll for extra cad…this will be the replacement brace which is away from where a head could hit.
0
2022/05/12 13:30:00
Caddyshack
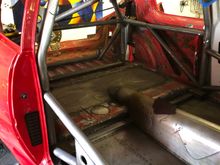
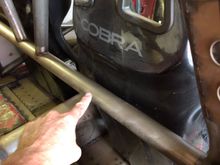
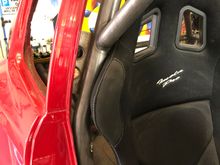
This bar stops the seat coming back about 4 inches so I could not straighten my legs in the car. I will probably put in a moving tilton pedal box.
0
2022/05/12 13:25:19
Caddyshack
0
2022/05/12 13:25:13
Caddyshack
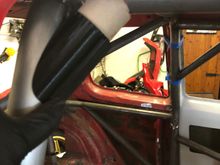
Had a bit of a seat / cage interface issue. The bar would not let the seat go all the way back and the big brace was too close to my head for comfort so I have cut out the bar behind the seat and that brace too. I will add back a brace tight to the hoop and then add in a harness bar at the correct height for the fia allowed safety angle of 15 degrees max.
0
2022/05/12 13:25:06
Caddyshack
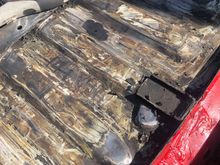
I have started to cut a recess in the old metal that was added in the 90’s as the supra diff hits the cross member with the cradle in there. The cross member no longer does anything but I will leave it for some strength.
0
2022/05/12 13:20:24
Caddyshack
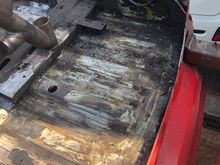
Stripping all the under seal, will tidy all this up to make it factory straight again.
0
2022/05/12 13:20:15
Caddyshack
0
2022/05/12 13:20:04
Caddyshack
0
2022/05/12 13:16:06
Caddyshack
There are lots of holes in the shell where rear seat belts or speakers would have been, I am playing over these. New plasma will help. All the little screw holes are getting migged and then dressed.
0
2022/05/12 13:15:22
Caddyshack
The exhaust will need to go up through the floor, over the cradle and back down through, I have cut off the inlet to the rear silencer here and just tacked it as I need to get the angles right. It will need purging and tig, I think.
0
2022/05/12 13:07:45
Caddyshack
Here I have cut out the turret and folding the new metal going in.
0
2022/05/12 13:04:45
Caddyshack
I know these are out of order, sorry. Here I am competing the welds where the new struts were put in. Everything will be bare metalled where needed as it will be white now, like the t16 rally cars.
0
2022/05/12 13:03:48
Caddyshack
That bump stop has also gone now and all under seal now stripped out, all the seams are being stitch welded now.
0
2022/05/12 12:57:25
Caddyshack
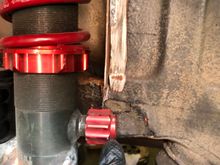
The strut remote reservoirs were hitting the inside of the tower so you can see why I boxed them at each end. The adjuster knob on the other side hit too, see below.
0
2022/05/12 12:56:25
Caddyshack
Filled the holes and you can see where I had to box in the turrets.
0
2022/05/12 12:50:59
Caddyshack
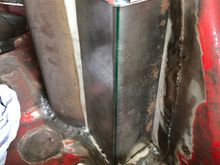
Here you can see the rumpled up inner wing. I didn’t want the hole left between the new turret and the inner wing so sorting that at same time. The dampers also hit the turrets in 2 places so needed cutting out. I am a mortgage broker and not a welder but at least I am doing it which is gonna get it done.
0
2022/05/12 12:47:20
Caddyshack
0
2022/05/12 12:41:12
Caddyshack
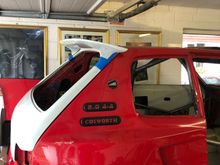
The ends where they meet the body will need some work.
0
2022/05/12 12:40:33
Caddyshack
0
2022/05/12 12:40:02
Caddyshack
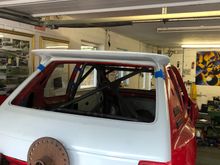
The bootlid is sitting too high due to it touching the spit.
0
2022/05/12 12:39:40
Caddyshack
Test fitting the T16 rally wing to the Carbon Kevlar rear boot lid.
0
2022/05/12 12:39:24
Caddyshack
0
2021/11/14 14:09:01
Caddyshack
0
2021/11/14 14:08:58
Caddyshack
First
Page
4 of 30
Last
Go To
Page
1
2
3
4
5
6
7
...
30
4 of 30
Go To
GO
Go to page
of 30
pages
1
2
3
4
5
6
7
...
30