
Saff Cossie - track car build cancelled! All parts for sale!
 18-01-2005, 04:53 PM
#81
20K+ Super Poster.
Thread Starter

Join Date: May 2003
Posts: 23,377
Likes: 0
Received 0 Likes
on
0 Posts
Paul,
Beam is custom made by Brom @ ZOO Motorsport.
Will get some pics up before it goes on the car. Loads more stuff to come from ZOO as well - adjustable front xmember, TCAs etc etc
Beam is custom made by Brom @ ZOO Motorsport.
Will get some pics up before it goes on the car. Loads more stuff to come from ZOO as well - adjustable front xmember, TCAs etc etc


 31-01-2005, 06:47 PM
#93
I've found that life I needed.. It's HERE!!


Join Date: May 2003
Location: ST Albans Car Clinic
Posts: 1,285
Likes: 0
Received 0 Likes
on
0 Posts
Originally Posted by RichardPON
PMSL @ Rob........
Nearly there lads! Hoping to turn the key and drive on the 28th
Nearly there lads! Hoping to turn the key and drive on the 28th
05-02-2005, 10:58 PM
#95
20K+ Super Poster.
Thread Starter
Join Date: May 2003
Posts: 23,377
Likes: 0
Received 0 Likes
on
0 Posts
Update as of today:
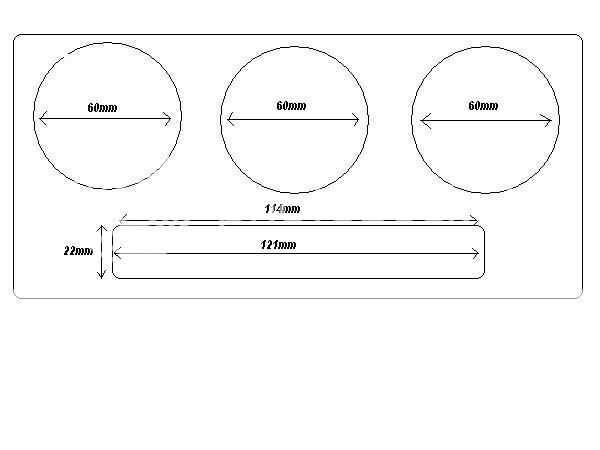
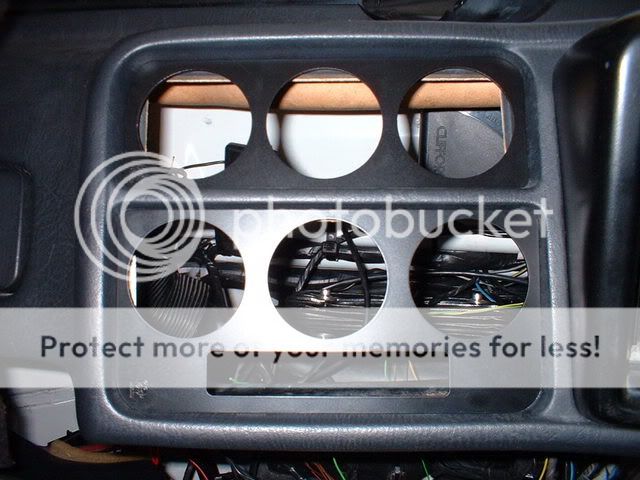
Got Martyn @ Nomad Racing to knock me up a couple of gauge pods for the car.
First one fits in the centre vents, and takes 3 60mm Defis - is far better quality than my old one.
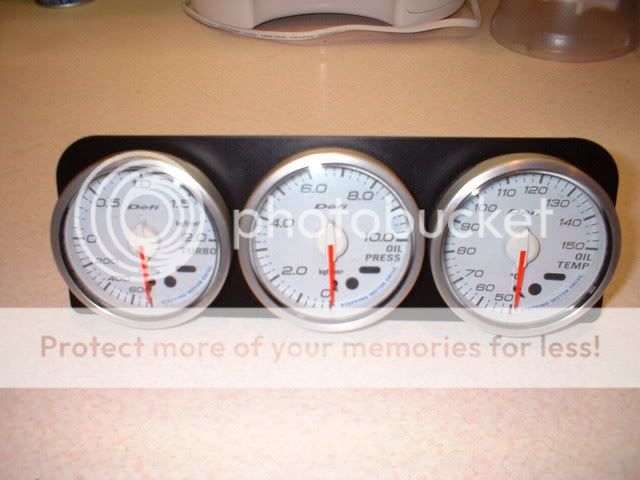
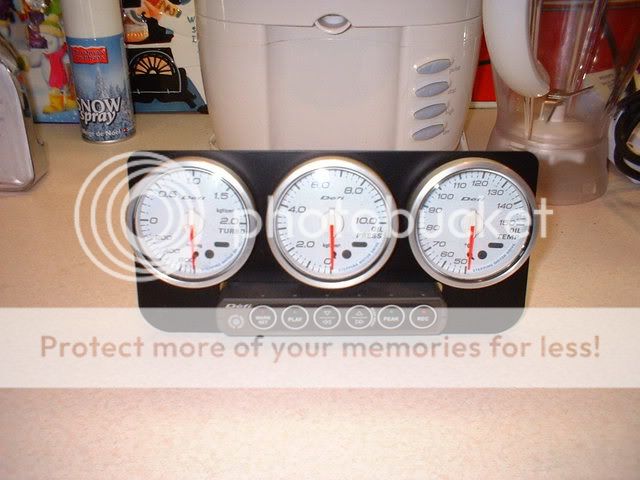
The second takes 3 more 60mm gauges and the Defi controller. I simply sent Martyn the diagram below, and he got it 100% spot on -the quality is just awesome:
Finished product:


Check out the mad little "RS" detailing - top work!

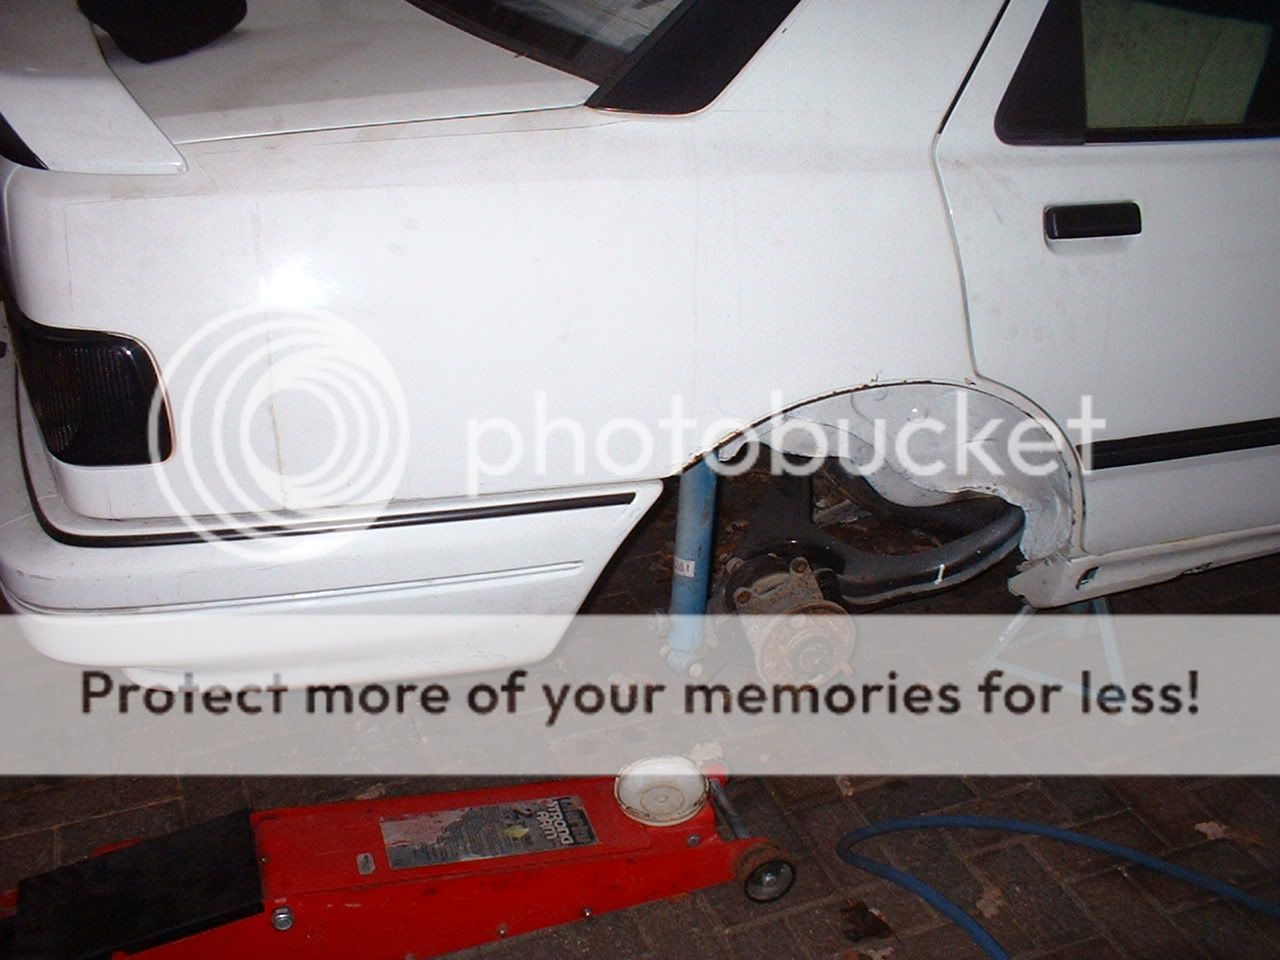
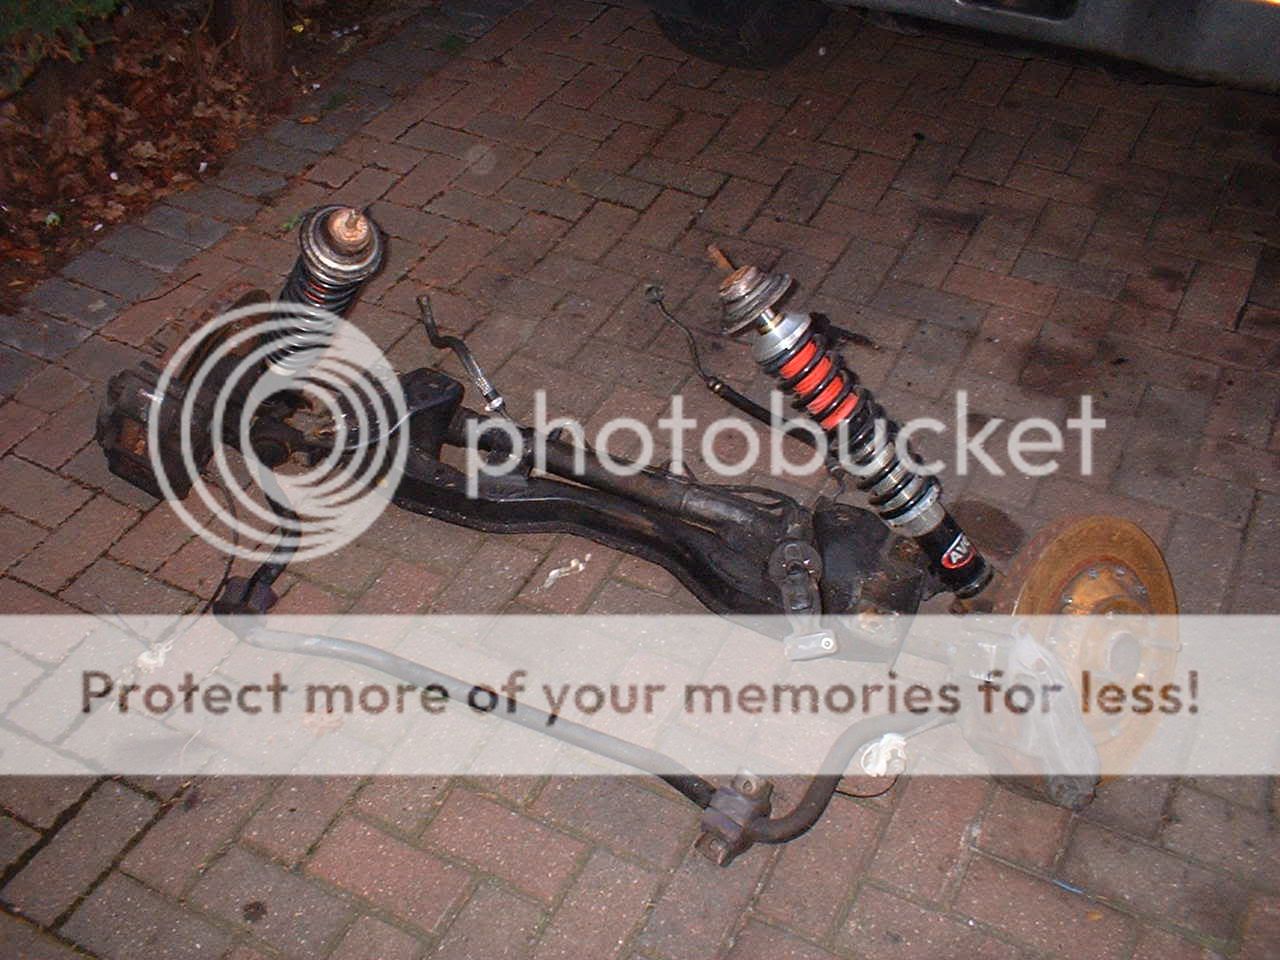
The I dropped the old manky rear beam off that was holding the car up:
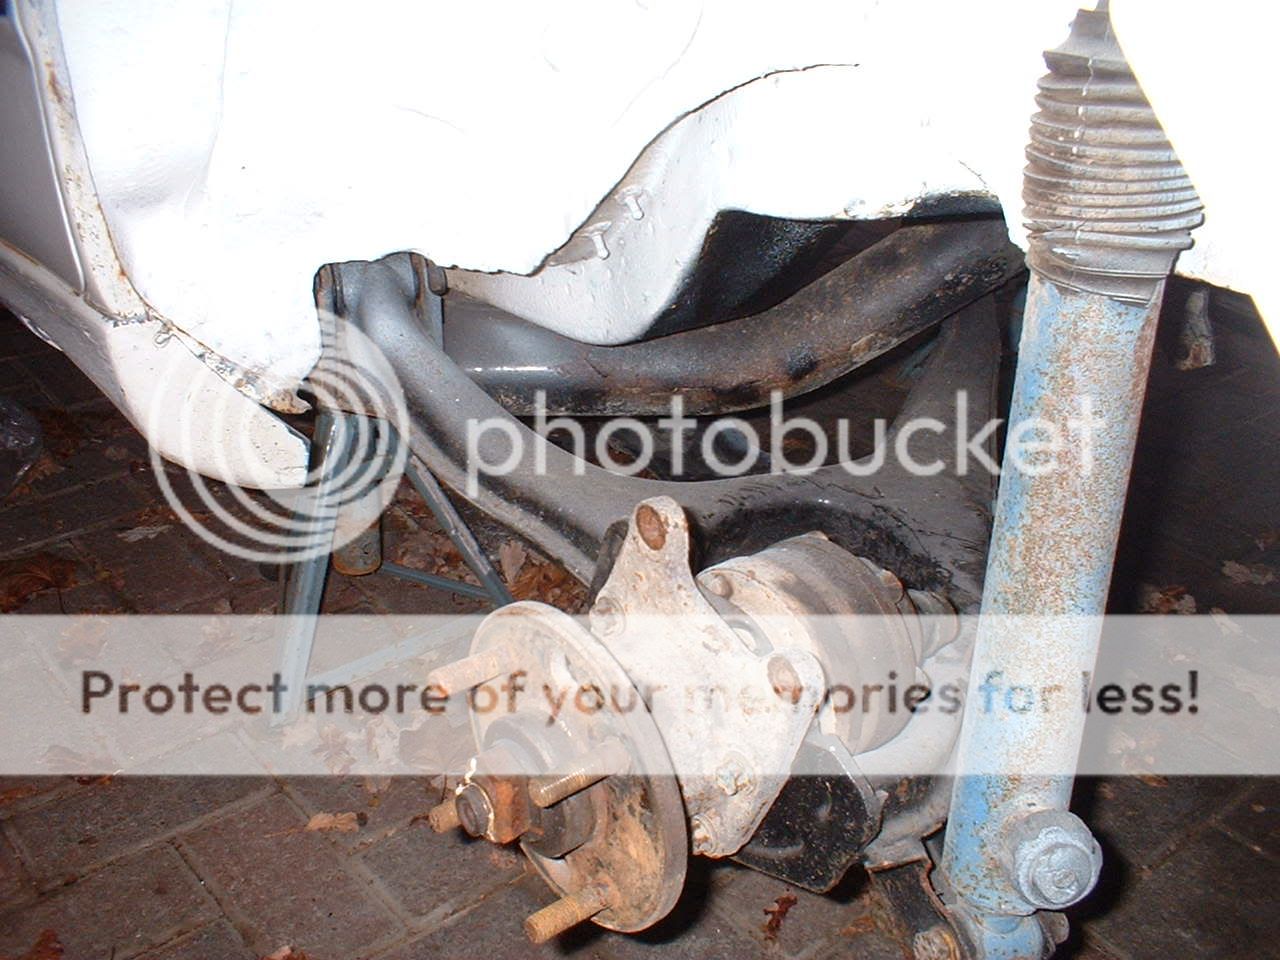

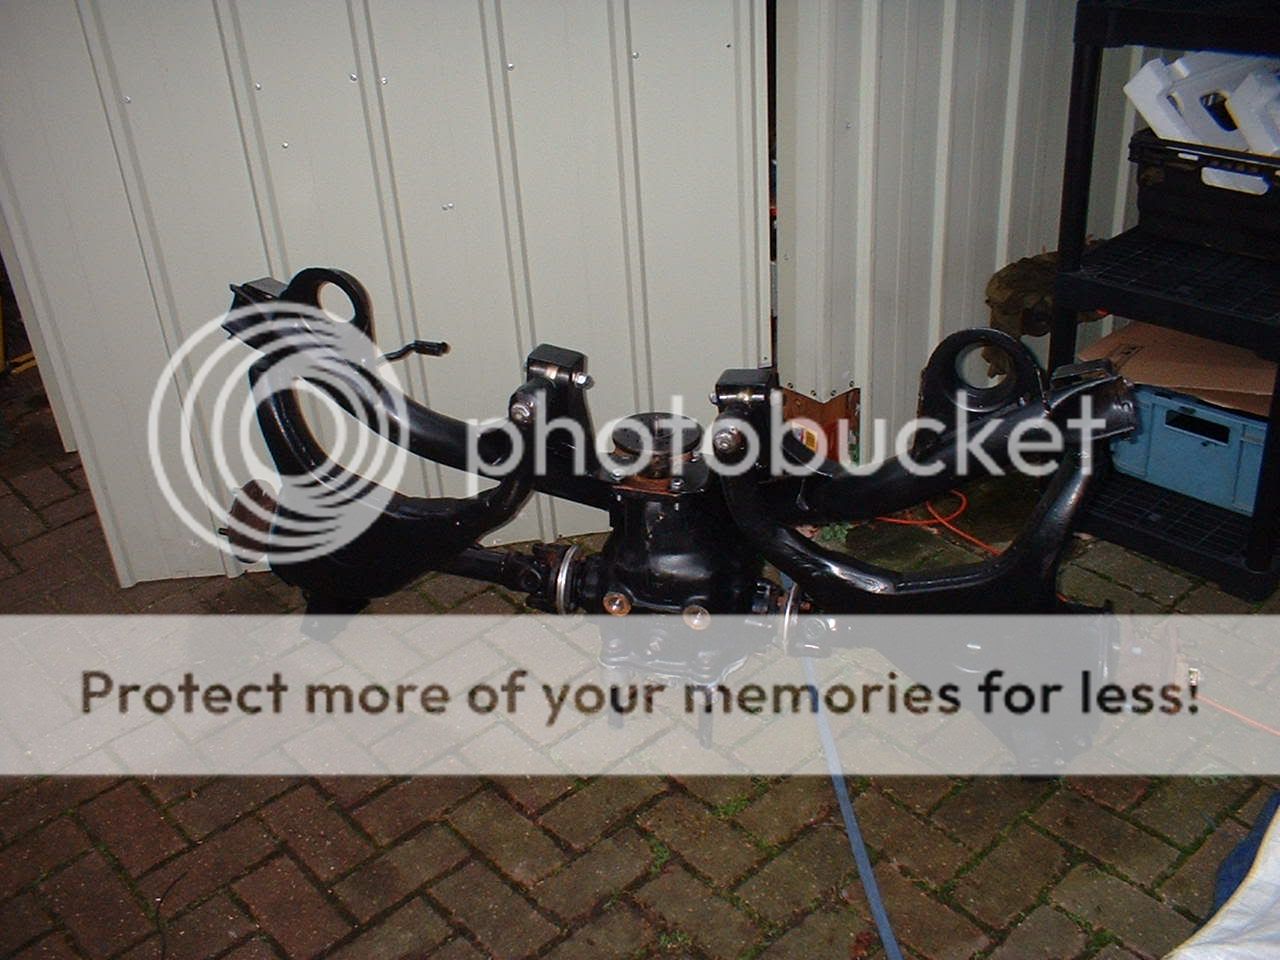
Brom from ZOO Motorsport turned up at my house this morning with 10 and a half inches of pure pleasure! Here it is in all its beauty:
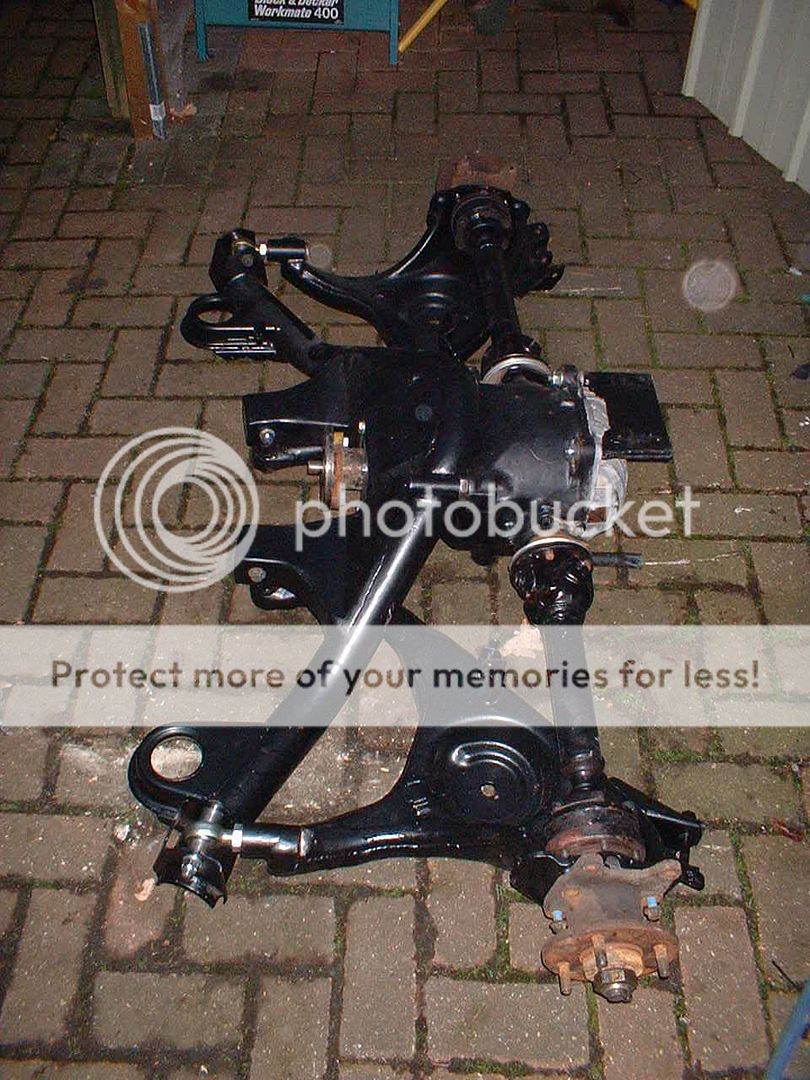
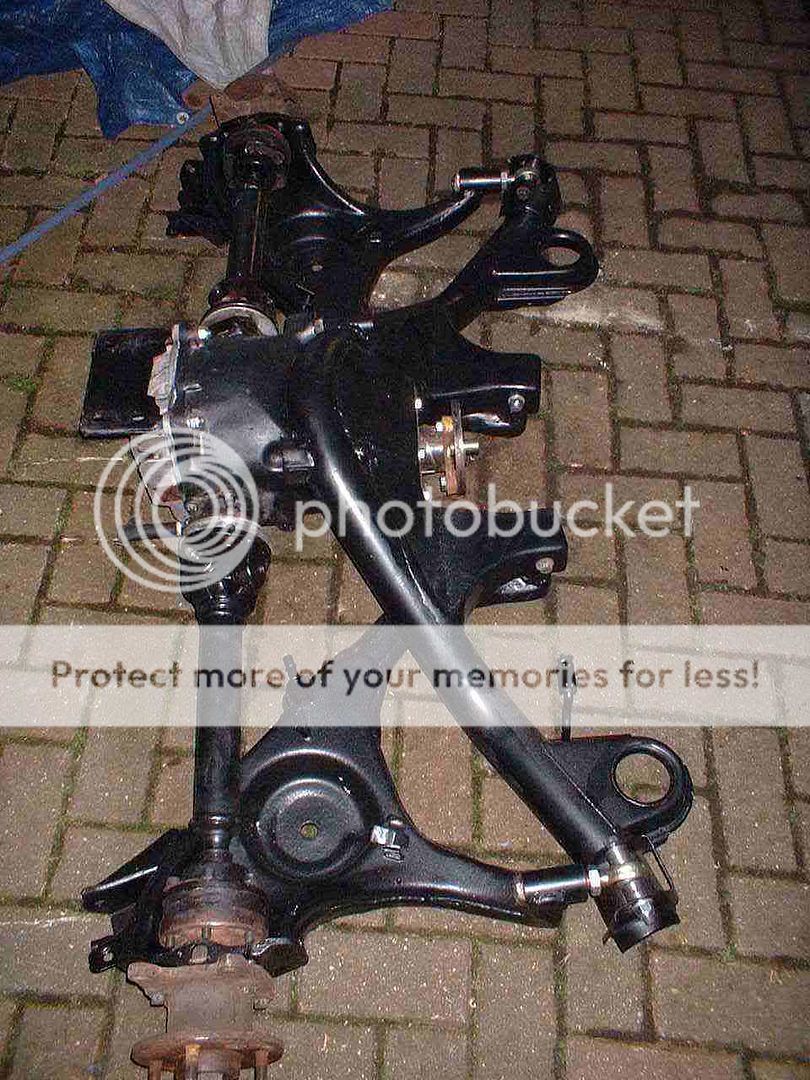
Close up of the rose joints:

This beam is a top of the line ZOO Motorsport product.
I'm running a fully rose jointed Group A beam, with 10.5" Jag diff conversion. The diff runs a 3.77 ratio, and utilises custom driveshafts and a custom prop. The rear diff is solid mounted to the chassis, but uses very hard polybushes to mount the beam to the car.
It's the same spec as the one in Rod Tarry's saff (aside from the ratio), so if it's good enough for his power, it's good enough for my pony 300bhp

I had to quickly knock up a trolley to get the thing down my driveway, as it weighs an absolute ton!
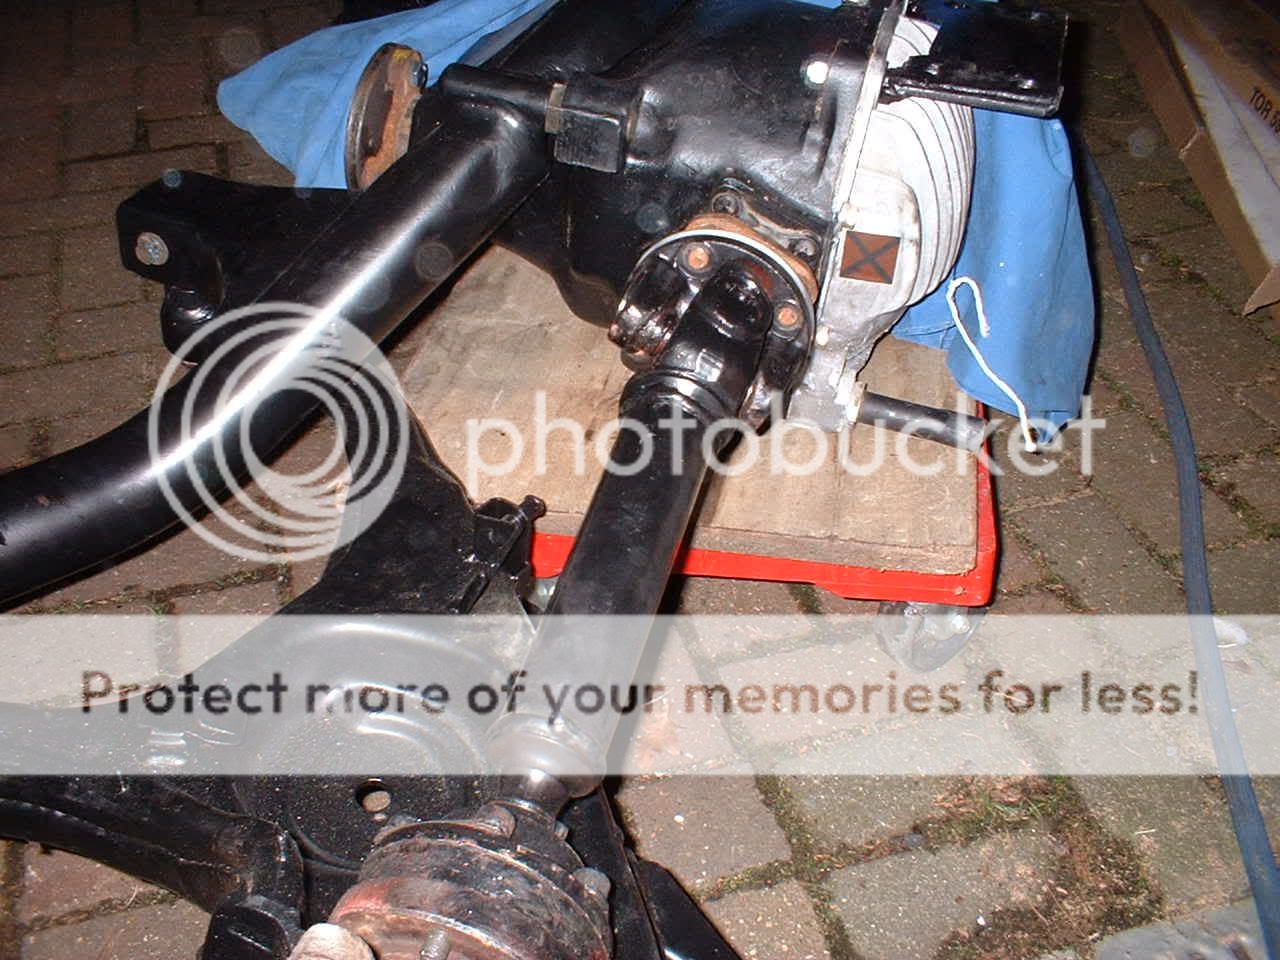
This was ideal, as it allowed me to maneouvre the whole beam setup into position under the car:
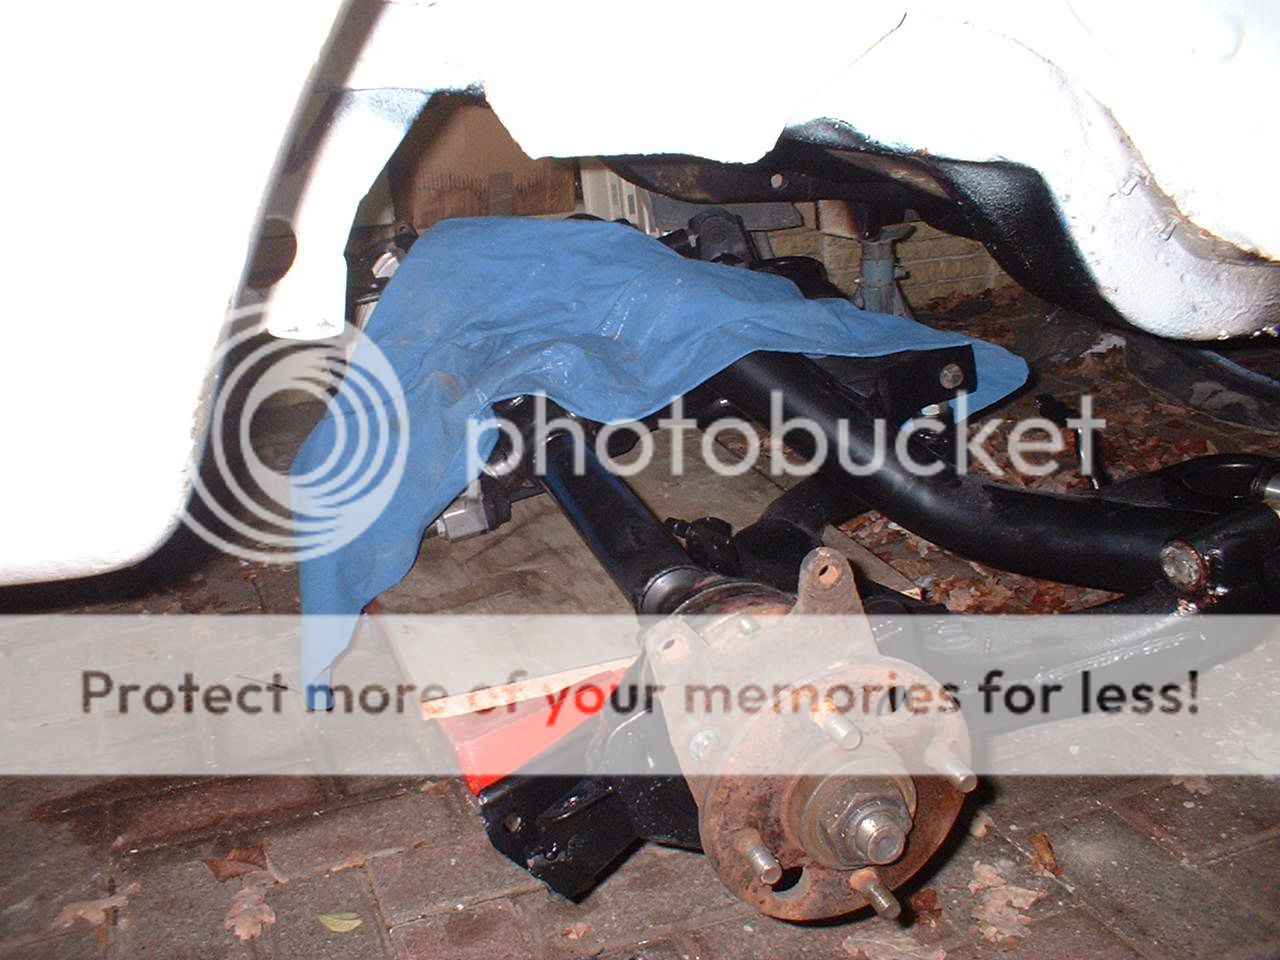
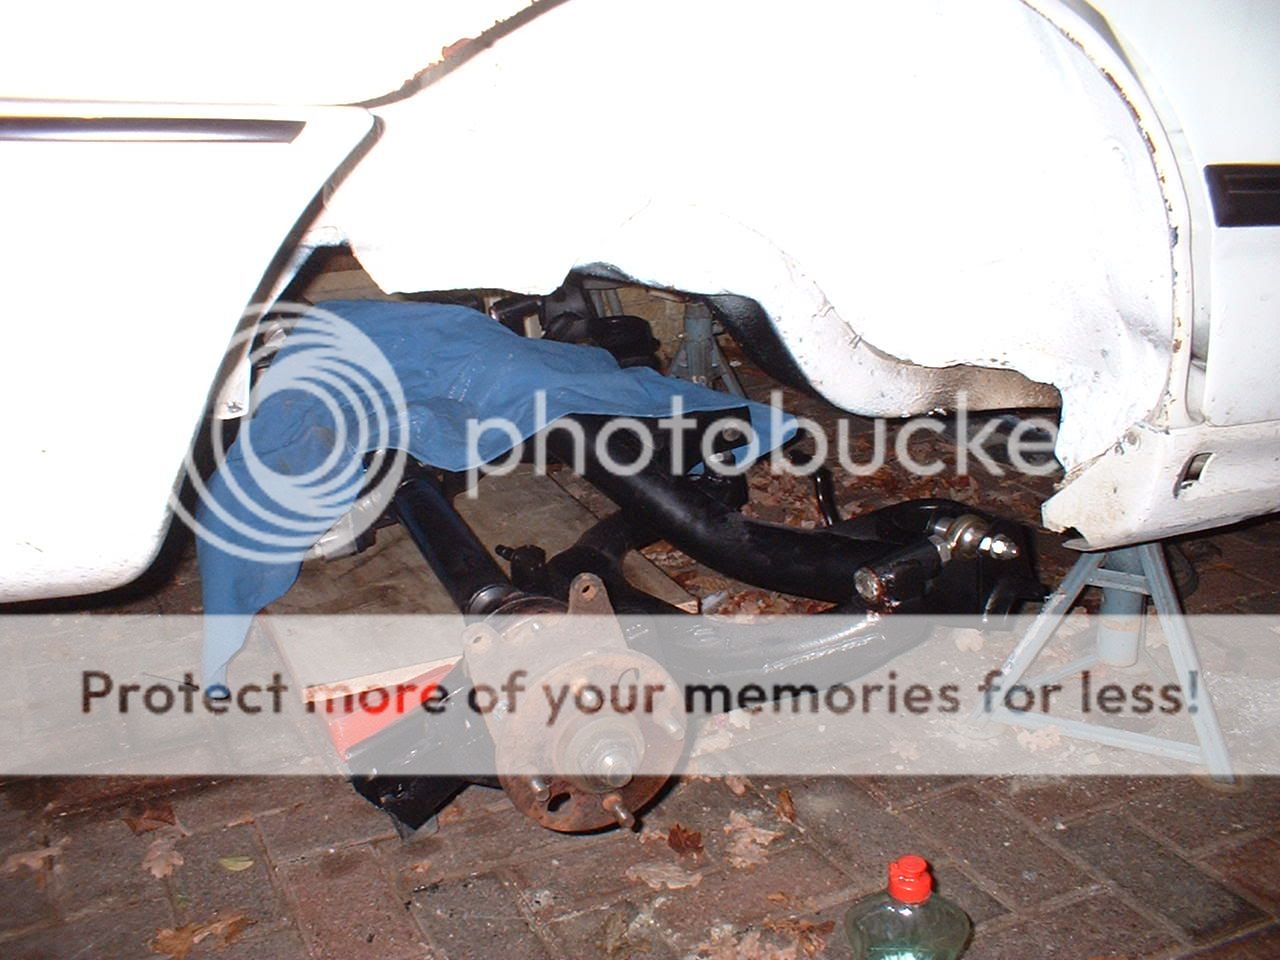
Will mount the beam up in the morning, and get some more pics when it's in. More updates to come later, as I'm just off to meet Bondy (Dingy's courier service ) for some more bits!
Pics about 1 a.m.
Got Martyn @ Nomad Racing to knock me up a couple of gauge pods for the car.
First one fits in the centre vents, and takes 3 60mm Defis - is far better quality than my old one.
The second takes 3 more 60mm gauges and the Defi controller. I simply sent Martyn the diagram below, and he got it 100% spot on -the quality is just awesome:
Finished product:
Check out the mad little "RS" detailing - top work!
The I dropped the old manky rear beam off that was holding the car up:
Brom from ZOO Motorsport turned up at my house this morning with 10 and a half inches of pure pleasure!
Here it is in all its beauty:Close up of the rose joints:
This beam is a top of the line ZOO Motorsport product.
I'm running a fully rose jointed Group A beam, with 10.5" Jag diff conversion. The diff runs a 3.77 ratio, and utilises custom driveshafts and a custom prop. The rear diff is solid mounted to the chassis, but uses very hard polybushes to mount the beam to the car.
It's the same spec as the one in Rod Tarry's saff (aside from the ratio), so if it's good enough for his power, it's good enough for my pony 300bhp
I had to quickly knock up a trolley to get the thing down my driveway, as it weighs an absolute ton!
This was ideal, as it allowed me to maneouvre the whole beam setup into position under the car:
Will mount the beam up in the morning, and get some more pics when it's in. More updates to come later, as I'm just off to meet Bondy (Dingy's courier service
Pics about 1 a.m.
 06-02-2005, 12:12 AM
#97
20K+ Super Poster.
Thread Starter
Join Date: May 2003
Posts: 23,377
Likes: 0
Received 0 Likes
on
0 Posts
More stuff!
As soon as I knew I could get one done, I had Dingy make up one of his new cossie looms.
The old loom out the car was in such a poor state of repair, that it was really only fit for the bin (before scavenging a few connectors and stuff of it first of course).
Dingy did me a really good price on the loom, and the workmanship is outstanding. It looks absolutely awesome - I would recommend this to every cossie owner!
Finished article:
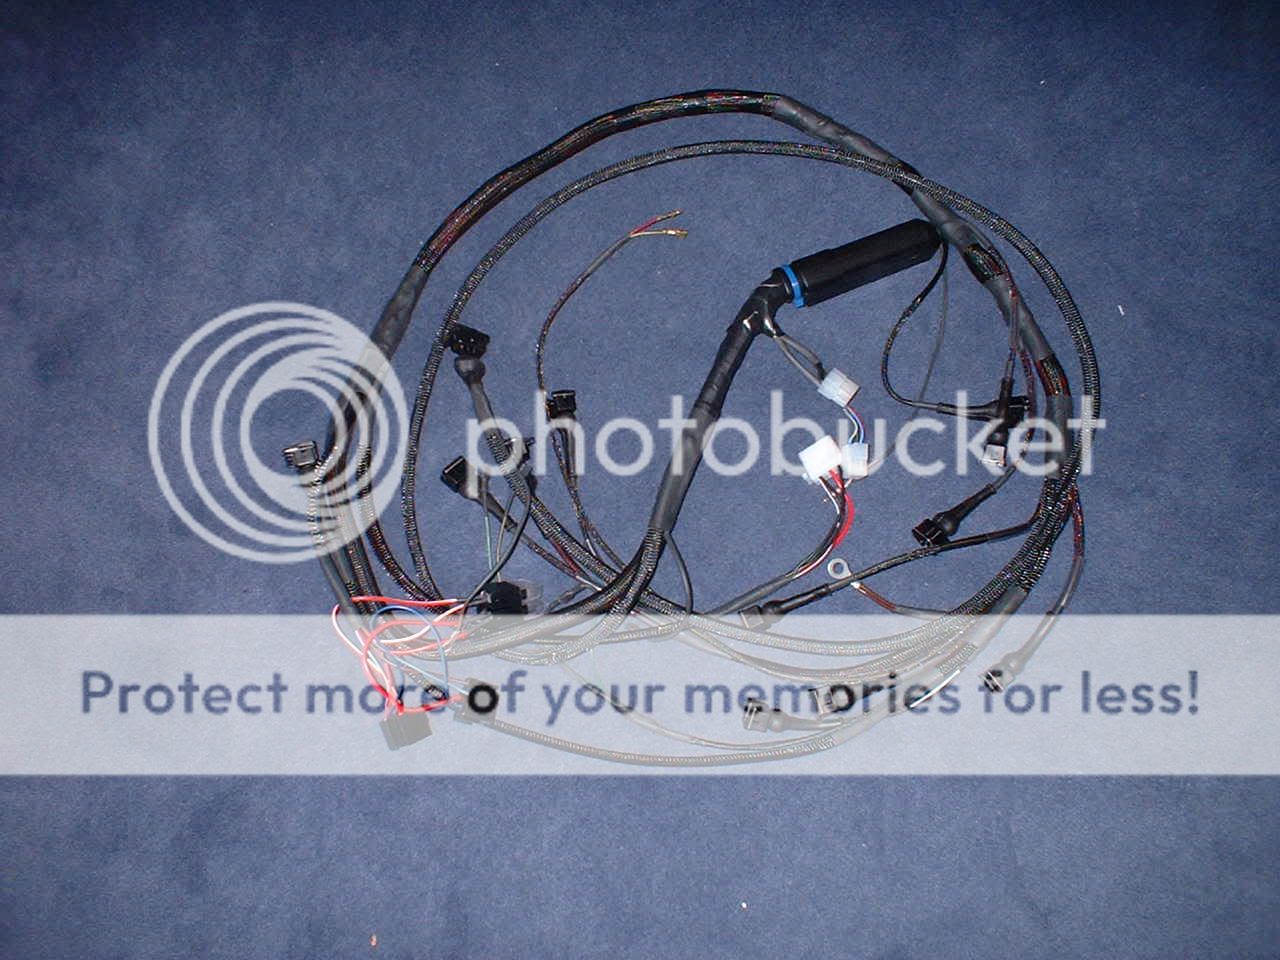
Close up of the quality:

Some pics of the build up process (courtesy of Dingy):


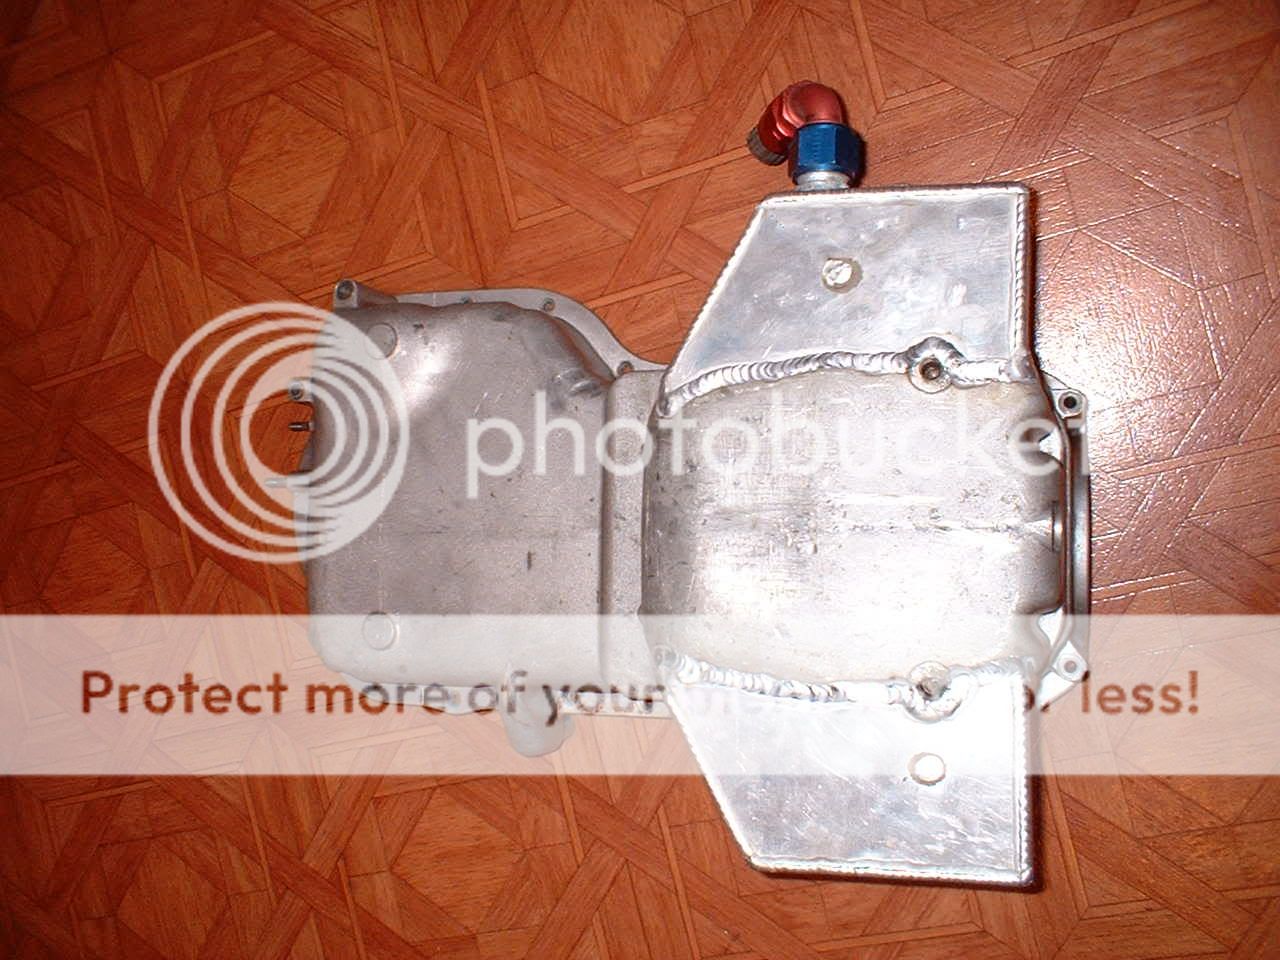
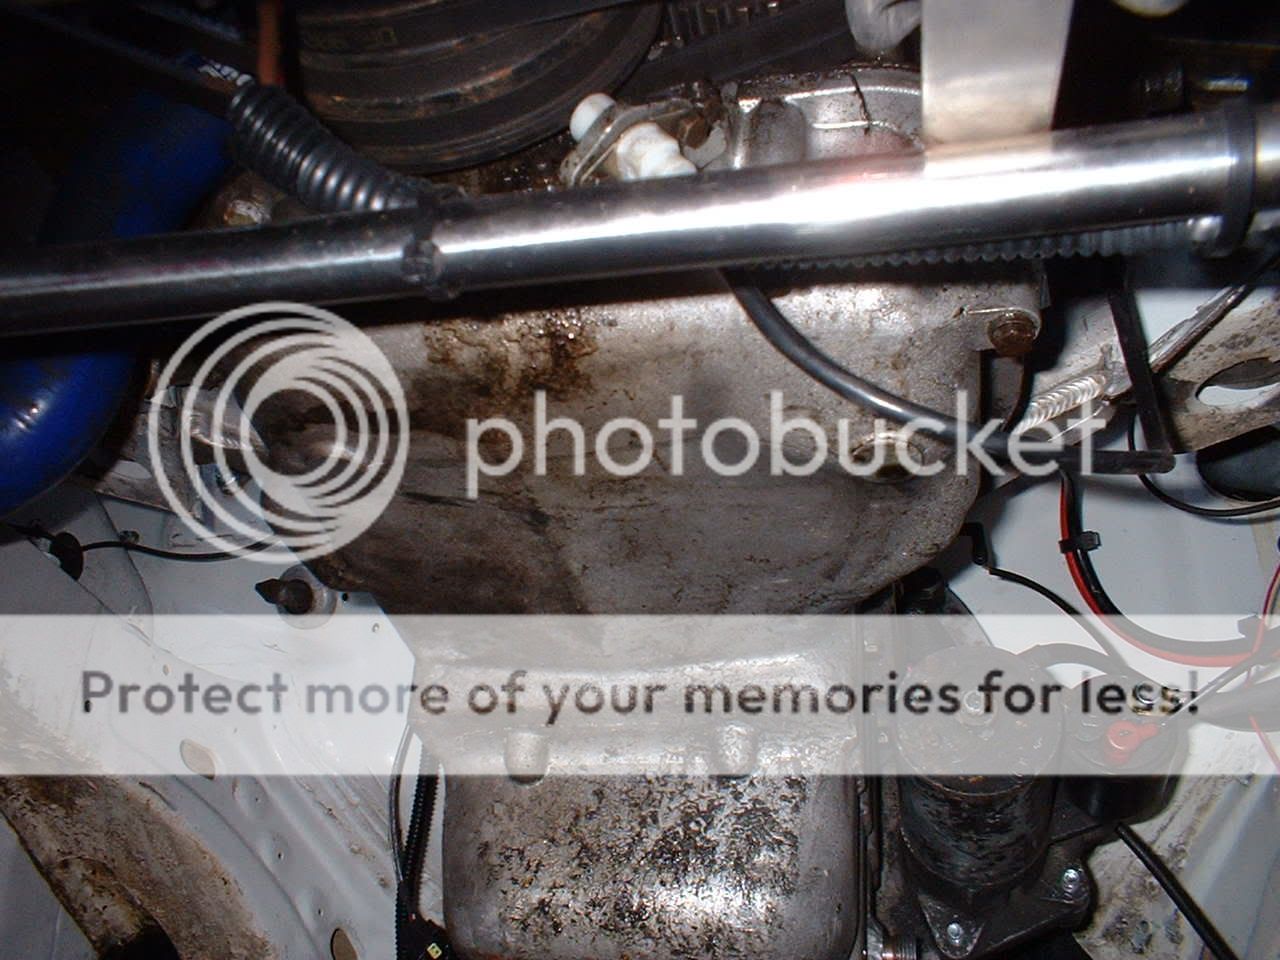
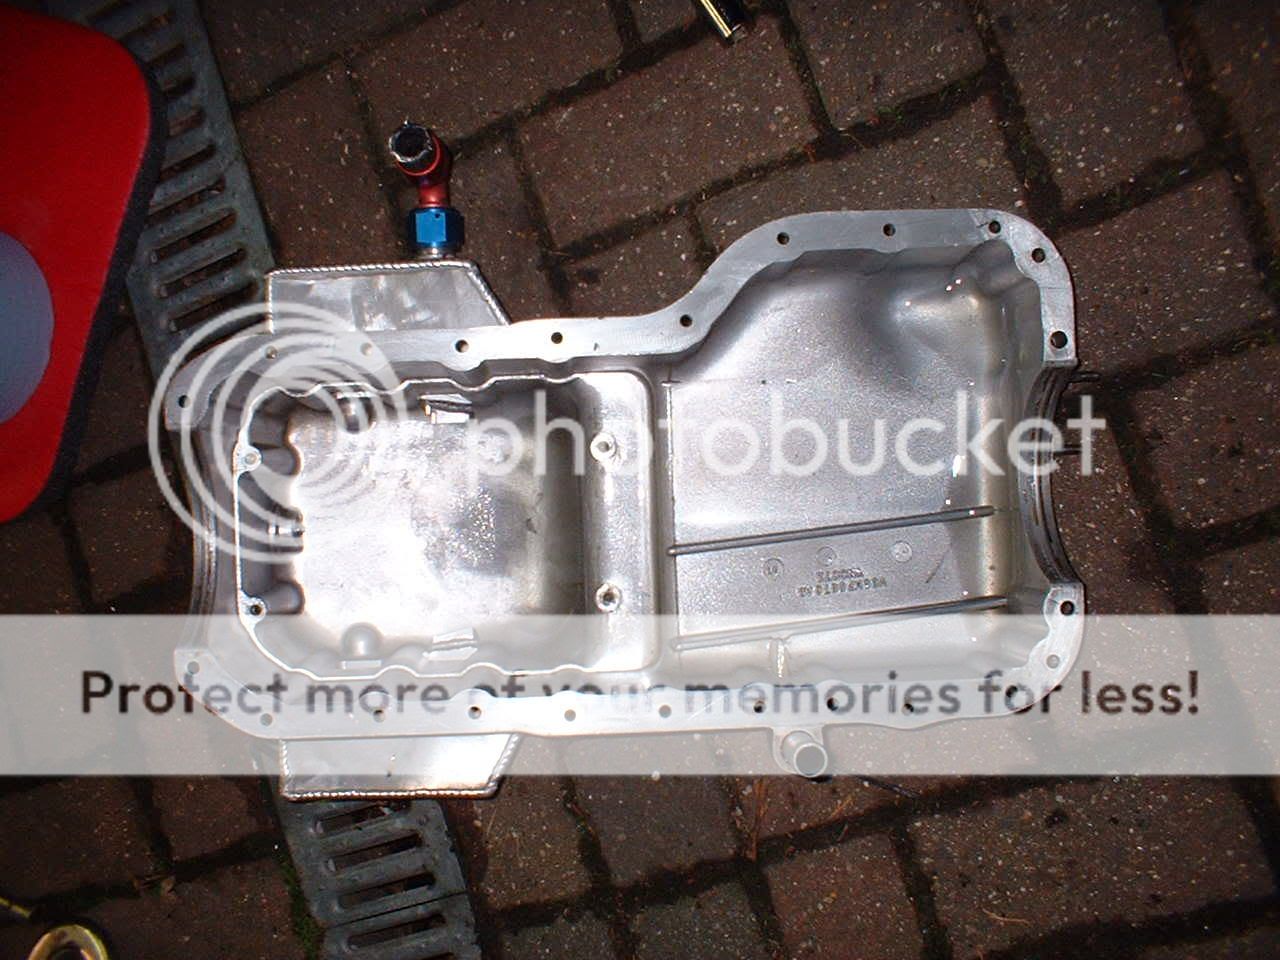
Having seen the quality of the sump on Dingy's own car, I got him to sort me out the same for my car so...........
Big winged sump, with aeroquip return for the breather, and welded in fitting for the oil temp gauge.
If you're not sure why you'd need this, on track on slicks, the cornering force can drag the oil in the sump away from the pick up pipe and slosh it about (technical term) all over the place. This guarantees that you'll never run the the oil supply dry, and that you have a little extra capacity too!
The standard of welding on the sump is sooooo good. Will be fitting tomorrow - some pics:


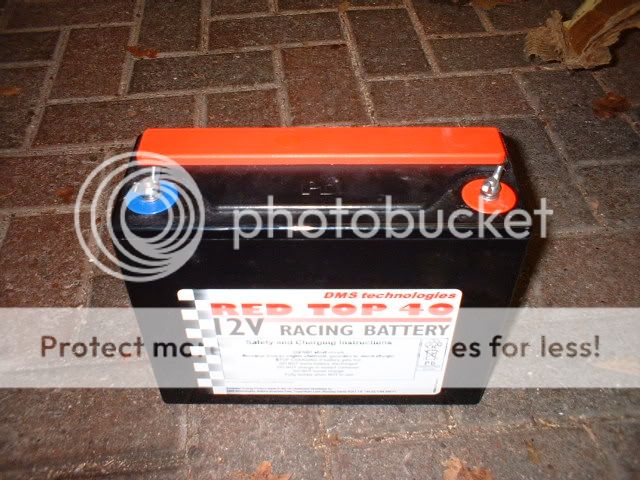
Also got hold of a Red Top gel battery.
I didn't like the idea of the standard battery being inside the passenger compartment (can't go in the boot as that's where the fuel tank is), so I splashed out on one of these bad boys:
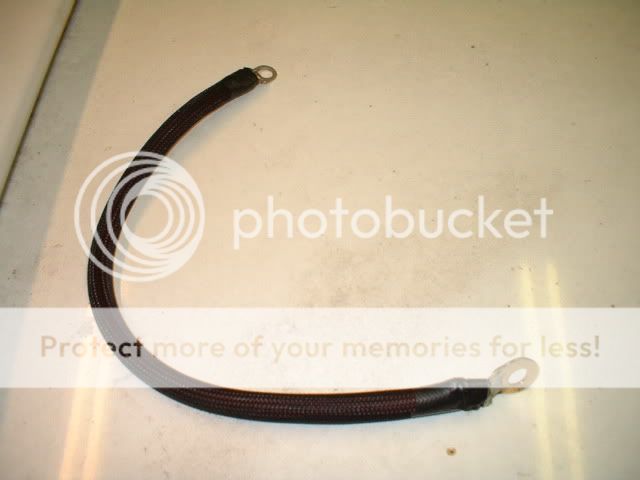
Also fabricated a nice big earth strap for it to ensure the battery is grounded as best as possible.........
Also got the rear AVOs built back up and ready to go back on:

More pics and update tomorrow when I have the task of fitting everything!
As soon as I knew I could get one done, I had Dingy make up one of his new cossie looms.
The old loom out the car was in such a poor state of repair, that it was really only fit for the bin (before scavenging a few connectors and stuff of it first of course).
Dingy did me a really good price on the loom, and the workmanship is outstanding. It looks absolutely awesome - I would recommend this to every cossie owner!
Finished article:
Close up of the quality:
Some pics of the build up process (courtesy of Dingy):
Having seen the quality of the sump on Dingy's own car, I got him to sort me out the same for my car so...........
Big winged sump, with aeroquip return for the breather, and welded in fitting for the oil temp gauge.
If you're not sure why you'd need this, on track on slicks, the cornering force can drag the oil in the sump away from the pick up pipe and slosh it about (technical term) all over the place. This guarantees that you'll never run the the oil supply dry, and that you have a little extra capacity too!
The standard of welding on the sump is sooooo good. Will be fitting tomorrow - some pics:
Also got hold of a Red Top gel battery.
I didn't like the idea of the standard battery being inside the passenger compartment (can't go in the boot as that's where the fuel tank is), so I splashed out on one of these bad boys:
Also fabricated a nice big earth strap for it to ensure the battery is grounded as best as possible.........
Also got the rear AVOs built back up and ready to go back on:
More pics and update tomorrow when I have the task of fitting everything!
 06-02-2005, 11:40 AM
#100
10K+ Poster!!
iTrader: (1)

Join Date: May 2003
Location: Lancashire
Posts: 12,748
Likes: 0
Received 0 Likes
on
0 Posts
Originally Posted by RichardPON
Also fabricated a nice big earth strap for it to ensure the battery is grounded as best as possible.........
Dunno how you plan to connect the starter, shell, engine block to the battery negative but if you are not running starter current through that earth lead then it will be fine.
06-02-2005, 01:29 PM
#102
20K+ Super Poster.
Thread Starter
Join Date: May 2003
Posts: 23,377
Likes: 0
Received 0 Likes
on
0 Posts
Daz - the lead is 4 gauge stereo power cable - the same thickness as that which rund down the car from the battery.
Just using it to earth the battery, and then everything else is earthed through the chassis at three good clean earth points.........
Just using it to earth the battery, and then everything else is earthed through the chassis at three good clean earth points.........
06-02-2005, 02:27 PM
#103
10K+ Poster!!
iTrader: (1)
Join Date: May 2003
Location: Lancashire
Posts: 12,748
Likes: 0
Received 0 Likes
on
0 Posts
4 AWG is about 20mm squared CSA. 20mm battery cable is rated at 300 amps. Stereo cabling will be about 50 a less due to thinner strands so should still be sufficient...
08-02-2005, 11:14 PM
#108
20K+ Super Poster.
Thread Starter
Join Date: May 2003
Posts: 23,377
Likes: 0
Received 0 Likes
on
0 Posts
Right - more stuff!
Had to change the sump over yesterday, which with no ramp can be a bit of a pig of a job on axle stands on ya drive!
Never done it before, and looked fairly simple, so got cracking. Fortunately, and as you can see from earlier pics of the engine bay, the engine doesn't sit on the subframe, but has it's own mount cradles, so you don't have to support the engine.
30 mins and a cup of tea later:
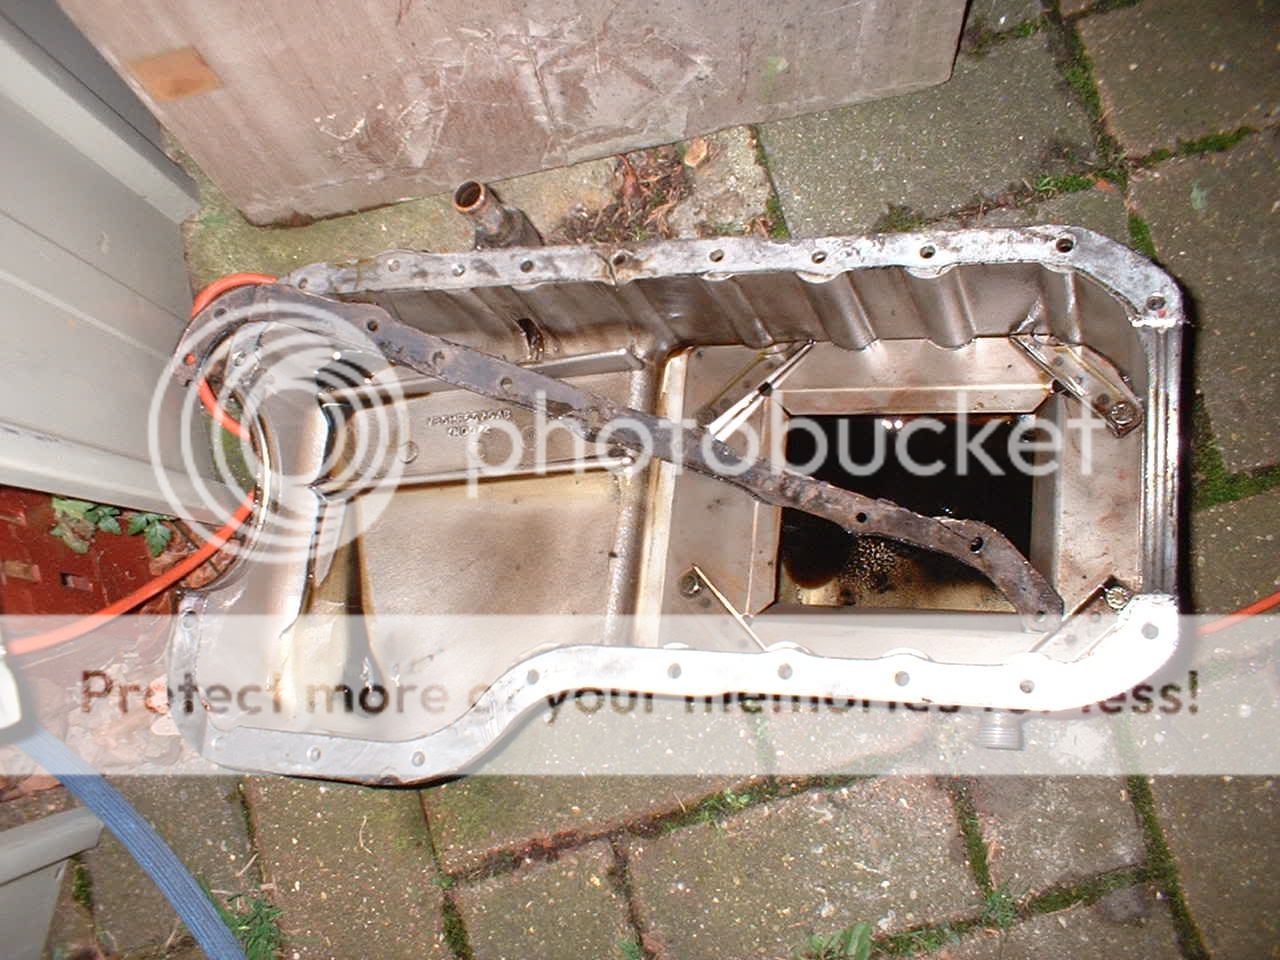
The old sump wasn't clean enough for my bufty tastes:
Having a look at it, all looked fine inside - no traces of metal or dirt which is a relief:
Nipped down to Ford and got hold of the gasket set (which thoughtfully comes with a sump plug washer, but bought a new sump plug whilst I was there.
Had a look and photograped the crank whilst it was all apart:
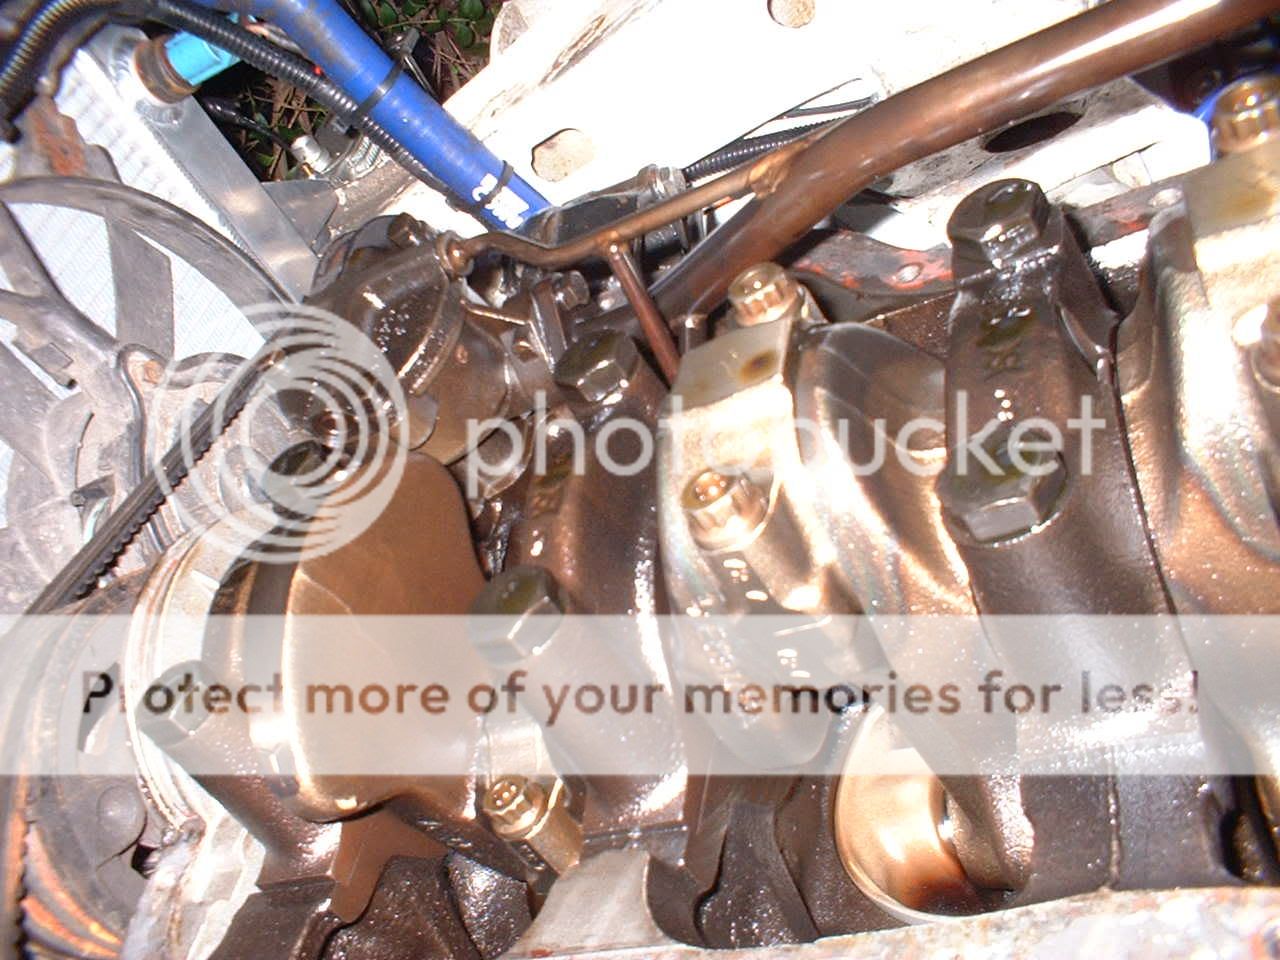

Spent about an hour cleaning the new sump out with loads of petrol, and then blew out any excess with the airline:
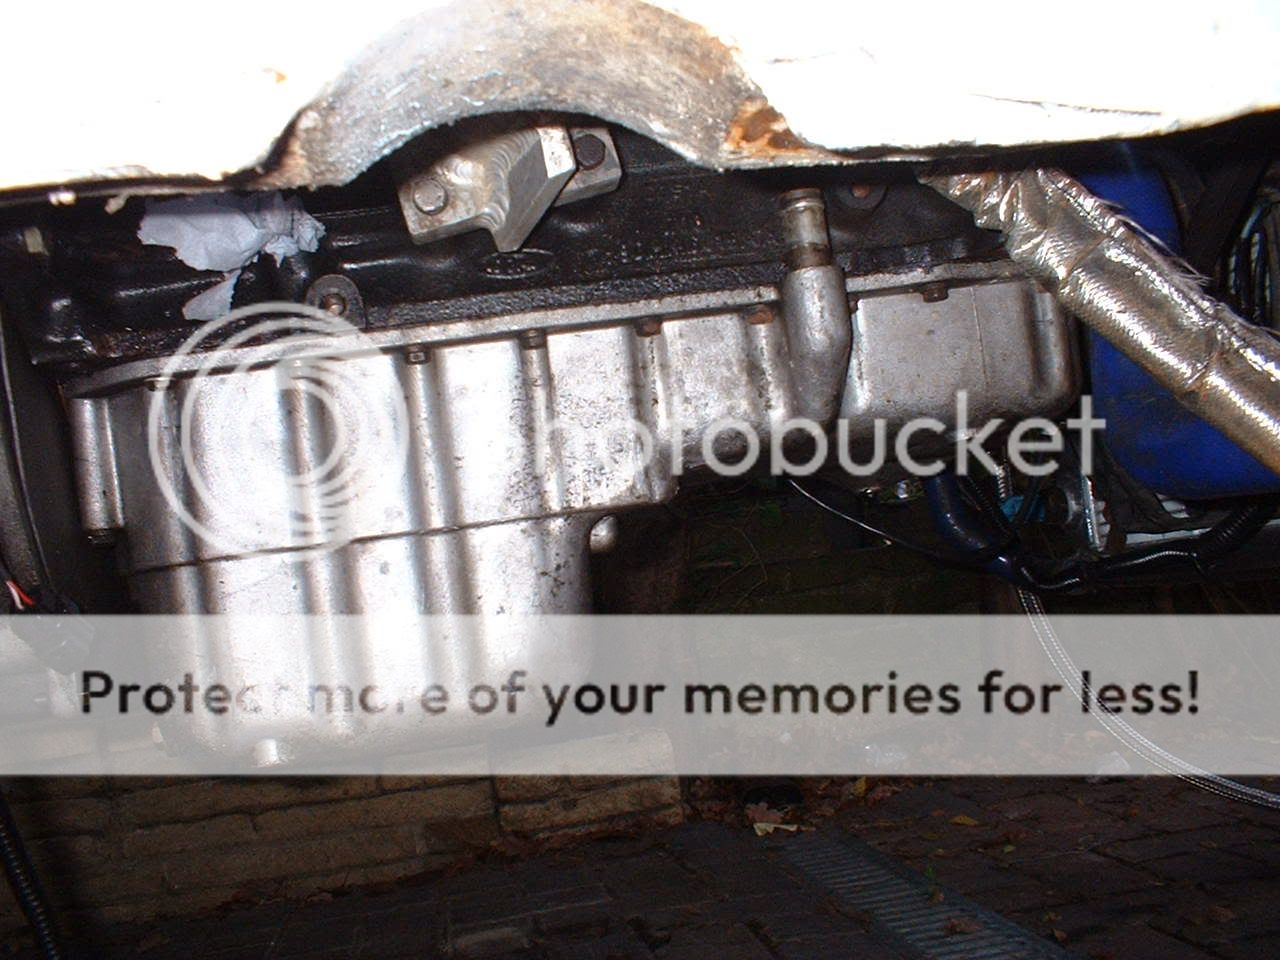
Then fitted the new sump on, replaced a few missing bolts, and lobbed the subframe back on. Pics here of the wings visible from above:
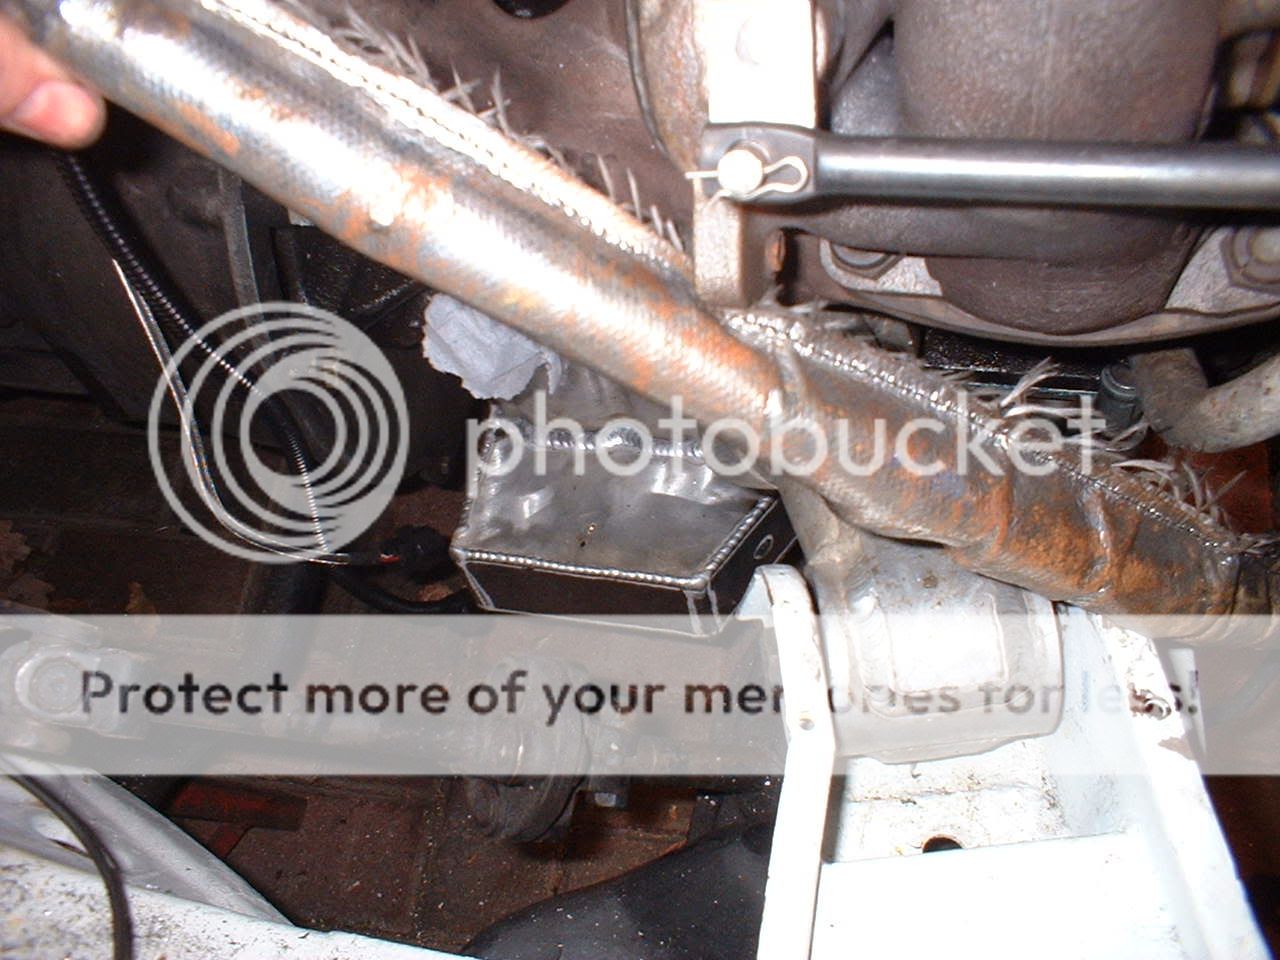
You can see in this pic how well built the sump is - mimics the line of the front x-member perfectly:

Had to change the sump over yesterday, which with no ramp can be a bit of a pig of a job on axle stands on ya drive!
Never done it before, and looked fairly simple, so got cracking. Fortunately, and as you can see from earlier pics of the engine bay, the engine doesn't sit on the subframe, but has it's own mount cradles, so you don't have to support the engine.
30 mins and a cup of tea later:
The old sump wasn't clean enough for my bufty tastes:
Having a look at it, all looked fine inside - no traces of metal or dirt which is a relief:
Nipped down to Ford and got hold of the gasket set (which thoughtfully comes with a sump plug washer, but bought a new sump plug whilst I was there.
Had a look and photograped the crank whilst it was all apart:
Spent about an hour cleaning the new sump out with loads of petrol, and then blew out any excess with the airline:
Then fitted the new sump on, replaced a few missing bolts, and lobbed the subframe back on. Pics here of the wings visible from above:
You can see in this pic how well built the sump is - mimics the line of the front x-member perfectly:
09-02-2005, 07:41 PM
#115
Advanced PassionFord User

Join Date: Jul 2004
Location: Cheshire
Posts: 2,030
Likes: 0
Received 0 Likes
on
0 Posts
sump look well rich,a mate of mine Geoff Turton GNT Enginering is doing mine,he done them for R.E.D rallying and he is also doing some modes to my inlet manifold.do you think it will be ready for bedford.
 10-02-2005, 08:37 PM
#118
20K+ Super Poster.
Thread Starter
Join Date: May 2003
Posts: 23,377
Likes: 0
Received 0 Likes
on
0 Posts
10-02-2005, 09:44 PM
#119
I've found that life I needed.. It's HERE!!
Join Date: May 2003
Location: ST Albans Car Clinic
Posts: 1,285
Likes: 0
Received 0 Likes
on
0 Posts
Originally Posted by RichardPON
It's gonna be close mate, but I think so...........
Be a Friday the 18th roadtest knowing you Rich