
C&B's 350bhp CVH RST BREAKING - See for sale section

 02-08-2007, 12:49 PM
#522
15K+ Super Poster!!

Nice one mate, probably the best setup i have seen 
I hope that the alternator relocation goes well - it gives many more possibilities. Then you can sell me a bracket
 Are all those holes in the block casting threaded? I can't remember - useful though!
I hope that the alternator relocation goes well - it gives many more possibilities. Then you can sell me a bracket
02-08-2007, 04:38 PM
#524
Advanced PassionFord User
Looks well good
How you going to adjust the alternator?
You might want to fit a FRST one as its hung differently and would put the adjuster at the top
How you going to adjust the alternator?
You might want to fit a FRST one as its hung differently and would put the adjuster at the top


 .
.
 04-08-2007, 05:05 PM
#532
PassionFord Post Whore!!
Looking fine as always.
The down pipe looks very free flowing.
Have you checked the inside bore of the Flexi, as i find you need to use a larger flexi than the pipe, to get the internal flow.

Have you tried the Alternator in car, or with the Engine mount fitted?
The down pipe looks very free flowing.
Have you checked the inside bore of the Flexi, as i find you need to use a larger flexi than the pipe, to get the internal flow.
Originally Posted by Christian and Beccy
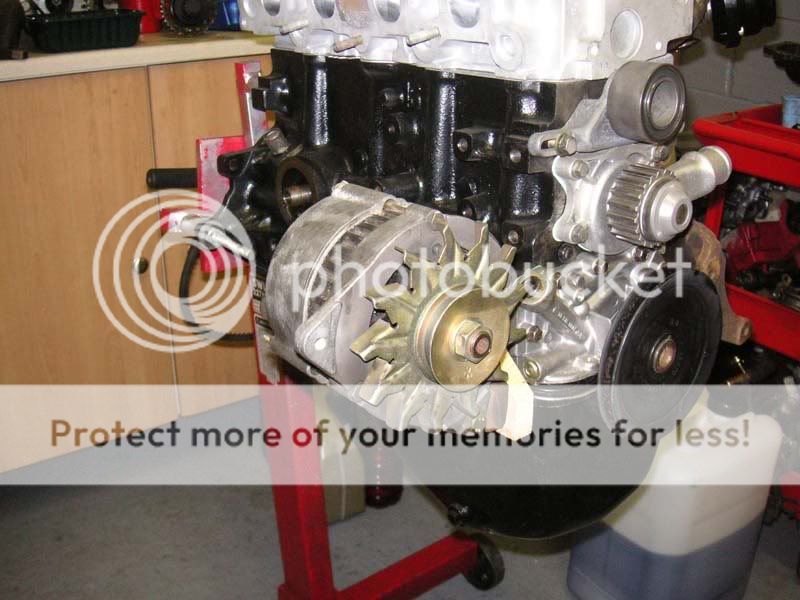
So, grabbing the bull by the horns, I set about making a mock-up for the relocation bracket for my Alternator. Yes, that's right, I am moving the Alternator!! It is going to the rear of the engine.......
...
...
Have you tried the Alternator in car, or with the Engine mount fitted?
04-08-2007, 08:20 PM
#533
Too many posts.. I need a life!!

Join Date: Aug 2005
Location: essex
Posts: 713
Likes: 0
Received 0 Likes
on
0 Posts
Awesome Awesome car 
So refreshing to see a bit of lateral thinking in regards to relocating the alternator. If it can be made to work, opens up yet more options to ring every last drop of oomph out of the ol' CVH
P.S You still after a bonnet??
Cheers
So refreshing to see a bit of lateral thinking in regards to relocating the alternator. If it can be made to work, opens up yet more options to ring every last drop of oomph out of the ol' CVH
P.S You still after a bonnet??
Cheers
04-08-2007, 09:58 PM
#534
Dan, I have roughly fitted the Alternator setup to the car and is VERY close to the inner wing, so will require some 'persuasion' if you know what I mean. 
I am on the hunt for a smaller diameter alternator now, if it exists as that would make it easier, I reckon. If not, I will just get the good old hitting stick out.
c.fogarty - Thanks for your words and yes I am still after a White RST bonnet (in decent usable condition), you got one??
I am on the hunt for a smaller diameter alternator now, if it exists as that would make it easier, I reckon. If not, I will just get the good old hitting stick out.
c.fogarty - Thanks for your words and yes I am still after a White RST bonnet (in decent usable condition), you got one??
04-08-2007, 10:23 PM
#535
PassionFord Post Whore!!
Aren't Jap alt's slightly smaller?
What ways it hitting the wing?
due to the belt wheel, or the size of the Alt?
as from yours pic's, could you make a bracket that fit's the alternator direct to the block, giving you 19mm more clearance?
What ways it hitting the wing?
due to the belt wheel, or the size of the Alt?
as from yours pic's, could you make a bracket that fit's the alternator direct to the block, giving you 19mm more clearance?
04-08-2007, 10:52 PM
#536
Originally Posted by Fiecos Dan
Aren't Jap alt's slightly smaller?
What ways it hitting the wing?
due to the belt wheel, or the size of the Alt?
as from yours pic's, could you make a bracket that fit's the alternator direct to the block, giving you 19mm more clearance?
What ways it hitting the wing?
due to the belt wheel, or the size of the Alt?
as from yours pic's, could you make a bracket that fit's the alternator direct to the block, giving you 19mm more clearance?
05-08-2007, 06:13 PM
#537
Advanced PassionFord User
iTrader: (1)

Join Date: Mar 2005
Location: Newcastle
Posts: 1,587
Likes: 0
Received 0 Likes
on
0 Posts
Awesome bit of development there mate
If your felling flush try these for a tiny alternator....
http://www.brise.co.uk/
If your felling flush try these for a tiny alternator....
http://www.brise.co.uk/
06-08-2007, 10:15 AM
#538
Originally Posted by Rs1
Awesome bit of development there mate
If your felling flush try these for a tiny alternator....
http://www.brise.co.uk/
If your felling flush try these for a tiny alternator....
http://www.brise.co.uk/
I'm not that flush, but I might well have to look at something like that.
Thanks.

 24-08-2007, 01:18 PM
#543
Quick update. I haven't done any more of the Manifold yet, kinda scared to incase it makes more power and I bust the gearbox again!! I really must press on with it I guess, but for now, here's my latest addition.
Being an old-biddy, well practically, I tend to get sick of the exhaust noise, mainly when we are travelling to an event or show and you sit for miles on the motorway right where it is it's loudest. So, this is what I have done......
(Sorry for the shit pics, it's the work camera which Gary launched on the floor the other day)

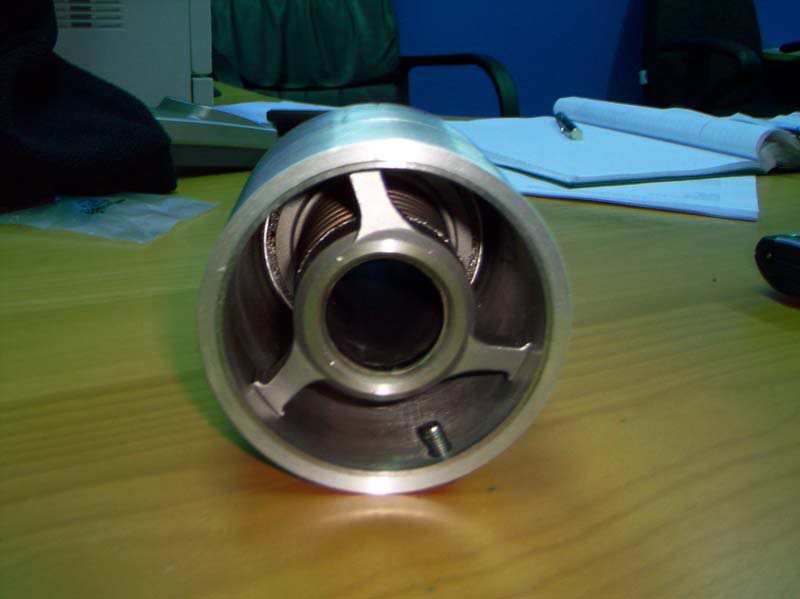
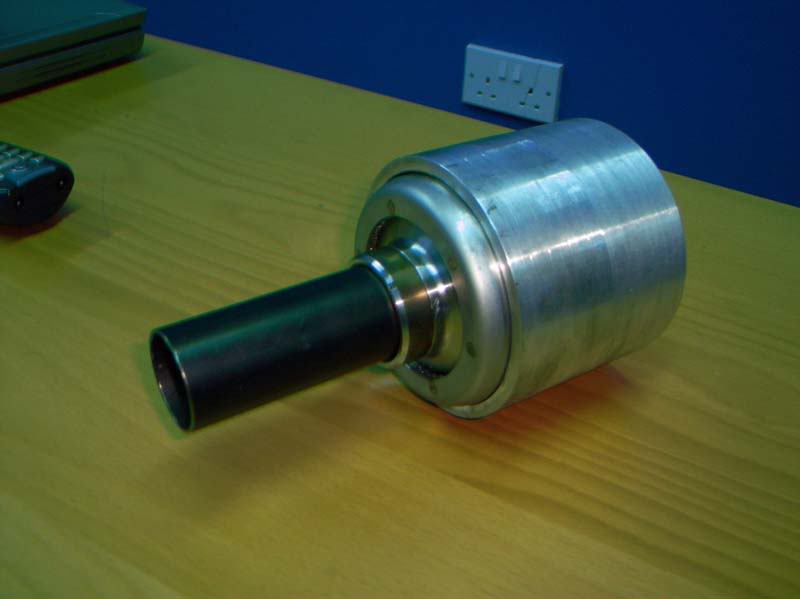
It's basically an insert which fits into the tailpipe and has a small bore pipe through it and a valve which opens under a certain amount of pressure to give increased flow when needed. It has Inconel internals and is really nice quality.
We have tested these on 200SX's and saw no significant power loss, so I thought I would give it a go. It has one tamper-proof bolt to remove it, so I can take it out for runway events etc, but enjoy a more peaceful journey to get there!!
Now, where's my slippers and newspaper.
I have used it and it certainly has made a difference, I can't tell what it's like at speed yet as I haven't been on the Dual Carriageway with it, but I'm sure it will be an improvement.
Being an old-biddy, well practically, I tend to get sick of the exhaust noise, mainly when we are travelling to an event or show and you sit for miles on the motorway right where it is it's loudest. So, this is what I have done......
(Sorry for the shit pics, it's the work camera which Gary launched on the floor the other day)
It's basically an insert which fits into the tailpipe and has a small bore pipe through it and a valve which opens under a certain amount of pressure to give increased flow when needed. It has Inconel internals and is really nice quality.
We have tested these on 200SX's and saw no significant power loss, so I thought I would give it a go. It has one tamper-proof bolt to remove it, so I can take it out for runway events etc, but enjoy a more peaceful journey to get there!!
Now, where's my slippers and newspaper.
I have used it and it certainly has made a difference, I can't tell what it's like at speed yet as I haven't been on the Dual Carriageway with it, but I'm sure it will be an improvement.

 25-08-2007, 10:06 AM
#552
10K+ Poster!!

Originally Posted by Christian and Beccy
Originally Posted by rapidcossie
fit another silencer to the exhaust?
That way you dont have to keep removing this.
25-08-2007, 11:58 AM
#553
Originally Posted by rapidcossie
Originally Posted by Christian and Beccy
Originally Posted by rapidcossie
fit another silencer to the exhaust?
That way you dont have to keep removing this.
It only takes 30 seconds to take it out.
30-08-2007, 02:09 PM
#555
Euan, there isn't really the room under an RST for any more boxes. The exhaust is close enough to the ground as it is.
Anyway, I have now got this up and running and its good actually.
It has totally 100% got rid of the god awful 70-80mph drone that was bugging me. Driving it around now its almost like a standard RST in terms of noise. Far better infact than I had expected.
It has killed the power though. I put this down to the fact that my tailpipe could only take an 87mm insert and not the 110mm one that we had previously tested.
Luckily it is a piece of piss to remove, so I can take it out in 30 seconds, allowing me to drive to an event with it in, then remove it for full power.
I should have some more pics of the manifold developments over the weekend. I have now modified the wastegate mount, just awaiting getting it all welded up. I have moved it slightly to allow more radiator clearance and for access to the fixings which were practically impossible to get to how it was and will begin building the temporary screamer pipe.
Watch this space.
 05-09-2007, 03:50 PM
#557
Right, I took the bull the the horns today so to speak and decided to have a proper test-fit. Having built this new manifold set-up on an engine out of the car, it has been tricky to get everything right, but I really wanted to do this at my own pace and didn't want to take the car off the road.
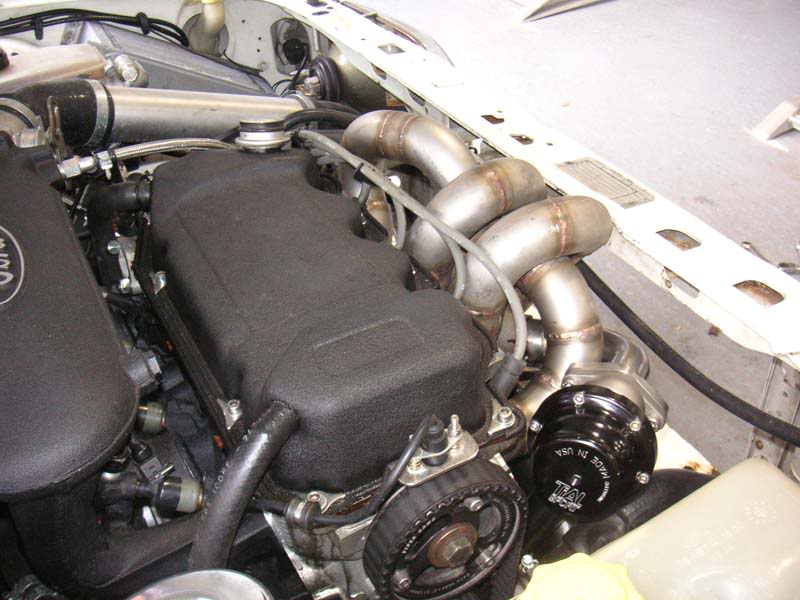
So, after removing my Bumper/Intercooler/Radiator/Turbo/Manifold/Alternator etc etc, I fitted up the new manifold. Immediately obvious was a couple of minor clearance issues. Firstly, the manifold touches part of the bonnet bracing, but also it touches the slam panel. Neither are that bad, I could get the bonnet closed and the slam panel didn't prevent me fitting the manifold, but they do both need attending to.
Then I fitted the turbine housing and downpipe, which all fits remarkably well and clears the starter motor exactly as planned.
Next was the Wastegate. After relocating it from its original forward facing position seen in earlier photos, I knew it was close to the Vernier pulley and I have already made one further adjustment to the mounting position to overcome that. It now sits perfectly. I have also built the Wastegate vent pipe (Screamer), although this is currently only tacked. The Screamer is only a temporary measure too, I have further plans for that once I have seen this setup work.
So, with everything in place so far and looking really promising, I decided to build my turbo into the new Turbine housing as I was concerned about gearbox clearance and oil drain height. It turned out that there was no issue with either of these. I have to alter the Compressor Outlet-to-Intercooler hose and remake the oil drain, but those are incidental jobs.
Then I put the radiator in position and was very pleased at just how much room I have down there. There is now masses of room between the turbo and radiator. I could, if I wanted, move the radiator back a good 2-3" and make room for a thicker Intercooler if I wanted, but that's for another time!! LOL.
So, after a great result with the test-fit, I dismantled it all in preparation for the final few bits to be welded up.


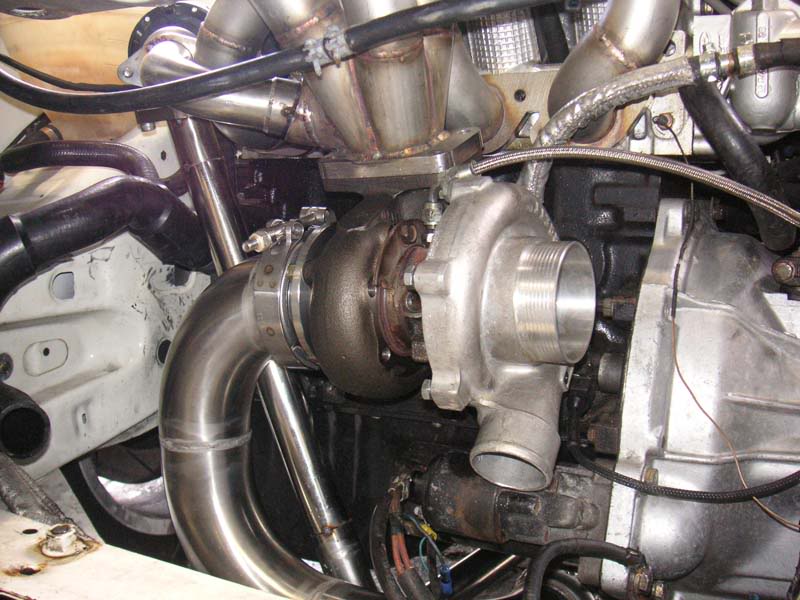
So, for the next session, I hope to make some further progress with the Alternator remount. Watch this space.
So, after removing my Bumper/Intercooler/Radiator/Turbo/Manifold/Alternator etc etc, I fitted up the new manifold. Immediately obvious was a couple of minor clearance issues. Firstly, the manifold touches part of the bonnet bracing, but also it touches the slam panel. Neither are that bad, I could get the bonnet closed and the slam panel didn't prevent me fitting the manifold, but they do both need attending to.
Then I fitted the turbine housing and downpipe, which all fits remarkably well and clears the starter motor exactly as planned.
Next was the Wastegate. After relocating it from its original forward facing position seen in earlier photos, I knew it was close to the Vernier pulley and I have already made one further adjustment to the mounting position to overcome that. It now sits perfectly. I have also built the Wastegate vent pipe (Screamer), although this is currently only tacked. The Screamer is only a temporary measure too, I have further plans for that once I have seen this setup work.
So, with everything in place so far and looking really promising, I decided to build my turbo into the new Turbine housing as I was concerned about gearbox clearance and oil drain height. It turned out that there was no issue with either of these. I have to alter the Compressor Outlet-to-Intercooler hose and remake the oil drain, but those are incidental jobs.
Then I put the radiator in position and was very pleased at just how much room I have down there. There is now masses of room between the turbo and radiator. I could, if I wanted, move the radiator back a good 2-3" and make room for a thicker Intercooler if I wanted, but that's for another time!! LOL.
So, after a great result with the test-fit, I dismantled it all in preparation for the final few bits to be welded up.
So, for the next session, I hope to make some further progress with the Alternator remount. Watch this space.
