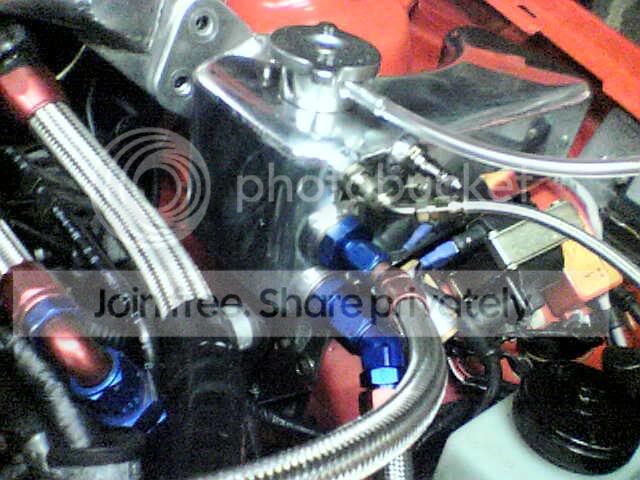
My homemade turbo heatsheild and works therm housing
 01-02-2005, 10:51 PM
#1
BANNED
BANNED
Thread Starter

Join Date: May 2003
Location: Mongsville, wiping Jimbo.'s spastic arse.
Posts: 23,032
Likes: 0
Received 2 Likes
on
2 Posts
The std headsheild wouldnt fit with the new turbo and fittings so i decided to make my own 
is really sturdy and looks pretty cool if i may say so
also shown is a new works thermostat housing, more fittings and a new Tarcal GGR header tank and swirl pot
(breater is slanted as its not fixed to the wing yet)
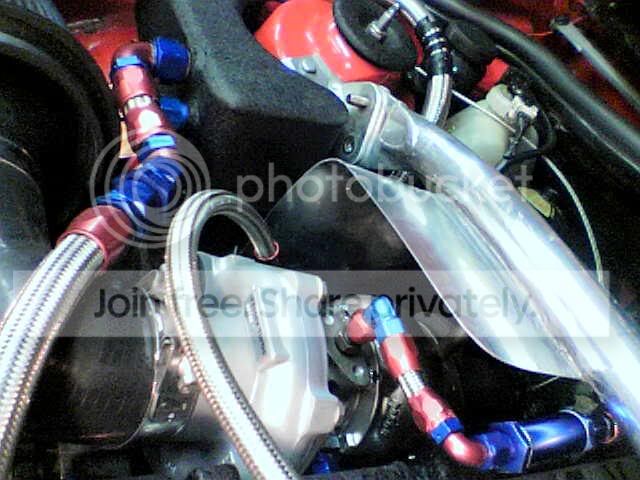

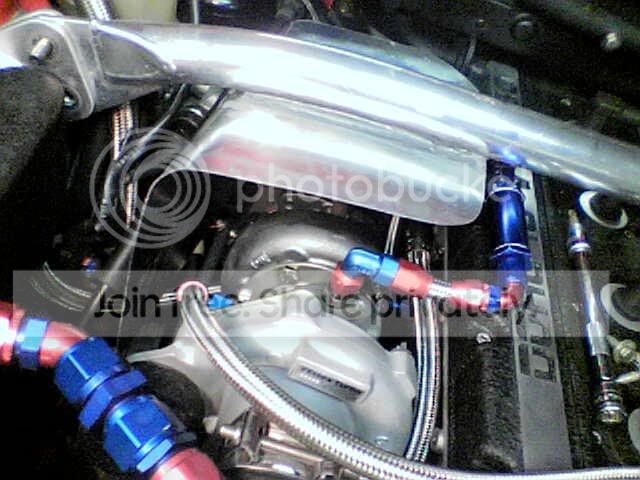

once the new engine is fitted, it should be finished!

is really sturdy and looks pretty cool if i may say so
also shown is a new works thermostat housing, more fittings and a new Tarcal GGR header tank and swirl pot
(breater is slanted as its not fixed to the wing yet)
once the new engine is fitted, it should be finished!


 01-02-2005, 11:32 PM
#7
BANNED
BANNED
Thread Starter
Join Date: May 2003
Location: Mongsville, wiping Jimbo.'s spastic arse.
Posts: 23,032
Likes: 0
Received 2 Likes
on
2 Posts
cheers guys
i think all the aftermarket ally heat sheilds look a bit tacky/wank. I spose in this case, simplest is the best?
i have had to bar think automotives number from all my phones
i think all the aftermarket ally heat sheilds look a bit tacky/wank. I spose in this case, simplest is the best?
i have had to bar think automotives number from all my phones
Trending Topics


 .
.
 02-02-2005, 08:26 AM
#18
BANNED
BANNED
Thread Starter
Join Date: May 2003
Location: Mongsville, wiping Jimbo.'s spastic arse.
Posts: 23,032
Likes: 0
Received 2 Likes
on
2 Posts
cheers guys
LOL @ dingy.. cant believe i got a compliment out of you believe me mate, if i could aeroquip electrical fittings for the coil, i would!
Mike, im so glad it has your seal of approval..
LOL @ dingy.. cant believe i got a compliment out of you
believe me mate, if i could aeroquip electrical fittings for the coil, i would! Mike, im so glad it has your seal of approval..
02-02-2005, 09:19 AM
#19
Advanced PassionFord User

Join Date: Jun 2003
Location: Lancashire
Posts: 1,627
Likes: 0
Received 0 Likes
on
0 Posts
Dave whats the differance with the thermo housing, and have you bought a new seal that goes were the thermostate fits ?
Dave.
PS did you ever fit the new temp sender in your rad ?
Dave.
PS did you ever fit the new temp sender in your rad ?
02-02-2005, 09:24 AM
#20
BANNED
BANNED
Thread Starter
Join Date: May 2003
Location: Mongsville, wiping Jimbo.'s spastic arse.
Posts: 23,032
Likes: 0
Received 2 Likes
on
2 Posts
Dave,
the thermostat housing has had all the sd push on lugs cut off and JIC fittings fitted. It also has quick release fittings and inside, the hole directly in front of the thermostat has been blanked to aid constant temps. Very cool
i shall replace the front therm seal, ill prob ring GGR as they are pretty good for bits like that.
havent got the new rad switch yet.. its next on my list.. im toying with the idea of getting an ally rad anyway
02-02-2005, 11:04 AM
#22
I've found that life I needed.. It's HERE!!

Looking good 
Bit of advise regarding the heatsheild, take it off and put some aluminised heat resistant cloth on the side nearest the turbo, Think Auto sell this (AGC2 is the one you want, 1 metre is more than enough). Use some contact adhesive to bond the pieces together then trim the excess. At the moment you have a heat transfer device
Also to tidy up the coil wiring you could use some heat shrink (the type with glue inside) to cover the blue connectors, looks better and stops water getting into where the wire and connector join
02-02-2005, 11:17 AM
#24
PassionFord Post Troll

Join Date: May 2004
Location: Robin Hood Country!!
Posts: 3,038
Likes: 0
Received 0 Likes
on
0 Posts
Love this car!! Everything on it seems to be well thought out Dave  Be good to see it this year, you goin to any shows so i can have a quick neb??
Be good to see it this year, you goin to any shows so i can have a quick neb??
 02-02-2005, 11:25 AM
#28
BANNED
BANNED
Thread Starter
Join Date: May 2003
Location: Mongsville, wiping Jimbo.'s spastic arse.
Posts: 23,032
Likes: 0
Received 2 Likes
on
2 Posts
cheers Wes, good point re the heatproofing, but i was already going to sort that the above piccies are pre assembly
Spiky, the box is a 'gordon spooner semi dog' but your guess is as good as mine!
i suspect std!
Spiky, the box is a 'gordon spooner semi dog' but your guess is as good as mine!
i suspect std!
 02-02-2005, 04:09 PM
#32
BANNED
BANNED
Thread Starter
Join Date: May 2003
Location: Mongsville, wiping Jimbo.'s spastic arse.
Posts: 23,032
Likes: 0
Received 2 Likes
on
2 Posts
nope, didnt have all the dash fittings. didnt realise how expensive they were untill i got the invoice! �480! for the coolant kit!
 02-02-2005, 06:15 PM
#34
Too many posts.. I need a life!!

Join Date: May 2003
Location: Kirkby, Notts
Posts: 953
Likes: 0
Received 0 Likes
on
0 Posts
Originally Posted by Porkie
And next children, Wes is going to show us a model Zoo he made earlier using Fairy liquid bottles, pipe cleaners and sticky back plastic

Thread
Thread Starter
Forum
Replies
Last Post