Ahmed style fuel pump fitting kit.... MikeR maybe?
 31-08-2006, 10:17 AM
#1
10K+ Poster!!
Thread Starter
iTrader: (2)
Join Date: May 2004
Location: UK
Posts: 11,383
Likes: 0
Received 0 Likes
on
0 Posts
Anybody had any dealings with fitting these, i've had a kit for a while but never got round to connecting it properly!
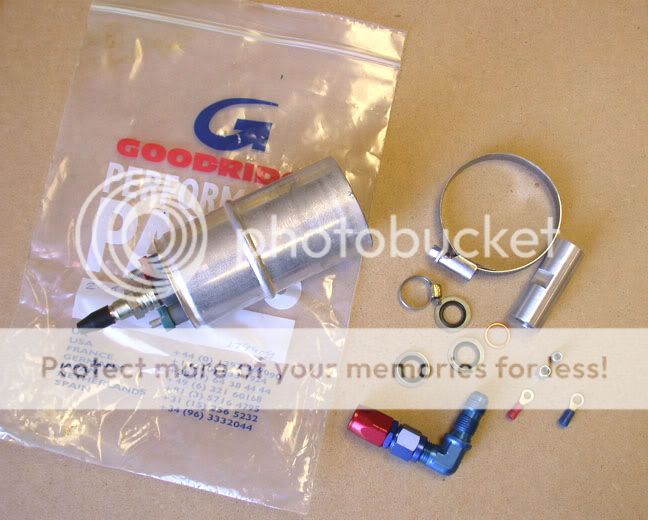
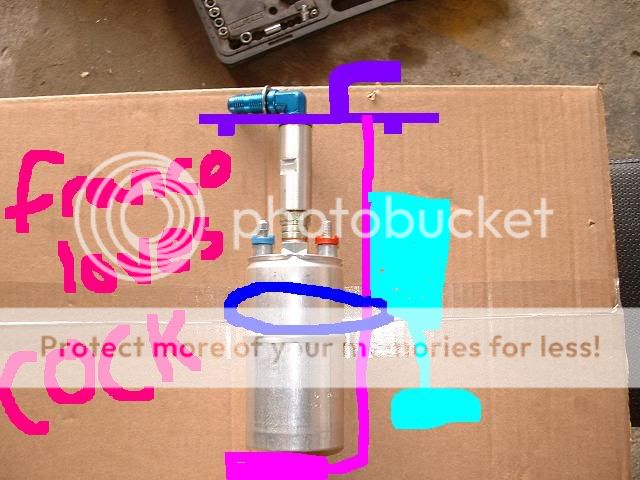
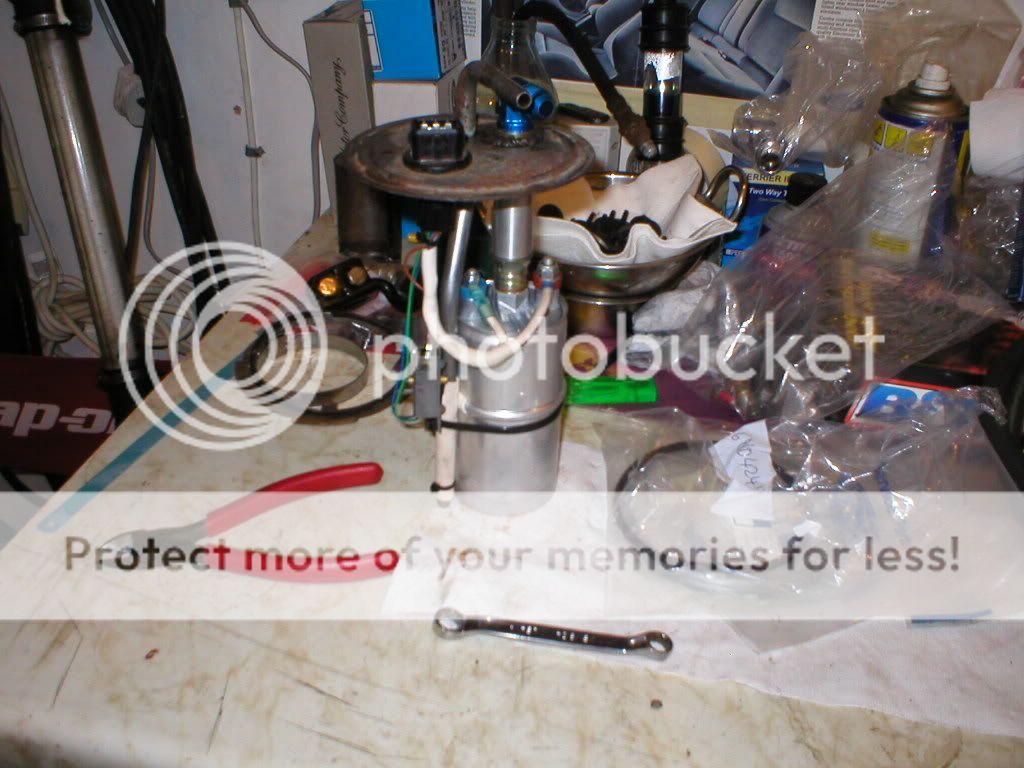
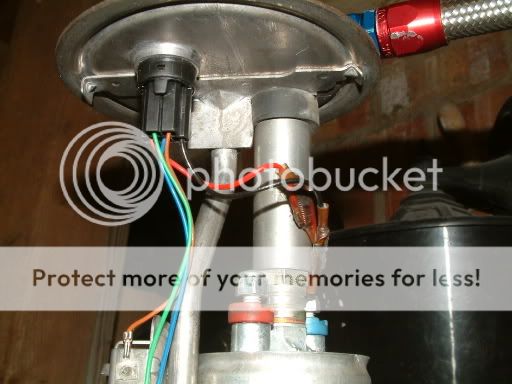
Am i right in thinking i need to remove all the bits as indicated in this pic?

Also the kit doesnt look like its complete? how many washers should i have?
This might be a job for Suparainbird!!
Am i right in thinking i need to remove all the bits as indicated in this pic?
Also the kit doesnt look like its complete? how many washers should i have?
This might be a job for Suparainbird!!
 31-08-2006, 10:28 AM
#2


How long has that lasted...

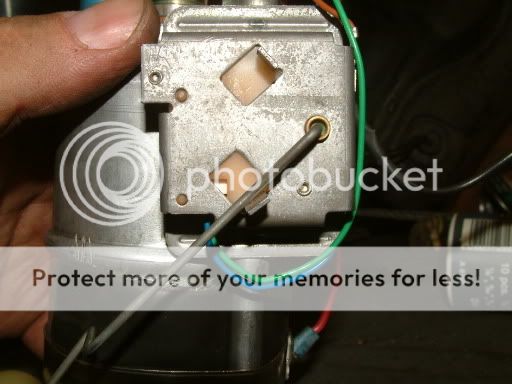
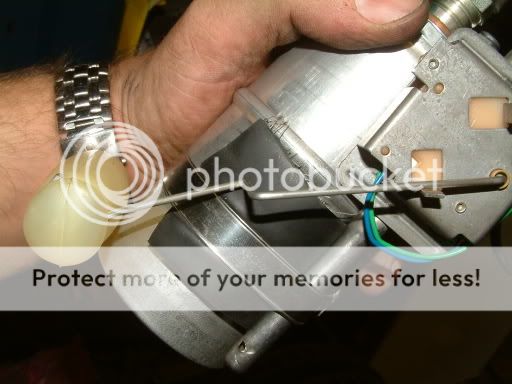
Jay... you need to remove the pipe and that part of the bracket you have indicated......then enlarge the hole where the pipe was big enough for the fitting from the new kit.....
Then simply build it up as per instructions...

If you haven`t got any destructions mate i can take a pic of mine later and show you how it`s done.....
31-08-2006, 10:34 AM
#3
10K+ Poster!!
Thread Starter
iTrader: (2)
Join Date: May 2004
Location: UK
Posts: 11,383
Likes: 0
Received 0 Likes
on
0 Posts
Originally Posted by nightdavva
How long has that lasted...
True blue peter styleee!!
Yeah if you could Rob, i just dont want to start cutting up the sender unit then end up fcuking it completely!
Ps where's Rainbird when you bloody need him!
 31-08-2006, 10:36 AM
#5
Originally Posted by nightdavva
How long has that lasted...
Jay... you need to remove the pipe and that part of the bracket you have indicated......then enlarge the hole where the pipe was big enough for the fitting from the new kit.....
Then simply build it up as per instructions...
If you haven`t got any destructions mate i can take a pic of mine later and show you how it`s done.....
.
 31-08-2006, 10:40 AM
#7
Originally Posted by Mike Rainbird
Originally Posted by nightdavva
How long has that lasted...
Jay... you need to remove the pipe and that part of the bracket you have indicated......then enlarge the hole where the pipe was big enough for the fitting from the new kit.....
Then simply build it up as per instructions...
If you haven`t got any destructions mate i can take a pic of mine later and show you how it`s done.....
. Will do Mike,going up to the workshop shortly so will show everyone how the pro`s do it...
Thats`s if i can find one...
Trending Topics
31-08-2006, 10:52 AM
#9
10K+ Poster!!
Thread Starter
iTrader: (2)
Join Date: May 2004
Location: UK
Posts: 11,383
Likes: 0
Received 0 Likes
on
0 Posts
Originally Posted by Doug Stirling
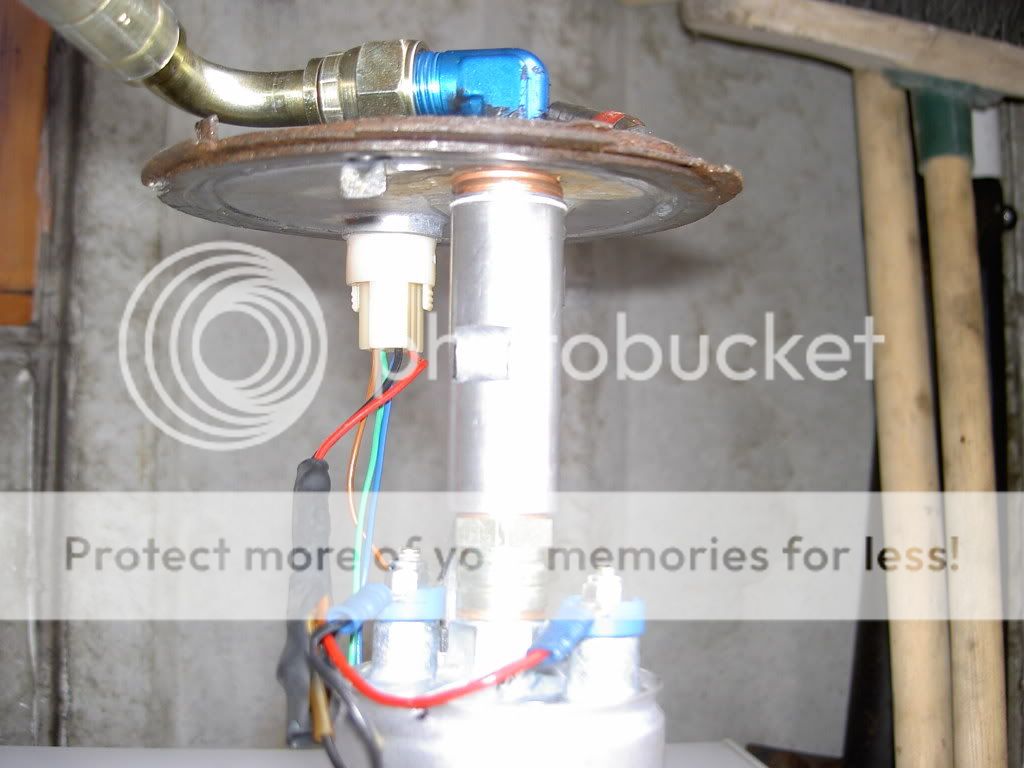
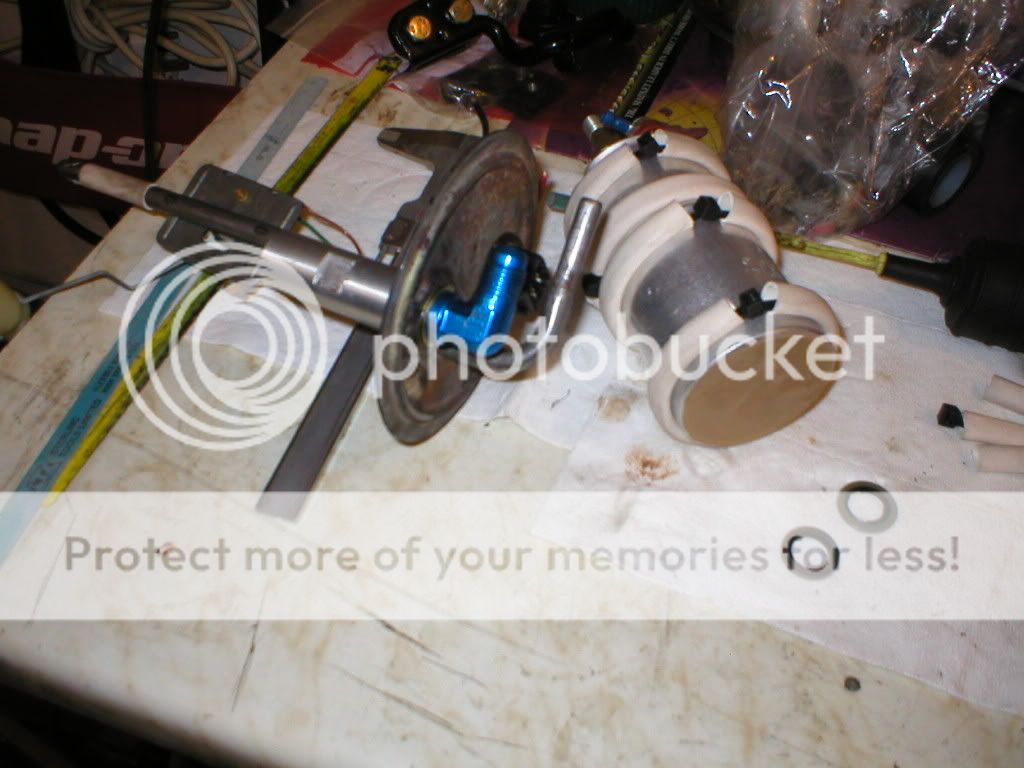
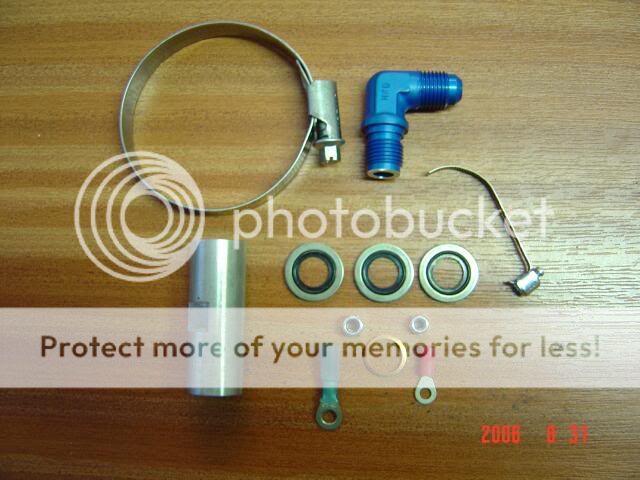
This is a Bosch pump with the full fitting kit that Mike R supplies:

Looks like i need a chinwag with Mr Rainbird!

 31-08-2006, 11:00 AM
#11
Originally Posted by Franco
Originally Posted by Doug Stirling
This is a Bosch pump with the full fitting kit that Mike R supplies:
Looks like i need a chinwag with Mr Rainbird!
 ?
31-08-2006, 11:05 AM
?
31-08-2006, 11:05 AM
#12
10K+ Poster!!
Thread Starter
iTrader: (2)
Join Date: May 2004
Location: UK
Posts: 11,383
Likes: 0
Received 0 Likes
on
0 Posts
In all honestly Mike, i havent used the kit until yesterday.....
The nuts supplied never fitted the 023 pump, nor did the connectors!
Have you got any more washers laying around you could stick in the post?
DaveEscos
I was waiting for that!!
The nuts supplied never fitted the 023 pump, nor did the connectors!
Have you got any more washers laying around you could stick in the post?
DaveEscos
I was waiting for that!!
31-08-2006, 11:23 AM
#14
10K+ Poster!!
Thread Starter
iTrader: (2)
Join Date: May 2004
Location: UK
Posts: 11,383
Likes: 0
Received 0 Likes
on
0 Posts
Originally Posted by Mike Rainbird
If I split a kit here to give you the two washers you have lost, then I will have a kit like yours .
The blue and red end fitting, I don't supply any more.
.The blue and red end fitting, I don't supply any more
. 31-08-2006, 11:24 AM
#15
10K+ Poster!!
Thread Starter
iTrader: (2)
Join Date: May 2004
Location: UK
Posts: 11,383
Likes: 0
Received 0 Likes
on
0 Posts
Originally Posted by Mike Rainbird
If I split a kit here to give you the two washers you have lost, then I will have a kit like yours .
The blue and red end fitting, I don't supply any more.
.The blue and red end fitting, I don't supply any more
. Must of been too much pimms when you put that kit together!
31-08-2006, 11:27 AM
Must of been too much pimms when you put that kit together!
31-08-2006, 11:27 AM
#16
The kit comes in a sealed polyethene bag direct from my supplier - all I have to do is look to see if it is complete (which yours WAS) and then send off .
I bet when you opened it, you did like a hasty child opening a bag of crisps and the bits went flying EVERYWHERE . Have a look on the floor where you opened them .
.I bet when you opened it, you did like a hasty child opening a bag of crisps and the bits went flying EVERYWHERE
. Have a look on the floor where you opened them .
31-08-2006, 11:34 AM
#17
10K+ Poster!!
Thread Starter
iTrader: (2)
Join Date: May 2004
Location: UK
Posts: 11,383
Likes: 0
Received 0 Likes
on
0 Posts
Originally Posted by Mike Rainbird
The kit comes in a sealed polyethene bag direct from my supplier - all I have to do is look to see if it is complete (which yours WAS) and then send off .
I bet when you opened it, you did like a hasty child opening a bag of crisps and the bits went flying EVERYWHERE . Have a look on the floor where you opened them .
.I bet when you opened it, you did like a hasty child opening a bag of crisps and the bits went flying EVERYWHERE
. Have a look on the floor where you opened them .Anyway email sent!!
31-08-2006, 11:45 AM
#18
Actually mine was the same as Jay`s......
Only one doughty washer as well.....
Ok chaps,here is one fitted....You will notice that rather than cut the end on my 90 degree fitting,i have spaced the fitting with soft copper washers to drop the fuel pump to the same level as the return pipe....This will hopefully give a little bit less chance of surge as the pump is lower in the swirl pot but not too low so as to be restricted by the swirl pot base....
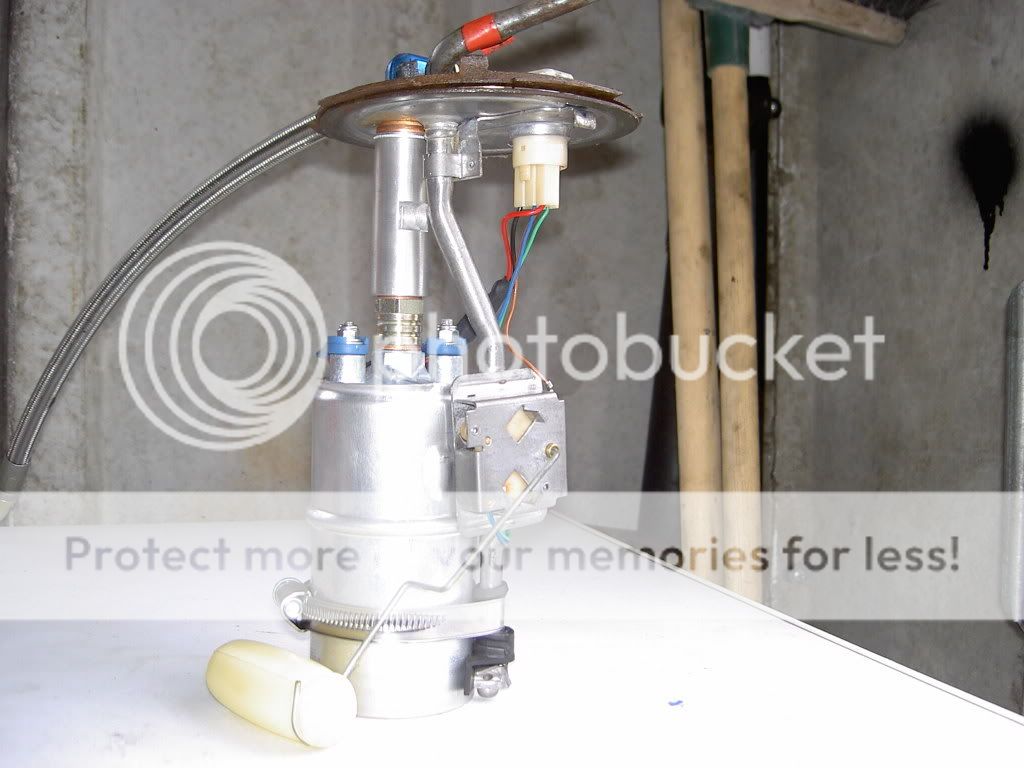
Works great and i`ve had it on the test rig up to 5 bar with no leaks...
Only one doughty washer as well.....
Ok chaps,here is one fitted....You will notice that rather than cut the end on my 90 degree fitting,i have spaced the fitting with soft copper washers to drop the fuel pump to the same level as the return pipe....This will hopefully give a little bit less chance of surge as the pump is lower in the swirl pot but not too low so as to be restricted by the swirl pot base....
Works great and i`ve had it on the test rig up to 5 bar with no leaks...
31-08-2006, 11:46 AM
#20
10K+ Poster!!
Thread Starter
iTrader: (2)
Join Date: May 2004
Location: UK
Posts: 11,383
Likes: 0
Received 0 Likes
on
0 Posts
OH FUCKING REALLY.............................
You comments Mr Rainbird before we set the lynch mob on to you!!!
Cheers Robbie, true gent amongst this riff raff!!
You comments Mr Rainbird before we set the lynch mob on to you!!!
Cheers Robbie, true gent amongst this riff raff!!
 31-08-2006, 12:46 PM
#24
10K+ Poster!!
Thread Starter
iTrader: (2)
Join Date: May 2004
Location: UK
Posts: 11,383
Likes: 0
Received 0 Likes
on
0 Posts
Originally Posted by Mike Rainbird
You both must be useless at opening bags, as I'm never wrong
31-08-2006, 12:53 PM
#25
Originally Posted by Franco
Originally Posted by Mike Rainbird
You both must be useless at opening bags, as I'm never wrong . What you do with the packages in the privacy of your own homes, is your business .
31-08-2006, 12:56 PM
#26
10K+ Poster!!
Thread Starter
iTrader: (2)
Join Date: May 2004
Location: UK
Posts: 11,383
Likes: 0
Received 0 Likes
on
0 Posts
Originally Posted by Mike Rainbird
Originally Posted by Franco
Originally Posted by Mike Rainbird
You both must be useless at opening bags, as I'm never wrong . What you do with the packages in the privacy of your own homes, is your business .
31-08-2006, 02:14 PM
#27
Originally Posted by Franco
Originally Posted by Mike Rainbird
You both must be useless at opening bags, as I'm never wrong Poor old Mike and his "Small Package".....
01-09-2006, 08:38 AM
#28
10K+ Poster!!
Thread Starter
iTrader: (2)
Join Date: May 2004
Location: UK
Posts: 11,383
Likes: 0
Received 0 Likes
on
0 Posts
Right too late now as its all done.....
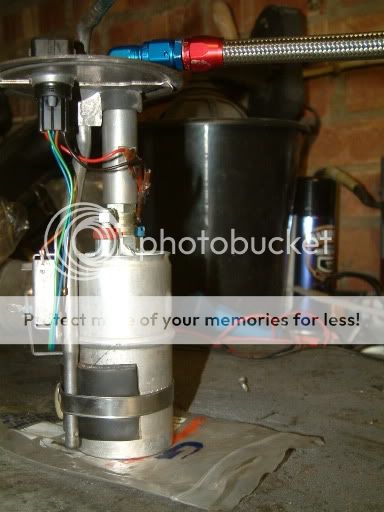
Wasn't too keen on using so many washers to space it under the return pipe so ended up using an old rubber rad mount to absorb the uneven feel of the underside of the sender.....
Brass washers fitted on every join except at the top.
Only thing that concerns me is that the fuel level bob now doesn't quite reach its final position (as it hits the pump)..........
Should this amount of discrepancy be anything to worry about
More pic's of the work in my resto thread if anybodies interested.
Any input appreciated!
Thanks
Jason
01-09-2006, 08:45 AM
#29
Banned

Join Date: Jul 2003
Posts: 7,078
Likes: 0
Received 0 Likes
on
0 Posts
Franco 
I would use the correct high pressure sealing washers as you dont want any pressure leakage AFTER the pump - for obvious reasons
Your 4 - 5 BAR line pressure MAY WELL cause a leak from that rad spacer washer shown.....also you dont know if the rubber is made from petrol/vapour resistant material - it could turn it to a blob of sludge with time.
01-09-2006, 09:00 AM
#30
10K+ Poster!!
Thread Starter
iTrader: (2)
Join Date: May 2004
Location: UK
Posts: 11,383
Likes: 0
Received 0 Likes
on
0 Posts
Originally Posted by Doug Stirling
Franco
I would use the correct high pressure sealing washers as you dont want any pressure leakage AFTER the pump - for obvious reasons
Your 4 - 5 BAR line pressure WILL cause a leak from the rad spacer washer shown.
I would use the correct high pressure sealing washers as you dont want any pressure leakage AFTER the pump - for obvious reasons
Your 4 - 5 BAR line pressure WILL cause a leak from the rad spacer washer shown.
Fear not captive audience, it can all be changed no bother!!
And there was me all proud of meself last night!!
01-09-2006, 09:44 AM
#31
Banned
Join Date: Jul 2003
Posts: 7,078
Likes: 0
Received 0 Likes
on
0 Posts
I know that the rubber is quite hard, but with 4 - 5 BAR line pressure it will distort and let fuel past.
The fuel wont be wasted as it will drip down in to the tank, but I think the pressure will be affected

The fuel wont be wasted as it will drip down in to the tank, but I think the pressure will be affected
01-09-2006, 09:51 AM
#32
10K+ Poster!!
Thread Starter
iTrader: (2)
Join Date: May 2004
Location: UK
Posts: 11,383
Likes: 0
Received 0 Likes
on
0 Posts
Yes Doug...............
So can i space this correctly with just washers? As the kit i got off Rainbird only can with one seling washer.... Or do i get a handful of them to replace the rubber mount.
Learning curve this!
So can i space this correctly with just washers? As the kit i got off Rainbird only can with one seling washer.... Or do i get a handful of them to replace the rubber mount.
Learning curve this!
01-09-2006, 10:00 AM
#34
Banned
Join Date: Jul 2003
Posts: 7,078
Likes: 0
Received 0 Likes
on
0 Posts
Originally Posted by Franco
WTF happened there, when i replied all i saw was a picture!!
To answer re the use multipile washers: Well, that may be better than what you have now, but still a "bit" of a bodge IMO..........
Why cant you get Mike R to send you some of the correct items?
01-09-2006, 10:32 AM
#35
10K+ Poster!!
Thread Starter
iTrader: (2)
Join Date: May 2004
Location: UK
Posts: 11,383
Likes: 0
Received 0 Likes
on
0 Posts
Because according to him, me & robbie got excited and lost a few!
Bless.
Ok i can totally see where you're coming from Doug but..........
The areoquip fitting runs through all the washers, rubber mounts straight to the billet tubing which is all tight. Thus i cannot see where the pressure will be lost.
Sorry for all this, i just want to make sure its right first time!
What i could do is build up from the billet pipe using washers (making the last one a h/press washer - that would mean i'd have 2 h/press washers either side of the actual sender part.
If that makes sense?!
01-09-2006, 10:48 AM
#37
10K+ Poster!!
Thread Starter
iTrader: (2)
Join Date: May 2004
Location: UK
Posts: 11,383
Likes: 0
Received 0 Likes
on
0 Posts
Originally Posted by Mike Rainbird
If I split a kit here to give you the two washers you have lost, then I will have a kit like yours .
The blue and red end fitting, I don't supply any more.
.The blue and red end fitting, I don't supply any more
.Have you changed the kit recently?!?
 01-09-2006, 10:55 AM
#39
Franco,
Seeing as you confirmed that you got that in the first picture that Doug posted, I find it strange you're saying now that you didn't.
It's the small banjo, but not looped round into a "ring" yet  - try Spec-savers .
I buy the kits in in bulk, and the first batch was like the picture Doug posted up, the second batch was like the picture I posted up.
Seeing as you confirmed that you got that in the first picture that Doug posted, I find it strange you're saying now that you didn't
.It's the small banjo, but not looped round into a "ring" yet
.I buy the kits in in bulk, and the first batch was like the picture Doug posted up, the second batch was like the picture I posted up
.
01-09-2006, 11:03 AM
#40
10K+ Poster!!
Thread Starter
iTrader: (2)
Join Date: May 2004
Location: UK
Posts: 11,383
Likes: 0
Received 0 Likes
on
0 Posts
Why the change then?
I tell you for why, the billet tube & the aeroquip fitting do not seal flush with the sender unit (due to the lenght of the quip in my OLDER kit).
This is what i'm trying to factor out using a bloody rubber bung!
I tell you for why, the billet tube & the aeroquip fitting do not seal flush with the sender unit (due to the lenght of the quip in my OLDER kit).
This is what i'm trying to factor out using a bloody rubber bung!