The Scorpion Project - My Cossie Capri - with pictures..... updated 18/07/08
 07-07-2008, 02:21 PM
#1
Alcatraz
Thread Starter
Join Date: Jul 2008
Location: Malta
Posts: 44
Likes: 0
Received 0 Likes
on
0 Posts
Please leave a comment ...If like this post and would like more updates I need more feedback and most importantly your support!
Thread Updated...26/09/2010
The Scorpion project was kept in store for 15 years now. The project proceeded some 3 years ago because I plucked up my courage to finish it. I'm posting guidelines on how the projects going! Most importantly I need your support and advice!
Do you think that the project is worth continuing? At the end, I will post the total spent on this car.
Cheers
Paul
__________________________________________________ ______
A bit of info on the car
The car was originally bought off its first owner as a Solar Gold Metallic (XSC 1366 - F.A Bollig and Kemper) excellent condition. Just fell in love with the car so much, that the day after it was parked in my garage! This is a one owner example 14,900 kms on the clock. The car had no dents or signs of rust anywhere The owner claimed that it was in its original paintwork.
Ongoing Criticism
Whenever I went out with the car, people used to gaze at it a lot....It only did 150 kms with it's original engine. In the remaining time, the car was undergoing the project transformation
Many ppl argued that this should have been kept original especially when considering the low mileage .
The Project Car
I had to create the car which I "always promised myself". Way back in 1995 I had already planned of putting in a Cosworth engine (I actually bought this in 1999).
My Cossie Baby

Engine and a nice Borg Warner Gearbox...

I had also done sketches in pencil of how my dream car would look after the whole project was complete (1994).
The sketched car looked like a Capri with a Cartel Kit, a whale tail and an xx nose cone ....
I didn't realise what I was in for and that it would have taken me so long!
There were a couple of hitches on the way which almost led me to discontinue my project several times. Was even going to sell the whole thing but so far I'm still holding on.
Pressure to Discontinue Project::
Some of the obstacles included:
- A spray painter who left this jewel car "wroth" (double meaning) for over 5 years.
- An angry girlfriend jealous of the car
- Famly always not wanting the car around in any way!
BUT ...... I DIDN'T GIVE UP .... AND I'M PROUD OF IT!....
The Spray Paint - The First Time:
Starting off with the spray painter .... the idiot always promised "he'd be starting it but in fact he never did.....work did not start up until the year 1999 when I was polite enough to break the guy's nose. Took the car elsewhere, a friend of mine named Paul who did a brilliant job ....
Some nice shots of the body after the respray

Front right wing ... and Carl Edgoose (Very good friend of mine who comes all over from the UK to see the progess

The back view ... look at the finish

Nowhere was spared .... not even inside ...

A First Shot at Fitting the Engine in
I joined the engine and BorgWarner box together and centred them in place...Don't try to make them pass together from the top cos you will dent the bodywork.
Most of the Capri owners i met would fit the cossie on the standard Pinto mounts. I realised that on the standard Pinto mounts on a Pinto Cross member, the engine would fit ok but one would have to:
- Cut down the propshaft by an inch Afterwards rebalance it ... trust me it never comes like the factory one
- Cut a bigger hole for the gear lever as it moves backwards Clearly this is the most stupid thing to do on a Capri. It ruins the driver's feel to the car. Anyone owning Capri's knows that the driver feels great at the back of the steering wheel. This all comes from the positioning of the driver's controls... mess about with that and the car's magic gone. Besides the gear lever and handbrake are very close already so another good reason not to mess about with the factory position.
- Invent a gearbox mounting ...
- Hammer in the car's bell housing in order to accomodate that huge Borg Warner gearbox
- Cut the battery tray 2 inches shorter
- Put in 2 huge 3.5 inch holes in the front panel to make the intercooler hoses pass through
- Cut yet another 4 inch hole on the driver's side front panel to make the air cleaner pass through ....
But Guys are you SERIOUS? You'd end up messing up the car to fit in a Cossie lump.

I'm fitting it MY WAY sorry!
- Make me create customised engine mounts
- Eliminate the propshaft problem keep it factory (perfect)
- Move gearbox forward and centre the gear lever
- Keep the bell housing untouched
- Move the centre of mass forward
- We still have the battery tray problem which I will solve as well
- Will eliminate the idea of the holes by creating a big custom intercooler and radiator shaped for the Capri and not vice versa....
Keeping the CAR UNTOUCHED...
Also in the pipeline ... is the idea of putting in a nice powersteering.....will fit it!

The car was finished in a nice perlescent Bluey / Purple Colour. The girlfriend (at the time ..)used to threaten that she would damage the car whenever i used to work on it! The car was yet AGAIN left under a plastic cover just to let sleeping dogs lie. Not realising that the humidity was damaging the paintwork .... Had a terrible surprise when I uncovered it 6 months later ....was angry..... One fine day, the girlfriend told me to "sell the stupid car and that I was unable to finish the car" . . so I got rid of her ...the girlfriend of course....longest 3 seconds of my life!
Restarting from Scratch!.....The second time
As the spray underneath the cover was still fresh. When humidity got between the cover and the paint work OMG OMG. The car got filled up with a very small number of spots in some areas. These never measured more than 1 to 1.5 mm each. I wasn't trusting the spray anymore.
When the sprayer saw the car ... he felt like killing me ... No matter how much i asked him to redo the brilliant job, Paul refused mainly because he had taken a lot of effort to produce the outstanding job. Futhermore he had stated that now it wasn't a matter of respraying the car. The car had to undergo a full restoration jobin order to make sure to cleant the spray bed and didn't have enough time to approach such a task.
Some years on, while looking for a spray painter and restorer, the only thing that was done on the car was sanding down and treating the spots. Luckily for me there was no signs of corrosion on the body underneath.
After scrutinizing the various jobs around, my eye caught a nice perlescent Sierra Cosworth in Candy Apple Red which was restored from a wreck. What was particular about the guy who did it was that he specialised in Fords and Cosworths...In my opiinion he had the balls to do a good job. Alan Busuttil (Daytona Wprkshop) took a good look at the car. While saying it was a good looking car indeed, he didnt really trust the black spots . The only way of knowing was to sand down the body completely and assess from there...Indeed he was right... there were more spots lurking underneath the etching primer (the lowermost coat). The verdict was that the metal was just contaminated with the humidity coming through the pores of the paint. Funnily enough he had told me that there are many more spots which we can't really see with the bare eye and that he would have proved this as we went along with the reborn project.
So far the car went through the following ...
Step 1 - the body shell outer areas such as wings, roof etc...got finely sanded down by hand and were given a special metal treatment: a very expensive acid which is sold in 200 ml cans....And i needed gallons of it! The acid surfaces these black spots and then hardens completely locking any air from going through. This rock hard coat has to be then sanded down by hand again and the respray process can begin ....The problem being sanding it down...To put you in the atmosphere it would take you around 30 - 40 minutes to take off 2 square inches of it!

Taking a close look at the right wing above, there seems to be "black dirt" coming out in certain areas of the wing. This occurs when the acid in the treatment surfaces the impurities within the metal to the top. This is not rust but if its left in the metal it does become rust indeed.
Note to the smart eyed: The rear windows now open...modified the frame in that area
Step 2 - The remaining areas which were not as delicate such as the engine bay, front & rear panels , running boards, windscreen surrounds, floor board etc.) got very finely sand blasted in order to eliminate these problems completely.

As seen above that greenish colour of the engine bayis the bare metal showing in its rust free state. This can be easily compared to the grayish colour of the treatment shown on the passenger wing. The pictures below show the good condition of the car in areas which are typically found to rust away on Capris.
Inspecting some more areas around the headlamps to make sure

Left headlamp area... factory sealer hiding original welding: perfectly clean

Right headlamp area ... just as clean

Gearbox bell housing

Check out chassis legs when buying a Capri.... they typically rust here as well!

These are clean though...

The rear panel...

The petrol filler area

inside was sand blasted as well... especially the blower's air duct...there typically is some surface rust and many of you overlook it!

After the sand blasting ...
Just as soon as the car got sand blasted it was carefully stored in a warm oven, the bare metal was specially cleaned and sprayed using Etching primer within the hour. It is important not to leave bear metal for long otherwise it starts oxidizing within a day.
Step 3: First all the still-dirty areas to be sprayed are thouroughly checked'n'cleaned with a soft wirebrush. Finally the special liquid cleaner is applied to eliminate all the dirt deposits...Yepp he's the Daytona man...Alan

Step 4: The clean sand-blasted areas were then sprayed with etching primer ...kept overnight to bake gently in the oven ... the following day the etching primer had several coats of primer applied over it...Here's an example.... and YES for the SMART - EYED... There will be NO HOLES IN HERE TO FIT THE COSSIE except maybe for putting the ECU inside. . . .Many even cut or remove the battery tray... I won't ...I moved it 2 inches forward

Back view of the right wing and running board.... yes ALL body parts in this Capri are still the original ones

That's all for now guys .... Tired
Last edited by Alcatraz; 26-09-2010 at 02:52 PM.
 12-07-2008, 09:11 AM
#3
Alcatraz
Thread Starter
Join Date: Jul 2008
Location: Malta
Posts: 44
Likes: 0
Received 0 Likes
on
0 Posts
- Candy Apple Red is One of My favourites .....
- the Standard 2.8i Metallic Dark Blue colour is also good ....
- MY favourite however is the Montreal Blue which i opted for in it's FIRST RESPRAY ... its a perlescent colour which comes out on the Z4 BMW... it has some 20 flakes of colour ... it's a dark colour but believe me when it's got lighting on it .... or the car's out and about in the sun...it's a stunner....Obviously you can't catch that in a picture ....
What do you think of the car's condition? Is it worth proceeding or should i quit?
 12-07-2008, 10:48 AM
#7
Alcatraz
Thread Starter
Join Date: Jul 2008
Location: Malta
Posts: 44
Likes: 0
Received 0 Likes
on
0 Posts
Trending Topics
12-07-2008, 01:08 PM
#8
15000
Join Date: May 2004
Posts: 21
Likes: 0
Received 0 Likes
on
0 Posts
What about BMW Carbon Black? Dark Blue/Black goes blue in the sun. You could add more pearl and mica if you wanted to be more pearlescent. Or even Candy Blue another amazing colour!
Only you know if its worth proceeding.. I've had my car for over 9 years and have had plans (Big and Small) to do things ever since i bought it.. Getting married other commitments, responsibilities etc. have made me thing is it worth it? But then I'm thinking i've had it for a decade or so, have all these images in my head. If i don't do it i will properly regret it.. Depends on what the car means to you. The other factor that made me decide to put my plans to action is, How many times you see your car on the road? I can't remember the last time i saw a Capri...
Only you know if its worth proceeding.. I've had my car for over 9 years and have had plans (Big and Small) to do things ever since i bought it.. Getting married other commitments, responsibilities etc. have made me thing is it worth it? But then I'm thinking i've had it for a decade or so, have all these images in my head. If i don't do it i will properly regret it.. Depends on what the car means to you. The other factor that made me decide to put my plans to action is, How many times you see your car on the road? I can't remember the last time i saw a Capri...
Last edited by Crazy; 12-07-2008 at 01:16 PM.
12-07-2008, 01:27 PM
#9
Alcatraz
Thread Starter
Join Date: Jul 2008
Location: Malta
Posts: 44
Likes: 0
Received 0 Likes
on
0 Posts
What about BMW Carbon Black? Dark Blue/Black goes blue in the sun. You could add more pearl and mica if you wanted to be more pearlescent. Or even Candy Blue another amazing colour!
Only you know if its worth proceeding.. I've had my car for over 9 years and have had plans (Big and Small) to do things ever since i bought it.. Getting married other commitments, responsibilities etc. have made me thing is it worth it? But then I'm thinking i've had it for a decade or so, have all these images in my head. If i don't do it i will properly regret it.. Depends on what the car means to you. The other factor that made me decide to put my plans to action is, How many times you see your car on the road? I can't remember the last time i saw a Capri...
Only you know if its worth proceeding.. I've had my car for over 9 years and have had plans (Big and Small) to do things ever since i bought it.. Getting married other commitments, responsibilities etc. have made me thing is it worth it? But then I'm thinking i've had it for a decade or so, have all these images in my head. If i don't do it i will properly regret it.. Depends on what the car means to you. The other factor that made me decide to put my plans to action is, How many times you see your car on the road? I can't remember the last time i saw a Capri...
 14-07-2008, 06:32 PM
#11
Alcatraz
Thread Starter
Join Date: Jul 2008
Location: Malta
Posts: 44
Likes: 0
Received 0 Likes
on
0 Posts
Ok .....Time for another update.... We sandblasted another particular area of the car... this time however prior to spraying the etching primer ... a coat of galvanizing was added in between... lets see who guesses which parts of the car are these!! Take a look .... 
Step1: Sanblasted ... Step 2 (Extra step): Galvanised ... Step 3: Sprayed in Etching Primer ... Mysterious picture...1

Mysterious Picture 2.....

Mysterious Picture 3......

ok ... that's the floor board from underneath and these particular pictures belong to the gearbox tunnel / the side sills and one of the floor panels.... I couldn't take better pics because I was stuck underneath the car an inch away from the floorboard...the point is ... the whole underside of the car is reflecting already!!...Am really happy with its condition!
Note: I did not waste time covering the mechanical bits because I do not intend to reuse them...
I didn't decide yet if this area will be sprayed in gloss finish (like the top colour) or in very fine stoneguard. . . .I reckon that stoneguard is more protective.....eventhough im tempted!
Step1: Sanblasted ... Step 2 (Extra step): Galvanised ... Step 3: Sprayed in Etching Primer ... Mysterious picture...1
Mysterious Picture 2.....
Mysterious Picture 3......
ok ... that's the floor board from underneath and these particular pictures belong to the gearbox tunnel / the side sills and one of the floor panels.... I couldn't take better pics because I was stuck underneath the car an inch away from the floorboard...the point is ... the whole underside of the car is reflecting already!!...Am really happy with its condition!
Note: I did not waste time covering the mechanical bits because I do not intend to reuse them...
I didn't decide yet if this area will be sprayed in gloss finish (like the top colour) or in very fine stoneguard. . . .I reckon that stoneguard is more protective.....eventhough im tempted!
Last edited by Alcatraz; 14-07-2008 at 06:53 PM.
14-07-2008, 07:23 PM
#12
Alcatraz
Thread Starter
Join Date: Jul 2008
Location: Malta
Posts: 44
Likes: 0
Received 0 Likes
on
0 Posts
Ok ... so once that the complete body got sprayed in proper etching primer and undercoat..... and sanded down with fine sanding foam
Step 1: The whole car was given a black tint so that:
- the colour does not light up too much and dark colour looks deeper.
- if you get some stone chiips with time, you don't get white spots all over the place....
- It's easier to spot minor defects (if any) prior to spraying the final colour on
- if you get some stone chiips with time, you don't get white spots all over the place....
- It's easier to spot minor defects (if any) prior to spraying the final colour on
Now i'm sure I want a dark colour on the car...

nice nose .....

back view....

right back.....

left back...

Right wing...

Left wing...

Step 2: The undercoat is adequately left to dry in the sun for some days. In this manner the paint won't chip that easily as the bed would be appropriately hardened
Step 3: Once it's done ... the paintwork is sanded down with very fine sanding foam again (dry no water) until it starts to reflect light off.....The whole car is placed in the oven again under neon lights to spot any defects... if there are any, these get corrected and the above 3 steps get repeated again.....In this case, the body was perfect so first time lucky


The paintwork gets cleaned a couple of times now and it's time for the colour..... but we'll see what i chose...
Enough for now ....Tired!
Enough for now ....Tired!
Last edited by Alcatraz; 14-07-2008 at 07:56 PM.
14-07-2008, 08:05 PM
#14
Alcatraz
Thread Starter
Join Date: Jul 2008
Location: Malta
Posts: 44
Likes: 0
Received 0 Likes
on
0 Posts
Just to continue on what you said. If i left the engine on the standard Pinto mounts and a Pinto Cross member...I would have had to modify the trans tunnel ... and the gear lever is an inch backwards from the centre of the hole... and for me that is inacceptable........most ppl just make a larger hole...and Im not doing that....for reasons explained in my first thread....
14-07-2008, 08:12 PM
#15
Alcatraz
Thread Starter
Join Date: Jul 2008
Location: Malta
Posts: 44
Likes: 0
Received 0 Likes
on
0 Posts
Cheers mate ...and congrats for your awesome Capri...As I told you ... I ain't sure yet ... what's with MrS1 on the whale tail idea?
15-07-2008, 06:53 AM
#16
founder of chicken porn

 15-07-2008, 08:46 AM
#17
Regular Contributor

Nice project
2 things though, the T5 will fit without modifying the tunnel, and you dont need to touch the battery tray either. I hear what your saying about the propshaft but surely its easier to get a new prop made than swap the engine mounts and move the tray!!
Ive got a spare prop here that's done less than 500 miles before I swapped my axle over which made it redundant.
15-07-2008, 11:10 AM
#18
Alcatraz
Thread Starter
Join Date: Jul 2008
Location: Malta
Posts: 44
Likes: 0
Received 0 Likes
on
0 Posts
Nice project
2 things though, the T5 will fit without modifying the tunnel, and you dont need to touch the battery tray either. I hear what your saying about the propshaft but surely its easier to get a new prop made than swap the engine mounts and move the tray!!
Ive got a spare prop here that's done less than 500 miles before I swapped my axle over which made it redundant.
2 things though, the T5 will fit without modifying the tunnel, and you dont need to touch the battery tray either. I hear what your saying about the propshaft but surely its easier to get a new prop made than swap the engine mounts and move the tray!!
Ive got a spare prop here that's done less than 500 miles before I swapped my axle over which made it redundant.
Thanks for the comment. but I find what you said contradicting...You're with me that you need a shorter propshaft .... so it is clear that the gearbox is longer by roughly an inch...The Borg Warner box gear lever comes 1 inch backwards... making the 2nd and the 4th gear bump into the handbrake which is inacceptable for me. I want to centre the gear lever and leave the propshaft stock. All in all, less mods will be done with my approach, even though doing new mountings will be tougher ... I reckon it's worthed cos of the benefits and not for the work involved.
Last edited by Alcatraz; 15-07-2008 at 11:13 AM.
15-07-2008, 11:20 AM
#19
Regular Contributor
Hi there
Thanks for the comment. but I find what you said contradicting...You're with me that you need a shorter propshaft .... so it is clear that the gearbox is longer by roughly an inch...The Borg Warner box gear lever comes 1 inch backwards... making the 2nd and the 4th gear bump into the handbrake which is inacceptable for me. I want to centre the gear lever and leave the propshaft stock. All in all, less mods will be done with my approach, even though doing new mountings will be tougher ... I reckon it's worthed cos of the benefits and not for the work involved.
Thanks for the comment. but I find what you said contradicting...You're with me that you need a shorter propshaft .... so it is clear that the gearbox is longer by roughly an inch...The Borg Warner box gear lever comes 1 inch backwards... making the 2nd and the 4th gear bump into the handbrake which is inacceptable for me. I want to centre the gear lever and leave the propshaft stock. All in all, less mods will be done with my approach, even though doing new mountings will be tougher ... I reckon it's worthed cos of the benefits and not for the work involved.
My gearlever does'nt touch my handbrake at all.
Will take a piccie of my interior for you to prove it mate
15-07-2008, 12:09 PM
#20
Alcatraz
Thread Starter
Join Date: Jul 2008
Location: Malta
Posts: 44
Likes: 0
Received 0 Likes
on
0 Posts
Originally Posted by 4parajon 
My gearlever does'nt touch my handbrake at all.
Will take a piccie of my interior for you to prove it mate
My gearlever does'nt touch my handbrake at all.
Will take a piccie of my interior for you to prove it mate
It would help if you take a pic of the gear lever with no bellow, just to see how the gear lever points out because we might be saying the same thing. Useless taking a pic of the covered gear lever!
I don't think the Capri is shorter
Thanks
Last edited by Alcatraz; 15-07-2008 at 12:12 PM.
 15-07-2008, 08:39 PM
#22
15000
Join Date: May 2004
Posts: 21
Likes: 0
Received 0 Likes
on
0 Posts
Hey Dude its coming along nicely keep up the work and dont loose heart no matter what anyone says, Family, Friend, etc... There just Jeleous!
Have you looked into that BMW Carbon black yet? Its a M colour found on the M3 & M5's BMW paint code 416. Like i said before you could always mix the paint with more pearl or/and Mica to switch it a little and had more sparkle/flip... Especially if your wanting a dark colour.. Or Subaru Pearl black Ive seen this thing look black untill the strong sunlight hit the body work then BAM! Yellow metal flakes out of nowhere. Another Great colour! espcially if your going split rims with gold bolts or gold faces! or even cream interior!
Have you looked into that BMW Carbon black yet? Its a M colour found on the M3 & M5's BMW paint code 416. Like i said before you could always mix the paint with more pearl or/and Mica to switch it a little and had more sparkle/flip... Especially if your wanting a dark colour.. Or Subaru Pearl black Ive seen this thing look black untill the strong sunlight hit the body work then BAM! Yellow metal flakes out of nowhere. Another Great colour! espcially if your going split rims with gold bolts or gold faces! or even cream interior!
16-07-2008, 10:52 AM
#23
Alcatraz
Thread Starter
Join Date: Jul 2008
Location: Malta
Posts: 44
Likes: 0
Received 0 Likes
on
0 Posts
Hey Dude its coming along nicely keep up the work and dont loose heart no matter what anyone says, Family, Friend, etc... There just Jeleous!
Have you looked into that BMW Carbon black yet? Its a M colour found on the M3 & M5's BMW paint code 416. Like i said before you could always mix the paint with more pearl or/and Mica to switch it a little and had more sparkle/flip... Especially if your wanting a dark colour.. Or Subaru Pearl black Ive seen this thing look black untill the strong sunlight hit the body work then BAM! Yellow metal flakes out of nowhere. Another Great colour! espcially if your going split rims with gold bolts or gold faces! or even cream interior!
Have you looked into that BMW Carbon black yet? Its a M colour found on the M3 & M5's BMW paint code 416. Like i said before you could always mix the paint with more pearl or/and Mica to switch it a little and had more sparkle/flip... Especially if your wanting a dark colour.. Or Subaru Pearl black Ive seen this thing look black untill the strong sunlight hit the body work then BAM! Yellow metal flakes out of nowhere. Another Great colour! espcially if your going split rims with gold bolts or gold faces! or even cream interior!
Thanks for the feedback ... but seems to me that nobody is interested so much! There's only a small amount of feedback .... And what i can't understand is how on earth do i get so many views if nobody bothers to leave a comment? Anyways thanx for your support... I'll try to continue.....
The car's original interior was champagnecolour which used to go out on the original metallic gold colour. I'm going for the Recaro interiors found on the 2.8's now. It's a lot nicer. So i really need to match somethign to that.....
The choice is between colours is between two really here. I had some six - seven cars in black! If I do another black car ... I like the mean look ... but I'm running a risk that ppl start thinking that i'm offering funeral services or something like that! So the car will either retain it's original Solar Gold (a nice greeny Gold) metallic colour or a Bluey colour ..... Colour is very fashionable and changes with time... just like the bodykits do...(let's not touch that subject for now cos im confused!)
As the wheels ain't part of the car really .... I know that split rims are nice on it....Cos it had split rims like those of the Red cossie Capri .... however the inside was Gold. I chose to go back to the 7 spoke alloys of the Capri ... Cos the craze at the time was for those.....and they really suit the car. But for an alloy wheel to suit the Capri you got to make the right choice and the trick lies in this fact. There are 2 general categories of wheels really. Category A is those wheels which offset the surrounding rubber INWARDS of the Car....and there is that category which offsets the rubber OUTWARDS of the car.....The car's design is more suitable for alloys which push more rubber OUTWARDS .... So that's why split rims look great... cos of the deep look that they give you....I think Whilee can't agree more than me on this....
Last edited by Alcatraz; 16-07-2008 at 11:02 AM.
16-07-2008, 07:42 PM
#24
Hi Paul
Just to continue on what you said. If i left the engine on the standard Pinto mounts and a Pinto Cross member...I would have had to modify the trans tunnel ... and the gear lever is an inch backwards from the centre of the hole... and for me that is inacceptable........most ppl just make a larger hole...and Im not doing that....for reasons explained in my first thread....
Just to continue on what you said. If i left the engine on the standard Pinto mounts and a Pinto Cross member...I would have had to modify the trans tunnel ... and the gear lever is an inch backwards from the centre of the hole... and for me that is inacceptable........most ppl just make a larger hole...and Im not doing that....for reasons explained in my first thread....
Paul
 18-07-2008, 12:25 PM
#26
Alcatraz
Thread Starter
Join Date: Jul 2008
Location: Malta
Posts: 44
Likes: 0
Received 0 Likes
on
0 Posts
18-07-2008, 12:31 PM
#27
Too many posts.. I need a life!!

Join Date: Jul 2007
Posts: 533
Likes: 0
Received 0 Likes
on
0 Posts
get it in crystal blue---limited edition colour for the cappers, very reflective (like black) and is metallic so very shiny in the sun.
but each to their own =)
keep on with the project btw!!
but each to their own =)
keep on with the project btw!!
Last edited by vibrating_cake; 18-07-2008 at 12:34 PM.
18-07-2008, 01:24 PM
#28
Alcatraz
Thread Starter
Join Date: Jul 2008
Location: Malta
Posts: 44
Likes: 0
Received 0 Likes
on
0 Posts
Once the car got completely cleaned .... it got the mmmm colour on
Here's some shots... just to give you an idea Mind you the car's a bit dusty .... but i'm not touching it! No scratches wanted .... i just could not keep you away from these pics.... The car's not been polished as yet... and it won't be until I'm done with the mechanical fittings and bodykit fitting....
Shot 1: No comments on the dust I KNOW

Shot 2: A closer view at the flake in some light ... Put some paper between the tailgate and body (at the back) so that I don't scratch this baby...

Shot 3: No doors on yet Back lateral view .... enough to see how perfect the body is

Shot 4: Left Door Horizontal view Just look at the Reflection And NO... those white spots are not scratches but polish

Shot 5: Take a better look maybe you get how STRAIGHT the doors are... The door's tilted and yet the REFLECTION of the building is perfectly straight

Shot 6: The car's eager to kick ass ....stonking body stonking colour

Shot 7: If I ever sell this ... whoever it will be to buy this will be a damn lucky man! Door's on now

Shot 8: Lateral view....

Please excuse the quality of the pics ... but that was what i had at hand at the time .... Hope you like it so far That's all ....Tired now!
Here's some shots... just to give you an idea
Shot 1: No comments on the dust I KNOW
Shot 2: A closer view at the flake in some light
Shot 3: No doors on yet
Shot 4: Left Door
Shot 5: Take a better look maybe you get how STRAIGHT the doors are
Shot 6: The car's eager to kick ass ....stonking body stonking colour
Shot 7: If I ever sell this ... whoever it will be to buy this will be a damn lucky man! Door's on now
Shot 8: Lateral view....
Please excuse the quality of the pics ... but that was what i had at hand at the time .... Hope you like it so far
Last edited by Alcatraz; 18-07-2008 at 01:38 PM.
18-07-2008, 02:04 PM
#30
Alcatraz
Thread Starter
Join Date: Jul 2008
Location: Malta
Posts: 44
Likes: 0
Received 0 Likes
on
0 Posts
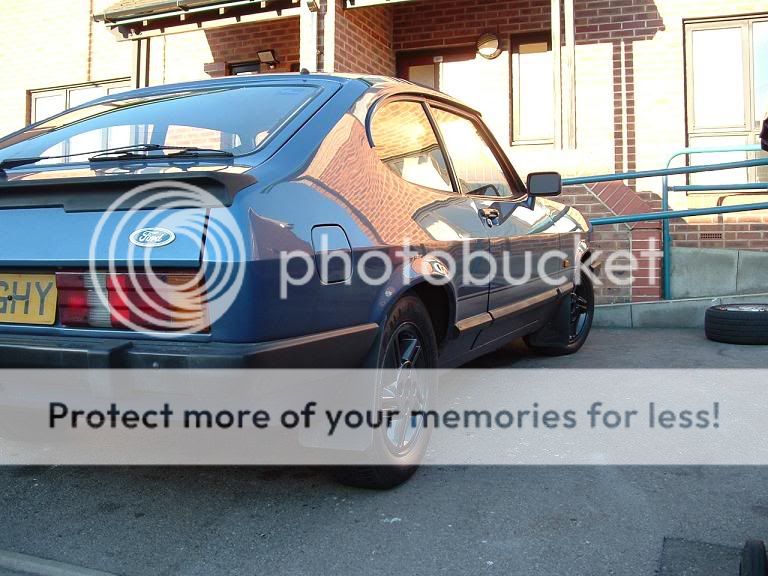
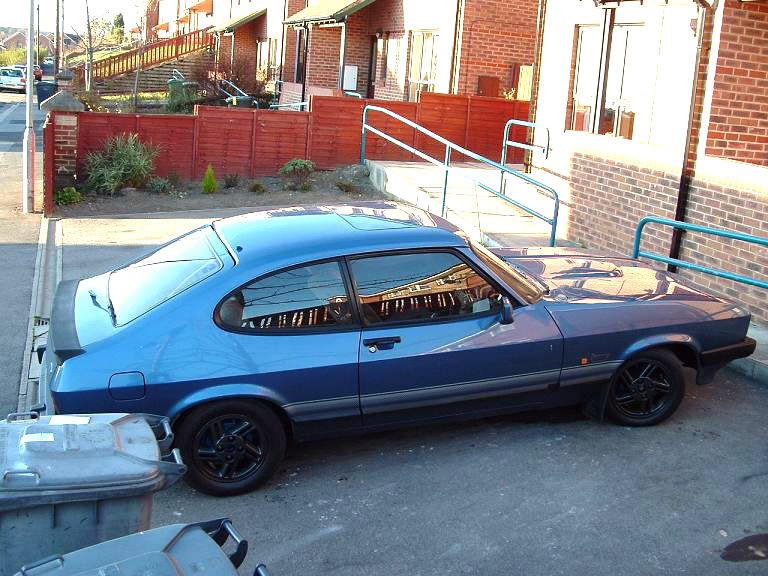
You got a very nice Capri as well
18-07-2008, 04:07 PM
#31
Alcatraz
Thread Starter
Join Date: Jul 2008
Location: Malta
Posts: 44
Likes: 0
Received 0 Likes
on
0 Posts
Remember me when i said i had a sketch in my mind of how my ideal Capri would look? Well here is a montage of how the prospective Capri will look .... The colour doesn't match, excuse my photoshop skills.... but at least you get the idea of what i am aiming for....
Shot 1: Mock up picture of proposed look...(edited in photoshop)... thank God THIS AIN'T MY COLOUR
[ R E M O V E D ]
I am not sure if the car will look good in these or not... So I decided to make the kit REMOVEABLE ... just like bumpers are.... so if i'm bored stiff with the look i can change it no problem .... ultimately i think i will go for the Tickford look......but for now i gotta be happy with these.....
Last edited by Alcatraz; 19-07-2008 at 05:02 PM.
18-07-2008, 11:53 PM
#34
Alcatraz
Thread Starter
Join Date: Jul 2008
Location: Malta
Posts: 44
Likes: 0
Received 0 Likes
on
0 Posts
As you can look at the pic...... YES I'm going for Cossie wheels that is the idea .... I hope that the mock up gave you a rough idea of the car....
19-07-2008, 09:07 PM
#37
Too many posts.. I need a life!!
Join Date: Jul 2007
Posts: 533
Likes: 0
Received 0 Likes
on
0 Posts
20-07-2008, 09:41 AM
#38
Alcatraz
Thread Starter
Join Date: Jul 2008
Location: Malta
Posts: 44
Likes: 0
Received 0 Likes
on
0 Posts
20-07-2008, 09:47 AM
#39
Alcatraz
Thread Starter
Join Date: Jul 2008
Location: Malta
Posts: 44
Likes: 0
Received 0 Likes
on
0 Posts
oh.... you mean the 7 spoke alloys? or the escos wheels? Another update posted soon! Follow this spot!
Last edited by Alcatraz; 21-07-2008 at 11:28 AM.