C&B's 350bhp CVH RST BREAKING - See for sale section
#81
Thread Starter
#1 in Spelling Club
iTrader: (14)
Joined: May 2003
Posts: 23,329
Likes: 6
From: Norfolk
I started assembling the Cylinder Head today. This process is very time-consuming, but cannot be rushed. This is what was done......

Once the Valve is fitted, the 'Installed height' is measured and adjusted using Shims......

.....before fitting the Valve Stem Oil Seals......

Then the Double Valve Springs are fitted with the Special Retainers.......


I have also prepared the Block and Main Bearing Caps ready for the next installment.


Once the Valve is fitted, the 'Installed height' is measured and adjusted using Shims......

.....before fitting the Valve Stem Oil Seals......

Then the Double Valve Springs are fitted with the Special Retainers.......


I have also prepared the Block and Main Bearing Caps ready for the next installment.

#83
Thread Starter
#1 in Spelling Club
iTrader: (14)
Joined: May 2003
Posts: 23,329
Likes: 6
From: Norfolk
Wes, to be honest, alot of people wouldn't bother and generally its not a major problem. To me, its a case of looking at everything.
As for the shims, I got them from the Company that did the machining.
As for the shims, I got them from the Company that did the machining.
#86
Thread Starter
#1 in Spelling Club
iTrader: (14)
Joined: May 2003
Posts: 23,329
Likes: 6
From: Norfolk
We are trying to fit in building this engine with the fact that we have little time to spare at the moment!!
The crank is now fitted.
Once the block was thoroughly cleaned and blown out with a High Pressure Airline, including all the Oilways etc, the crank was thoroughly cleaned and again, the Oilways were blown through.
The Main Bearings were then cleaned to remove any treatment that was applied to them at the factory and they were laid into place. The Main Caps were then put on to check that the Groove's lined up. Once this was all satisfactory, the Caps were removed and the Crank put into place, after which the Main Caps were fitted.
The Bearing Tolerances are checked using 'Plastiguage'......

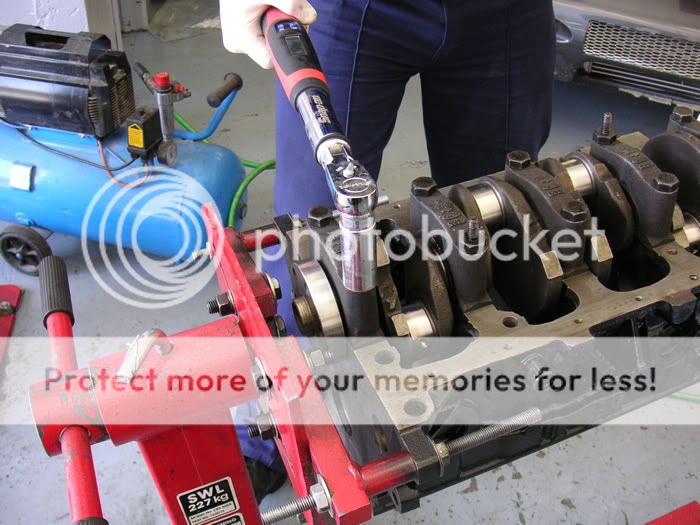
The Main Caps are all Torque'd down in 2 stages.......

....before the whole assembly is dismantled to check the Tolerance.......

......using the Chart.

The End Float of the Crank was also checked using a DTI.

Hopefully the weekend should see the Pistons in place.
The crank is now fitted.
Once the block was thoroughly cleaned and blown out with a High Pressure Airline, including all the Oilways etc, the crank was thoroughly cleaned and again, the Oilways were blown through.
The Main Bearings were then cleaned to remove any treatment that was applied to them at the factory and they were laid into place. The Main Caps were then put on to check that the Groove's lined up. Once this was all satisfactory, the Caps were removed and the Crank put into place, after which the Main Caps were fitted.
The Bearing Tolerances are checked using 'Plastiguage'......

The Main Caps are all Torque'd down in 2 stages.......

....before the whole assembly is dismantled to check the Tolerance.......

......using the Chart.

The End Float of the Crank was also checked using a DTI.

Hopefully the weekend should see the Pistons in place.

#90
 Looking good chaps.
Christian, why do you use shims under the valve stem oil seal?
Does that not lift the valve stem oil seal up higher causing contact between the spring retainer and the seal when the valve is on full lift?
I see no use for them other than compressing the springs a further 0.5mm.
Don't mean to sound as though i'm "Nit-picking", its a genuine querry as i'm thinking of changing some of my cam gear.

Matt.
#92
Thread Starter
#1 in Spelling Club
iTrader: (14)
Joined: May 2003
Posts: 23,329
Likes: 6
From: Norfolk
Originally Posted by zvhturbo
 Looking good chaps.
Christian, why do you use shims under the valve stem oil seal?
Does that not lift the valve stem oil seal up higher causing contact between the spring retainer and the seal when the valve is on full lift?
I see no use for them other than compressing the springs a further 0.5mm.
Don't mean to sound as though i'm "Nit-picking", its a genuine querry as i'm thinking of changing some of my cam gear.

Matt.
HTH.

#93
Advanced PassionFord User
Joined: May 2003
Posts: 2,442
Likes: 0
From: Workin on the car , or workin the missus
good work fella ,
i wish i had the time to start my new one , might pull my finger out at the end of the year and have it done for brunters ,
i want 161mph ,
Hat off tho mate , 1600 8 valve , outstanding .
i wish i had the time to start my new one , might pull my finger out at the end of the year and have it done for brunters ,
i want 161mph ,

Hat off tho mate , 1600 8 valve , outstanding .
#95
Thread Starter
#1 in Spelling Club
iTrader: (14)
Joined: May 2003
Posts: 23,329
Likes: 6
From: Norfolk
Today, we finally got the Pistons in, after Filing and Fitting the Piston Rings (which is a very time-consuming task!!). Here you can see the block with the Oil Pump in place and the Head Gasket on........


Then the Head was laid on......

.....and the Head bolts fitted and Torque'd down......

Then the new Head > Exhaust Studs were fitted.....


I also did a bit more painting and need to order some bits from Ford, but it is really starting to take shape. The Baffled Sump is ready to fit, this will go on tomorrow or Saturday, as will the Exhaust Manifold and Turbo.
I have also just had my Inlet/Injector Plate/Rocker Cover and Fuel Rail back from being Painted. I'm not sure if I am going to post pics of that though, at this stage. Suffice to say, I am VERY pleased with how it has come out.


Then the Head was laid on......

.....and the Head bolts fitted and Torque'd down......

Then the new Head > Exhaust Studs were fitted.....


I also did a bit more painting and need to order some bits from Ford, but it is really starting to take shape. The Baffled Sump is ready to fit, this will go on tomorrow or Saturday, as will the Exhaust Manifold and Turbo.
I have also just had my Inlet/Injector Plate/Rocker Cover and Fuel Rail back from being Painted. I'm not sure if I am going to post pics of that though, at this stage. Suffice to say, I am VERY pleased with how it has come out.

#104
Thread Starter
#1 in Spelling Club
iTrader: (14)
Joined: May 2003
Posts: 23,329
Likes: 6
From: Norfolk
Originally Posted by Freddy_mercury_magic
Christian and Beccy, is there a reason why you havent taken pictures of the inlets side of the head 
or can we not see it?
Also how hard is taking a cvh head apart
Thanks Radleigh
or can we not see it?
Also how hard is taking a cvh head apart
Thanks Radleigh
As for taking a CVH head apart, it isn't really hard as long as you know what you are doing, but takes a while.

Originally Posted by zvhturbo
Looking good chaps 
How comes youv'e not gone for a wire rung block and lower compression if your looking to run big boost ??
??

How comes youv'e not gone for a wire rung block and lower compression if your looking to run big boost
Infact, it is Low Compression, but not really sure what makes you think it isn't??
#111
Thread Starter
#1 in Spelling Club
iTrader: (14)
Joined: May 2003
Posts: 23,329
Likes: 6
From: Norfolk
Originally Posted by Tony Turbo
Originally Posted by Christian and Beccy
Hoping to plonk it back in the hole over the weekend.
Fantastic news mate
 So what about the engine?
Originally Posted by Lee @ Fusion


beat me to it


#114
Thread Starter
#1 in Spelling Club
iTrader: (14)
Joined: May 2003
Posts: 23,329
Likes: 6
From: Norfolk
Update time!!
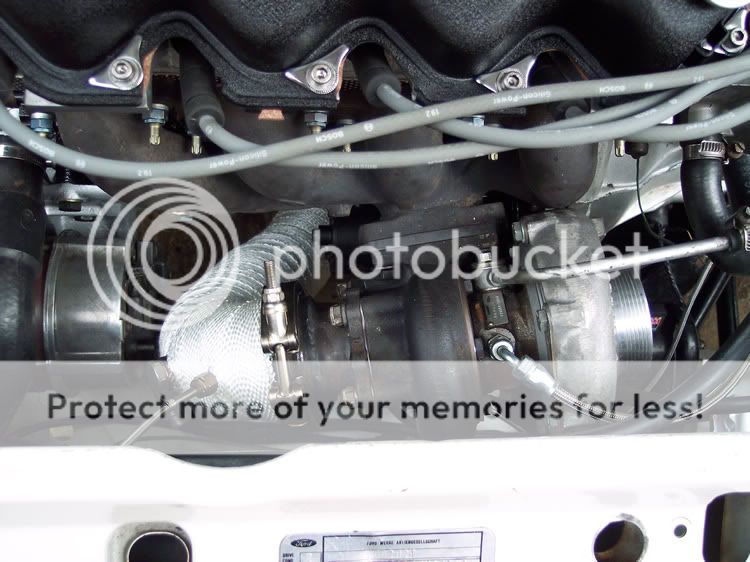
After a slight alteration to the Downpipe as it sat a little low, I wrapped it with Heatproof Wrap. The smaller of the 2 Bosses is for Exhaust Gas Temperature and the larger one is for the Lambda Sensor (We run a Wideband Sensor in there for mapping and eventually the Omex will require a sensor in there permanently).


The Wrap is a Double layer where is runs close to the Alternator and Starter Motor and continues to just beyond the Driveshafts.......


More to follow........
After a slight alteration to the Downpipe as it sat a little low, I wrapped it with Heatproof Wrap. The smaller of the 2 Bosses is for Exhaust Gas Temperature and the larger one is for the Lambda Sensor (We run a Wideband Sensor in there for mapping and eventually the Omex will require a sensor in there permanently).


The Wrap is a Double layer where is runs close to the Alternator and Starter Motor and continues to just beyond the Driveshafts.......


More to follow........
#116
Thread Starter
#1 in Spelling Club
iTrader: (14)
Joined: May 2003
Posts: 23,329
Likes: 6
From: Norfolk
I have opted for a slightly different Inlet Manifold. There were a number of different reasons for this. It was very hard to adapt it to fit. The Throttle Body mounting had to be completely altered and adjusted to point at a more appropriate angle........


Obviously, with the lack of Inlet Crossover Pipe, I could then use a boggo CVH Rocker Cover.......


Obviously, with the lack of Inlet Crossover Pipe, I could then use a boggo CVH Rocker Cover.......


#118
Thread Starter
#1 in Spelling Club
iTrader: (14)
Joined: May 2003
Posts: 23,329
Likes: 6
From: Norfolk
Here is the engine in place and 95% finished. I just have a few loose ends to tie up.
I started to fabricate a Throttle Cable bracket today and have an Inlet Pipe on its way from Pro Alloy. I also have a remote Fuel Pressure Regulator to fit.


Here you can see the Injector mounting and the spangly wiring loom braiding. Man, that was time consuming!!

Hoping to turn the key over the weekend.....


I started to fabricate a Throttle Cable bracket today and have an Inlet Pipe on its way from Pro Alloy. I also have a remote Fuel Pressure Regulator to fit.


Here you can see the Injector mounting and the spangly wiring loom braiding. Man, that was time consuming!!


Hoping to turn the key over the weekend.....


#119
SEXUAL!!! 


Liking it alot. Finally all those MONTHS of hard work on that inlet manifold have payed off. I remember you starting that when my other engine was still being mapped

Looks the bollox mate, and to do it all yourself.......


Liking it alot. Finally all those MONTHS of hard work on that inlet manifold have payed off. I remember you starting that when my other engine was still being mapped

Looks the bollox mate, and to do it all yourself.......


