
MonK-E's ST170 Project


I've found that life I needed.. It's HERE!!
Joined: Jan 2012
Posts: 1,055
Likes: 126
From: Linc's
Ahhh I can’t wait that long for progress on the plenum. It’s the main thing about my build I haven't finalised yet. Still I will need a shit load of practise before can tig as well as you.
Thread Starter
I'm Finding My Feet Here Now
Joined: Dec 2017
Posts: 124
Likes: 13
From: East Sussex
Cheers bud. I’m no pro welder or even a fabricator, it costs a lot in argon to practice so I watch a lot of YouTube vids and try to learn from them. One day I’d love to do it for a job but I’m not good enough.
I’ll still progress with it a bit in the mean time. I think I’ll smooth out the sharp edges on the entrance to the runners. Then there’s cutting out all the other sides and what not. I’m still wondering if I should go for a different throttle body and if I should make up a flange for the idle control valve. Or do something different for idle control. Still plenty of bits to do on this before I get more argon
I’ll still progress with it a bit in the mean time. I think I’ll smooth out the sharp edges on the entrance to the runners. Then there’s cutting out all the other sides and what not. I’m still wondering if I should go for a different throttle body and if I should make up a flange for the idle control valve. Or do something different for idle control. Still plenty of bits to do on this before I get more argon

PassionFord Regular
Joined: Jan 2015
Posts: 350
Likes: 48
From: Bristol, England
Would love to be able to make parts but just don't have the time, space and equipment so trying to keep up have just bought a crank case breather. Looking forward to see how it all works out.
Just a quick question though: is there any benefit to making it from scratch instead of modifying a Rover item?
Just a quick question though: is there any benefit to making it from scratch instead of modifying a Rover item?
Thread Starter
I'm Finding My Feet Here Now
Joined: Dec 2017
Posts: 124
Likes: 13
From: East Sussex
I don’t know much about the rover inlet tbh, so I can’t say for sure. But for me it’s reasonably cheap as I don’t have to pay for my own time to fabricate it. A custom mani should support a large amount of power with ease. The other benefits are I can run whatever throttle body I like and adjust the runner length to suit where I want peak power 
I've found that life I needed.. It's HERE!!
Joined: Jan 2012
Posts: 1,055
Likes: 126
From: Linc's
I’ve tried a couple of Rover manifolds, is it the T series ? I found the ports miles out.
for a rwd plenum the mk1 1.8 mx5 is a dam good port match.
for fwd take a look at the Mitzi evo4 the ports are bigger but the centres are close.
both of these can be had for way less than the Rover.
On the jenvey website they have manifold drawings with the port dimensions to compare.
for a rwd plenum the mk1 1.8 mx5 is a dam good port match.
for fwd take a look at the Mitzi evo4 the ports are bigger but the centres are close.
both of these can be had for way less than the Rover.
On the jenvey website they have manifold drawings with the port dimensions to compare.
Thread Starter
I'm Finding My Feet Here Now
Joined: Dec 2017
Posts: 124
Likes: 13
From: East Sussex
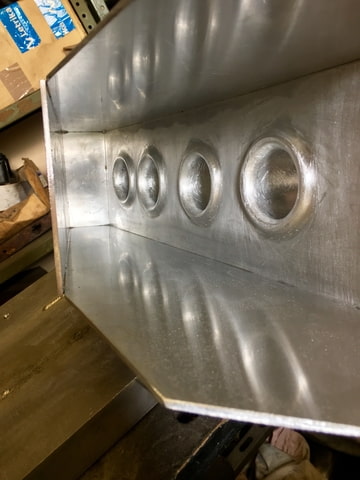
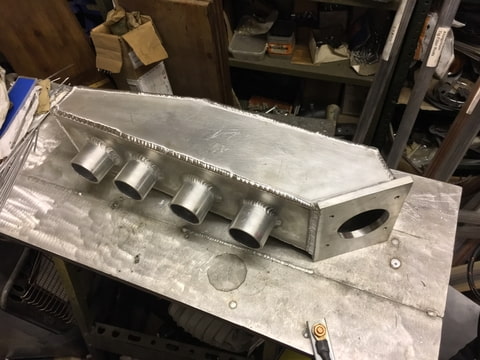
I rounded off the inlet ports on the plenum back plate, hopefully this will help with a bit better non turbulent air flow
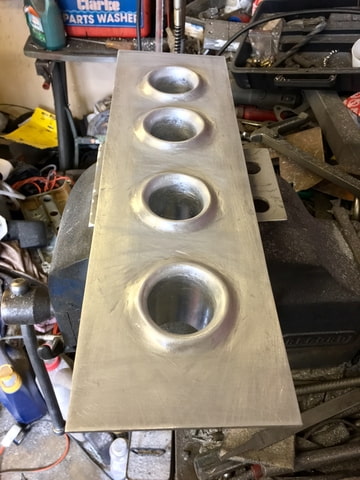
then I cut out a the top and bottom plate, I was thinking of putting in diagonal edges on the back. However it would make it a lot more complicated for no benefit. So I decided it’s probably best to keep it simple
heres a rough idea of the shape. Didn’t get much else done as I’m doimg a bit of research and also looking at getting some thick plate for the standard throttle body. I’m also going to make up a flange for fitting the standard idle control valve. So when it’s done it should be pretty straightforward to fit
Thread Starter
I'm Finding My Feet Here Now
Joined: Dec 2017
Posts: 124
Likes: 13
From: East Sussex
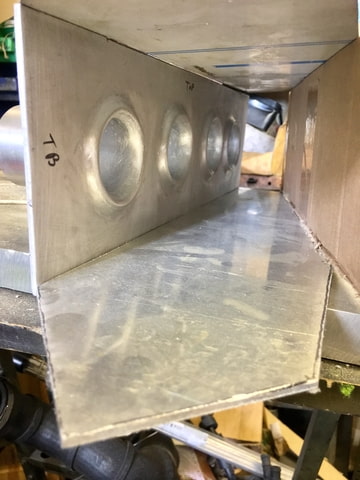
Done a little more to the mani, I’m out of sheet aluminium and argon now. So this’ll be it for progress on the manifold until the end of the month.
Just about tacked on the top, bottom and two parts of the sides
I’ll order up a 120x120x10mm billet of aluminium for the throttle body flange and a 80x50x40mm billet for the idle control valve port. Along with a few vac fittings and a sheet of 3mm aluminium
I might start prepping the engine bay next week as there’s a lot of work to do in there
Thread Starter
I'm Finding My Feet Here Now
Joined: Dec 2017
Posts: 124
Likes: 13
From: East Sussex
I really didn’t do much this weekend, so it’s only a very little update. Quite a lot of other stuff on my mind at the moment. But hey progress is progress.
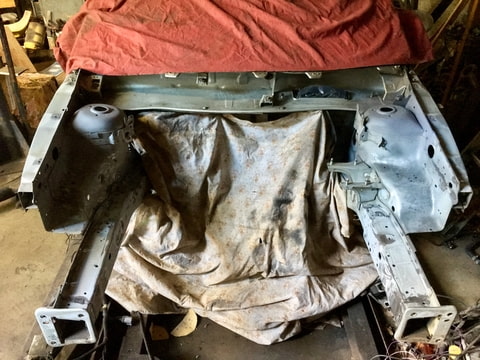
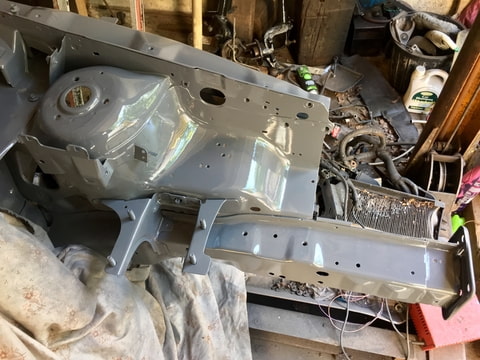
I’ve made a start on pulling the engine bay apart so it’s ready for cleaning and a bit of a colour change.
As you can see in the pic the workshop needs a bloody good clear out. So I might do that next weekend or the weekend after. I’m seriously considering reconditioning the workshop and running a small fabrication business from it. We will see though a lot of hoops to jump through first
Advanced PassionFord User


Joined: Oct 2012
Posts: 1,738
Likes: 149
From: South Coast
Seriously liking your work, and you are making good progress with your project. Jumping through hoops is exhausting, but if the end result is worth the effort, then do it  you certainly have the skills.
Thread Starter
I'm Finding My Feet Here Now
Joined: Dec 2017
Posts: 124
Likes: 13
From: East Sussex
Thanks bud
I’ve got to start dividing my time up properly between home life, work, workshop and projects. It’ll be super tough for a while but it should be well worth it in the long run. I’m hoping to move right next to the workshop at the end of the yeah so that should help quite a fair bit with time management and being able to get on with stuff a lot easier.
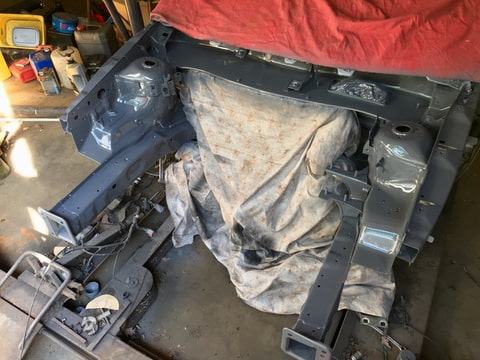
I only done a one a little bit to the bay this weekend. Just cleaned rust back and started to primer some of it but ran out really quick as I only had a little bit left.
Next week I should be able to crack on a bit more as it’s pay day
I’ve got to start dividing my time up properly between home life, work, workshop and projects. It’ll be super tough for a while but it should be well worth it in the long run. I’m hoping to move right next to the workshop at the end of the yeah so that should help quite a fair bit with time management and being able to get on with stuff a lot easier.
I only done a one a little bit to the bay this weekend. Just cleaned rust back and started to primer some of it but ran out really quick as I only had a little bit left.
Next week I should be able to crack on a bit more as it’s pay day
Thread Starter
I'm Finding My Feet Here Now
Joined: Dec 2017
Posts: 124
Likes: 13
From: East Sussex
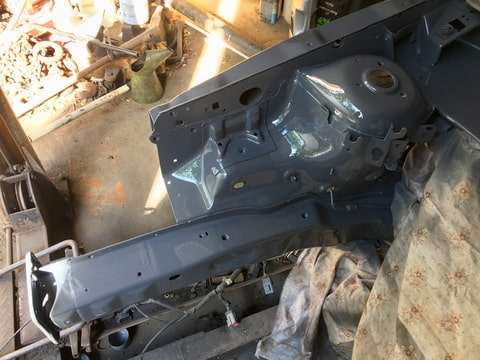
Got some paint on the bay today. Quite pleased with how it’s come out considering it’s just tractor paint/implement enamel and put on with a cheap Lidl spray gun. Not only that I had the workshop doors open for ventilation, so it’s only one step up from spraying outside.
in other news, I have a fresh bottle of argon and the rest of the aluminium sheet and plate has been ordered. So hopefully I’ll crack on finishing off the manifold next weekend
in other news, I have a fresh bottle of argon and the rest of the aluminium sheet and plate has been ordered. So hopefully I’ll crack on finishing off the manifold next weekend
Thread Starter
I'm Finding My Feet Here Now
Joined: Dec 2017
Posts: 124
Likes: 13
From: East Sussex
cheers bud 
hopefully when I get round to doing the rest of the body it�ll all look awesome when done. But tbh the outside appearance of the old girl is one of the later things on the list. Once the mani is finished I want to get the engine back in and test fit it to make sure the measurements I took were good. otherwise I�ll have to modify it a little around the back of it where it�s close to the bulkhead. I�m hoping that with the intake runner controller removed there will be plenty of clearance. However I�m not entirely sure how much the engine will move once under load.
I think I might also DIY poly bush the dog bone mount as it should help a fair bit
Thread Starter
I'm Finding My Feet Here Now
Joined: Dec 2017
Posts: 124
Likes: 13
From: East Sussex
How come dude? it�s quite a straightforward job. Although tapping aluminium can be a bit anoying as it can gall up quite easy if the tap isn�t cleaned regularly and lubricated.
Thread Starter
I'm Finding My Feet Here Now
Joined: Dec 2017
Posts: 124
Likes: 13
From: East Sussex
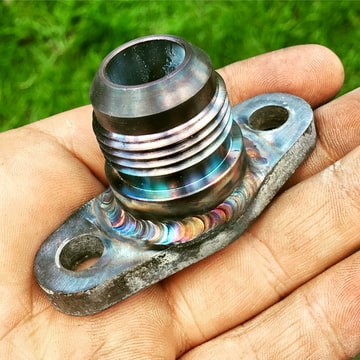
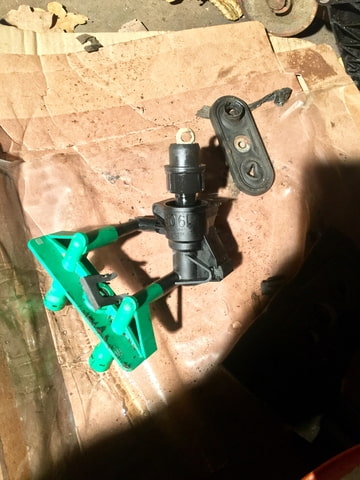
I decided to sort the turbo oil return flange out. It originally had a bit of pipe badly welded to it.
So I cut it off and cleaned it up a bit.

The AN12 fitting has a step on the back of it. So to centre it properly I put a stepper drill into it so it has a slight recess for it
Then welded it out
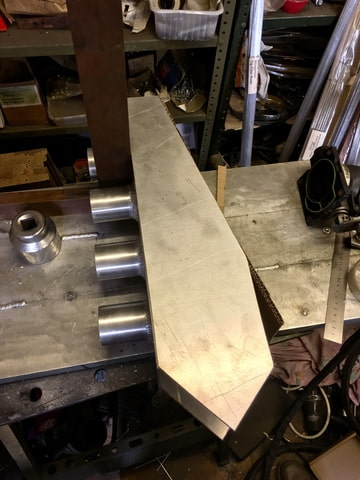
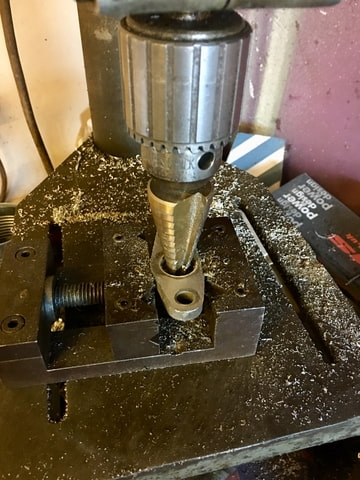
The aluminium plate turned up for the TB flange for the manifold. To be honest I was dreading this bit as all of my hole cutters are pretty cheap and wobble all over the place and obviously I want a fairly precise fit.
I grabbed the closest size I have to the ID of the TB which is a little big but should be ok.
clamped it down, lubed it up and went for it.
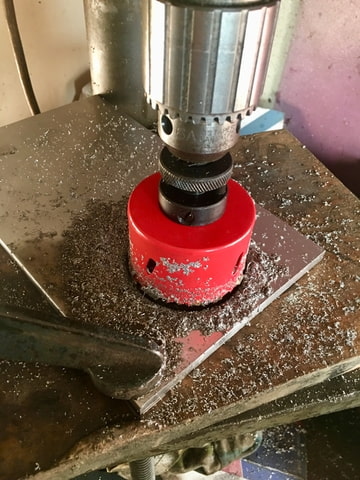
with the pillar drill on the slowest speed possible and lots of cutting fluid it finally bored a reasonable hole through it. It would of been better with a 5mm smaller cutter but hey, gotta work with what I have.
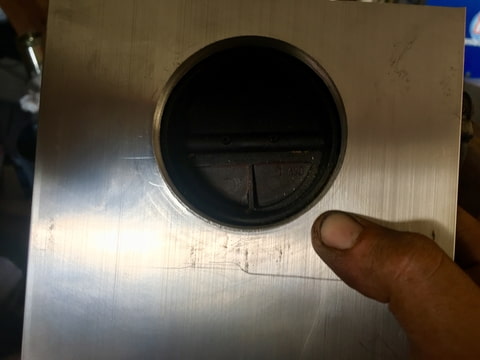
it should do the job just fine and be ready for a slightly larger TB if needed later on.
Ill either continue with the manifold this weekend or get the engine ready to slot back in the bay.... maybe a bit of both if I’m allowed
So I cut it off and cleaned it up a bit.
The AN12 fitting has a step on the back of it. So to centre it properly I put a stepper drill into it so it has a slight recess for it
Then welded it out
The aluminium plate turned up for the TB flange for the manifold. To be honest I was dreading this bit as all of my hole cutters are pretty cheap and wobble all over the place and obviously I want a fairly precise fit.
I grabbed the closest size I have to the ID of the TB which is a little big but should be ok.
clamped it down, lubed it up and went for it.
with the pillar drill on the slowest speed possible and lots of cutting fluid it finally bored a reasonable hole through it. It would of been better with a 5mm smaller cutter but hey, gotta work with what I have.
it should do the job just fine and be ready for a slightly larger TB if needed later on.
Ill either continue with the manifold this weekend or get the engine ready to slot back in the bay.... maybe a bit of both if I’m allowed
 and it took me a while to build up the courage....
Thread Starter
I'm Finding My Feet Here Now
Joined: Dec 2017
Posts: 124
Likes: 13
From: East Sussex
I've found that life I needed.. It's HERE!!
Joined: Jan 2012
Posts: 1,055
Likes: 126
From: Linc's
No it's a wet sump, but it is the best rwd kitcar zetec wet sump going.
I have modified the oem in the past but I just can't seem to find the time so I've cheated on a few bits to get the project moving again.
I have modified the oem in the past but I just can't seem to find the time so I've cheated on a few bits to get the project moving again.
Last edited by big_wasa; Oct 3, 2018 at 08:51 AM.
Thread Starter
I'm Finding My Feet Here Now
Joined: Dec 2017
Posts: 124
Likes: 13
From: East Sussex
Man �500 on a sump though. I’d find the time lol
tbh I do understand really in some cases I often wonder with the amount of time it takes to make certain things I could of just bought them.
I love the challenge though so I’m allways up for making or doing as much as I possibly can myself even if it’s the long way round
tbh I do understand really in some cases I often wonder with the amount of time it takes to make certain things I could of just bought them.
I love the challenge though so I’m allways up for making or doing as much as I possibly can myself even if it’s the long way round

I've found that life I needed.. It's HERE!!
Joined: Jan 2012
Posts: 1,055
Likes: 126
From: Linc's
Yes it’s baffled and has a a separate windage tray. It’s well proven in westfields / kitcars for track work. It’s as good as it gets with out going for a dry sump and holds a full 5L
Thread Starter
I'm Finding My Feet Here Now
Joined: Dec 2017
Posts: 124
Likes: 13
From: East Sussex
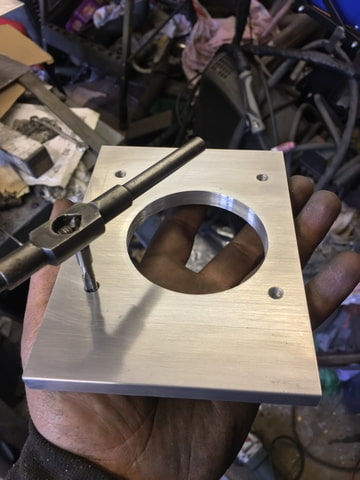
I finished drilling and tapping the TB flange the other day.
then cut out the other little panels for the back side. (Forgot to take pics, pretty boring any way)
after that I tacked the rest of it together so now it’s ready for a little test fit tomorrow. Then might weld it up Sunday if all is well.

then cut out the other little panels for the back side. (Forgot to take pics, pretty boring any way)
after that I tacked the rest of it together so now it’s ready for a little test fit tomorrow. Then might weld it up Sunday if all is well.
Thread Starter
I'm Finding My Feet Here Now
Joined: Dec 2017
Posts: 124
Likes: 13
From: East Sussex
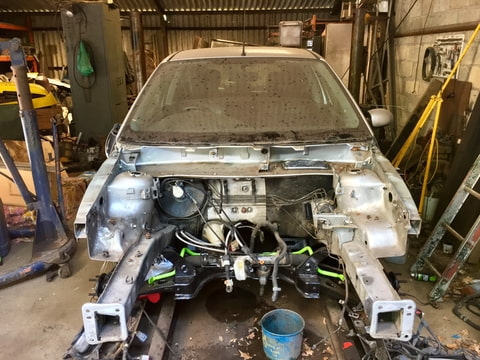
I managed to get a fair bit done on Saturday. Then went out for a brew or two which ended up with me not getting in until 5am which sort of wrote today off.
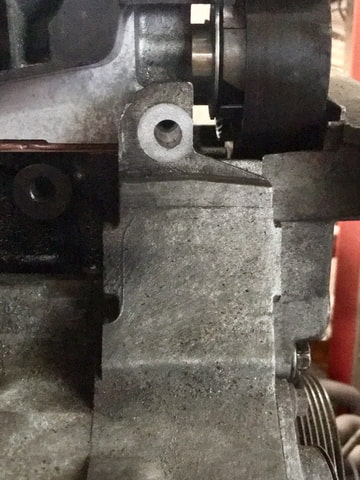
anyway I ran into a couple of issues one being the top bolt on the alternator mount. Very minor really, where I’ve spaced the head up it no longer lines up. Easy enough to fix by elongating the hole slightly which will be done a bit later on
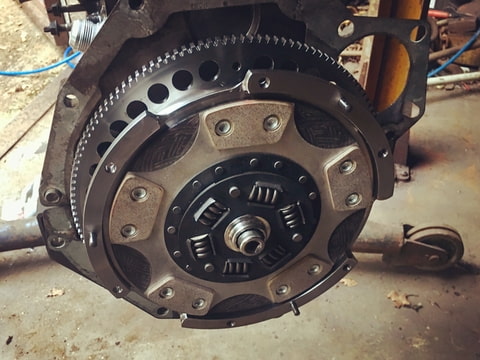
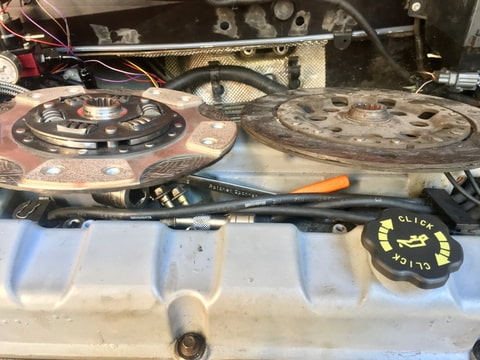
The flywheel and clutch went on nice and smoothly though
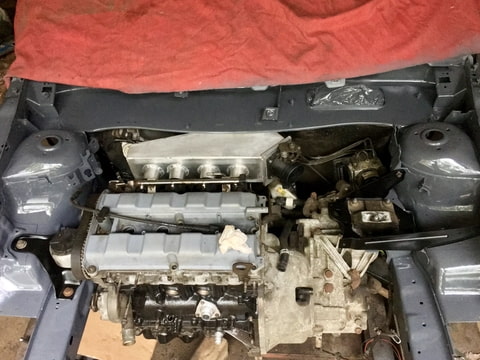
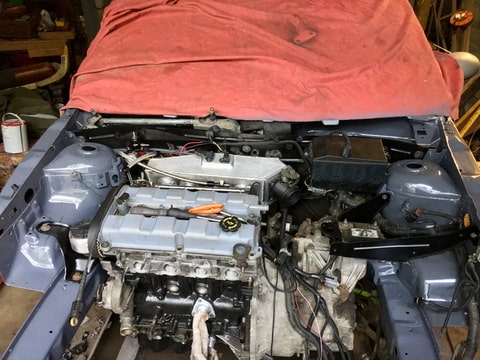
I popped the gearbox back on, got the engine mounts back on and “slipped” the engine back in (making it sound easy, in reality it was a bit of a struggle to line the engine and gearbox mounts up at the same time)
It’ll probably come back out soon to finish cleaning the gearbox casings, bolts and bits. It’s more of a dry fit to get everything where I want it and enable me to mock up the exhaust mani at some point soon.
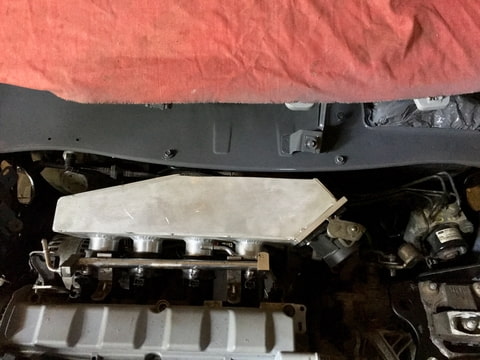
first though I have to get the inlet manifold to fit properly. Allways an issue when fabricating away from the car and not easily being able to pop in and out to check fitment.
As you can see the runners could do with being around 1” shorter and a 45 degree angle putting along the top back edge for a nice bit of clearance. Still it’s not bad for the first trial fit
anyway I ran into a couple of issues one being the top bolt on the alternator mount. Very minor really, where I’ve spaced the head up it no longer lines up. Easy enough to fix by elongating the hole slightly which will be done a bit later on
The flywheel and clutch went on nice and smoothly though
I popped the gearbox back on, got the engine mounts back on and “slipped” the engine back in (making it sound easy, in reality it was a bit of a struggle to line the engine and gearbox mounts up at the same time)
It’ll probably come back out soon to finish cleaning the gearbox casings, bolts and bits. It’s more of a dry fit to get everything where I want it and enable me to mock up the exhaust mani at some point soon.
first though I have to get the inlet manifold to fit properly. Allways an issue when fabricating away from the car and not easily being able to pop in and out to check fitment.
As you can see the runners could do with being around 1” shorter and a 45 degree angle putting along the top back edge for a nice bit of clearance. Still it’s not bad for the first trial fit
Thread Starter
I'm Finding My Feet Here Now
Joined: Dec 2017
Posts: 124
Likes: 13
From: East Sussex
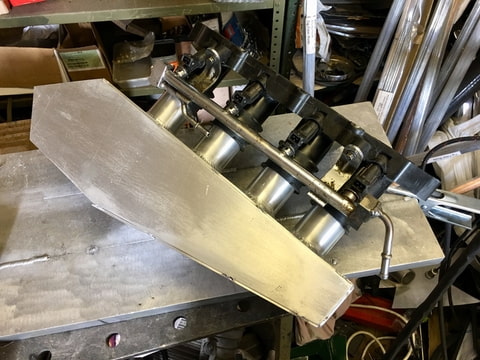
Had a bit more of a play with the mani, ended up shortening the runners by 20mm and cutting the back off to get sufficient clearance for the scuttle panel.
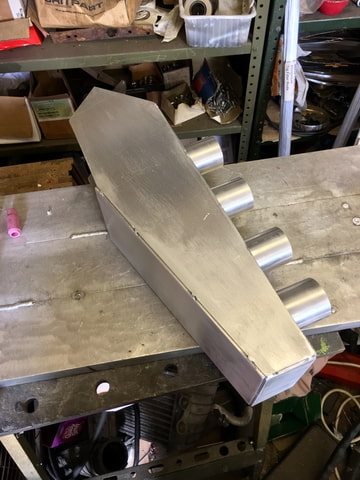
with that test fitted it’s finally time to weld it out.
Welding 3mm plate to 10mm isn easy. It takes a lot of amps and careful torch angle, too easy to blow through the 3mm. Lucky this didn’t happen here just got a bit wobbly towards the end as it was burning my hand lol
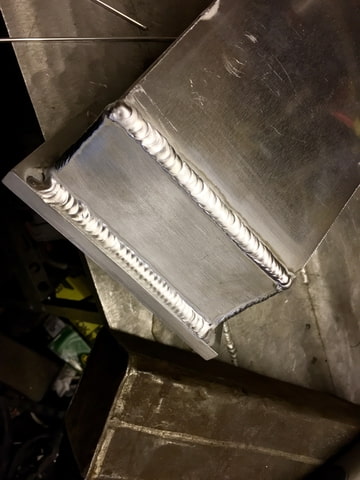
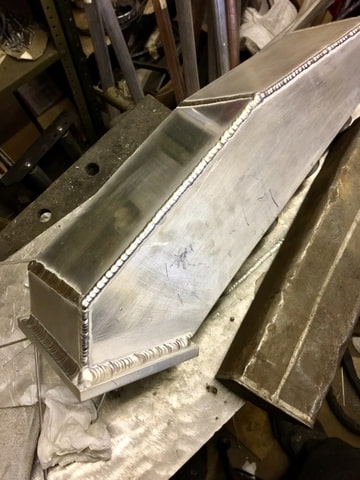
there we go, all welded up. Still got a few bits to sort out on it, like the ICV port if I use it (I might just use the grub screw to jack the TB open a little bit at first. Then there’s the vac ports for the servo, dump valve and boost control. Again these can come a bit later as they won’t be needed for a trial fire up.
with that test fitted it’s finally time to weld it out.
Welding 3mm plate to 10mm isn easy. It takes a lot of amps and careful torch angle, too easy to blow through the 3mm. Lucky this didn’t happen here just got a bit wobbly towards the end as it was burning my hand lol
there we go, all welded up. Still got a few bits to sort out on it, like the ICV port if I use it (I might just use the grub screw to jack the TB open a little bit at first. Then there’s the vac ports for the servo, dump valve and boost control. Again these can come a bit later as they won’t be needed for a trial fire up.
Thread Starter
I'm Finding My Feet Here Now
Joined: Dec 2017
Posts: 124
Likes: 13
From: East Sussex
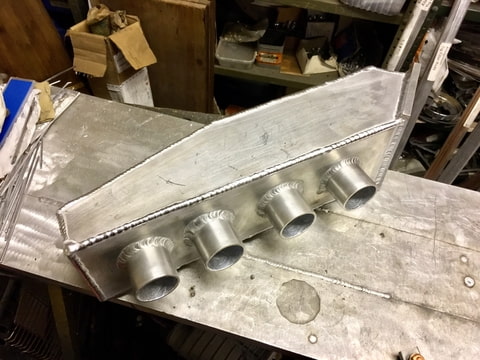
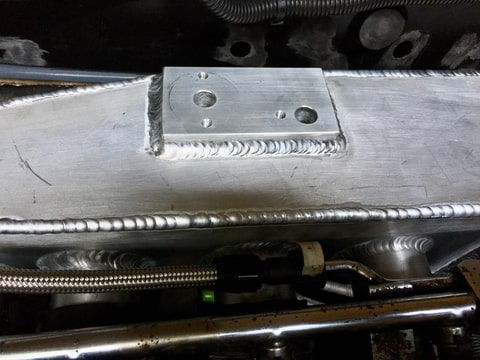
A little more progress. I made up a sensor block for the 4bar map and IAT sensor.
I didn’t take pics of making it due to wanting to get it done and everyone probably getting a little bored with intake manifold pics.
I fitted the brake/clutch reservoir but unfortunately it touches the corner of the TB flange so I’ll have to relocate it. Possibly where the power steering reservoir is supposed to be. By the looks of it I’ll end up making new brake/clutch, power steering reservoirs and a new coolant expansion tank.
Anyway before I get into that I want to get her fired up on the bare minimum and verify all is good with ME442. It’s coming up a to year since I started the project so I want at least see her run before the year is out. Which means back to playing with wires haha
so I sorted the bundle hanging out of the drivers side wheel arch and ran them along the bulkhead, removing parts of the loom I no longer need. This is about as far as I got, hopefully tomorrow I’ll smash the rest of the engine bay loom
Thread Starter
I'm Finding My Feet Here Now
Joined: Dec 2017
Posts: 124
Likes: 13
From: East Sussex
Finally had a fruitful day
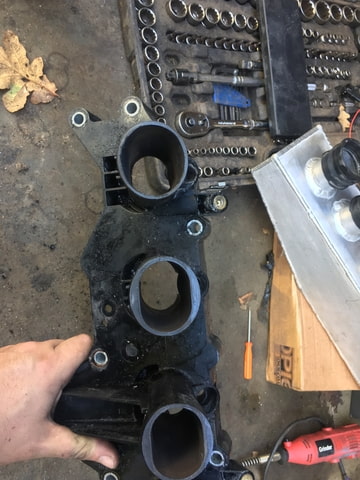
started off with porting the standard runners to match the manifold and replaced the crap rubber joiners for some nice bits of silicone.
then hen went back to wiring. I got a fair amount tidied up and almost ready to try and start her up.
I thought it best I turn the engine over by hand and double check timing and what not. But it wouldn’t budge....
I whipped out the plugs and poked a bore scope down each of the cylinders.
No valves touching or any sings of anything untoward.
Then it dawned on me....
the clutch alignment tool I made up wasn’t 100% tight although it enabled me to fit the gearbox it must of still been slightly offset.
So I blead the clutch and noticed another issue. It only goes 3/4 of the way to the floor. At a guess the calibra friction plate must be a good 2-3mm thicker than the st170’s and it’s causing it to limit the travel of the pressure plate.
I have a few ideas how to get round it. I might either machine down the pressure plate surface or space the gear box off the engine by about 3mm.
anyway with the clutch blead and it releasing a bit I was able to freely turn the engine.
So with the battery connected back up I ran through some checks on me442.
The crank and cam sensors are now reading properly and giving full sync.
I did some research on earthing and it turns out if the engine earths aren’t good and clean when turning the engine over it can create a large magnetic field around the engine bay. Something you can’t shield against, which is why the cam and crank sensors were picking up so much interference.
With them reading properly I turned the fuel pump back on and tried firing it up......
Still no luck, it just turned over and over with a few pops and bangs
i knoticed that the intake manifold was getting hot??
Bit strange, it would mean the timing is out or the plug leads are mixed up (not likely as they are clearly numbered)
which can only mean I’ve mixed up the wires to the coil pack. So I swapped them over in me442’s software AND........
Finaly she fires
Thats as far as I got, but it’s such a relief to hear some life out of the old girl.
I've found that life I needed.. It's HERE!!
Joined: Jan 2012
Posts: 1,055
Likes: 126
From: Linc's
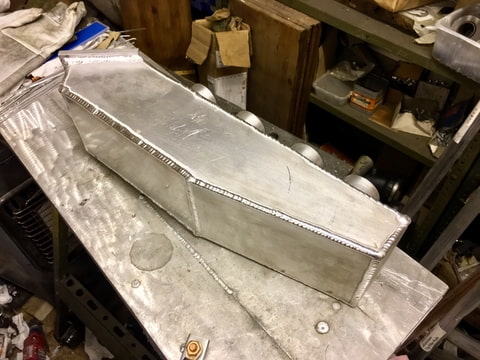
Still loving your welding skills. Would have been prettier to have the map sensor underneath but I guess it’s practical there.
whats next exhaust mani ?
i would love to get mine test fired next weekend as the last two have been a wash out.
whats next exhaust mani ?
i would love to get mine test fired next weekend as the last two have been a wash out.
Thread Starter
I'm Finding My Feet Here Now
Joined: Dec 2017
Posts: 124
Likes: 13
From: East Sussex
my welding skills aren�t all that great, I�ve still got so much to learn.
Yeah it definitely would of looked cleaner with the sensors underneath but as you say it�s the practicality of it especially when I plan on running wmi. If any moisture condenses in the manifold it�ll lay in the sensors and they won�t last all that long.
Ive got a ton of stuff to tidy up and sort out yet. I�m not sure to be honest because I really wasn�t sure it was actually going to fire up. I�m thinking I might relocate a few bits and bobs first and work out where I�m going run stuff like power steering pipes and what not before I tackle the exhaust mani. It shouldn�t be too long before I start on it though.
Thread Starter
I'm Finding My Feet Here Now
Joined: Dec 2017
Posts: 124
Likes: 13
From: East Sussex
Thread Starter
I'm Finding My Feet Here Now
Joined: Dec 2017
Posts: 124
Likes: 13
From: East Sussex
I decided to revisit the clutch issue as I sort of broke the master cylinder the other day. I pushed the clutch pedal to the floor which took a fair bit of pressure then suddenly something popped. Why did I do it.... I knew full well it’s not right and didn’t want to be forced but I did it any way. I swear my brains just run straight out of my nostrils some time.
Any way this is the damage damage of stupidity
its blown the top off the master cylinder. Luckily I saw a post on FB that someone was selling one for �10 so I snapped it up and fitted it as soon as it arrived.
After correcting my balls up I popped the gear box off and started to investigate exactly why the clutch didn’t want to go all the way down to the floor.
i measured the old friction plate compared to the new one and there was only about 1.4mm difference so it wast that what was causing it.
Then after staring it it for a bit it I noticed some marks around the spring retaining plate. It looks like the fingers were coming in contact with it.
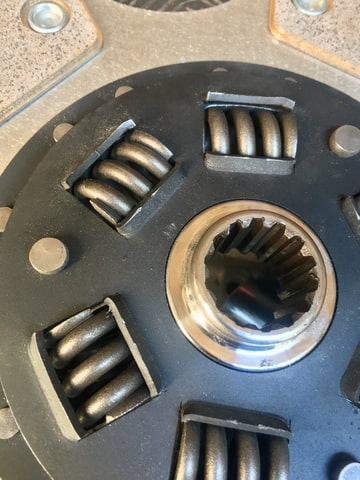
as you can see the sprung plate protrudes past the friction surface by a fair bit. When comparing it to the old friction plate it’s reasonably obvious it wasn’t going to work.
so after some more head scratching I thought, what’s stopping me from putting the friction plate in backwards.
Normaly you can’t as the sprung plate would contact the bolt heads on the flywheel. However the TTV flywheel is especially deep so after a few measurements it shows there would be at least 12mm clearance between the bolt heads and the face of the sprung plate, plenty of wear clearance.
I also measured the offset of the splined collar. Turns out it will sit 2mm from the end of the input shaft. So with that I can’t see any reason not to install it backwards.
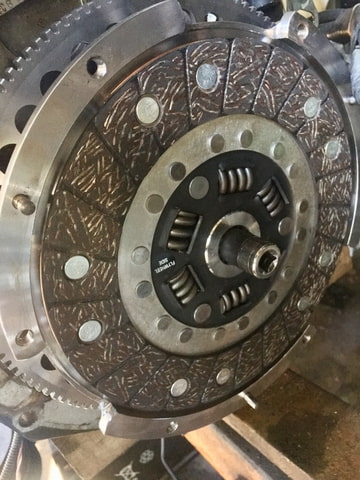
With that I popped the gear box back on bolted it all up and bled the clutch through. I hand tested it by getting the other half to jump on the pedal while I was turning the drive shafts to feel it engage and disengage properly.
So far so good it seems to have sorted it right out.
its funny how some stuff only requires the simplest of solutions
The real test will be dropping the clutch at 4K with a dash of 2 step
a lot of work to be done first though lol
Any way this is the damage damage of stupidity
its blown the top off the master cylinder. Luckily I saw a post on FB that someone was selling one for �10 so I snapped it up and fitted it as soon as it arrived.
After correcting my balls up I popped the gear box off and started to investigate exactly why the clutch didn’t want to go all the way down to the floor.
i measured the old friction plate compared to the new one and there was only about 1.4mm difference so it wast that what was causing it.
Then after staring it it for a bit it I noticed some marks around the spring retaining plate. It looks like the fingers were coming in contact with it.
as you can see the sprung plate protrudes past the friction surface by a fair bit. When comparing it to the old friction plate it’s reasonably obvious it wasn’t going to work.
so after some more head scratching I thought, what’s stopping me from putting the friction plate in backwards.
Normaly you can’t as the sprung plate would contact the bolt heads on the flywheel. However the TTV flywheel is especially deep so after a few measurements it shows there would be at least 12mm clearance between the bolt heads and the face of the sprung plate, plenty of wear clearance.
I also measured the offset of the splined collar. Turns out it will sit 2mm from the end of the input shaft. So with that I can’t see any reason not to install it backwards.
With that I popped the gear box back on bolted it all up and bled the clutch through. I hand tested it by getting the other half to jump on the pedal while I was turning the drive shafts to feel it engage and disengage properly.
So far so good it seems to have sorted it right out.
its funny how some stuff only requires the simplest of solutions
The real test will be dropping the clutch at 4K with a dash of 2 step
a lot of work to be done first though lol
Last edited by MonK-E; Oct 20, 2018 at 08:30 PM.
Thread Starter
I'm Finding My Feet Here Now
Joined: Dec 2017
Posts: 124
Likes: 13
From: East Sussex
Sorry no updates for now. I've had a lot going on with work and home life. Also need to move in a couple of weeks time. I'll be back on the ST at the beginning of December with any luck
Thread Starter
I'm Finding My Feet Here Now
Joined: Dec 2017
Posts: 124
Likes: 13
From: East Sussex
It's good to know that I've done the right thing by flipping it over

Thread
Thread Starter
Forum
Replies
Last Post
Fudgey
Restorations, Rebuilds & Projects.
289
Sep 4, 2014 09:33 AM
robbie1988
Restorations, Rebuilds & Projects.
50
Jan 12, 2014 09:37 PM
JezSierra
Restorations, Rebuilds & Projects.
14
Mar 21, 2006 10:17 AM