B9KOS: Shonky Ver 2.0 is here !!! Updated 13-04-10

 02-08-2006, 05:57 PM
#163
PassionFord Post Troll

Join Date: Jul 2003
Location: Suffolk
Posts: 2,582
Likes: 0
Received 0 Likes
on
0 Posts
Originally Posted by B9KOS
Then removed the front crank pulley in one piece for a change  Used a fly wheel puller from machine mart (cheers for the link Jared) which did the job easily. �18 for a puller is cheaper than �85 for a new pulley
Used a fly wheel puller from machine mart (cheers for the link Jared) which did the job easily. �18 for a puller is cheaper than �85 for a new pulley
02-08-2006, 08:41 PM
#164
Originally Posted by CosRush
Originally Posted by B9KOS
Then removed the front crank pulley in one piece for a change Used a fly wheel puller from machine mart (cheers for the link Jared) which did the job easily. �18 for a puller is cheaper than �85 for a new pulley
Used a fly wheel puller from machine mart (cheers for the link Jared) which did the job easily. �18 for a puller is cheaper than �85 for a new pulley
02-08-2006, 09:00 PM
#165
Another day closer to MSD and its coming along slowly but surely. Began the day with a trip to the local motorfactors to get some new inner cv boots for the front drive shafts. What a fiasco that turned into  Wrong item in box etc.
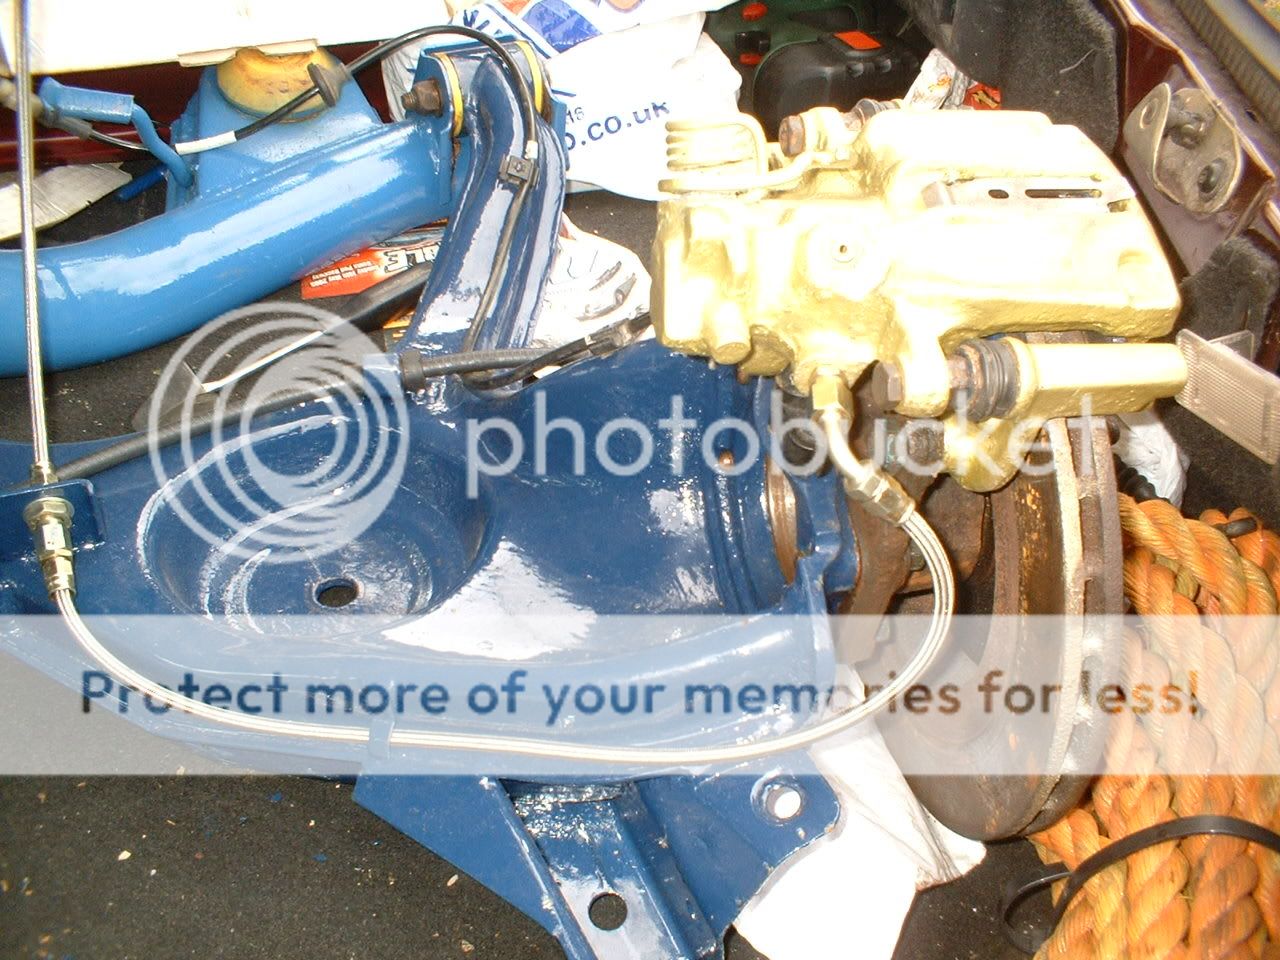
Refitted front hubs, struts, TCAs, and brakes as planned. The plan is to replace the TCAs and anti roll bar next month with Adjustable TCAs and a set of Compression struts
The postman made yet another delivery A pair of verniers off eBay. Excellent quality for a good price as well. Removed the standard pulleys and fitted them ready to reset the timing.

Once fitted we set the crank and cams at the standard timing points and fitted and tensioned the cam belt. Also replaced the tensioner stud and locking nut as well as the tensioner itself. Then had some fun setting the cam trigger for the WRC style phase sensor. Will update my thread in the Technical Essay Section when i take some pictures tommorrow.

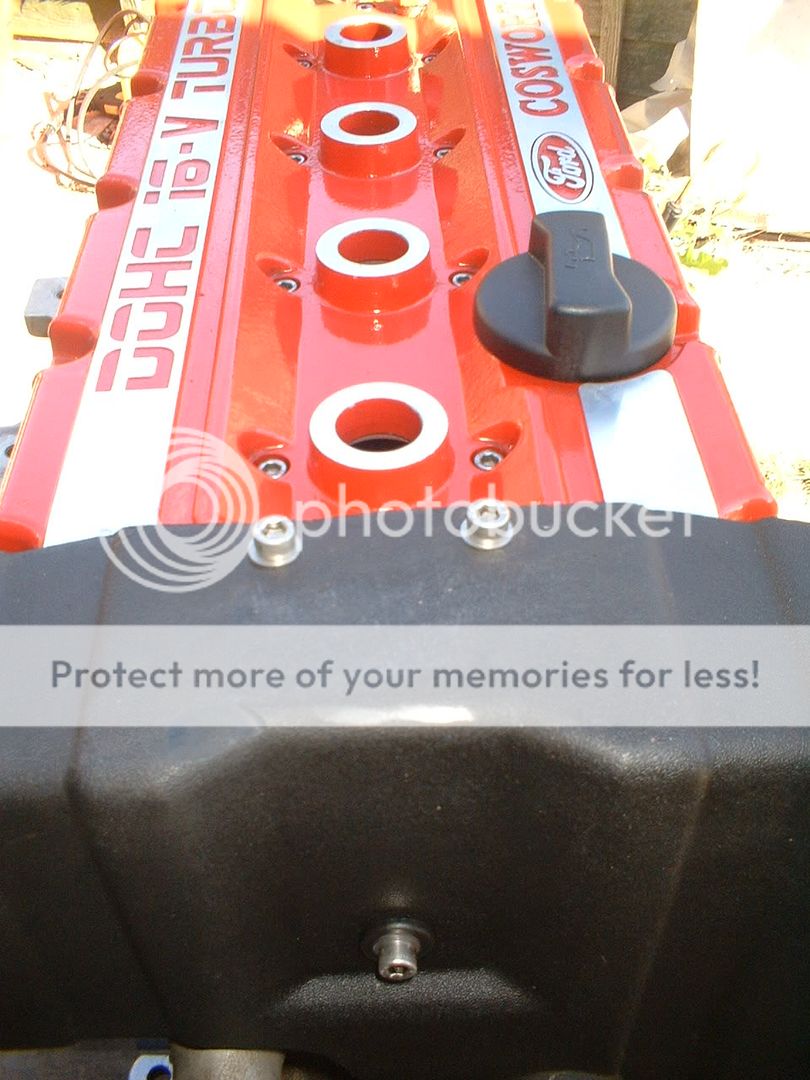
The cam cover is going to be powder coated black as usual
Early start again tommorrow again
Wrong item in box etc.Refitted front hubs, struts, TCAs, and brakes as planned. The plan is to replace the TCAs and anti roll bar next month with Adjustable TCAs and a set of Compression struts
The postman made yet another delivery
Once fitted we set the crank and cams at the standard timing points and fitted and tensioned the cam belt. Also replaced the tensioner stud and locking nut as well as the tensioner itself. Then had some fun setting the cam trigger for the WRC style phase sensor. Will update my thread in the Technical Essay Section when i take some pictures tommorrow.
The cam cover is going to be powder coated black as usual
Early start again tommorrow again
 thermostat housing


 03-08-2006, 04:11 AM
#172
PassionFord Post Whore!!
Join Date: Apr 2004
Location: oxfordshire/berkshire
Posts: 7,053
Likes: 0
Received 0 Likes
on
0 Posts
Originally Posted by B9KOS
Another day closer to MSD and its coming along slowly but surely. Began the day with a trip to the local motorfactors to get some new inner cv boots for the front drive shafts. What a fiasco that turned into Wrong item in box etc.
Refitted front hubs, struts, TCAs, and brakes as planned. The plan is to replace the TCAs and anti roll bar next month with Adjustable TCAs and a set of Compression struts
The postman made yet another delivery A pair of verniers off eBay. Excellent quality for a good price as well. Removed the standard pulleys and fitted them ready to reset the timing.
Once fitted we set the crank and cams at the standard timing points and fitted and tensioned the cam belt. Also replaced the tensioner stud and locking nut as well as the tensioner itself. Then had some fun setting the cam trigger for the WRC style phase sensor. Will update my thread in the Technical Essay Section when i take some pictures tommorrow.
The cam cover is going to be powder coated black as usual
Early start again tommorrow again
Wrong item in box etc.Refitted front hubs, struts, TCAs, and brakes as planned. The plan is to replace the TCAs and anti roll bar next month with Adjustable TCAs and a set of Compression struts
The postman made yet another delivery
Once fitted we set the crank and cams at the standard timing points and fitted and tensioned the cam belt. Also replaced the tensioner stud and locking nut as well as the tensioner itself. Then had some fun setting the cam trigger for the WRC style phase sensor. Will update my thread in the Technical Essay Section when i take some pictures tommorrow.
The cam cover is going to be powder coated black as usual
Early start again tommorrow again
Looking very good tho m8 i forgot you where running a fancy fuel reg
03-08-2006, 09:46 PM
#173
Originally Posted by Alan s1
Do you want a nice set of Stainless Steel bolts for the cam cover Cheap Also got the 3 for the cam belt cover in s/s if your inteasted let me know
Looking very good tho m8 i forgot you where running a fancy fuel reg Dont surpos you have your old 4x4 fuel reg i also need a 4x4 inlet aswell i have a fuel rail let me know if you do
Looking very good tho m8 i forgot you where running a fancy fuel reg
Thanks for the offer mate but i'm happy with the pikey black ones Got no 4x4 bits as mine was originally 2wd
Your new cage looks
03-08-2006, 10:28 PM
#175
Been busy again today
Started the day with hacksaw in hand Cut off the intercooler inlet and outlet pipes to change the angles slightly. Using the new pipes i got from Pro Alloy we got the correct angles after a bit of head scratching Just need my welder friend Ben to weld them up now 
Then finished off the fuel system by fitting:
1. New fuel tank.
2. New 044 Fuel Pump.
3. New wiring for fuel pump, will be wire direct from battery via new relay.
4. New fuel filter.
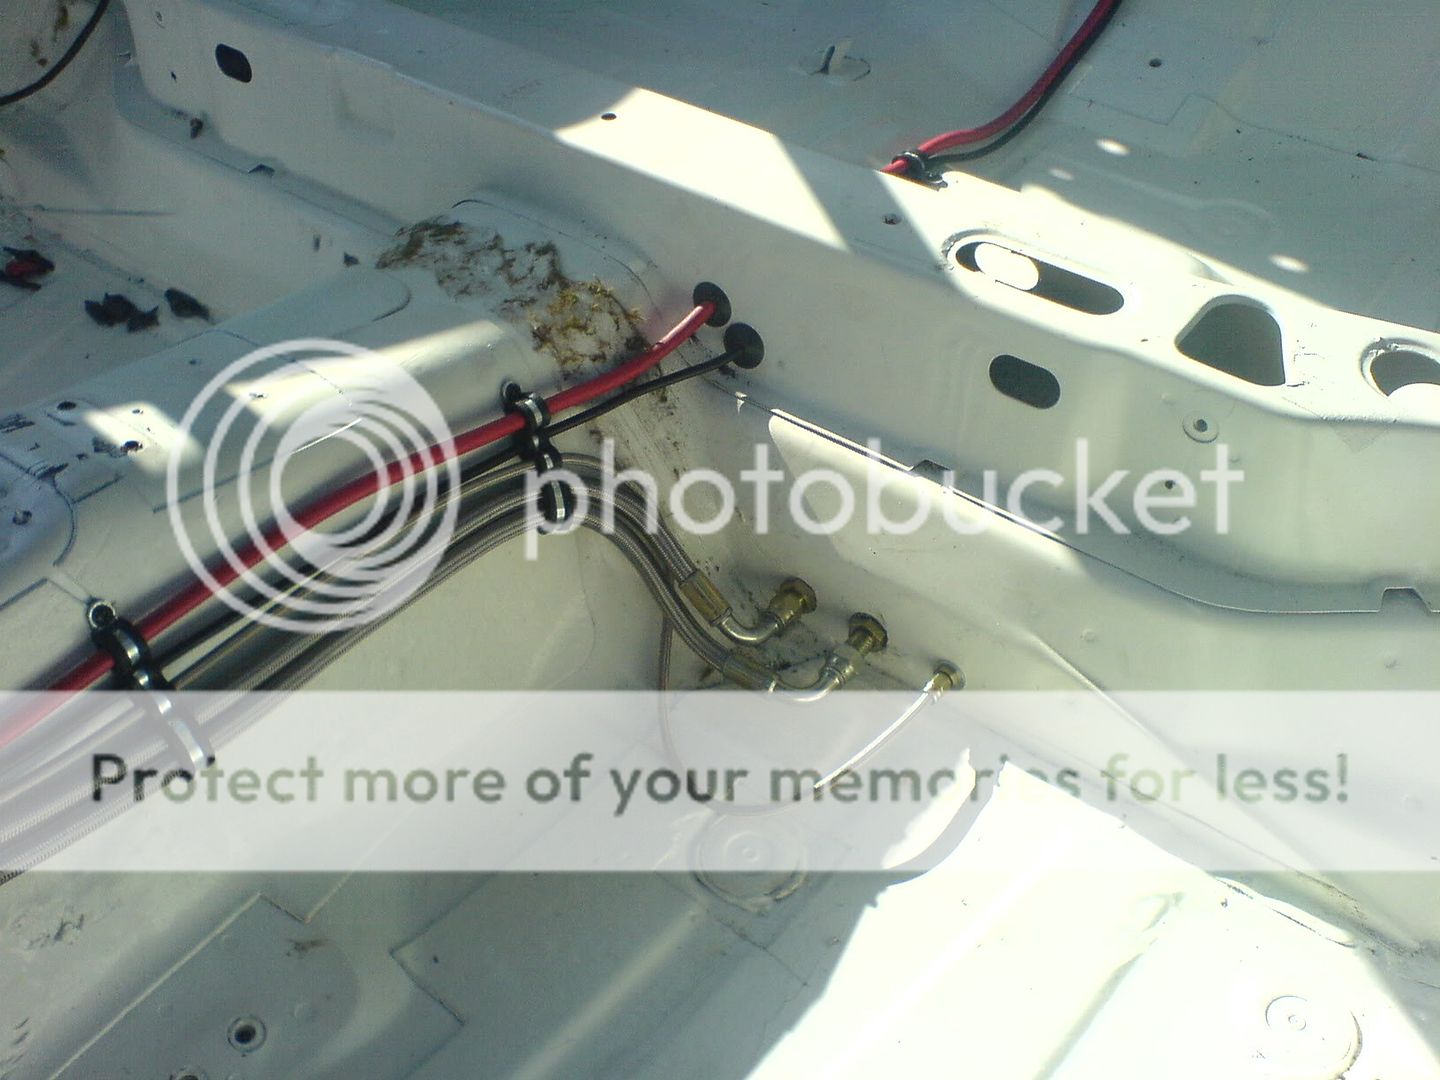
5. New fuel lines.
Fuel lines are now run through the car to reduce the risk off damage should i have any moments on track I've used a 3/8 bore convoluted, PTFE lined braided stainless steel hose for these. This hose is slightly larger bore than the standard line and can bend without kinking like some of the Aeroquip stuff does and is only �14 +vat a metre  Used swaged on zinc plated -6 connectors as they are 'Functional Not Cosmetic' Also tested to 4000psi
Then moved onto the brakes and made the braided line ( -3 hose from Rally Design) to run inside the car. Whilst i made the hose and fitted the through bulkhead fittings Trev made a copper pipe to run over the rear beam to complete the line to the tee piece above the diff
Routed the main battery cable and extinuisher supply pipe through the rear seat cross member so i can refit the bench part of the rear seat.
Thats it for today
Started the day with hacksaw in hand
Cut off the intercooler inlet and outlet pipes to change the angles slightly. Using the new pipes i got from Pro Alloy we got the correct angles after a bit of head scratching Then finished off the fuel system by fitting:
1. New fuel tank.
2. New 044 Fuel Pump.
3. New wiring for fuel pump, will be wire direct from battery via new relay.
4. New fuel filter.
5. New fuel lines.
Fuel lines are now run through the car to reduce the risk off damage should i have any moments on track
Then moved onto the brakes and made the braided line ( -3 hose from Rally Design) to run inside the car. Whilst i made the hose and fitted the through bulkhead fittings Trev made a copper pipe to run over the rear beam to complete the line to the tee piece above the diff
Routed the main battery cable and extinuisher supply pipe through the rear seat cross member so i can refit the bench part of the rear seat.
Thats it for today
04-08-2006, 04:04 AM
#176
PassionFord Post Whore!!
Join Date: Apr 2004
Location: oxfordshire/berkshire
Posts: 7,053
Likes: 0
Received 0 Likes
on
0 Posts
It was worth a try Look great tho
Dont know why i thought yours was a 4wd
Also i have done all my brake hoses on the rear beam in braided

And yes im not looking folward to getting it in
The old one was a right pain in the arse
Look great tho Dont know why i thought yours was a 4wd
Also i have done all my brake hoses on the rear beam in braided
And yes im not looking folward to getting it in
The old one was a right pain in the arse
04-08-2006, 09:28 PM
#180
Originally Posted by StickerPaul
I like the blue rocker cover with the blue verniers
Not far from turning the key Rich
Not far from turning the key Rich
Nearly Paul, hopefully tommorrow
Originally Posted by Franco
Going well Rich!!
Good to see the photos of you actually working on yours
 04-08-2006, 10:01 PM
#182
Feels like we're getting there now
Refitted the alternator and replaced the belts. Connected power steering pipes to the rack, fitted the belt and filled the resevoir.
Then made a bracket to hold the fuse box in its new position above the drivers side kick panel. Can now do the final fit and securing off the main car loom.

Recieved some relay connectors and pins/crimps off Ryan Means can now make a little sub loom to power the radiator fans. Each fan will be wired seperately with fused relays and an overide switch.
Decided to put the overide switch in the lower Defi panel.

Trev expertly removed the old car to ecu connector and replaced it with the new connector provided by Ryan with my new loom. Then completed the new wiring for the fuel pump.
Jobs left to do:
Fit front diff cover and fill with oil
Replace sump plug and fill sump with oil
Weld intercooler inlet/outlet pipes and refit it
Fit radiator and fans, then fill with anti freeze/water
Finish off the wiring
Fit speed sensor to front hub for STACK
Put the interior back in
Fill it with Optimax and turn the key
Then give it a shakedown test to see what falls off
Only a week to go as well
Refitted the alternator and replaced the belts. Connected power steering pipes to the rack, fitted the belt and filled the resevoir.
Then made a bracket to hold the fuse box in its new position above the drivers side kick panel. Can now do the final fit and securing off the main car loom.
Recieved some relay connectors and pins/crimps off Ryan
Means can now make a little sub loom to power the radiator fans. Each fan will be wired seperately with fused relays and an overide switch.Decided to put the overide switch in the lower Defi panel.
Trev expertly removed the old car to ecu connector and replaced it with the new connector provided by Ryan with my new loom. Then completed the new wiring for the fuel pump.
Jobs left to do:
Fit front diff cover and fill with oil
Replace sump plug and fill sump with oil
Weld intercooler inlet/outlet pipes and refit it
Fit radiator and fans, then fill with anti freeze/water
Finish off the wiring
Fit speed sensor to front hub for STACK
Put the interior back in
Fill it with Optimax and turn the key
Then give it a shakedown test to see what falls off
Only a week to go as well
04-08-2006, 10:06 PM
#184
Originally Posted by CosKev3
Looking good m8
How much was the Pro-Alloy fan kit????????
Are the fans more efficient than the orig cos ones,or just a direct replacement??????
How much was the Pro-Alloy fan kit????????
Are the fans more efficient than the orig cos ones,or just a direct replacement??????
They are a direct fit and although i've not tried them yet they will be alot better than the shonky standard ones i'm sure
05-08-2006, 12:36 AM
#188
10K+ Poster!!
iTrader: (2)
Join Date: May 2004
Location: UK
Posts: 11,383
Likes: 0
Received 0 Likes
on
0 Posts
Originally Posted by B9KOS
Fit front diff cover and fill with oil
Replace sump plug and fill sump with oil
Weld intercooler inlet/outlet pipes and refit it
Fit radiator and fans, then fill with anti freeze/water
Finish off the wiring
Fit speed sensor to front hub for STACK
Put the interior back in
Fill it with Optimax and turn the key
Replace sump plug and fill sump with oil
Weld intercooler inlet/outlet pipes and refit it
Fit radiator and fans, then fill with anti freeze/water
Finish off the wiring
Fit speed sensor to front hub for STACK
Put the interior back in
Fill it with Optimax and turn the key
Days work for you Rich!
Get stuck in mate, bet its running by Monday!
05-08-2006, 01:57 PM
#190
PassionFord Post Troll
Join Date: Apr 2004
Location: Shropshire.
Posts: 3,047
Likes: 0
Received 0 Likes
on
0 Posts
Originally Posted by B9KOS
Originally Posted by CosKev3
Looking good m8
How much was the Pro-Alloy fan kit????????
Are the fans more efficient than the orig cos ones,or just a direct replacement??????
How much was the Pro-Alloy fan kit????????
Are the fans more efficient than the orig cos ones,or just a direct replacement??????
They are a direct fit and although i've not tried them yet they will be alot better than the shonky standard ones i'm sure
Mine are just about knackered,draw way to much current
Will deffo get a pair of them,when I get alloy rad
06-08-2006, 10:41 PM
#192
Weekend update :
Still waiting to get intercooler to be welded
Trev has kindly offered to take it around a few fabrication shops tommorrow to get it sorted. Can't afford to wait any longer for my mate to do it
The wiring is coming along well, its now got lights(most of them ), the elec windows work, the heater and wipers work, and the starter circuit and starter work . The engine even turns on the key 
Big thanks to Brom@ZooMotorsport for helping sort out a adjustable clutch cable and a small problem i had with the pedal box. All over the phone as well
Still waiting to get intercooler to be welded
Trev has kindly offered to take it around a few fabrication shops tommorrow to get it sorted. Can't afford to wait any longer for my mate to do it
The wiring is coming along well, its now got lights(most of them
), the elec windows work, the heater and wipers work, and the starter circuit and starter work . The engine even turns on the key Big thanks to Brom@ZooMotorsport for helping sort out a adjustable clutch cable and a small problem i had with the pedal box. All over the phone as well
 07-08-2006, 11:08 PM
#195
Now finally feels like we are getting some where
Intercooler all welded up and fitted along with boost hoses
Radiator, turbo cooler and new fans all back in. Just got to get some hose to run from the swirl pot to the header tank and it'll be ready for some water/antifreeze.
Front sump and engine now both filled with oil. Collecting new turbo feed pipe to morrow.
So hopefully get the f****r running tomorrow
08-08-2006, 09:58 PM
#197
After some teething problems with a leaking fuel filter union we finally got it started
Got some oil pressure as well which is nice Just over 70 psi on tick over
Did a little rabbit run to get the Defis working, mmmm They look
  when lit up, although the low oil pressure alarm is quite annoying
Got some oil pressure as well which is nice
Just over 70 psi on tick over Did a little rabbit run to get the Defis working, mmmm
They look