What I did to my car before National Day - never made it :(
 22-08-2004, 03:51 PM
#1
Advanced PassionFord User
Thread Starter

Join Date: May 2004
Location: Bexhill, East Sussex
Posts: 1,789
Likes: 0
Received 0 Likes
on
0 Posts
Hey everyone,
Been busy getting the car sorted out for RSOC national day today, including getting the car running in a fit enough state to actually make it (although the exhaust manifold gasket is now in need of replacement), getting some driver issues with the carputer sorted out and then went on to sort out the bumper camera.
This is something I'd been promising to do for ages and at the moment it's still a very basic setup and I'll probably re-do it during the week, but I really wanted to get it on in time for RSOC national day and so went ahead with the prototype so to speak.
Take one driver's side spotlight unit from the front bumper of your XR2i/RST/bodykitted Fiesta.
Buy yourself a fairly decent webcam (the smaller the size of the unit the better) to fit inside the light unit.
Remove the bulb holder and cut/hack the back of the light unit until you have space to fit your camera into the light unit itself.
Trial fit the camera to make sure that there is going to be clearance at the back of the unit for when refitting into the bumper.
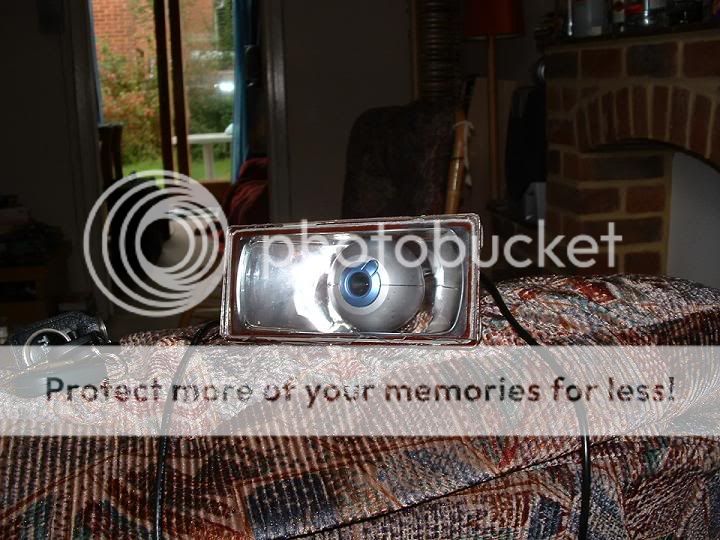
Prise the glass from the front of the light unit until it should all peel away, leaving you with one metal casing for the glass unit.
Get yourself some relatively tough perspex sheeting (secondary double glazing sheeting is best) - I was lucky and had some lying around (having removed it from my windows when I moved in - it stopped me from opening any of the windows in the house!).
I found that this stuff is pretty tricky to cut, so if you can get hold of a proper flat based tile cutter (B&Q sell a Plasplugs one) then use that - score a deep line in the perspex and then snap it on the edge of a workbench or similar.
I then trial fitted the perspex to make sure it was going to fit and then silicon sealed the perspex into the front of the casing and then fixed teh camera in the back with some more silicon sealer. Having done that I then wrapped the back of the camera unit in lots and lots of insulation tape to help prevent any moisture from getting to the unit - I'll modify a rubber bung on the next version as I think this will work better.
Fit the light unit back into the black plastic surround and then put this back into the bumper as normal - I insulated off the ends of the old spotlight cables so that I can re-use them if I so wish.

Due to the nature of the fit the webcam can be adjusted if I need to by removing the perspex and resealing it again, or the direction of the camera can be adjusted by reaching under the bumper.
I wired the camera into my carputer via the mini-hub located inside the centre console of the car - running the cable up along behind the headlamp and along the inside of the front wing through the wiring bung above the fusebox.
Voila!

I've still got some mucking about to do but ran out of time to get some proper footage taken - I'll keep you updated on that during the week.

Cheers,
Andy
P.S. Misfire problems meant I didn't make it so
Been busy getting the car sorted out for RSOC national day today, including getting the car running in a fit enough state to actually make it (although the exhaust manifold gasket is now in need of replacement), getting some driver issues with the carputer sorted out and then went on to sort out the bumper camera.
This is something I'd been promising to do for ages and at the moment it's still a very basic setup and I'll probably re-do it during the week, but I really wanted to get it on in time for RSOC national day and so went ahead with the prototype so to speak.
Take one driver's side spotlight unit from the front bumper of your XR2i/RST/bodykitted Fiesta.
Buy yourself a fairly decent webcam (the smaller the size of the unit the better) to fit inside the light unit.
Remove the bulb holder and cut/hack the back of the light unit until you have space to fit your camera into the light unit itself.
Trial fit the camera to make sure that there is going to be clearance at the back of the unit for when refitting into the bumper.
Prise the glass from the front of the light unit until it should all peel away, leaving you with one metal casing for the glass unit.
Get yourself some relatively tough perspex sheeting (secondary double glazing sheeting is best) - I was lucky and had some lying around (having removed it from my windows when I moved in - it stopped me from opening any of the windows in the house!).
I found that this stuff is pretty tricky to cut, so if you can get hold of a proper flat based tile cutter (B&Q sell a Plasplugs one) then use that - score a deep line in the perspex and then snap it on the edge of a workbench or similar.
I then trial fitted the perspex to make sure it was going to fit and then silicon sealed the perspex into the front of the casing and then fixed teh camera in the back with some more silicon sealer. Having done that I then wrapped the back of the camera unit in lots and lots of insulation tape to help prevent any moisture from getting to the unit - I'll modify a rubber bung on the next version as I think this will work better.
Fit the light unit back into the black plastic surround and then put this back into the bumper as normal - I insulated off the ends of the old spotlight cables so that I can re-use them if I so wish.
Due to the nature of the fit the webcam can be adjusted if I need to by removing the perspex and resealing it again, or the direction of the camera can be adjusted by reaching under the bumper.
I wired the camera into my carputer via the mini-hub located inside the centre console of the car - running the cable up along behind the headlamp and along the inside of the front wing through the wiring bung above the fusebox.
Voila!
I've still got some mucking about to do but ran out of time to get some proper footage taken - I'll keep you updated on that during the week.
Cheers,
Andy
P.S. Misfire problems meant I didn't make it so
 22-08-2004, 04:02 PM
#2
15K+ Super Poster!!
Like I said mate, looks the nuts, good thing your getting some practice in for when you fit one of them to mine 
Shame you didn't make it to the show thou mate.
Shame you didn't make it to the show thou mate.
22-08-2004, 04:07 PM
#3
Advanced PassionFord User
Thread Starter
Join Date: May 2004
Location: Bexhill, East Sussex
Posts: 1,789
Likes: 0
Received 0 Likes
on
0 Posts
Originally Posted by MadMac
Like I said mate, looks the nuts, good thing your getting some practice in for when you fit one of them to mine
Shame you didn't make it to the show thou mate.
Shame you didn't make it to the show thou mate.
It's a shame that neither of us could make it today
Cheers,
Andy


 23-08-2004, 05:08 PM
#6
Advanced PassionFord User
Thread Starter
Join Date: May 2004
Location: Bexhill, East Sussex
Posts: 1,789
Likes: 0
Received 0 Likes
on
0 Posts
Thanks guys!
I'm dropping off the car at Grove Garage tomorrow for mapping - should be interesting getting some footage taken when I get it back
Cheers,
Andy
I'm dropping off the car at Grove Garage tomorrow for mapping - should be interesting getting some footage taken when I get it back
Cheers,
Andy

Trending Topics


Thread
Thread Starter
Forum
Replies
Last Post
Versus_Creations
Pictures, video & Photoshop Forum
24
05-08-2015 09:32 PM