When you click on links to various merchants on this site and make a purchase, this can result in this site earning a commission. Affiliate programs and affiliations include, but are not limited to, the eBay Partner Network.
So ive decided after a 6 year hiatus from anything Ford and resto i have the itch,
And ive picked up the below fairly cheaply.
Done some digging with the screwdriver and surprise... holes
So, as its a cabby, and i believe they have extra strengthening along the sills, im thinking of cutting the outer sill off completely and putting a new panel in, along with a front wing and rear wheel arch on each side.
Now ive done patching and even some larger sill sections before, but never an entire sill or wheel arch.
Its only the sill ends that are gone, and the inner sills are fine,
Anything advice on this would be very much appreciated.
Thanks caddyshack,
Now trying to decide weather to patch the bottoms of the front and rear wings or fit new rear wheel arch and front wing.
Any pro's n cons?
Yea to be honest,
Its the bottom rear of the front arches both sides, and the bottom fronts of the rears (the part that meets the sill)
I know i need to put a new rear sill piece in, but im wondering if the repalcemnt panel will replace the broken part of the wing
OK, so after a morning with the angle grinder, it was time to get the card template out and start making some replacement parts,
Pics up very soon,
Have to rework the Sill replacement as the Cabrio one is completely different on the lower section where the extra gusset meets the outer sill, but straighteneing it out and then re-folding in the box bender got me the shame i wanted.... pesky wayoyl cathes fire far too easily
Rear right suspension off and in the shot blaster at work, Bushes burnt out and thent he bush sleeves cut and removed, treated with hammer finish paint then poly bushes in from Matt Lewis racing, excellent value and fit PROPERLY!
With part of the rear rot cut out, i havnt cut neat lines yet, just wanted access tot he rather complicated yet quite strong Cabby gurder sills
Going to need some creative thinking to make a new bottom lip, worried at this point
Decided to cut the NOS full sill from Hadrians in half, as i needed to modify the shape of the 3door sill to fit the cabrio profile at theh rear anyway
Used the front remaining piece to fashion a new lower lip
I looked over the construction of the sills for the cabrio and it seems the only places that all the pieces come together are at the bottom edge , so with the new piece in, when the outer sill goes over the top it will form what would have been the original structure, seam welded all the way along also
Excuse the welding, first time in 8 years and it was hard to dial the gas flow in without a gauge
RH Rear Wishbone with the rubber bushes out, the only method after 27 years... FIRE!!!
I purchased a set of poly bushes from Matt Lewis Racing fro the rear after realizing you cant get NOS bushes, and besides, they would be a wanker to press new ones in.
Turned up next day! So i sat at work today trying to get them in... could i fook!
So before calling up and complaining, i read a few forums and it seems there is lots of opinions and methods on this.
Well i realised i had removed the rubber portion of the bush but both inner and outers have a steel bush sleeve pressed in that should have come out with the bush
So a hacksaw and drift later and i had it free and the poly bushes fitted a treat.!!
XR2i inlet i stripped and painted 8 years ago for my S1 and never fitted, amazing how well the paint has lasted, must have done something right
Now just need a bottom an XR2i bottom and and head with a set of Turbo pistons and im ready to rebuid the engine, sourced a great deal engine stand from fleabay, #30 brand new and delivered!!
thanks Twins, Ive literally a mountain of work to do, but luckily things like electronics and looms are my forte, so ive just the hard mechanical bit to do,
RH Rear Wishbone with the rubber bushes out, the only method after 27 years... FIRE!!!
I purchased a set of poly bushes from Matt Lewis Racing fro the rear after realizing you cant get NOS bushes, and besides, they would be a wanker to press new ones in.
Turned up next day! So i sat at work today trying to get them in... could i fook!
So before calling up and complaining, i read a few forums and it seems there is lots of opinions and methods on this.
Well i realised i had removed the rubber portion of the bush but both inner and outers have a steel bush sleeve pressed in that should have come out with the bush
So a hacksaw and drift later and i had it free and the poly bushes fitted a treat.!!
Christ I've never seen a Cabriolet with that much rot before. I used to have a red D plate one, Granted it was 10 years ago, only rot it had was a little scab on the drivers side sill hidden under the door seal where it meets the inner seal(spot weld) and the battery tray had a small hole along the inner wing.
Yea tell me about it Mark, But every old Ford deserves a second, third and fourth chance, after all, why else would we do it?!
Update pics below
Seems to be going well, just concentrating on one area at a time
Had to fabricate some inner wing, and repair some of the cabrio extra gusseting
More inner wing lip restored, i didnt want to buy and entire inner panel just for the lip, so some 20Awg from work did nicely, its seam welded to the good part further round
After lots of advice i decided to only replace the bad parts, but took it back to good, i had some of the lower gusset to replace too, but once it was in, its strong as feck, i can pull that axle stand out and it wont budge an inch! Lots of grinding of my crappy welding now, and plenty of red oxide and skim of filler
the inner return of the sill ( door aperture) was a bitch to try and flat back , but after some door closing tests i realised i could afford quite a bit of filler to level out the welds, as id removed a lot of crap that was there previous
A coat of red oxide everywhere and a break for lunch was on the cards, cheese on toast anyone?
First skim of filler , seems to be going ok, im not the most patient person when it comes to filler, paint and prep work,
And this is how ive left it for today, 6 hours and ive had enough, i think another skim of filler and some wet N Dry and ill be ready for some Radiant Red
What id forgotten is that the welding of bits in, is actually quite easy, but the pattern making and prep work to try and retain the original shape of everything takes a lot a patience, i could have stuck the new sill over the top and just welded it straight to the part that met, but it wouldn't have looked much like the cabrio sill shape at the the rear, so i'm glad i have gone the extra length to retain its shape.
Really starting to get the love back for these old things!
T3 on its way, XR2i lump on its way, turbo Pistons on their way, Pectel T6 on the way
Should be able to make a pretty sweet and reliable lump from that little lot i think
Its handy to know an Ex Pectel chap and access to a rolling road Buck Shee
Ahaa, it seems it pays to have friends in the right places,
Forget the T6, now a proud owner of an SQ6 overkill for a CVH? nahhhhhh
So its time to get mocking the new loom up
you can probably see fromt the earlier pic of the INlet manifold, i started making the Motorsport loom years ago for it, so im nearly done there,
Add some boost control, Wideband Lambda, and few other sensors... because i can and then get it set up over CAN with a Motec Dash perhaps
I guess an appropriate question would be some advice on boost control plumbing and solenoids, along with which injectors to run,
Im looking for a reliable 200bhp, nothing extreme,
Got all the bits i need now, Thanks to some helpfull Ford fans,
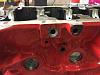
Befor i rebiuild the bottom end, how have people sorted the oil return for N/A EFI blocks?
Can i drill out the Boss thats drilled on the Turbo blocks? or does this lead to disaster, id rather not drill the sump, It looks like the casting is the same as the turbo but the machine operation to drill through hasnt been carried out.
Well, in the absence of anyone having done this before, I decided what the hell .
Ordered an oil return stub from eBay, 2 for £15 , the ones used for zvh conversions.
The helpful chap told me what side to drill and what tap I needed but had never done it to an engine block before.
I grabbed my cordless drill and 18mm HSS drill bit and got going drilling out the block
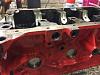
Started slowly using the spirit level as a guide
Actually cut quite nicely, on a slow and steady speed with plenty of WD40
Marked out the cross bore into the sump area
And then bored down
I need to run a die grinder along the sharp inside edges to relieve any potential stress points,
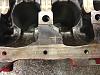
Then through the hot wash at work a few times and should be golden,
Oh, need to tap the hole to 1/2" bsp tho
Thanks Rooos, it was nerve racking, and I would have thought someone would have done it before and been willing to offer some advice, but I've ended up with a really good result,
Now tapped with 1/2bsp thread for the brass stub from eBay,
All went well
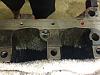
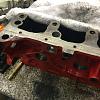
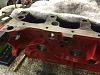
Finally managed to get the oil gallery bungs out. That was a trying job, I had to walk away twice after rounding them off, but a blow lamp and a few scrap screwdriver bits saw the better of them... Now I'm ready for a 3 stage clean at work.
Thing is...
Where do I get replacement gallery bungs from? A Google search has resulted in absolutely nothing. Plenty for the OHV and pinto from burtons. But not the CVH
Anyone?
Thanks
Rich
but you might looking for the threaded block plugs or others...
in such case, if i were you, not being able to re-use the old ones (even with sealer pastes or teflon tape), i'd fetch them to some serious spare-dealers or engine-machining-shop, trying to work something out...
they may be the same used on other engine blocks.
Its the oil Gallery bung (threaded inserts) not the core plugs.
It looks like ill have to go looking for some replacements then at a machine shop.
Thanks
Rich
I have done some searching, and you can get replacement oil gallery plugs from ebay
with a ford part number of 1759055 for the CVH,
Just isn't easy to find stuff anymore
Rich


 !
!