


Moonstone 3-door

Thread Starter
Wahay!! I've lost my Virginity!!
Joined: Apr 2010
Posts: 68
Likes: 0
From: Lancashire
 Moonstone 3-door
A Big hello to everyone  and heres my car which is a 1986 moonstone blue sierra cosworth


Specs of the car are its running with the sapphire 4X4 engine and running gear, stage 3 tuned at 330bhp (though ive personally not had it on rolling road yet), RS500 cut out in front bumper, Genuine RS500 front splitter and lower boot spoiler, delocked boot and doors, escort cossie alloys on gaz coilovers so it sits better and little bits of shiney stuff under the bonnet
Bought to enjoy and take to shows the plan soon changed when after a couple of months of ownership I noticed a crack running along the inner wings of the car and around the suspension turrets which turned into this


After finding all the grot under the bonnet decision was made to go to town and bring the car back up to standard by replacing the inner and outer front wings for genuine bits and so the engine bay was stripped ready for the removal of the engine and gearbox


After few days the car was ready have engine dropped so my mate arrived in his pulling machine (not the sort that attarcts the ladies) and the car was taken to a unit with ramp to have the engine dropped straight out the bottom

As is the way come the next day couldnt get into unit as keys had been lost. Unaware of this I turned up the following day to have shock of my life when I saw the car looking like

Not a recommended idea using a fork lift for this but as needs must the brake and fuel lines were disconnected, engine mounts undone and fingers crossed as the car was lifted in the air and car and engine parted company


Once high enough the engine was wheeled out from underneath and the car loaded up and taken to mates where work commenced on those wings, next update will be just that
and heres my car which is a 1986 moonstone blue sierra cosworthSpecs of the car are its running with the sapphire 4X4 engine and running gear, stage 3 tuned at 330bhp (though ive personally not had it on rolling road yet), RS500 cut out in front bumper, Genuine RS500 front splitter and lower boot spoiler, delocked boot and doors, escort cossie alloys on gaz coilovers so it sits better and little bits of shiney stuff under the bonnet
Bought to enjoy and take to shows the plan soon changed when after a couple of months of ownership I noticed a crack running along the inner wings of the car and around the suspension turrets which turned into this
After finding all the grot under the bonnet decision was made to go to town and bring the car back up to standard by replacing the inner and outer front wings for genuine bits and so the engine bay was stripped ready for the removal of the engine and gearbox
After few days the car was ready have engine dropped so my mate arrived in his pulling machine (not the sort that attarcts the ladies) and the car was taken to a unit with ramp to have the engine dropped straight out the bottom
As is the way come the next day couldnt get into unit as keys had been lost. Unaware of this I turned up the following day to have shock of my life when I saw the car looking like
Not a recommended idea using a fork lift for this but as needs must the brake and fuel lines were disconnected, engine mounts undone and fingers crossed as the car was lifted in the air and car and engine parted company
Once high enough the engine was wheeled out from underneath and the car loaded up and taken to mates where work commenced on those wings, next update will be just that
Last edited by Jay's 3-door; Jan 18, 2011 at 05:02 PM.

Thread Starter
Wahay!! I've lost my Virginity!!
Joined: Apr 2010
Posts: 68
Likes: 0
From: Lancashire
So engine removed and car back at mates work began on those inner wings. Due to the state they where in I wanted to replace the whole lot, however I had no idea at this point how hard the inners were to get hold of  in the end after thinking we'd have to work with what was there got a call from geoff at chorley street garage who had a sierra in he only wanted roof off for his, great this was snapped up and the whole lot brought back


Can see a lot better than what was there, having been able to source 2 new outer wings work set about to remove the inners. The outer wings were ground off to access the inner wings then a lot of spot drilling of the welds were required to get the inners off with minimal damage


Eventually after a lot of drilling/prying/swearing both wings where safely off and ready for use

in the end after thinking we'd have to work with what was there got a call from geoff at chorley street garage who had a sierra in he only wanted roof off for his, great this was snapped up and the whole lot brought backCan see a lot better than what was there, having been able to source 2 new outer wings work set about to remove the inners. The outer wings were ground off to access the inner wings then a lot of spot drilling of the welds were required to get the inners off with minimal damage
Eventually after a lot of drilling/prying/swearing both wings where safely off and ready for use
Thread Starter
Wahay!! I've lost my Virginity!!
Joined: Apr 2010
Posts: 68
Likes: 0
From: Lancashire
Cheers Harris, luckily its bit down the line now, been meaning to join up for a while so just going through the pictures now get up to speed. At the time was kick in teeth for sure but weve had worse down the line as you'll see 
Thread Starter
Wahay!! I've lost my Virginity!!
Joined: Apr 2010
Posts: 68
Likes: 0
From: Lancashire
So wings ready to go could concentrate on getting front end of the car sorted. Car was brought back to mates and put on railway sleepers to keep the car level while work was going on

The dashboard was removed along with 20 odd years of wiring and add on's

With all wiring out of the way could have a proper look under the bonnet and be sure nothing was going to be accidentley cut in the process, had a bit more banging and poking around the front end of the car to see how bad things where and.....


On the face of it the nearside doesnt look to bad, amazing what a bit of bog can do though


So both sides gone as bad as they where just as well I pulled the car off the road when I did, and refused temptation of a lap around silverstone at ford fair 2 weeks previous due to engine problems
Next step was getting the lot out of there, Car had been bogged and failed to stop the rot so if a jobs worth doing its worth doing properly. And where any cossie's concerned this has to be the case so outer wings where removed and cleaned up to find the spot welds


Can see how bad now the inner wings where. a bit of this was now carefully cut out to give better access to the spot welds, now you see it

and now you dont

this gone any spot welds where cleaned up with a wire brush along the chassis leg and body of the car

Until again we where able to pry the remaining piece off and expose the chassis leg


this process was repeated for the near side until the front end of the car was looking just a bit bare

Next updates the refitting of the wings its fag break now though all this typing isnt good
The dashboard was removed along with 20 odd years of wiring and add on's
With all wiring out of the way could have a proper look under the bonnet and be sure nothing was going to be accidentley cut in the process, had a bit more banging and poking around the front end of the car to see how bad things where and.....
On the face of it the nearside doesnt look to bad, amazing what a bit of bog can do though
So both sides gone as bad as they where just as well I pulled the car off the road when I did, and refused temptation of a lap around silverstone at ford fair 2 weeks previous due to engine problems
Next step was getting the lot out of there, Car had been bogged and failed to stop the rot so if a jobs worth doing its worth doing properly. And where any cossie's concerned this has to be the case so outer wings where removed and cleaned up to find the spot welds
Can see how bad now the inner wings where. a bit of this was now carefully cut out to give better access to the spot welds, now you see it
and now you dont
this gone any spot welds where cleaned up with a wire brush along the chassis leg and body of the car
Until again we where able to pry the remaining piece off and expose the chassis leg
this process was repeated for the near side until the front end of the car was looking just a bit bare
Next updates the refitting of the wings
its fag break now though all this typing isnt good


Trending Topics
Thread Starter
Wahay!! I've lost my Virginity!!
Joined: Apr 2010
Posts: 68
Likes: 0
From: Lancashire
cheers for the commentI was looking for a black one at first but glad I opted for a moonstone, like you say I dont think theres a better colour especially in fading light as the blue starts popping more. The cars coming along nice, been bit of a mission from how it started out but the lights at the end of the tunnel, more pics and updates on the way
Last edited by Jay's 3-door; Apr 11, 2010 at 05:57 PM. Reason: because i cant spell


Will follow this, Makes me worry that the fronts that bad though, whats it like underneath?
Do you think youre going to be chasing rust for a while, You certainly seem to have the commitment to get it done.
I would have given up after about half one of them wings.
Forget how old these cars are getting now
Do you think youre going to be chasing rust for a while, You certainly seem to have the commitment to get it done.
I would have given up after about half one of them wings.
Forget how old these cars are getting now
Last edited by Ebonycossie4x4; Apr 11, 2010 at 06:20 PM.
Thread Starter
Wahay!! I've lost my Virginity!!
Joined: Apr 2010
Posts: 68
Likes: 0
From: Lancashire
So following day got on with trial fitting the wings to make sure everything lined up right, cue excitment as we offered the new wings into place


Looking good and already miles better than what was there, before welding the wings back on though the jacking points of the car where now exposed after the removal of the wings, over the 20 odd years of cars life these have been flattened and crushed so while accessable these were knocked back down

The wings where then cleaned then lined up and my mate (being a better welder than me) set about welding them back onto the car


The spot weld which had been drilled out where filled back in and a long time later the inner wings where back on the car


The bonnet had been left on throughout this process and so the outer wings where placed and clamped on and the bonnet shut to check everything was still lining up as it should, and im delighted to say everything did, better than expected really for 2 people with no experience in this


At the front where the headlights sit again for the life of me couldnt find the 2 required pieces, thought id hit gold on an internet site only to be told the parts where now obsolete. Luckily being an engineer I have some experience in sheet metal work so went about making a paper template from the old part, transferred that to cardboard then traced the shape onto a piece of sheet metal

This was then bent and shaped to match and welded onto the car


as last job with the inner wings all the little holes where filled with weld and the bigger ones had pieces made and welded in to give a clean base for after spraying and get rid of some of the holes which were not being used, a dust of copper spray was applied to protect the wings from going to rusty while the car was outside under a sheet

With that cue the cheesy grin and thinking the worse of its over now at least, how those words came back to haunt me the following week
Looking good and already miles better than what was there, before welding the wings back on though the jacking points of the car where now exposed after the removal of the wings, over the 20 odd years of cars life these have been flattened and crushed so while accessable these were knocked back down
The wings where then cleaned then lined up and my mate (being a better welder than me) set about welding them back onto the car
The spot weld which had been drilled out where filled back in and a long time later the inner wings where back on the car
The bonnet had been left on throughout this process and so the outer wings where placed and clamped on and the bonnet shut to check everything was still lining up as it should, and im delighted to say everything did, better than expected really for 2 people with no experience in this
At the front where the headlights sit again for the life of me couldnt find the 2 required pieces, thought id hit gold on an internet site only to be told the parts where now obsolete. Luckily being an engineer I have some experience in sheet metal work so went about making a paper template from the old part, transferred that to cardboard then traced the shape onto a piece of sheet metal
This was then bent and shaped to match and welded onto the car
as last job with the inner wings all the little holes where filled with weld and the bigger ones had pieces made and welded in to give a clean base for after spraying and get rid of some of the holes which were not being used, a dust of copper spray was applied to protect the wings from going to rusty while the car was outside under a sheet
With that cue the cheesy grin and thinking the worse of its over now at least, how those words came back to haunt me the following week
Thread Starter
Wahay!! I've lost my Virginity!!
Joined: Apr 2010
Posts: 68
Likes: 0
From: Lancashire
to many now are being broken for bits so I like the idea of being able to keep another from going down that route, again thanks for the commentsAgain sir thanks for the welcome and comments, been to a few ford fairs and think its certainly the best family car wise to be a part of
Will follow this, Makes me worry that the fronts that bad though, whats it like underneath?
Do you think youre going to be chasing rust for a while, You certainly seem to have the commitment to get it done.
I would have given up after about half one of them wings.
Forget how old these cars are getting now
Do you think youre going to be chasing rust for a while, You certainly seem to have the commitment to get it done.
I would have given up after about half one of them wings.
Forget how old these cars are getting now
as I said to ste its a case of loving the cars and wanting to see it back on the road, 80's fords in general have the worst metal ive ever come across so its been one long trial but the lights there now, stay tuned for the underside coming up next and yeah it was as bad but as you said you forget the cars are now 24yrs old so you have to expect it I suppose
Last edited by Jay's 3-door; Apr 11, 2010 at 06:39 PM.
Thread Starter
Wahay!! I've lost my Virginity!!
Joined: Apr 2010
Posts: 68
Likes: 0
From: Lancashire
So next day with weather taking a turn for the worse we decided while the car was looking like it did would make no sense to not give the rest of it a proper check over and make sure the rust hadnt spread, on the face of it the rest of the car didnt look to bad but on the safe side the rear subframe and petrol tank where removed for a closer inspection

And heres me looking slightly worried under the car where the subframe mounts

At this point decided best way to go about things was to invest in a jig to rotate the car and get better access and viewing of the underneath, a quick call to rick at Mk2Mania and the following week was in possession of a jig which the car was put on ready for the next stage
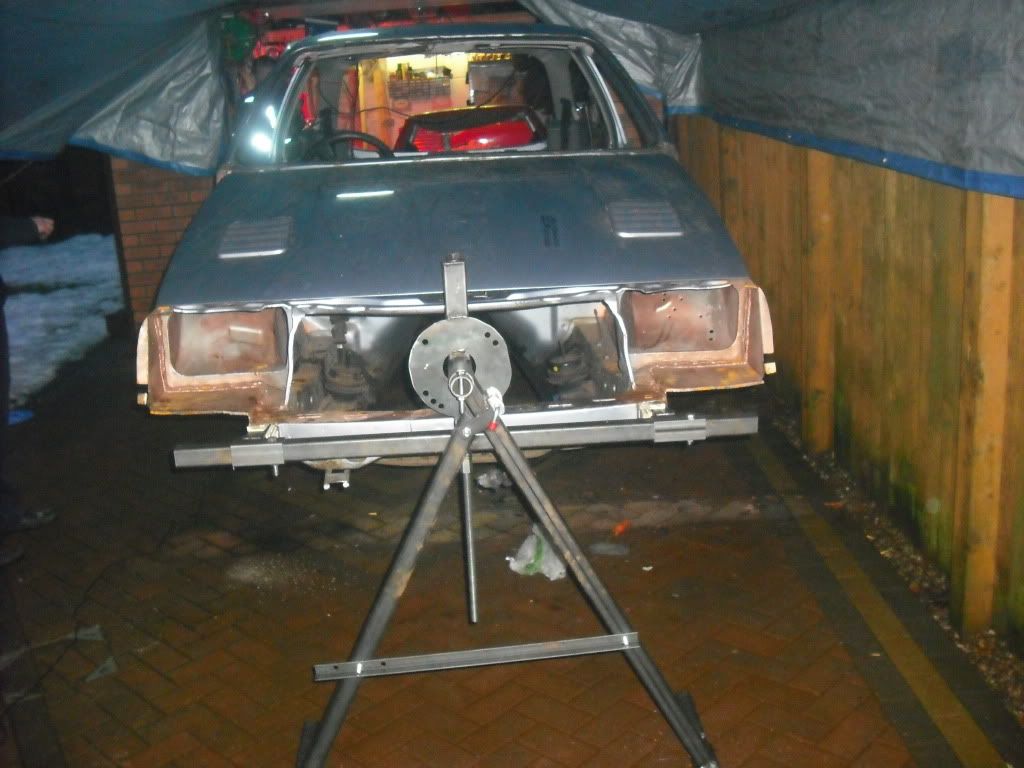
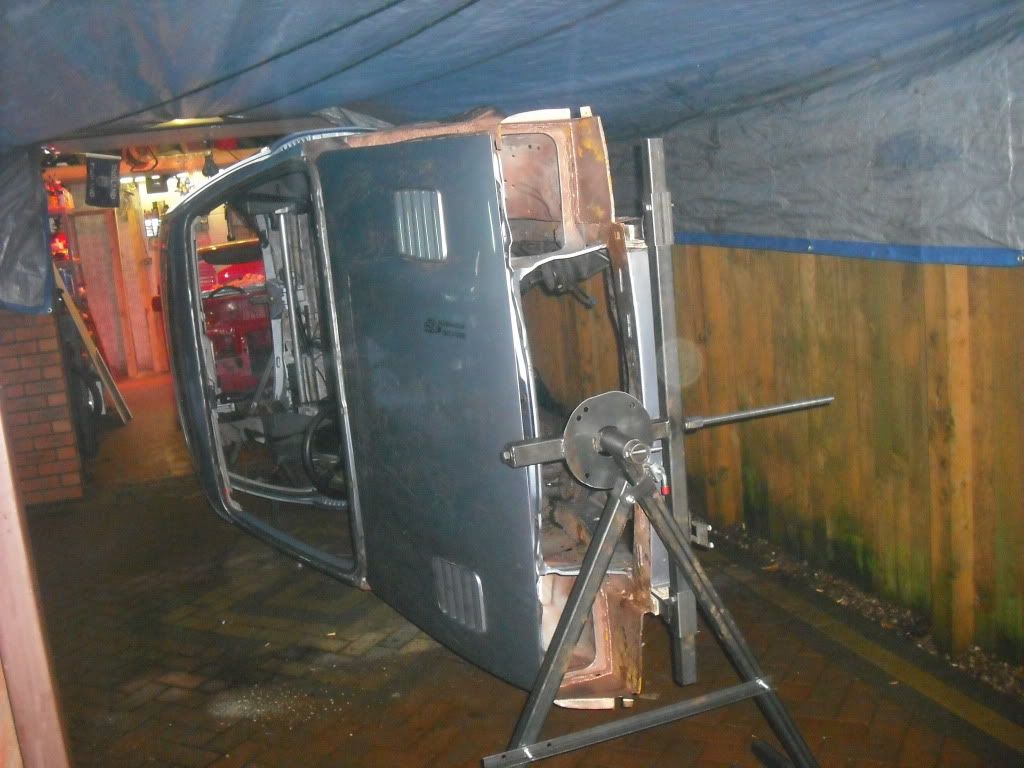
A bargin at £200 if only for the ease of not having to crawl on back, his website details are here if anyones looking at buying a jig for their project
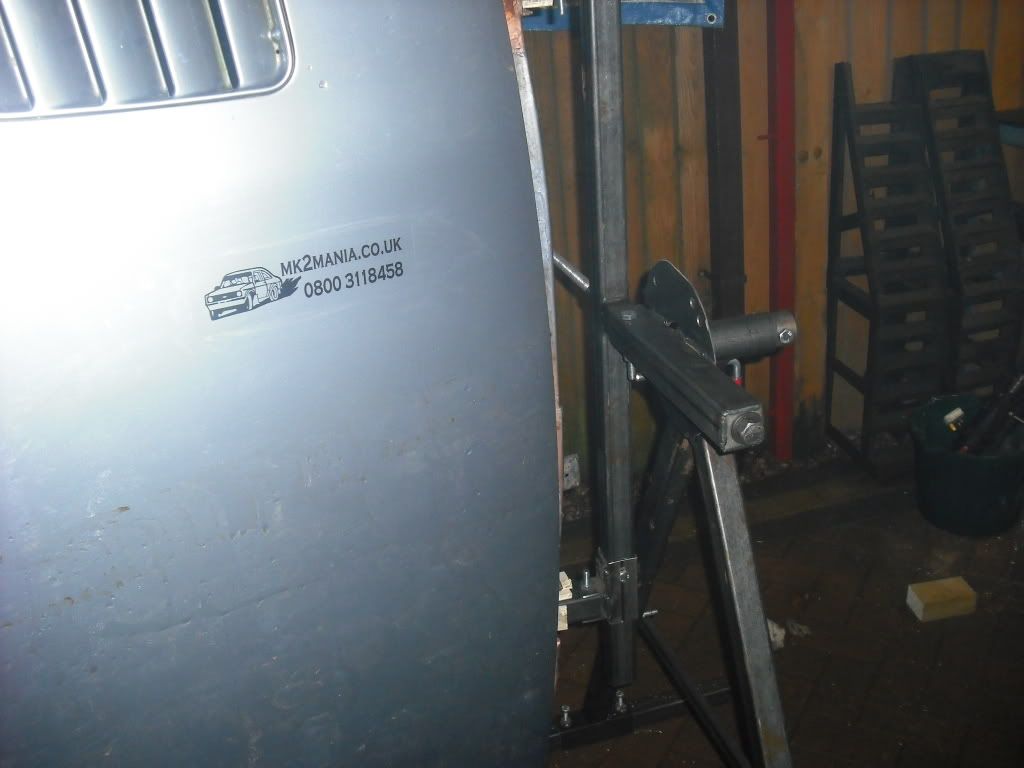
with car now on its side could see to what extent the rust had spread and it didnt make for a good picture

Could see straight away where the subframe mounts was rotten and it had already been patched up further along. cue of s**t. with that hot air gun was plugged in and began heating up the underbosy sealant to make it easier to scrape off, unfortanatly it was actually the underbody sealant holding the chassis leg together so the more I scraped the worse the situation got


So not good when the whole subframe locates on a pin thats floating in midair but in finding this at least decision to buy the jig had been justified. It was at this point I was ready for throwing the towel in until a chance look on ebay brought me across one of the members here selling a complete genuine ford chassis leg, not quite believing my luck for a change this was quickly snapped up and was on way to me. few days wait and next part was started removing the old chassis leg
And heres me looking slightly worried under the car where the subframe mounts
At this point decided best way to go about things was to invest in a jig to rotate the car and get better access and viewing of the underneath, a quick call to rick at Mk2Mania and the following week was in possession of a jig which the car was put on ready for the next stage
A bargin at £200 if only for the ease of not having to crawl on back, his website details are here if anyones looking at buying a jig for their project
with car now on its side could see to what extent the rust had spread and it didnt make for a good picture
Could see straight away where the subframe mounts was rotten and it had already been patched up further along. cue of s**t. with that hot air gun was plugged in and began heating up the underbosy sealant to make it easier to scrape off, unfortanatly it was actually the underbody sealant holding the chassis leg together so the more I scraped the worse the situation got
So not good when the whole subframe locates on a pin thats floating in midair
but in finding this at least decision to buy the jig had been justified. It was at this point I was ready for throwing the towel in until a chance look on ebay brought me across one of the members here selling a complete genuine ford chassis leg, not quite believing my luck for a change this was quickly snapped up and was on way to me. few days wait and next part was started removing the old chassis leg
Thread Starter
Wahay!! I've lost my Virginity!!
Joined: Apr 2010
Posts: 68
Likes: 0
From: Lancashire


PassionFord Post Whore!!


Joined: May 2004
Posts: 3,833
Likes: 100
From: East Sussex
Just read the whole thread and pics, what a nightmare!!!!!!
Full credit to you tho mate, and I really hope all goes well with the repair, at least you will have a solid car when done.
Good luck and will keep watching the rebuild
Full credit to you tho mate, and I really hope all goes well with the repair, at least you will have a solid car when done.
Good luck and will keep watching the rebuild

Thread Starter
Wahay!! I've lost my Virginity!!
Joined: Apr 2010
Posts: 68
Likes: 0
From: Lancashire
While waiting for the chassis leg to arrive scraping continued with the rest of the car, the other rear chassis leg was scraped back and though not brilliant was in a lot better condition than the other side

eventually the whole car was scraped of sealant and could look at what was lurking underneath


so more bits of rust

more bits flattened by quick fit fitters

and more bits we'll cover as we go along by the time this point had been reached chassis leg was here and work began on removing the old one. As the full section was being replaced and the car was currently located on the jig via the chassis leg the car was blocked up on wood to hold its weight while the leg was removed


Once any rock in the car had gone set about like the front wings wire brushing along the chassis leg to find the spot welds which where then marked up clearly


where possiable the centres where punched to help the spot weld drill locate and each spot weld was then drilled out


where access proved difficult sections of the leg where removed to make things a bit easier


eventually after a fair bit of messing around and banging the leg was removed from the car

and again because nobody can resist th new piece was put roughly into place to make sure it would fit directly on

It did and so the next part was welding the new leg onto the car
eventually the whole car was scraped of sealant and could look at what was lurking underneath
so more bits of rust
more bits flattened by quick fit fitters
and more bits we'll cover as we go along
by the time this point had been reached chassis leg was here and work began on removing the old one. As the full section was being replaced and the car was currently located on the jig via the chassis leg the car was blocked up on wood to hold its weight while the leg was removedOnce any rock in the car had gone set about like the front wings wire brushing along the chassis leg to find the spot welds which where then marked up clearly
where possiable the centres where punched to help the spot weld drill locate and each spot weld was then drilled out
where access proved difficult sections of the leg where removed to make things a bit easier
eventually after a fair bit of messing around and banging the leg was removed from the car
and again because nobody can resist th new piece was put roughly into place to make sure it would fit directly on
It did and so the next part was welding the new leg onto the car
Thread Starter
Wahay!! I've lost my Virginity!!
Joined: Apr 2010
Posts: 68
Likes: 0
From: Lancashire
help keeps mojo up on something like this as I said knowing people who like fords as much appreciate the work, makes it more worthwhile, and cheers for the welcome Im hoping it will be after the work thats gone into it now anyway, I suppose the big test will be when its been sprayed back to moonstone and seeing it all in one colour again lol

Thread Starter
Wahay!! I've lost my Virginity!!
Joined: Apr 2010
Posts: 68
Likes: 0
From: Lancashire
Ive seen 2 up for sale since on ebay from him, hope that helps you out pal and you can track one down

Thread Starter
Wahay!! I've lost my Virginity!!
Joined: Apr 2010
Posts: 68
Likes: 0
From: Lancashire
And so moving onto the fitting of the new leg and first things first the side which meets the sill behind the chassis leg was looking a little worse for wear as you can see here

This piece was cut out and removed to eliminate any chance of the rust returning and a new piece cut and welded in to replace it


With this in out came the angle grinder and the area where the chassis leg locates was cleaned up and deburred

The chassis leg was then drilled for welding in the same way the inner wings where attached, then measurments taken off the subframe to get the distance across and the existing leg on the other side for position


The leg was then held in place using the seat belt bolt and other nuts and bolts to pull the leg tight to the cars body


then one by one all the holes where filled with weld and the leg was seam welded in other places for added strength as this is something I dont want to take a risk with


and with that another big tick and another big headache was crossed off the list, next up the cars sills oh yes it goes on, lol
This piece was cut out and removed to eliminate any chance of the rust returning and a new piece cut and welded in to replace it
With this in out came the angle grinder and the area where the chassis leg locates was cleaned up and deburred
The chassis leg was then drilled for welding in the same way the inner wings where attached, then measurments taken off the subframe to get the distance across and the existing leg on the other side for position
The leg was then held in place using the seat belt bolt and other nuts and bolts to pull the leg tight to the cars body
then one by one all the holes where filled with weld and the leg was seam welded in other places for added strength as this is something I dont want to take a risk with
and with that another big tick and another big headache was crossed off the list, next up the cars sills
oh yes it goes on, lol

Thread Starter
Wahay!! I've lost my Virginity!!
Joined: Apr 2010
Posts: 68
Likes: 0
From: Lancashire
luckily it wasnt as bad as the other so repairing it was viable, i just personally prefer old for new where i can, ill the best with getting yours sorted as wellCheers for the welcome and comments dooge, looks like a nice moonstone 3dr you have as well there, actually in one piece unlike mine, lol
I thankyou again sir for the kind comments, it wasnt meant to be a project initially, and as I found the rust I certainly used words worse than project to sum her up, but when it became one the theory is do it right and make it last rather than do it again in a few years time
Last edited by Jay's 3-door; Apr 11, 2010 at 09:31 PM.
Thread Starter
Wahay!! I've lost my Virginity!!
Joined: Apr 2010
Posts: 68
Likes: 0
From: Lancashire
so chassis leg ticked off the list moved onto the sill on the same side, with being able to get hold of sills quite easily and being another spot prone to rust had decided ages ago I was going to replace them, plus somebody had already done a bit of welding to them which was visable without the bodykit which was bad enough anyway as you can see from this picture

The new sill was placed on and marked out


This was then cut out all the way along so the full piece could be used

after getting the sill off became obvious the car had some work to the floor in the past, the sill was floating in mid air and the lip of which we needed to weld the replacement sill to was none existent

a piece of angle inch x inch angle was bought from auto crash parts and welded into place

after this strips from another length where cut and welded on to reattach the inner sill to the car body

Before refitting the outer sill the inner sills were wire brushed down and given a coat of POR-15 rust preventative paint to help protect them in the future


Once dry the sill was put into position and carfully welded into place to avoid distorting the rear quarter panel


the sill now on finishing jobs where to grind the weld flat and cut the plate at the back to match the size of the sill

and looking underneath was slowly starting to make headway at last on the car


Next up was taking the wooden supports out and flipping the car around the other way to repeat the work on opposite side
The new sill was placed on and marked out
This was then cut out all the way along so the full piece could be used
after getting the sill off became obvious the car had some work to the floor in the past, the sill was floating in mid air and the lip of which we needed to weld the replacement sill to was none existent
a piece of angle inch x inch angle was bought from auto crash parts and welded into place
after this strips from another length where cut and welded on to reattach the inner sill to the car body
Before refitting the outer sill the inner sills were wire brushed down and given a coat of POR-15 rust preventative paint to help protect them in the future
Once dry the sill was put into position and carfully welded into place to avoid distorting the rear quarter panel
the sill now on finishing jobs where to grind the weld flat and cut the plate at the back to match the size of the sill
and looking underneath was slowly starting to make headway at last on the car
Next up was taking the wooden supports out and flipping the car around the other way to repeat the work on opposite side
Thread Starter
Wahay!! I've lost my Virginity!!
Joined: Apr 2010
Posts: 68
Likes: 0
From: Lancashire
So car now back under strain of jig was brought around level so the inside of the sill where the door is could be shaped correct with the weld


the whole process was repeated on the drivers side, out with the old

In with the new


little bits of rot where then removed from various points on the car and replaced, so a bit on the drivers rear wheel arch

a piece was cut out at the back on the drivers side and replaced


new pieces where made for the rear wheel arces near the sills

bit of work on the wheel arch

more work at the back of the car where there was rust

and a slightly bigger plate a bit further along to sort it out where someone had botched the car up in their wisdom

With most of the welding now complete moved onto wire brushing the floor back to bare metal making sure there was nothing that had been missed, update to follow of the next process
the whole process was repeated on the drivers side, out with the old
In with the new
little bits of rot where then removed from various points on the car and replaced, so a bit on the drivers rear wheel arch
a piece was cut out at the back on the drivers side and replaced
new pieces where made for the rear wheel arces near the sills
bit of work on the wheel arch
more work at the back of the car where there was rust
and a slightly bigger plate a bit further along to sort it out where someone had botched the car up in their wisdom
With most of the welding now complete moved onto wire brushing the floor back to bare metal making sure there was nothing that had been missed, update to follow of the next process
Thread Starter
Wahay!! I've lost my Virginity!!
Joined: Apr 2010
Posts: 68
Likes: 0
From: Lancashire
Most loborious job of the lot this one and was done over the course of a few weeks, after first few nites raised question of why i was doing it but paint i was going to use needed to bond to bare metal, so over first few nights got the front section done with


Turned the car back over and at this point had to make decision on other chassis leg. Had held off for as long as could do hoping one would turn up but as a few people have found if and when they do there not about for long. As this side wasnt as bad we went about repairing the section, so here it is from an earlier post as reminder (the cars also the other way around on jig at this point)

Not as bad as the other side but still a concern, therefore as much was removed as possiable. the chassis leg here is double skinned and so 2 pieces of sheet metal (thicker than original) were cut and shapped, the first piece was welded in place and ground back

then the second piece was welded over the top and edges rounded off to match what was there in the first place


That done I could carry on brushing the back end of the car so by the time thats was done the difference was 100x times better than what was there

as one last bit of welding for the underside the crumpled jacking points further under the car (again think those garages that flatten your floor, of which if you look at the floor now on this weve knocked it out again) were now letting it down badly, had tried jack hammer and not got anywhere but ripping the metal rather than pulling it, rather than leaving them crumpled welded a new piece over the top, so again from an earlier picture heres how they looked and how they ended up


again a marked improvement, I dont think its going to be a concourse car because as I said i like driving it to much but I would like to know having the chance to do something about it that it was done
So heres a picture of the car bare metaled underneath

thats a lot better than when I began posting this afternoon, In that picture its just drying off after being degreased and that leads me onto the final post before were at where the car is at the moment thankgod I really should of joined sooner, lol
Turned the car back over and at this point had to make decision on other chassis leg. Had held off for as long as could do hoping one would turn up but as a few people have found if and when they do there not about for long. As this side wasnt as bad we went about repairing the section, so here it is from an earlier post as reminder (the cars also the other way around on jig at this point)
Not as bad as the other side but still a concern, therefore as much was removed as possiable. the chassis leg here is double skinned and so 2 pieces of sheet metal (thicker than original) were cut and shapped, the first piece was welded in place and ground back
then the second piece was welded over the top and edges rounded off to match what was there in the first place
That done I could carry on brushing the back end of the car so by the time thats was done the difference was 100x times better than what was there
as one last bit of welding for the underside the crumpled jacking points further under the car (again think those garages that flatten your floor, of which if you look at the floor now on this weve knocked it out again
) were now letting it down badly, had tried jack hammer and not got anywhere but ripping the metal rather than pulling it, rather than leaving them crumpled welded a new piece over the top, so again from an earlier picture heres how they looked and how they ended upagain a marked improvement, I dont think its going to be a concourse car because as I said i like driving it to much but I would like to know having the chance to do something about it that it was done
So heres a picture of the car bare metaled underneath
thats a lot better than when I began posting this afternoon, In that picture its just drying off after being degreased and that leads me onto the final post before were at where the car is at the moment thankgod I really should of joined sooner, lol
Last edited by Jay's 3-door; Apr 13, 2010 at 12:32 AM.
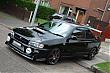
 Fair play to you. . . Your work looks spot on
lol fair play jay , lot of had work gon into this so far ,
and i though i had it bad baremettaling my floor beofre it was welded into the car lol ,
credit to all your had graft matey
will keep an eye on this one ,
beef
and i though i had it bad baremettaling my floor beofre it was welded into the car lol ,
credit to all your had graft matey
will keep an eye on this one ,
beef
Thread Starter
Wahay!! I've lost my Virginity!!
Joined: Apr 2010
Posts: 68
Likes: 0
From: Lancashire
Im hoping this is my last progress update of the night now, with the car bare metaled I began process of applying POR-15 to the underside. For those who dont know of it its a rust preventative paint so I thought if any car needs it its got to be this one
step one, use POR-15 marine clean and degrease the car, dont use normal degreaser on any rust paint, few of mates have found out to cost most degreasers cause the paint to react, wash off after half an hour and leave car to dry
Step two, use metal ready which leaves a zinc coat over the metal, dissolves any bits of surface rust and gives the paint something to bite into, can see it as blue liquid pooling in corner of this pic

step three, get the paint brushed on and hope it does exactly what it says on the tin


sills, rear windows, rear arches and petrol cap recess got the same treatment


that done the remainder of the front was wire brushed and painted in the same way


this was done on the inside of the car as well along the floor


a before and after here

the inside quarter panels were sprayed in eastwoods rust encapsulator then covered in grey schultz for sound proofing


And im pleased say that thats where the car currentley is at the moment, If you've read full thread then cheers for sticking with it be less from now on as can update as go along though its not far off going to be sprayed. Again thanks all for looking and comments tonight, appreciate them all 
step one, use POR-15 marine clean and degrease the car, dont use normal degreaser on any rust paint, few of mates have found out to cost most degreasers cause the paint to react, wash off after half an hour and leave car to dry
Step two, use metal ready which leaves a zinc coat over the metal, dissolves any bits of surface rust and gives the paint something to bite into, can see it as blue liquid pooling in corner of this pic
step three, get the paint brushed on and hope it does exactly what it says on the tin
sills, rear windows, rear arches and petrol cap recess got the same treatment
that done the remainder of the front was wire brushed and painted in the same way
this was done on the inside of the car as well along the floor
a before and after here
the inside quarter panels were sprayed in eastwoods rust encapsulator then covered in grey schultz for sound proofing
And im pleased say that thats where the car currentley is at the moment, If you've read full thread then cheers for sticking with it
be less from now on as can update as go along though its not far off going to be sprayed. Again thanks all for looking and comments tonight, appreciate them all