
DIY alloy wheel refurb

Hi guys,
Want to refurb all my alloys over the summer and I'm looking for a guide or something but can't seem to find one. Basically I'm assuming I'll need to fully rub down, primer, paint and lacquer. Few things I want to ask though:
1) Should I take the tyres off? I've seen people put newspaper and stuff around but from previosu experience masking tape doesn't hold on tyres.
2) I know it is probably well recommended to use a compressor over rattle cans but will it be a big advantage to do so? Bear in mind I'd have to rent one if I was to do this. Also where do you buy paint and lacquer to put into a compressor?
3) I've never done anything like this before but I also can't afford to pay to get a full set of refurbs! I'm in North London but will still consider getting them refurbed elsewhere if cheap enough or if anyone is willing to refurb them, I'm more than willing to travel, possibly deliver the wheels to you and by all means pay you for your troubles.
P.S. I'm also after someone that can do paintless dent removal as I have a couple that need doing.
Cheers!
how much you got to spend mate ? thing is youve obviously got to be confident enough to do the work other wise youll pay out for all the bits and it will end up looking wank.
where you live ? im in watford and my mate does powder coating he charges 30 per wheel if your intrested
thanks paul
where you live ? im in watford and my mate does powder coating he charges 30 per wheel if your intrested
thanks paul

I got quoted �200 to recon my 17" superleggras and spray them or �300 hundred to recon and powdercoat them. This was a shop on the a10 at cheshunt ill get you the name of the shop if you want its in my van.If you get them sprayed there do it in a day.


PassionFord Post Whore!!
Joined: Apr 2004
Posts: 8,264
Likes: 17
I did my old civic wheels, they were battered!!!
IMO get them done proffessional as it take a long time and effort to do them and cots about 60 - 100 quid in materials to do them yourself.
IF you do them yourself, here is what I did.
Scrubbed the wheels and tyres down with soapy water and dried them.
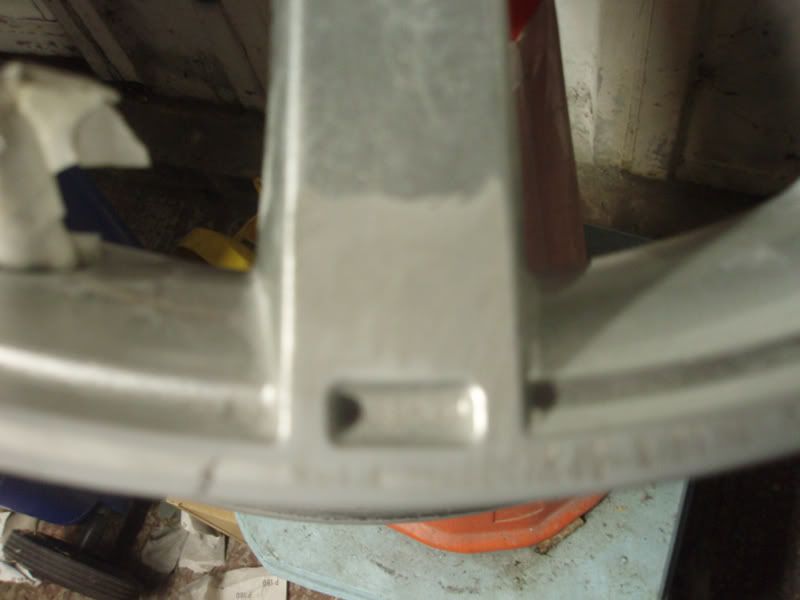
Used a medium sand paper to sand out the chips etc, used a metal filler on deep gouges.
Then used a finer paper to flat it all off. Then cleaned them with water and dried.
I then stuck bits of tape down in between the tyre and the alloy rim all the way round, then used kitched clingfilm to wrap the tyre. Then taped the tape to the cling film.
Cling film is spot on, and even shrinks to hug the tyre giving a good seal.
I dusted the tyre in primer to see if there are any imperfections - sort ANYTHING you can see at this stage as it will look a million times worse when painted.
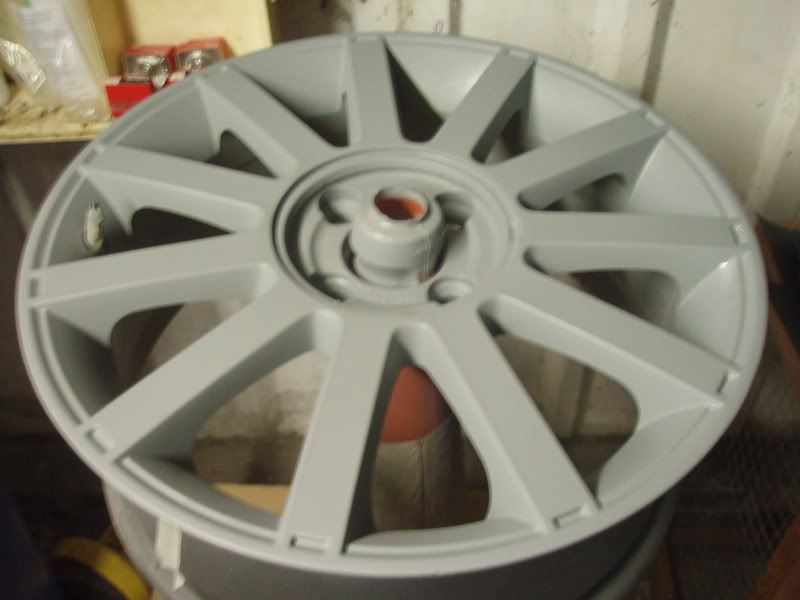
Ince happy, I tack wiped the alloys down to remove dust, then sprayed 3 layers of primer in light coats 15 minutes apart.
Let this dry over night, the next day I sanded any little blemishes, you can flat this off with wet and dry, I didn't need to, rattle can finish was pretty smooth.
Tackwiped it again and laid down 3 coats of Stratos Silver 15 minutes apart, light coats.
After 30 minutes apply 3 coats of lacquer, different methods her, I found that putting a decent coat down but not enough to run gave a smoother finish, to thin and it looked arange peeled.
Leave it a few days and then t-cut them and polish them up.
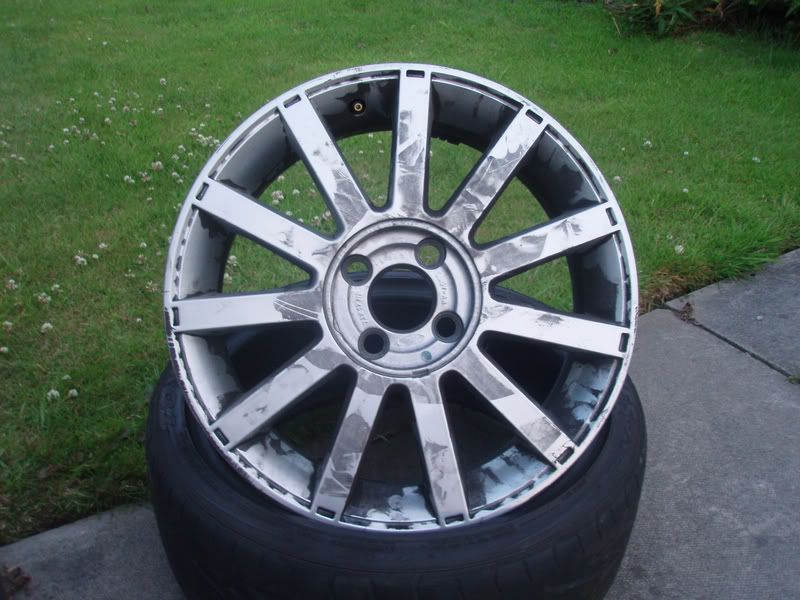
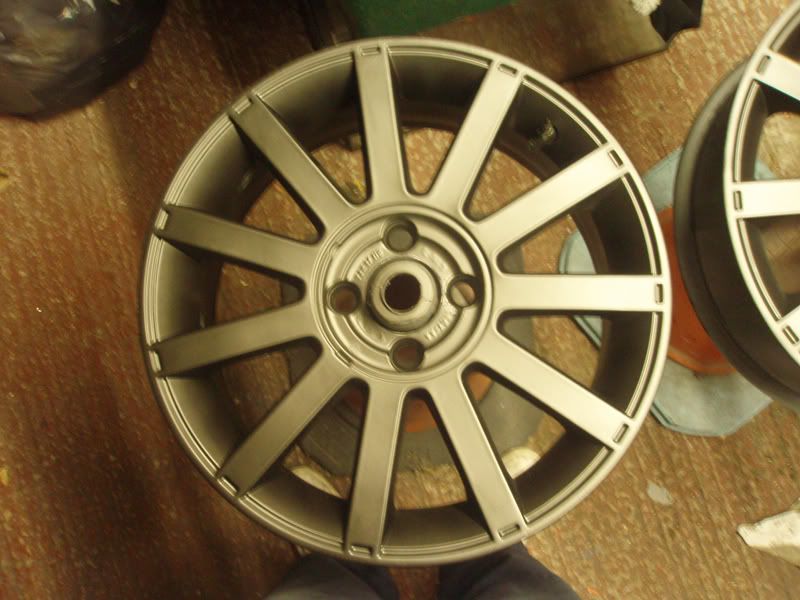
Here are mine before polishing...
before

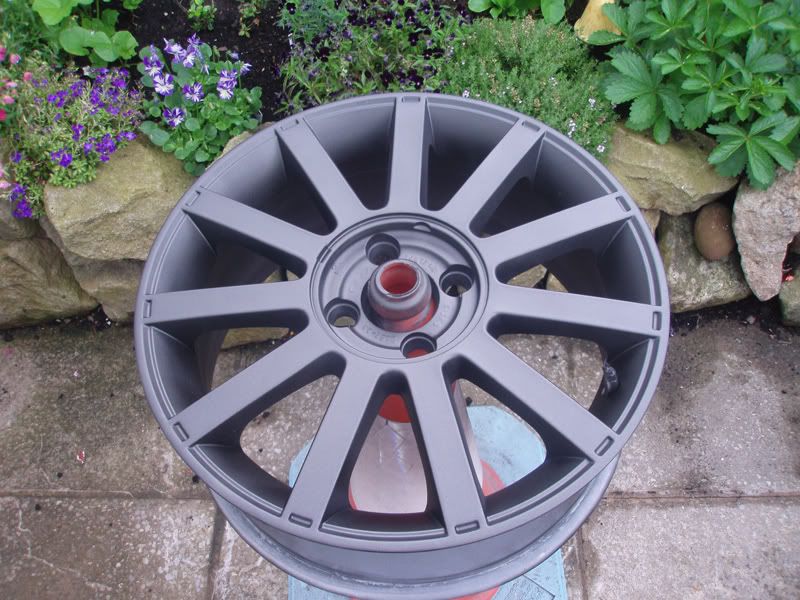
after...

IMO get them done proffessional as it take a long time and effort to do them and cots about 60 - 100 quid in materials to do them yourself.
IF you do them yourself, here is what I did.
Scrubbed the wheels and tyres down with soapy water and dried them.
Used a medium sand paper to sand out the chips etc, used a metal filler on deep gouges.
Then used a finer paper to flat it all off. Then cleaned them with water and dried.
I then stuck bits of tape down in between the tyre and the alloy rim all the way round, then used kitched clingfilm to wrap the tyre. Then taped the tape to the cling film.
Cling film is spot on, and even shrinks to hug the tyre giving a good seal.
I dusted the tyre in primer to see if there are any imperfections - sort ANYTHING you can see at this stage as it will look a million times worse when painted.
Ince happy, I tack wiped the alloys down to remove dust, then sprayed 3 layers of primer in light coats 15 minutes apart.
Let this dry over night, the next day I sanded any little blemishes, you can flat this off with wet and dry, I didn't need to, rattle can finish was pretty smooth.
Tackwiped it again and laid down 3 coats of Stratos Silver 15 minutes apart, light coats.
After 30 minutes apply 3 coats of lacquer, different methods her, I found that putting a decent coat down but not enough to run gave a smoother finish, to thin and it looked arange peeled.
Leave it a few days and then t-cut them and polish them up.
Here are mine before polishing...
before
after...
Trending Topics
PassionFord Post Whore!!
Joined: Apr 2004
Posts: 8,264
Likes: 17
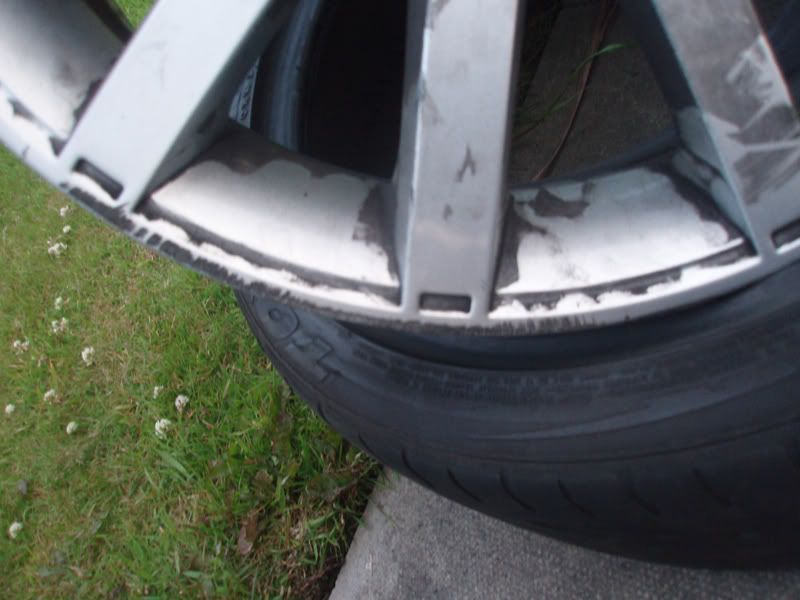
ps although they dont look it, mine had corrossion, and deep gouges and chipping all the way round the rim on every wheel.
It takes a good 3 days to sort if bad from start to finish with 1 - 2 hours sanding per wheel.
Items I used:
1 x pack of tack wipes
12 x meduim wet and dry paper sheets
5 x fine wet and dry paper
5 can of primer
5 cans of silver
5 cans of laqcure.
roll of masking tape
roll of cling film
scrubbing brush
I also picked up a little hologen heater, came in hand to help with drying and cost about 20 quid.
Tips that I found handy, not always 100% way but worked for me
DO NOT RUSH the prep, very tempting to get paint on, but it will look naff, it is all in the prep, spend the time getting it right or you will be doing it all again.
Make sure it is clean before spraying - if something lands in the paint mid spray - leave it, then flat it out before the next coat, often fine dust of fibres that settle you can gently rub out with your finger if you leave the paint for half an hour to harden off a bit.
Dont go prodding when the paint is wet, you'll make a mess.
Mask up properly and make sure your working area is clean, dry and as dust free as possible and make sure you can get round the wheel to spray, I lay the wheels face up to avoid runs - if you do get them, they run off the back and so are easy to fix after.
Dont go to the bottom of the can, once it starts to feel like it is running out, throw it in the bin - if not, it will start to spit and leave blotches over you lovely finish - this is true at each stage, primer, colour etc - don't be tight, lob it!!
Don't buy the cheapest stuff, if it's a pound a can, it will be gaff, I found out (50% extra free!!) yep, only after 3 seconds of spraying it started spitting globs of paint and the nozzle was spent (5 cans straight in the bin).
Be patient, don't rush the spraying, give the paint the time it should have between coats, and once you have lacqured - LEAVE THEM ALONE FOR ATLEAST 4 HOURS.
Tempting to try and get them on the car or fit centre caps, the result will be scuffed lacquer and you wishing you had left them to dry properly.
Ideally having left them over night, stick them on the car carefully, imo it takes a few days to harden off, even a week so don't go polishing them etc.
After a week, I used t-cut and gave them a buff followed by a polish.
They wont be as resistante to stone chipping, but mine and my sisters have been fine.
Thanks for the write up mate, proper appreciate that just what I was after!
Due to the cost of materials and prep work required by myself, I reckon it is probably better to get them done professionally although may still consider it at this point. Cheers anyway that is very much appreciated!
Due to the cost of materials and prep work required by myself, I reckon it is probably better to get them done professionally although may still consider it at this point. Cheers anyway that is very much appreciated!
PassionFord Post Whore!!
Joined: Apr 2004
Posts: 8,264
Likes: 17
No worries.
One thing that i did wonder is this, is there a difference between "powdercoating" prices, and refurbishing prices??
Reason I say this is that, if they just powdercoat the wheels, surely all the imperfections or deep scratches will still be there, but if refurbished I would imagine they are flatted and repaired??
Worth asking before the work is done as I did see a set that had been powdercoated and wasn't overly impressed, plus the guy who had had them done said he need to prep them before he took them in??
Never gonna give you up!
Joined: Sep 2004
Posts: 5,852
Likes: 0
From: Location: Location: Location: Location:
I basically, rubbed them down, filled the grooves with chemical metal, sanded it down again with various grades of wet n dry, primered it, a few coats of that, rubbed it down again and then sprayed a few coats of Satin Grey, a Citreon colour
That was my first attempt at refurbishing wheels, just be methodical about it, get yourself a road cone as a stand, I'm lucky and already had 4 of them and take the tyres off it's easier.
When you come to have the tyres remounted make sure the paint is fully hardened otherwise you'll be fooked!
Last edited by Rick Astley; Jun 1, 2009 at 10:41 PM.
I will definitely be enquiring into this as I probably will buy a set of steelies or something to run around on if I do this and possibly get the tyres taken off and remounted. Will have to find out proper costs though. Other option I have is my uncle owns a bodyshop and also fits tyres. I'm sure I could ask him to take the tyres off for me and prepare and spray the alloys for me but with this comes the problem of when he can do it as I'm family I tend to get pushed to the back of the queue although it is done heavily discounted all the time and sometimes I get a few freebies so can't complain 

BANNED
Joined: Sep 2008
Posts: 496
Likes: 0
From: london
ps although they dont look it, mine had corrossion, and deep gouges and chipping all the way round the rim on every wheel.
It takes a good 3 days to sort if bad from start to finish with 1 - 2 hours sanding per wheel.
Items I used:
1 x pack of tack wipes
12 x meduim wet and dry paper sheets
5 x fine wet and dry paper
5 can of primer
5 cans of silver
5 cans of laqcure.
roll of masking tape
roll of cling film
scrubbing brush
I also picked up a little hologen heater, came in hand to help with drying and cost about 20 quid.
Tips that I found handy, not always 100% way but worked for me
DO NOT RUSH the prep, very tempting to get paint on, but it will look naff, it is all in the prep, spend the time getting it right or you will be doing it all again.
Make sure it is clean before spraying - if something lands in the paint mid spray - leave it, then flat it out before the next coat, often fine dust of fibres that settle you can gently rub out with your finger if you leave the paint for half an hour to harden off a bit.
Dont go prodding when the paint is wet, you'll make a mess.
Mask up properly and make sure your working area is clean, dry and as dust free as possible and make sure you can get round the wheel to spray, I lay the wheels face up to avoid runs - if you do get them, they run off the back and so are easy to fix after.
Dont go to the bottom of the can, once it starts to feel like it is running out, throw it in the bin - if not, it will start to spit and leave blotches over you lovely finish - this is true at each stage, primer, colour etc - don't be tight, lob it!!
Don't buy the cheapest stuff, if it's a pound a can, it will be gaff, I found out (50% extra free!!) yep, only after 3 seconds of spraying it started spitting globs of paint and the nozzle was spent (5 cans straight in the bin).
Be patient, don't rush the spraying, give the paint the time it should have between coats, and once you have lacqured - LEAVE THEM ALONE FOR ATLEAST 4 HOURS.
Tempting to try and get them on the car or fit centre caps, the result will be scuffed lacquer and you wishing you had left them to dry properly.
Ideally having left them over night, stick them on the car carefully, imo it takes a few days to harden off, even a week so don't go polishing them etc.
After a week, I used t-cut and gave them a buff followed by a polish.
They wont be as resistante to stone chipping, but mine and my sisters have been fine.
It takes a good 3 days to sort if bad from start to finish with 1 - 2 hours sanding per wheel.
Items I used:
1 x pack of tack wipes
12 x meduim wet and dry paper sheets
5 x fine wet and dry paper
5 can of primer
5 cans of silver
5 cans of laqcure.
roll of masking tape
roll of cling film
scrubbing brush
I also picked up a little hologen heater, came in hand to help with drying and cost about 20 quid.
Tips that I found handy, not always 100% way but worked for me
DO NOT RUSH the prep, very tempting to get paint on, but it will look naff, it is all in the prep, spend the time getting it right or you will be doing it all again.
Make sure it is clean before spraying - if something lands in the paint mid spray - leave it, then flat it out before the next coat, often fine dust of fibres that settle you can gently rub out with your finger if you leave the paint for half an hour to harden off a bit.
Dont go prodding when the paint is wet, you'll make a mess.
Mask up properly and make sure your working area is clean, dry and as dust free as possible and make sure you can get round the wheel to spray, I lay the wheels face up to avoid runs - if you do get them, they run off the back and so are easy to fix after.
Dont go to the bottom of the can, once it starts to feel like it is running out, throw it in the bin - if not, it will start to spit and leave blotches over you lovely finish - this is true at each stage, primer, colour etc - don't be tight, lob it!!
Don't buy the cheapest stuff, if it's a pound a can, it will be gaff, I found out (50% extra free!!) yep, only after 3 seconds of spraying it started spitting globs of paint and the nozzle was spent (5 cans straight in the bin).
Be patient, don't rush the spraying, give the paint the time it should have between coats, and once you have lacqured - LEAVE THEM ALONE FOR ATLEAST 4 HOURS.
Tempting to try and get them on the car or fit centre caps, the result will be scuffed lacquer and you wishing you had left them to dry properly.
Ideally having left them over night, stick them on the car carefully, imo it takes a few days to harden off, even a week so don't go polishing them etc.
After a week, I used t-cut and gave them a buff followed by a polish.
They wont be as resistante to stone chipping, but mine and my sisters have been fine.
I was going to say, if you spend time on the prep you can do them yourself for (relatively) peanuts.
Must emphasise though, spend TIME on the prep, its the root of the entire finish!


Thread
Thread Starter
Forum
Replies
Last Post
Adam Graham
Restorations, Rebuilds & Projects.
7
Sep 6, 2015 06:04 AM
rog
General Car Related Discussion.
5
Sep 4, 2015 07:24 AM