another saph 1.8cvh to 2.0silvertop conv. on the cheap? what the ... was i thinking?
 04-07-2016, 07:47 PM
#81
PassionFord Regular
Thread Starter
!!! THIS THREAD'S BEEN FUCKED BY PHOOTOBUCKET !!!
if i want my photo to be public again, i have to pay a ransom of 400usd per year for a service which once was free. (not the only one in this catch).
nice move, bunch of greedy fucktards...
many thanks for the support, to anyone who's answered on here .
.
for the ones interested in this, working on a new thread opening soon. just let me the time to copy and paste everything...
thanks for reading.
__________________________________________________ __________________________________________________ ___
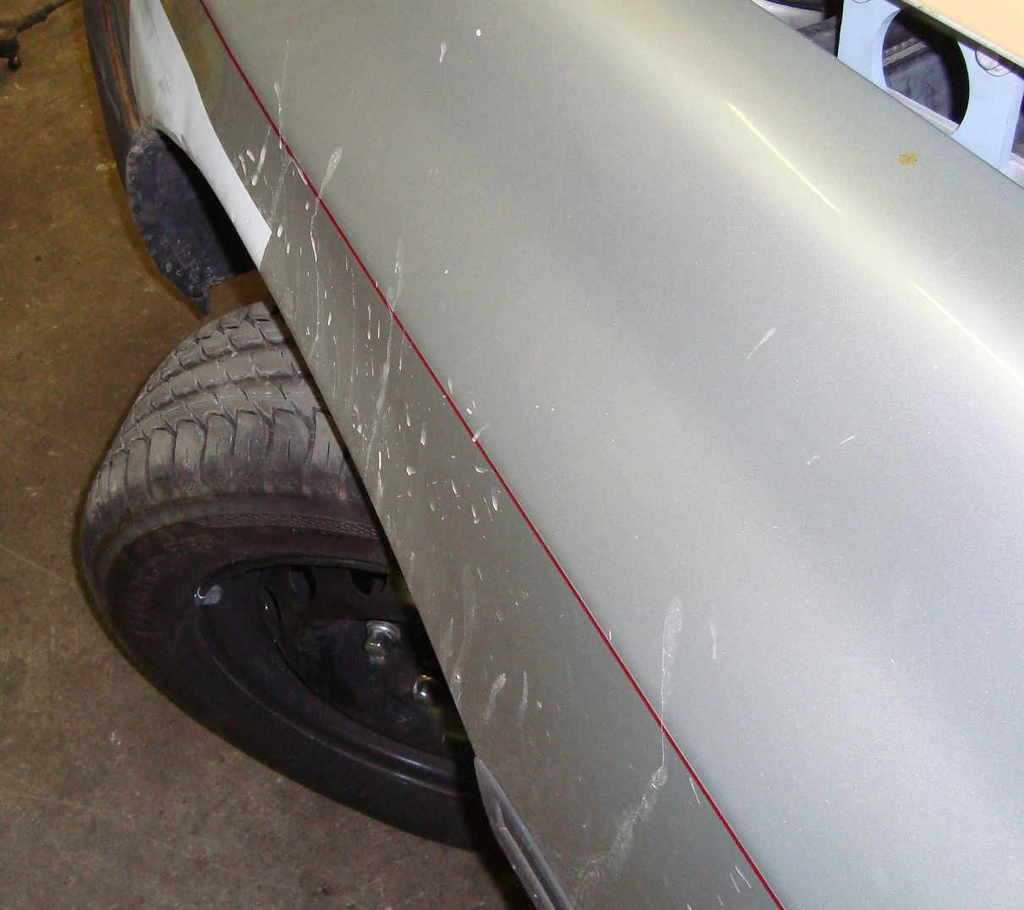
STEERING RACK FOR MORE LOCK pt.II
the column dust cover for the manual steering rack is impossible to reach.
i made one with the top of a coffee tin can.
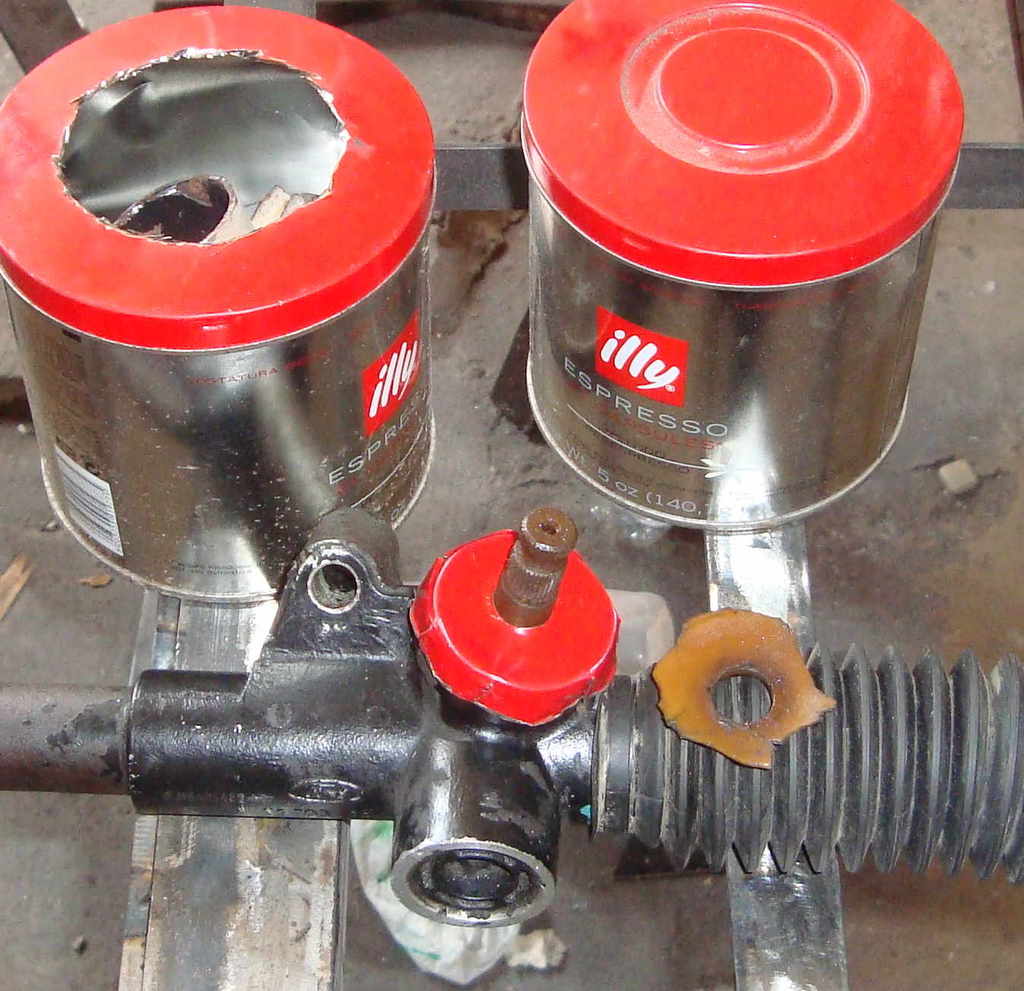
shitty one, but better than nothing.
with the car on the hoist, i'm touching nothing.
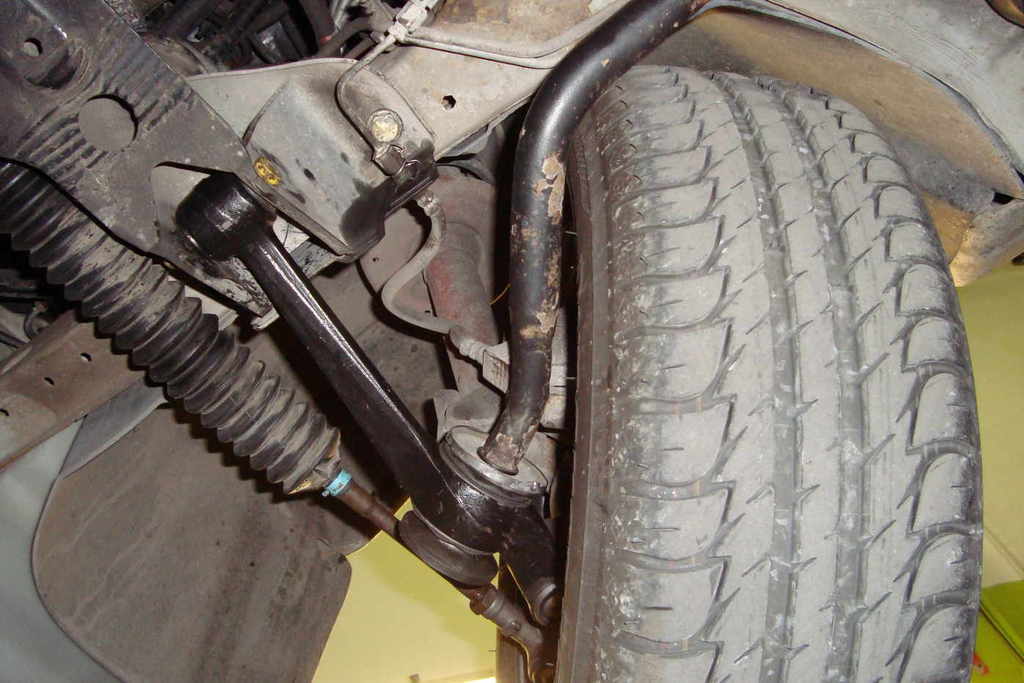
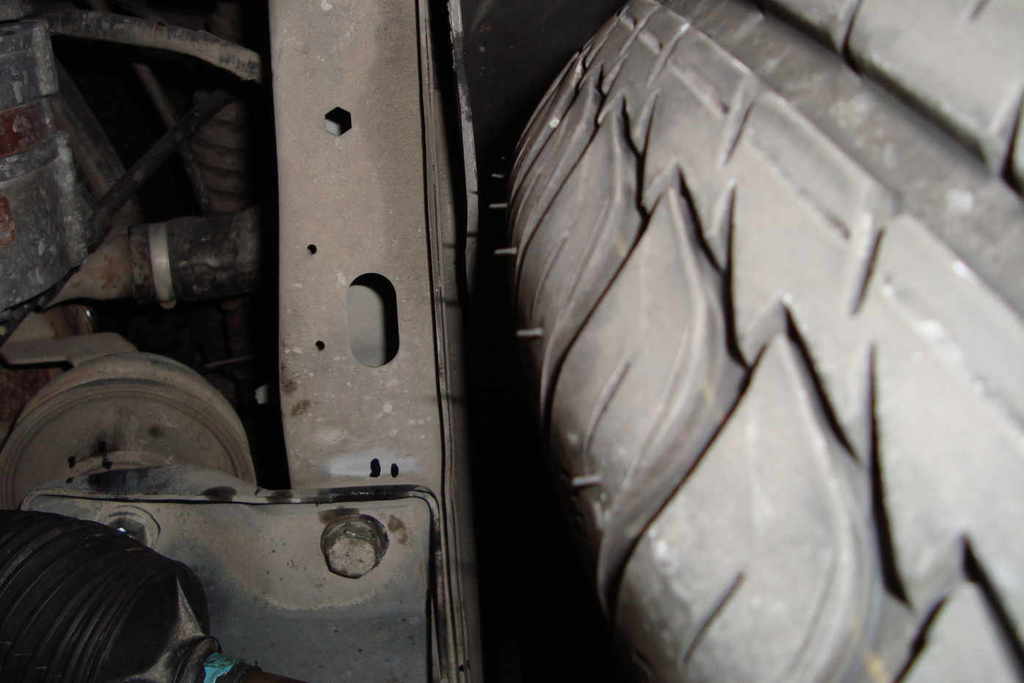
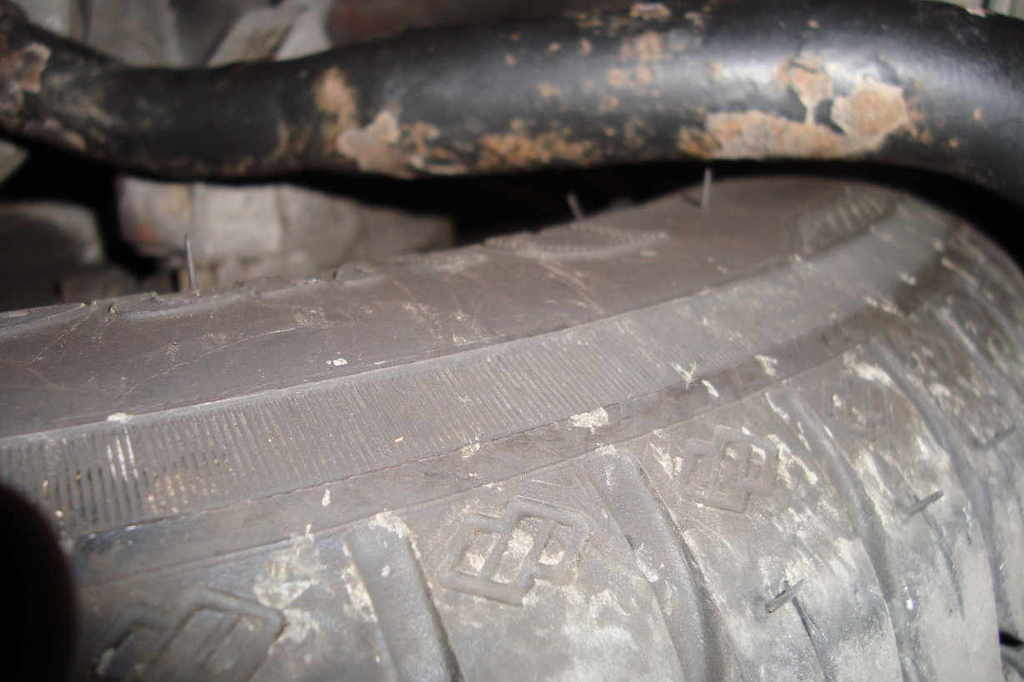
this is the new steering lock on my sierra:
12.5mm cut on the manual steering rack bump stops, wearing std citroen steelies 5.5jx14 et24 with 185/65 14 tyres.

the car behaves fine.
quite oversteering due to the toe in service still un-done, i'd say convergent, (but with the welded in the ass, i still have a tons of margin).
the rack behaves like the std one, it just goes further.
wheels still haven't touched anything inside the fender, (still haven't experienced big g's, at full lock though).
i'm happy at least this one's gone well, (worked alone on it 14h, and the antisway story made me pull a lot).
 many thanks to the gentlemen and geniuses, who shared info about this mod, here on pf and on other websites:
because of you, my mod was a straight line job, i have to correct nothing on this one.
cheers guys!
time to focus on the incoming engine again..
if i want my photo to be public again, i have to pay a ransom of 400usd per year for a service which once was free. (not the only one in this catch).
nice move, bunch of greedy fucktards...
many thanks for the support, to anyone who's answered on here
.for the ones interested in this, working on a new thread opening soon. just let me the time to copy and paste everything...
thanks for reading.
__________________________________________________ __________________________________________________ ___
STEERING RACK FOR MORE LOCK pt.II
the column dust cover for the manual steering rack is impossible to reach.
i made one with the top of a coffee tin can.

shitty one, but better than nothing.
with the car on the hoist, i'm touching nothing.


this is the new steering lock on my sierra:
12.5mm cut on the manual steering rack bump stops, wearing std citroen steelies 5.5jx14 et24 with 185/65 14 tyres.


the car behaves fine.
quite oversteering due to the toe in service still un-done, i'd say convergent, (but with the welded in the ass, i still have a tons of margin).
the rack behaves like the std one, it just goes further.
wheels still haven't touched anything inside the fender, (still haven't experienced big g's, at full lock though).
i'm happy at least this one's gone well, (worked alone on it 14h, and the antisway story made me pull a lot).
many thanks to the gentlemen and geniuses, who shared info about this mod, here on pf and on other websites: because of you, my mod was a straight line job, i have to correct nothing on this one.
cheers guys!
time to focus on the incoming engine again..
Last edited by rooos; 01-07-2017 at 02:43 PM.
 04-07-2016, 07:48 PM
#82
PassionFord Regular
Thread Starter
MEGAJOLT ECU pt.I
i'm planning a bench first start up for the silvertop...
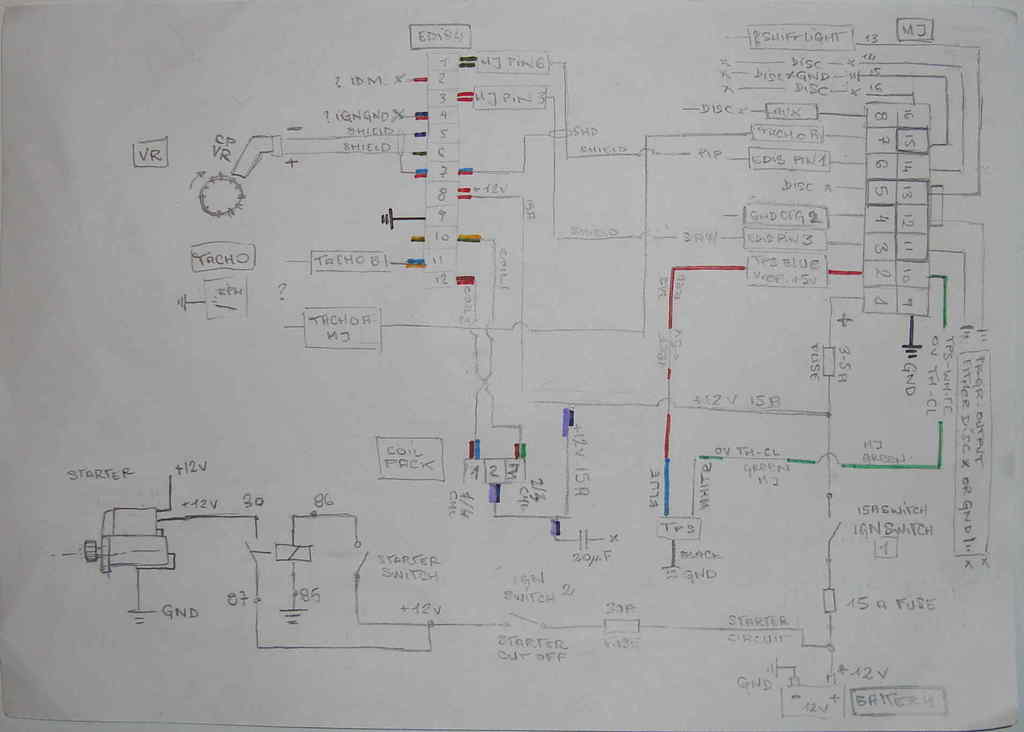
did my homework last night. i started figuring out who's connecting to who.
not too much experience in looming cars.
donno... but i thought it was harder, at least to understand...
i'm planning a bench first start up for the silvertop...
did my homework last night. i started figuring out who's connecting to who.
not too much experience in looming cars.
donno... but i thought it was harder, at least to understand...
 09-07-2016, 11:47 PM
#83
PassionFord Regular
Thread Starter
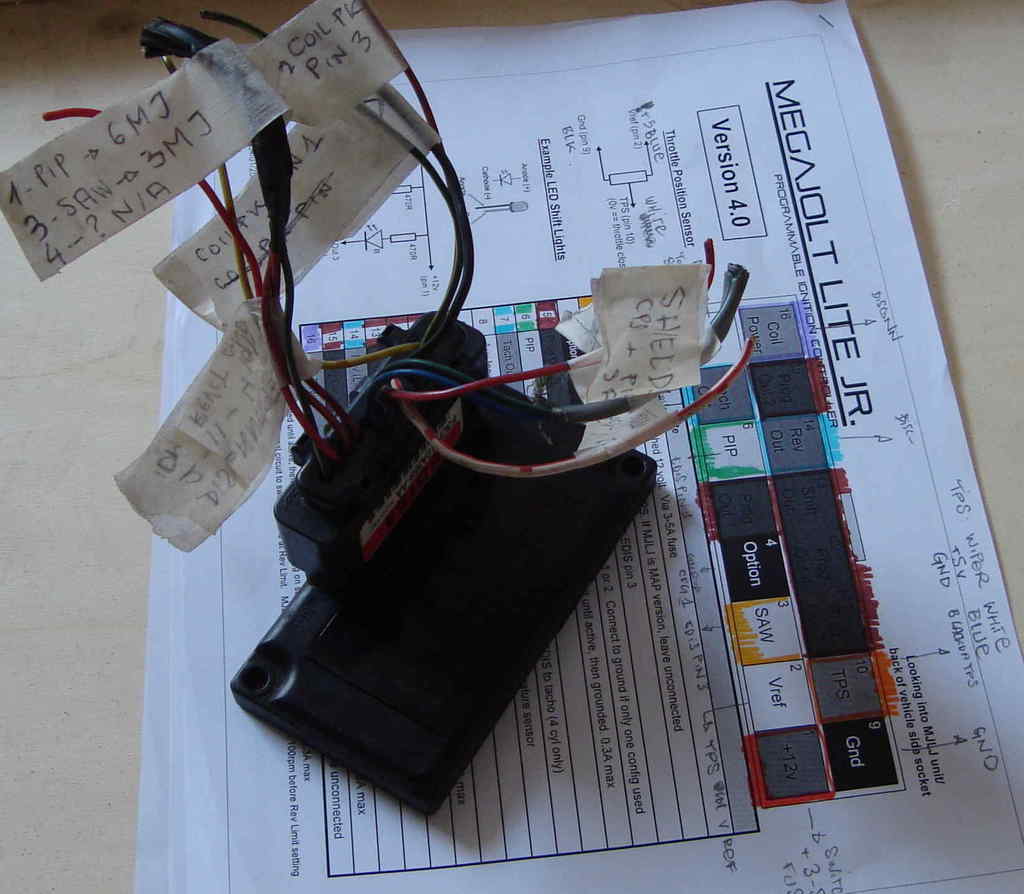
i know the most of you'll laugh about this, but down here megajolts are not so common.
(i'd say bacuse of engl-language ignorance, mine too)
in my hereabouts none has seen 'em.
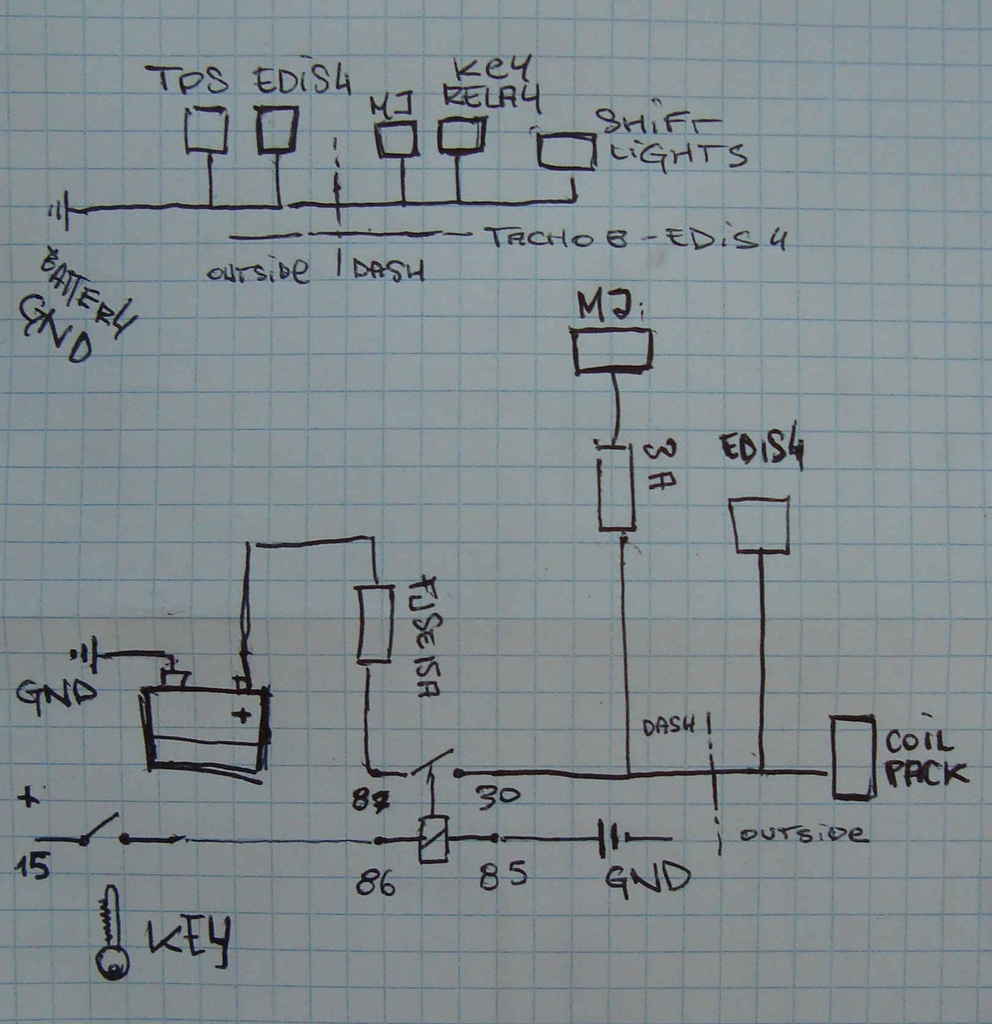
after a while passed through megajolt manual and web readings, i pulled out this one.
(i might take down this pic if it doesn't work)
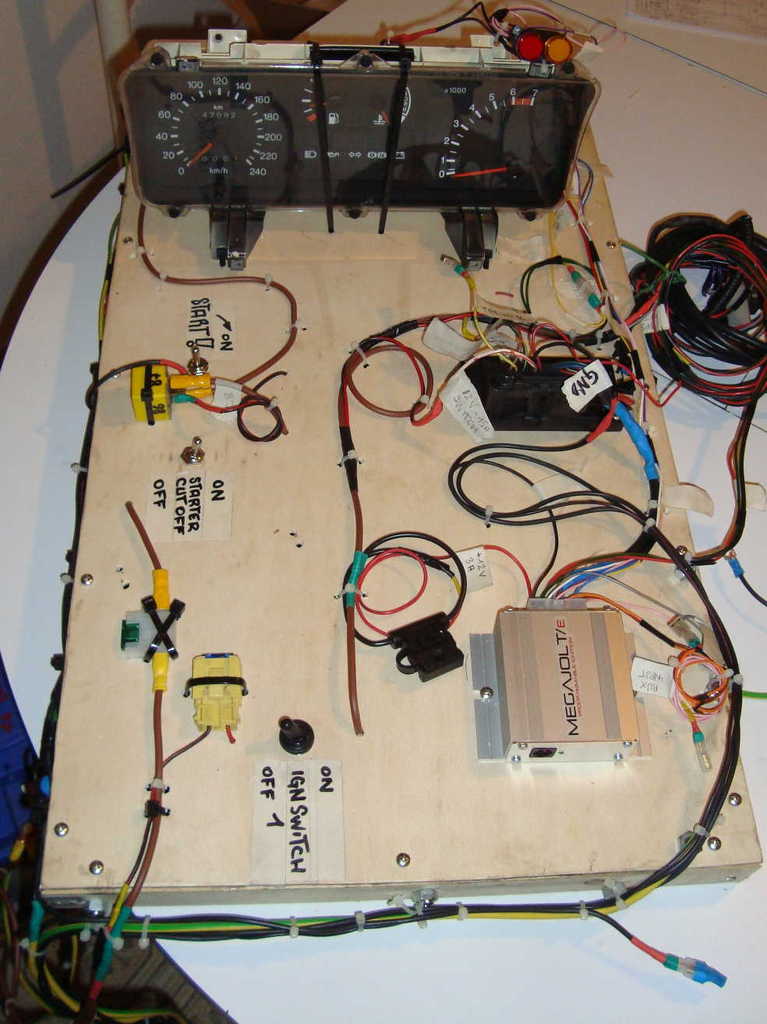
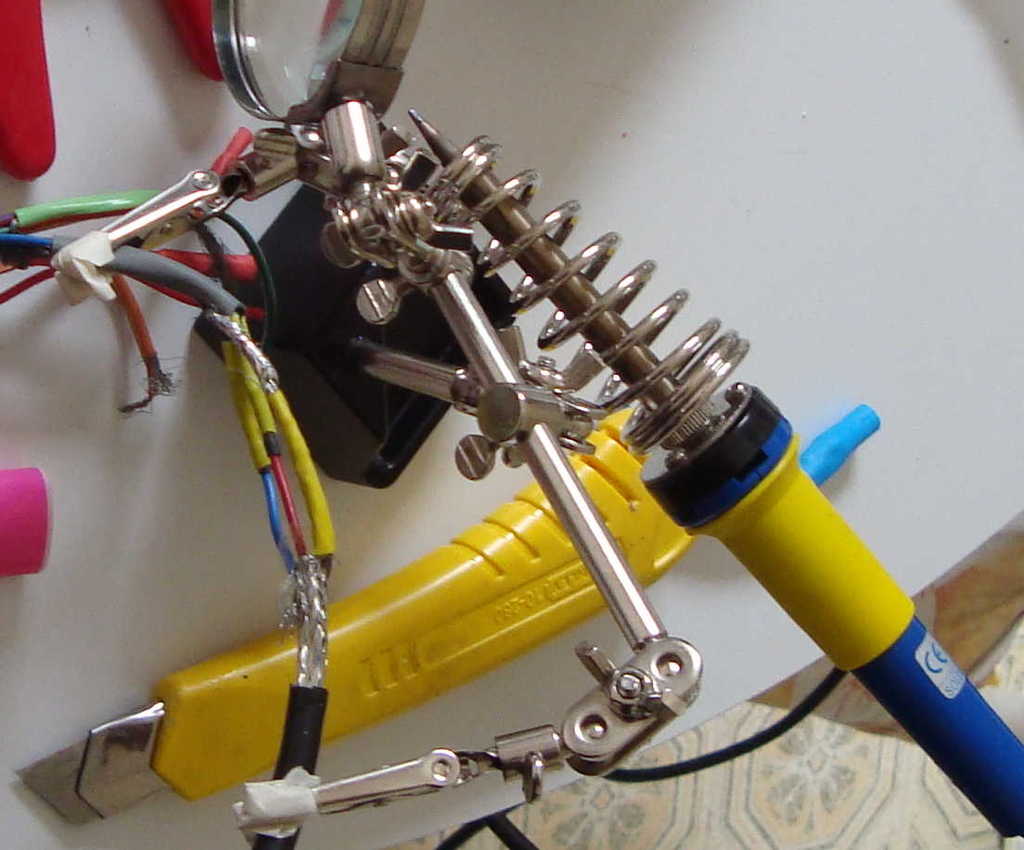
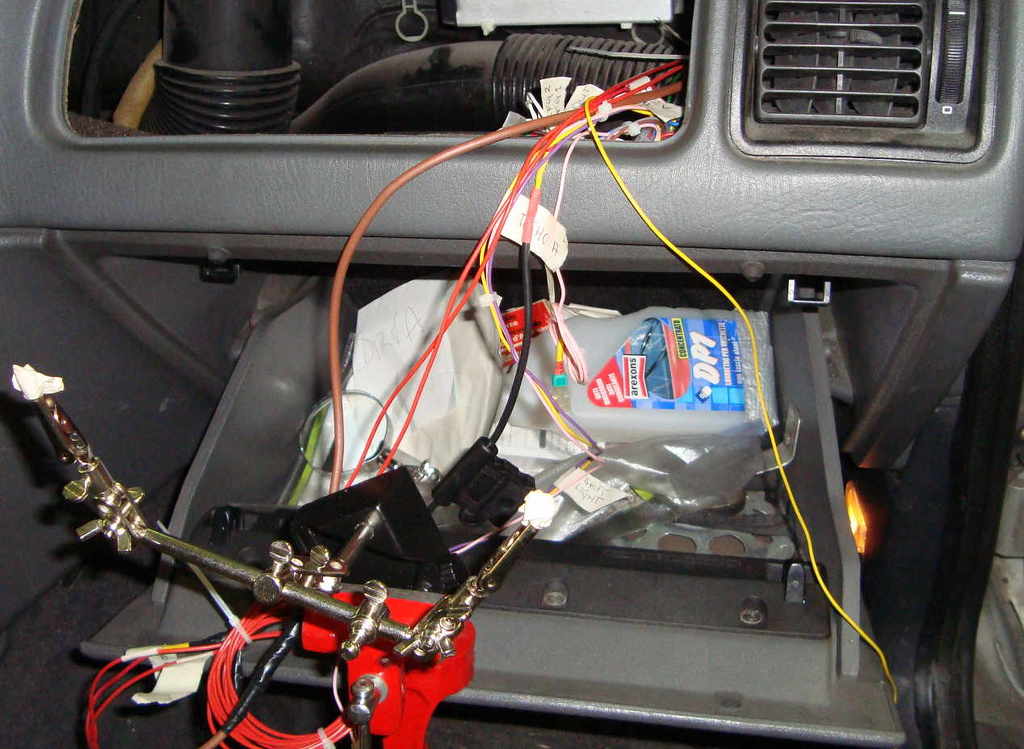
then here's the panel i made for the engine priming and the first start up...
as many of you already know, i figured thaht the hardest part aint making connections, but making the right connection...
it took longer than i thought, but i triple checked each connection before making it.
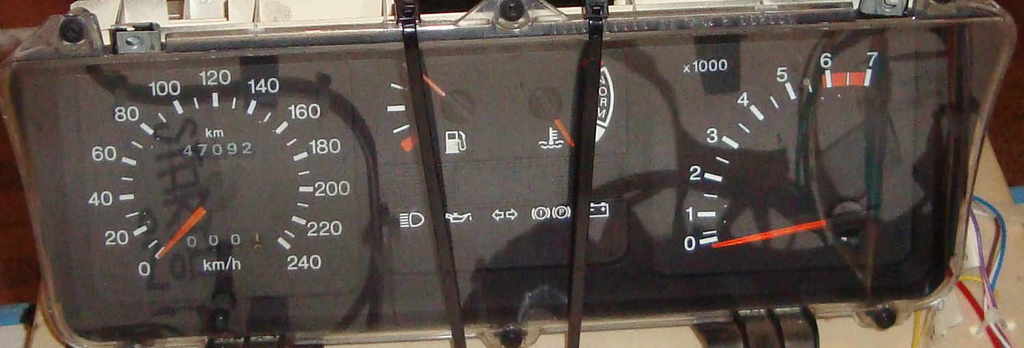
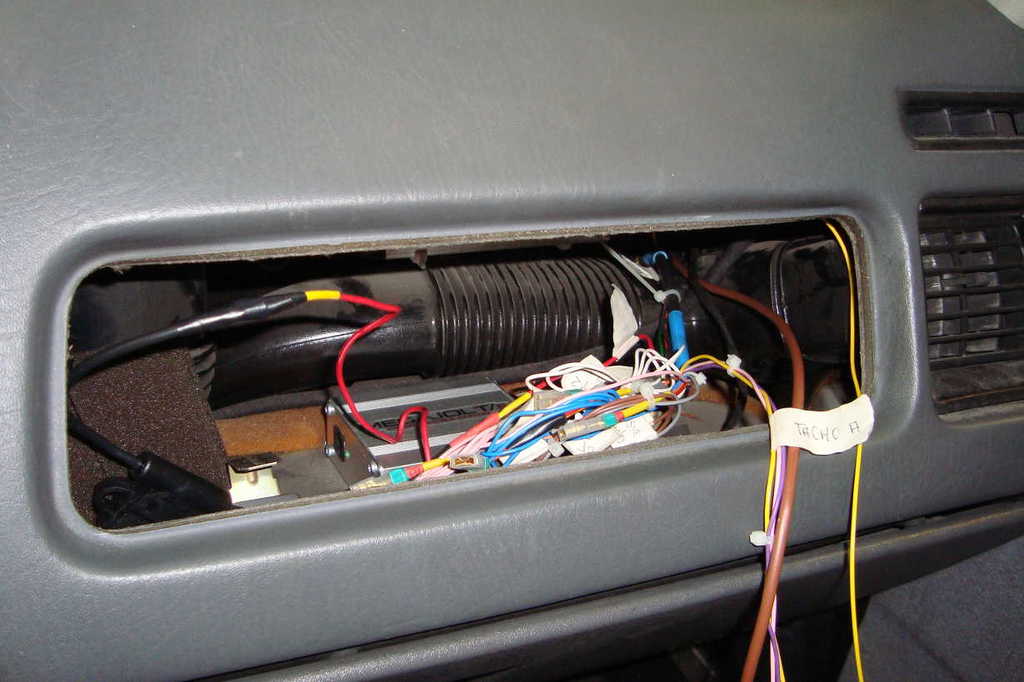
while looking for the tacho connections, i tried to make a picture of the ford ghia 87bb-10k843-cb dash board pins.
this one:
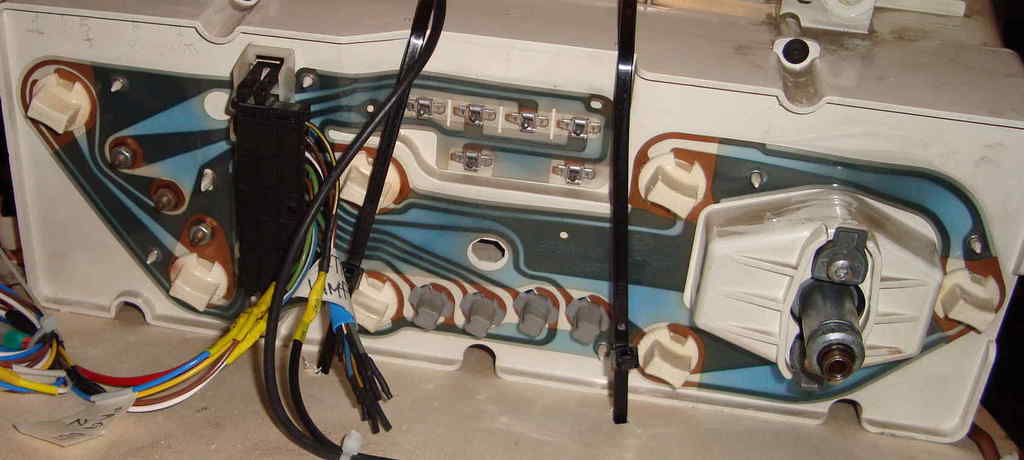
from top to bottom:
1 -gnd
2 -tank signal
3 -hot water signal
4 -tacho impulse
5 -+12V
6 -dash night illumination
7 -brights on lamp
8 -oil lamp (+)
9 -indicator lamp
10-indicator lamp
11-brake lamp
12-battery lamp
i figured out myself. no experience with electric, if it's wrong i'll re-edit it.
hope someone who knows will correct me if i'm wrong...
i'll try to use some of the dash lamps as megajolt output, just for this first run... experiment.
(i'd say bacuse of engl-language ignorance, mine too)
in my hereabouts none has seen 'em.
after a while passed through megajolt manual and web readings, i pulled out this one.
(i might take down this pic if it doesn't work)

then here's the panel i made for the engine priming and the first start up...
as many of you already know, i figured thaht the hardest part aint making connections, but making the right connection...
it took longer than i thought, but i triple checked each connection before making it.

while looking for the tacho connections, i tried to make a picture of the ford ghia 87bb-10k843-cb dash board pins.
this one:


from top to bottom:
1 -gnd
2 -tank signal
3 -hot water signal
4 -tacho impulse
5 -+12V
6 -dash night illumination
7 -brights on lamp
8 -oil lamp (+)
9 -indicator lamp
10-indicator lamp
11-brake lamp
12-battery lamp
i figured out myself. no experience with electric, if it's wrong i'll re-edit it.
hope someone who knows will correct me if i'm wrong...
i'll try to use some of the dash lamps as megajolt output, just for this first run... experiment.
09-07-2016, 11:48 PM
#84
PassionFord Regular
Thread Starter
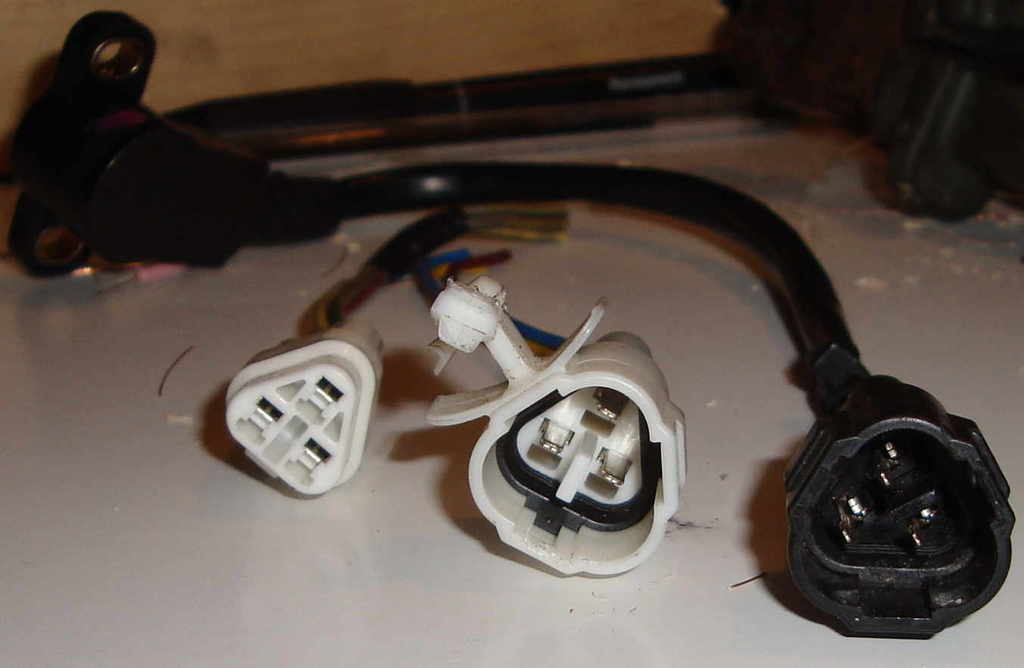
TPS SENSOR
i just have the female connector of the japan made zx9r carb tps.
at the scrapyard, my man immediately figured it can be found on toyotas, and gave me this one for free.
he saved me a lot of time. many thanks to Lorenzo at Perelli autodemolizioni.
the megajolt manual is not such clear about connecting the tps sensor.
Vref => pin2 on mj
TPS => pin10 on mj
GND => pin9
time ago, i tested it with a multimeter, and i had these readings:
--------------------------------|- black/white--|---black / blue----|---white / blue-----|
zero-throttle position: ------|--0.98 kohm---|----4.21 kohm----|----3.58 kohm------|
full-throttle position: --------|--3.86 kohm---|----4.21 kohm----|----0.75 kohm------|
i read something on the web, and found out these rules:
-(many thanks to david jenkins on autosportlabs forum)
"Set the meter to measure resistance then put it across a pair of pins and turn the TPS spindle. By trying various pairs you will find one that doesn't change resistance as the spindle turns. These are the fixed ends of the potentiometer, and the remaining pin is the wiper.
Now put one lead on the wiper pin, and the other on one of the fixed end pins. If the resistance starts low and increases as the spindle is turned then you've found the O volts (chassis) fixed pin. If the resistance starts high and decreases, then you've found the 5 volt fixed pin."
-(many thanks to davedew on haynes forum)
"Vref is the +5v power supply to the TPS. The middle yellow wire is the TPS input to the megajolt. This value will increase with throttle opening.
The other wire connects to the same ground as the megajolt."
-(many thanks to adsport69 on autosportlabs forum)
"Ideally it should be grounded/eathed the same earth point as you earth the megajolt, edis module etc."
translated in the zx9r tps wiring colours
white => tps pin10 on mj
blue => +5V pin2 on mj
black => GND
i just have the female connector of the japan made zx9r carb tps.
at the scrapyard, my man immediately figured it can be found on toyotas, and gave me this one for free.
he saved me a lot of time. many thanks to Lorenzo at Perelli autodemolizioni.

the megajolt manual is not such clear about connecting the tps sensor.
Vref => pin2 on mj
TPS => pin10 on mj
GND => pin9
time ago, i tested it with a multimeter, and i had these readings:
--------------------------------|- black/white--|---black / blue----|---white / blue-----|
zero-throttle position: ------|--0.98 kohm---|----4.21 kohm----|----3.58 kohm------|
full-throttle position: --------|--3.86 kohm---|----4.21 kohm----|----0.75 kohm------|
i read something on the web, and found out these rules:
-(many thanks to david jenkins on autosportlabs forum)
"Set the meter to measure resistance then put it across a pair of pins and turn the TPS spindle. By trying various pairs you will find one that doesn't change resistance as the spindle turns. These are the fixed ends of the potentiometer, and the remaining pin is the wiper.
Now put one lead on the wiper pin, and the other on one of the fixed end pins. If the resistance starts low and increases as the spindle is turned then you've found the O volts (chassis) fixed pin. If the resistance starts high and decreases, then you've found the 5 volt fixed pin."
-(many thanks to davedew on haynes forum)
"Vref is the +5v power supply to the TPS. The middle yellow wire is the TPS input to the megajolt. This value will increase with throttle opening.
The other wire connects to the same ground as the megajolt."
-(many thanks to adsport69 on autosportlabs forum)
"Ideally it should be grounded/eathed the same earth point as you earth the megajolt, edis module etc."
translated in the zx9r tps wiring colours
white => tps pin10 on mj
blue => +5V pin2 on mj
black => GND
Last edited by rooos; 10-07-2016 at 11:38 AM.
09-07-2016, 11:50 PM
#85
PassionFord Regular
Thread Starter
15-07-2016, 10:40 AM
#86
PassionFord Regular
Thread Starter
few days ago i managed to start up the engine.
there's a video of it, but still i can't reach it...
i used a cracked t9 bellhousing and a starter motor i had in my cellar for spares.
ENGINE PRIMING
i firstly tried to prime the engine cranking it without spark plugs.
but the low revving of the starter wasn't enough to build oil pressure, even with a battery booster.
took down the oil press_ sensor, no oil spurted out from there while cranking.
but the oil regularly flowed from the oil pump through the oil filter circuit, while cranking without it.
with a big syringe, once filled enough oil from the oil press_ sensor hole, the oil lamp switched off after a couple of revolutions.
maybe not the best way to build oil pressure up, but it worked.
FIRST START UP
once calibrated the tps via software, each cylinder started up immediately. it keeps a regular minimum rev speed.
so i assume the megajolt wiring diagram above is correct.
without any other reference for silvertop engines, i loaded in the mj unit, the blacktop-tps advance map which came with the megajolt cd.
in first place i mistakenly inverted pip and saw connection, so neither the pc and the mj unit weren't able to read the rpm. the system worked at 12 degrees fixed advance. (now corrected).
tacho, speed lights, other lights in the dash: none of these outputs had been seen working. damn it! (so still can't say sh*t about the dash pins...).
also:
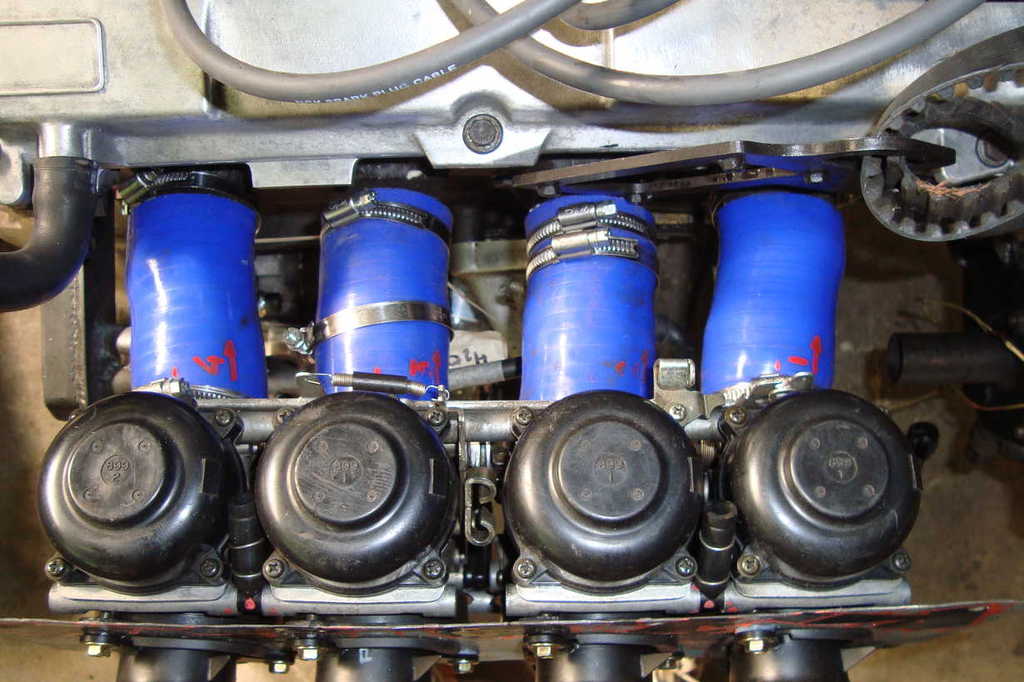
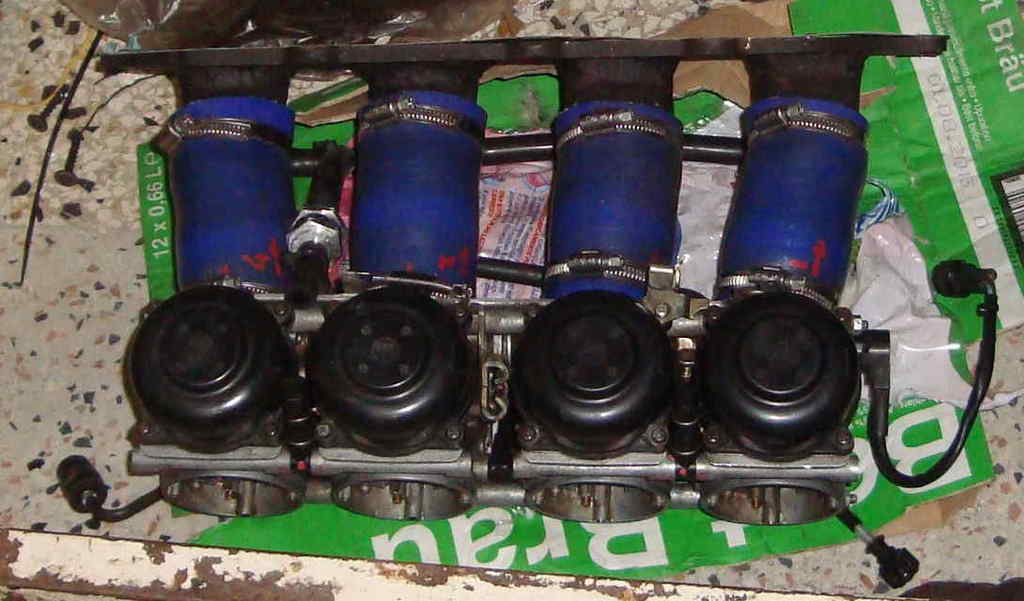
-too long hoses between zx9r carbs and the manifold i made: they contract themselves while revving at minimum speed...
-wrongly assembled intake camshaft sealer, my bad. it leaks tons of oil.
but both of these should be fixed in short terms.
i hope i manage to post that video or some pic of it soon...
there's a video of it, but still i can't reach it...
i used a cracked t9 bellhousing and a starter motor i had in my cellar for spares.
ENGINE PRIMING
i firstly tried to prime the engine cranking it without spark plugs.
but the low revving of the starter wasn't enough to build oil pressure, even with a battery booster.
took down the oil press_ sensor, no oil spurted out from there while cranking.
but the oil regularly flowed from the oil pump through the oil filter circuit, while cranking without it.
with a big syringe, once filled enough oil from the oil press_ sensor hole, the oil lamp switched off after a couple of revolutions.
maybe not the best way to build oil pressure up, but it worked.
FIRST START UP
once calibrated the tps via software, each cylinder started up immediately. it keeps a regular minimum rev speed.
so i assume the megajolt wiring diagram above is correct.
without any other reference for silvertop engines, i loaded in the mj unit, the blacktop-tps advance map which came with the megajolt cd.
in first place i mistakenly inverted pip and saw connection, so neither the pc and the mj unit weren't able to read the rpm. the system worked at 12 degrees fixed advance. (now corrected).
tacho, speed lights, other lights in the dash: none of these outputs had been seen working. damn it! (so still can't say sh*t about the dash pins...).
also:
-too long hoses between zx9r carbs and the manifold i made: they contract themselves while revving at minimum speed...
-wrongly assembled intake camshaft sealer, my bad. it leaks tons of oil.
but both of these should be fixed in short terms.
i hope i manage to post that video or some pic of it soon...
Last edited by rooos; 15-07-2016 at 11:35 AM.
19-07-2016, 09:35 PM
#87
PassionFord Regular
Thread Starter
(had some problem connecting to pf lately, now it works fine)
here's the video:
(please reply in here if you can't see this...)
actually it wasn't proper the first start, but i managed to start it up about an half an hour before this video.
it can be seen how the intake hoses contract themselves.
the noise also changed in better as soon as i correctly connected edis4 and megajolt.
https://www.youtube.com/watch?v=jzCG...ature=youtu.be
(i hate being captured while smoking, don't feel cool at all. but it had been a really full day...)
that pc is my home computer/portable pc.
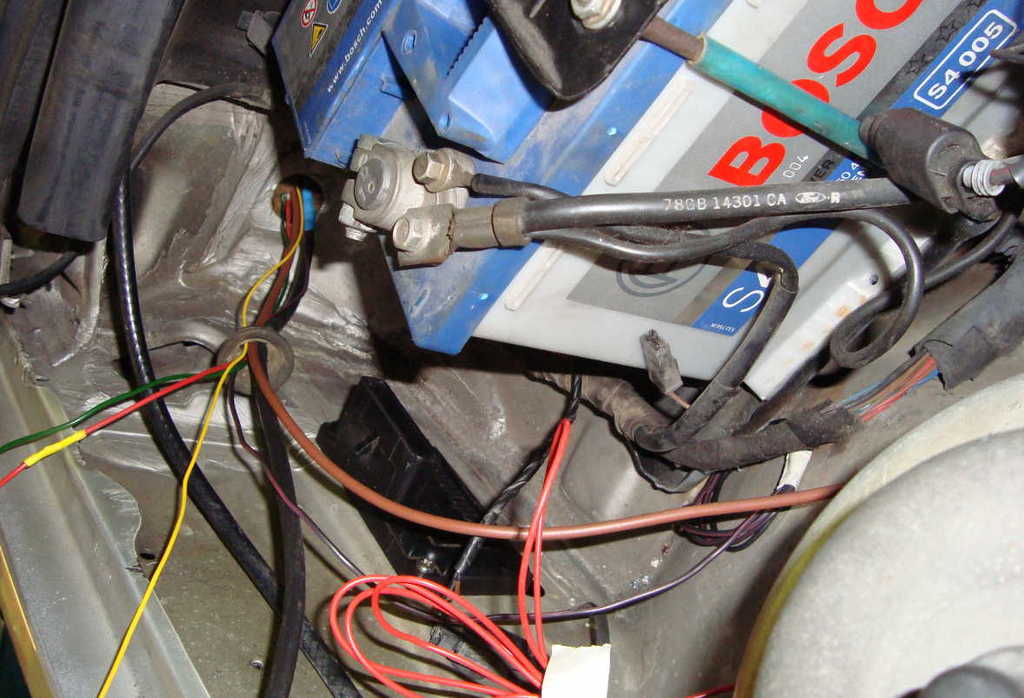
the red light on the intake is the oil lamp, connected to the oil pressure sensor and to the +12v pole on the battery.
here's the video:
(please reply in here if you can't see this...)
actually it wasn't proper the first start, but i managed to start it up about an half an hour before this video.
it can be seen how the intake hoses contract themselves.
the noise also changed in better as soon as i correctly connected edis4 and megajolt.
https://www.youtube.com/watch?v=jzCG...ature=youtu.be
(i hate being captured while smoking, don't feel cool at all. but it had been a really full day...)
that pc is my home computer/portable pc.
the red light on the intake is the oil lamp, connected to the oil pressure sensor and to the +12v pole on the battery.
Last edited by rooos; 19-07-2016 at 09:52 PM.
19-07-2016, 09:36 PM
#88
PassionFord Regular
Thread Starter
MEGAJOLT ECU pt.II
...this means i can loom the car for the new ecu, waiting for the swap...
this is a modification to the diagram above, to suit it to the car.
(i'm just putting the ecu under relay)
...this means i can loom the car for the new ecu, waiting for the swap...


this is a modification to the diagram above, to suit it to the car.
(i'm just putting the ecu under relay)
 19-07-2016, 09:37 PM
#89
PassionFord Regular
Thread Starter
i hope to complete the ground section tomorrow, so i can clean the interior...
(my girlfriend hetes it, she says i'm riding a dumpster. actually donno why...)
(my girlfriend hetes it, she says i'm riding a dumpster. actually donno why...)
19-07-2016, 09:37 PM
#90
PassionFord Regular
Thread Starter
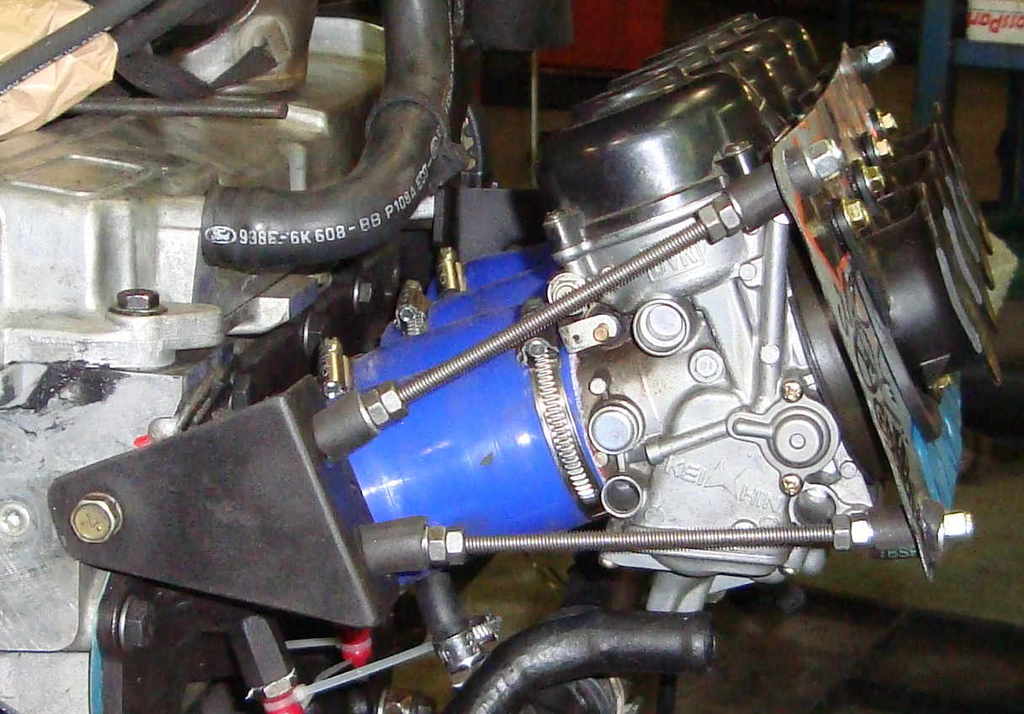
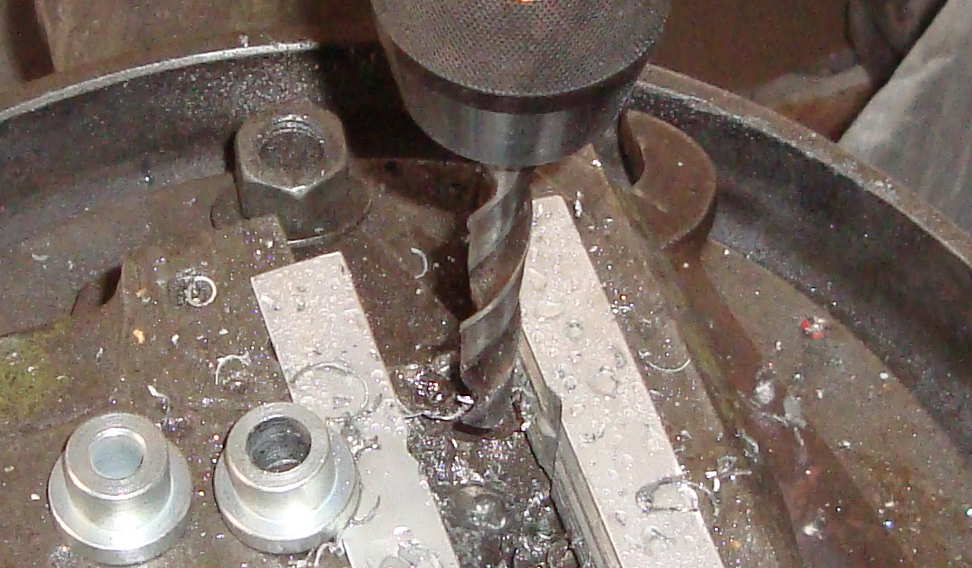
INTAKE MANIFOLD pt.??
about the intake hoses contraction, i made these rings:
4x 50mm od - 2mm thick - 25mm long
4x 50mm od - 2mm thick - 13mm long
some of these are going inside the 48mm id hoses, in order to keep them in the correct shape.
the pipe is for push them in.
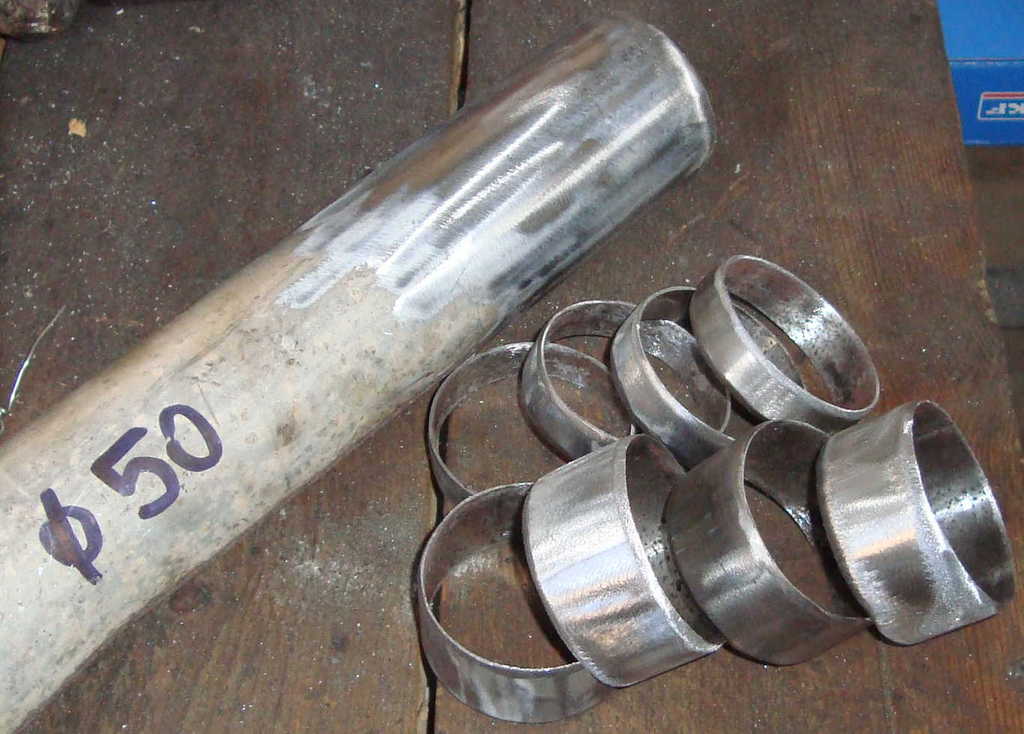
they're made from a fiat ducato exhaust pipe.
the inner surface aint miss world. but as i've said before, this would be just for a first run...
27-07-2016, 08:58 AM
#91
PassionFord Regular
Thread Starter
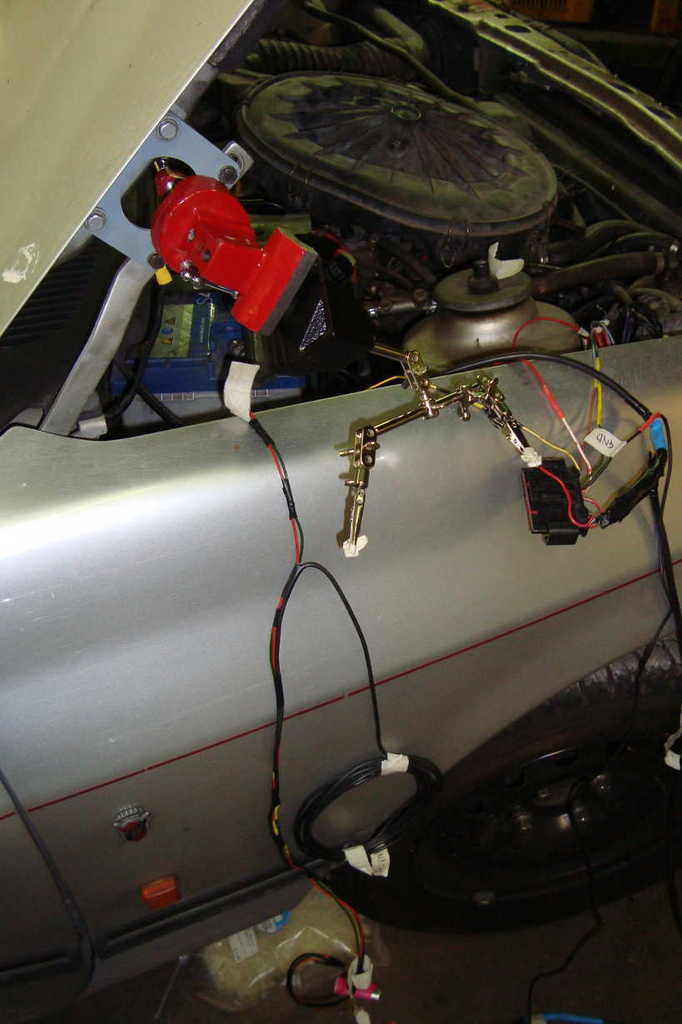
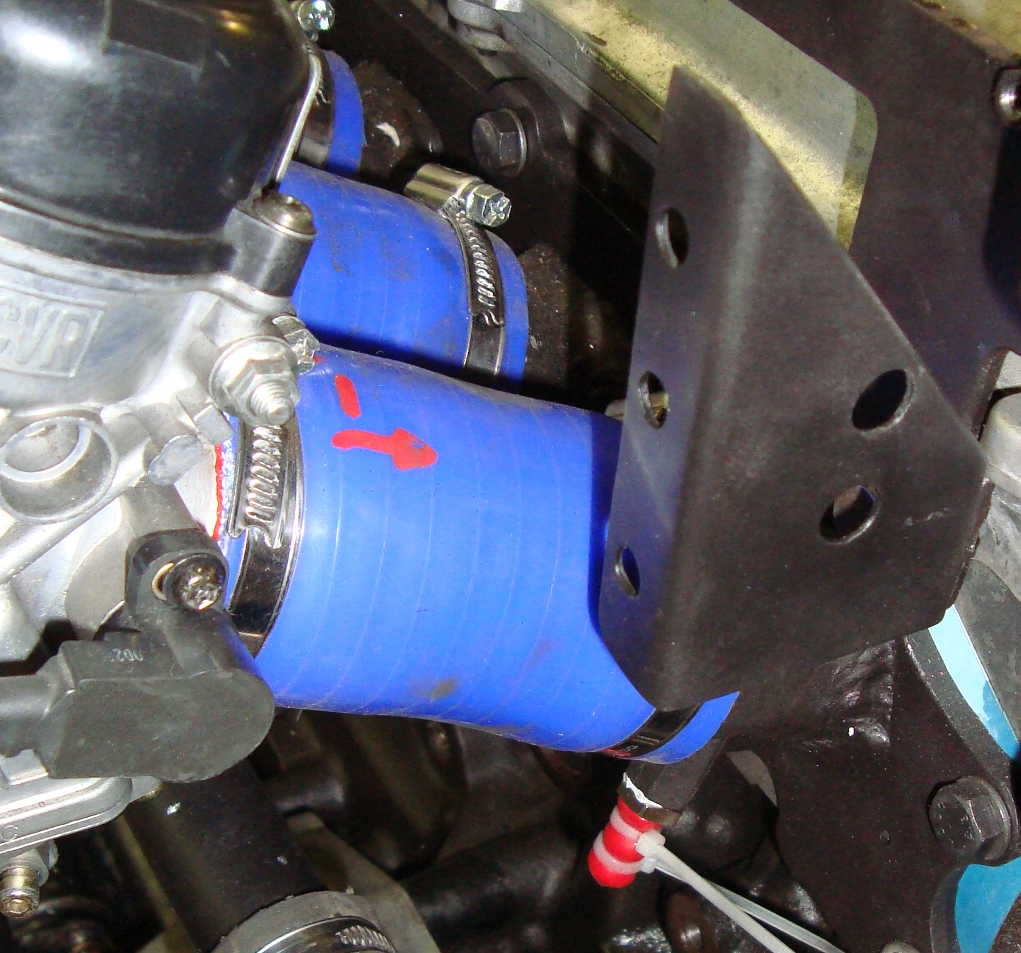
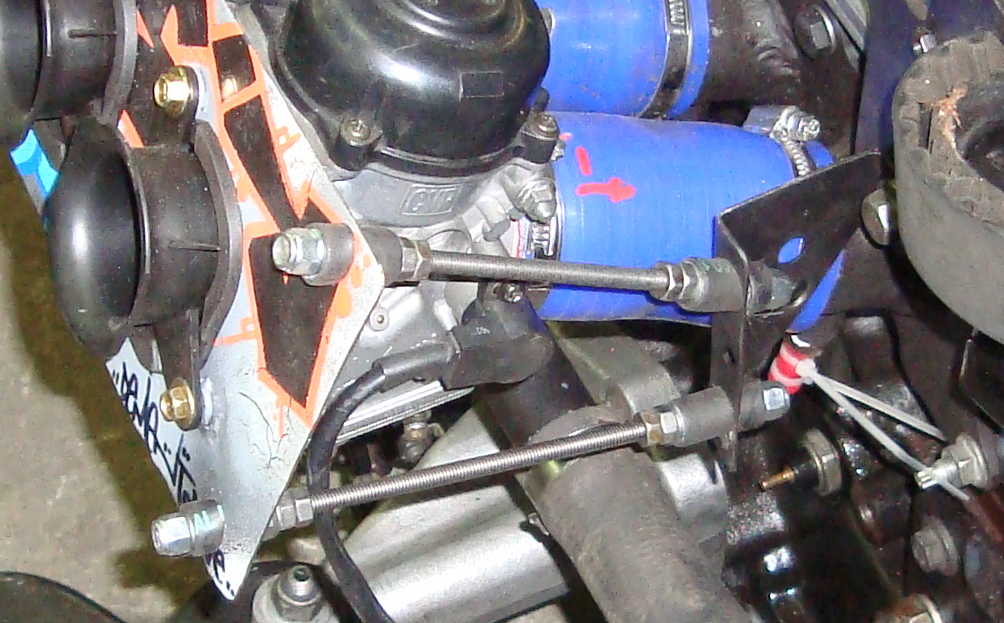
pull them inside:
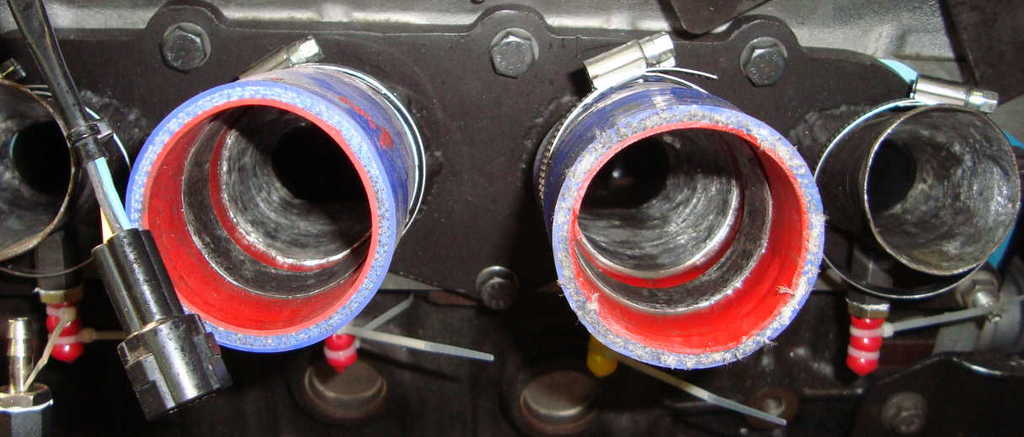
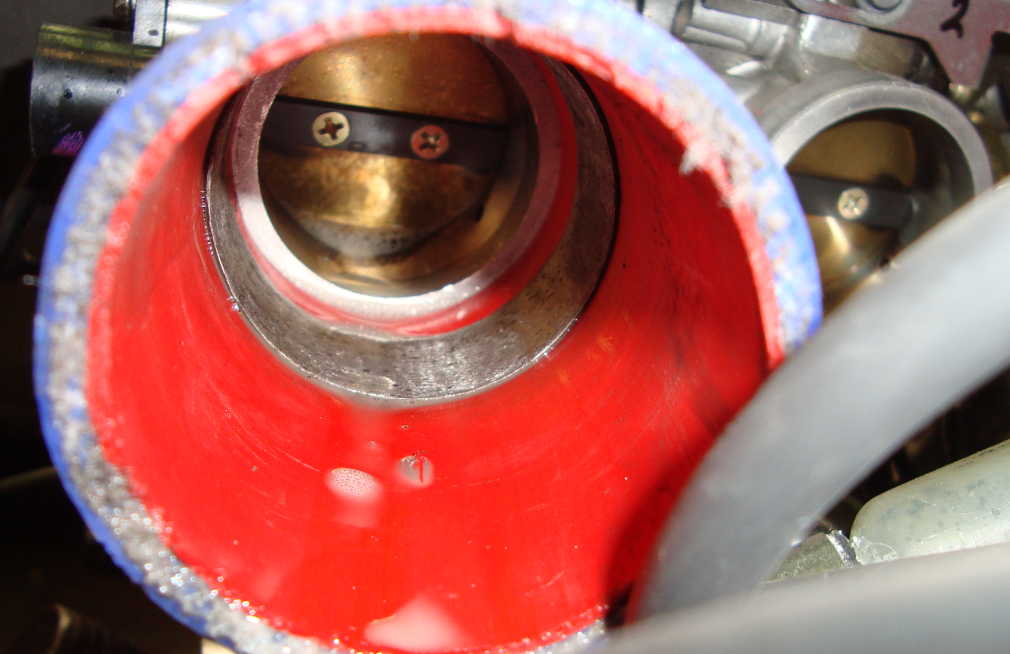
now the hoses are stiffer; they shouldn't contract themselves as in the video.
i also made a couple of brackets (by eye made of crap, almost no measurements had been taken):
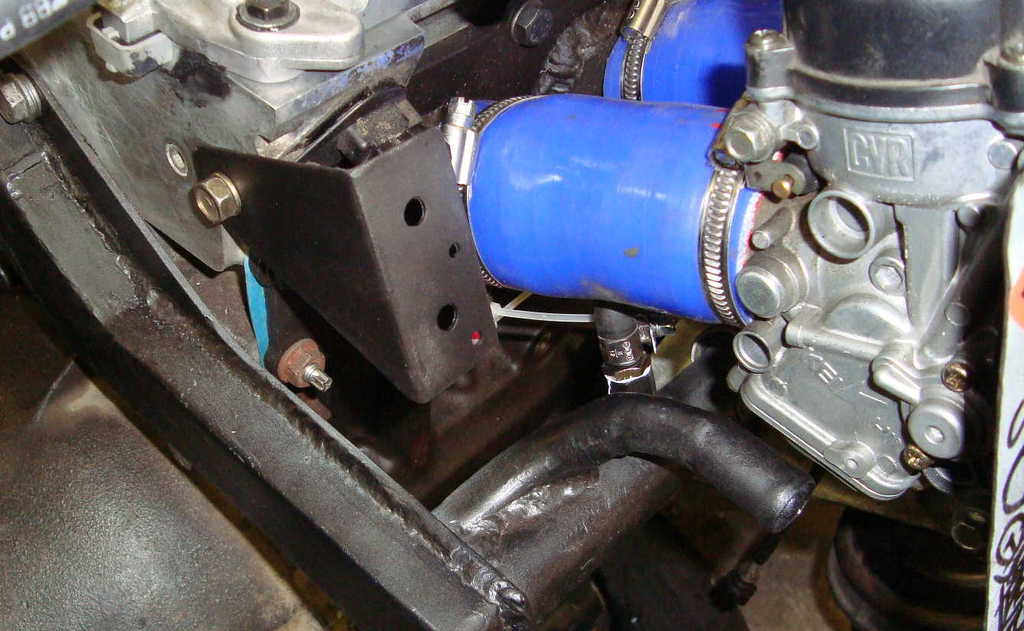
then with an M6 threaded bar, some fuel hose, washers, nuts and auto-locking nuts, i made these cheap "tie-rods"...
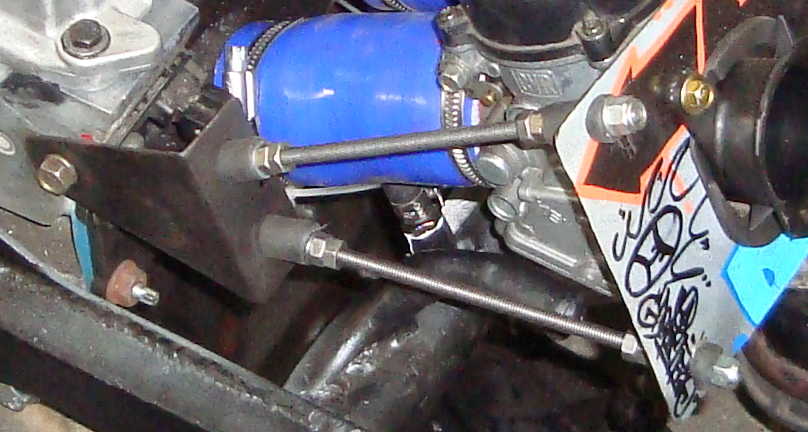


now the hoses are stiffer; they shouldn't contract themselves as in the video.

i also made a couple of brackets (by eye made of crap, almost no measurements had been taken):


then with an M6 threaded bar, some fuel hose, washers, nuts and auto-locking nuts, i made these cheap "tie-rods"...


Last edited by rooos; 27-07-2016 at 09:03 AM.
27-07-2016, 08:59 AM
#92
PassionFord Regular
Thread Starter
SOME OTHER RANDOM BITS
car fully loomed with megajolt, it's just waiting the new engine...
intake camshaft sealer leaking issue:
the new one arrived.
i figured the leaking one was assembled fine, but in this case was a:
RIGHT BOX, WRONG SPARE!
this one was leaking because the outer diameter was 1mm smaller than the required.
strange thing, 'cause when the pack was delivered, i double checked the code on all the spare-boxes inside.
other bits on the engine:
re-opened some threaded holes in the block...
they were occluded by bricklayer-wasps, while sitting in the shop all this time.
water rail completed with some water-hose found in the shop-dumpster and some of the 29.5mm pipe, remaining from the bicycle chassis cut.
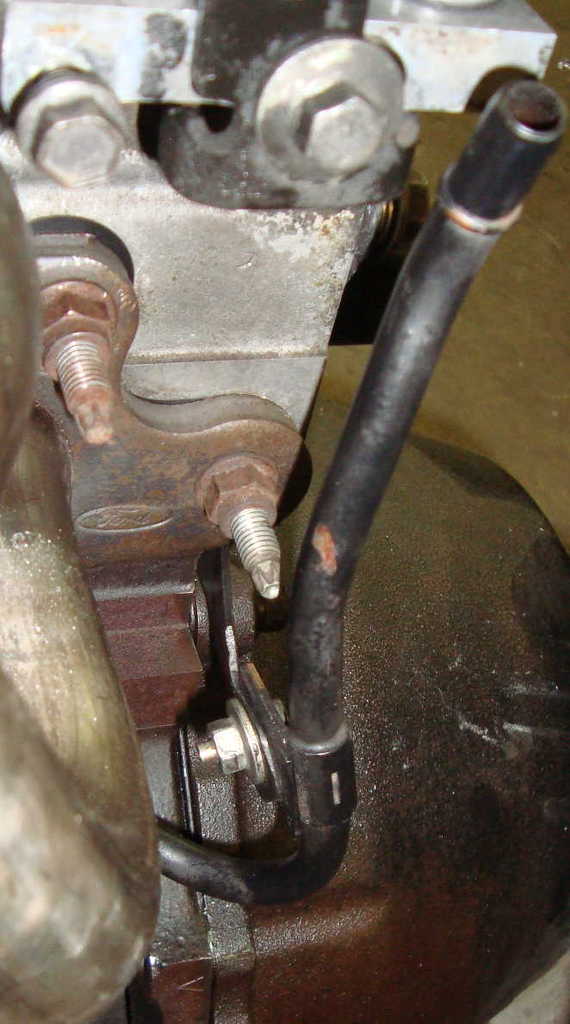
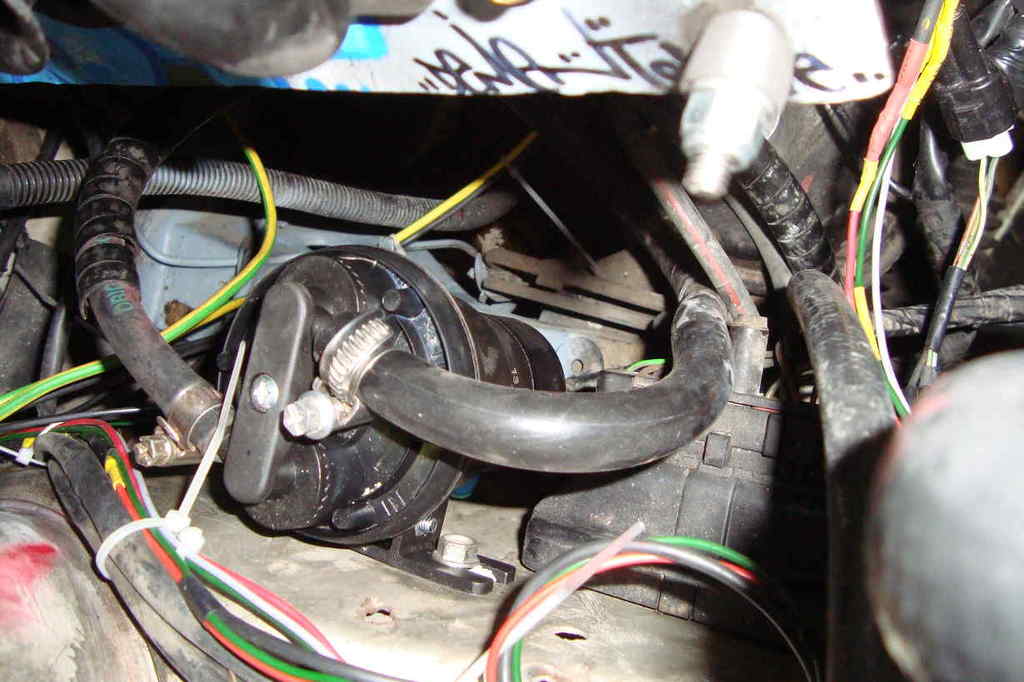
crankcase breathing pipe bracket, in order to move it to a more comfy position:
more coming,
thanks for reading...
car fully loomed with megajolt, it's just waiting the new engine...
intake camshaft sealer leaking issue:
the new one arrived.
i figured the leaking one was assembled fine, but in this case was a:
RIGHT BOX, WRONG SPARE!
this one was leaking because the outer diameter was 1mm smaller than the required.
strange thing, 'cause when the pack was delivered, i double checked the code on all the spare-boxes inside.
other bits on the engine:
re-opened some threaded holes in the block...
they were occluded by bricklayer-wasps, while sitting in the shop all this time.

water rail completed with some water-hose found in the shop-dumpster and some of the 29.5mm pipe, remaining from the bicycle chassis cut.

crankcase breathing pipe bracket, in order to move it to a more comfy position:


more coming,
thanks for reading...
04-08-2016, 06:31 PM
#93
PassionFord Regular
Thread Starter
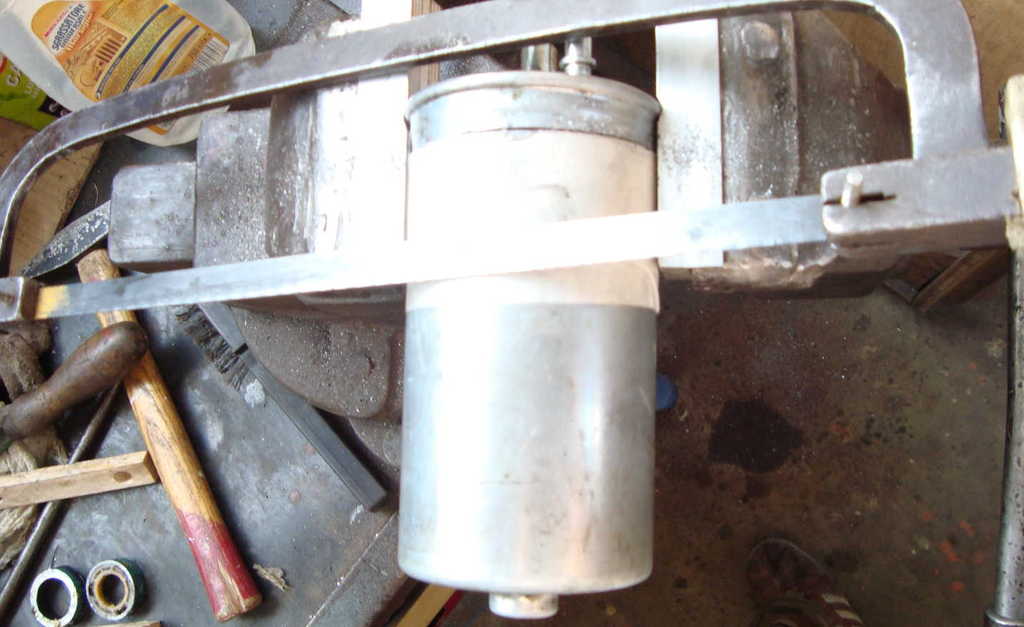
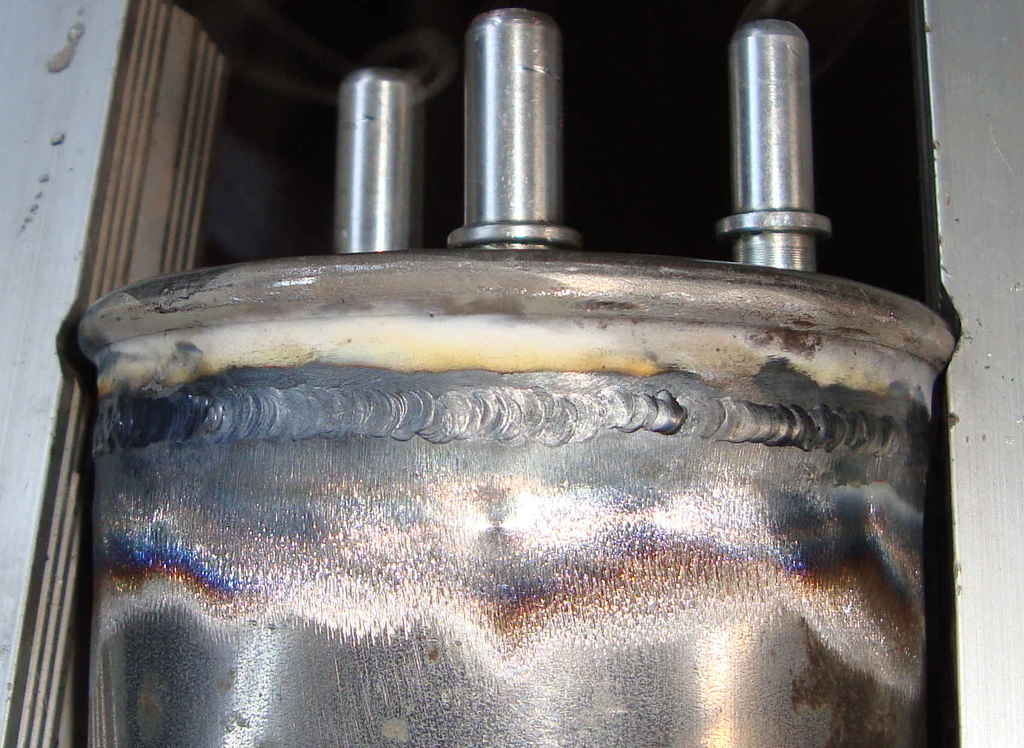
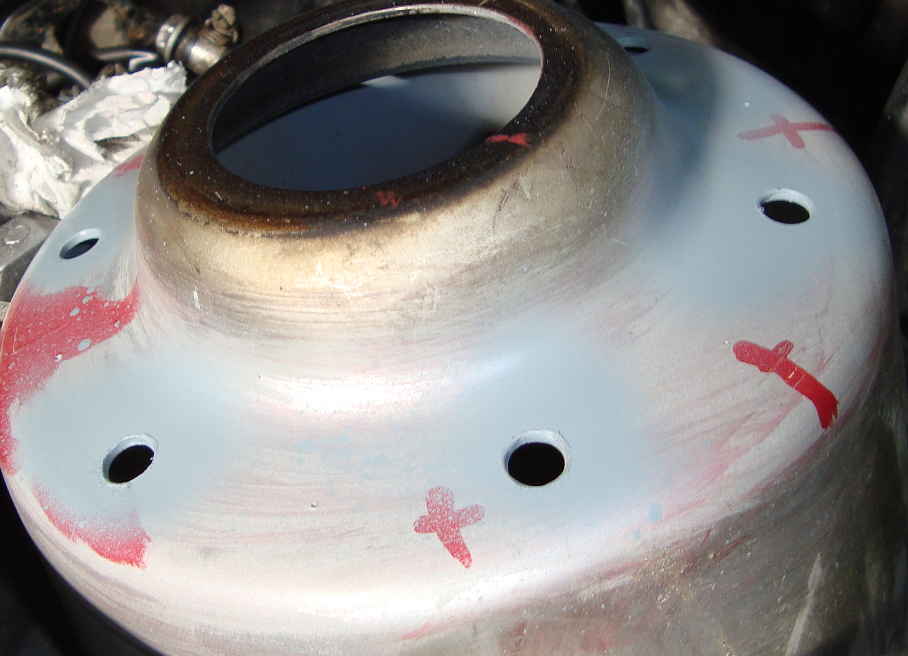
OIL CATCH CAN pt.I
from the shop dumpster i took up these two diesel filters:
-fram p10852a (donno what car. just googled it, looks like a renault one);
-ufi 24 445 00 from 1.3 diesel multijet, down here a pretty common engine (as far as i know, in here it's the most expensive fuel filter).
this means that it's quite easy find a mounting bracket for cheap at the junkyard (both of 'em have an 80mm od body).
it can be found on 1.3mj diesel fiat, opel/vauxhall 1.3cdti and suzukis.
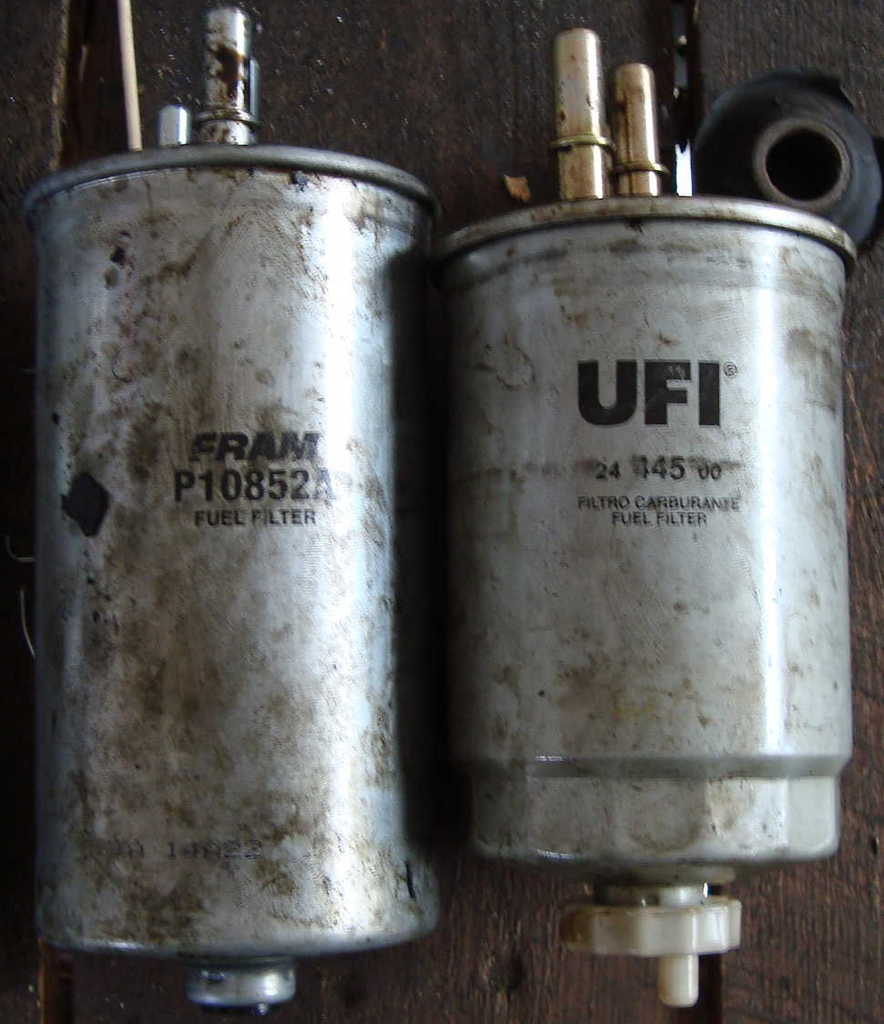
i could've used a honey jar or similars, but since i have a tig machine at home, it saves me the costs of the hose fittings, (these already have three).
they also have a threaded purging hole on theyr bottom.
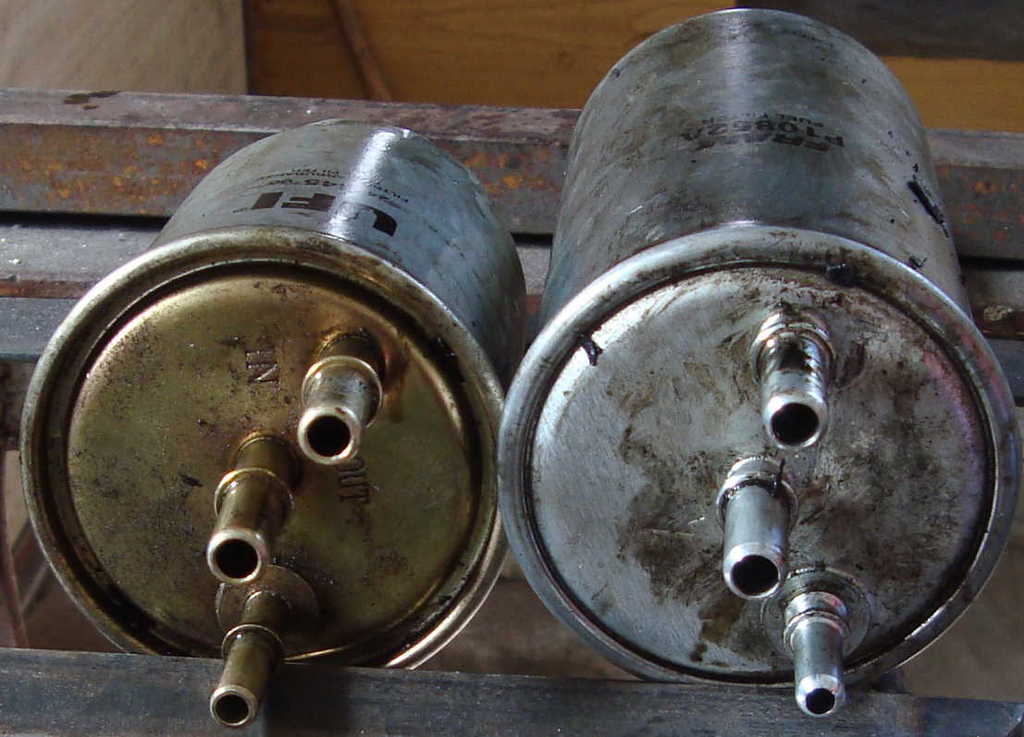
even if the diesel vapours shouldn't explode, i'd avoid to cut them with the angle grinder...
what's inside 'em...
there's also a ball valve which could be used as pcv, but i decided to not to use it.
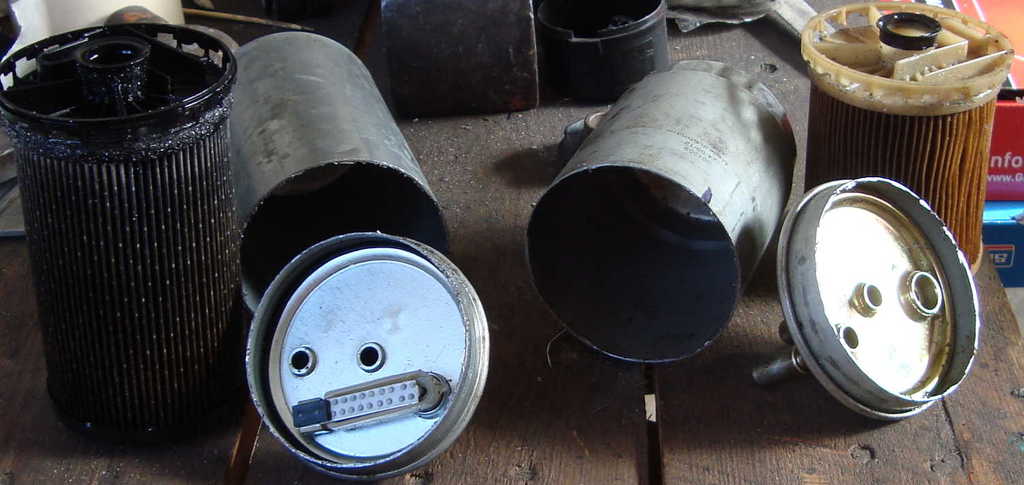
this would be the first one i did. i filled it with some 1cm mesh iron garden net i already had at home.
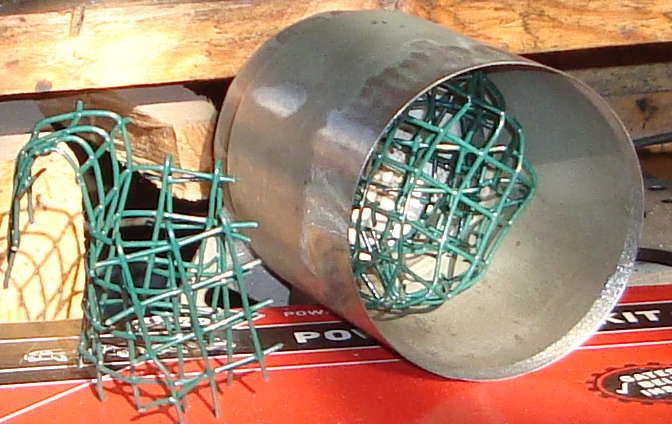
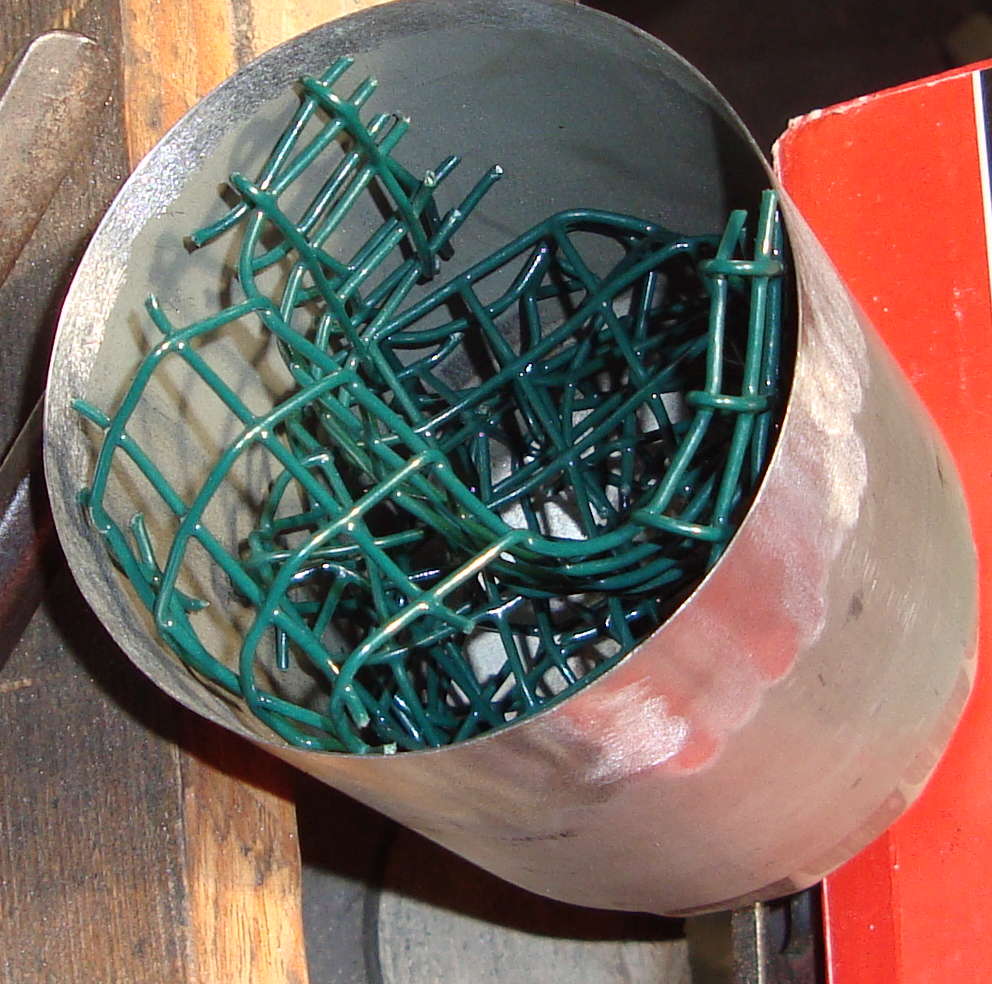
then i put just a little steel straw in it... this spot will face the inlet ports of the filter.

after the clean up with the grinding, there wasn't so much meat left for the welding. i'd say 0.5-0.8mm thickness: quite a bitch...
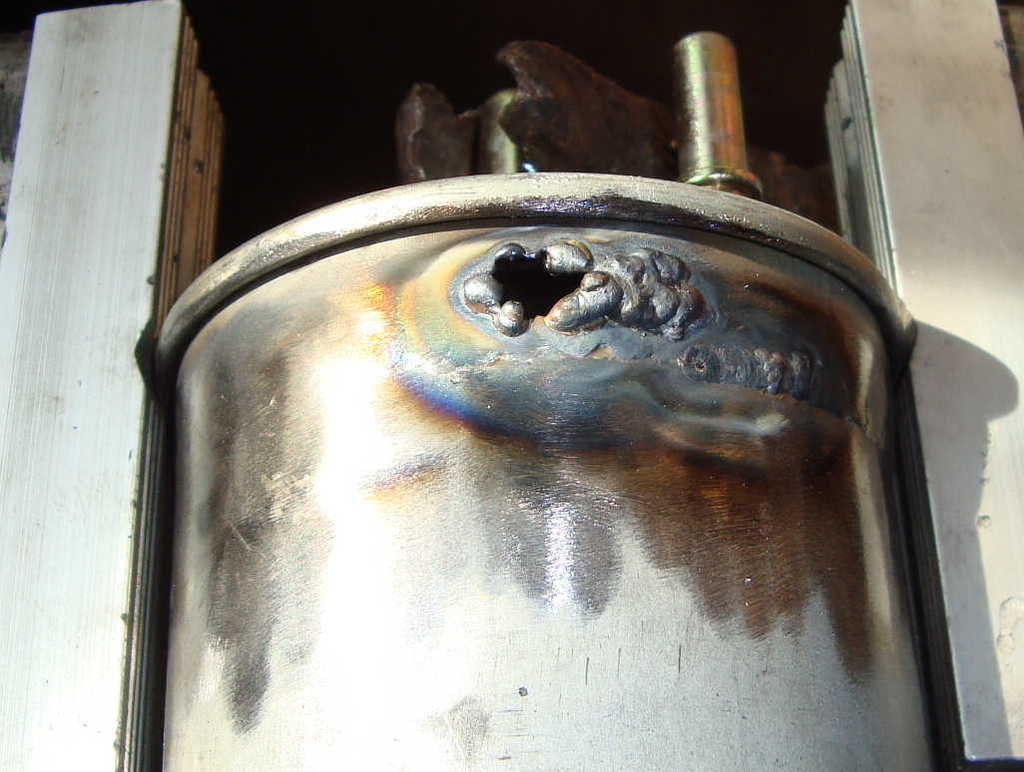
bit shitty, but it'll work.
i'm still learning guys...
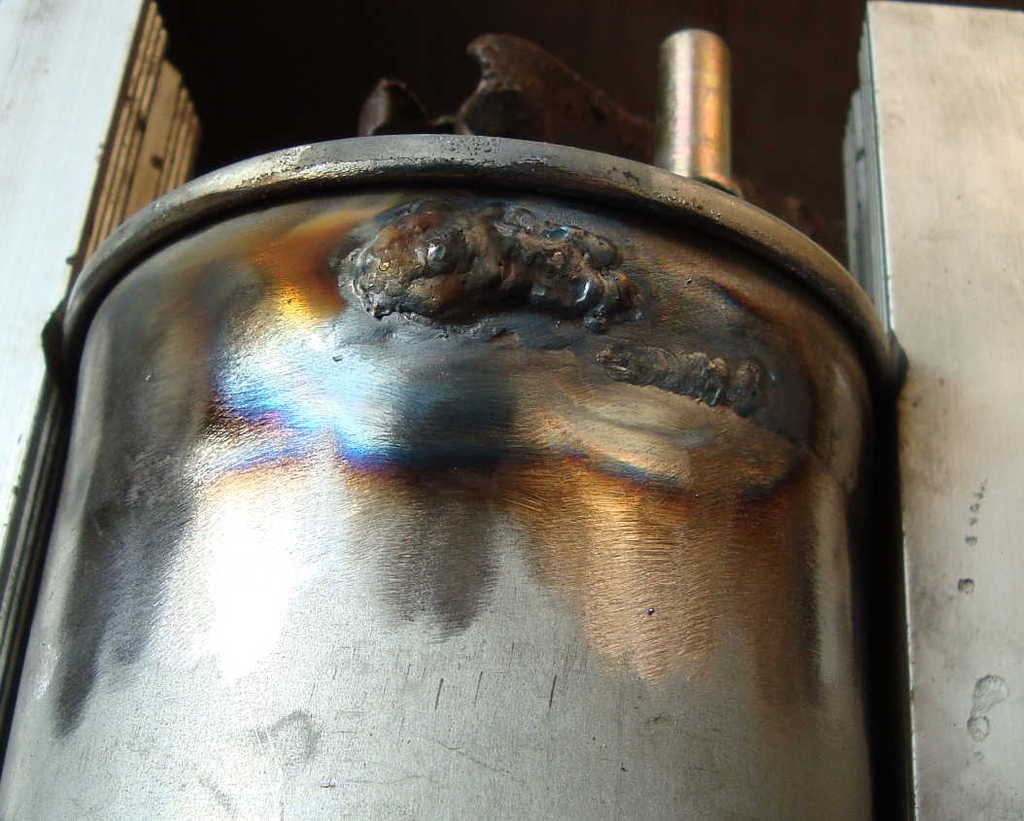
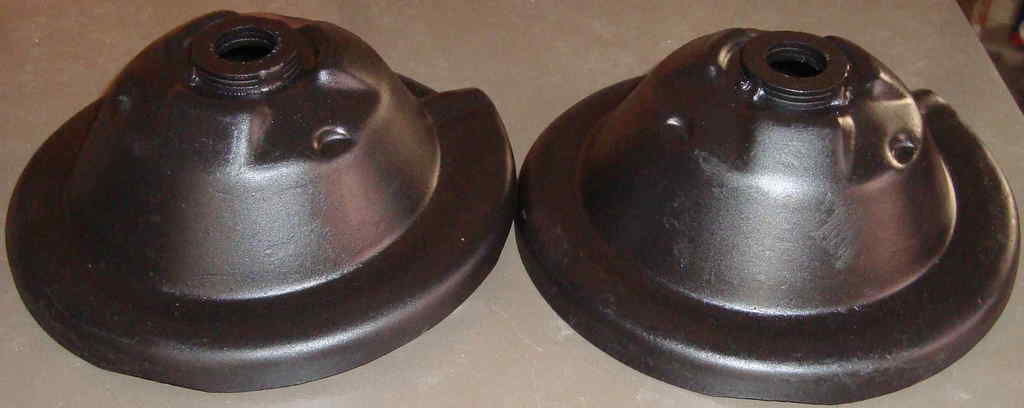
i wanted the second catch can filter a bit more open.
so i made this piece of metal from a 2mm thick sheet and tack-welded it to the top.
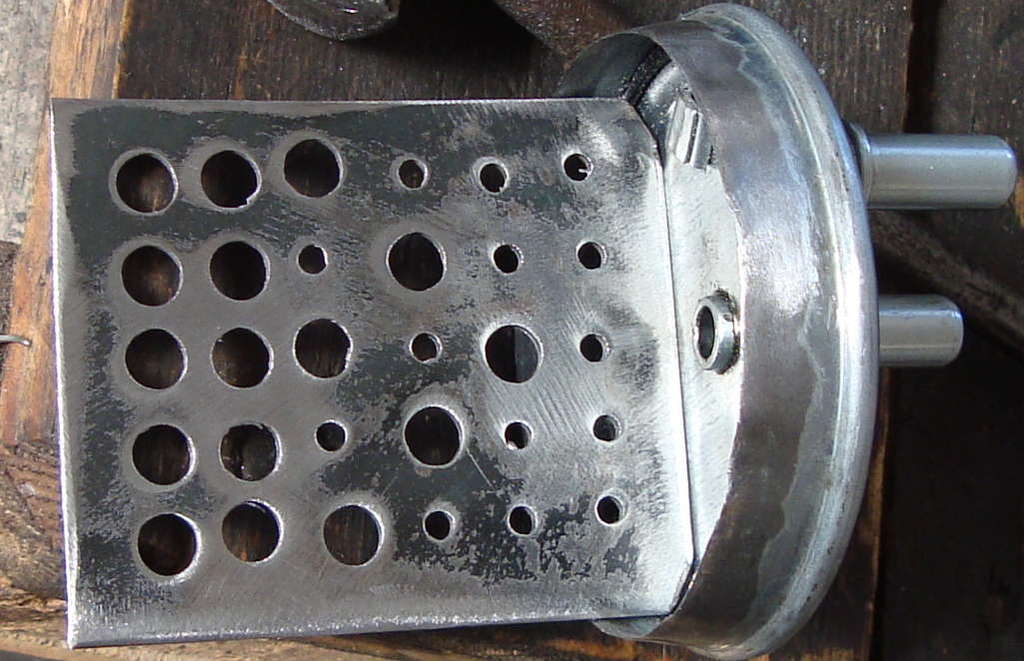
then i just filled it with much more garden net.

using hammer and anvil i made the connection a bit conical, in order to better juxtapose the welding edges.

this one (same thickness) came out ways better.
hi-temp black coated...
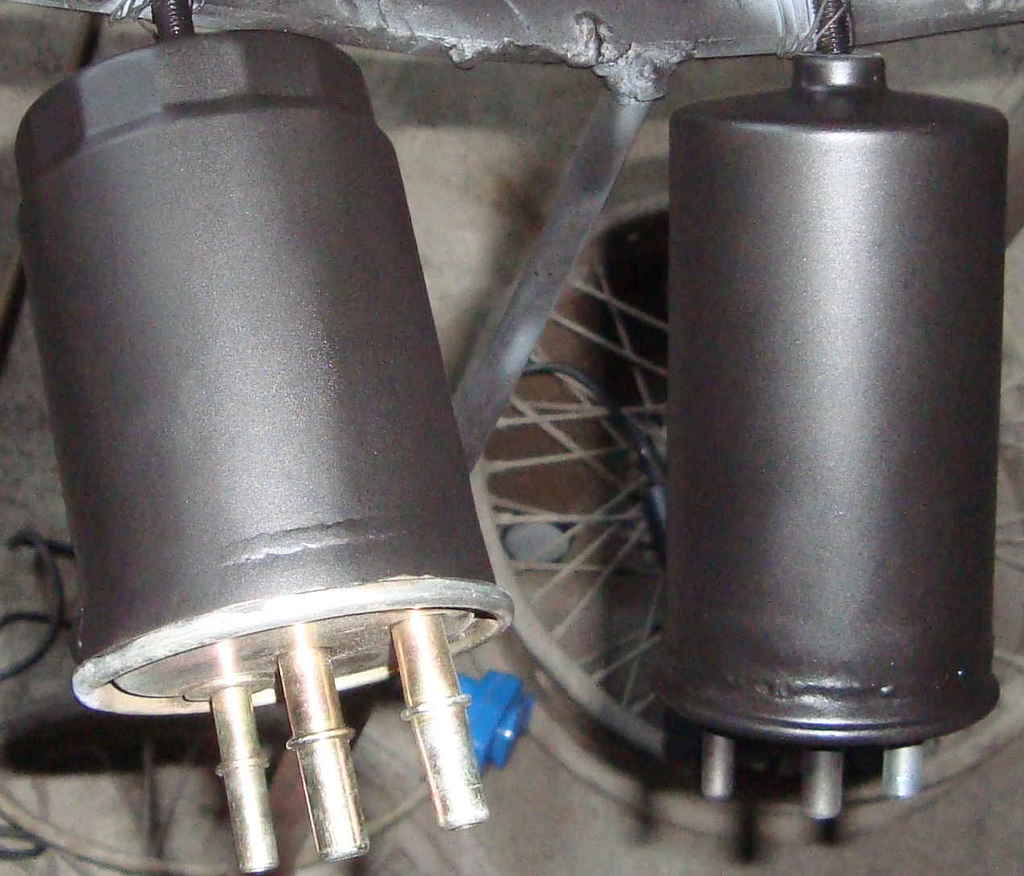
more coming, thanks for reading...
from the shop dumpster i took up these two diesel filters:
-fram p10852a (donno what car. just googled it, looks like a renault one);
-ufi 24 445 00 from 1.3 diesel multijet, down here a pretty common engine (as far as i know, in here it's the most expensive fuel filter).
this means that it's quite easy find a mounting bracket for cheap at the junkyard (both of 'em have an 80mm od body).
it can be found on 1.3mj diesel fiat, opel/vauxhall 1.3cdti and suzukis.

i could've used a honey jar or similars, but since i have a tig machine at home, it saves me the costs of the hose fittings, (these already have three).
they also have a threaded purging hole on theyr bottom.

even if the diesel vapours shouldn't explode, i'd avoid to cut them with the angle grinder...

what's inside 'em...
there's also a ball valve which could be used as pcv, but i decided to not to use it.


this would be the first one i did. i filled it with some 1cm mesh iron garden net i already had at home.


then i put just a little steel straw in it... this spot will face the inlet ports of the filter.

after the clean up with the grinding, there wasn't so much meat left for the welding. i'd say 0.5-0.8mm thickness: quite a bitch...


bit shitty, but it'll work.
i'm still learning guys...
i wanted the second catch can filter a bit more open.
so i made this piece of metal from a 2mm thick sheet and tack-welded it to the top.

then i just filled it with much more garden net.

using hammer and anvil i made the connection a bit conical, in order to better juxtapose the welding edges.

this one (same thickness) came out ways better.

hi-temp black coated...

more coming, thanks for reading...
Last edited by rooos; 06-08-2016 at 09:17 AM.
06-08-2016, 09:41 AM
#94
PassionFord Regular
Thread Starter
i gave the ufi 1.3 mj one to a friend of mine. he needs it 'cause he's having some oil vapour issues in his toyota.
now the sierra is stuck due to a broken clutch cable. still able to ride, but since i'm doing a lot of city drive, i don't wanna overload the starter motor, until the new spare arrives.
so here's what i'm riding now..
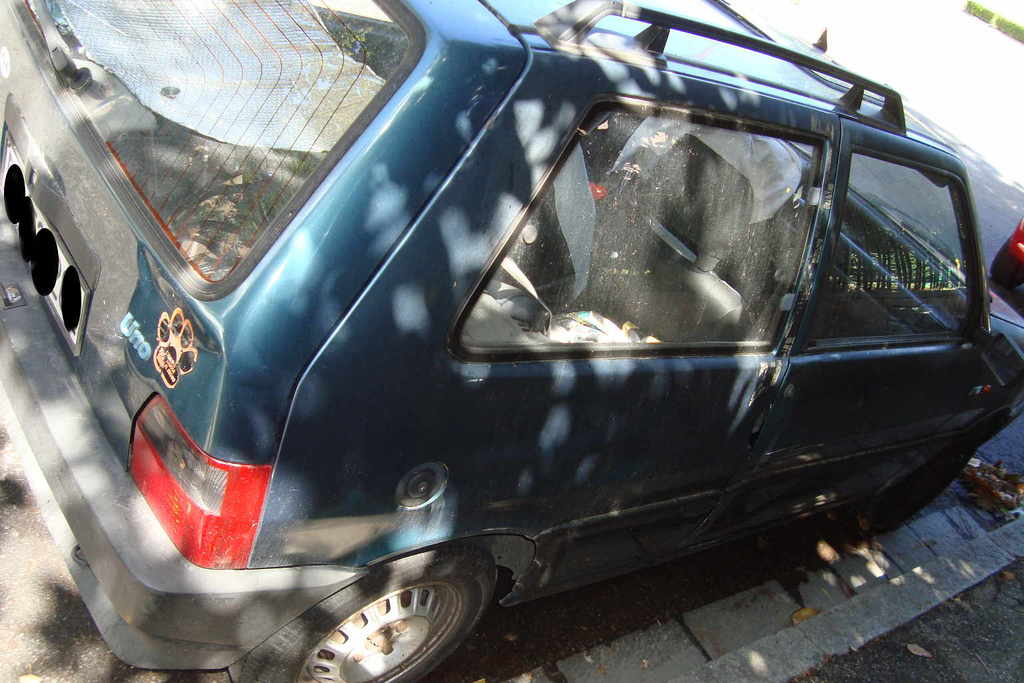

32yo and my daily is still my mom's: hey ladies!
now the sierra is stuck due to a broken clutch cable. still able to ride, but since i'm doing a lot of city drive, i don't wanna overload the starter motor, until the new spare arrives.
so here's what i'm riding now..


32yo and my daily is still my mom's: hey ladies!
10-08-2016, 06:48 PM
#95
PassionFord Regular
Thread Starter
the two clutch cables i ordered arrived (a nk and a trw one).
two 'cause is the second time i'm servicing this one, in less than 5 years.
i'll add an earth strap on the gearbox hoping that helps, but i'll gladly accept some advice...
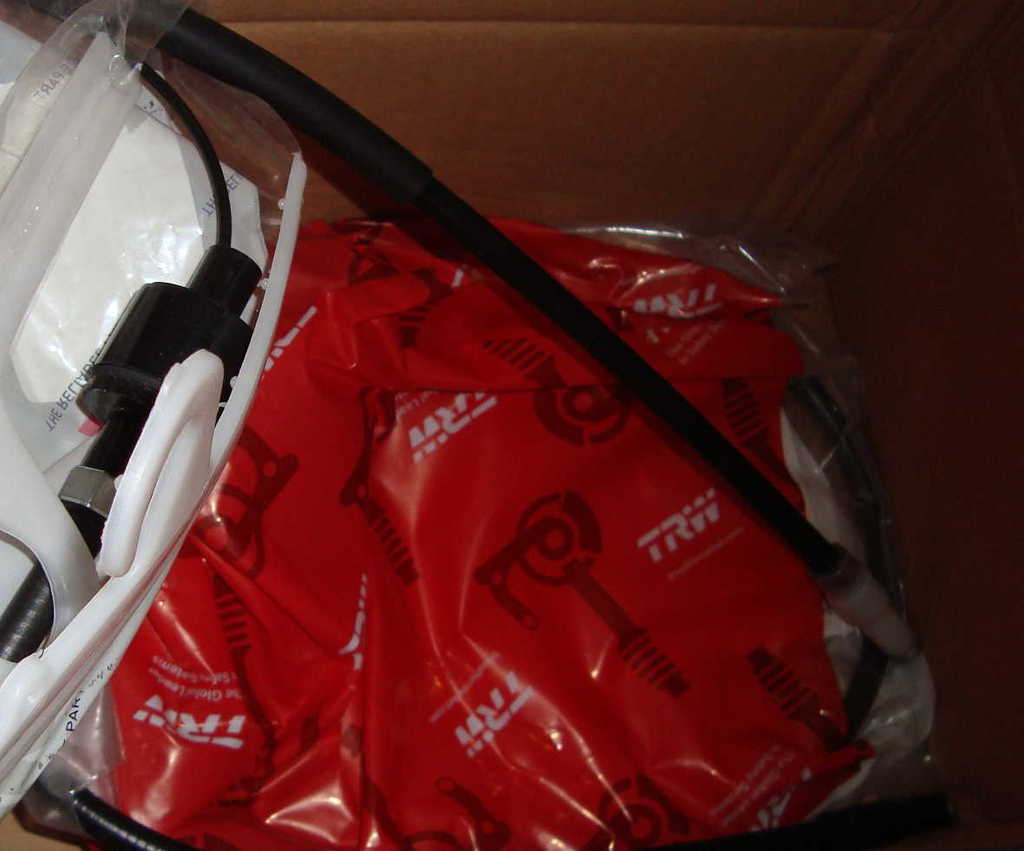
two 'cause is the second time i'm servicing this one, in less than 5 years.
i'll add an earth strap on the gearbox hoping that helps, but i'll gladly accept some advice...
 10-08-2016, 06:51 PM
#96
PassionFord Regular
Thread Starter
i've also caught the occasion: free hoist + free uno.
so today i made some room, out with the old...

no second thoughts now.
thanks for watching.
so today i made some room, out with the old...


no second thoughts now.
thanks for watching.
11-08-2016, 09:46 PM
#97
PassionFord Regular
Thread Starter
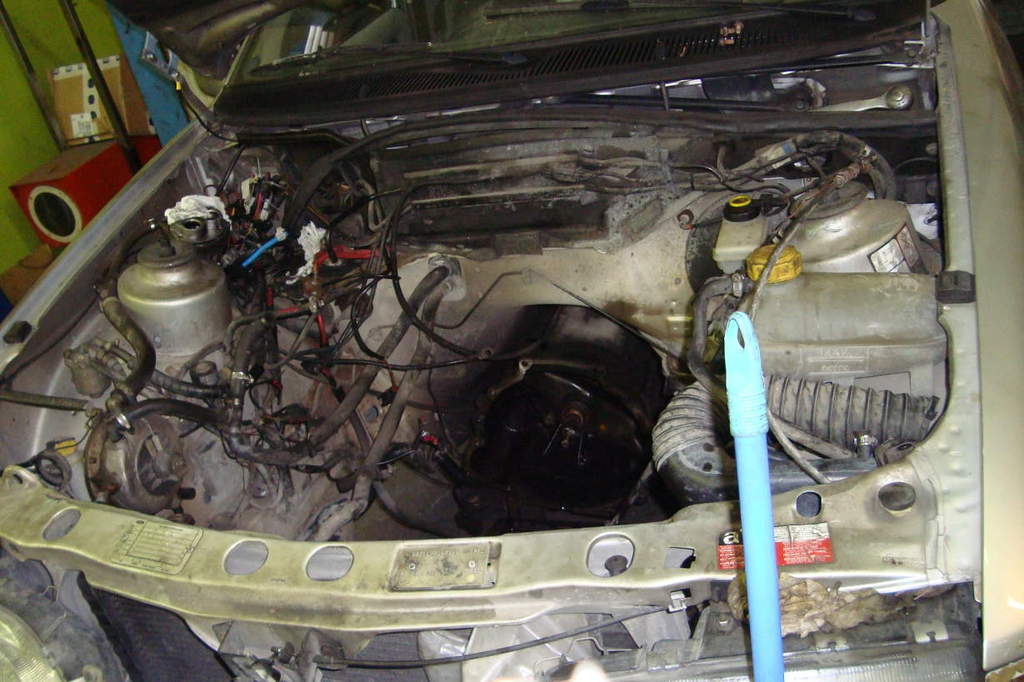
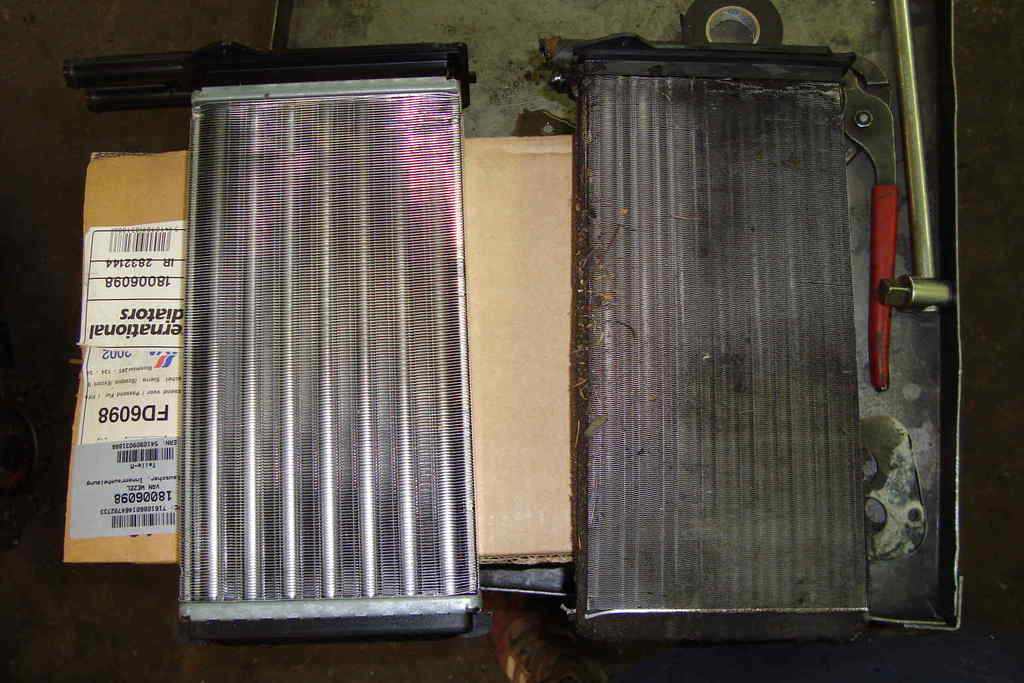
with the engine out of the bay, i was more comfortable to replace the old leaking interior heater.
but inside the car, it'd been a bit tough however.
i also managed to do this..

still a lotta things to do.
can't f*ckin' believe i f*ckin' did it...
but inside the car, it'd been a bit tough however.

i also managed to do this..


still a lotta things to do.
can't f*ckin' believe i f*ckin' did it...
The following users liked this post:
rooos (12-08-2016)
15-08-2016, 09:14 AM
#99
PassionFord Regular
Thread Starter
cheers!
...but actually i'd say it's a bit messy .
.
there is no bolt nor nut which matches the other. this means the next time i have a clutch service, i'll need 200 wrenches.
i also tried to clean up a bit, but with this car, it's like putting a serviette on a pig.
when watching to your work, or others made by people in here, i feel quite embarassed . i just hope everything just work fine.
last friday i managed to change the halfshafts too, they're from a twin-cam, a bit more tough than mines...
took down some pic, but i forgot the camera at the shop, and down here it's holiday since tomorrow.
wanted to reply you with some pics, but i couldn't wait so long...
so thanks for your support mate!
...but actually i'd say it's a bit messy
there is no bolt nor nut which matches the other. this means the next time i have a clutch service, i'll need 200 wrenches.
i also tried to clean up a bit, but with this car, it's like putting a serviette on a pig.
when watching to your work, or others made by people in here, i feel quite embarassed
last friday i managed to change the halfshafts too, they're from a twin-cam, a bit more tough than mines...
took down some pic, but i forgot the camera at the shop, and down here it's holiday since tomorrow.
wanted to reply you with some pics, but i couldn't wait so long...
so thanks for your support mate
!
The following users liked this post:
rooos (16-08-2016)
16-08-2016, 08:10 PM
#101
PassionFord Regular
Thread Starter
16-08-2016, 08:17 PM
#102
PassionFord Regular
Thread Starter
i didn't open this thread because my car or my works are something i'm proud of...
i did it 'cause i hope the cheap solution i adopted, may help someone else to save his/her sierra from the scrapyard. that's it...
camera now f*ck'd. posting some pics as soon...
i did it 'cause i hope the cheap solution i adopted, may help someone else to save his/her sierra from the scrapyard. that's it...
camera now f*ck'd.
posting some pics as soon...
20-08-2016, 08:16 AM
#103
PassionFord Regular
Thread Starter
some update...
it's been a while... more doing less posting this time, i've been lucky.
awfully i mistakenly deleted the hafshafts job's pics, but more following.
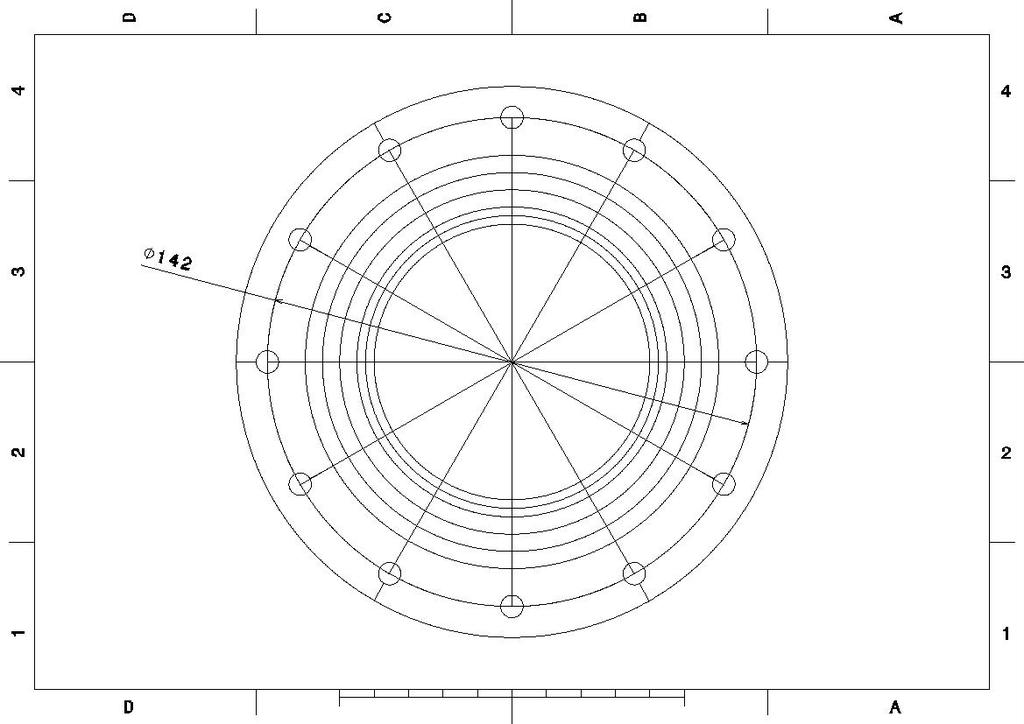
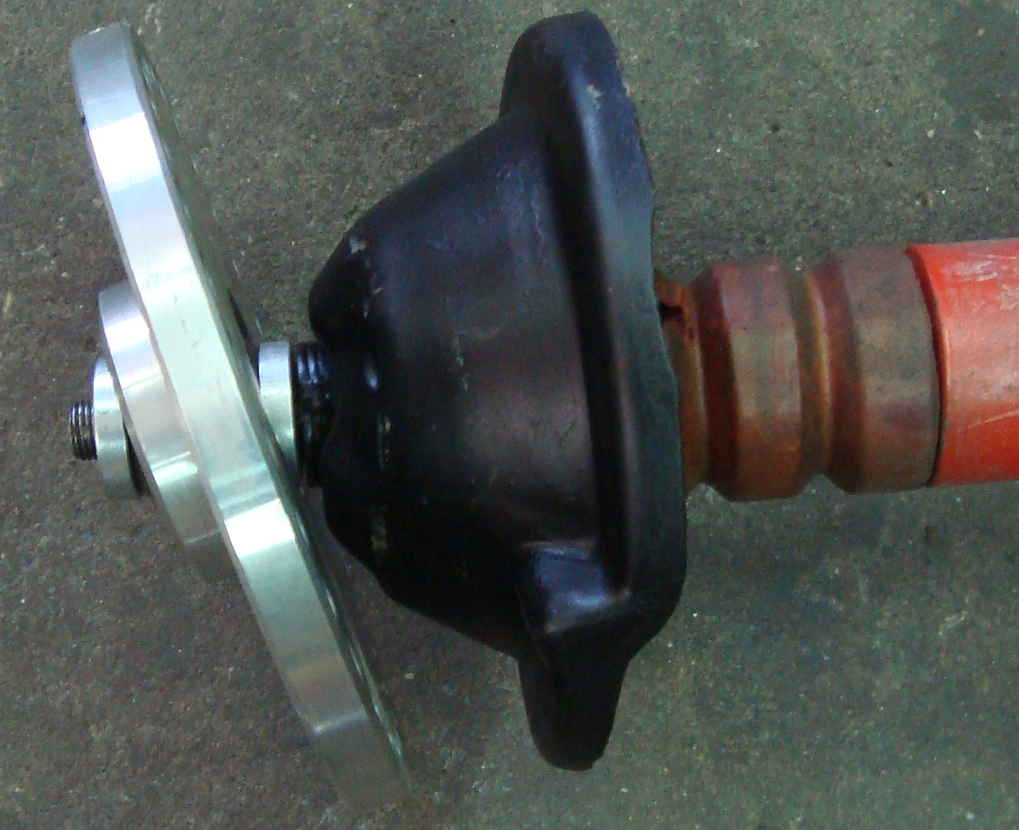
CAMBER PLATES pt.I
time ago i paid a little fortune for these:

this is how i aligned, (or at least i think i did), to the body, the holes for these adjustable top-mounts.
decided to make six of 'em per side.
the 350+k km over-dented body hasn't been judged a good and square reference for the process.
made this with cad and 1:1 scale printed:
outer circumference 160mm;
bolt pattern 142mm (36 x M8 holes).
with a paint marker, i made a dozen vertical marks on the body...
(do not try to paint the whole car, as i did)
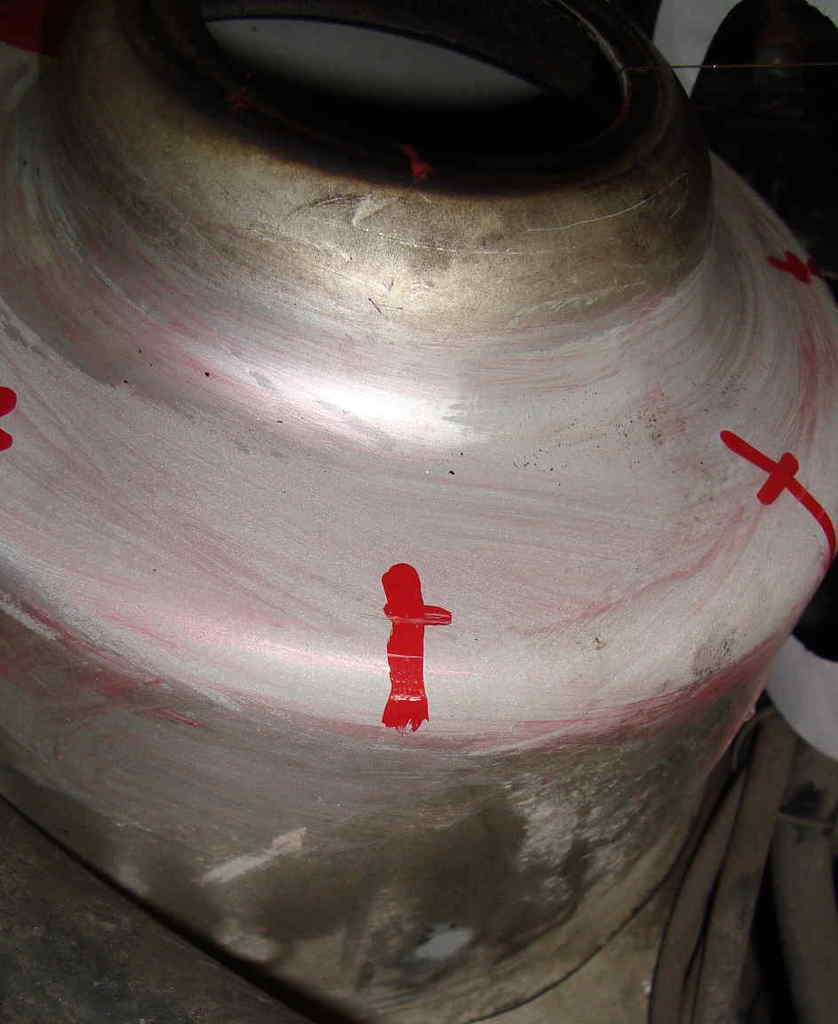
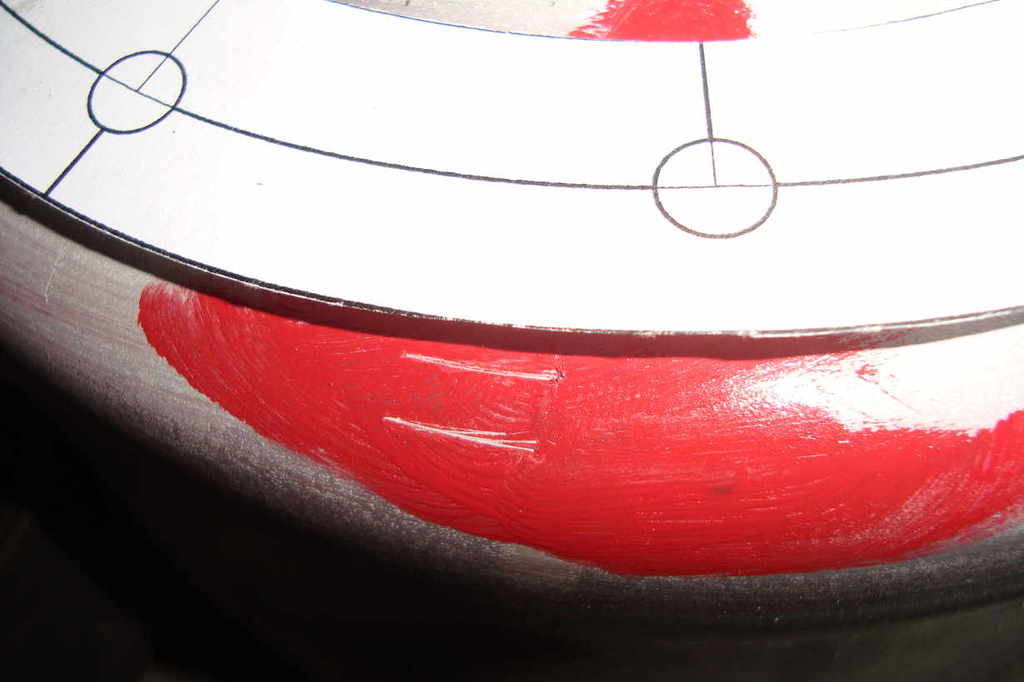
when dry, made circumferential scratches with the caliper on the top-mount hole, measuring 50mm.
(the other seen are just the first try i did...)

when the mask is perfectly cut on the 160mm circle, it (kinda) matches these scratches.
so the 142mm bolt pattern is now considered to be concentrical to the top-mount hole.
i tied some fishing wire to a couple of bolts from the scrap-bucket.
there must be not so much weight difference between each other.
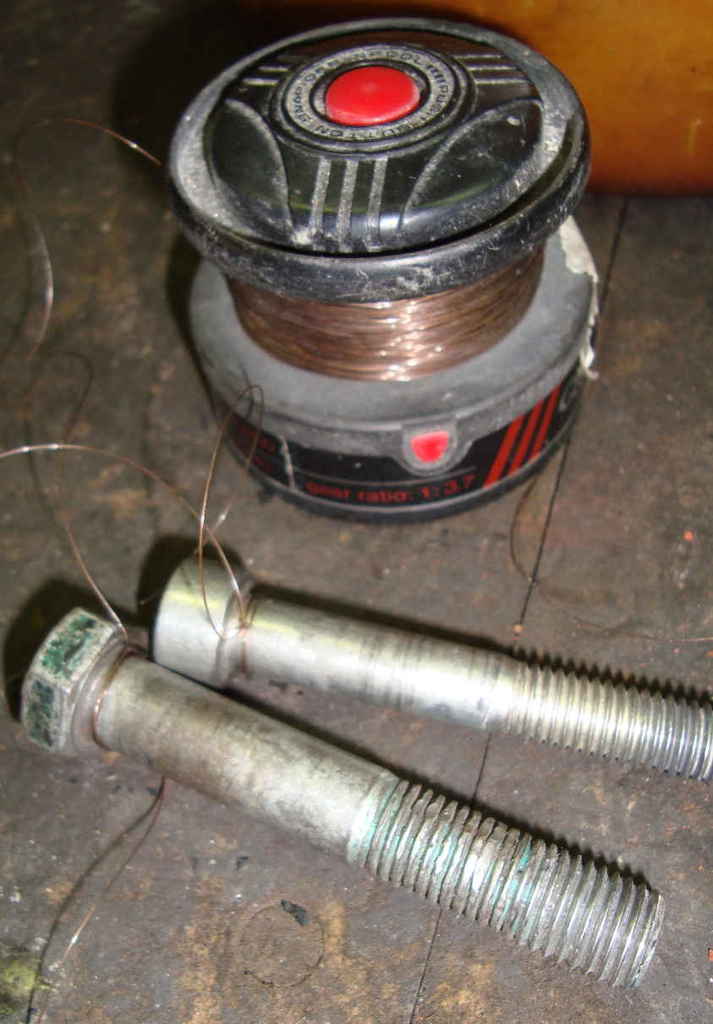
with the bolts hanging in the two holes, i measured the minimum "trasversal hanging-lenght". (mine is 961mm: checked five times).
then i scratched down the wire position on the body.
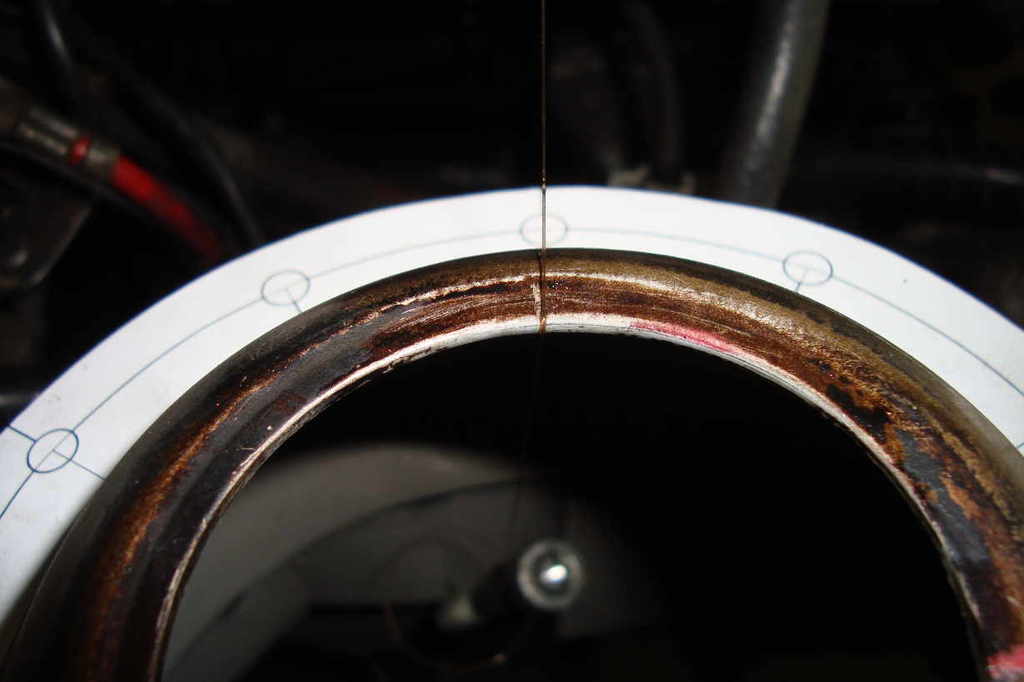
while sighting the wire line, i aligned the diametral lines on the two masks, (being sure their 160mm circle were on the circumferentials scratches).
after the diametral position had been scratched on the body, the mask were taped down on it, and i engraved the hole positions...

9mm holes and the plates fit pretty good.
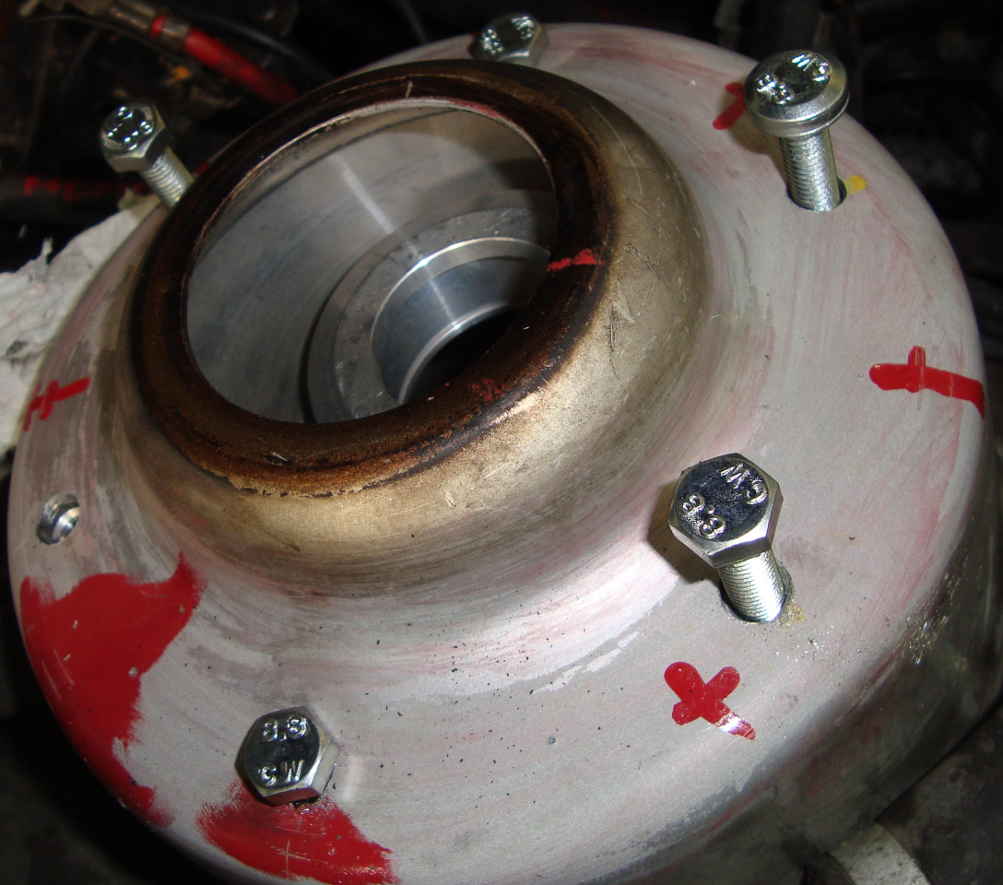
then the minimum required: a little lick of grey antirust primer paint.
does it look good?

not too much...
this is the best i could do with the tools i had.
it's been a while... more doing less posting this time, i've been lucky.
awfully i mistakenly deleted the hafshafts job's pics, but more following.
CAMBER PLATES pt.I
time ago i paid a little fortune for these:

this is how i aligned, (or at least i think i did), to the body, the holes for these adjustable top-mounts.
decided to make six of 'em per side.
the 350+k km over-dented body hasn't been judged a good and square reference for the process.
made this with cad and 1:1 scale printed:
outer circumference 160mm;
bolt pattern 142mm (36 x M8 holes).

with a paint marker, i made a dozen vertical marks on the body...
(do not try to paint the whole car, as i did)

when dry, made circumferential scratches with the caliper on the top-mount hole, measuring 50mm.
(the other seen are just the first try i did...)

when the mask is perfectly cut on the 160mm circle, it (kinda) matches these scratches.
so the 142mm bolt pattern is now considered to be concentrical to the top-mount hole.

i tied some fishing wire to a couple of bolts from the scrap-bucket.
there must be not so much weight difference between each other.

with the bolts hanging in the two holes, i measured the minimum "trasversal hanging-lenght". (mine is 961mm: checked five times).
then i scratched down the wire position on the body.

while sighting the wire line, i aligned the diametral lines on the two masks, (being sure their 160mm circle were on the circumferentials scratches).

after the diametral position had been scratched on the body, the mask were taped down on it, and i engraved the hole positions...

9mm holes and the plates fit pretty good.

then the minimum required: a little lick of grey antirust primer paint.

does it look good?

not too much...
this is the best i could do with the tools i had.
20-08-2016, 08:17 AM
#104
PassionFord Regular
Thread Starter
QUESTION
actually i made 9mm holes for the M8s...
would anybody advice me to drill 'em out to 10mm, in order to have more space for the chassis alignement?
i guess the process error i made could be better corrected with larger holes, while doing the toe-in service...
actually i made 9mm holes for the M8s...
would anybody advice me to drill 'em out to 10mm, in order to have more space for the chassis alignement?
i guess the process error i made could be better corrected with larger holes, while doing the toe-in service...
20-08-2016, 08:19 AM
#105
PassionFord Regular
Thread Starter
the steel bushings which come with the plates have a 10mm hole (they were sold as: "for sierra", weird thing).
front stock shock absorber have a M12 on the top.
so i drilled them bores out.
as robrs2 correctly suggested, stock spring caps need to be spacered from the plates.
i used 3 x M16 washers (per each side), tack welded on 'em.


then high temperature black coated, look like tits.
they fit pretty good, but there is not so much thread left (just 6mm long)...
some way out...
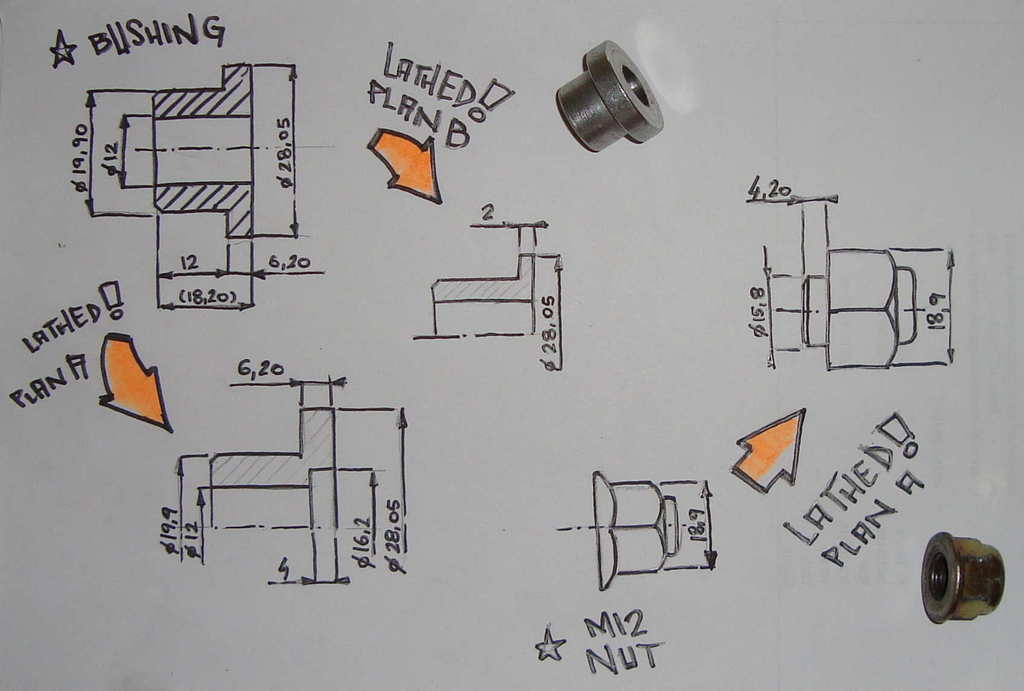
with each solution i'll have a 10mm long thread on a M12, it'll work better than 6mm.
but "10 on M12" is still a "not too good doing"...

i'd go for the plan B.
as it can be seen in the next, it'll be the nut which hold the spherical bearing, not the bushing.
theoretically it'd mean simpler, no internal lathing, less fatigue stressing, etc
(i also put the pic to remember me the bearing code, once i have to replace 'em).

this will be a thing done, only once i can afford new shock absorber. :/sh*t!
bad thing is:
when i dismantled the left strut, the allen hole literally exploded, so i had to cut away another 10mm from the top of the shock abs'er thread.
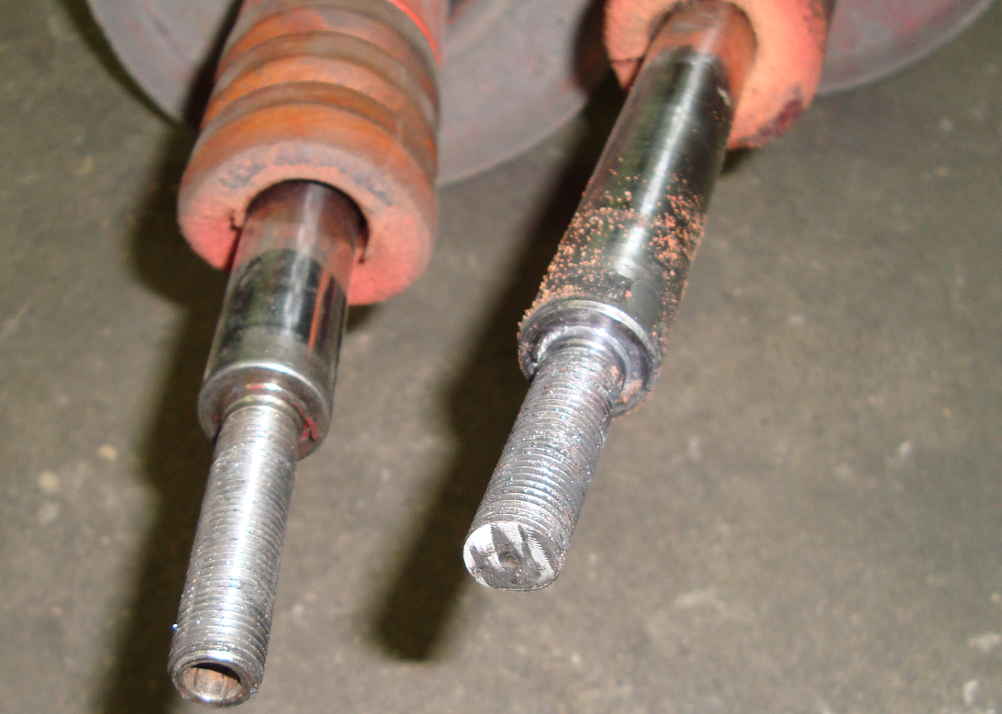
this means that after all this effort, still riding on stock topmounts.
boll*cks
front stock shock absorber have a M12 on the top.
so i drilled them bores out.

as robrs2 correctly suggested, stock spring caps need to be spacered from the plates.
i used 3 x M16 washers (per each side), tack welded on 'em.


then high temperature black coated, look like tits.

they fit pretty good, but there is not so much thread left (just 6mm long)...

some way out...

with each solution i'll have a 10mm long thread on a M12, it'll work better than 6mm.
but "10 on M12" is still a "not too good doing"...

i'd go for the plan B.
as it can be seen in the next, it'll be the nut which hold the spherical bearing, not the bushing.
theoretically it'd mean simpler, no internal lathing, less fatigue stressing, etc
(i also put the pic to remember me the bearing code, once i have to replace 'em).

this will be a thing done, only once i can afford new shock absorber. :/sh*t!
bad thing is:
when i dismantled the left strut, the allen hole literally exploded, so i had to cut away another 10mm from the top of the shock abs'er thread.

this means that after all this effort, still riding on stock topmounts.
boll*cks
Last edited by rooos; 20-08-2016 at 03:26 PM.
20-08-2016, 08:22 AM
#106
PassionFord Regular
Thread Starter
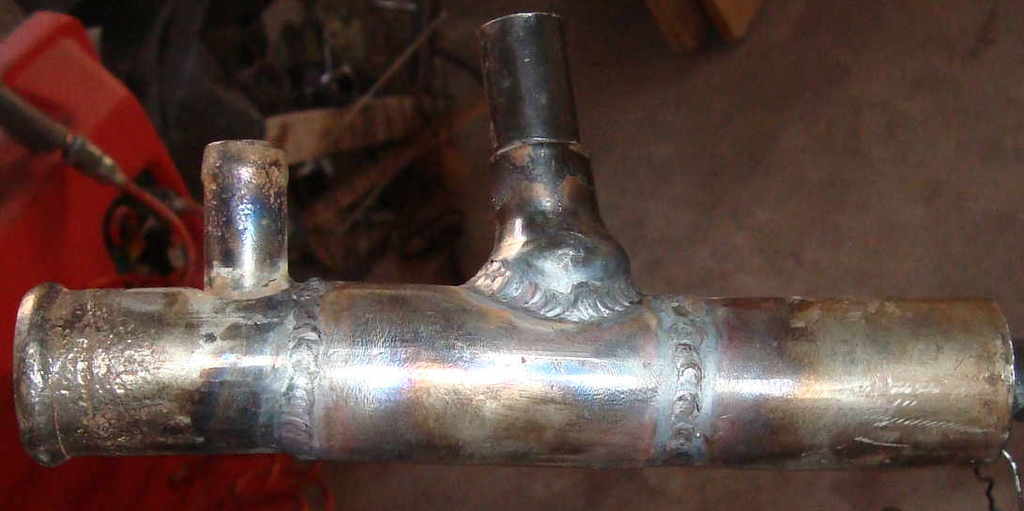
WATER COMPILATION pt.I
made this stainless pipe... (42.4mm to 36mm)
it looks quite crappy, the edges were badly juxtaposed. but i just need it to be waterproof...

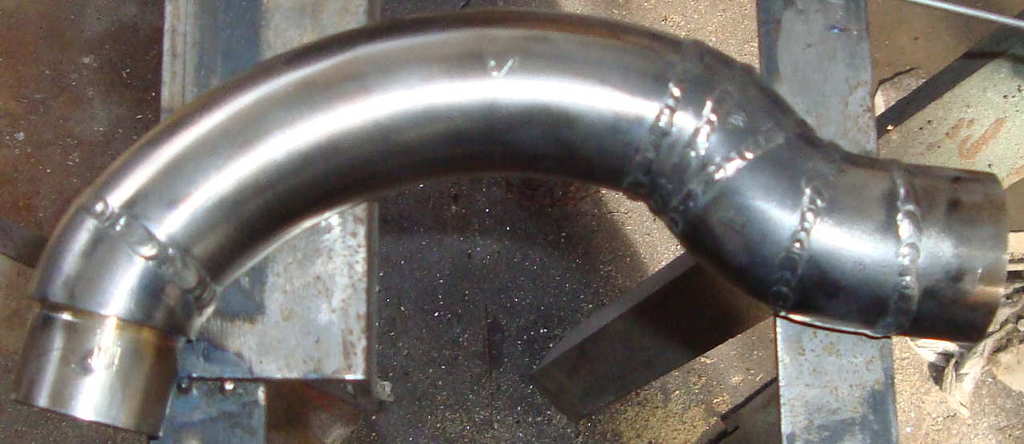
which it's for...

it dodges the alternator from the retroford reverse pump (outlet 44mm).
i could've used a rubber hose, but i didn't like this solution.
i had to make a scheme of the water connection. even if in the first times i don't run the lpg system, i'll feed the lpg-lung however...
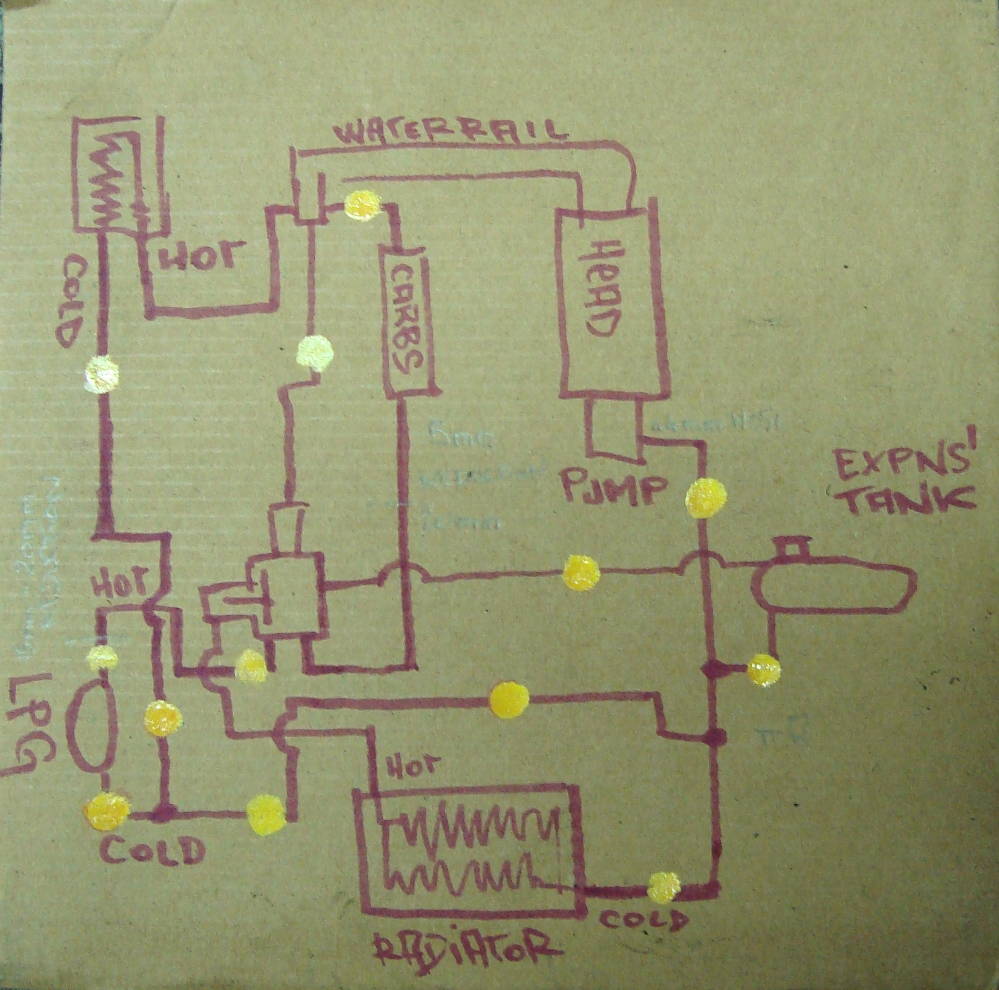
it's almost complete, the yellow dotted ones are the connections i already have done.
this is the crap i'm using at the moment...


i've already said it was a lo-budget thing, but with this i'm might going too far.
20-08-2016, 08:23 AM
#107
PassionFord Regular
Thread Starter
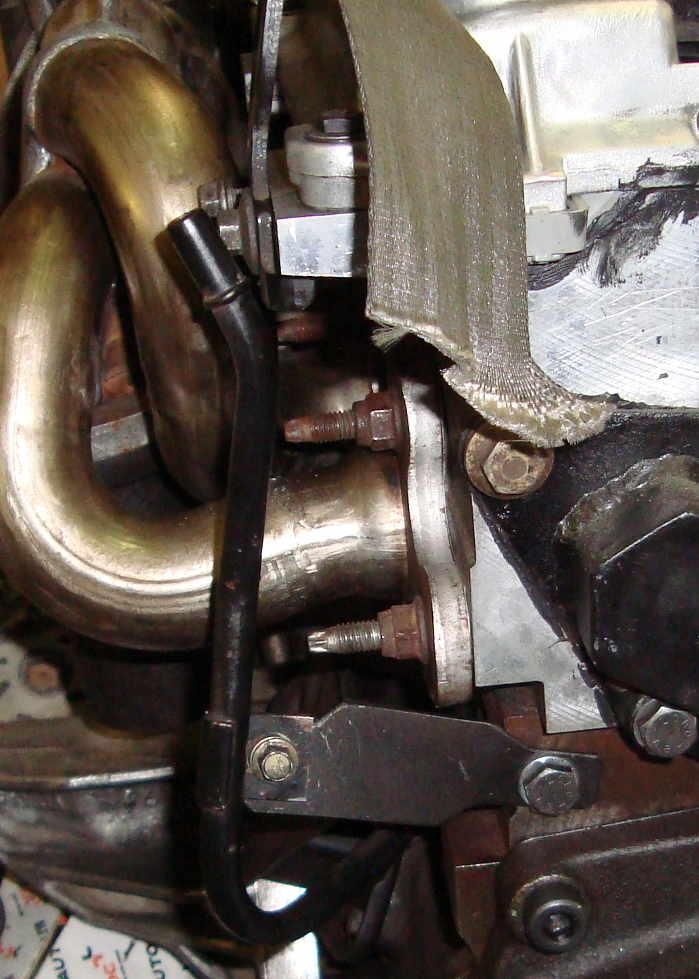
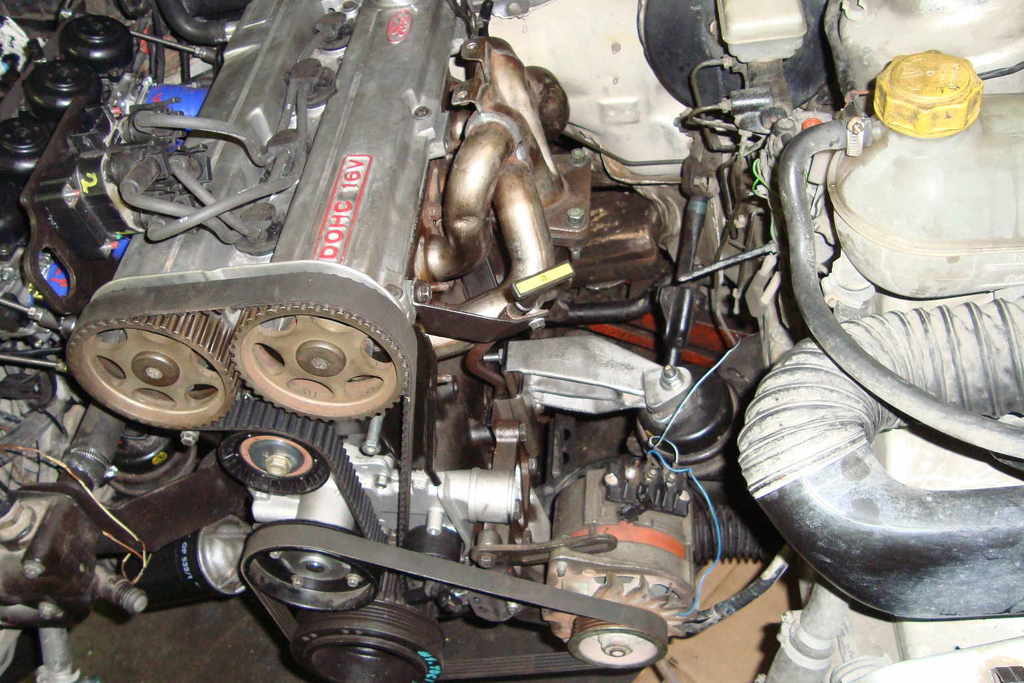
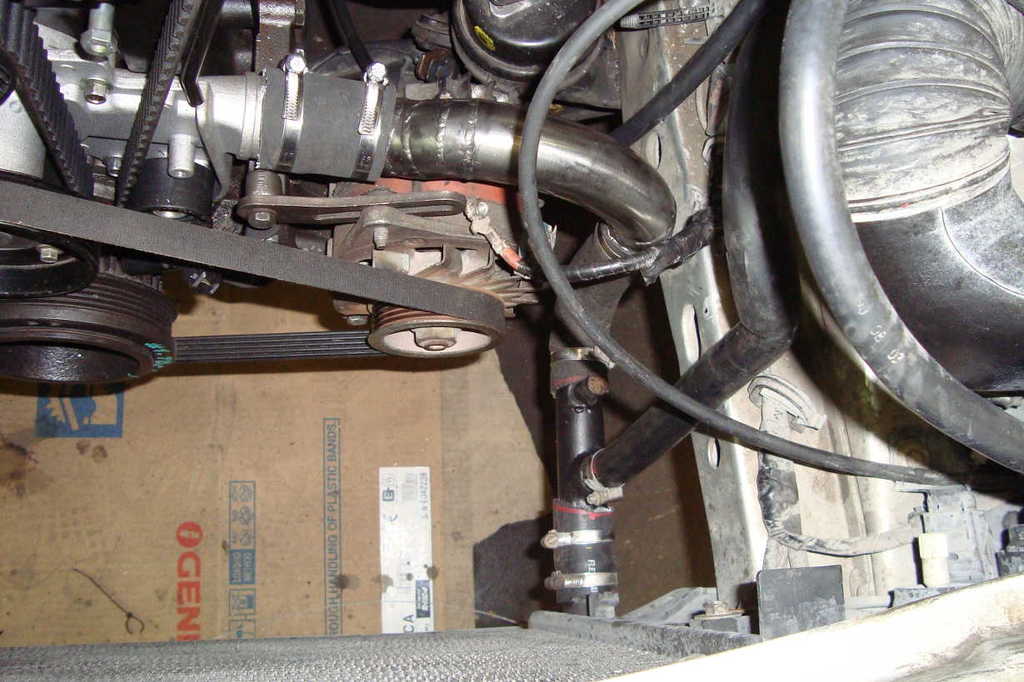
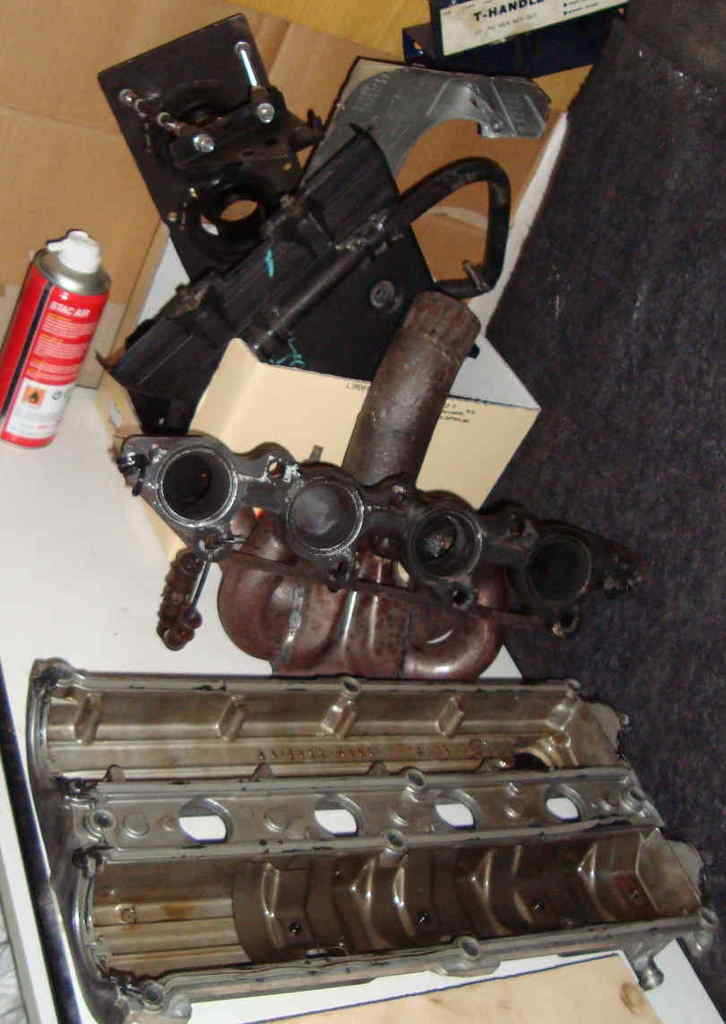
EXHAUST pt.??
modified this one, in order to not interfere with the cranckcase ventilation system...
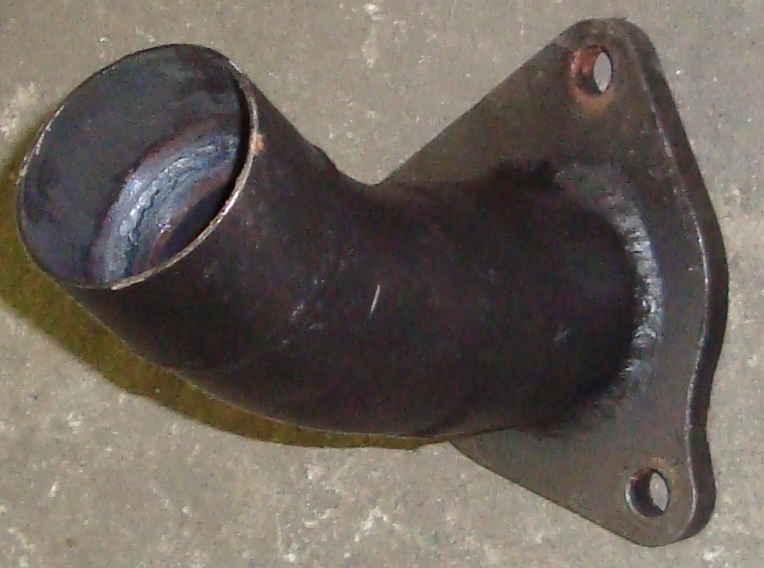
once assembled...
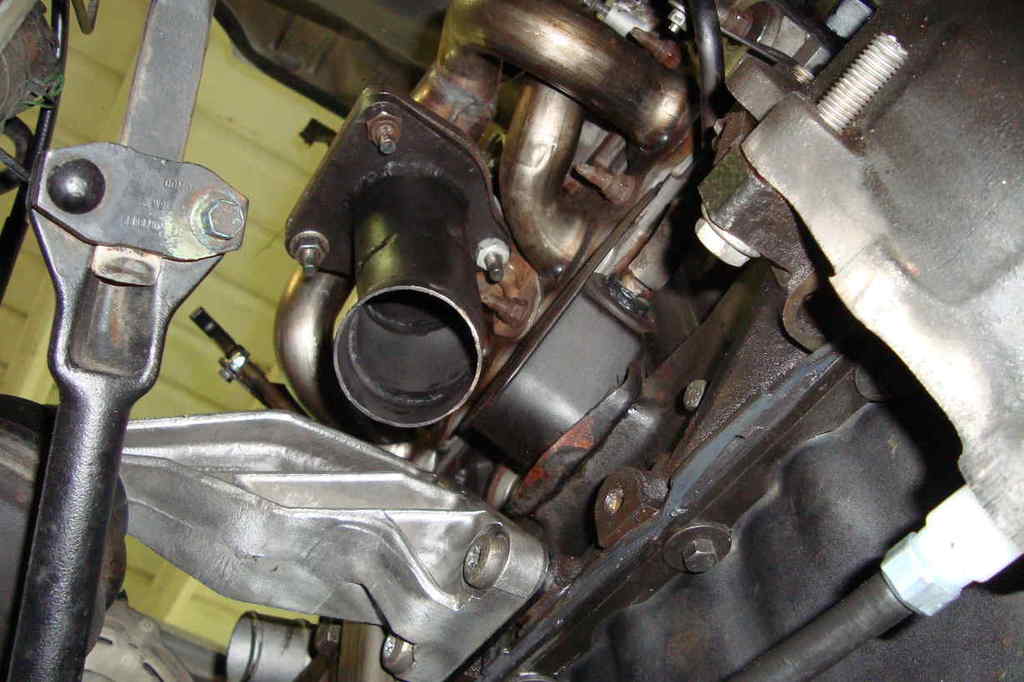
so this one's the whole exhaust kit, which connects the 1.8 zetec focus manifold to the std cvh exh system.
57mm id polylock stainless flexible 750mm long pipe.


modified this one, in order to not interfere with the cranckcase ventilation system...

once assembled...

so this one's the whole exhaust kit, which connects the 1.8 zetec focus manifold to the std cvh exh system.
57mm id polylock stainless flexible 750mm long pipe.

 20-08-2016, 08:25 AM
#108
PassionFord Regular
Thread Starter
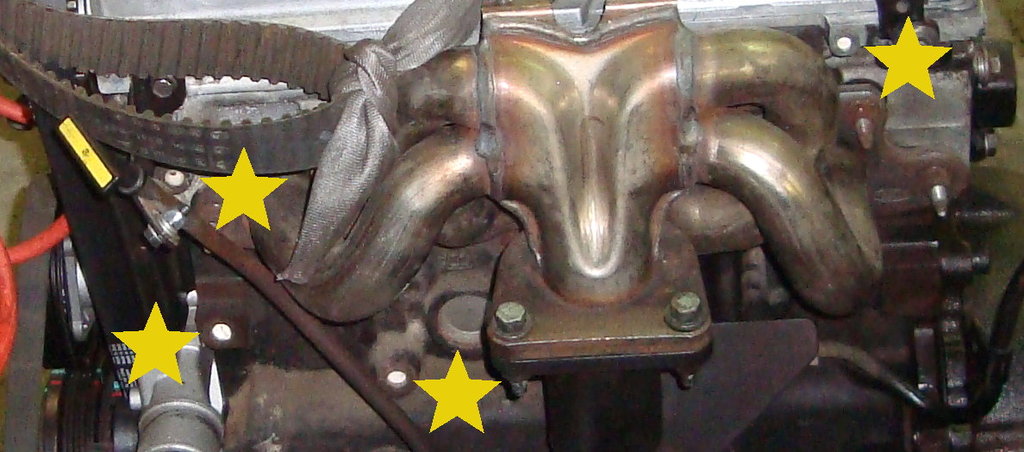
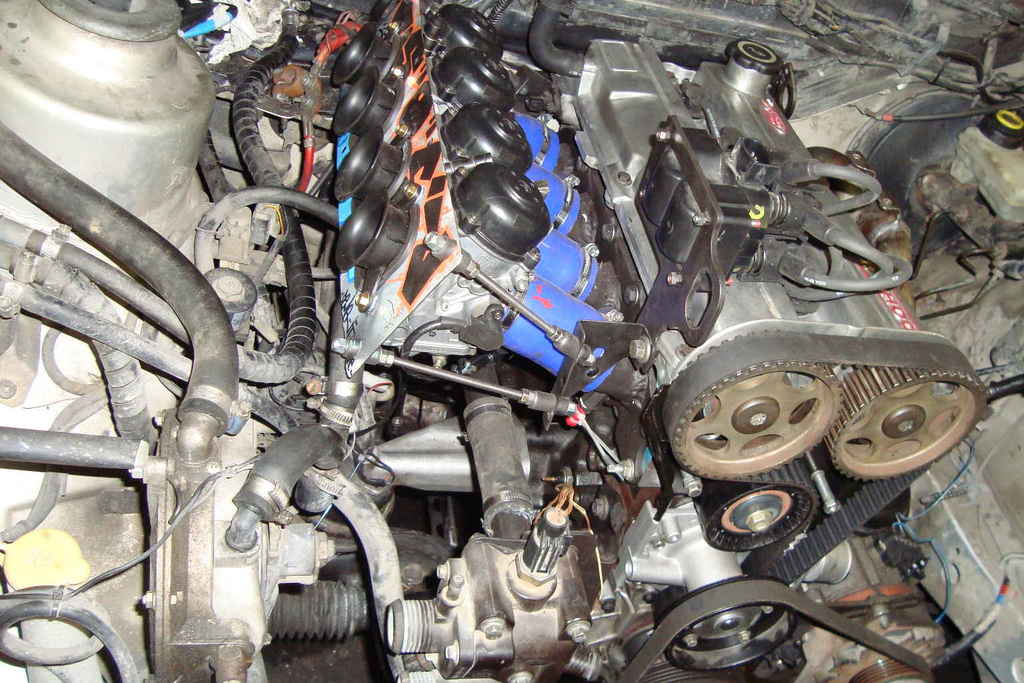
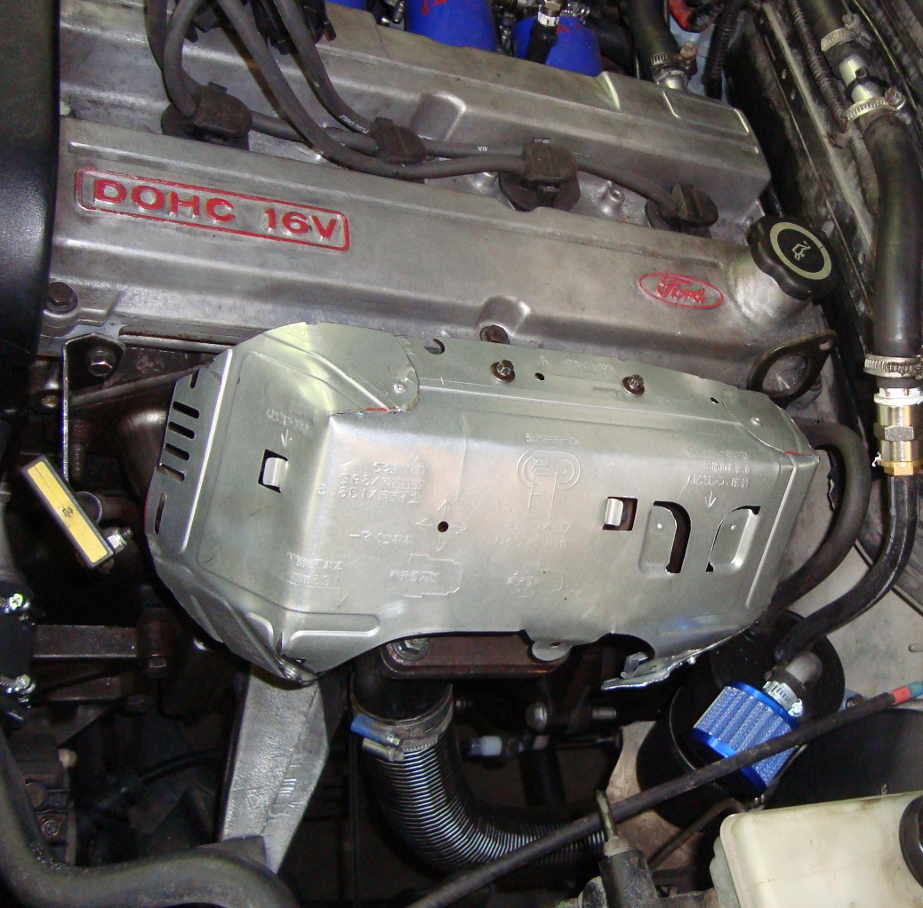
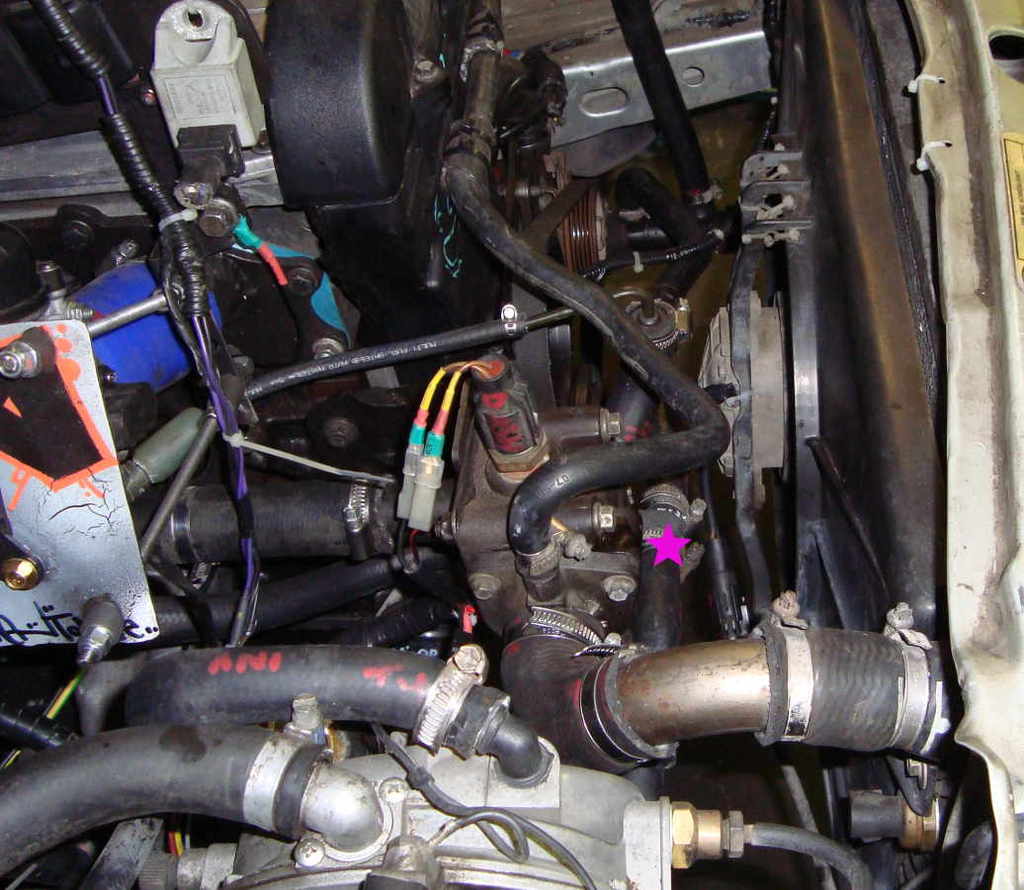
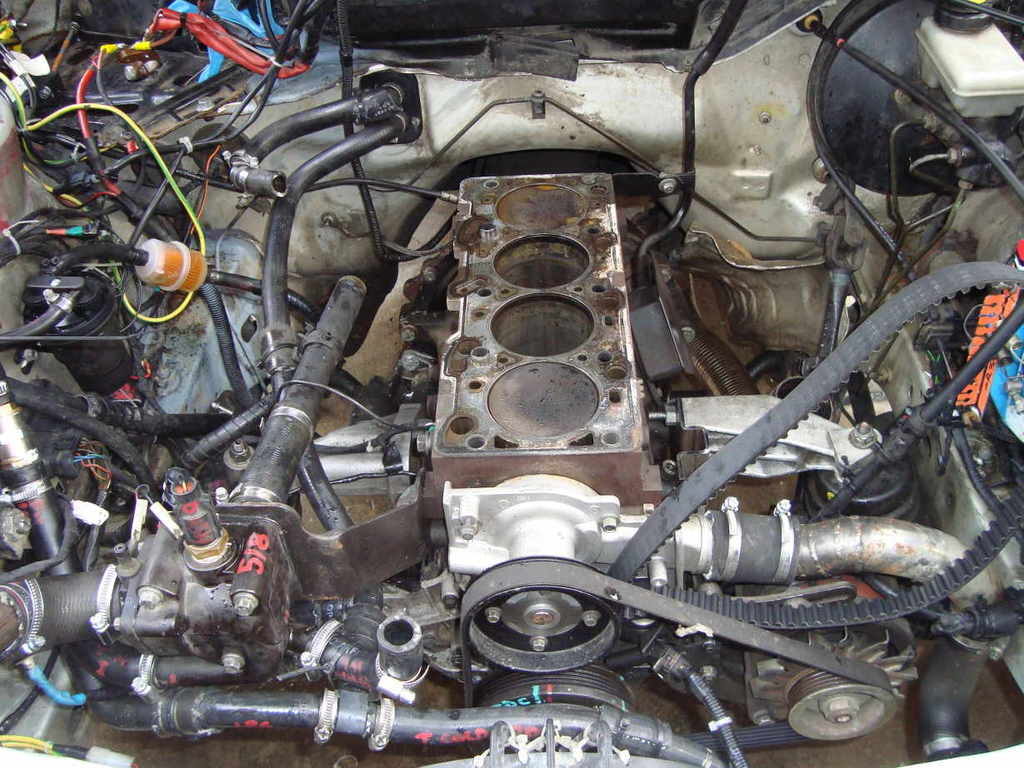
SOME OTHER RANDOM BITS
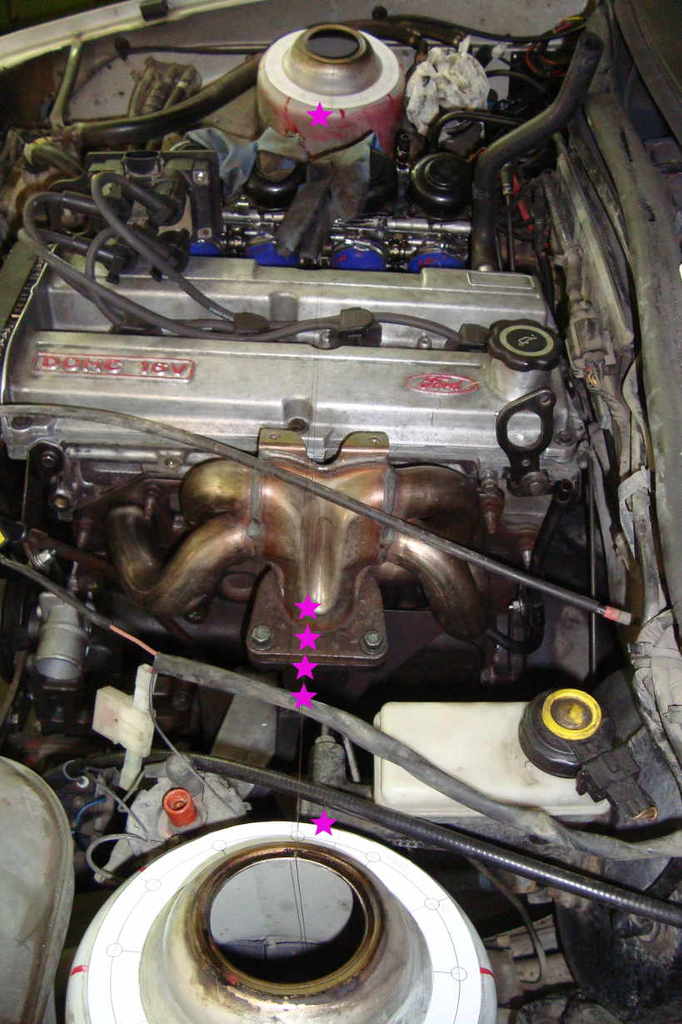
this would be a lhd car problem only, rhds have the brake pump instead of it:
in order to make some more space for the carbs, i had to cut a corner from the battery plate.
i'm sorry car...
in this pic it can also be seen how the water rail does not interfere with the interior heating connections (purple stars).
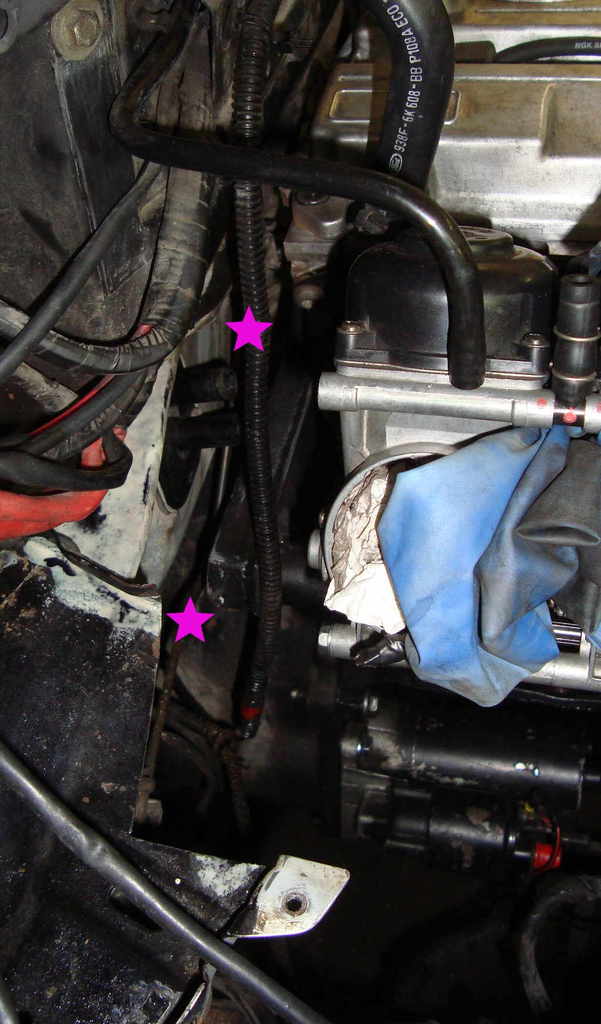
i'm gonna keep that corner so i may weld it on in the future..

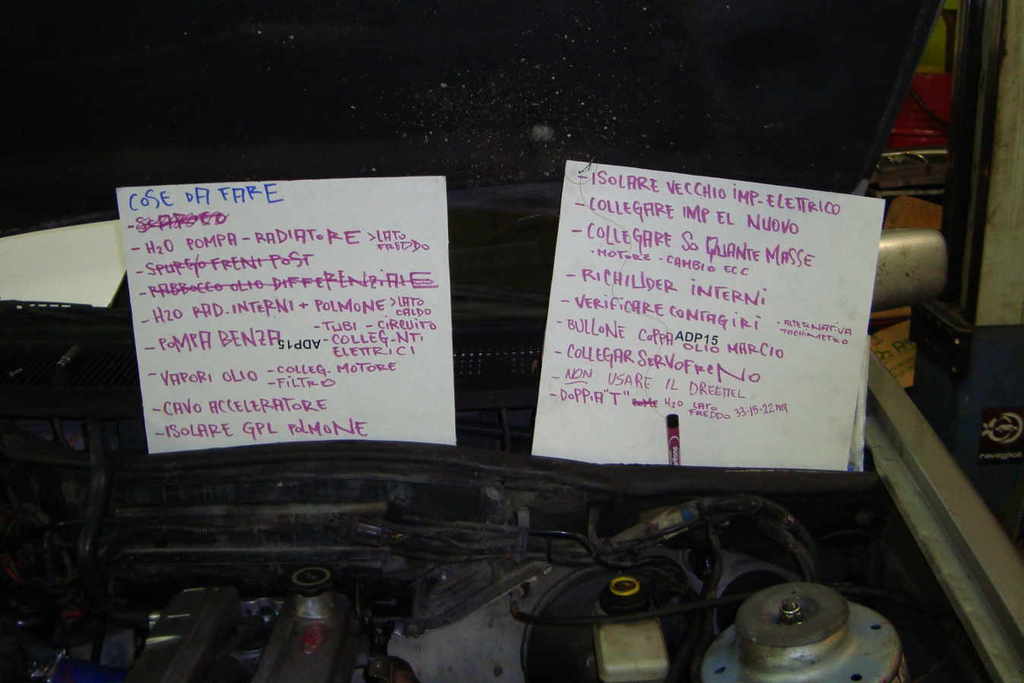
the to do list is still too long:
(sorry it's in italian)...
this would be a lhd car problem only, rhds have the brake pump instead of it:
in order to make some more space for the carbs, i had to cut a corner from the battery plate.
i'm sorry car...
in this pic it can also be seen how the water rail does not interfere with the interior heating connections (purple stars).

i'm gonna keep that corner so i may weld it on in the future..

the to do list is still too long:
(sorry it's in italian)...

Last edited by rooos; 20-08-2016 at 08:28 AM. Reason: wrong picture, phootobuucket s*cks
31-08-2016, 06:14 PM
#109
PassionFord Regular
Thread Starter
some update... (this time i won't drink while posting, i promise)
luckily more doing time than posting time, these weeks too...
WATER COMPILATION pt.II
another component of the cooling system...
bit shitty this one too. made of stainless mixed with non-stainless. but it works.
high temperature black paint covered and fitted in its place...
luckily more doing time than posting time, these weeks too...
WATER COMPILATION pt.II
another component of the cooling system...

bit shitty this one too. made of stainless mixed with non-stainless. but it works.
high temperature black paint covered and fitted in its place...
 31-08-2016, 06:19 PM
#110
PassionFord Regular
Thread Starter
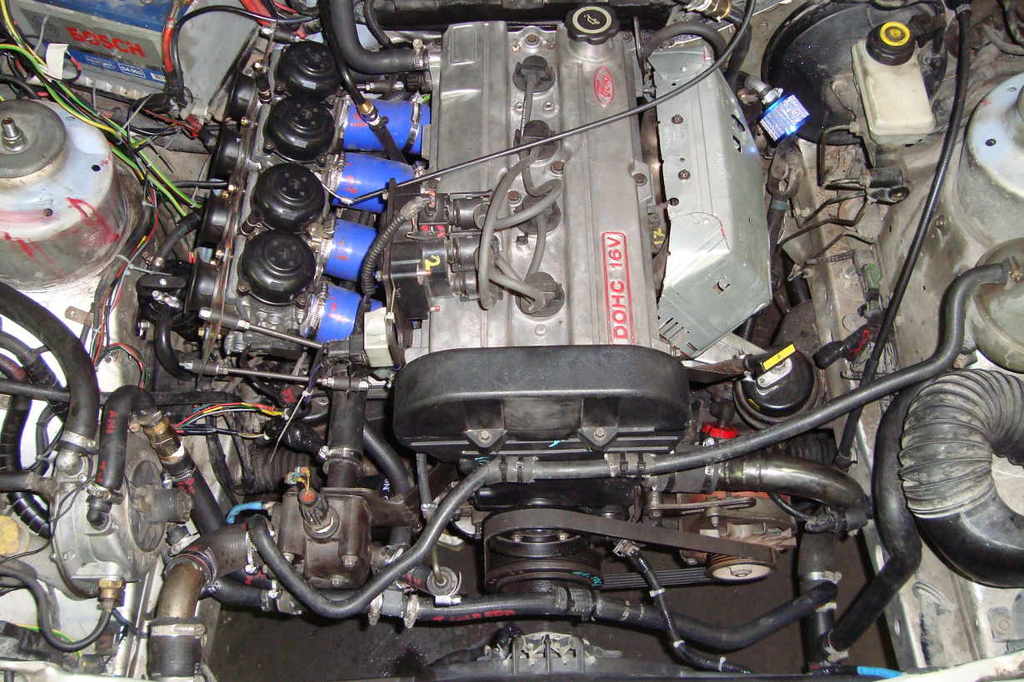
GOOD NEWS...
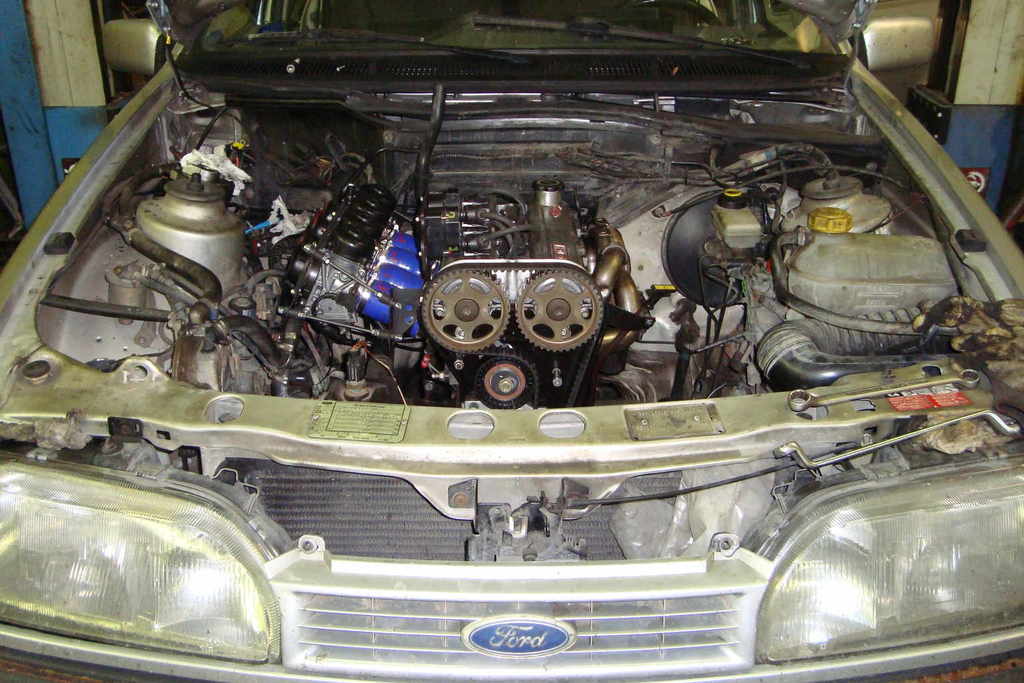
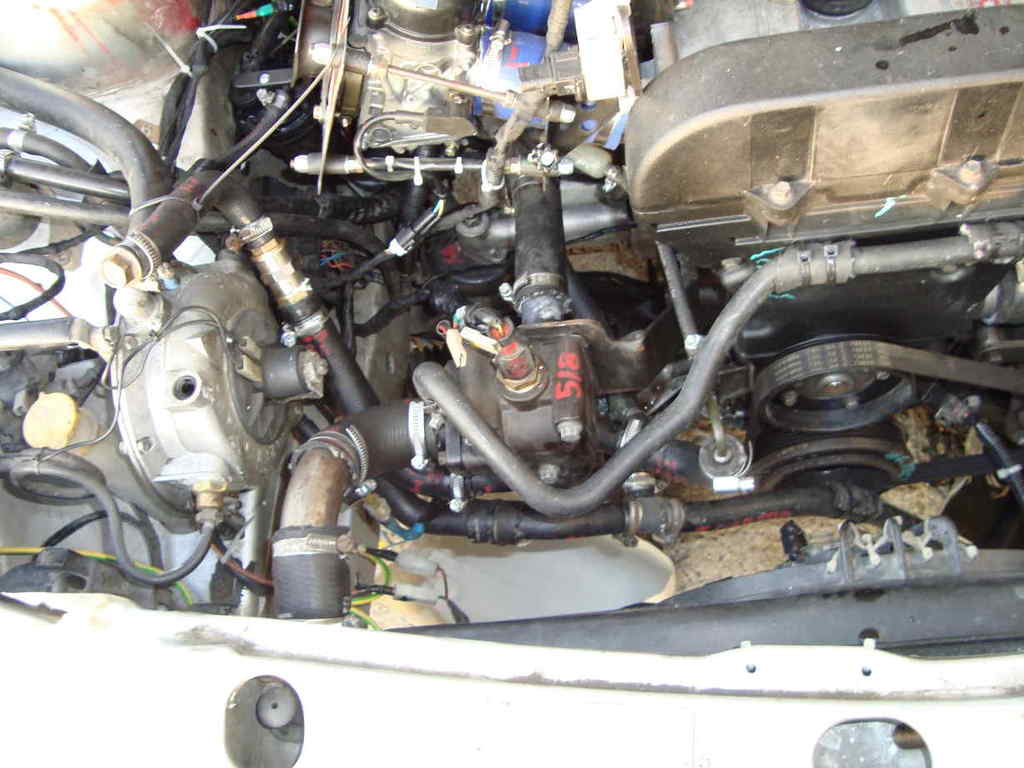
engine bay: not so neat, but it's 80% operational.
wiring still in pre-assembly state. engine starts up, it keeps a good idle speed, giving throttle it sings like pavarotti.
still a lot to do but very satisfied....
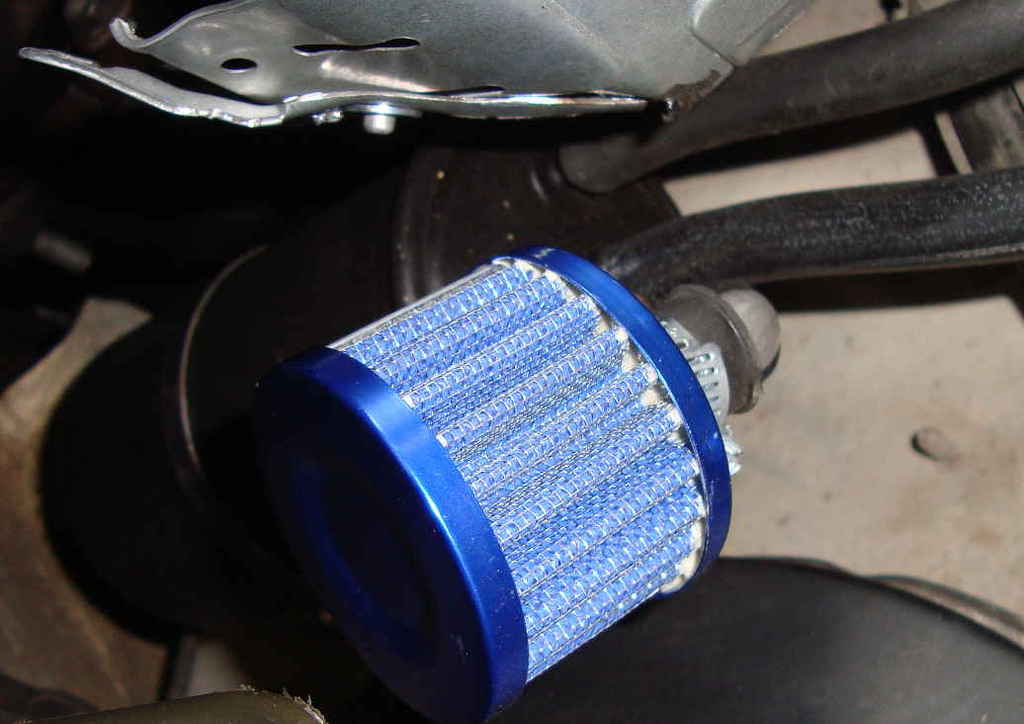
oil catch can. how it was meant to be...
for the filter, i made a 90 deg aluminum bend, sewed from a damaged ac 12mm od pipe taken from the shop dumpster.
double "s" bracket and a large hose clip hold it in position...
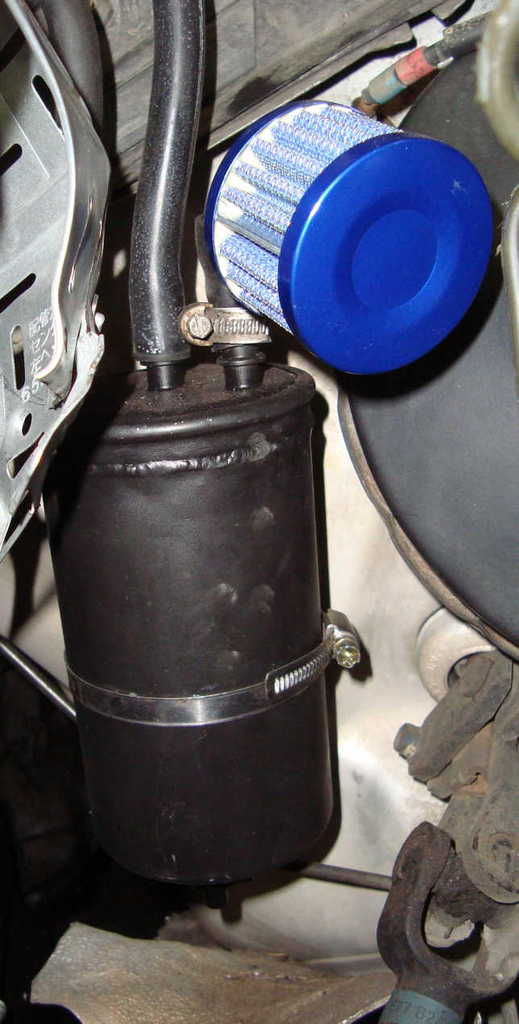
also a shitty heat shield on the manifold. it's made of a bottom sheet of a chinese a/c splitter unit... (another temporary solution).
huco fuel pump (now directly connected to the carbs). it looks like it's working perfectly.
many thanks to big_wasa for the advice.
also many thanks to all the gentlemen who's supported my technical help request in this thread:
https://passionford.com/forum/techni...ce-needed.html
engine bay: not so neat, but it's 80% operational.
wiring still in pre-assembly state. engine starts up, it keeps a good idle speed, giving throttle it sings like pavarotti.
still a lot to do but very satisfied....

oil catch can. how it was meant to be...
for the filter, i made a 90 deg aluminum bend, sewed from a damaged ac 12mm od pipe taken from the shop dumpster.
double "s" bracket and a large hose clip hold it in position...


also a shitty heat shield on the manifold. it's made of a bottom sheet of a chinese a/c splitter unit... (another temporary solution).

huco fuel pump (now directly connected to the carbs). it looks like it's working perfectly.
many thanks to big_wasa for the advice.
also many thanks to all the gentlemen who's supported my technical help request in this thread:
https://passionford.com/forum/techni...ce-needed.html
 31-08-2016, 06:22 PM
#111
PassionFord Regular
Thread Starter
BAD NEWS...
tried to improvise an accelerator cable with these...
but it doesn't work as it should...
throttle cable is the first priority now.
i also need to reduce the throttle stroke from 61mm to 15mm.
now i'm working on a mechanism which does that, posting some pics about it as soon...
i have two coolant leaks:
-between the head and the water rail plate -->
-thermostat (purple star, no big deal).
(in the shitty sea the good news is that all the welds i did, look like they're waterproof)
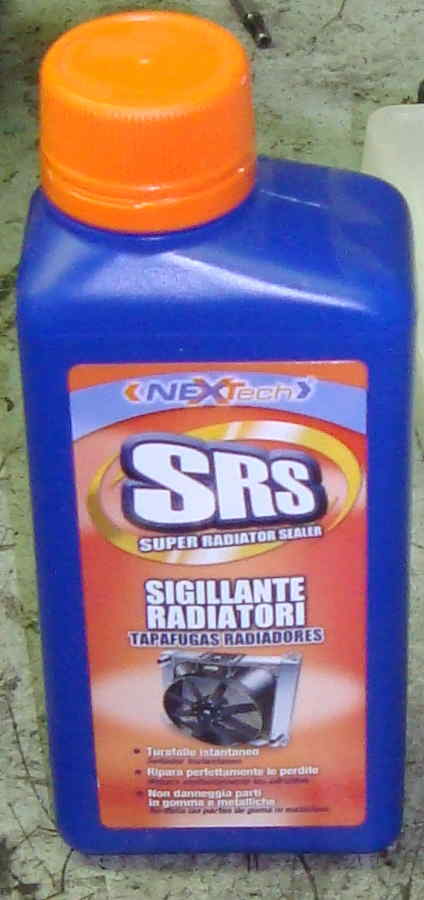
first attempt: i'll try with this, radiator repair solution.
i've seen miracles with it, i hope it does something or i'm quite f@cked
can do it once the throttle cable's on and working...
thanks for reading...
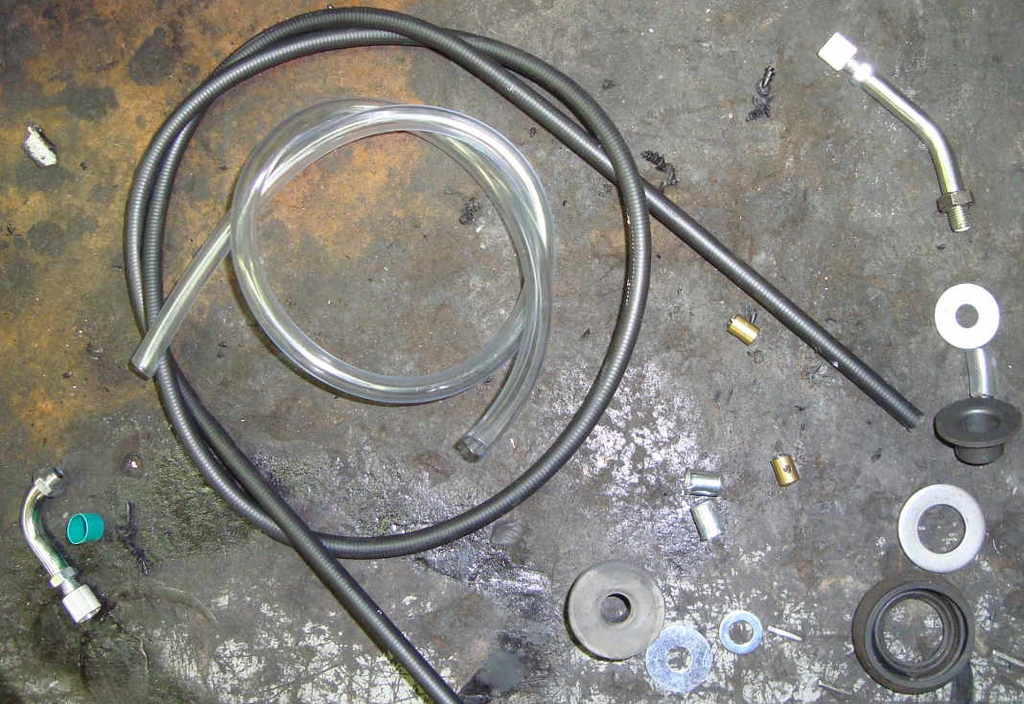
tried to improvise an accelerator cable with these...

but it doesn't work as it should...
throttle cable is the first priority now.
i also need to reduce the throttle stroke from 61mm to 15mm.
now i'm working on a mechanism which does that, posting some pics about it as soon...
i have two coolant leaks:
-between the head and the water rail plate -->
-thermostat (purple star, no big deal).
(in the shitty sea the good news is that all the welds i did, look like they're waterproof)

first attempt: i'll try with this, radiator repair solution.
i've seen miracles with it, i hope it does something or i'm quite f@cked
can do it once the throttle cable's on and working...

thanks for reading...
Last edited by rooos; 11-09-2016 at 09:22 AM.
11-09-2016, 09:19 AM
#112
PassionFord Regular
Thread Starter
no miracle happened, so hand on the engine again.
found the cause of the leak...
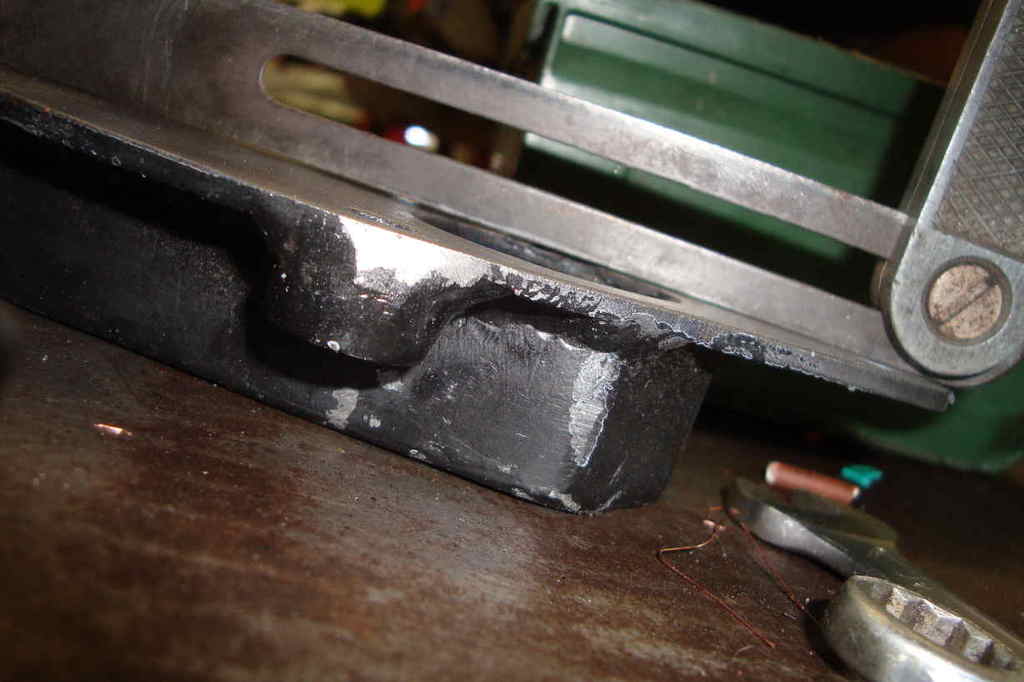
the water rail i did warped too much when i welded it.
first solution attempt:
roughly sandblasted and covered of arexoons epoxy metal.
(the flange thickness is just 3mm, i preferred to put some meat on instead of working on the bare surface)
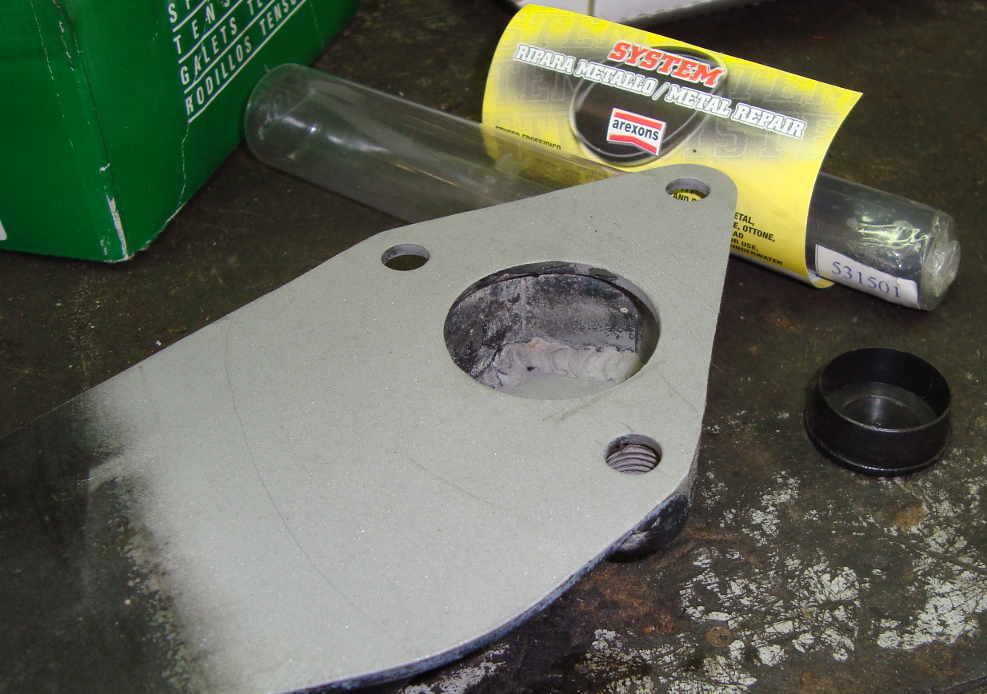
then skimmed... (not the easiest material to work on, a bit fragile).

i put that sh*t on with tons of black sealant paste, but it's still leaking...
i'll make another try...
found the cause of the leak...


the water rail i did warped too much when i welded it.
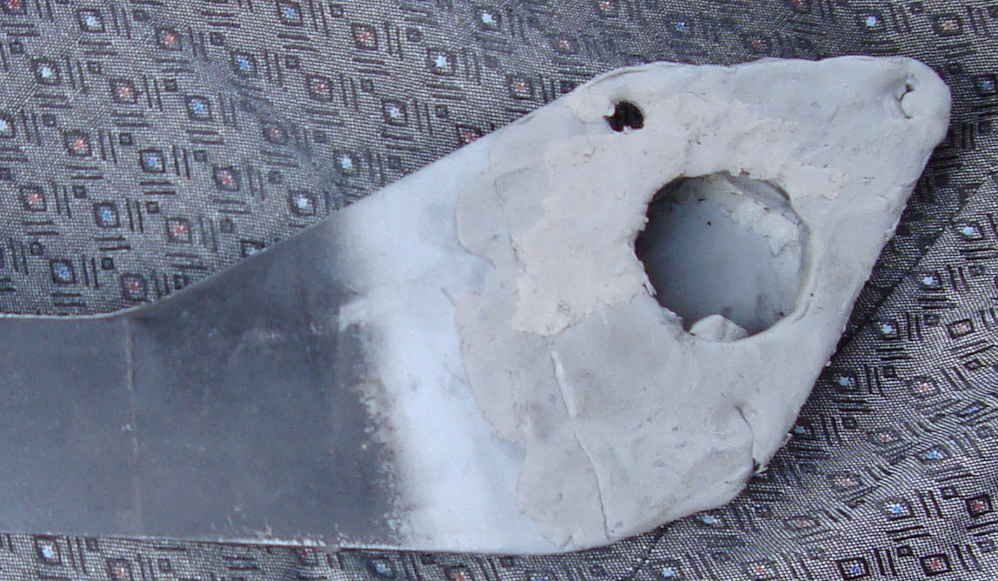
first solution attempt:
roughly sandblasted and covered of arexoons epoxy metal.
(the flange thickness is just 3mm, i preferred to put some meat on instead of working on the bare surface)


then skimmed... (not the easiest material to work on, a bit fragile).

i put that sh*t on with tons of black sealant paste, but it's still leaking...
i'll make another try...
Last edited by rooos; 01-10-2016 at 06:55 PM. Reason: bad englis grammar, need to go to school again
11-09-2016, 09:21 AM
#113
PassionFord Regular
Thread Starter
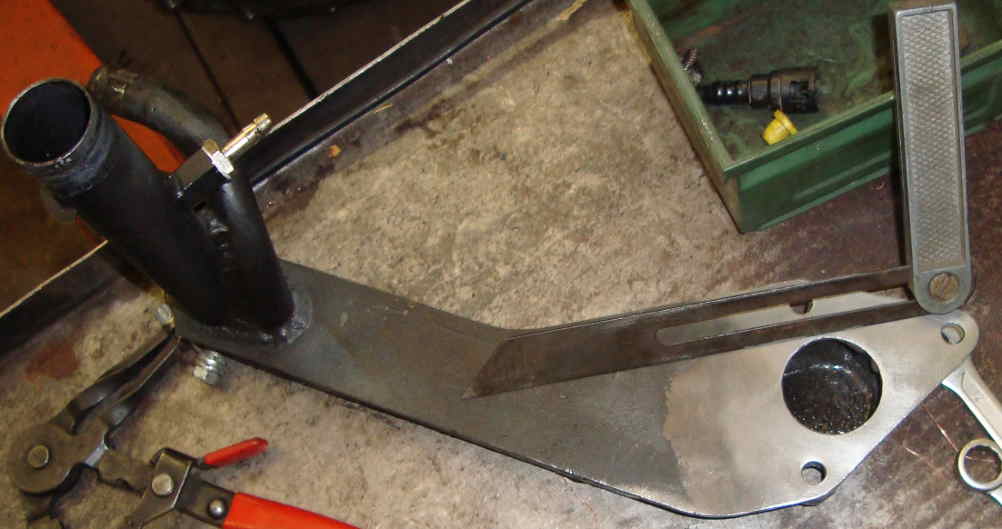
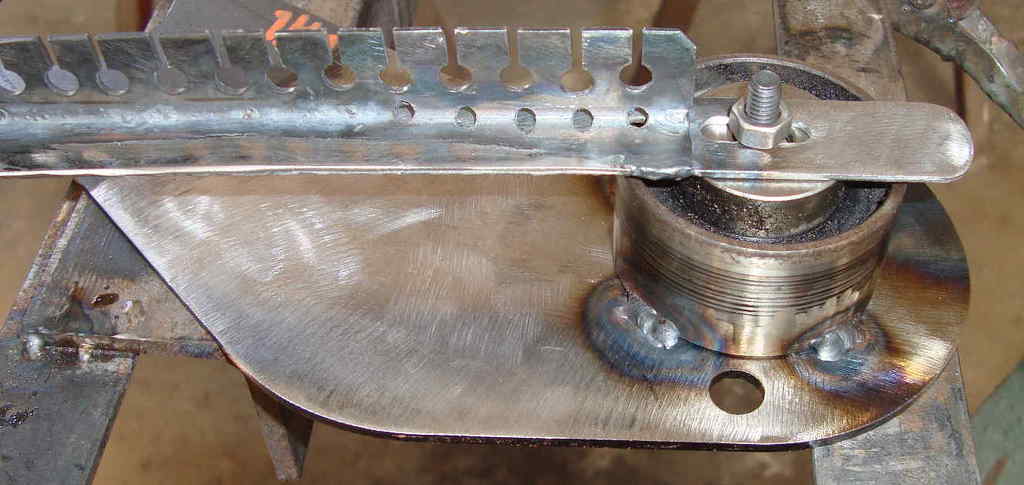
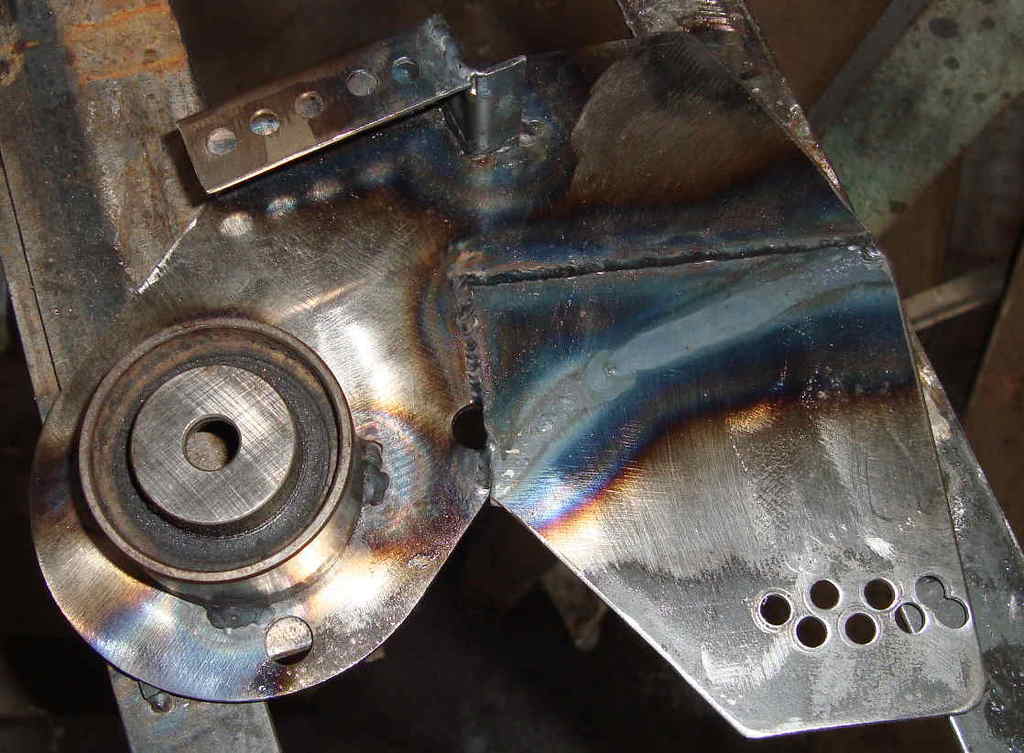
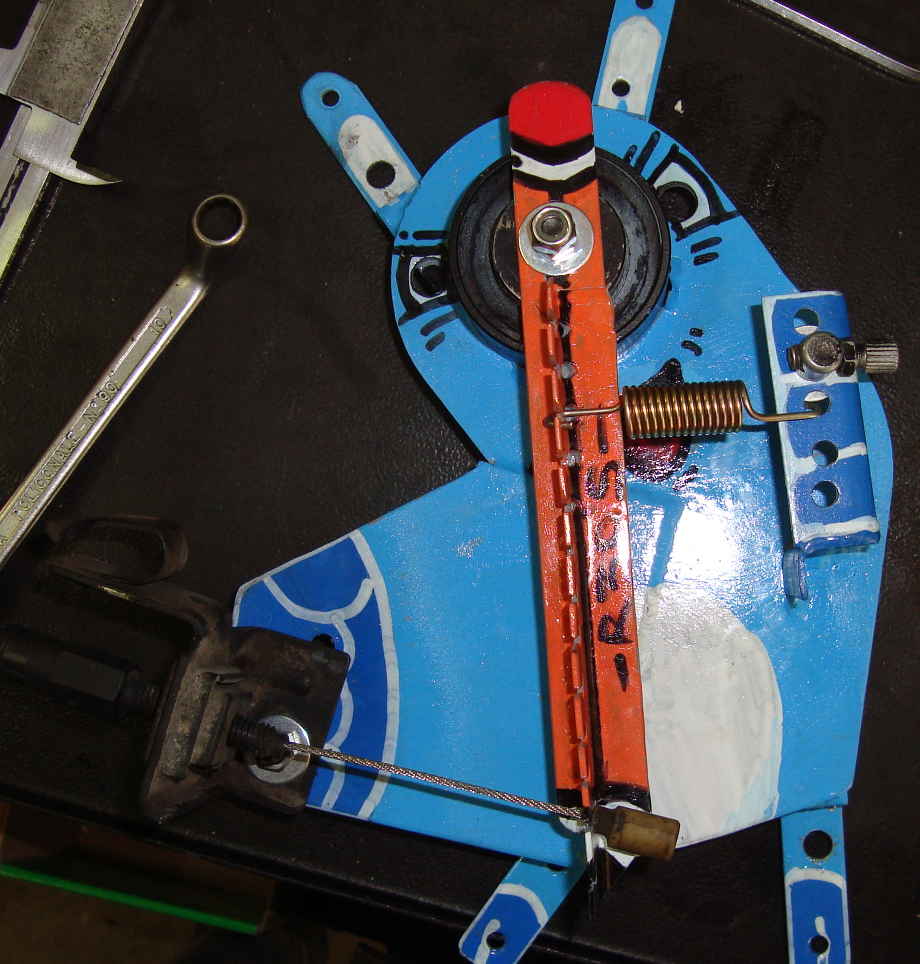
ACCELERATOR CABLE STROKE REDUCER pt.I
my std sapphire accelerator pedal runs 60mm, while the zx9r carbs cable needs 15mm stroke from 0 to full throttle.
i put some crap together, in order to try to make things square.
the bearing has been taken down from a cam belt service. from dumpster, so donno what car.
the plate is a laser-cut from the old abandoned water rail project.
other pics taken in process.

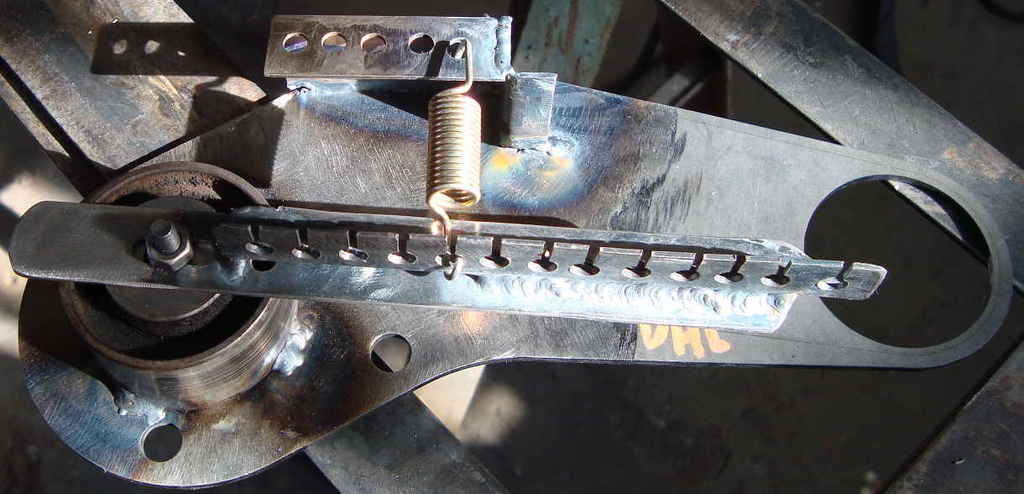


it wasn't meant like this from the start, like: "since we have to make it, why don't make it look like a pokemon?",
but when i saw its final shape...
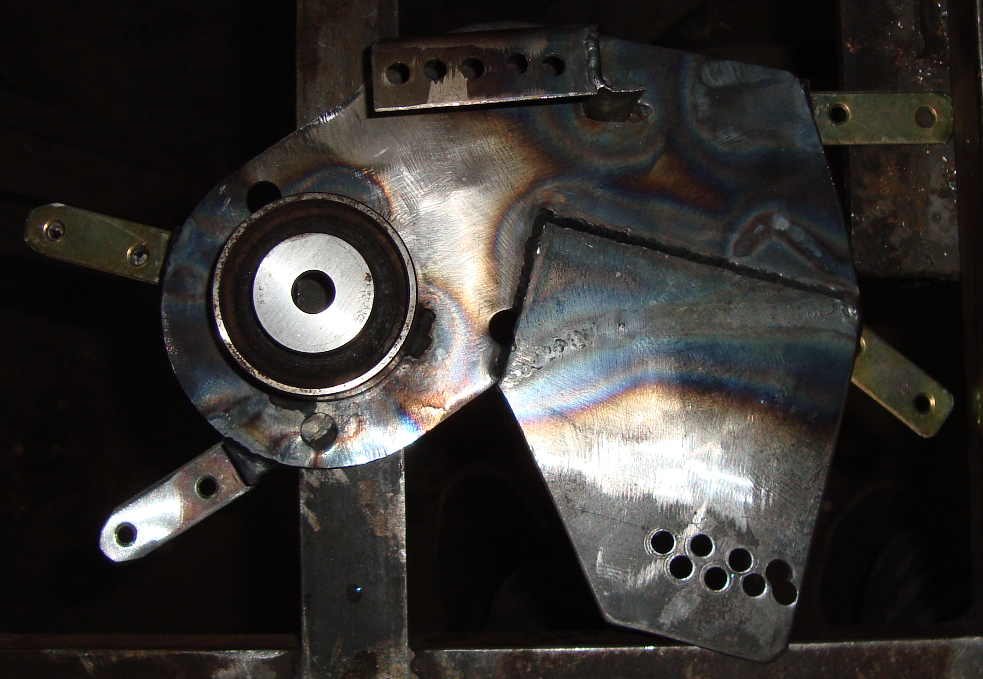
i couldn't resist and did stupid things...
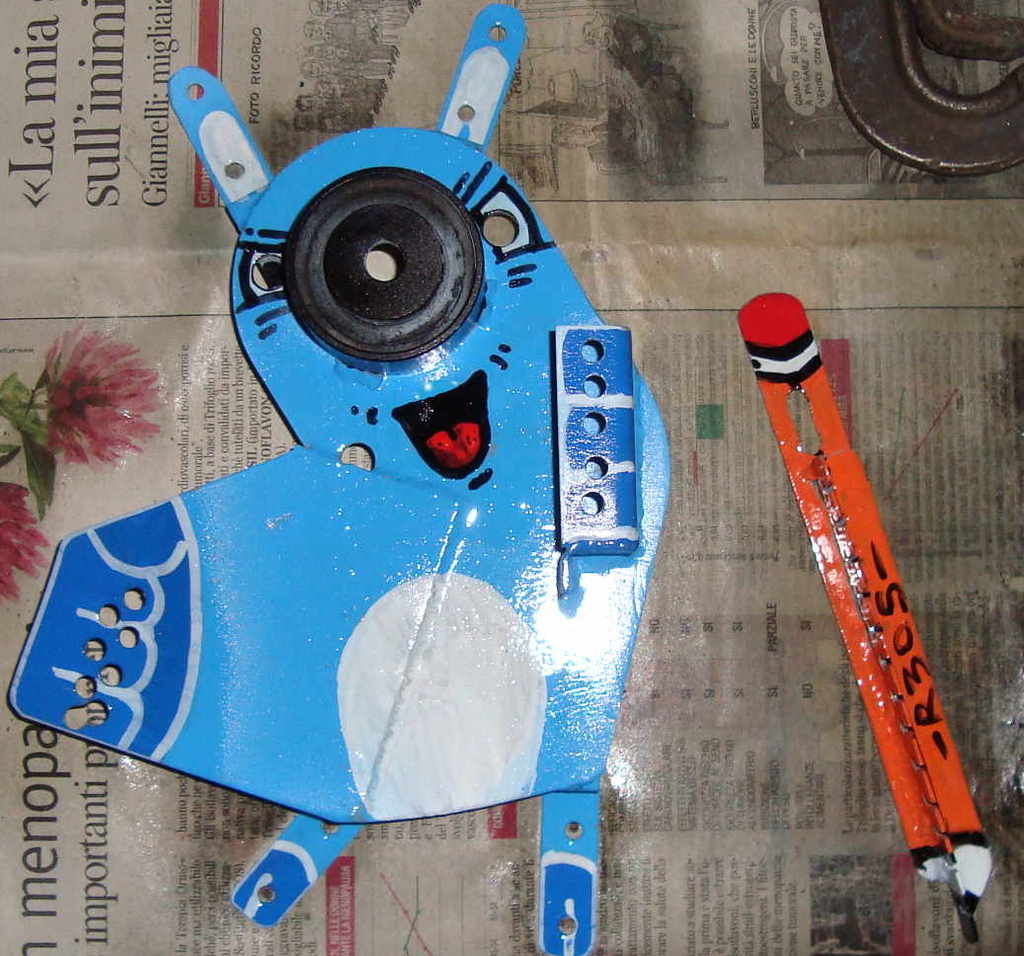
quite a punch in the eye, but it works fine.
here with just the sierra cable assembled...
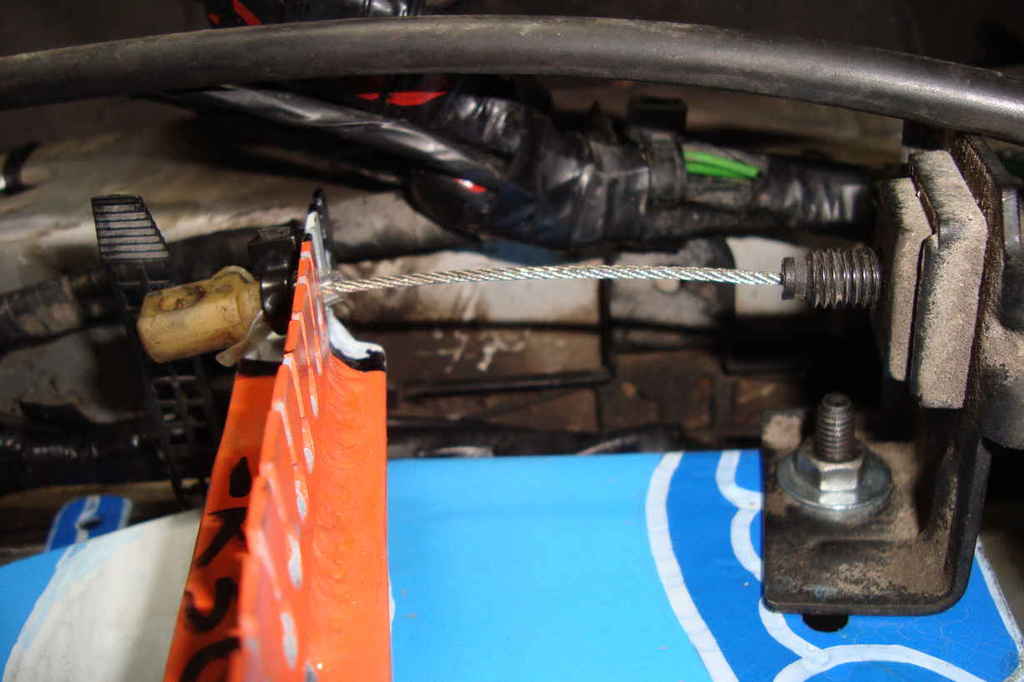
and then the cable to the zx9r carb system...
the reaction is still jerkily, i'll have to find a harder spring and make some little correction, but...
...with this set up i managed to arrive at full throttle with both pedal and carbs at the same time, which is what i was looking for.
thanks for reading...
my std sapphire accelerator pedal runs 60mm, while the zx9r carbs cable needs 15mm stroke from 0 to full throttle.
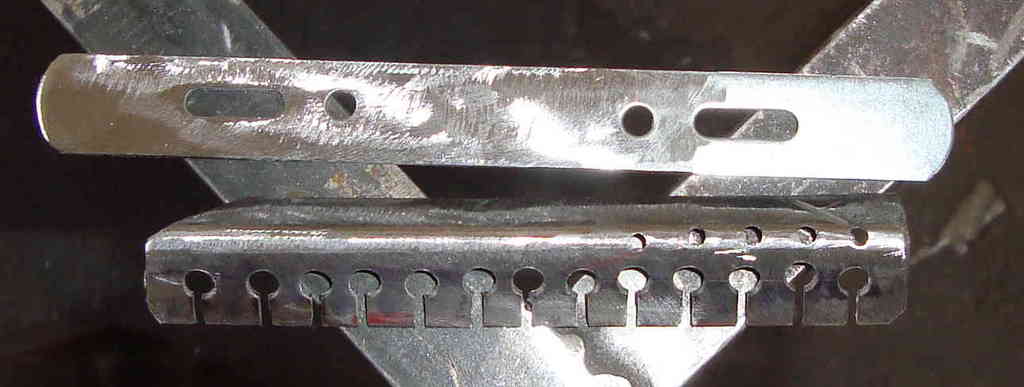
i put some crap together, in order to try to make things square.

the bearing has been taken down from a cam belt service. from dumpster, so donno what car.
the plate is a laser-cut from the old abandoned water rail project.

other pics taken in process.


it wasn't meant like this from the start, like: "since we have to make it, why don't make it look like a pokemon?",
but when i saw its final shape...

i couldn't resist and did stupid things...

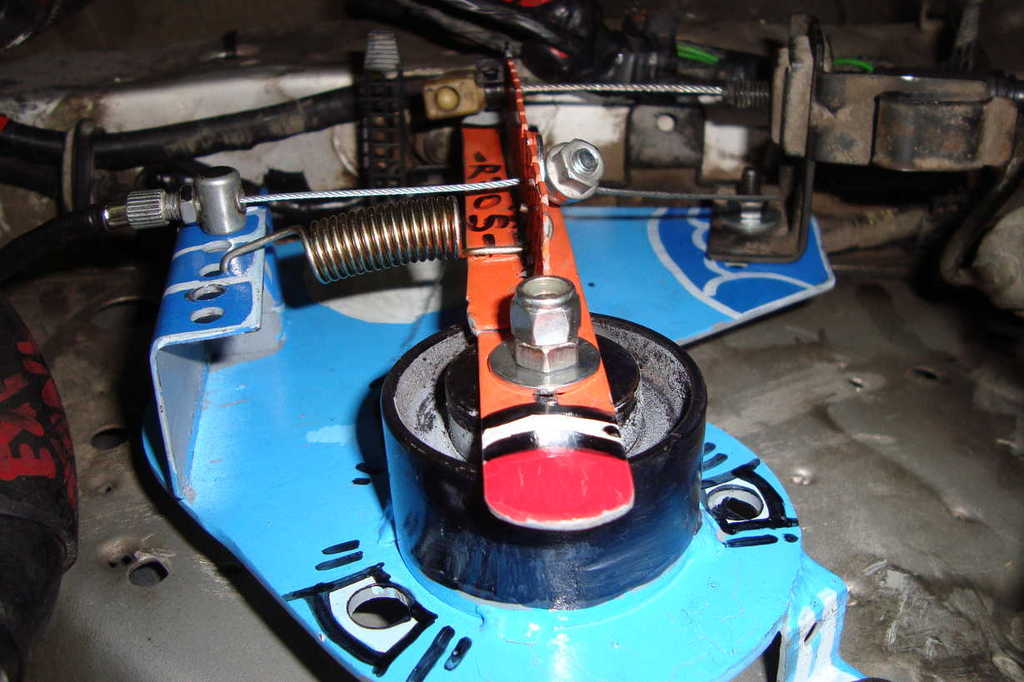
quite a punch in the eye, but it works fine.
here with just the sierra cable assembled...


and then the cable to the zx9r carb system...

the reaction is still jerkily, i'll have to find a harder spring and make some little correction, but...
...with this set up i managed to arrive at full throttle with both pedal and carbs at the same time, which is what i was looking for.
thanks for reading...
Last edited by rooos; 11-09-2016 at 09:23 AM.
13-09-2016, 07:10 PM
#114
PassionFord Regular
Thread Starter
finally i've found myself a new job, started yesterday.
less time to work on my car, but more money to do stupid things with her, i hope...
another harder spring fitted on the accelerator cable reducer. now it's ways better...
meanwhile, this evening i took down the water-rail today again. f@ck it!
the black sealer and the epoxy-metal looked like it held...
hope the coolant leak does not come from the head gasket, or i'm truly f*ck'd.
don't suppose so though, too much water out of it...
maybe tomorrow i manage to find a solution to this problem, which is really really really hassling me.
pics coming as soon...
thanks for reading.
01-10-2016, 06:37 PM
#115
PassionFord Regular
Thread Starter
long time from the last update...
good news: water rail leak stopped. i made a sandwich with black paste sealer and a paper gasket. (sorry, no pics).
i also realized that pulling out the exhaust side engine mount makes the water rail dismantling ways faster and more comfy.
new job and no time for sit down and sh*t. and this is another good news for me.
last week tried to reach the workplace with this car but i'd got stuck three times due to unknown causes...
gasoline didn't reach the engine and after a while, dead battery while trying to crank her up...
car stopped for a week, two hours late at work and tow truck insurance bonus gone.
played hours with compressed air, while diagnosing. maybe a plugged hose, where? the 2010 gasoline i still had in the tank, highly likely, could be more seaweed than fuel.
added a fuel filter between tank and engine bay pump, added injector cleaner.
no-f*cking-thing, anything looked good... almost ready to dismantle tank or carbs for a clean up. didn't know where the f*ck beat my head.
then i finally realized that all this was due to a...
DRY EMPTY GAS TANK... there wasn't neither the smell of the gasoline in it, sh*t, she drank it too.
dodgy dash gas indicator is just a false justification. i could've at least knock on the tank before...
now, lesson of the day:
<< you could also know anything of everything, but never forget you are, and always will be a d*ckhead in first place >>
lesson good for me, but learnt nothing as usual ...
...
thanks for reading...
good news: water rail leak stopped. i made a sandwich with black paste sealer and a paper gasket. (sorry, no pics).
i also realized that pulling out the exhaust side engine mount makes the water rail dismantling ways faster and more comfy.
new job and no time for sit down and sh*t. and this is another good news for me.
last week tried to reach the workplace with this car but i'd got stuck three times due to unknown causes...
gasoline didn't reach the engine and after a while, dead battery while trying to crank her up...
car stopped for a week, two hours late at work and tow truck insurance bonus gone.
played hours with compressed air, while diagnosing. maybe a plugged hose, where? the 2010 gasoline i still had in the tank, highly likely, could be more seaweed than fuel.
added a fuel filter between tank and engine bay pump, added injector cleaner.
no-f*cking-thing, anything looked good... almost ready to dismantle tank or carbs for a clean up. didn't know where the f*ck beat my head.
then i finally realized that all this was due to a...

DRY EMPTY GAS TANK... there wasn't neither the smell of the gasoline in it, sh*t, she drank it too.
dodgy dash gas indicator is just a false justification. i could've at least knock on the tank before...
now, lesson of the day:
<< you could also know anything of everything, but never forget you are, and always will be a d*ckhead in first place >>
lesson good for me, but learnt nothing as usual
...thanks for reading...
Last edited by rooos; 01-10-2016 at 07:01 PM. Reason: bad english gramaar, need to go to school again
01-10-2016, 07:04 PM
#116
PassionFord Regular
Thread Starter
i kicked my ass by myself on this one, but i know there are more coming...
The following users liked this post:
rooos (02-10-2016)
07-10-2016, 05:55 PM
#118
PassionFord Regular
Thread Starter
thanks NobbyClark !
i'm not so proud of it, but i'm always glad to inspire people with my bullsh*ts, if i'm able to...
i also appreciate your support, because now...
... i've found i have a blown head gasket and no cash in the pocket until payday...
not such a good update, but an update however.. sh*t!
thanks for reading
!i'm not so proud of it, but i'm always glad to inspire people with my bullsh*ts, if i'm able to...
i also appreciate your support, because now...
... i've found i have a blown head gasket and no cash in the pocket until payday...
not such a good update, but an update however.. sh*t
!thanks for reading
30-10-2016, 07:29 AM
#119
PassionFord Regular
Thread Starter
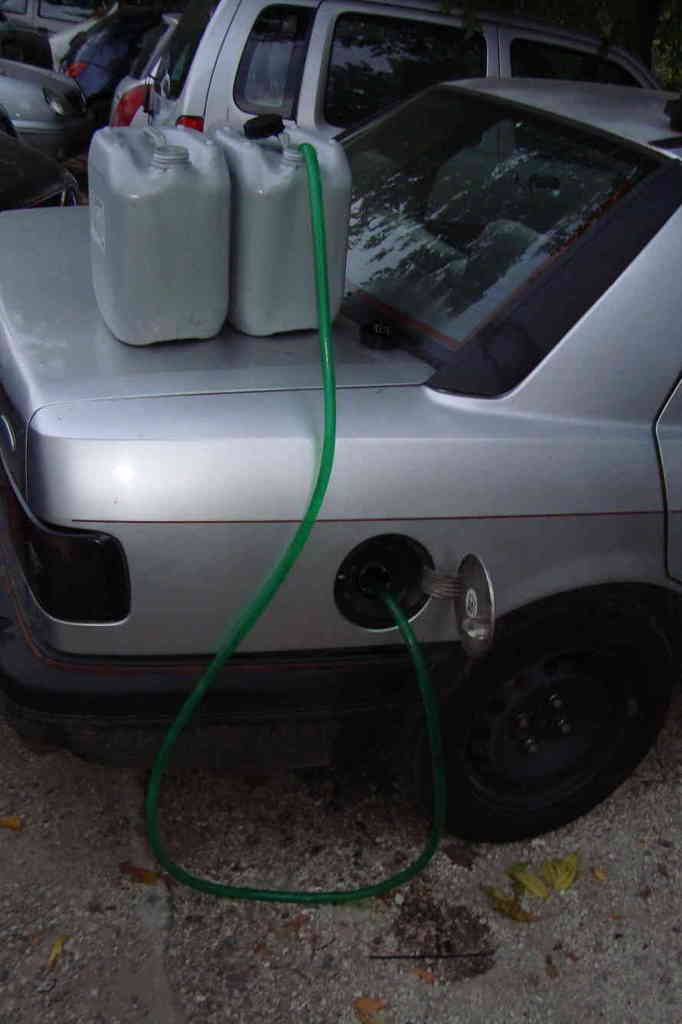
finally payday arrived .
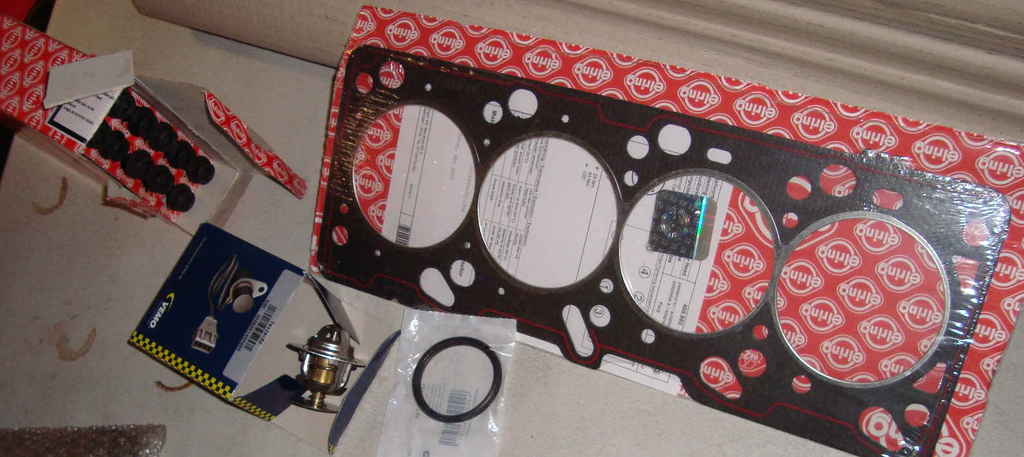
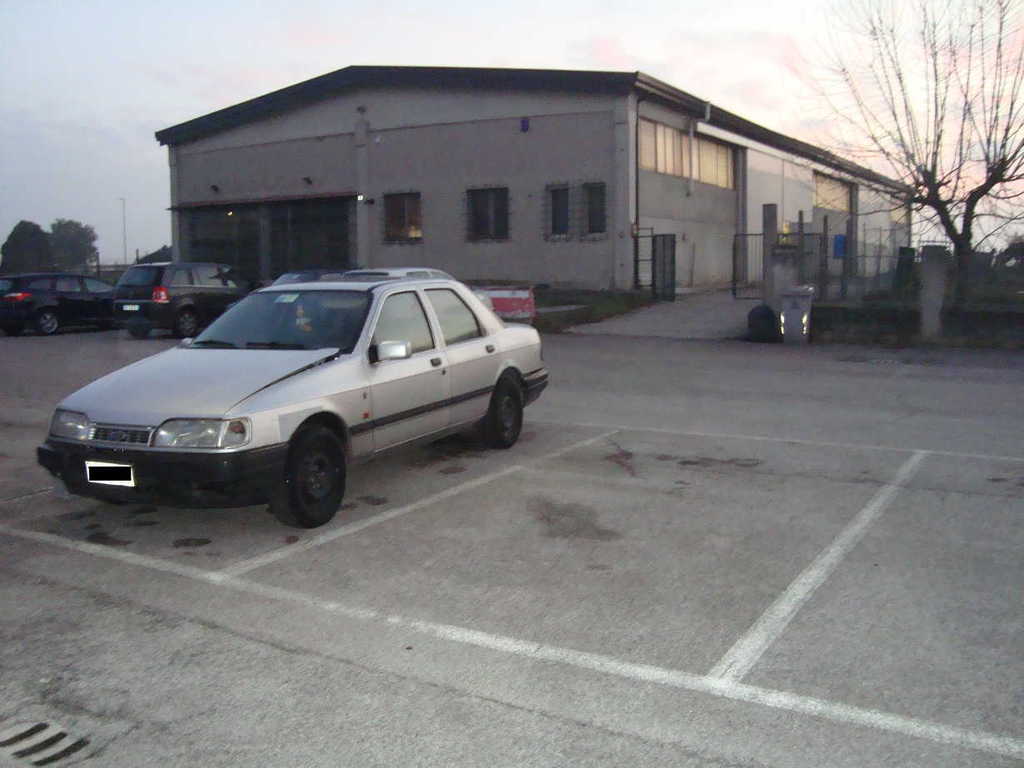
so brand new... you already know what...
all this time she had been left abandoned in my workplace public parking lot.
diagnosis:
blowing compressed air in the spark plug holes, i'd say that there's a crack in the gasket between the n#3 cyl and the coolant conduit.
in fact the coolant gets ridiculous pressures immediately while cranking, and once opened the bowl, it smells exhaust.
cause:
thermostat valve got stuck closed. the engine speeded along for 30km, until the white-smoke heart-attack at the first red light... and i also warmed it for good before running.
(first diagnosis, hope that's it but i'm not sure. i'm aiming to the cheapest head job i can do because of it... no head skimming if it doesn't need it, etc)
i noticed a too much cold radiator, but i was told that it could've been just the unpurged coolant.
by my ignorance, i never heard of a thermostat valve that can get stuck closed, i knew just that they stuck open when they get stuck. didn't see that coming. another very expensive lesson learnt, shit...
luckily, i farsighted this event, and i designed the thermostat housing in the comfiest place possible...
now after 5min of idle, the radiator feels hot touching the bottom side, the upper side might be full of exhaust.
for the next step, can't do the head job on public road, i just need to find out a place where do it, (the shop where i did the swap now is f*cking full till unknown date)...
more coming, thanks for reading.
.so brand new... you already know what...

all this time she had been left abandoned in my workplace public parking lot
.
diagnosis:
blowing compressed air in the spark plug holes, i'd say that there's a crack in the gasket between the n#3 cyl and the coolant conduit.
in fact the coolant gets ridiculous pressures immediately while cranking, and once opened the bowl, it smells exhaust.
cause:
thermostat valve got stuck closed. the engine speeded along for 30km, until the white-smoke heart-attack at the first red light... and i also warmed it for good before running
.(first diagnosis, hope that's it but i'm not sure. i'm aiming to the cheapest head job i can do because of it... no head skimming if it doesn't need it, etc)
i noticed a too much cold radiator, but i was told that it could've been just the unpurged coolant.
by my ignorance
, i never heard of a thermostat valve that can get stuck closed, i knew just that they stuck open when they get stuck. didn't see that coming. another very expensive lesson learnt, shit... luckily, i farsighted this event, and i designed the thermostat housing in the comfiest place possible...

now after 5min of idle, the radiator feels hot touching the bottom side, the upper side might be full of exhaust.
for the next step, can't do the head job on public road, i just need to find out a place where do it, (the shop where i did the swap now is f*cking full till unknown date)...
more coming, thanks for reading.
Last edited by rooos; 30-10-2016 at 07:33 AM. Reason: silly statements, need to grow up
06-11-2016, 03:35 PM
#120
PassionFord Regular
Thread Starter
i've had to wait for a not too much foggy day/night.
if i'd been stopped on that road, i'd have been mown by some semitrailer or else...
managed to run the 30km work-place home adding water here and there, but in the last 500m i heard knocking.
flat encephalogram at 40m from home, whistling like a teapot in a big cloud of smoke.
condominium yard.
theoretically couldn't do the job in here, but it's my home nontheless, so...
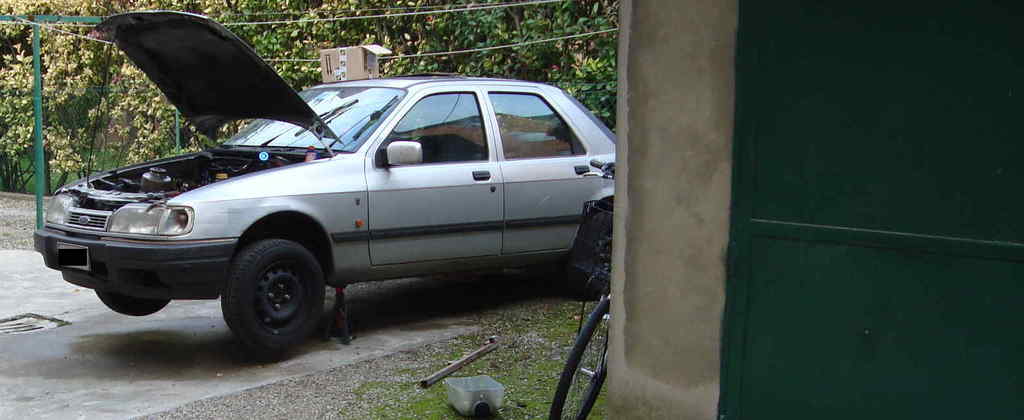
took down some random bits,...
...then the big one...
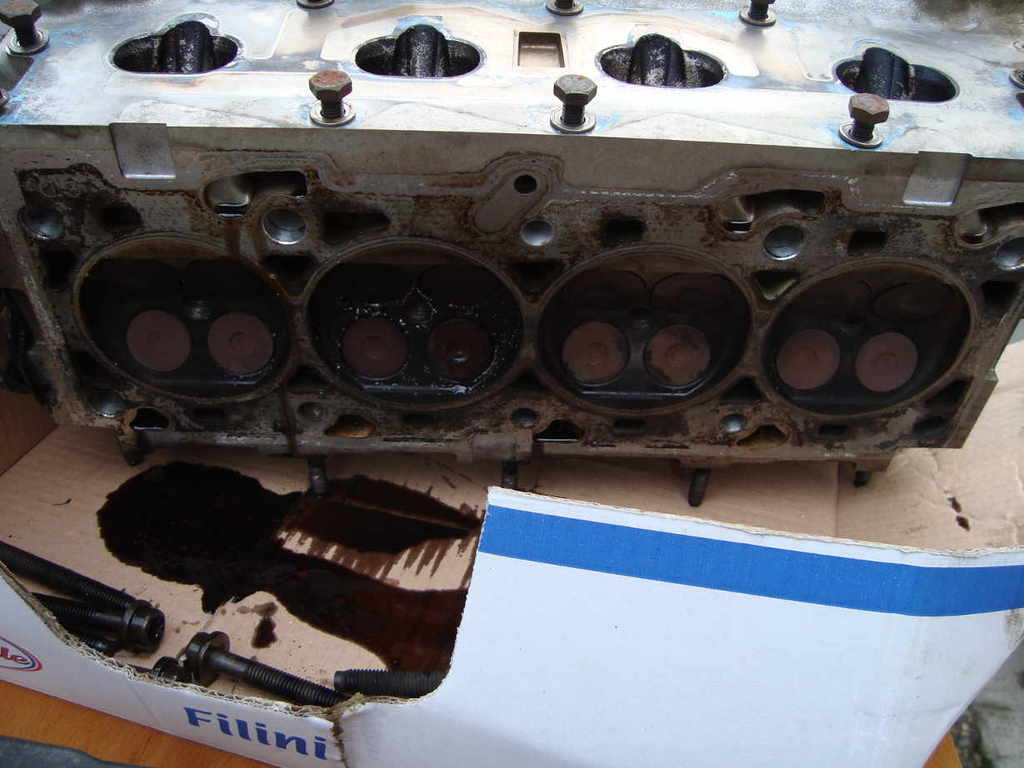
lot of water in the oil too. sh*******t.
still need to buy some other bits, like a brand new intake gasket etc...
more coming, thanks for reading.
if i'd been stopped on that road, i'd have been mown by some semitrailer or else...
managed to run the 30km work-place home adding water here and there, but in the last 500m i heard knocking.
flat encephalogram at 40m from home, whistling like a teapot in a big cloud of smoke.
condominium yard.
theoretically couldn't do the job in here, but it's my home nontheless, so...

took down some random bits,...


...then the big one...


lot of water in the oil too. sh*******t.
still need to buy some other bits, like a brand new intake gasket etc...
more coming, thanks for reading.