another saph 1.8cvh to 2.0silvertop conv. on the cheap? what the ... was i thinking?
 03-05-2016, 10:03 AM
#1
PassionFord Regular
Thread Starter
!!! THIS THREAD'S BEEN FUCKED BY PHOOTOBUCKET !!!
if i want my photo to be public again, i have to pay a ransom of 400usd per year for a service which once was free. (not the only one in this catch).
nice move, bunch of greedy fucktards...
many thanks for the support, to anyone who's answered on here .
.
for the ones interested in this, working on a new thread opening soon. just let me the time to copy and paste everything...
thanks for reading.
__________________________________________________ __________________________________________________ _
hello gentlemen. newbie from italy. many thanks for let me join to your community!
i apologize for my shitty english. still learning...
i first have to say that this is my first project, i'm just a sunday fabricator, i weld like a but**ole and i know a s**t about engine swaps (nothing but web lectures).
also, highly likely my project will have a sudden stop due to money, health, work & human being related issues.
so i wanna share what i'm doing and the work done so far, trying to help others and giving all the infos i've reached until now.
for a lot of things i'd been inspired from people & geniuses on the web (here too)...
the car would be this one:
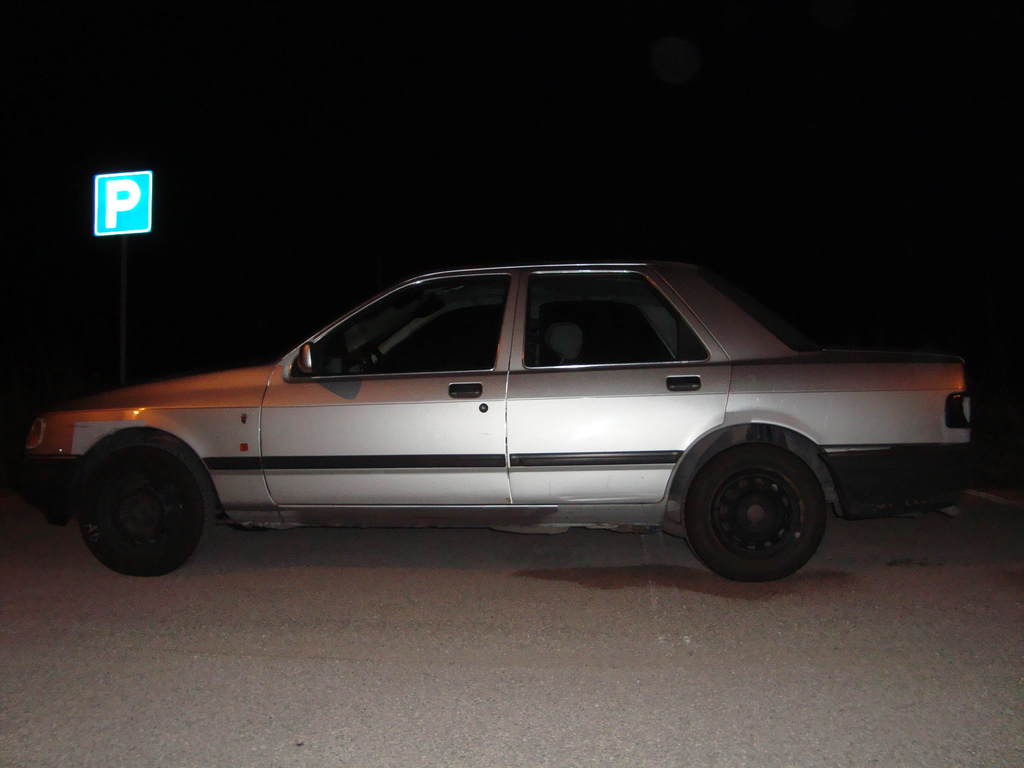
here when i tried to make the kessel run in less than 12 parsec. (but don't be an as**ole, speeding ain't cool..)
for the records, i didn't make it...
saved from the junkyard with 100euros.
she became my only and daily, still she is and she will be for a long time i hope,
(until i smash her up on a tree or i crumble with her in a moat... just matter of time).
a few years ago i bought another one for spares, almost everything but the shell, for 150euros.
thus i have all the parts i need to arrange a zetec silvertop conversion while driving mine regularly.
PROJECT
trying to build up a honest drift car for rookies on the cheap.
1.8 cvh r2a to 2.0 silvertop nga swap...
if i want my photo to be public again, i have to pay a ransom of 400usd per year for a service which once was free. (not the only one in this catch).
nice move, bunch of greedy fucktards...
many thanks for the support, to anyone who's answered on here
.for the ones interested in this, working on a new thread opening soon. just let me the time to copy and paste everything...
thanks for reading.
__________________________________________________ __________________________________________________ _
hello gentlemen. newbie from italy. many thanks for let me join to your community!
i apologize for my shitty english. still learning...
i first have to say that this is my first project, i'm just a sunday fabricator, i weld like a but**ole and i know a s**t about engine swaps (nothing but web lectures).
also, highly likely my project will have a sudden stop due to money, health, work & human being related issues.
so i wanna share what i'm doing and the work done so far, trying to help others and giving all the infos i've reached until now.
for a lot of things i'd been inspired from people & geniuses on the web (here too)...
the car would be this one:

here when i tried to make the kessel run in less than 12 parsec. (but don't be an as**ole, speeding ain't cool..)

for the records, i didn't make it...
saved from the junkyard with 100euros.
she became my only and daily, still she is and she will be for a long time i hope,
(until i smash her up on a tree or i crumble with her in a moat... just matter of time).
a few years ago i bought another one for spares, almost everything but the shell, for 150euros.
thus i have all the parts i need to arrange a zetec silvertop conversion while driving mine regularly.
PROJECT
trying to build up a honest drift car for rookies on the cheap.
1.8 cvh r2a to 2.0 silvertop nga swap...
Last edited by rooos; 01-07-2017 at 02:46 PM.
 03-05-2016, 10:04 AM
#2
PassionFord Regular
Thread Starter
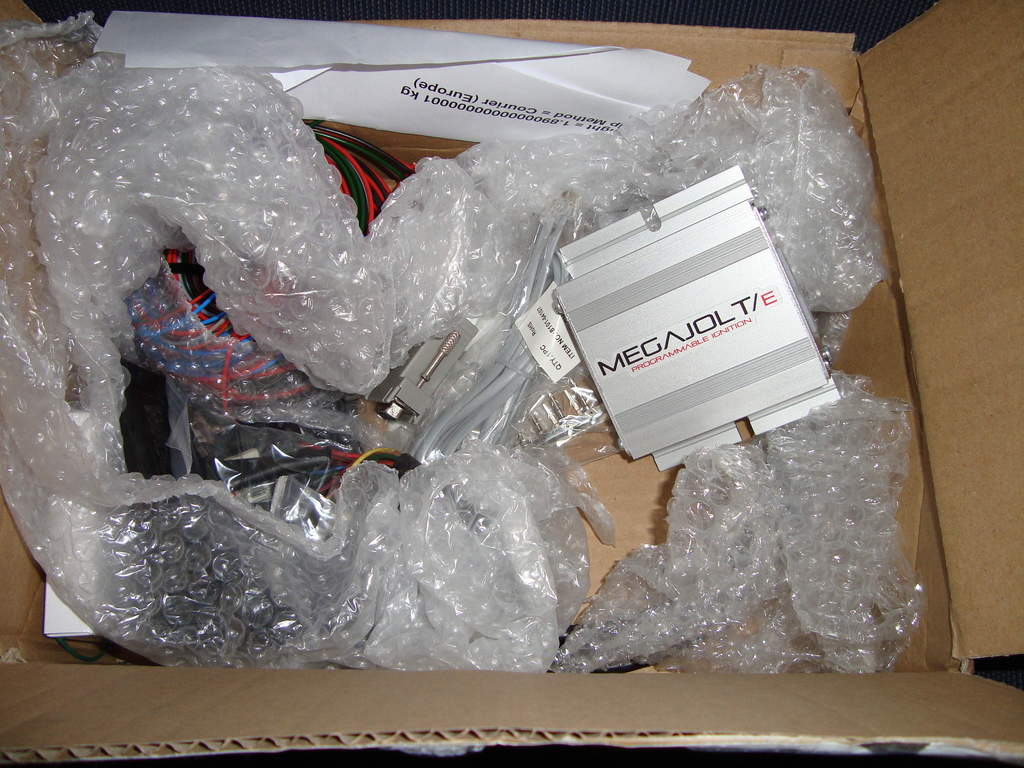
SOME INSANE SHOPPING
i bought these...
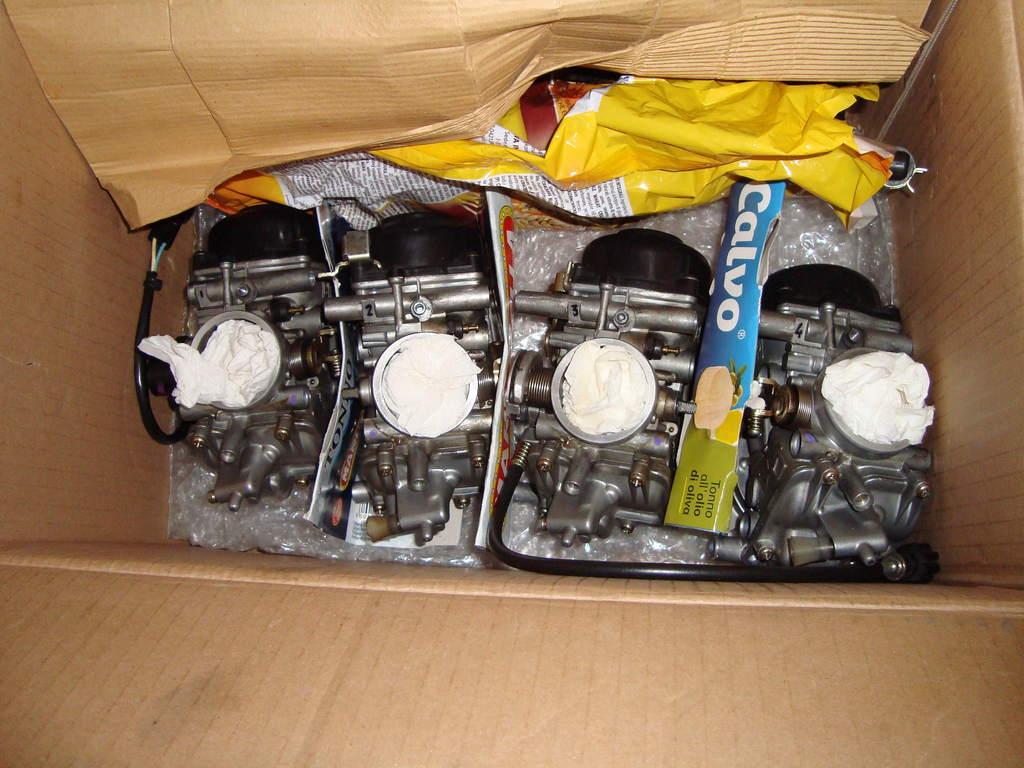
used kawasaki kei hin ninja 900 carbs (110euros)
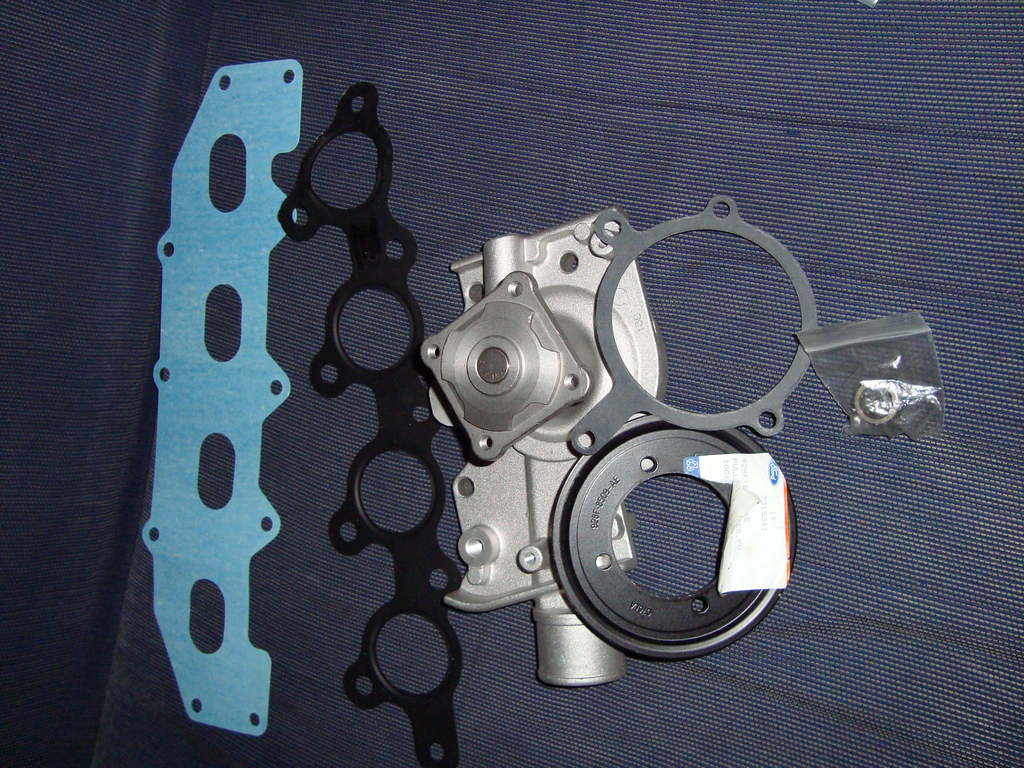
silvertop reverse water pump, t9-to-zetec spigot bearing, intake and exhaust gaskets, from retro-ford.
megajolt tps ignition ecu and stuff from trigger-wheels.com
PROCESS
the big deal of what i'm doing:
spent a lot of time measuring & cadding,
i had all these laser-cut for me. like xmas day on april...
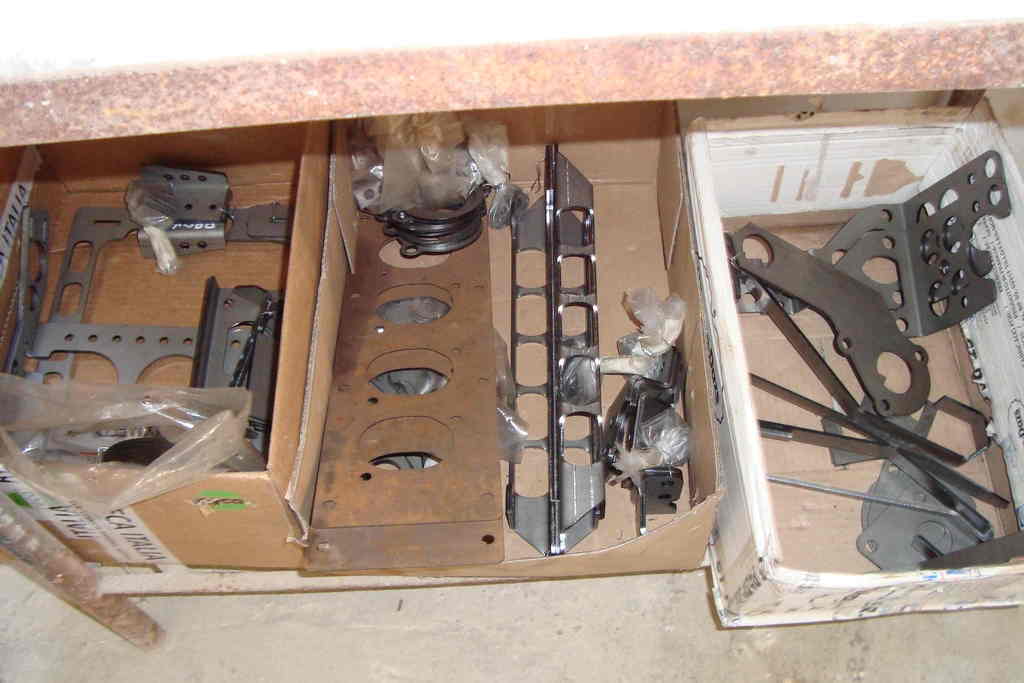
then i personally (very bad idea!) tig 'em up with a 250euro (brand-new price) welding machine.
i bought these...
used kawasaki kei hin ninja 900 carbs (110euros)

silvertop reverse water pump, t9-to-zetec spigot bearing, intake and exhaust gaskets, from retro-ford.

megajolt tps ignition ecu and stuff from trigger-wheels.com

PROCESS
the big deal of what i'm doing:
spent a lot of time measuring & cadding,

i had all these laser-cut for me. like xmas day on april...

then i personally (very bad idea!) tig 'em up with a 250euro (brand-new price) welding machine.
03-05-2016, 10:05 AM
#3
PassionFord Regular
Thread Starter
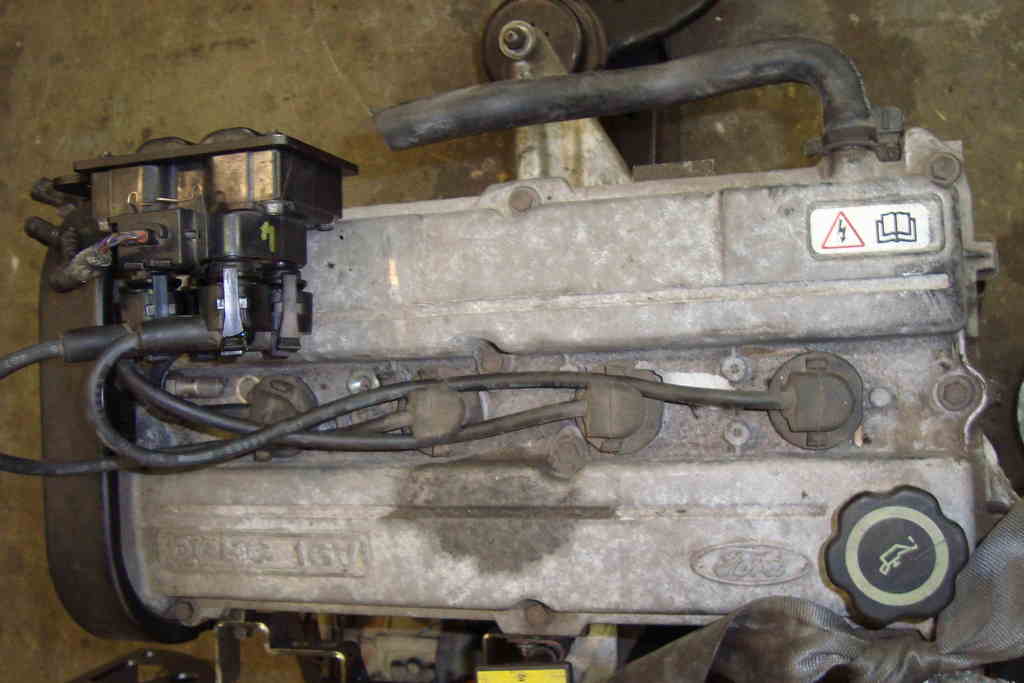
CURRENT STATUS
engine: 1.8 cvh r2a. running on lpg and wanna stick on it.
yes i've said lpg: (cylinder behind rear seats)

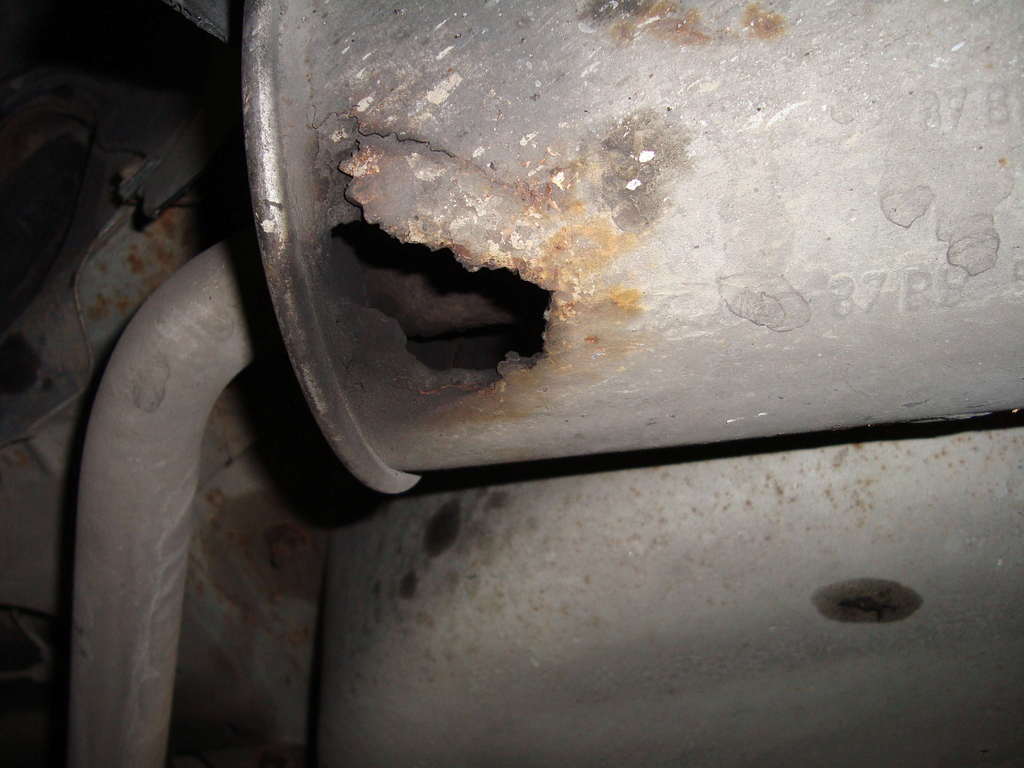
it's an oil eater, knackered by the high mileage (1 litre oil each 400km) and absolutely under-f**king-powered.
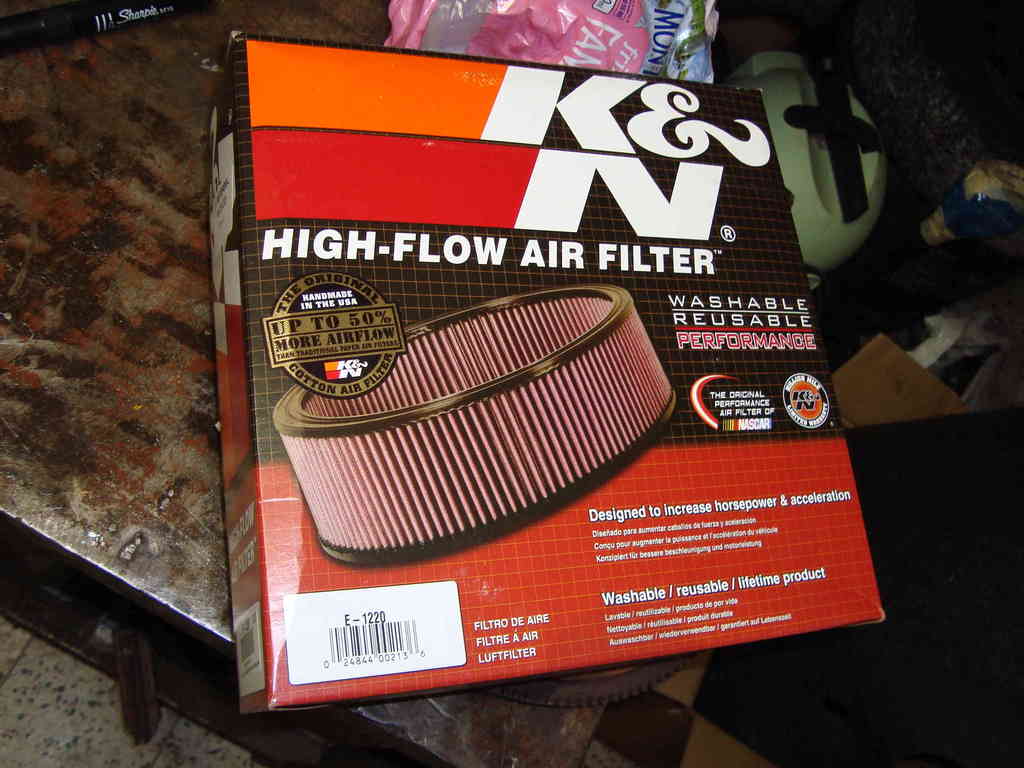
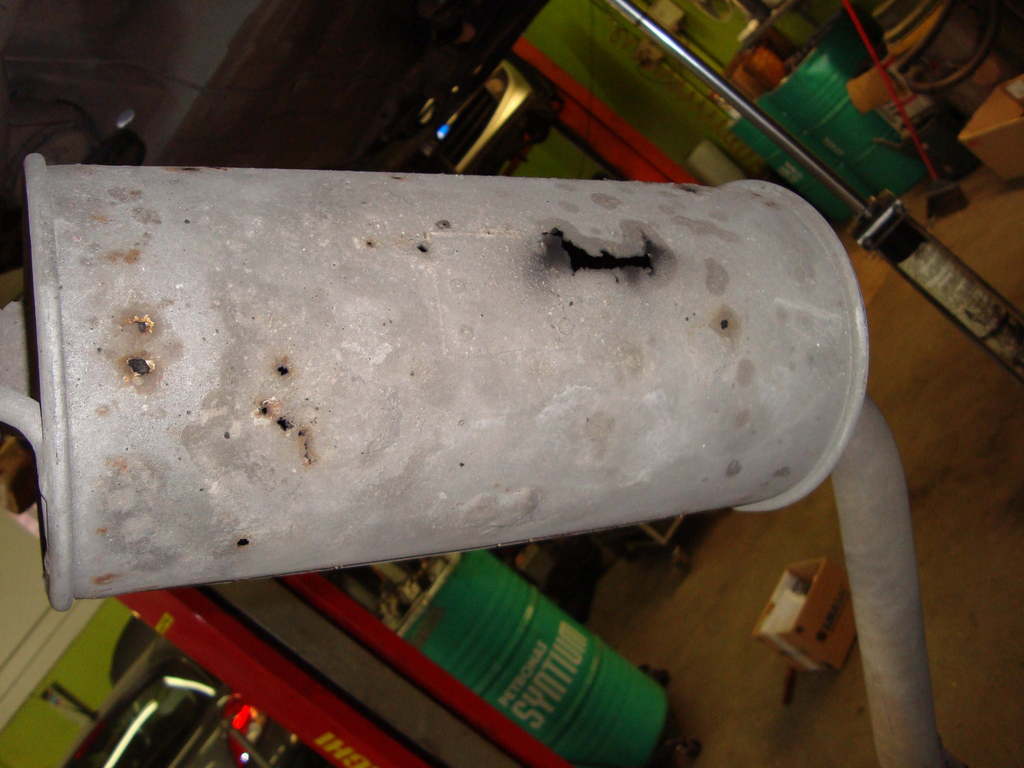
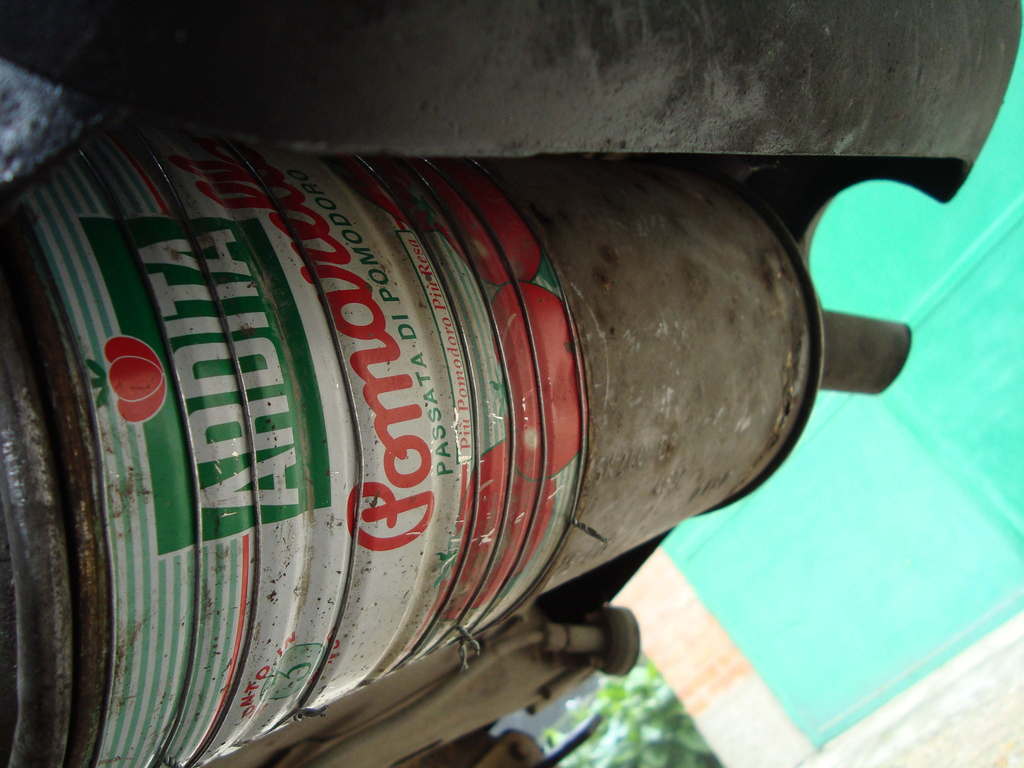
k&n air filter, from motomobil.com, and simplified exhaust, make me able to reach 165km.
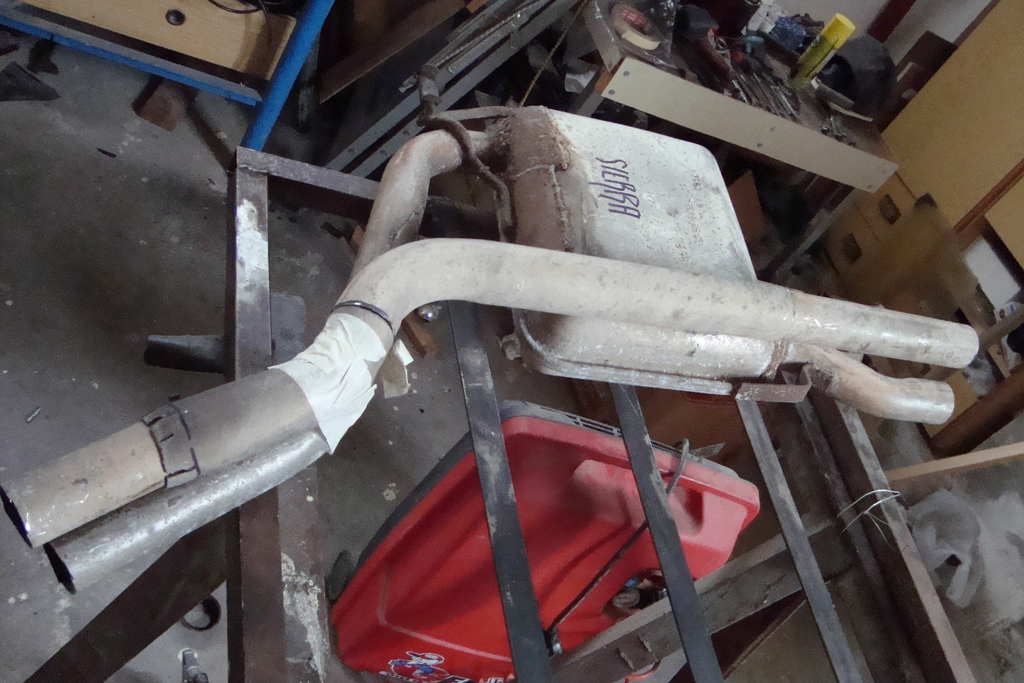
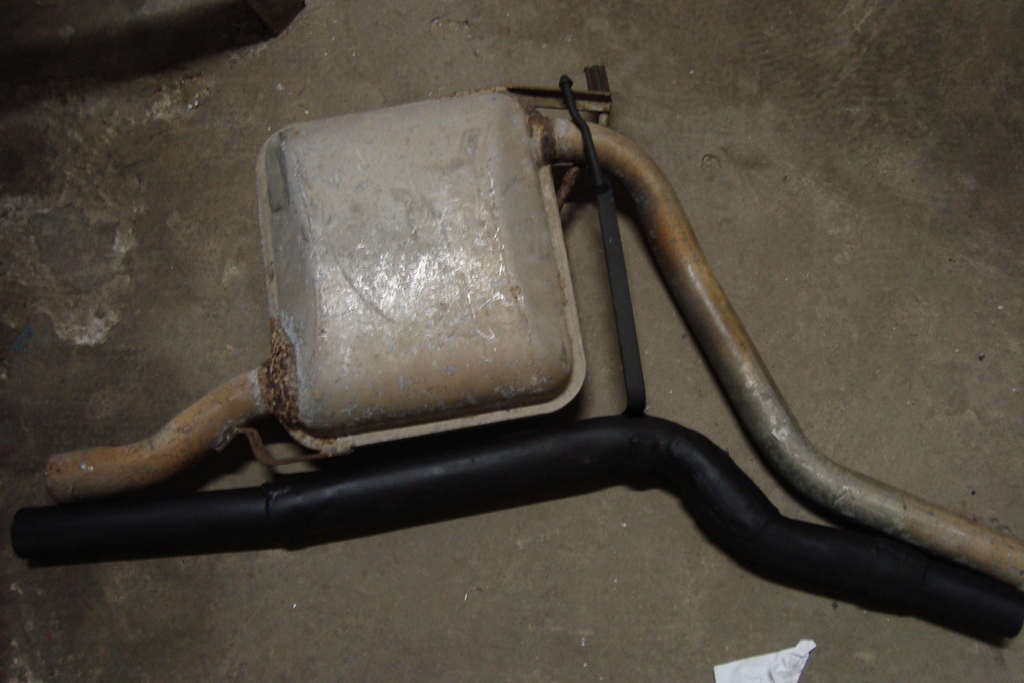
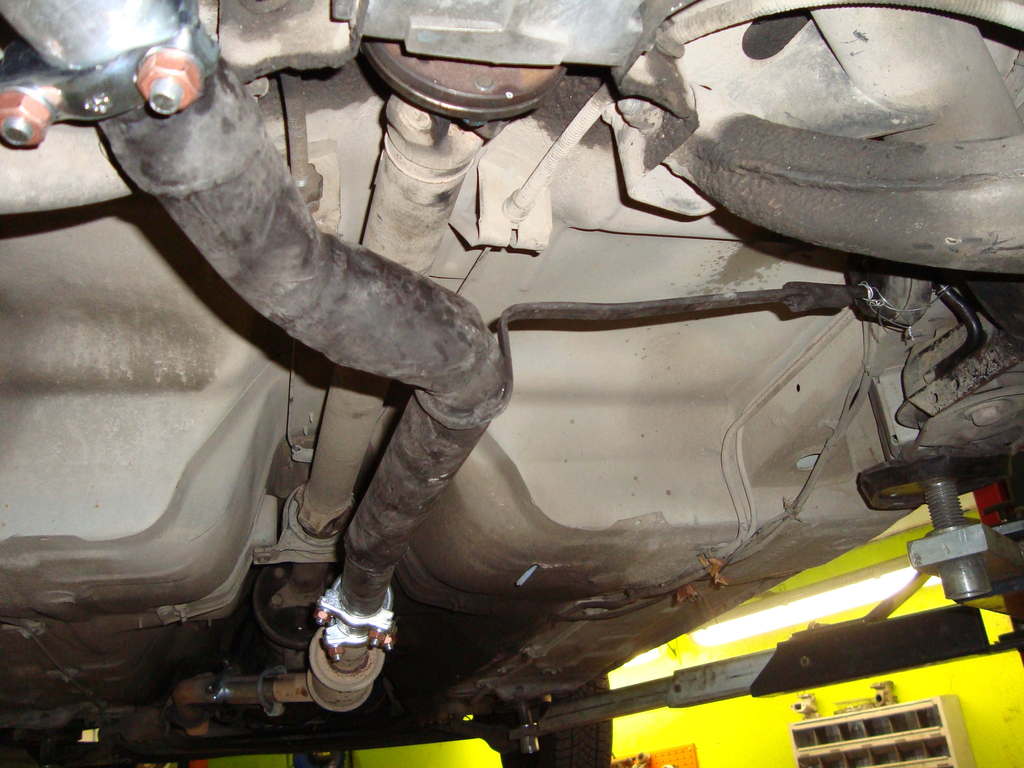
holes in the muffler repaired in pizza style:
wanna put this one in the right place:
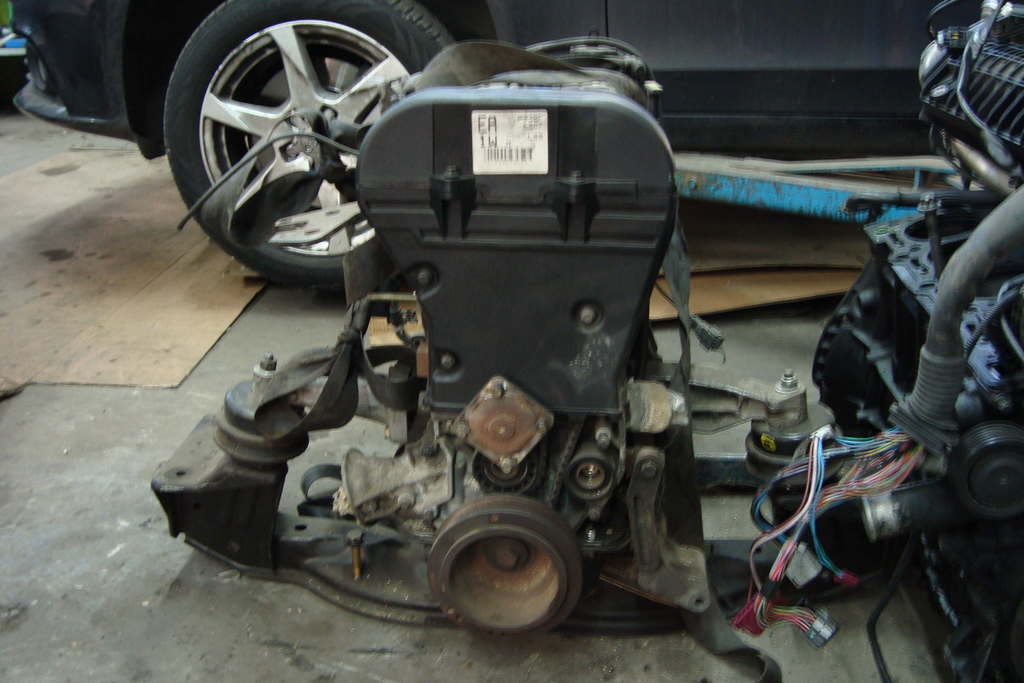
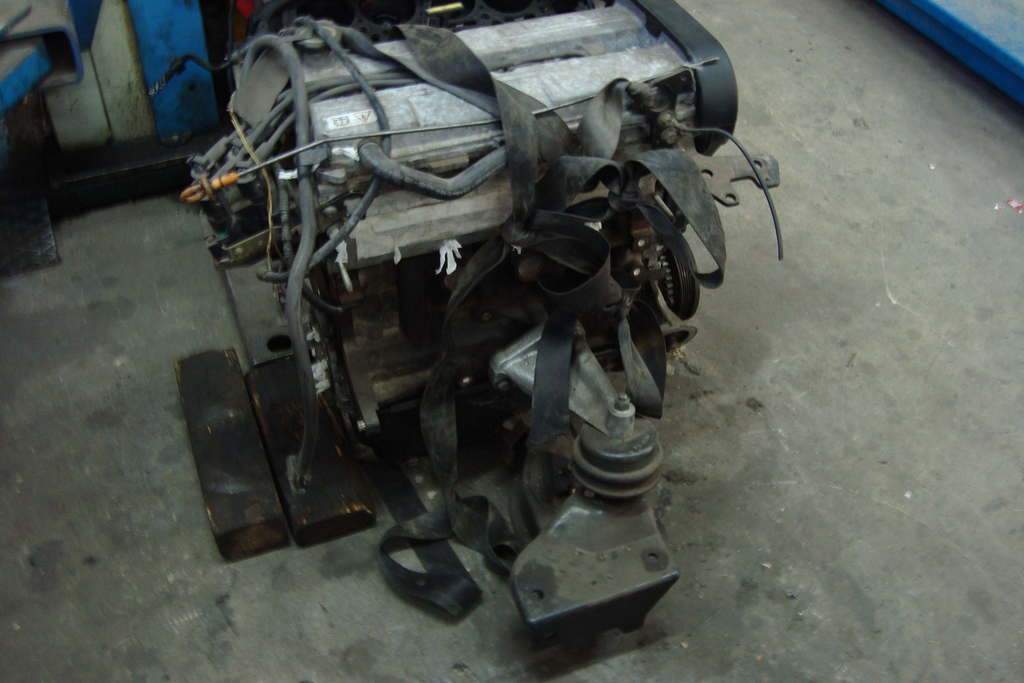
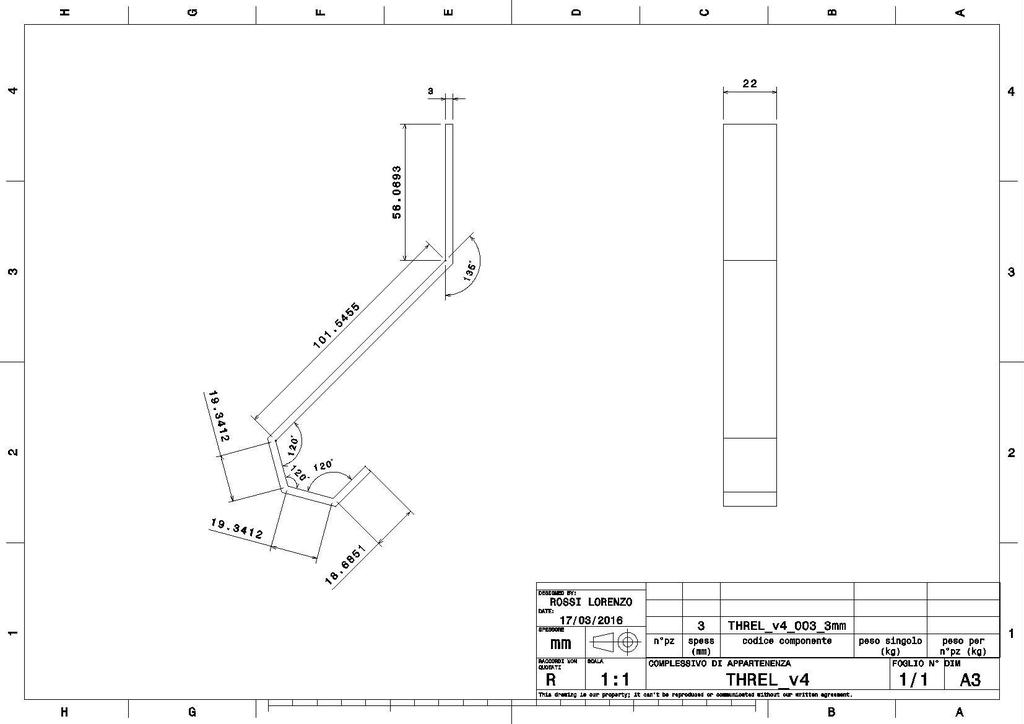
zetec 2.0 nga silvertop, here sitting on a saph 1.8cvh front crossmember. with 1.8cvh r2a: mounts, sump and oil pick-up
i hope to have it turboed in the next future, but now i can't afford anything else but the stock t9 gearbox.
so, until then, the plan is it to be an n/a.
engine: 1.8 cvh r2a. running on lpg and wanna stick on it.
yes i've said lpg: (cylinder behind rear seats)

it's an oil eater, knackered by the high mileage (1 litre oil each 400km) and absolutely under-f**king-powered.
k&n air filter, from motomobil.com, and simplified exhaust, make me able to reach 165km.


holes in the muffler repaired in pizza style:


wanna put this one in the right place:
zetec 2.0 nga silvertop, here sitting on a saph 1.8cvh front crossmember. with 1.8cvh r2a: mounts, sump and oil pick-up

i hope to have it turboed in the next future, but now i can't afford anything else but the stock t9 gearbox.
so, until then, the plan is it to be an n/a.
03-05-2016, 10:05 AM
#4
PassionFord Regular
Thread Starter
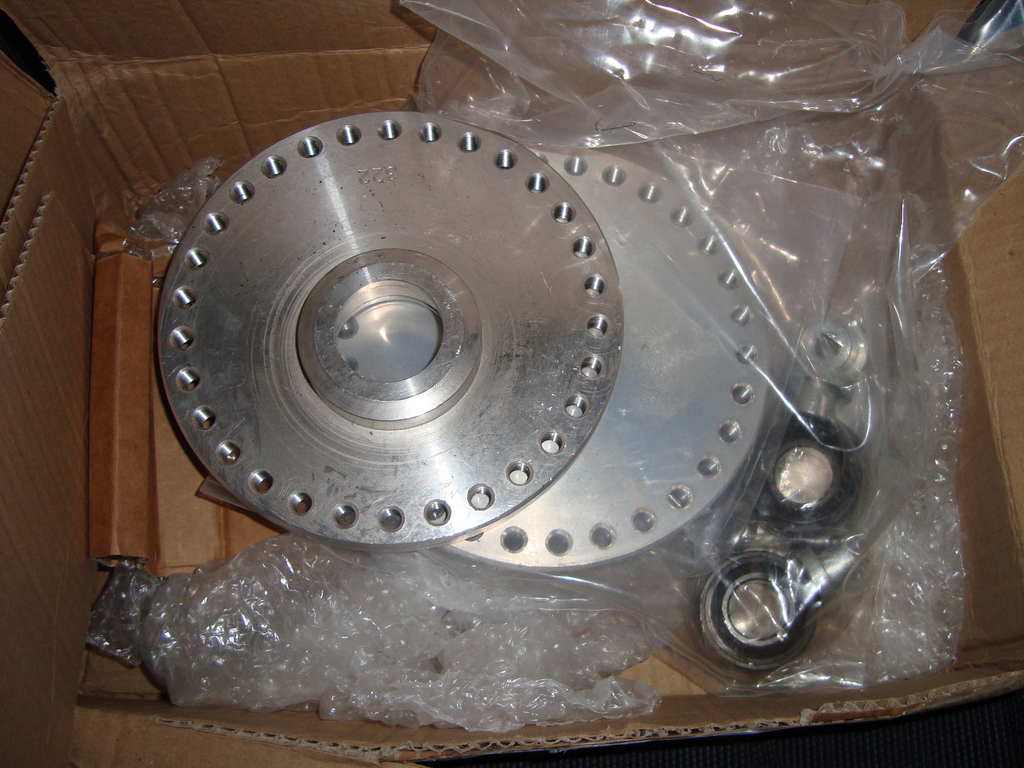
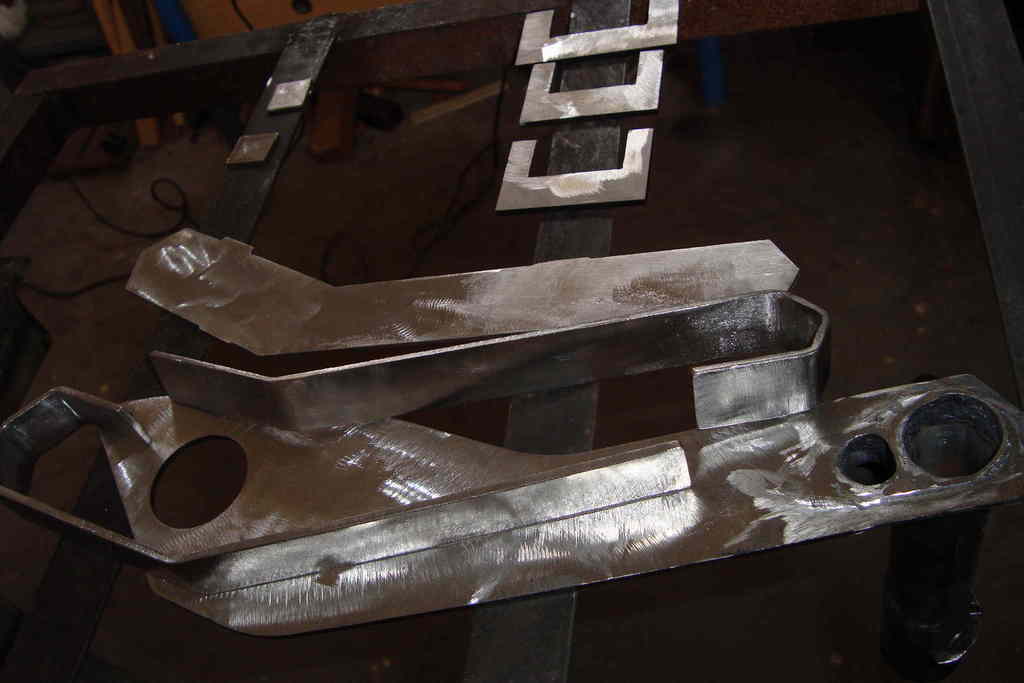
DIFF pt.I
first thing for a drifter wannabe...
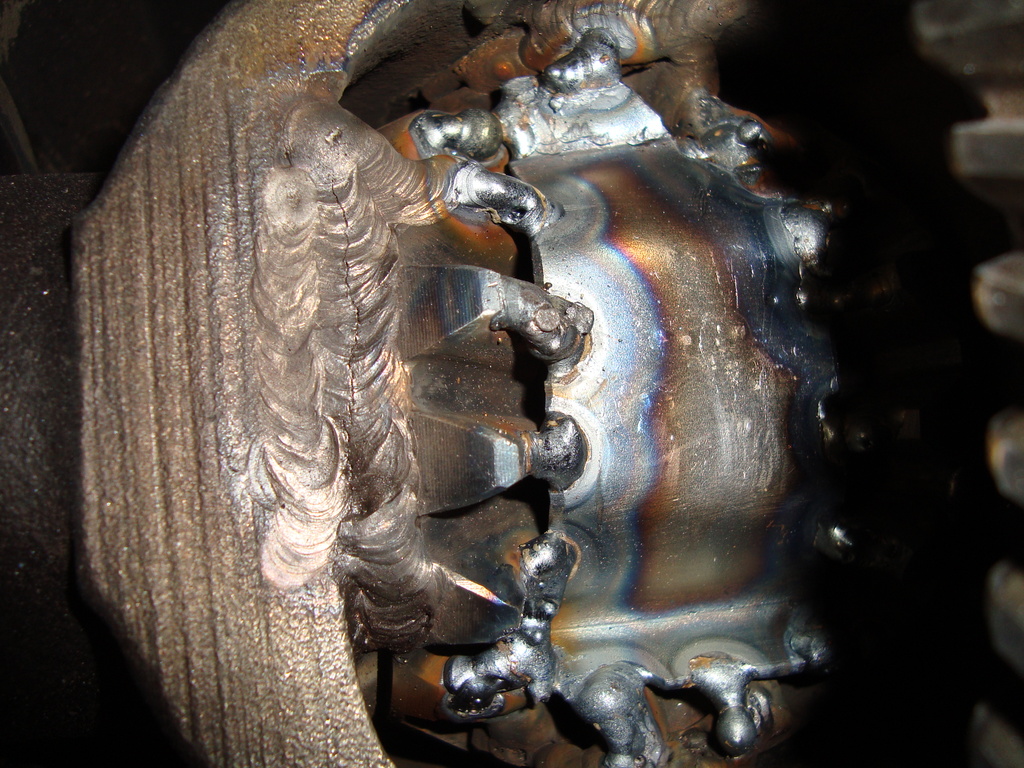

the crack between carrier and solar (halfshaft gear) is still there. i assume it won't hurt due to its position and the torque route.
am i a moron? i guess so, but time will tell...
first thing for a drifter wannabe...


the crack between carrier and solar (halfshaft gear) is still there. i assume it won't hurt due to its position and the torque route.
am i a moron? i guess so, but time will tell...
03-05-2016, 10:05 AM
#5
PassionFord Regular
Thread Starter
BODY pt.I
not painting her in silly colours, don't wanna silly stickers nor silly body kits.
don't wanna change colour. kinda sleeper or whatever.
just rust maintenance, (here in italy not big deal), and minimum indispensible for our mot green light.
but i might change my mind cause i'm a silly guy...
maybe getting light-weight with plastic side-windows, fiberglass bonnet and trunk from pesh...
http://www.pesch.cz/...rd-sierra-sedan
http://www.pesch.cz/...for-ford-sierra
... but now these are just a dream.
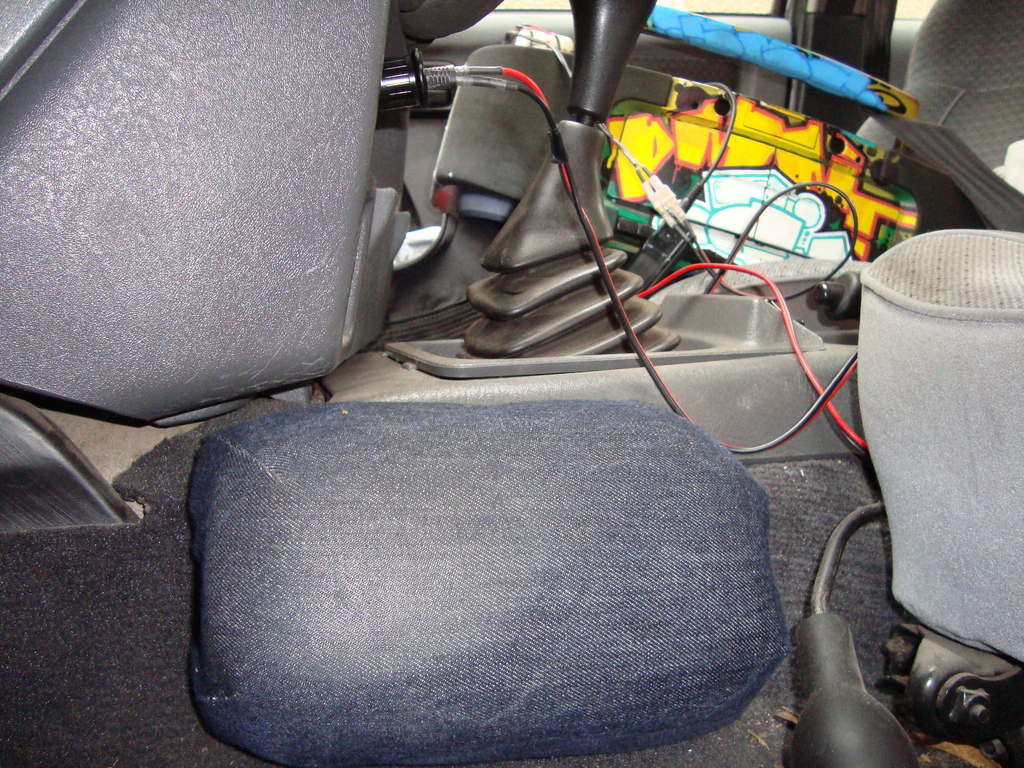
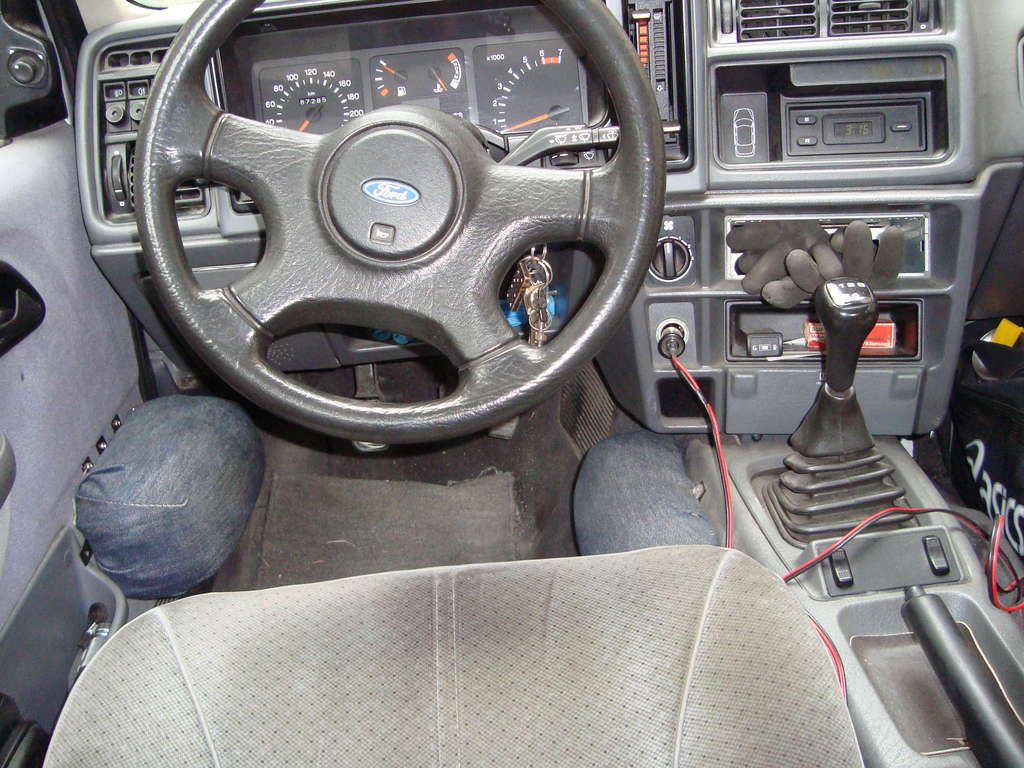
still no bucket seats in there, but just knee-pillows. to not to be thrown out of the car every roundabout...

not painting her in silly colours, don't wanna silly stickers nor silly body kits.
don't wanna change colour. kinda sleeper or whatever.
just rust maintenance, (here in italy not big deal), and minimum indispensible for our mot green light.
but i might change my mind cause i'm a silly guy...
maybe getting light-weight with plastic side-windows, fiberglass bonnet and trunk from pesh...
http://www.pesch.cz/...rd-sierra-sedan
http://www.pesch.cz/...for-ford-sierra
... but now these are just a dream.
still no bucket seats in there, but just knee-pillows. to not to be thrown out of the car every roundabout...


 03-05-2016, 10:06 AM
#6
PassionFord Regular
Thread Starter
USPENSIONS pt.I
still on stocks, dreaming these from motomobil
http://www.motomobil...43321480-1.html
http://www.motomobil...43221460-1.html
camber plates from rally design:
http://www.rallydesign.co.uk/product...oducts_id=7371
still in the wrong place: not in the car
still on stocks, dreaming these from motomobil
http://www.motomobil...43321480-1.html
http://www.motomobil...43221460-1.html
camber plates from rally design:
http://www.rallydesign.co.uk/product...oducts_id=7371

still in the wrong place: not in the car
03-05-2016, 10:06 AM
#7
PassionFord Regular
Thread Starter
WHEELS pt.I
i've drawn this psa-citroen to ford adaptor ring,
i have these laser cut for me. 14 pieces for few quids,
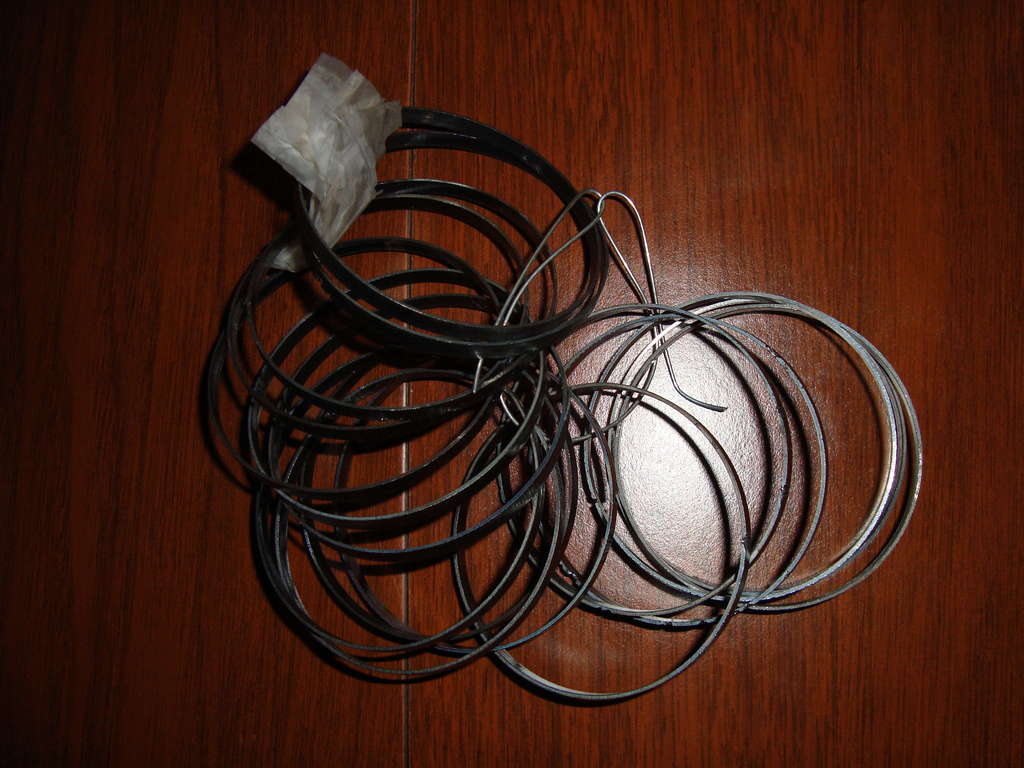
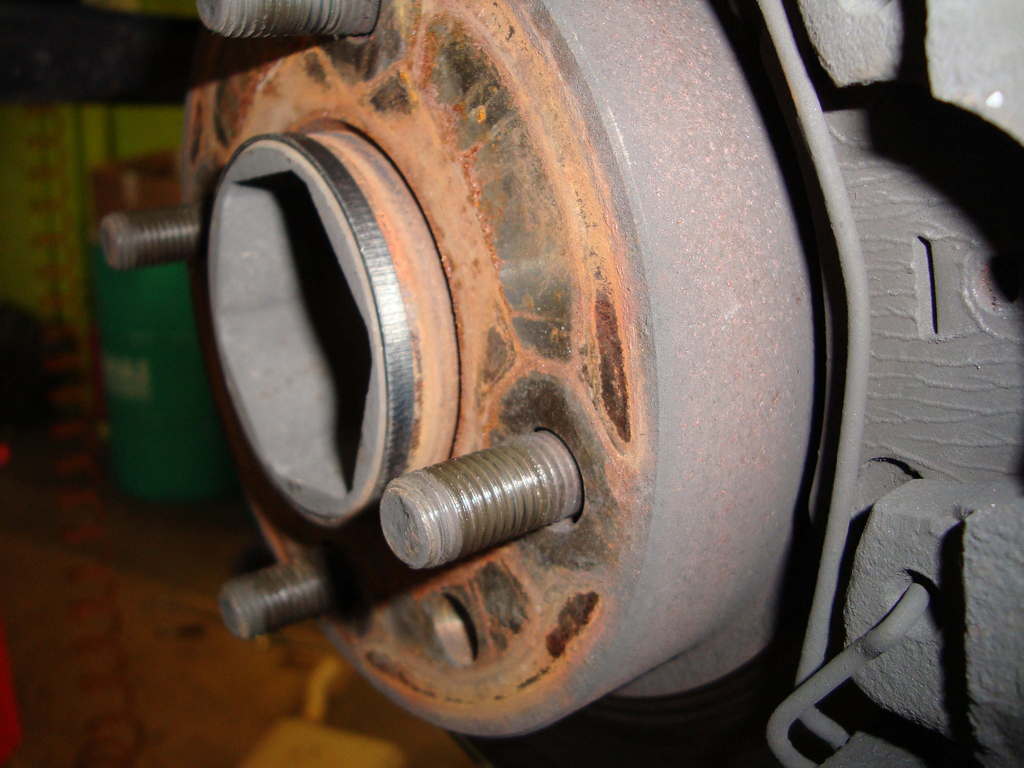
little interference with the knuckles, they go on tapping 'em lightly with an hammer, and down with a large flat screw-driver.
more clearence with the rim, which goes up and down easily centered.
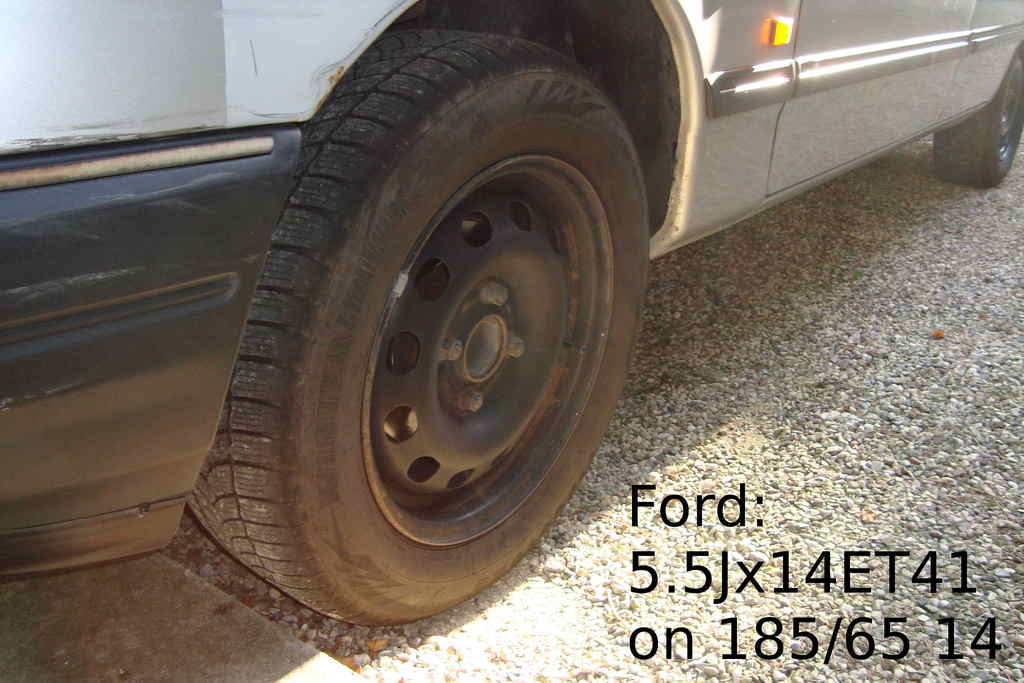
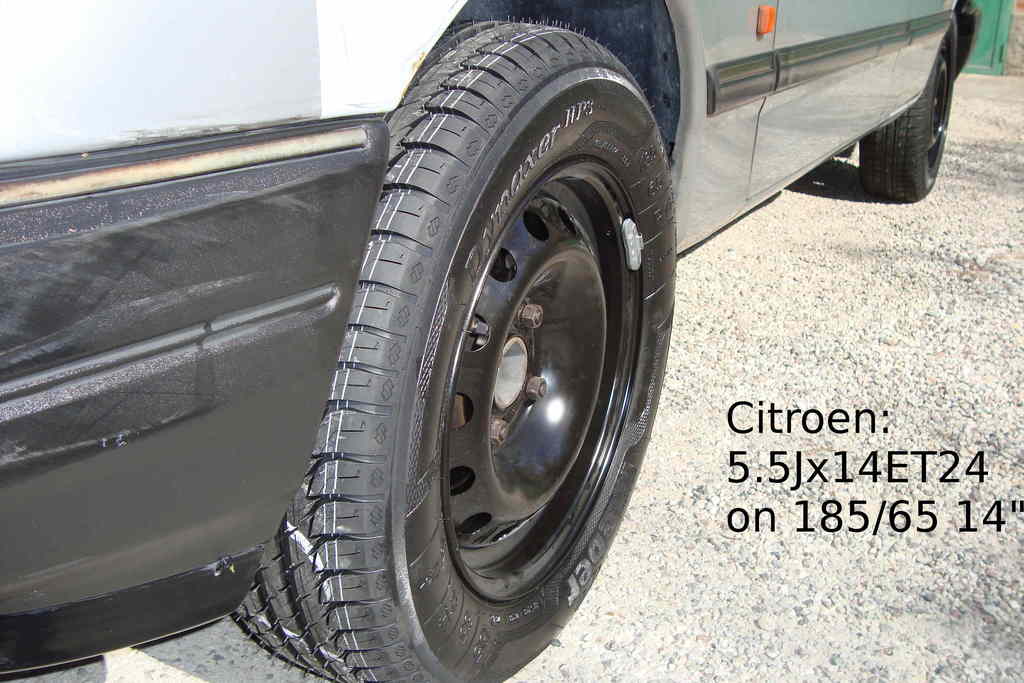
now wearing 185/65 r14 86t, with:
citroen c3 5.5Jx14 et24 steel rims on the front (with new tires);
peugeot 206 5.5Jx14 et34 steel rims on the rear.
(oem 14" 5.5/6j ford steelies are about et41/43, donno exactly)...
(car on stock suspension)
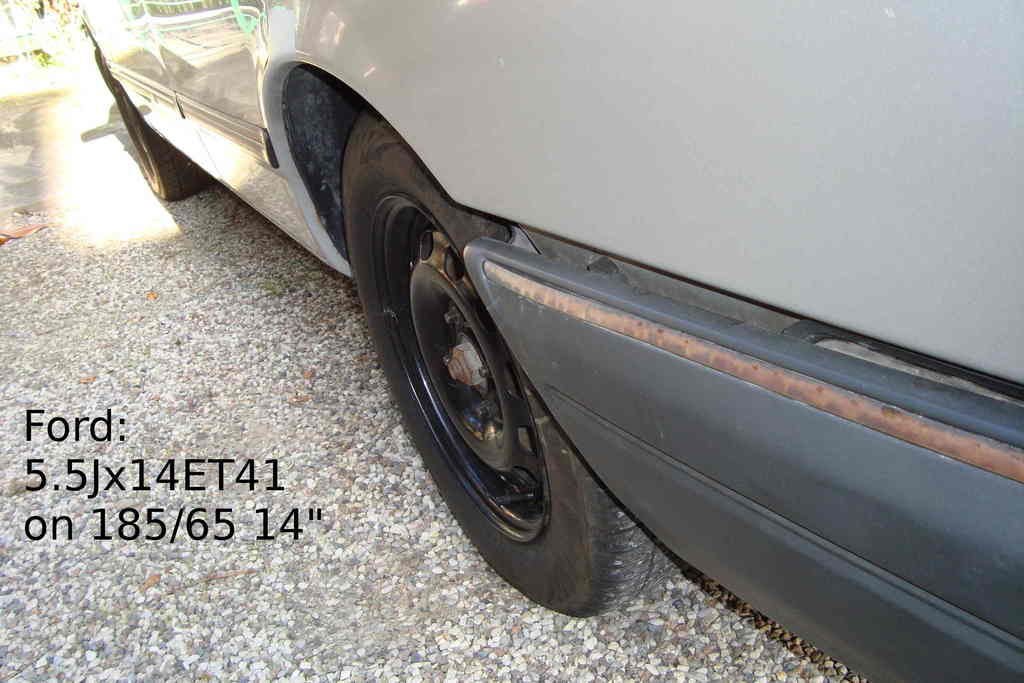

not cool nor good looking,
little more understeer. drifting comes whole a lot easier, which is what i was looking for.
also little more hi-speed stability, but it's not my case.
turn-in with a welded is quite a bitch though.
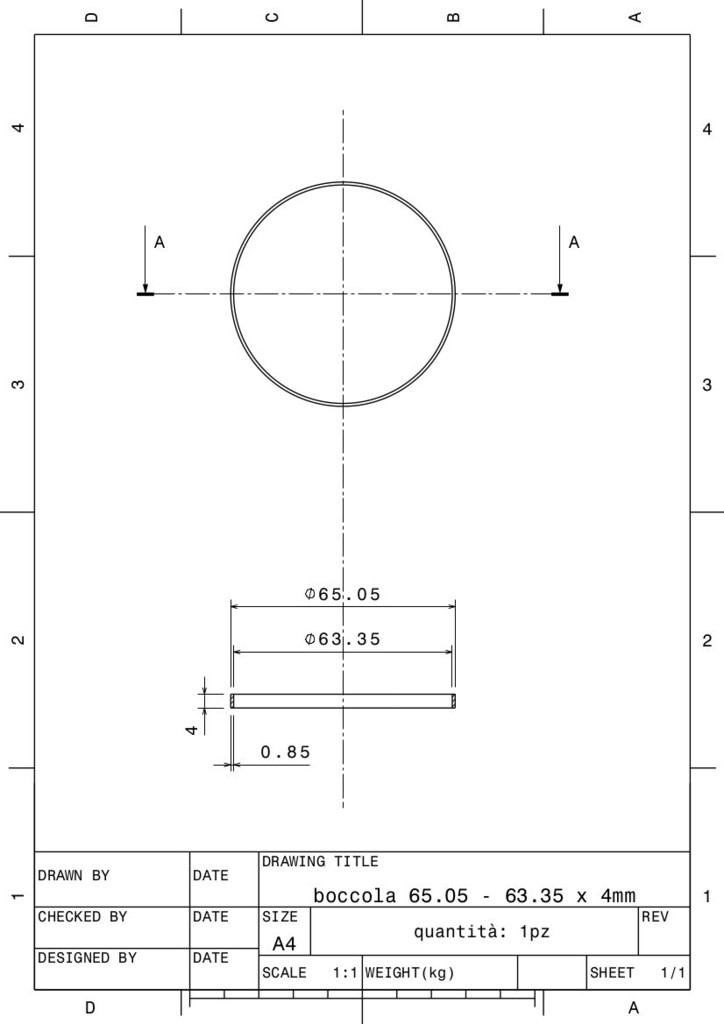
i also have drawn these 2mm shims,
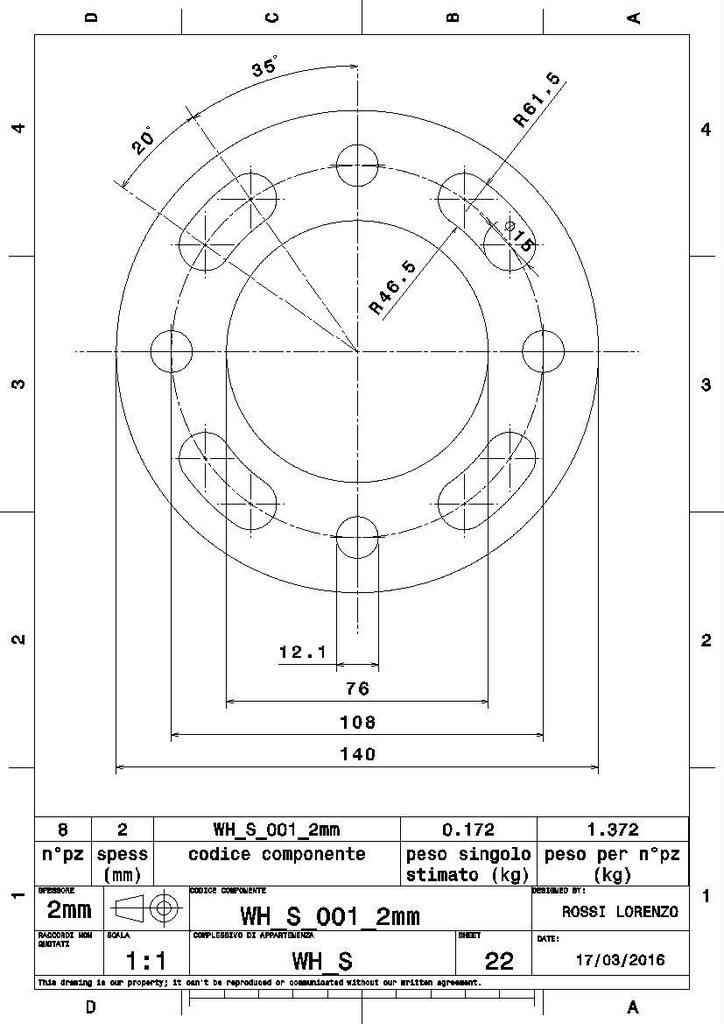
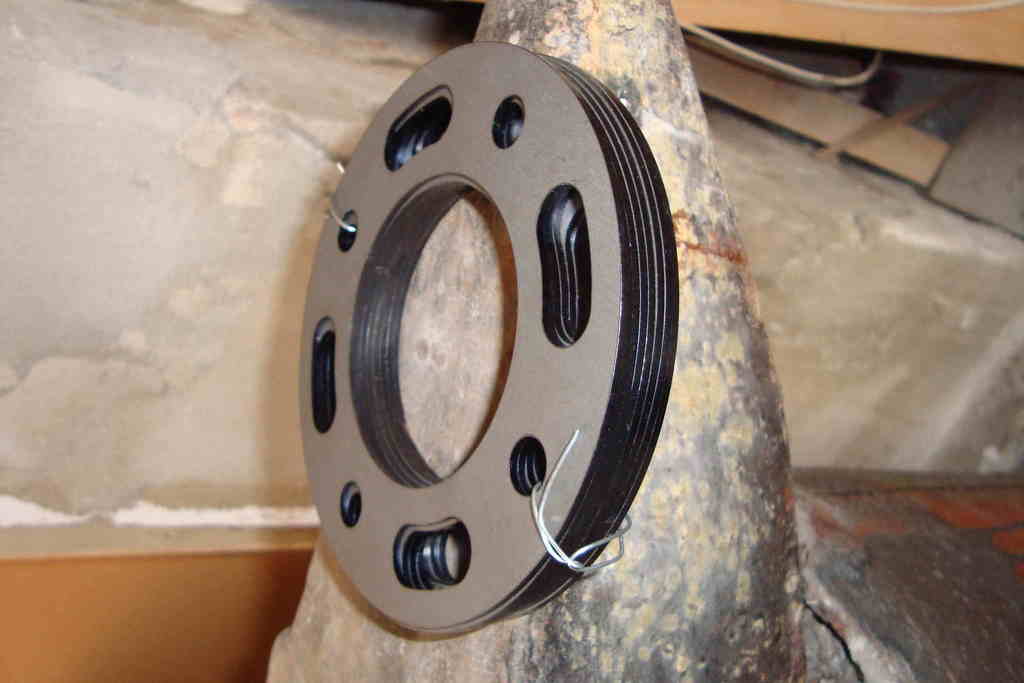
with drum&disc brakes, std studs, there can be mounted:
1 shim per each wheel on the front,
2 shims per each wheel on the rear,
rims are already in budget for a drifter.
without purchasing wheel spacer or longer studs, if you don't give a damn about the look, a fine under/over-steer adjustement can be done either, for cheap, with ring and shims (not the best nor more effective, but just another mean).
just check on the web. there are a lot of et's avalaible between ford's, citroen's, peugeot's, 14"-15"-alloys and steelies, all 4x10⁸ bolt pattern.
i've drawn this psa-citroen to ford adaptor ring,

i have these laser cut for me. 14 pieces for few quids,


little interference with the knuckles, they go on tapping 'em lightly with an hammer, and down with a large flat screw-driver.
more clearence with the rim, which goes up and down easily centered.
now wearing 185/65 r14 86t, with:
citroen c3 5.5Jx14 et24 steel rims on the front (with new tires);
peugeot 206 5.5Jx14 et34 steel rims on the rear.
(oem 14" 5.5/6j ford steelies are about et41/43, donno exactly)...
(car on stock suspension)


not cool nor good looking,
little more understeer. drifting comes whole a lot easier, which is what i was looking for.
also little more hi-speed stability, but it's not my case.
turn-in with a welded is quite a bitch though.
i also have drawn these 2mm shims,


with drum&disc brakes, std studs, there can be mounted:
1 shim per each wheel on the front,
2 shims per each wheel on the rear,
rims are already in budget for a drifter.
without purchasing wheel spacer or longer studs, if you don't give a damn about the look, a fine under/over-steer adjustement can be done either, for cheap, with ring and shims (not the best nor more effective, but just another mean).
just check on the web. there are a lot of et's avalaible between ford's, citroen's, peugeot's, 14"-15"-alloys and steelies, all 4x10⁸ bolt pattern.
Trending Topics
03-05-2016, 10:07 AM
#8
PassionFord Regular
Thread Starter
STEERING & FRONT CHASSIS MODIFICATION pt.I
chopped steering knuckles, oem ackermann angle withstanding...
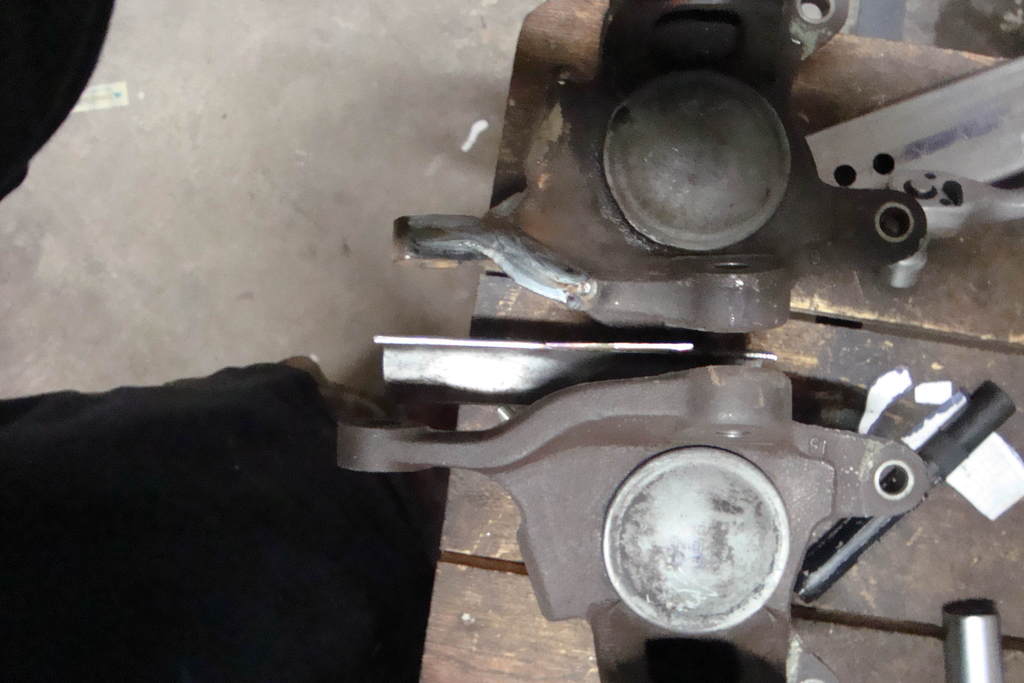
i wrote an "how-i-made-'em" on this page:
http://www.trampdrift.co.uk/forum/to...lded-knuckles/
still work in progress, they might need laser cuts and longer studs, to achieve more "steering-arm ball joint" to "disc" clearence...
but they've jumped off to the bottom of the to-do-list time ago.
chopped steering knuckles, oem ackermann angle withstanding...


i wrote an "how-i-made-'em" on this page:
http://www.trampdrift.co.uk/forum/to...lded-knuckles/
still work in progress, they might need laser cuts and longer studs, to achieve more "steering-arm ball joint" to "disc" clearence...
but they've jumped off to the bottom of the to-do-list time ago.
03-05-2016, 10:07 AM
#9
PassionFord Regular
Thread Starter
EXHAUST pt.I
bought this manifold time ago, (donno, from what car?).
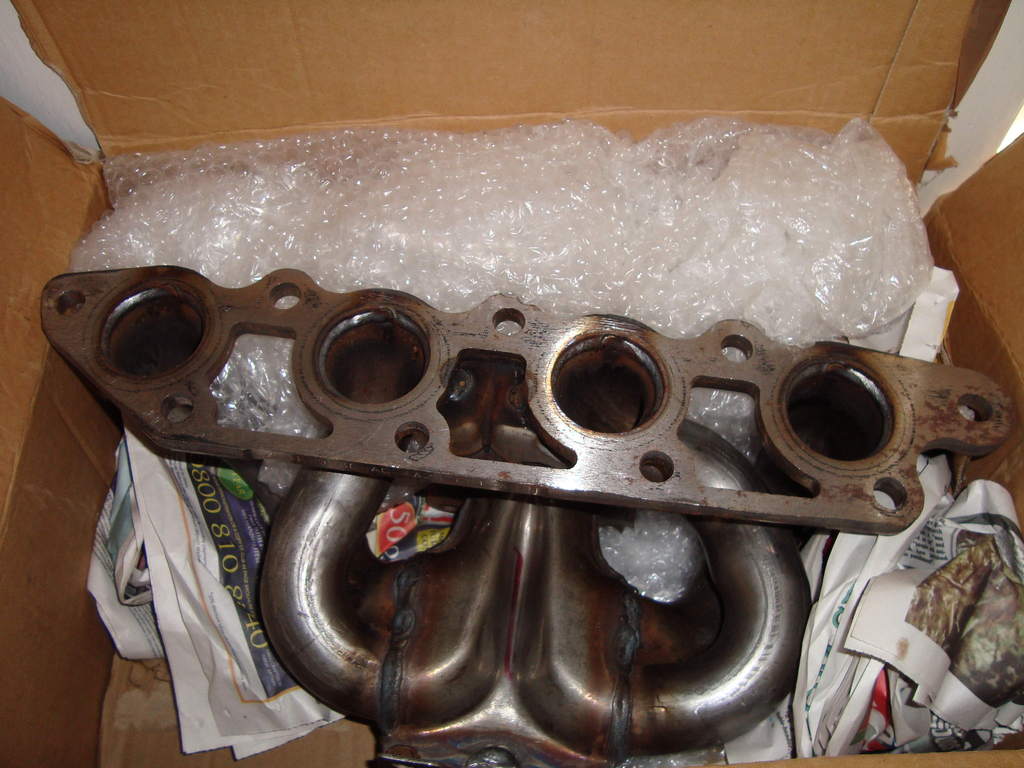
had its outlet flange laser-cut...
i've tig'd up an od 57mm pipe from the shop dumpster (i think it's from a fiat ducato muffler), then from my personal crap reservoir, an adaptor for the std 1.8cvh exhaust tube-line.
i'll connect the two with a flexible id 57mm stainless tube, like this one:
http://www.ebay.it/itm/57mm-2-1-4-Un...3D111452605760
also made crankase vapour blanking-plates. donno if i use 'em, or if the exh-manifold leave me enough space to mantain the std one (hope so).
but just in case... (laser-cut is cheap enough).
!!!still haven't verified dimensions of these ones. before order it from your machining shop, just do a 1:1 paper model, to verify if it fits correctly.

bought this manifold time ago, (donno, from what car?).

had its outlet flange laser-cut...

i've tig'd up an od 57mm pipe from the shop dumpster (i think it's from a fiat ducato muffler), then from my personal crap reservoir, an adaptor for the std 1.8cvh exhaust tube-line.

i'll connect the two with a flexible id 57mm stainless tube, like this one:
http://www.ebay.it/itm/57mm-2-1-4-Un...3D111452605760
also made crankase vapour blanking-plates. donno if i use 'em, or if the exh-manifold leave me enough space to mantain the std one (hope so).
but just in case... (laser-cut is cheap enough).
!!!still haven't verified dimensions of these ones. before order it from your machining shop, just do a 1:1 paper model, to verify if it fits correctly.
 03-05-2016, 10:08 AM
#10
PassionFord Regular
Thread Starter
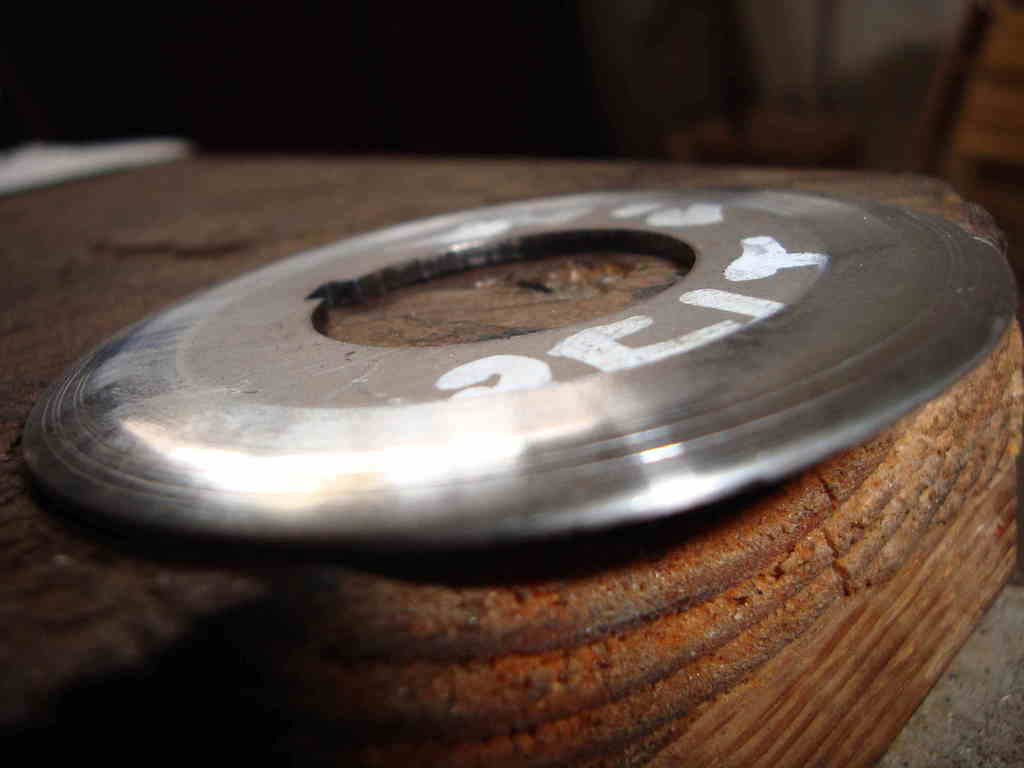
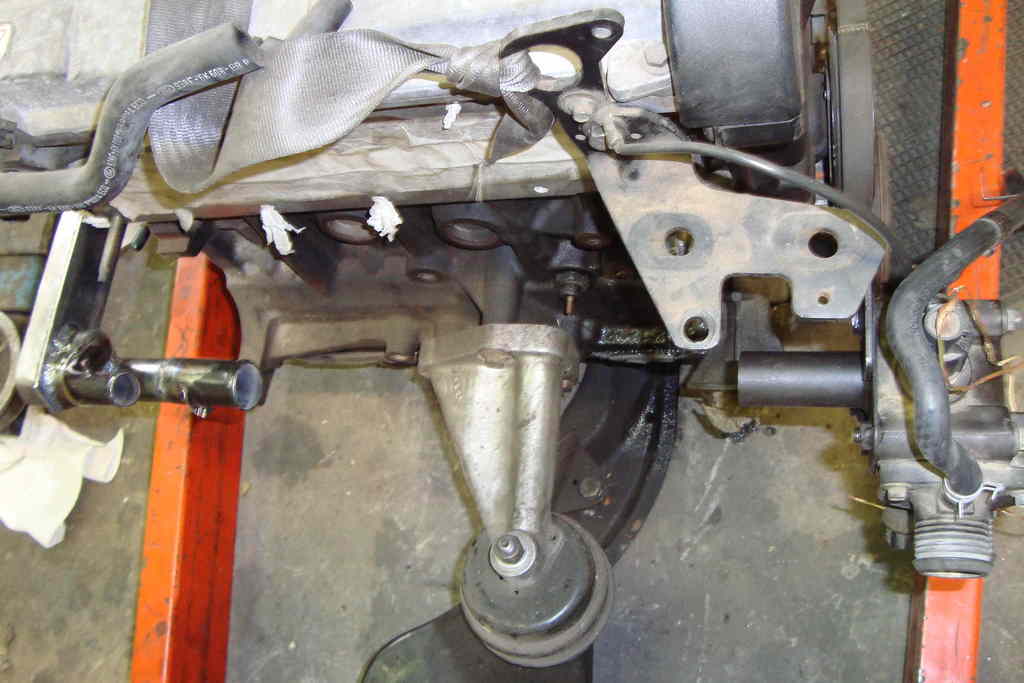
FRONT ENGINE SET UP pt.I
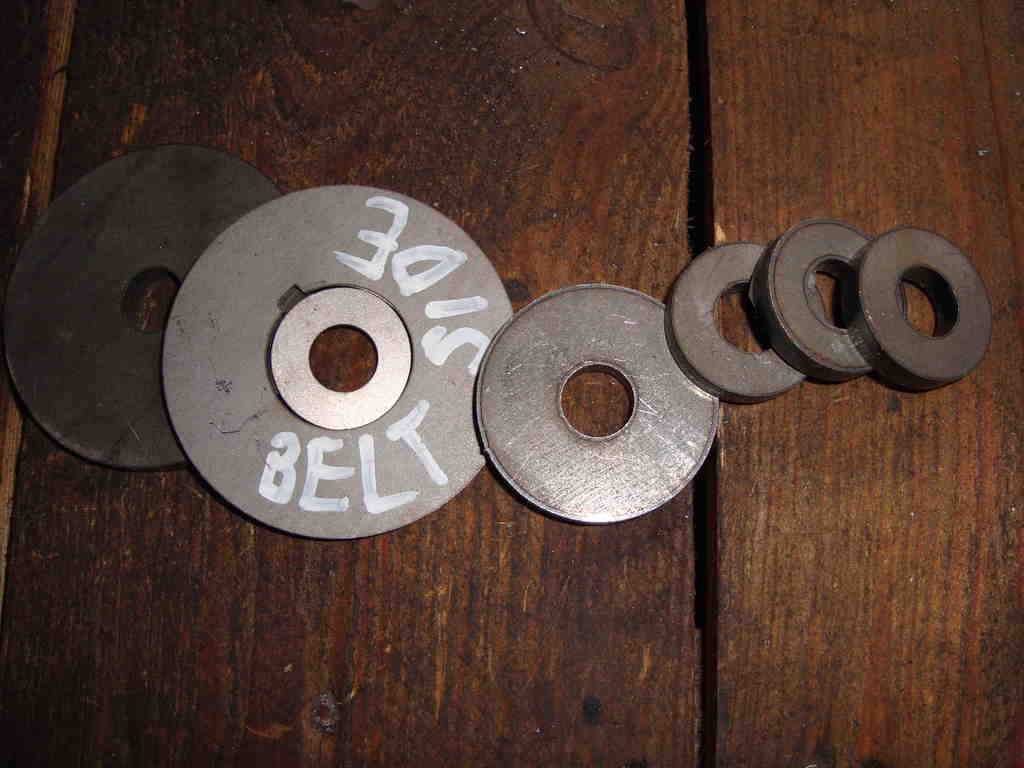
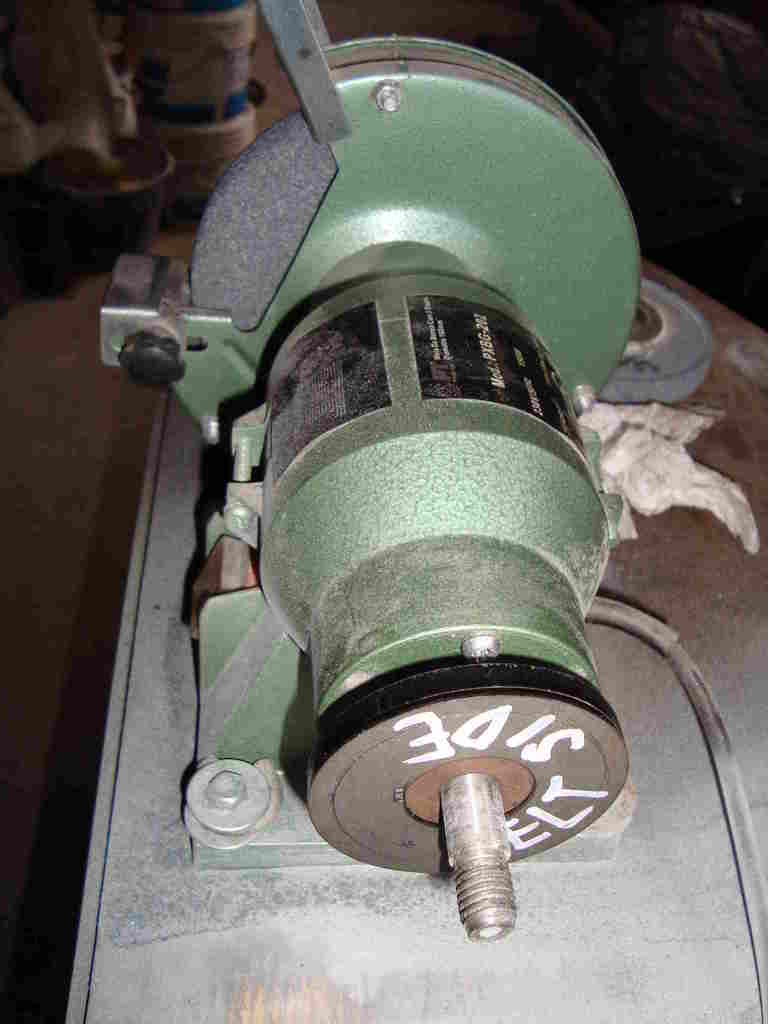
here it is my set-up:
-1.8 cvh std cranckshaft pulley with 2mm shim (see next);
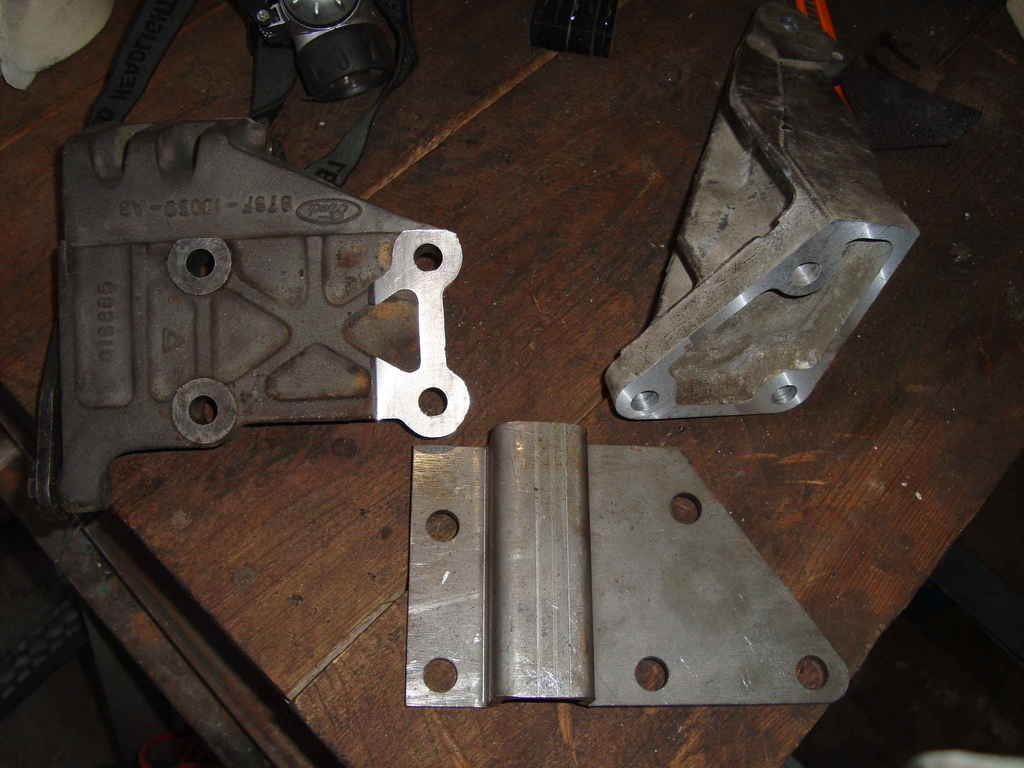
-1.8 cvh std alternator with 1.8 cvh std alternator mount (milled down of 4mm see above);
-retroford reverse water pump with 6pk pulley which comes with;
-5pk 962mm poly-v belt

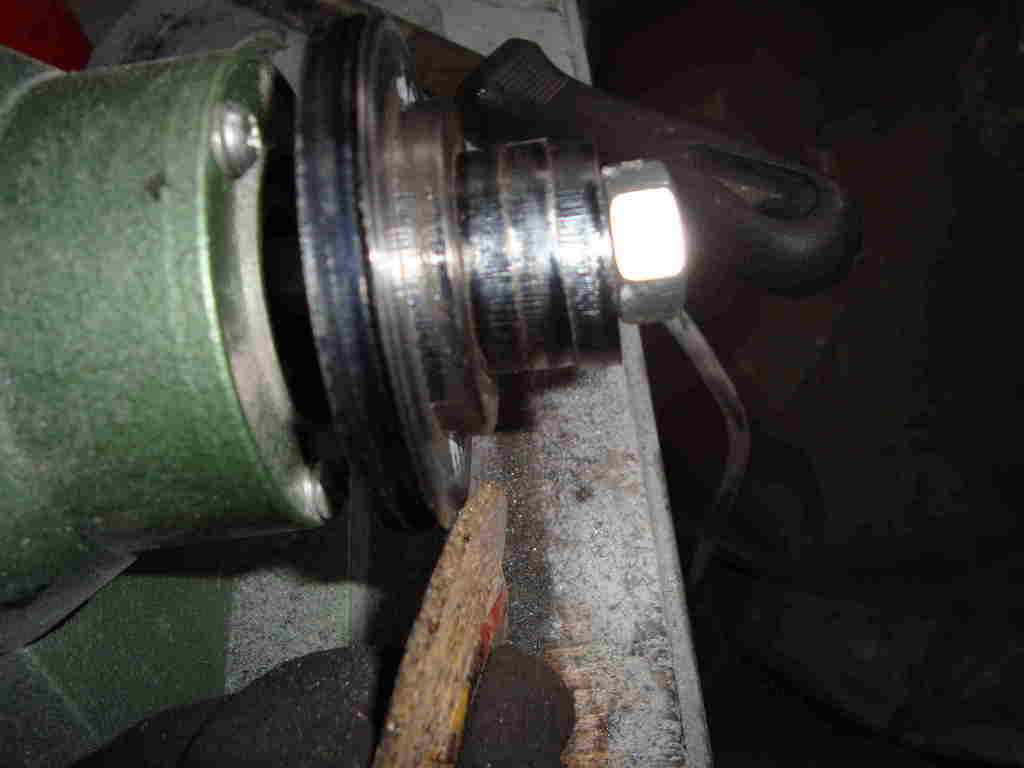
the 1.8cvh crankshaft pulley needs a 2mm shim to be aligned with the other ones

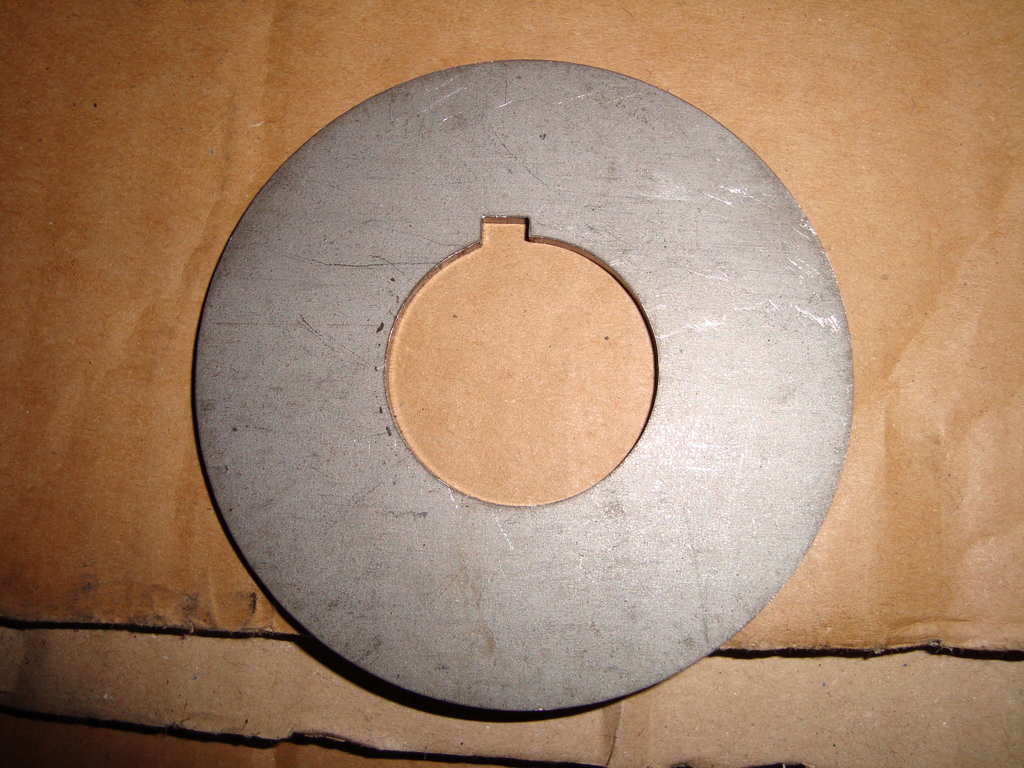
the raw laser needs to be smothered, to avoid camshaft belt scrubbing on it.
no chance to put it on a lathe, so i had these custom washers made for me, to arrange something on my little bench grinder.
only way i found, to work on it, was with an old f**ked up grind disc.
maybe cause either my files are too dull or the bench grinder spins too fast.
here it is my set-up:
-1.8 cvh std cranckshaft pulley with 2mm shim (see next);
-1.8 cvh std alternator with 1.8 cvh std alternator mount (milled down of 4mm see above);
-retroford reverse water pump with 6pk pulley which comes with;
-5pk 962mm poly-v belt

the 1.8cvh crankshaft pulley needs a 2mm shim to be aligned with the other ones


the raw laser needs to be smothered, to avoid camshaft belt scrubbing on it.
no chance to put it on a lathe, so i had these custom washers made for me, to arrange something on my little bench grinder.
only way i found, to work on it, was with an old f**ked up grind disc.
maybe cause either my files are too dull or the bench grinder spins too fast.


 03-05-2016, 10:08 AM
#11
PassionFord Regular
Thread Starter
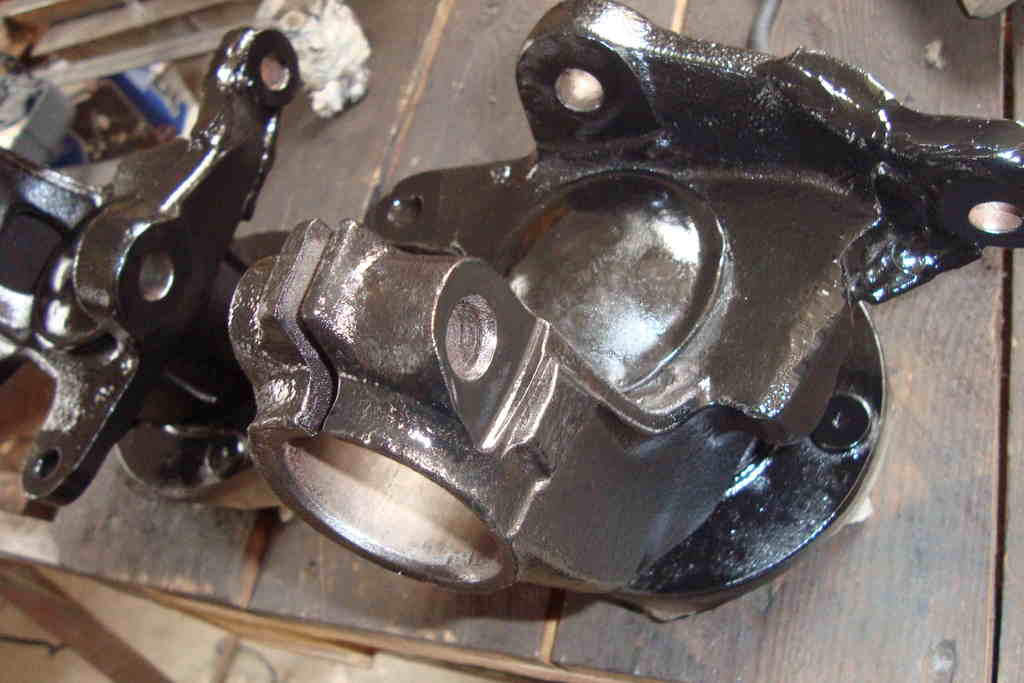
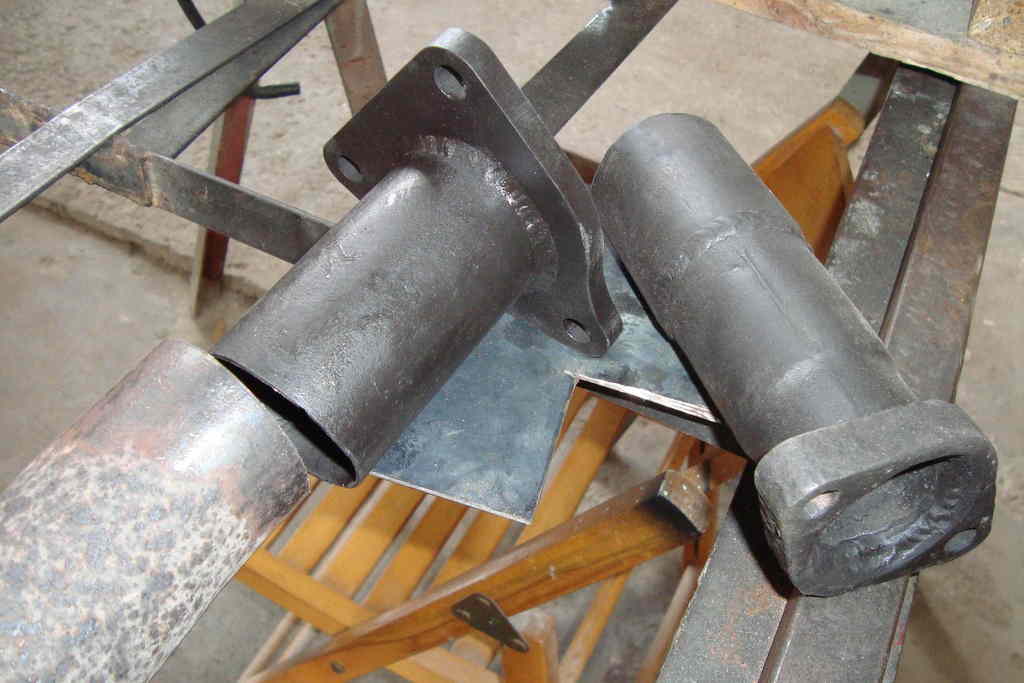
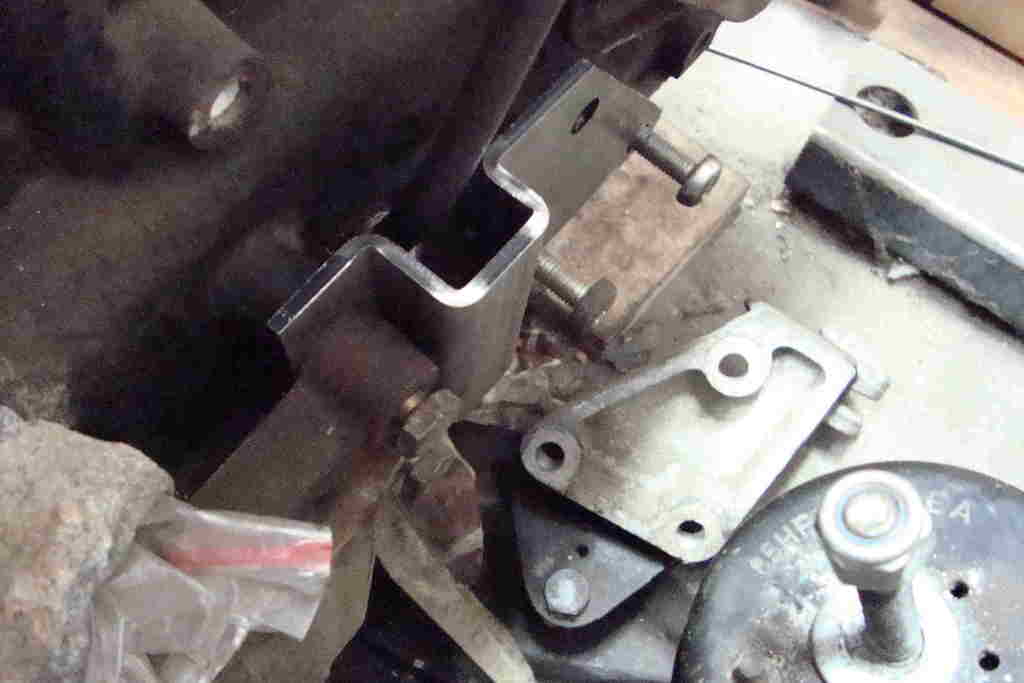
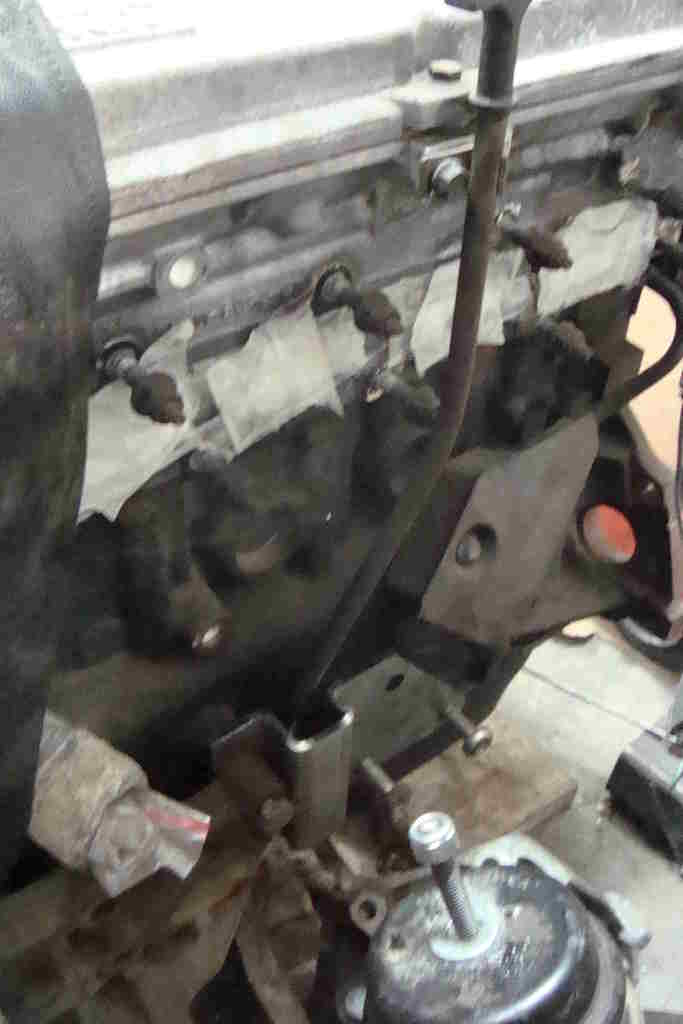
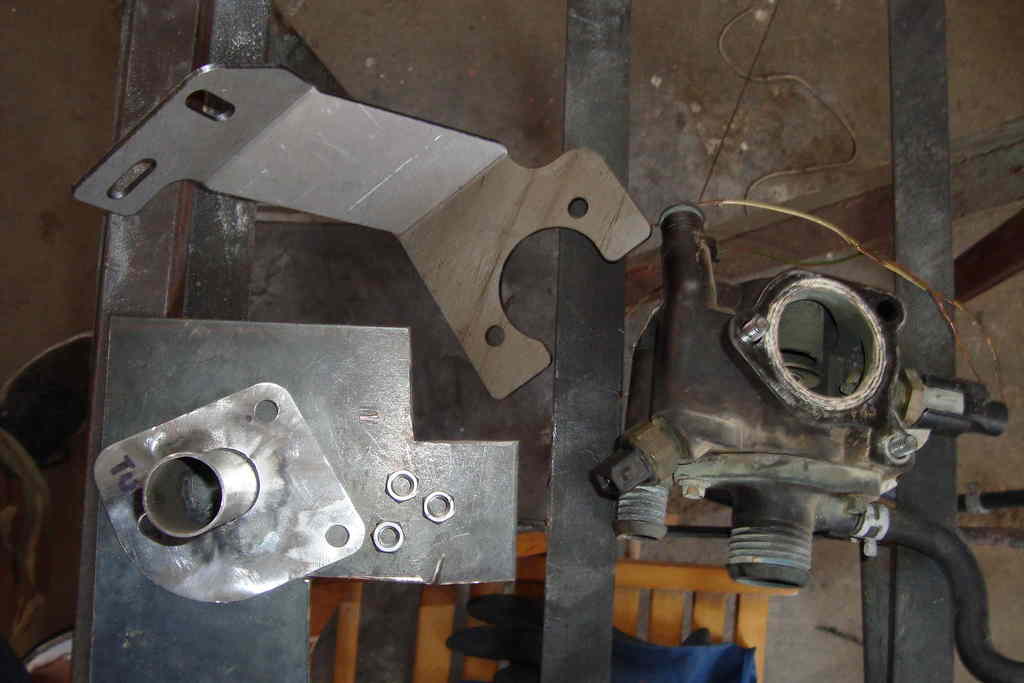
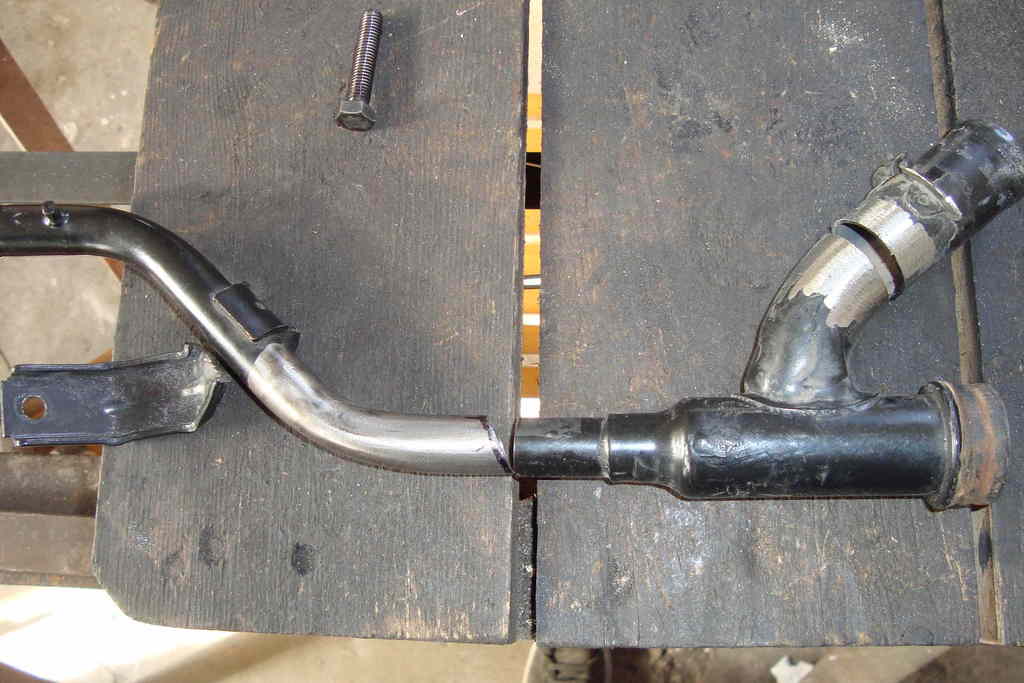
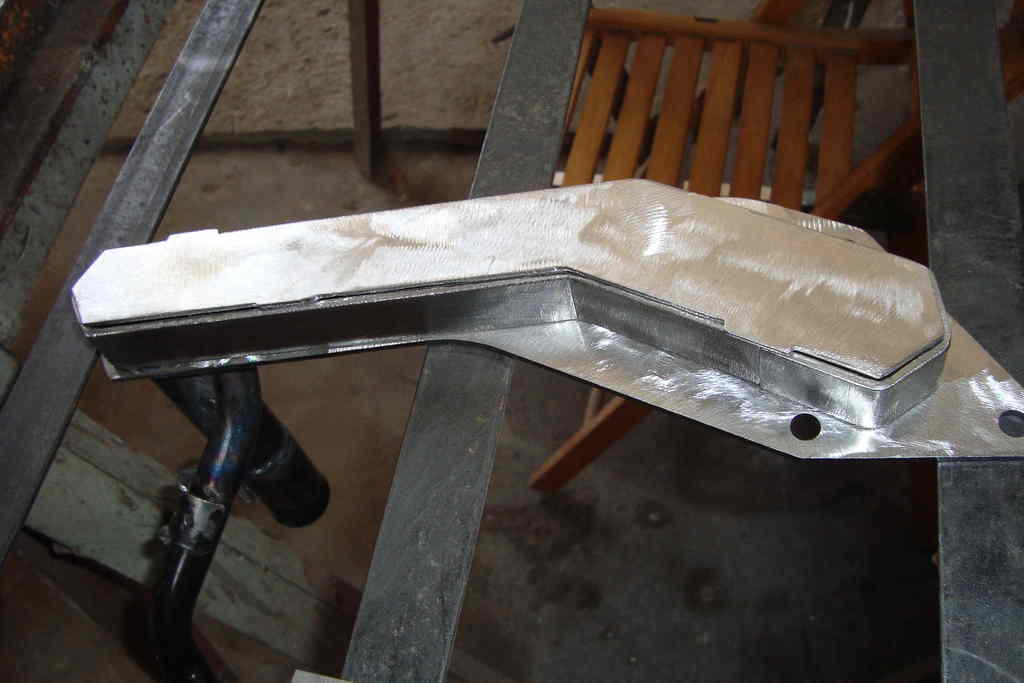
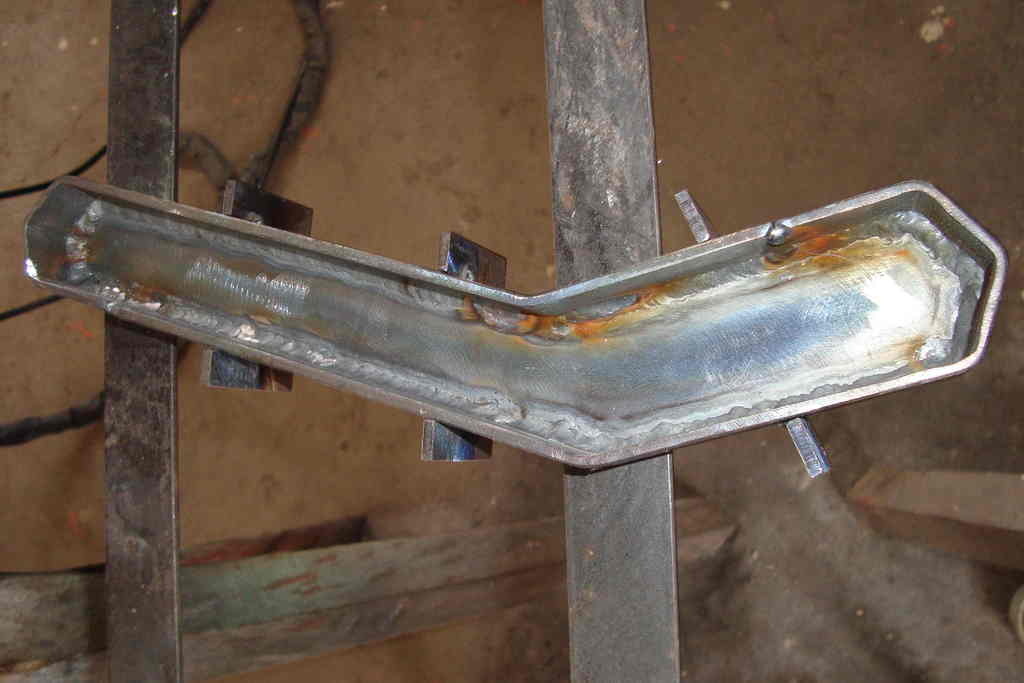
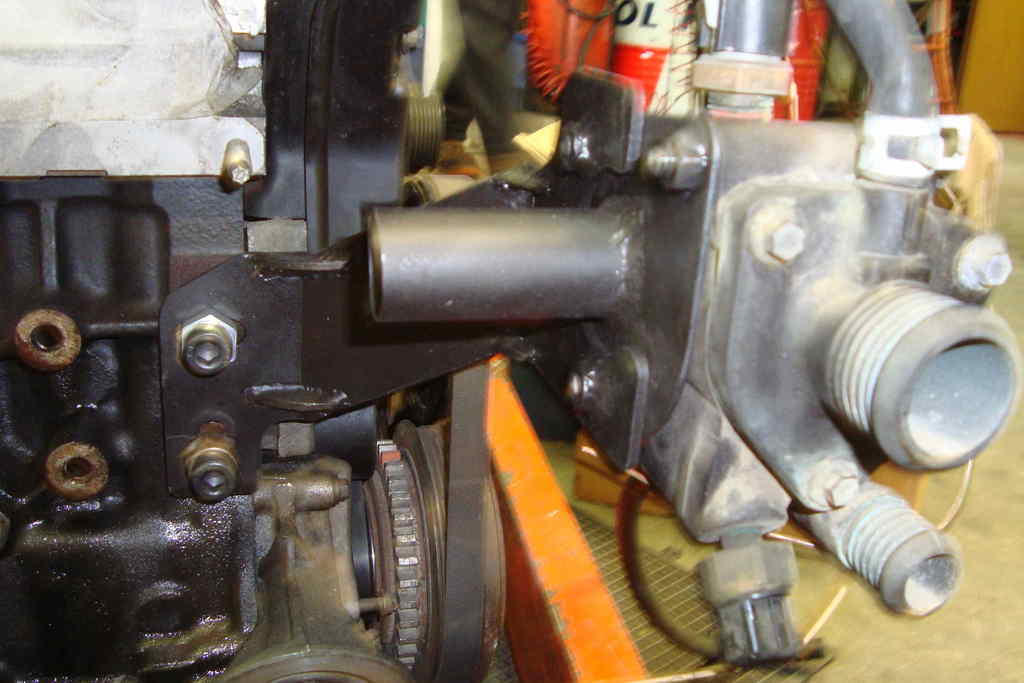
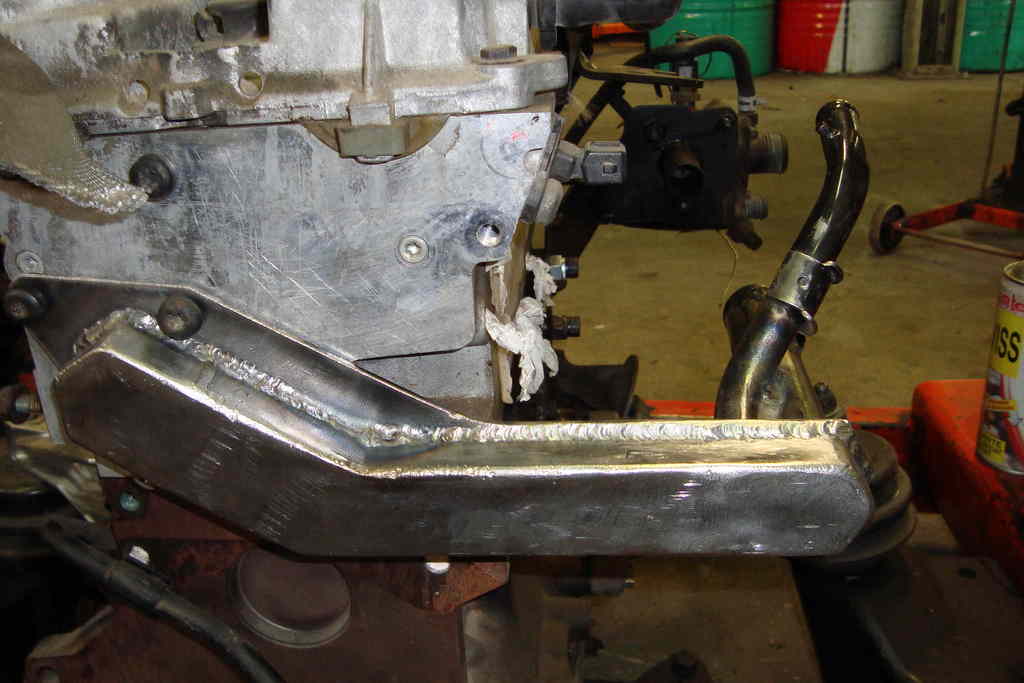
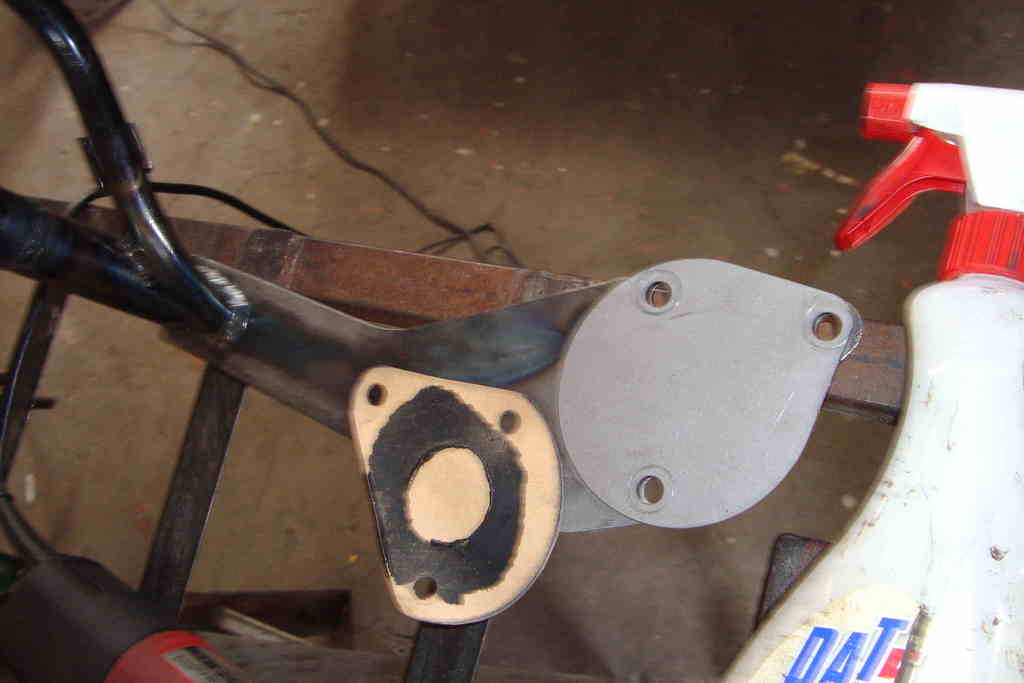
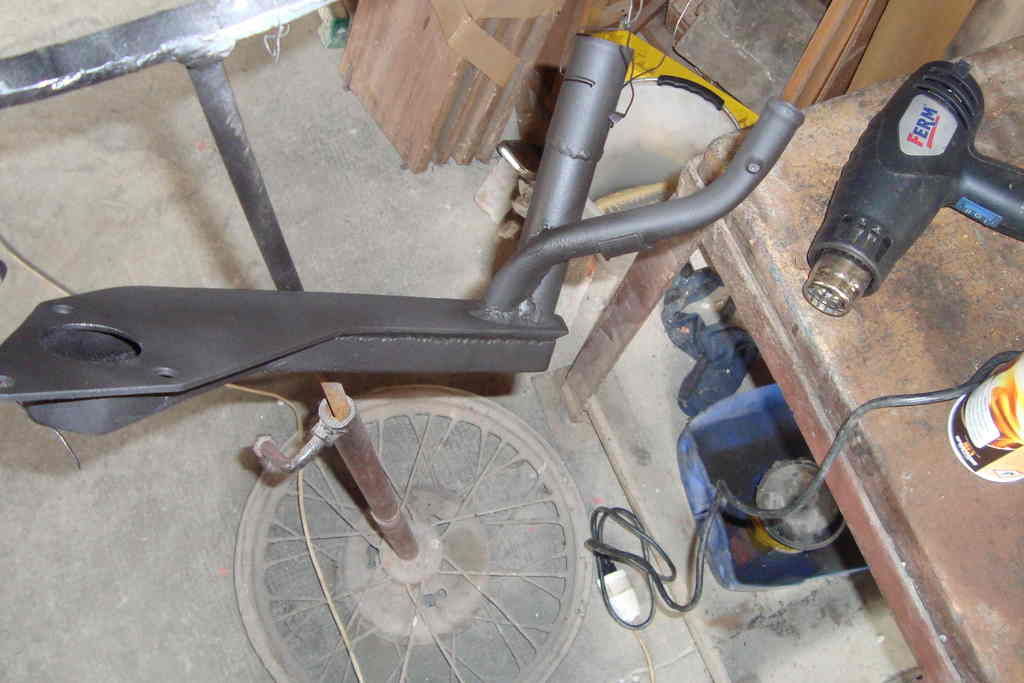
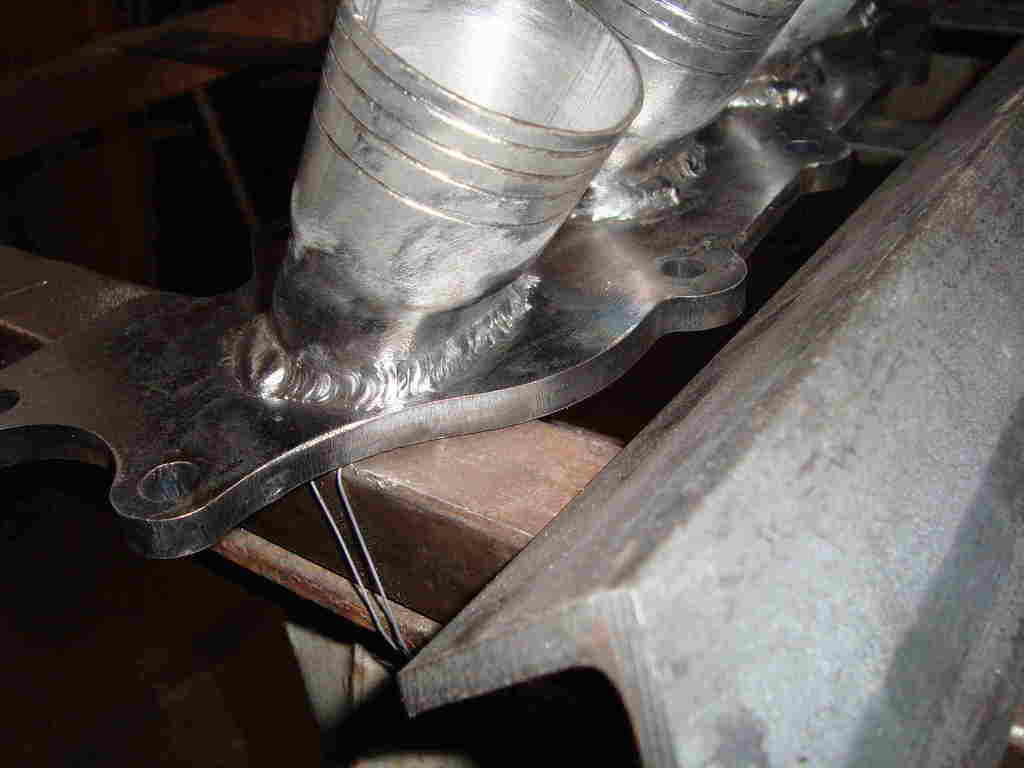
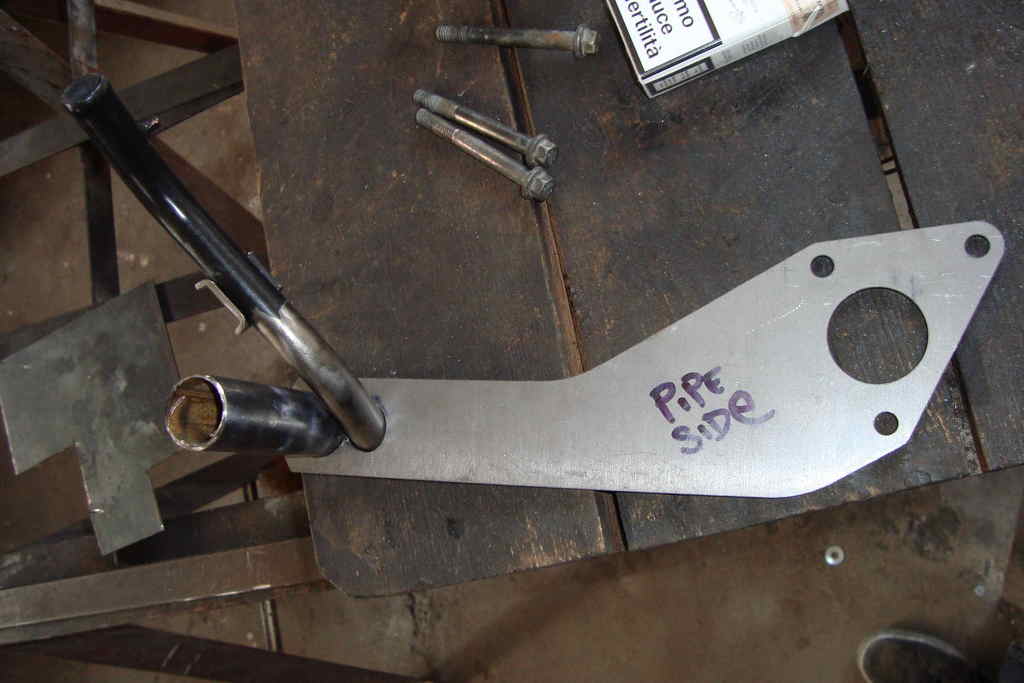
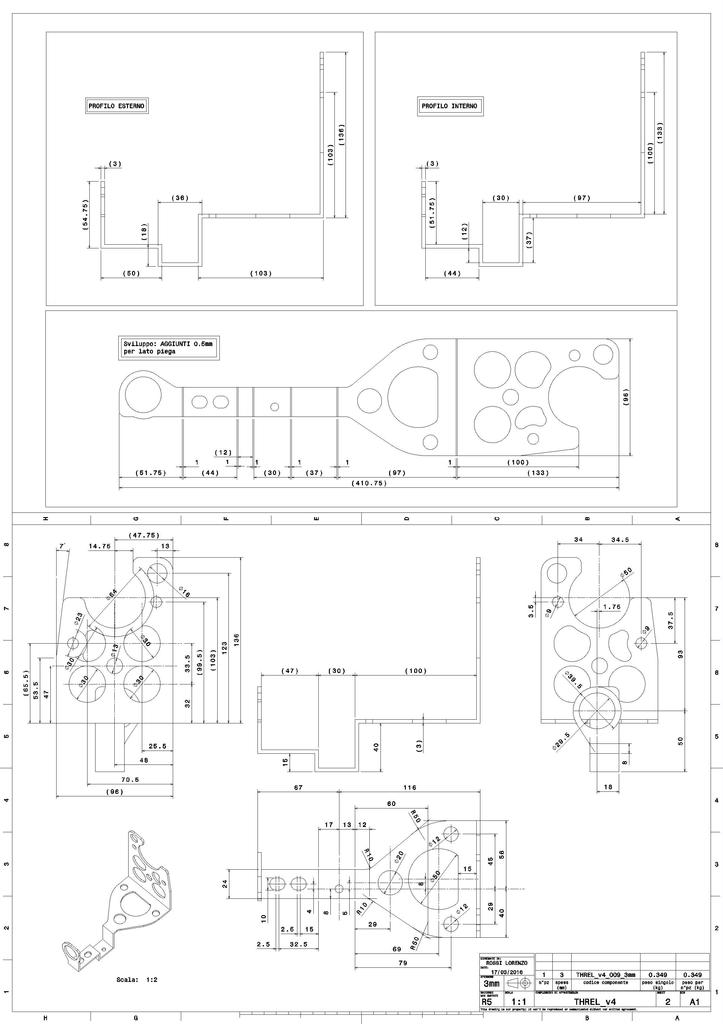
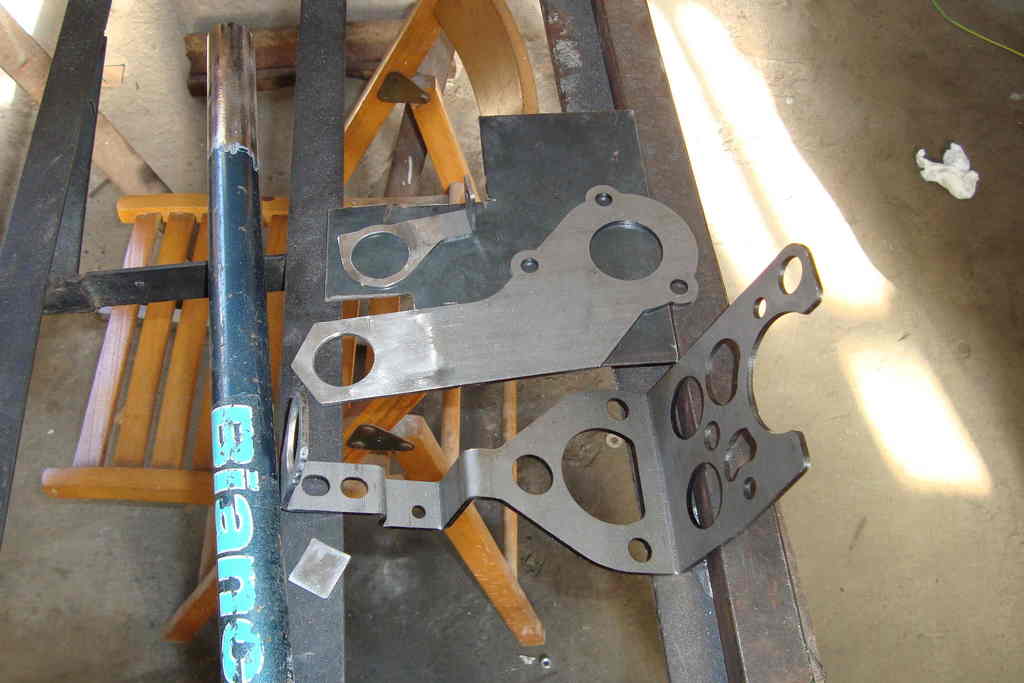
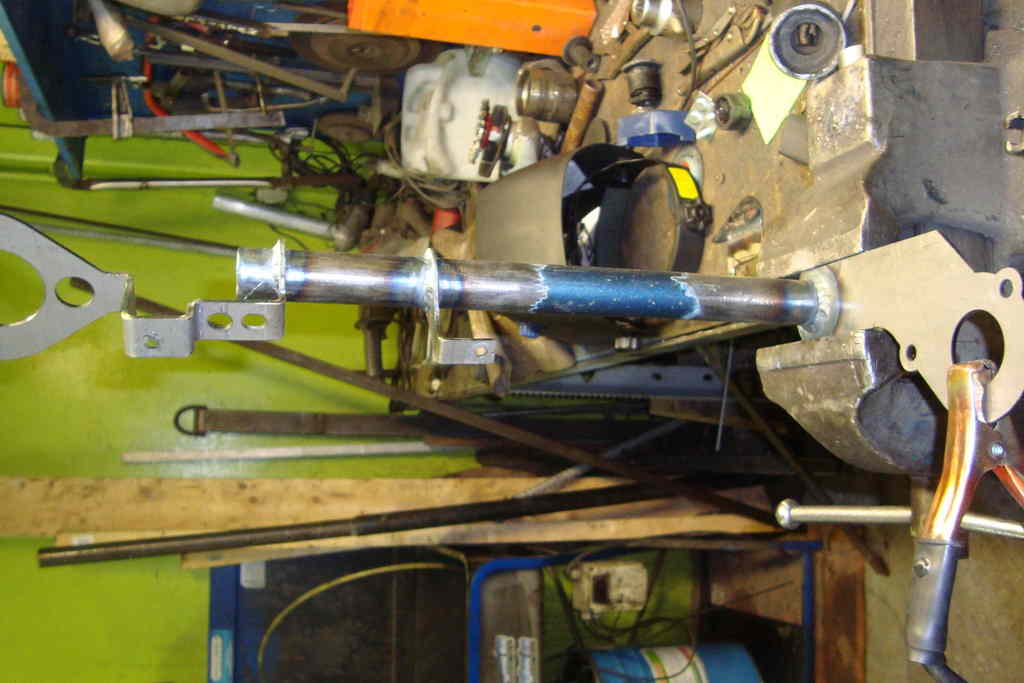
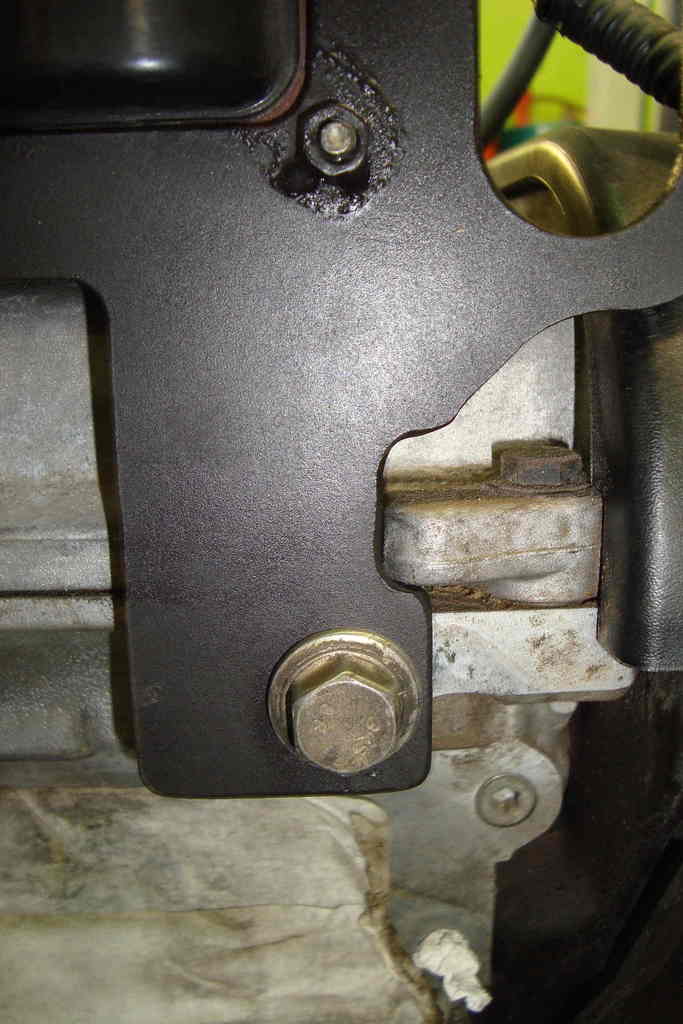
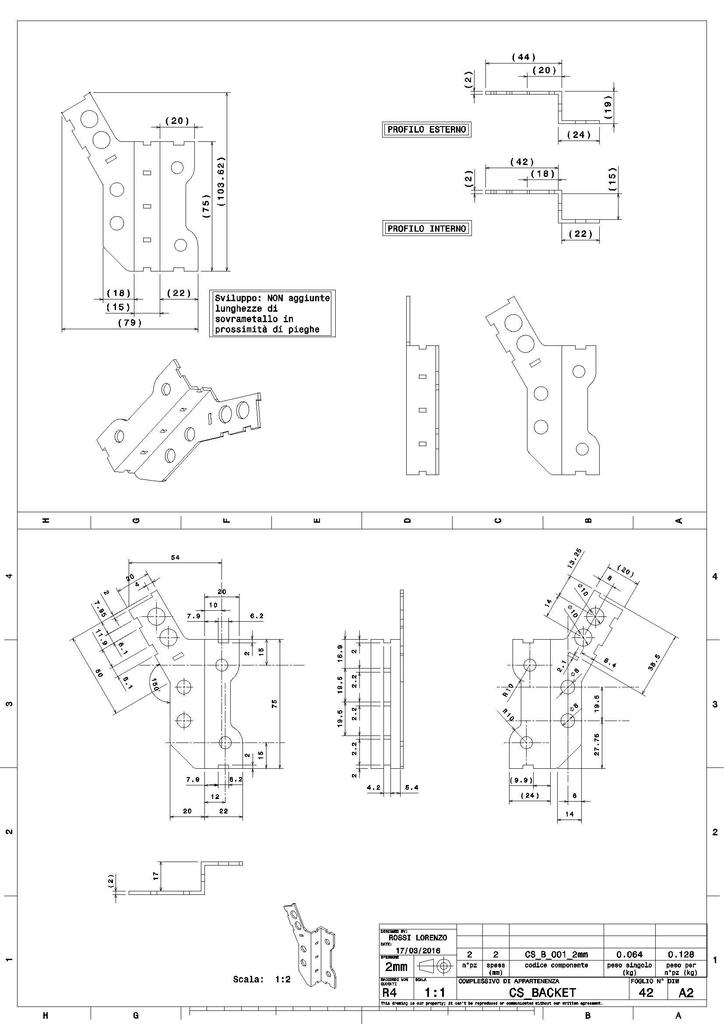
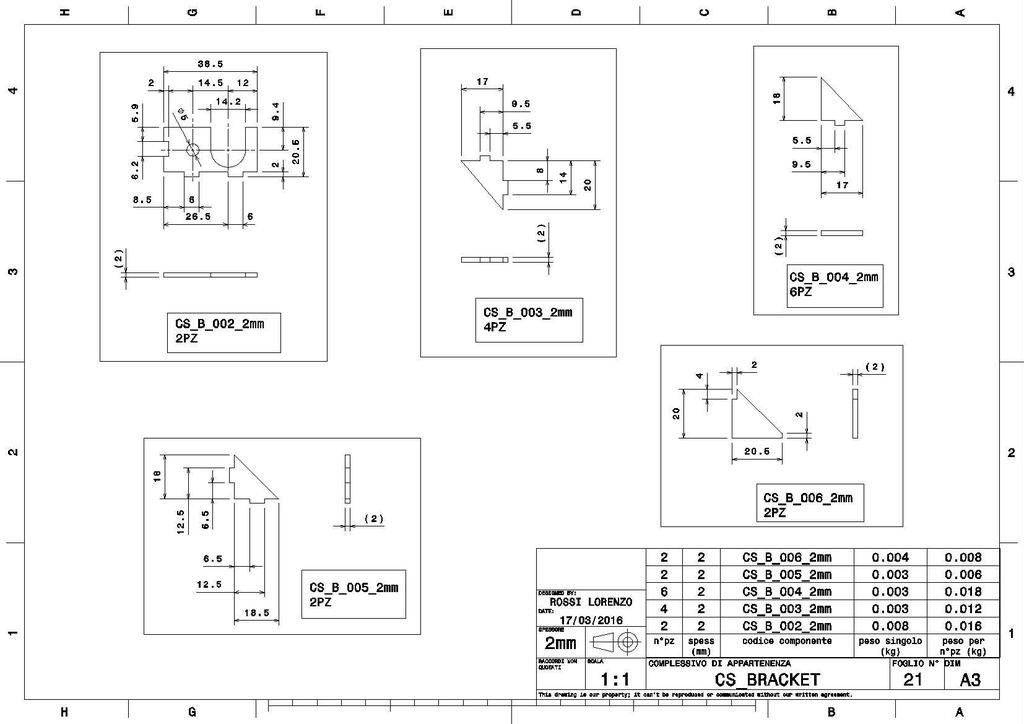
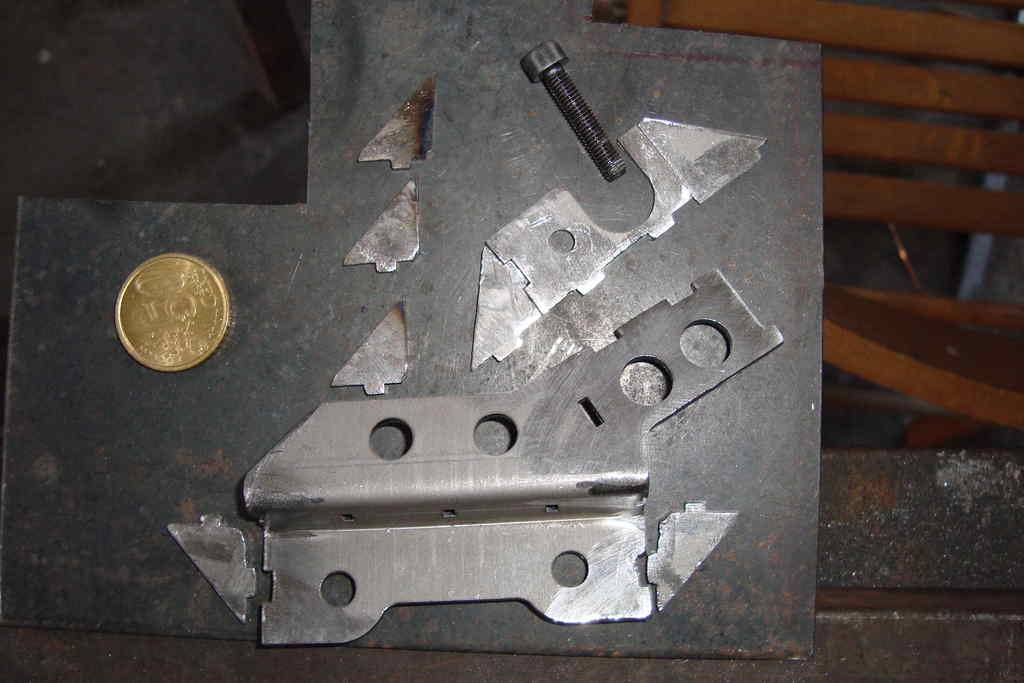
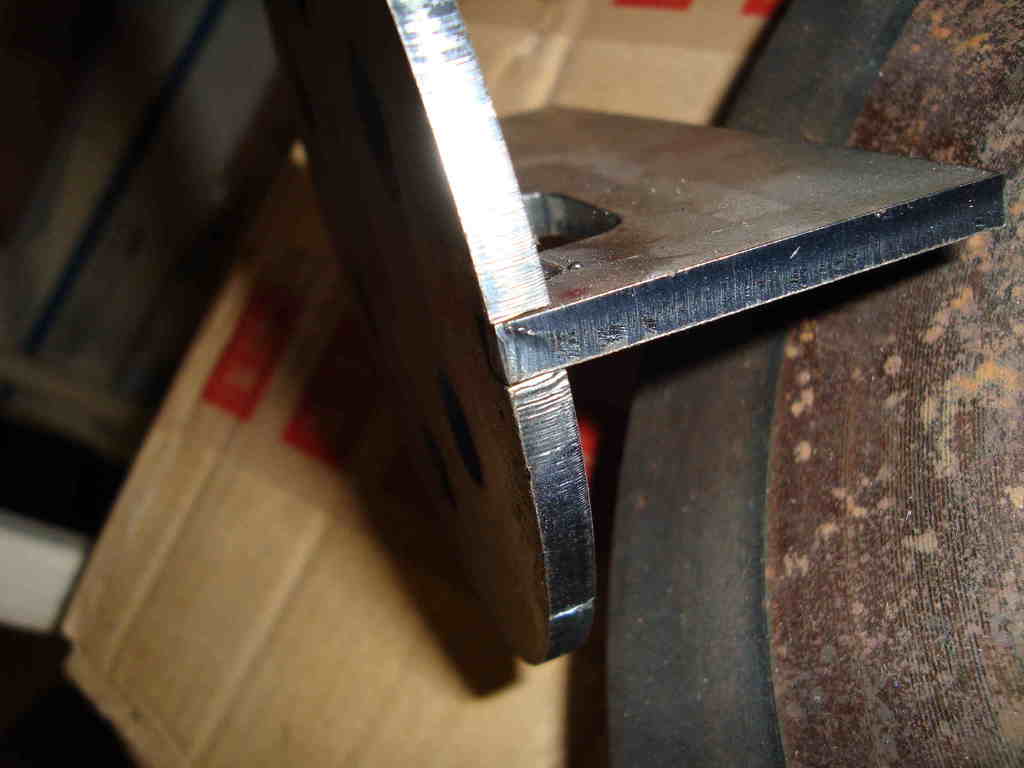
ENGINE MOUNTS
using stock 1.8cvh r2a saph engine mounts;
intake side no problem, straight fits.
in the exhaust side, a hole is missing.
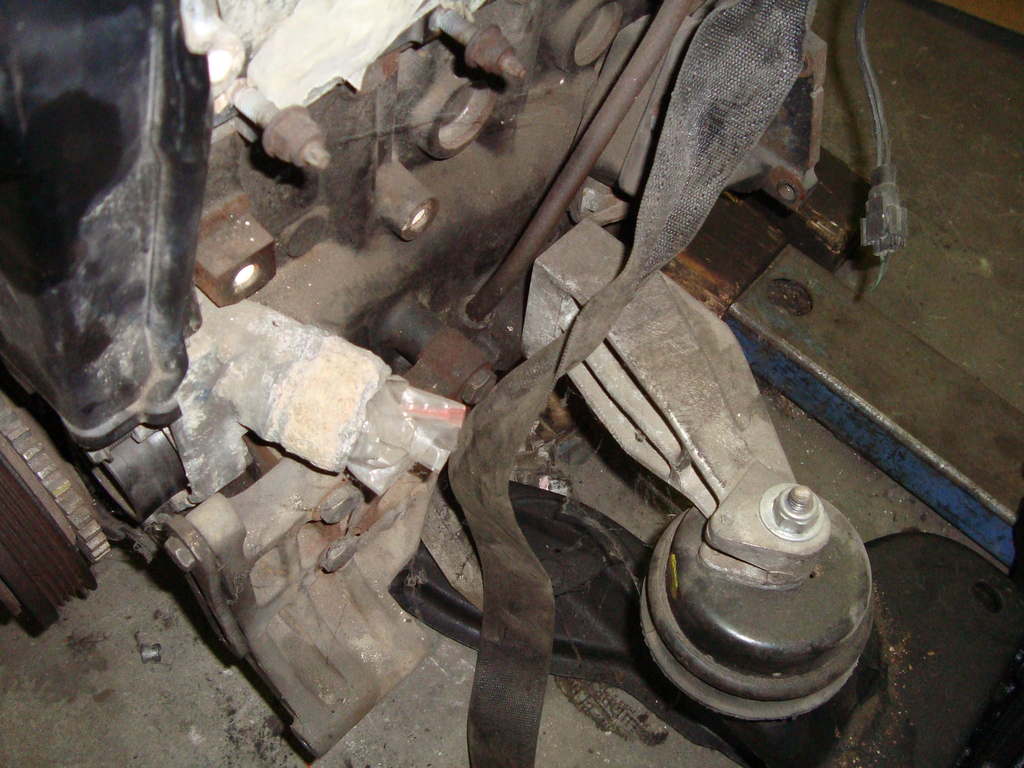
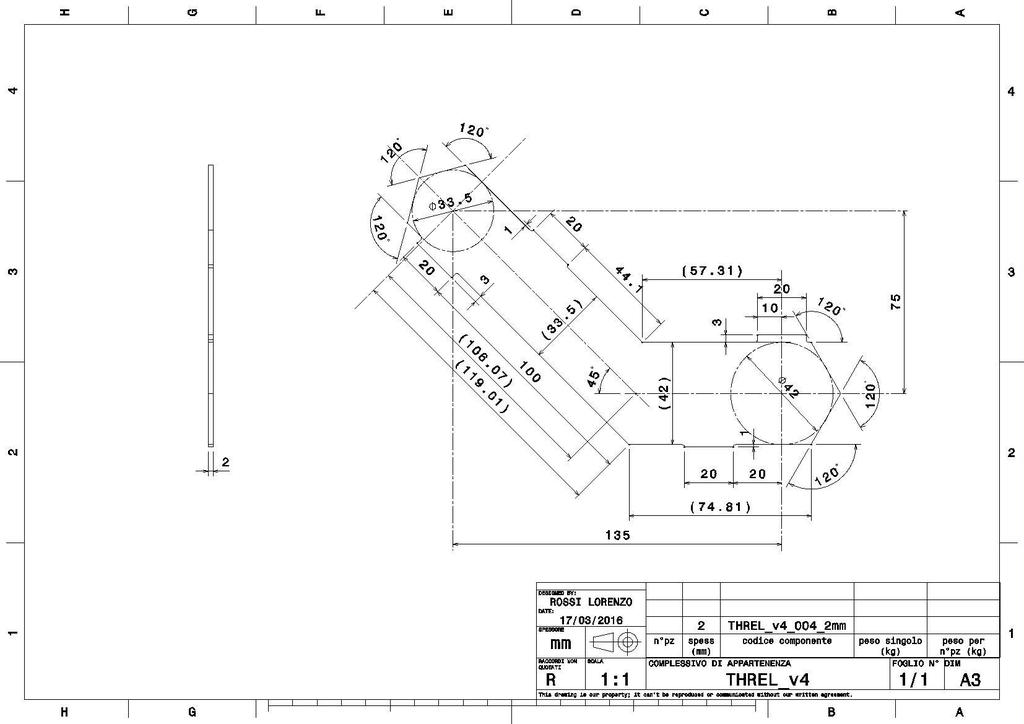
so, after some cadwork, i had this plate made for me:
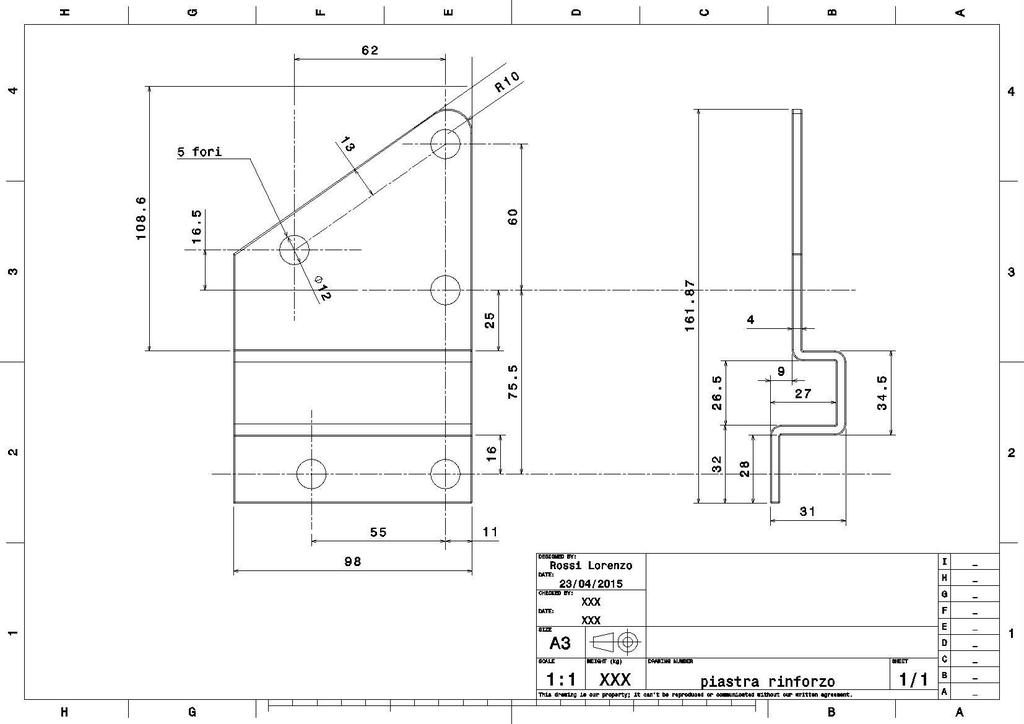
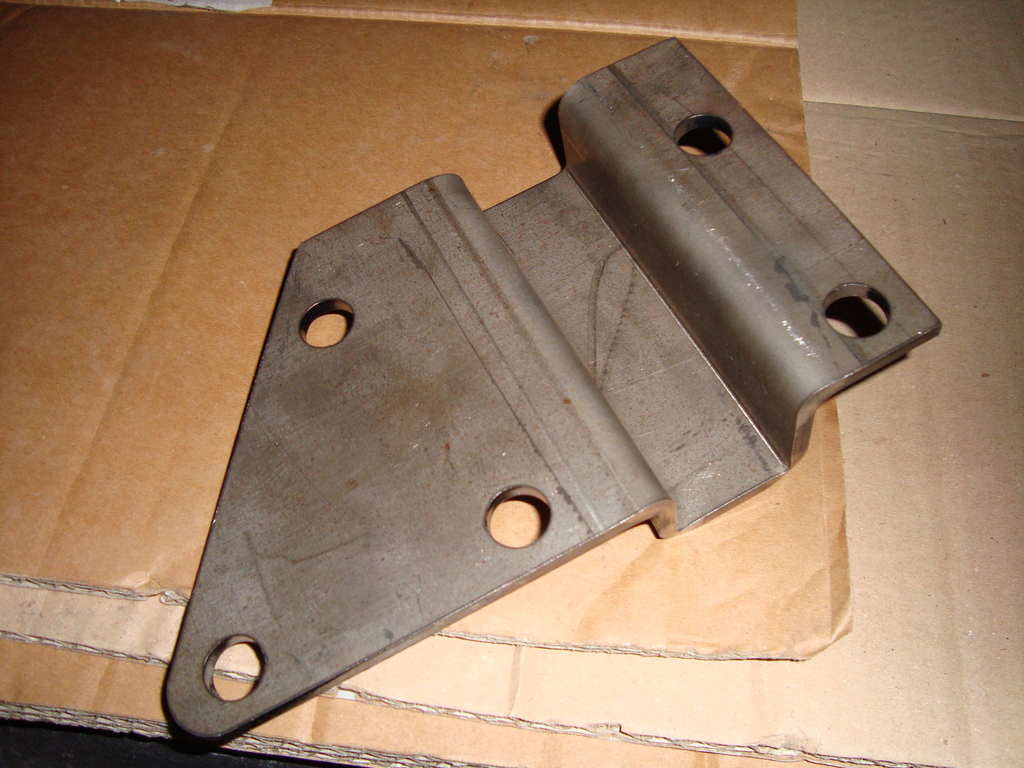
no need to change oil dipstick.
the bent also gives more stiffness.
but in order to keep the engine in position, the exh-side mount and the alternator support need to be milled down of 4mm;
using stock 1.8cvh r2a saph engine mounts;
intake side no problem, straight fits.

in the exhaust side, a hole is missing.

so, after some cadwork, i had this plate made for me:


no need to change oil dipstick.
the bent also gives more stiffness.
but in order to keep the engine in position, the exh-side mount and the alternator support need to be milled down of 4mm;


 03-05-2016, 10:09 AM
#12
PassionFord Regular
Thread Starter
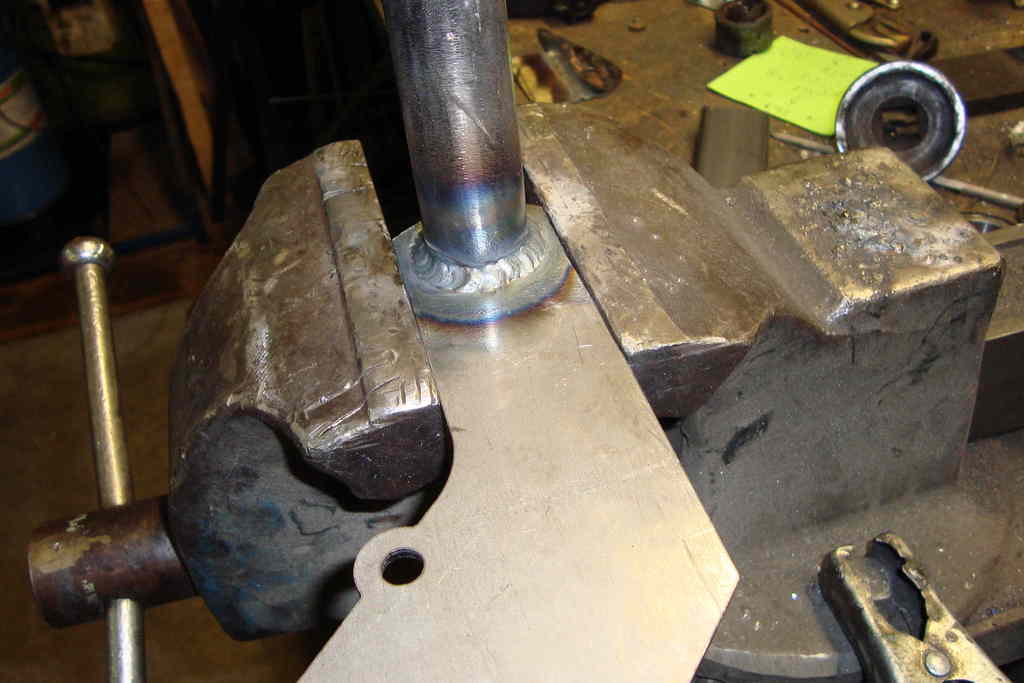
WATER RAIL pt.I
ispired by people on the web, in first attempt i designed this one:

then i figured out that a 2" pipe was enormous for the use.
now it's time for the plan B:
wanna put the oem thermostat in front of the engine, intake side...


the base plate:
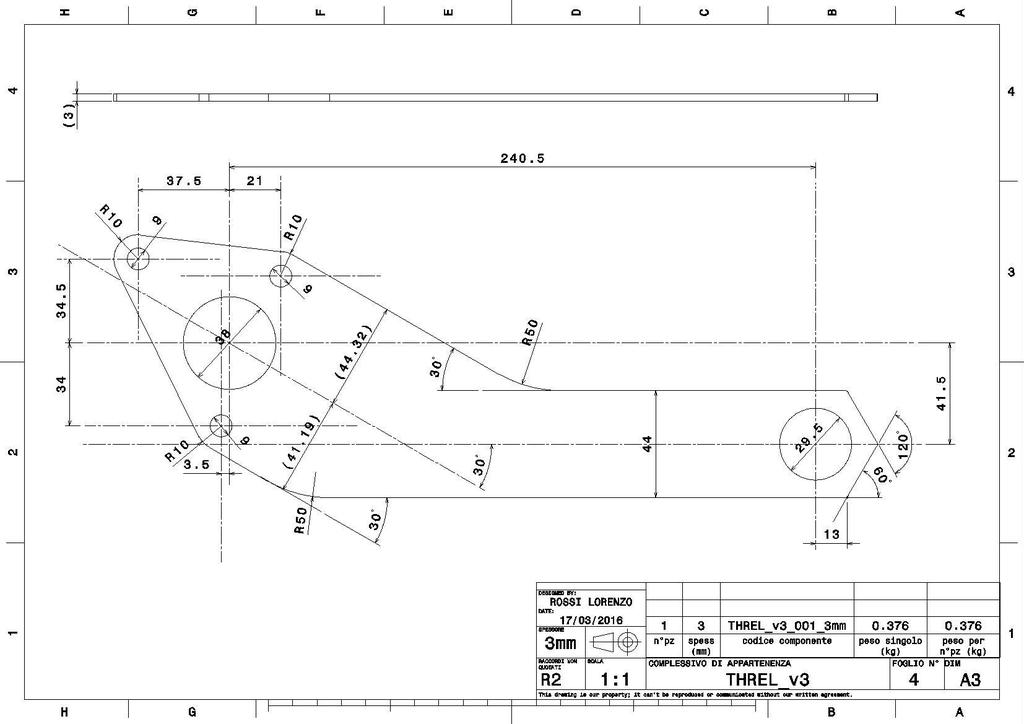
i had a second thought about the outlet section, maybe too little...
the 29.5mm od piping comes from an old dumped man bike chassis.
the others come from a fiat punto II 1.2 fire a188.
internal side...
here welded, smoothed for major efficency, and prepped for the hat.
ispired by people on the web, in first attempt i designed this one:


then i figured out that a 2" pipe was enormous for the use.
now it's time for the plan B:
wanna put the oem thermostat in front of the engine, intake side...


the base plate:

i had a second thought about the outlet section, maybe too little...
the 29.5mm od piping comes from an old dumped man bike chassis.
the others come from a fiat punto II 1.2 fire a188.


internal side...

here welded, smoothed for major efficency, and prepped for the hat.


 03-05-2016, 10:10 AM
#13
PassionFord Regular
Thread Starter
the hat:
in process...

tig welding the hat internal side first, was a bad idea.
it was impossible to clean enough the outside, so the outside weld shows a lot of porosity. damn!
but i assume the internal is still water&pressure proof... (hope so).


in process...


tig welding the hat internal side first, was a bad idea.
it was impossible to clean enough the outside, so the outside weld shows a lot of porosity. damn!
but i assume the internal is still water&pressure proof... (hope so).
 03-05-2016, 10:10 AM
#14
PassionFord Regular
Thread Starter
pre-assemble on the engine,...
i made this one, for a compressed air and soap test...
i had luck! no bubble seen.
then hi-temp black coated.


i made this one, for a compressed air and soap test...
i had luck! no bubble seen.


then hi-temp black coated.
 03-05-2016, 10:11 AM
#15
PassionFord Regular
Thread Starter
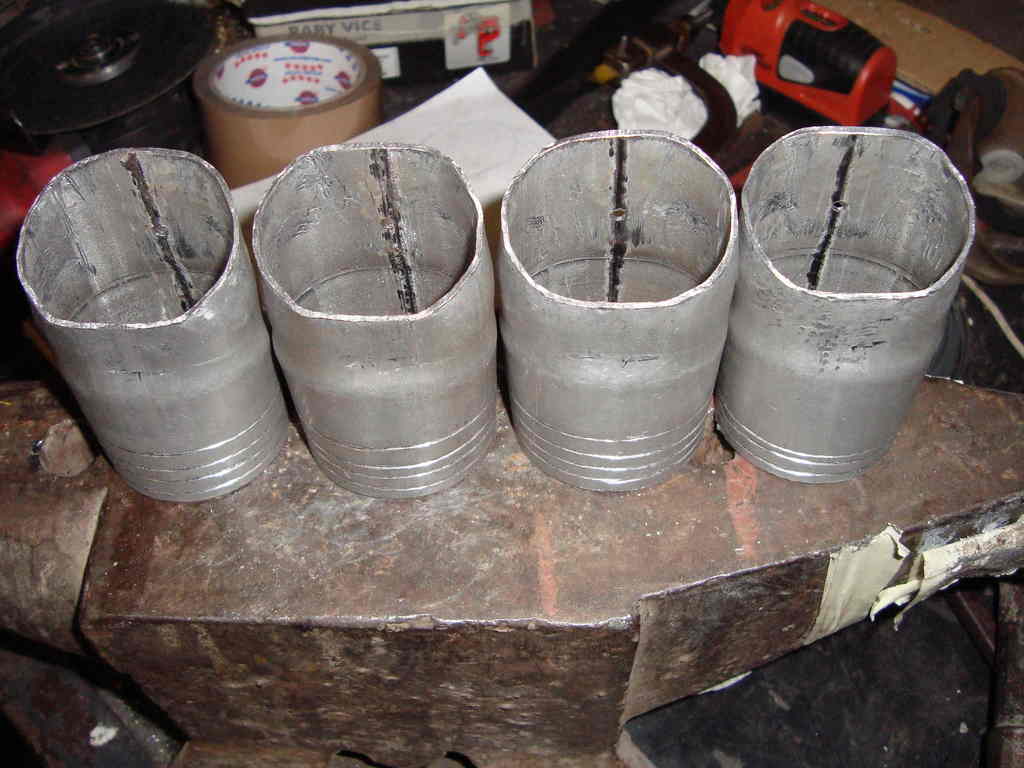
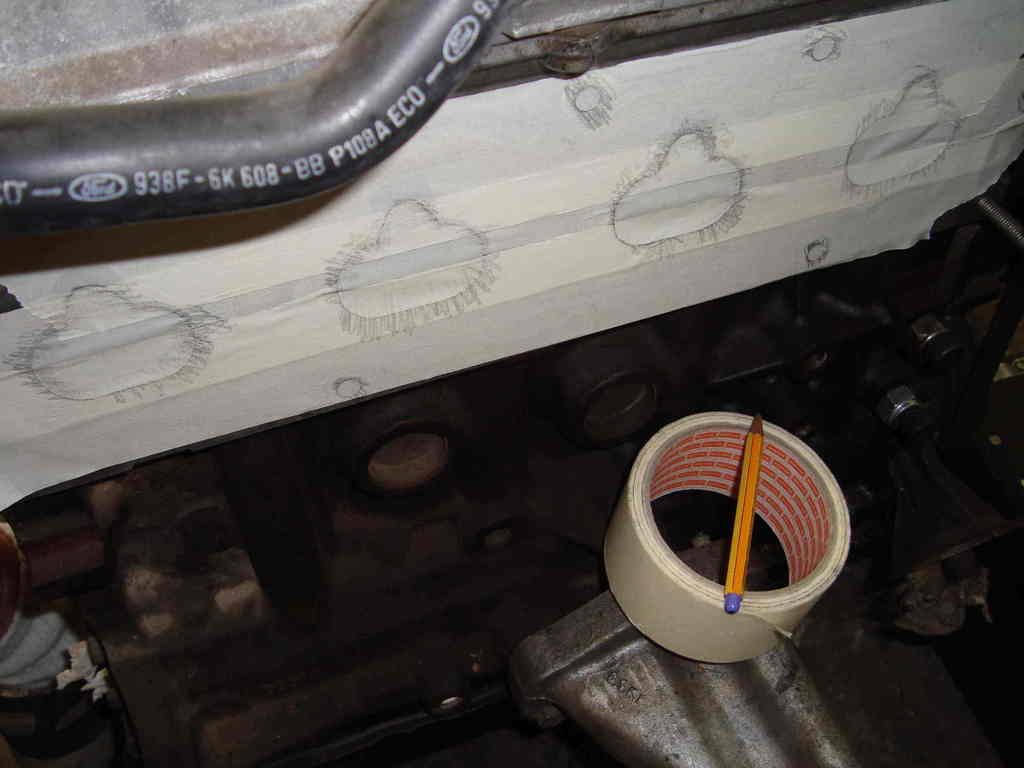
INTAKE pt.I
for the intake, i'm going to do as this genius-gentleman did:
http://www.xrtwo.com/forum/viewtopic.php?t=88057
(thank you ericdean, that topic has been very precious to me)
...but without buying the flange and stay stick to lpg.
directly copied from the web:
some pic of the process...

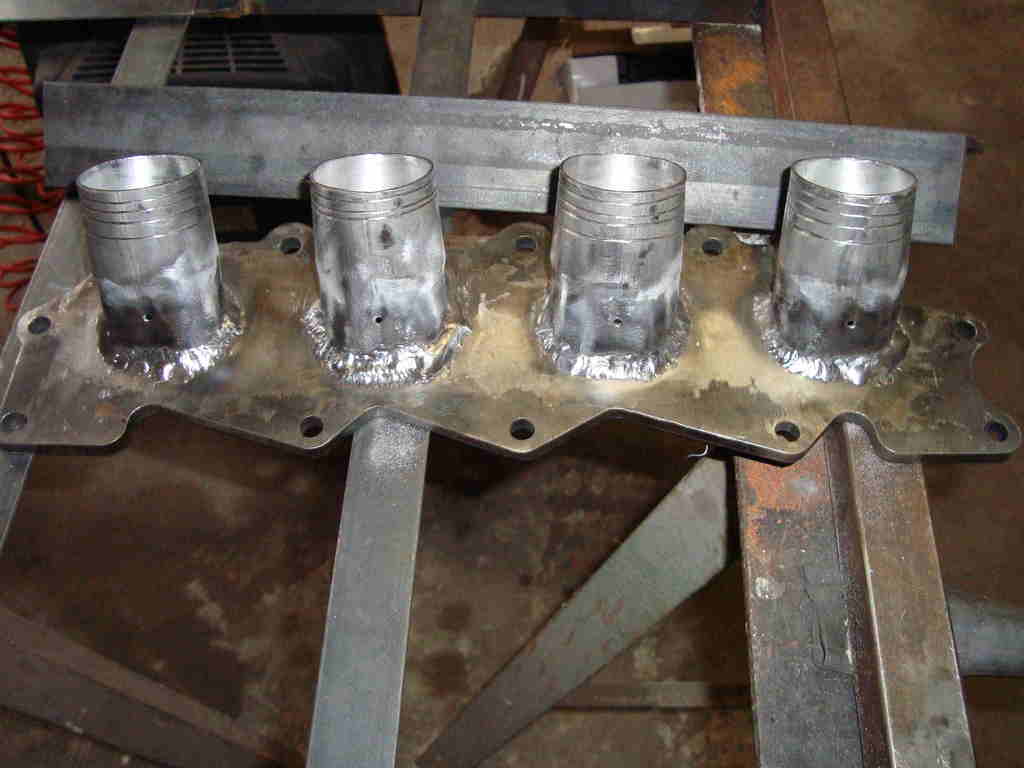
also made this one, to be able to put it square in a mill vise, and work on the front face, once i have the ports dremeled...
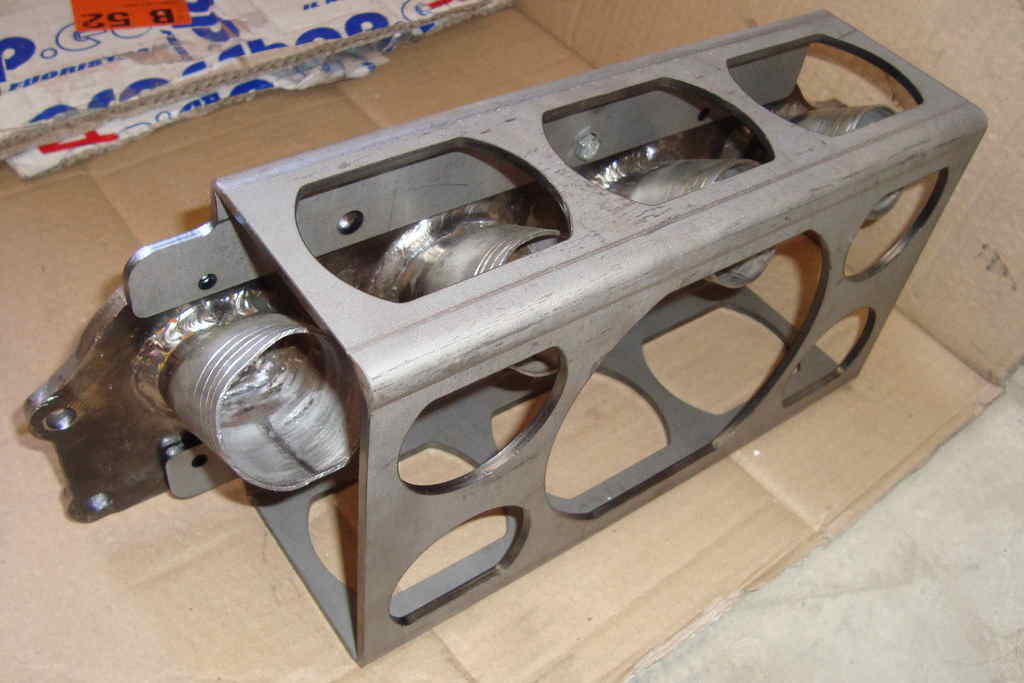
this also needs work on the carbs linkages...
this will make me go out of time, i might submit to the dark side and purchase a dan-st's kit...
for the intake, i'm going to do as this genius-gentleman did:
http://www.xrtwo.com/forum/viewtopic.php?t=88057
(thank you ericdean, that topic has been very precious to me)
...but without buying the flange and stay stick to lpg.
directly copied from the web:


some pic of the process...


also made this one, to be able to put it square in a mill vise, and work on the front face, once i have the ports dremeled...


this also needs work on the carbs linkages...
this will make me go out of time, i might submit to the dark side and purchase a dan-st's kit...
03-05-2016, 10:49 AM
#16
PassionFord Regular
Thread Starter
i made some copy and paste errors, 'cause i'm posting in other forums:
INTAKE pt.I
for the intake, i'm going to do as this genius-gentleman did:
http://www.xrtwo.com/forum/viewtopic.php?t=88057
(thank you ericdean, that topic has been ver...
...I WAS GOING...
FRONT ENGINE SET UP pt.I
here it is my set-up:
-1.8 cvh std cranckshaft pulley with 2mm shim (see next);
-1.8 cvh std alternator with 1.8 cvh std alternator mount (milled down of 4mm see above);....
...SEE NEXT);...
also sorry for the useless doubled pics...

The following users liked this post:
rooos (03-05-2016)
03-05-2016, 06:57 PM
#18
PassionFord Regular
Thread Starter
thank you man,
working on it this evening...
keeping you posted as soon...
working on it this evening...
keeping you posted as soon...
08-05-2016, 06:38 PM
#19
PassionFord Regular
Thread Starter
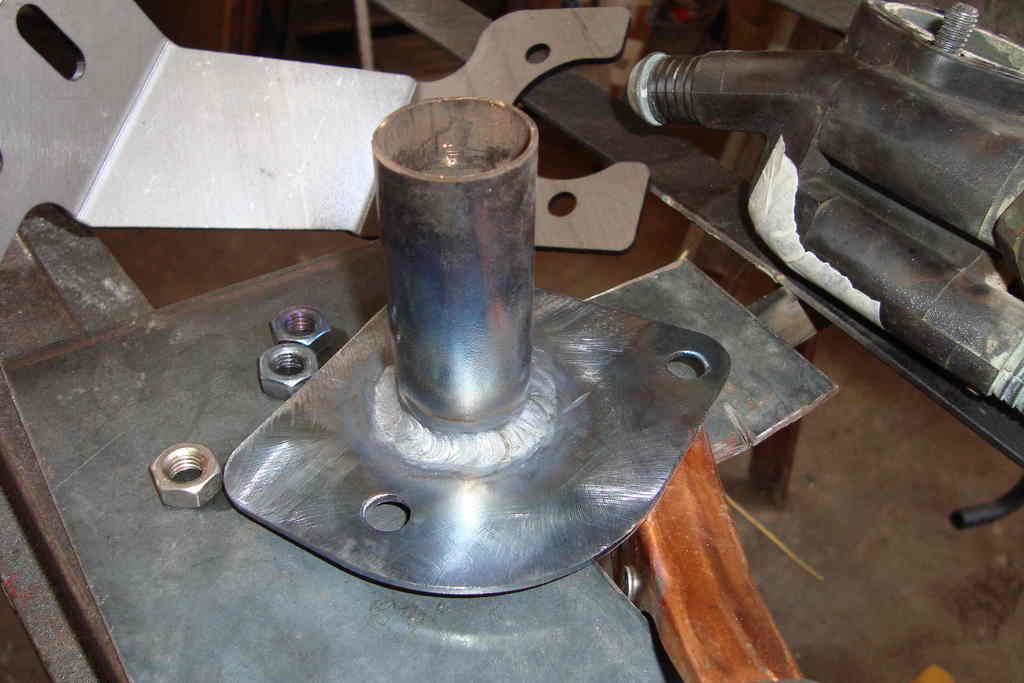
WATER-RAIL pt.II
here the pic i wanted to put instead of the doubled one... (water-rail, plan-b, base plate)
now: getting everything ready for the plan-c:
i also drawn down these ones:

here the pic i wanted to put instead of the doubled one... (water-rail, plan-b, base plate)

now: getting everything ready for the plan-c:
i also drawn down these ones:


 08-05-2016, 06:38 PM
#20
PassionFord Regular
Thread Starter
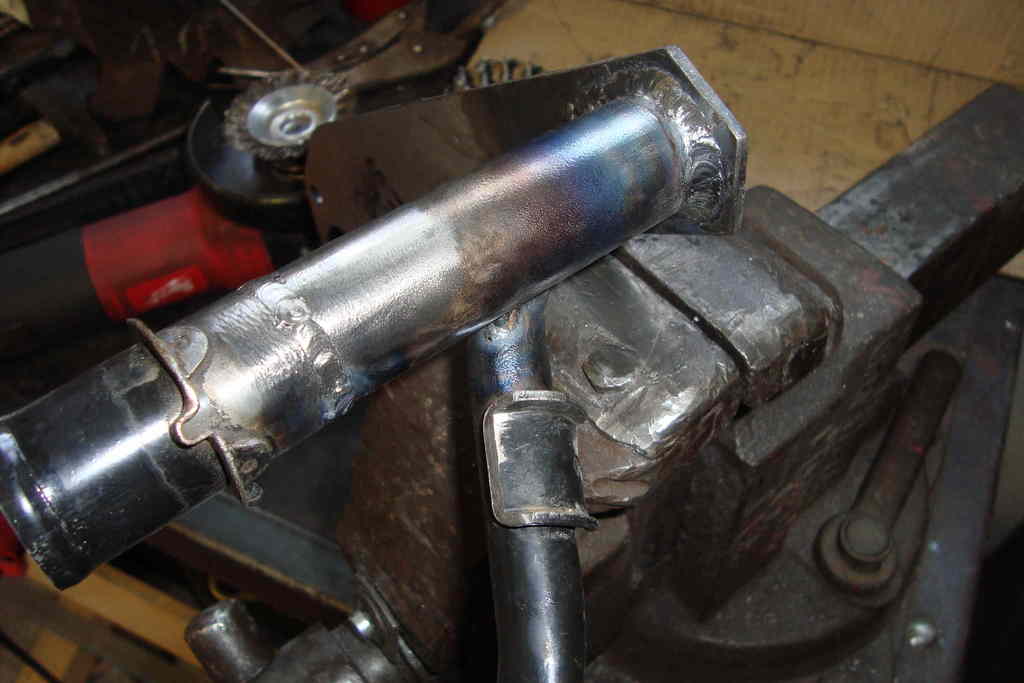
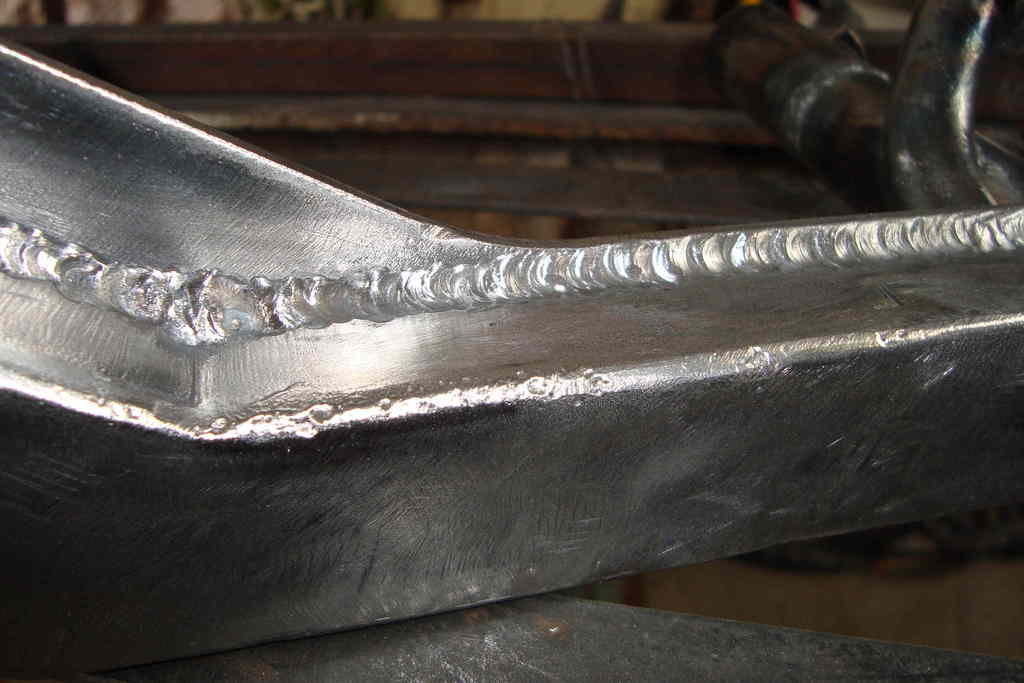
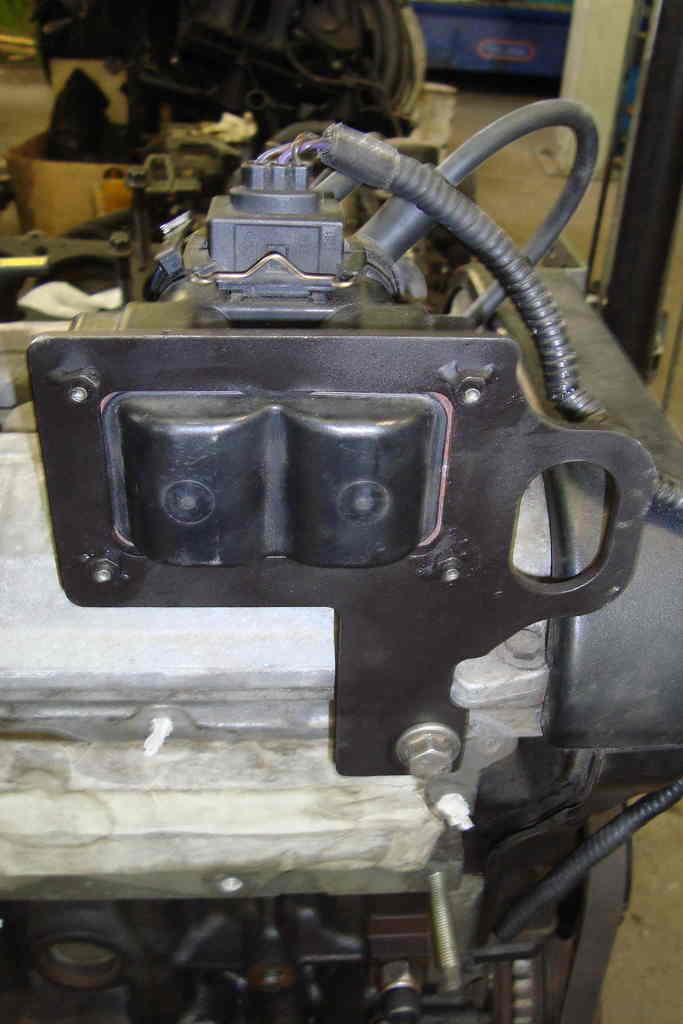
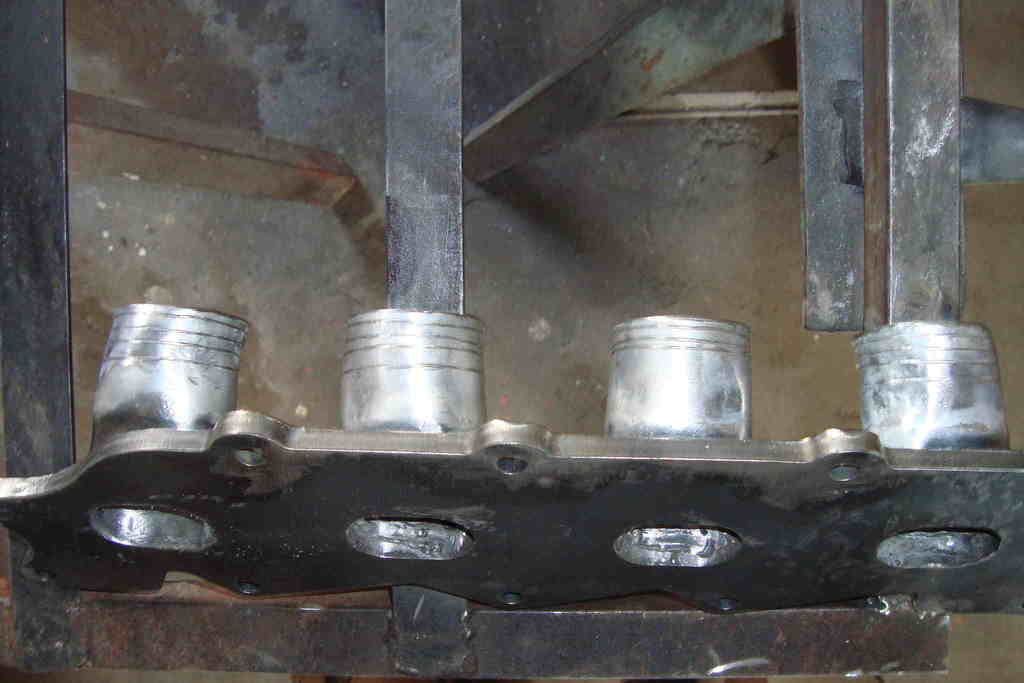
it is imperative tack weld 'em in position on the head.
i preferred to do it at this moment, instead of doing it with the engine already in the car, with the fuel and lpg lines all around...
here some pic of the process.
(you can also see the "exhaust-side engine-mount plate" correctly assembled).
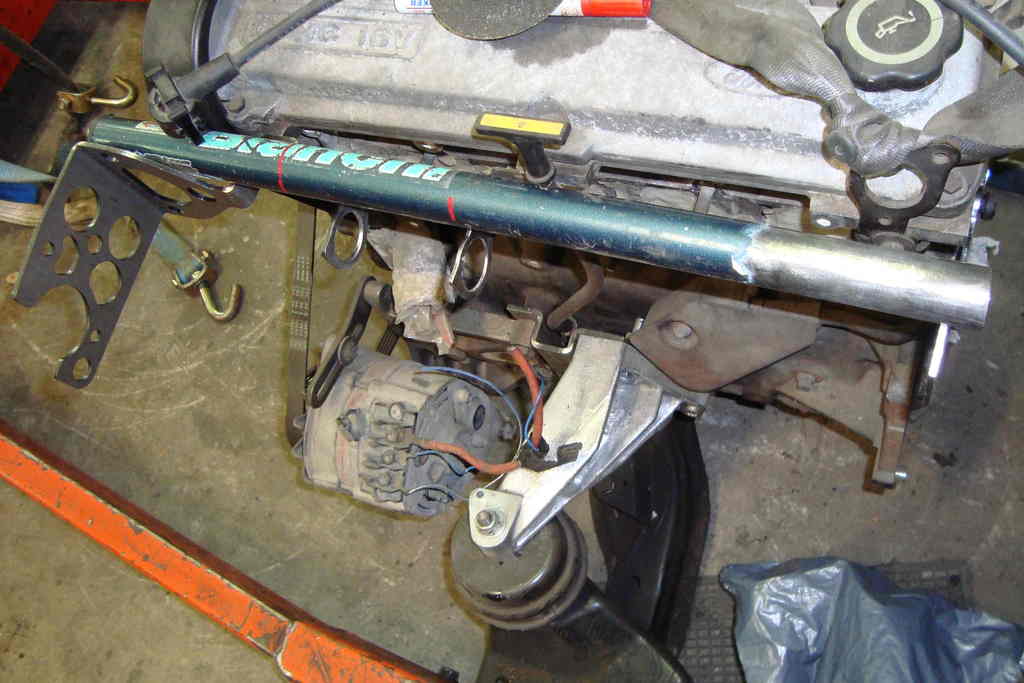
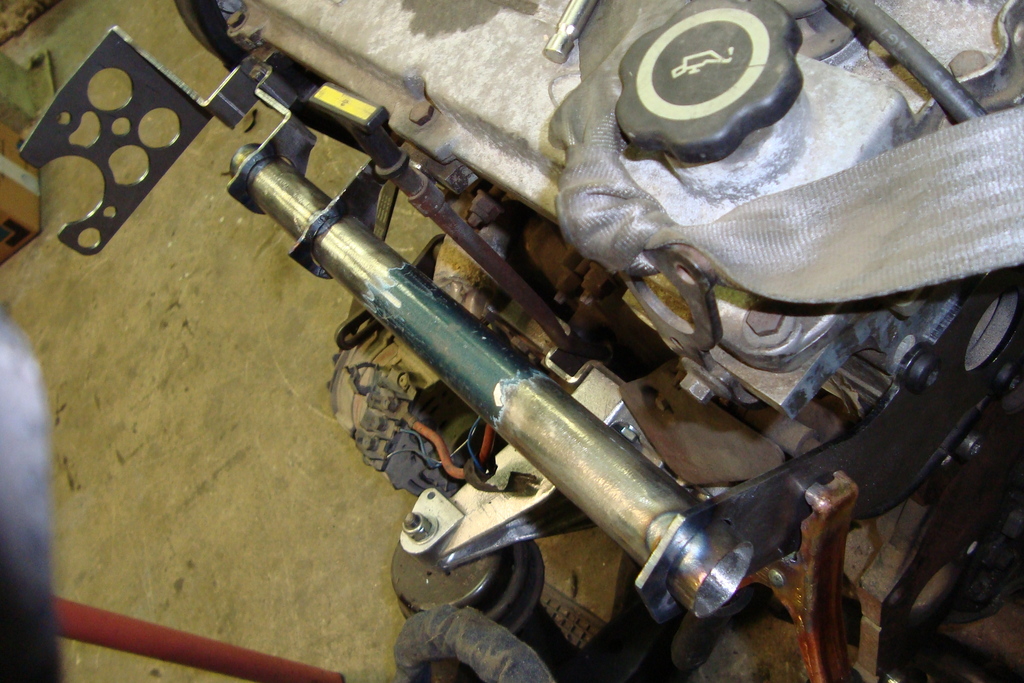
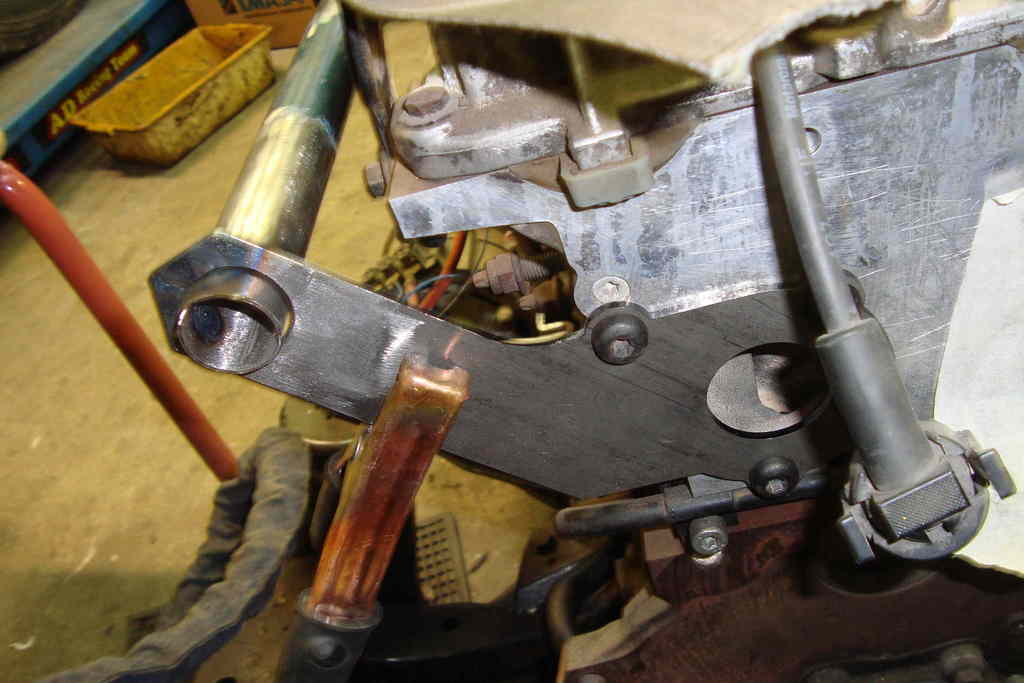
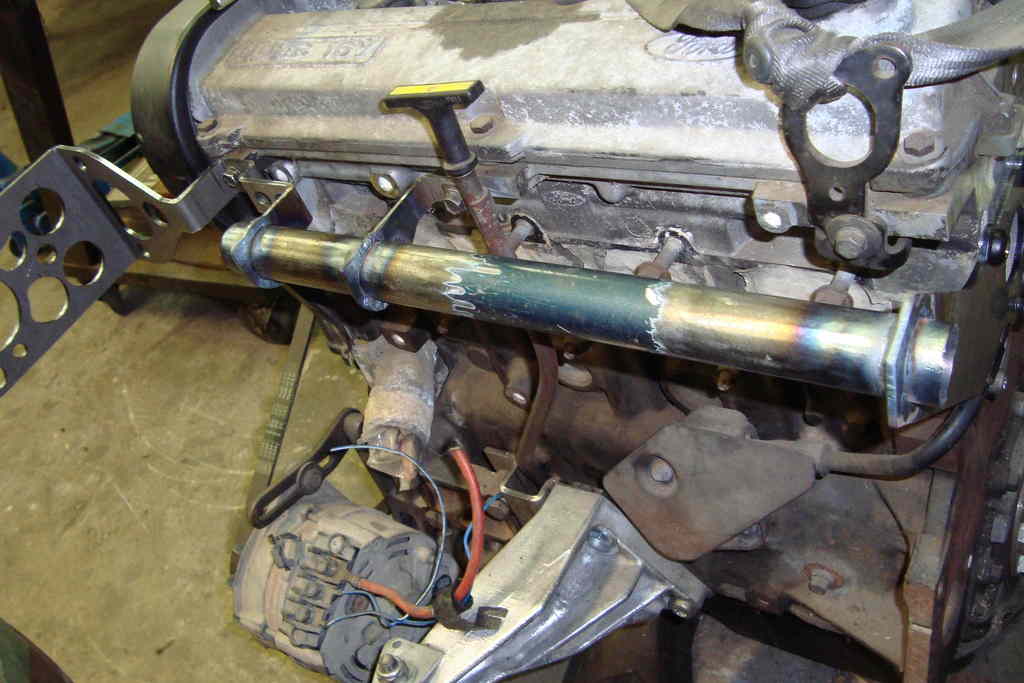
i preferred to do it at this moment, instead of doing it with the engine already in the car, with the fuel and lpg lines all around...
here some pic of the process.
(you can also see the "exhaust-side engine-mount plate" correctly assembled).


 08-05-2016, 06:39 PM
#21
PassionFord Regular
Thread Starter
it also will need:
-another one of these, to be connected at the whole with a rubber hose (not urgent at this moment)...
...
-the hat: ....
still not have them parts, but i made some very-very-raw drafts, with dimension, just for anybody who might be interested...

...
-and to relocate the exhaust manifold, (the one i already have), so...
-another one of these, to be connected at the whole with a rubber hose (not urgent at this moment)...
...
-the hat: ....
still not have them parts, but i made some very-very-raw drafts, with dimension, just for anybody who might be interested...


...
-and to relocate the exhaust manifold, (the one i already have), so...
08-05-2016, 07:46 PM
#22
PassionFord Regular
Thread Starter
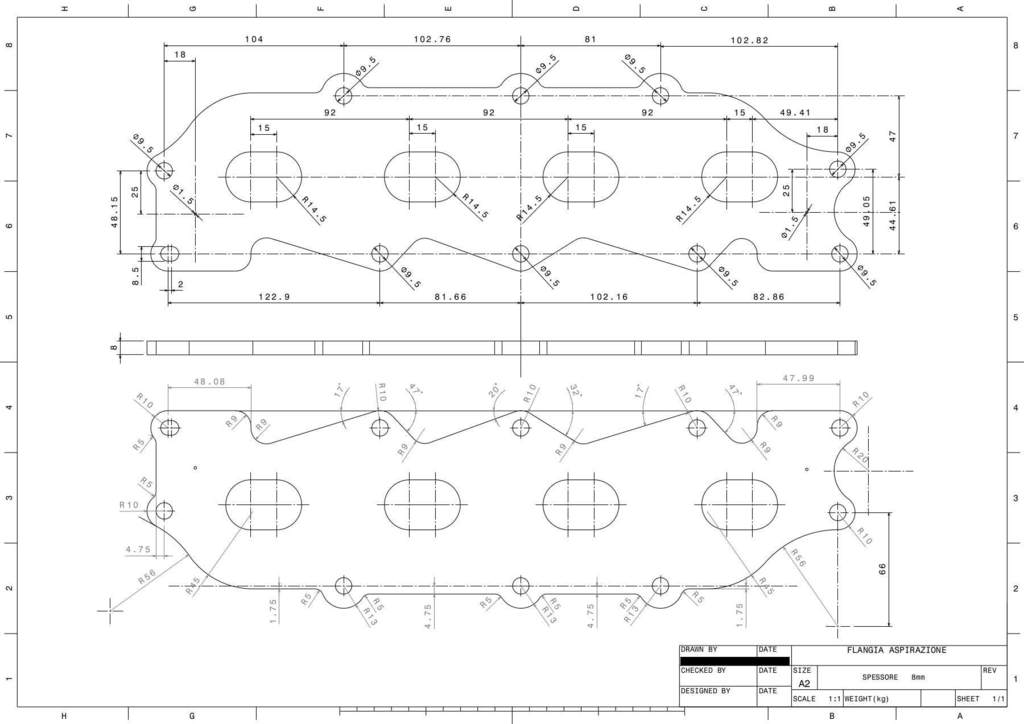
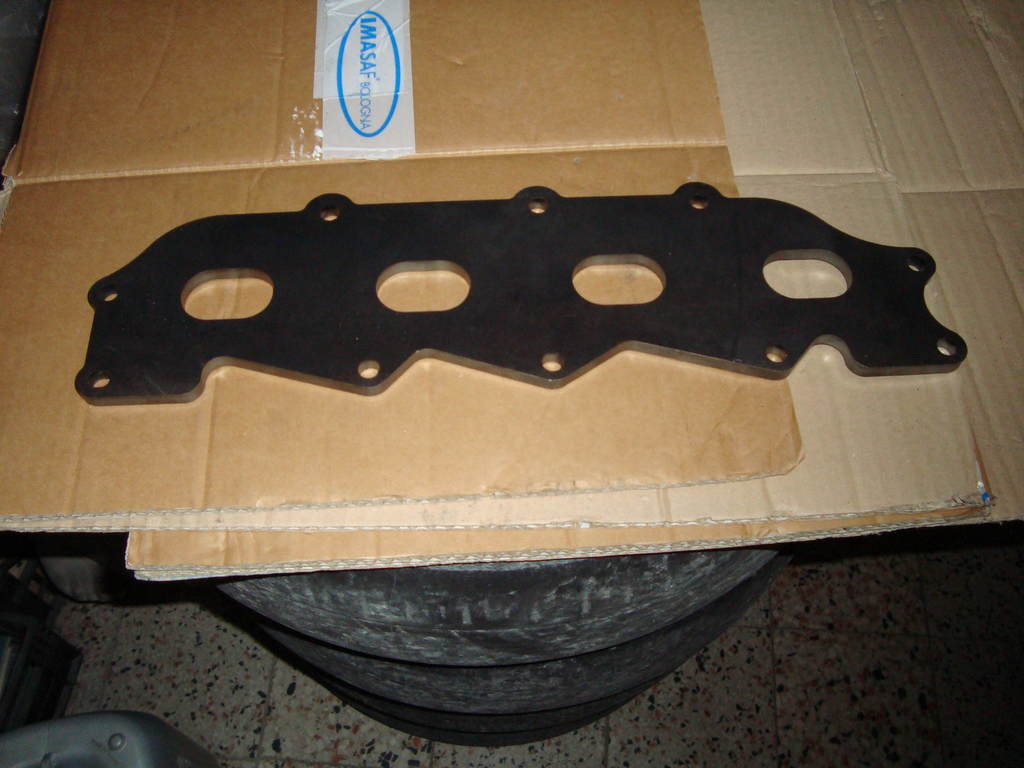
EXHAUST pt.II
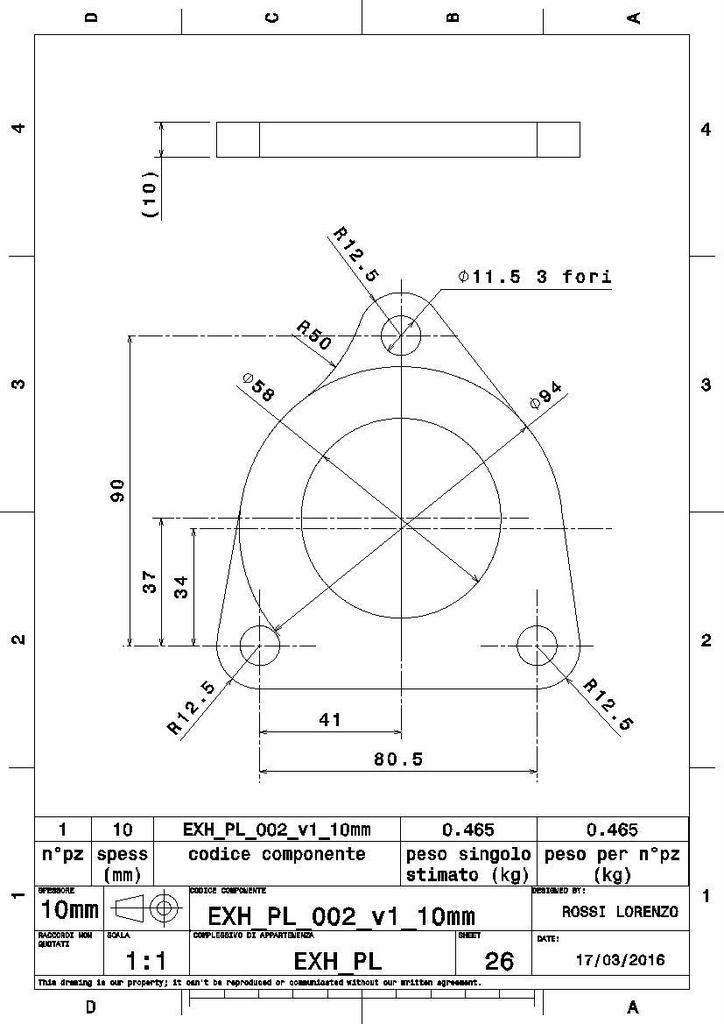
the exh-manifold i have won't fit wit the water rail plan-c, i need to make some kind of extension.
i tracked down the dimension from this one (donno, what car is it from?)

and drawn this one:
zetec silvertop exhaust manifold flange, with dimensions (i hope it works for blacktop too)
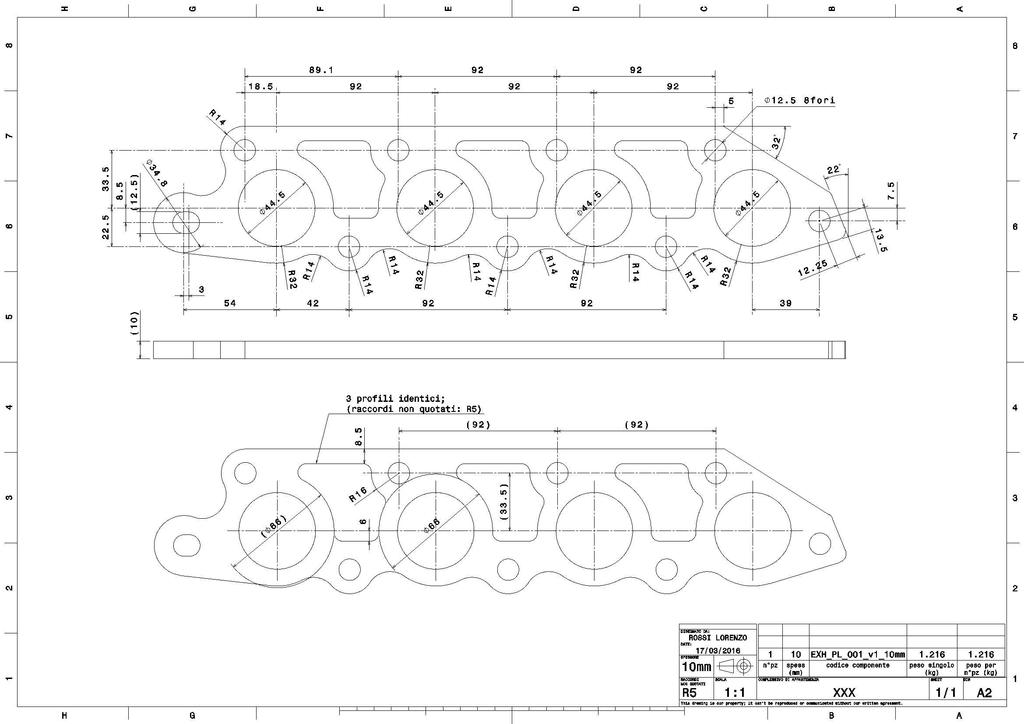
>>> !!!still haven't verified the dimensions. before ordering this from your machine shop, make a 1:1 paper model, to check if it fits correctly!!! <<<
the exh-manifold i have won't fit wit the water rail plan-c, i need to make some kind of extension.
i tracked down the dimension from this one (donno, what car is it from?)
and drawn this one:
zetec silvertop exhaust manifold flange, with dimensions (i hope it works for blacktop too)

>>> !!!still haven't verified the dimensions. before ordering this from your machine shop, make a 1:1 paper model, to check if it fits correctly!!! <<<
09-05-2016, 10:31 AM
#23
PassionFord Regular
Thread Starter
COILPACK BRACKET pt.I
need to relocate the coilpack (i guess is its name). so as usual:

i needed to modify it a bit, to fit the head.
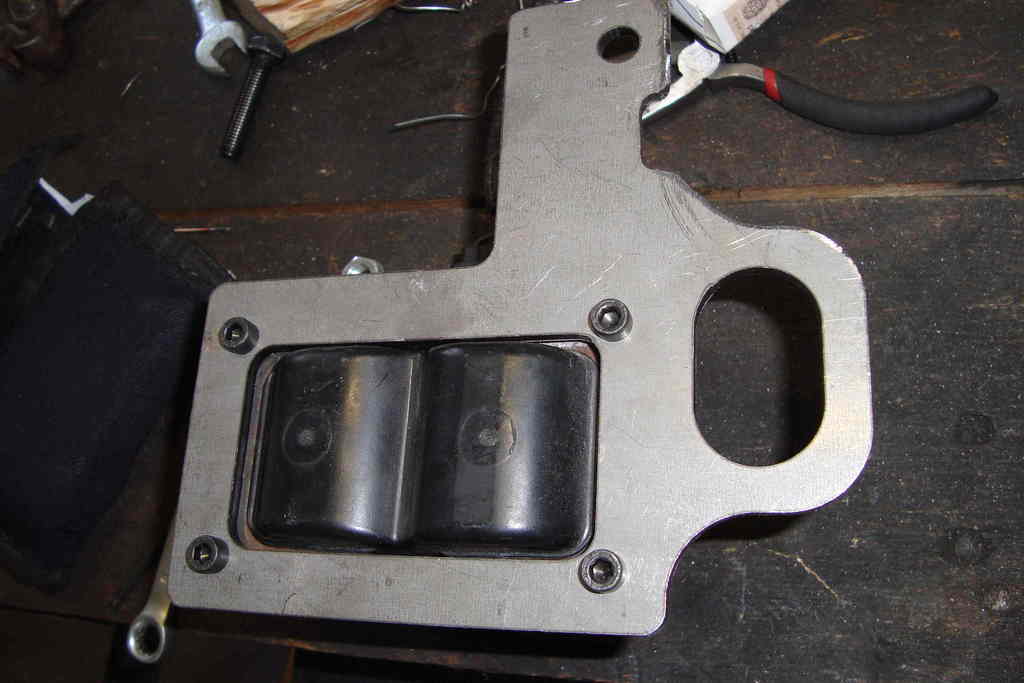
here it is how i positioned the 4 M5 nuts i tack welded on it.
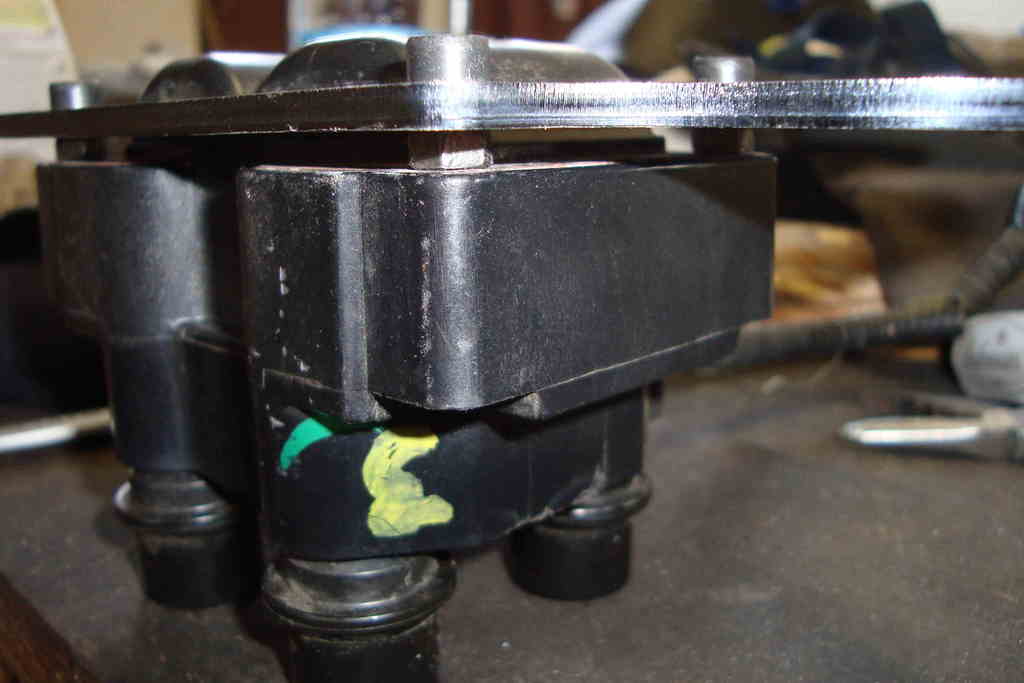
it fits ok, no needed longer spark plug cables.
but in the next laser cut order, i'll have one these:
-10mm higher,
-6mm thick (instead of 4mm),
'cause the coilpack is too close to the valve cover.
as you can see in these pics...

need to relocate the coilpack (i guess is its name). so as usual:

i needed to modify it a bit, to fit the head.


here it is how i positioned the 4 M5 nuts i tack welded on it.

it fits ok, no needed longer spark plug cables.
but in the next laser cut order, i'll have one these:
-10mm higher,
-6mm thick (instead of 4mm),
'cause the coilpack is too close to the valve cover.
as you can see in these pics...


 09-05-2016, 07:49 PM
#24
PassionFord Regular
Thread Starter
ACCESORIES pt.I
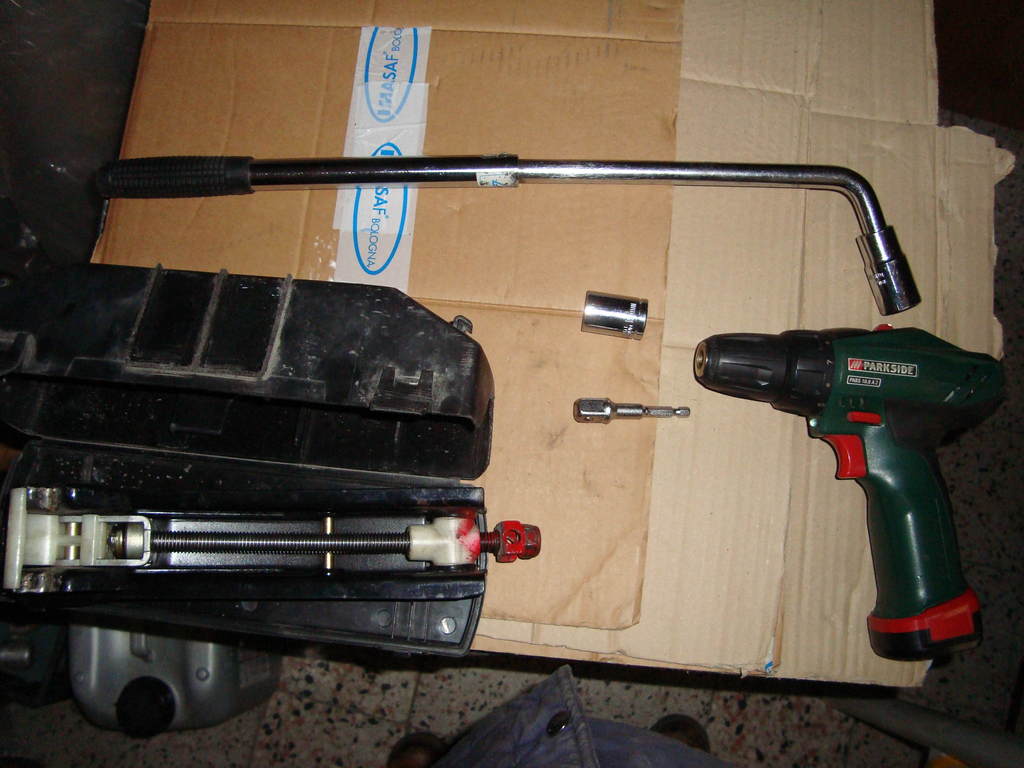
drifters need to change rear tyres very often, whenever neccessary.
(i now keep 2 spares in the trunk, you know what for, lol).
the std nut&studs set-up, is a bitch. stud threads are always dirt, and wd40 is always empty.
a battery drill, tooled with a 19mm, socket comes very handy for this job.
sadly, i spent in beers and cigarettes the whole budget for an hydraulic lifter.
so to lift the car up, i welded a 19mm nut to a mechanical jack, bought for nothing at the junk,

and i first arranged a kit like this one:
this jack is from a peugeot 206 has a too high rev-to-lift ratio and need a strong driller.
i made this one, from an old f**cked up 12v battery drill. but i almost burned it.
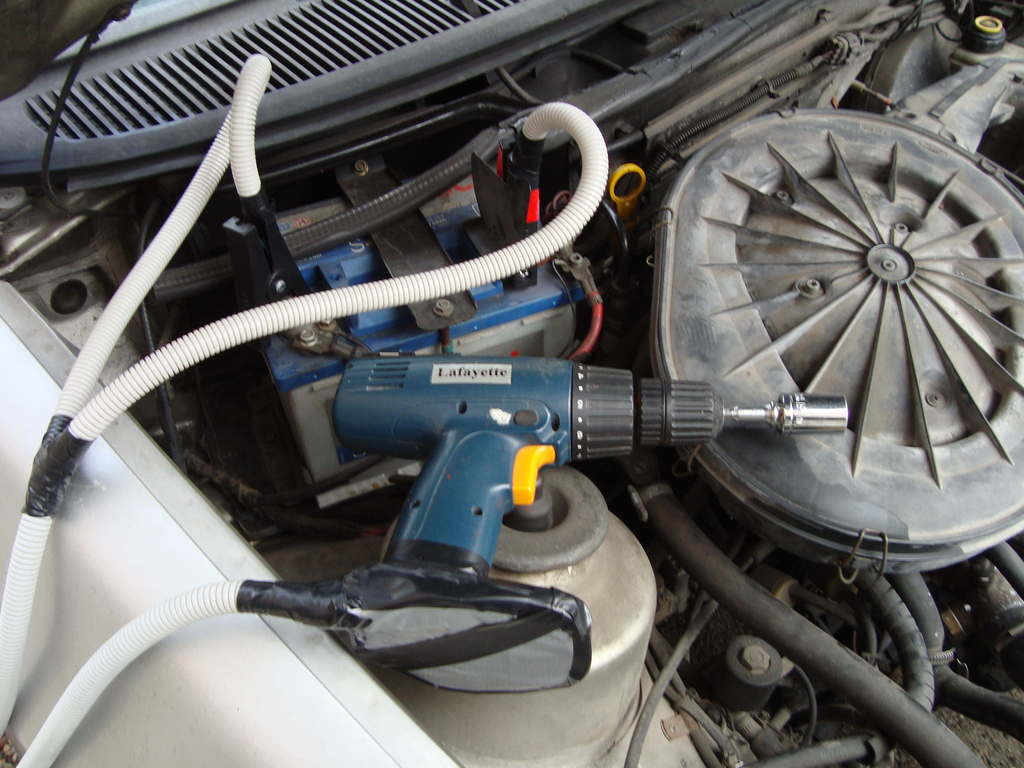
all that cable is pretty fancy to handle, and i also need something more "water-proof", if connected to the battery, to be used in my rainy closed-parking-lot-nights.
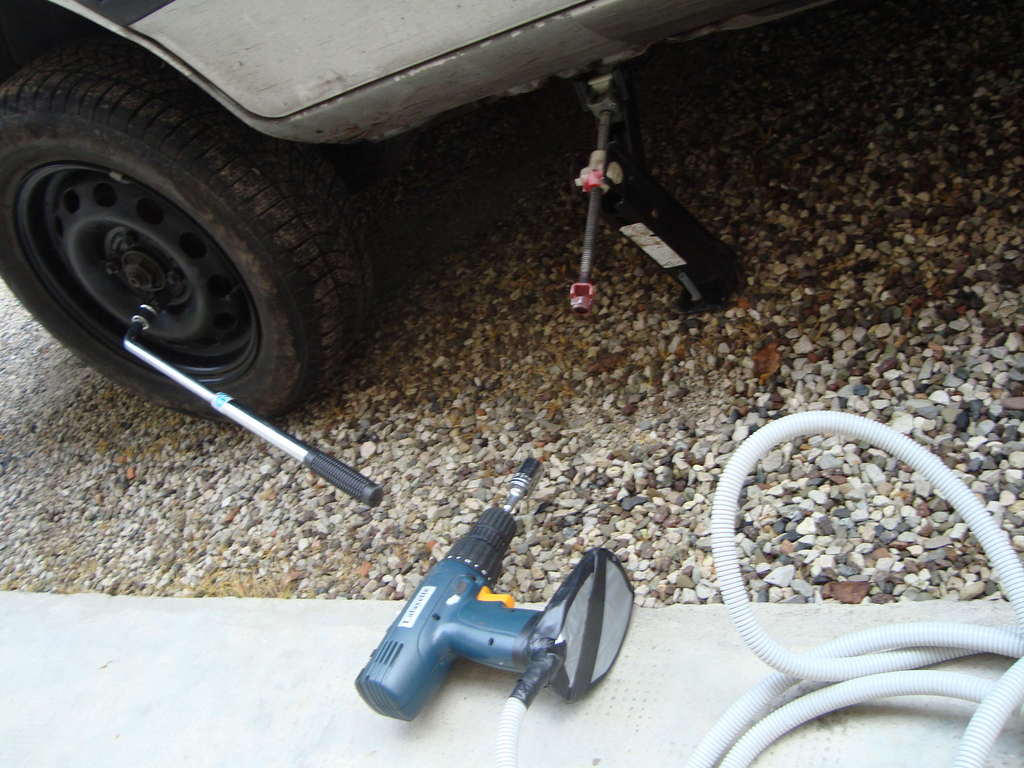
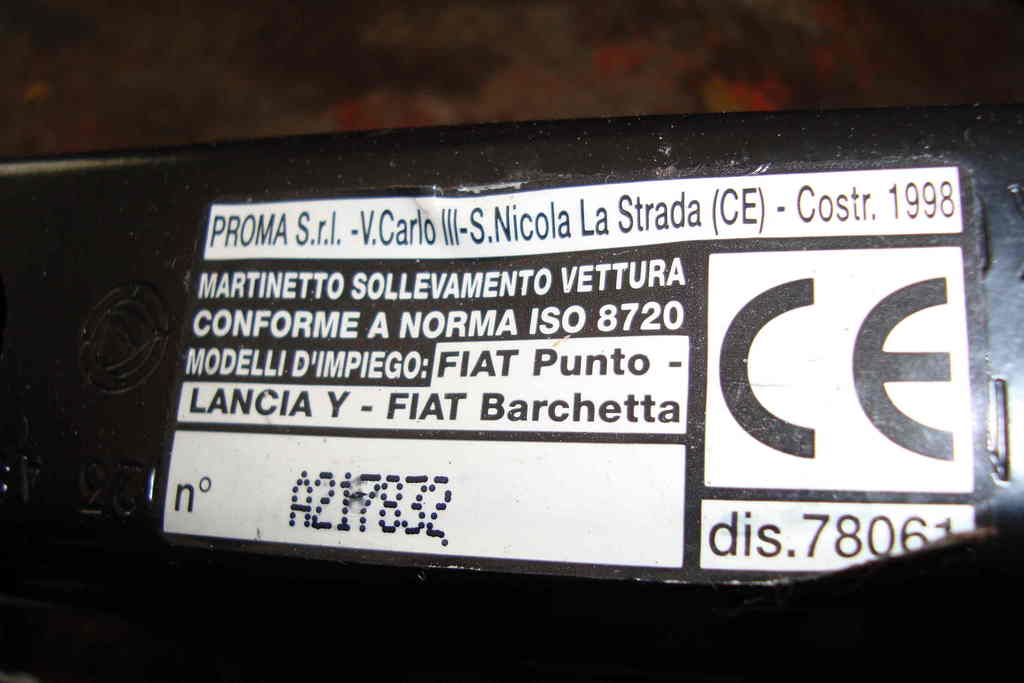
i've finally found another jack at the junk (almost for free), from a fiat punto mk1 (&others), which has a lower rev-to-lift ratio,
as you can see from the inclination of the 2 threads (at right, the punto one)...

it means that i can lift the car with a std 10euros euro-spin driller (the first one), without connecting anything to the car battery.
i just have to keep the thread a little greasy.
(i also kept the std crank, just in case...)
all fits in a small and light-weight bag.
drifters need to change rear tyres very often, whenever neccessary.
(i now keep 2 spares in the trunk, you know what for, lol).
the std nut&studs set-up, is a bitch. stud threads are always dirt, and wd40 is always empty.
a battery drill, tooled with a 19mm, socket comes very handy for this job.
sadly, i spent in beers and cigarettes the whole budget for an hydraulic lifter.
so to lift the car up, i welded a 19mm nut to a mechanical jack, bought for nothing at the junk,

and i first arranged a kit like this one:

this jack is from a peugeot 206 has a too high rev-to-lift ratio and need a strong driller.
i made this one, from an old f**cked up 12v battery drill. but i almost burned it.


all that cable is pretty fancy to handle, and i also need something more "water-proof", if connected to the battery, to be used in my rainy closed-parking-lot-nights.
i've finally found another jack at the junk (almost for free), from a fiat punto mk1 (&others), which has a lower rev-to-lift ratio,
as you can see from the inclination of the 2 threads (at right, the punto one)...


it means that i can lift the car with a std 10euros euro-spin driller (the first one), without connecting anything to the car battery.
i just have to keep the thread a little greasy.
(i also kept the std crank, just in case...)
all fits in a small and light-weight bag.
11-05-2016, 06:50 AM
#25
PassionFord Regular
Thread Starter
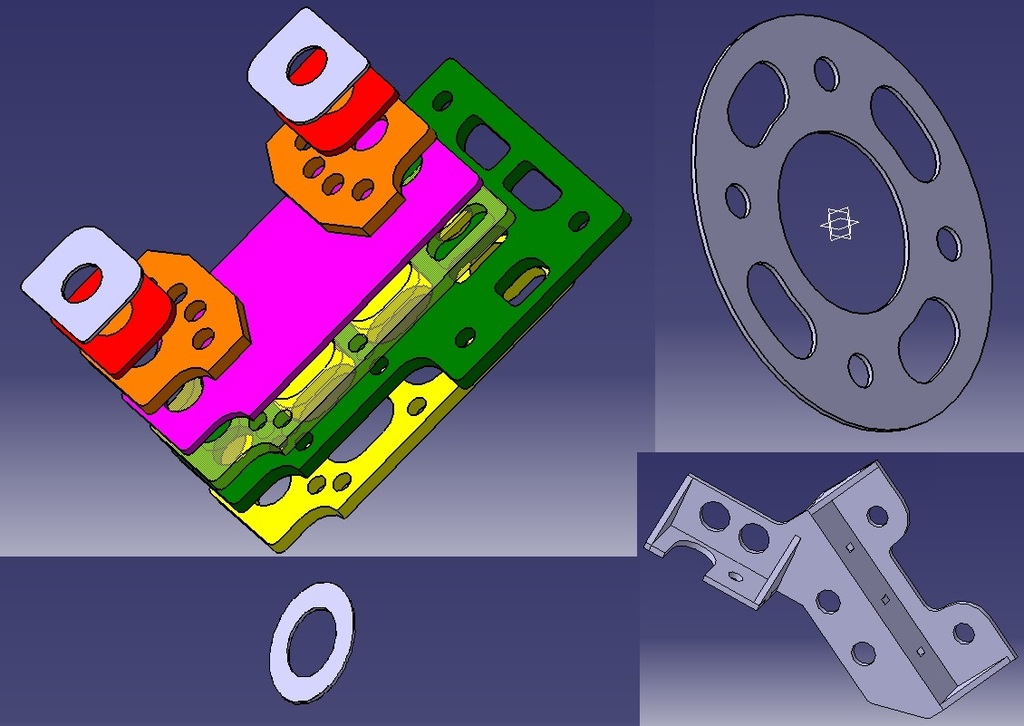
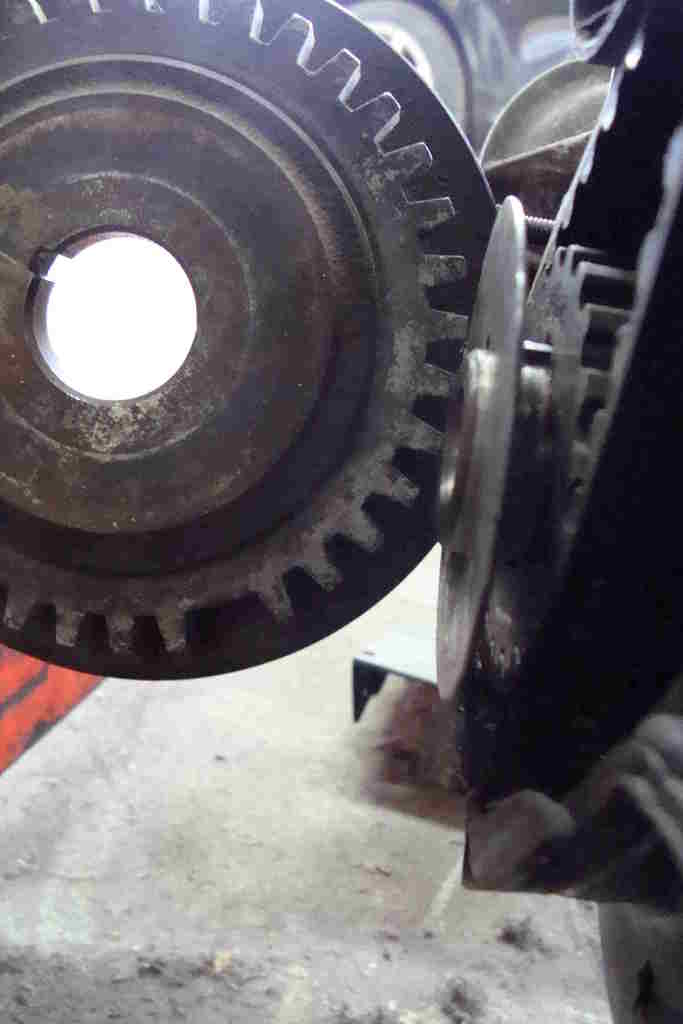
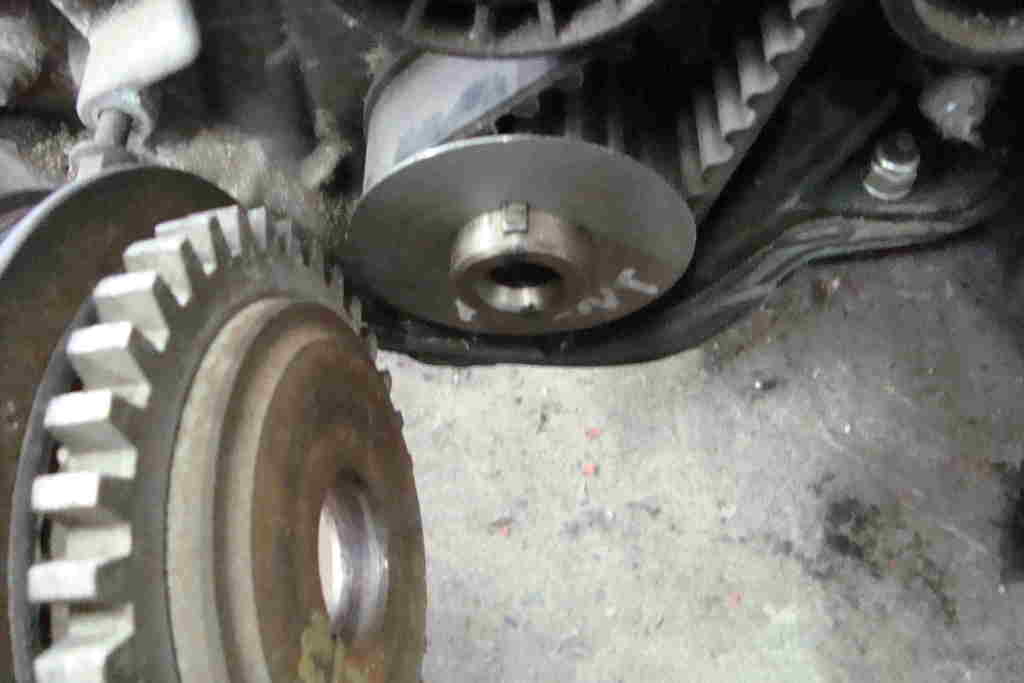
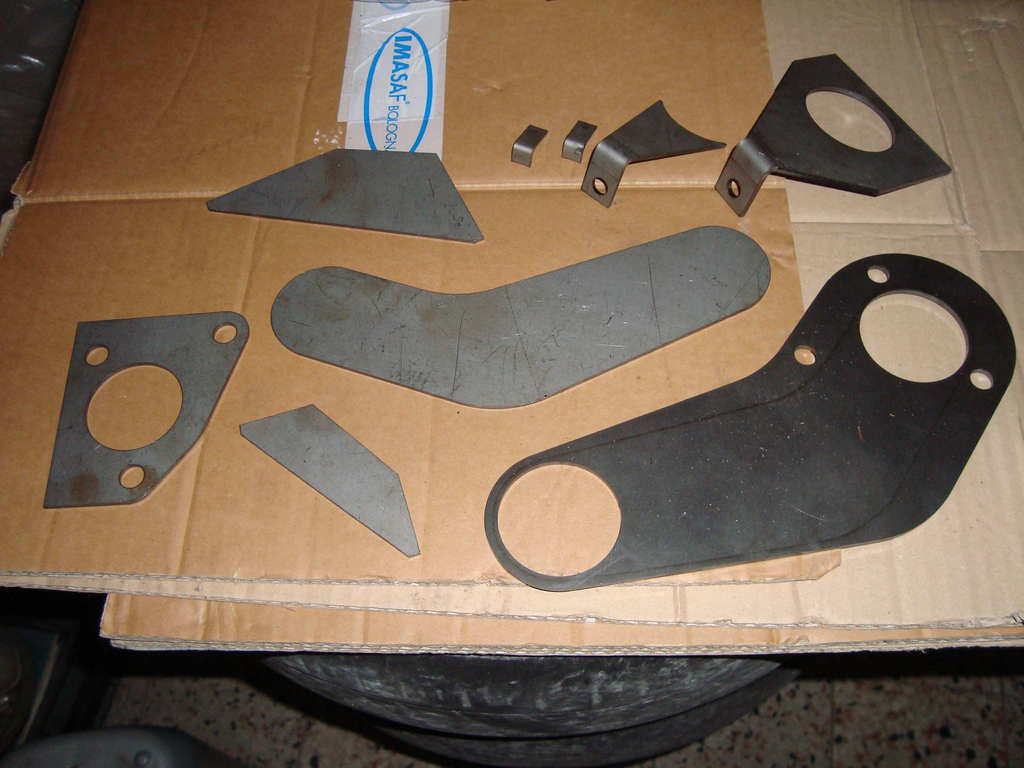
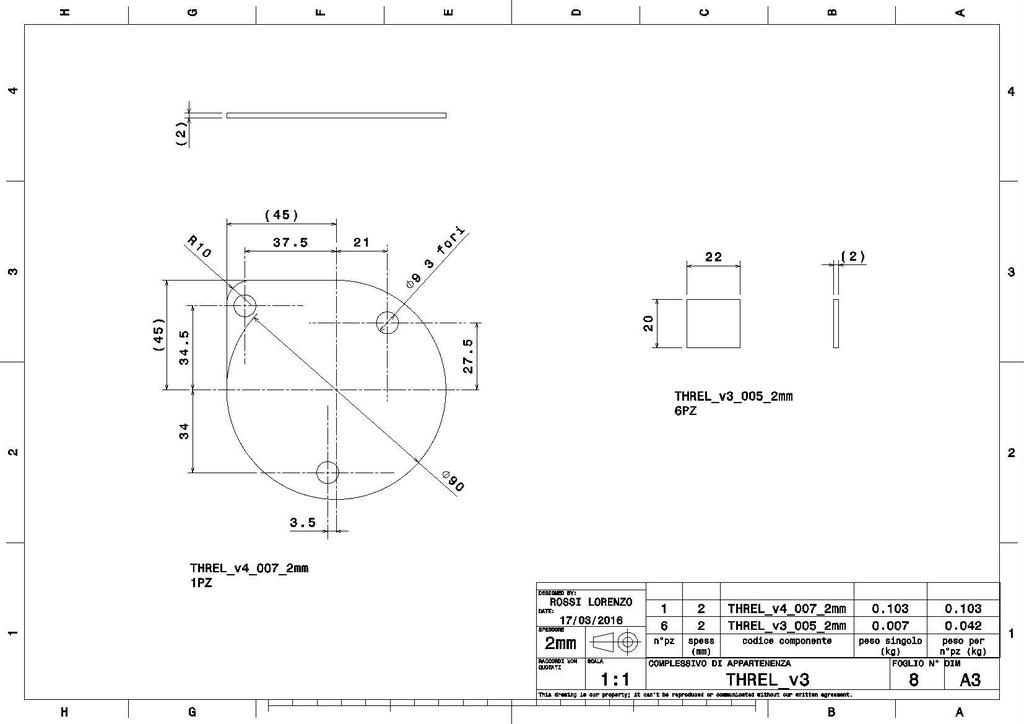
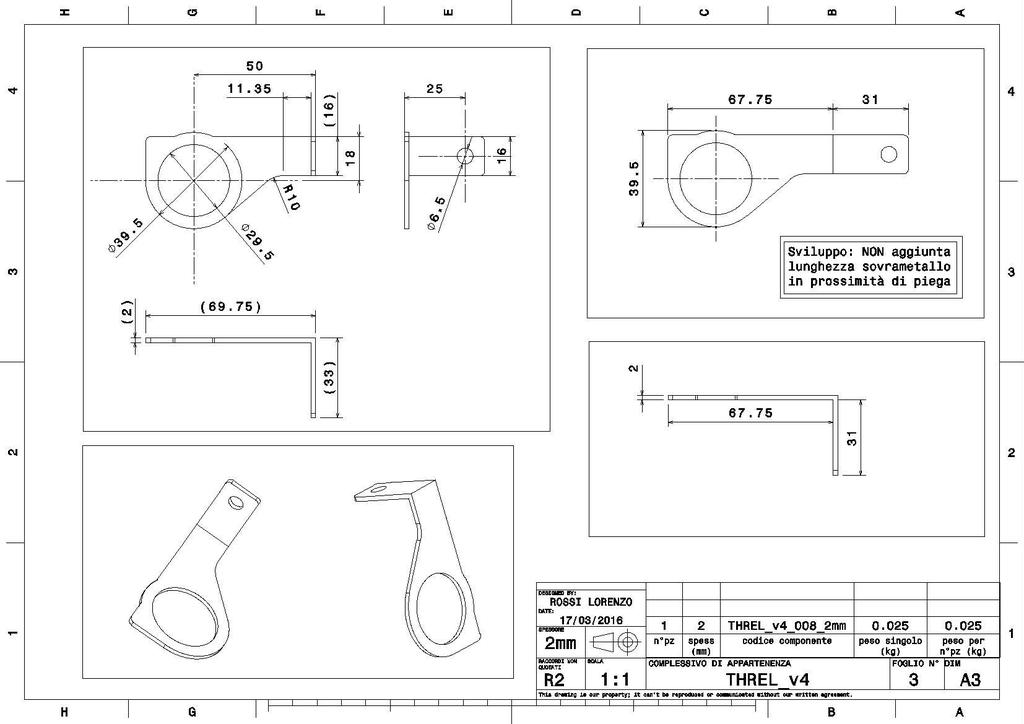
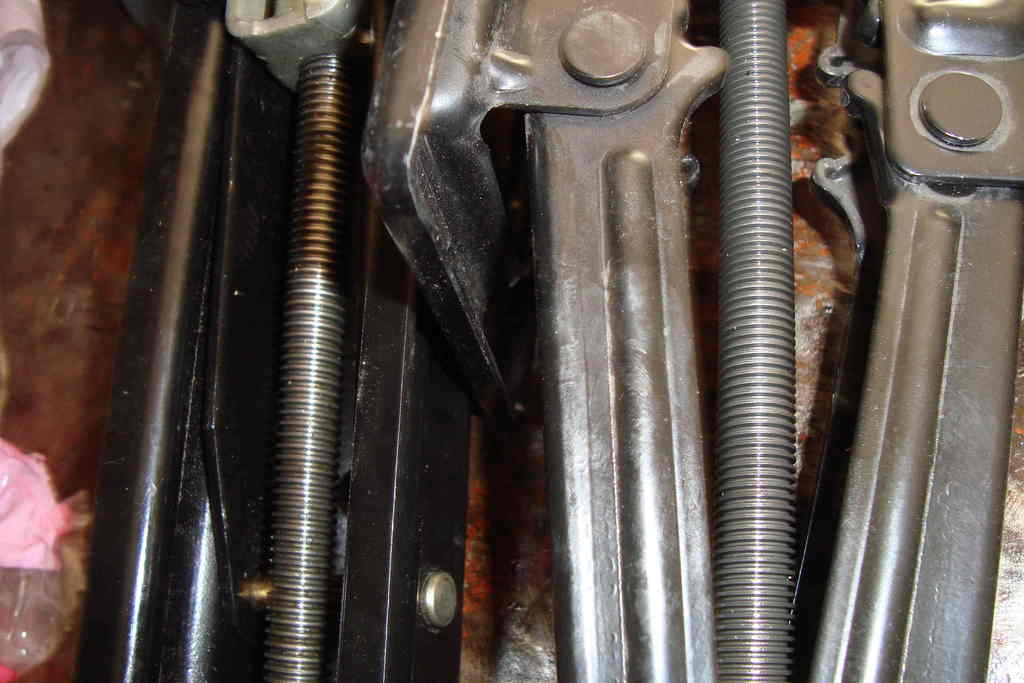
CRANKSHAFT SENSOR BRACKET
did some math, (i'll explain it if needed):
using the 1.8cvh crankshaft pulley, to suit megajolt requirements, the crankshaft sensor must stay 60� clockwise from the vertical.
(i hope it's correct, or i'm f**ked).
as usual, i made a paper model, drawn down these,...
...had 'em laser-cut for me,...
(almost cut my thumbs off to clean these little motherf**kers for the tig process),
(M5 bolt, maybe 25mm long, can't remember)
it's made to be assembled lego-like, for a quick and precise tack-welding...
a friend of mine gave me the idea, thank you Gianluca B.!
after a lot of UN-precision weldings, i threaded 2 M5 holes in the alternator support, to assemble it in position.
the sensor is from trigger-wheels.com
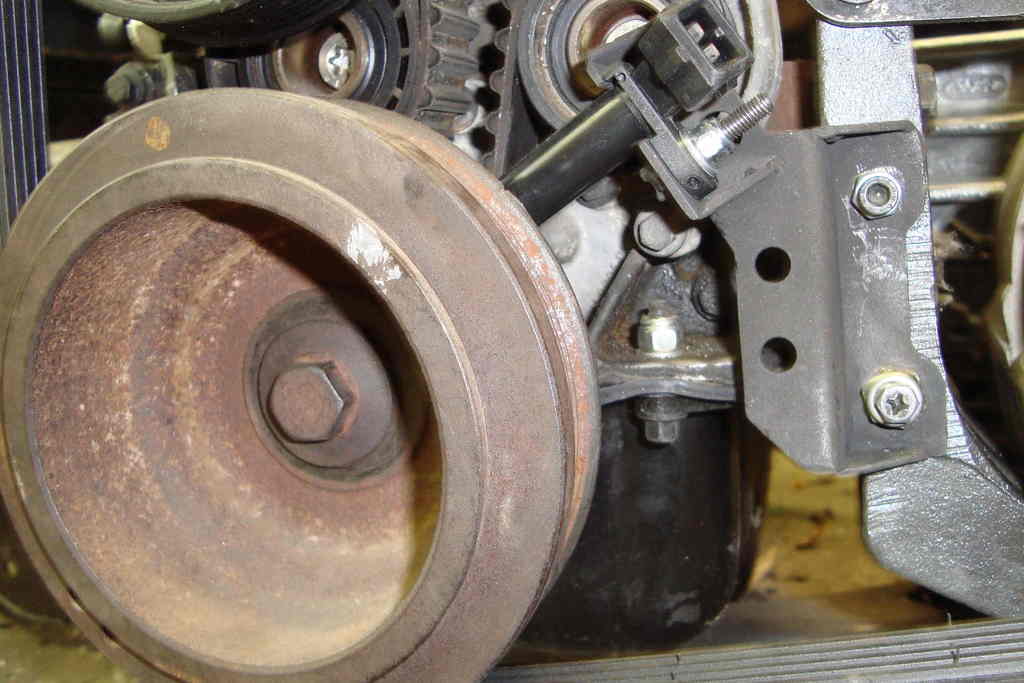
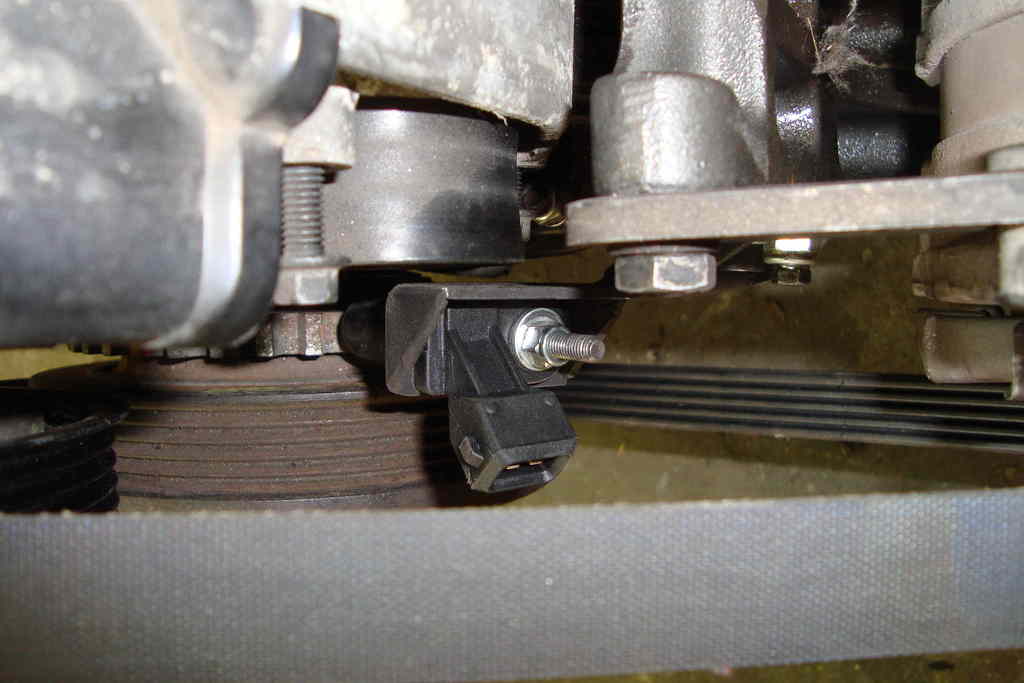
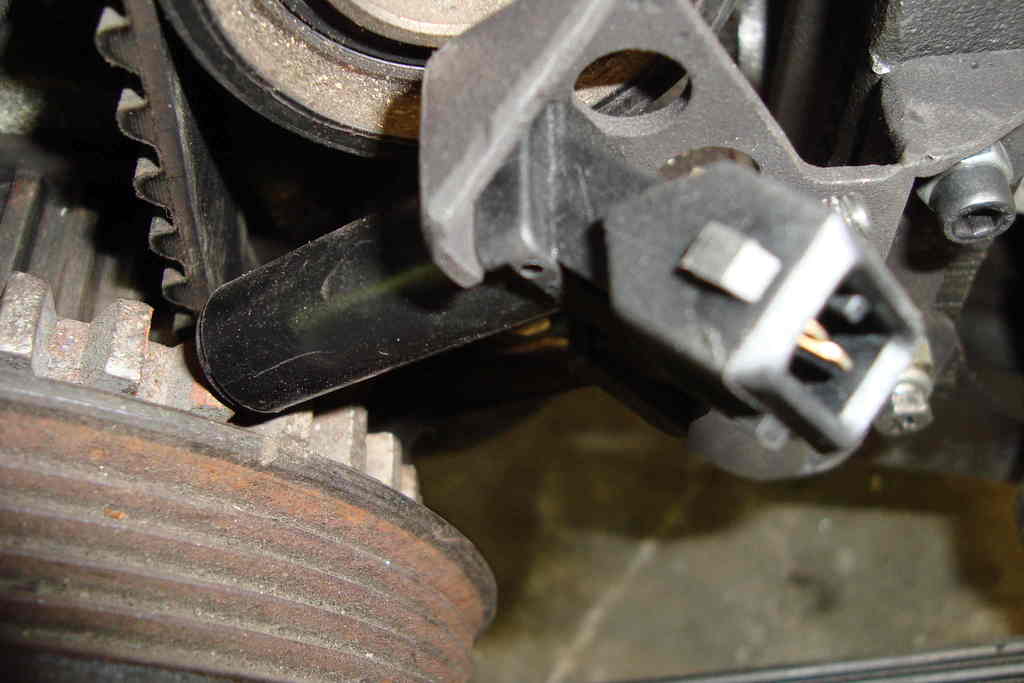
very light-weight and solid (i hope no vibration).
i worked in very tight spaces, and it fits perfectly.
if it also works, i can make tortellini with my but**ole...
did some math, (i'll explain it if needed):
using the 1.8cvh crankshaft pulley, to suit megajolt requirements, the crankshaft sensor must stay 60� clockwise from the vertical.
(i hope it's correct, or i'm f**ked).
as usual, i made a paper model, drawn down these,...


...had 'em laser-cut for me,...
(almost cut my thumbs off to clean these little motherf**kers for the tig process),
(M5 bolt, maybe 25mm long, can't remember)

it's made to be assembled lego-like, for a quick and precise tack-welding...
a friend of mine gave me the idea, thank you Gianluca B.!
after a lot of UN-precision weldings, i threaded 2 M5 holes in the alternator support, to assemble it in position.
the sensor is from trigger-wheels.com


very light-weight and solid (i hope no vibration).
i worked in very tight spaces, and it fits perfectly.
if it also works, i can make tortellini with my but**ole...
The following users liked this post:
rooos (13-05-2016)
13-05-2016, 06:23 PM
#27
PassionFord Regular
Thread Starter
13-05-2016, 06:27 PM
#28
PassionFord Regular
Thread Starter
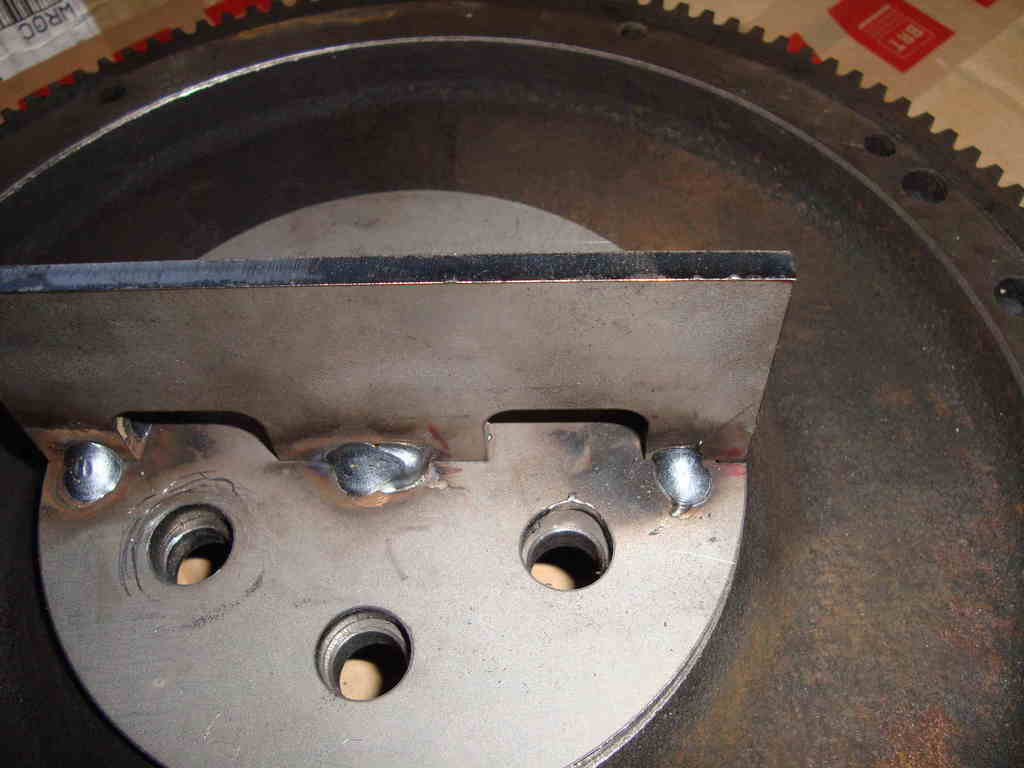
FLYWHEEL
using std 1.8cvh one, lightweight and cheap, but no trigger holes in it. that's why i'm using the std 1.8cvh crankshaft pulley too.
holes need to be bored out to 12mm.
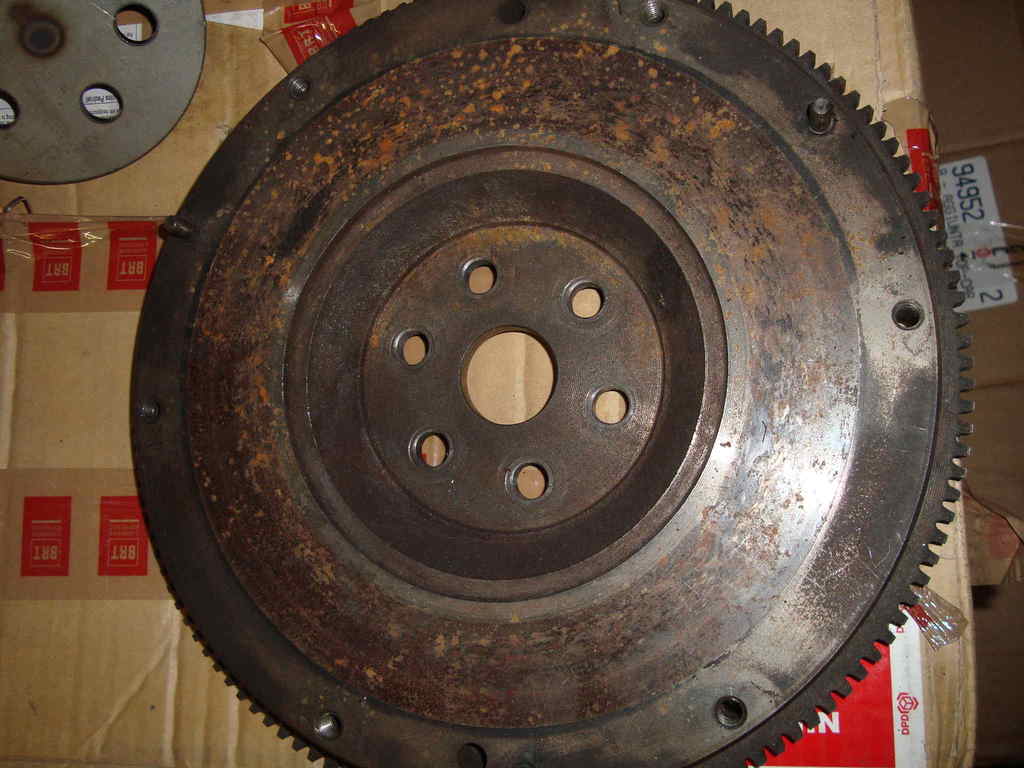
also made these ones:

actually there were no need of these, but i was already ordering 15kg of iron at the laser cut shop.
i drawn 'em, just to save me the time necessary to make 2 holes in a piece of metal, giving myself a lord treatment.
it's made to be assembled lego like... (thanks for the idea Gianluca B.!!!)
its only use is to keep the flywheel square in the drill station vise, while boring out the bolt holes...
using std 1.8cvh one, lightweight and cheap, but no trigger holes in it. that's why i'm using the std 1.8cvh crankshaft pulley too.
holes need to be bored out to 12mm.

also made these ones:

actually there were no need of these, but i was already ordering 15kg of iron at the laser cut shop.
i drawn 'em, just to save me the time necessary to make 2 holes in a piece of metal, giving myself a lord treatment.
it's made to be assembled lego like... (thanks for the idea Gianluca B.!!!)

its only use is to keep the flywheel square in the drill station vise, while boring out the bolt holes...
 22-05-2016, 06:10 PM
#29
PassionFord Regular
Thread Starter
hemorrhoids and doctors took me a big part of the budget. i was going to buy a danst intake manifold, but now i can't afford it.
the manifold i started to make required a loooong dremel session.
i have no ac at home, so i burnt 3 drillers (two of 'em changed immediately in warranty, lol ).
).
...but i'm still ashamed of the results .
.
at least i'm learning something: "how not to build an intake manifold".
i'm facing a lot of work hours just to repair my mistakes...
big times...
i was going to buy a danst intake manifold, but now i can't afford it.the manifold i started to make required a loooong dremel session.
i have no ac at home, so i burnt 3 drillers (two of 'em changed immediately in warranty, lol
...but i'm still ashamed of the results
at least i'm learning something: "how not to build an intake manifold".
i'm facing a lot of work hours just to repair my mistakes...
big times...
22-05-2016, 06:31 PM
#30
PassionFord Regular
Thread Starter
i also damaged the exhaust line today, which needs time to be welded and patched up, or i'll sweep the asphalt with the muffler.
i'm just asking if it's worth...
, which needs time to be welded and patched up, or i'll sweep the asphalt with the muffler.i'm just asking if it's worth...
28-05-2016, 07:40 PM
#31
PassionFord Regular
Thread Starter
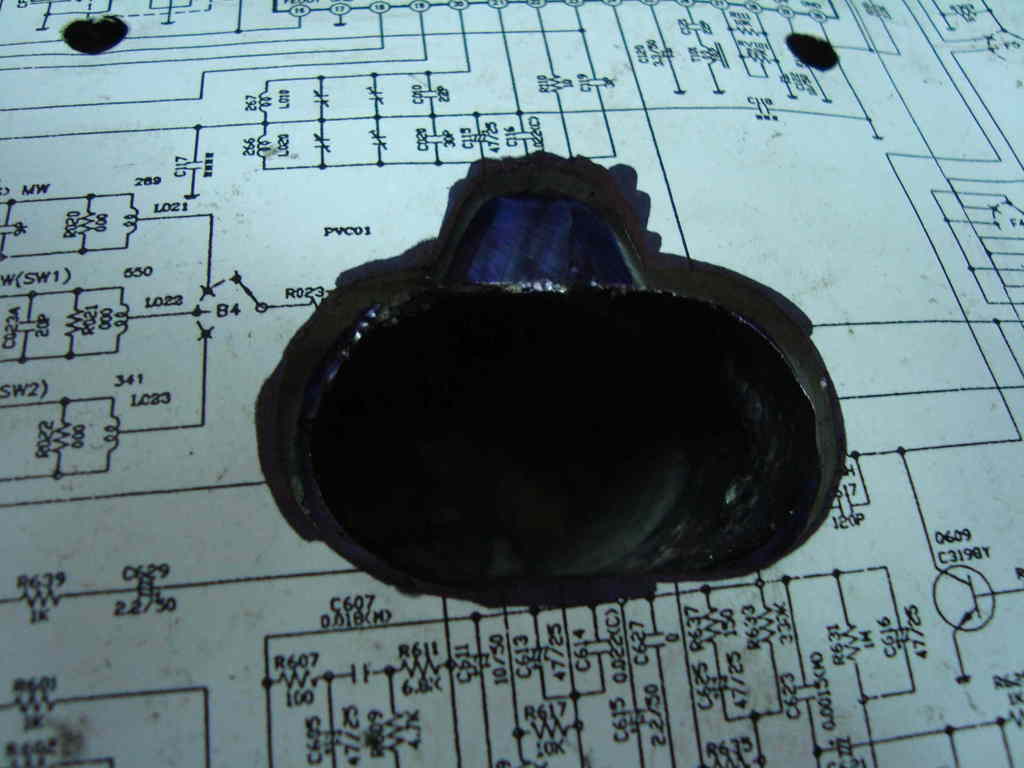
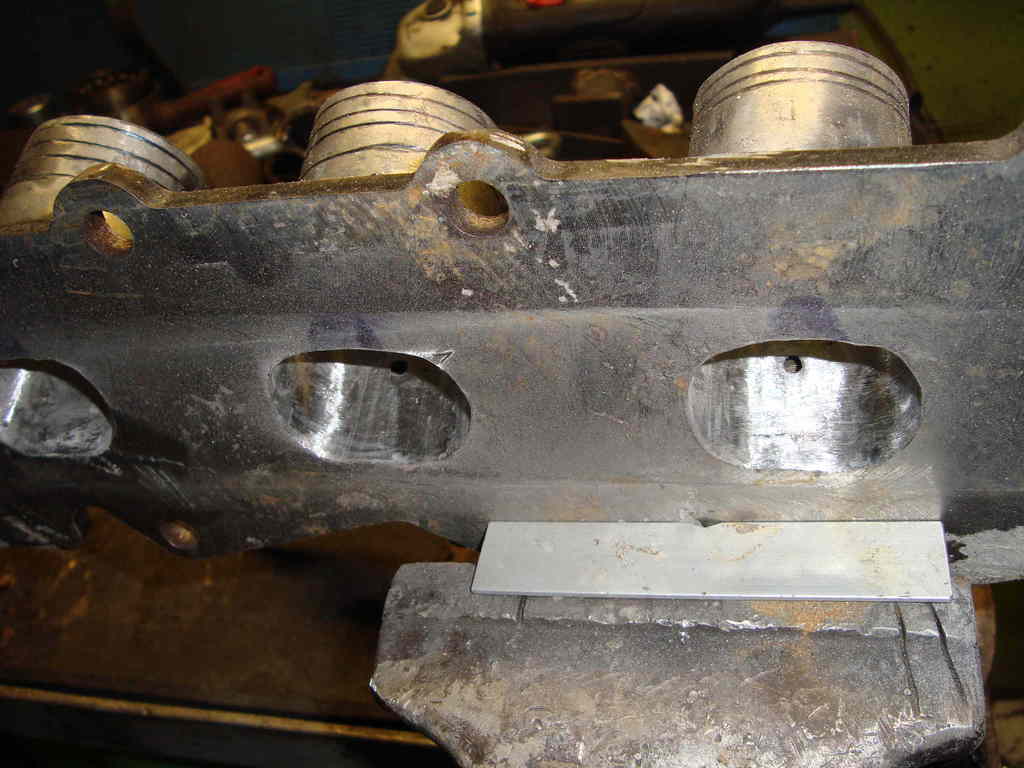
INTAKE MANIFOLD pt.II
still on that damn manifold...
warped the #1 and the #4 runners on the anvil...
dremel away the big deal of this s**t,
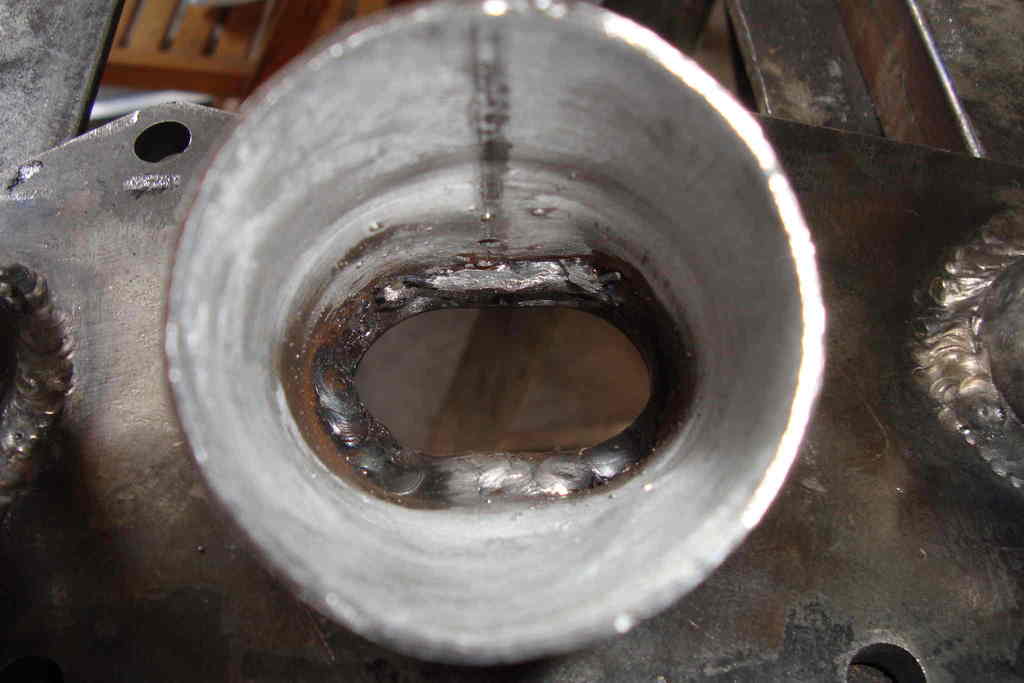
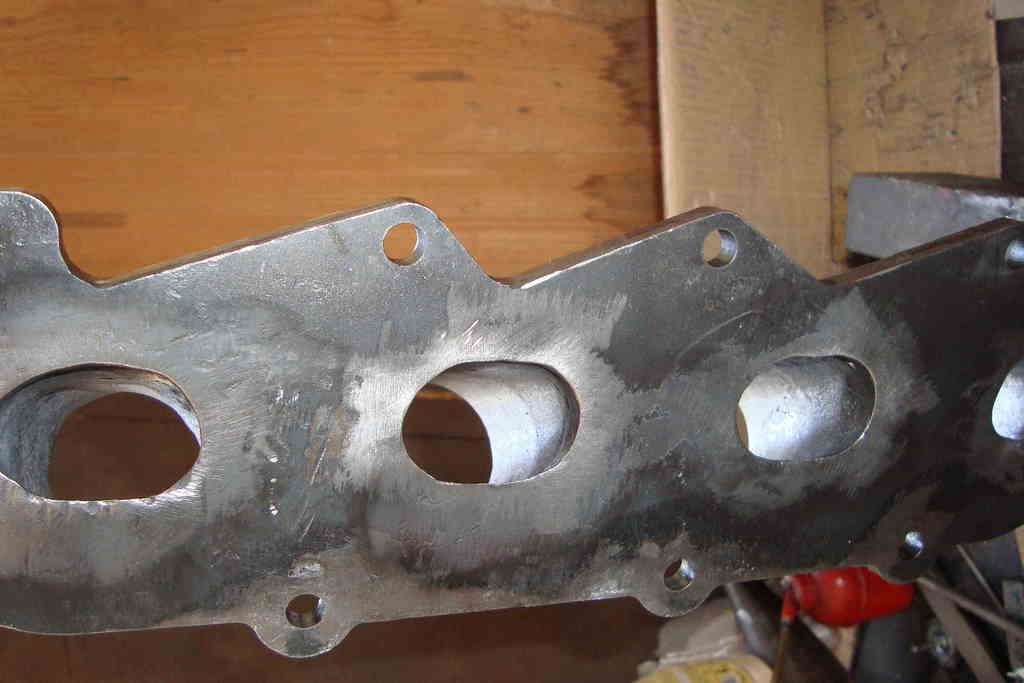
still on that damn manifold...
warped the #1 and the #4 runners on the anvil...

dremel away the big deal of this s**t,

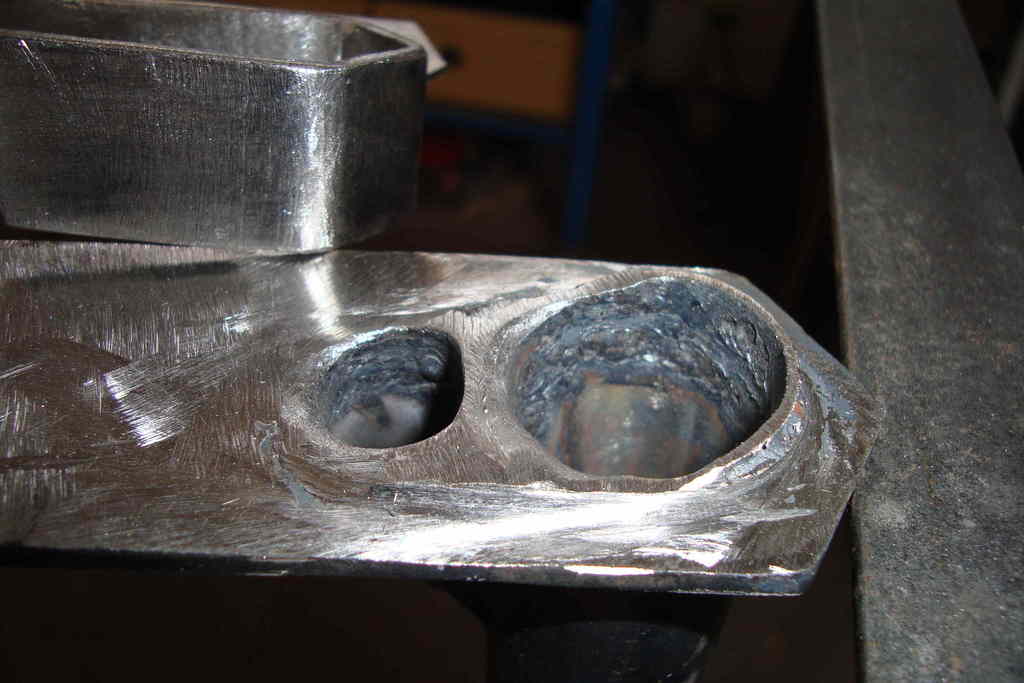
 28-05-2016, 07:41 PM
#32
PassionFord Regular
Thread Starter
still not a good job though:
i welded on some more meat for the dremel, on the inside and on the outside.


i welded on some more meat for the dremel, on the inside and on the outside.
 28-05-2016, 07:42 PM
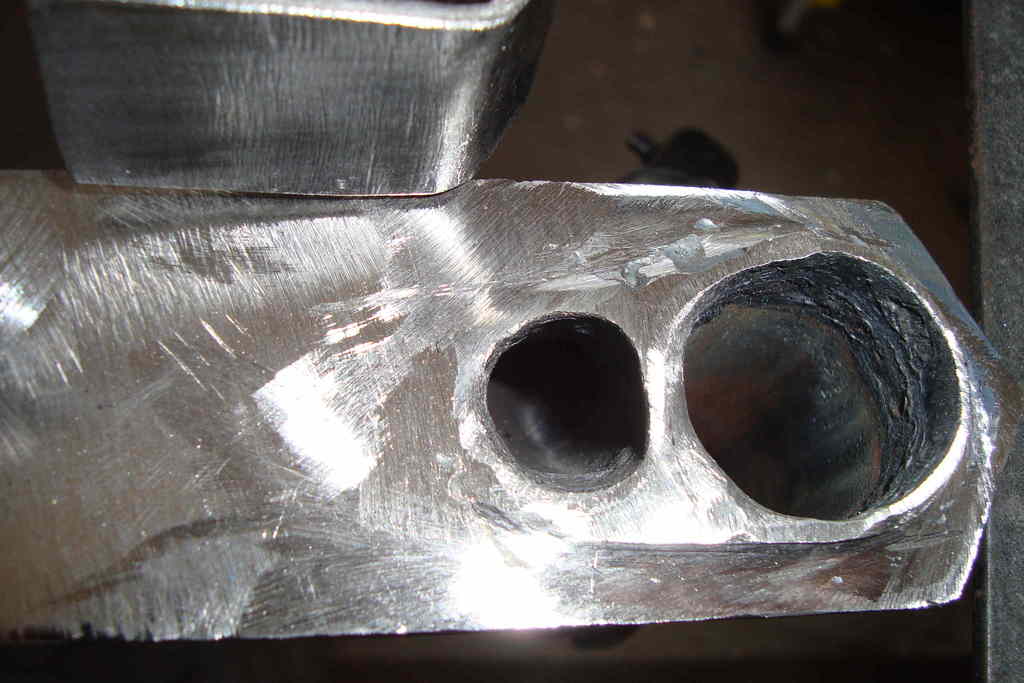
#33
PassionFord Regular
Thread Starter
had the front surface milled for me.
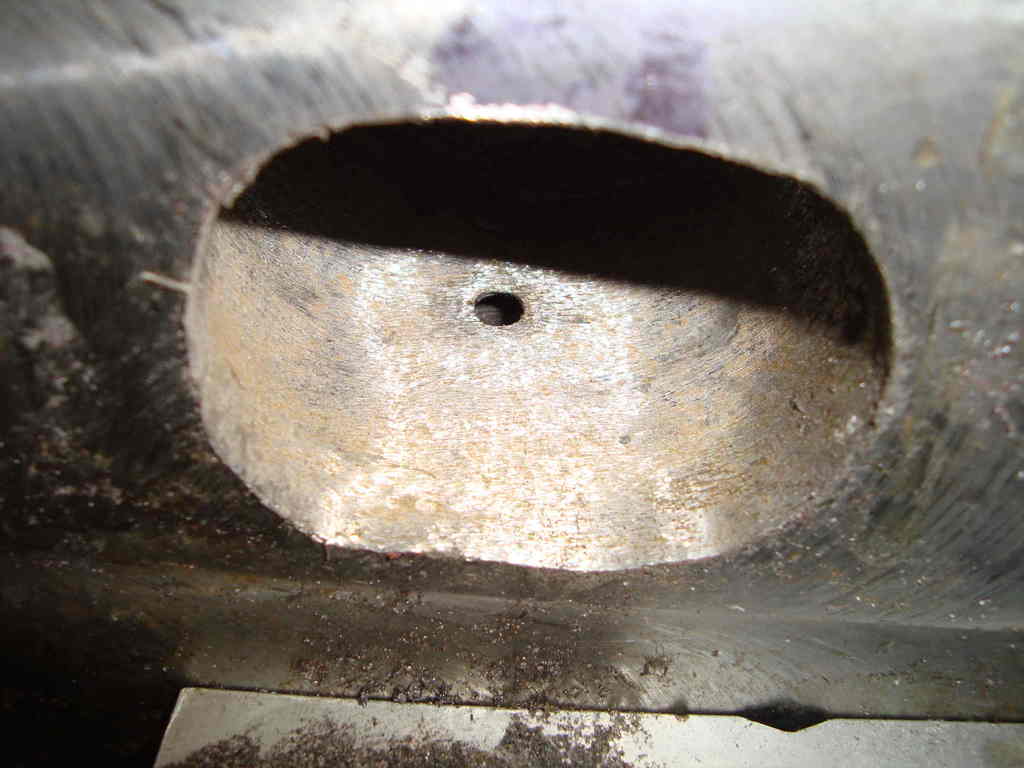
opened the holes up to 11.5mm and drilled two more 2.5mm holes.
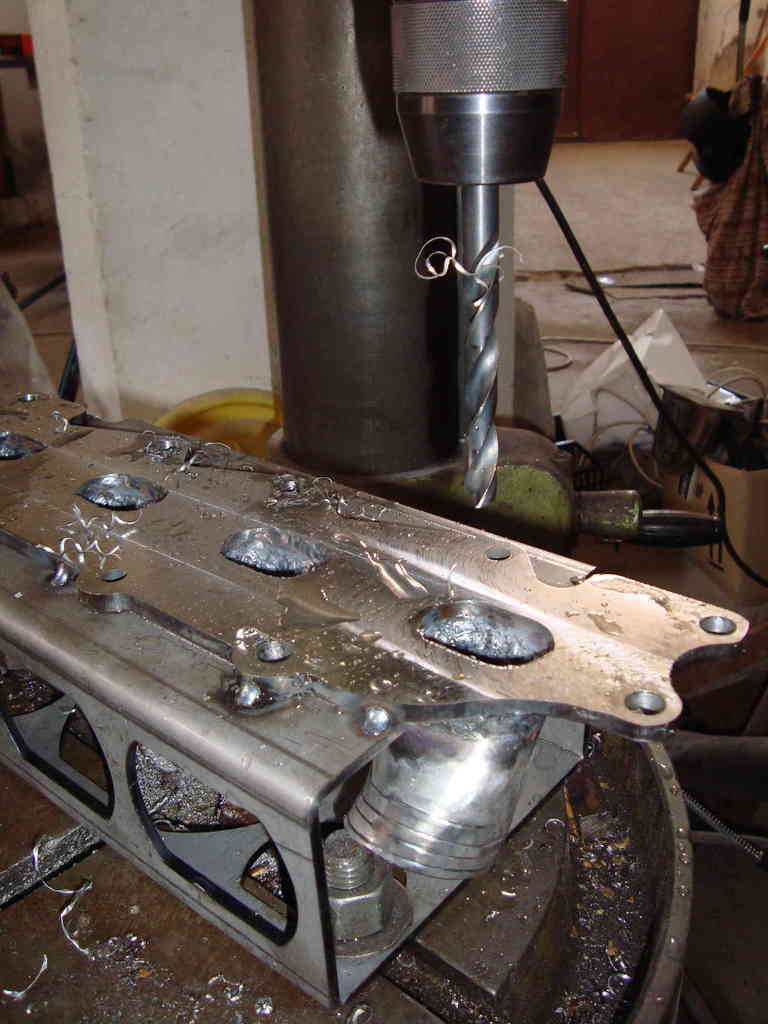
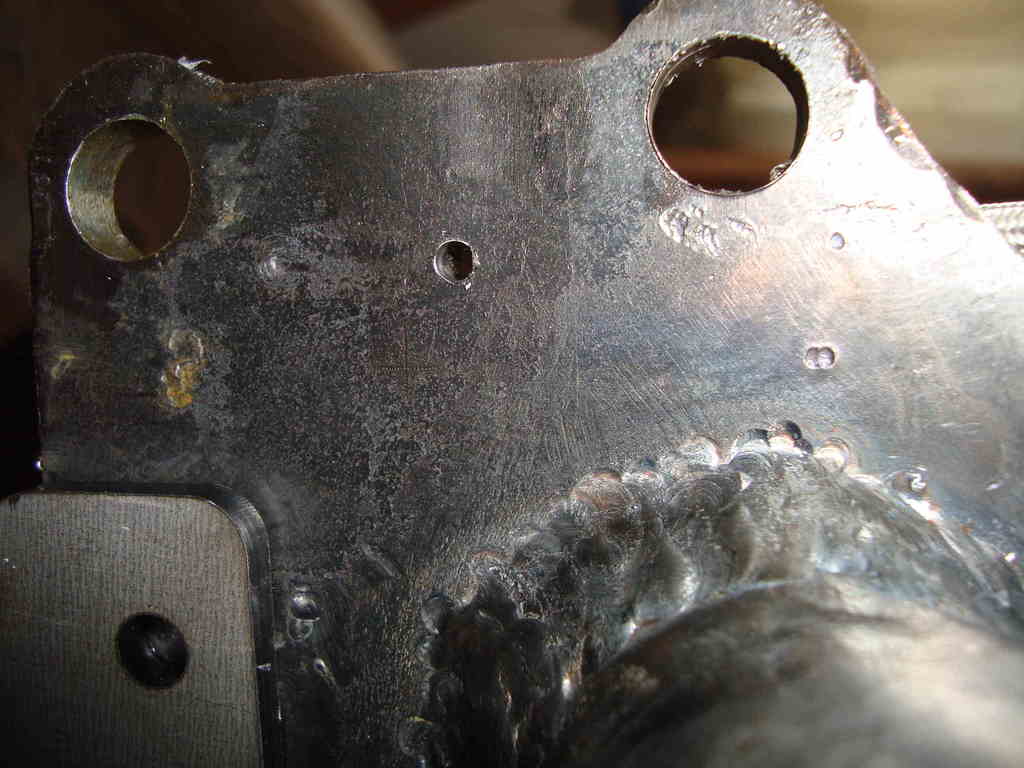
opened the holes up to 11.5mm and drilled two more 2.5mm holes.


 28-05-2016, 07:43 PM
#34
PassionFord Regular
Thread Starter
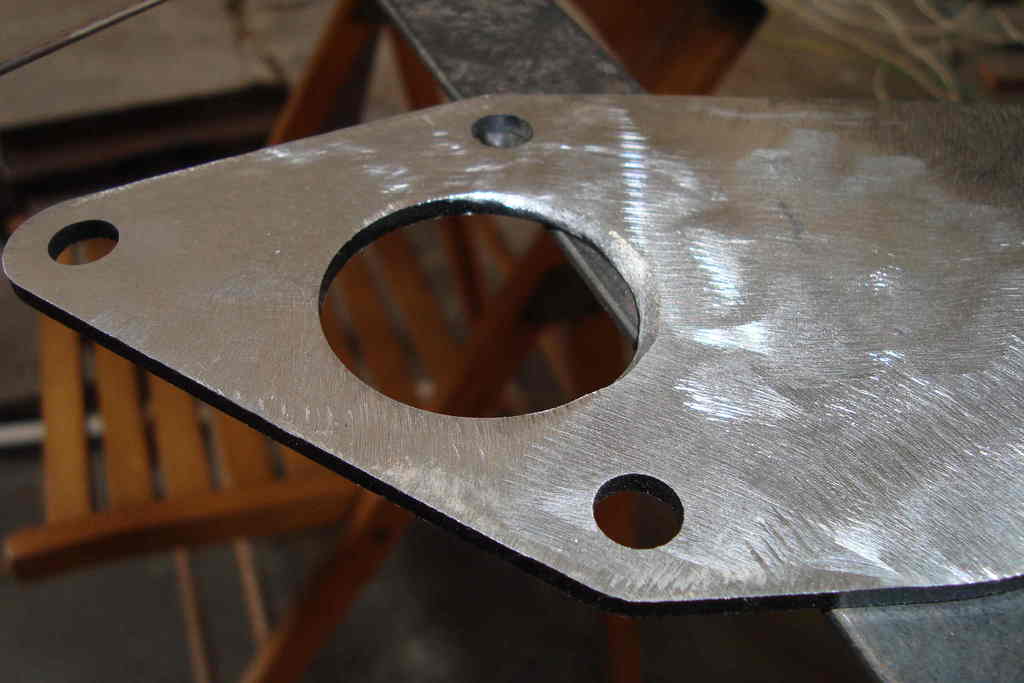
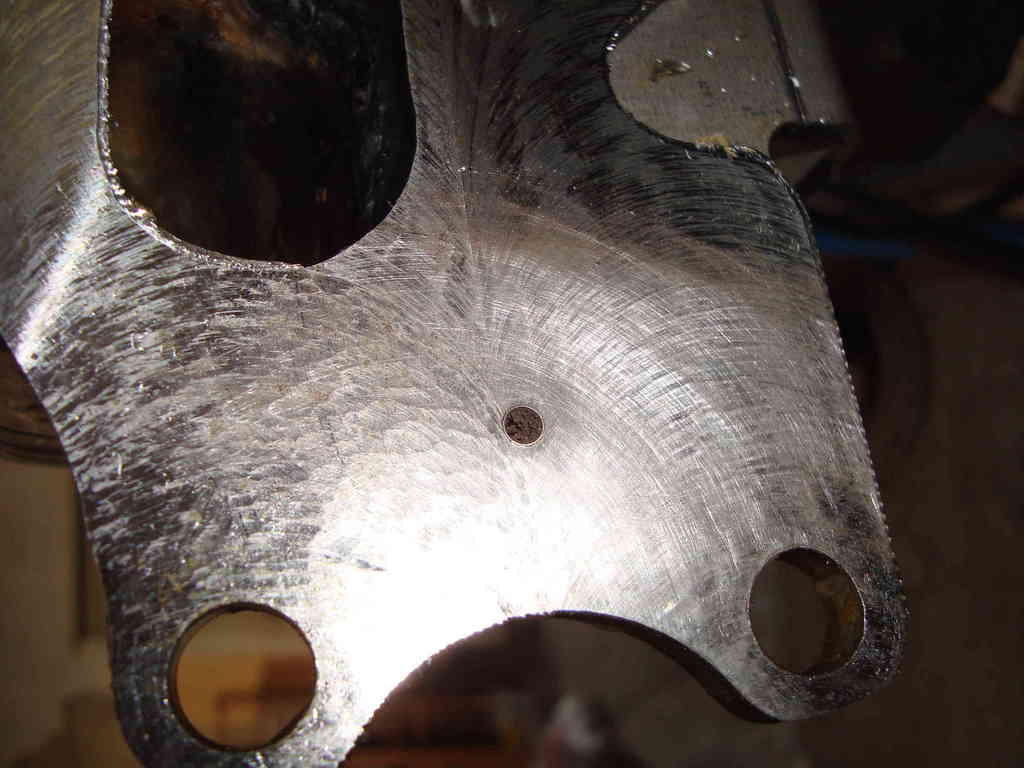
connection for the brake servo 8mm fittings.
[URL=http://s612.photobucket.com/user/rooos/media/intk_manifold/DSC00996_zpsxtp1ixpk.jpg.html]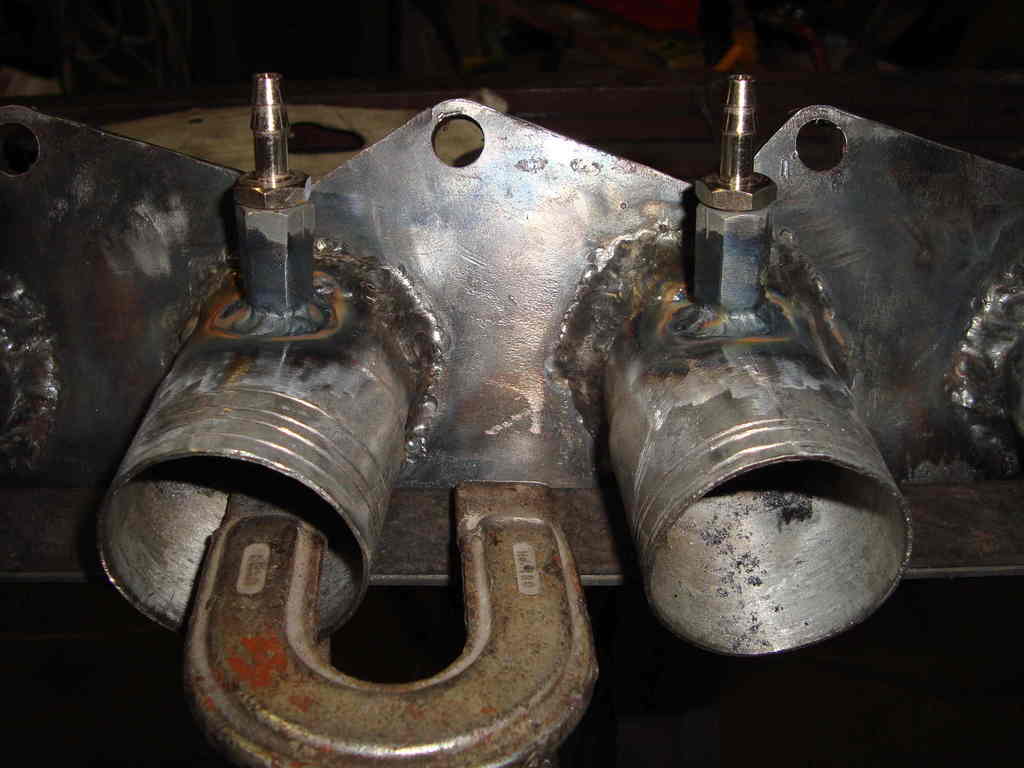 [/URL
[/URL

[URL=http://s612.photobucket.com/user/rooos/media/intk_manifold/DSC00996_zpsxtp1ixpk.jpg.html]
[/URL
28-05-2016, 07:46 PM
#35
PassionFord Regular
Thread Starter
 28-05-2016, 07:49 PM
#36
PassionFord Regular
Thread Starter
somebody at the shop broke my 6mm tig ceramic nozzle, i had to use the one for elephants.
furthermore i was running out of argon, so i pumped up the amps in order to make the situation quicker.
welds don't look nice but they'll work however (hope so).
..and it still needs to be dremeled.
too much work for a not so much horsepower thing...
i just want to have this damn thing done...
furthermore i was running out of argon, so i pumped up the amps in order to make the situation quicker.
welds don't look nice but they'll work however (hope so).
..and it still needs to be dremeled.
too much work for a not so much horsepower thing...
i just want to have this damn thing done...
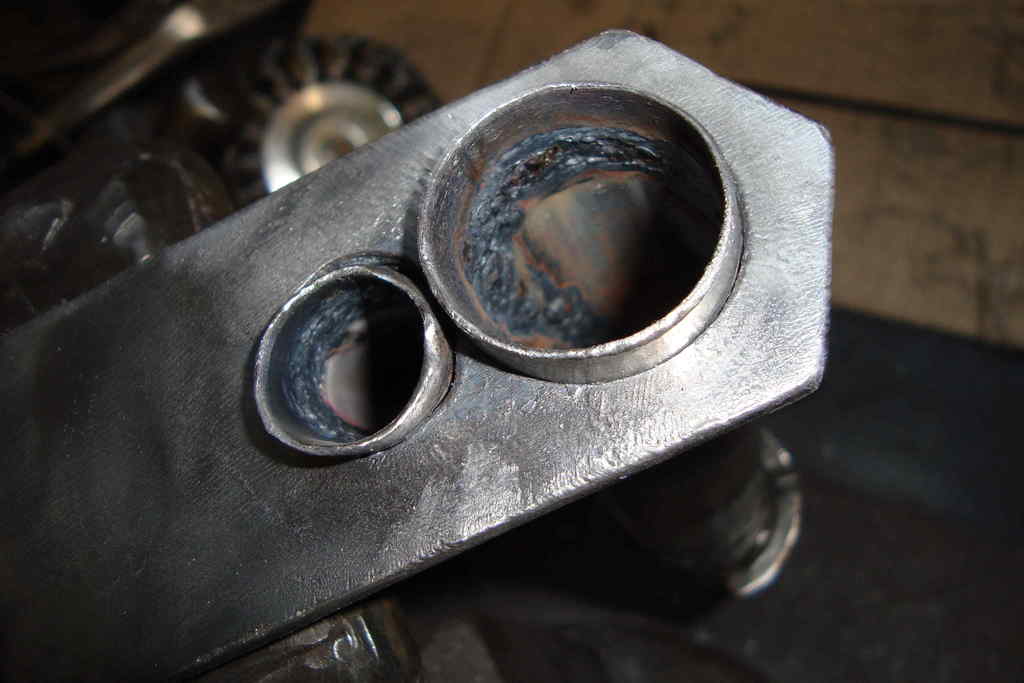
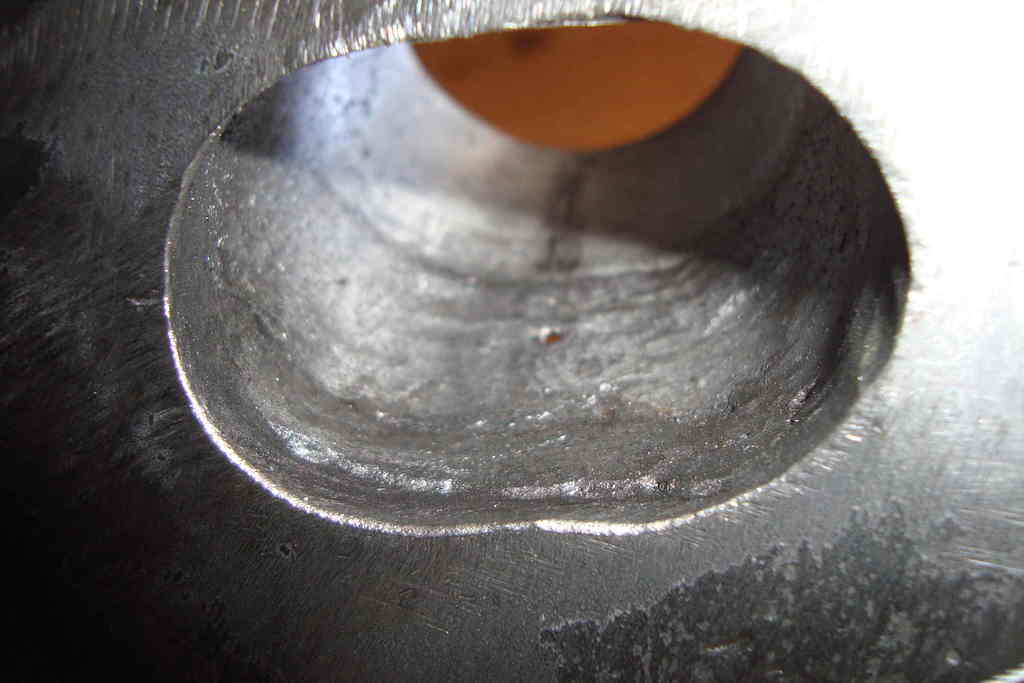
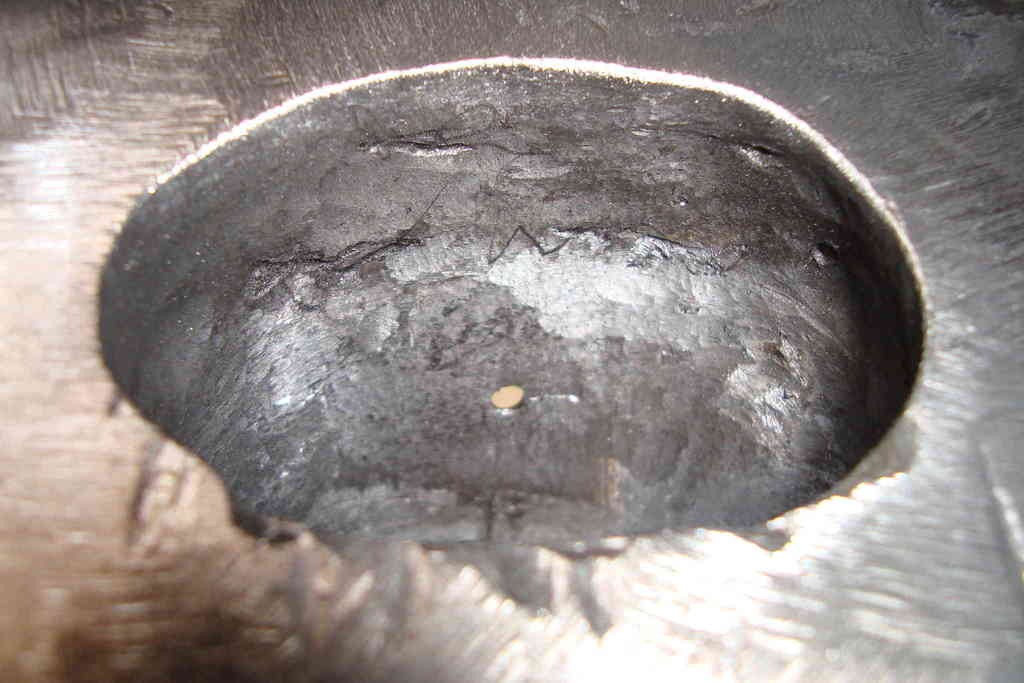
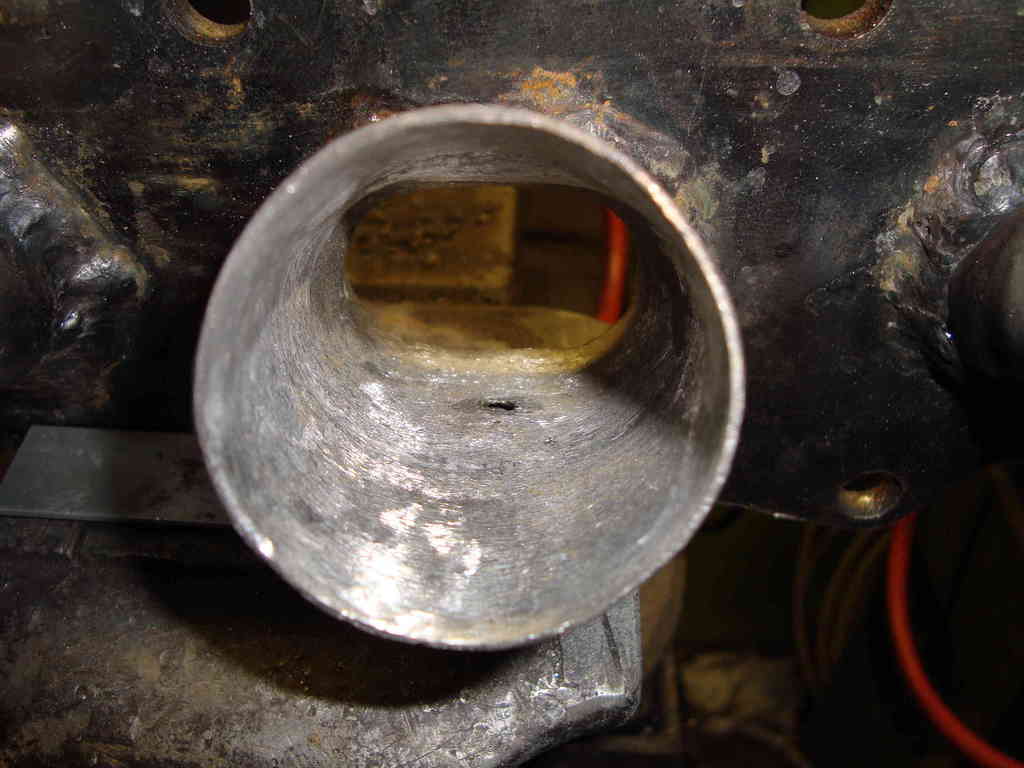
30-05-2016, 08:58 PM
#37
PassionFord Regular
Thread Starter
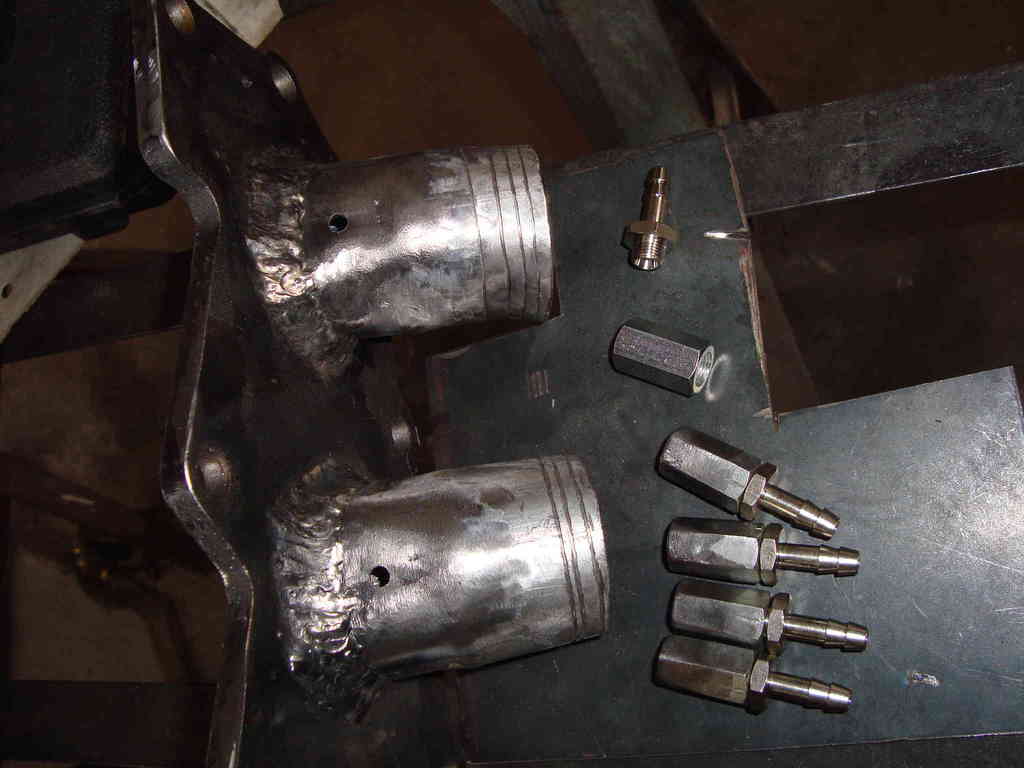
today another f**king dremel session:
trying to match ports and runners...
(no blue machining available).

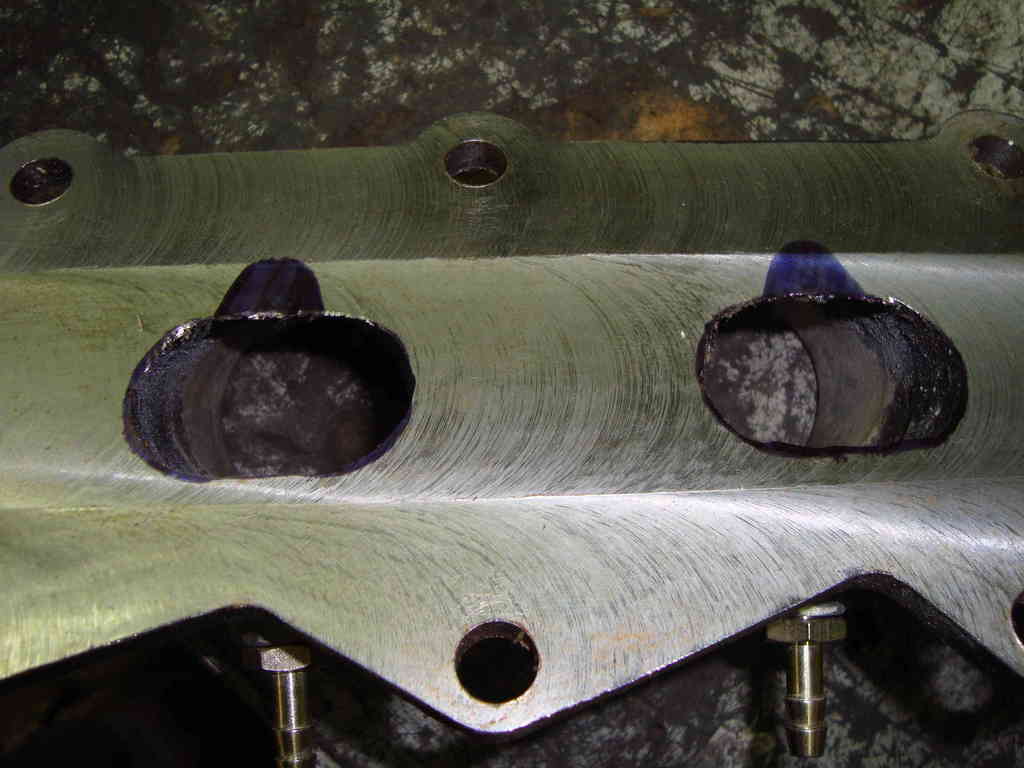
opened up...

then smoothed as best as i could.
summarizing:
from this sh*t,...

...to this sh*t.
...
trying to match ports and runners...
(no blue machining available
).


opened up...

then smoothed as best as i could.


summarizing:
from this sh*t,...
...to this sh*t.

...
30-05-2016, 09:20 PM
#38
PassionFord Regular
Thread Starter
...
this one would be just for a first run...
if i had been smarter, i'd rather have purchased the danst one: almost the same money spent, less headache and hours lost.
but i'm just a moron: learnt nothing from this experience, (as usual).
next time i'll try again re-thinking the whole manifold project from scratch, (i already have something in mind).
matter of principle...
this one would be just for a first run...
if i had been smarter, i'd rather have purchased the danst one: almost the same money spent, less headache and hours lost
.but i'm just a moron: learnt nothing from this experience
next time i'll try again re-thinking the whole manifold project from scratch, (i already have something in mind).
matter of principle...
The following users liked this post:
rooos (01-06-2016)
01-06-2016, 03:03 PM
#40
PassionFord Regular
Thread Starter
cheers Glenn  !
!
it may not be tip-top, but yes, it should work...
that manifold almost exhausted me, so thanks for your support mate !
!
i'll start working on the carbs this evening...
keeping you posted...
!it may not be tip-top, but yes, it should work...
that manifold almost exhausted me, so thanks for your support mate
!i'll start working on the carbs this evening...
keeping you posted...