
Fitting a 3 port oil seperator / breather on a 4x4 YB engine
 18-02-2005 | 05:40 PM
#1
Thread Starter
PassionFord Post Whore!!
Joined: Sep 2003
Posts: 4,519
Likes: 1
From: Macclesfield - you'll never leave....!
Im going to list with all the pictures as i did mine while i had the head off, this not only makes it easier to get to, but makes it easier to see where you should be connecting to....
Right, First job, remove the factory breather pie from the airbox, seen here on the right hand side of the head going to the factory seperator top.

Now this is where is is MUCH easier to do with the head off, you can probably do nearly as well with just the inlet manifold removed and while you are at it replace the gasket with a cometic one you can see the factory breather/sererator poking up - this is what some people call the flame trap - its not a flame trap, it just contains seperator baffles and is adequate for a std car on std boost in half decent condition. Once the boost is turned up and the engine gets more worn and the car is driven harder, an uprated one is needed to allow more blow by flow through it and to seperate the oil mist that it is carrying otherwise you get excessive oil blown back up the brather back intot the airbox when the amount of blowby oil overcomes the capacity of the std breather system.

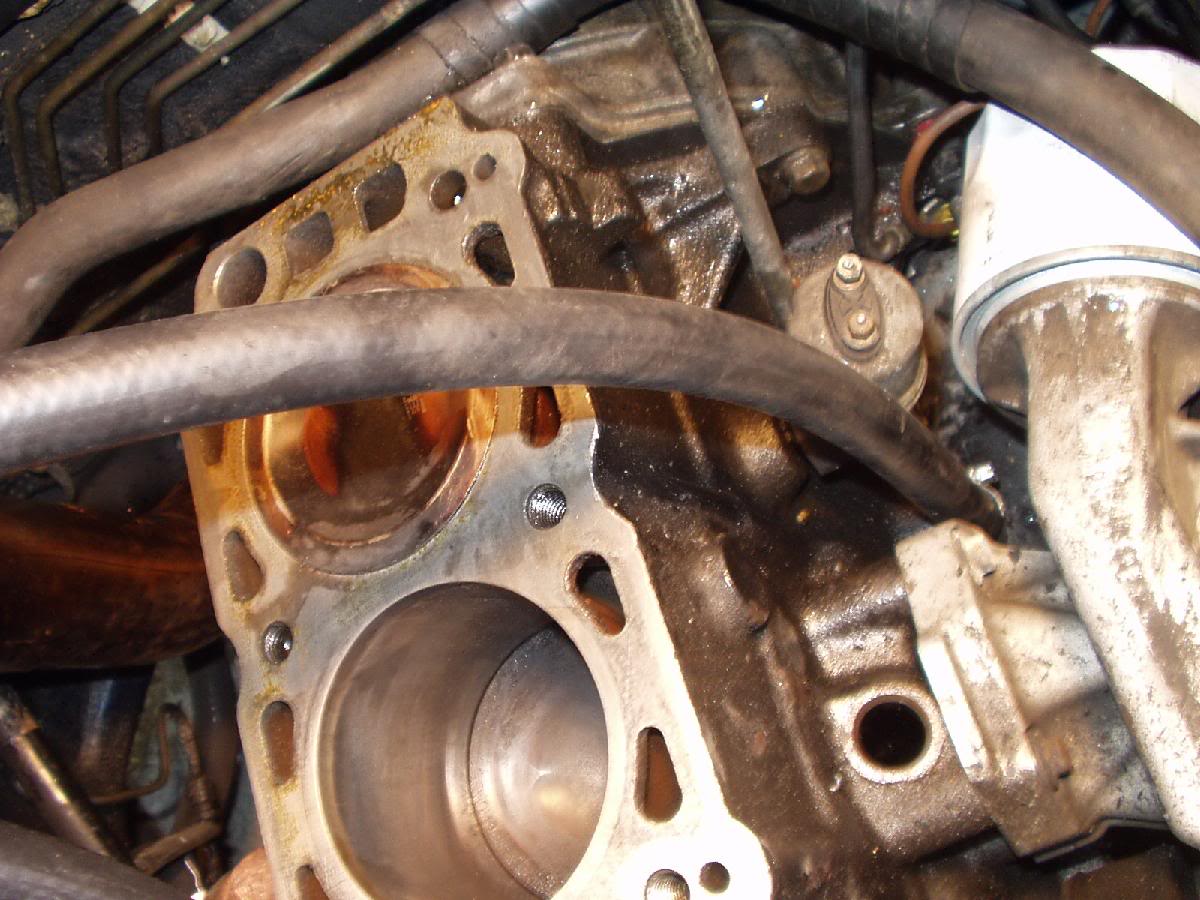
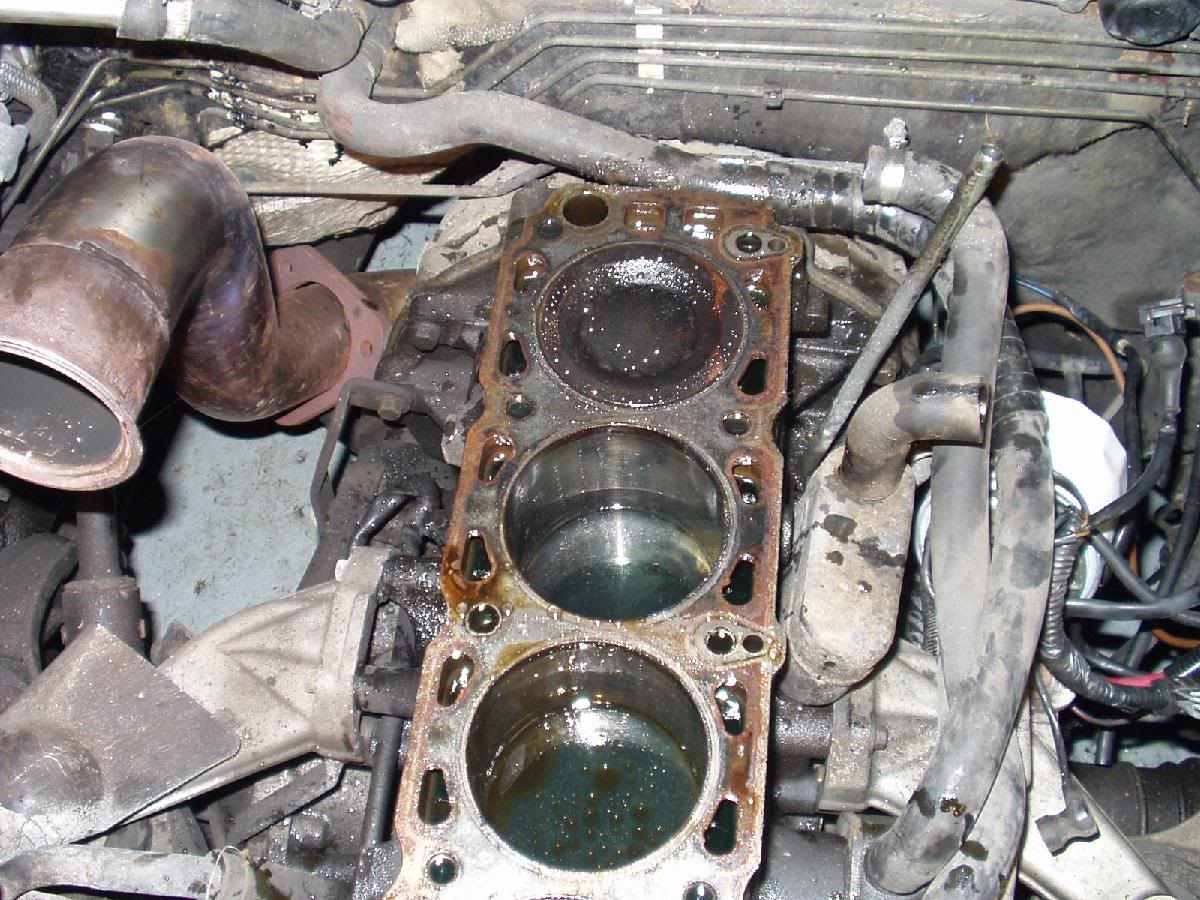
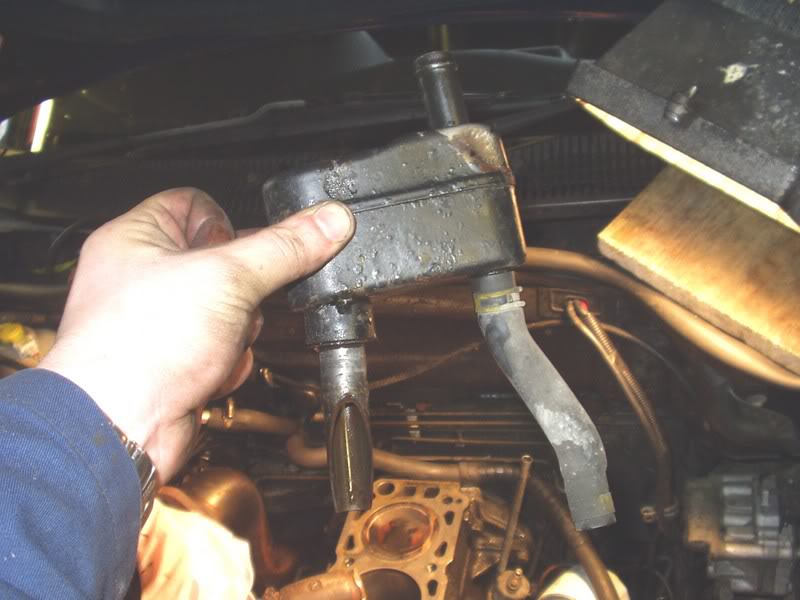
Here you can see more clearly the factory one with its inlet port from the block hidden underneath, but the vent to the airbox is at the top and its oil return to the sump is the smaller one on the right. witht the rubber pipe connected.

here it is removed - it is a very tight fit but does come out with enough wd 40 and waggleing about This is what most people call the flame trap - it is not 

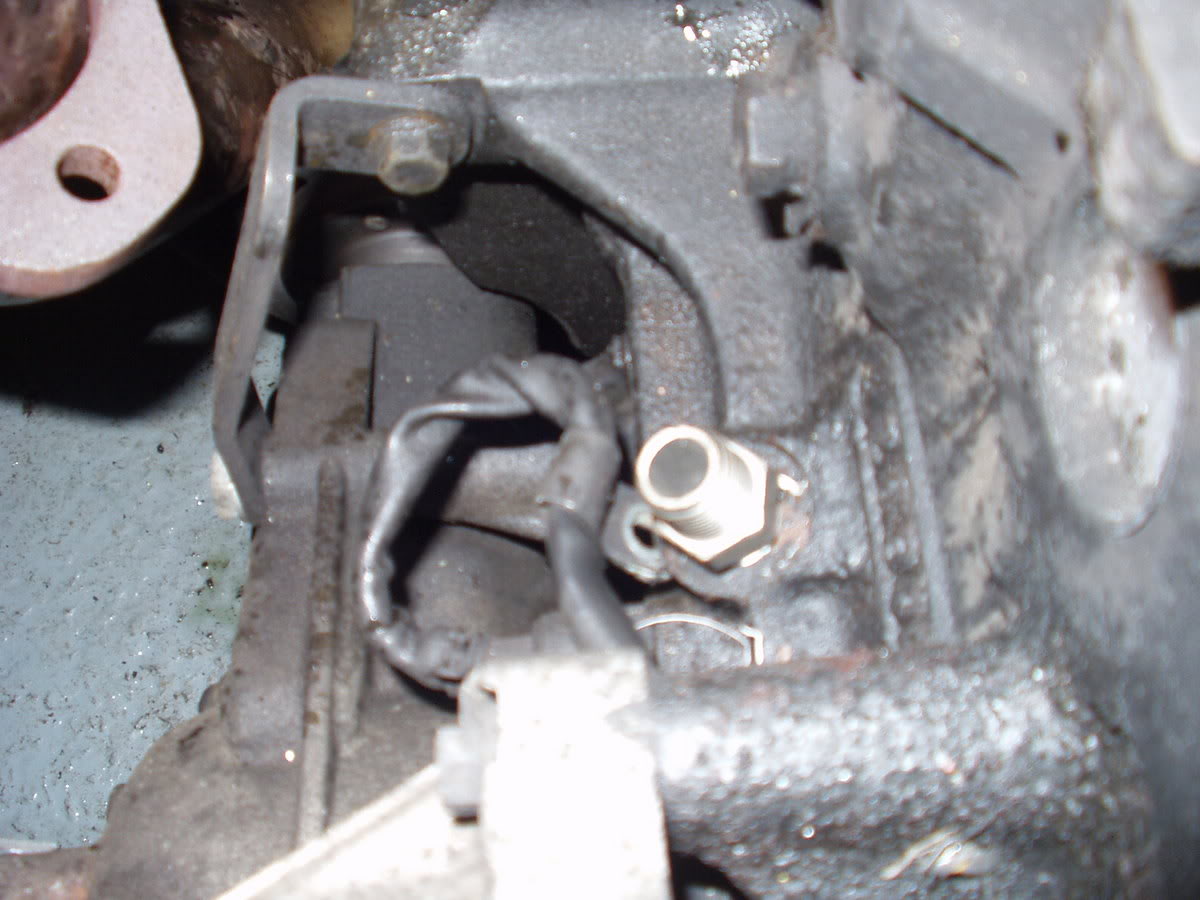
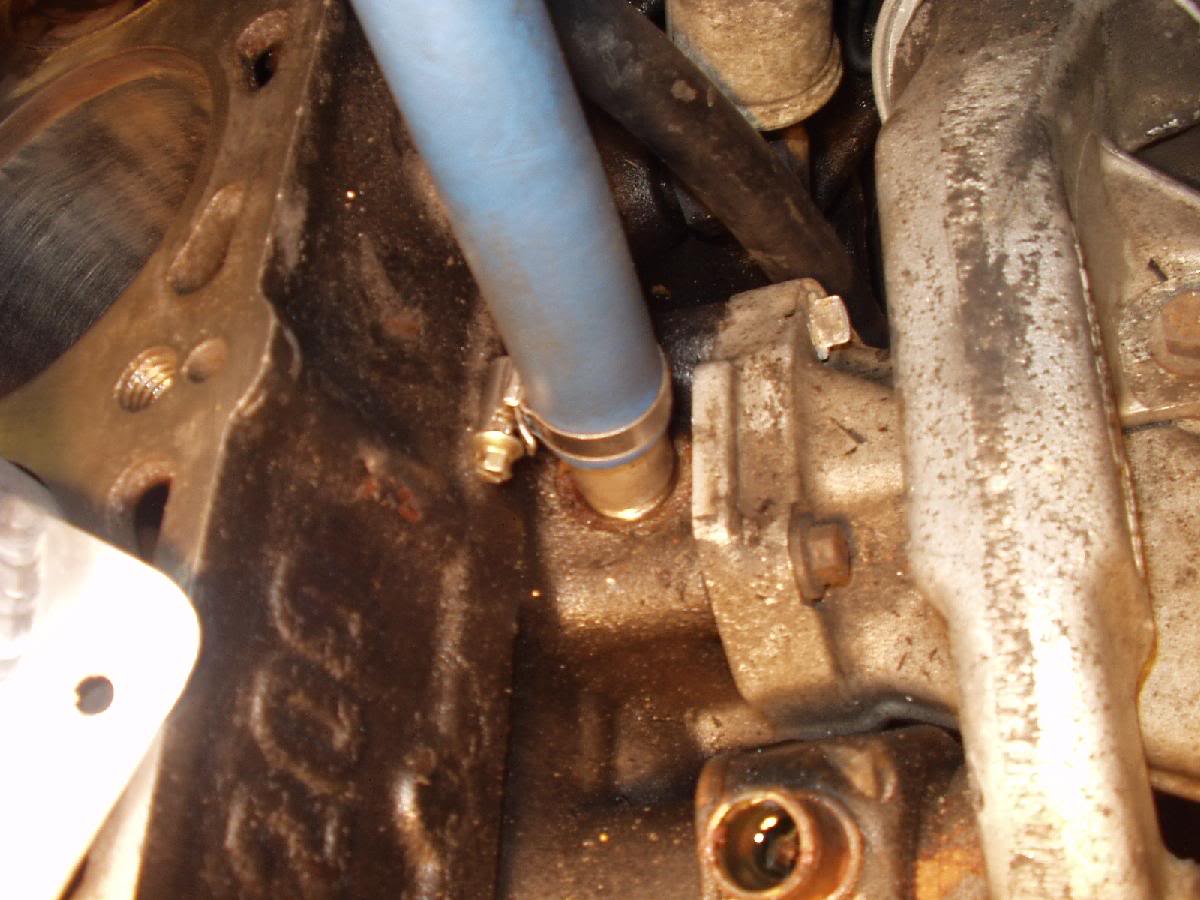
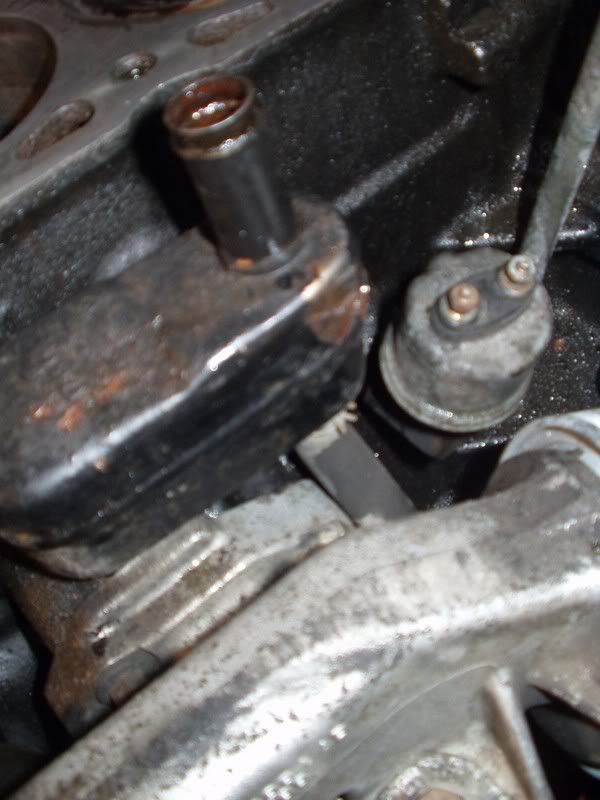
Now you need to remove the bung from the turbo side of the block, it has the knock sensor wire clipped to teh top of it as std... i have removed the small bolt from the top here...

now remove the bung and add a nipple in its place with some PTFE tape round the threads...onto this nipple, connecty your oil/heat resistant pipe( i used blue pipe ), this connects to one side of the breather at the top.

now connect a smaller diamter pipe ( i used black pipe here) to the oil return port on the sump, this is where the dogleg bent pipe on the facotory seperator was connected to, this will connect to the smaller port on the bottom of you new seperator.

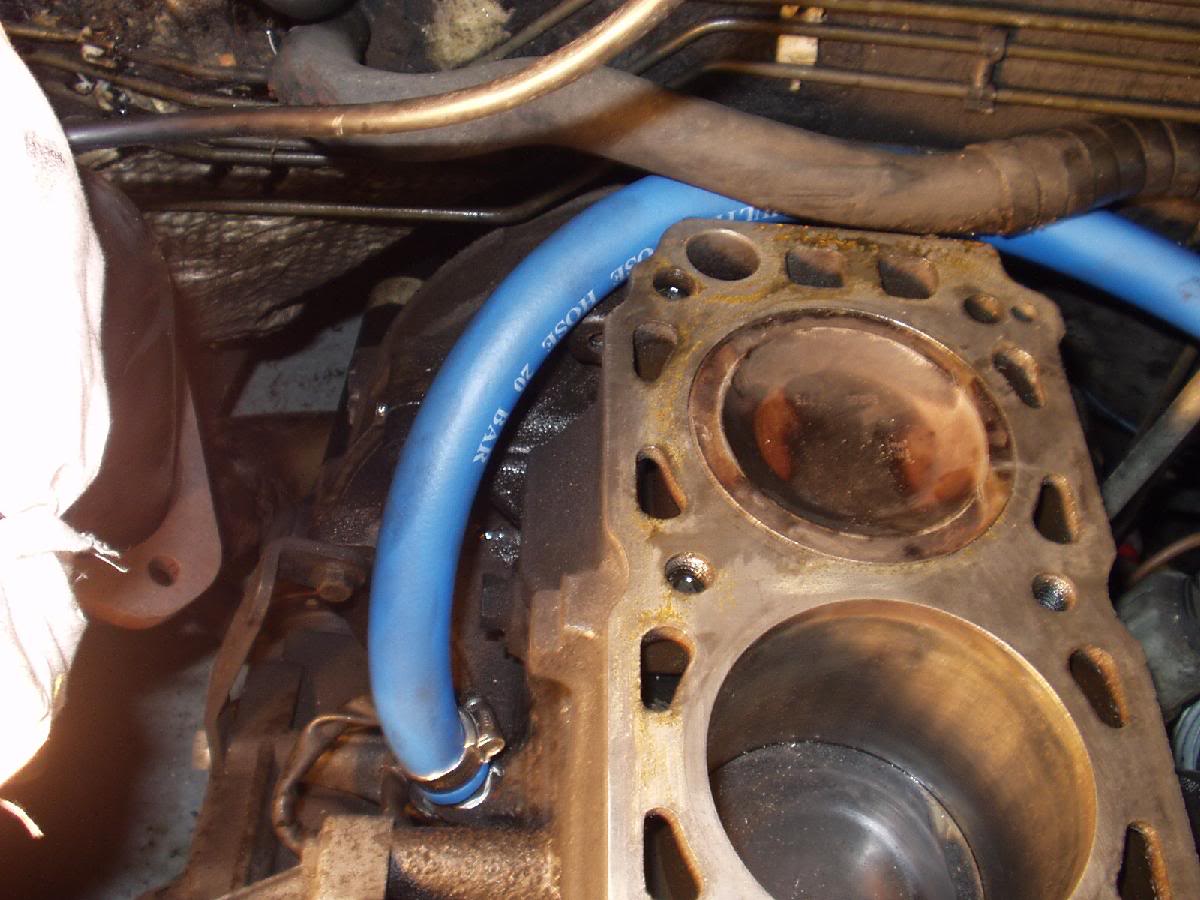
You can see above the hole where the facotory seperator came from, in here you need to fit another nipple and silicone it in place, connect another length of blue hose to this....( silicone not yet sealed around edge on here)

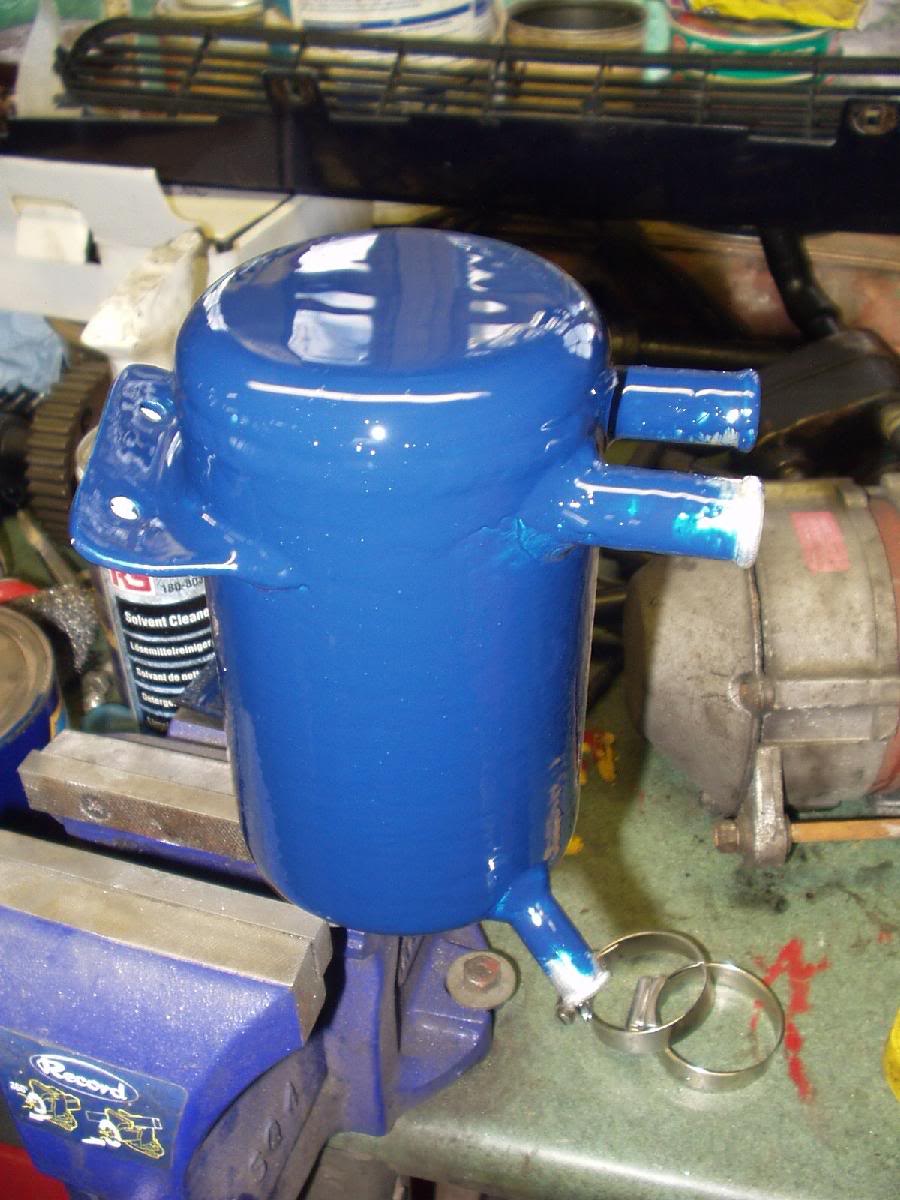
You are now ready for your new brether/seperator pot, ive got mine gripped by the large bottom port in the vice here while i painted it. The two ports at the top are for the blue pipes, the smaller angled one at the bottom is for the oil return (black pipe)

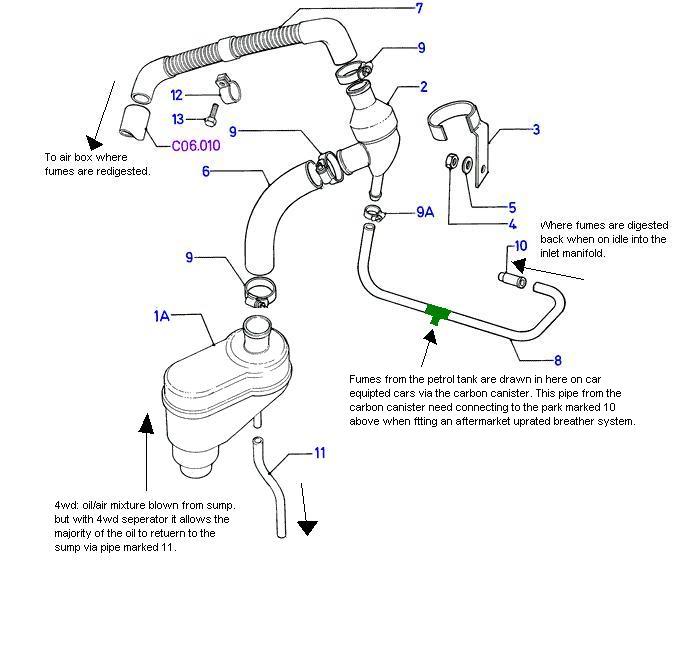
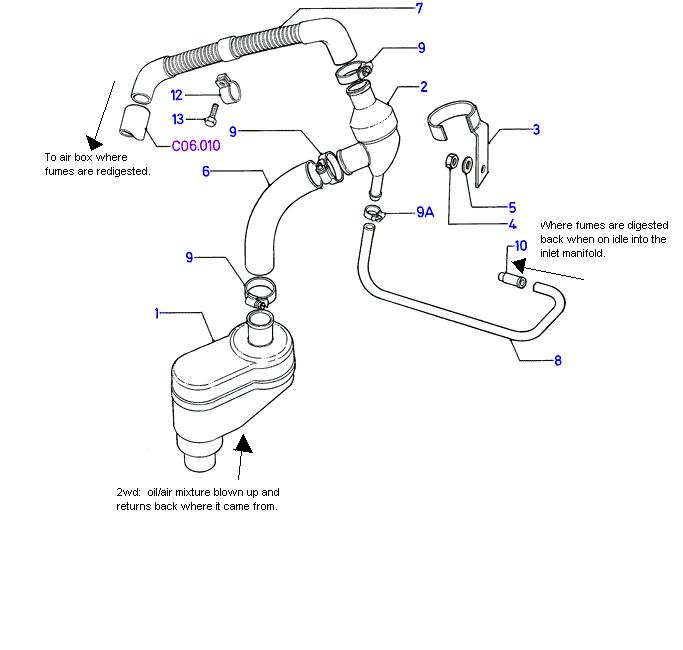
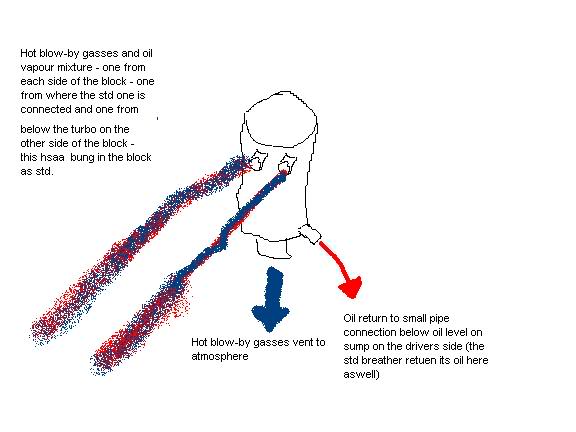
here is my rough drawing of what gasses/oils etc go where - this is for a left hand drive car - where it says drivers side, swap with passenger side for a rhd car.

before yuo refit the head, either wrap the pipe that will go under the turbo with some heat reflective foil or some other suitable heat shield as the heat will melt the rubber even with the standard turbo heat shield in place. once the head is refitted, cut to length the hoses so that you can connect them nicely when all routed through the inlet manifold etc...


1 small item i forgot,,,, if you car is acat equipt one with teh carbon canister purge valve etc , there is a pipe that used to go to the green T pictured here

with the head off, this allowed fuel vapour to be drawn through from the tank and digested back into the breather system. this pipe comes from the chassis rail from the purge solenoid, remoove the pipe work picturd here form the head (as it is no longer needed with the factory breather removed) and connect in anoher nipple into the head like this...

The pipe from the solenoid can now be connected on to this.
Seen here all reftted with the silver colour clamp holding it on...

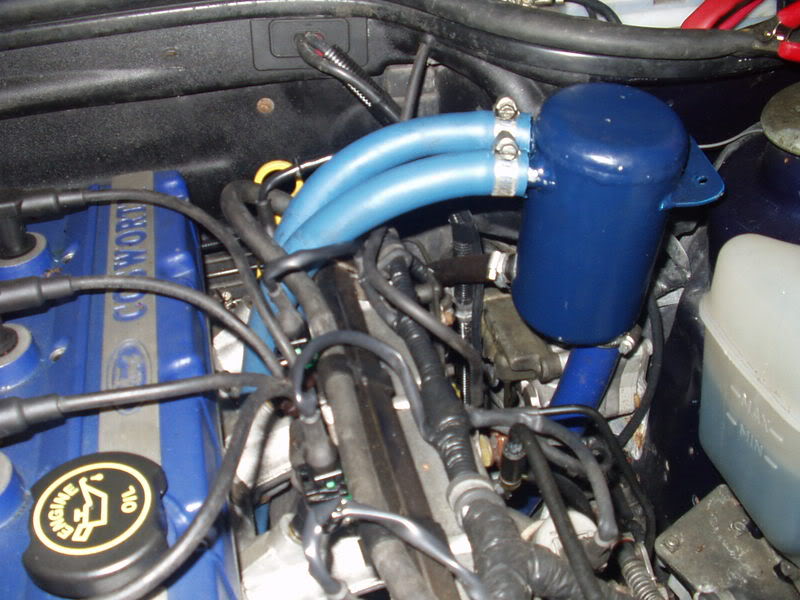
Here is my finished install, notice the large blue pipe at the bottom, this one just allows the fumes to be blown down under the car rather than into the engnine bay and to be sucked in the cabin by your fan You could connect this instead to a catch pot, the GGR system has its catchpot as a mirror of the water headter tank on the other inner wing.

Just a couple more pics of it all back tgether from eaither side of the engine bay...


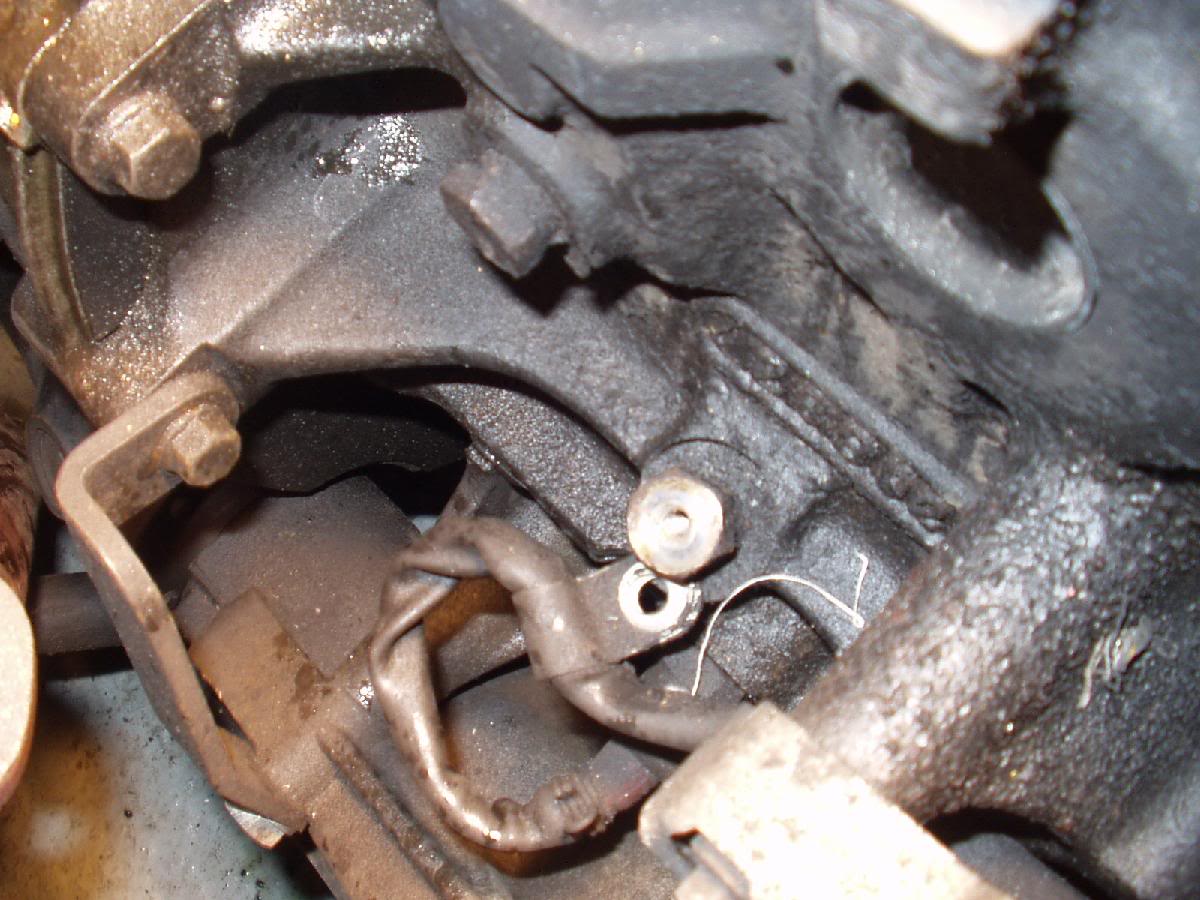
Now for a 4 port system, you need to do ALL of the above with the addition of drilling the cam cover at the back and connecting a nipple to that, this allows am extra route for blow by gasses from teh back of the block up through the head and out the top aswel as from both sides of the block. The location for the nipple in the top can be seen in this pic...

This obviously needs an extra connection on the breather/seperator.
A note for peple with 2wd engines.: you dont have the oil return pipe from the seperator to the sump. You would need to drill a hole in the sump below the oil line and fit a nipple for connecting the return pipe to. This is not to big of a job, but is best done with the sump off for obvious reasons
Hope this has helps a few people out, feel fre to add any comments or questions
Right, First job, remove the factory breather pie from the airbox, seen here on the right hand side of the head going to the factory seperator top.
Now this is where is is MUCH easier to do with the head off, you can probably do nearly as well with just the inlet manifold removed and while you are at it replace the gasket with a cometic one
Here you can see more clearly the factory one with its inlet port from the block hidden underneath, but the vent to the airbox is at the top and its oil return to the sump is the smaller one on the right. witht the rubber pipe connected.
here it is removed - it is a very tight fit but does come out with enough wd 40 and waggleing about
Now you need to remove the bung from the turbo side of the block, it has the knock sensor wire clipped to teh top of it as std... i have removed the small bolt from the top here...
now remove the bung and add a nipple in its place with some PTFE tape round the threads...onto this nipple, connecty your oil/heat resistant pipe( i used blue pipe ), this connects to one side of the breather at the top.
now connect a smaller diamter pipe ( i used black pipe here) to the oil return port on the sump, this is where the dogleg bent pipe on the facotory seperator was connected to, this will connect to the smaller port on the bottom of you new seperator.
You can see above the hole where the facotory seperator came from, in here you need to fit another nipple and silicone it in place, connect another length of blue hose to this....( silicone not yet sealed around edge on here)
You are now ready for your new brether/seperator pot, ive got mine gripped by the large bottom port in the vice here while i painted it. The two ports at the top are for the blue pipes, the smaller angled one at the bottom is for the oil return (black pipe)
here is my rough drawing of what gasses/oils etc go where - this is for a left hand drive car - where it says drivers side, swap with passenger side for a rhd car.
before yuo refit the head, either wrap the pipe that will go under the turbo with some heat reflective foil or some other suitable heat shield as the heat will melt the rubber even with the standard turbo heat shield in place. once the head is refitted, cut to length the hoses so that you can connect them nicely when all routed through the inlet manifold etc...
1 small item i forgot,,,, if you car is acat equipt one with teh carbon canister purge valve etc , there is a pipe that used to go to the green T pictured here
with the head off, this allowed fuel vapour to be drawn through from the tank and digested back into the breather system. this pipe comes from the chassis rail from the purge solenoid, remoove the pipe work picturd here form the head (as it is no longer needed with the factory breather removed) and connect in anoher nipple into the head like this...
The pipe from the solenoid can now be connected on to this.
Seen here all reftted with the silver colour clamp holding it on...
Here is my finished install, notice the large blue pipe at the bottom, this one just allows the fumes to be blown down under the car rather than into the engnine bay and to be sucked in the cabin by your fan
Just a couple more pics of it all back tgether from eaither side of the engine bay...
Now for a 4 port system, you need to do ALL of the above with the addition of drilling the cam cover at the back and connecting a nipple to that, this allows am extra route for blow by gasses from teh back of the block up through the head and out the top aswel as from both sides of the block. The location for the nipple in the top can be seen in this pic...
This obviously needs an extra connection on the breather/seperator.
A note for peple with 2wd engines.: you dont have the oil return pipe from the seperator to the sump. You would need to drill a hole in the sump below the oil line and fit a nipple for connecting the return pipe to. This is not to big of a job, but is best done with the sump off for obvious reasons
Hope this has helps a few people out, feel fre to add any comments or questions
18-02-2005 | 11:21 PM
#2
0-60 in 17 seconds (eek)
Joined: Apr 2004
Posts: 6,717
Likes: 0
From: Berkshire
Nice one Dave, top advice as usual. I fitted mine a while ago, and would have benefitted from this 
Judging by the amount of people who ask how to fit one, this has to be one of the best technical posts around
Judging by the amount of people who ask how to fit one, this has to be one of the best technical posts around

 02-05-2005 | 05:56 PM
#4

Just remember the following and get the parts BEFORE you start this
* the bung under the turbo is 3/8" M NPT
* the pipe diameter of the original breather hole is �20mm
* the diameter of the pipe of the original oil return is �9,5mm
* the bung under the turbo is 3/8" M NPT
* the pipe diameter of the original breather hole is �20mm
* the diameter of the pipe of the original oil return is �9,5mm


Thread
Thread Starter
Forum
Replies
Last Post
big_Rad
General Car Related Discussion.
8
15-09-2017 10:36 AM
track.focus'd
Restorations, Rebuilds & Projects.
26
12-08-2015 06:53 PM