
Smart ForTwo Hayabusa Project - Update 04/05/2015
 12-06-2009, 04:24 PM
#41
Regular Contributor
Thread Starter

The Smartuki design uses trailing arm suspension which doesn't improve on the extremely poor handling of a smart fortwo, and their prices are extortionate. They also use 3 bolt rear hubs still.
W're going for double wishbone and 4x10⁸PCD everything (including new front hubs).
Smartuki's design can't house a Hayabusa (1300R) either. These are the main reasons we're doing our own and will be selling them in kit form after the new year
W're going for double wishbone and 4x10⁸PCD everything (including new front hubs).
Smartuki's design can't house a Hayabusa (1300R) either. These are the main reasons we're doing our own and will be selling them in kit form after the new year
 13-06-2009, 10:36 PM
#42
Virgin

Join Date: Feb 2005
Location: BLACKPOOL
Posts: 3
Likes: 0
Received 0 Likes
on
0 Posts
have you got a price in mind for your kit when your work is complete, as i think they will be lots of intrest in you kit as you seem to have every angle on build quality covered. also would be intrested in one of your kits. also will this kit fit both LHD, and RHD models
16-06-2009, 11:03 PM
#43
Virgin
Join Date: Feb 2005
Location: BLACKPOOL
Posts: 3
Likes: 0
Received 0 Likes
on
0 Posts
just found one for sale on ebay and it looks ok for the money i think i may have a bid
http://cgi.ebay.co.uk/smart-car-smar...3A1%7C294%3A50
http://cgi.ebay.co.uk/smart-car-smar...3A1%7C294%3A50
18-07-2009, 08:12 PM
#44
Virgin

Join Date: Jul 2009
Location: ashford
Posts: 6
Likes: 0
Received 0 Likes
on
0 Posts
Hi will you do a complete kit with engine would definately be ordering one of these could you fit? what year is your smart cant wait to see some pics of this build with engine in roll on the new year
Last edited by smartz; 19-07-2009 at 07:22 PM.
20-01-2010, 10:38 PM
#45
Regular Contributor
Thread Starter
Hey Everyone!
A good few months from my last update, so lets explain whats been going on.
Firstly, I now have a new job which has needed alot of my attention since september. I was offered a excellent oppertunity which I couldn't turn down so i'm now a project manager for a web development company. Nice!
As per all good things in life on this exact same day I was offered the above oppertunity my long term girlfriend left me. So obviously a bit of recovering time needed to sort myself out and give the project some thought.
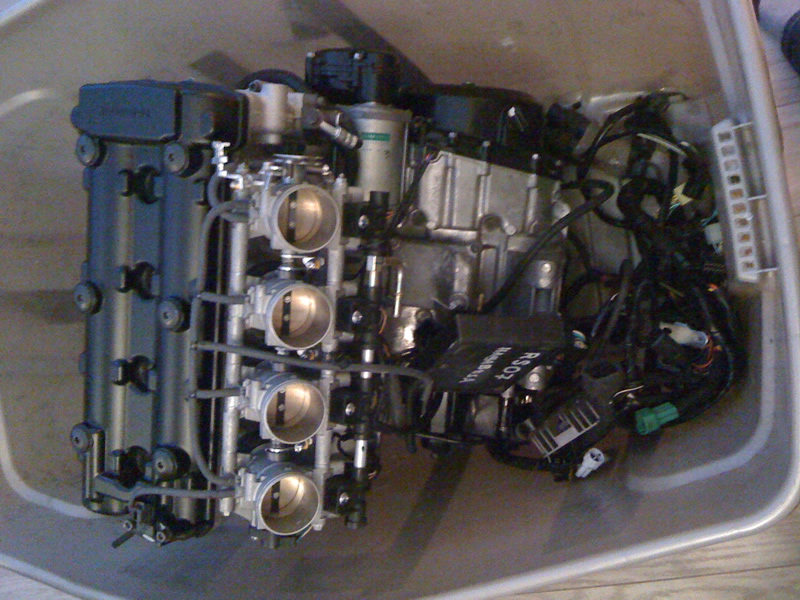
Now on to funds, I've been building up the funds to buy an 2007 Suzuki Haybusa Engine. 2007 Is last of the decent ones before they upped compression and engine capacity in 2008. These are awful to tune and tend to give bad tuning results, hence why 2007's are so sought after.
I'm very proud to say i'm picking up mine next week for an amount of money that'll make your arse fall off. With under 2000 miles on the clock its worth the extra few ���.
So where does that leave leave the project?
Only a few things to do *gulp*
So i'll post up more pics when the engine arrives, i've been told its an extremely clean example but i'll give it a clean up anyway.
Really want the project completed before some sort of warm weather arrives, would love it on the road by May. So i've set that as the target!
So thats it for the moment, just waiting for the phone call to say "Come pick the engine up".
A good few months from my last update, so lets explain whats been going on.
Firstly, I now have a new job which has needed alot of my attention since september. I was offered a excellent oppertunity which I couldn't turn down so i'm now a project manager for a web development company. Nice!
As per all good things in life on this exact same day I was offered the above oppertunity my long term girlfriend left me. So obviously a bit of recovering time needed to sort myself out and give the project some thought.
Now on to funds, I've been building up the funds to buy an 2007 Suzuki Haybusa Engine. 2007 Is last of the decent ones before they upped compression and engine capacity in 2008. These are awful to tune and tend to give bad tuning results, hence why 2007's are so sought after.
I'm very proud to say i'm picking up mine next week for an amount of money that'll make your arse fall off. With under 2000 miles on the clock its worth the extra few ���.
So where does that leave leave the project?
Only a few things to do *gulp*
- Complete Subframe
- Complete Suspension
- Fit Engine
- Intergrate Loom with Smart Fortwo Loom
- Design and Impliment Air Intake
- Design and Manufacture Front Hubs
- Purchase and Fit Pedal Box
- Purchase and Fit Dash
- Purchase and Fit Front Brakes
- Purchase and Fit Wheels
- Purchase and Fit New Radiator
- Purchase and Fit New Fuel Tank
- Engine First Start!..
- Purchase and Fit Bucket Seats
- Purchase 4x Piranah Nozzel's & Distribution Block (To Replace the current Shark Nozzel)
- Fit Nitrous Kit
- Pass MOT
So i'll post up more pics when the engine arrives, i've been told its an extremely clean example but i'll give it a clean up anyway.
Really want the project completed before some sort of warm weather arrives, would love it on the road by May. So i've set that as the target!
So thats it for the moment, just waiting for the phone call to say "Come pick the engine up".
 22-01-2010, 07:28 PM
#49
Regular Contributor
Thread Starter
24-01-2010, 09:36 PM
#51
Regular Contributor
Thread Starter
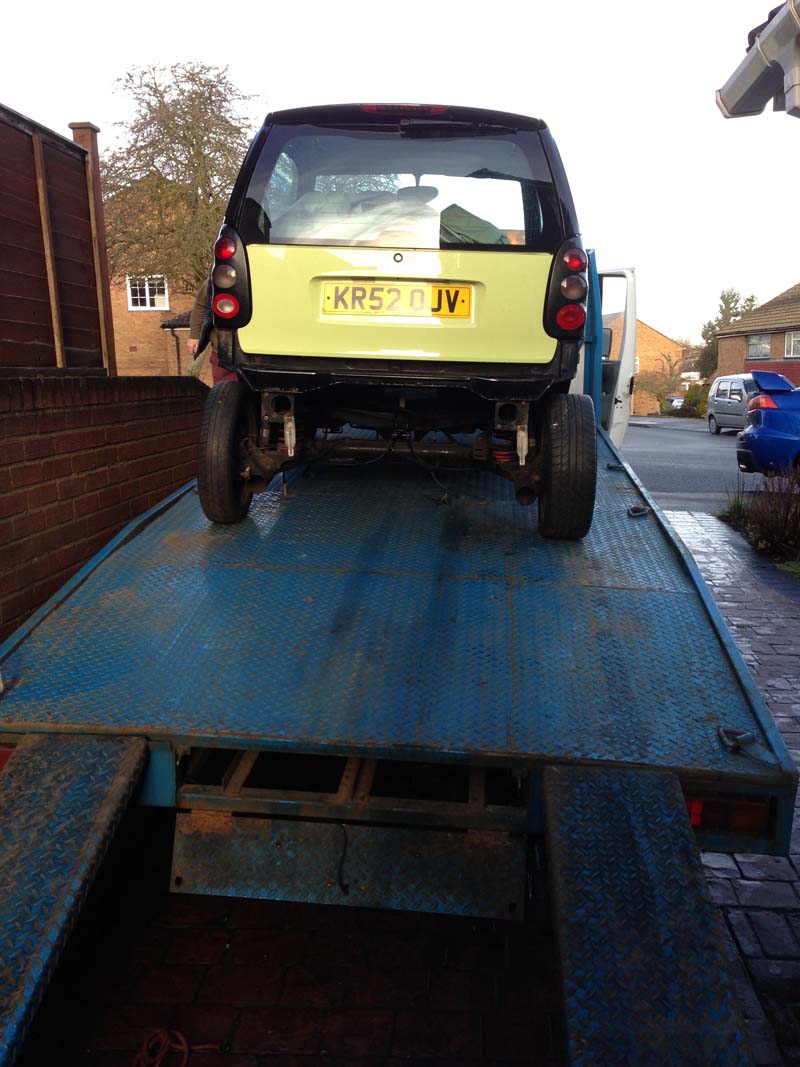
I found mine dirt cheap last year. It was a 52 plate (RHD) with no engine, �600. Everything was immaculate!
They usually blow a stock engine quite often so should find a nice example on eBay or similar
They usually blow a stock engine quite often so should find a nice example on eBay or similar
31-01-2010, 07:06 PM
#53
Regular Contributor
Thread Starter
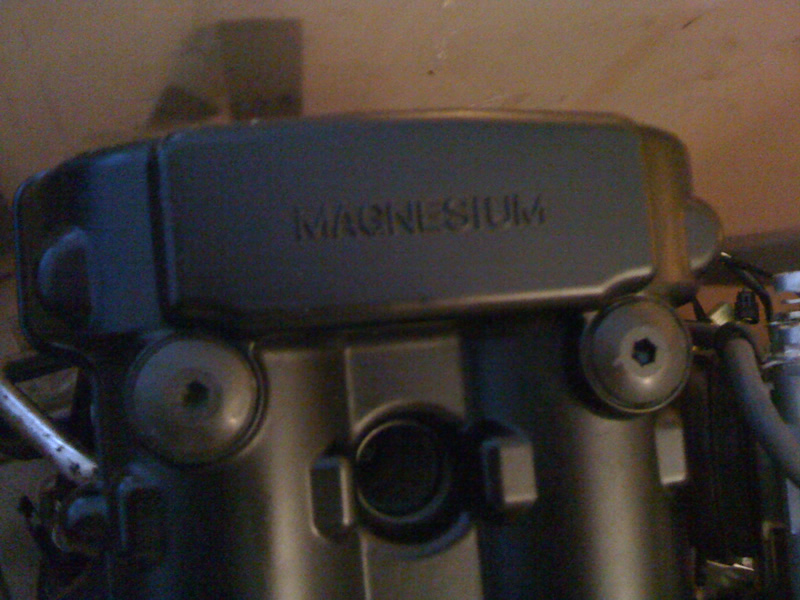
Went for a bit of a road trip today to pick up the 07 Hayabusa engine. Its in excellent condition with only 2360 miles on it
The pre 08's tend to have the best tuning results, the compression ratio and stroke is slightly different on the 08+'s.
Just the fuel pump is now needed for the engine and thats out the way, just the rest to do now .
.
The pre 08's tend to have the best tuning results, the compression ratio and stroke is slightly different on the 08+'s.
Just the fuel pump is now needed for the engine and thats out the way, just the rest to do now
.
31-01-2010, 08:47 PM
#54
Virgin
Join Date: Jul 2009
Location: ashford
Posts: 6
Likes: 0
Received 0 Likes
on
0 Posts
 that engine looks the nuts do you no if your sub frame will fit a roadster ive been told there the same but im not sure. are you going to fit the bike clocks in the car with 220 mph?
 09-03-2010, 08:01 AM
#57
Regular Contributor
Thread Starter
None as of yet, I'm due to launch two websites next week so i've preparing a few bits and bobs. One is quite closely related to supplying materials for projects like these... The weather has been pants also so i've been doing some research on brakes and contacted a few companies.
I'll be going for 4Pots with 280(ish)mm discs all round that fit under a 13" wheel. This will mean I can forget un-proportional sized wheels and stick to a nice set of 15's..
More news soon :0)
I'll be going for 4Pots with 280(ish)mm discs all round that fit under a 13" wheel. This will mean I can forget un-proportional sized wheels and stick to a nice set of 15's..
More news soon :0)
16-07-2010, 05:51 AM
#58
Virgin

Join Date: Jul 2010
Location: South Africa
Posts: 1
Likes: 0
Received 0 Likes
on
0 Posts
Hi i would like to know if it would be possible to help with drawings or any info that may assist me with a project similar to yours. I have seen sites where the parts are available but with the exchange rate in South Africa i think you would have to be a millonaire to afford to buy then import. Thanks Dinkey
16-07-2010, 07:47 AM
#59
PassionFord Post Whore!!
Ths is gonna be such fun
16-07-2010, 12:31 PM
#60
Mad engine scientist

Now all you need is a decent 400+ bhp turbo tune of the Busa engine and your weight/power-ratio will be ok by Norwegian standards. 
I've ridden my bike with 1.77whp per kilo of bike - 1.12whp per kilo with me included - and yes, you need such power.
(for those of you not math inclined it's 184 kg's of GSX-R 1342 bigbore/stroker Turbo IC EFI with 326 whp at 16 psi).
I've ridden my bike with 1.77whp per kilo of bike - 1.12whp per kilo with me included - and yes, you need such power.
(for those of you not math inclined it's 184 kg's of GSX-R 1342 bigbore/stroker Turbo IC EFI with 326 whp at 16 psi).
 10-07-2014, 11:53 AM
#62
Regular Contributor
Thread Starter
It's been a long time since my last update, life has been busy with many up's and down's and sacrifices had to be made in the form of time. Time is very precious and I'm happy that I now have surplus to continue this amazing project.
Rather than saying I'm going to re-start the project and get followers excited, I just continued where I left off with a few major changes.
A few months have passed and progress has gained some amazing ground, there has been some huge changes and many lessons learnt.
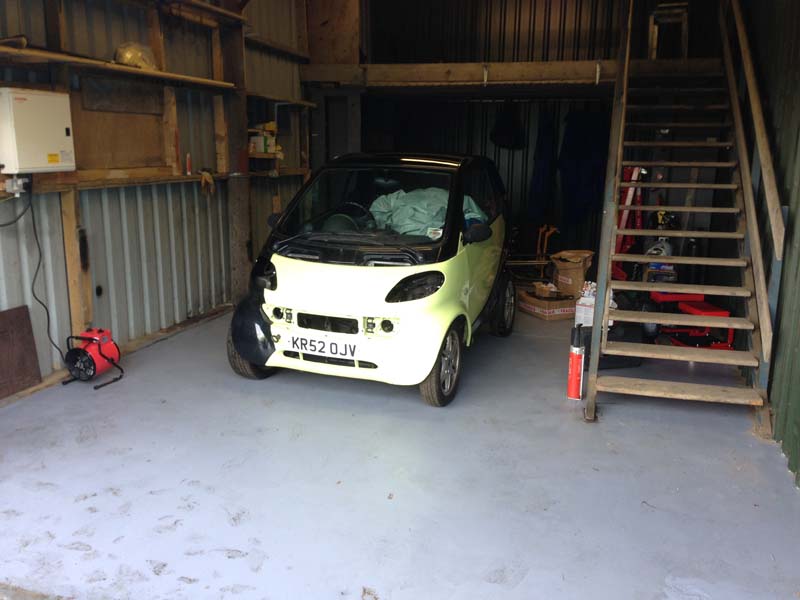
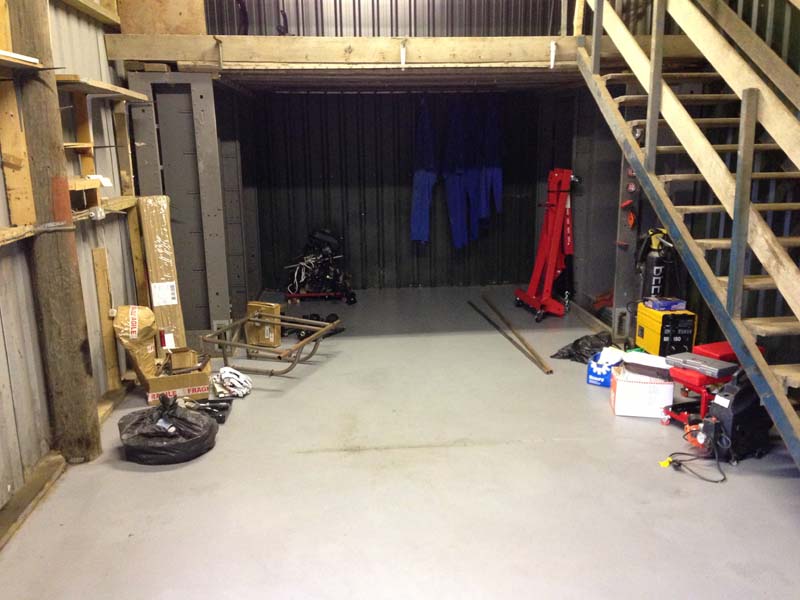
Firstly we've moved the project location. Myself and my dad were cramped for space so we've moved to a small unit which we rent locally, this has made a huge improvement in itself as we now have space to work and store parts.
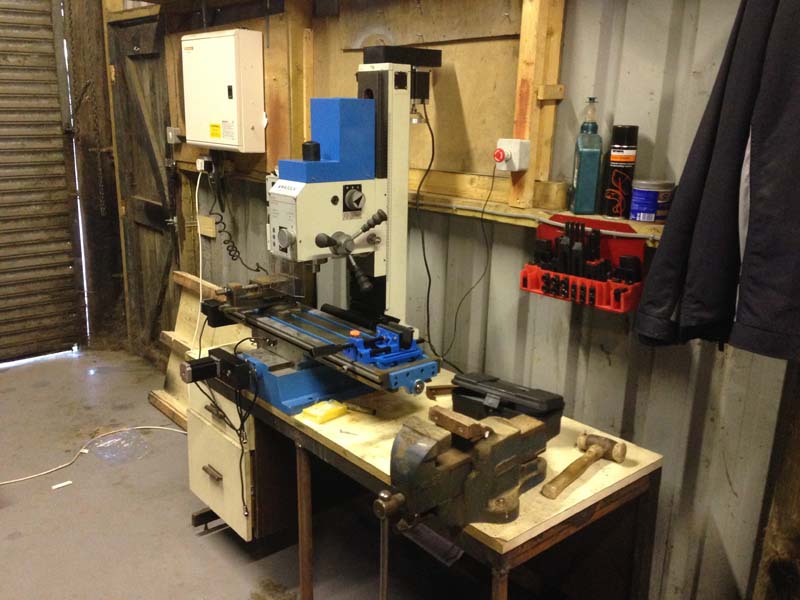
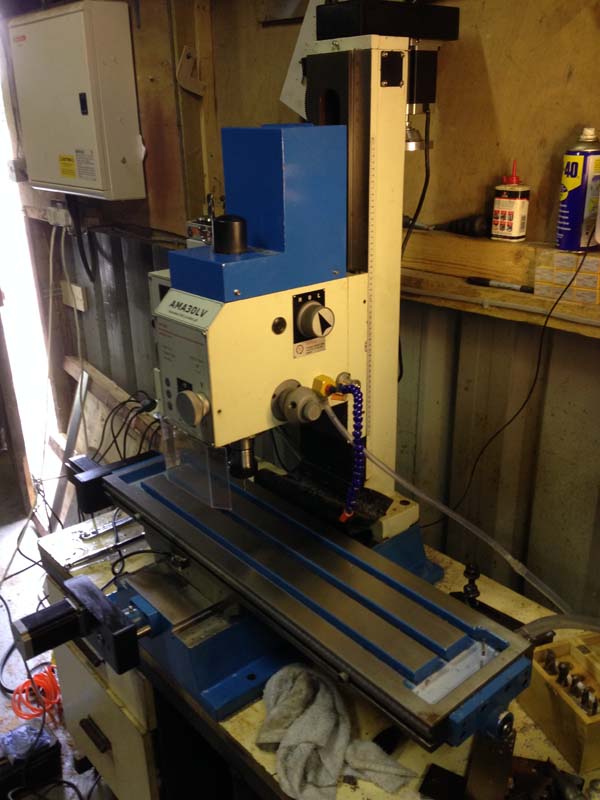
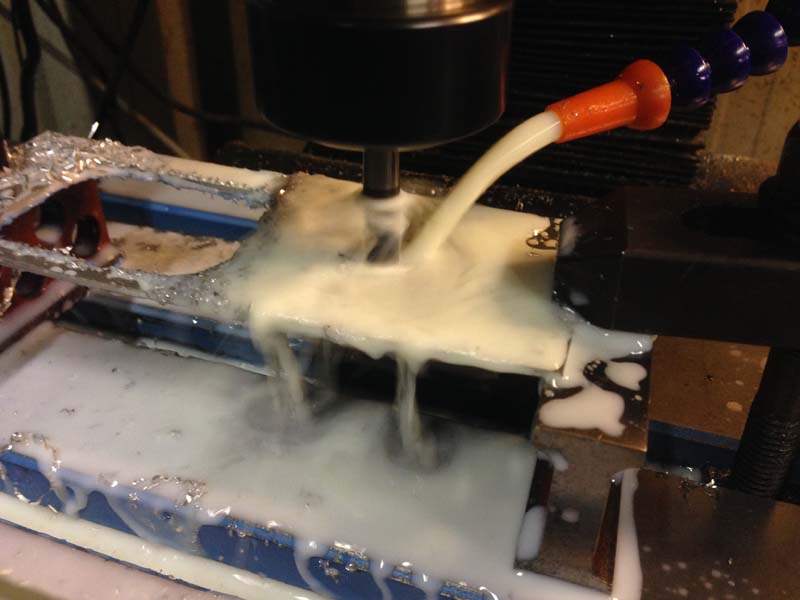
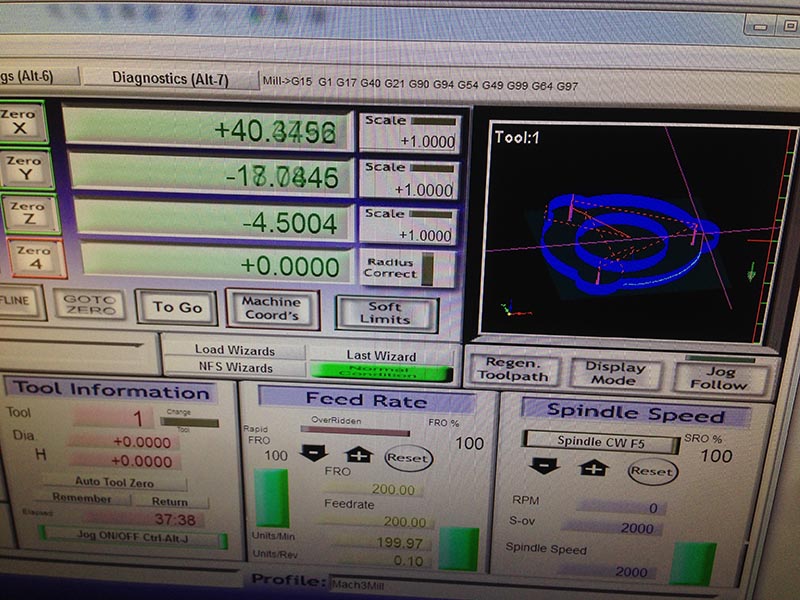
Our equipment has changed. We had long lead times for parts to be laser cut, machined and modified and it was slowing us down. We took a leap of faith and purchased a fantastic CNC machine for all our custom parts, it has paid for itself in worth already. We now draw then start machining in around 20-30 minutes and the results are astounding.
Here is where I should start filling up the thread with many many photos but let me answer a few questions that I feel may come up.
Will you be making kits available?
Maybe, my dad is close to retiring age and would love to. Nothing would make him happier than somewhere to work/play on projects like this. I have drawings and versions for every part ever made for this project and an inventory of parts required. I think what's most important now is to finish this project and then think about it, I don't want to make mistakes like a commonly hear from other companies producing similar kits.
Where is the engine located?
In the back where it's supposed to. It's not hard to Google other kits and conversions, this project isn't a first but we've done things right. We wanted to retained both seats.
Do you need to modify the chassis?
Yes, in order for this project to feel purposeful it needed to abide by a few person rules. Things like independent rear suspension, equal length driveshafts and many many adjustable parts with a standard look meant the chassis needs to be modified slightly in the form of cutting the engine bay so the engine fits, it's not a lot.
I could of quite easily built a subframe to work around the original chassis and finished by now but handling and ride wouldn't of been be amazing. I'm not building an outright track weapon but it can be, think of it as a mix of 'fast road and track'.
What vehicle are the parts from?
A mix, we wanted parts easily obtainable as we could of made them all with the equipment available but that incurs a great cost and not what this project is about.
So far the parts are from/meant for.
Sierra Cossorth
Radical SR3
MNR Vortex
VW Polo
This may change but how things are staying at the moment.
I'll post pictures up through out the day, please feel free to ask any questions. I'd be more than happy to answer them
David
Rather than saying I'm going to re-start the project and get followers excited, I just continued where I left off with a few major changes.
A few months have passed and progress has gained some amazing ground, there has been some huge changes and many lessons learnt.
Firstly we've moved the project location. Myself and my dad were cramped for space so we've moved to a small unit which we rent locally, this has made a huge improvement in itself as we now have space to work and store parts.
Our equipment has changed. We had long lead times for parts to be laser cut, machined and modified and it was slowing us down. We took a leap of faith and purchased a fantastic CNC machine for all our custom parts, it has paid for itself in worth already. We now draw then start machining in around 20-30 minutes and the results are astounding.
Here is where I should start filling up the thread with many many photos but let me answer a few questions that I feel may come up.
Will you be making kits available?
Maybe, my dad is close to retiring age and would love to. Nothing would make him happier than somewhere to work/play on projects like this. I have drawings and versions for every part ever made for this project and an inventory of parts required. I think what's most important now is to finish this project and then think about it, I don't want to make mistakes like a commonly hear from other companies producing similar kits.
Where is the engine located?
In the back where it's supposed to. It's not hard to Google other kits and conversions, this project isn't a first but we've done things right. We wanted to retained both seats.
Do you need to modify the chassis?
Yes, in order for this project to feel purposeful it needed to abide by a few person rules. Things like independent rear suspension, equal length driveshafts and many many adjustable parts with a standard look meant the chassis needs to be modified slightly in the form of cutting the engine bay so the engine fits, it's not a lot.
I could of quite easily built a subframe to work around the original chassis and finished by now but handling and ride wouldn't of been be amazing. I'm not building an outright track weapon but it can be, think of it as a mix of 'fast road and track'.
What vehicle are the parts from?
A mix, we wanted parts easily obtainable as we could of made them all with the equipment available but that incurs a great cost and not what this project is about.
So far the parts are from/meant for.
Sierra Cossorth
Radical SR3
MNR Vortex
VW Polo
This may change but how things are staying at the moment.
I'll post pictures up through out the day, please feel free to ask any questions. I'd be more than happy to answer them
David
Last edited by 42Haya; 10-07-2014 at 11:56 AM.
10-07-2014, 09:46 PM
#64
Regular Contributor
Thread Starter
So before I post any more pictures I should probably show how it currently sits.
After a bit of cutting/trimming.
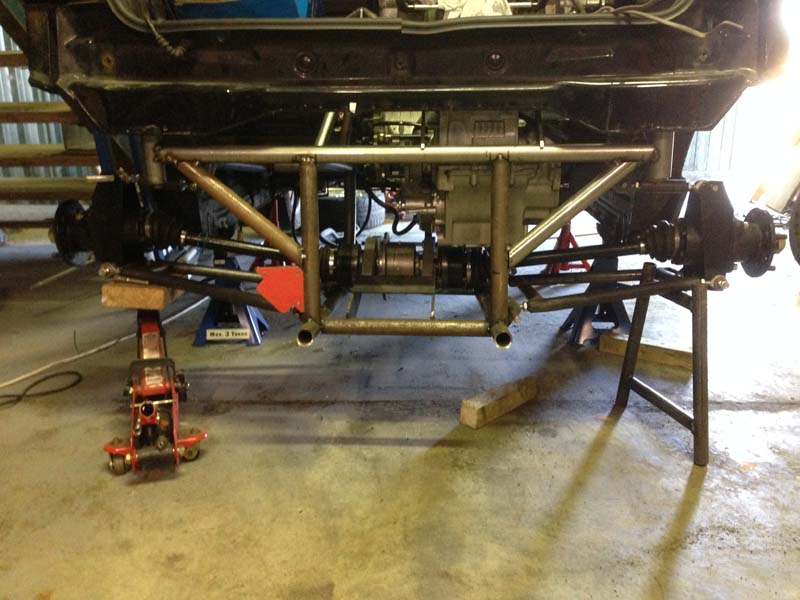
We test fitted the frame. Note: This is probably the 4th or 5th complete frame that's been created, the rest never made the cut.
Then test fitted the engine
Bumper on to see what will be left on show, the exhaust will hide all this.
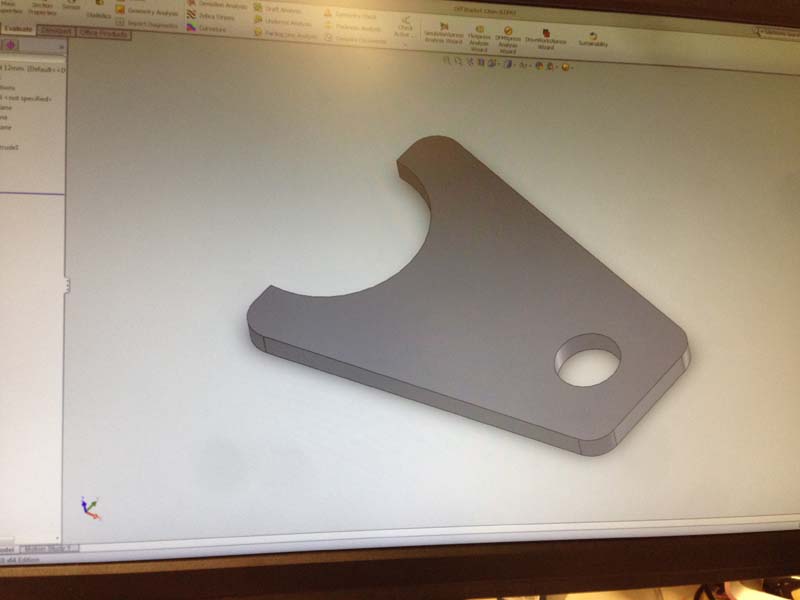
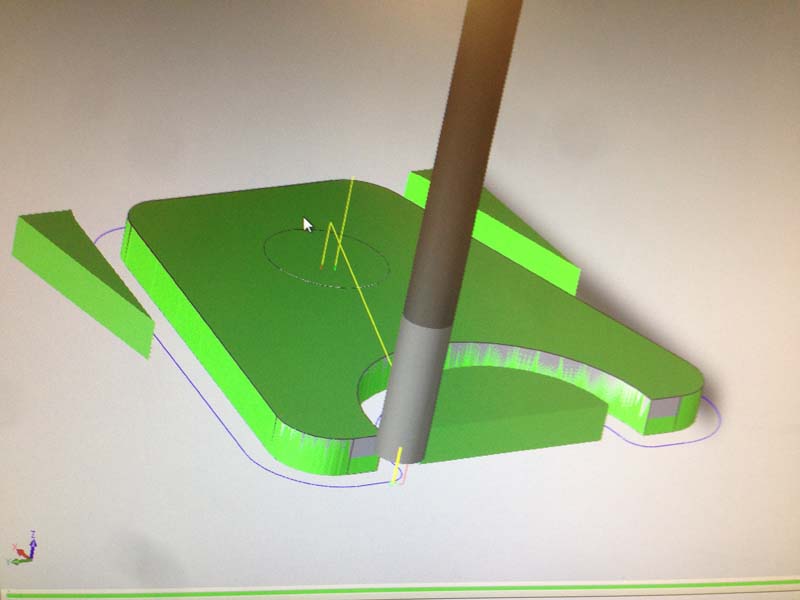
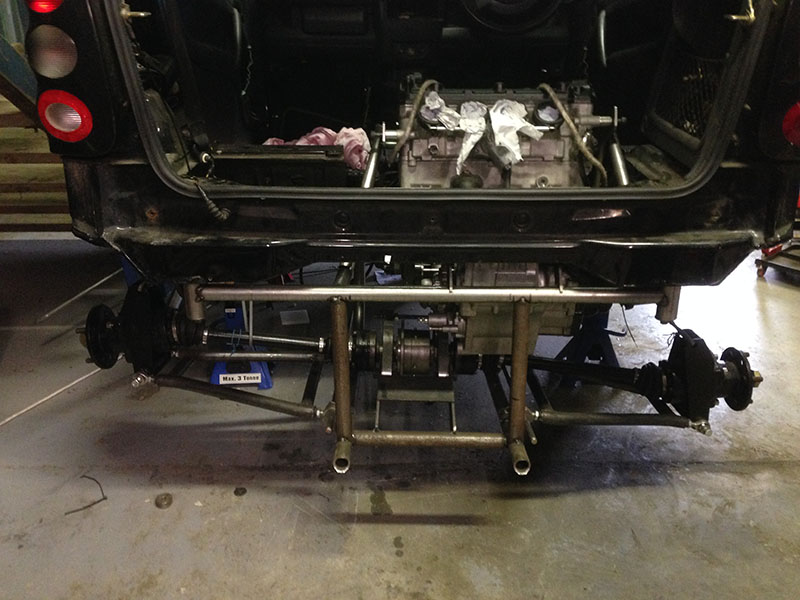
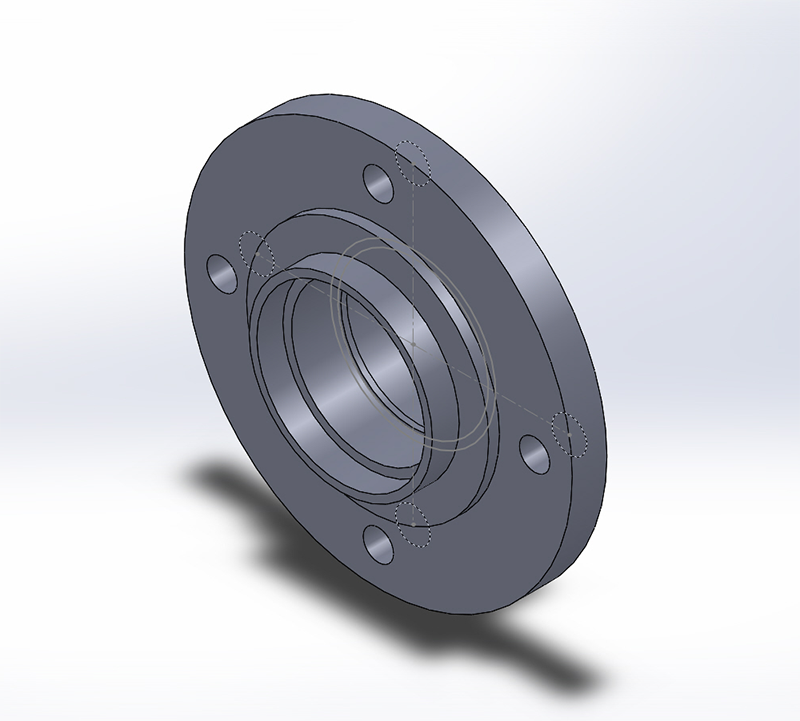
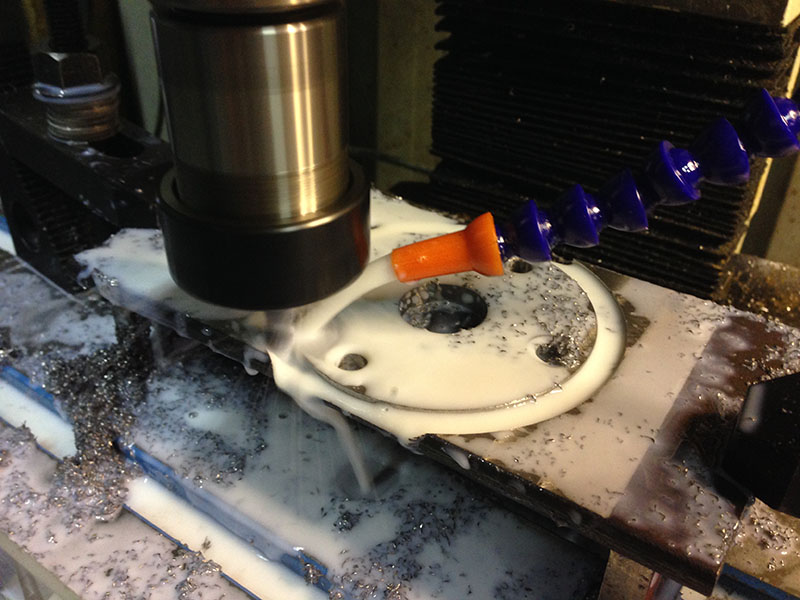
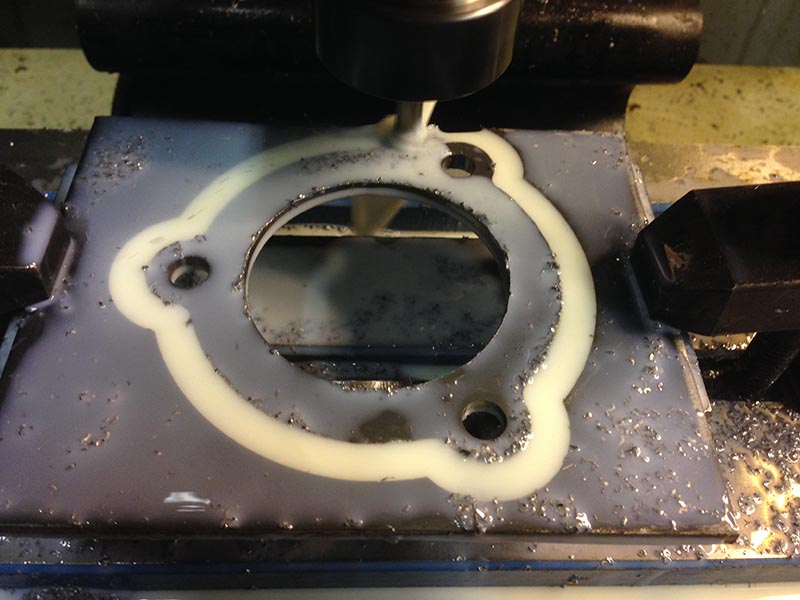
Finally.. something that has been on my mind for a while. Custom front hubs with the same Ford PCD as the rear setup, retaining the ABS rings, offset but with slightly larger bearings.
As well as the evil looking cutter which may be cutting them out of a stainless steel billet. I've ordered aluminum which I've done a simulated stress test but I need to see how they come out before I decide.
Tomorrow I'll put up a few more photo's through out the day.
David
After a bit of cutting/trimming.
We test fitted the frame. Note: This is probably the 4th or 5th complete frame that's been created, the rest never made the cut.
Then test fitted the engine
Bumper on to see what will be left on show, the exhaust will hide all this.
Finally.. something that has been on my mind for a while. Custom front hubs with the same Ford PCD as the rear setup, retaining the ABS rings, offset but with slightly larger bearings.
As well as the evil looking cutter which may be cutting them out of a stainless steel billet. I've ordered aluminum which I've done a simulated stress test but I need to see how they come out before I decide.
Tomorrow I'll put up a few more photo's through out the day.
David
Last edited by 42Haya; 10-07-2014 at 09:48 PM.
14-07-2014, 02:15 PM
#66
Regular Contributor
Thread Starter
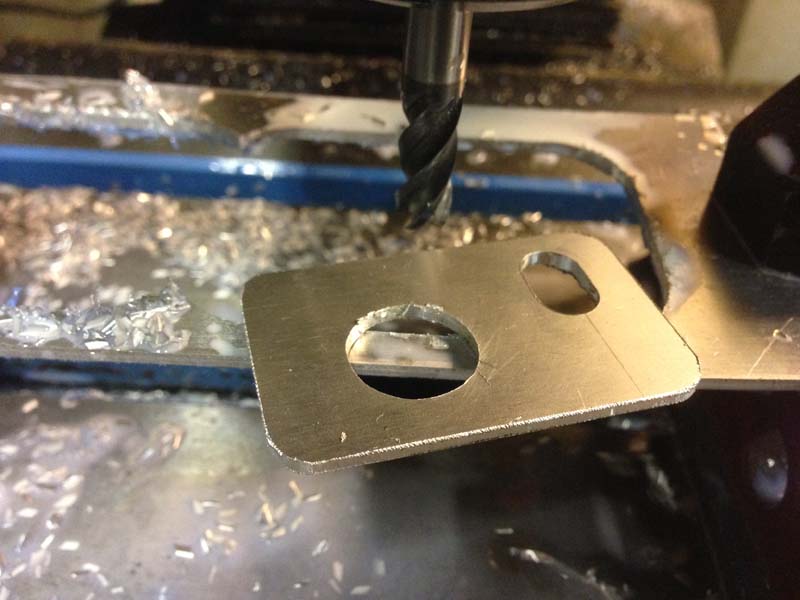
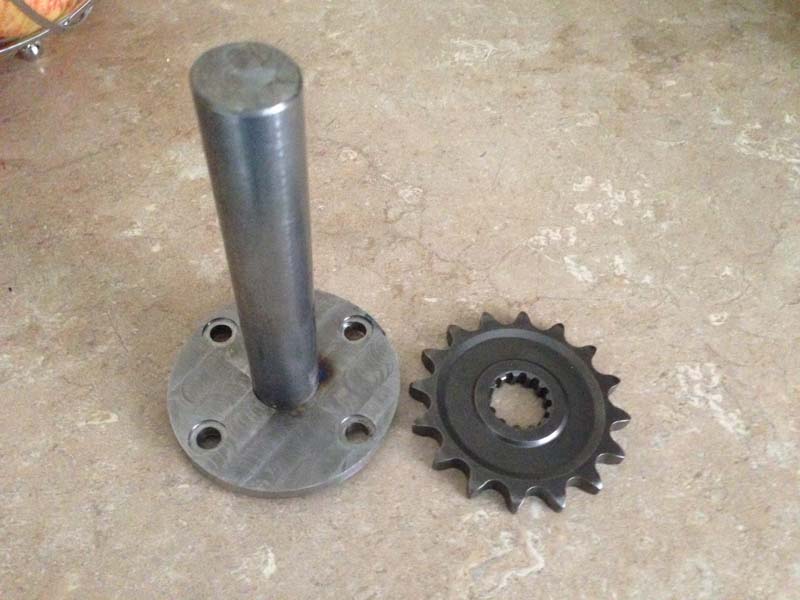
Just a small update today, I CNC'd out a new drive adapter for the jackshaft.
Not sure if i'm welding the sprocket on to the shaft that mounts to this are make it with a spline.
David
Not sure if i'm welding the sprocket on to the shaft that mounts to this are make it with a spline.
David
11-08-2014, 12:23 PM
#67
Regular Contributor
Thread Starter
A few updates from the weekend.
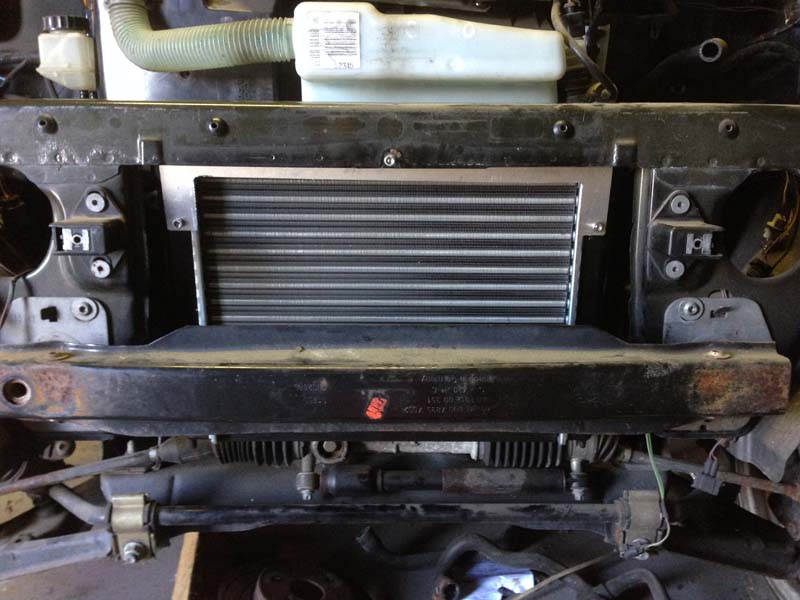
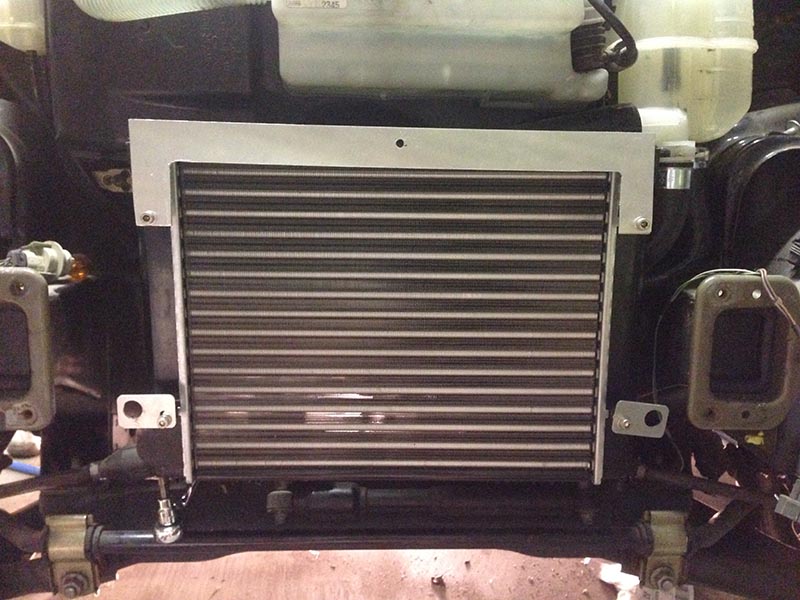
I've managed to fit the new twin core radiator with some custom mounts I machined up.
Upper suspension arms are finished and some additional bracing was added to the subframe.
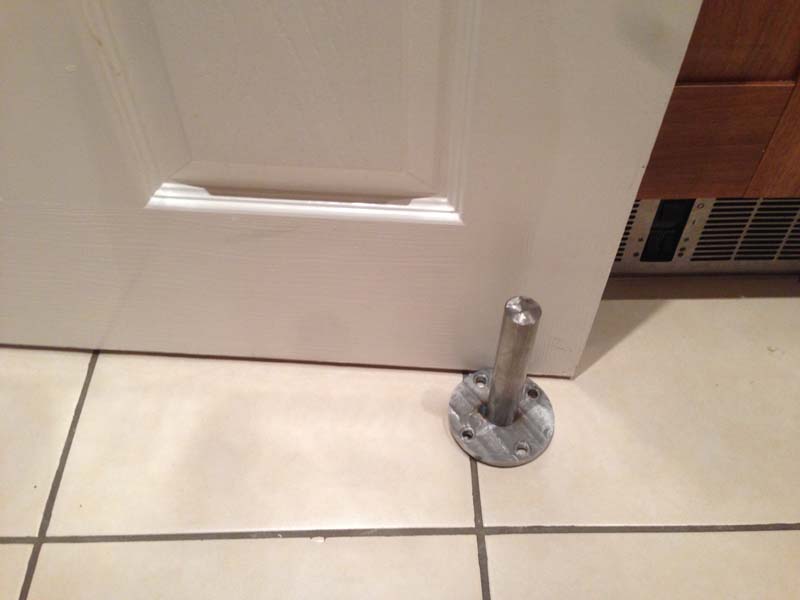
The week before I managed to weld the jackshaft together which my fiancee promptly used as a door stop .
.
I've ordered some misc supplies such as caphead bolts, washers etc to replace the randomly sized stuff currently being used.
Once they're all bolted in I can then measure for coilovers and get it off the jack stands!
More updates soon.
David
I've managed to fit the new twin core radiator with some custom mounts I machined up.
Upper suspension arms are finished and some additional bracing was added to the subframe.
The week before I managed to weld the jackshaft together which my fiancee promptly used as a door stop
.I've ordered some misc supplies such as caphead bolts, washers etc to replace the randomly sized stuff currently being used.
Once they're all bolted in I can then measure for coilovers and get it off the jack stands!
More updates soon.
David
11-08-2014, 01:55 PM
#68
I'm Finding My Feet Here Now

Simply amazing. There are two things that i need to do when this is built, first watch it fly past me with unbelievable acceleration and second, that amazing sound that only Hayabusa's can make!
03-09-2014, 04:22 PM
#69
Regular Contributor
Thread Starter
Not many updates with regards to pictures but I've now started cutting and fitting the radiator hoses, while doing so I thought i'd use the original expansion tank, while putting a hose on I snapped one of the outlets off! Looking at the other outlets they looked quite brittle and past it so i've ordered another.
I also managed to get the ride height about right to measure for coilovers, these are now ordered (Gaz), I even trainer tested (Mighty Car Mods style) to ensure it was about right.
The exhaust was started on too, I have an original Hayabusa Exhaust and one from a Hayabusa powered Mini just to get an idea of the exit route. The original ended up being cut up so i've ordered exhaust sized tube and a 4 in to 1 collector to finish it.
I might not going to use it long term but it'll get the project going, I'll probably end up getting it made in stainless by a 3rd party if need be.
As for rear calipers i've been looking in to using original Sierra's or some Wilwood Powerlites. I've read mixed reviews about the Powerlites and the Sierra's seem the better option, this might not be a long term choice but again it'll mean the car is that bit closer to finishing.
This weekend I should be able to get the rest of the baffles fitting to the clutch (sump is already done) and fit the rest of the clutch back together.
I've also taken a look in to the water pump and decided to junk the original and fit a electronic pump and controller.
More updates soon
12-09-2014, 11:30 AM
#71
Regular Contributor
Thread Starter
Hello All,
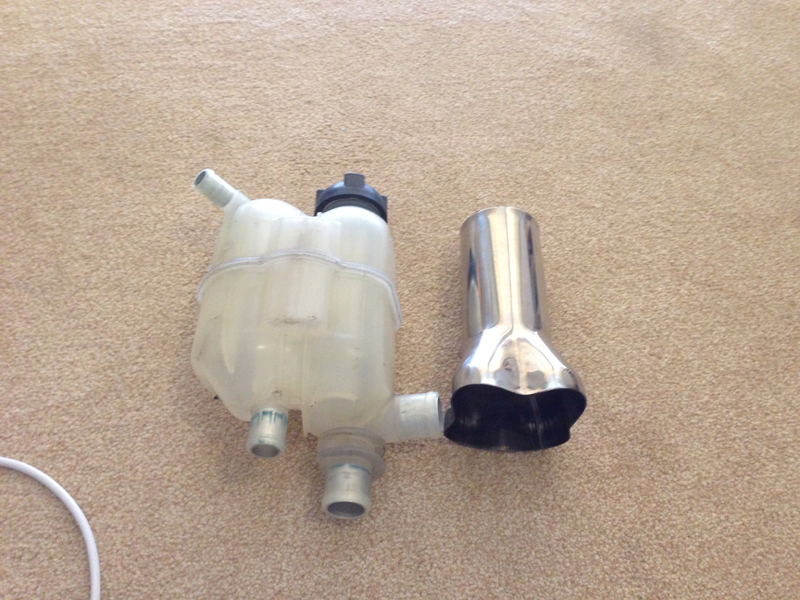
I've had parts arriving most of this week to finish up the cooling and exhaust, including the replacement header tank I broke!
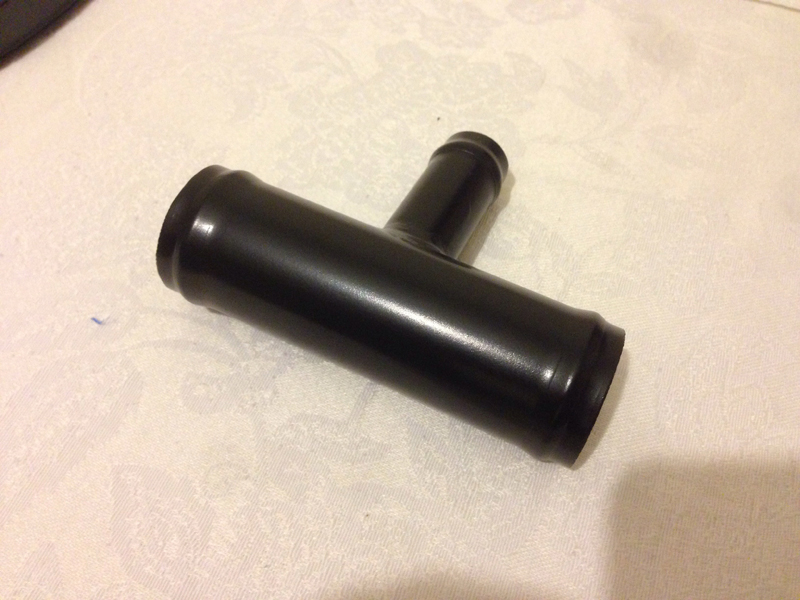
Coolant T-Piece
Header Tank
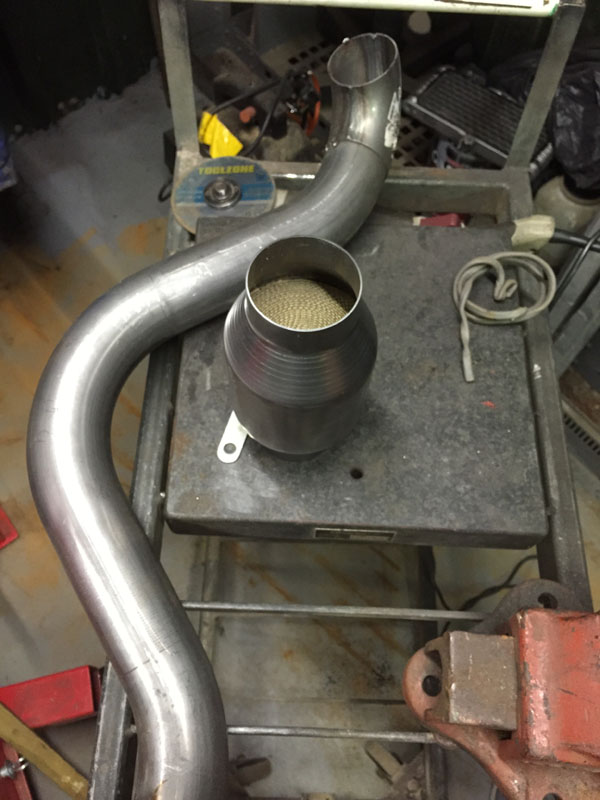
As you can also see a 4 in to 1 collector has arrived! I've modified the original exhaust manifold and have the tube to bring the manifold in to the collector, I then have 2.5" running from the collector to the can.
I believe there is enough room to run it out the back easily, the oil cooler isn't far from the route but this should be fine.
I contacted a Hayabusa specialist about running an electric water pump, rather than blocking off the existing mechanical water pump its easier to just remove the shaft, themostat and use the existing inlets and outlets.
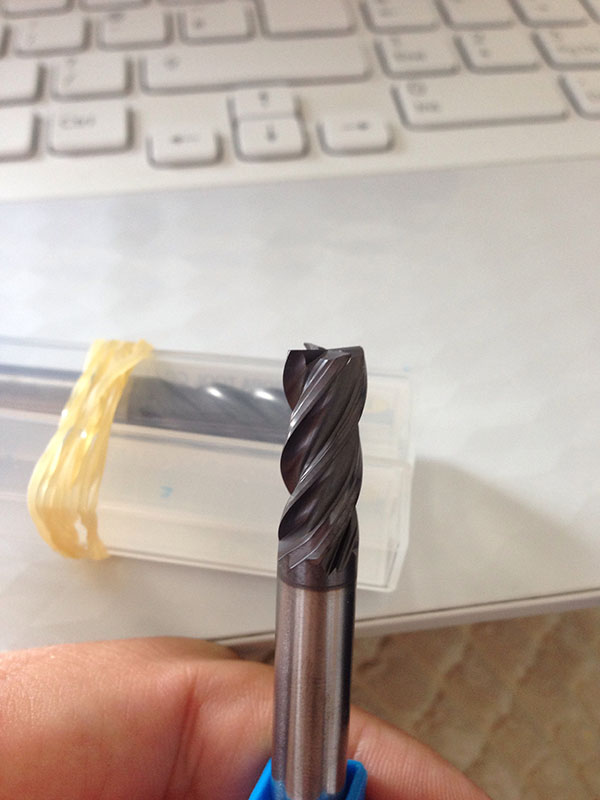
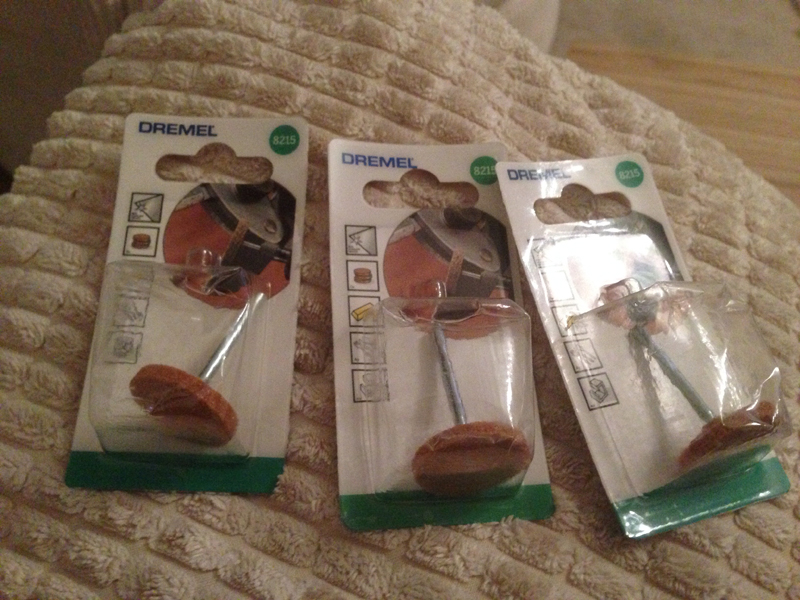
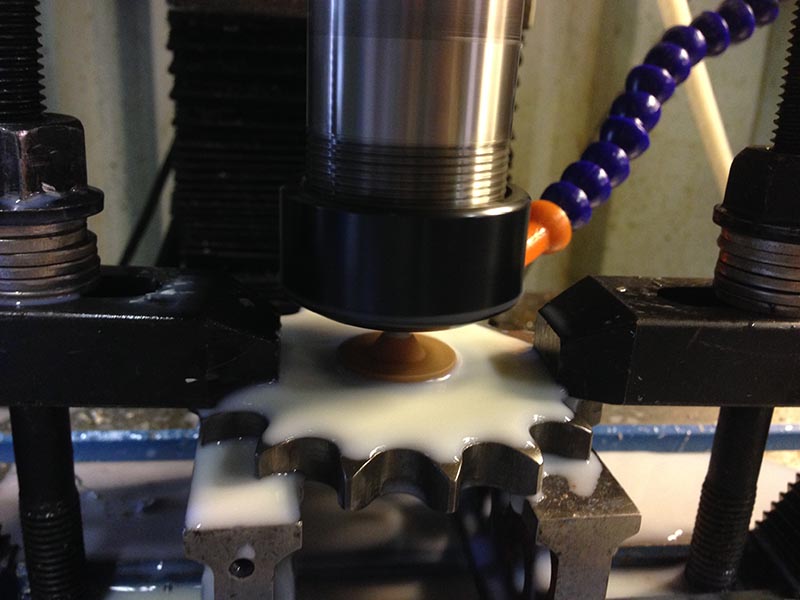
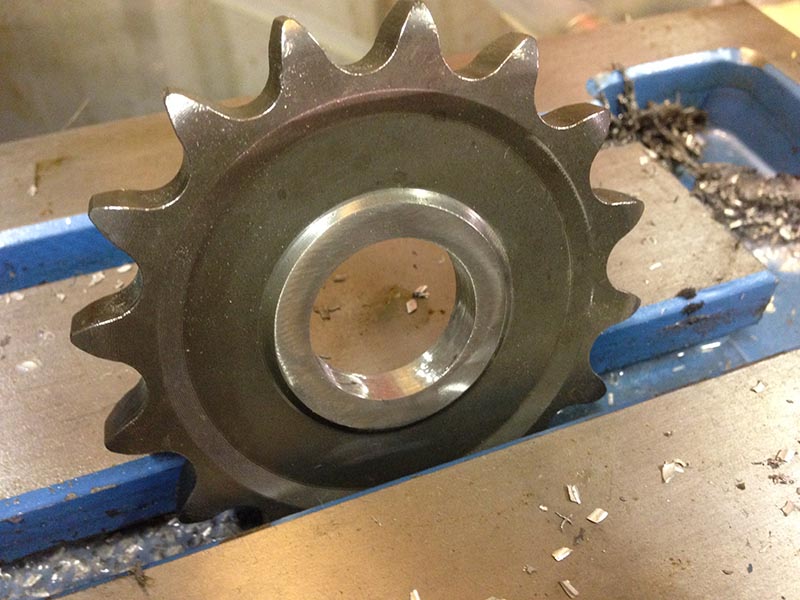
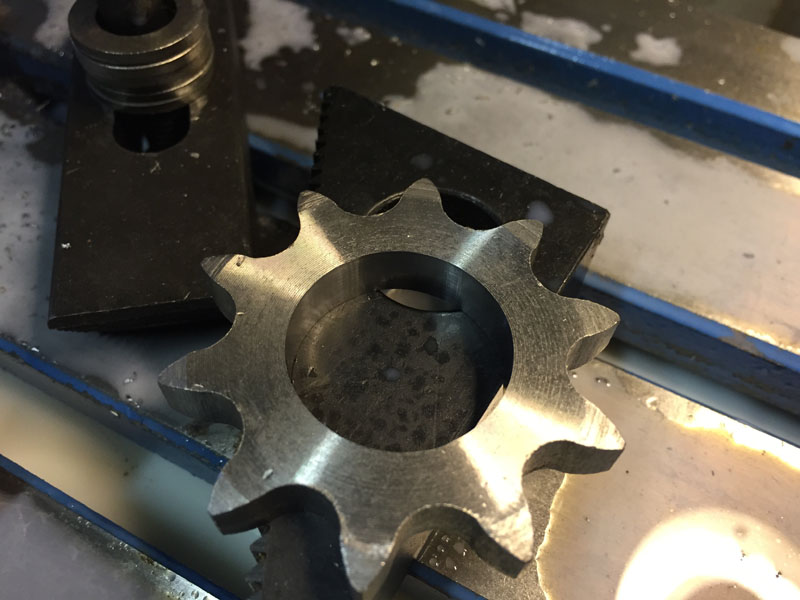
Finally, I need to cut the splines out of a motorbike sprocket, I was advised not to use the CNC machine for this as its simply too hard to mill hardened steel. Instead I will grind it out using these, a much more cost effective way!
I can then mount the output shaft to the gear box and throw the chain round it
I think thats for all, more updates and pictures during the weekend.
I've had parts arriving most of this week to finish up the cooling and exhaust, including the replacement header tank I broke!
Coolant T-Piece
Header Tank
As you can also see a 4 in to 1 collector has arrived! I've modified the original exhaust manifold and have the tube to bring the manifold in to the collector, I then have 2.5" running from the collector to the can.
I believe there is enough room to run it out the back easily, the oil cooler isn't far from the route but this should be fine.
I contacted a Hayabusa specialist about running an electric water pump, rather than blocking off the existing mechanical water pump its easier to just remove the shaft, themostat and use the existing inlets and outlets.
Finally, I need to cut the splines out of a motorbike sprocket, I was advised not to use the CNC machine for this as its simply too hard to mill hardened steel. Instead I will grind it out using these, a much more cost effective way!
I can then mount the output shaft to the gear box and throw the chain round it
I think thats for all, more updates and pictures during the weekend.
16-09-2014, 02:36 PM
#73
Regular Contributor
Thread Starter
Hardened steel is very hard.
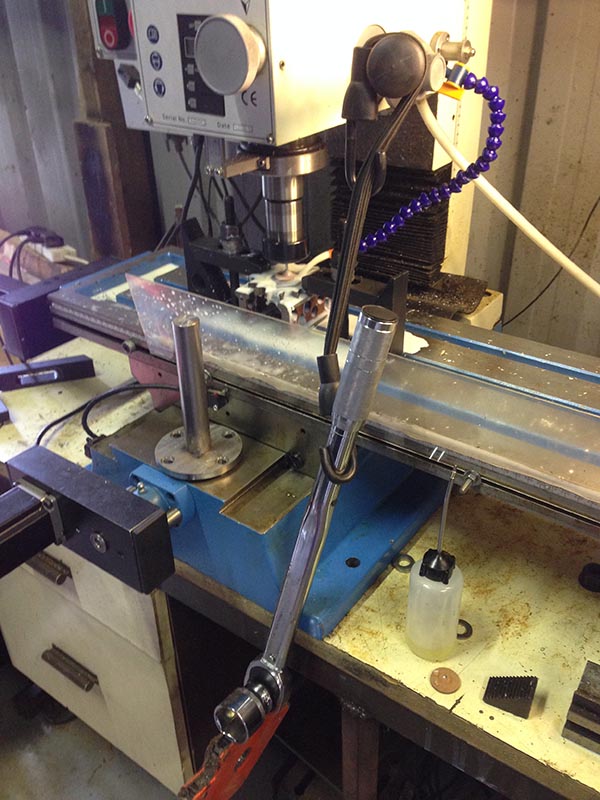
I mounted up the Dremel grinding stone in the CNC machine and started grinding by hand..
This was taking some time so I had to devise a way of holding constant pressure on the tool.
The grinding stones were doing a great job but the shafts were too small and heat was building up and snapping them right at the base. After 4 stones and around 2 hours this was the final result.
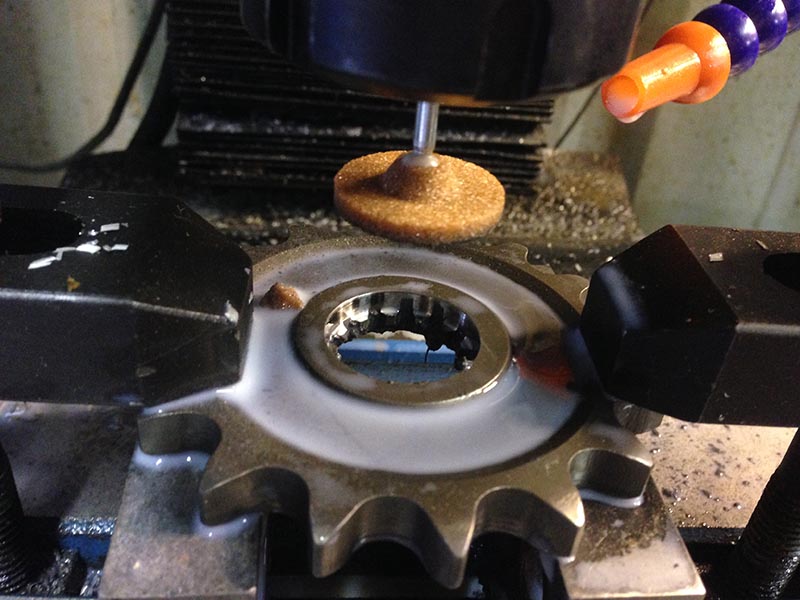
As you can see I'm about half way through so i've ordered 6 more and a slightly different design with a thicker shaft. If I ever need to change the gearing on the back i'll be changing the aluminium split sprockets as it'll be a lot easier!
The exhaust work come on very well and all 4 manifold tubes are almost in the collector, I've ordered 2.5" mandrel bends and a flexi join to allow some movement once the exhaust is mounted.
The harder springs have also arrived, this will prevent the possibility of the clutch slipping due to the extra weight of the car. The aluminium adapter prevents clutch 'chatter' which is common on this engine (see the following video for installation https://www.youtube.com/watch?featur...BSvSS9Lc#t=110).
This weekend I should have the exhaust finished and hopefully a sprocket with no splines!
More updates soon.
I mounted up the Dremel grinding stone in the CNC machine and started grinding by hand..
This was taking some time so I had to devise a way of holding constant pressure on the tool.
The grinding stones were doing a great job but the shafts were too small and heat was building up and snapping them right at the base. After 4 stones and around 2 hours this was the final result.
As you can see I'm about half way through so i've ordered 6 more and a slightly different design with a thicker shaft. If I ever need to change the gearing on the back i'll be changing the aluminium split sprockets as it'll be a lot easier!
The exhaust work come on very well and all 4 manifold tubes are almost in the collector, I've ordered 2.5" mandrel bends and a flexi join to allow some movement once the exhaust is mounted.
The harder springs have also arrived, this will prevent the possibility of the clutch slipping due to the extra weight of the car. The aluminium adapter prevents clutch 'chatter' which is common on this engine (see the following video for installation https://www.youtube.com/watch?featur...BSvSS9Lc#t=110).
This weekend I should have the exhaust finished and hopefully a sprocket with no splines!
More updates soon.
Last edited by 42Haya; 16-09-2014 at 02:40 PM.
22-09-2014, 10:02 AM
#75
Regular Contributor
Thread Starter
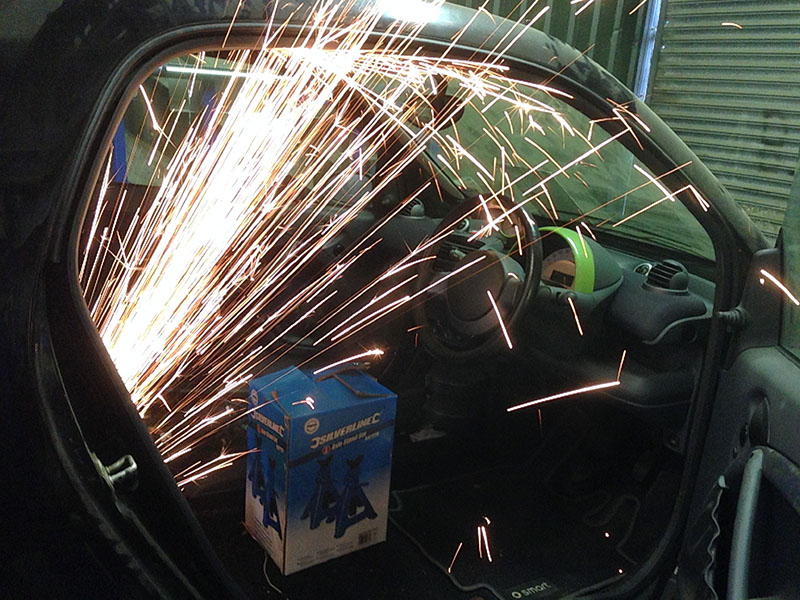
A great weekend for progress, I finally managed to grind through the hardened steel sprocket and got it mounted on to the jack shaft.
(You can see some of the surface taken back a few thousandths so it can be welded a little nicer)
This is how it looks mounted up ready to be aligned with the rear differential and sprocket.
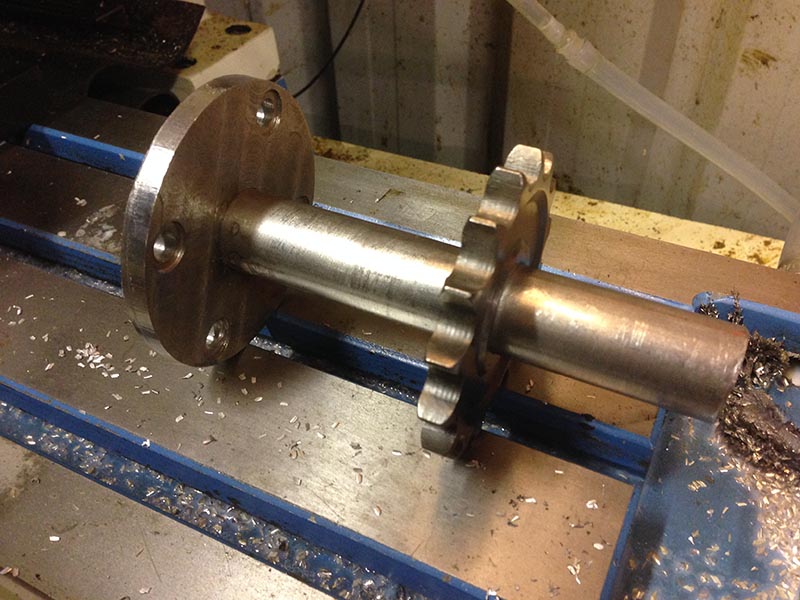
As you can see I need to mount the bearing and shorten the clutch slave cylinder, this is the reason I went after market with the clutch as I can shorten the legs and pin to make it sit closer to the gearbox (I'll also clear the water pump).
The cooling up front is all done, I need one more T-Bolt clamp for the top right bend in the following picture (check out the crazy 360 setup to get it to fit!). I ended up taking more of the front-end apart to get decent access.
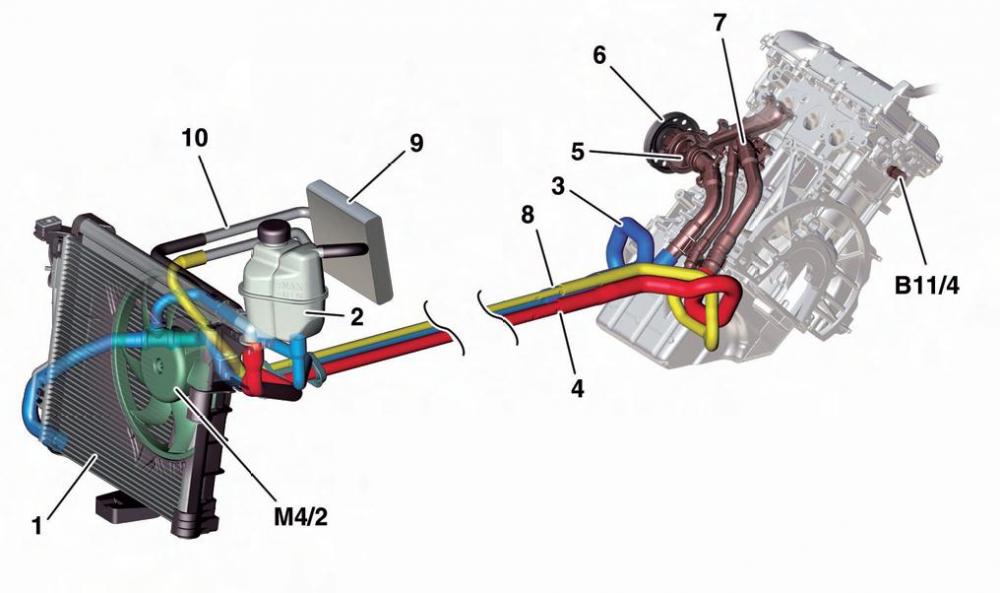
As mentioned before I've used the original header tank and the two long coolant tubes that run the entire length of the car to the back. I'll just need some reducers etc to fit with the Hayabusa engine.
Here is the original cooling setup which I've followed.
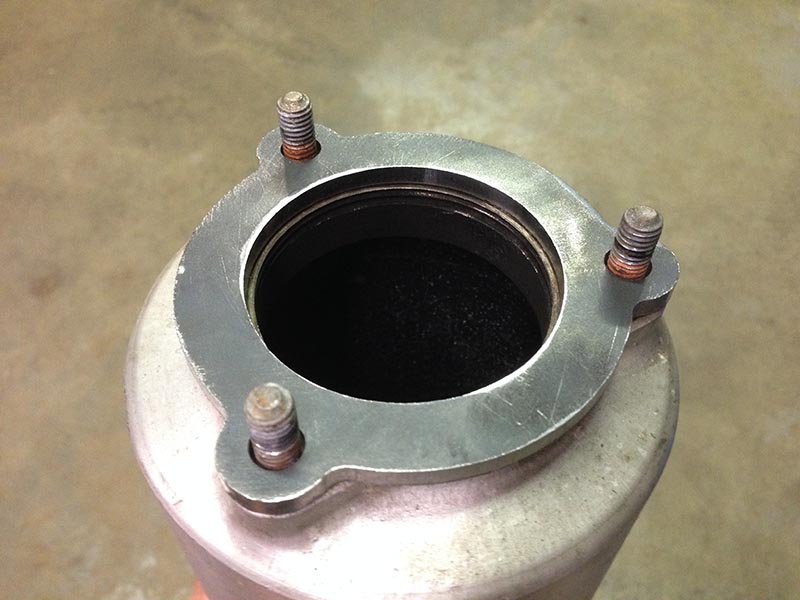
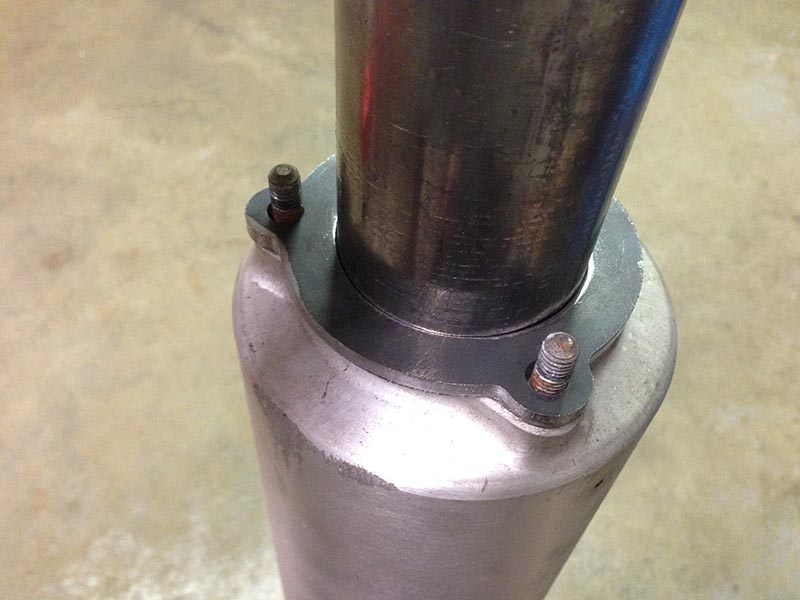
Finally, I had some time to create a flange to mount the standard Hayabusa exhaust can (I have a couple laying about) to the exhaust setup.
The mandrel bends I ordered weren't tight enough so hopefully the new ones I ordered will be here by the weekend.
I've chased Burton Power/Gaz to see how long the coilovers are going to take (at the earliest it'll be the end of this month) so the car can finally get off the axle stands.
I'll then take a look at getting the engine work done (oil, new plugs, clutch back together, water pump) and take a look at the gear shift mechanism.
The end result will be to use one of the many paddle shift systems that are about (clutch less up and down shifts with auto-blip) but I want a manual setup as a fail-safe.
More updates soon
(You can see some of the surface taken back a few thousandths so it can be welded a little nicer)
This is how it looks mounted up ready to be aligned with the rear differential and sprocket.
As you can see I need to mount the bearing and shorten the clutch slave cylinder, this is the reason I went after market with the clutch as I can shorten the legs and pin to make it sit closer to the gearbox (I'll also clear the water pump).
The cooling up front is all done, I need one more T-Bolt clamp for the top right bend in the following picture (check out the crazy 360 setup to get it to fit!). I ended up taking more of the front-end apart to get decent access.
As mentioned before I've used the original header tank and the two long coolant tubes that run the entire length of the car to the back. I'll just need some reducers etc to fit with the Hayabusa engine.
Here is the original cooling setup which I've followed.
Finally, I had some time to create a flange to mount the standard Hayabusa exhaust can (I have a couple laying about) to the exhaust setup.
The mandrel bends I ordered weren't tight enough so hopefully the new ones I ordered will be here by the weekend.
I've chased Burton Power/Gaz to see how long the coilovers are going to take (at the earliest it'll be the end of this month) so the car can finally get off the axle stands.
I'll then take a look at getting the engine work done (oil, new plugs, clutch back together, water pump) and take a look at the gear shift mechanism.
The end result will be to use one of the many paddle shift systems that are about (clutch less up and down shifts with auto-blip) but I want a manual setup as a fail-safe.
More updates soon
Last edited by 42Haya; 22-09-2014 at 10:04 AM.
13-10-2014, 10:12 AM
#76
Regular Contributor
Thread Starter
Huge update, I've not posted progress on the forum for a couple of weeks for a very good reason.
I'm happy to announce after a long time the car is finally off the stands! So let me explain how all this happened.
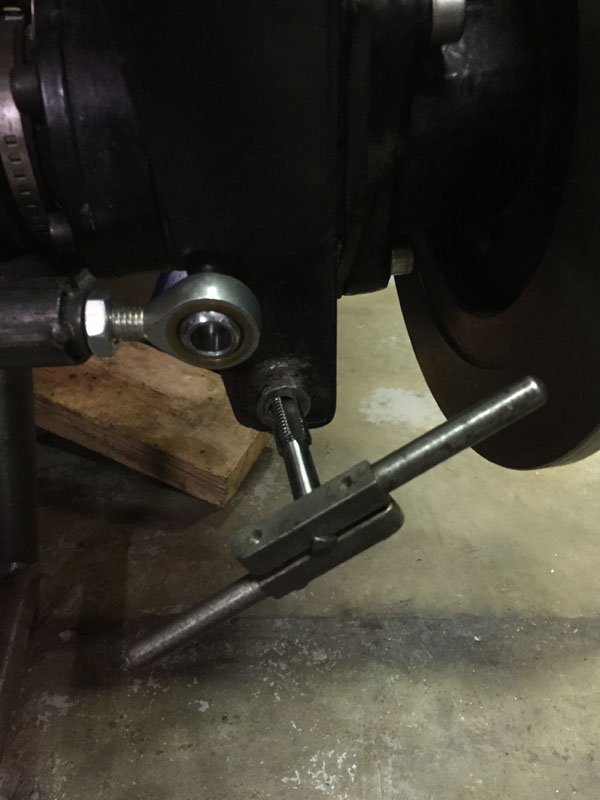
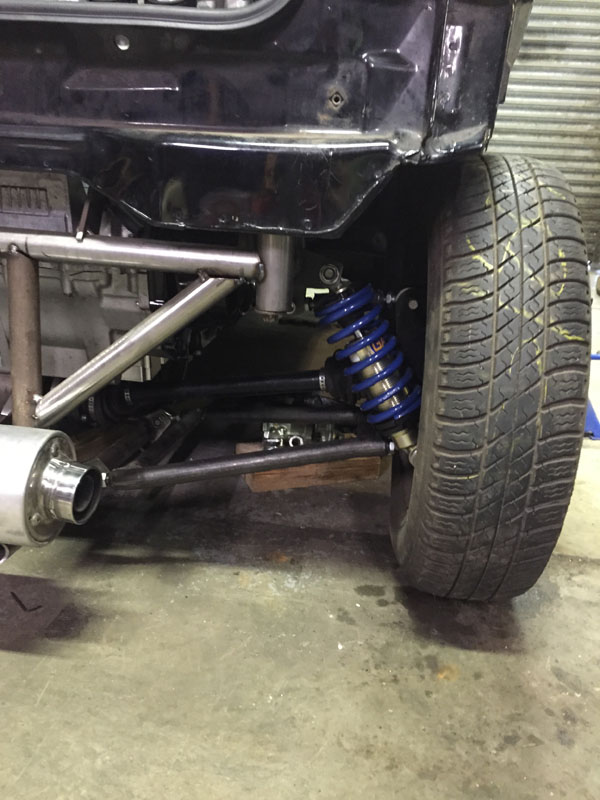
When mixing and matching parts from production cars and kit cars sometimes small steps need to be made to 'standardise' some of the parts. First up was tapping the rear uprights to match the size of the rose joints.
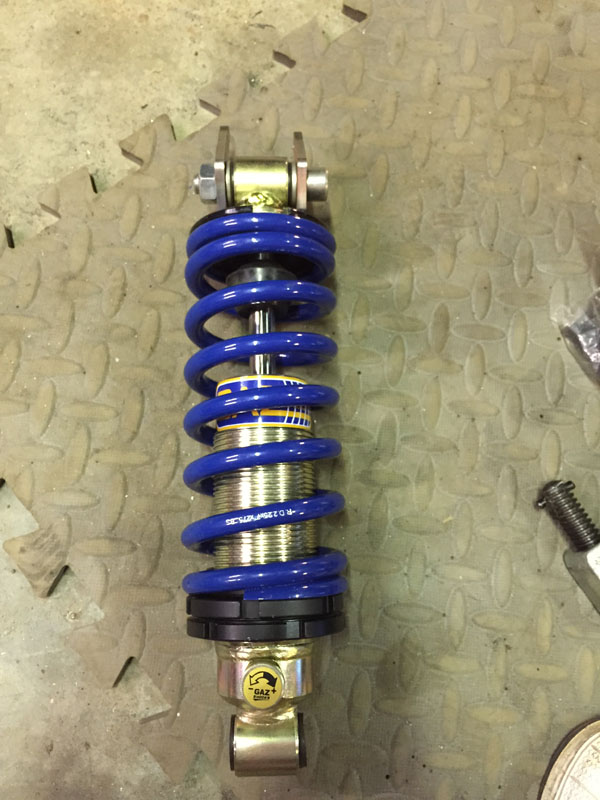
The coilovers finally arrived and the springs were promptly fitted, note.. I ordered the wrong size springs first time round so I had to grab some replacements on the quick!
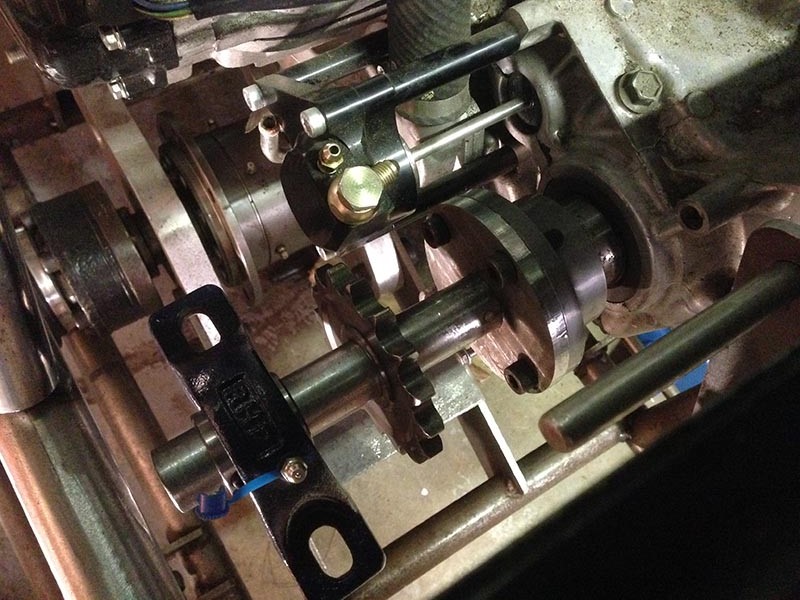
I designed and CNC'd out some new brackets to mount the coilovers to the top of subframe, I'm mounting the bottom on the rear uprights. Space is quite tight on the right where the engine is mostly sitting and this was the most 'comfortable' place to have them.
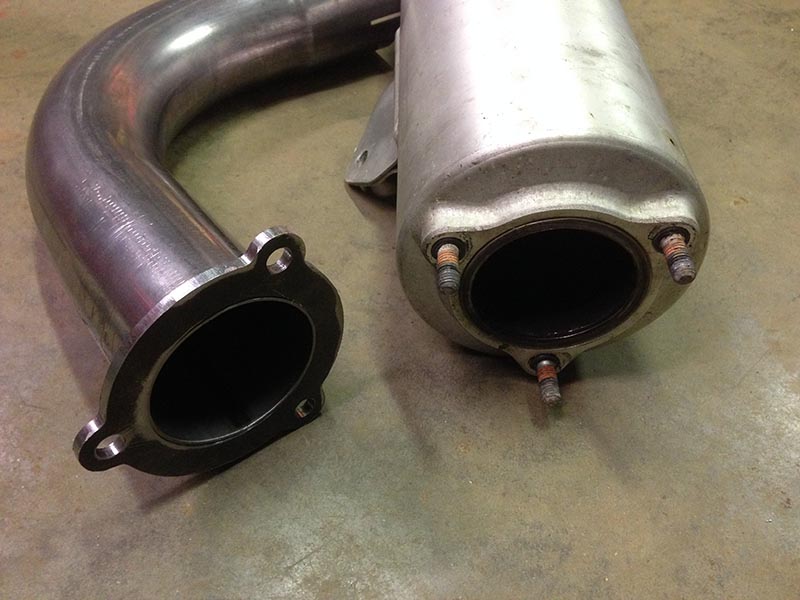
The exhaust is proving a little difficult, again due to space constraints at the front of the subframe but this is basically the setup i'm going with.
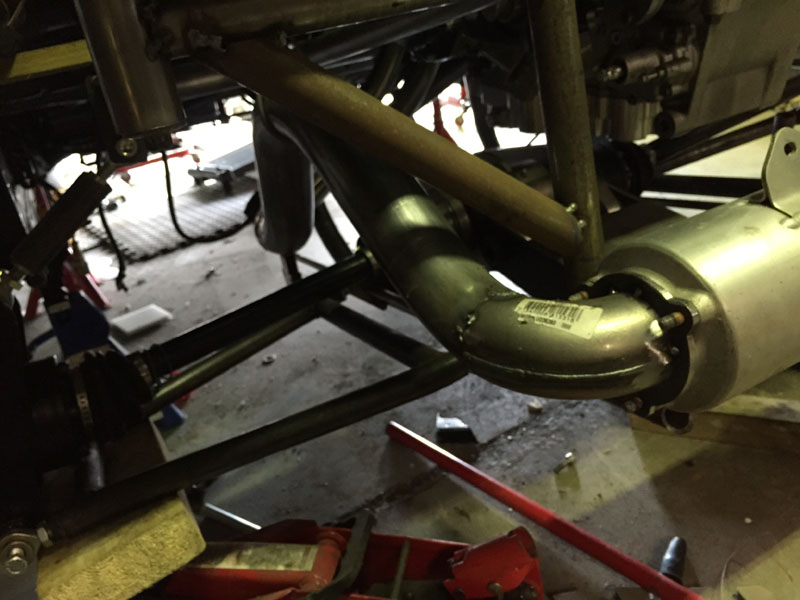
From the above you can see the sport cat that needs to be added to the system, after a bit of research on various kit car forums this setup should get it through the emissions test without any issues. I've got flanges for both the cat and a straight through piece, for the track obviously .
.
Rear brakes are now all on and together, the first set of discs were too small (ordered in excitement). The replacements arrived just in time for test fitting with the new rear calipers.

They're almost the same size as the standard fronts! I'm now in quite a predicament where I need to get new front hubs made but I don't really want to purchase the equipment and tooling. This is so I can run bigger ford wheels on the front like the back, that will also mean I can run bigger brakes (something like 300mm would be great).
I had time last week to create a chain tensioner from a sprocket, as its only keeping the chain tensioned so I decided to use non-hardened after the hassle I got cutting through hardened steel before!
I've pressed a bearing in to the sprocket so I can bolt it to the subframe nice and easy, replacement's and maintenance will be a breeze.
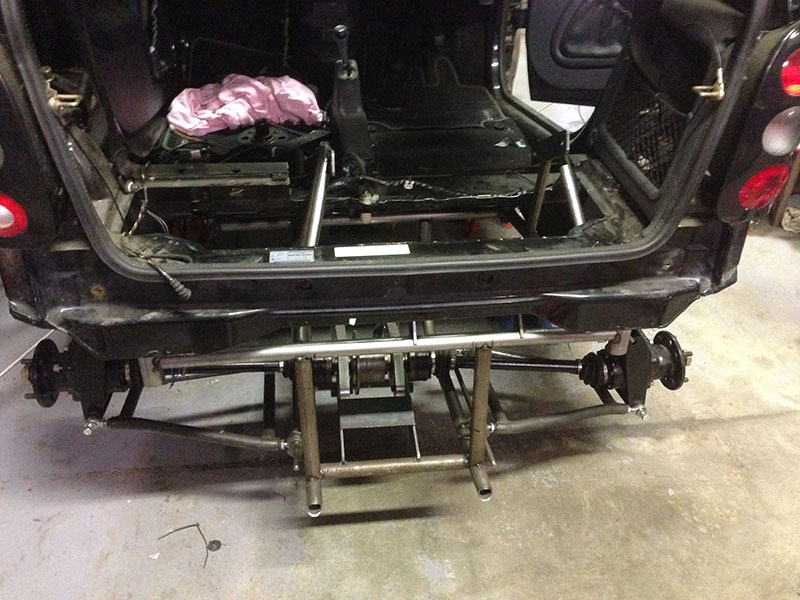
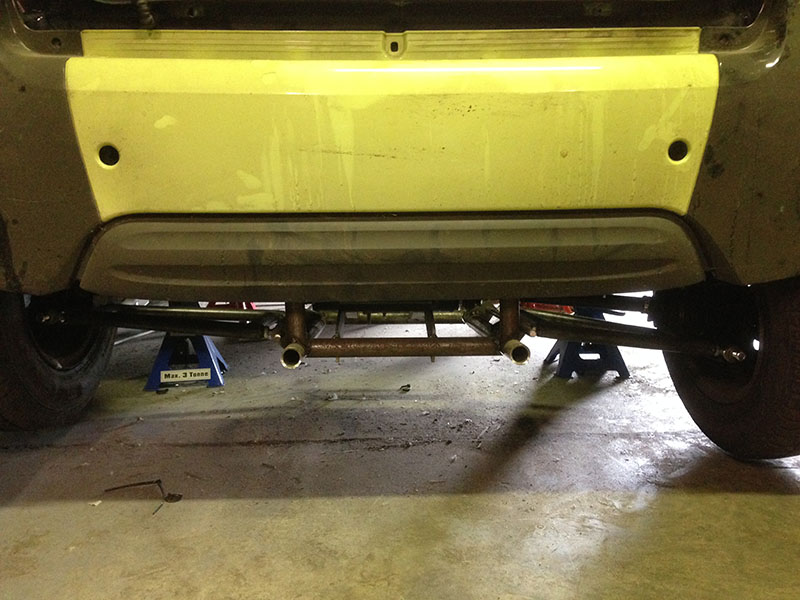
So the final pictures will be what I've been working towards for a long time, the car off the stands and on the ground. Most of the subframe is only tacked together but all the suspension is welded properly.
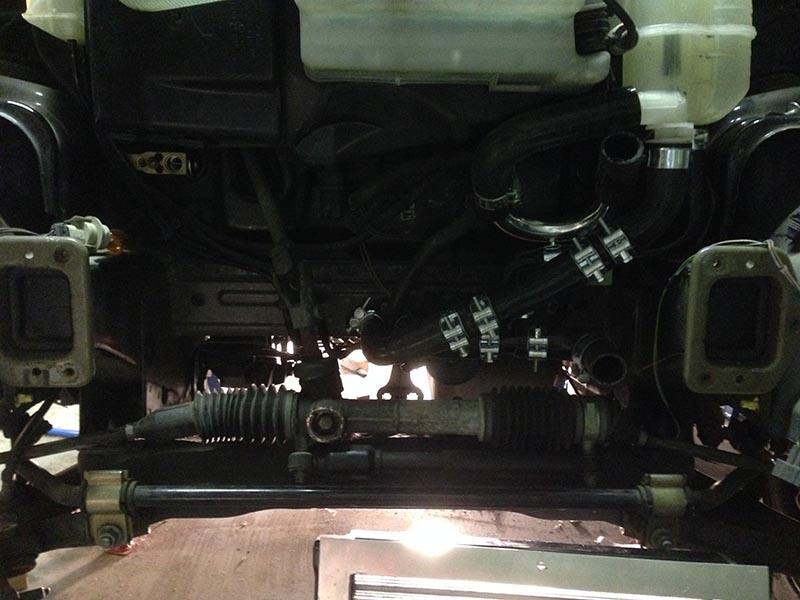
Note the relocated radiator to the front of the crossmember, this was needed to get the coolant hoses and fan to fit a lot better. It only required modified mounts from the ones I created before.
The two tubes poking out are getting cut back and blanked off, they're serving as a good exhaust mount while test fitting currently.
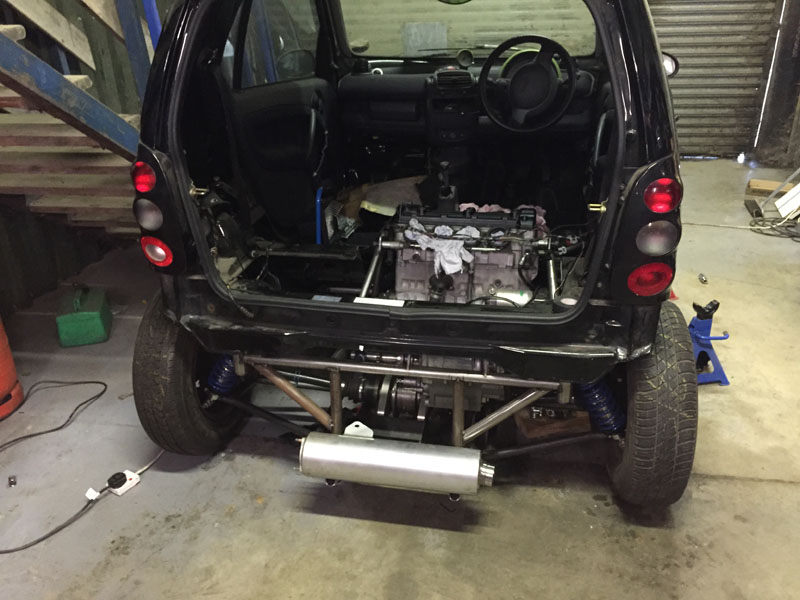
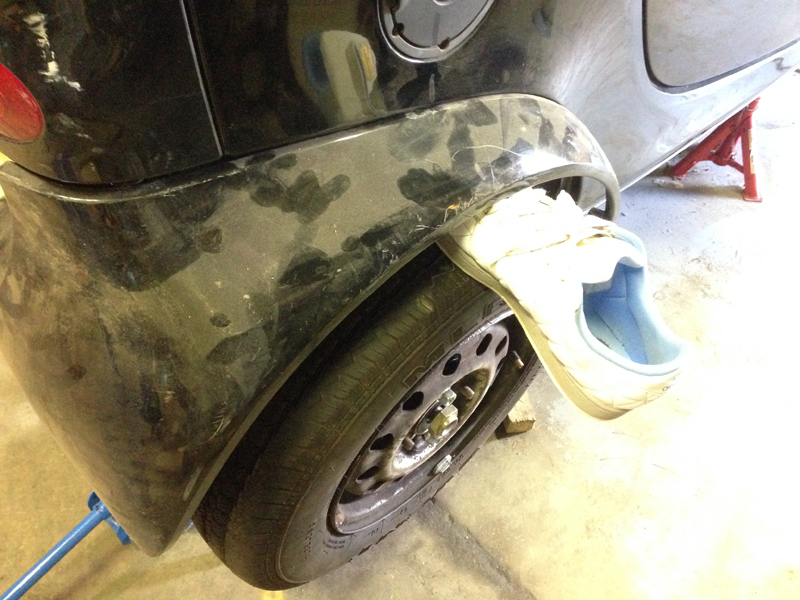
Now for the mandatory crazy offset picture..
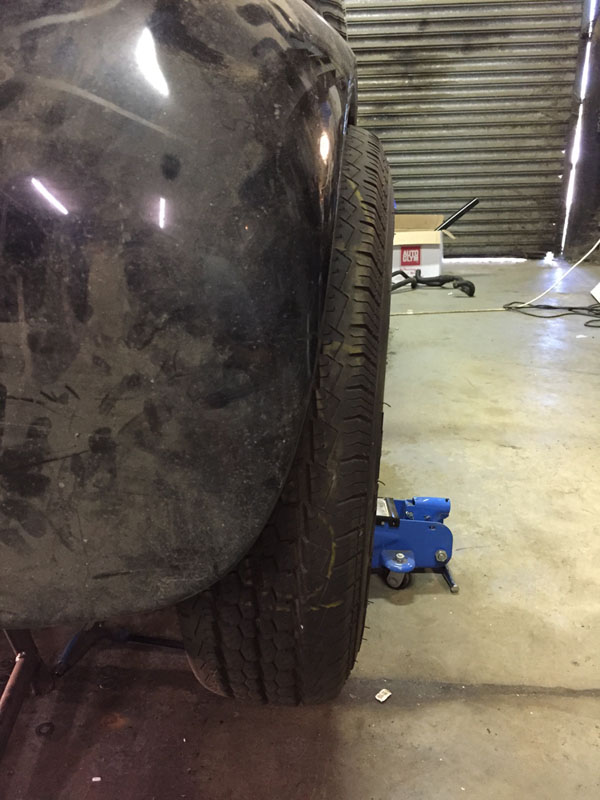
The back of the car is around an inch wider on both sides, I've ordered some temporary wheels with the correct offset and size which I'll test fit. This should show how much I need to extend the arches (if any) and will fit over the new rear brake setup .
.
A few parts are on their way, I managed to destroy a driveshaft nut - I've got a feeling I was sold the wrong size so some replacements will be here in the next few days as well as other misc bolts, material, gaskets, parts and of course the wheels.
I now need to source somebody to create the custom front hubs for me, I've got designs and even the materials to get it done I just can't justify a lathe etc to do so myself.
More updates soon.
I'm happy to announce after a long time the car is finally off the stands! So let me explain how all this happened.
When mixing and matching parts from production cars and kit cars sometimes small steps need to be made to 'standardise' some of the parts. First up was tapping the rear uprights to match the size of the rose joints.
The coilovers finally arrived and the springs were promptly fitted, note.. I ordered the wrong size springs first time round so I had to grab some replacements on the quick!
I designed and CNC'd out some new brackets to mount the coilovers to the top of subframe, I'm mounting the bottom on the rear uprights. Space is quite tight on the right where the engine is mostly sitting and this was the most 'comfortable' place to have them.
The exhaust is proving a little difficult, again due to space constraints at the front of the subframe but this is basically the setup i'm going with.
From the above you can see the sport cat that needs to be added to the system, after a bit of research on various kit car forums this setup should get it through the emissions test without any issues. I've got flanges for both the cat and a straight through piece, for the track obviously
.Rear brakes are now all on and together, the first set of discs were too small (ordered in excitement). The replacements arrived just in time for test fitting with the new rear calipers.
They're almost the same size as the standard fronts! I'm now in quite a predicament where I need to get new front hubs made but I don't really want to purchase the equipment and tooling. This is so I can run bigger ford wheels on the front like the back, that will also mean I can run bigger brakes (something like 300mm would be great).
I had time last week to create a chain tensioner from a sprocket, as its only keeping the chain tensioned so I decided to use non-hardened after the hassle I got cutting through hardened steel before!
I've pressed a bearing in to the sprocket so I can bolt it to the subframe nice and easy, replacement's and maintenance will be a breeze.
So the final pictures will be what I've been working towards for a long time, the car off the stands and on the ground. Most of the subframe is only tacked together but all the suspension is welded properly.
Note the relocated radiator to the front of the crossmember, this was needed to get the coolant hoses and fan to fit a lot better. It only required modified mounts from the ones I created before.
The two tubes poking out are getting cut back and blanked off, they're serving as a good exhaust mount while test fitting currently
Now for the mandatory crazy offset picture..
The back of the car is around an inch wider on both sides, I've ordered some temporary wheels with the correct offset and size which I'll test fit. This should show how much I need to extend the arches (if any) and will fit over the new rear brake setup
.A few parts are on their way, I managed to destroy a driveshaft nut - I've got a feeling I was sold the wrong size so some replacements will be here in the next few days as well as other misc bolts, material, gaskets, parts and of course the wheels.
I now need to source somebody to create the custom front hubs for me, I've got designs and even the materials to get it done I just can't justify a lathe etc to do so myself.
More updates soon.
Last edited by 42Haya; 15-10-2014 at 07:50 AM.
 15-10-2014, 09:24 AM
#80
Regular Contributor
Thread Starter
I've just received a quote to get the new front hubs made to Ford PCD which weren't too expensive. I'm going to find new bearings and tripple check my measurements and get them started .