General Car Related Discussion. To discuss anything that is related to cars and automotive technology that doesnt naturally fit into another forum catagory.

Removing Roofskin- Could do with a quick answer!

Thread Tools
 
Search this Thread
 
Old 21-04-2009, 09:32 AM
  #1  
Mike C
The Special One
Thread Starter
iTrader: (1)
 
Mike C's Avatar
 
Join Date: Mar 2005
Location: Bridgnorth
Posts: 10,852
Likes: 0
Received 0 Likes on 0 Posts
Default Removing Roofskin- Could do with a quick answer!

Anyone on here removed an Escort MK5/6/Cosworth roofskin?

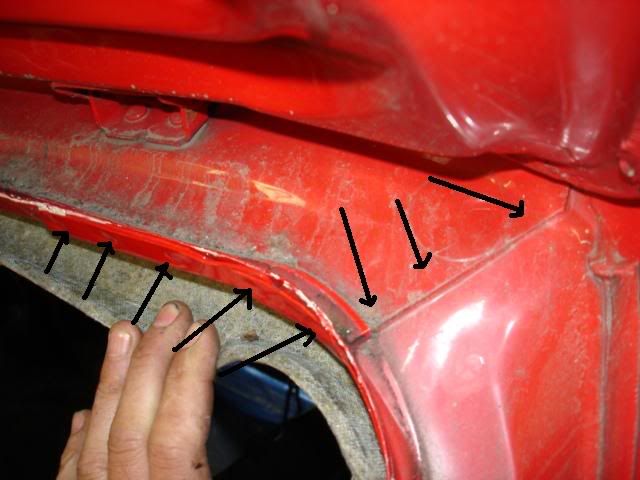
The spotwelds down the sides and at the front are obvious enough I think, but I'm not entirely sure about the rear.

There appears to be 2 rows of spotwelds, the furthest ones being right on the the seam under the tailgate. I'm assuming these are the ones I need to drill out?

But if so, it looks like it's welded on the end pieces, and will need cutting through, but from what I've heard it's just a case of drilling spotwelds out, so I'm slightly confused by that one.

Any help would be much appreciated!
Old 21-04-2009, 09:50 AM
  #2  
Martin-Hadland
1st to 200 without NOS
iTrader: (2)
 
Martin-Hadland's Avatar
 
Join Date: May 2003
Location: Birmingham
Posts: 12,304
Likes: 0
Received 119 Likes on 80 Posts
Default

Old 21-04-2009, 09:55 AM
  #3  
Mike C
The Special One
Thread Starter
iTrader: (1)
 
Mike C's Avatar
 
Join Date: Mar 2005
Location: Bridgnorth
Posts: 10,852
Likes: 0
Received 0 Likes on 0 Posts
Default

So there are spots at the seam on the side then?

If that's the case, bingo!

Cheers Martin
Old 21-04-2009, 09:56 AM
  #4  
Luca
Lukesville
iTrader: (2)
 
Luca's Avatar
 
Join Date: Nov 2005
Location: Portsmouth
Posts: 9,668
Likes: 0
Received 1 Like on 1 Post
Default

Did you speak to Mike mate at Central Day - if you went of course
Old 21-04-2009, 10:02 AM
  #5  
Mike C
The Special One
Thread Starter
iTrader: (1)
 
Mike C's Avatar
 
Join Date: Mar 2005
Location: Bridgnorth
Posts: 10,852
Likes: 0
Received 0 Likes on 0 Posts
Default

Originally Posted by Luca
Did you speak to Mike mate at Central Day - if you went of course
No Mate, I wasn't there! Was there any vital information I missed out on? Might give him a call.
Old 21-04-2009, 10:12 AM
  #6  
Luca
Lukesville
iTrader: (2)
 
Luca's Avatar
 
Join Date: Nov 2005
Location: Portsmouth
Posts: 9,668
Likes: 0
Received 1 Like on 1 Post
Default

Originally Posted by Mike C
No Mate, I wasn't there! Was there any vital information I missed out on? Might give him a call.

No nothing new that im aware off but he was there with a stand, was swarmed all day too

He is possibly at Classic Ford show, just a nice oppertunity to have a face to face natter about things.
Old 21-04-2009, 10:23 AM
  #7  
panelbeater
PassionFord Regular
 
panelbeater's Avatar
 
Join Date: Nov 2006
Posts: 392
Likes: 0
Received 1 Like on 1 Post
Default

obviously don't drill the ones shown where the tailgate rubber sits, the way the arrows are pointing otherwise you will end up with holes through the remaining 2 pieces of metal

Trending Topics

Old 21-04-2009, 10:26 AM
  #8  
Lo@der
Passionford Thread Killer
iTrader: (8)
 
Lo@der's Avatar
 
Join Date: Feb 2006
Location: bournemouth
Posts: 3,771
Likes: 0
Received 1 Like on 1 Post
Default

Ones at the front under the windscreen rubber??
Old 21-04-2009, 10:27 AM
  #9  
Mike C
The Special One
Thread Starter
iTrader: (1)
 
Mike C's Avatar
 
Join Date: Mar 2005
Location: Bridgnorth
Posts: 10,852
Likes: 0
Received 0 Likes on 0 Posts
Default

Originally Posted by panelbeater
obviously don't drill the ones shown where the tailgate rubber sits, the way the arrows are pointing otherwise you will end up with holes through the remaining 2 pieces of metal
Now that's one thing that I was worried about because how do you get the drill in from the top? You're hampered by the top of the roof. But don't you end up with holes where all the front ones under the windscreen have been removed in the metal underneath, and the sides too anyway when you come through from the top?

Luke, yeah I heard he had a stand. Good to know it was busy, massive potential for more products for Mike I think

Last edited by Mike C; 21-04-2009 at 10:37 AM.
Old 21-04-2009, 10:29 AM
  #10  
Mike C
The Special One
Thread Starter
iTrader: (1)
 
Mike C's Avatar
 
Join Date: Mar 2005
Location: Bridgnorth
Posts: 10,852
Likes: 0
Received 0 Likes on 0 Posts
Default

Originally Posted by loader5710
Ones at the front under the windscreen rubber??
Yes mate, it's easy with the screen out. Just scrape off all the sealant (or linish it is much quicker and easy) and it will expose them
Old 21-04-2009, 11:59 AM
  #11  
Martin-Hadland
1st to 200 without NOS
iTrader: (2)
 
Martin-Hadland's Avatar
 
Join Date: May 2003
Location: Birmingham
Posts: 12,304
Likes: 0
Received 119 Likes on 80 Posts
Default

Originally Posted by panelbeater
obviously don't drill the ones shown where the tailgate rubber sits, the way the arrows are pointing otherwise you will end up with holes through the remaining 2 pieces of metal
You have to drill through at least one thickness to enable removal (I'm sure one part has three parts) Using a spot weld drill bit is obviously required.

It ends up a bit like this..


Last edited by Martin-Hadland; 21-04-2009 at 12:01 PM.
Old 21-04-2009, 12:18 PM
  #12  
Mike C
The Special One
Thread Starter
iTrader: (1)
 
Mike C's Avatar
 
Join Date: Mar 2005
Location: Bridgnorth
Posts: 10,852
Likes: 0
Received 0 Likes on 0 Posts
Default

Originally Posted by martin-reyland
You have to drill through at least one thickness to enable removal
That's what I thought. At least that's what I've ended up with at the front with the couple I've done. Couldn't see how it was avoidable so hoped I hadn't done anything wrong, lol!

So those ones at the rear, did you drill them out from the underneath (the way the arrows are pointing) or from the top (which looks awkward to me)?

Think things are becoming clearer now!
Old 21-04-2009, 12:26 PM
  #13  
panelbeater
PassionFord Regular
 
panelbeater's Avatar
 
Join Date: Nov 2006
Posts: 392
Likes: 0
Received 1 Like on 1 Post
Default

bend the lip over to aid access to the welds on the opposite side, drill the welds then panel the lip back over, simple
Old 21-04-2009, 12:30 PM
  #14  
Martin-Hadland
1st to 200 without NOS
iTrader: (2)
 
Martin-Hadland's Avatar
 
Join Date: May 2003
Location: Birmingham
Posts: 12,304
Likes: 0
Received 119 Likes on 80 Posts
Default

Originally Posted by Mike C
That's what I thought. At least that's what I've ended up with at the front with the couple I've done. Couldn't see how it was avoidable so hoped I hadn't done anything wrong, lol!

So those ones at the rear, did you drill them out from the underneath (the way the arrows are pointing) or from the top (which looks awkward to me)?

Think things are becoming clearer now!
The ones where the rubber sits I drill out from the rear, check how many layers of metal there are and only go through enough not all! If you do it that way you can then plug weld the replacement skin in place, its not the end of the world if you go all the way through on the odd one it just takes a bit of skill with the MIG welder to sort .
Old 21-04-2009, 12:44 PM
  #15  
Mike C
The Special One
Thread Starter
iTrader: (1)
 
Mike C's Avatar
 
Join Date: Mar 2005
Location: Bridgnorth
Posts: 10,852
Likes: 0
Received 0 Likes on 0 Posts
Default

Cheers chaps, much appreciated!

Think I'm on the right track now.
Old 21-04-2009, 01:41 PM
  #16  
S1
...............
 
S1's Avatar
 
Join Date: Jul 2003
Location: Essex
Posts: 2,663
Received 0 Likes on 0 Posts
Default

Not sure if its the same on the Mk5/6 escorts but quite often you will come across braze where the roof skin meets the top of the a-pillars. It really needs to be taken off to get a clean weld.
Old 21-04-2009, 06:49 PM
  #17  
Mike C
The Special One
Thread Starter
iTrader: (1)
 
Mike C's Avatar
 
Join Date: Mar 2005
Location: Bridgnorth
Posts: 10,852
Likes: 0
Received 0 Likes on 0 Posts
Default

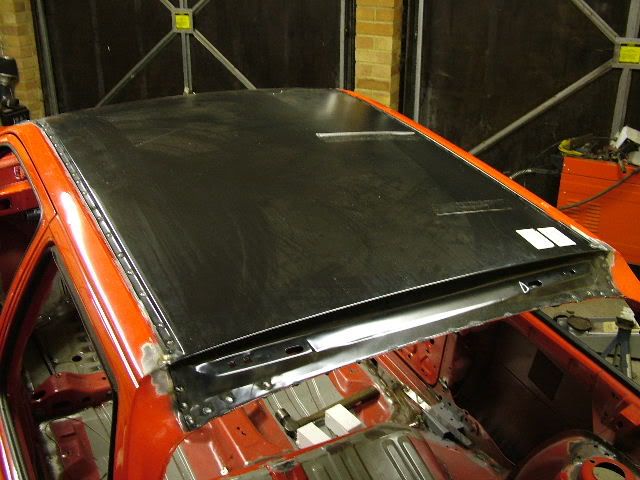
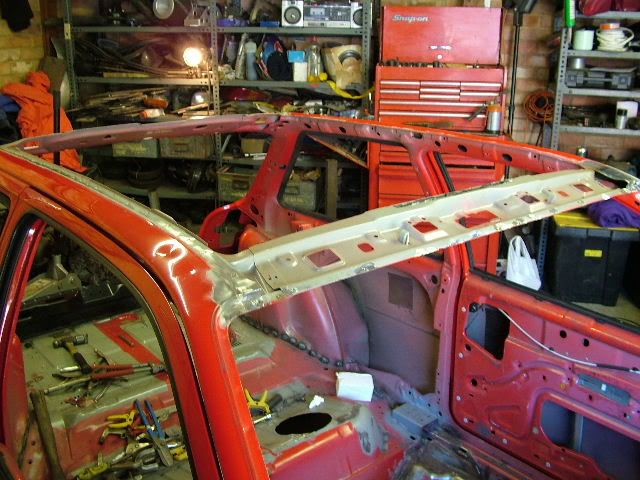
How does this look. Done both sides like this pretty much. Here's one side as an example:


I've found the spot weld drill bit to be a bit of a pain in the arse! It keep slipping, hence the mess around some of them. I used a centre punch, but that didn't really do a lot to be honest, so then got it started with a normal, thin drill bit, then continued with the spot weld remover, and that seems to have helped quite a bit, so a little happier with them now.

I just don't want to go too far down and make a horlicks of it! Am I missing anything?

And at the front, it's such a fine line between going through the one skin and through the piece underneath as well, hence this one


It would be ideal to drill them out from underneath if they're going to go through both as they're so much easier to locate from the underside.

New skin is going to be carbon fibre, and hence bonded on. Can any holes left behind still be filled in afterwards? (plug weld and grind I guess)

Old 21-04-2009, 06:53 PM
  #18  
jacko
PassionFord Post Whore!!
 
jacko's Avatar
 
Join Date: Nov 2004
Location: Middlesbrough
Posts: 7,295
Likes: 0
Received 0 Likes on 0 Posts
Default

if the new skin is carbon you can use an air file to take the old one off it mens you dont disturb the bits its welded to
Old 21-04-2009, 06:55 PM
  #19  
Mike C
The Special One
Thread Starter
iTrader: (1)
 
Mike C's Avatar
 
Join Date: Mar 2005
Location: Bridgnorth
Posts: 10,852
Likes: 0
Received 0 Likes on 0 Posts
Default

I did think about that, but was unsure about doing the sides. The front would be easy enough becuase you could leave the whole front lip, and I guess the rear would be pretty much the same.

It seems a relatively straightforward job, just being a little cautious as I've never tackled anything quite like this before, lol.

Last edited by Mike C; 21-04-2009 at 07:17 PM.
Old 21-04-2009, 07:50 PM
  #20  
S1
...............
 
S1's Avatar
 
Join Date: Jul 2003
Location: Essex
Posts: 2,663
Received 0 Likes on 0 Posts
Default

Originally Posted by Mike C
It seems a relatively straightforward job, just being a little cautious as I've never tackled anything quite like this before, lol.
It is straightforward mate, just need to take your time and remove it cleanly.


Finished result.

Old 21-04-2009, 08:24 PM
  #21  
foreigneRS
Testing the future
 
foreigneRS's Avatar
 
Join Date: Jul 2003
Location: W. Sussex
Posts: 17,597
Received 24 Likes on 16 Posts
Default

have you braced the pillars before removal to keep everything lined up?
Old 21-04-2009, 08:31 PM
  #22  
jacko
PassionFord Post Whore!!
 
jacko's Avatar
 
Join Date: Nov 2004
Location: Middlesbrough
Posts: 7,295
Likes: 0
Received 0 Likes on 0 Posts
Default

it wont move mate he is only removing a skin
Old 21-04-2009, 08:35 PM
  #23  
Mike C
The Special One
Thread Starter
iTrader: (1)
 
Mike C's Avatar
 
Join Date: Mar 2005
Location: Bridgnorth
Posts: 10,852
Likes: 0
Received 0 Likes on 0 Posts
Default

S1- looks a very tiday job mate!

As said, it's only a skin, no structural strength in it.
Old 21-04-2009, 08:36 PM
  #24  
Kelv
Almost there!

iTrader: (4)
 
Kelv's Avatar
 
Join Date: Jun 2003
Location: Gatwick (ish)
Posts: 7,434
Likes: 0
Received 0 Likes on 0 Posts
Default

Martoon will be getting mine to change anyway.

Although hes not fully aware of this as yet
Old 21-04-2009, 08:40 PM
  #25  
jacko
PassionFord Post Whore!!
 
jacko's Avatar
 
Join Date: Nov 2004
Location: Middlesbrough
Posts: 7,295
Likes: 0
Received 0 Likes on 0 Posts
Default

whats wrong with it you aint rolled it have you
Old 21-04-2009, 08:41 PM
  #26  
Kelv
Almost there!

iTrader: (4)
 
Kelv's Avatar
 
Join Date: Jun 2003
Location: Gatwick (ish)
Posts: 7,434
Likes: 0
Received 0 Likes on 0 Posts
Default

LOL, not this one

Mike C has taken on all the efforts in getting Carbon Roof skins made for several of us, mine being one of them
Old 21-04-2009, 09:02 PM
  #27  
SillyFezzaMk1
Rubber Rhino Crew
iTrader: (1)
 
SillyFezzaMk1's Avatar
 
Join Date: Dec 2005
Location: Birmingham
Posts: 2,157
Likes: 0
Received 0 Likes on 0 Posts
Default

I've got all this to come

Happy Days

Dan
Old 21-04-2009, 09:10 PM
  #28  
jacko
PassionFord Post Whore!!
 
jacko's Avatar
 
Join Date: Nov 2004
Location: Middlesbrough
Posts: 7,295
Likes: 0
Received 0 Likes on 0 Posts
Default

Originally Posted by Kelv
LOL, not this one

Mike C has taken on all the efforts in getting Carbon Roof skins made for several of us, mine being one of them

verry nice id love to do a full carbon escos
Old 22-04-2009, 08:03 AM
  #29  
Mike C
The Special One
Thread Starter
iTrader: (1)
 
Mike C's Avatar
 
Join Date: Mar 2005
Location: Bridgnorth
Posts: 10,852
Likes: 0
Received 0 Likes on 0 Posts
Default

S1, any chance you could re-host those top few pics. Fiesta Turbo won't allow links to other sites by the looks, and I tried pasting in the URL and you still get that same forbidden message
Old 22-04-2009, 08:16 AM
  #30  
S1
...............
 
S1's Avatar
 
Join Date: Jul 2003
Location: Essex
Posts: 2,663
Received 0 Likes on 0 Posts
Default

FT is down at the mo so cant see the pics ive posted!

These are on my photobucket.


Old 22-04-2009, 08:29 AM
  #31  
Mike C
The Special One
Thread Starter
iTrader: (1)
 
Mike C's Avatar
 
Join Date: Mar 2005
Location: Bridgnorth
Posts: 10,852
Likes: 0
Received 0 Likes on 0 Posts
Default

Cheers mate, good job!
Old 22-04-2009, 10:49 AM
  #32  
S1
...............
 
S1's Avatar
 
Join Date: Jul 2003
Location: Essex
Posts: 2,663
Received 0 Likes on 0 Posts
Default

Looking at your photo's again, it looks like you're using the type of spot-weld drill that looks like a mini hole-cutter. I much prefer the other type that looks like a flat drill bit. They are more expensive but give a much better job imo. Just keep the drill square to the job. If you look carefully you can see the difference when you go through the skins so you dont go through the second layer. Also get yourself a thin pallet knife and sharpen it up with a grinder so you can use it with a hammer to slide between the layers/panels to break them apart.
Old 22-04-2009, 11:15 AM
  #33  
Luca
Lukesville
iTrader: (2)
 
Luca's Avatar
 
Join Date: Nov 2005
Location: Portsmouth
Posts: 9,668
Likes: 0
Received 1 Like on 1 Post
Default

Originally Posted by S1
FT is down at the mo so cant see the pics ive posted!

These are on my photobucket.


Hello mate, what process did you use to remove the sound deadening on the floor? Looks like an ultra clean method.

Last edited by Luca; 22-04-2009 at 12:44 PM.
Old 22-04-2009, 12:41 PM
  #34  
Mike C
The Special One
Thread Starter
iTrader: (1)
 
Mike C's Avatar
 
Join Date: Mar 2005
Location: Bridgnorth
Posts: 10,852
Likes: 0
Received 0 Likes on 0 Posts
Default

Sound deadening!

That's something else that's giving me a nightmare at present
Old 22-04-2009, 12:45 PM
  #35  
Lo@der
Passionford Thread Killer
iTrader: (8)
 
Lo@der's Avatar
 
Join Date: Feb 2006
Location: bournemouth
Posts: 3,771
Likes: 0
Received 1 Like on 1 Post
Default

some very helpful info here for when i come to do mine . cheers.
Old 22-04-2009, 06:07 PM
  #36  
Mike C
The Special One
Thread Starter
iTrader: (1)
 
Mike C's Avatar
 
Join Date: Mar 2005
Location: Bridgnorth
Posts: 10,852
Likes: 0
Received 0 Likes on 0 Posts
Default

I'm almost there now. Just packed up for this evening as my drill ran out of charge, but should be finished by about this time tomorrow fingers crossed!

Old 25-04-2009, 07:57 PM
  #37  
Mike C
The Special One
Thread Starter
iTrader: (1)
 
Mike C's Avatar
 
Join Date: Mar 2005
Location: Bridgnorth
Posts: 10,852
Likes: 0
Received 0 Likes on 0 Posts
Default

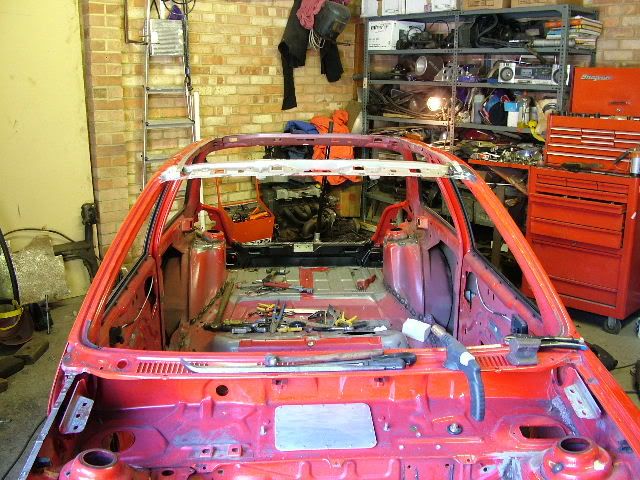
Something came up on thursday, so did it today instead. All done now. Fairly straightforward, just takes a little time. The rear was a bit of a pain in the arse, seemed to be loads of very randomly placed welds in the two rear corners. Got 90% off nice and cleanly, but the rear will need a little welding/tidying before the carbon skin goes on. Was a bit of a nightmare to separate along the rear seam, especially where it's triple skinned. As Martin says though, it's nothing a bit of welding and grinding won't fix!

Old 26-04-2009, 12:34 PM
  #38  
Mike C
The Special One
Thread Starter
iTrader: (1)
 
Mike C's Avatar
 
Join Date: Mar 2005
Location: Bridgnorth
Posts: 10,852
Likes: 0
Received 0 Likes on 0 Posts
Default

Few pics for anyone who's interested!


Old 26-04-2009, 01:38 PM
  #39  
Rab
Fucking superstar........
 
Rab's Avatar
 
Join Date: May 2004
Location: Argyll.... It's lonely...
Posts: 13,240
Likes: 0
Received 0 Likes on 0 Posts
Default

Such a cool car!
Old 26-04-2009, 02:05 PM
  #40  
Mike C
The Special One
Thread Starter
iTrader: (1)
 
Mike C's Avatar
 
Join Date: Mar 2005
Location: Bridgnorth
Posts: 10,852
Likes: 0
Received 0 Likes on 0 Posts
Default

Cheers! Can't wait to get the shell finished and painted, should look alright then


Quick Reply: Removing Roofskin- Could do with a quick answer!


All times are GMT. The time now is 03:38 PM.