
My MK5 XR3i 130spec restoration - Ooo another update!! 08/08

Thread Starter
Part of the Furniture
Joined: May 2004
Posts: 178
Likes: 0
From: East Mids
Ok well bear with me first lol, lots of pics to post!
A little tale first..
Bought the car in May 2004, as my first car. It was obvious from the immaculate service history that it had been very well looked after. However it was now a bit of a rescue case, mother nature had taken her toll and the car was very rusty, even after having replacement arches once before in its life. The arches, sills, battery tray, chassis and numerous other places were rusted.. but it was just to good a car for the scrapyard, with hardly any MK5 130specs around - I decided to restore her.
Plus being only 17 at the time, I had no license so I thought I may as well lol. Tis almost a year on now (am 18 wahay lol), and its been a few months since I got my license..and about 7 months since my car has seen my driveway
Anyways on with the pics!
First off when I got her, got a mate to drive her back - and she was beautiful the whole way down. Didn't play up or miss a beat over 100miles...not bad for a car that had only done 50miles in the past 2 years! Did it all on about �10 worth of fuel as well!
Even showed up a VTS on the way back as well in a little blat, thoroughly enjoyable to see four chavs being shown up lol.
Only bad thing with the car was it had a towbar on it, YES a towbar pmsl...but that came off first. Took a lot of levering and pulling from me and my mate as it had some feck off bolts that had rusted on - in the end I gave up with the last bolt and took it to my garage to have it ground off pmsl. Only took me 5 hours!
Well here are the never before seen pics of when I first got her, forgive the quality as they are photos...which I have taken a photo of LOL.
And yes thats me cleaning it, and standing behind it before it was cleaned


And here are some better quality photos, unfortunately I never took any of the engine bay...but let me assure you it was rather filthy, and certainly not shiny lol.
So here they are...

 (yup new mats about the only mod at this time lol)


Now on with the restoration itself...
A little tale first..
Bought the car in May 2004, as my first car. It was obvious from the immaculate service history that it had been very well looked after. However it was now a bit of a rescue case, mother nature had taken her toll and the car was very rusty, even after having replacement arches once before in its life. The arches, sills, battery tray, chassis and numerous other places were rusted.. but it was just to good a car for the scrapyard, with hardly any MK5 130specs around - I decided to restore her.
Plus being only 17 at the time, I had no license so I thought I may as well lol. Tis almost a year on now (am 18 wahay lol), and its been a few months since I got my license..and about 7 months since my car has seen my driveway
Anyways on with the pics!
First off when I got her, got a mate to drive her back - and she was beautiful the whole way down. Didn't play up or miss a beat over 100miles...not bad for a car that had only done 50miles in the past 2 years! Did it all on about �10 worth of fuel as well!
Even showed up a VTS on the way back as well in a little blat, thoroughly enjoyable to see four chavs being shown up lol.
Only bad thing with the car was it had a towbar on it, YES a towbar pmsl...but that came off first. Took a lot of levering and pulling from me and my mate as it had some feck off bolts that had rusted on - in the end I gave up with the last bolt and took it to my garage to have it ground off pmsl. Only took me 5 hours!
Well here are the never before seen pics of when I first got her, forgive the quality as they are photos...which I have taken a photo of LOL.
And yes thats me cleaning it, and standing behind it before it was cleaned
And here are some better quality photos, unfortunately I never took any of the engine bay...but let me assure you it was rather filthy, and certainly not shiny lol.
So here they are...
(yup new mats about the only mod at this time lol)Now on with the restoration itself...
Thread Starter
Part of the Furniture
Joined: May 2004
Posts: 178
Likes: 0
From: East Mids
Onto the First stage of restoration!
Basically the story goes like this; I had bought a Powercoated Red Cam Cover, and Red Calliper paint upon deciding the colour coding I was going for under the engine bay.
So the callipers now red, and the bay with a little bit of colour I pondered on the rust, the rear arches were fecked to put it blunt, both of them. The petrol cap was rusted, although not badly (or so it seemed...), the battery tray had a lot of surface rust, but was solid (for now) and the sills were completely fudged lol.
The rear of the sill lips had totally folded over obviously from where it had been jacked up, and they had not been strong enough to support the car. The whole sill lip was rusted badly...and this worried me, the bottom of the car also shared its share of spots, thankfully they were all nothing major as I had caught them just as they had emerged so to speak.
The Rear Chassis Rails looked ok, although there was a piercing into the underseal in the common spot. So certainly not the worst thats ever been seen - but not the best either, and for me - thats not good enough. I have always though why bother modding a car thats rusty, its just let down. So I decided to get the rust SORTED!
Unfortunately I did not have the funds to pay for a complete restoration, and I was certainly not competant to weld myself. So I was stuck at the time, all my mates were driving around - and I had a rusty car, totally standard compared to their modded masterpieces. Although mine was the fastest, it was ugly to put it blunt.
One day I was sat down with my mate, and he was talking to me about knocking out rust on the arches of cars...he had done it to his old Escort and a few other cars, and said it wouldn't be that worst of jobs to do.
I remember I had some unopened Body Filler, Primer, Hammerite Kurust, and Lacquer from where I had mended my mums old Volvo 360's rusty door at the time, so we thought feck it. My mum had earlier left to go on holiday for 2 weeks (much prefered to stay at home with me mates lol) so we started.
It was a strange feeling, days before I had been jumping on the nearest bird to my car - now I was chisseling the passenger arch away lol, soon we had decided to do both sides...and away I was hammering both sides of my car!
Unfortunately for us it looked like it had been proffesionally repaired at least once before, as we found traces of filler...lots of it lol. Infact the whole arch lip on both sides came totally out, and about an inch up the bodywork as well it was quite a bit worse than it had initially looked, as you will see in the following pictures!
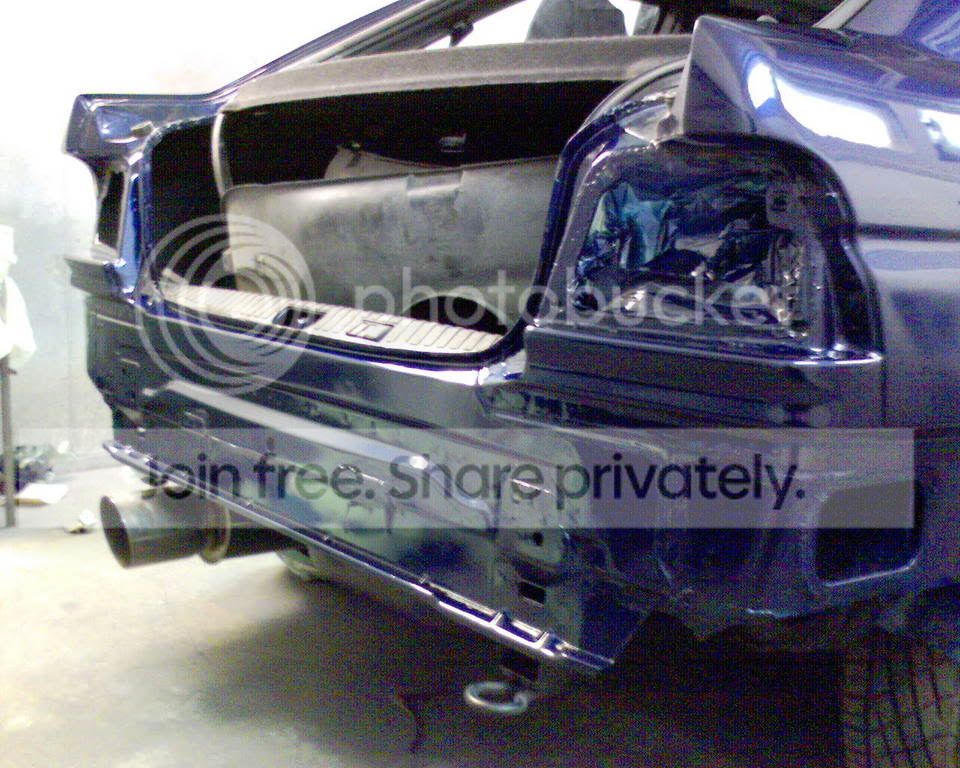
After we took the Rear Bumper off we discovered even more rust, where the very bottom of the arch meets the flat part of the floor, was a hole in the corner, probably the worst of places for a novice "fillerer" lol, and yup both sides were the same lol. The rear panel was in pretty mint nick, just two small spots at either side in the corners, which were soon ground off.
Soon after we decided it would be best to jack the car up, so off came the rear wheels - and the whole rear end was put on stands. It remained like that for 2 weeks of solid hard graft last summer, in the blistering heat..and occasional summer storm.
We used wire mesh and filler to build up the arches, cost me �75 in filler and paint in the end..we got threw 3 Kingsize tins lol, we found out afterwards that we had used P38 filler...which was the softer stuff used on dents, and we should have used P40 for the rebuilding. Good job I had used about ten times more hardener that usual then lol, the filler was pink LOL.
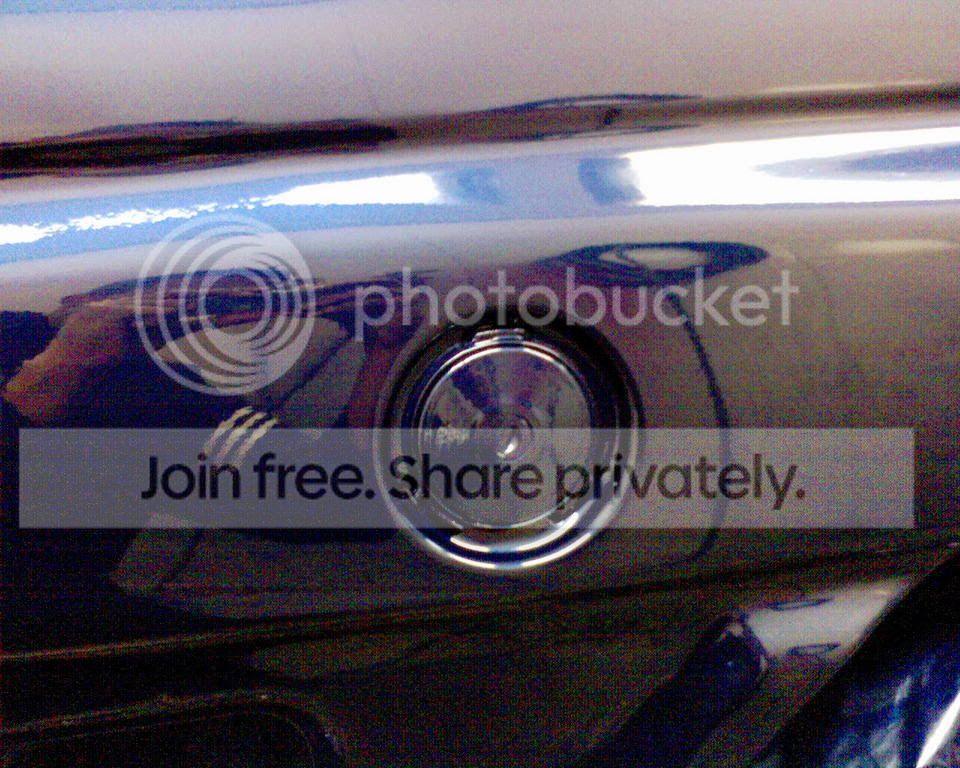
After it had all been sanded down, we came to the problem of the petrol cap. We knocked it out and it literally fell to pieces, now we knew filler could not rebuild it as the filler neck had to clip into place and needed a strong steel lip, so we came up with an idea...
We went down the local scrapyard and amongst the 30 cars there, (about 25 of them scorts ) we found a trusty white orion, we got a chisel and in 5 mins we got the petrol cap out...all without any regard to the half tank of petrol pmsl!
As you will see from the pics, we ground down this petrol cap - and it was solid. We gave it ten coats of Hammerite on the inside, and 5 coats of primer to stop any water settling, and we set around fitting it. We hammered the old filler cap inwards, after we had derusted it the best we could and sealed it. We them riveted the new cap ontop of it, ground it down with a dremel (yes sparks and petrol are bad lol) and then fillered it. It wasn't perfect, but a darn site better - and to be honest, it would at least stop the car rusting anymore until I could afford to get it done by a proffesional!
So we then set the task of painting it, lots of primer and masking later and we had the finished result. Was a pig to do as it kept raining and the car was on my drive, so we kept having to primer it and tape some binbags over it to stop it rusting lol...
Anyways, here are the pics of those crazy 2 weeks.


Will post the pics of the finished work at that time, in the next post
Basically the story goes like this; I had bought a Powercoated Red Cam Cover, and Red Calliper paint upon deciding the colour coding I was going for under the engine bay.
So the callipers now red, and the bay with a little bit of colour I pondered on the rust, the rear arches were fecked to put it blunt, both of them. The petrol cap was rusted, although not badly (or so it seemed...), the battery tray had a lot of surface rust, but was solid (for now) and the sills were completely fudged lol.
The rear of the sill lips had totally folded over obviously from where it had been jacked up, and they had not been strong enough to support the car. The whole sill lip was rusted badly...and this worried me, the bottom of the car also shared its share of spots, thankfully they were all nothing major as I had caught them just as they had emerged so to speak.
The Rear Chassis Rails looked ok, although there was a piercing into the underseal in the common spot. So certainly not the worst thats ever been seen - but not the best either, and for me - thats not good enough. I have always though why bother modding a car thats rusty, its just let down. So I decided to get the rust SORTED!
Unfortunately I did not have the funds to pay for a complete restoration, and I was certainly not competant to weld myself. So I was stuck at the time, all my mates were driving around - and I had a rusty car, totally standard compared to their modded masterpieces. Although mine was the fastest, it was ugly to put it blunt.
One day I was sat down with my mate, and he was talking to me about knocking out rust on the arches of cars...he had done it to his old Escort and a few other cars, and said it wouldn't be that worst of jobs to do.
I remember I had some unopened Body Filler, Primer, Hammerite Kurust, and Lacquer from where I had mended my mums old Volvo 360's rusty door at the time, so we thought feck it. My mum had earlier left to go on holiday for 2 weeks (much prefered to stay at home with me mates lol) so we started.
It was a strange feeling, days before I had been jumping on the nearest bird to my car - now I was chisseling the passenger arch away lol, soon we had decided to do both sides...and away I was hammering both sides of my car!
Unfortunately for us it looked like it had been proffesionally repaired at least once before, as we found traces of filler...lots of it lol. Infact the whole arch lip on both sides came totally out, and about an inch up the bodywork as well
After we took the Rear Bumper off we discovered even more rust, where the very bottom of the arch meets the flat part of the floor, was a hole in the corner, probably the worst of places for a novice "fillerer" lol, and yup both sides were the same lol. The rear panel was in pretty mint nick, just two small spots at either side in the corners, which were soon ground off.
Soon after we decided it would be best to jack the car up, so off came the rear wheels - and the whole rear end was put on stands. It remained like that for 2 weeks of solid hard graft last summer, in the blistering heat..and occasional summer storm.
We used wire mesh and filler to build up the arches, cost me �75 in filler and paint in the end..we got threw 3 Kingsize tins lol, we found out afterwards that we had used P38 filler...which was the softer stuff used on dents, and we should have used P40 for the rebuilding. Good job I had used about ten times more hardener that usual then lol, the filler was pink LOL.
After it had all been sanded down, we came to the problem of the petrol cap. We knocked it out and it literally fell to pieces, now we knew filler could not rebuild it as the filler neck had to clip into place and needed a strong steel lip, so we came up with an idea...
We went down the local scrapyard and amongst the 30 cars there, (about 25 of them scorts
) we found a trusty white orion, we got a chisel and in 5 mins we got the petrol cap out...all without any regard to the half tank of petrol pmsl!As you will see from the pics, we ground down this petrol cap - and it was solid. We gave it ten coats of Hammerite on the inside, and 5 coats of primer to stop any water settling, and we set around fitting it. We hammered the old filler cap inwards, after we had derusted it the best we could and sealed it. We them riveted the new cap ontop of it, ground it down with a dremel (yes sparks and petrol are bad lol) and then fillered it. It wasn't perfect, but a darn site better - and to be honest, it would at least stop the car rusting anymore until I could afford to get it done by a proffesional!
So we then set the task of painting it, lots of primer and masking later and we had the finished result. Was a pig to do as it kept raining and the car was on my drive, so we kept having to primer it and tape some binbags over it to stop it rusting lol...
Anyways, here are the pics of those crazy 2 weeks.
Will post the pics of the finished work at that time, in the next post
Thread Starter
Part of the Furniture
Joined: May 2004
Posts: 178
Likes: 0
From: East Mids
On with the pics of me and my mates handywork


Whilst we were doing this I bought myself a �30 Race X Induction Kit, and a Replica Cosworth Front Grill...don't even ask how much hassle that piece of crap was lol. Never order any replica parts from POTN imo..
Now the finished job, after a little clean of course!


Talk about looking a state lol, but at the time believe me it actually looked a lot better. So I was quite pleased, mainly due to the fact that I knew she would fare up a lot better to the winter looming in, whilst I saved my pennies for the real restoration thats been going on the past 7 months...
Unfortunately for me the paint from Halfords decided to fade, and generally feck up...here are some pictures of what happened after I had colour coded my Door Handles and Locks later on that month..


Whilst we were doing this I bought myself a �30 Race X Induction Kit, and a Replica Cosworth Front Grill...don't even ask how much hassle that piece of crap was lol. Never order any replica parts from POTN imo..
Now the finished job, after a little clean of course!
Talk about looking a state lol, but at the time believe me it actually looked a lot better. So I was quite pleased, mainly due to the fact that I knew she would fare up a lot better to the winter looming in, whilst I saved my pennies for the real restoration thats been going on the past 7 months...
Unfortunately for me the paint from Halfords decided to fade, and generally feck up...here are some pictures of what happened after I had colour coded my Door Handles and Locks later on that month..
Thread Starter
Part of the Furniture
Joined: May 2004
Posts: 178
Likes: 0
From: East Mids
But onwards and upwards as they say!
The arches I thought looked pretty darn good for a first time job, it took two weeks but they looks spot on dimension wise, the only way you could tell they were not metal, was sticking you under the "lip" which was there, but it had no lip underneath...it was solid lol
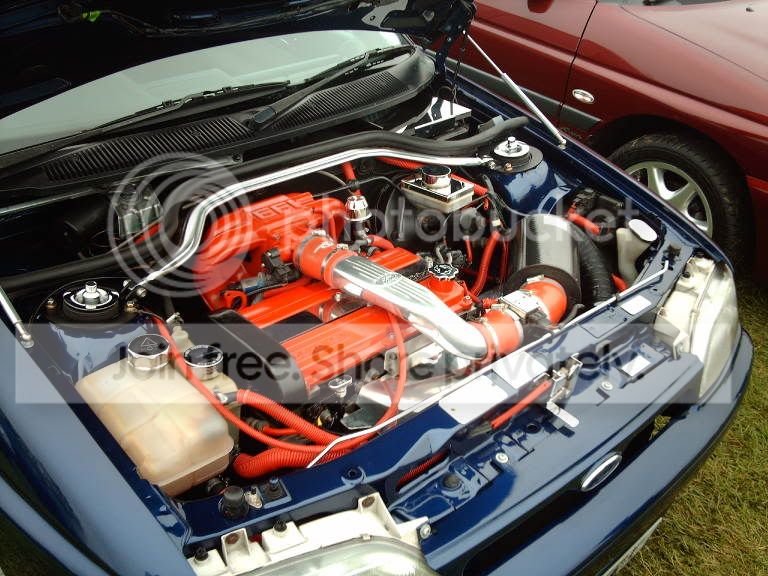
Anyways on rolled a month or two until it reached October, money had been running low and I felt like treating the motor to something, so I bought some Clear Rears..and some more Paint, I colour coded a few things under the bay, the Inlet Manifold being the best of those achievements. Although I never got round to sanding the EFI lettering silver, along with the lettering on the cam cover lol. Another job to add to the list methinks
I also got around to Waxoyling the bottom of the car, took 10 gallons of the stuff and was the worst experience of my life lol, lets just say it took me about 5hours to apply the stuff (after removing any surface rust - THANKFULLY none bad at all ) but then took me about another 5hours to clean myself! To say it doesn't "stick" is an understatement and a half lol.
I also got around to grinding off the rust on the Chassis Rail underneath the Airbox in the engine bay, you may have noticed from the last set of pictures it was black and bubbly with sealent...well I got around to grinding it off - and thankgawd it came up perfect, I spent hours grinding it with a metal drill, and I put about 30 layers of rust proof primer and sealent on it before I sprayed it...
But anyways, heres a few more pics - the arches weren't looking to bad, apart from the faded paint


The arches I thought looked pretty darn good for a first time job, it took two weeks but they looks spot on dimension wise, the only way you could tell they were not metal, was sticking you under the "lip" which was there, but it had no lip underneath...it was solid lol
Anyways on rolled a month or two until it reached October, money had been running low and I felt like treating the motor to something, so I bought some Clear Rears..and some more Paint, I colour coded a few things under the bay, the Inlet Manifold being the best of those achievements. Although I never got round to sanding the EFI lettering silver, along with the lettering on the cam cover lol. Another job to add to the list methinks
I also got around to Waxoyling the bottom of the car, took 10 gallons of the stuff and was the worst experience of my life lol, lets just say it took me about 5hours to apply the stuff (after removing any surface rust - THANKFULLY none bad at all
) but then took me about another 5hours to clean myself! To say it doesn't "stick" is an understatement and a half lol.I also got around to grinding off the rust on the Chassis Rail underneath the Airbox in the engine bay, you may have noticed from the last set of pictures it was black and bubbly with sealent...well I got around to grinding it off - and thankgawd it came up perfect, I spent hours grinding it with a metal drill, and I put about 30 layers of rust proof primer and sealent on it before I sprayed it...
But anyways, heres a few more pics - the arches weren't looking to bad, apart from the faded paint
Thread Starter
Part of the Furniture
Joined: May 2004
Posts: 178
Likes: 0
From: East Mids
Over the next few months unfortunately I did not have access to a camera, so pics had to wait...in the meantime though I had spent over �500 on a new alarm system, I won't disclose what it is...but its the tits, and was well worth the money, I got the tracker reactivated and bought a steering lock as well to keep my mind at bay.
However soon after I almost gave up on the car, whilst it was sat on my driveway the Gear linkage snapped - meaning I needed a new gearbox, the starter motor went, as did a central locking motor and my bonnet catch cable. I plugged away though and threw luck I found a guy who fitted me a new box, with racing oil for just over �300, he was also kind enough to sort my starter motor for �35 as well! I did the rest of the work myself with the cables and motor for central locking.
A very depressing time with the car, but it payed off a few weeks later..
In fact these pics were taken with a Digital Camera, that I got given free from work pmsl - the quality is absolutely crap, but its good enough for now.
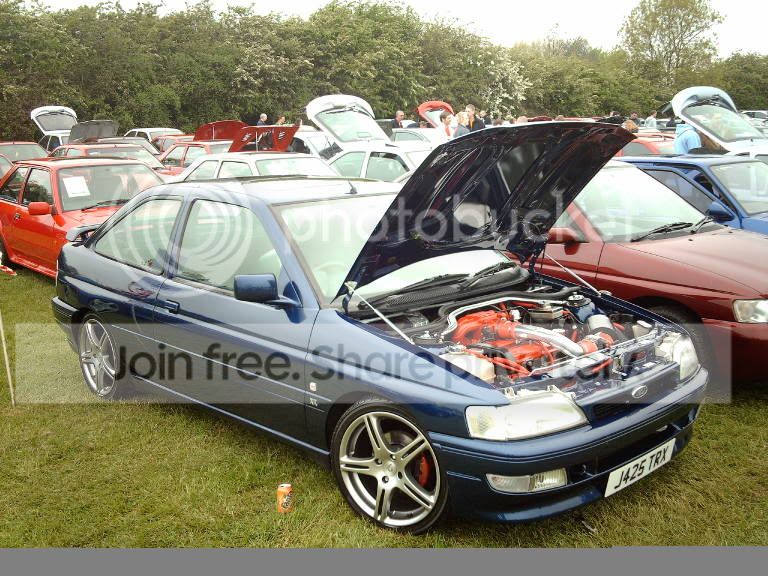
For my 18th birthday my Mum and Gran really pulled out something amazing, and got me �600 towards some Alloys I wanted..amazing considering things! So with a bit of money I had already saved, I thought feck it - and off to Motech styling!
Took a long time to decide, but I finally knew which alloys I wanted...I decided on some Boss XTS alloys, with the new "b" centrecap which has the british flag inside the b's lettering if you look closely
Had them wrapped in some Yokohama rubber and was away, got a set of Locking nuts thrown in to!
I must say the transformation was amazing, I absolutely loved them!! The best mod I had done so far to the car, bar removing the rust!
Not only that, but Christmas was equally as happy for me, I managed to scrabble together just over �350 between my money and what I was given..and with my mate off we went to Powerflow Exhausts on the 6th of January 2005, I got myself a Full System Decat, with no Middle Box which leads straight to a Powerflow, jap style can at the back. It has a 5" slash cut exit which follows the angle of the rear splitter. Yes it looks big, but it suits the car spot on - and I wanted to be different.
The car was spot on all the way there and back (55 mile round trip) and it was probably the best ride I have had to date in it, the car is fecking loud LOL and shocked everybody, felt a darn bit nippier to and was absolutely awesome on the way back. We overtook everything and anything and it was the most fun the car had in a longtime, it needed a good run and it good a fecking good blat LOL. Will never forget that ride home...
The guys at powerflow did an awesome job on it, its fitted solid under the car, and was cut perfectly into the splitter. They let me do the honours of starting it up, and they even asked for my help sorting out the cutting of the splitter. Couldn't recommend the Aylesbury boys enough
They also got the sound spot on, deep as fook, and loud as fook when you floor it, with a nice shrieking wail at top revs - it sounds like a V6 on steriods lol. It also idles lovely, very loud I admit (might have to get that idling toned down a bit ) but it sounds like a V8 purring...luuurly!
So here are the pics of the exhaust on the car, and the alloys as well. Now I admit the exhaust looks out of place, but when its carbed up - the cars lowered, and the splitter is colour coded it will look spot on, trust me
The other mods at the time were some Clear Indicators, and Side Repeators..courtesy of my 10 year old bro (top lad ) and a Ford Badge for my Cossie Grill, I also neatened up the bay quite a bit.


However soon after I almost gave up on the car, whilst it was sat on my driveway the Gear linkage snapped - meaning I needed a new gearbox, the starter motor went, as did a central locking motor and my bonnet catch cable. I plugged away though and threw luck I found a guy who fitted me a new box, with racing oil for just over �300, he was also kind enough to sort my starter motor for �35 as well! I did the rest of the work myself with the cables and motor for central locking.
A very depressing time with the car, but it payed off a few weeks later..
In fact these pics were taken with a Digital Camera, that I got given free from work pmsl - the quality is absolutely crap, but its good enough for now.
For my 18th birthday my Mum and Gran really pulled out something amazing, and got me �600 towards some Alloys I wanted..amazing considering things! So with a bit of money I had already saved, I thought feck it - and off to Motech styling!
Took a long time to decide, but I finally knew which alloys I wanted...I decided on some Boss XTS alloys, with the new "b" centrecap which has the british flag inside the b's lettering if you look closely
Had them wrapped in some Yokohama rubber and was away, got a set of Locking nuts thrown in to!
I must say the transformation was amazing, I absolutely loved them!! The best mod I had done so far to the car, bar removing the rust!
Not only that, but Christmas was equally as happy for me, I managed to scrabble together just over �350 between my money and what I was given..and with my mate off we went to Powerflow Exhausts on the 6th of January 2005, I got myself a Full System Decat, with no Middle Box which leads straight to a Powerflow, jap style can at the back. It has a 5" slash cut exit which follows the angle of the rear splitter. Yes it looks big, but it suits the car spot on - and I wanted to be different.
The car was spot on all the way there and back (55 mile round trip) and it was probably the best ride I have had to date in it, the car is fecking loud LOL and shocked everybody, felt a darn bit nippier to and was absolutely awesome on the way back. We overtook everything and anything and it was the most fun the car had in a longtime, it needed a good run and it good a fecking good blat LOL. Will never forget that ride home...
The guys at powerflow did an awesome job on it, its fitted solid under the car, and was cut perfectly into the splitter. They let me do the honours of starting it up, and they even asked for my help sorting out the cutting of the splitter. Couldn't recommend the Aylesbury boys enough
They also got the sound spot on, deep as fook, and loud as fook when you floor it, with a nice shrieking wail at top revs - it sounds like a V6 on steriods lol. It also idles lovely, very loud I admit (might have to get that idling toned down a bit
) but it sounds like a V8 purring...luuurly!So here are the pics of the exhaust on the car, and the alloys as well. Now I admit the exhaust looks out of place, but when its carbed up - the cars lowered, and the splitter is colour coded it will look spot on, trust me
The other mods at the time were some Clear Indicators, and Side Repeators..courtesy of my 10 year old bro (top lad
) and a Ford Badge for my Cossie Grill, I also neatened up the bay quite a bit.
Thread Starter
Part of the Furniture
Joined: May 2004
Posts: 178
Likes: 0
From: East Mids
Now the new year came, I managed to get a better part time job alongside my school work (6th form) so the cash coming in, the saving for the restoration began..
In the meantime I thought about doing something to keep me busy, I had seen in many posts people asking how to get rid of the nasty plastic induction piping that comes on the MK5, finally I found someone who (a mr "Twinkle" on FEOC) who had the answer. He showed me that the RS Turbo Crossover Pipe could be used, with some rather nice increases in torque...but it did need either a lot of money, or a lot of work.
Being short as I was saving for the full restoration, I decided to get hold of a Crossover pipe and do it myself, it cost me around �25 on ebay and came in a right state.
So first job was to cut off the now un-needed flanges on either side, with the only hacksaw in the house being blunt...it took me 7 hours to do it, my arm hurt for days on end...and it took me a week to do it lol.


After that, I ponder on what to do with the protruding cylinder used for the RST's charge sensor (I think lol )...and a mate of mine came up with a great idea, it was taking me hours to sand the ridges left by the flanges flat - so use the machines in the tech department of school!
So I did, it sanded them pretty darn flat, and got rid of that protruding cylinder, problem was it left a very rough surface...
So it was Wet and Flat, Wet and Flat, Wet and Flat...without any exaggeration it took me over 2 months of flatting this every evening to get it smooth and polished with Autosol, I wish I had known about drill assisted buffers before I spent another month using Autosol but it was worth it, and added about another inch to my Biceps
So heres some pics of the progress I had made:


(Can someone say this RST has a fecking oily charge pipe pmsl)


Not bad eh? Onto the next part of the restoration...(well the main part soon pmsl)
In the meantime I thought about doing something to keep me busy, I had seen in many posts people asking how to get rid of the nasty plastic induction piping that comes on the MK5, finally I found someone who (a mr "Twinkle" on FEOC) who had the answer. He showed me that the RS Turbo Crossover Pipe could be used, with some rather nice increases in torque...but it did need either a lot of money, or a lot of work.
Being short as I was saving for the full restoration, I decided to get hold of a Crossover pipe and do it myself, it cost me around �25 on ebay and came in a right state.
So first job was to cut off the now un-needed flanges on either side, with the only hacksaw in the house being blunt...it took me 7 hours to do it, my arm hurt for days on end...and it took me a week to do it lol.
After that, I ponder on what to do with the protruding cylinder used for the RST's charge sensor (I think lol
So I did, it sanded them pretty darn flat, and got rid of that protruding cylinder, problem was it left a very rough surface...
So it was Wet and Flat, Wet and Flat, Wet and Flat...without any exaggeration it took me over 2 months of flatting this every evening to get it smooth and polished with Autosol, I wish I had known about drill assisted buffers before I spent another month using Autosol
but it was worth it, and added about another inch to my Biceps So heres some pics of the progress I had made:
(Can someone say this RST has a fecking oily charge pipe pmsl)
Not bad eh? Onto the next part of the restoration...(well the main part soon pmsl)
Thread Starter
Part of the Furniture
Joined: May 2004
Posts: 178
Likes: 0
From: East Mids
Along with some Banshee Red Hoses custom made to the right size, and some Wire Covers from the local TMC Motoring...the Crossover pipe was fitted to the car, no bad even if I do say so myself
In the past few months I also caught the "bling bug"...has so far cost me my bank balance a few times but has been worth it pmsl. At the time I treated myself to some Suspension Top Covers, a Bonnet Stand, and an MAF Sensor Cover..

Now onto the fun stuff as we say
In the past few months I also caught the "bling bug"...has so far cost me my bank balance a few times but has been worth it pmsl. At the time I treated myself to some Suspension Top Covers, a Bonnet Stand, and an MAF Sensor Cover..
Now onto the fun stuff as we say
Trending Topics
Thread Starter
Part of the Furniture
Joined: May 2004
Posts: 178
Likes: 0
From: East Mids
After finally saving up enough money, it was time to find somewhere to get me my restoration!
The quotes varied immensely, one quote I got was for �1500...JUST for two arches 
In the end I went down to a local garage, where a guy I know works...top lad he is, he quoted me �300 for two new arches fully welded in, with both rear quarters resprayed, he soon discounted the price though...and we agreed for �750 he would respray all the paint under the bonnet, the bonnet itself topside and underneath, the car would be delocked, and both door fully resprayed, that both arches and the petrol cap would be done and sprayed, and the battery tray would be replaced, and sprayed along with the rest of the bay - bargain
Soon after though I wanted more and more done to the car, I bought a Genuine Cosworth Front Grill, an RS2K Bonnet, a Lower Cosworth Spoiler, and Sparco Rear Strut Brace.. he agreed an awesome price to me (espicially as they are a small garage)...here is the final list of work thats being carried out as we speak:
Rust on bottom of Doors Rectified
Both Chassis Rails replaced and welded up were required, all rust rectified
Inspection under car, all rust removed and rectified
New Full Arches on Both Sides
New Petrol Cap
Removal of Front Bumper and Inspection/Removal of Rust
Removal of Rear Bumper and Inspection/Removal of Rust
New Petrol Cap
New Battery Tray
Both Rear Quarters Resprayed
Underside of Bonnet Resprayed
Topside of Bonnet Sprayed
RS2K Bonnet Fitted, rust removed on bonnet and plated up
New Cosworth Front Grill Resprayed
Cosworth Grill Mesh Sprayed Black
Door Delocked
FULL RESPRAY including:
Front Bumper
Rear Bumper
Sideskirts
Door Handles
Mirror Bases
Rear Splitter
Rear Strut Brace
Lower Cosworth Spoiler
RS2K Bonnet
All Paint in engine bay sprayed
New Inner and Outer sills replaced
Sills and Arches fully sealed, fully welded, and Waxoyled again after spraying
Then the carwill be MOT'ed
The only downside to the whole job was the time it was going to take, being done on the cheap - �1200 exactly, whereas they would usually charge over �4000 meant they had to take a lot longer doing it...so I have (and still am) playing the waiting game.
On the plus side the work done is incredible, the guy doing most of it used to work for Astin Martin...and he was one of their top restorers working on older cars, so his work is top notch. In fact when he plated up my RS2K bonnet, it was done so well I couldn't actually tell it had been done, he even sanded the INSIDE of the bonnet skin perfectly flat...even though you would need a torch to see inside the skin when the bonnets open pmsl.
Its so far been about 7months since it went in their...and here are some pics of the work when it first went in


Thats mud on the exhaust on floor of the car for all those wondering lol!


The sills were a lot worse than I had thought, there were quite a few holes...and yup these pics are after the sills were ground down - and straightened!! However strong they look, they were infact as flimsy as paper, and the only was was to replace them - so thats what happened! Unfortunately it uncovered a small 1mm wide hole, about 20cm long where the inner sill joined the floor of the car, but that was sorted out as well.
What was the biggest shock was what was underneath the main sill when it was taken off, it was clear Ford had sealed it from the factory, as the top of the inner sill was MINT, not a mark on it - yet there was a dead cert line right across it where the sealent ended, and the rust was dead on its heals...why Ford didn't seal the whole thing I don't know, but I intend to put right the wrongs Ford did!
The only majorly disturbing part was the rear box section, which was completely corroded into pieces, which explained why the sill had folded over...as the sill in that place is supposed to be double skinned to take the weight of the car, but it had rusted off...so there was nothing there to take any weight
This all had to be build up by hand, and was custom done - unfortunately I didn't have a camera at the time...but you will see the progress in the next few pics
The last few pics show it sat on a ramp...and yup it was there for over four months whilst work slowly progressed, was a painful time for me...as I missed it and more importantly I passed my test! So now for the first time in my life, I could get to drive my baby...once I got her back and insured of course...
The quotes varied immensely, one quote I got was for �1500...JUST for two arches
In the end I went down to a local garage, where a guy I know works...top lad he is, he quoted me �300 for two new arches fully welded in, with both rear quarters resprayed, he soon discounted the price though...and we agreed for �750 he would respray all the paint under the bonnet, the bonnet itself topside and underneath, the car would be delocked, and both door fully resprayed, that both arches and the petrol cap would be done and sprayed, and the battery tray would be replaced, and sprayed along with the rest of the bay - bargain
Soon after though I wanted more and more done to the car, I bought a Genuine Cosworth Front Grill, an RS2K Bonnet, a Lower Cosworth Spoiler, and Sparco Rear Strut Brace.. he agreed an awesome price to me (espicially as they are a small garage)...here is the final list of work thats being carried out as we speak:
Rust on bottom of Doors Rectified
Both Chassis Rails replaced and welded up were required, all rust rectified
Inspection under car, all rust removed and rectified
New Full Arches on Both Sides
New Petrol Cap
Removal of Front Bumper and Inspection/Removal of Rust
Removal of Rear Bumper and Inspection/Removal of Rust
New Petrol Cap
New Battery Tray
Both Rear Quarters Resprayed
Underside of Bonnet Resprayed
Topside of Bonnet Sprayed
RS2K Bonnet Fitted, rust removed on bonnet and plated up
New Cosworth Front Grill Resprayed
Cosworth Grill Mesh Sprayed Black
Door Delocked
FULL RESPRAY including:
Front Bumper
Rear Bumper
Sideskirts
Door Handles
Mirror Bases
Rear Splitter
Rear Strut Brace
Lower Cosworth Spoiler
RS2K Bonnet
All Paint in engine bay sprayed
New Inner and Outer sills replaced
Sills and Arches fully sealed, fully welded, and Waxoyled again after spraying
Then the carwill be MOT'ed
The only downside to the whole job was the time it was going to take, being done on the cheap - �1200 exactly, whereas they would usually charge over �4000 meant they had to take a lot longer doing it...so I have (and still am) playing the waiting game.
On the plus side the work done is incredible, the guy doing most of it used to work for Astin Martin...and he was one of their top restorers working on older cars, so his work is top notch. In fact when he plated up my RS2K bonnet, it was done so well I couldn't actually tell it had been done, he even sanded the INSIDE of the bonnet skin perfectly flat...even though you would need a torch to see inside the skin when the bonnets open pmsl.
Its so far been about 7months since it went in their...and here are some pics of the work when it first went in
Thats mud on the exhaust on floor of the car for all those wondering lol!
The sills were a lot worse than I had thought, there were quite a few holes...and yup these pics are after the sills were ground down - and straightened!! However strong they look, they were infact as flimsy as paper, and the only was was to replace them - so thats what happened! Unfortunately it uncovered a small 1mm wide hole, about 20cm long where the inner sill joined the floor of the car, but that was sorted out as well.
What was the biggest shock was what was underneath the main sill when it was taken off, it was clear Ford had sealed it from the factory, as the top of the inner sill was MINT, not a mark on it - yet there was a dead cert line right across it where the sealent ended, and the rust was dead on its heals...why Ford didn't seal the whole thing I don't know, but I intend to put right the wrongs Ford did!
The only majorly disturbing part was the rear box section, which was completely corroded into pieces, which explained why the sill had folded over...as the sill in that place is supposed to be double skinned to take the weight of the car, but it had rusted off...so there was nothing there to take any weight
This all had to be build up by hand, and was custom done - unfortunately I didn't have a camera at the time...but you will see the progress in the next few pics
The last few pics show it sat on a ramp...and yup it was there for over four months whilst work slowly progressed, was a painful time for me...as I missed it
Thread Starter
Part of the Furniture
Joined: May 2004
Posts: 178
Likes: 0
From: East Mids
So here we are on the 21st September 2005...a few months on from the last pics, but work has been cracking on - and she is almost ready for her rebirth!
I also got her insured ready for when she is back, its costing me the crazy sum of �4070...but I love her so, and I can't let her sit any longer. She is fully taxed again as well, which will make almost two years of taxing a car, for it to move a few meager miles lol. To say I have stuck to the law in an understatement, the car has had a tank of petrol..I have had the keys, and my mums been on holiday for weeks on end - yet I never moved it further than about 50 metres from the house along the small street road, which I used to keep her moving, and stopping the brakes from seizing.
I got a new fangled mobile phone today as well, which has FINALLY GIVEN ME MY OWN CAMERA!!!
So here are some pics for you all to enjoy!! Hope you like


Little bit less rust on those sills this time eh?


In case your wondering, the black bit on the arch is some dirt lol


Not often you see an Escort with a mint floor eh?

Here's my mates project car, looking quite good at the moment..

Heres the dust free booth she will be painted in soon...


And heres a rather nasty looking Ford Focus, which I stole the bumper off to create a devil impersonation on my car...
I also got her insured ready for when she is back, its costing me the crazy sum of �4070...but I love her so, and I can't let her sit any longer. She is fully taxed again as well, which will make almost two years of taxing a car, for it to move a few meager miles lol. To say I have stuck to the law in an understatement, the car has had a tank of petrol..I have had the keys, and my mums been on holiday for weeks on end - yet I never moved it further than about 50 metres from the house along the small street road, which I used to keep her moving, and stopping the brakes from seizing.
I got a new fangled mobile phone today as well, which has FINALLY GIVEN ME MY OWN CAMERA!!!
So here are some pics for you all to enjoy!! Hope you like
Little bit less rust on those sills this time eh?
In case your wondering, the black bit on the arch is some dirt lol
Not often you see an Escort with a mint floor eh?
Here's my mates project car, looking quite good at the moment..
Heres the dust free booth she will be painted in soon...
And heres a rather nasty looking Ford Focus, which I stole the bumper off to create a devil impersonation on my car...
Thread Starter
Part of the Furniture
Joined: May 2004
Posts: 178
Likes: 0
From: East Mids
So thats it for now! Thanks for reading and taking the time, its been a long road but I am almost there...just cannot wait, will be the first time I get to drive my baby on the roads!!!
But whats next for her? Well at the moment the engine bay needs some more flatting, as does the roof and tailgate, then the whole car will go under the gun..the spray gun of course
Once she is painted, its MOT time and then she's back in my hands.
The work won't stop though...here is a short list of some of things I have got to fit to her when I get her back, and yes they include some new seats, a bucketload of chrome, and some coilovers
The List:
XR Badges + PLaque
Giant BMC Cold Feed
Manifold Chrome Cover
Induction Kit Bracket + Clips
Chrome Battery Cover + Clamp
G-Tech Meter
New Leather FPUK Handbrake Handle
2x Interior Trim Parts, New Boot Carpet
Chrome Interior Doorhandles
Gearbox Cover Plate with "XR" engraved
RS Bonnet
Chrome Bonnet Catch
Cosworth Grill
Paint and Fit new EGR Removed Manifold
Fit Custom Sunroof Brackets for Leccy Sunroof Conversion
Front Strut Brace (Chrome E-Tech)
Chrome Oil Cap
Avo Coilovers - with brand new mounts, bearings - everything that needs to be fitted with them, is new!
Chrome Banshee Plaque
Rear Sparco Strut Brace thats being Colourcoded
Chrome Coolant Cap
Chrome Power Steering Cap
New Ford Badge for Cosworth Grill
Chrome Suspension Top Nut Covers
BMC CDA Induction Kit
AS Chrome Plaque
Cusomt Made Steering Column Pod + Ford Racing Voltmeter Gauge
Four new Seatbelts
new Black/Blue Racing Reclining Recaro style seats
New Dash Piece
Custom made XR3i Plaque (top secret this hehe )
Custom made Chrome XR3i sill covers (got a special suprise along with the above hehe )
EcoTek Valve
Powerboost Valve
4 x One Touch Relays, (two up, two down)
Powerboost Foam to clean out the engine
Red Brake Line Hose Covers (to cover green pipes under the bay)
Chrome Bonnet Lifters
2x New Sidelights (the clip on one broke when I shut the bonnet, the other got pulled off )
New Clean Numberplates
Chrome Oil Dipstick Handle
Assorted Zinced Bolts
2-Pot Brembo Callipers + Pads with 300mm ST170 vented discs
Well thats it for now, taken me 5 hours to post this - so enjoy!!!!
But whats next for her? Well at the moment the engine bay needs some more flatting, as does the roof and tailgate, then the whole car will go under the gun..the spray gun of course
Once she is painted, its MOT time and then she's back in my hands.
The work won't stop though...here is a short list of some of things I have got to fit to her when I get her back, and yes they include some new seats, a bucketload of chrome, and some coilovers
The List:
XR Badges + PLaque
Giant BMC Cold Feed
Manifold Chrome Cover
Induction Kit Bracket + Clips
Chrome Battery Cover + Clamp
G-Tech Meter
New Leather FPUK Handbrake Handle
2x Interior Trim Parts, New Boot Carpet
Chrome Interior Doorhandles
Gearbox Cover Plate with "XR" engraved
RS Bonnet
Chrome Bonnet Catch
Cosworth Grill
Paint and Fit new EGR Removed Manifold
Fit Custom Sunroof Brackets for Leccy Sunroof Conversion
Front Strut Brace (Chrome E-Tech)
Chrome Oil Cap
Avo Coilovers - with brand new mounts, bearings - everything that needs to be fitted with them, is new!
Chrome Banshee Plaque
Rear Sparco Strut Brace thats being Colourcoded
Chrome Coolant Cap
Chrome Power Steering Cap
New Ford Badge for Cosworth Grill
Chrome Suspension Top Nut Covers
BMC CDA Induction Kit
AS Chrome Plaque
Cusomt Made Steering Column Pod + Ford Racing Voltmeter Gauge
Four new Seatbelts
new Black/Blue Racing Reclining Recaro style seats
New Dash Piece
Custom made XR3i Plaque (top secret this hehe
Custom made Chrome XR3i sill covers (got a special suprise along with the above hehe
EcoTek Valve
Powerboost Valve
4 x One Touch Relays, (two up, two down)
Powerboost Foam to clean out the engine
Red Brake Line Hose Covers (to cover green pipes under the bay)
Chrome Bonnet Lifters
2x New Sidelights (the clip on one broke when I shut the bonnet, the other got pulled off
)New Clean Numberplates
Chrome Oil Dipstick Handle
Assorted Zinced Bolts
2-Pot Brembo Callipers + Pads with 300mm ST170 vented discs
Well thats it for now, taken me 5 hours to post this - so enjoy!!!!


Thread Starter
Part of the Furniture
Joined: May 2004
Posts: 178
Likes: 0
From: East Mids
Cheers everyone, I really appreciate the comments - makes me feel a lot better after spending so much on something I can't drive lol
Been told it will be under the spray gun in the next few days *fingers crossed*
Been told it will be under the spray gun in the next few days *fingers crossed*
Thread Starter
Part of the Furniture
Joined: May 2004
Posts: 178
Likes: 0
From: East Mids
Originally Posted by maxest
Deffo a lot of hard work gone into it, but mate your absolutely of your head for paying 4k on insurance! 
But its the only way for me to have an XR3i, the mods, and the speed. Was a major shock when I rang up for quotes pmsl
Thread Starter
Part of the Furniture
Joined: May 2004
Posts: 178
Likes: 0
From: East Mids
UPDATE!!!
Wooooo lol.
Here's the first set of pics from this morning


And here she was 5 hours later at 2pm, no pics of the painted article yet...as for obvious reasons I was not allowed in the dust free booth - she will stay there overnight to dry solid, and completely dust free!!!
He said he will give it a few extra coats of lacquer to
Here's the pics of the almost fully prepped motor!!!


Wooooooo, lets just hope the Primer/Topcoat and Lacquer didn't take to long to apply, as they only had 2hours to do it all as I left!
Should *fingers crossed* have some nice piccys tom
Wooooo lol.
Here's the first set of pics from this morning
And here she was 5 hours later at 2pm, no pics of the painted article yet...as for obvious reasons I was not allowed in the dust free booth - she will stay there overnight to dry solid, and completely dust free!!!
He said he will give it a few extra coats of lacquer to
Here's the pics of the almost fully prepped motor!!!
Wooooooo, lets just hope the Primer/Topcoat and Lacquer didn't take to long to apply, as they only had 2hours to do it all as I left!
Should *fingers crossed* have some nice piccys tom


I'm Finding My Feet Here Now
Joined: Aug 2005
Posts: 141
Likes: 0
From: derbyshire
you are a saint!!!! there must have been times when you thought Fk it and scrap it but like any other blue oval obsessed nut you have pulled through! well done mate cant wait to see the painted pics! thoght for a min that you were going the WRC look but glad you decided not to IMO they look gash and most of the cossie reps look daft too cos of the work going into the arches and the wheelbase difference at the end. hope you get it done real soon and get out and enjoy it! UPDATE!!!!!


Thread Starter
Part of the Furniture
Joined: May 2004
Posts: 178
Likes: 0
From: East Mids
Wow its been a long time since I updated this, so thought I had bloody better lol.
Unfortunately photobucket has ran outta room so I don't really have many pics (anyone know of another place I can host pics?) but here's some that I do have!
Well basically I left the story at the bodyshop...car was fully prepped and had just been painted/left in the oven, well I went over there the minute they opened in the morning and this is what I found - was stunned at how different and how great it looked, well they say pics are a thousand words so here they are!

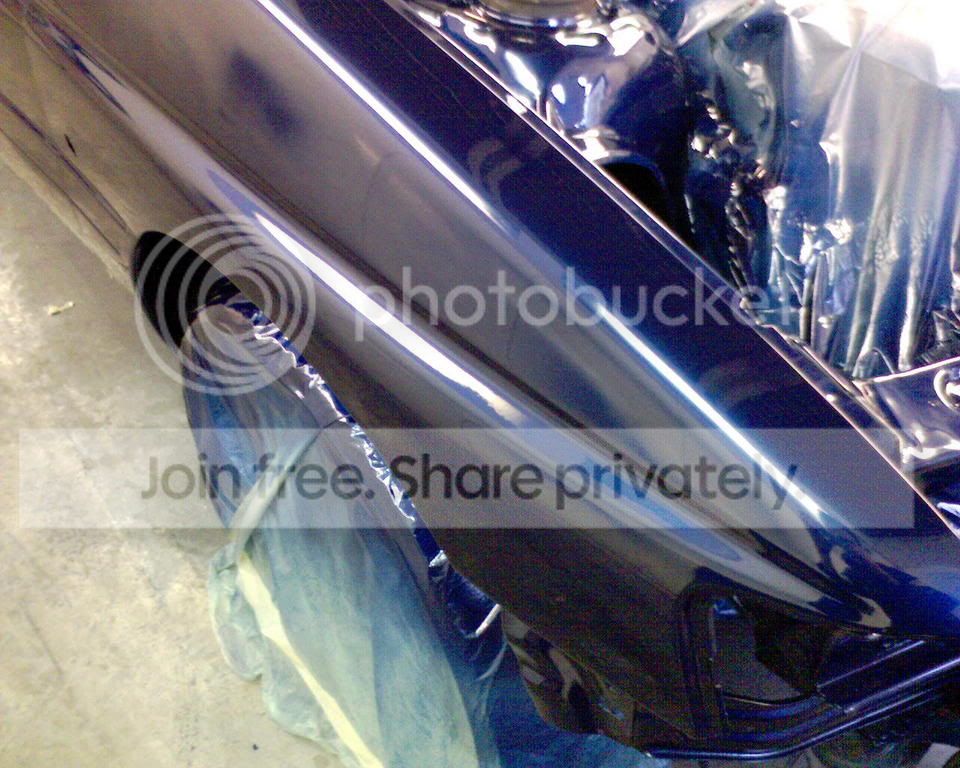
ooooh silky smooth

Love this shot - shows just how good the finish is!


No more rust....

Tailgate was sprayed seperately lol

Hmmm as fresh as the day it was made

Do I hear shiny?


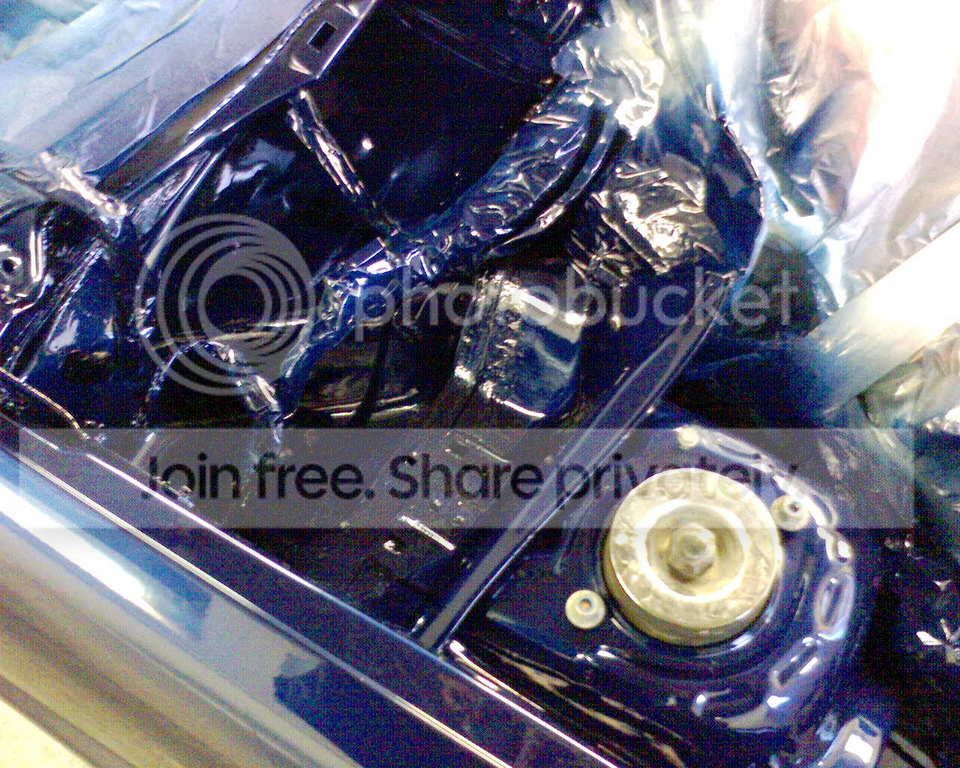
Mint battery tray..

Some of the masking removed - still filthy tho

Back in the workshop - god it needed the coilovers on it lol.

Brakes look tiny lol, even tho there the bigger XR/RS jobbies!

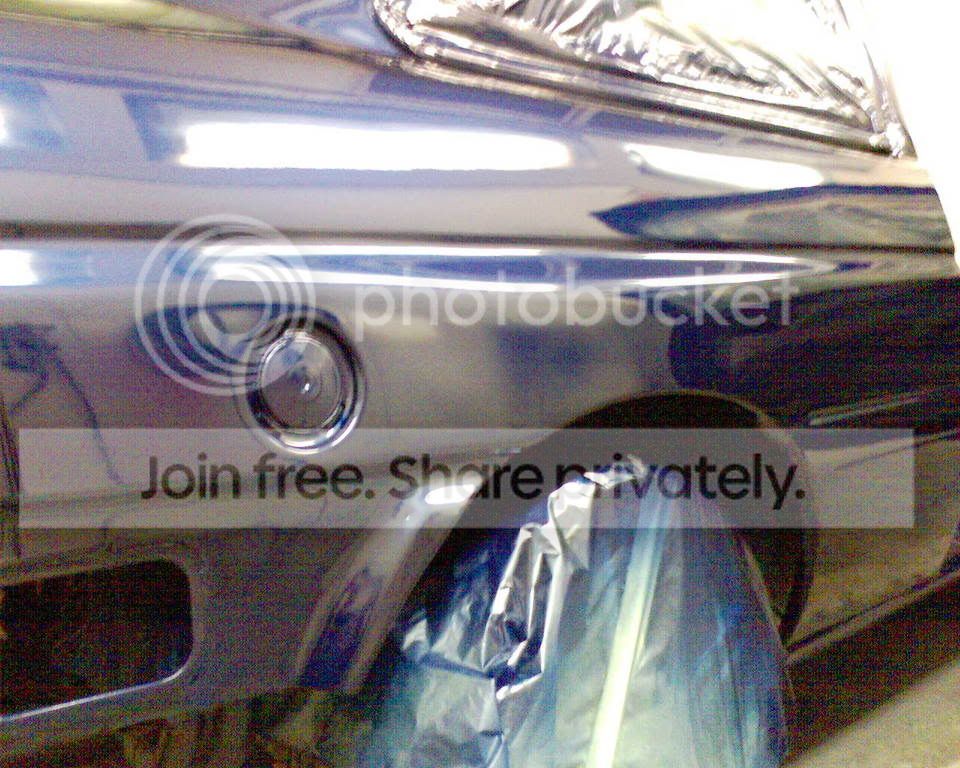
Fresh bumper - minus splitters for now


Colour coded base plates look great imo, suits the dark colour!

Random shot lol.
So thats how it sat, was a few more days of painful waiting to get it reassembled and all wired up, but got there in the end and it was finally ready for its mot!
Unfortunately for me it failed
Couldn't believe it pmsl could have been driving it but nope, it needed new wipers all around, the coilovers needed fitting (standard shocks knackered), brake pipe was lose and needed refitting, sunstrip was to big, and the disks were rusty.
So I got to drive it all of 400yards home....where it would sit for 2weeks before they could fit it in for a retest!
Oh well lol, got rid of the nasty sunstrip as I thought it looked cack anyways so that was good, got some new wipers, and fitted the coilovers...only to have the adjustment on the front passenger side to shear off the first time I went to have it adjusted....so that had to be taken off again sent back to be repaired and then refitted.
Got it back to the MOT station (disks had cleaned up by now as well) and it finally passed!!!!!!!
First time I had ever driven her on the roads, and the first time I had drove in 3months since passing my test, and boy what a feeling. Could have so nearly ended in tears tho, after 5mins of driving some idiot went the wrong way at the roundabout and cut right across me - emergency stop just missed him I was going mental lol.
Anywho onto the next chapter....
Unfortunately photobucket has ran outta room so I don't really have many pics (anyone know of another place I can host pics?) but here's some that I do have!
Well basically I left the story at the bodyshop...car was fully prepped and had just been painted/left in the oven, well I went over there the minute they opened in the morning and this is what I found - was stunned at how different and how great it looked, well they say pics are a thousand words so here they are!
ooooh silky smooth
Love this shot - shows just how good the finish is!
No more rust....
Tailgate was sprayed seperately lol
Hmmm as fresh as the day it was made
Do I hear shiny?
Mint battery tray..
Some of the masking removed - still filthy tho
Back in the workshop - god it needed the coilovers on it lol.
Brakes look tiny lol, even tho there the bigger XR/RS jobbies!
Fresh bumper - minus splitters for now
Colour coded base plates look great imo, suits the dark colour!
Random shot lol.
So thats how it sat, was a few more days of painful waiting to get it reassembled and all wired up, but got there in the end and it was finally ready for its mot!
Unfortunately for me it failed
Couldn't believe it pmsl could have been driving it but nope, it needed new wipers all around, the coilovers needed fitting (standard shocks knackered), brake pipe was lose and needed refitting, sunstrip was to big, and the disks were rusty.
So I got to drive it all of 400yards home....where it would sit for 2weeks before they could fit it in for a retest!
Oh well lol, got rid of the nasty sunstrip as I thought it looked cack anyways so that was good, got some new wipers, and fitted the coilovers...only to have the adjustment on the front passenger side to shear off the first time I went to have it adjusted....so that had to be taken off again sent back to be repaired and then refitted.
Got it back to the MOT station (disks had cleaned up by now as well) and it finally passed!!!!!!!
First time I had ever driven her on the roads, and the first time I had drove in 3months since passing my test, and boy what a feeling. Could have so nearly ended in tears tho, after 5mins of driving some idiot went the wrong way at the roundabout and cut right across me - emergency stop just missed him
I was going mental lol.Anywho onto the next chapter....
Thread Starter
Part of the Furniture
Joined: May 2004
Posts: 178
Likes: 0
From: East Mids
Well I drove her for all of a week before I ran into mechanical issues lol, broke down on me up our local city centre...had to be towed home by a mate lol
Turned out the alternator was knackered so had that sorted...was fine for about another 5 days and they broke down again lol, turned out the shealthed wiring to the alternator was now fecked as well lol so had all of that replaced. I also found a strange problem with my front fog lights - when they were turned on the indicators illuminated lol, turned out it was a dodgy earth so I had all of them replaced
I then got around to fitting my BMC-CDA induction kit, and all my chrome bits and bobs I had lying around - including my custom painted rear strut brace and lower cosworth spoiler!
The BMC is awesome btw, even in the hottest weather the inlet manifold and metal pipe above the engine stay completely cool - unlike with the old induction kit which goes to show how much more air and how efficient it is, car feels just as fast in searing heat as it did before in the cold, awesome!
Anywho here were the pics at the time, car was still a bit high as I was having to much fun driving it to have time to fine tune the coilovers lol, altho I did adjust the stiffness to the softest setting, and its still pretty darn solid lol!
Needed a polish at this point to but was sooo cold lol.


Oh and here are some random pics of my polished wiper motor I did lol


Hope you like
Turned out the alternator was knackered so had that sorted...was fine for about another 5 days and they broke down again lol, turned out the shealthed wiring to the alternator was now fecked as well lol so had all of that replaced. I also found a strange problem with my front fog lights - when they were turned on the indicators illuminated lol, turned out it was a dodgy earth so I had all of them replaced
I then got around to fitting my BMC-CDA induction kit, and all my chrome bits and bobs I had lying around - including my custom painted rear strut brace and lower cosworth spoiler!
The BMC is awesome btw, even in the hottest weather the inlet manifold and metal pipe above the engine stay completely cool - unlike with the old induction kit which goes to show how much more air and how efficient it is, car feels just as fast in searing heat as it did before in the cold, awesome!
Anywho here were the pics at the time, car was still a bit high as I was having to much fun driving it to have time to fine tune the coilovers lol, altho I did adjust the stiffness to the softest setting, and its still pretty darn solid lol!
Needed a polish at this point to but was sooo cold lol.
Oh and here are some random pics of my polished wiper motor I did lol
Hope you like
Thread Starter
Part of the Furniture
Joined: May 2004
Posts: 178
Likes: 0
From: East Mids
After that thought it went slightly downhill woke up one morning to find my spoiler had been ripped off, completely ruining it (which was very annoying as I spent hours sanding and sorting it out originally because it was in a bit of a state)...it was bolted on with 6 bolts and 5 had been ripped out, it was left dangling by one, seemed a bit strange to me as I would have thought they would have just stolen it outright.
It also make some nasty scratches on my tailgate, there was actually a muddy footprint on the car were they had wrenched it off, and scratched everything
So I did the best I could to T-Cut and touch everything up, and this time I bonded it on with industrial bodykit adhesive...and then colour coded the adhesive you could see, took me hours to do!
But then a few weeks later I wake up to find the spoiler is completely gone, it had been fecking cut off with the bottom of it still on the car!!!!!!! B******S! So feeling very disheartened I just left it looking a state for a few weeks, finally got around to chiselling, yes thats right chiselling the remains of it off - glue was bloody tough stuff and I stuck my standard ford spoiler back on - and touched up the ruined tailgate as best I could.
Infact thats how it is now, I thought it pointless to fix when its sat on my driveway and could be stolen again, so my latest project is building a top notch garage with hidden camera - being done by a mate of mine for less that it would cost to have the spoiler fixed, so well worth it and means I can sleep easy at night
Well onto the latest news....
Funnily enough the car progress has almost slowed to a halt since I got it on the road in november last year, the thing has been so unreliable I haven't been able to afford to do anything except fix it. Its costing me �339 a month to insure it (thank god its gonna drop to well under half that lol) and then I worked out its averaged about �400 a month in repairs, add optimax petrol to that and well there goes all my wage
Off the top of my head its now had:
Two new bearings on the passenger front, and a new hub.
New rear passenger bearing.
New bonnet cable.
New speedo drive and diff for the nearly new gearbox as that broke!
2 new starter motors.
New lower arms.
New pins for alarm.
Relays for fusebox.
There's a ton more stuff to, about �2000 worth in total including the above seriously thought about selling up, espicially when in May 06 the clutch went, leaving me stranded AGAIN lol.
Except it wasn't that simple - it needed a new clutch, clutch bearing, clutch pressure plate, clutch ratchet, and clutch cable! The tax also needed doing, as did a few other bits....
Finally got it back, and my brake lights stopped working when the pedal was pressed so I had to get a new brake clip before I could even drive it again lol.
Anywho back a few days lol here are some pics of it at FITP 2006, finally got it to a show (my first) and was really pleased, wasn't the best of weather and car was quite dirty but still looked very nice and got me right back in the mood for the car, which was lucky as the clutch went about two days later lol. Anywho here we are:

And yup thats my fanta can pmsl
Only thing really different in the pics to the last is a few little bits to the engine bay, painting cleaning and what not, the standard rear spoiler and fecked tailgate!
Soooooo onwards again...
It also make some nasty scratches on my tailgate, there was actually a muddy footprint on the car were they had wrenched it off, and scratched everything
So I did the best I could to T-Cut and touch everything up, and this time I bonded it on with industrial bodykit adhesive...and then colour coded the adhesive you could see, took me hours to do!
But then a few weeks later I wake up to find the spoiler is completely gone, it had been fecking cut off with the bottom of it still on the car!!!!!!! B******S! So feeling very disheartened I just left it looking a state for a few weeks, finally got around to chiselling, yes thats right chiselling the remains of it off - glue was bloody tough stuff and I stuck my standard ford spoiler back on - and touched up the ruined tailgate as best I could.
Infact thats how it is now, I thought it pointless to fix when its sat on my driveway and could be stolen again, so my latest project is building a top notch garage with hidden camera - being done by a mate of mine for less that it would cost to have the spoiler fixed, so well worth it and means I can sleep easy at night
Well onto the latest news....
Funnily enough the car progress has almost slowed to a halt since I got it on the road in november last year, the thing has been so unreliable I haven't been able to afford to do anything except fix it. Its costing me �339 a month to insure it (thank god its gonna drop to well under half that lol) and then I worked out its averaged about �400 a month in repairs, add optimax petrol to that and well there goes all my wage
Off the top of my head its now had:
Two new bearings on the passenger front, and a new hub.
New rear passenger bearing.
New bonnet cable.
New speedo drive and diff for the nearly new gearbox as that broke!
2 new starter motors.
New lower arms.
New pins for alarm.
Relays for fusebox.
There's a ton more stuff to, about �2000 worth in total including the above
seriously thought about selling up, espicially when in May 06 the clutch went, leaving me stranded AGAIN lol.Except it wasn't that simple - it needed a new clutch, clutch bearing, clutch pressure plate, clutch ratchet, and clutch cable! The tax also needed doing, as did a few other bits....
Finally got it back, and my brake lights stopped working when the pedal was pressed so I had to get a new brake clip before I could even drive it again lol.
Anywho back a few days lol here are some pics of it at FITP 2006, finally got it to a show (my first) and was really pleased, wasn't the best of weather and car was quite dirty but still looked very nice and got me right back in the mood for the car, which was lucky as the clutch went about two days later lol. Anywho here we are:
And yup thats my fanta can pmsl
Only thing really different in the pics to the last is a few little bits to the engine bay, painting cleaning and what not, the standard rear spoiler and fecked tailgate!
Soooooo onwards again...
Thread Starter
Part of the Furniture
Joined: May 2004
Posts: 178
Likes: 0
From: East Mids
The latest news is actually quite good for once lol, had to have my tax redone which has gone up so not so good...and after all the bearings I have had done its still got a whine lol so its process of ellimination onto the next side pmsl
Anywho I mentioned above I had bought some 2pot Brembo callipers to fit with 300mm disks, well it turned out to be a lot of hassle to get brackets made up for the Brembo's and I just couldn't be bothered. Plus I wanted to replace everything with new parts to stop things going wrong...
Got some money together this month for once lol and decided to buy a few bits for the car, as well as pay for the clutch to be sorted lol.
Went a bit overboard but I bought some brand new (from ford) corner splitters for my bumper, fitted them and they really look great - finish the front off a treat
Bought a load of screws and bits and bobs for the interior, and bought a new fog light switch as mine had lost illumintion - that little lot cost �40 lol
I also found out both my rear callipers were knackered, so I went off to ford and got myself two new rear callipers, disks and pads....I also saw a full ST170 conversion going for a good price - so bought that as well lol!
I then got myself a full set of braided hoses, a load of Dot 5.1 Brake fluid to flush and refill the system with, I then got myself some very expensive but very good red calliper paint, some degreaser and a few paint brushes for odd jobs, and I got a stainless cambelt cover from a good lad on feoc
I then found a guy selling brand new idle control valves for the 130spec on ebay, so bought one of those to - came to �24 including postage which is awesome!
I then got myself some footwell lights, which I need to wire in along with my one touch relays when I get a chance lol.
I have a new MAF on the way as well and hopefully that should sort out a few more niggly problems...and I will be a lot happier, but nope thats not all fpmsl.
I fully waxoyled the inside of my arches, took the interior trim panel off and they are hollow lol really would hate to crash this car , but I poured in about a gallon into each and sprayed it everywhere down the sill the lot and had it leaking out the sills into my drive lol but at least it won't rust!
And last but not least I took the car to powerflow to have the exhaust made quieter, had a centre box fitted and its sooo much better now, its quiet but really throaty and still a bit noisy when I give it some...its also a lot more responsive and a bit faster to, which is always a bonus!
So after spending about �1300 on it this month (yup and I am having the garage built currently lol) its looking a lot better, only things left to sort on the whole car is the tailgate/spoiler, heated screen not working, locating the whining bearing, replacing a cracked heated mirror, and resealing the little rubber thing under the rear bumper that lets air out - as it melted when the car was being welded in the resto - and its leaking when I jet wash her lol.
Soooooooooo fingers crossed all my goodies will arrive soon, and I will get them fitted and get some updated pics!! Can't wait
Thanks for reading
Anywho I mentioned above I had bought some 2pot Brembo callipers to fit with 300mm disks, well it turned out to be a lot of hassle to get brackets made up for the Brembo's and I just couldn't be bothered. Plus I wanted to replace everything with new parts to stop things going wrong...
Got some money together this month for once lol and decided to buy a few bits for the car, as well as pay for the clutch to be sorted lol.
Went a bit overboard but I bought some brand new (from ford) corner splitters for my bumper, fitted them and they really look great - finish the front off a treat
Bought a load of screws and bits and bobs for the interior, and bought a new fog light switch as mine had lost illumintion - that little lot cost �40 lol
I also found out both my rear callipers were knackered, so I went off to ford and got myself two new rear callipers, disks and pads....I also saw a full ST170 conversion going for a good price - so bought that as well lol!
I then got myself a full set of braided hoses, a load of Dot 5.1 Brake fluid to flush and refill the system with, I then got myself some very expensive but very good red calliper paint, some degreaser and a few paint brushes for odd jobs, and I got a stainless cambelt cover from a good lad on feoc
I then found a guy selling brand new idle control valves for the 130spec on ebay, so bought one of those to - came to �24 including postage which is awesome!
I then got myself some footwell lights, which I need to wire in along with my one touch relays when I get a chance lol.
I have a new MAF on the way as well and hopefully that should sort out a few more niggly problems...and I will be a lot happier, but nope thats not all fpmsl.
I fully waxoyled the inside of my arches, took the interior trim panel off and they are hollow lol really would hate to crash this car
And last but not least I took the car to powerflow to have the exhaust made quieter, had a centre box fitted and its sooo much better now, its quiet but really throaty and still a bit noisy when I give it some...its also a lot more responsive and a bit faster to, which is always a bonus!
So after spending about �1300 on it this month (yup and I am having the garage built currently lol) its looking a lot better, only things left to sort on the whole car is the tailgate/spoiler, heated screen not working, locating the whining bearing, replacing a cracked heated mirror, and resealing the little rubber thing under the rear bumper that lets air out - as it melted when the car was being welded in the resto - and its leaking when I jet wash her lol.
Soooooooooo fingers crossed all my goodies will arrive soon, and I will get them fitted and get some updated pics!! Can't wait
Thanks for reading
Advanced PassionFord User
Joined: Oct 2005
Posts: 2,062
Likes: 0
From: SUTTON IN ASHFIELD
Nice one mate really really top job you've done there big big credit to you for your hard work and dedication, I'm hoping to make mine as mint as that,I can't believe yours needed that much work i thought mine was bad all mine needed was battery tray now done, petrol cap, outer sills and some work on the floor pans then paint although as easy and as short as it all sound the list grows and grows as i'm sure you know too well,
Very nice job on yours mate and some very hard and top quality work gone on there although colour coding the mirror base plates and the rear splitter are not to my taste but hey it's your car and a very good looking one at that top work mate
Thread Starter
Part of the Furniture
Joined: May 2004
Posts: 178
Likes: 0
From: East Mids
Bit of shit update now really....just spent hours redoing this post today, walk outside (was at work) and this is what I find:


Its on CCTV but it hasn't got their registration and the police won't do anything! GRRRRRRRRRRRRR. Its a f#$%ing private carpark and to avoid paying they have driven over a massive curb and barrier to park in the private park crashed into my car and drove off.
Some prick in a silver Honda CRV god i'm really pissed off!! Its pushed the whole wing right in, popped the sidelight/headlight out, the bonnet barely shuts at the corner as it catches.
So great thats another shit load of money and its ruined my car the backs ruined cause of those spoiler robbing tits and now the front is to
Look at the size of the dents

Fucking superstar........
Joined: May 2004
Posts: 13,240
Likes: 0
From: Argyll.... It's lonely...
Your due some luck there mate I hope you get that sorted. As for the cunt that drove off 
Fucking arseholes...
Car looks ace
Good luck with the repair on the wing mate. Don't let it get you down
Fucking arseholes...
Car looks ace
Good luck with the repair on the wing mate. Don't let it get you down
Thread Starter
Part of the Furniture
Joined: May 2004
Posts: 178
Likes: 0
From: East Mids
Finished painting all my new callipers today, will have to get some pics up asap - trying to see if photobucket will let me signup to another account lol
Fingers crossed garage will be finished tuesday, and then I hope to get the brakes on this weekend and will have the car safe and sound at last!
Also going to have a pop at pushing out that dent and t-cutting the affected area.
Stay tuned
Fingers crossed garage will be finished tuesday, and then I hope to get the brakes on this weekend and will have the car safe and sound at last!
Also going to have a pop at pushing out that dent and t-cutting the affected area.
Stay tuned


Thread Starter
Part of the Furniture
Joined: May 2004
Posts: 178
Likes: 0
From: East Mids
Thanks for all the comments guys, much appreciated
Should have an update soon, garage is finished and I got all the brakes fitted this weekend
So thats St 300mm upgrade on the front, complete replacement callipers/disks/pads on the rear, and braided hoses all round with 5.1racing fluid
Should have an update soon, garage is finished and I got all the brakes fitted this weekend
So thats St 300mm upgrade on the front, complete replacement callipers/disks/pads on the rear, and braided hoses all round with 5.1racing fluid
Thread Starter
Part of the Furniture
Joined: May 2004
Posts: 178
Likes: 0
From: East Mids
Update!!
Finally got my ST brakes fitted, fully braided hose kit and 5.1racing fluid in there to - along with completely new rear callipers disks and pads as they had all seized up lol. Brakes are a thousand times better now they have bedded in, pedal is firm and they stop great!
Got my chrome cambelt cover fitted to, along with a new idle control valve and maf sensor, got a few other bits ordered to, new bumper air vent seal (under rear bumper) and a new fog light switch and footwell lights! I have also bought a new engine, a BRAND NEW RS2000 i4
Anywho as with any update theres always bad news for me lol, straight after I fitted the brakes (took a whole weekend) I had an early start the next day, on the way back from work I went into the back of someone! Shame they hadn't bedded in earlier pmsl. Basically a lady pulled out at a roundabout and stopped after she went over the white line, I assumed she had gone and just as I checked to the right she stopped and bang!
Caused �1800 worth of damage to her car, but luckily I have paid for it all (loan) so it won't go threw the insurance, as on the 6th of August it drops from �4070 to �1500.
Damage to her car was a new boot, bumper, rear slam panel, mine just needs a new headlight, bumper and crossmember, and a dent in my bonnet, fortunately for me the bulbs still work on the headlight and the damage won't fail an mot once the headlight is sorted!
So I will add that to my list of bits that need doing, after the car park and spoiler incident!
But as they say onwards and upwards, once the �1800 is paid off I will sort out my car, and get my new engine fitted with a few goodies. Will probably have the engine bay resprayed again as well as completely right down, and get everything minted in their, I am a bit of a bufty
On the plus side again before I forget, my garage is finally finished! So my car can sit safely at night, and fingers crossed if my important job interview goes well I might even have a company car soon and a massive pay rise - so things could move forward much faster!
Anywho here are some piccies..

Hmmmm new bits..

Callipers after some special heat proof paint, top stuff it was took fooking hours but so much better than hammerite!

Garage almost done..

Done!!!

Brakes before..

Brakes after..


Damage to car.
Finally got my ST brakes fitted, fully braided hose kit and 5.1racing fluid in there to - along with completely new rear callipers disks and pads as they had all seized up lol. Brakes are a thousand times better now they have bedded in, pedal is firm and they stop great!
Got my chrome cambelt cover fitted to, along with a new idle control valve and maf sensor, got a few other bits ordered to, new bumper air vent seal (under rear bumper) and a new fog light switch and footwell lights! I have also bought a new engine, a BRAND NEW RS2000 i4
Anywho as with any update theres always bad news for me lol, straight after I fitted the brakes (took a whole weekend) I had an early start the next day, on the way back from work I went into the back of someone! Shame they hadn't bedded in earlier pmsl. Basically a lady pulled out at a roundabout and stopped after she went over the white line, I assumed she had gone and just as I checked to the right she stopped and bang!
Caused �1800 worth of damage to her car, but luckily I have paid for it all (loan) so it won't go threw the insurance, as on the 6th of August it drops from �4070 to �1500.
Damage to her car was a new boot, bumper, rear slam panel, mine just needs a new headlight, bumper and crossmember, and a dent in my bonnet, fortunately for me the bulbs still work on the headlight and the damage won't fail an mot once the headlight is sorted!
So I will add that to my list of bits that need doing, after the car park and spoiler incident!
But as they say onwards and upwards, once the �1800 is paid off I will sort out my car, and get my new engine fitted with a few goodies. Will probably have the engine bay resprayed again as well as completely right down, and get everything minted in their, I am a bit of a bufty
On the plus side again before I forget, my garage is finally finished! So my car can sit safely at night, and fingers crossed if my important job interview goes well I might even have a company car soon and a massive pay rise - so things could move forward much faster!
Anywho here are some piccies..
Hmmmm new bits..
Callipers after some special heat proof paint, top stuff it was took fooking hours but so much better than hammerite!
Garage almost done..
Done!!!
Brakes before..
Brakes after..
Damage to car.
