
Mounting 4 point harnesses


Thread Starter
Advanced PassionFord User
Joined: Dec 2006
Posts: 1,990
Likes: 1
From: Manchester
Whats the best way, Im looking at getting two buckets and was wondering whats the best way to mount the harnesses.
I carnt afford a full cage at the min so have seen two options,
1. Bolt the harnesses to the floor,

2. Get a tube (roll cage material) welded in across the back suspension turrets and use the harnesses that wrap around the tube.
Which would be best?
cheers

I carnt afford a full cage at the min so have seen two options,
1. Bolt the harnesses to the floor,
2. Get a tube (roll cage material) welded in across the back suspension turrets and use the harnesses that wrap around the tube.
Which would be best?
cheers

Thread Starter
Advanced PassionFord User
Joined: Dec 2006
Posts: 1,990
Likes: 1
From: Manchester


Too many posts.. I need a life!!
iTrader: (1)
Joined: Nov 2008
Posts: 813
Likes: 8
From: Perthshire, Scotland
Ideally, they should project down within 20degrees of the horizontal through the harness holes in the seat. Il try and find a pic.
Last edited by Fezman1; Dec 29, 2010 at 08:45 AM.

...............
Joined: Jul 2003
Posts: 2,663
Likes: 0
From: Essex
I made a rear brace up to fit my harnesses in my FRS. Didnt last long as I hated it when it was stripped out even though it was noticeably quicker.


If you change the front seats you lose one of the mounts for the seatbelts, I ended up cutting out the rear floor seat belt brackets from an old S1 and mounting it under the floor of the FRS at the front.
If you change the front seats you lose one of the mounts for the seatbelts, I ended up cutting out the rear floor seat belt brackets from an old S1 and mounting it under the floor of the FRS at the front.
Trending Topics


A better explanation of the picture above
This image shows the shoulder belt and lap belt angles:

The lap straps must be routed so that:
� lap belt strap length must be as short as possible. The distance between the lap belt anchor points should not be greater than the width of occupant’s pelvis or the outer width of the occupant’s bucket seat. The distance of approximately 400 mm [16”] is recommended. If there are choices of several anchor points choose those that come the closest to these recommendations.
� Lap belt straps must be routed over the pelvic bone to stay firmly and tightly in the crest between the pelvic bone and the upper thigh.
� Lap belt downward angle should be approximately 60� measured from the horizontal, passing through the occupant’s hip joint. This is the suggested angle for upright seating [15-20� backrest declination]. A higher backrest declination, e.g. 30� – 40�, as is common in open wheel race cars, requires a belt angle of 70� – 80�.
� Make sure there are no sharp edges [seat structure, seat mounts, chassis] that may tear or cut the lap belt webbing.
Also, in the above image note that the shoulder belts should not be straight from each shoulder when the distance is greater than 500mm [20“] behind the seatback.
POSITIONING OF SHOULDER STRAP ANCHOR POINTS
X = Distance from Shoulder Points to attachment. Take the measurement from the highest shoulder point.
Z = Distance from the middle of the left shoulder point of the webbing to the middle of the right shoulder point of the webbing.
Y = Approximate distance between anchor points. [measured from the middle of the webbing at the left anchor point to the middle of the webbing at the right anchor point]
Approximate result: the shoulder belts will cross over when the anchor points are located more than approx. 500 mm [20”] behind the seat backrest.

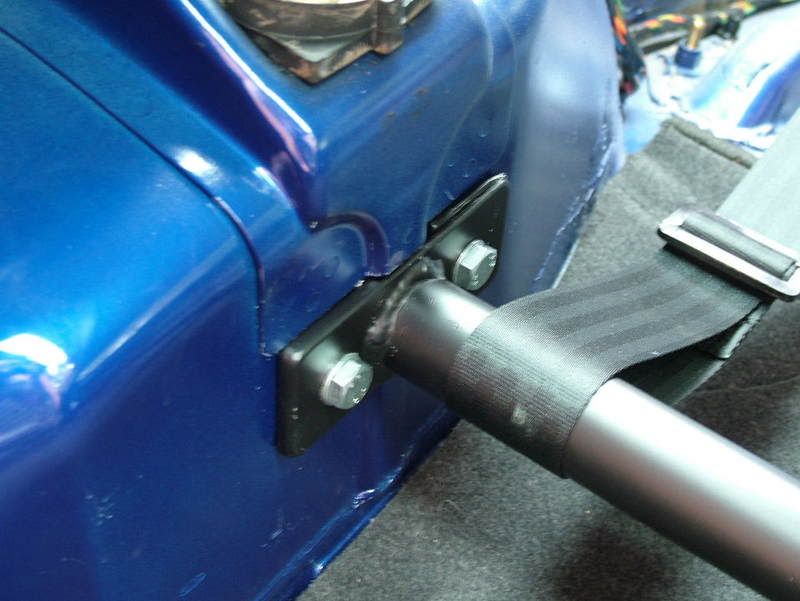
And finally, the mounting points themselves.
Tightening Torques by Bolt Dimension
• Each bolt diameter and type of thread requires an individual torque for proper tightening. These torques as listed below are defined by national or international standardisation organisations.
• For safe installation always tighten bolts to the recommended torque.
• For any installation use e.g. “Loctite 243” or spring washers where recommended to secure bolt fastening.
Bolt size - 7/16” 20 UNF / Torque in Nm 40 / Torque in lbinch 30
For new attachment points to the chassis you should use a FIA specified reinforcement plate.
• Drill a hole of 12 mm diameter for lap- & shoulder belt and 5-point anti-sub strap attachments.
• Use seal compound and stick the reinforcement plate from underneath to the floor panel. The seal also helps to prevent water intrusion.
This image shows the shoulder belt and lap belt angles:
The lap straps must be routed so that:
� lap belt strap length must be as short as possible. The distance between the lap belt anchor points should not be greater than the width of occupant’s pelvis or the outer width of the occupant’s bucket seat. The distance of approximately 400 mm [16”] is recommended. If there are choices of several anchor points choose those that come the closest to these recommendations.
� Lap belt straps must be routed over the pelvic bone to stay firmly and tightly in the crest between the pelvic bone and the upper thigh.
� Lap belt downward angle should be approximately 60� measured from the horizontal, passing through the occupant’s hip joint. This is the suggested angle for upright seating [15-20� backrest declination]. A higher backrest declination, e.g. 30� – 40�, as is common in open wheel race cars, requires a belt angle of 70� – 80�.
� Make sure there are no sharp edges [seat structure, seat mounts, chassis] that may tear or cut the lap belt webbing.
Also, in the above image note that the shoulder belts should not be straight from each shoulder when the distance is greater than 500mm [20“] behind the seatback.
POSITIONING OF SHOULDER STRAP ANCHOR POINTS
X = Distance from Shoulder Points to attachment. Take the measurement from the highest shoulder point.
Z = Distance from the middle of the left shoulder point of the webbing to the middle of the right shoulder point of the webbing.
Y = Approximate distance between anchor points. [measured from the middle of the webbing at the left anchor point to the middle of the webbing at the right anchor point]
Approximate result: the shoulder belts will cross over when the anchor points are located more than approx. 500 mm [20”] behind the seat backrest.
And finally, the mounting points themselves.
Tightening Torques by Bolt Dimension
• Each bolt diameter and type of thread requires an individual torque for proper tightening. These torques as listed below are defined by national or international standardisation organisations.
• For safe installation always tighten bolts to the recommended torque.
• For any installation use e.g. “Loctite 243” or spring washers where recommended to secure bolt fastening.
Bolt size - 7/16” 20 UNF / Torque in Nm 40 / Torque in lbinch 30
For new attachment points to the chassis you should use a FIA specified reinforcement plate.
• Drill a hole of 12 mm diameter for lap- & shoulder belt and 5-point anti-sub strap attachments.
• Use seal compound and stick the reinforcement plate from underneath to the floor panel. The seal also helps to prevent water intrusion.
Thread Starter
Advanced PassionFord User
Joined: Dec 2006
Posts: 1,990
Likes: 1
From: Manchester
i know that in theory it dosent say mount them between the suspension turrets but do you think it will be ok till i go for a full cage or at least better than bolting to the floor?
cheers
cheers

Thread
Thread Starter
Forum
Replies
Last Post
rsguy
General Car Related Discussion.
44
Sep 29, 2015 03:29 PM
SMILER258
Restorations, Rebuilds & Projects.
36
Sep 28, 2015 09:04 AM
DavidK
Ford Sierra/Sapphire/RS500 Cosworth
1
Sep 27, 2015 02:55 PM