Foxxie Focus ST170(ish)
 09-04-2014, 04:37 PM
#161
Advanced PassionFord User
Thread Starter
So here we go, my post arrived today 
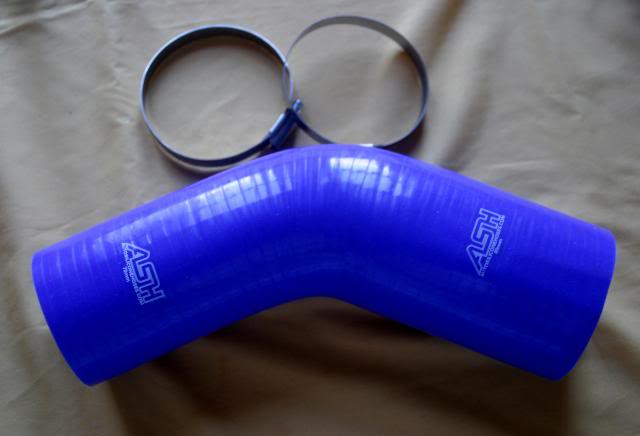
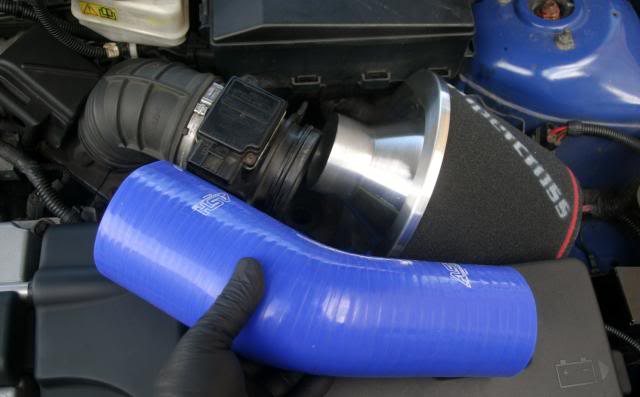
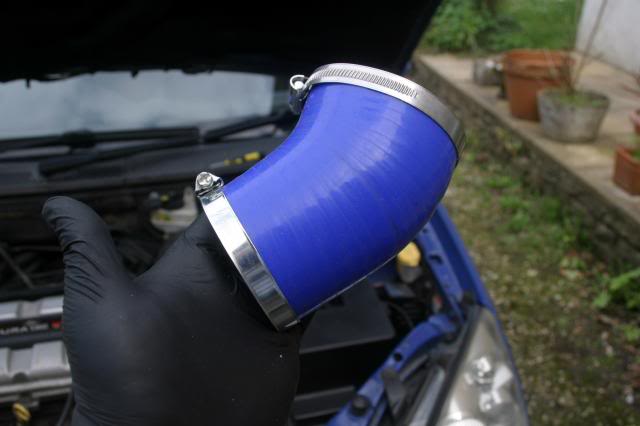
This is a 45 degree 80mm to 70mm reducer pipe that I got from Ash.
This is the filter I ordered online.
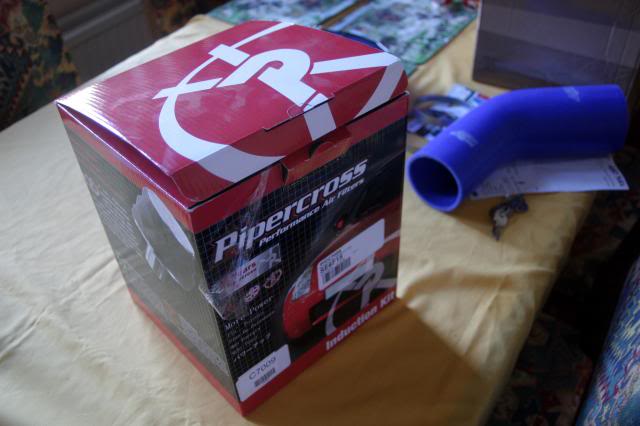
The size is as follows:
Neck OD: 71mm
Overall Outer Diameter: 200mm
Filter Height: 150mm
Total Length: 235mm
This is the filter on the end of my arm
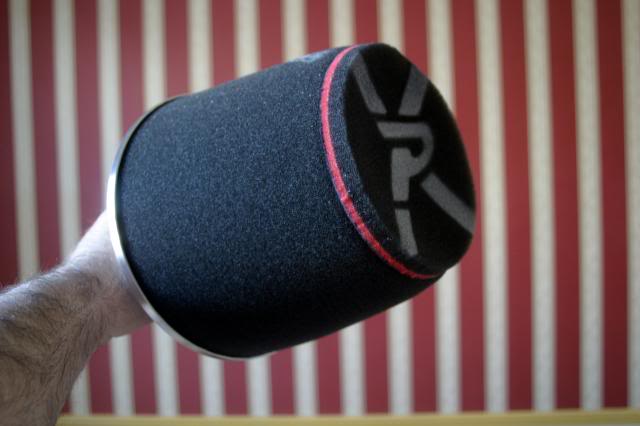
Rather large I know, but it should fit
This is a 45 degree 80mm to 70mm reducer pipe that I got from Ash.

This is the filter I ordered online.

The size is as follows:
Neck OD: 71mm
Overall Outer Diameter: 200mm
Filter Height: 150mm
Total Length: 235mm
This is the filter on the end of my arm

Rather large I know, but it should fit
 09-04-2014, 04:46 PM
#162
Advanced PassionFord User
Thread Starter
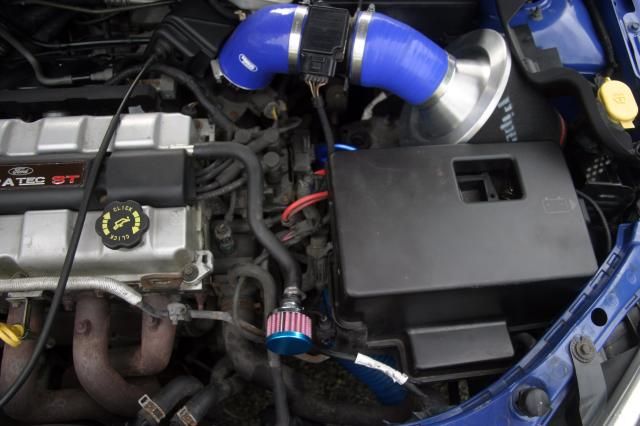
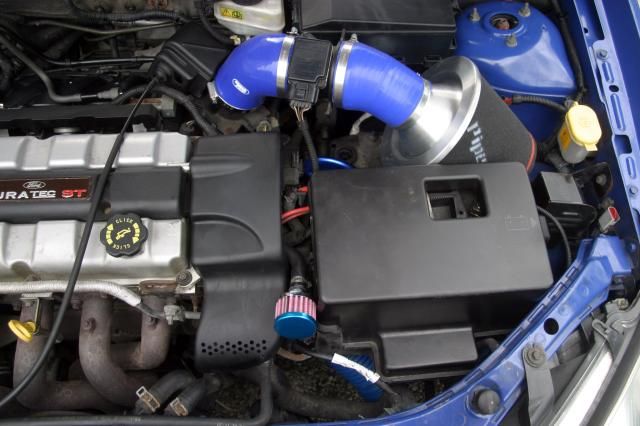
So here we are again:
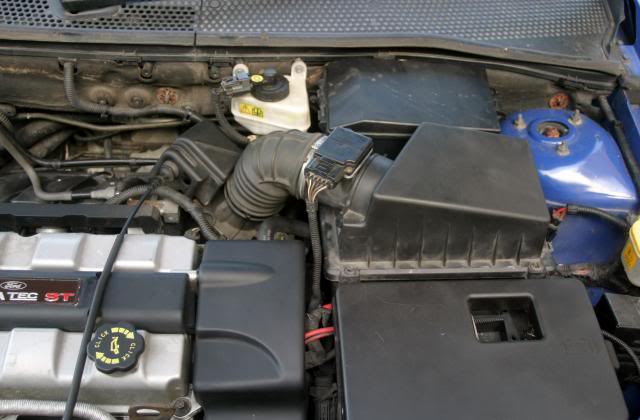
My engine bay:
So first thing for me was to rubber up, as I always like to play safe.
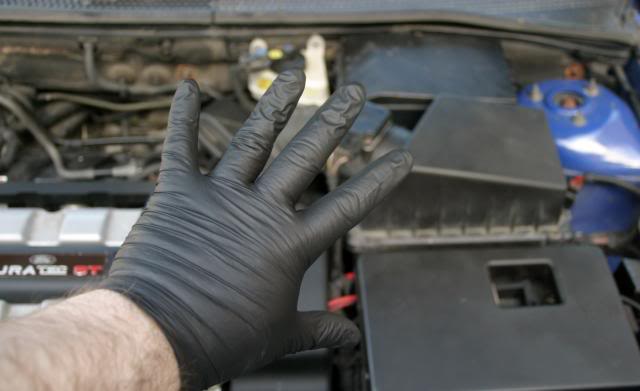
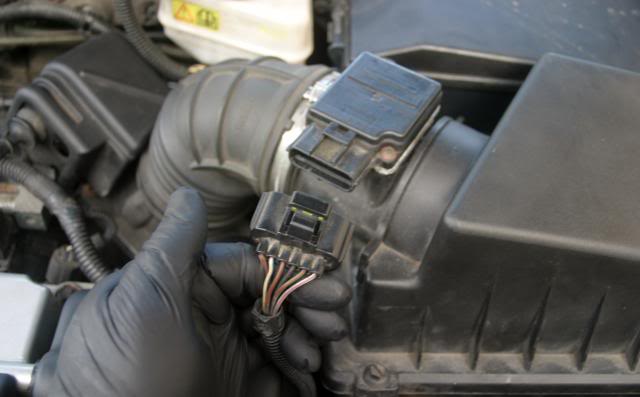
First thing I did was unplug this, as I planned on moving it around a little.
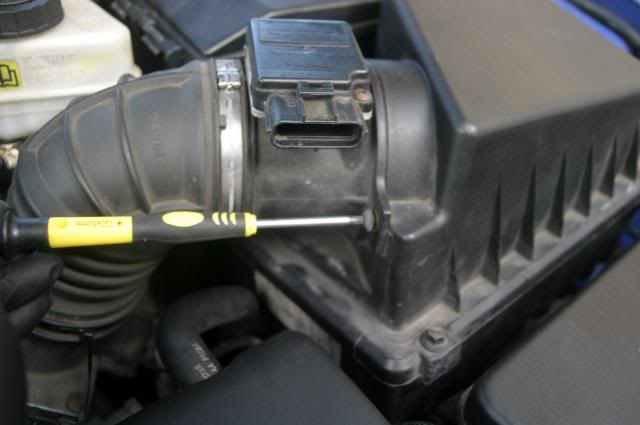
I then used a T20 to undo the two screws holding the air box on.
Once removed you can see my cold air feed.
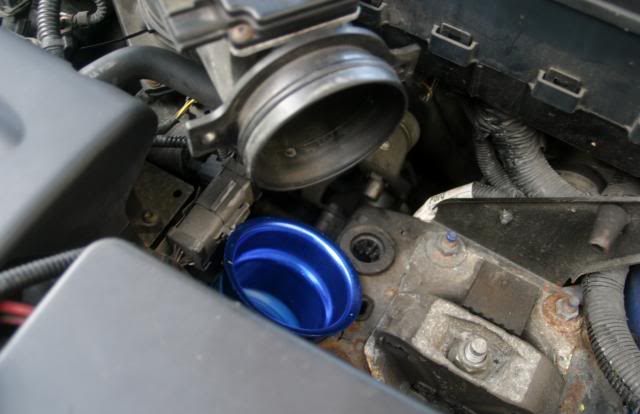
So firstly I placed the filter into the area it's meant to fit.
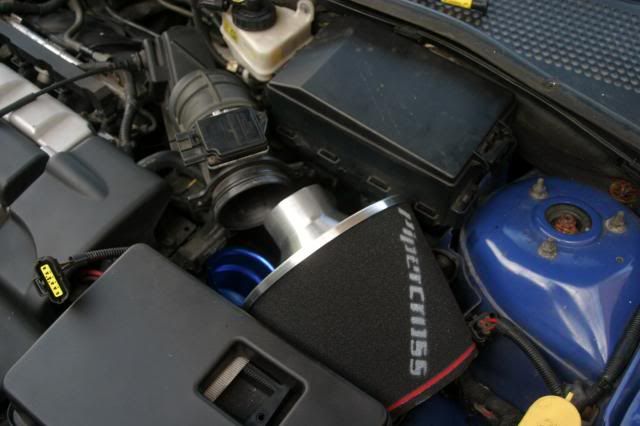
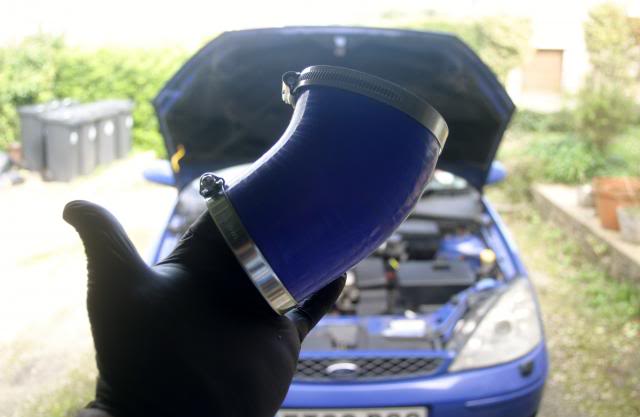
The next thing was to measure the amount of pipe I needed.
The way I cut the pipe is by securing the hose clip to it, then cut along the edge with a very sharp knife, and NOT a hacksaw.
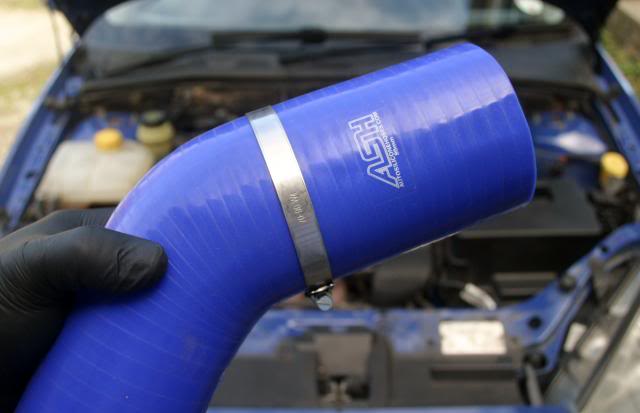
This is the end result:
I then attached the hose, to see how it fitted (making sure the hose clips where already waiting to be secured.
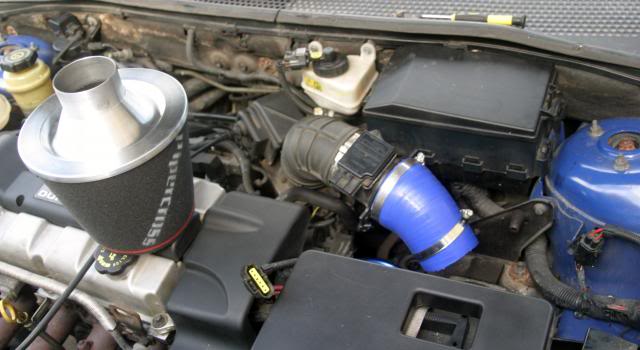
Then I pushed on the air filter.
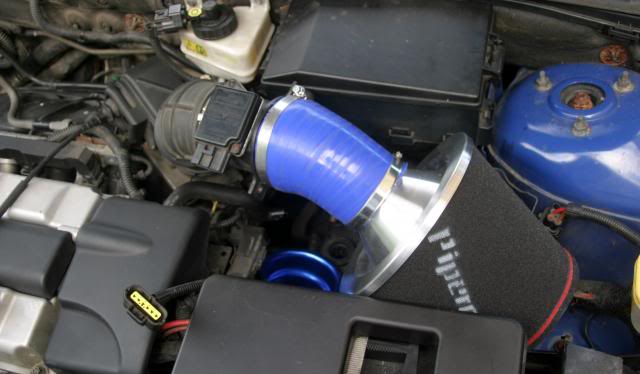
Reattached the plug, and tried to position it in the best place.

Needless to say the bonnet shuts with ease, and I will trim the hose a little more at the weekend, as well as look at making my own heat shield.
As for any difference, well a little. I can know get the traction control light to come on in the dry changing from 1st to 2nd gear, and the car feels more responsive on smaller throttle inputs.
Oh and it's slightly more noisy, well I say slightly, basically the car chirps when you touch the throttle, then it goes into this deep like cycle or grown as it sucks on lots of air, then a little further up the rev range, well lets just say "f'king nuts" is an understatement out side of that the car now pops and goes as I'm going a long, which was part of the plan.
My engine bay:

So first thing for me was to rubber up, as I always like to play safe.

First thing I did was unplug this, as I planned on moving it around a little.

I then used a T20 to undo the two screws holding the air box on.

Once removed you can see my cold air feed.

So firstly I placed the filter into the area it's meant to fit.

The next thing was to measure the amount of pipe I needed.

The way I cut the pipe is by securing the hose clip to it, then cut along the edge with a very sharp knife, and NOT a hacksaw.

This is the end result:


I then attached the hose, to see how it fitted (making sure the hose clips where already waiting to be secured.

Then I pushed on the air filter.

Reattached the plug, and tried to position it in the best place.

Needless to say the bonnet shuts with ease, and I will trim the hose a little more at the weekend, as well as look at making my own heat shield.
As for any difference, well a little
Oh and it's slightly more noisy, well I say slightly, basically the car chirps when you touch the throttle, then it goes into this deep like cycle or grown as it sucks on lots of air, then a little further up the rev range, well lets just say "f'king nuts" is an understatement
10-04-2014, 02:30 PM
#164
Advanced PassionFord User
Thread Starter
Yep will do Steve, I will take a look later tonight and thanks, enjoying the filter. The drive to work this morning with the cold air was epic, truly epic, the car just pulls so much cleaner, which is really odd as people often discredit aftermarket air filters etc.
What part did I need again ?
What part did I need again ?
 10-04-2014, 03:41 PM
#166
Advanced PassionFord User
Thread Starter
11-04-2014, 07:21 PM
#167
Wahay!! I've lost my Virginity!!
Join Date: Mar 2014
Location: Essex
Posts: 57
Likes: 0
Received 0 Likes
on
0 Posts
I'm not quite looking to do what you have done as I have put a K&N panel filter in. Just wondered if I routed through the cold air feed pipe took the resonator box off and slotted it in where that was it would be feeding more cold air into the airbox?
12-04-2014, 09:15 AM
#168
Advanced PassionFord User
Thread Starter
Yes that would work as you would have two cold air feed going into the bottom of the box which would make a difference.
13-04-2014, 06:45 PM
#169
Wahay!! I've lost my Virginity!!
Join Date: Mar 2014
Location: Essex
Posts: 57
Likes: 0
Received 0 Likes
on
0 Posts
The only trouble is routing the damn thing through to the box! 😡 obviously have the same problem as the alarm module is in the way as well as the bracket!
27-04-2014, 03:11 PM
#170
Advanced PassionFord User
Thread Starter
A little bit random. but I've tried to make a couple of very short videos of my car, basically I'm trying to capture the real sound of my filter.
Sadly I'm using a Bush FDV200, I think it came free in a cereal box, any way despite claiming to be HD, well the sound is really bad. My engine doesn't sound like a bag of nuts and bolts (like in the video).
A friend of mine has offered me a cheap complete GoPro2, the one with all the motor attachments, but does anyone know if the mic is much better ?
Last edited by PaulinhoT; 27-04-2014 at 03:25 PM.
27-04-2014, 05:26 PM
#171
PassionFord Regular
Join Date: Mar 2013
Location: Ripley, Derbyshire
Posts: 376
Likes: 0
Received 0 Likes
on
0 Posts
looks like a good place for filter, looks quite a way away from block. Are you going to put a heat shield to try and prevent heat soak further?
my engine sounds a bit like that, especially when cold so wouldnt worry. I've had it checked out and ford engineer says its normal especially with the vvt system.
my engine sounds a bit like that, especially when cold so wouldnt worry. I've had it checked out and ford engineer says its normal especially with the vvt system.
27-04-2014, 08:02 PM
#172
Advanced PassionFord User
Thread Starter
Thanks Dave, and yes the next plan is to make a nice heat shield
17-05-2014, 12:15 PM
#173
Advanced PassionFord User
Thread Starter
So a few weeks have passed and I've not managed to do a great deal to the ST170 of late, but one thing that has been getting to me is the lacquer peel on the rear spoiler.


This last week the lacquer has really started to flake and fall off so I thought last night I would set about a quick repair. Two reasons, 1. I just wanted something cheap atm as 2. I may be changing the rear spoiler soon anyway.
Well I had a few sheets of P800 so I wetted the area and paper and lightly sanded away.

Clearly the paint was very thin as I pretty much straight away went through the blue paint the idea just just remove the lacquer and redo that was long since past.
So I sanded it all back and masked off the area around the spoiler.


I went through my stores of spray paint in my garage, and I had some other blue, some red, some orange (tempted), and some blacks. So it hit me, do it matte black like the old XR3i rear spoilers

A few coats, and it wasn't looking to bad. So this morning I go out and remove the paper and tape, and although it's just a temporary job, I think it looks OK.
My only concern is that the matt paint will slow the air flow down, making the car even slower (JOKE)


So that's today's update


This last week the lacquer has really started to flake and fall off
Well I had a few sheets of P800 so I wetted the area and paper and lightly sanded away.

Clearly the paint was very thin as I pretty much straight away went through the blue paint
So I sanded it all back and masked off the area around the spoiler.


I went through my stores of spray paint in my garage, and I had some other blue, some red, some orange (tempted), and some blacks. So it hit me, do it matte black like the old XR3i rear spoilers

A few coats, and it wasn't looking to bad. So this morning I go out and remove the paper and tape, and although it's just a temporary job, I think it looks OK.
My only concern is that the matt paint will slow the air flow down, making the car even slower (JOKE)


So that's today's update
Last edited by PaulinhoT; 17-05-2014 at 12:23 PM.
17-05-2014, 12:54 PM
#175
Advanced PassionFord User
Thread Starter
Thanks Paul and yes
29-05-2014, 07:01 PM
#176
Advanced PassionFord User
Thread Starter
Well I've had another go at tinting my windows, and what a bugger it is. I actually removed some of the trim and laid it out in my boot, trying to be good and all.
The rear one is SO hard, and as of yet it's still full of soapy bubbles. I fear I may actually have to pay someone to do this for me
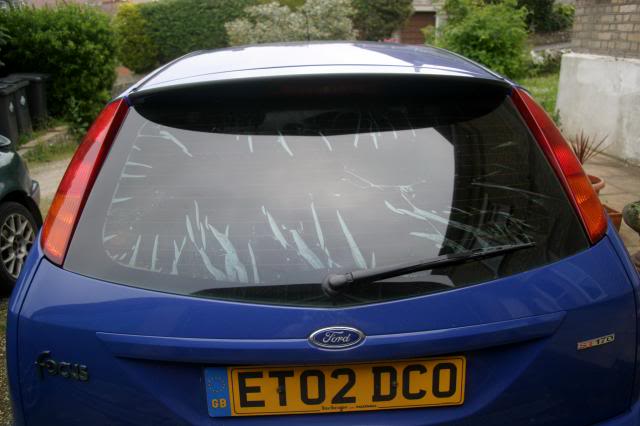
The sides aren't perfect, but I will see how they look tomorrow.


The rear one is SO hard, and as of yet it's still full of soapy bubbles. I fear I may actually have to pay someone to do this for me

The sides aren't perfect, but I will see how they look tomorrow.

 30-05-2014, 04:20 PM
#178
Advanced PassionFord User
Thread Starter
Thanks and yes the rear is a right pain. I'm still trying to decide if I actually like it, as I think it makes the car look like a van. Still it only cost �29 in tinting film, I will wait out the weekend and if I change my mind I will get a pro to do it
I had promised myself I wouldn't do anything to the car unless it made it quicker or handle better.
I had promised myself I wouldn't do anything to the car unless it made it quicker or handle better.
31-05-2014, 04:16 PM
#179
Advanced PassionFord User
Thread Starter
Well I couldn't live with the tinting film, even if it was done nicely, I just didn't like the way it changed the overall look of the car. Oddly in my mind it messed up the rear visual balance, so I removed it.
At this point I thought, what the heck, the weather is nice so I will give the inside a good clean. Now my car doesn't really get that dirty anyway, but clean it I did.
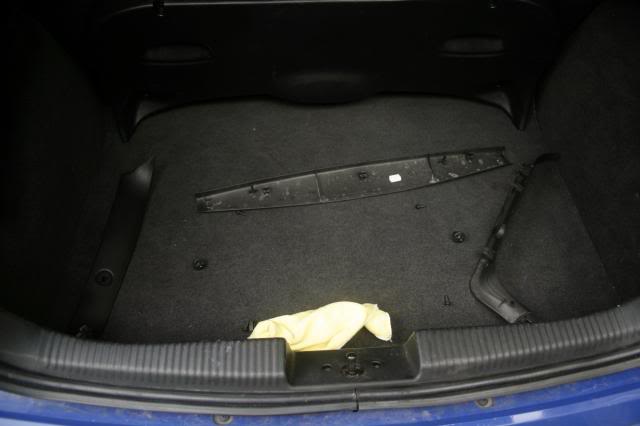
The hatch:

I purposely run a brush up the carpet after I have done it.
The Passengers side:

The mats will be changed as soon as I find the ones I would like.
Drivers Side:

The Dash:

The Gauges:


Front Seats (Still wet):

For the seats I used some Simoniz Foam Action Upholstery Cleaner. Now the seats aren't overly dirty, but they are not clean like new, does anyone know of a stronger safer cleaner I can use on the seats ?
Oddly it took me over 2 hours to clean the inside (glass included), and tomorrow if I don't go shopping with the gf, I will do the outside.
At this point I thought, what the heck, the weather is nice so I will give the inside a good clean. Now my car doesn't really get that dirty anyway, but clean it I did.
The hatch:

I purposely run a brush up the carpet after I have done it.
The Passengers side:

The mats will be changed as soon as I find the ones I would like.
Drivers Side:

The Dash:

The Gauges:


Front Seats (Still wet):

For the seats I used some Simoniz Foam Action Upholstery Cleaner. Now the seats aren't overly dirty, but they are not clean like new, does anyone know of a stronger safer cleaner I can use on the seats ?
Oddly it took me over 2 hours to clean the inside (glass included), and tomorrow if I don't go shopping with the gf, I will do the outside.
31-05-2014, 04:23 PM
#180
PassionFord Regular
Join Date: Mar 2013
Location: Ripley, Derbyshire
Posts: 376
Likes: 0
Received 0 Likes
on
0 Posts
looking good mate
i use daisy apc watered down on my seats, they come up an absolute treat when given a scrub with a soft scrubbing brush. on the leather i use meguiars leather cleaner
i use daisy apc watered down on my seats, they come up an absolute treat when given a scrub with a soft scrubbing brush. on the leather i use meguiars leather cleaner
28-06-2014, 12:40 PM
#181
Advanced PassionFord User
Thread Starter
Thanks Dave, I will give it a try
16-07-2014, 08:46 PM
#182
Wahay!! I've lost my Virginity!!
Join Date: Mar 2014
Location: Essex
Posts: 57
Likes: 0
Received 0 Likes
on
0 Posts
Well I've had another go at tinting my windows, and what a bugger it is. I actually removed some of the trim and laid it out in my boot, trying to be good and all.


The rear one is SO hard, and as of yet it's still full of soapy bubbles. I fear I may actually have to pay someone to do this for me

The sides aren't perfect, but I will see how they look tomorrow.


The rear one is SO hard, and as of yet it's still full of soapy bubbles. I fear I may actually have to pay someone to do this for me
The sides aren't perfect, but I will see how they look tomorrow.
16-07-2014, 09:26 PM
#184
ffoc.co.uk
Ah I bought new centre pieces from a uk ford dealer. They are on almost 12 months now and have already started to lose their shape and twist etc. I have them secured for now.
I have double sided velcro keeping them still too so they don't rattle about. If one or more falls off I'm going to use the small hub centre caps instead. I had them on my last focus and they looked alright.
Edit: more info.
I used some CG fabric clean in a numatic 370. It's a wet extraction machine and it pulls the dirt grime and grease out of them. It may take a few passes to get them right but it does a good fookin clean on them.
Last edited by H3lsing; 16-07-2014 at 09:29 PM.
17-07-2014, 03:29 PM
#185
Advanced PassionFord User
Thread Starter
Hi,
I brought them off of ebay, they were listed as "Ford Alloy Wheel Centre Caps" and the size was 54mm. Sadly I found them slightly on the small side, and in order to secure them in place I used a cable tie on the circumference of the inner plastic.
17-07-2014, 03:30 PM
#186
Advanced PassionFord User
Thread Starter
06-08-2014, 04:25 PM
#187
Advanced PassionFord User
Thread Starter
Well it's been almost a month since my last update and this is mainly due to work being SO busy (which is a good thing). The one thing I did decide to do is order my air intake hose that connects to the throttle body from the censor.
I ordered it from Burton on Monday, and it was here today (Wednesday), one of the hose clips was a little bit small for my car so I used one of my spares.
Getting the items ready:

First off I removed the lower cable tie (yes a temp I put on).

After this I then removed the cover over the throttle cable housing (?)

The I removed the top Ford oem clip with a flat bladed screwdriver.

After this I removed the hose completely but stored it in case I need it for future use.

The I reversed the process making sure the hose clip cleared rubbing against anything near them.


As for fitting time, maybe 5 minutes, but I did double check everything.
It's not much of an update, but it's something I have wanted to do for a few months now
I ordered it from Burton on Monday, and it was here today (Wednesday), one of the hose clips was a little bit small for my car so I used one of my spares.
Getting the items ready:
First off I removed the lower cable tie (yes a temp I put on).
After this I then removed the cover over the throttle cable housing (?)
The I removed the top Ford oem clip with a flat bladed screwdriver.
After this I removed the hose completely but stored it in case I need it for future use.
The I reversed the process making sure the hose clip cleared rubbing against anything near them.
As for fitting time, maybe 5 minutes, but I did double check everything.
It's not much of an update, but it's something I have wanted to do for a few months now
14-08-2014, 05:54 PM
#188
Advanced PassionFord User
Thread Starter
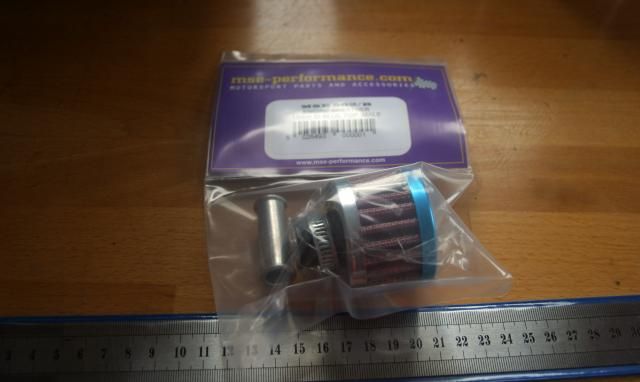
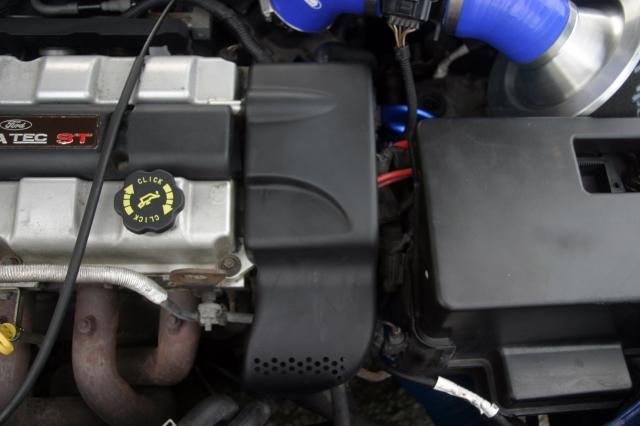
Well since finishing my induction system (well I say finish lol) it seems the oil breather pipe sometimes lets an oily smell into the cockpit of my car, so I thought I would fit a breather filter today that Mr Postman brought me.

So up went the bonnet.

I then removed the black cover that goes over the coil pack.
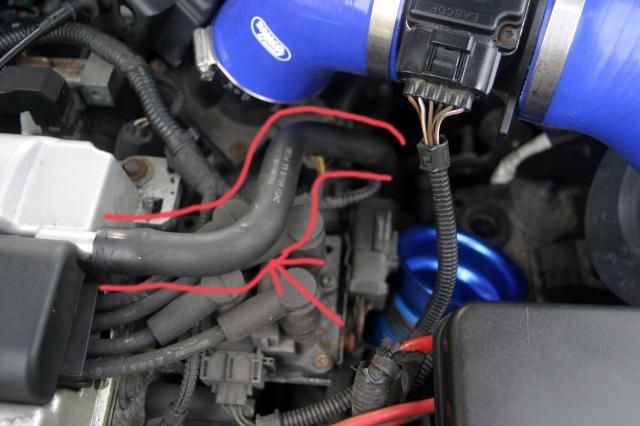
I have outlined the hose I needed to fit the filter to.

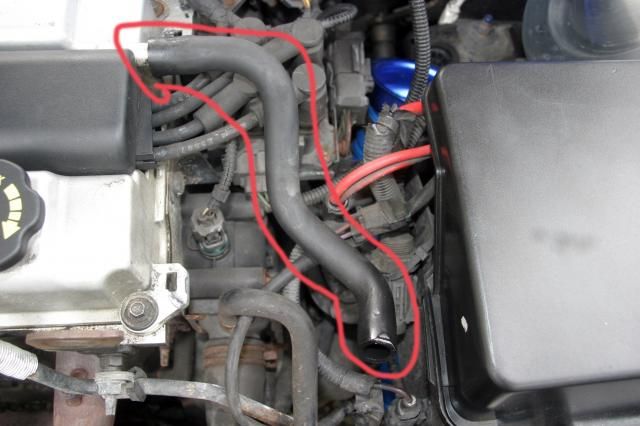
The thing is I wanted the filter to sit at the front of the engine bay, so I turned it around.

This is with the filter fitted, and looking neat.

Now with the cover back on and looking tidy.


So up went the bonnet.

I then removed the black cover that goes over the coil pack.
I have outlined the hose I needed to fit the filter to.

The thing is I wanted the filter to sit at the front of the engine bay, so I turned it around.

This is with the filter fitted, and looking neat.

Now with the cover back on and looking tidy.

 16-09-2014, 07:12 PM
#191
Wahay!! I've lost my Virginity!!
Join Date: Mar 2014
Location: Essex
Posts: 57
Likes: 0
Received 0 Likes
on
0 Posts
Well since finishing my induction system (well I say finish lol) it seems the oil breather pipe sometimes lets an oily smell into the cockpit of my car, so I thought I would fit a breather filter today that Mr Postman brought me.
So up went the bonnet.
I then removed the black cover that goes over the coil pack.
I have outlined the hose I needed to fit the filter to.
The thing is I wanted the filter to sit at the front of the engine bay, so I turned it around.
This is with the filter fitted, and looking neat.
Now with the cover back on and looking tidy.
Thanks
14-01-2015, 05:02 PM
#192
Advanced PassionFord User
Thread Starter
21-02-2015, 12:19 PM
#193
Advanced PassionFord User
Thread Starter

Well today I actually managed to get some time to myself, so I decided to pop my bonnet and polish my hoses
Foxxie is still going really well (famous last words) and her MOT is due in April. The dual mass still rattles well, but the clutch doesn't slip. I'm looking to get a second set of alloys with out and out summer tyres on, plus a handy rack to mount them on in my garage
07-03-2015, 12:05 PM
#194
Advanced PassionFord User
Thread Starter
Well this morning I had my V11 turn up, so I redid my tax for the 1st of April. I maybe alone on this but I find the online system and no tax disc in my car window a real pleasure.
Later this month the ST is going in for it's MOT, so I'm just going through a few things to make sure it isn't too bad.
I had my birthday midweek so was treated to some car bits and bobs
Firstly some gloves, I do use rubber ones, but wanted something a little better.

I also got this attachment for my pressure washer.

Plus a lovely brush attachment and a nozzle that squirts under the car.

Plus my favorite smelling screen wash

Last but not least, a nice mat to lay on, as my gravel drive is rather uncomfortable lol
 30-03-2015, 06:24 PM
#196
Advanced PassionFord User
Thread Starter
It's actually really good, although once you remove it from the wheels spokes, it goes all over your shoes and trousers lol.. doh...
So to update, Foxxie had her MOT today, and the tester said that he had to rev the car to heat the catalyst a little for the emissions to drop, so it maybe worth looking into replacing that in the future, but otherwise, straight through.
Well what to do now ?
So to update, Foxxie had her MOT today, and the tester said that he had to rev the car to heat the catalyst a little for the emissions to drop, so it maybe worth looking into replacing that in the future, but otherwise, straight through.
Well what to do now ?
15-08-2015, 02:35 PM
#197
Advanced PassionFord User
Thread Starter
So it's been a while since I've posted on my thread, but work and home life have been a little crazy, thus I've just not had the time to do anything to the ST.
The car has undergone some repair work, mainly being the drive belt and lower pulley which failed whilst it was away having the rear bumper resprayed.

Since this was fixed at the local Ford Dealership the car has been transformed, it's really odd but the car feels SO much more responsive and free through the rev range. Although I've not exactly opened her up due to the exhaust being broken
As the car is going back in next week to have rectification work done, I decided to spend 10 minitues giving the engine bay a quick once over.
This was the before shot, and although not that dirty, still not that fresh.

This was the end result, and although it's far from complete, once I get the car back, and all is well, I will finally start to spend some ���
 09-09-2015, 10:45 AM
#198
Advanced PassionFord User
Thread Starter
Well I've got a couple of days off, first time since March, but I'm not complaining as it's good to be kept busy. So I thought I would treat the edge of my cars sill, as the paint had begun to flake off.
Some months ago I had put some rust treatment primer on the edge.

So this morning I masked off a little, and treated the edge to some Kurust.

I then sprayed the area with some anti rust primer.

Shortly followed by some blue, which isn't a 100% match, but it's better then is was


The orange in the photo is my Halfords ground mat, as I can no longer lay on gravel lol
So it's not much of an update, but the car is still rocking on, and I'm happy'ish with her at the moment.
Although it now seems on the odd occasion I get water coming in from the passengers wing mirror, so I must look at that soon.
09-09-2015, 11:16 AM
#199
ffoc.co.uk
Nice update. Re the passenger side wing mirror, there is a seal behind the base plate section that has probably perished due to weather conditions. I'd get onto the local ford parts as they can order a replacement.
The following users liked this post:
PaulinhoT (10-09-2015)
10-09-2015, 11:11 AM
#200
Advanced PassionFord User
Thread Starter
Cheers I will have a look at how easy it is to take off, and take a look