
Rust :-/


Thread Starter
I've found that life I needed.. It's HERE!!
Joined: Dec 2005
Posts: 1,318
Likes: 2
From: Exeter
Hi guys,
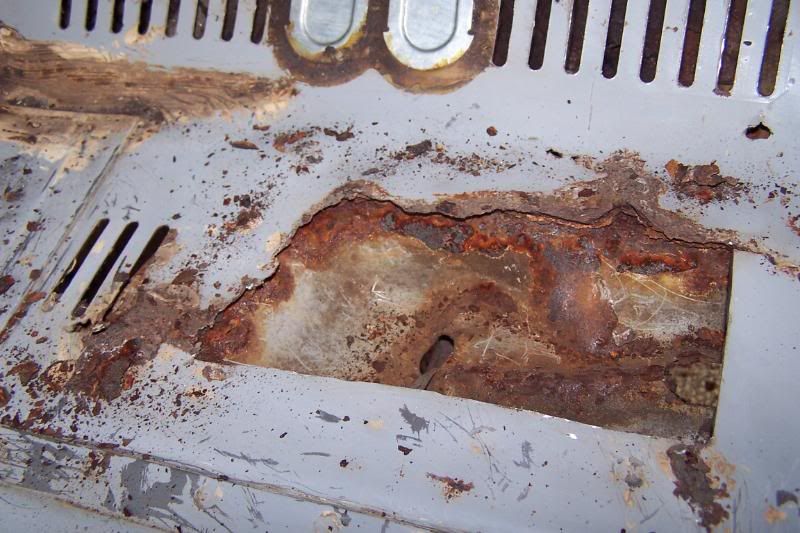
I stripped out the saph today getting ready for new sills and rear arches, only to come across this in the drivers footwell:


Is this fixable or terminal?
Many regards,
Kieren
I stripped out the saph today getting ready for new sills and rear arches, only to come across this in the drivers footwell:


Is this fixable or terminal?
Many regards,
Kieren
PassionFord Post Whore!!
Joined: May 2004
Posts: 5,730
Likes: 150
From: Surrey/Norfolk/Cambs
Is the first pic the outer seat mount? If so, mine was like that, my mate welded a plate over it, I'm sure the tunnel area can be cut out and a plate welded in....?
Hope you can sort it easily!
Hope you can sort it easily!
Thread Starter
I've found that life I needed.. It's HERE!!
Joined: Dec 2005
Posts: 1,318
Likes: 2
From: Exeter
Yeah it's the outer seat mount.
Well I would love to fix her, but weighing up the options at the moment, reshell may be an option, just really like this car?!
Well I would love to fix her, but weighing up the options at the moment, reshell may be an option, just really like this car?!
PassionFord Post Whore!!
Joined: May 2004
Posts: 5,730
Likes: 150
From: Surrey/Norfolk/Cambs
Can't remember exactly how he did it, but my mate didn't have any real trouble welding the seat mount area back in... I fear mine is going in the footwell area too, just not as bad as yours! ....I hope!!!
You must surely be able to get a repair panel to do the footwell, even if you have to pay someone to weld it in (I can't weld for shit, so that's what I'd have to do!!) it would be easier than re shelling it, unless the rest of its rotten like that underneath!?
It's not GOT to be mega neat, so maybe you could hire a mig welder an have a bash yourself!?
mk6 escort fantasist
Joined: Aug 2013
Posts: 1,303
Likes: 56
From: south east london
if your getting sills and arches done already, you may aswell throw the bit extra towards these other bits. either that or cancel the bodyshop and buy a kit to try your hand at it yourself. practice first though! atleast if you find you cant do it, you can flog on the welder etc with minimal loss and then decide what to do.
cue someone from a bodyshop to come on saying your mad to try it yourself, cant beat a professional job rah rah, if you have the time and patience ro learn how to do it and do it properly, the only difference will be the amount of time it will take (considerably longer) and momey (considerably less)
cue someone from a bodyshop to come on saying your mad to try it yourself, cant beat a professional job rah rah, if you have the time and patience ro learn how to do it and do it properly, the only difference will be the amount of time it will take (considerably longer) and momey (considerably less)
4x4 resto
Joined: Jan 2005
Posts: 100
Likes: 1
From: blackpool
Hi , my sapph went in exactly the same places and we cut out the rot then made some repair pieces to fit , its quite time consuming , you will find its double skinned on the tunnel so we had to repair both skins but it can be done
Trending Topics

PassionFord Regular
Joined: May 2013
Posts: 353
Likes: 7
From: Stoke-on-Trent
Ayup fella.
Mine was exactly the same I hadn't got a clue about welding either!!!! My mate had done a bit so we just got the grinder out & cut all the rot out the took our time cutting & shaping everything so when it was welded it looked like a factory finish, the tunnel was the hardest as it was double skinned, & shaped all different ways but now it's all painted u would never tell. As I'm a tad fussy about things looking right.
Mine was exactly the same I hadn't got a clue about welding either!!!! My mate had done a bit so we just got the grinder out & cut all the rot out the took our time cutting & shaping everything so when it was welded it looked like a factory finish, the tunnel was the hardest as it was double skinned, & shaped all different ways
but now it's all painted u would never tell. As I'm a tad fussy about things looking right.
Thread Starter
I've found that life I needed.. It's HERE!!
Joined: Dec 2005
Posts: 1,318
Likes: 2
From: Exeter
Thanks for the replies guys, it's reassuring to know that this isn't terminal!
Although I am surprised that you can't get the floorpan as you can get all sorts for the mk1+2 escorts, hey ho, the joys of old ford ownership :-/
Although I am surprised that you can't get the floorpan as you can get all sorts for the mk1+2 escorts, hey ho, the joys of old ford ownership :-/
PassionFord Post Whore!!
iTrader: (4)
Joined: May 2004
Posts: 7,886
Likes: 35
From: Bangor, Northern Ireland
Those are common rust areas unfortunately. Worth saving though!
Cosworth's are getting old enough now that they'll be able to be used in rallies etc again soon. I think we'll see lots more panels being remade when people can compete in them again.
Cosworth's are getting old enough now that they'll be able to be used in rallies etc again soon. I think we'll see lots more panels being remade when people can compete in them again.

I've found that life I needed.. It's HERE!!
Joined: Nov 2004
Posts: 1,198
Likes: 44
If you have got the time and patience buy a mig welder and have a go yourself as said above practice on some scrap first, to cut mine I used a dremel with the speed click 38mm cutting wheels on the end of a flexy shaft takes a little bit longer than a grinder but gives a more accurate cut in tight areas.
here is a few pics of my first attempt


here is a few pics of my first attempt


Thread Starter
I've found that life I needed.. It's HERE!!
Joined: Dec 2005
Posts: 1,318
Likes: 2
From: Exeter
Hmmm, might actually attempt this!! I have a grinder, can buy a welder, couple of questions though,
What can I coat the metal work in to stop it reoccurring?
Also my seat anchor is very close to the chassis number, what options do I have if the rust is under that?
What's the easiest way to get the sound deadening up with?
What can I coat the metal work in to stop it reoccurring?
Also my seat anchor is very close to the chassis number, what options do I have if the rust is under that?
What's the easiest way to get the sound deadening up with?

Thread Starter
I've found that life I needed.. It's HERE!!
Joined: Dec 2005
Posts: 1,318
Likes: 2
From: Exeter
Tosh, will that stop it rusting again? Mark what did you coat yours with?
Some really good looking work there!! Mark, with a standard grinder how did you not go through the jacking point etc on the outside?
Some really good looking work there!! Mark, with a standard grinder how did you not go through the jacking point etc on the outside?
http://www.screwfix.com/p/flexovit-u...ack-of-5/71334
Next to no distortion when cutting as they make hardly any heat.
I did go through the jacking point a tiny bit as you can see the small slit in this pic.

I just welded it up and ground it smooth, I also built up the area around the jacking point hole with weld and spent ages with a dremel smoothing it out.

On the inside of the panels that are not accessible after welding I used weld through zinc primer from Halfords
http://www.halfords.com/webapp/wcs/s...egoryId_165625
Once the whole car is painted I'll drown all the cavities in dinitrol
http://www.rust.co.uk/products/produ...hs-cavity-wax/
All bare metal that I could get to after welding I used epoxy primer
http://www.rust.co.uk/products/categ...y-body-primer/
After that I used epoxy chassis paint
http://www.rust.co.uk/products/categ...chassis-paint/
After sanding more primer, then top coated with two pack.

With hindsight I should have used the epoxy chassis paint first and then used epoxy primer over the top.
Last edited by Mark V8; Apr 9, 2014 at 08:54 PM.
Tosh made a good point when he said about using a dremel on the tunnel.
It's really difficult to get into the tight corner with a regular grinder, dremel takes a while but does a neat job.
It's really difficult to get into the tight corner with a regular grinder, dremel takes a while but does a neat job.

I've found that life I needed.. It's HERE!!

Joined: Feb 2005
Posts: 1,142
Likes: 0
Dremmel is very good I used one to cut out inner wing behind the strut top, nothing else would have got in there.
Also jotun 87 is similar to epoxy mastic as above and a lot cheaper
Also jotun 87 is similar to epoxy mastic as above and a lot cheaper
Last edited by daz1968; Apr 10, 2014 at 05:20 PM.
I've found that life I needed.. It's HERE!!
Joined: Nov 2004
Posts: 1,198
Likes: 44
Totally agree! You would be surprised how good a dremel with the 575 angle attachment is, and with the speedclick cutting disc's it makes a great mini grinder and cuts thin metal pretty quickly.
I bought the cheapest, nastiest electric drill that B&Q sell and used these.
http://www.ebay.co.uk/itm/24pc-Wire-...ht_2543wt_1161
It buggers the drill up fairly quickly so you just take the broken one back and exchange it for a new one

http://www.ebay.co.uk/itm/24pc-Wire-...ht_2543wt_1161
It buggers the drill up fairly quickly so you just take the broken one back and exchange it for a new one

I've found that life I needed.. It's HERE!!
Joined: Nov 2004
Posts: 1,198
Likes: 44
I was recommend to use zintec coated steel I think it was 1mm great stuff had it lying around for ages and didn't rust, if it's for structural parts you would probably need thicker.

PassionFord Post Whore!!
iTrader: (4)
Joined: May 2004
Posts: 7,886
Likes: 35
From: Bangor, Northern Ireland

Too many posts.. I need a life!!


Joined: Aug 2009
Posts: 529
Likes: 36
From: -
Hi guys,
I stripped out the saph today getting ready for new sills and rear arches, only to come across this in the drivers footwell:
Attachment 61981
Attachment 61982
Is this fixable or terminal?
Many regards,
Kieren
I stripped out the saph today getting ready for new sills and rear arches, only to come across this in the drivers footwell:
Attachment 61981
Attachment 61982
Is this fixable or terminal?
Many regards,
Kieren
They come in pair with proper square weld nuts. �120+28 shipping to Britain from Norway.
Ideal for your restoration.
Best regards
Andreas


Thread
Thread Starter
Forum
Replies
Last Post
nicodinho
Ford Non RS / XR / ST parts for sale.
6
Oct 7, 2015 12:56 PM