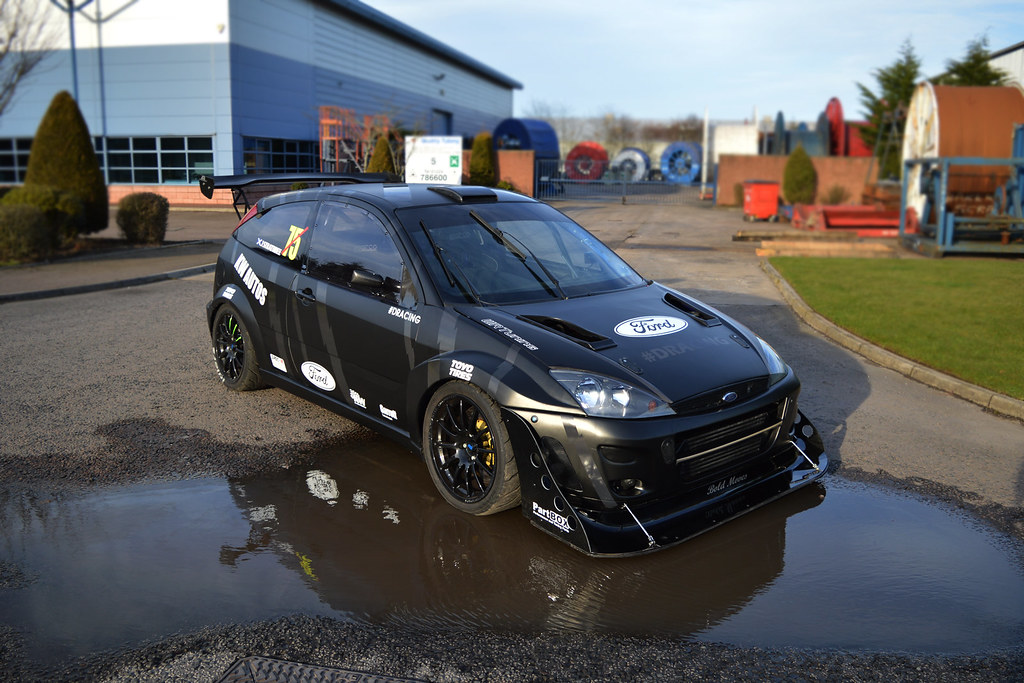
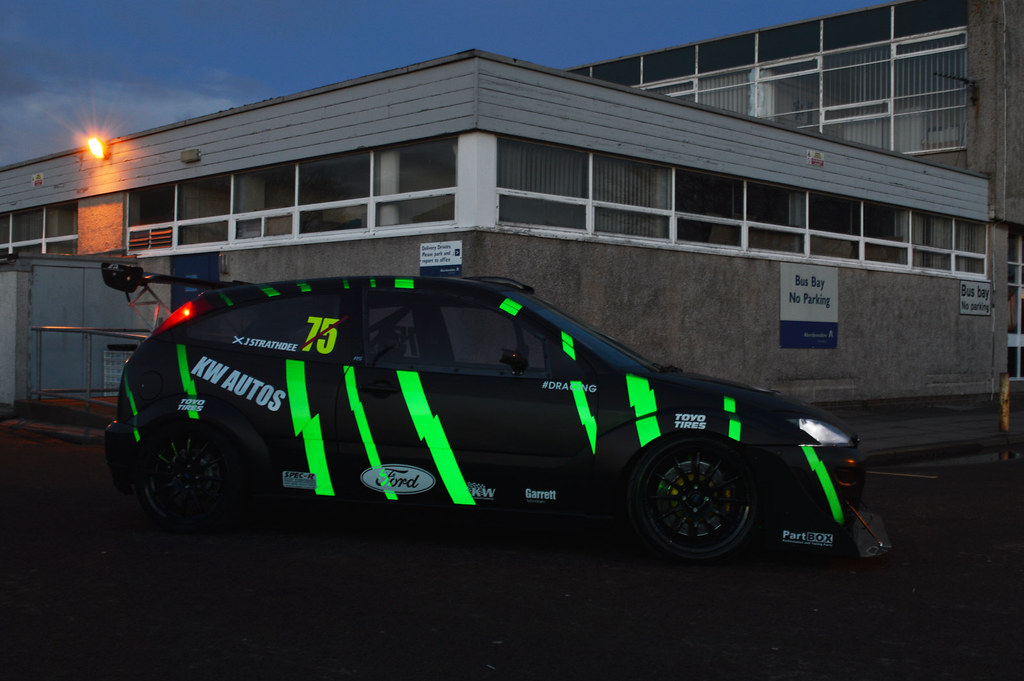
Project WTF - Mk1 Focus RS Racecar


 30-08-2018, 03:40 PM
#42
Part of the Furniture
Thread Starter
 30-08-2018, 03:45 PM
#43
Part of the Furniture
Thread Starter
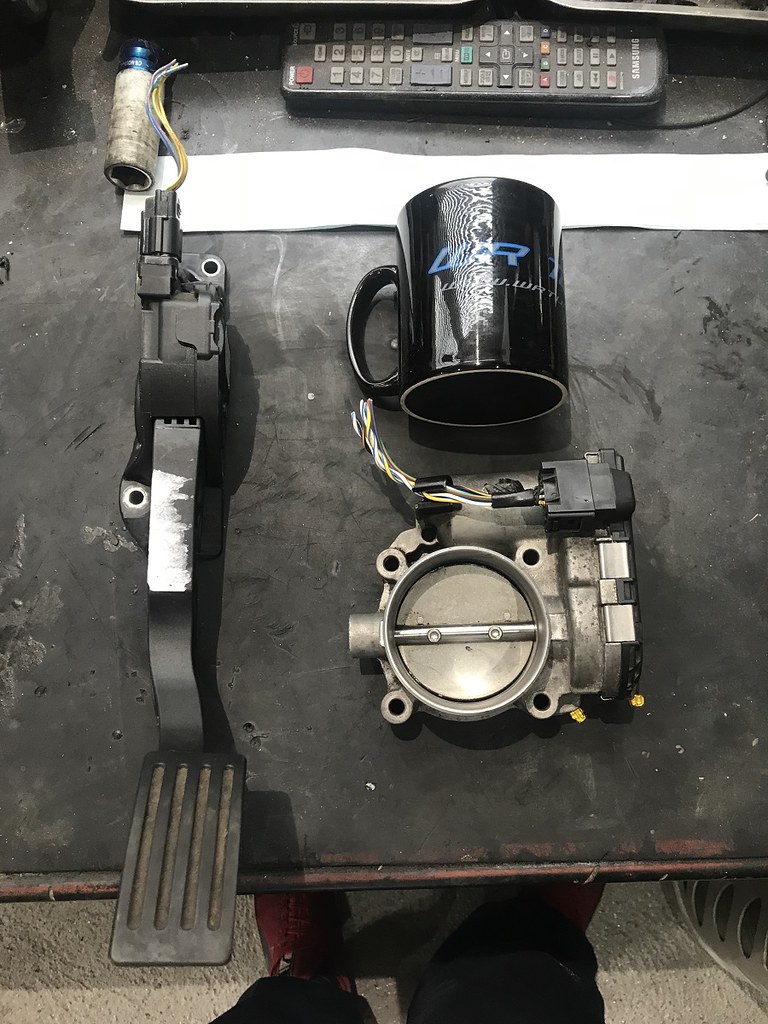
A little side project for later on in the year (most likely after iv done my 2 events in july) iv decided to collect the bits for going DBW, MK2 focus ST/RS Throttle body and a MK3 Focus throttle pedal (will probably get a RS/ST one as they have a nice little metal plate on them!)
Reason for this is i get some nice features with the syvecs , better anti lag and auto blip on the way down through the box and its a slightly bigger TB as well going from 57mm standard to 66mm. Looking forward to getting it up and working! A shout out to Will at WR Tuning for supply the TB plug from a spare loom he had! saved me a load off stress!
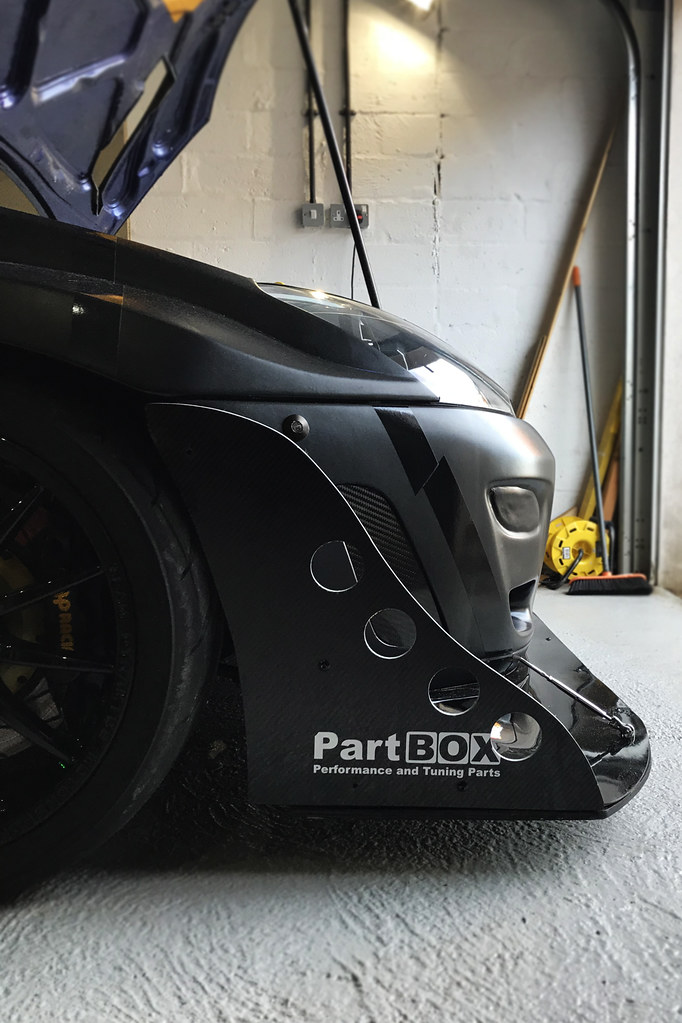
Next on the list was to sort out my side exit pipe!
Im not a welder so we will clear that up right now haha! i can weld but its so so ! , when making this side exit i had group b / Nascar in my mind.... well this was my effort !
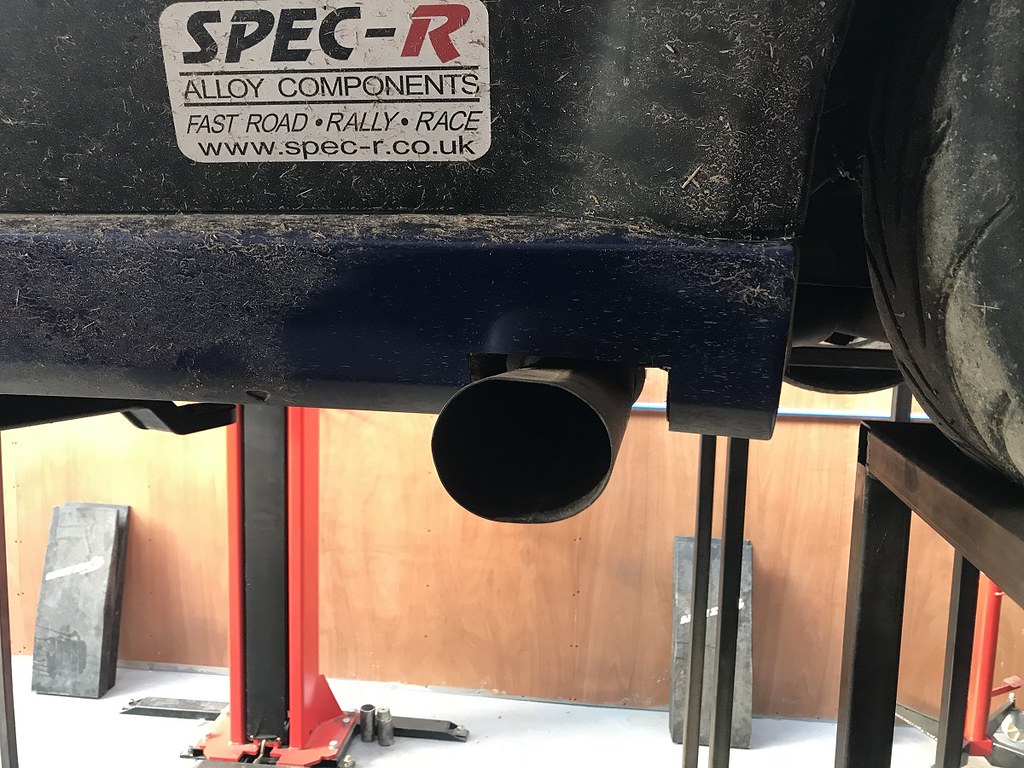
A Solid 4/10 if i dont say so my self! haha!
the cutting out of the sill and replacement metal wasnt much better if im honest!
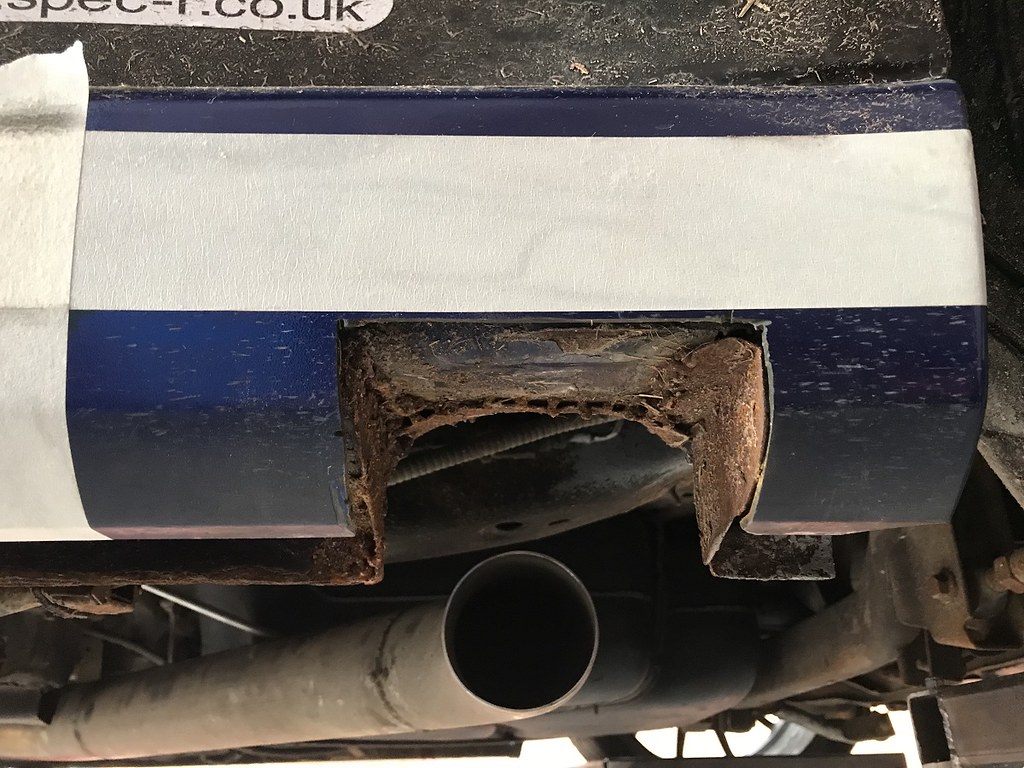
So was time to take it to a real fab guy and callum haynes sorted me out!
first step was to remove all old rusty rubbish!
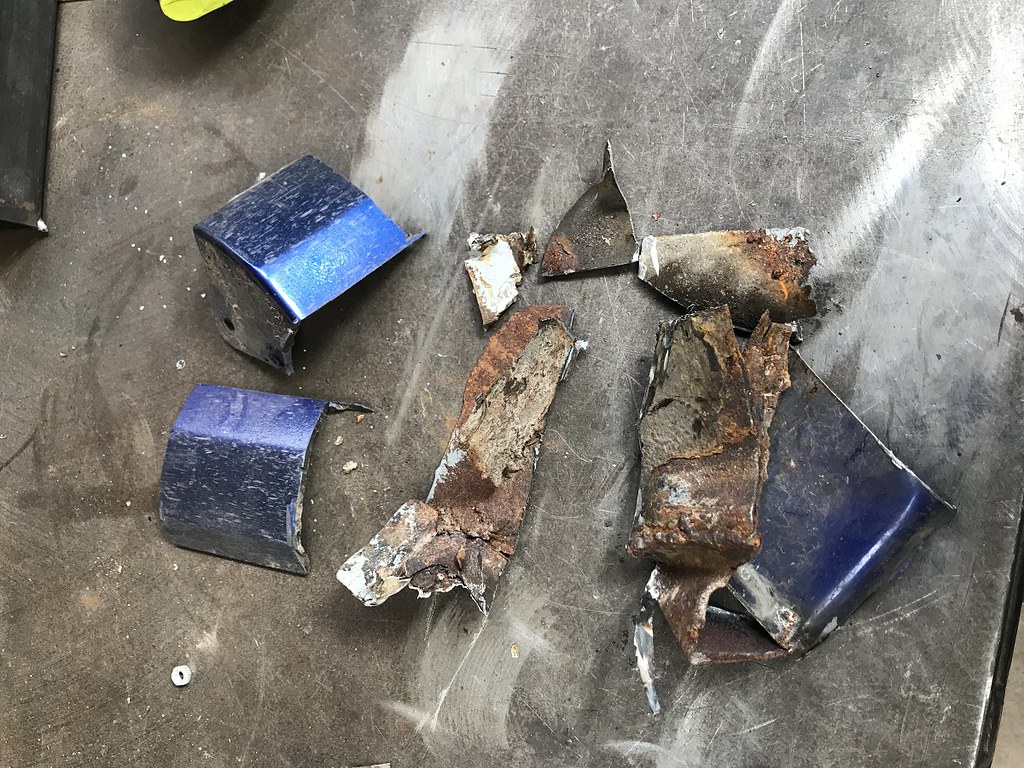
He then fabbed up a plate and welded it in place!
And before you knew it the nascar tip was on the car
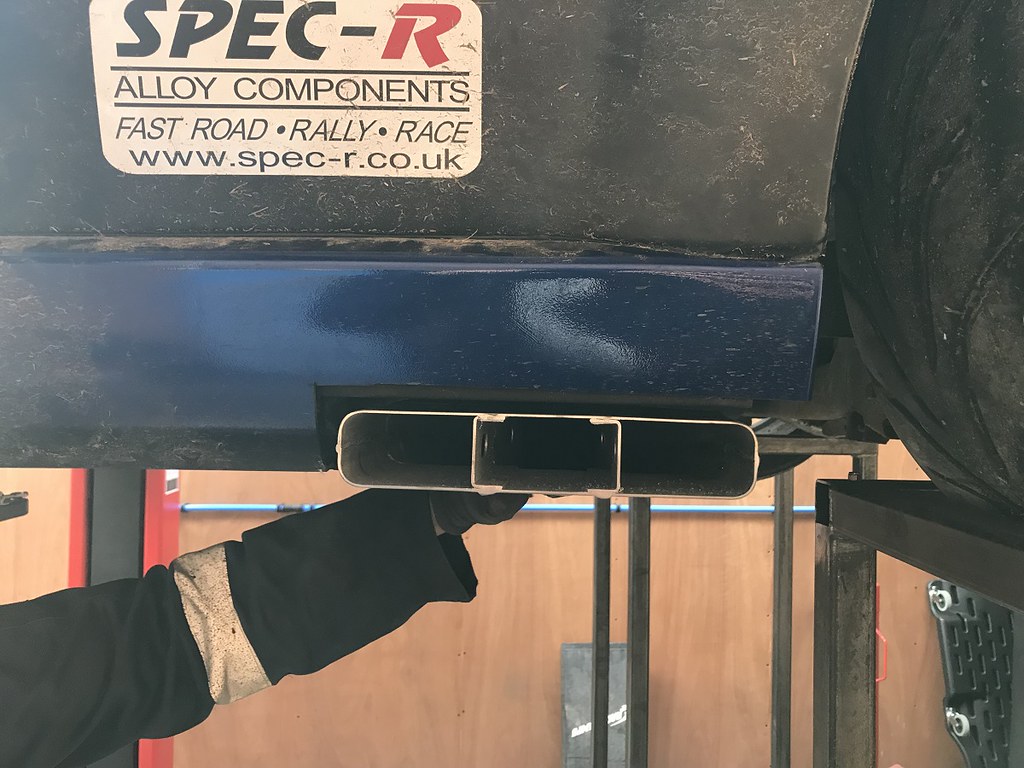
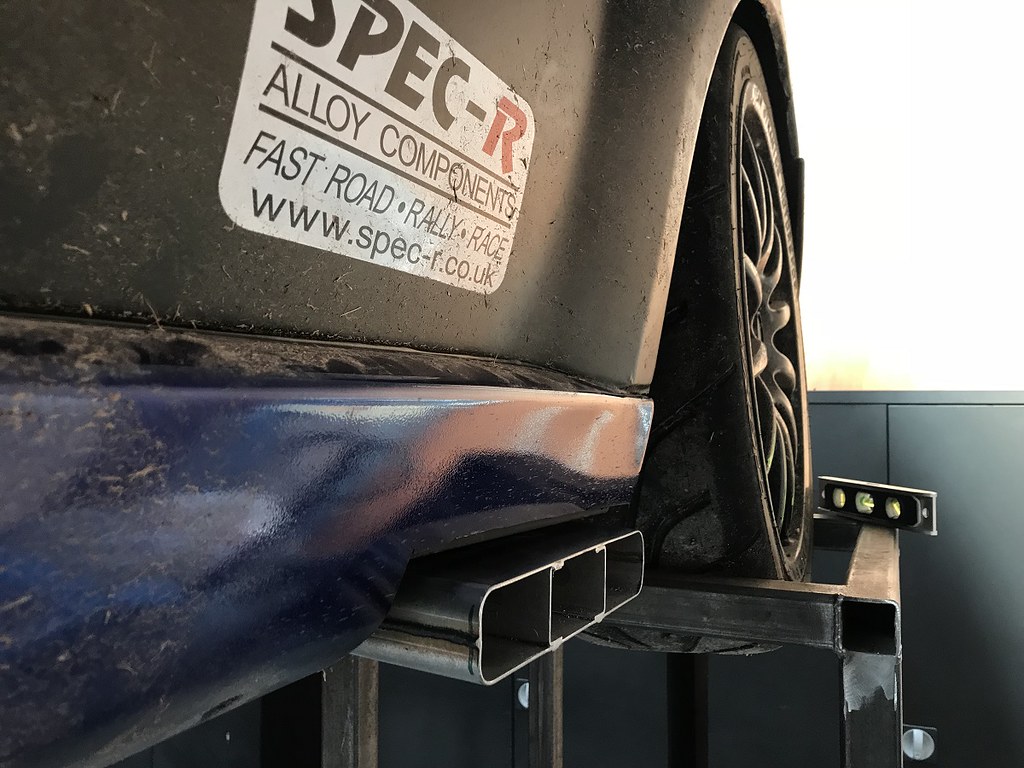
Still need to wrap the side skirt and fit the alloy trim to stop it melting everything when the car chucks out its 2ft flames!
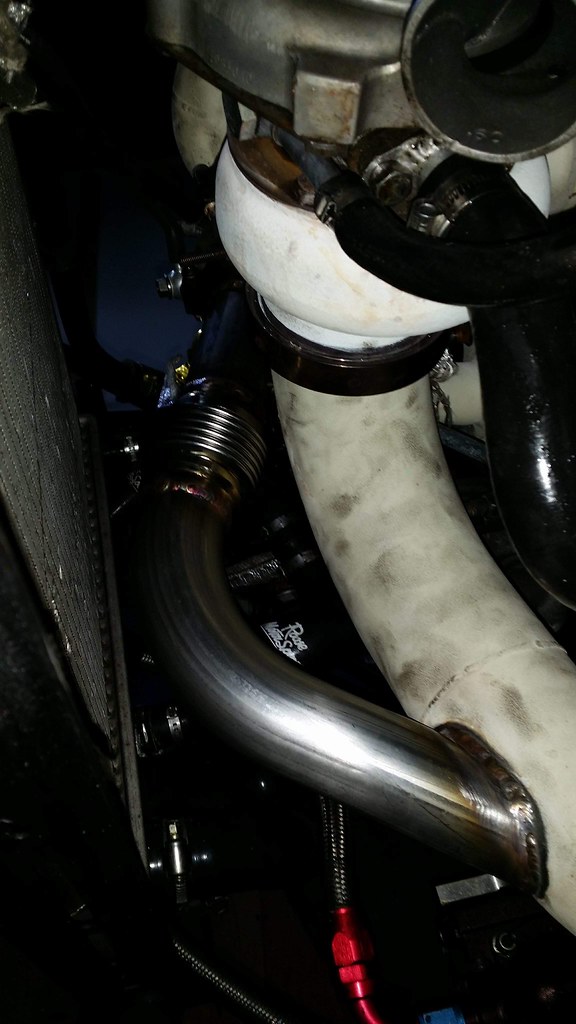
While it was up there callum also set about putting the screamer pipe back into the exhaust system, the MSA had finally caught up with them so this was the easiest way forward! The car is so quiet now on boost!
callum did an ace job removing minimal coating on the down pipe but i think im going to get it all re done as the oil leak from the turbo had made a fair mess of it as well sadly
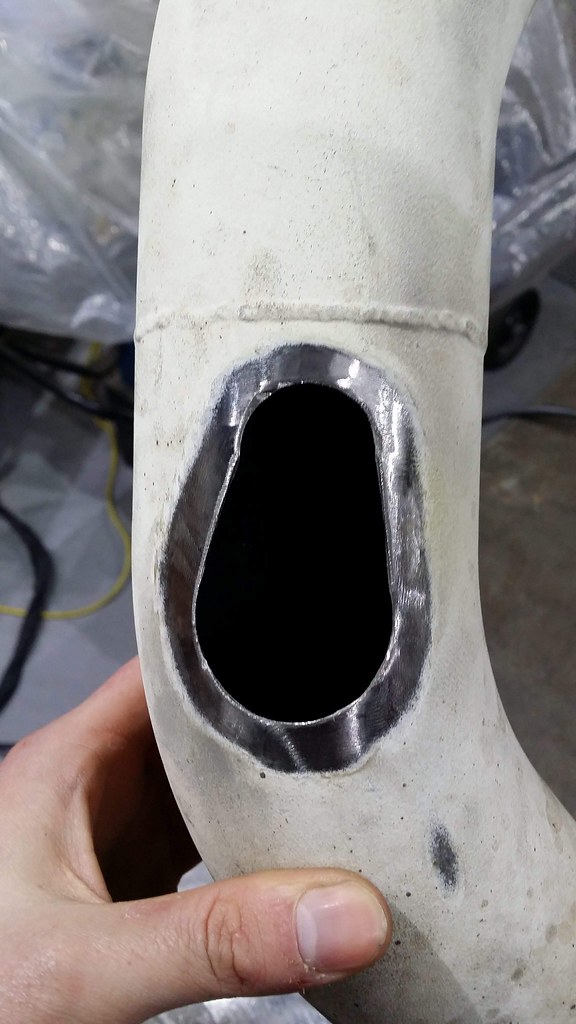
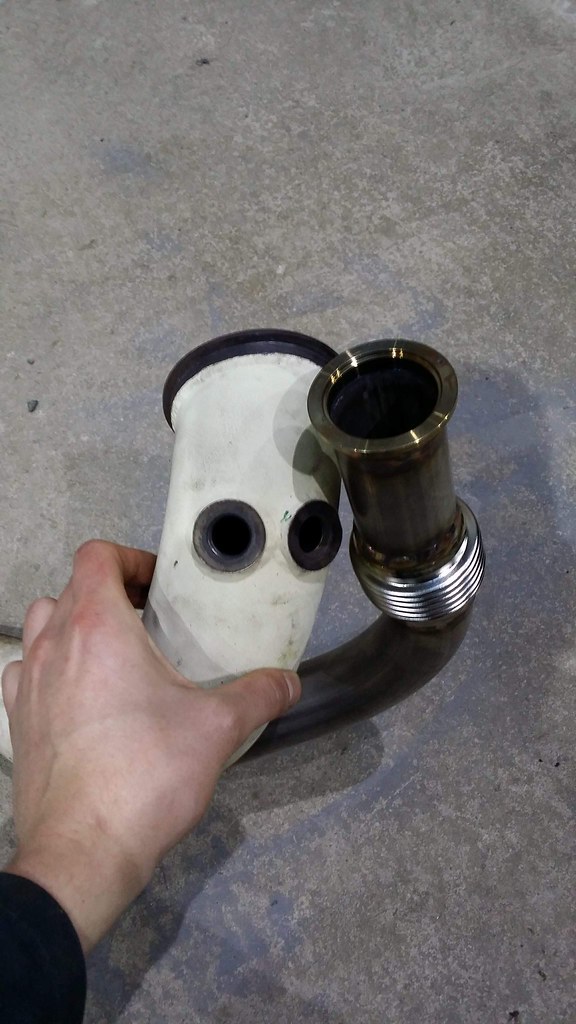
nice flow back into it
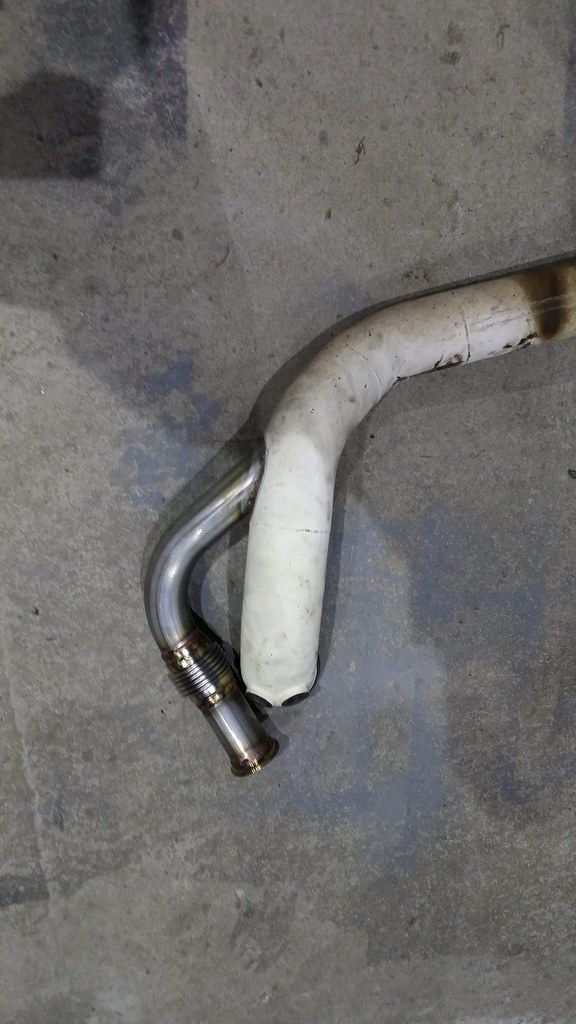
and still got some clearance between it and the rad!
Reason for this is i get some nice features with the syvecs , better anti lag and auto blip on the way down through the box and its a slightly bigger TB as well going from 57mm standard to 66mm. Looking forward to getting it up and working! A shout out to Will at WR Tuning for supply the TB plug from a spare loom he had! saved me a load off stress!
Next on the list was to sort out my side exit pipe!
Im not a welder so we will clear that up right now haha! i can weld but its so so ! , when making this side exit i had group b / Nascar in my mind.... well this was my effort !
A Solid 4/10 if i dont say so my self! haha!
the cutting out of the sill and replacement metal wasnt much better if im honest!
So was time to take it to a real fab guy and callum haynes sorted me out!
first step was to remove all old rusty rubbish!
He then fabbed up a plate and welded it in place!
And before you knew it the nascar tip was on the car
Still need to wrap the side skirt and fit the alloy trim to stop it melting everything when the car chucks out its 2ft flames!
While it was up there callum also set about putting the screamer pipe back into the exhaust system, the MSA had finally caught up with them so this was the easiest way forward! The car is so quiet now on boost!
callum did an ace job removing minimal coating on the down pipe but i think im going to get it all re done as the oil leak from the turbo had made a fair mess of it as well sadly
nice flow back into it
and still got some clearance between it and the rad!
 30-08-2018, 05:14 PM
#45
Advanced PassionFord User
I really like your car, I've been following you on Flick R for some time now, very impressed. Thanks for sharing it on here
30-08-2018, 06:19 PM
#46
Part of the Furniture
Thread Starter
The following users liked this post:
PaulinhoT (06-09-2018)
30-08-2018, 08:55 PM
#48
Part of the Furniture
Thread Starter
 03-09-2018, 05:09 PM
#49
Part of the Furniture
Thread Starter
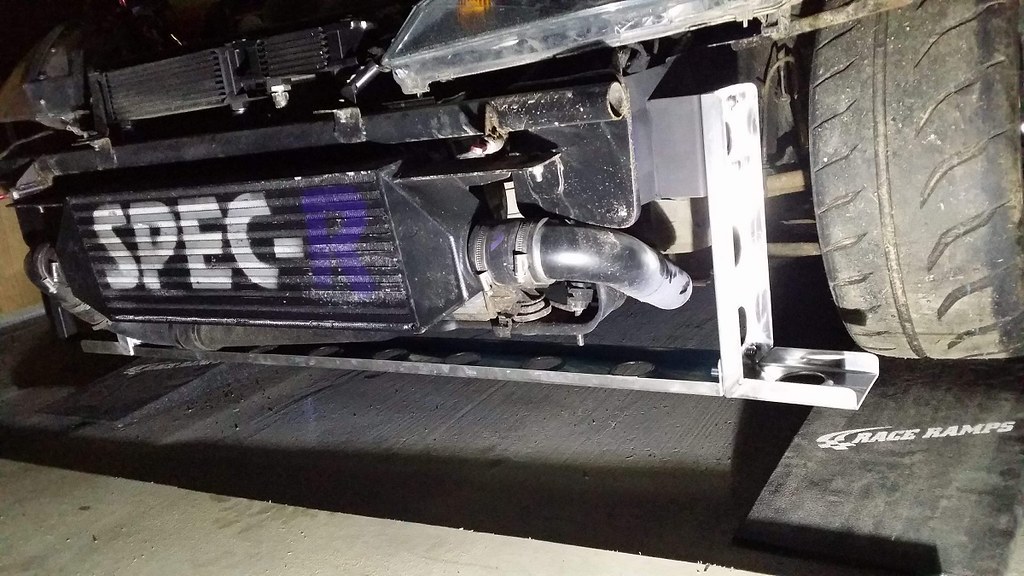
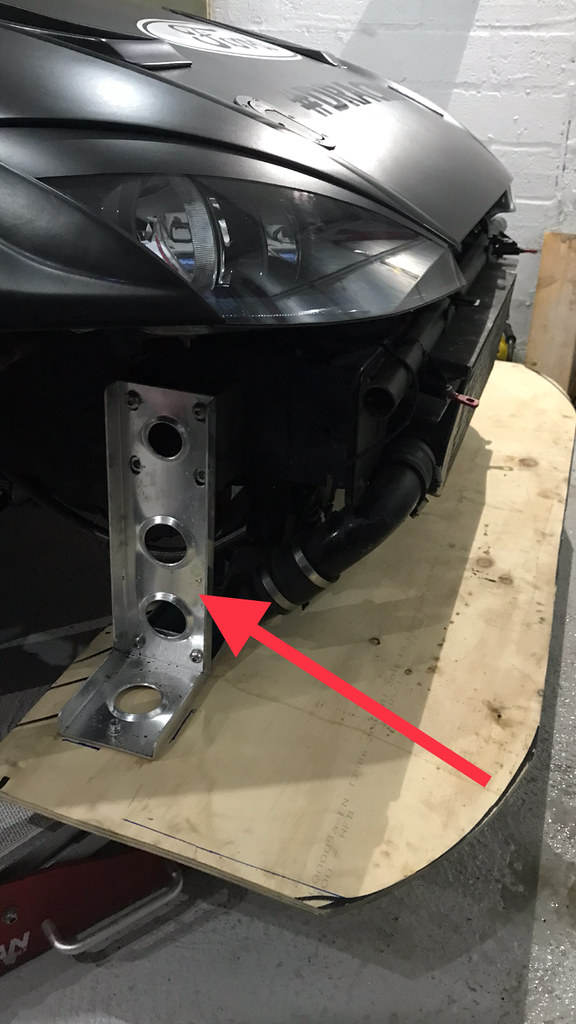
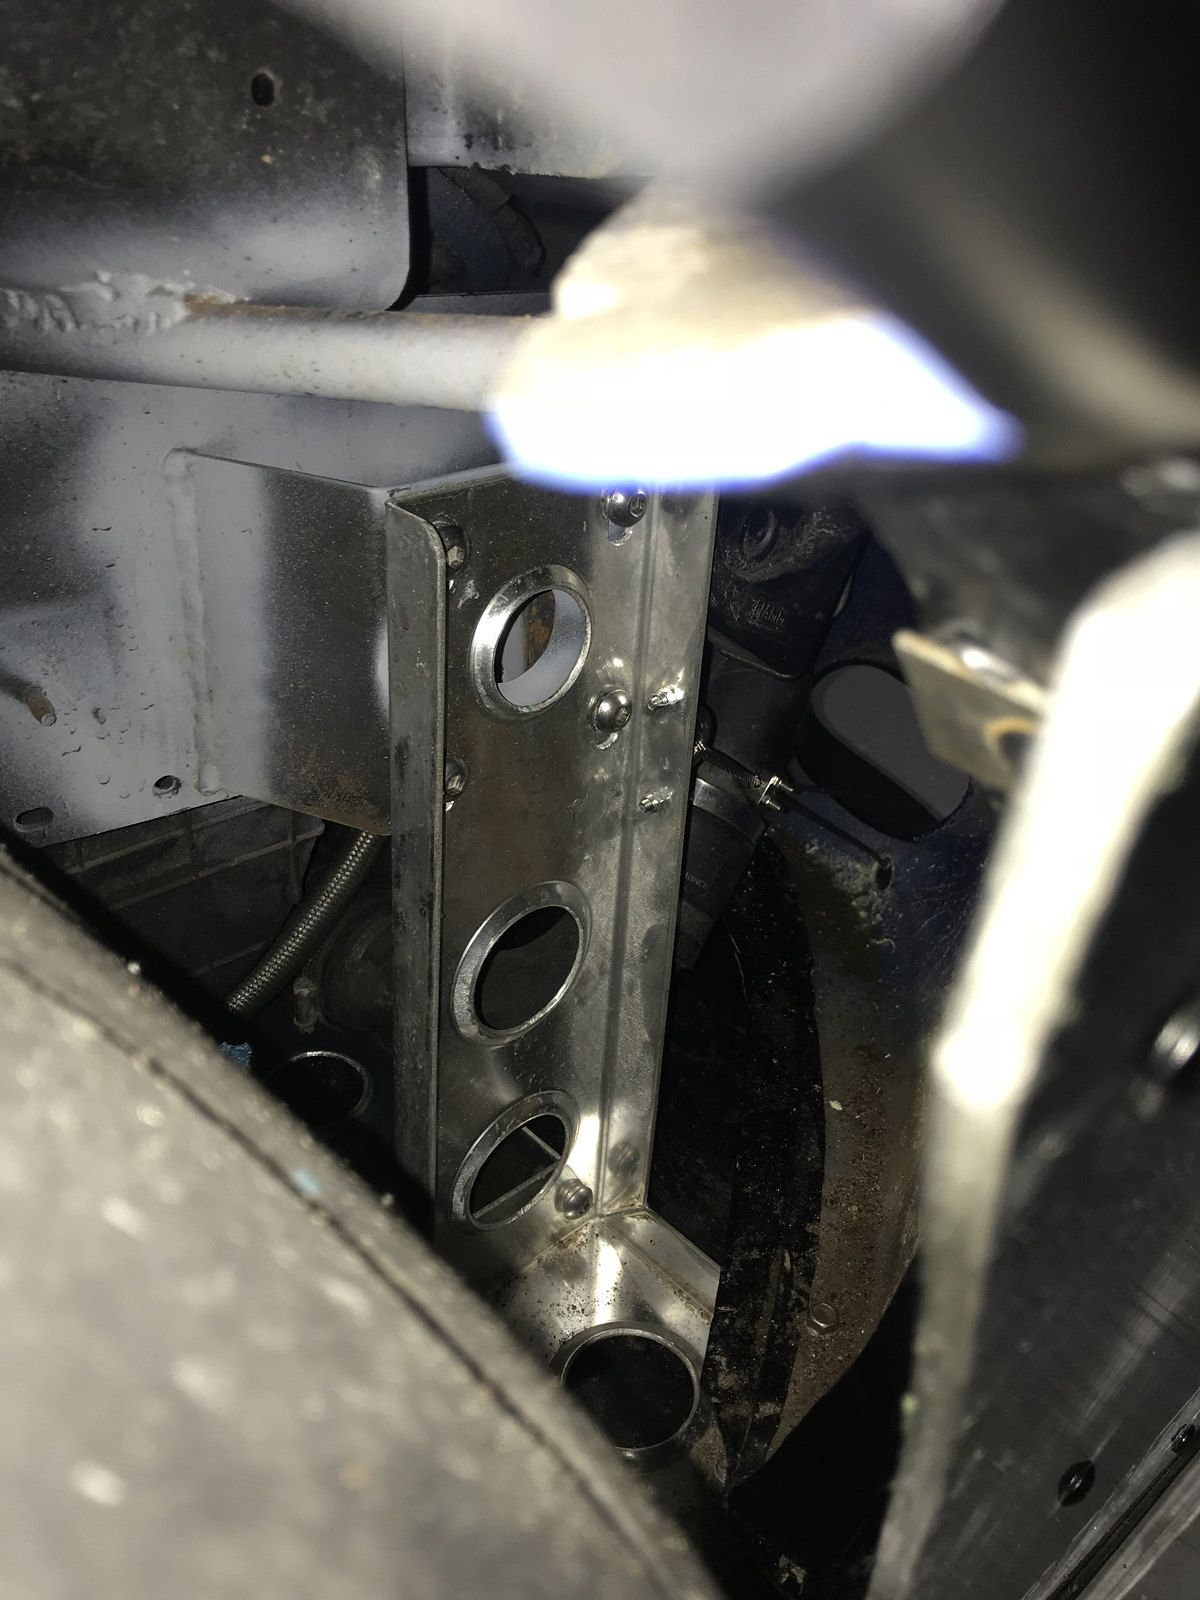
Last thing for callum was to design a splitter mount system for me, the whole car will be flat floored at some point but for now this spliiters main job is to hold the downforce of the front splitter and stop it trying to rip the bumper off!
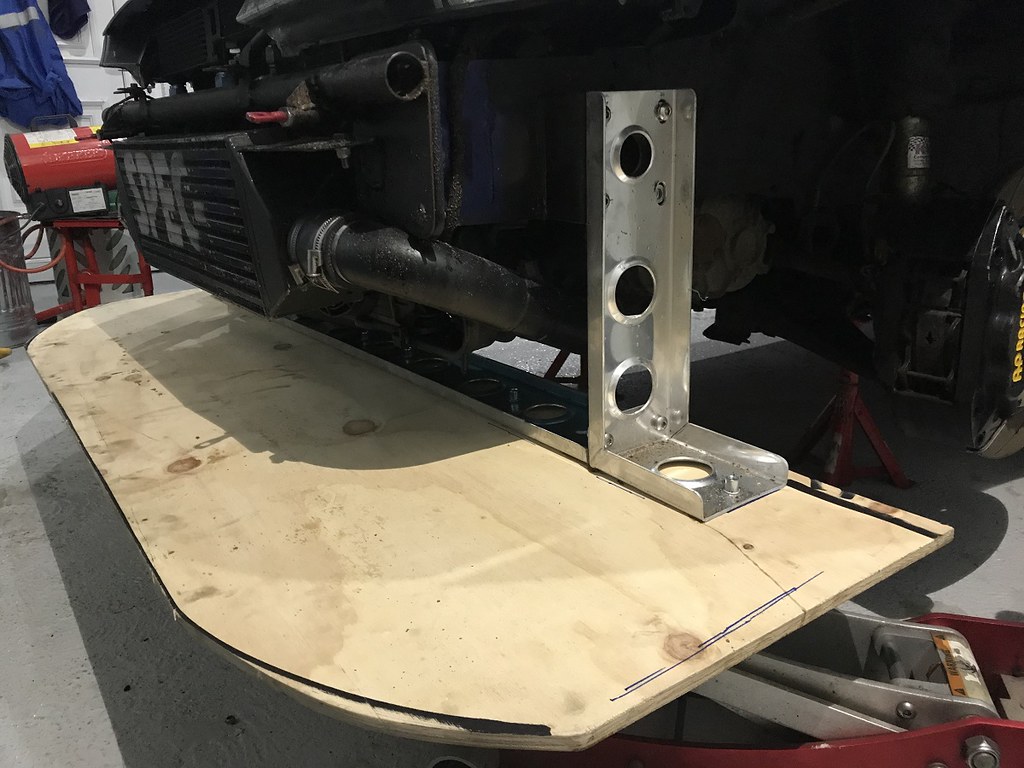
Once that was done i got the car home for a day and started to make my front splitter, just out of plywood for just now but might change to something lighter given time and im happy it works!
Also having to try a few places for the tie rods to mount, thanks to adam for the info on these!
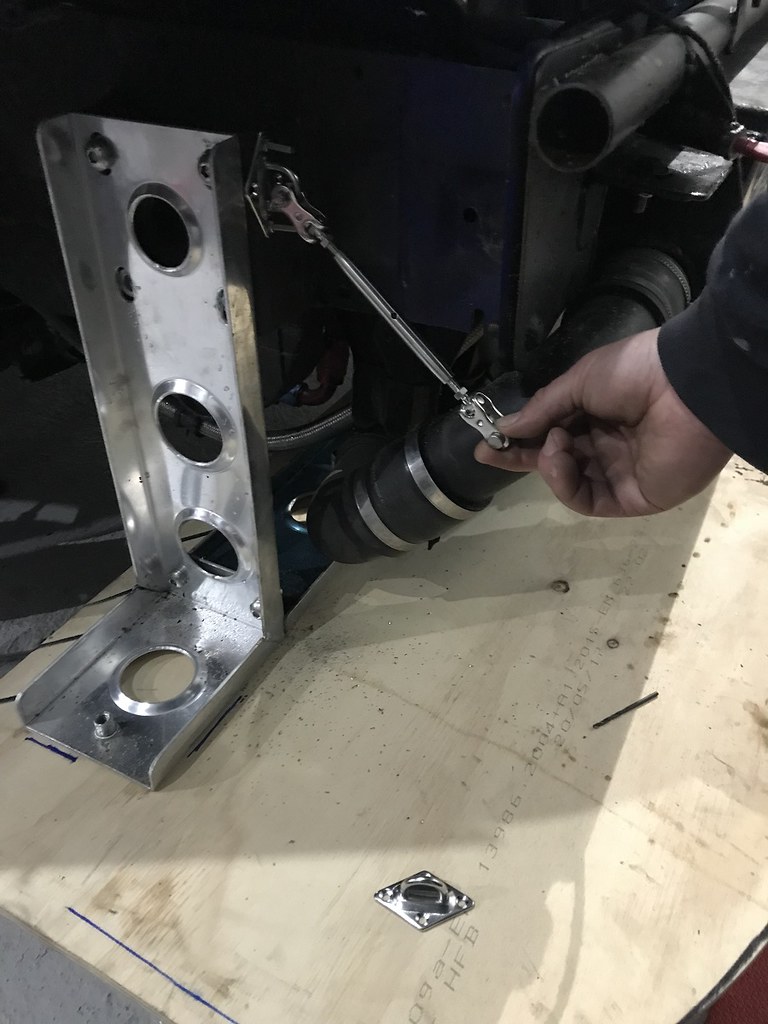
trying to get the angles right for not cutting up the bumper any more!
Will get there im sure! then i can finaly get out on the road and do some road testing as i was having a fuel cut issue but i think it was the worn fuel pump but its never been tested since so cant wait to get that done! and then once thats done its time to get a track day or 2 booked and learn how to drive a manual again! haha!
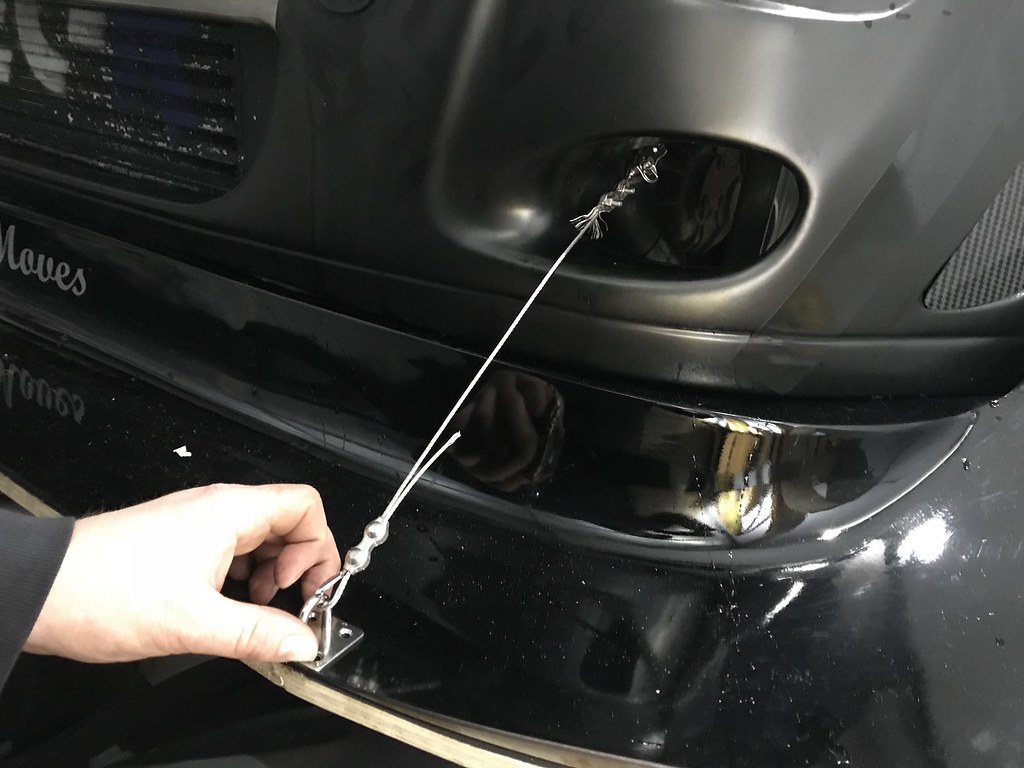
Had initially tryed to get the stays to go through the "fog lights" but the more i played with it i realised that i just didn't have the length or height to do that. So it was going to be a case of slotting the bumper or drilling holes.
I was offshore offcouse trying to work this all out but i decided on holes just below the "fog lights"
So you can see here the stays going though the bumper
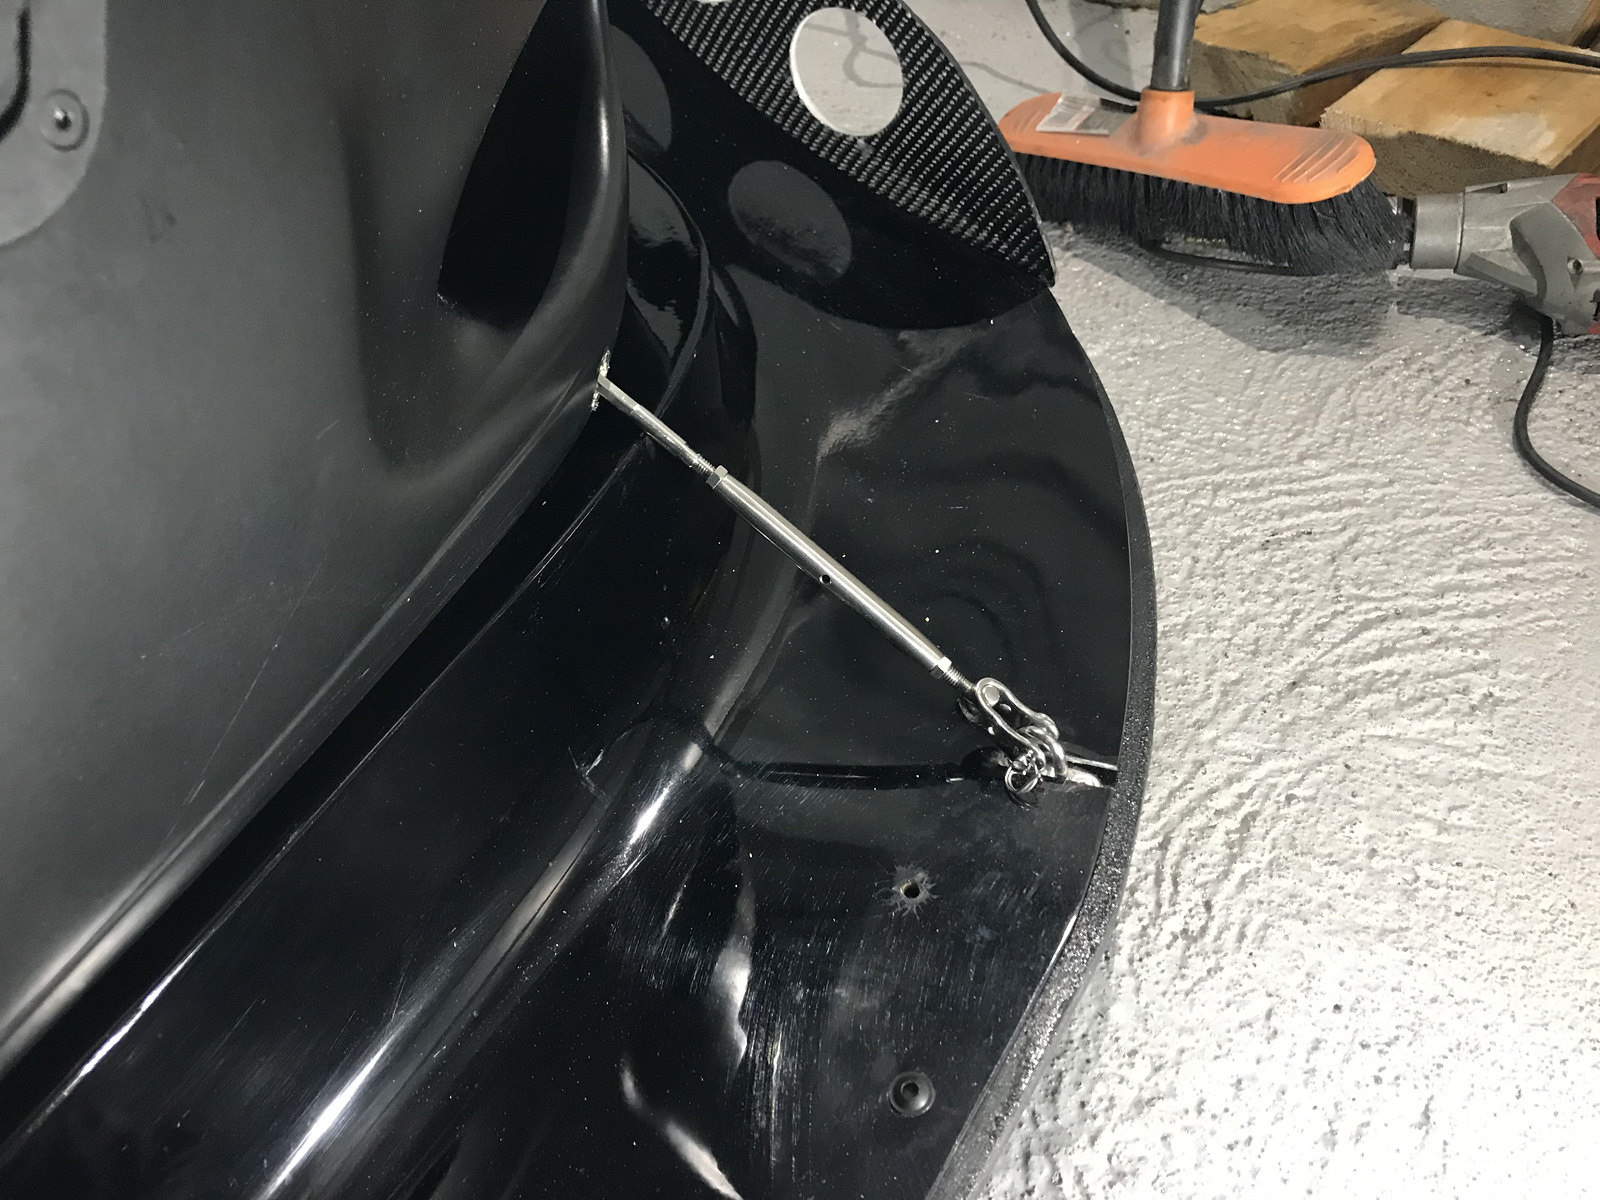
And where they pick up on the splitter support.
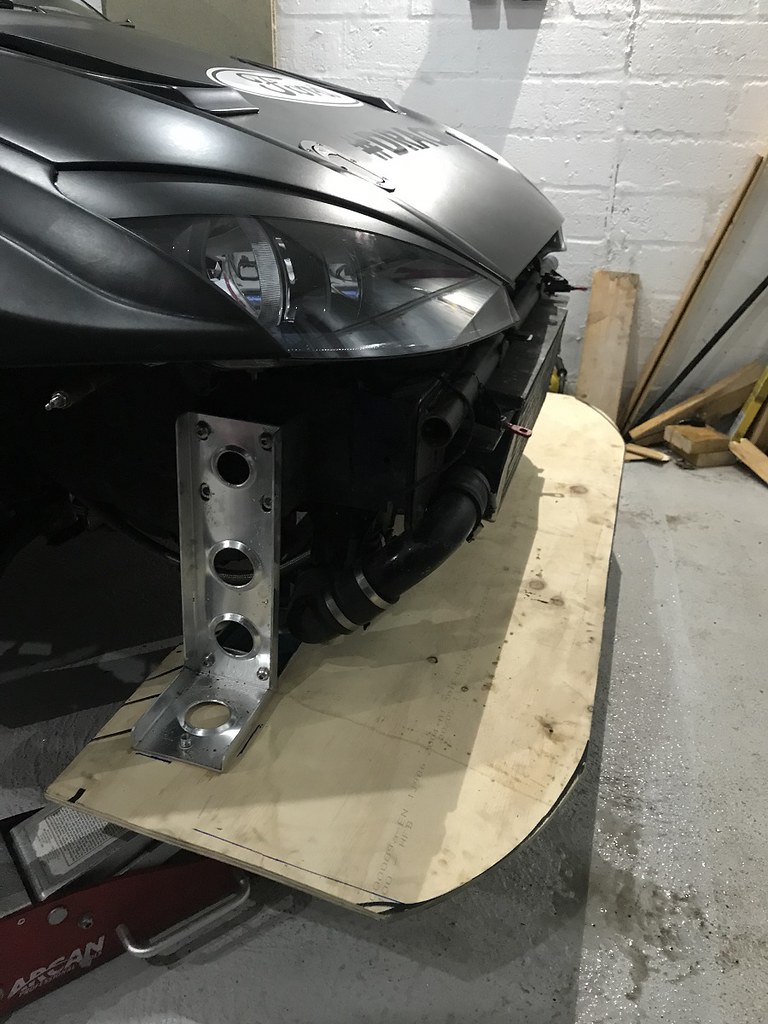
The splitter was finally mounted! massive relive and so happy how its worked out! Have gave it a lick of black epoxy even though it is its mock splitter i didnt want it soaking up water and destroying its self right away!
Slight issue was where the splitter (fibreglass bumper part) sat on the ply part was a little gap about 1cm big, i thoght that this could potentially let air in between the splitters and damage something so found out you get threaded inserts for wood ( basically wood versions of riv nuts lol!) so bought some of them and now have 5 M6's joining the 2 together!
Eagle eyes might of noticed the end plates above have a new hole in them!
This was added to let some of the air out as it was basically creating to much down force still! (madness!) have yet to try them out but if they dont work then i might just have to make really small end plates, more in the style of the old ESCOS hockey sticks
Once that was done i got the car home for a day and started to make my front splitter, just out of plywood for just now but might change to something lighter given time and im happy it works!
Also having to try a few places for the tie rods to mount, thanks to adam for the info on these!
trying to get the angles right for not cutting up the bumper any more!
Will get there im sure! then i can finaly get out on the road and do some road testing as i was having a fuel cut issue but i think it was the worn fuel pump but its never been tested since so cant wait to get that done! and then once thats done its time to get a track day or 2 booked and learn how to drive a manual again! haha!
Had initially tryed to get the stays to go through the "fog lights" but the more i played with it i realised that i just didn't have the length or height to do that. So it was going to be a case of slotting the bumper or drilling holes.
I was offshore offcouse trying to work this all out but i decided on holes just below the "fog lights"
So you can see here the stays going though the bumper
And where they pick up on the splitter support.
The splitter was finally mounted! massive relive and so happy how its worked out! Have gave it a lick of black epoxy even though it is its mock splitter i didnt want it soaking up water and destroying its self right away!
Slight issue was where the splitter (fibreglass bumper part) sat on the ply part was a little gap about 1cm big, i thoght that this could potentially let air in between the splitters and damage something so found out you get threaded inserts for wood ( basically wood versions of riv nuts lol!) so bought some of them and now have 5 M6's joining the 2 together!
Eagle eyes might of noticed the end plates above have a new hole in them!
This was added to let some of the air out as it was basically creating to much down force still! (madness!) have yet to try them out but if they dont work then i might just have to make really small end plates, more in the style of the old ESCOS hockey sticks

 05-09-2018, 03:24 PM
#51
Part of the Furniture
Thread Starter
Thanks! The car is build for racing so if im not trying to get the lap times down then i might as well give up! haha! I know the car has so much more in it! just i lack the seat time! This winter will be a few little changes but mainly refreshing the whole car over!

 07-09-2018, 01:12 PM
#54
Part of the Furniture
Thread Starter
[left]Also while on the aero side of things i thought id try these out!
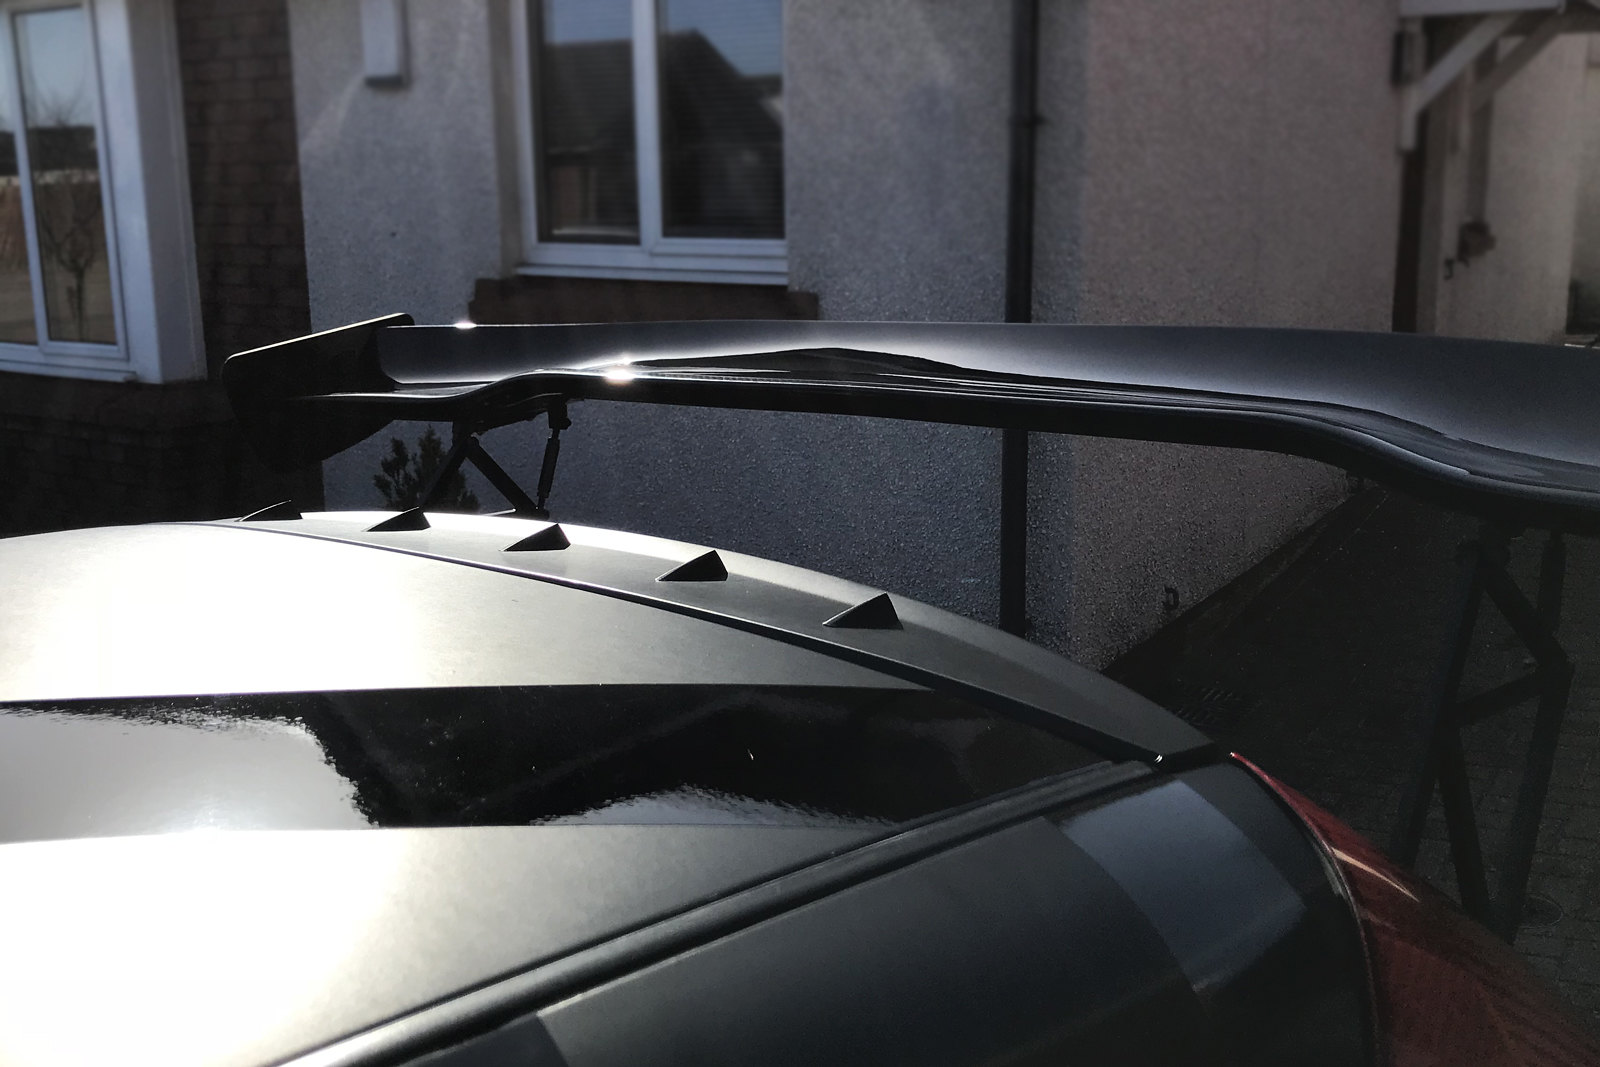
Famous in the evo world but for those who dont know they are little (3D printed) vortex generators There job is to stop the air basically flowing right down the rear window and chuck it into the rear wing to then let it do its job! Will get the wool tails out and film it on the go pro see if its made any odds!
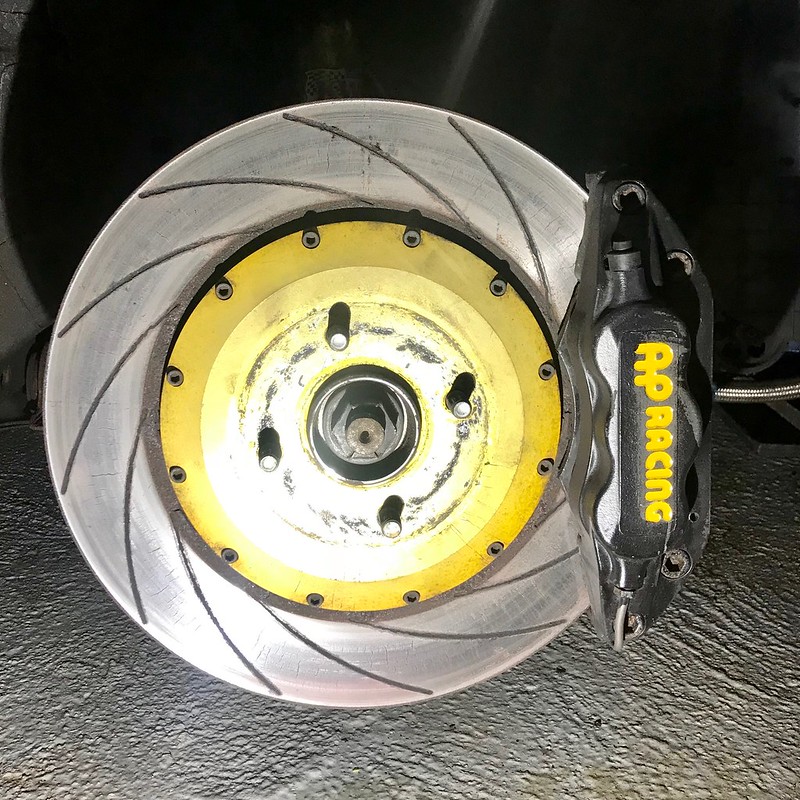
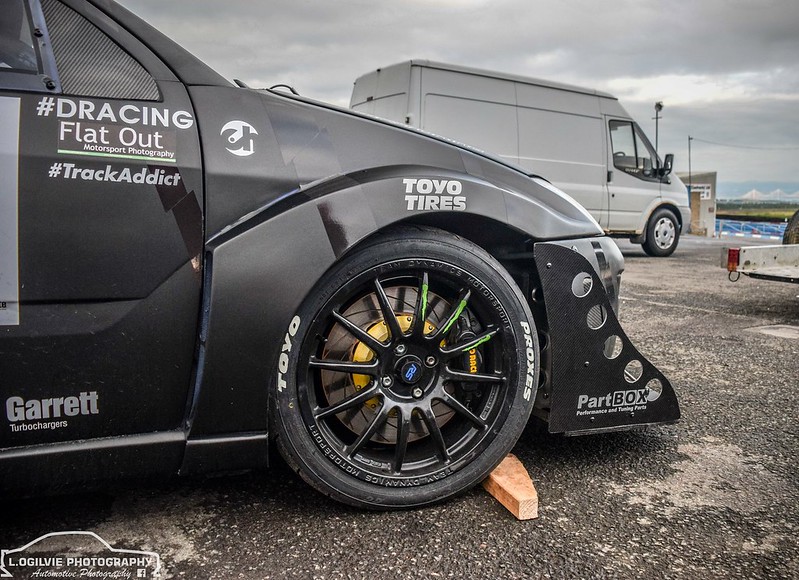
Other than that a delivery from AP racing turned up

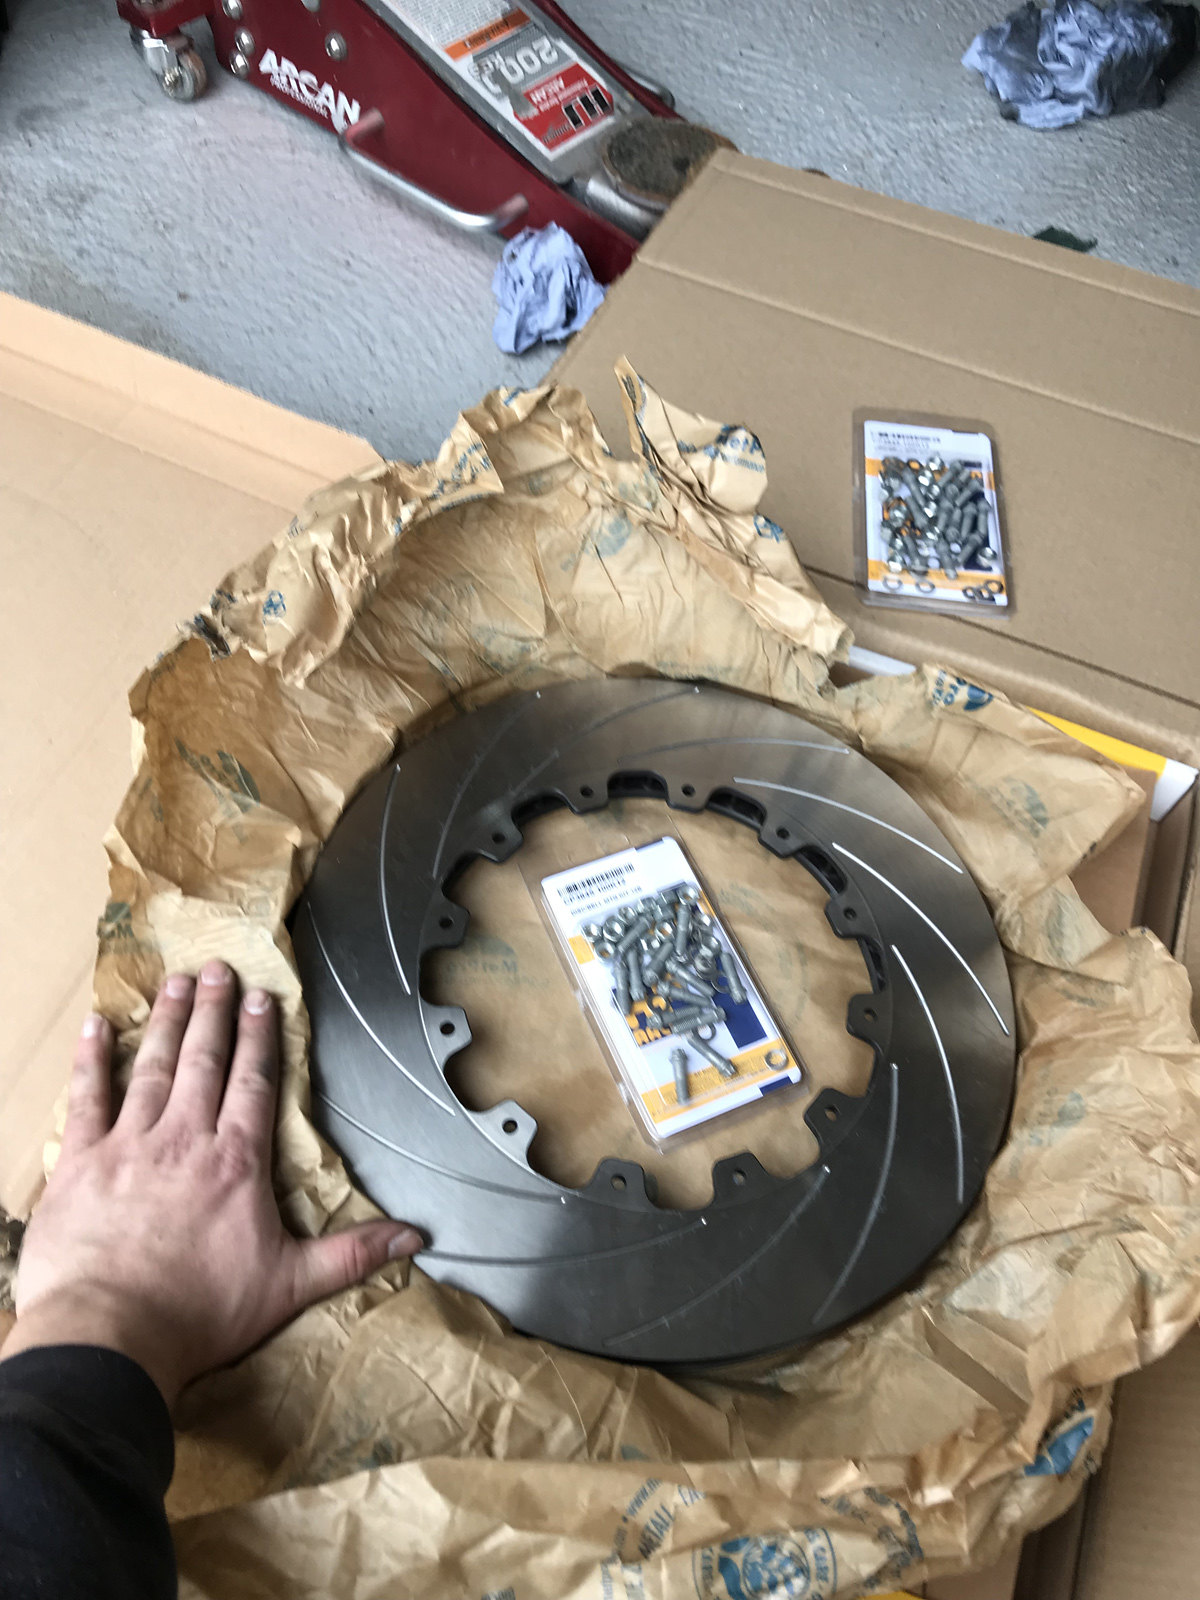
Forgot how big these disks are! massive! Will get them replaced and bedded in soon!
Only other thing is i had the car out for some road testing! Destroyed another gearbox 3&4th now grind above 7k shifts and 5th gear is a little temperamental ! Was planning on sending the quafie box away to get a check over before putting it back in for SLS in july but i sadly dont have enough time for that, mapping and then testing again! So i am not going to be able to get it sent off before the racing starts! Fingers crossed its ok! Other than that i had a slight misfire, checked the logs and all is ok so gapped the plugs down and its went away. Might have an injector issue so going to remove them and get them cleaned and see how they come back. Other than that the car is going very well and im falling in love with it again! Animal!
Thanks
Famous in the evo world but for those who dont know they are little (3D printed) vortex generators There job is to stop the air basically flowing right down the rear window and chuck it into the rear wing to then let it do its job! Will get the wool tails out and film it on the go pro see if its made any odds!
Other than that a delivery from AP racing turned up
Forgot how big these disks are! massive! Will get them replaced and bedded in soon!
Only other thing is i had the car out for some road testing! Destroyed another gearbox
Thanks
Last edited by Jackstrath; 07-09-2018 at 01:15 PM.
The following users liked this post:
H3lsing (08-09-2018)
09-09-2018, 09:35 AM
#55
Part of the Furniture
Thread Starter
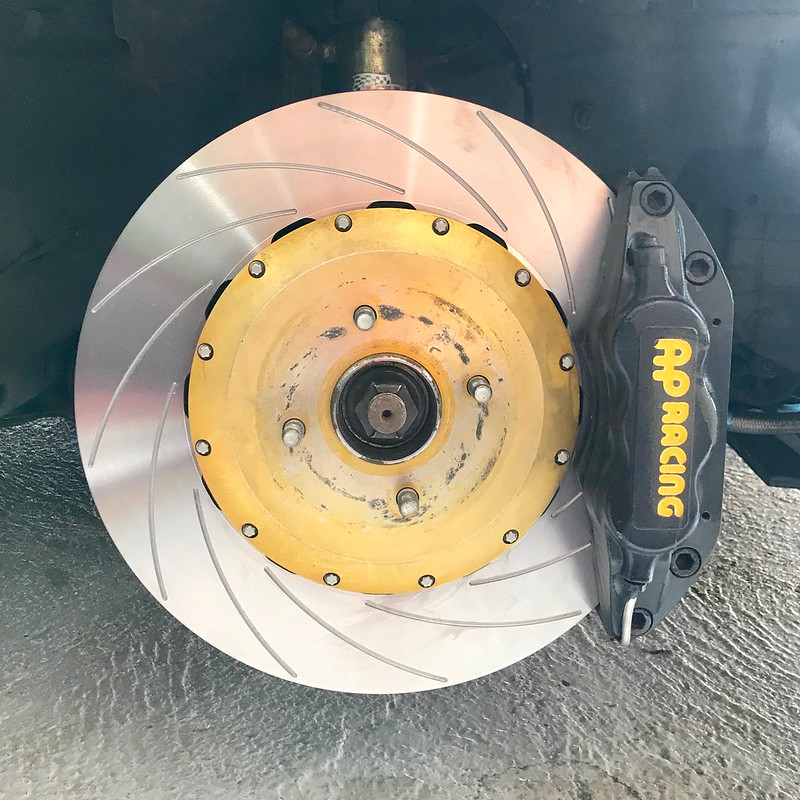
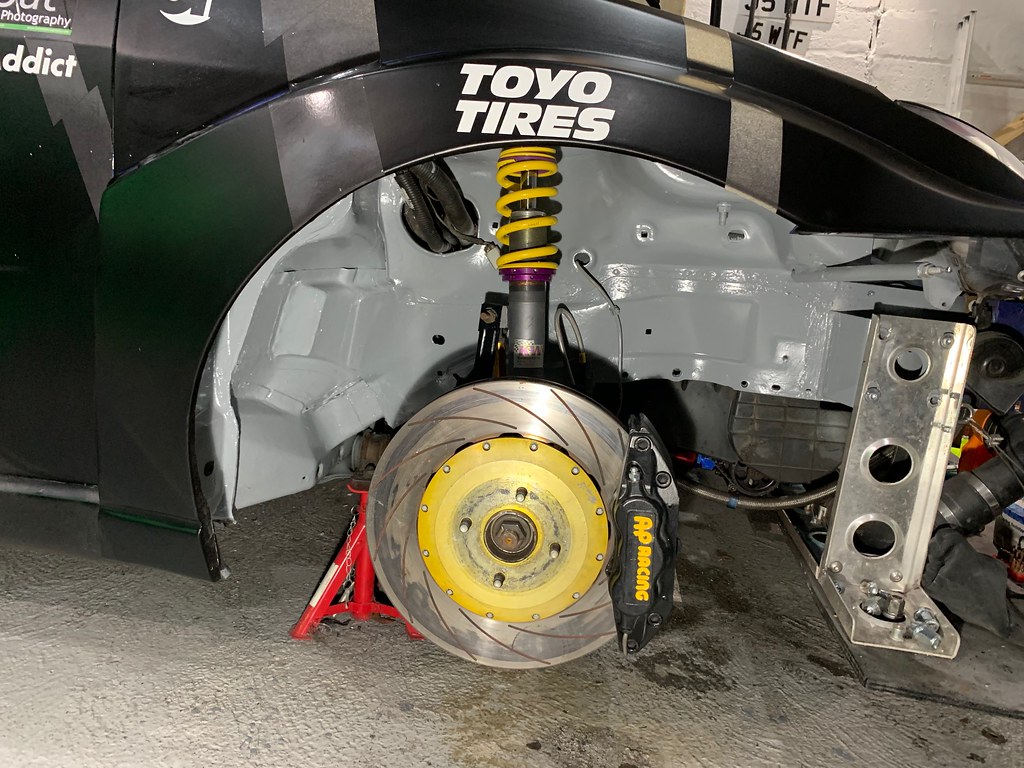
New brake disks from AP to swap out! they were over due, some 20 odd thousand miles on them so no complaints from me as they have seen there fair share of action!
Interestingly they have changed from the cap head bolts to the little E socket bolts, Was a bit concerned as they had suppled double the ammount of washers need as i couldnt use the washer bell side like iv seen before, quick phone call and that was put to rest that it would be fine!
Outer face of the disk didnt look to bad
Inner face was looking a little worse for wear!
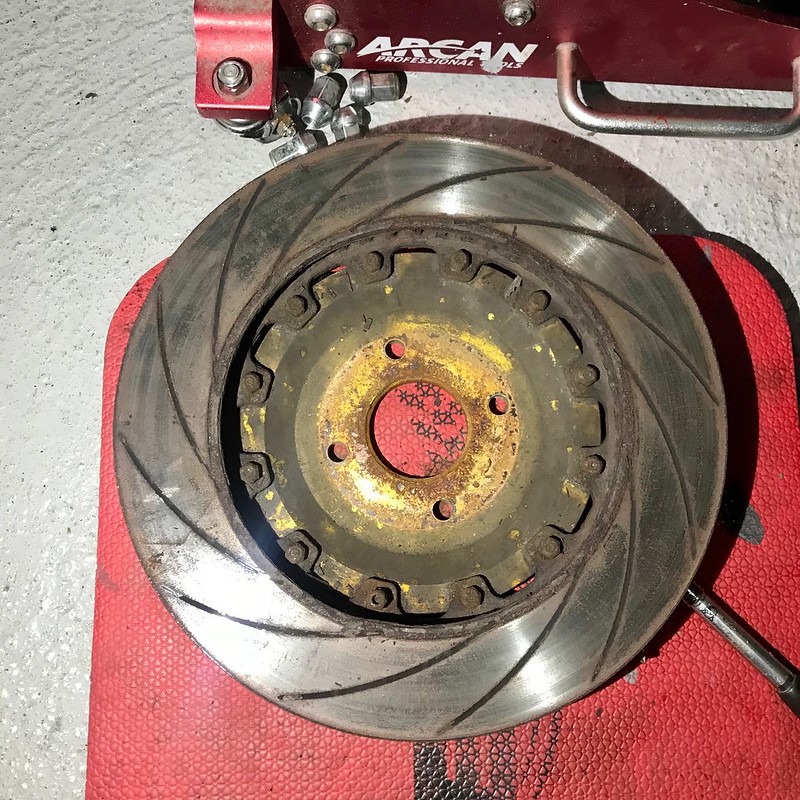
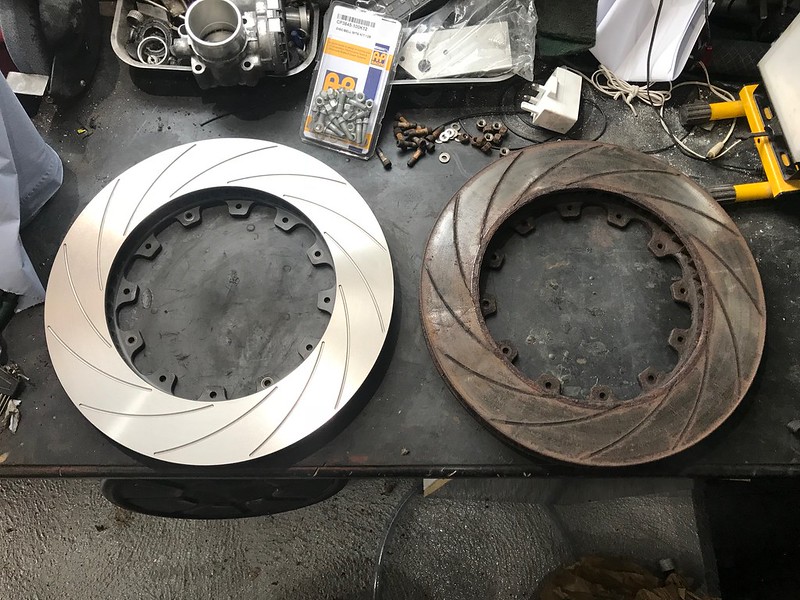
Gave the bells a clean up as best as i could with out damaging the coating, dont think they look to bad considering they are 6 years old!
Gearbox was changed to the quaife box and since the ratios are different a little tweek was needed to the cars map
Interestingly they have changed from the cap head bolts to the little E socket bolts, Was a bit concerned as they had suppled double the ammount of washers need as i couldnt use the washer bell side like iv seen before, quick phone call and that was put to rest that it would be fine!
Outer face of the disk didnt look to bad
Inner face was looking a little worse for wear!
Gave the bells a clean up as best as i could with out damaging the coating, dont think they look to bad considering they are 6 years old!
Gearbox was changed to the quaife box and since the ratios are different a little tweek was needed to the cars map
10-09-2018, 04:21 PM
#56
Part of the Furniture
Thread Starter
So i can never make up my mind if the focus is fighting me or my luck isn�t just what it used to be! 😂
While bedding in the brakes I noticed the pads were not facing up to the disks right, now I did give them a quick scuff with emery paper but nothing drastic and didn�t give them much attention as I was more concerned about the pins as they were looking a little interesting.
Anyway after a few more miles and using the brakes a bit more they still did not face up so it was pad out time to see what was going on.
Soon as I took the pad out it a bigger issue showed it�s face
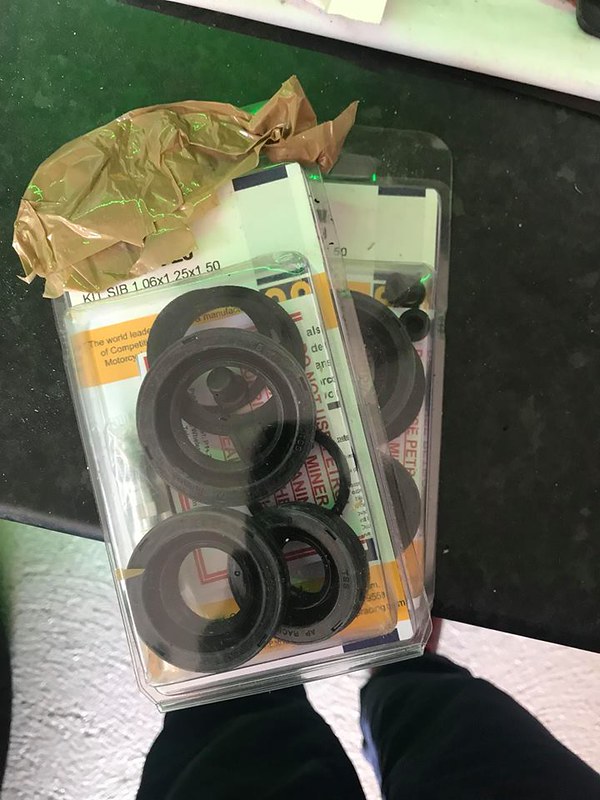
The material had started to crack ☹️ was only going to be a matter of time before that failed so with out any more messing about I was on the phone and got a new set of pads ordered up, along with some pins, and while I was at it I got the high temp brake seal kit for the ap�s (as technically these are a road caliper)

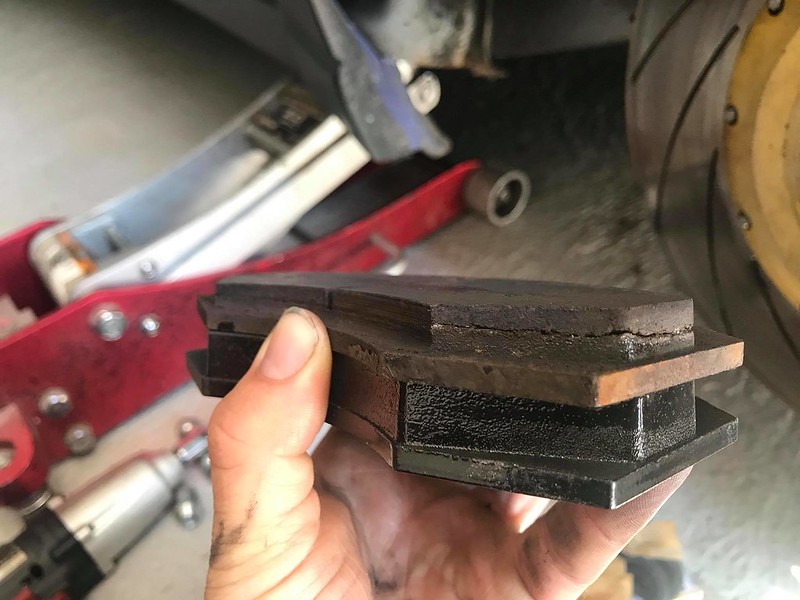
The pads are old, about 3 years of sitting , thats 3 winters with the damp in the air ect ect, not overly concernred but it certianly was an expense i could of done with out!.
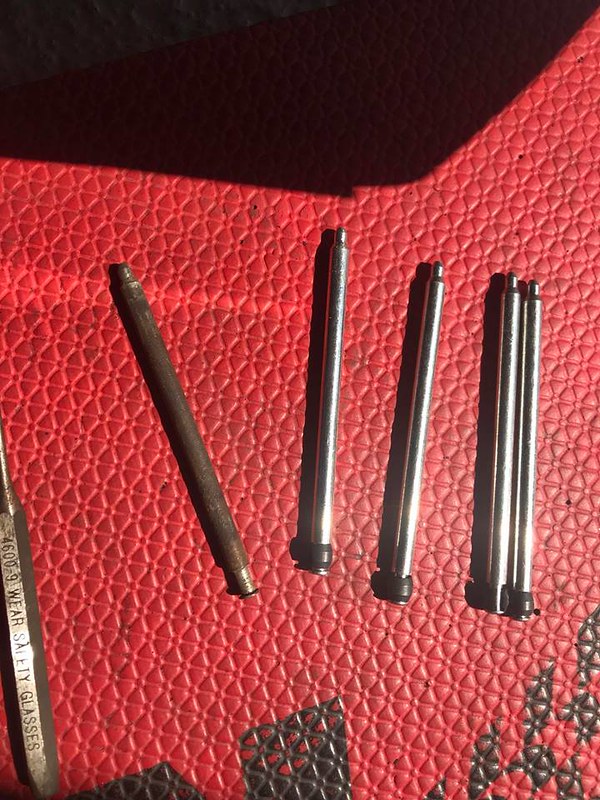
Pins were replaced , as you can see one of the little retaining coller had failed completely !
New seals to be fitted after the race.
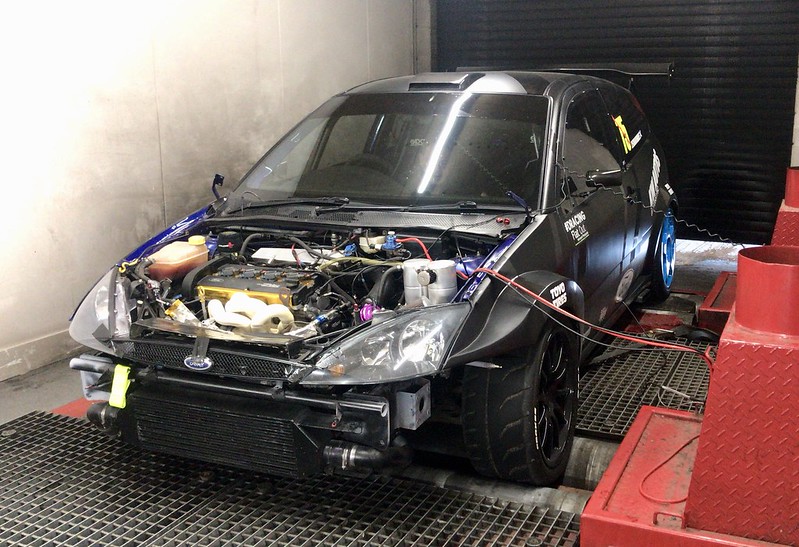
So with that sorted the car was off to the dyno! Quick tweek at MB Motorsports seen the map back to what it was with the new/old quaife gearbox in!
While bedding in the brakes I noticed the pads were not facing up to the disks right, now I did give them a quick scuff with emery paper but nothing drastic and didn�t give them much attention as I was more concerned about the pins as they were looking a little interesting.
Anyway after a few more miles and using the brakes a bit more they still did not face up so it was pad out time to see what was going on.
Soon as I took the pad out it a bigger issue showed it�s face
The material had started to crack ☹️ was only going to be a matter of time before that failed so with out any more messing about I was on the phone and got a new set of pads ordered up, along with some pins, and while I was at it I got the high temp brake seal kit for the ap�s (as technically these are a road caliper)
The pads are old, about 3 years of sitting , thats 3 winters with the damp in the air ect ect, not overly concernred but it certianly was an expense i could of done with out!.
Pins were replaced , as you can see one of the little retaining coller had failed completely !
New seals to be fitted after the race.
So with that sorted the car was off to the dyno! Quick tweek at MB Motorsports seen the map back to what it was with the new/old quaife gearbox in!
10-09-2018, 04:23 PM
#57
Part of the Furniture
Thread Starter
And then!
After everything going so well with the mapping and the last-minute brake expenditure, i thought i was done! Entry in to round 4&5 of SLS and it finally felt like a big weight had been lifted! Well.... That didn�t last long!
With the car sitting for the best part of 2 and a half years i thought it was worth doing a spanner check over the whole car just to make sure nothing was going to fall off! Did the whole front end, found a few bolts that needed a wee nip up but on the whole, for running near solid engine mounts the car was fairly solid!
One thing that i can�t seem to stop is the constant little sweat a few of the AN oil lines have, iv tried new fittings ect new seals where i can but no matter how much i dick about i can�t get the oil to stop having a little sweat, iv came to accept the car just self waxoils lol, but i thought id better give it a clean off anyway and while doing so i noticed a potential show stopper (yes that�s right , less than 12 hours after i put my entry in it was potentially going to have to get cancelled!)
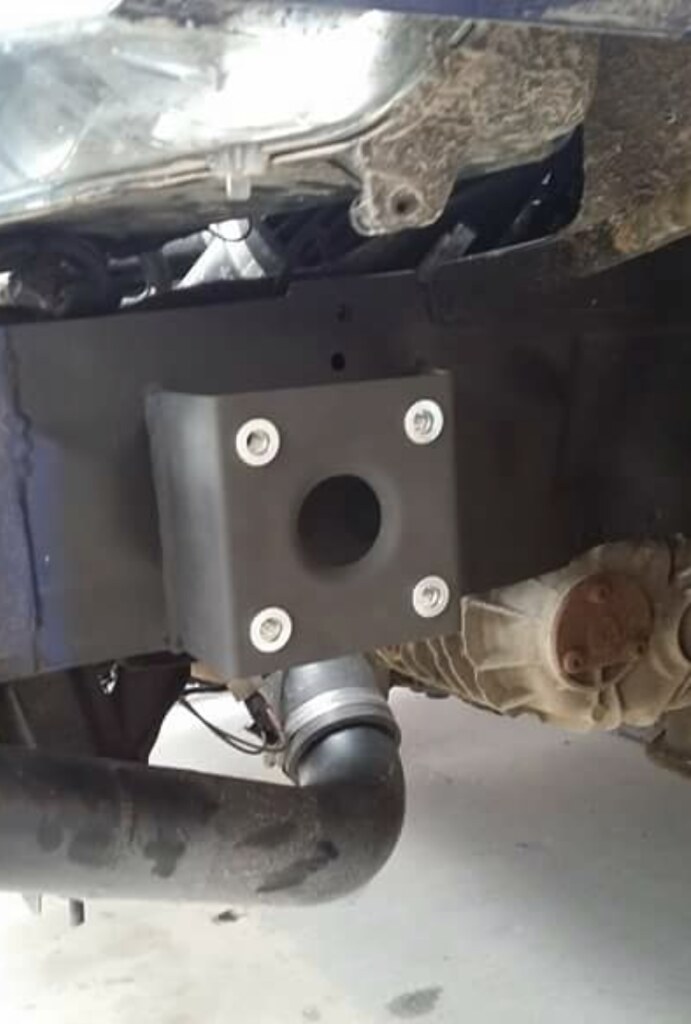
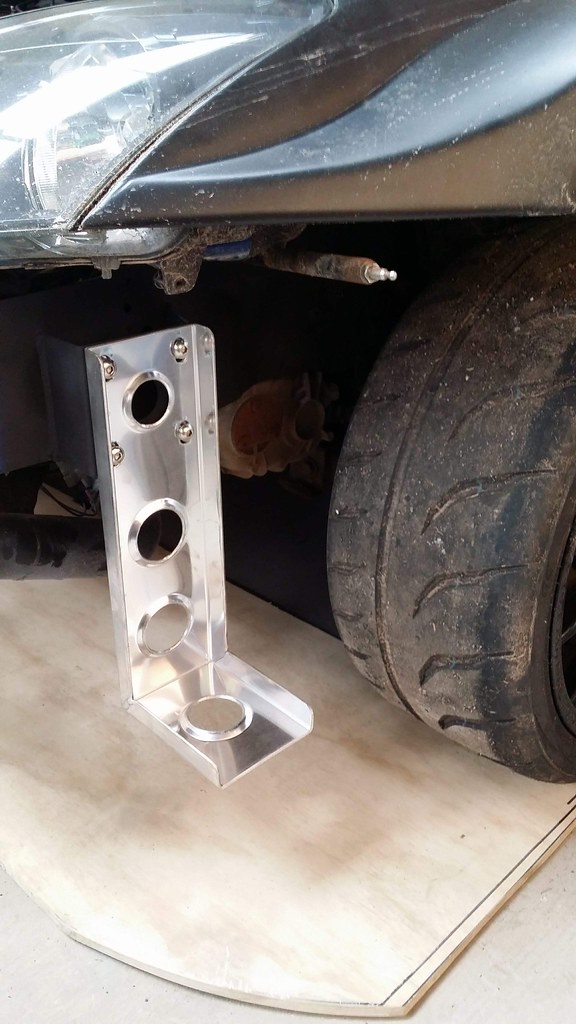
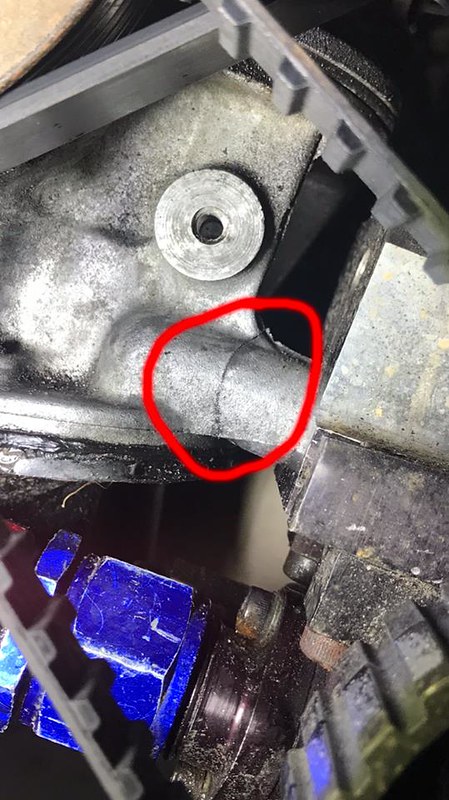
While cleaning the oil lines and pump i noticed a bit of play in the pump, odd i thought, maybe another loose bolt? Wrong, its never that simple! Long story short, the oil pump mounting point on the upper sump had broken/failed/fell apart.
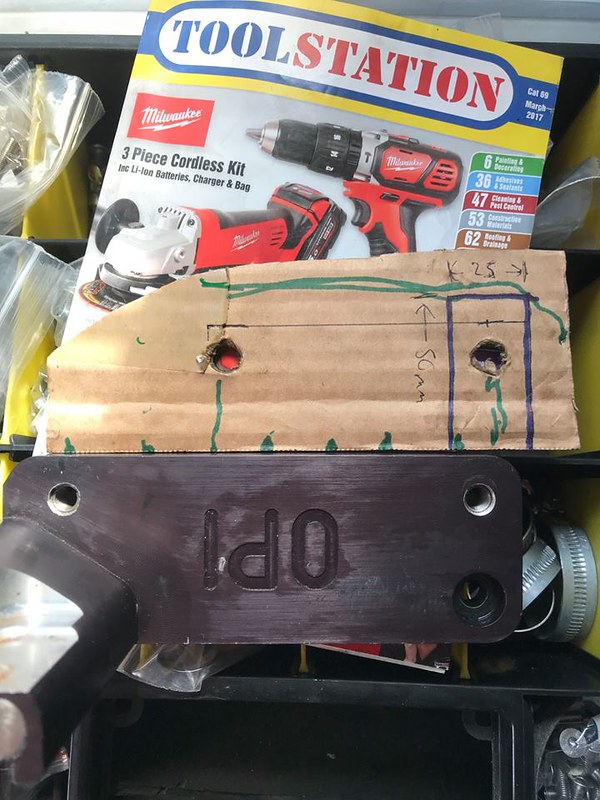
Panic set in, the External oil pump is a fairly important part of the engine!, Few words with Paul and he had sent me a fix for it, it works as he has used and tested it but i was hunting about for other places to potentially re locate the pump, and found since i don�t run the Air con pump i could use 2 of the bolt holes in the block fairly easy - So a bit of ball scratching as the bracket is billet alloy there was only 1 person that i knew could do exactly what i wanted ,and a few messages to Calum at Calum Hayes Fabrications he said bring it up and we could get our weld on! (well he could, il stick to steel lol)
Made a carboard template, Calum didn�t like that, so then remade one in sheet alloy, got a ruler out (first for everything on this car) and boom had a Template made up!
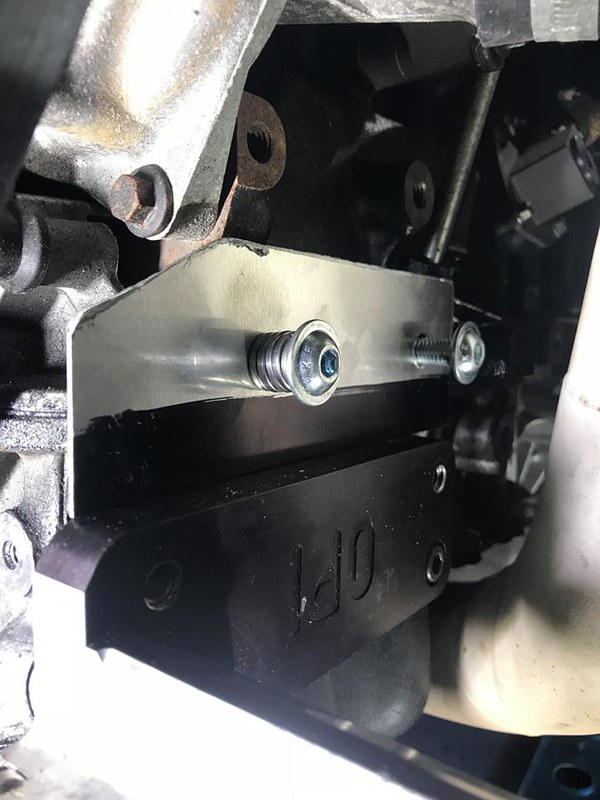
So a little road trip to Calums, job done (on a Saturday!), Ralph the dog cuddled and i was back at mine, trial fitted (no further mods needed) and a lick of paint later it was fitted! Feels solid and its just had 60 miles on tyre scrubbing and brake bedding in thrown at it!
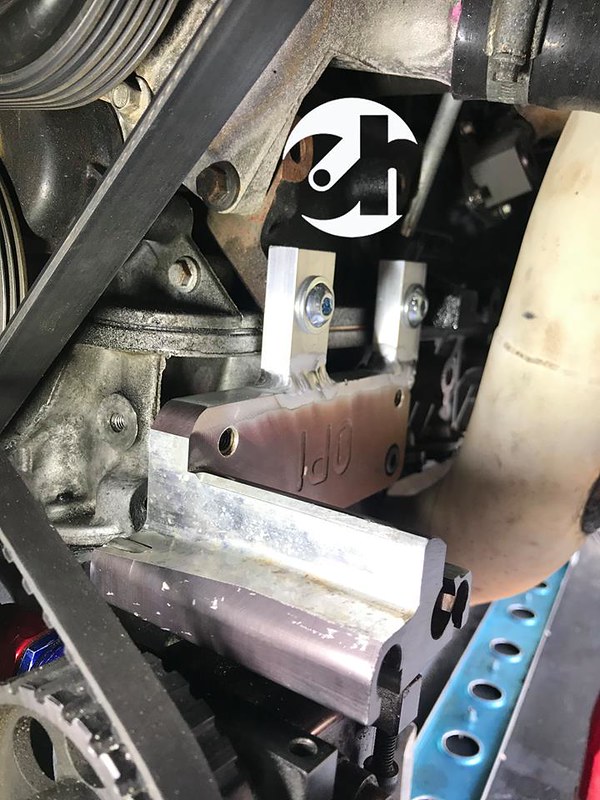
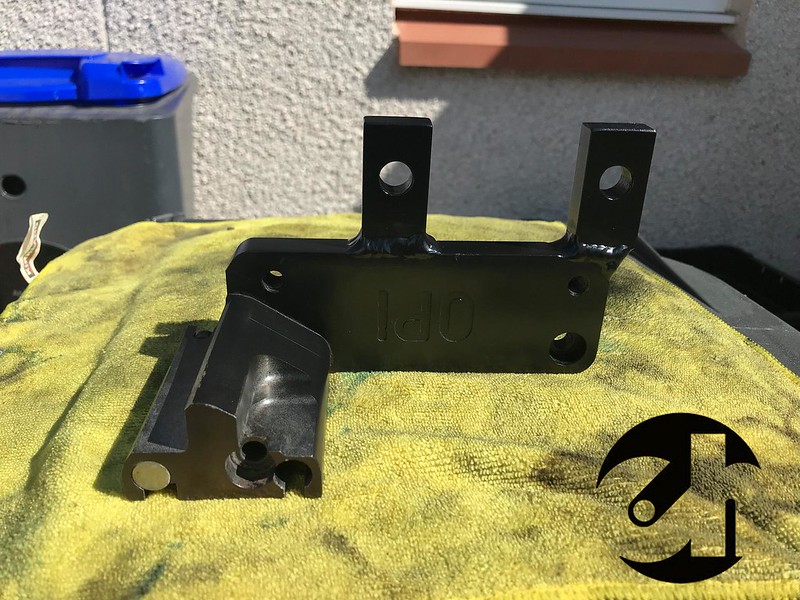
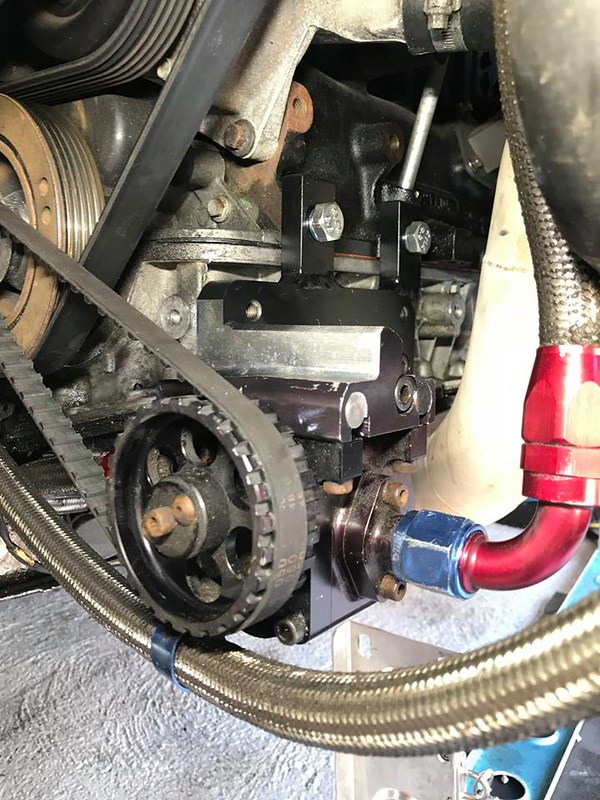
Can finally breath again! - Please no more!
After everything going so well with the mapping and the last-minute brake expenditure, i thought i was done! Entry in to round 4&5 of SLS and it finally felt like a big weight had been lifted! Well.... That didn�t last long!
With the car sitting for the best part of 2 and a half years i thought it was worth doing a spanner check over the whole car just to make sure nothing was going to fall off! Did the whole front end, found a few bolts that needed a wee nip up but on the whole, for running near solid engine mounts the car was fairly solid!
One thing that i can�t seem to stop is the constant little sweat a few of the AN oil lines have, iv tried new fittings ect new seals where i can but no matter how much i dick about i can�t get the oil to stop having a little sweat, iv came to accept the car just self waxoils lol, but i thought id better give it a clean off anyway and while doing so i noticed a potential show stopper (yes that�s right , less than 12 hours after i put my entry in it was potentially going to have to get cancelled!)
While cleaning the oil lines and pump i noticed a bit of play in the pump, odd i thought, maybe another loose bolt? Wrong, its never that simple! Long story short, the oil pump mounting point on the upper sump had broken/failed/fell apart.
Panic set in, the External oil pump is a fairly important part of the engine!, Few words with Paul and he had sent me a fix for it, it works as he has used and tested it but i was hunting about for other places to potentially re locate the pump, and found since i don�t run the Air con pump i could use 2 of the bolt holes in the block fairly easy - So a bit of ball scratching as the bracket is billet alloy there was only 1 person that i knew could do exactly what i wanted ,and a few messages to Calum at Calum Hayes Fabrications he said bring it up and we could get our weld on! (well he could, il stick to steel lol)
Made a carboard template, Calum didn�t like that, so then remade one in sheet alloy, got a ruler out (first for everything on this car) and boom had a Template made up!
So a little road trip to Calums, job done (on a Saturday!), Ralph the dog cuddled and i was back at mine, trial fitted (no further mods needed) and a lick of paint later it was fitted! Feels solid and its just had 60 miles on tyre scrubbing and brake bedding in thrown at it!
Can finally breath again! - Please no more!
10-09-2018, 04:25 PM
#58
Part of the Furniture
Thread Starter
and theres more
So With that sorted, it was time to bed in the new disks and pads, scrub in a set of wets and test the oil pump.
All was going well, about 60 miles done and then the car started to ride on a little. Would lift off and the car would hang for a second before slowing, yup awesome, throttle cable issues.....
Long story short the throttle cable is toast. RS only part that ford stopped making/selling a few years ago now.. Im going drive by wire end of this year so it really was typical this happened now, again im glad it happend before the racing rather than at it, but its still ANOTHER expence i could of done with out!
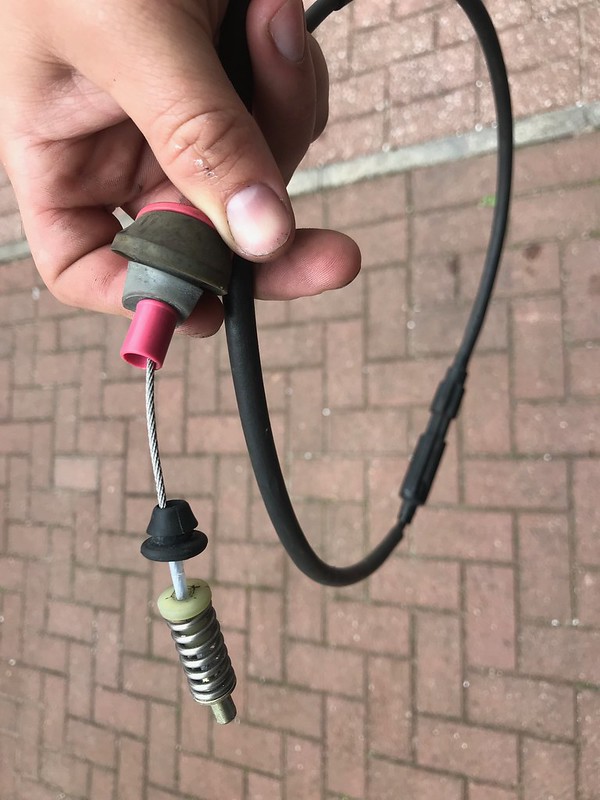
So a bit of hunting about and there was one on ebay but it was �70 posted (they were �110 new when selling) and i was only needing it for a few months, some guys on the focus RS facebook page sugested a company called speedy cables, so its off for a refurb and hopefully that is the car ready for knockhill!
So With that sorted, it was time to bed in the new disks and pads, scrub in a set of wets and test the oil pump.
All was going well, about 60 miles done and then the car started to ride on a little. Would lift off and the car would hang for a second before slowing, yup awesome, throttle cable issues.....
Long story short the throttle cable is toast. RS only part that ford stopped making/selling a few years ago now.. Im going drive by wire end of this year so it really was typical this happened now, again im glad it happend before the racing rather than at it, but its still ANOTHER expence i could of done with out!
So a bit of hunting about and there was one on ebay but it was �70 posted (they were �110 new when selling) and i was only needing it for a few months, some guys on the focus RS facebook page sugested a company called speedy cables, so its off for a refurb and hopefully that is the car ready for knockhill!
12-09-2018, 01:22 PM
#59
Part of the Furniture
Thread Starter
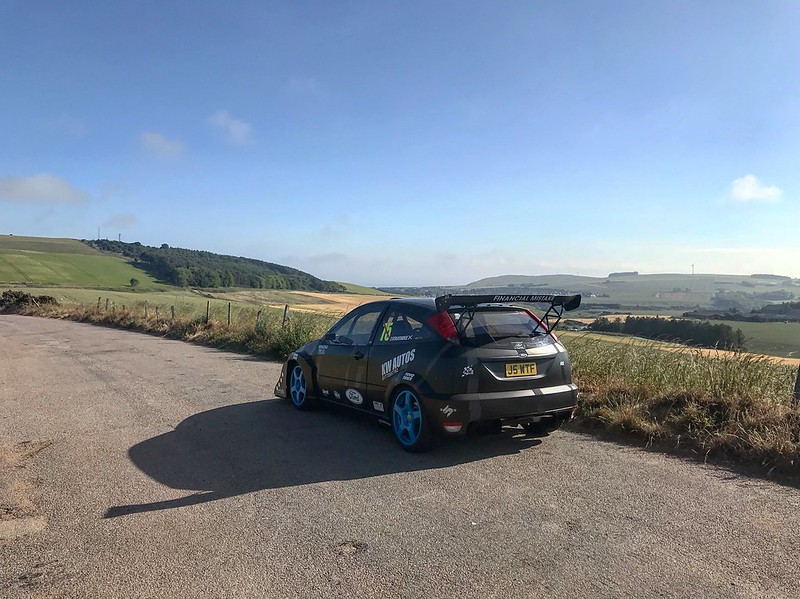
So! Round 5 Super Lap Scotland,
This was the "balls to the walls" day
Back to the track, i had gave the sore gearbox a fresh oil change the night before so the prep work to be done that morning was minimal.
So back to clockwise direction and set out for 1st practice. I was excited as i had done way more laps this way and that boosted confidence that i was going to go quicker! Also had my dad down and a few friends had also made the trip down to show there support!
Hans device took a bit of getting used to. Not 100% on it but i guess it beats a sore neck!
Well the confidence only lasted 4 laps, when changing up on my first hot lap of the day to find the limits the throttle cable (yes the one that had been refurbed the week before) snapped ! , I honestly could off cried as soon as it happened i knew exactly what it was. I mean 4 laps in! Even the temperamental gearbox had taken more punishment!
So im at a loss, i know how hard these cables are to get and im stuck at a track in the middle of the Scottish countryside!
Just as i get towed into the pits i get my phone out and have a missed call from my pal Paul Daly and as fait would have it i gave him a ring back and he turned his car around, headed home and went and removed his throttle cable from HIS OWN focus RS and gave it to me to use for the rest of the day! Honestly couldn�t believe my luck!
So had counted out missing first practice and having to go balls to the wall in qualifying and then hoping i could hold it together for 1 final lap! But Paul got it to me in double time and i had it fitted just in time for practice! Just what i needed! Went out a bit flustered and again over drove the car! But what i did know that i was 100% understeering way to much.
I had to sort this, after practice was done i bumped into another focus RS owner and race mechanic master man
Andrew from Andrew Lamont Motorsport Ltd, told him how i have managed to make one of the most best handling cars of its time turn into a understeer machine and one simple tip was to raise the back end up to get it a bit more loose! So right over to the car i went and raised the rear up about 20mm to get some weight back onto the front.
Armed with the "fat tyres" and quick suspension change it was out for quailing, still on low boost to just try find my lines through the corners rather than over the curbs!
Set a 56.4 , another PB, the understeer had been reduced and the times dropped and confidence grew!
With just the final to go i put a bit more air in the rear tyres to see if i could get a little more turn in and just as id finished
doing that Duncan of Duncan Vincent Commentary came and stuck a microphone in my face and asked what the game plan was for the afternoon!, well peer pressure kicked in and i said "high boost and wing it" haha!

So final came , onto high boost for the Final, kept it smooth neat and tidy and blasted out a 55.6 lap! Over the moon! First time out in 3 years in the focus, smashed my PB of 57.01 and to be right in about with the rest of the bunch i was delighted! P2 was mine and that was the best weekend of my year so far!
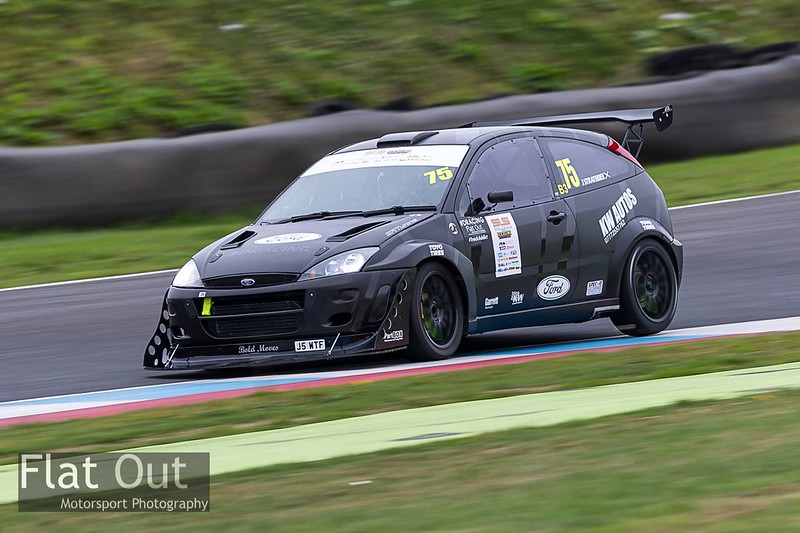
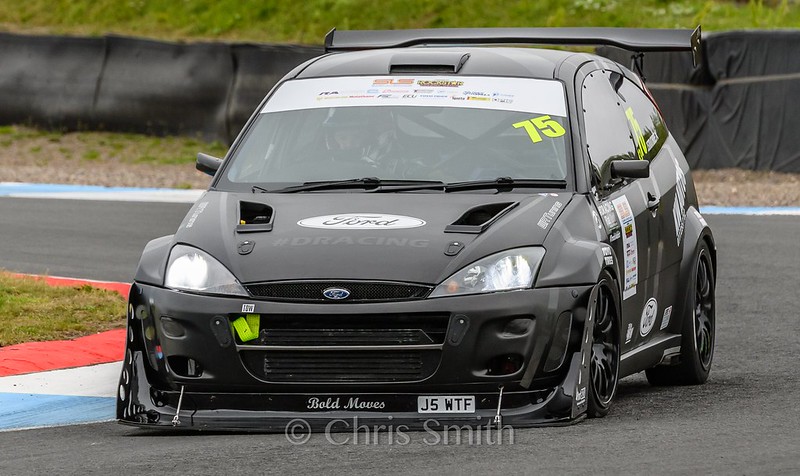
So With the awards handed out i added a 2nd place trophie to the collection.
Car all loaded and i was back up the road before sunset!
Big thanks to everyone thats helped along the way!
The last min favours, the late nights and the constant support from everyone the likes a post or has a comment!
My main sponser Kev @ KW autos, who has yet again helped me build this car back up! And all the other names on the car! Thank you all!
On board footage of the final lap!
https://www.youtube.com/watch?v=B7L491vUZgo
This was the "balls to the walls" day
Back to the track, i had gave the sore gearbox a fresh oil change the night before so the prep work to be done that morning was minimal.
So back to clockwise direction and set out for 1st practice. I was excited as i had done way more laps this way and that boosted confidence that i was going to go quicker! Also had my dad down and a few friends had also made the trip down to show there support!
Hans device took a bit of getting used to. Not 100% on it but i guess it beats a sore neck!
Well the confidence only lasted 4 laps, when changing up on my first hot lap of the day to find the limits the throttle cable (yes the one that had been refurbed the week before) snapped
So im at a loss, i know how hard these cables are to get and im stuck at a track in the middle of the Scottish countryside!
Just as i get towed into the pits i get my phone out and have a missed call from my pal Paul Daly and as fait would have it i gave him a ring back and he turned his car around, headed home and went and removed his throttle cable from HIS OWN focus RS and gave it to me to use for the rest of the day! Honestly couldn�t believe my luck!
So had counted out missing first practice and having to go balls to the wall in qualifying and then hoping i could hold it together for 1 final lap! But Paul got it to me in double time and i had it fitted just in time for practice! Just what i needed! Went out a bit flustered and again over drove the car! But what i did know that i was 100% understeering way to much.
I had to sort this, after practice was done i bumped into another focus RS owner and race mechanic master man
Andrew from Andrew Lamont Motorsport Ltd, told him how i have managed to make one of the most best handling cars of its time turn into a understeer machine and one simple tip was to raise the back end up to get it a bit more loose! So right over to the car i went and raised the rear up about 20mm to get some weight back onto the front.
Armed with the "fat tyres" and quick suspension change it was out for quailing, still on low boost to just try find my lines through the corners rather than over the curbs!
Set a 56.4 , another PB, the understeer had been reduced and the times dropped and confidence grew!
With just the final to go i put a bit more air in the rear tyres to see if i could get a little more turn in and just as id finished
doing that Duncan of Duncan Vincent Commentary came and stuck a microphone in my face and asked what the game plan was for the afternoon!, well peer pressure kicked in and i said "high boost and wing it" haha!
So final came , onto high boost for the Final, kept it smooth neat and tidy and blasted out a 55.6 lap! Over the moon! First time out in 3 years in the focus, smashed my PB of 57.01 and to be right in about with the rest of the bunch i was delighted! P2 was mine and that was the best weekend of my year so far!
So With the awards handed out i added a 2nd place trophie to the collection.
Car all loaded and i was back up the road before sunset!
Big thanks to everyone thats helped along the way!
The last min favours, the late nights and the constant support from everyone the likes a post or has a comment!
My main sponser Kev @ KW autos, who has yet again helped me build this car back up! And all the other names on the car! Thank you all!
On board footage of the final lap!
https://www.youtube.com/watch?v=B7L491vUZgo
15-09-2018, 07:26 PM
#62
Part of the Furniture
Thread Starter
Anyway, since the last time it was out the focus has gained some weight, about 30kg's not a massive amount but im putting it down to all the aero stuff! Going by current class B regs iv got nearly 100kg to play with if i stay at this power level! So i took one look at the car and decided there is weight inside it that can go!
List so far is:
Sound spray in the passanger side floor and foot well.
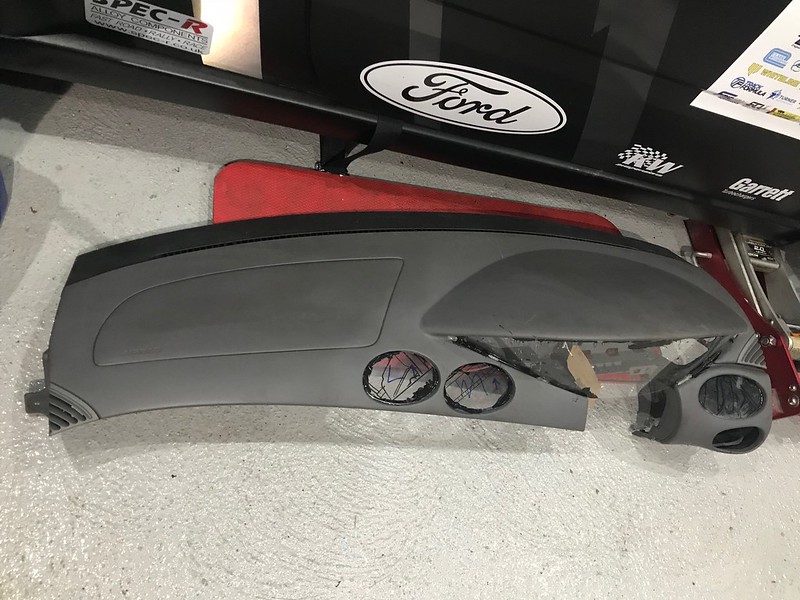
Both drivers and pas original seat mounts.
The standard full size dash
Interiors loom needs trimmed again and tidyed up
Dash support bar can be trimmed to loose some beef
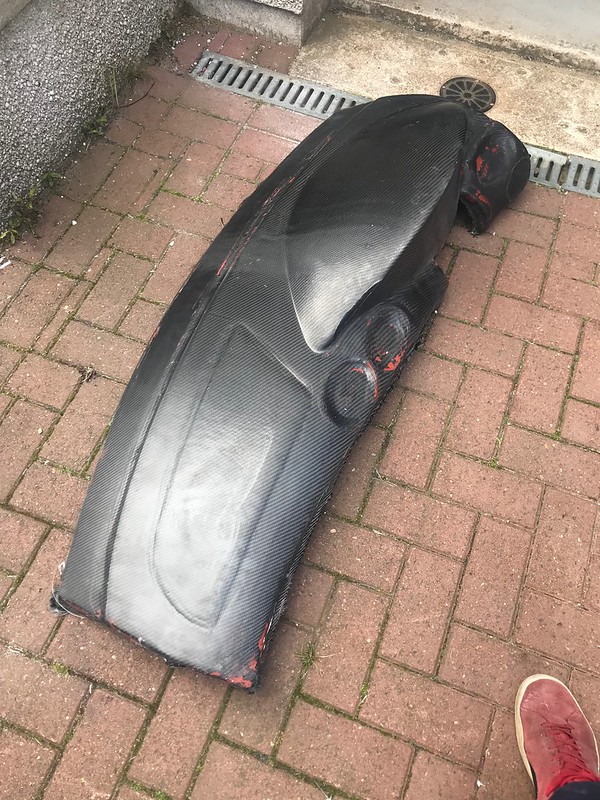
So was on ebay and bought a 2nd dash. was quite surprised at the weight of it, so chopped it down to a half dash like so:
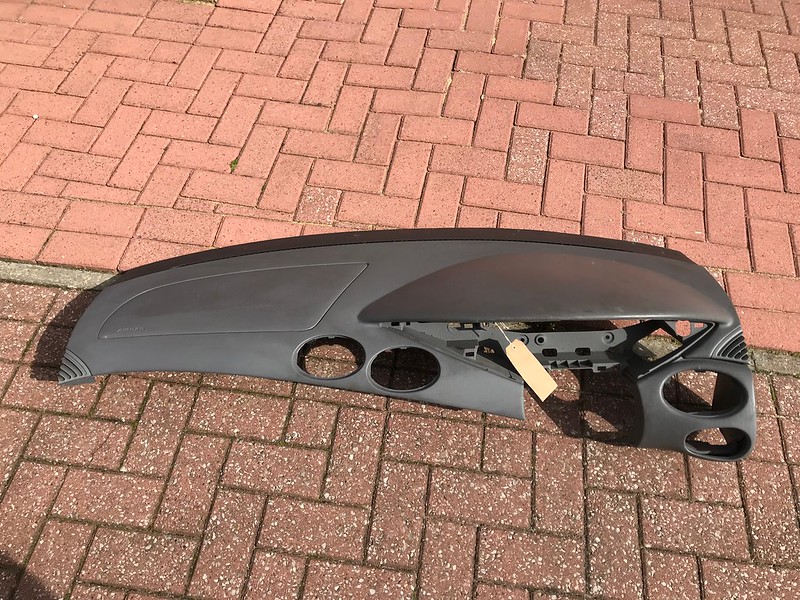
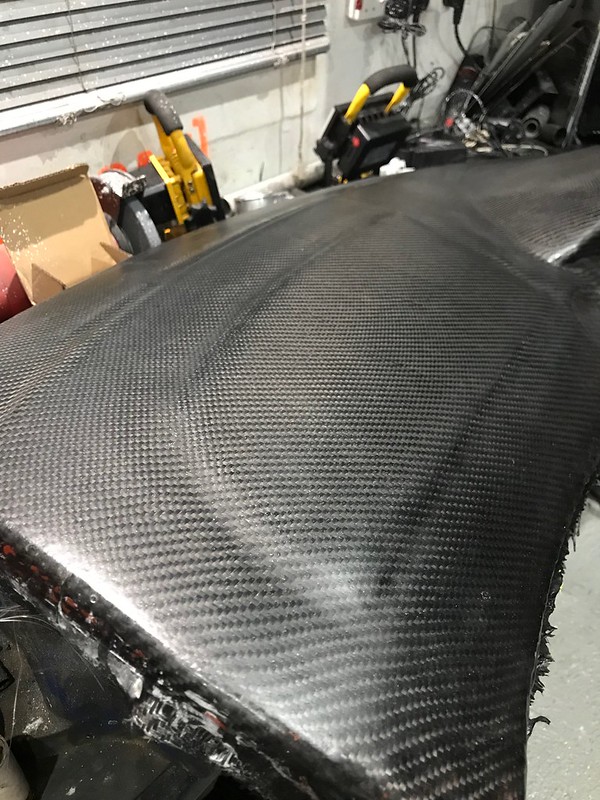
But that still weighed in at 5kg due to having the heater vents on the underside moulded into it, now i could of went and trimmed that all away but i decided to give carbon fiber moulding a go!
So a few calls and i was pointing in the right direction.
first block up what you dont need:
then fillet putty the gaps where resin will seep down into
cover in tooling gel coat
chopped strand fiberglass
let it cure and pull out the dash, one rough mold
clean and wax
lay up carbon trying to keep the weve nice! (this part was so hard!)
one carbon dash needing cleaned up
thick gel coat added to wet sand flat to remove the fake leather look that had transfered to the mold and then to the dash
and then a wet sand to make it flat & matt so hopefully it doesnt shine on the window!
Now im no pro and this isnt perfect but im more than happy with how this turned out for just wet laying, no vaccum bagging or anything fancy, i think i will make one using a pals vaccum bag to see if i can improve it a bit but if not this one will do! currently needs a final trim but its coming in at 1.7kg but i think that will go down to 1.3kg once iv trimmed it!
hopefully compared to the full size dash that currently in there and the trimmed dash bar i think il loose about 8kg, which given how bare the car currently is thats not a bad weight saving imo!
16-09-2018, 08:01 AM
#63
Advanced PassionFord User
That's looking really good, and a great weight saving as well.
The following users liked this post:
Jackstrath (02-11-2018)

The following users liked this post:
Jackstrath (02-11-2018)
01-10-2018, 04:06 PM
#65
Part of the Furniture
Thread Starter
So a few weeks since i last updated this, to be honest not alot has been happning.
First things was the car developed a starting issue, was running fine and then i shut it off and it never started again!
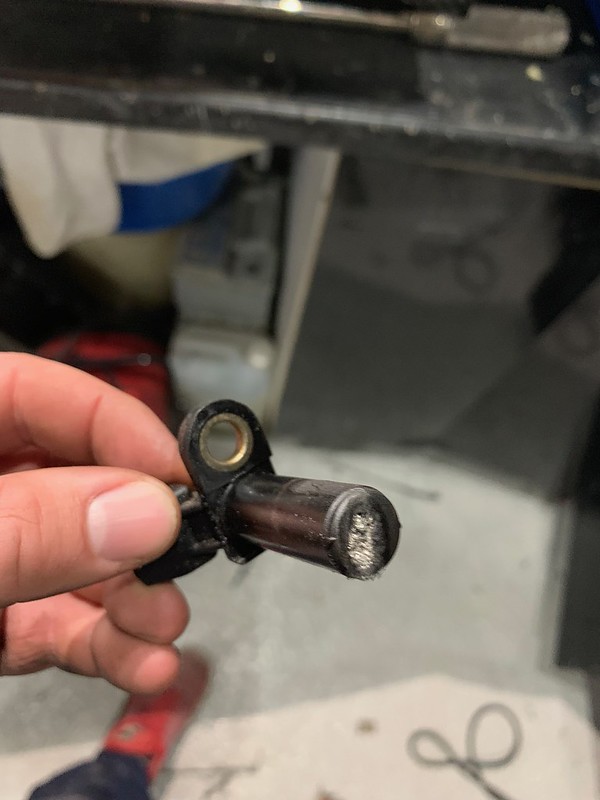
Process of elemination checking my wiering and a quick chat to matty at MB garage it was clear i wasnt getting a spark, map checked out to be fine ( i had been playing about with some settings the previous day) so it was put down to not getting a signel from crank/cam - i had a new cam sensor so fired that in and no change. Went downstairs and found the issue, crank sensor was loose and in turn was damaged.
Soild engine mounts for you!
So with that sorted it was time to make the most of the last hot weather we are going to have for a while!
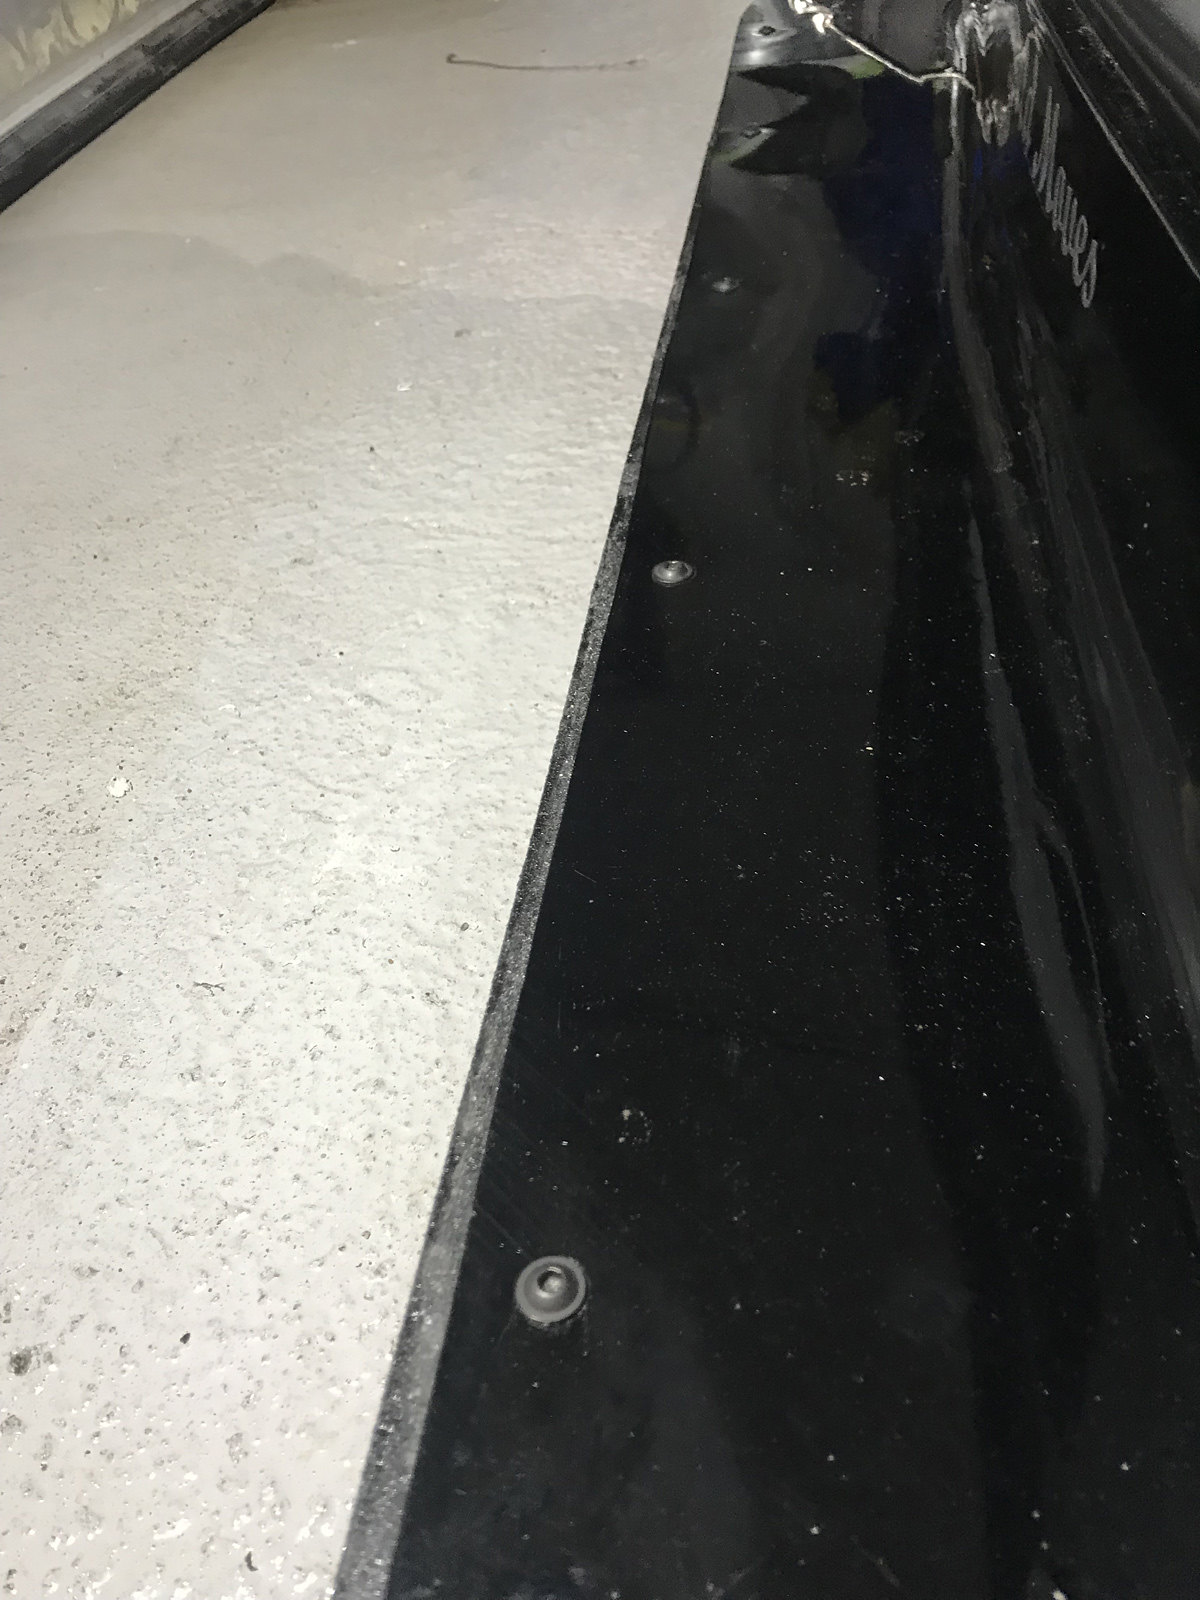
So front arch clean up was due!
I hate removing all the old crud thats built up.

Although being honest the fronts were not as bad as i was expecting!
So were buffed back and, zink primed and new seam sealler applyed
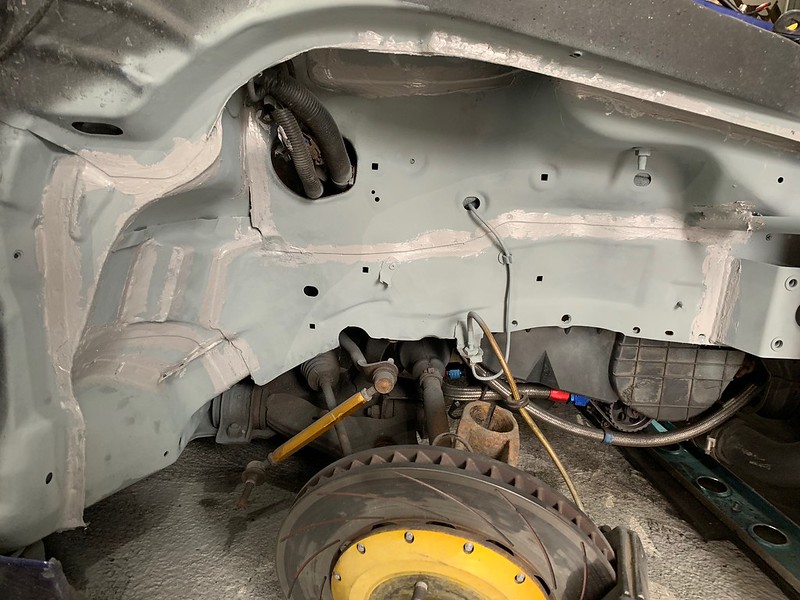
Then bilt hamber 2 pack applyed to the front
Gave the wing top area a spray of blue as its on show and i like the blue bay!

First things was the car developed a starting issue, was running fine and then i shut it off and it never started again!
Process of elemination checking my wiering and a quick chat to matty at MB garage it was clear i wasnt getting a spark, map checked out to be fine ( i had been playing about with some settings the previous day) so it was put down to not getting a signel from crank/cam - i had a new cam sensor so fired that in and no change. Went downstairs and found the issue, crank sensor was loose and in turn was damaged.
Soild engine mounts for you!
So with that sorted it was time to make the most of the last hot weather we are going to have for a while!
So front arch clean up was due!
I hate removing all the old crud thats built up.
Although being honest the fronts were not as bad as i was expecting!
So were buffed back and, zink primed and new seam sealler applyed
Then bilt hamber 2 pack applyed to the front
Gave the wing top area a spray of blue as its on show and i like the blue bay!
01-10-2018, 04:06 PM
#66
Part of the Furniture
Thread Starter
Next up was the shocks
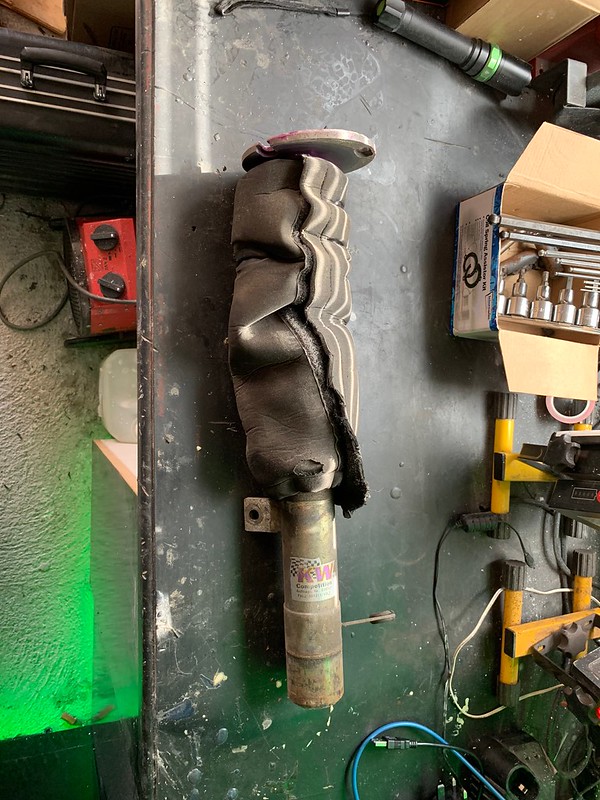
socks had done there job nicely!
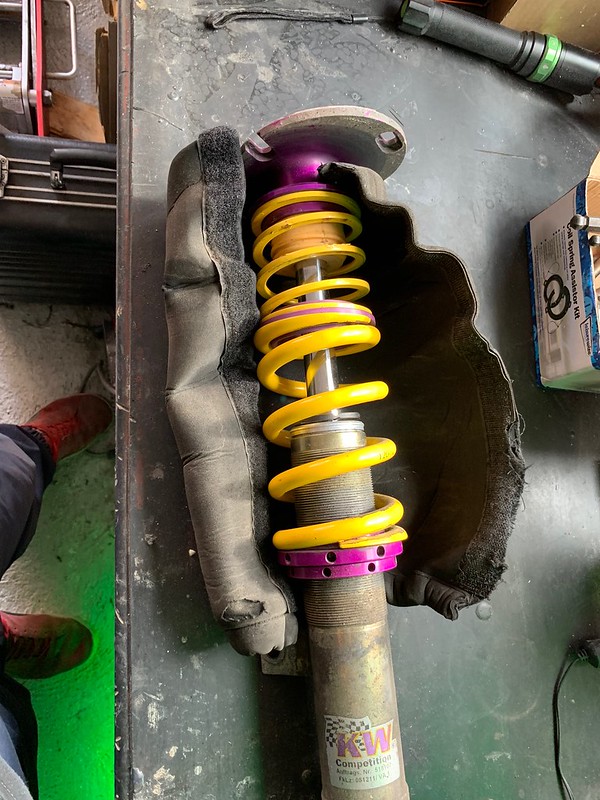
Very little needing to be cleaned so it was a wipe down , spray with moly and grease up

Installed back in and looking alot fresher under there now!

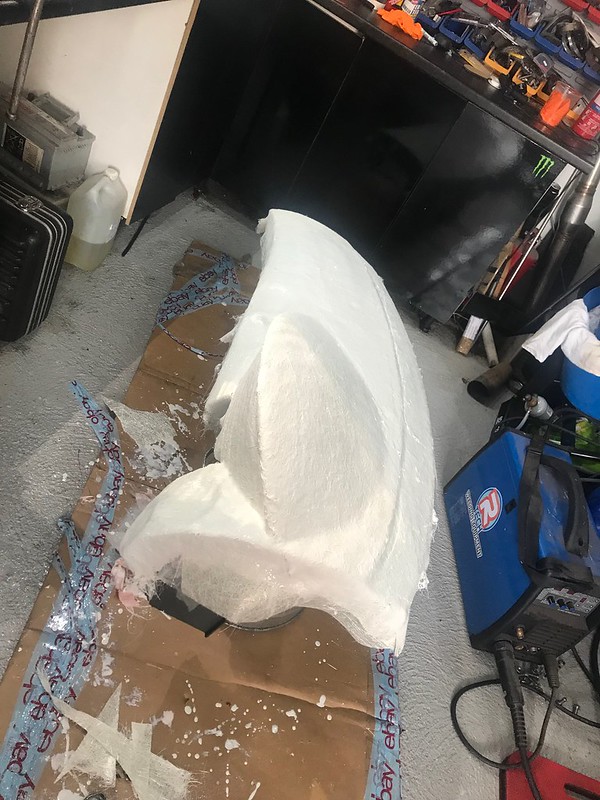
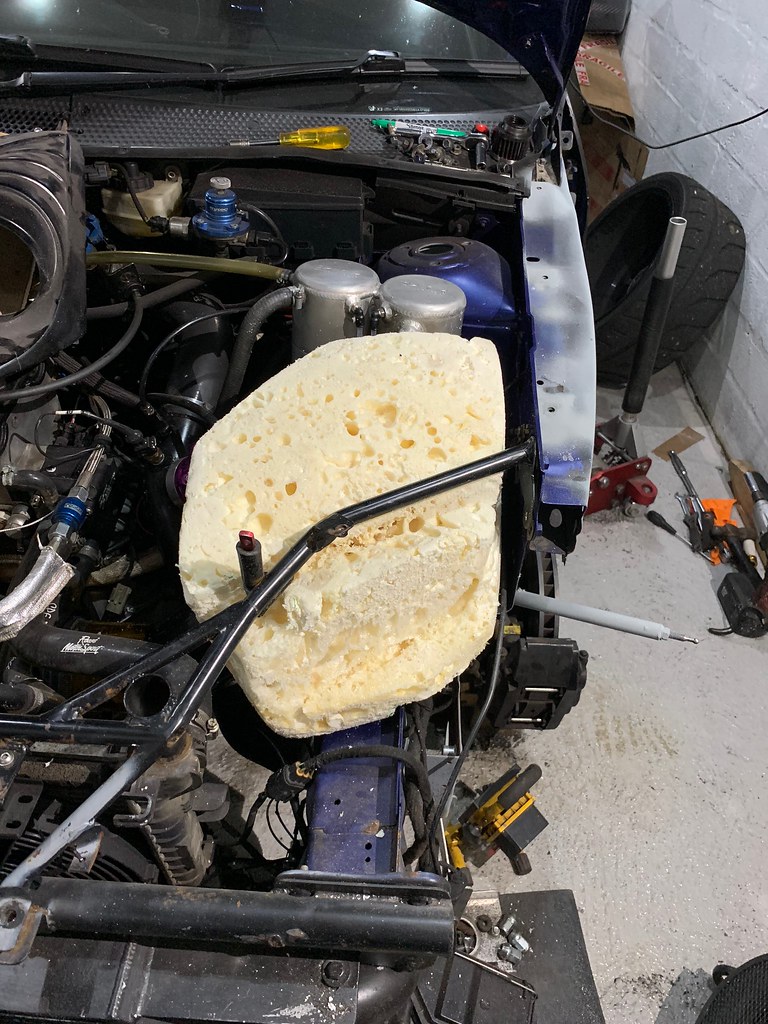
Next up is another little side project, i should prob finish the carbon dash first but i fanced trying to make a airbox for my filter to try keep the heat out off the intake!
So wanted it to fit the bay nicely so it was fill a bag up with expandy foam
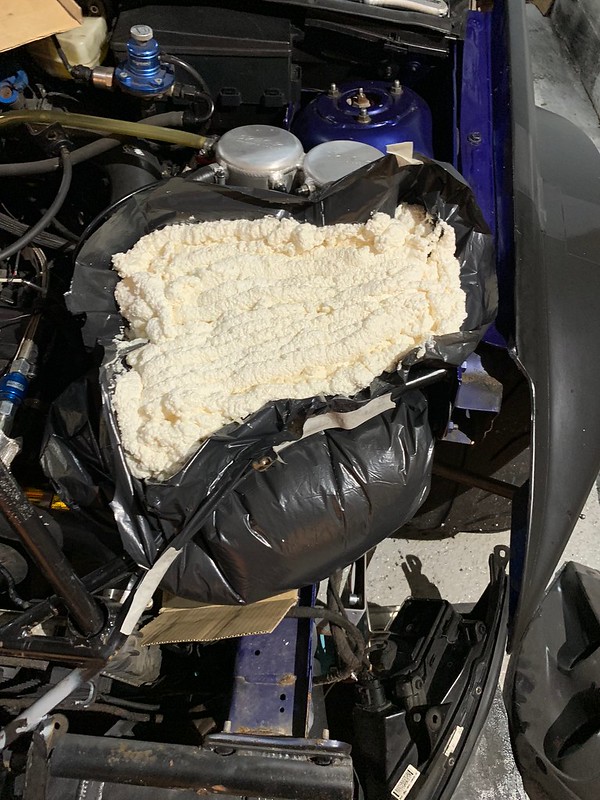
And cutting to a rough shape is as far as iv got
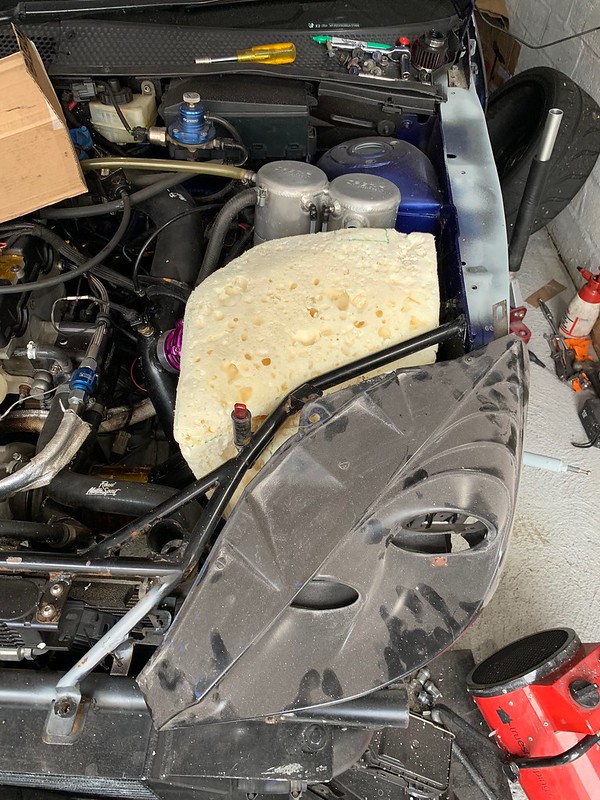
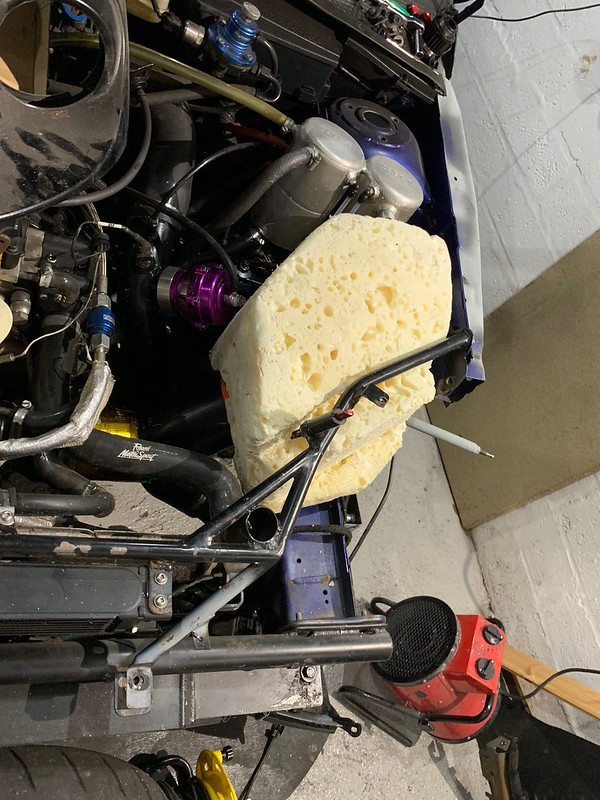
Will hopefully get the body filler on it next time home and get a mold made!
socks had done there job nicely!
Very little needing to be cleaned so it was a wipe down , spray with moly and grease up
Installed back in and looking alot fresher under there now!
Next up is another little side project, i should prob finish the carbon dash first but i fanced trying to make a airbox for my filter to try keep the heat out off the intake!
So wanted it to fit the bay nicely so it was fill a bag up with expandy foam
And cutting to a rough shape is as far as iv got
Will hopefully get the body filler on it next time home and get a mold made!
28-11-2018, 07:10 PM
#67
Part of the Furniture
Thread Starter
So WRC spain last time home eat all my time and mainly energy to spend on the focus, but this time at home iv found a litte motivation to get some work done.
First things first a little pressy to myself!
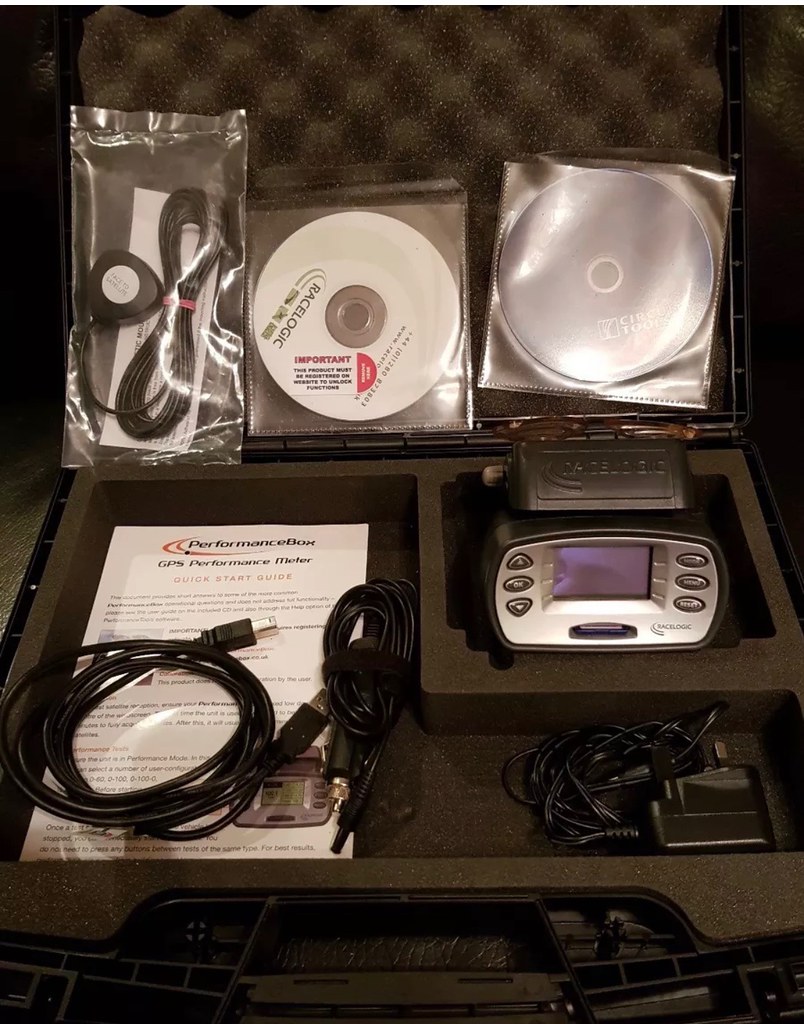
Its clear after veiwing logs from the ECU, that data really does help you improve, now be that engine side of things or lap timing.
Im hoping with a bit of guidance from adam that i can quickly find missing time, or at least know where the car CAN go faster and aim to get that perfect lap strung together! The car 100% has a 54 second lap in it!
so this near new racelogic was picked up at a good price and came with the GPS aerial, might not need it but i do have a heated screen so it wont do it any harm!
So, back to the focus!
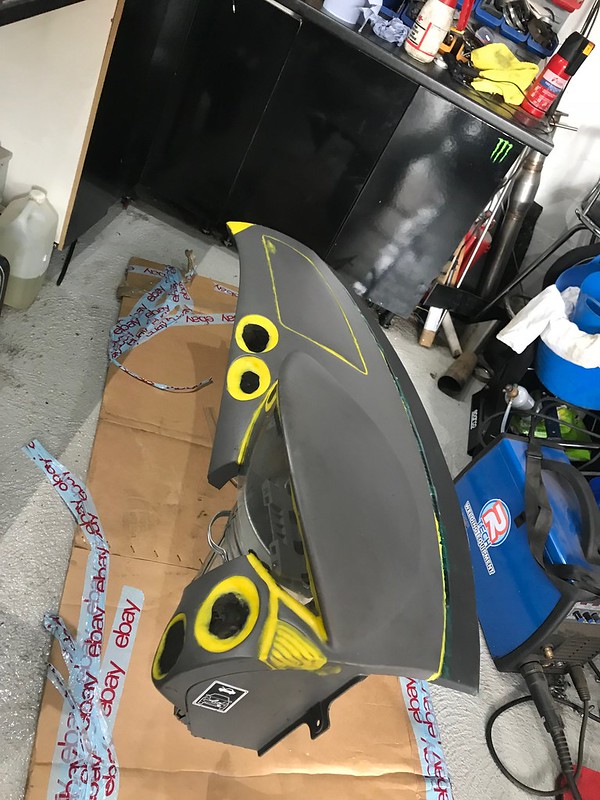
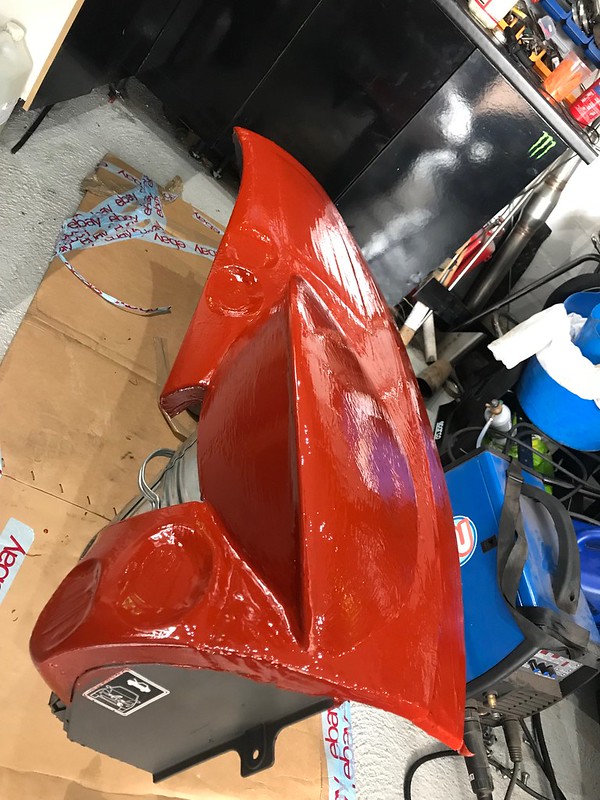
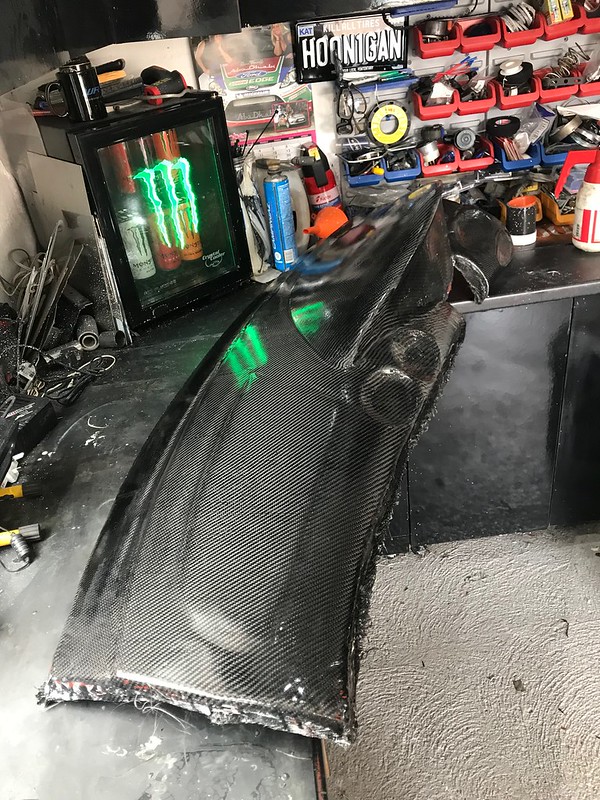
As previous the carbon dash was made, i mock fitted it and noticed right away the gloss finish was a nightmare, reflected right onto the window!
Coming from a full flocked dash that doesnt reflect a bit this wasnt going to work!
Tryed satin clear coat... wasnt much better, so have now went matt clear coat! much better, might still have to spray the first 4-5" matt black as its stil lgot a little reflection thats annoying me but im going to wait untill im in the car and see how it is!
So since the dash was coming out iv cut back the loom again!

honestly this is not fun one bit!
chop chop chop!
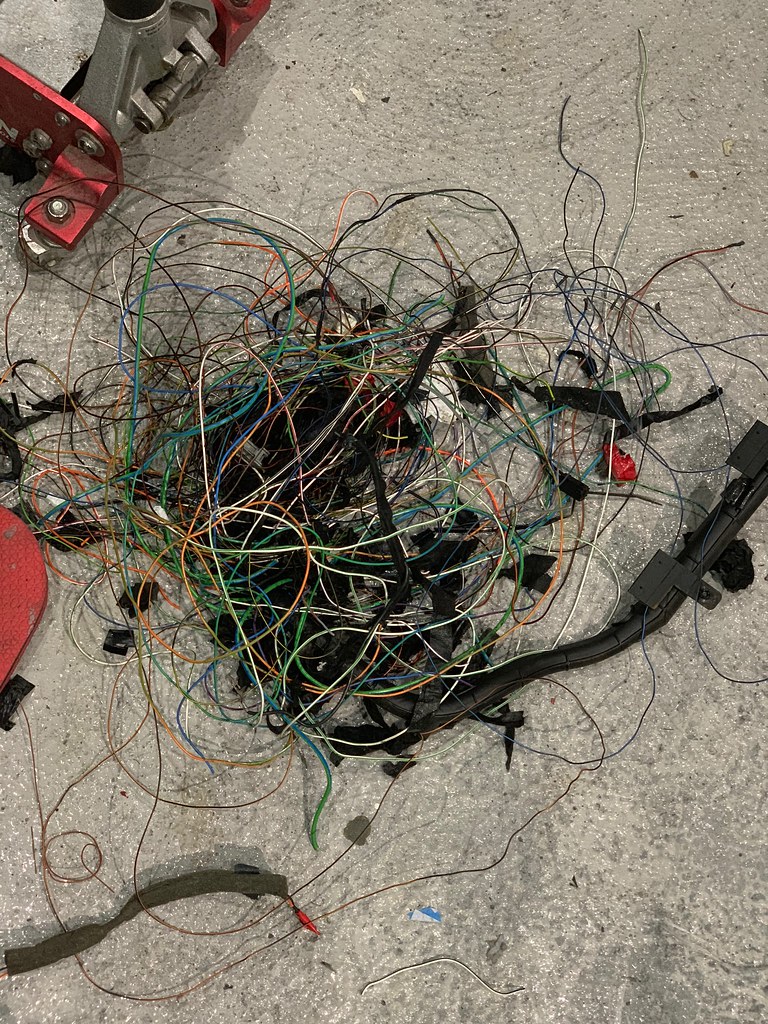
and once i tested the car stil started, loom wrapped it all up
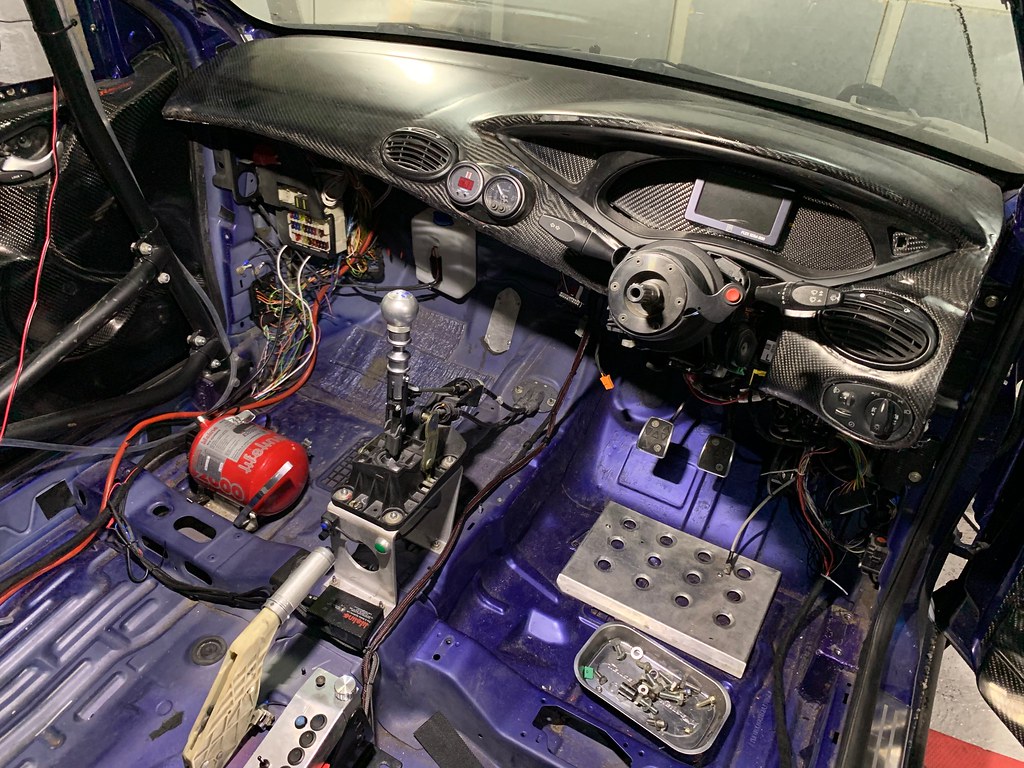
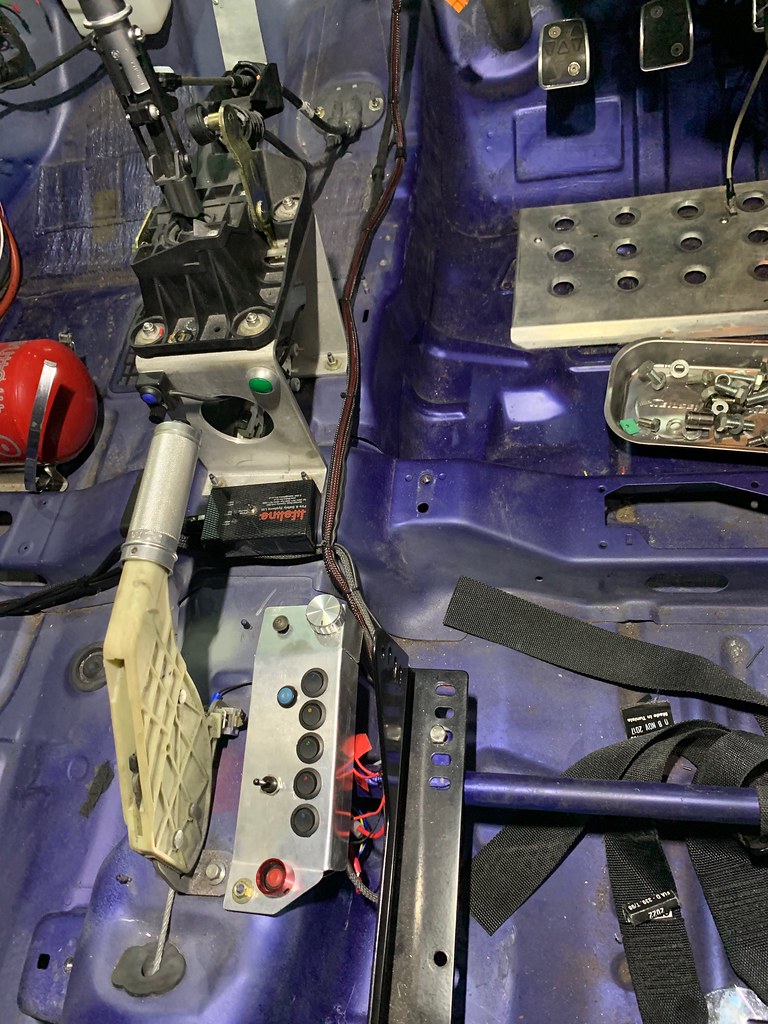
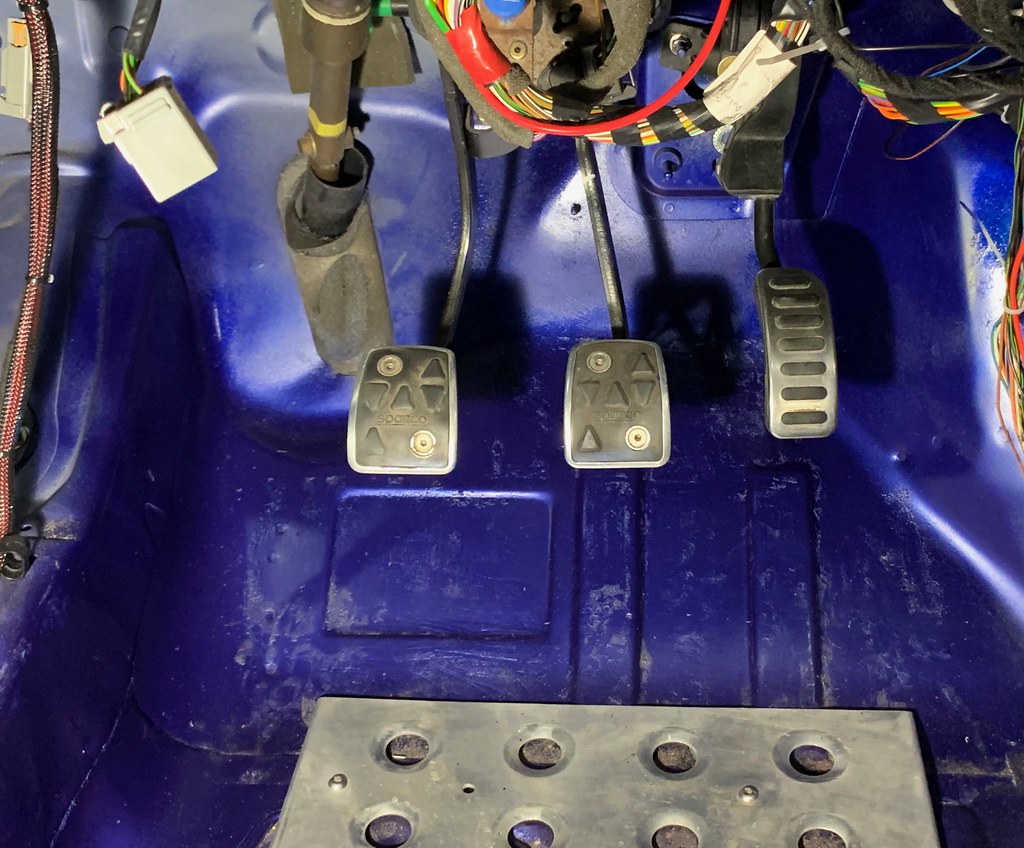
Still have to wire in the DBW set up so hence the fuse box and pedals look ing a little messy, thats not finished yet!
Also iv moved my switchs down to beside the seat, since the mounting point for them is no longer there on the standard dash!
Needs a hover and a lick of paint i know!
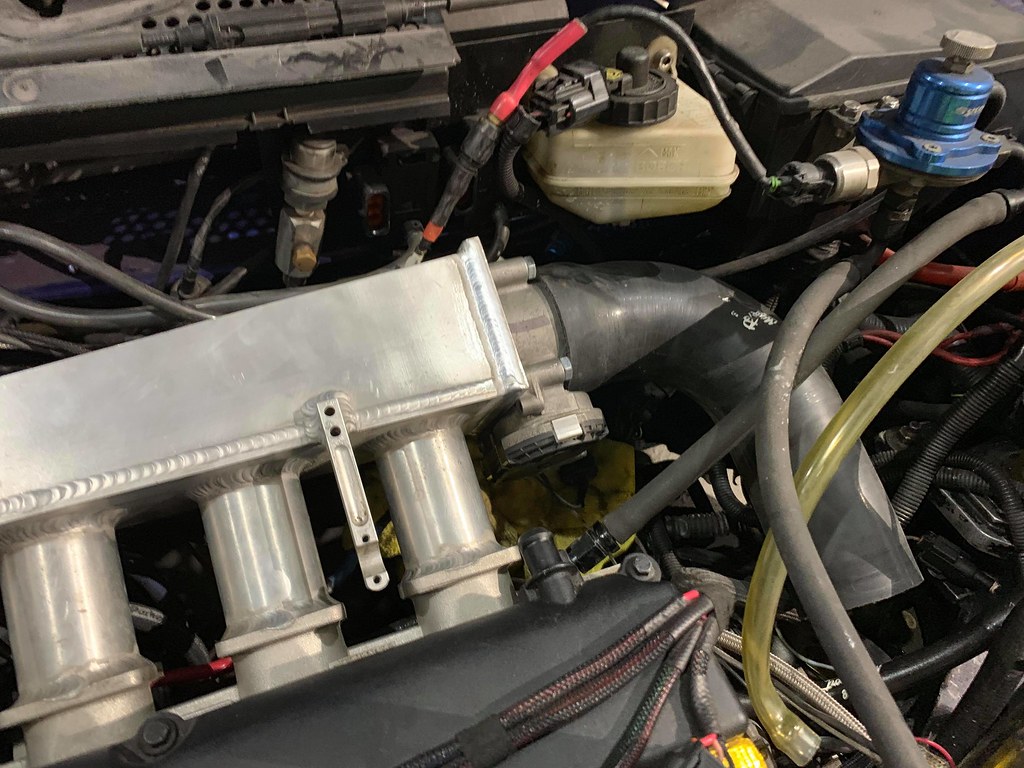
Have spoke with Calum haynes fab and next time home he is going to make me up some dash supports and mod the intake manifold to fit the mk2 focus throttle body! Oh and on that note im now using a mk1 Audi TT 225 throttle pedal as the focus ones did some weird things with CANBUS that would just be a pain to get the syvecs to work with !
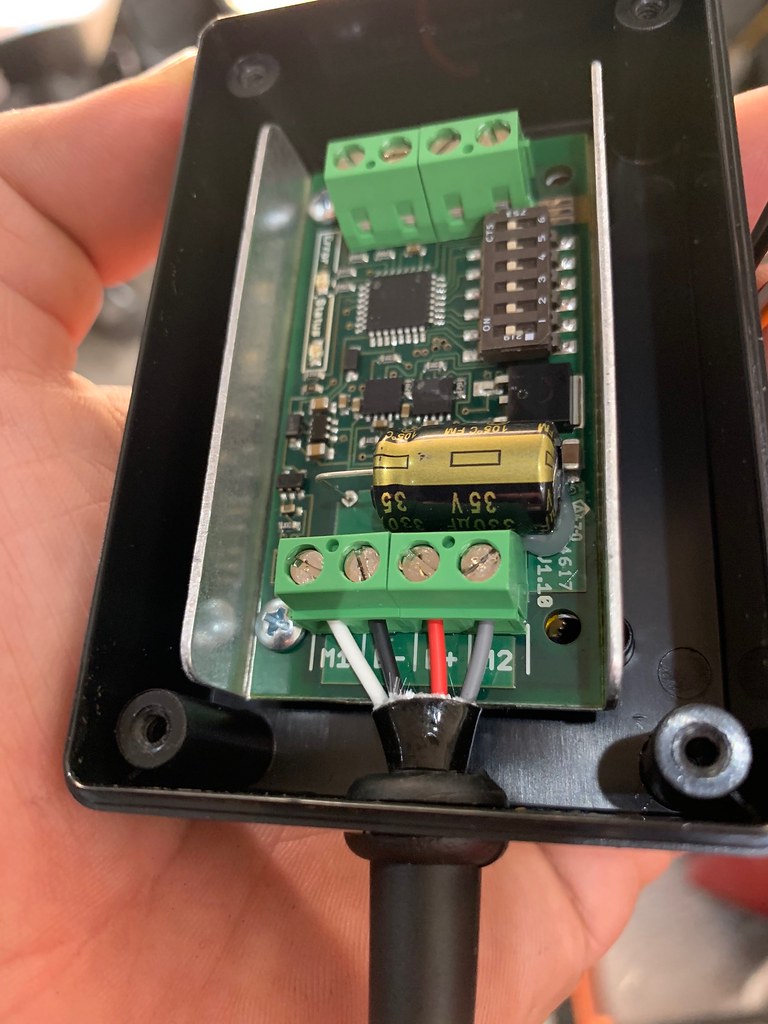
Got the H Bridge driver for the syvecs ordered to power the DBW TB
didnt come with any wiring diagrams so had to open it up and see what colour wires did what!
And last little update is the big wotsit airbox is starting to take shape , only 15kg of filler in it so far ! haha Will hopefully get that finished off next time at home as well and get a mold of it done!

Thanks!
First things first a little pressy to myself!
Its clear after veiwing logs from the ECU, that data really does help you improve, now be that engine side of things or lap timing.
Im hoping with a bit of guidance from adam that i can quickly find missing time, or at least know where the car CAN go faster and aim to get that perfect lap strung together! The car 100% has a 54 second lap in it!
so this near new racelogic was picked up at a good price and came with the GPS aerial, might not need it but i do have a heated screen so it wont do it any harm!
So, back to the focus!
As previous the carbon dash was made, i mock fitted it and noticed right away the gloss finish was a nightmare, reflected right onto the window!
Coming from a full flocked dash that doesnt reflect a bit this wasnt going to work!
Tryed satin clear coat... wasnt much better, so have now went matt clear coat! much better, might still have to spray the first 4-5" matt black as its stil lgot a little reflection thats annoying me but im going to wait untill im in the car and see how it is!
So since the dash was coming out iv cut back the loom again!
honestly this is not fun one bit!
chop chop chop!
and once i tested the car stil started, loom wrapped it all up
Still have to wire in the DBW set up so hence the fuse box and pedals look ing a little messy, thats not finished yet!
Also iv moved my switchs down to beside the seat, since the mounting point for them is no longer there on the standard dash!
Needs a hover and a lick of paint i know!
Have spoke with Calum haynes fab and next time home he is going to make me up some dash supports and mod the intake manifold to fit the mk2 focus throttle body! Oh and on that note im now using a mk1 Audi TT 225 throttle pedal as the focus ones did some weird things with CANBUS that would just be a pain to get the syvecs to work with !
Got the H Bridge driver for the syvecs ordered to power the DBW TB
didnt come with any wiring diagrams so had to open it up and see what colour wires did what!
And last little update is the big wotsit airbox is starting to take shape , only 15kg of filler in it so far ! haha Will hopefully get that finished off next time at home as well and get a mold of it done!
Thanks!
 01-12-2018, 09:06 PM
#69
PassionFord Post Troll

Great read mate cars a credit to you welldone for sticking at it
02-12-2018, 09:01 PM
#71
Part of the Furniture
Thread Starter
Thanks
Thanks, it trys me sometimes! but the buzz you get then it all works and comes together is near unbeatable imo!
Thanks! Hopefully not much further now! The car is done imo, its proven to work on track so now its just a "refine" process im going though, iv had the car coming up 10 years now and theres alot young 18yr jack didnt know back then! So just going through the steps perfecting it!
A few things like custom wiring loom and a PDM would be nice, as would a sequential gearbox, then if i could get the car to 1000kg dry id be content i think ! haha but being realistic non of that is going to happen but as close as i would be happy with!
20-12-2018, 03:40 PM
#72
Part of the Furniture
Thread Starter
mini update.
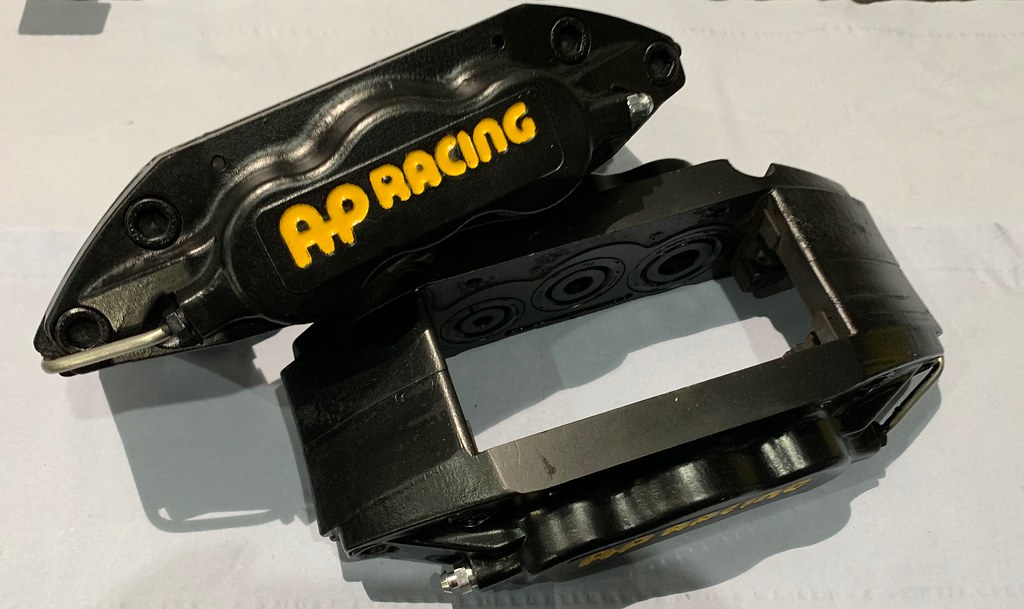
Brakes, if you remeber back pre racing i noticed the dust seals on both calipers had seen better days, a few had split , a few wernt far away at all from splitting.
The caliper i have isnt a "racing" caliper, more a fast road caliper, but seeing as i do sprints and hillclimbs with the car its suited fine for my use and hasnt been a issue, so because of this they dont have "high temp" seals in the from factory, so decided to treat the calipers to some new high temp spec seals and dust covers, richard at north east brakes sorted me out with a next day turn around. They were a little faded colour wise as well so gave the yellow a mask up and gave them a quick blast with satan black to freshen them up, baked in the over for 15 mins! (the joys of living on your own! lol)
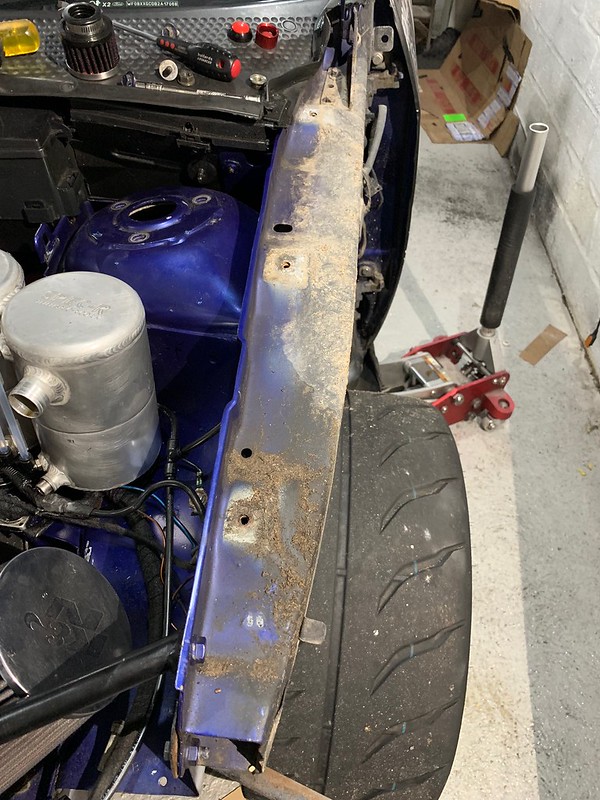
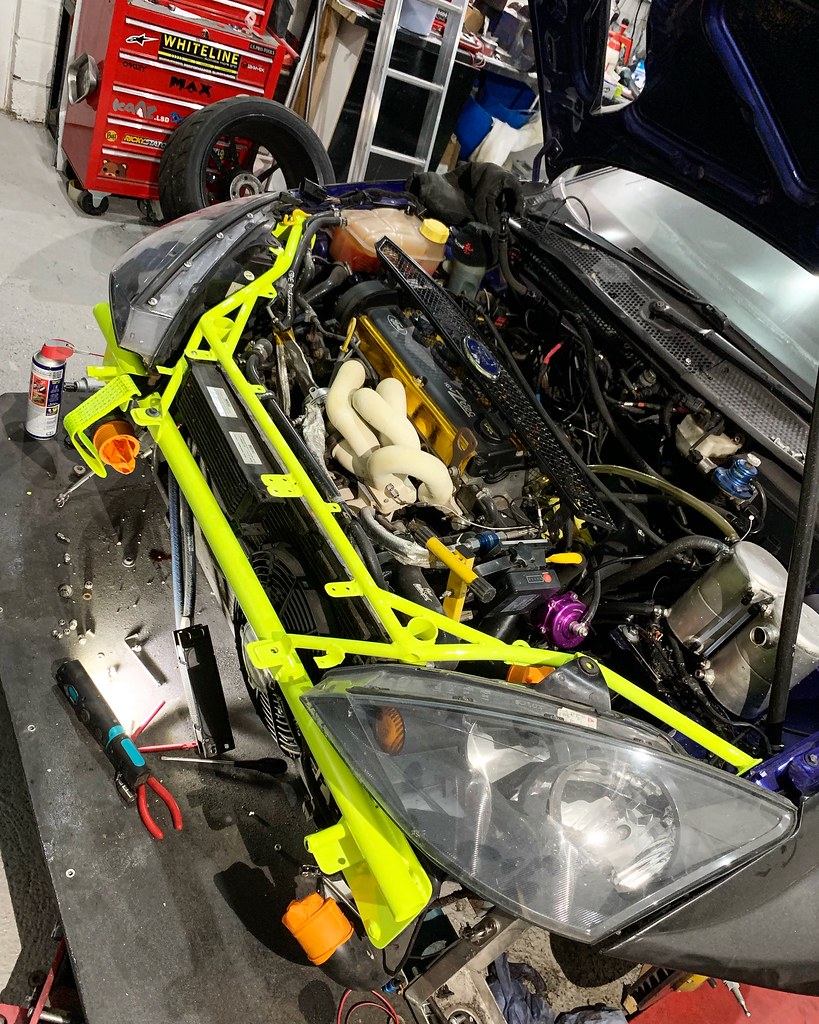
Next i got my front cross member back from customised coatings, was going to go black, but decided just to let my hair down and go floro yellow! This was much needed as the road salt had started to eat my poor previous rattle can job!
think it looks the part!
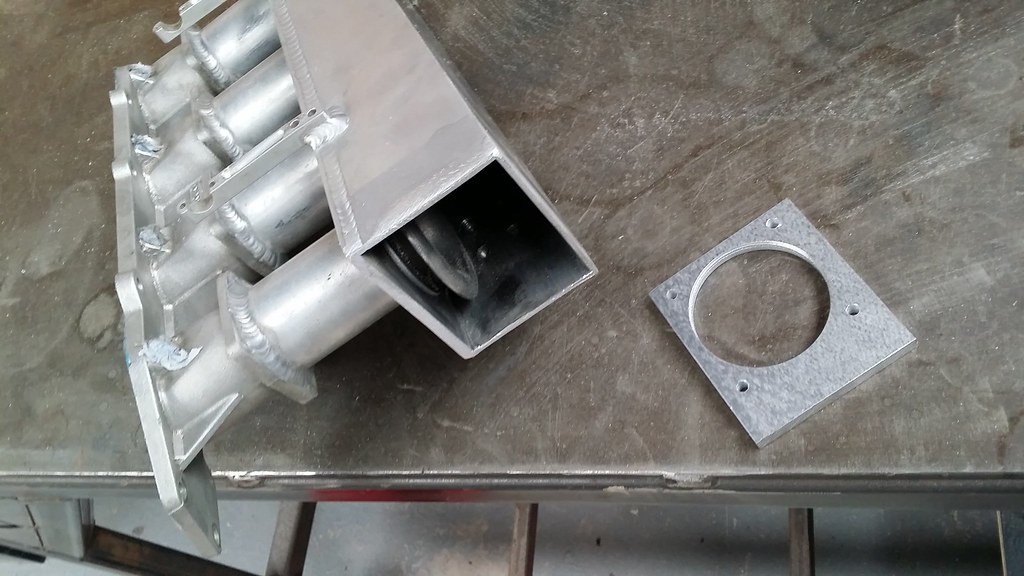
Next was to drop the template off to Calum Haynes fab to sort up the dash mounts, and also get him to make my mk2 RS throttle body fit my intake !
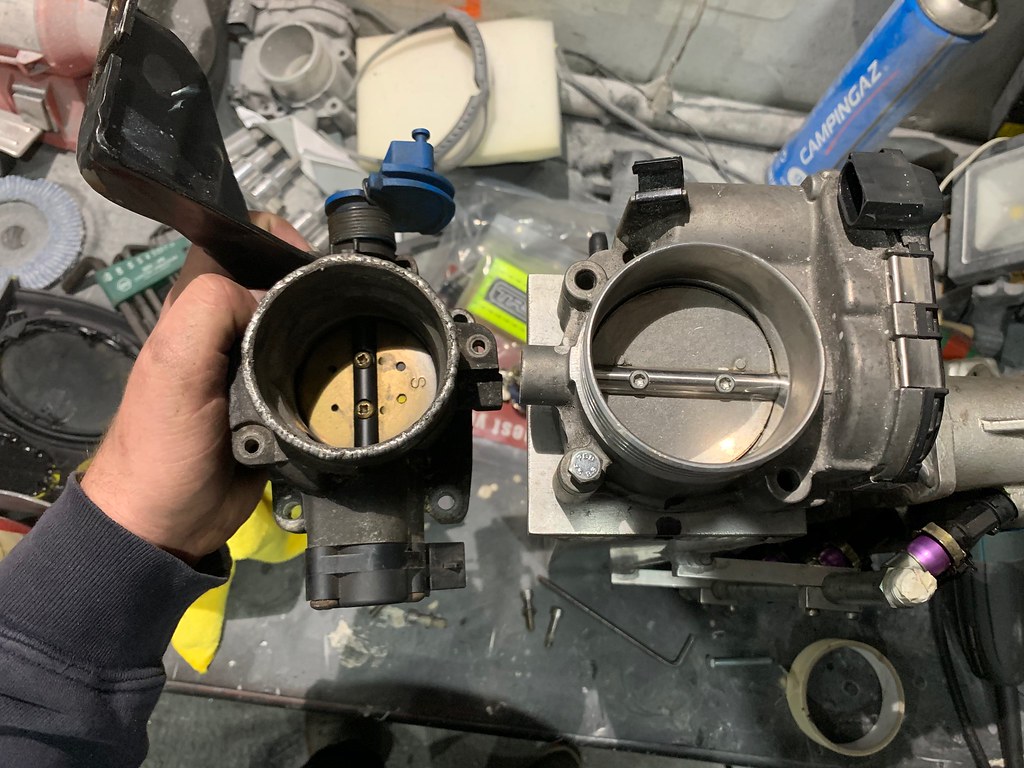
Fair size diffrence!
And in preperation for that i made up my "looms" for the DBW set up, will wait untill i have the pedal mounted before wrapping that loom and then finaly pinning it all into the ECU, realisticly not going to be untill jan now!

Thanks!
Brakes, if you remeber back pre racing i noticed the dust seals on both calipers had seen better days, a few had split , a few wernt far away at all from splitting.
The caliper i have isnt a "racing" caliper, more a fast road caliper, but seeing as i do sprints and hillclimbs with the car its suited fine for my use and hasnt been a issue, so because of this they dont have "high temp" seals in the from factory, so decided to treat the calipers to some new high temp spec seals and dust covers, richard at north east brakes sorted me out with a next day turn around. They were a little faded colour wise as well so gave the yellow a mask up and gave them a quick blast with satan black to freshen them up, baked in the over for 15 mins! (the joys of living on your own! lol)
Next i got my front cross member back from customised coatings, was going to go black, but decided just to let my hair down and go floro yellow! This was much needed as the road salt had started to eat my poor previous rattle can job!
think it looks the part!
Next was to drop the template off to Calum Haynes fab to sort up the dash mounts, and also get him to make my mk2 RS throttle body fit my intake !
Fair size diffrence!
And in preperation for that i made up my "looms" for the DBW set up, will wait untill i have the pedal mounted before wrapping that loom and then finaly pinning it all into the ECU, realisticly not going to be untill jan now!
Thanks!
22-12-2018, 07:03 PM
#73
Advanced PassionFord User

That's some progress Jack. When are you racing next?
22-12-2018, 07:48 PM
#74
Part of the Furniture
Thread Starter
22-12-2018, 07:57 PM
#75
Part of the Furniture
Thread Starter
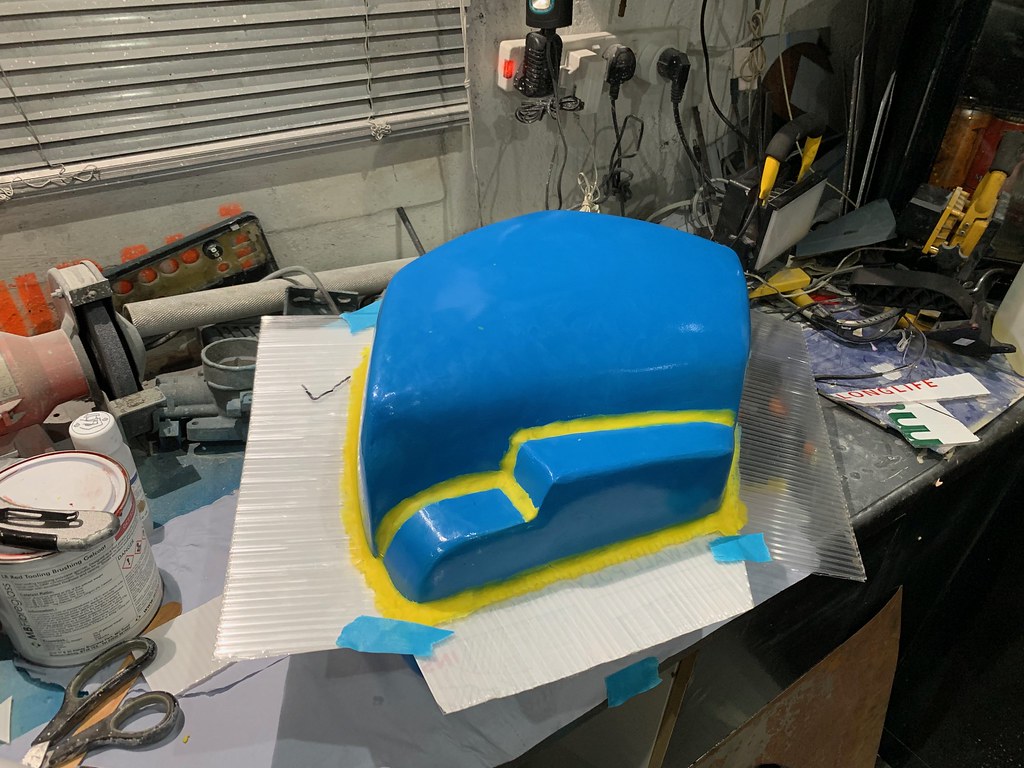
This is just a little update for side project "blob" , aka the carbon airbox, having got this far i know there is an easier way to do this, this has honestly swallowed up a scary amount of hours, im not sure if thats due to the way iv done it or the lack of skill i have haha!
anyway a little lapse of what iv done so far!
i wanted the airbox to make the most of the space, and it will be ducket from the headlight area, hopefully be made from carbon and stop the heat soak from the hot engine bay, i did want to try get a V1 WRC airbox that would use the hood vent on the pas side as its cool air intake but they are fairly rare it would seem! so making my own was the only way i could see forward.
So fill a bag of expandy foam to take a shape of the place it will sit, this was attempt 2 after finding out you cant just fill a bag up and expect it to set! i think it must use air to harden, so yeh the first attempt went in the bin and has probs still not set lol!

chop to a rough shape
slap a bit of filler on it
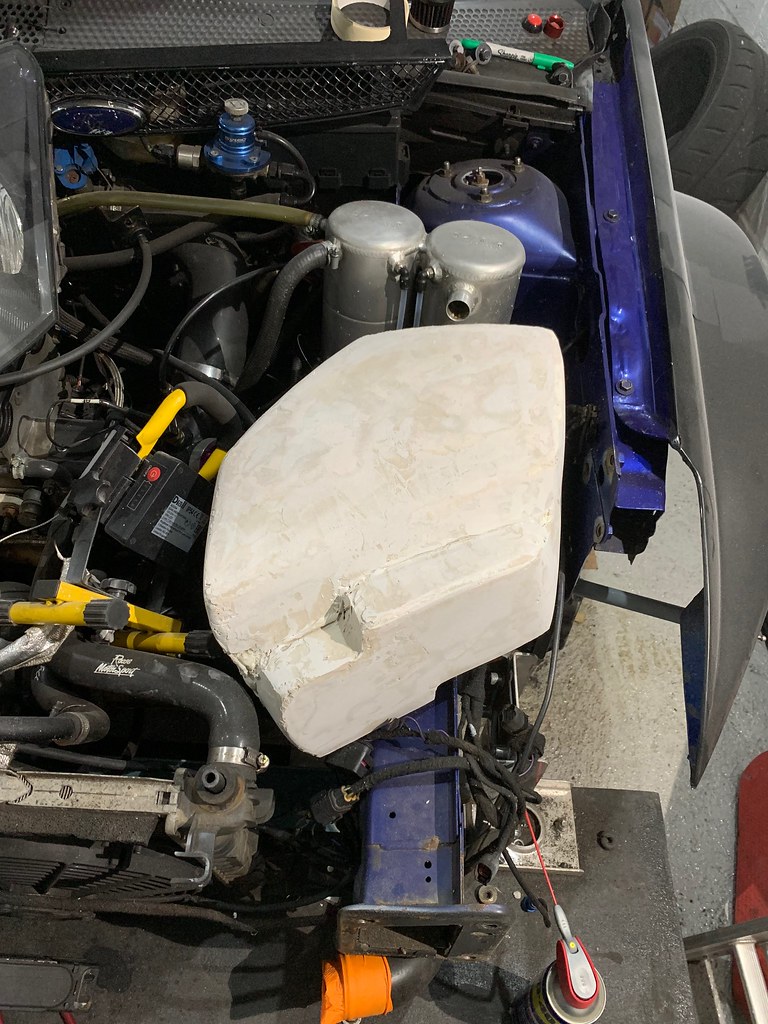
then it lituraly was hours of sanding to try get this as smooth as possible

and iv just gave it a lick of colour and have now started clear coating it!
il need to build up 4-6 heavy coats , flatten and polish , then it should hopefully be ready to make a mold of it! , but as im sure your all aware the temps have dropped now, and my garage heater went pop yesterday so i have no way to heat the garage up to 15oC to where the resins ect work at!
hopefully this works out as well as i think it should! lol if not il just delete this post haha!!
anyway a little lapse of what iv done so far!
i wanted the airbox to make the most of the space, and it will be ducket from the headlight area, hopefully be made from carbon and stop the heat soak from the hot engine bay, i did want to try get a V1 WRC airbox that would use the hood vent on the pas side as its cool air intake but they are fairly rare it would seem! so making my own was the only way i could see forward.
So fill a bag of expandy foam to take a shape of the place it will sit, this was attempt 2 after finding out you cant just fill a bag up and expect it to set! i think it must use air to harden, so yeh the first attempt went in the bin and has probs still not set lol!
chop to a rough shape
slap a bit of filler on it
then it lituraly was hours of sanding to try get this as smooth as possible
and iv just gave it a lick of colour and have now started clear coating it!
il need to build up 4-6 heavy coats , flatten and polish , then it should hopefully be ready to make a mold of it! , but as im sure your all aware the temps have dropped now, and my garage heater went pop yesterday so i have no way to heat the garage up to 15oC to where the resins ect work at!
hopefully this works out as well as i think it should! lol if not il just delete this post haha!!
25-12-2018, 09:00 PM
#76
Advanced PassionFord User
That looks really good, and I look forward to seeing the next stage
26-12-2018, 12:47 PM
#77
Advanced PassionFord User
That's some air box that mate. Is it going to house a cone filter or are you planning on fitting a panel filter inside?
01-01-2019, 03:19 PM
#78
Part of the Furniture
Thread Starter
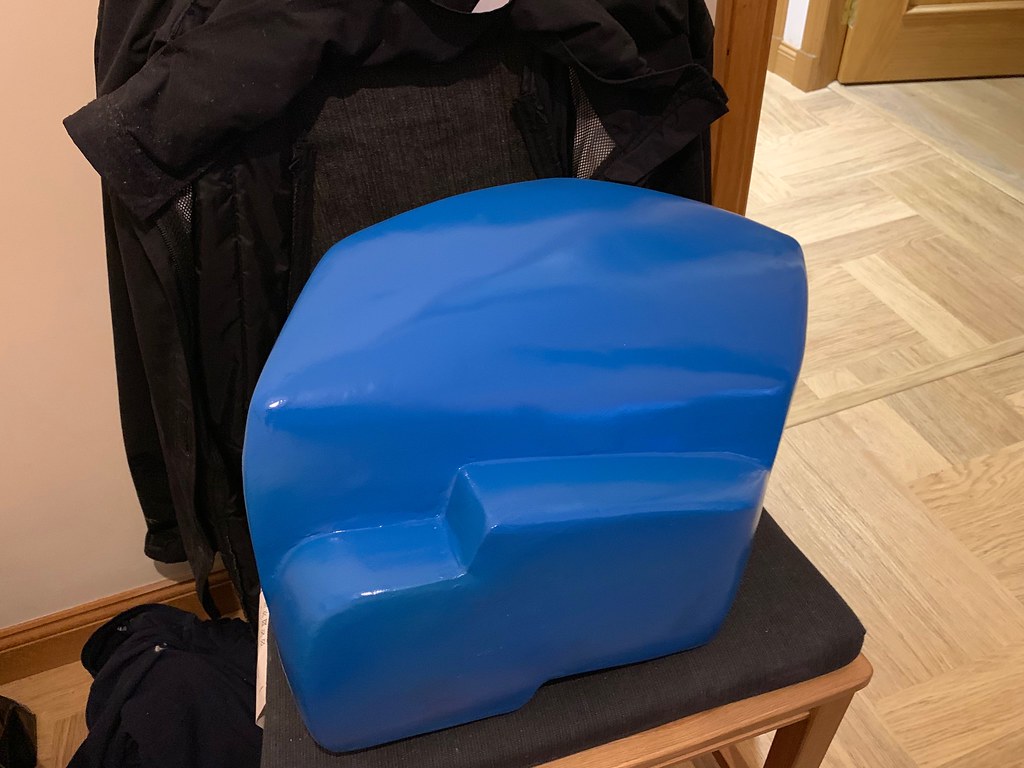
Bigger is better right ? :P
House a cone filter jon, im not clever enough to make the panel filter thing work lol
House a cone filter jon, im not clever enough to make the panel filter thing work lol
17-01-2019, 03:49 PM
#79
Part of the Furniture
Thread Starter
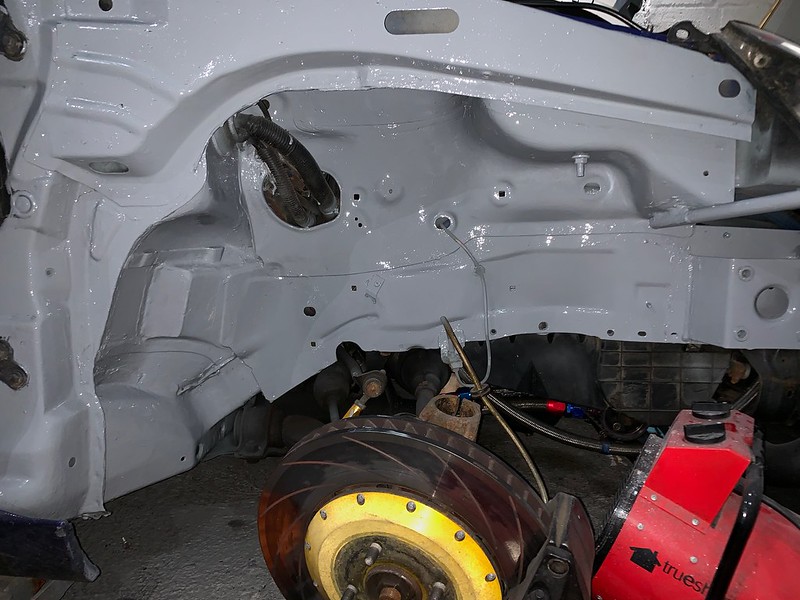
So got the front end suspention back on, New brake lines ect as well just to jazz it all up! will be intresting to see how this lasts compared to the waxoil stone chip stuff!
before:
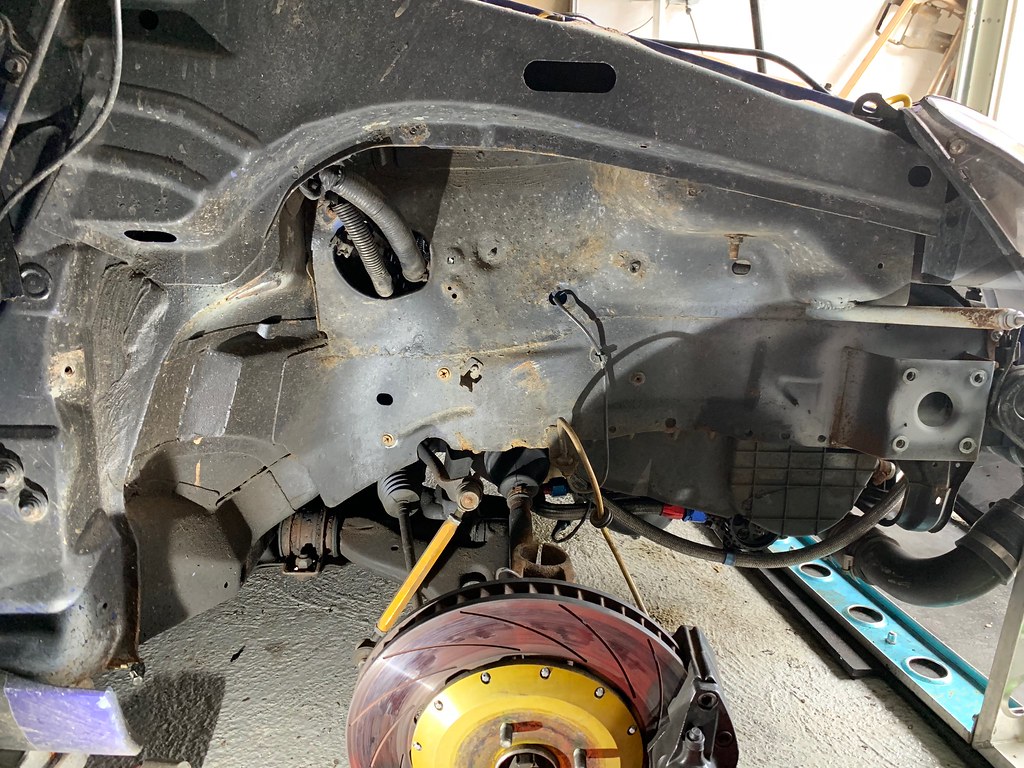
After:
Also got the DBW throttle peddel mounted up, will now need to wire it in ! Fitted a stop to the peddel as well, dont want to snap this one!
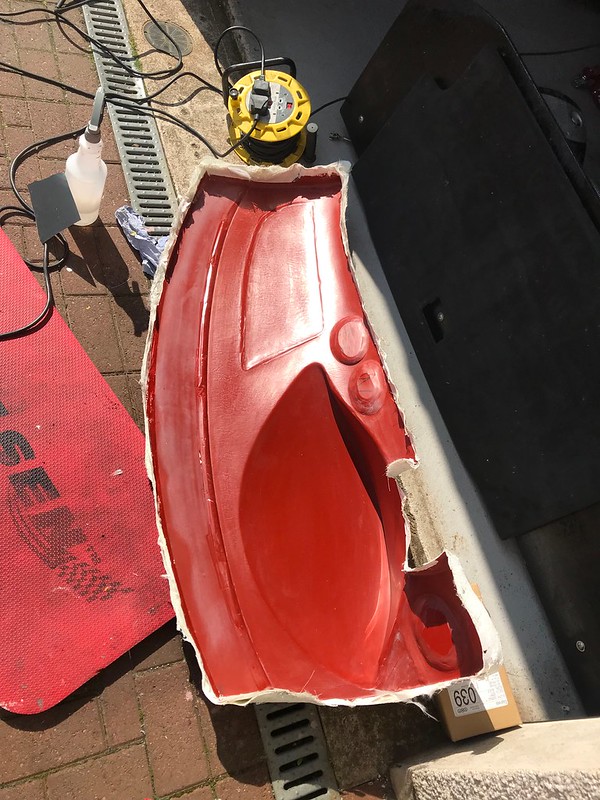
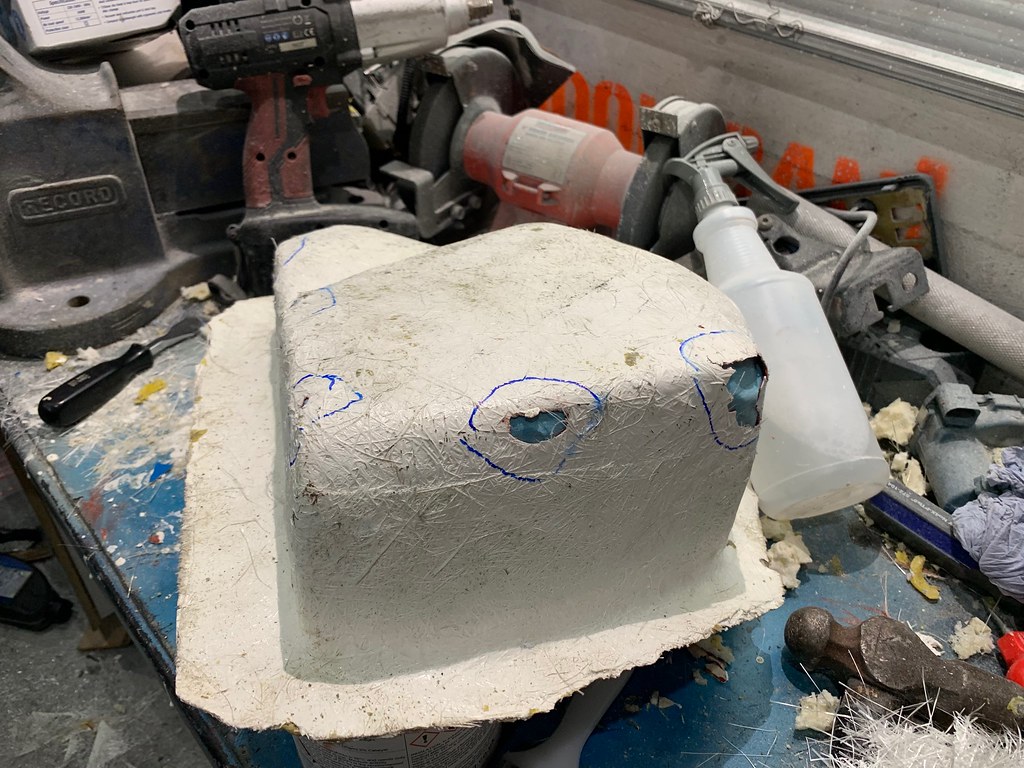
And this next part shows what can go wrong when working with fiberglass/moulds ect
So was ready to apply the gel coat to the plug
That was done drama free -

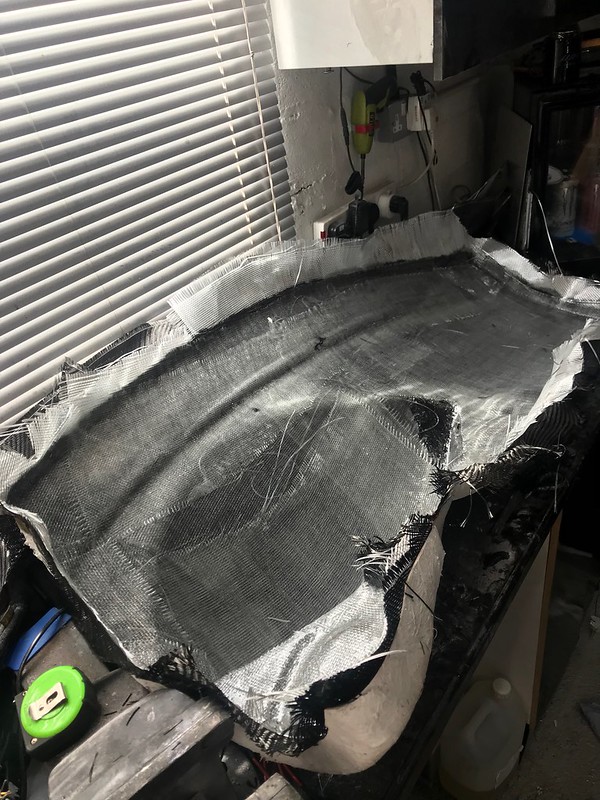
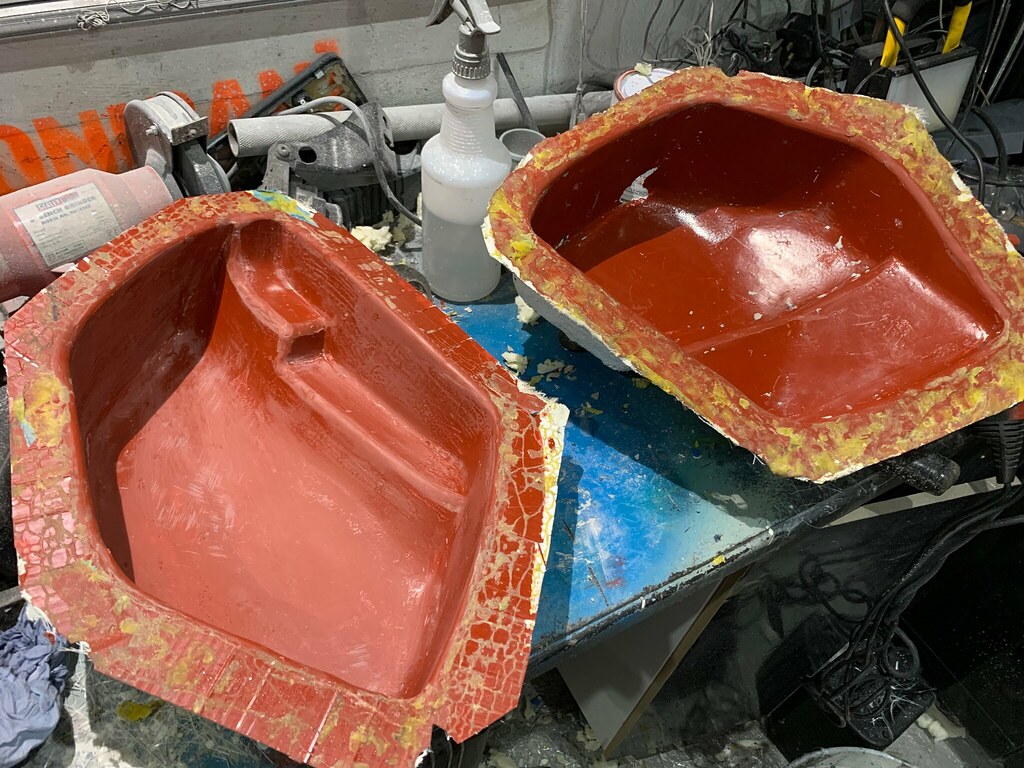
Layer up the fiberglass
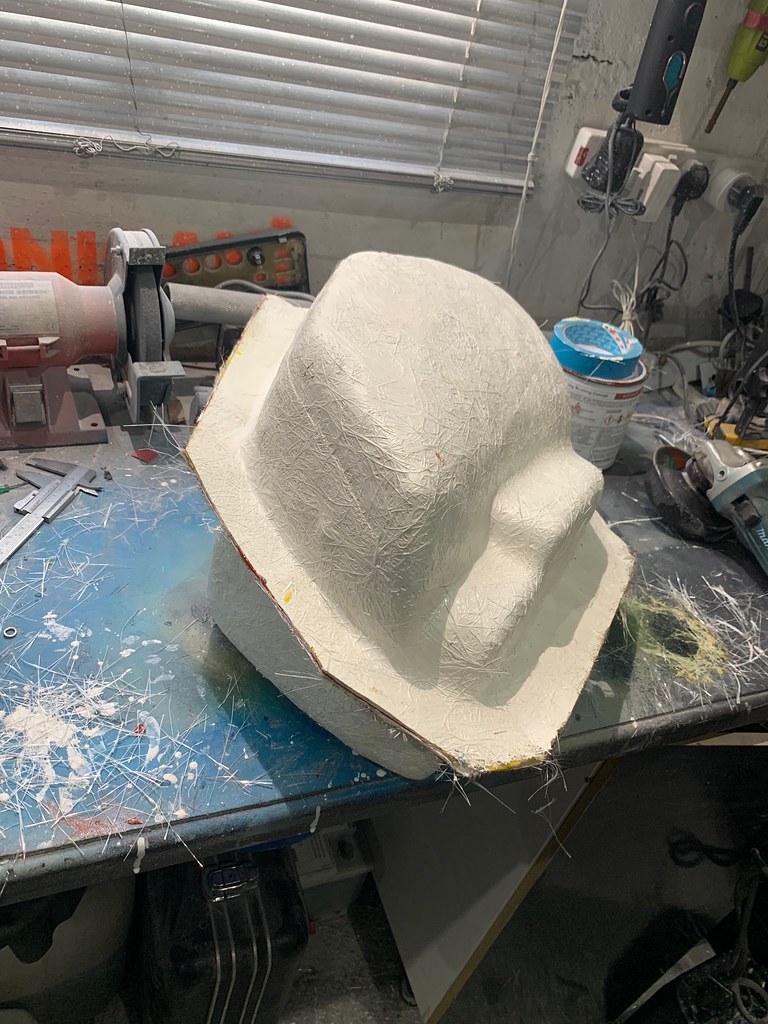
Wait for it to dry and repeat for the bottom half!
One complete split mould!
I go to seperate it and boom! its locked could i get it apart! could i F^$%!
Ended up chopping it in half so had two halfs like this!
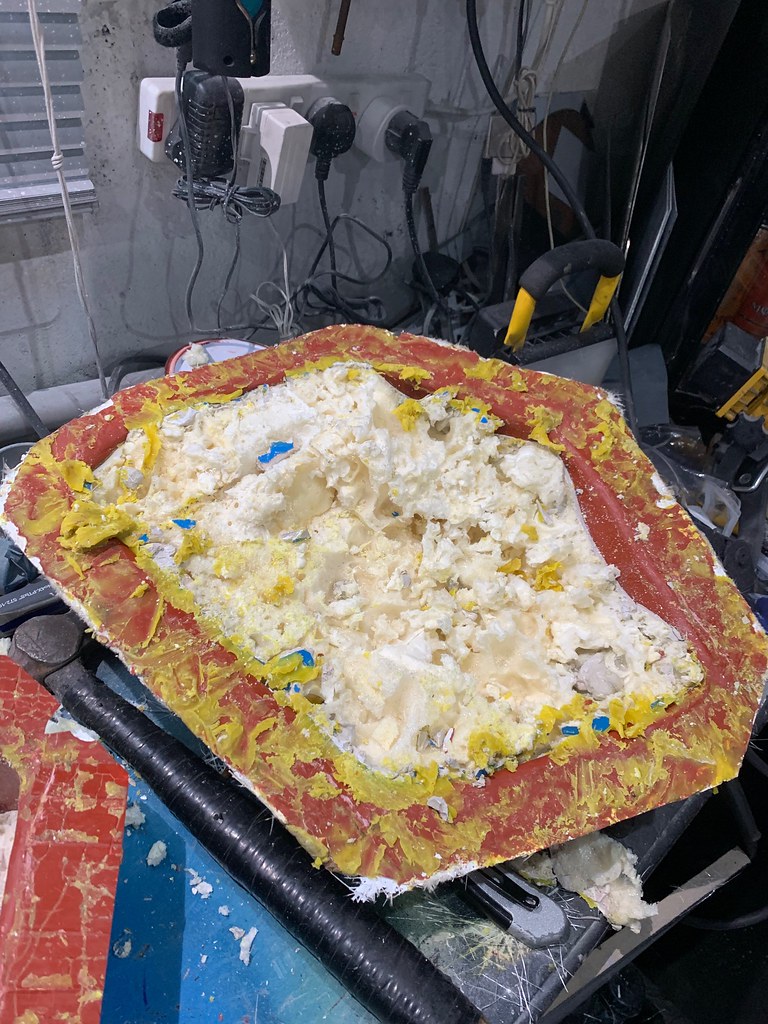
After hours of chipping away!
A few holes due to me being a bit heavy with the chizzle !
So dug out all the cracked bits and applyed fiberglass to the back

So il now have to re apply the gel coat and wet sand down

Then it will be wet sand the whole thing, polish it back up and then wax wax and wax!
It was clearly a release issue with the plug, im not sure if the laqure failed or what but that has basicly chewed up 2 whole days just getting to that stage from the point it should of been ready to use as a mould and make the airbox!
Its going to take a good day or 2 to re prep the mould now so i think the airbox will half to wait untill im home before i can try make it now, that said temp needs to be about 15oC and the garage is currently 4oC ! so i might just wait untill spring lol!
Thanks!
before:
After:
Also got the DBW throttle peddel mounted up, will now need to wire it in ! Fitted a stop to the peddel as well, dont want to snap this one!
And this next part shows what can go wrong when working with fiberglass/moulds ect
So was ready to apply the gel coat to the plug
That was done drama free -
Layer up the fiberglass
Wait for it to dry and repeat for the bottom half!
One complete split mould!
I go to seperate it and boom! its locked
Ended up chopping it in half so had two halfs like this!
After hours of chipping away!
A few holes due to me being a bit heavy with the chizzle !
So dug out all the cracked bits and applyed fiberglass to the back
So il now have to re apply the gel coat and wet sand down
Then it will be wet sand the whole thing, polish it back up and then wax wax and wax!
It was clearly a release issue with the plug, im not sure if the laqure failed or what but that has basicly chewed up 2 whole days just getting to that stage from the point it should of been ready to use as a mould and make the airbox!
Its going to take a good day or 2 to re prep the mould now so i think the airbox will half to wait untill im home before i can try make it now, that said temp needs to be about 15oC and the garage is currently 4oC ! so i might just wait untill spring lol!
Thanks!
31-01-2019, 03:54 AM
#80
Part of the Furniture
Thread Starter
its all repaired now, its not going to be super pretty due to this now but its going to be a function over form part i think!
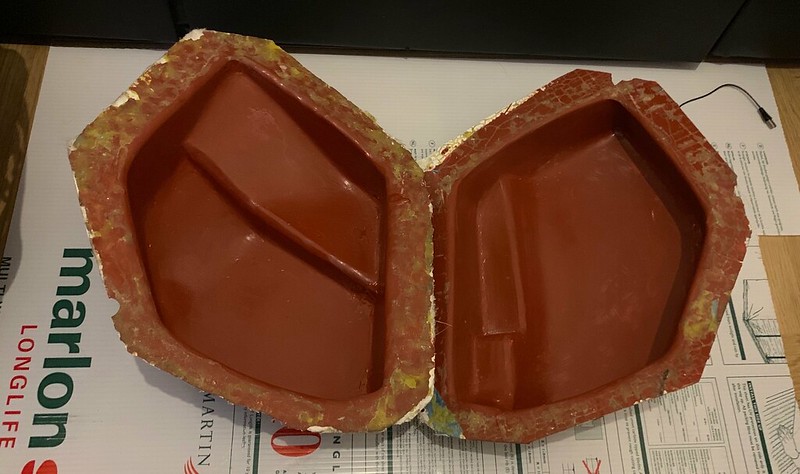
Will polish it up and get the wax built up on it next time home!
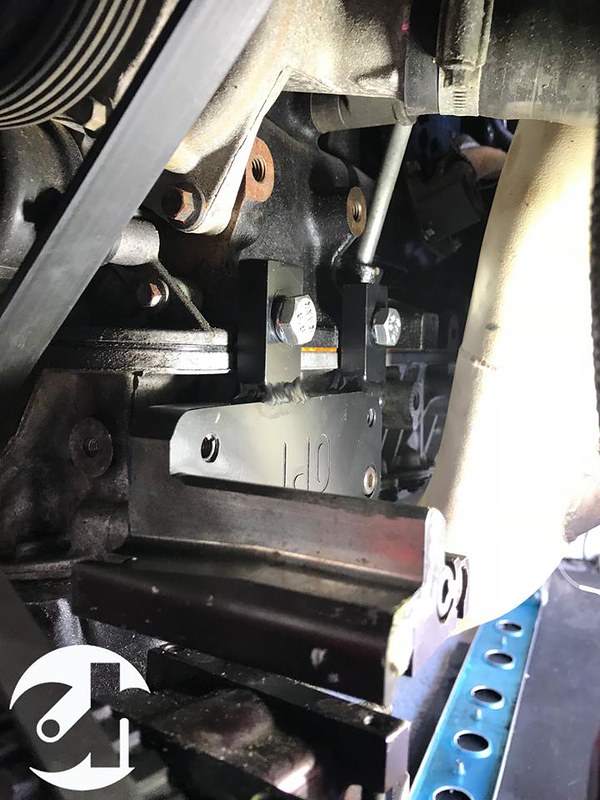
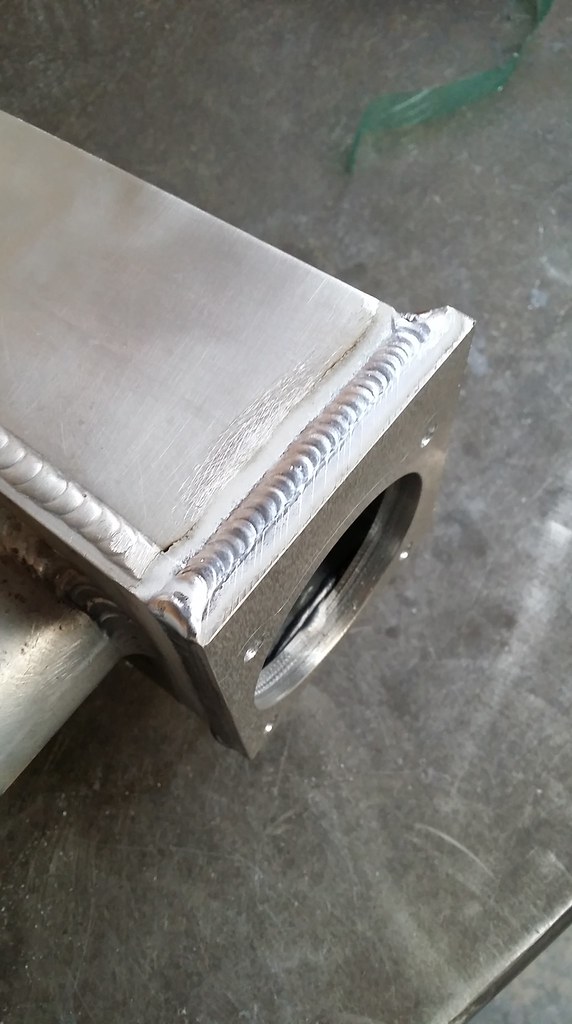
Throttle body next!
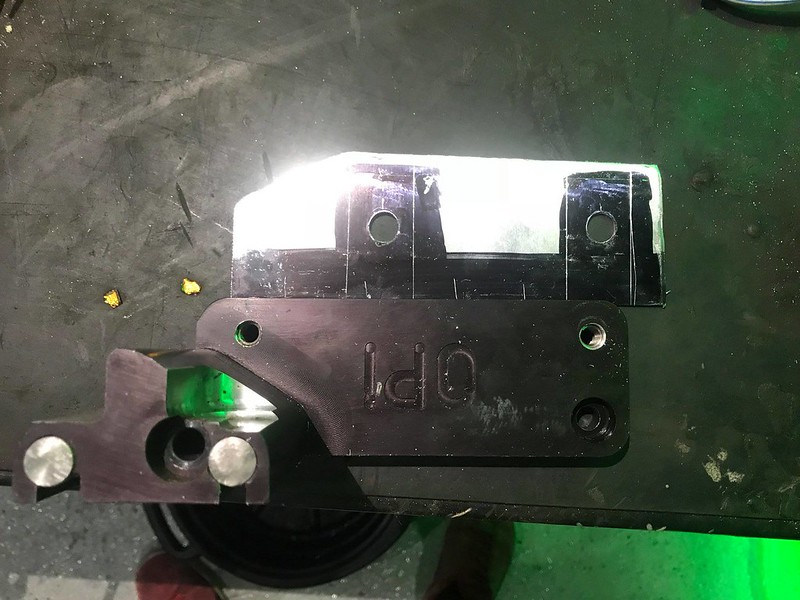
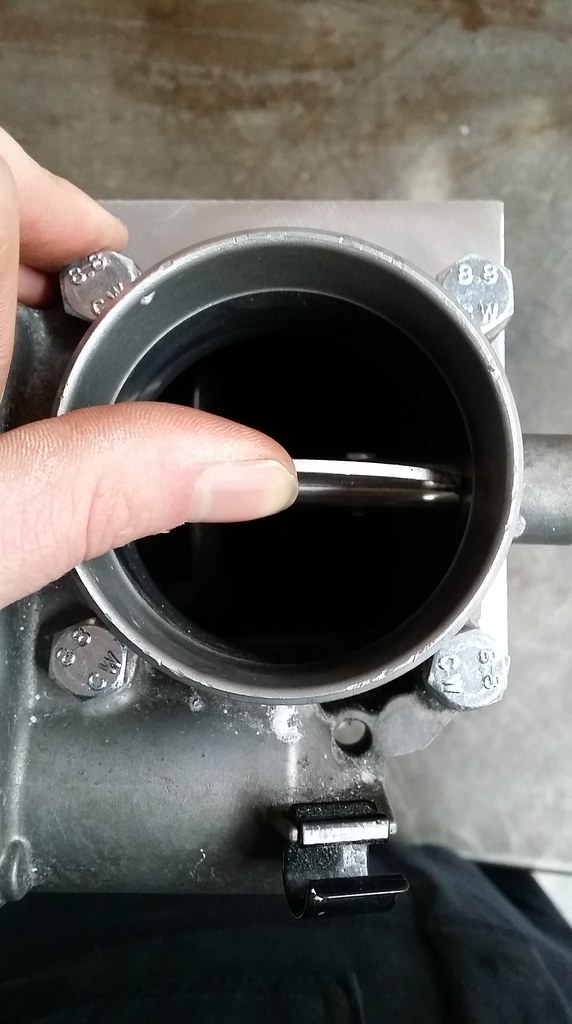
going from the standard 55mm body to a 68mm body should be a nice gain in its self!
Back to calum haynes and he chopped the old TB plate off and welded on a nice new one for me! ( i make it sound so much easier that it is haha!)
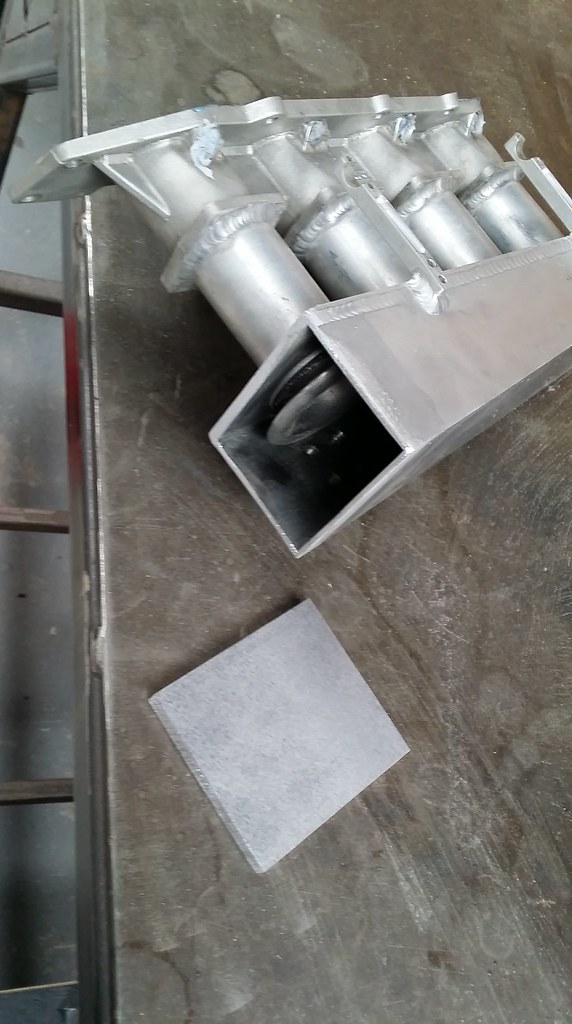
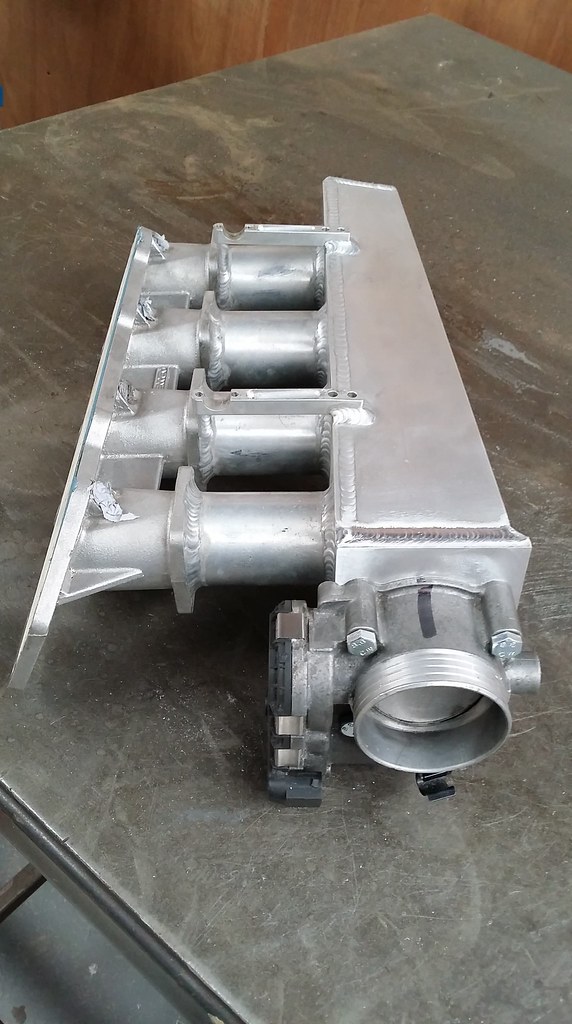
And on the back of that i got the Throttle pedal wired up and working fine! so just the throttle body to do now! Need to wire in the Syvecs H Bridge as well so will need to have a little look at how that plugs into the ECU and talks!
Thanks
Will polish it up and get the wax built up on it next time home!
Throttle body next!
going from the standard 55mm body to a 68mm body should be a nice gain in its self!
Back to calum haynes and he chopped the old TB plate off and welded on a nice new one for me! ( i make it sound so much easier that it is haha!)
And on the back of that i got the Throttle pedal wired up and working fine! so just the throttle body to do now! Need to wire in the Syvecs H Bridge as well so will need to have a little look at how that plugs into the ECU and talks!
Thanks