another saph 1.8cvh to 2.0silvertop conv. on the cheap? what the ... was i thinking?
 17-12-2016, 07:42 PM
#121
PassionFord Regular
Thread Starter
!!! THIS THREAD'S BEEN FUCKED BY PHOOTOBUCKET !!!
if i want my photo to be public again, i have to pay a ransom of 400usd per year for a service which once was free. (not the only one in this catch).
nice move, bunch of greedy fucktards...
many thanks for the support, to anyone who's answered on here .
.
for the ones interested in this, working on a new thread opening soon. just let me the time to copy and paste everything...
thanks for reading.
__________________________________________________ __________________________________________________ __
shitty update...
in almost three month, almost nothing done... shame on me, shame on me.
worked lots of hours, lot of overtimes all well paid (which is quite a rare thing down here).
making the point... all i managed to do in this whole time:
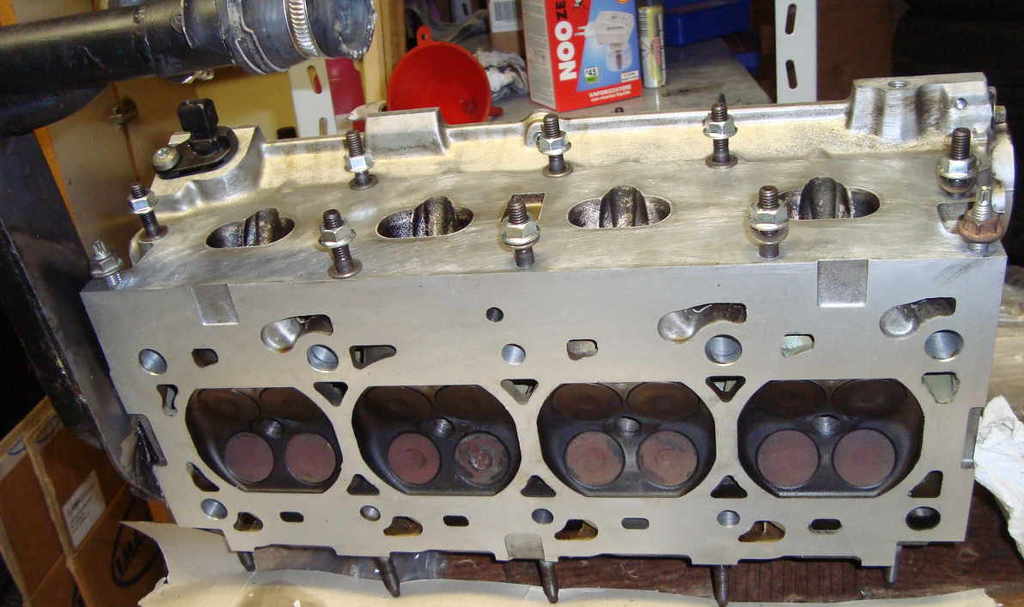
head skimmed, taken down 0.30mm.
also the oil i took out from the engine was matt black and had the consistency of the honey.
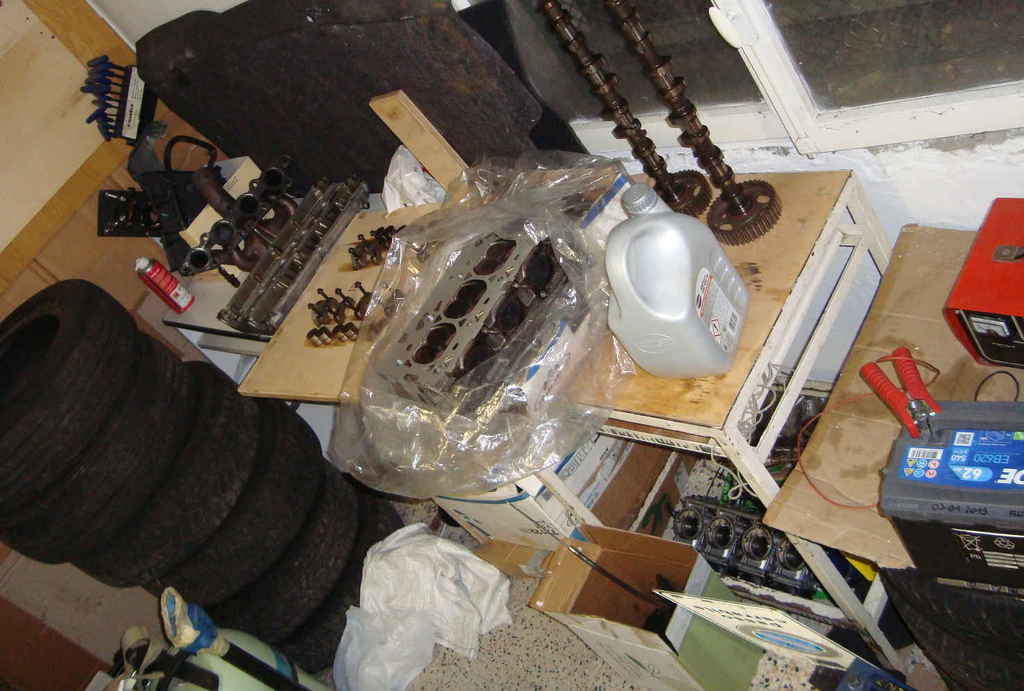
studs for the intake manifold too.
i foresee many "up&down"s forward and i'm quite a dog with wrenches.
without them, i'll highly likely destroy the aluminum head threads.
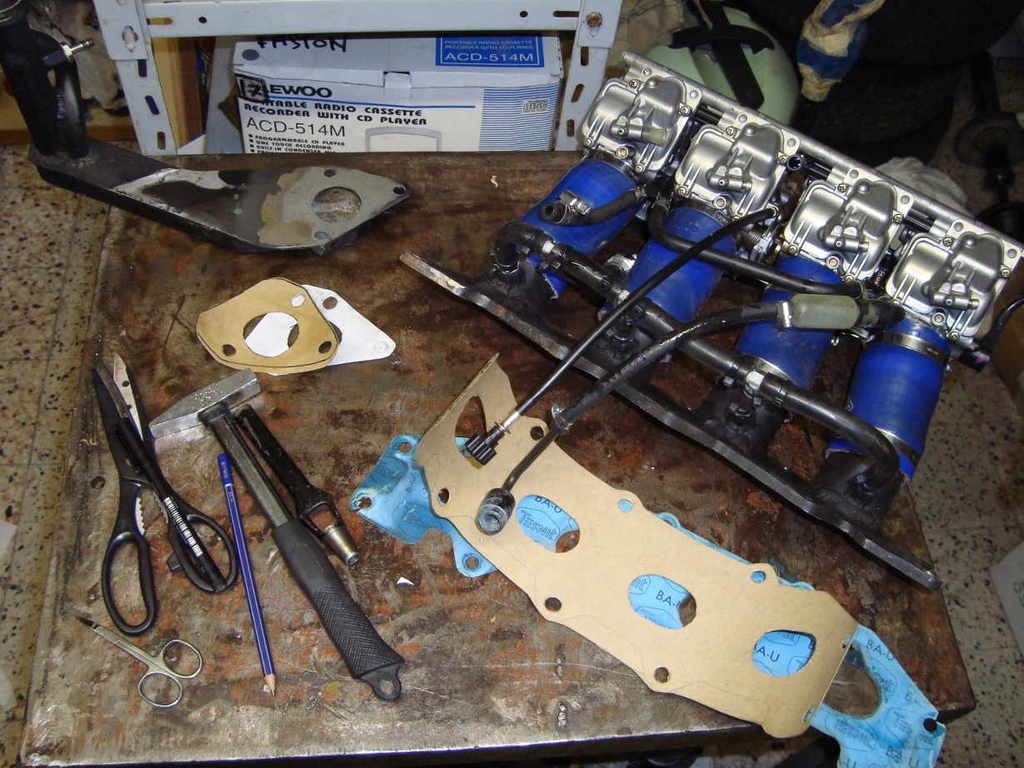
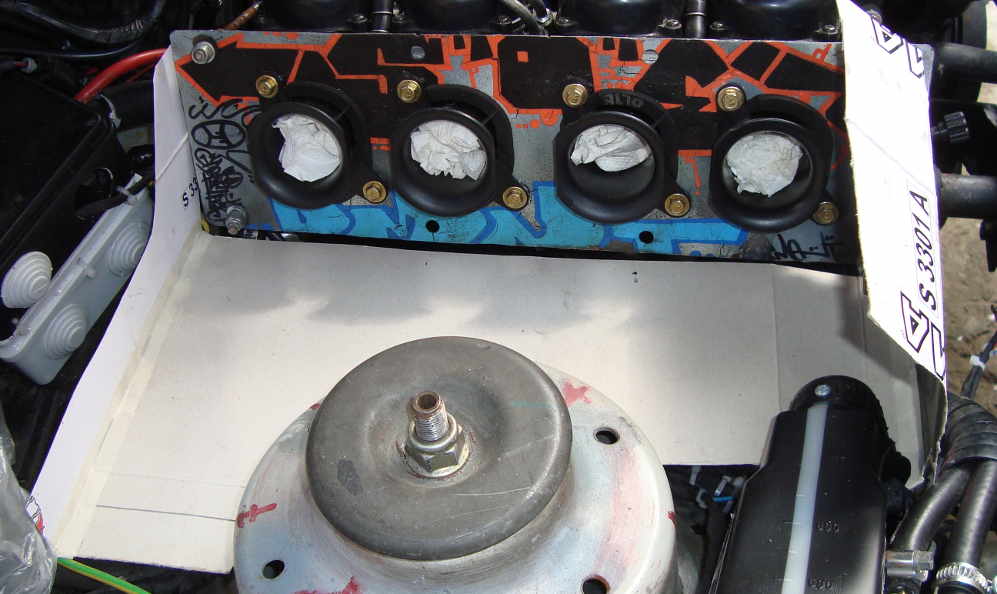
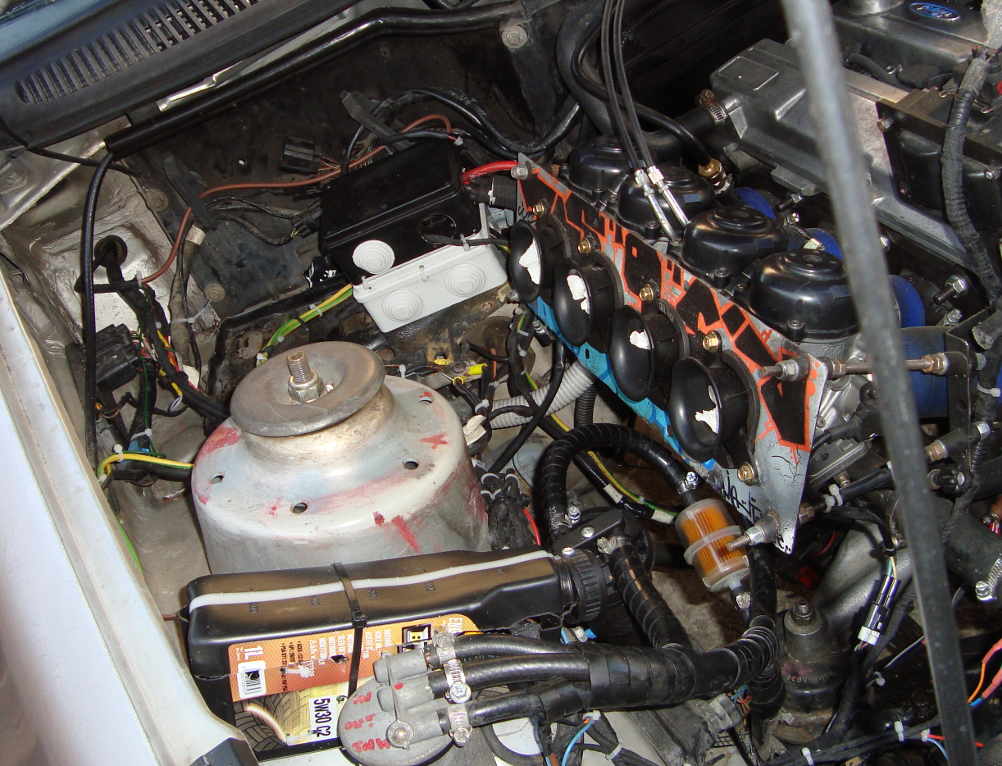
diy intake manifold and water rail gaskets.
made of 1mm thick gasket paper.
at work i also made this tool, to hold the crankshaft pulleys in position, while loosening & tightening 'em, (80mm between the teeth).
made of scraps in no time. sh*t quality welded , but it'll work.

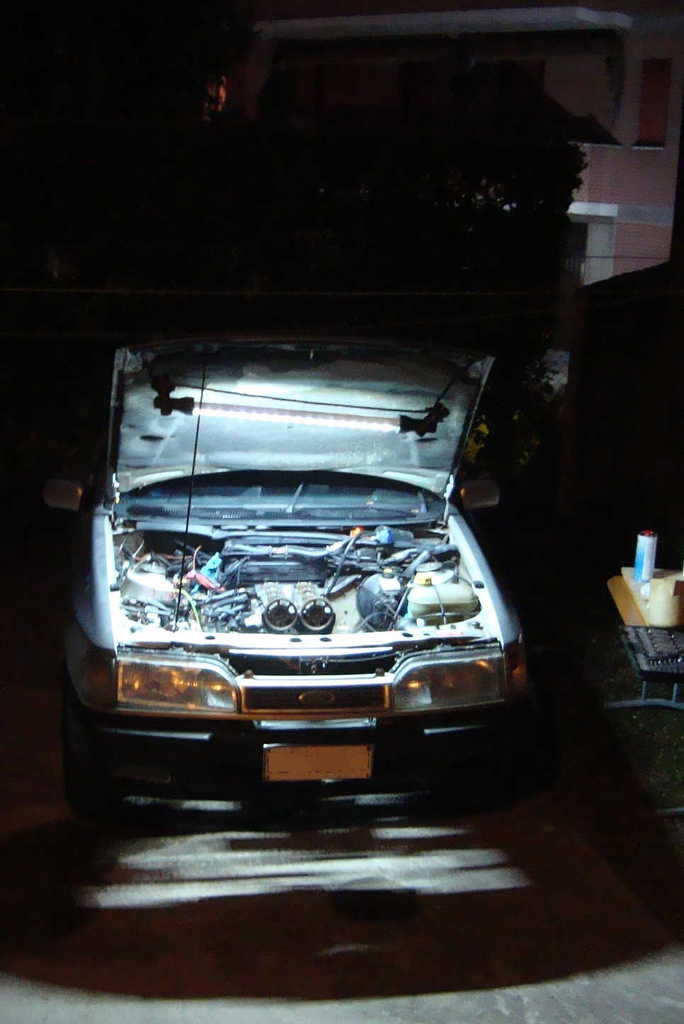
working in the dark with some true special effects by lidl...
i'm on foot again: now that's closed the 3months job contract i had, i should've more time to work on it.
thanks for reading.
if i want my photo to be public again, i have to pay a ransom of 400usd per year for a service which once was free. (not the only one in this catch).
nice move, bunch of greedy fucktards...
many thanks for the support, to anyone who's answered on here
.for the ones interested in this, working on a new thread opening soon. just let me the time to copy and paste everything...
thanks for reading.
__________________________________________________ __________________________________________________ __
shitty update...
in almost three month, almost nothing done... shame on me, shame on me.
worked lots of hours, lot of overtimes all well paid (which is quite a rare thing down here).
making the point... all i managed to do in this whole time:
head skimmed, taken down 0.30mm.
also the oil i took out from the engine was matt black and had the consistency of the honey.

studs for the intake manifold too.
i foresee many "up&down"s forward and i'm quite a dog with wrenches.
without them, i'll highly likely destroy the aluminum head threads.

diy intake manifold and water rail gaskets.
made of 1mm thick gasket paper.

at work i also made this tool, to hold the crankshaft pulleys in position, while loosening & tightening 'em, (80mm between the teeth).
made of scraps in no time. sh*t quality welded

working in the dark with some true special effects by lidl...

i'm on foot again: now that's closed the 3months job contract i had, i should've more time to work on it.
thanks for reading.
Last edited by rooos; 01-07-2017 at 02:41 PM.

The following users liked this post:
rooos (17-12-2016)
06-01-2017, 12:47 PM
#123
PassionFord Regular
Thread Starter
cheers Glenn, i wouldn't say amazing is a proper word for it, but i really appreciate your support mate, thanks! 
i thought i had more time... i hadn't.
however, head is on.
engine bay back to point zero...
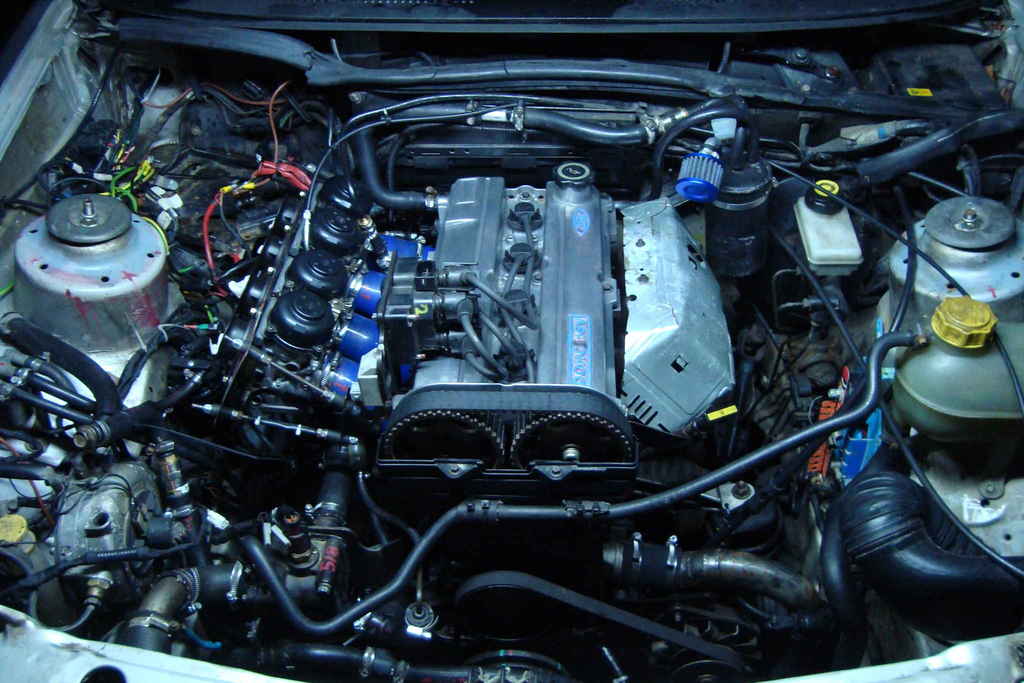
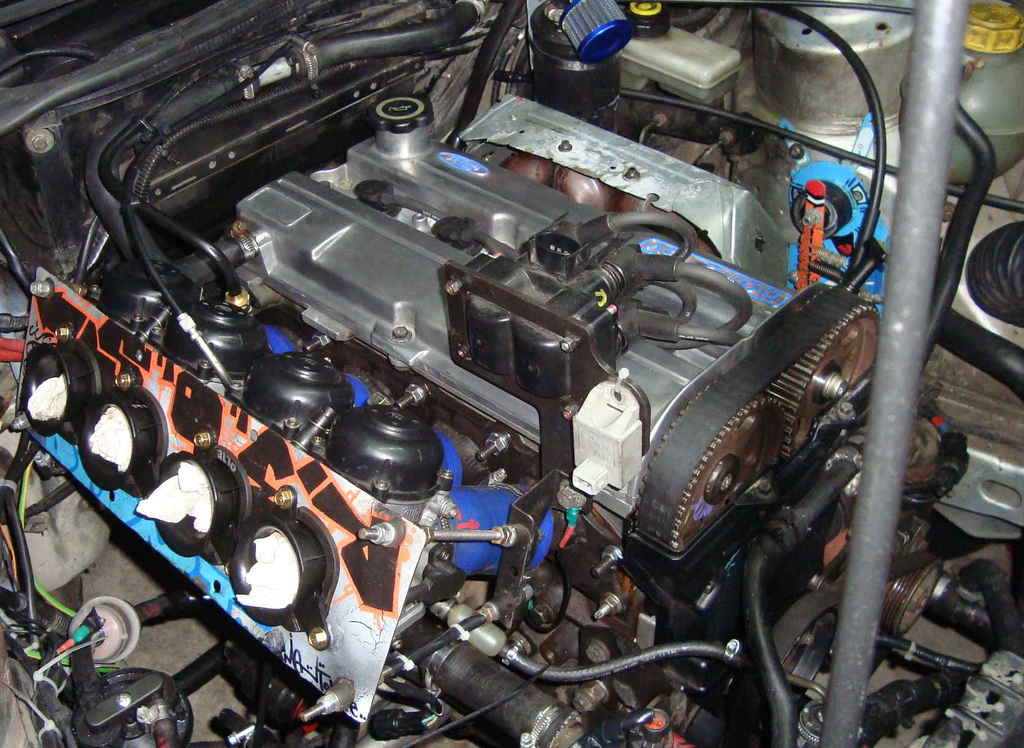
...at least is what i hoped. engine cranks, idles, and works quite fine (for not being truly carbed), then...
...it pisses oil so badly, i won't ride more than 5miles before empty the pan dry.
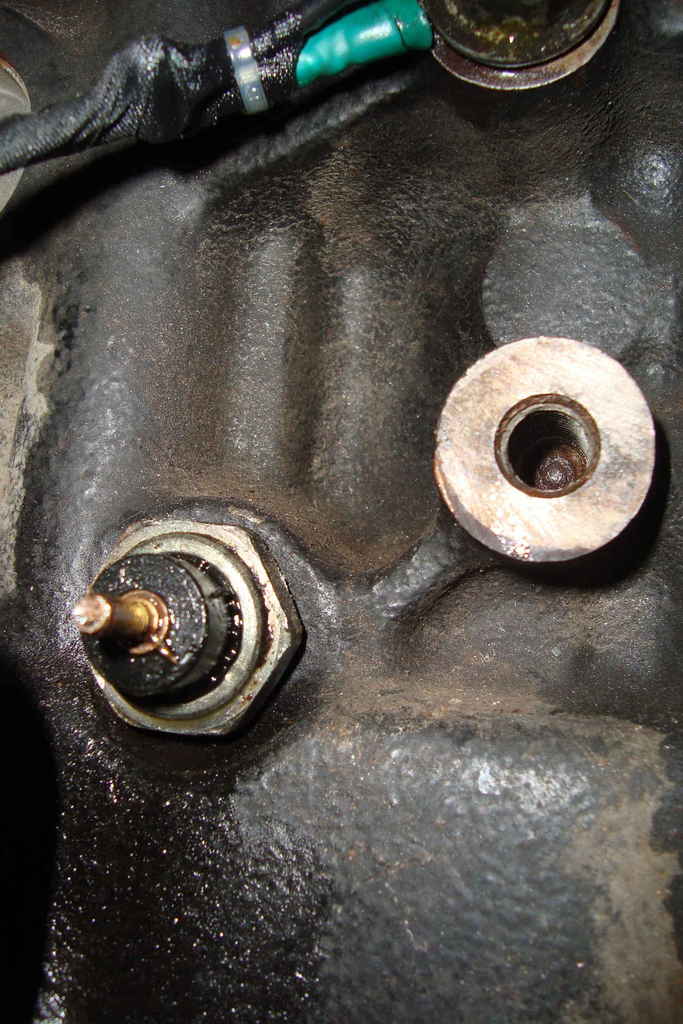
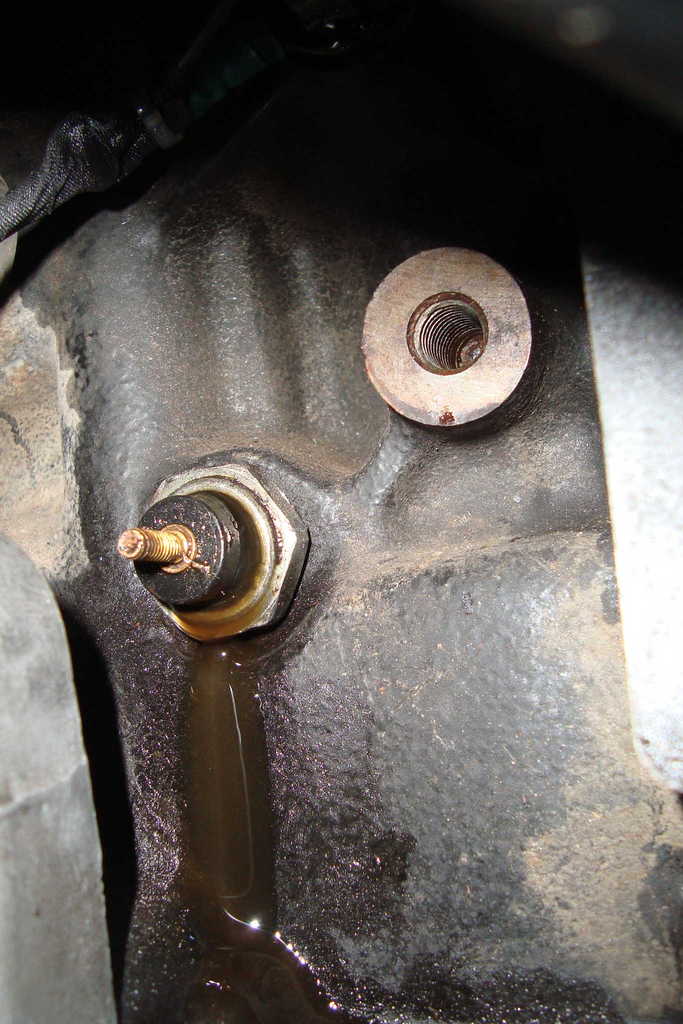
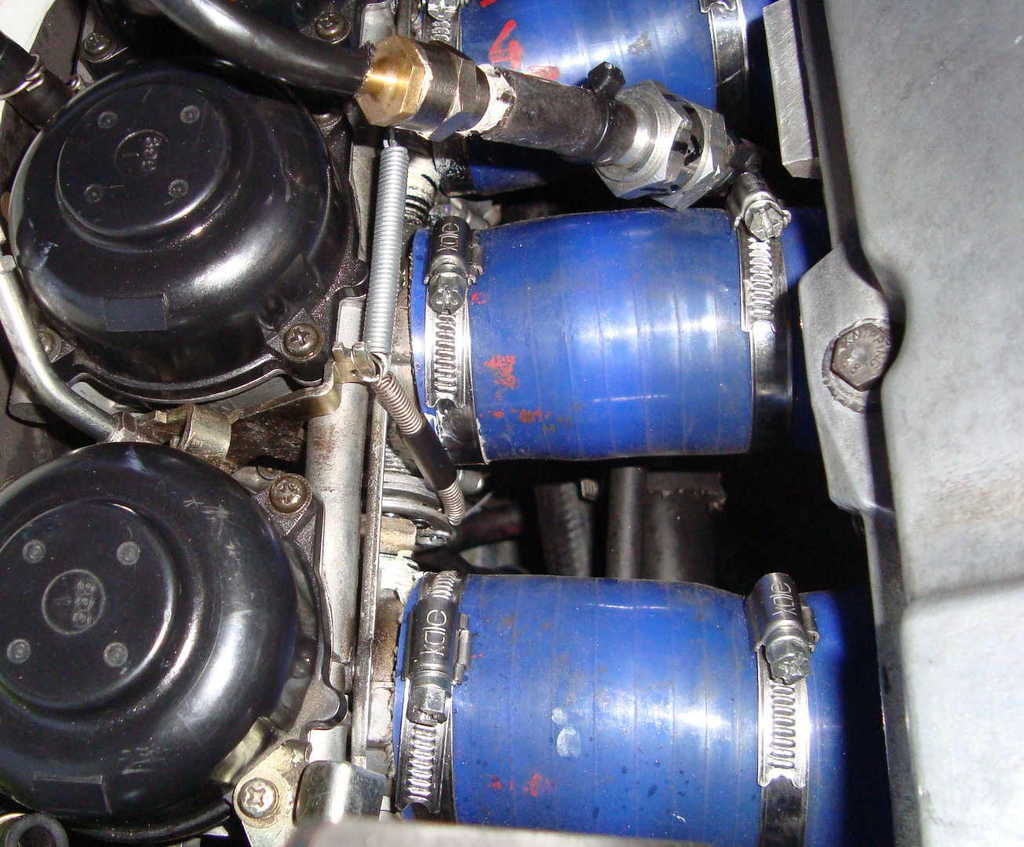
couldn't se sh*t in there, so i made these couple of pics to diagnose the problem.
f*cked up leaking oil pressure swich.
thinking about the thread in the block was the cause, scared the sh*t out of me.
thanx god it ain't.
before cranking the engine up:
and while idling:
while waiting for some of the spares ordered, i took care of the inside and put on some bits...
before..
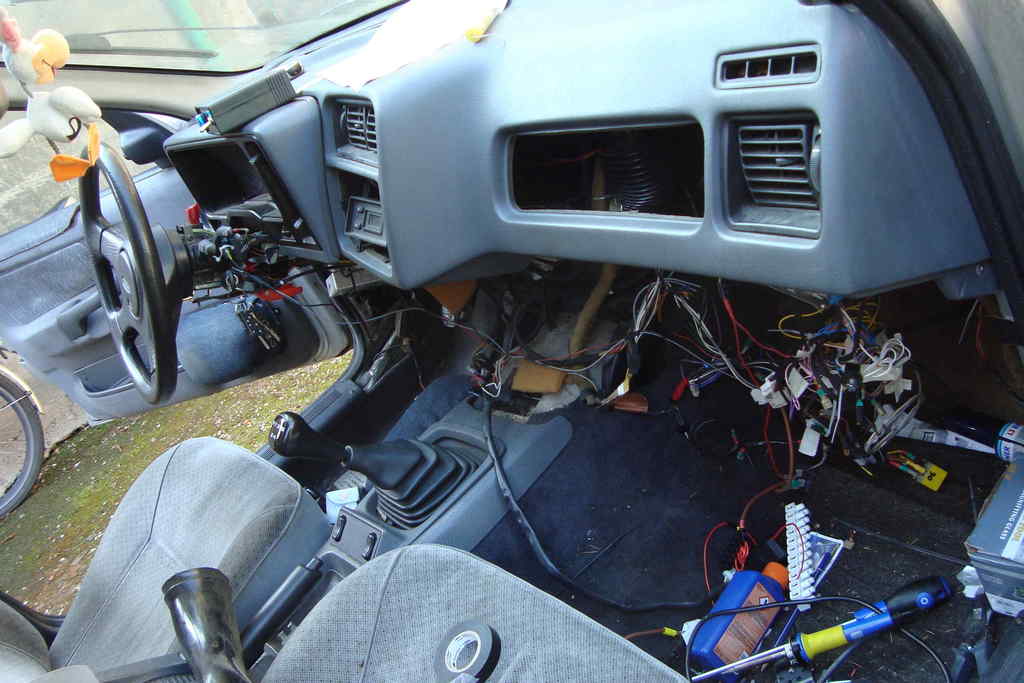
...and after
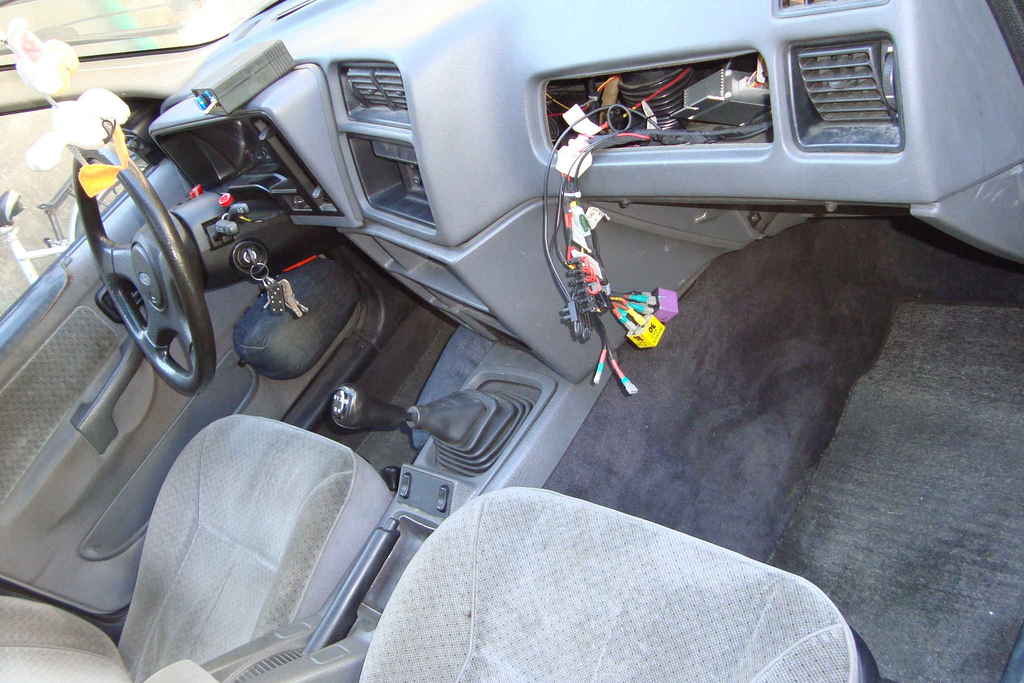
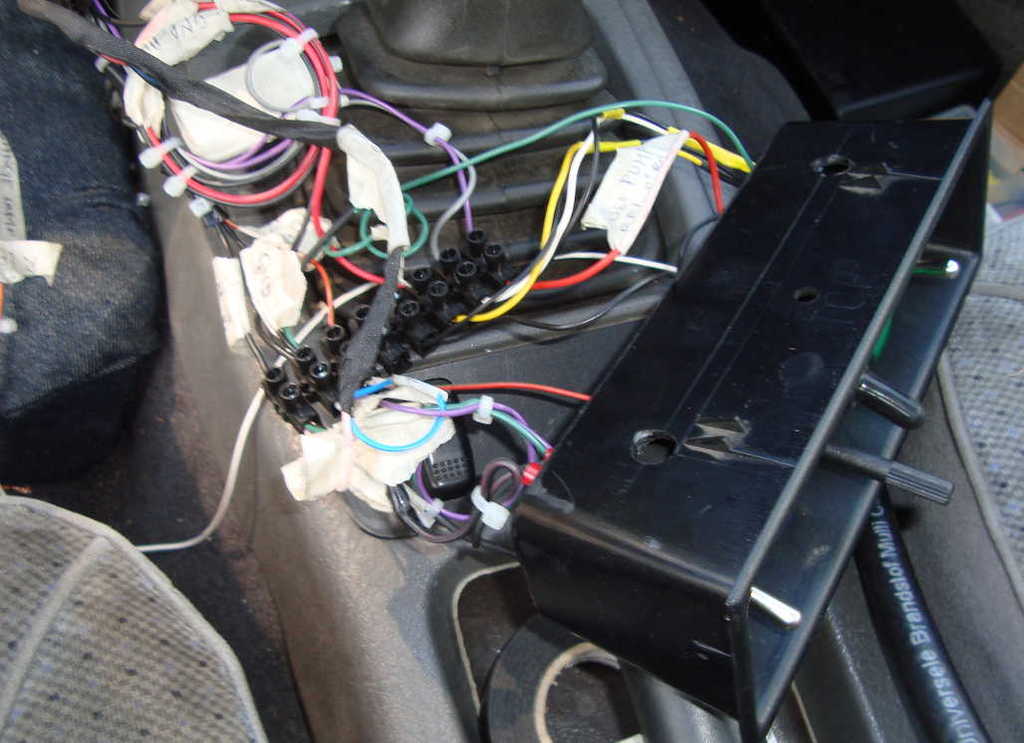
the harness is still a bit pikey, but each wire has been labeled, separated by polarity wherever possible, and the more loaded (and hot) ones run out of the core of each bundle. hope it lasts...
she hasn't seen any vacuum cleaner in more than 2years.
even if it's still on jack stands, i'm truly enjoying having a car which looks more like "car" than "dumpster". now i really can't wait for them spares...
thanks for reading....
i thought i had more time... i hadn't.
however, head is on.
engine bay back to point zero...


...at least is what i hoped. engine cranks, idles, and works quite fine (for not being truly carbed), then...
...it pisses oil so badly, i won't ride more than 5miles before empty the pan dry.
couldn't se sh*t in there, so i made these couple of pics to diagnose the problem.
f*cked up leaking oil pressure swich.
thinking about the thread in the block was the cause, scared the sh*t out of me.
thanx god it ain't.
before cranking the engine up:

and while idling:

while waiting for some of the spares ordered, i took care of the inside and put on some bits...
before..

...and after

the harness is still a bit pikey, but each wire has been labeled, separated by polarity wherever possible, and the more loaded (and hot) ones run out of the core of each bundle. hope it lasts...
she hasn't seen any vacuum cleaner in more than 2years.
even if it's still on jack stands, i'm truly enjoying having a car which looks more like "car" than "dumpster". now i really can't wait for them spares...
thanks for reading....
Last edited by rooos; 06-01-2017 at 12:50 PM. Reason: baad english, needd to go to school again
10-02-2017, 03:20 AM
#124
PassionFord Regular
Thread Starter
long time since the last update...
my girl is feeling quite sick, and can't spend too much time on the web atm.
now i'm also having hard times with my back, that's why i'm posting here at this dumb hour (4 to 5am in here).
however some work has been done and some bit has been bought, waiting for better moments. here you are...
car running again, and again i'd been towed once for free for empty gas tank. haha!
still struggling a bit with dodgy throttle pedal. releasing accelerator, the engine didn't follow to idle quickly enough. so the choke spring has been put in place of the throttle closing cable and another spring has been put on the choke.
very better now, driveable but still not enough. in the next future, i might make some sort of direct linkage and get rid of that pokemon...
moreover, many thanks to new1ru who's mailing me and giving me tons of good tips.
THANKS PAL!
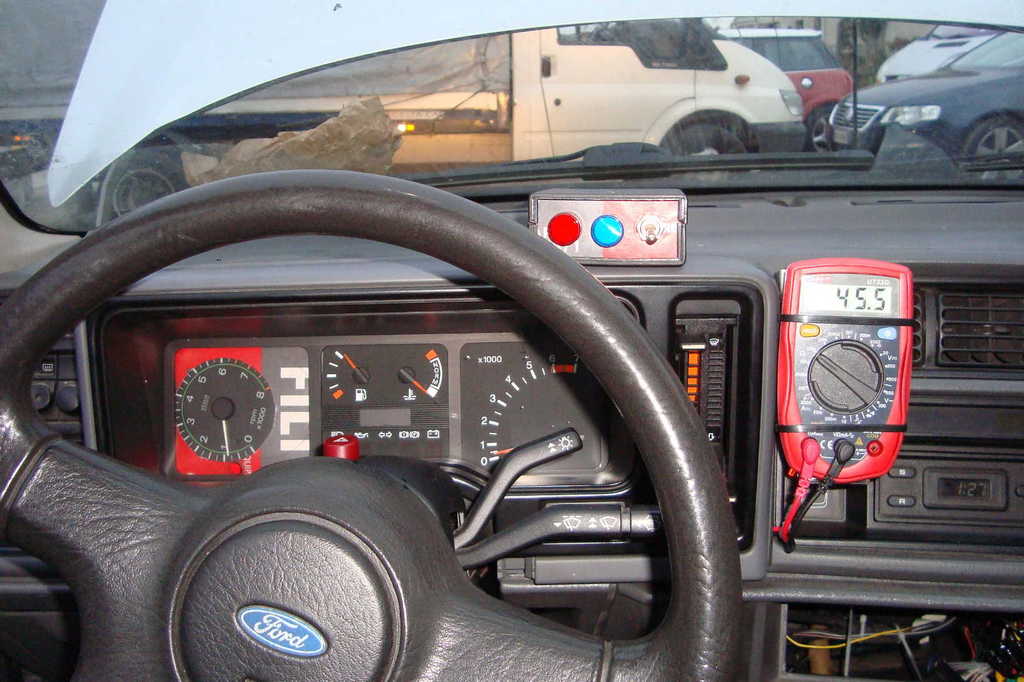
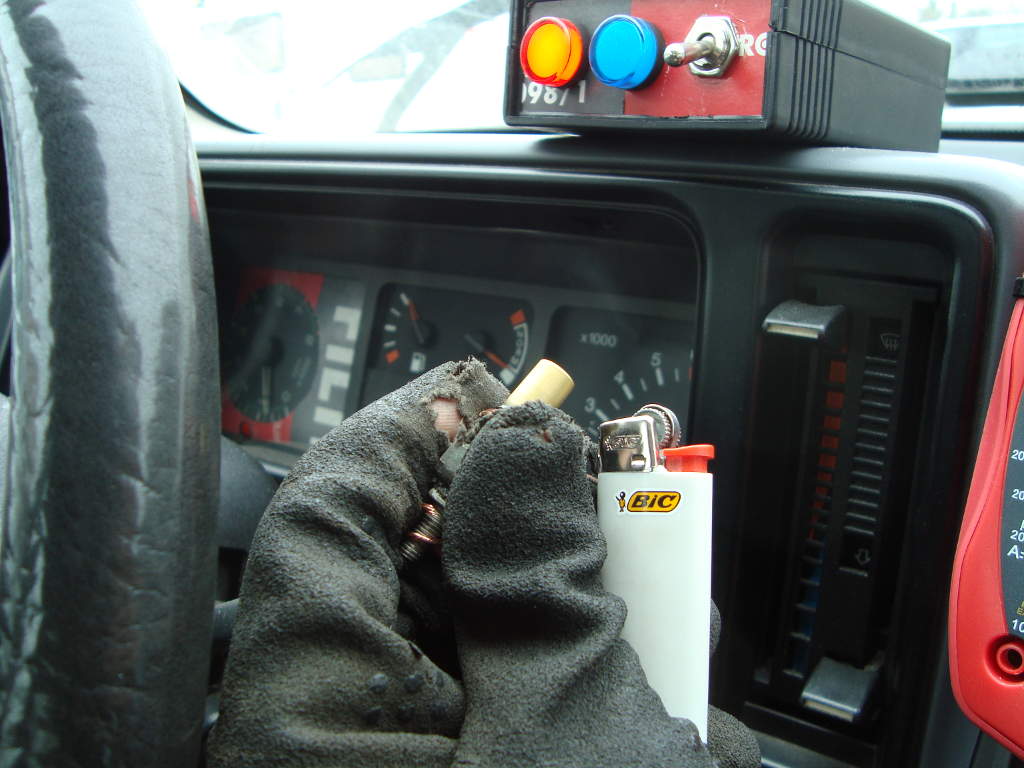
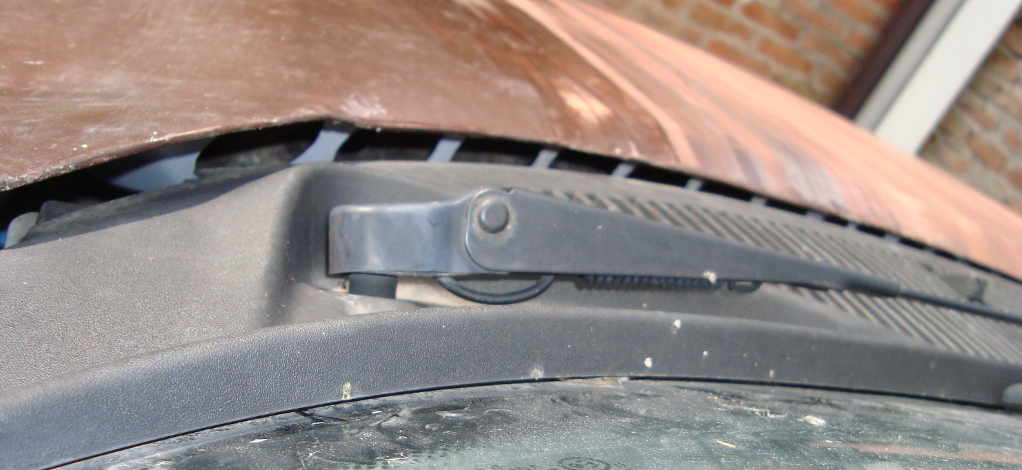
gave up trying to connect the coolant sensor to the dash. tried everything, still no signal. so here's my actual dash set up: (for temporary use),
-fiat punto mkI veglia borletti tacho (in place of the speedometer). strangely it correctly communicates with the edis4 module, while the ford tacho doesn't;
-ford tacho connected to one coilpack which just gives half rpm reading;
-box on the dash with: auxiliary red light oil lamp, blue lamp on when fan is on, fan switch;
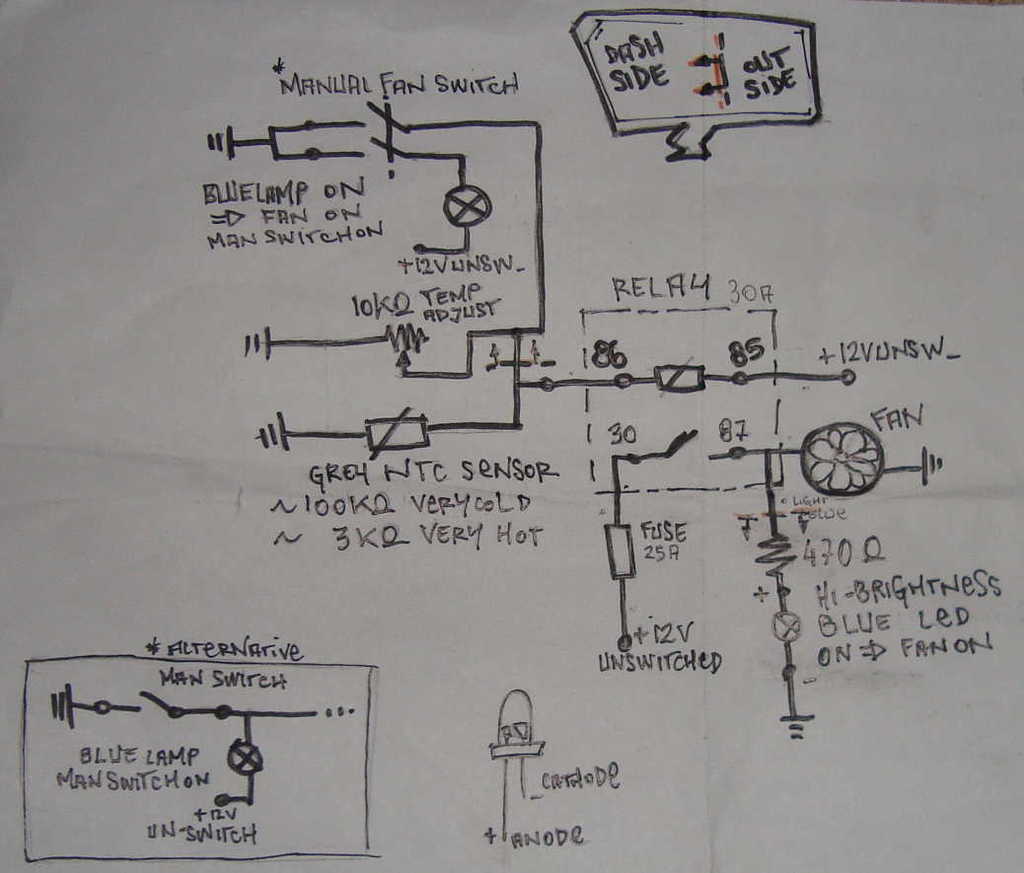
-multimeter, to be set up on the 200kohm scale, in order to have a resistance reading by the ntc sensor of the coolant, (when the read is around 3.5kohm, i manually switch on the fan).
made exception for the tank level, the rest of the dash works fine (illumination, indicator, oil lamp, etc...)
my girl is feeling quite sick, and can't spend too much time on the web atm.
now i'm also having hard times with my back, that's why i'm posting here at this dumb hour (4 to 5am in here).
however some work has been done and some bit has been bought, waiting for better moments. here you are...
car running again, and again i'd been towed once for free for empty gas tank. haha!
still struggling a bit with dodgy throttle pedal. releasing accelerator, the engine didn't follow to idle quickly enough. so the choke spring has been put in place of the throttle closing cable and another spring has been put on the choke.
very better now, driveable but still not enough. in the next future, i might make some sort of direct linkage and get rid of that pokemon...
moreover, many thanks to new1ru who's mailing me and giving me tons of good tips.
THANKS PAL!

gave up trying to connect the coolant sensor to the dash. tried everything, still no signal. so here's my actual dash set up: (for temporary use),
-fiat punto mkI veglia borletti tacho (in place of the speedometer). strangely it correctly communicates with the edis4 module, while the ford tacho doesn't;
-ford tacho connected to one coilpack which just gives half rpm reading;
-box on the dash with: auxiliary red light oil lamp, blue lamp on when fan is on, fan switch;
-multimeter, to be set up on the 200kohm scale, in order to have a resistance reading by the ntc sensor of the coolant, (when the read is around 3.5kohm, i manually switch on the fan).
made exception for the tank level, the rest of the dash works fine (illumination, indicator, oil lamp, etc...)
 10-02-2017, 03:22 AM
#125
PassionFord Regular
Thread Starter
hard times with the coolant too...
firstly i cap changed with a used one, the system was not presurizing at all.
water still squirted out of it.
cap is ok now, it keeps pressure even overnight.
it looks like the engine's running a little hot.
radiator replacing is the last option i'd take, so i'm starting from the cheapest ones...
i put on a radiator-flap, made of cheap shitty (green) plastic sheet. once i got time and money, i'll make it of stainless or aluminum...
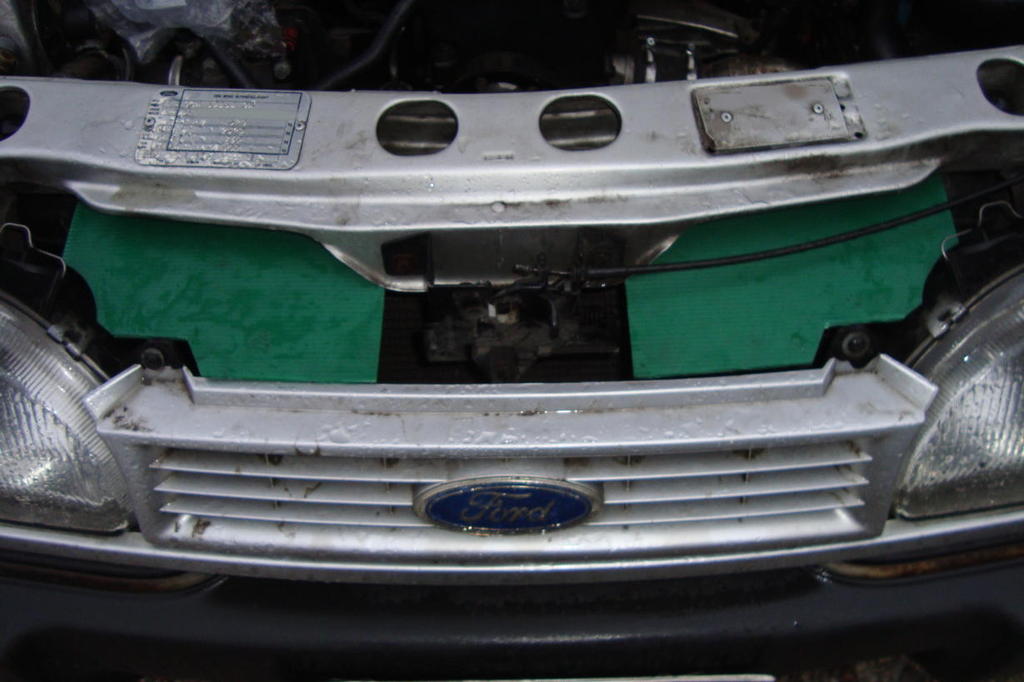
holed the fan mount, in order to improve a bit the radiator efficency, just on the higher-hotter part of it.
just for reference:
radiator is a twink, fan is the old single 1.8cvh, water pump is a reversed one from retro-ford.
each hose i took down was internally covered by sludge, built up by the radiator leak-stop solution previously used. i assumed the radiator core was internally dirty too. so in first place i cleaned up the whole coolant circuit running a radiator cleaner solution. sorry no pics---
firstly i cap changed with a used one, the system was not presurizing at all.
water still squirted out of it.
cap is ok now, it keeps pressure even overnight.
it looks like the engine's running a little hot.
radiator replacing is the last option i'd take, so i'm starting from the cheapest ones...
i put on a radiator-flap, made of cheap shitty (green) plastic sheet. once i got time and money, i'll make it of stainless or aluminum...


holed the fan mount, in order to improve a bit the radiator efficency, just on the higher-hotter part of it.
just for reference:
radiator is a twink, fan is the old single 1.8cvh, water pump is a reversed one from retro-ford.

each hose i took down was internally covered by sludge, built up by the radiator leak-stop solution previously used. i assumed the radiator core was internally dirty too. so in first place i cleaned up the whole coolant circuit running a radiator cleaner solution. sorry no pics---
10-02-2017, 03:22 AM
#126
PassionFord Regular
Thread Starter
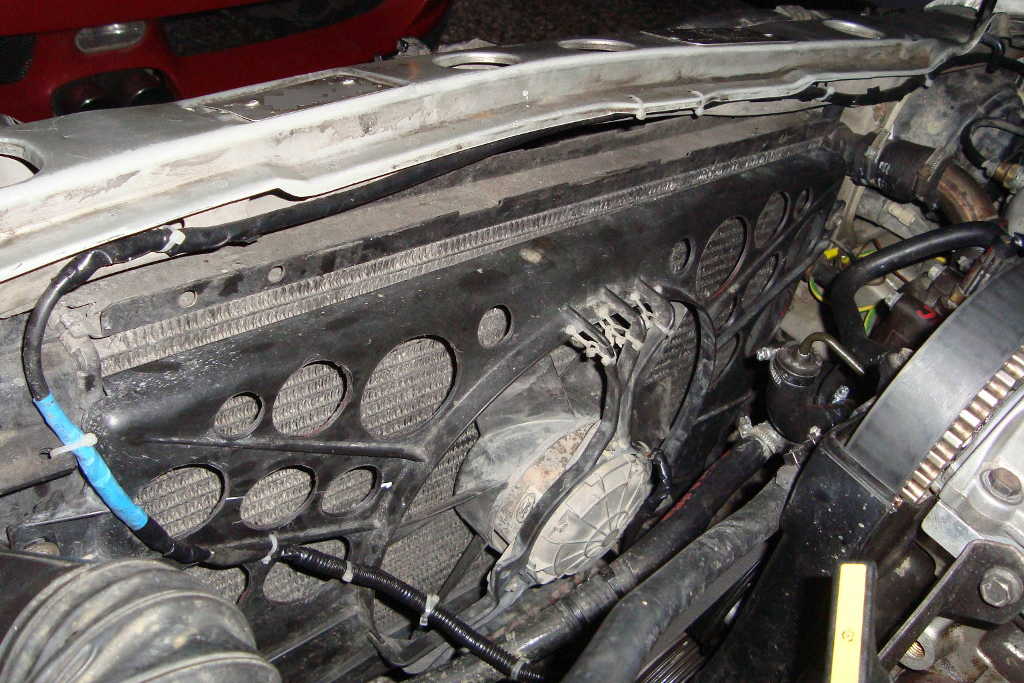
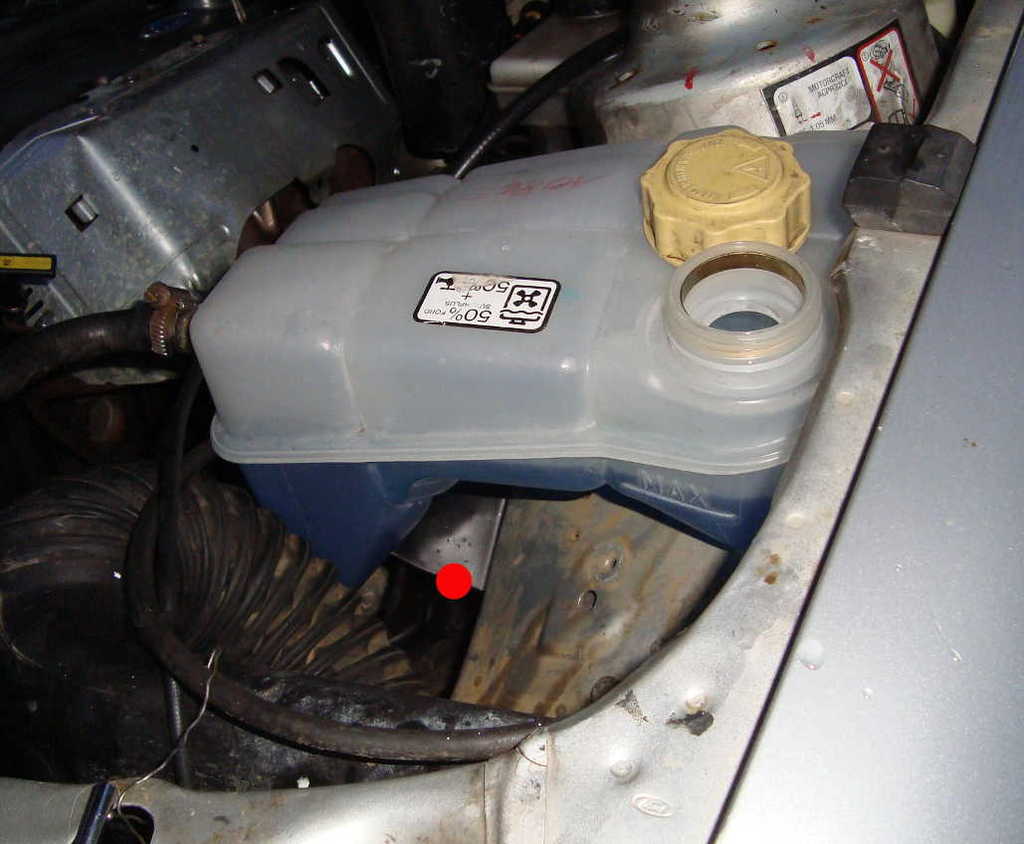
when the coolant gets hot, it fills all the expansion tank and, even with the level beneath the minimum@cold, lot of coolant is squirted out of the cap.
i've seen that the coolant circuit now takes in much more water than before, due to the thermostat relocation and all the add-on plumbing i built.
hoping it's not a overheating-boiling issue, changed a bit the circuit first. took down the useless lpg purpose hoses.
now i'm trying with a bigger expansion tank (kinda 10usd at the junk).
it's from a 1.8gasoline mondeo, donno what year. bigger stomach than the old 1.8cvh one.
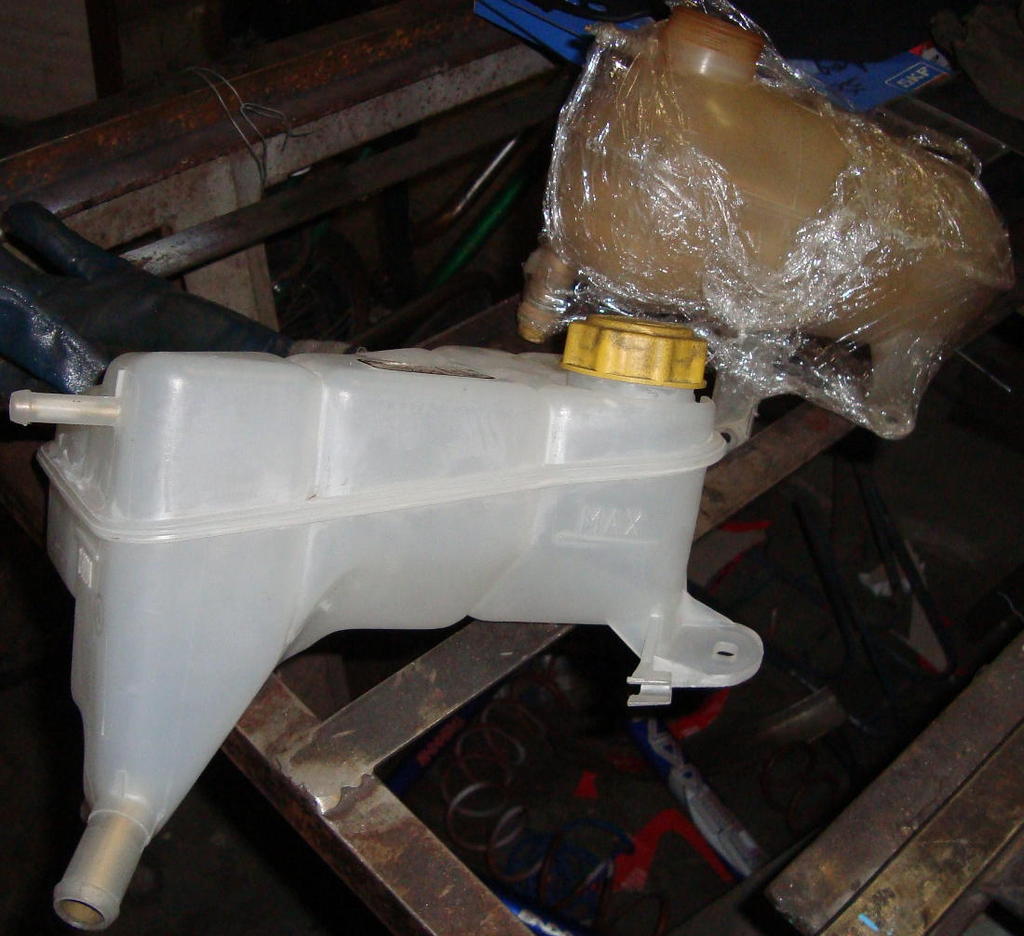
just had to improvise a small bracket for it, (red dot). it's not leveled but it goes almost straight on.
i'll give it a try in the next days. let's hope it does the job.

 10-02-2017, 03:23 AM
#127
PassionFord Regular
Thread Starter
some other bits...
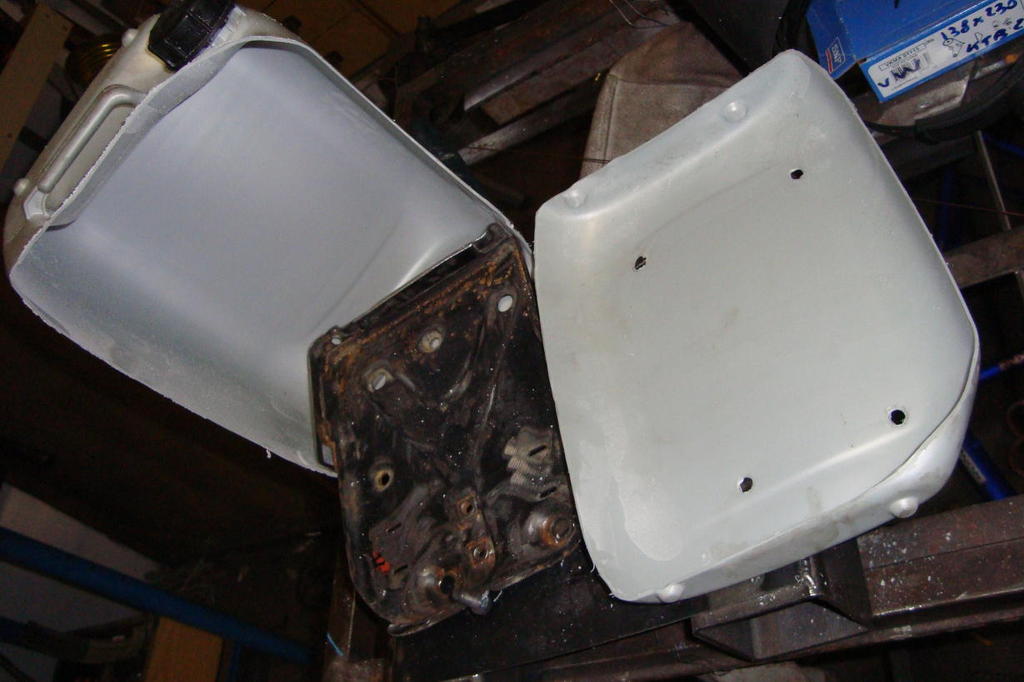
splash-protection-screen for the carbs, made out cutting a plastic battery cover found in the dumpster. to be fixed on when necessary with zip ties.
wanna put the battery on the rear of the front-passenger seat.
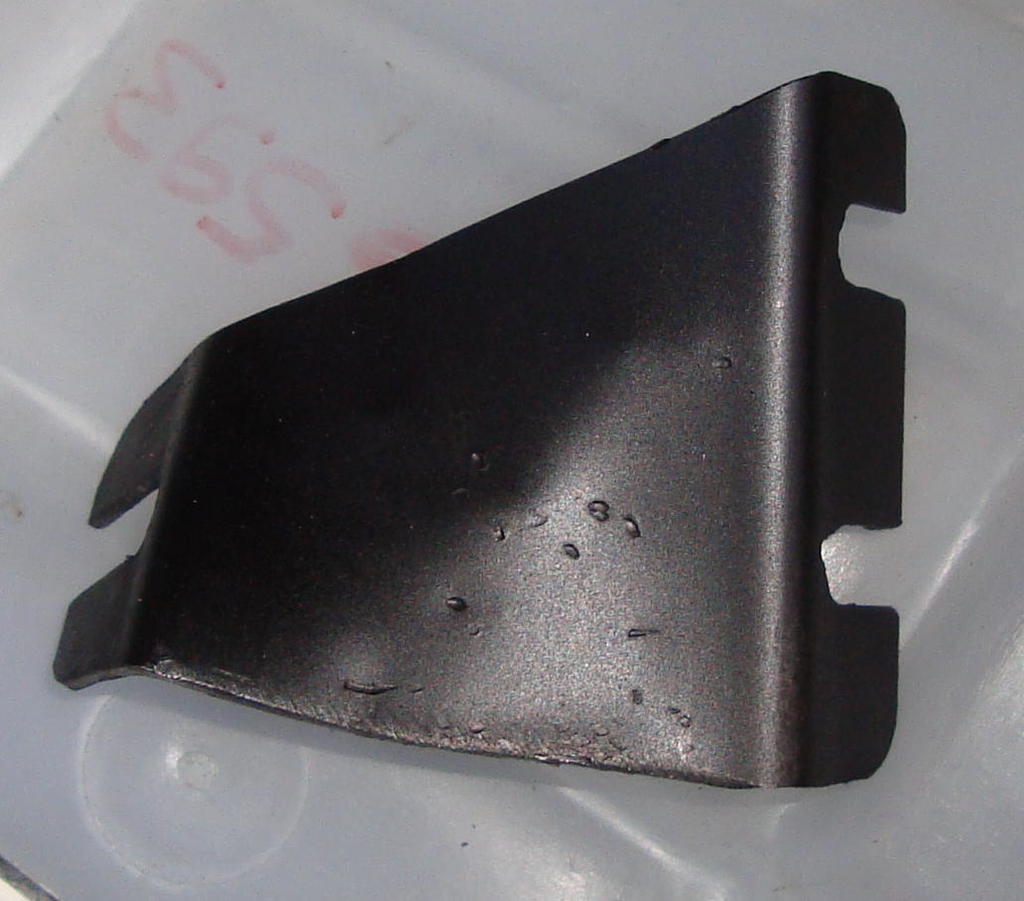
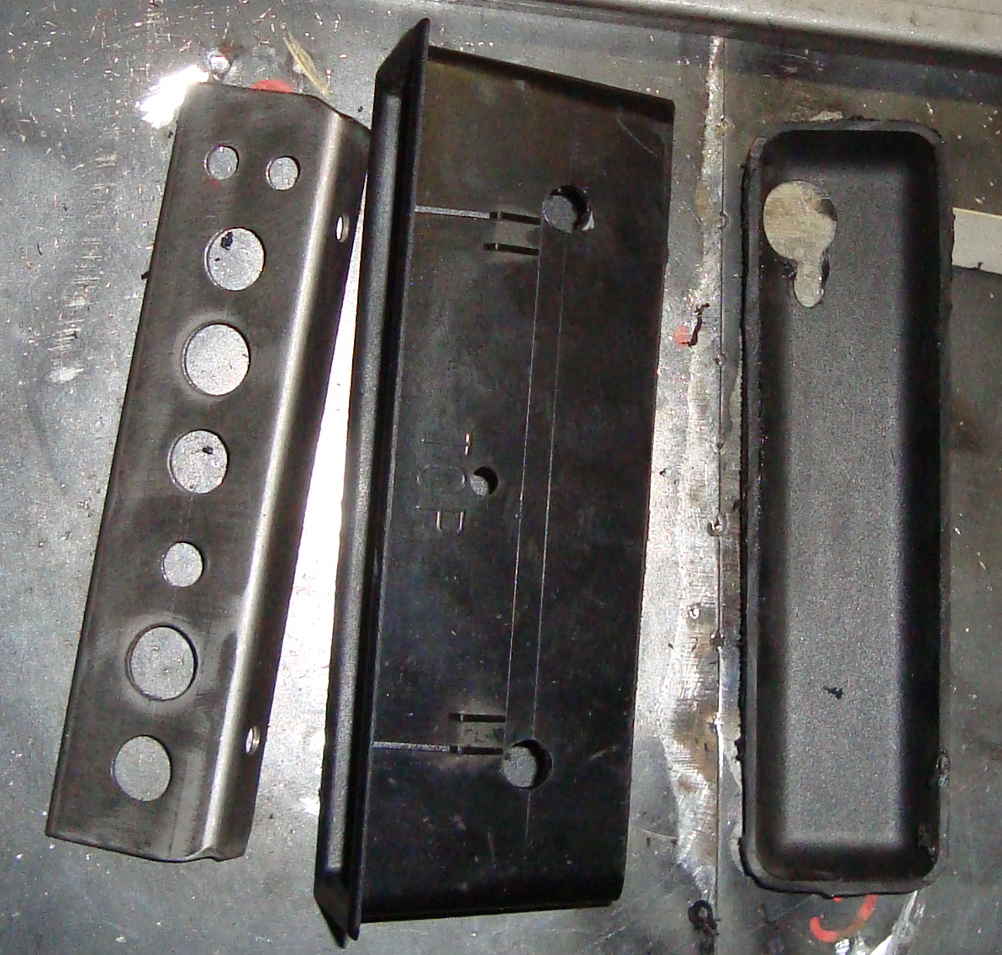
at the junk i had for free this battery plate. it's for small fiat based models, i guess it's a lancia ypsilon's, but not sure.
cleaned it up a bit with the grinder, (don't want it too flashy though).
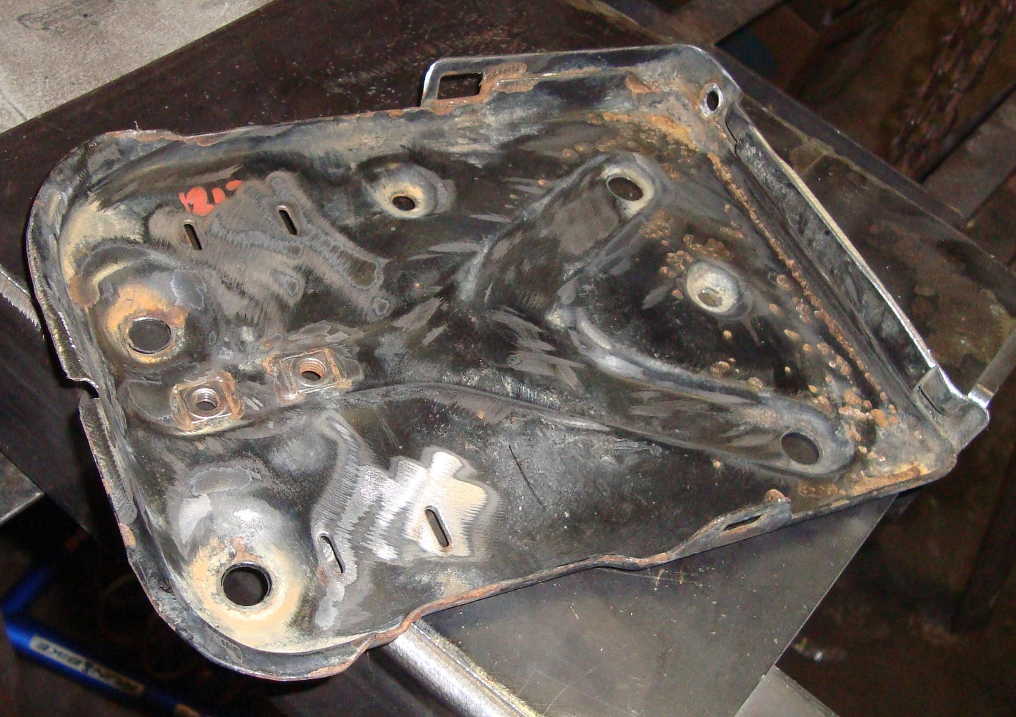
it's supposed to be for 215mm long 55Ah batteries. just welded a bolt on, to make it accept the 240mm long 65Ah too.
a plastic plate, made from an oil tank, in order to protect the upholstery and body from acid.
that's all for now...
thanks for reading.
splash-protection-screen for the carbs, made out cutting a plastic battery cover found in the dumpster. to be fixed on when necessary with zip ties.

wanna put the battery on the rear of the front-passenger seat.
at the junk i had for free this battery plate. it's for small fiat based models, i guess it's a lancia ypsilon's, but not sure.
cleaned it up a bit with the grinder, (don't want it too flashy though).


it's supposed to be for 215mm long 55Ah batteries. just welded a bolt on, to make it accept the 240mm long 65Ah too.

a plastic plate, made from an oil tank, in order to protect the upholstery and body from acid.

that's all for now...
thanks for reading.
12-03-2017, 07:23 PM
#128
PassionFord Regular
Thread Starter
abandoned the battery relocation project for a while and tried to resolve some major issues...
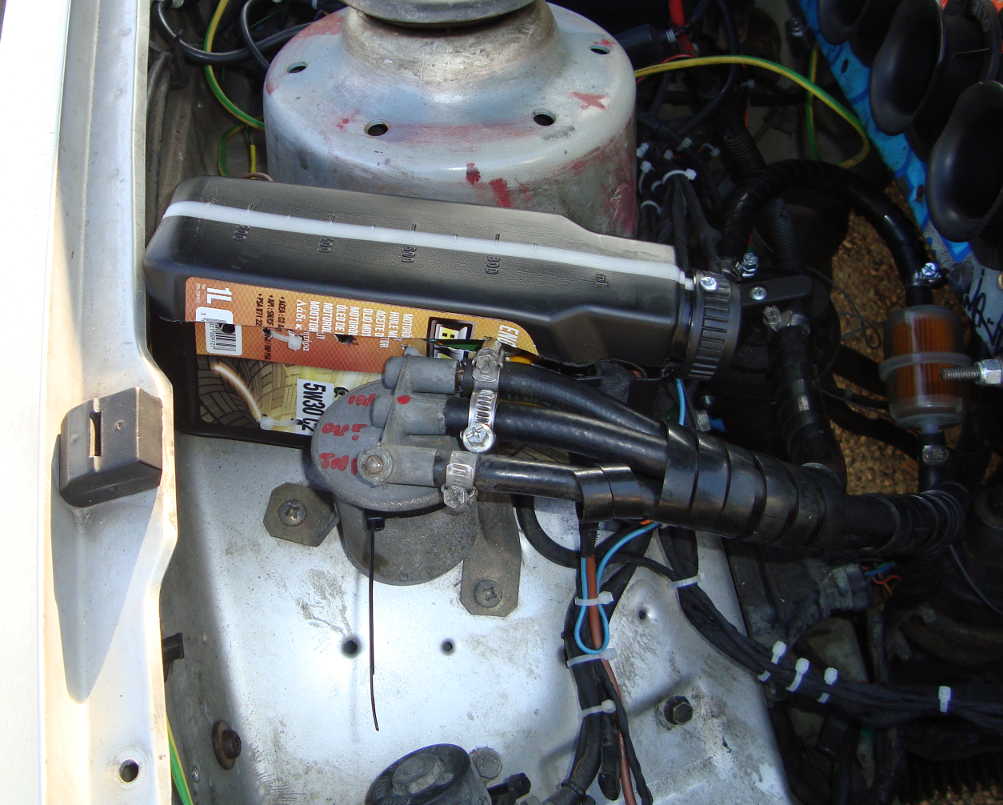
WATER RAIL pt.??
water still boiling. suspecting of a air bubble, decided to take down the water rail and put a bleeding valve on it in order to purge the air from the head...
bought a weld-on bushing, ...
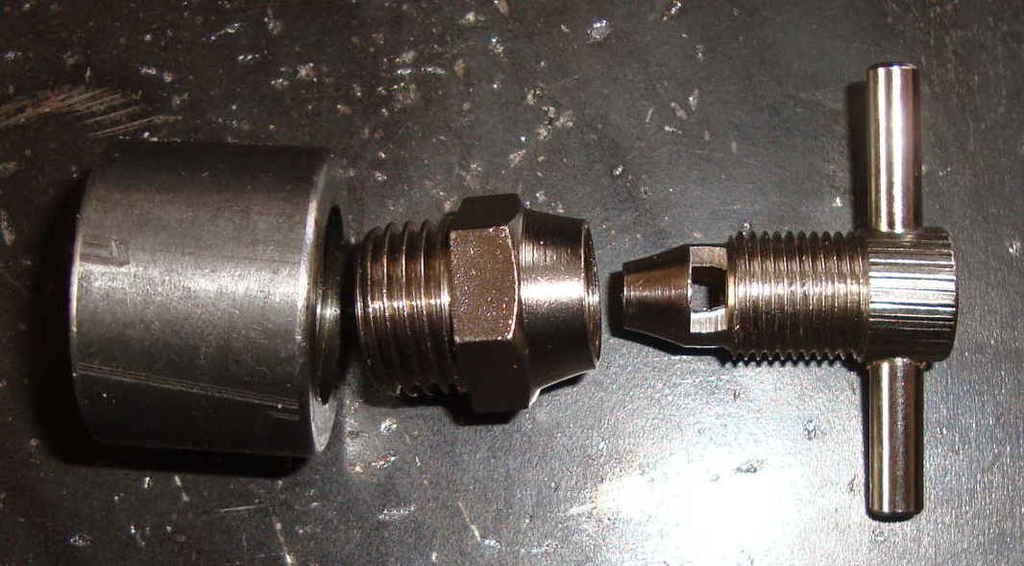
but i lately decided to simply tap a hole.
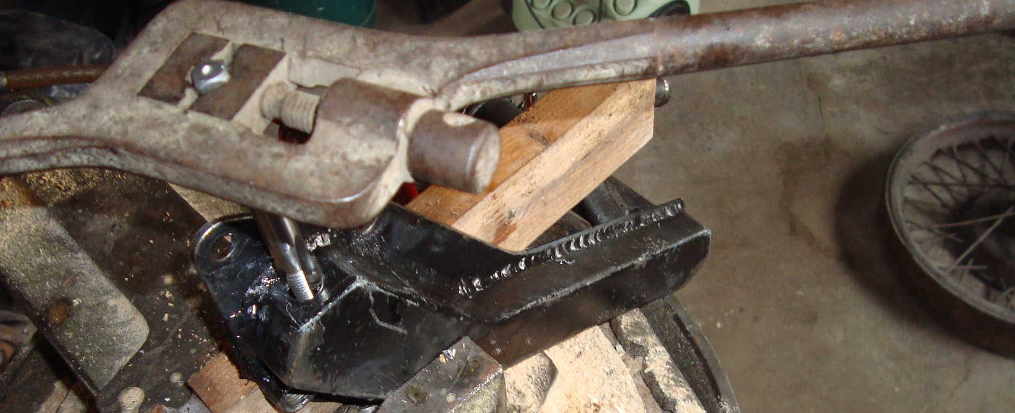


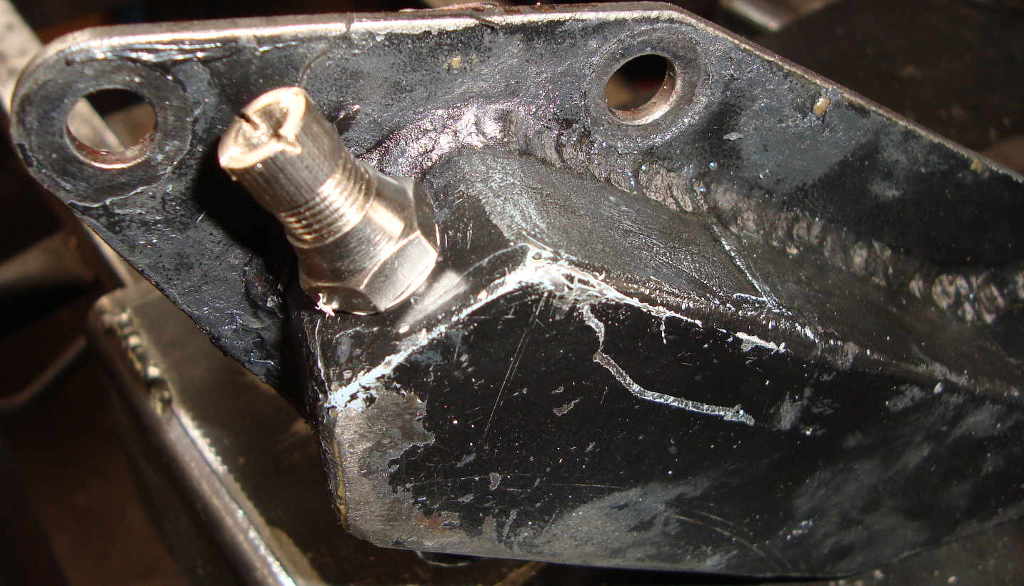
a cross on the top made with a saw, in order to operate on it with a screwdriver.
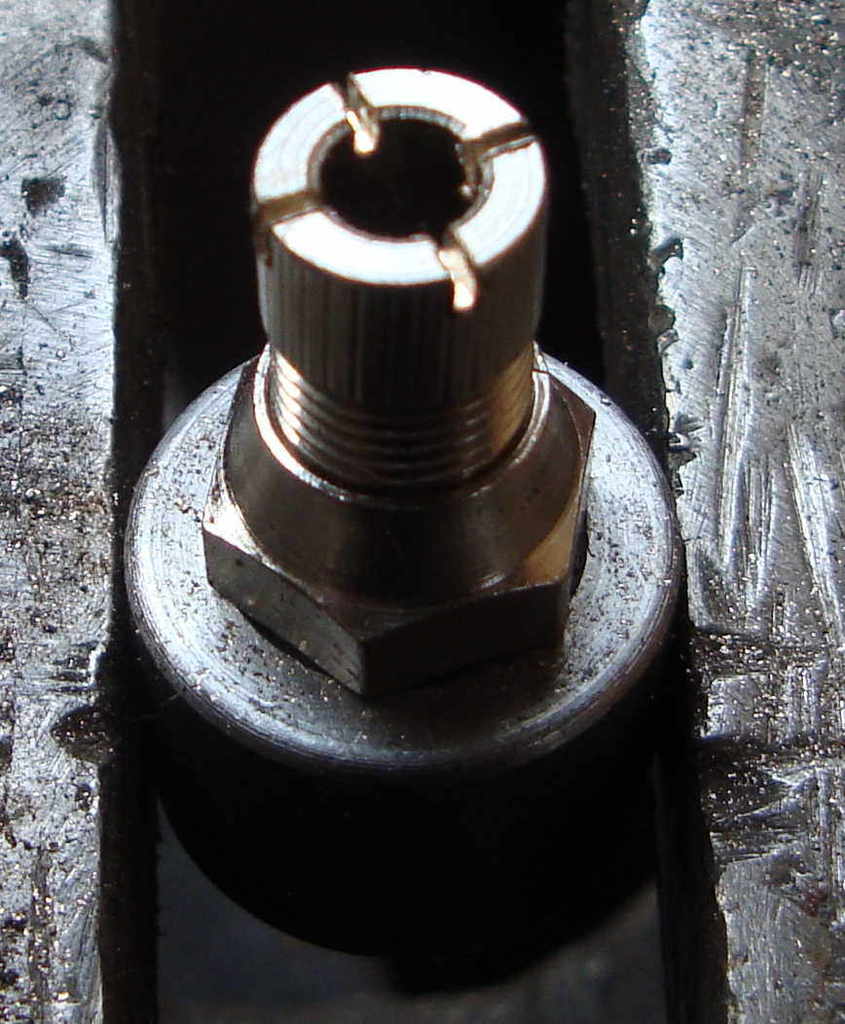
i also cut the carbs off the coolant circuit. they're level is higher than the head.
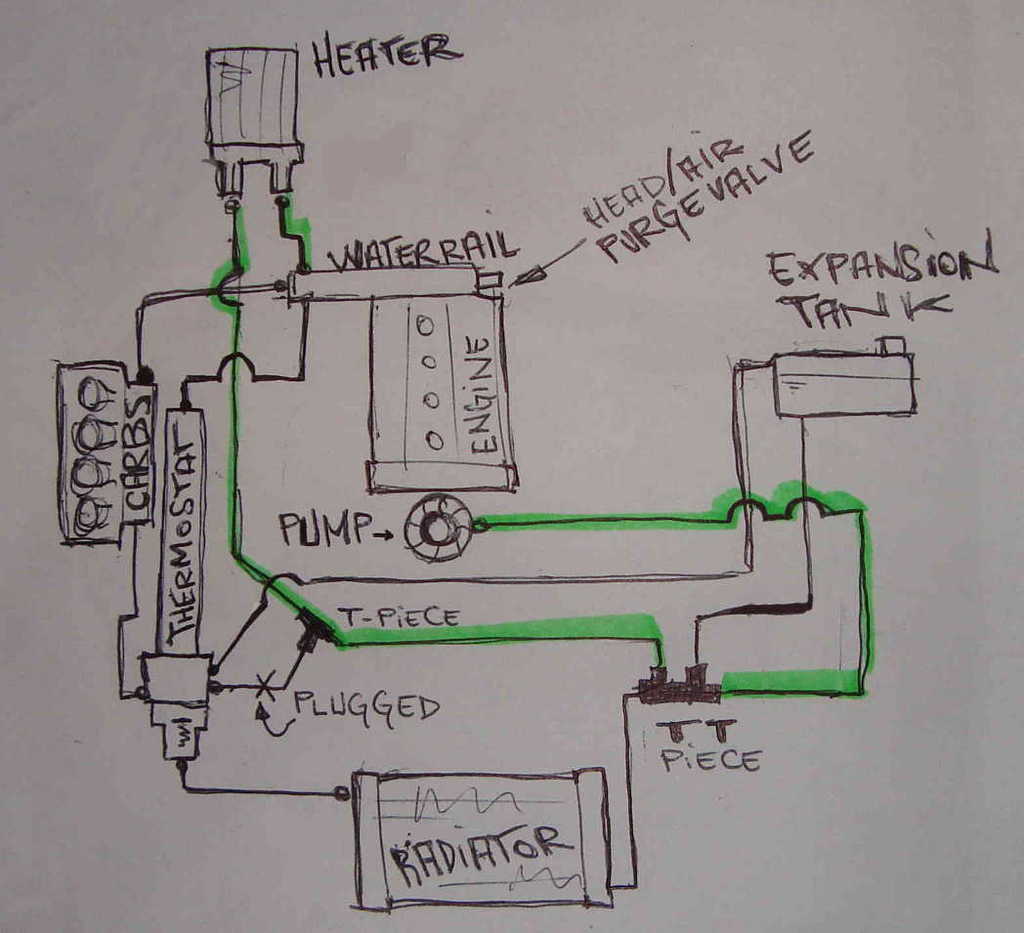
many thanks again to new1ru for his useful tips, cheers mate! 

WATER RAIL pt.??
water still boiling. suspecting of a air bubble, decided to take down the water rail and put a bleeding valve on it in order to purge the air from the head...
bought a weld-on bushing, ...

but i lately decided to simply tap a hole.


a cross on the top made with a saw, in order to operate on it with a screwdriver.

i also cut the carbs off the coolant circuit. they're level is higher than the head.

many thanks again to new1ru for his useful tips,
cheers mate!
Last edited by rooos; 15-08-2017 at 10:49 AM.
12-03-2017, 07:24 PM
#129
PassionFord Regular
Thread Starter
water still boiling...
trying to get the mixture lean... (as far as i know the exhaust gases should be hotter, but i should have colder end of combustion temperatures).
looks like it's a good direction... still can't tell for sure, haven't done any run atmo, since the last carb adjusting.
(however not so lean, the main jets are 1.85mm (post #47)).
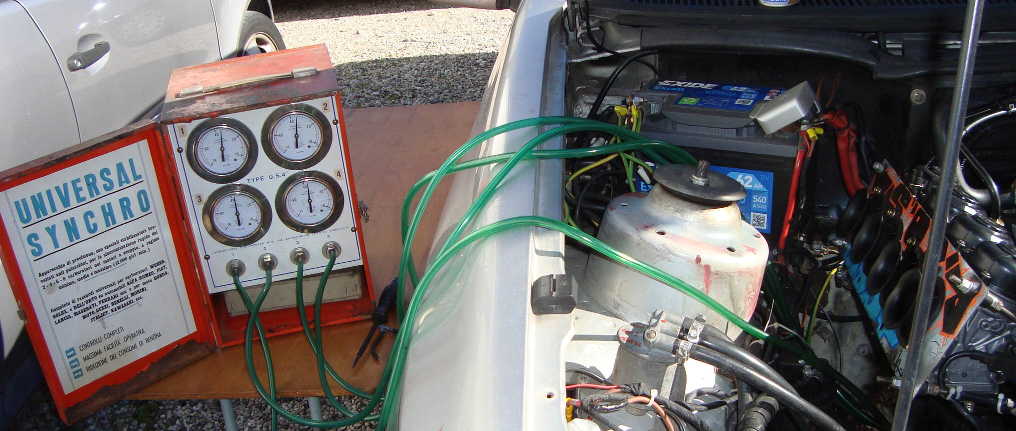
here while balancing... i'd say it's pretty reliable, once balanced, operating on the main enrichment screws, even randomly, it keeps the balance. couldn't believe it, so i had to take a pic.
trying to get the mixture lean... (as far as i know the exhaust gases should be hotter, but i should have colder end of combustion temperatures).
looks like it's a good direction... still can't tell for sure, haven't done any run atmo, since the last carb adjusting.
(however not so lean, the main jets are 1.85mm (post #47)).
here while balancing... i'd say it's pretty reliable, once balanced, operating on the main enrichment screws, even randomly, it keeps the balance. couldn't believe it, so i had to take a pic.
 12-03-2017, 07:25 PM
#130
PassionFord Regular
Thread Starter
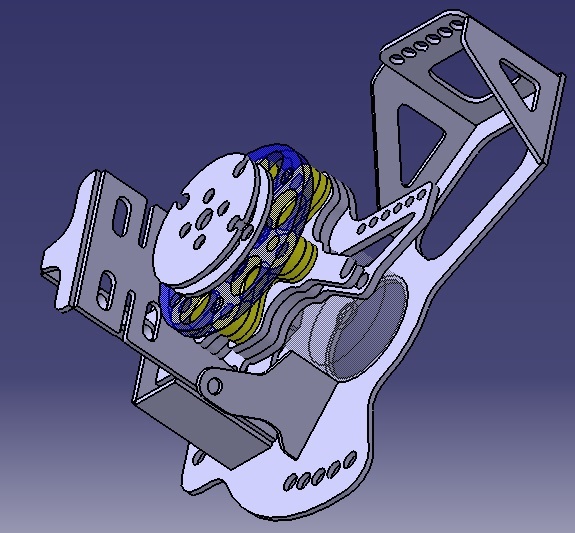
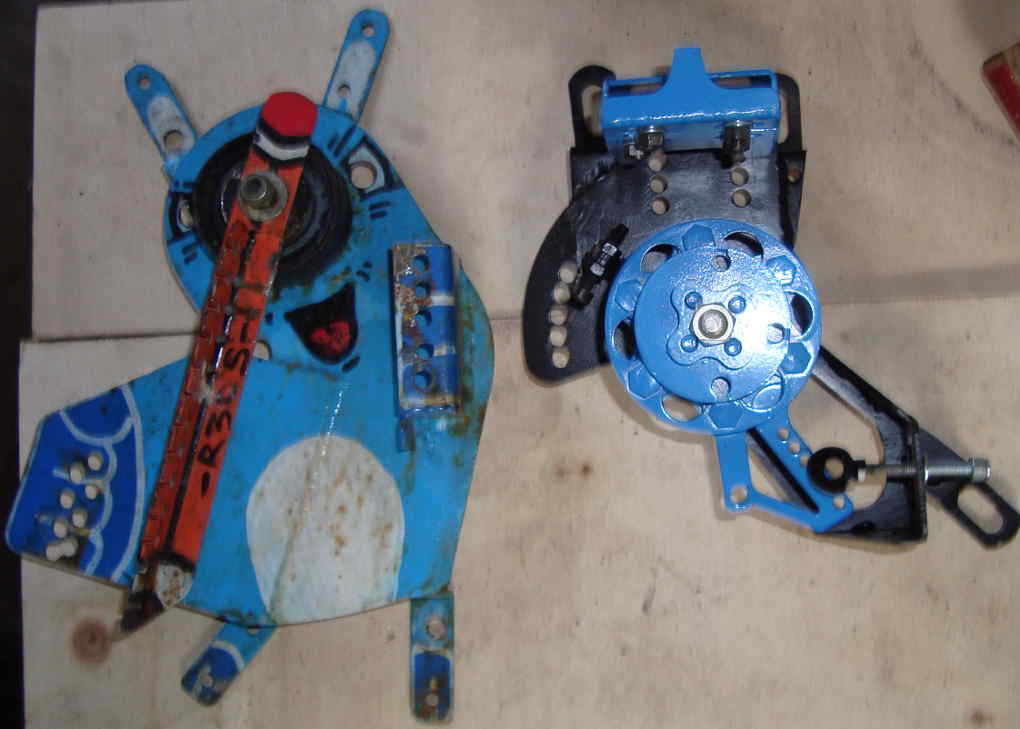
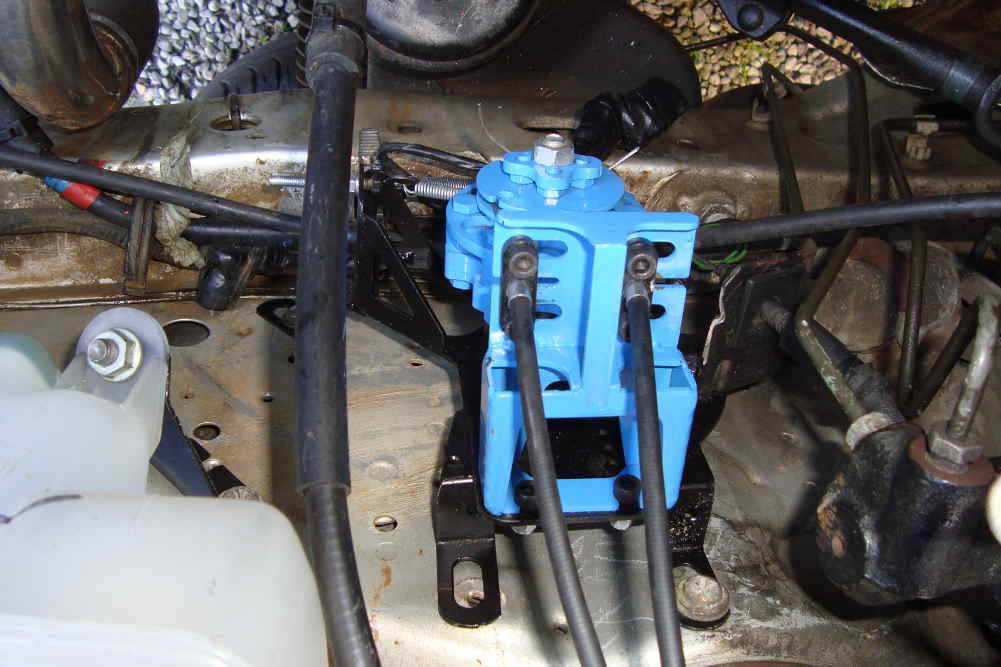
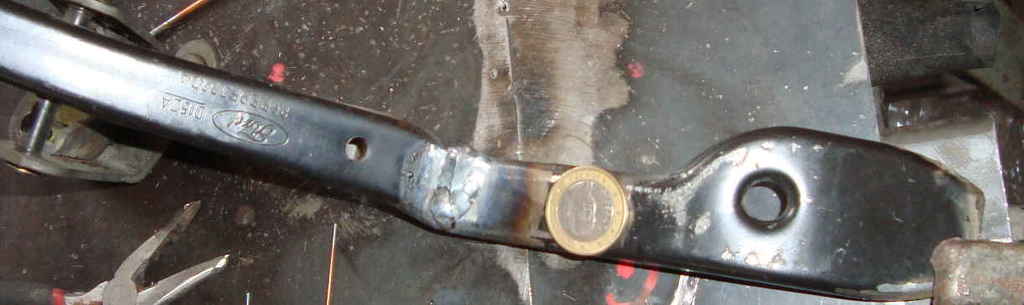
THROTTLE LINKAGE
the accelerator pedal was really annoying me. jerk reaction, especially while giving little gas.
for the ones who don't know and don't wanna read all:
my sierra accelerator pedal runs 60mm cable to the floor, the zx9r carbs need 15mm cable stroke from 0� to 90� throttle valve. they can't simply be fixed together.
the pokemon i made wasn't up for the task anymore, so i decided to re-design the whole mechanism...
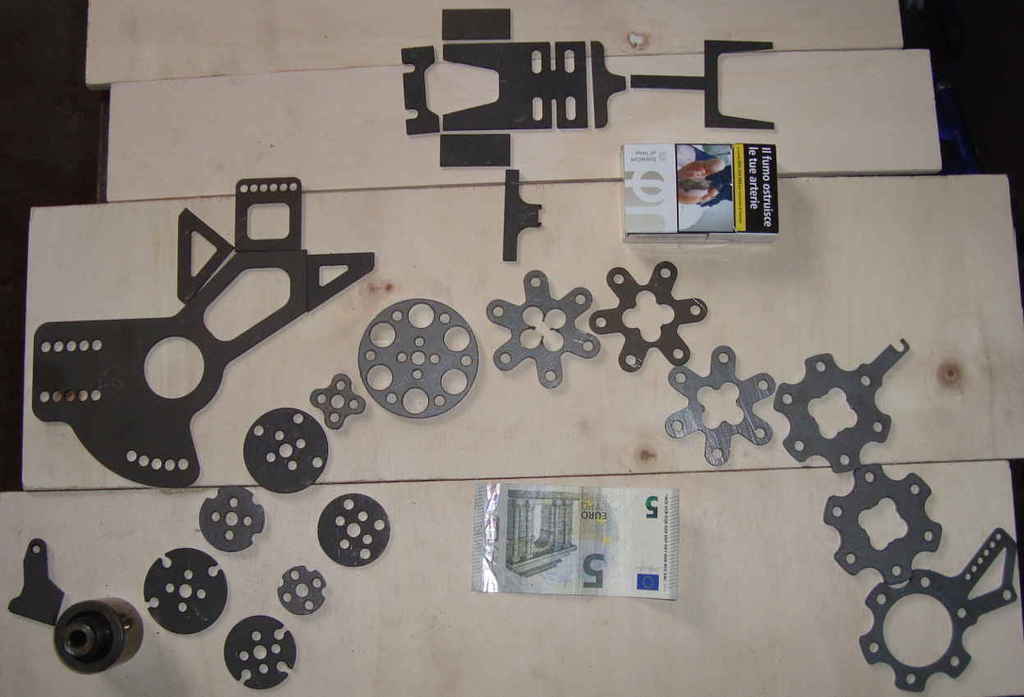
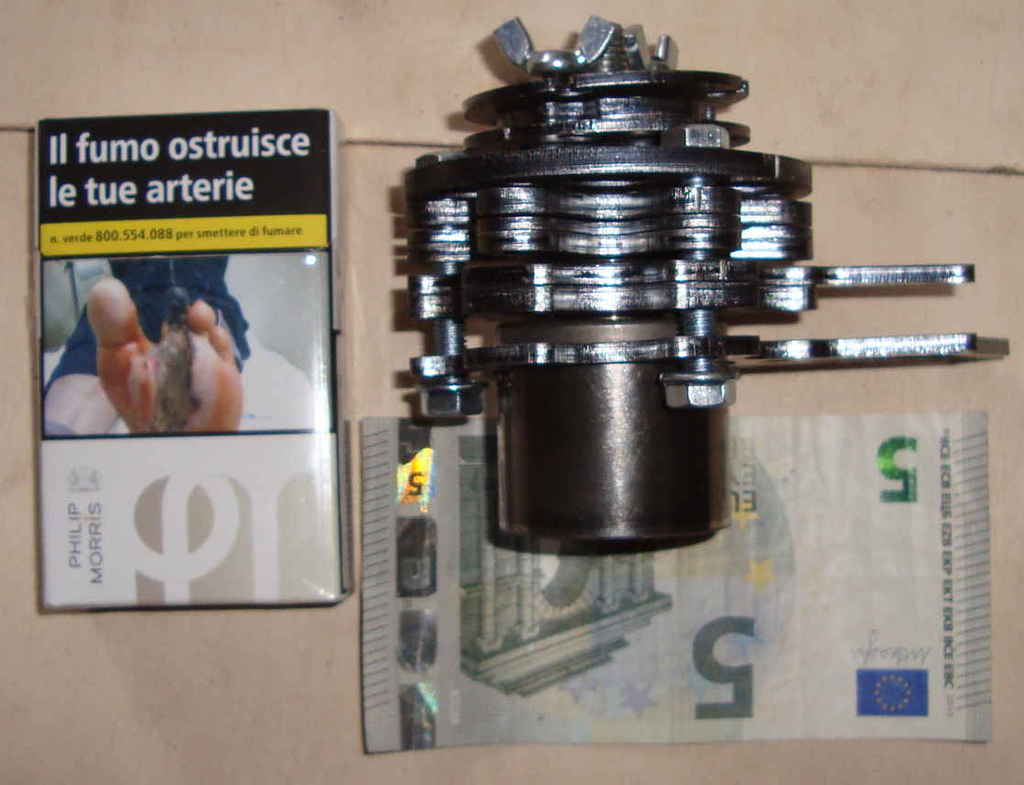
...then laser-cuts (cash and cigarettes, to give an idea of the dimensions).
some pic of the assembly process... (maybe too many pics, sorry...)
the bearing has been found in a dumpster after a cambelt service of an unknown car.
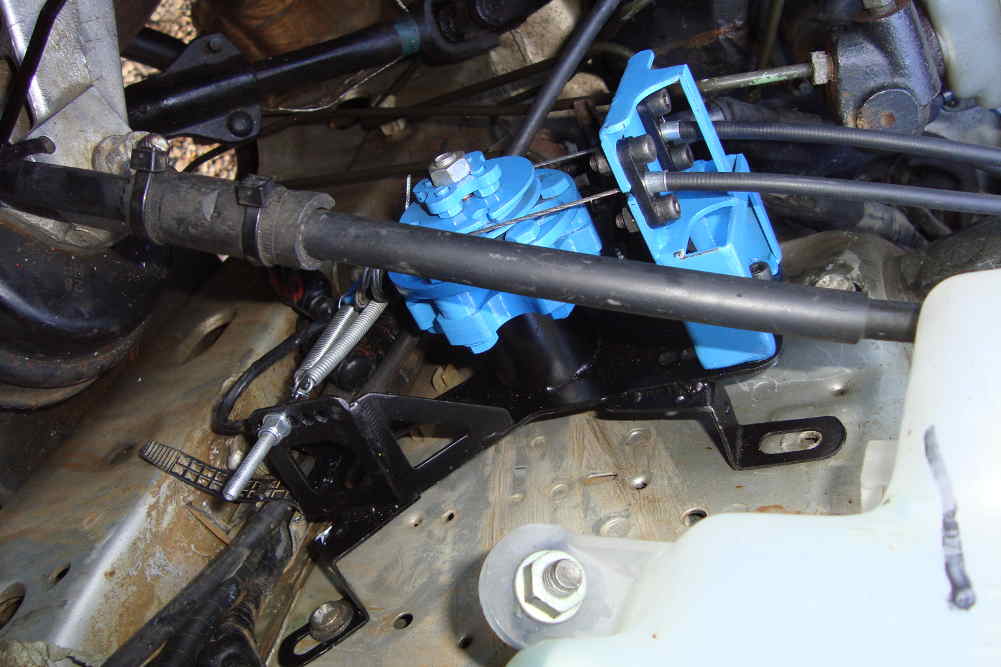
drum assembly:

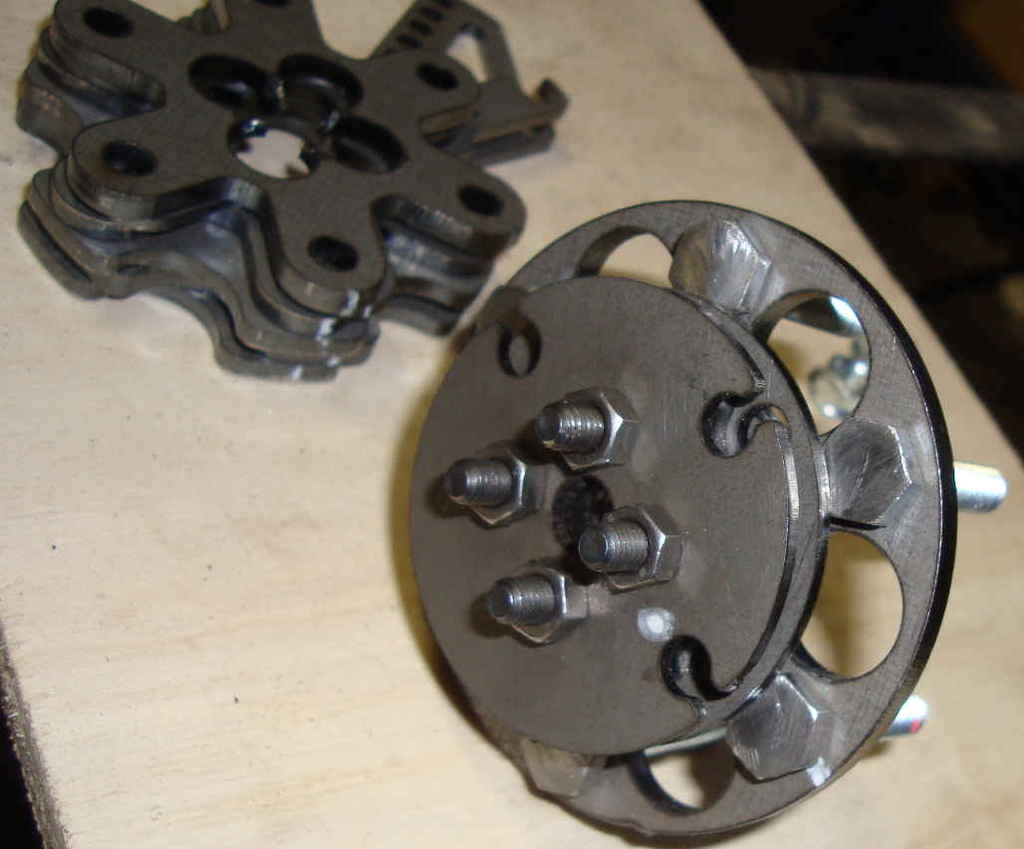
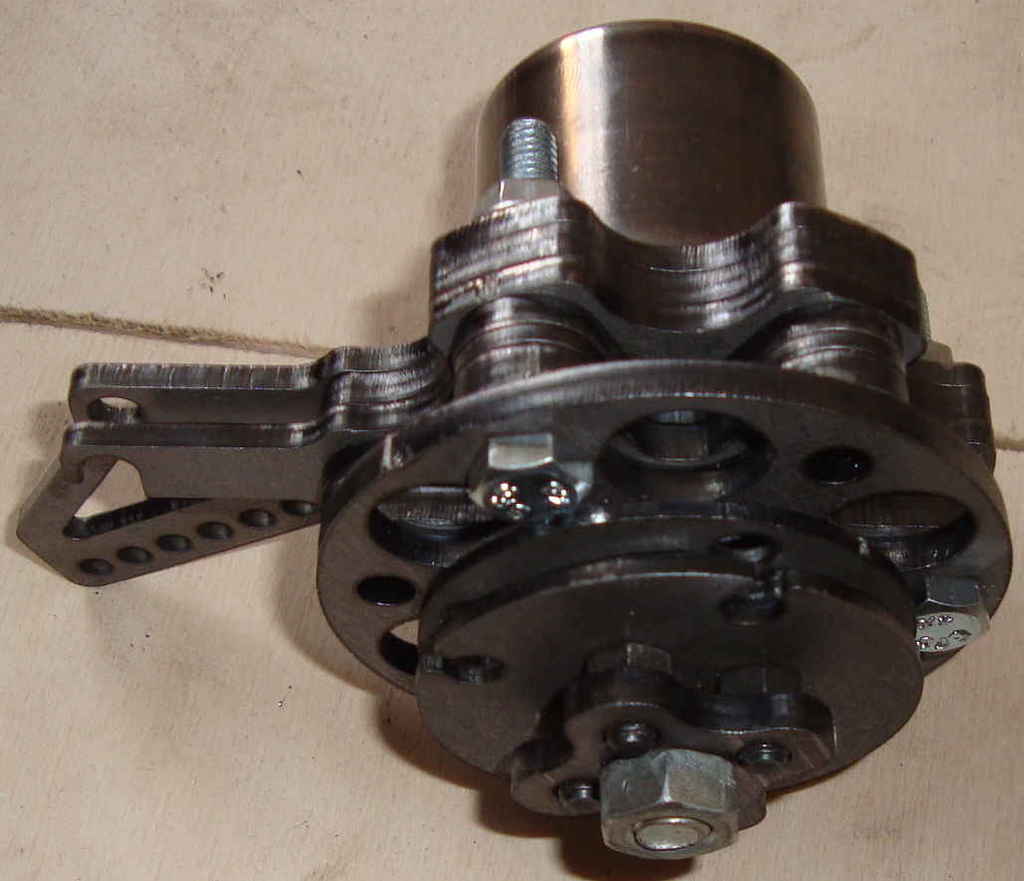
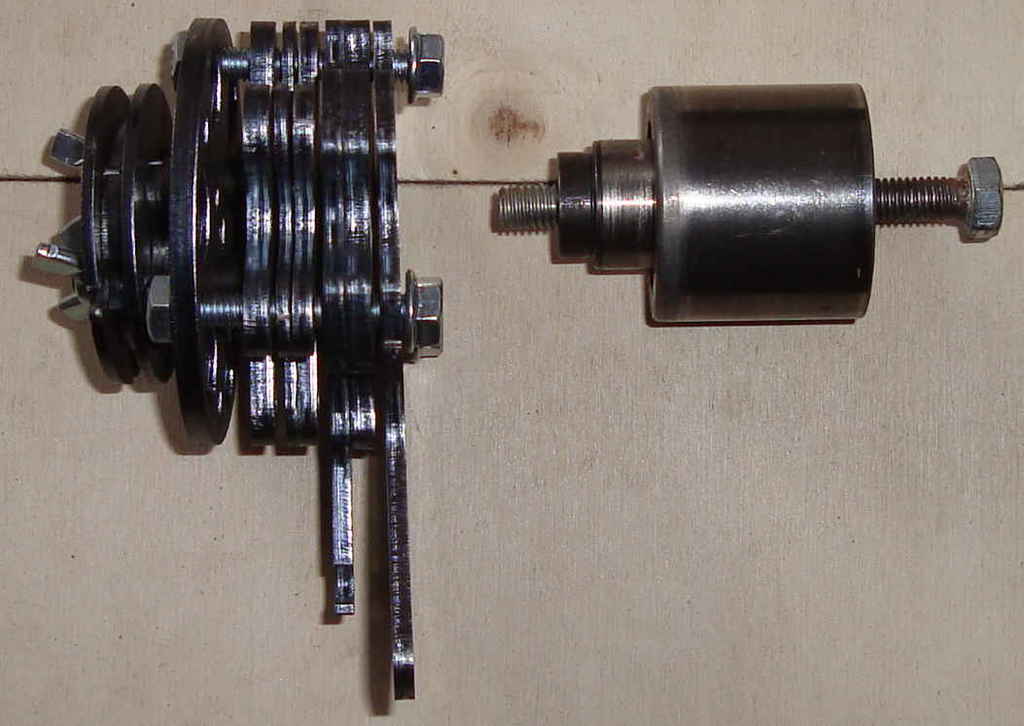
the 8mm socket fits perfectly inside...

some welding on the castle and on the plate...
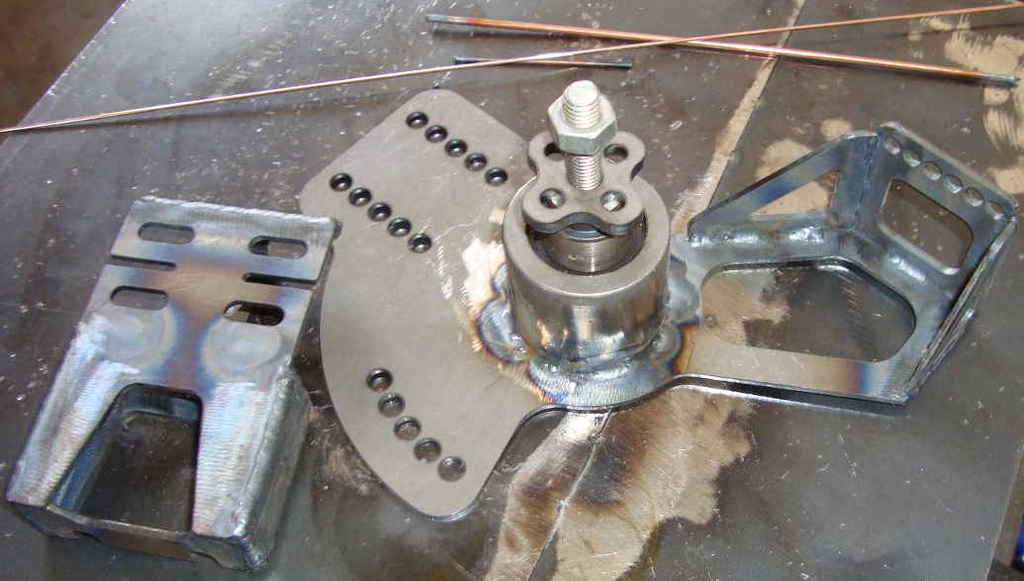
(purple star), this M5 screw will stop the pedal, to not flip the bodies valve over 90�.
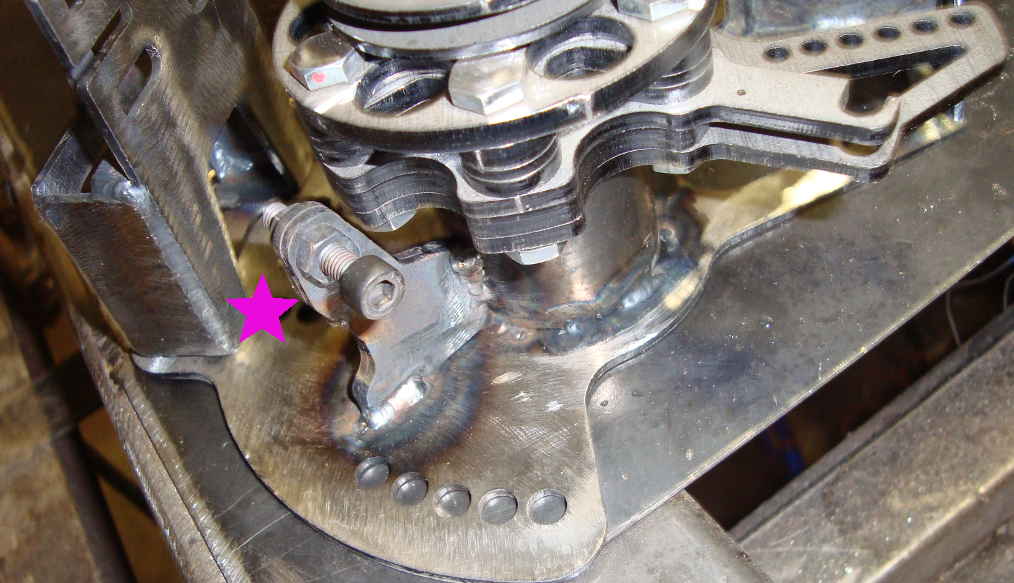
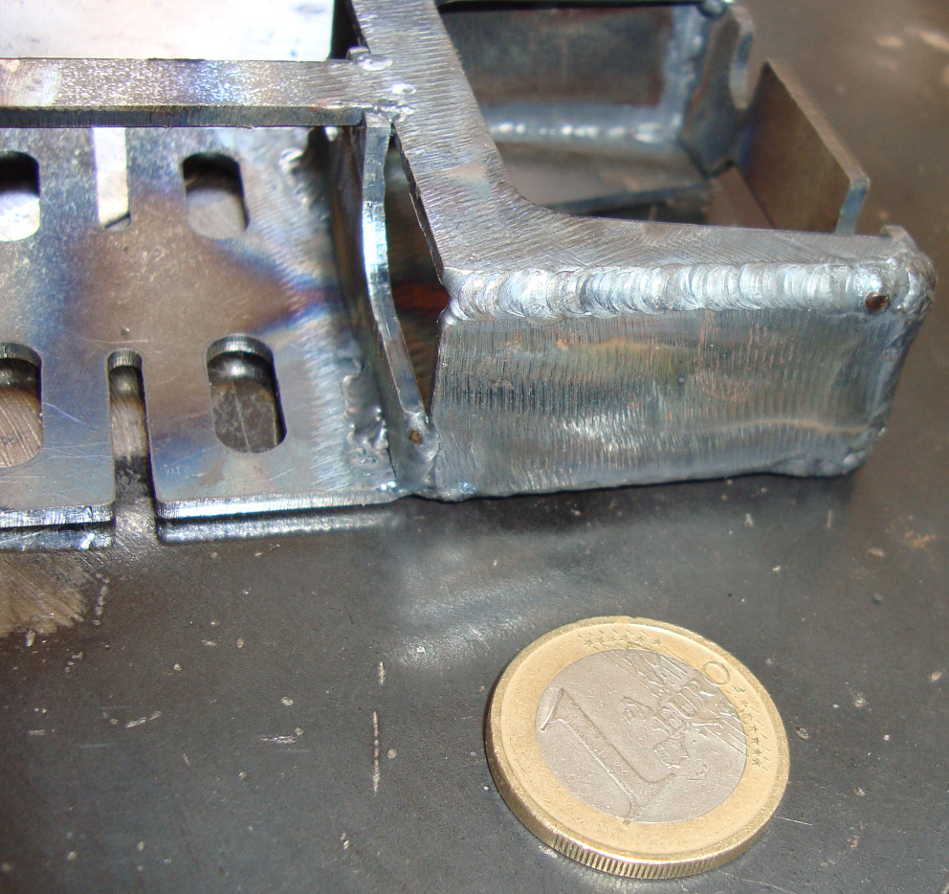
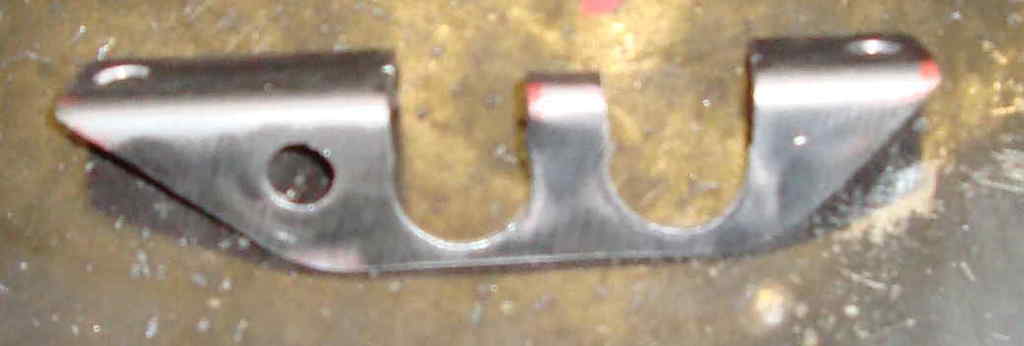
to make support brackets...
a map of the holes on the inner fender taken with a pen, then transferred on a sheet metal with a red marker.
brackets tack welded.

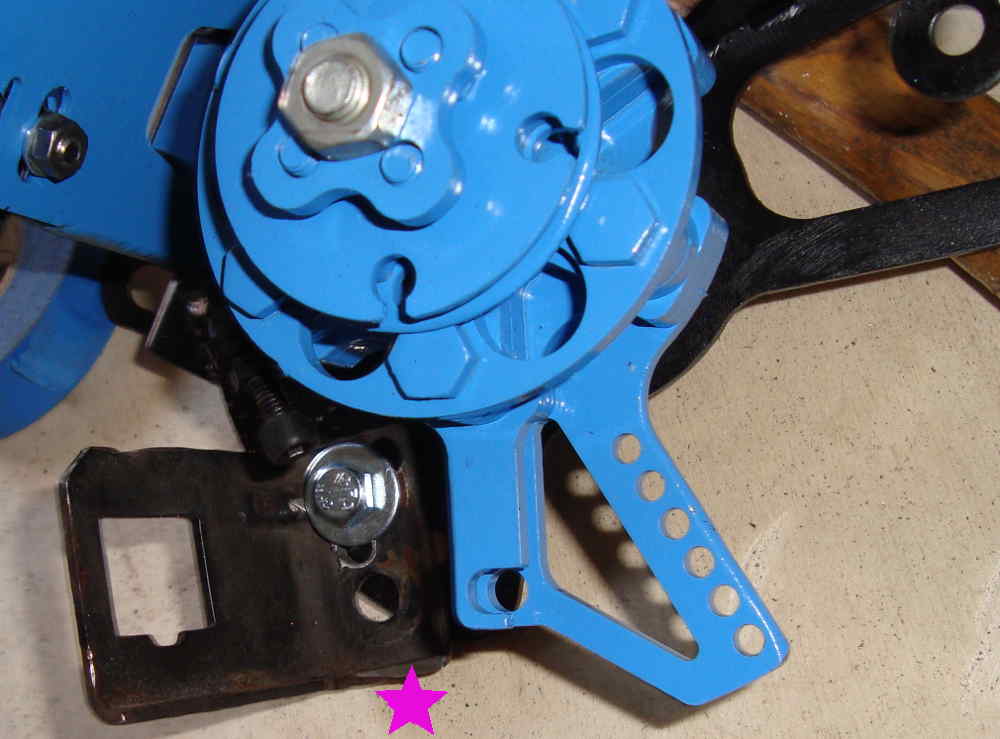
(purple star), modified 1.8cvh sierra throttle cable bracket.
here painted aside the pokemon which is going in pension...
(purple star), that M5 screw will adjust the preload of the spring(s).
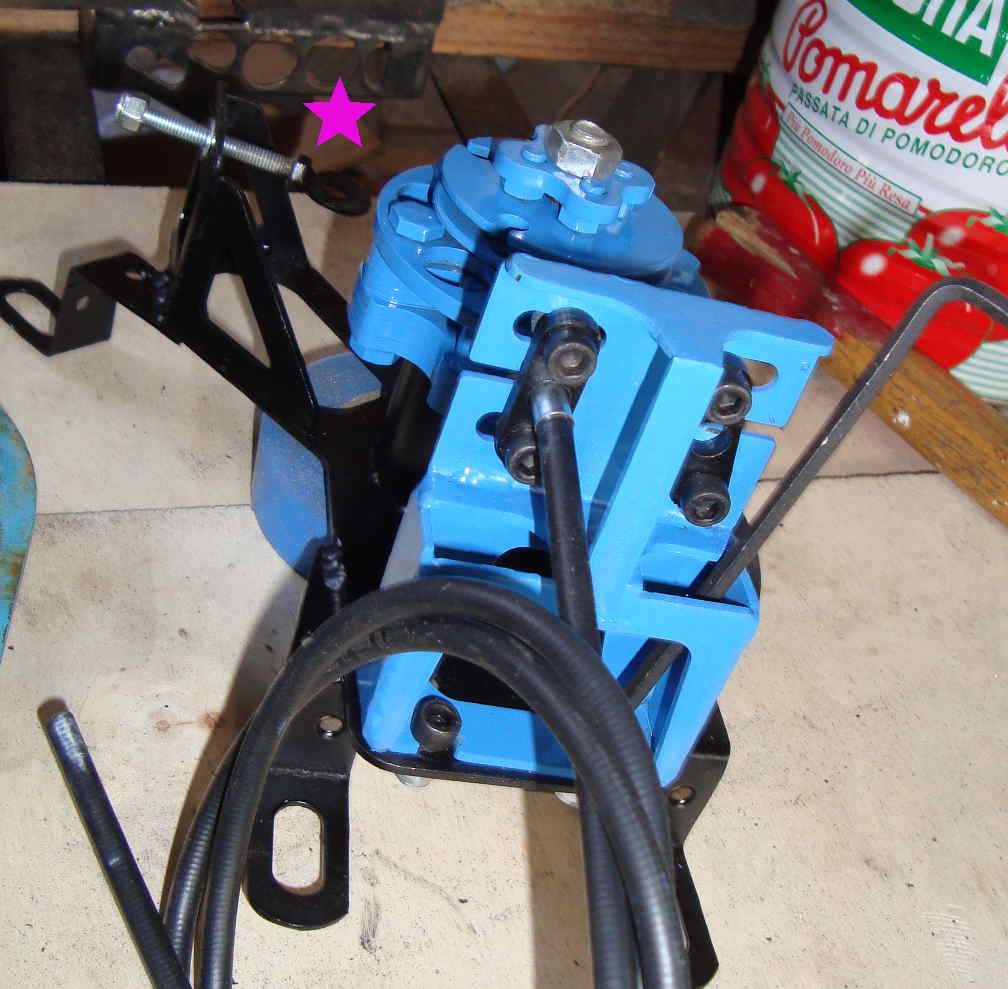
(green star), closing cable, the one which was missing with the pokemon set-up and the reason why of this all brand new one.
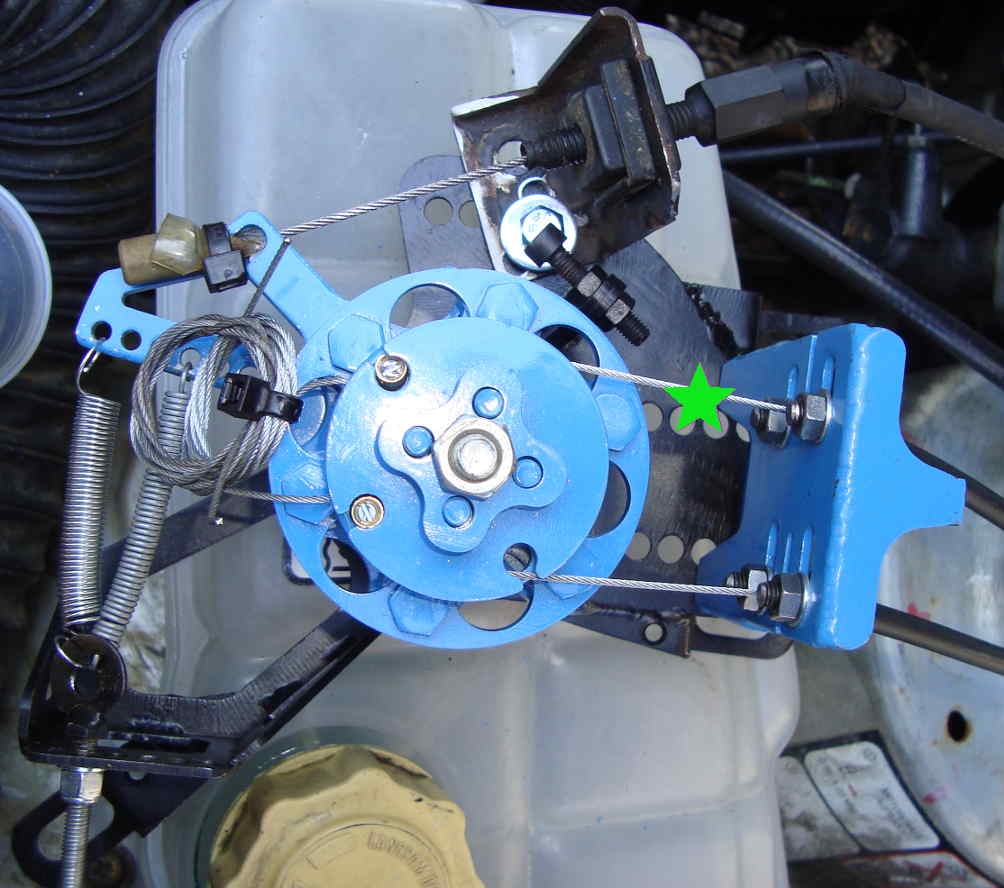
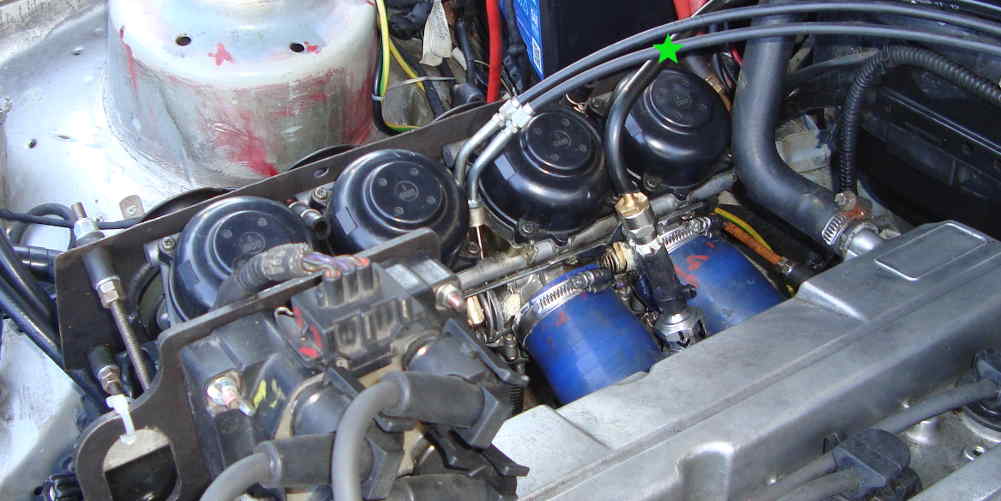
how it fits in the engine bay, (exhaust side).
very happy of it. still a bit hard pedal, but the reaction is ways more predictable than before. now i can park the car without over-revving the engine...
that's all for now.
thanks for reading.
the accelerator pedal was really annoying me. jerk reaction, especially while giving little gas.
for the ones who don't know and don't wanna read all:
my sierra accelerator pedal runs 60mm cable to the floor, the zx9r carbs need 15mm cable stroke from 0� to 90� throttle valve. they can't simply be fixed together.
the pokemon i made wasn't up for the task anymore, so i decided to re-design the whole mechanism...

...then laser-cuts (cash and cigarettes, to give an idea of the dimensions).

some pic of the assembly process... (maybe too many pics, sorry...)
the bearing has been found in a dumpster after a cambelt service of an unknown car.
drum assembly:


the 8mm socket fits perfectly inside...

some welding on the castle and on the plate...


(purple star), this M5 screw will stop the pedal, to not flip the bodies valve over 90�.

to make support brackets...
a map of the holes on the inner fender taken with a pen, then transferred on a sheet metal with a red marker.

brackets tack welded.

(purple star), modified 1.8cvh sierra throttle cable bracket.

here painted aside the pokemon which is going in pension...

(purple star), that M5 screw will adjust the preload of the spring(s).

(green star), closing cable, the one which was missing with the pokemon set-up and the reason why of this all brand new one.


how it fits in the engine bay, (exhaust side).


very happy of it. still a bit hard pedal, but the reaction is ways more predictable than before. now i can park the car without over-revving the engine...
that's all for now.
thanks for reading.
Last edited by rooos; 12-03-2017 at 07:28 PM.
The following users liked this post:
rooos (12-03-2017)
12-03-2017, 10:49 PM
#132
PassionFord Regular
Thread Starter
The following users liked this post:
rooos (13-03-2017)
13-03-2017, 07:27 AM
#134
PassionFord Regular
Thread Starter
13-03-2017, 07:05 PM
#135
PassionFord Regular
The following users liked this post:
rooos (19-03-2017)
02-04-2017, 10:38 AM
#136
PassionFord Regular
Thread Starter
couple of things' done:
technical inspection coming soon . they need a good shot of the rear of the car.
no welded diff allowed, so put the open on again.
no cracks on the rear bumper allowed, nor on the rear lens.
the front of the car can instead be ripped off by a shark bite, and there would be a tech-ok however... i love italy.
SOME UGLY BODYWORK pt.I
fiberglass and filler to repair the cracks on the corners, then a lick of black.
this is my first time with fiberglass...
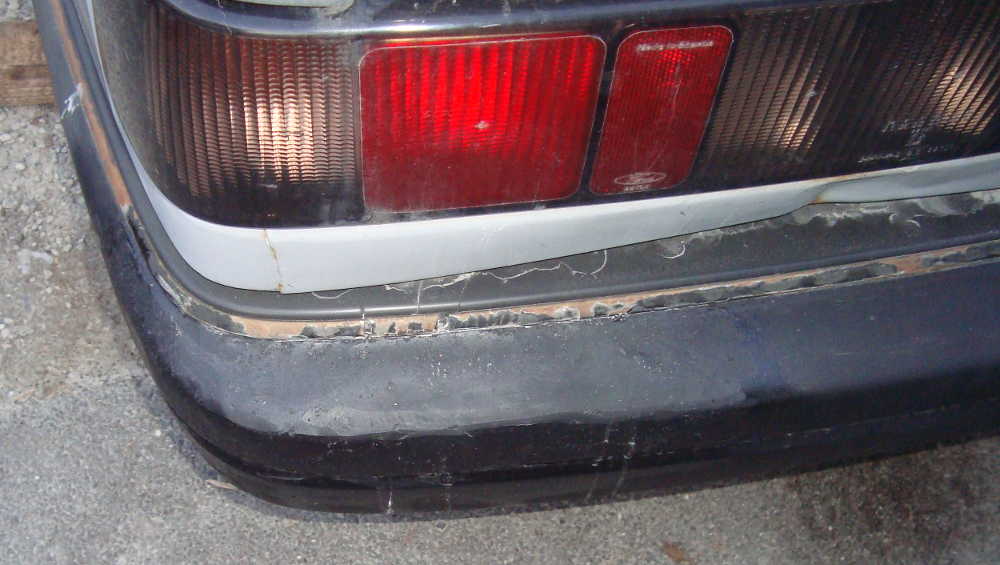
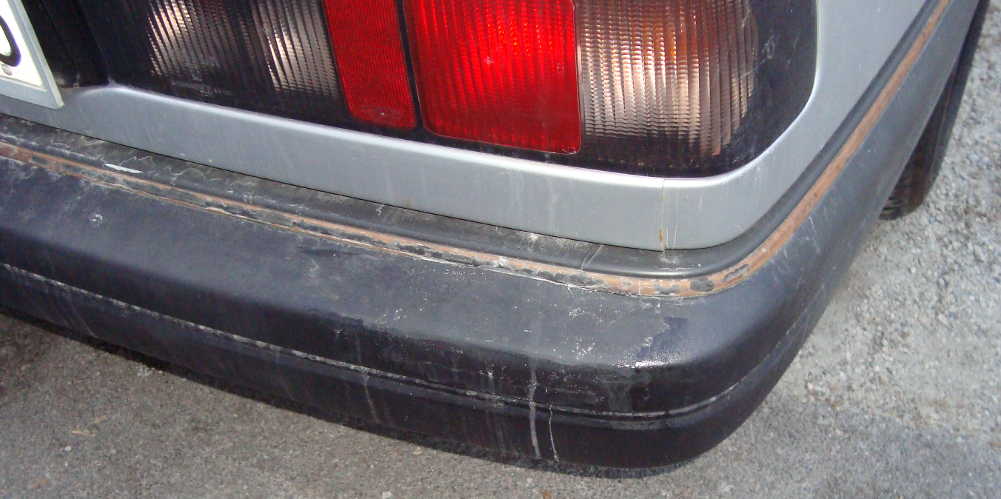
painted on bird sh*ts too, lol.
actually i'm not giving two f*cks about it. it's just for a tech-inspection OK, i'll refine this job once the aesthetic will be considered as an important point, (which is not today nor tomorrow).
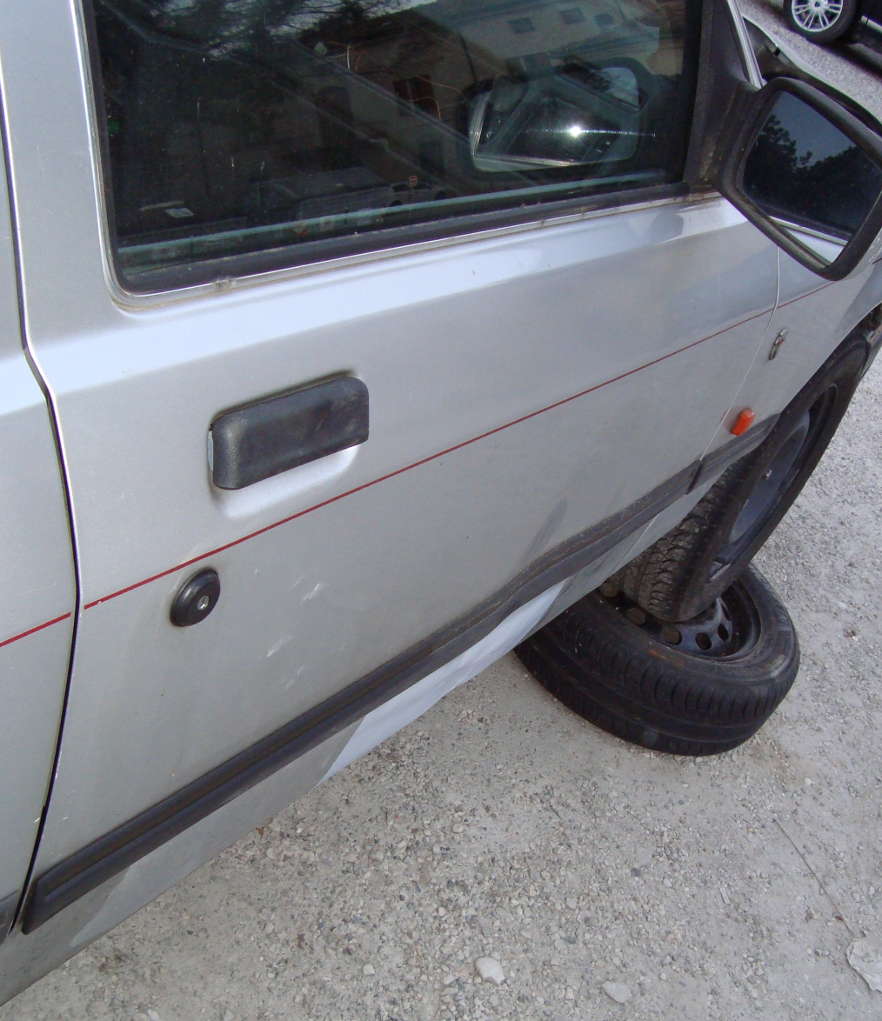
also pulled out a bit the passenger door panel, this was just for my pleasure...
before...
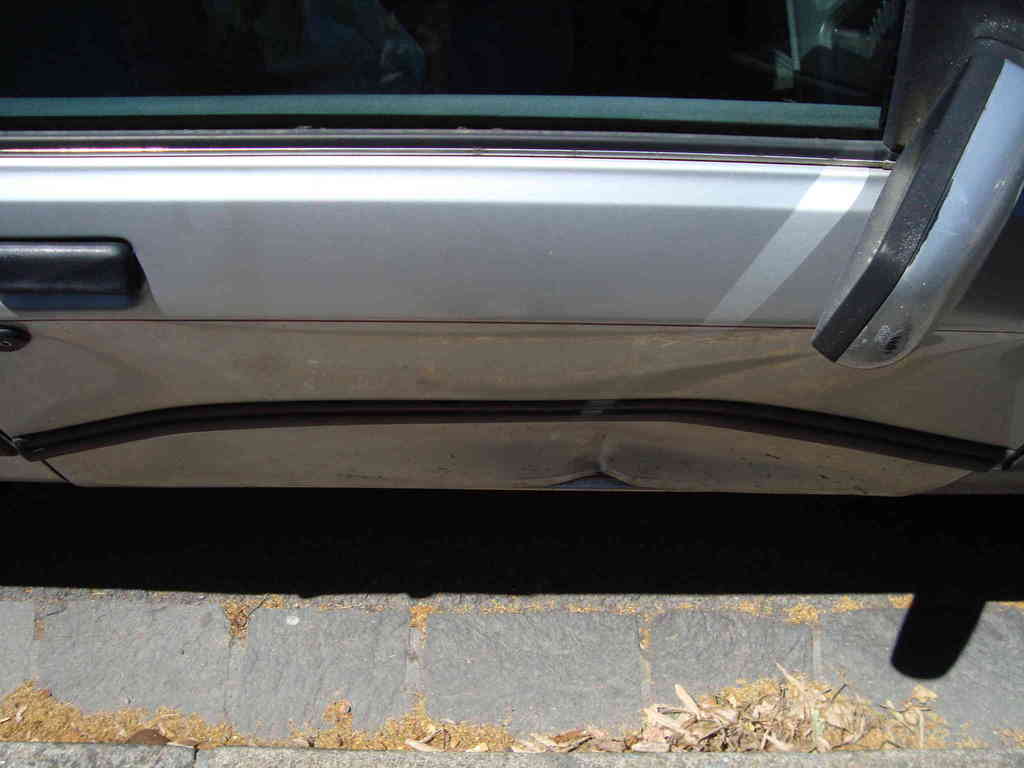
...and after.
 .
.
technical inspection coming soon
. they need a good shot of the rear of the car.no welded diff allowed, so put the open on again.
no cracks on the rear bumper allowed, nor on the rear lens.
the front of the car can instead be ripped off by a shark bite, and there would be a tech-ok however... i love italy.
SOME UGLY BODYWORK pt.I
fiberglass and filler to repair the cracks on the corners, then a lick of black.
this is my first time with fiberglass...


painted on bird sh*ts too, lol.
actually i'm not giving two f*cks about it. it's just for a tech-inspection OK, i'll refine this job once the aesthetic will be considered as an important point, (which is not today nor tomorrow).
also pulled out a bit the passenger door panel, this was just for my pleasure...
before...

...and after.

 .
02-04-2017, 10:40 AM
.
02-04-2017, 10:40 AM
#137
PassionFord Regular
Thread Starter
THROTTLE PEDAL
something wrong with my pedals set up. donno why, throttle and brake are too near between each other. i got used to it once it was my daily, now i'm not.
since i've got a throttle pedal for spare... a simple cut & weld job.
not my best shot with the welder... but it'll work...
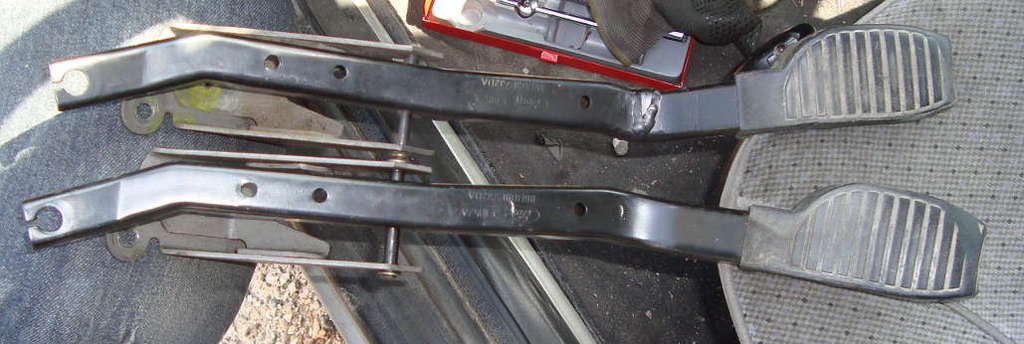
pedals set-up before...
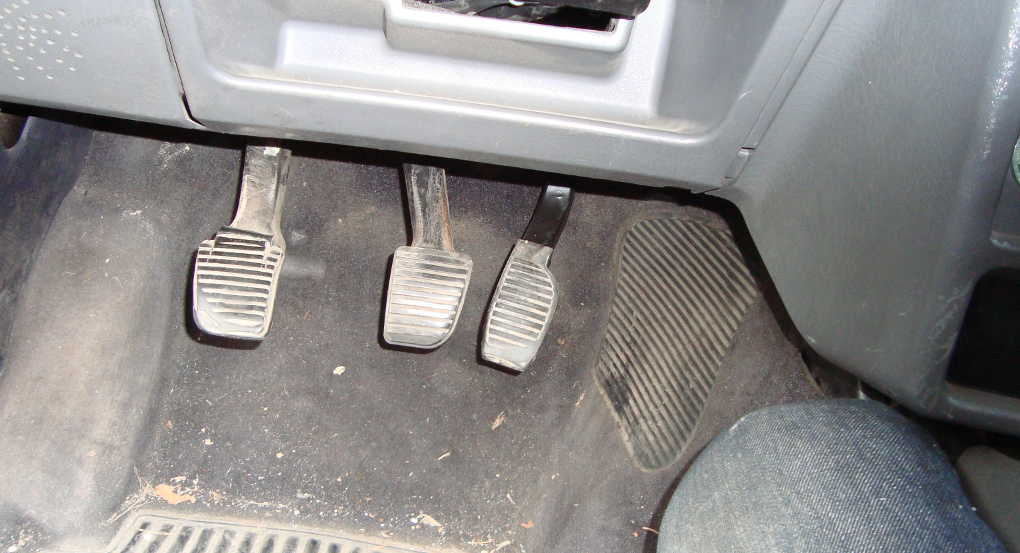
...and after.
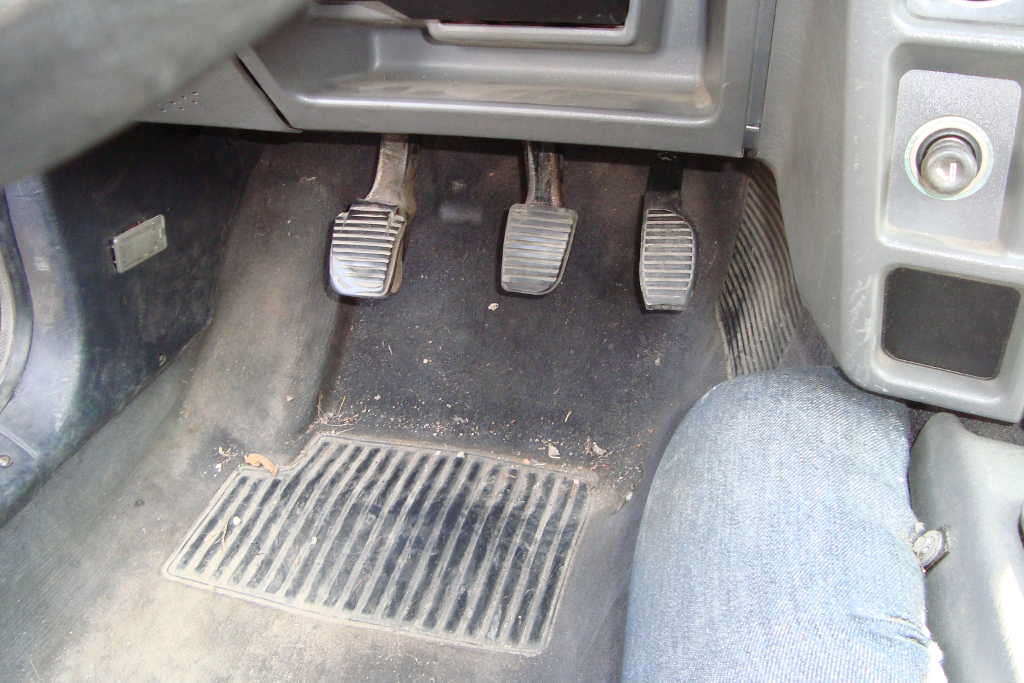
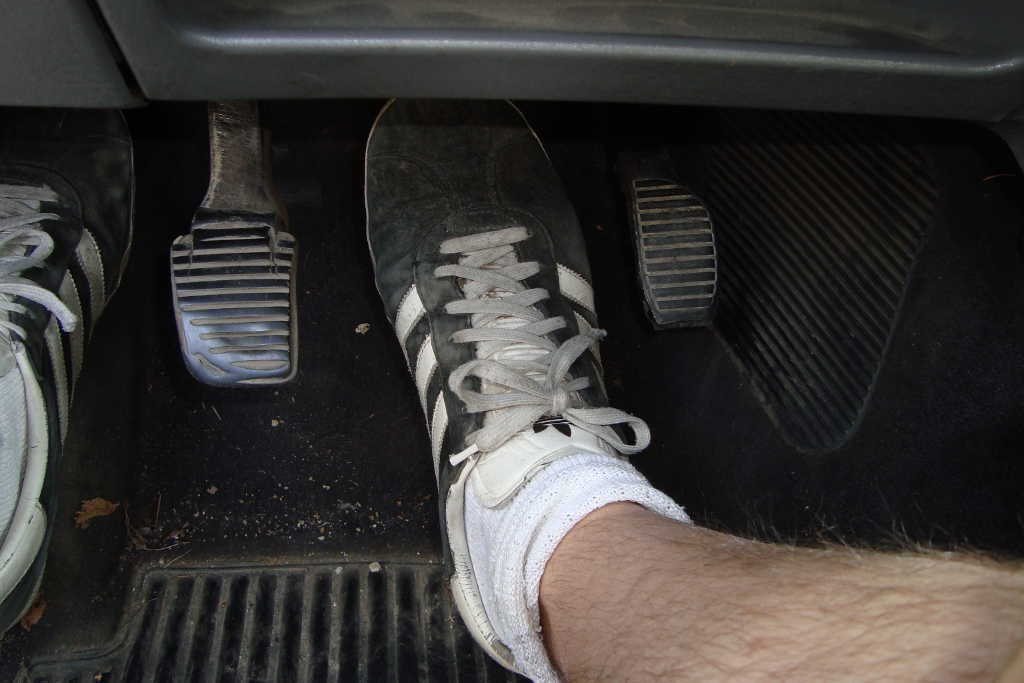
(got a wide foot even with small shoes. now i can kick them with work/heavy boots too).
something wrong with my pedals set up. donno why, throttle and brake are too near between each other. i got used to it once it was my daily, now i'm not.
since i've got a throttle pedal for spare... a simple cut & weld job.


not my best shot with the welder... but it'll work...

pedals set-up before...

...and after.


(got a wide foot even with small shoes. now i can kick them with work/heavy boots too).
Last edited by rooos; 02-04-2017 at 10:42 AM.
02-04-2017, 10:44 AM
#138
PassionFord Regular
Thread Starter
DASH pt.II
finally i've found the correct coolant temp sender for the dash.
many thanks to new1ru who's supporting me with tons of infos too... thanks mate!
just needed this, to do all this...
made an experiment. bought potentiometer of each size from 470ohm to 100kohm.
put these, one by one, in parallel with the grey temp switch, (which actually is a ntc sensor) with one pole grounded. with a relay and a lamp, i simulate the fan switch points.
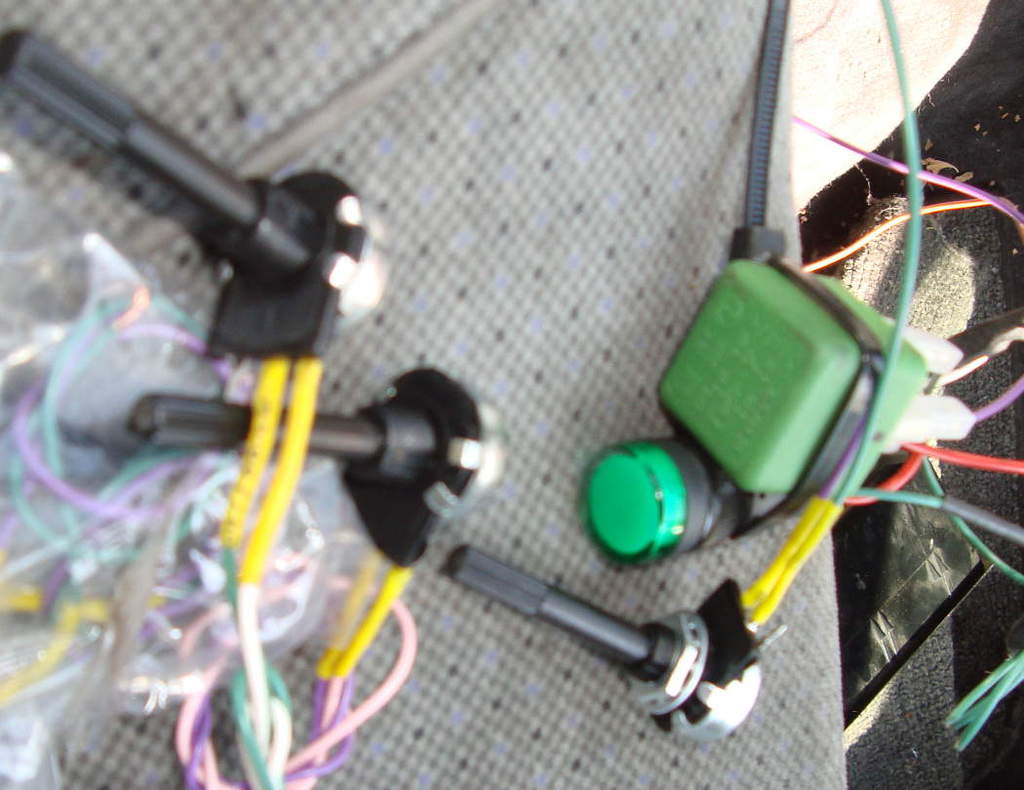
the green lamp simulates the fan working.
now i have all the elements to make the fan switch points adjustable from inside the car.
wanted to put the fuel pump under switch too...
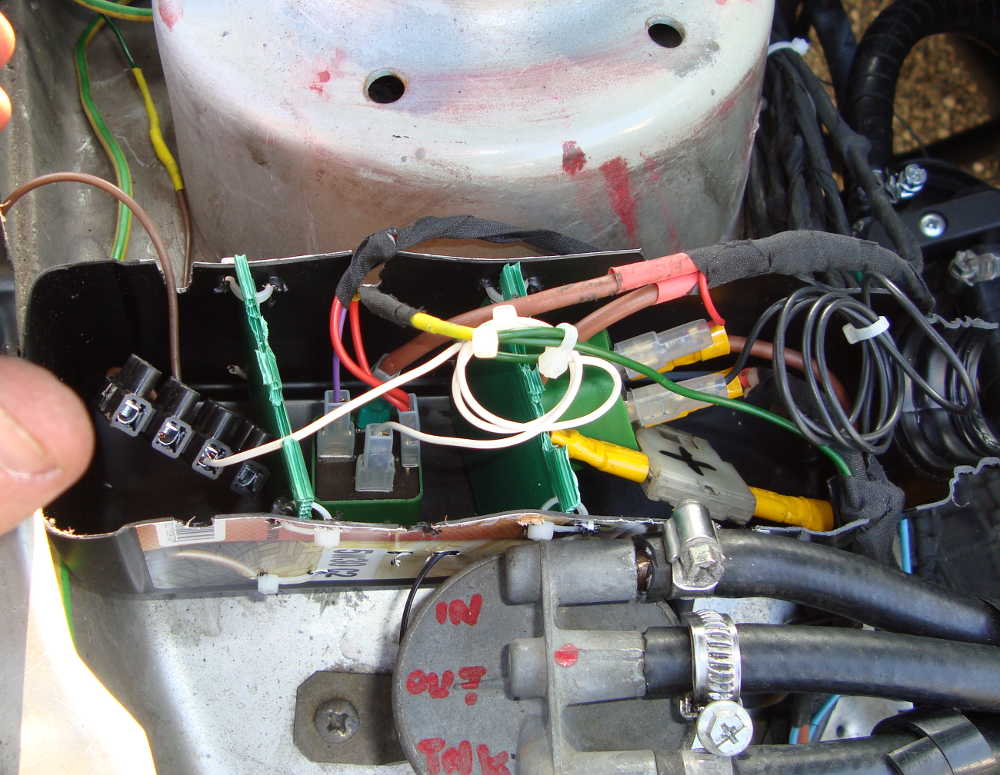
this relay box had been made out of a oil-bottle (for temporary use?).
here while clearing a bit the wiring and fuel hoses, in this engine bay corner.
(cut and soldered at proper length many wires too).

my back is crying, these weeks tests revealed both lumbar and cervical hernias. (atta rubbish, gotta work on these ones too...)
needed to lift up the car just for a wiring job...
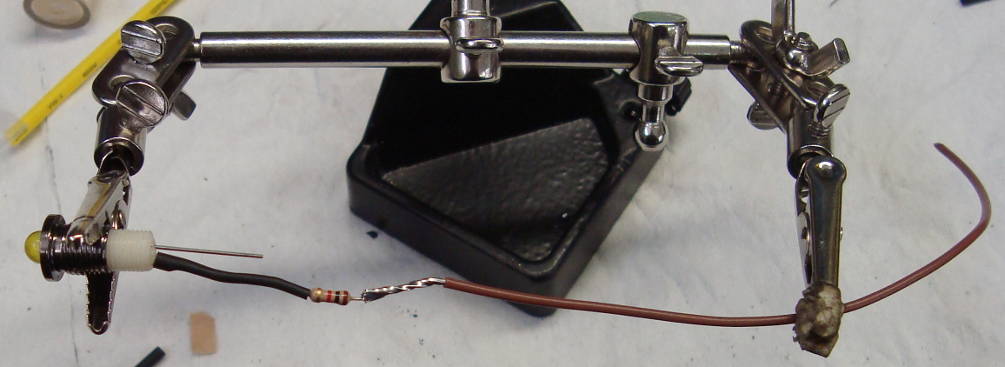
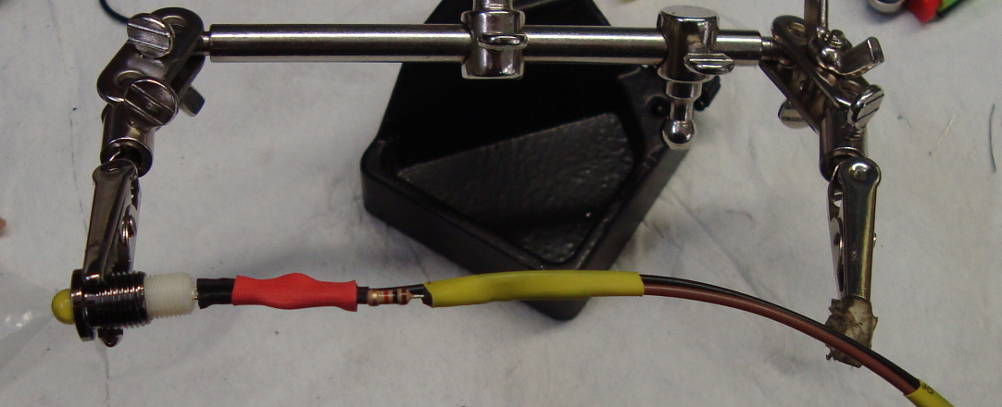
working on the dash, made some brackets and put some leds and lamps...
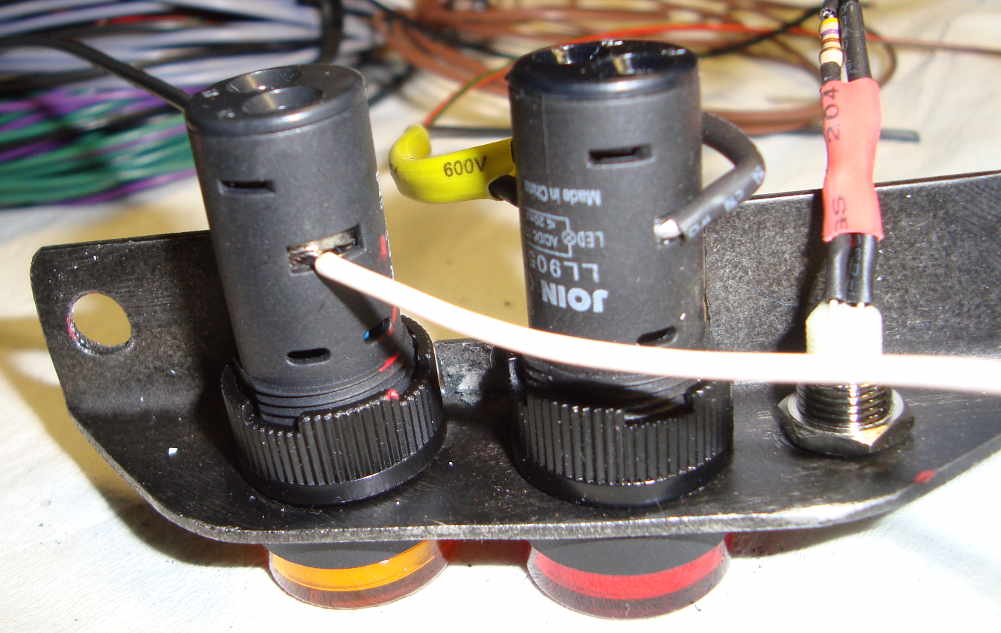
never wired leds. deflowered myself about this one too...
dash rear...
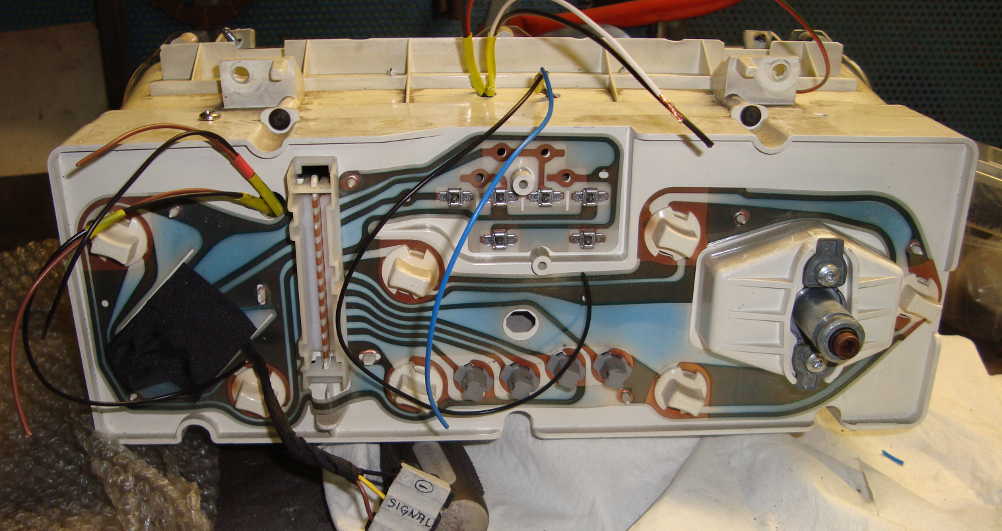
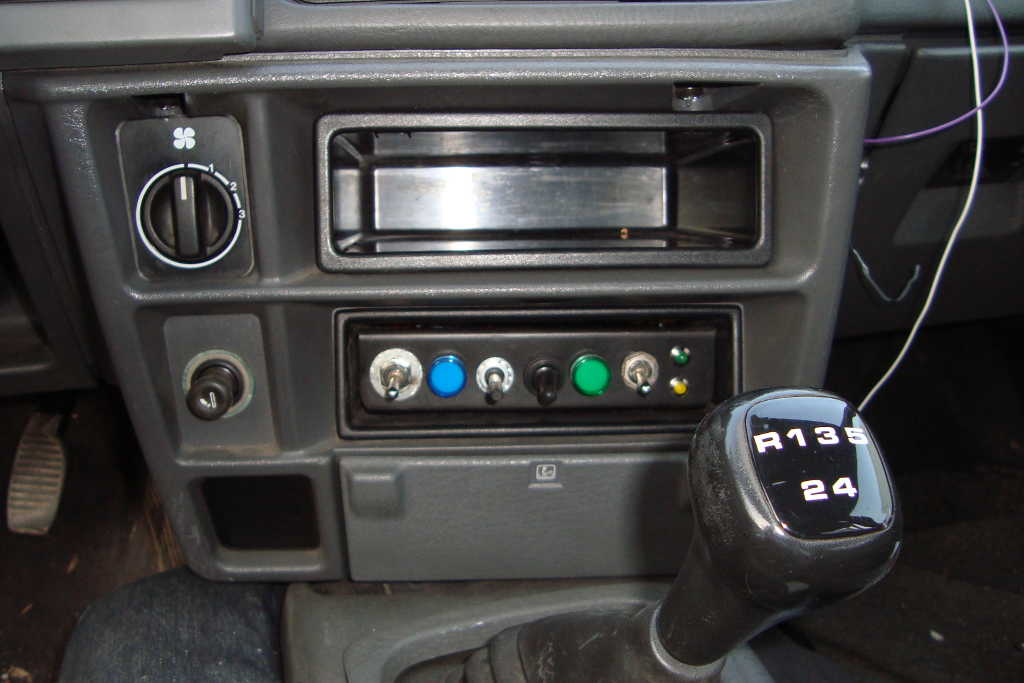
dash and central switch panel:

central switch panel assembly and connection terminal...
...so:
dash before...

...and after.
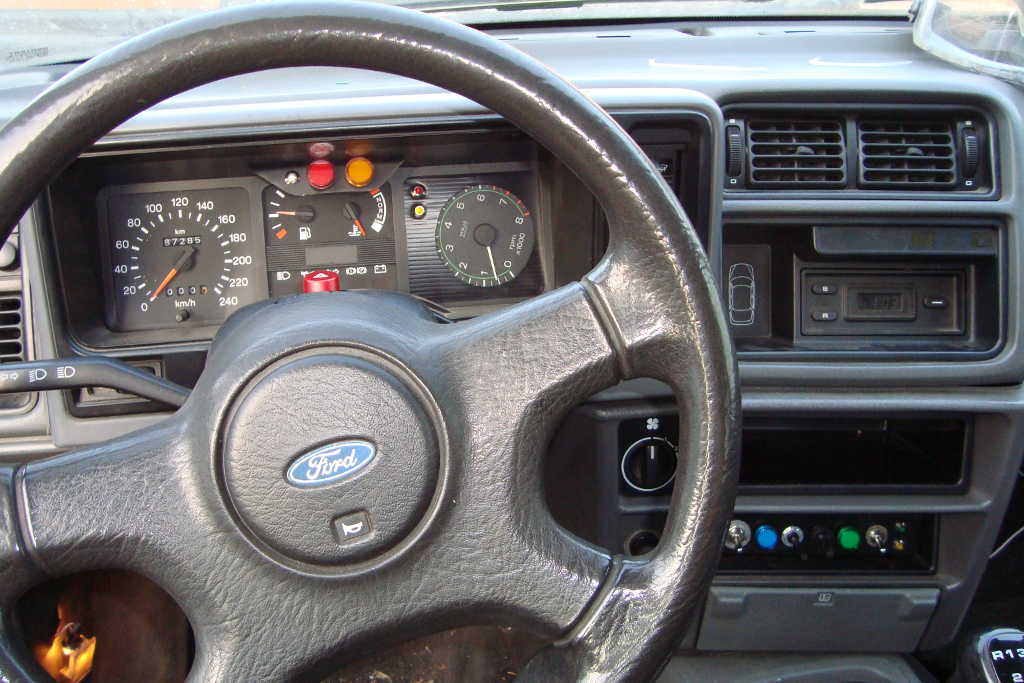
dash:
-std speedometer on again (now working! never seen on this car);
-fiat punto mkI rev counter (wich correctly communicates with the edis4 module, while the std ford doesn't);
-yellow (around 5krpm) and red (ar_d 5.8krpm) leds (still unconnected to mj ecu);
-blue hi-brightness led (looks white) => fan on (either manual or automatic);
-auxiliary oil red lamp (with redundant cable from the pressure switch);
-orange switch lamp (to be set around 6.5krpm) (still unconnected to mj ecu).
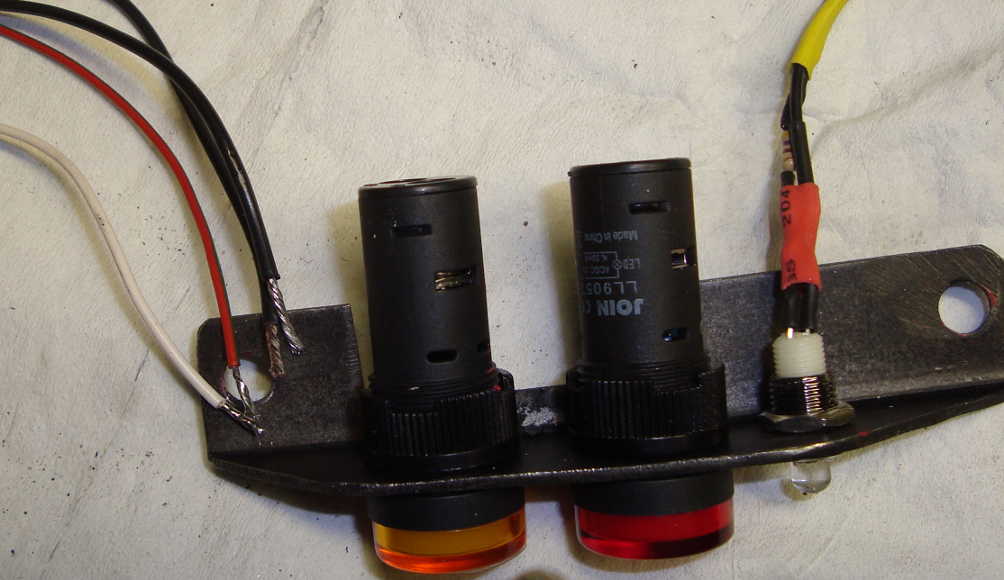
central switch panel: (from left to right)
-fan switch;
-blue lamp => manual fan switch on;
-10kohm potentiometer fan temp switch point adjuster;
-black switch and green lamp (for further use);
-fuel pump switch;
-yellow led => fuel pump off;
-green led => fuel pump on.
(only thing doesn't work is the fuel tank gauge, still driving with a 10lt canister in the trunk)
fan wiring diagram (with in car switch point temp adjuster):
fuel pump wiring diagram:

money spent so far (from post#136): around 15eur / 18gbp.
just for leds, resistances and potentiometers.
the rest, switches, relays and lamps were from dumpsters or i've already got 'em...
that's all for now...
thanks for reading.
finally i've found the correct coolant temp sender for the dash.
many thanks to new1ru who's supporting me with tons of infos too... thanks mate!

just needed this, to do all this...
made an experiment. bought potentiometer of each size from 470ohm to 100kohm.
put these, one by one, in parallel with the grey temp switch, (which actually is a ntc sensor) with one pole grounded. with a relay and a lamp, i simulate the fan switch points.

the green lamp simulates the fan working.
now i have all the elements to make the fan switch points adjustable from inside the car.
wanted to put the fuel pump under switch too...
this relay box had been made out of a oil-bottle (for temporary use?).
here while clearing a bit the wiring and fuel hoses, in this engine bay corner.
(cut and soldered at proper length many wires too).


my back is crying, these weeks tests revealed both lumbar and cervical hernias. (atta rubbish, gotta work on these ones too...
) needed to lift up the car just for a wiring job...

working on the dash, made some brackets and put some leds and lamps...


never wired leds. deflowered myself about this one too...


dash rear...

dash and central switch panel:

central switch panel assembly and connection terminal...


...so:
dash before...
...and after.

dash:
-std speedometer on again (now working! never seen on this car);
-fiat punto mkI rev counter (wich correctly communicates with the edis4 module, while the std ford doesn't);
-yellow (around 5krpm) and red (ar_d 5.8krpm) leds (still unconnected to mj ecu);
-blue hi-brightness led (looks white) => fan on (either manual or automatic);
-auxiliary oil red lamp (with redundant cable from the pressure switch);
-orange switch lamp (to be set around 6.5krpm) (still unconnected to mj ecu).
central switch panel: (from left to right)
-fan switch;
-blue lamp => manual fan switch on;
-10kohm potentiometer fan temp switch point adjuster;
-black switch and green lamp (for further use);
-fuel pump switch;
-yellow led => fuel pump off;
-green led => fuel pump on.
(only thing doesn't work is the fuel tank gauge, still driving with a 10lt canister in the trunk)
fan wiring diagram (with in car switch point temp adjuster):

fuel pump wiring diagram:

money spent so far (from post#136): around 15eur / 18gbp.
just for leds, resistances and potentiometers.
the rest, switches, relays and lamps were from dumpsters or i've already got 'em...
that's all for now...
thanks for reading.
Last edited by rooos; 04-04-2017 at 07:33 AM. Reason: baad english, needd to go to school again
17-04-2017, 06:58 PM
#139
PassionFord Regular
Thread Starter
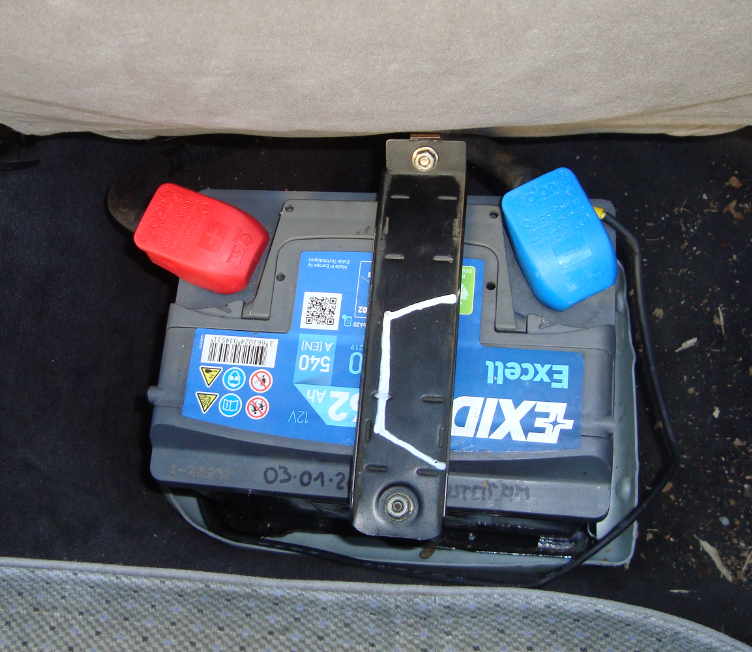
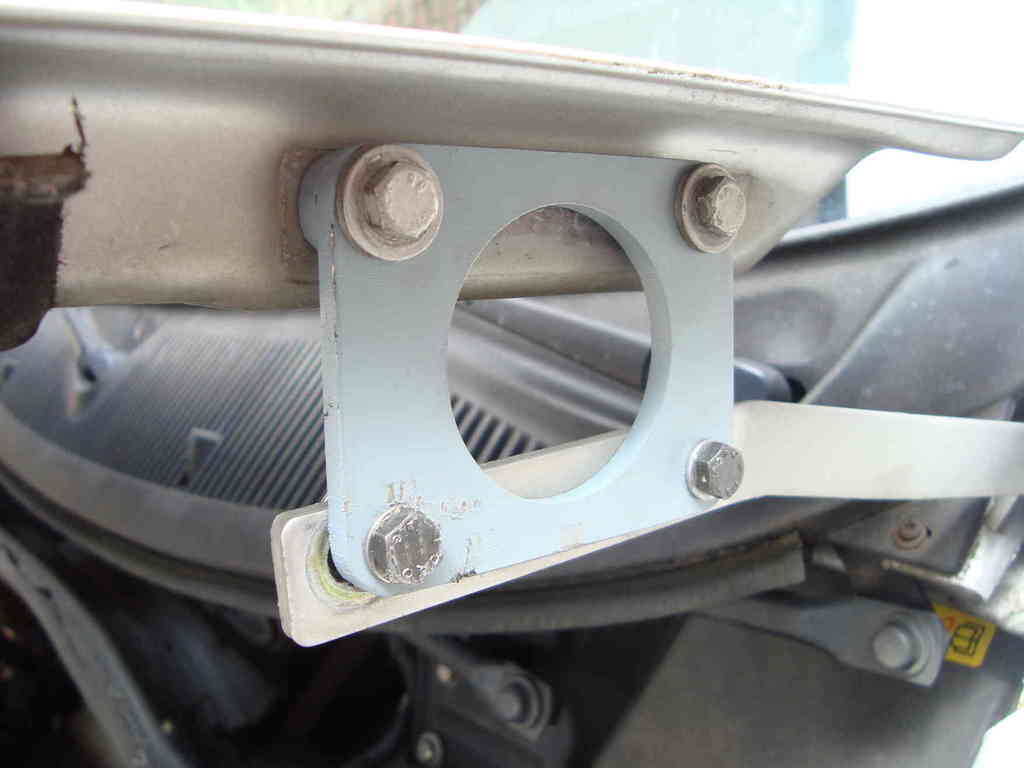
BUTTERY RELOCATION pt.II
purpose of this is subtracting weight from the higher part and put it down, in order to lower the center of gravity and balance driver's weight. etc...
bought nautical quick fit pole terminals, (almost no need of an inside battery kill switch...)
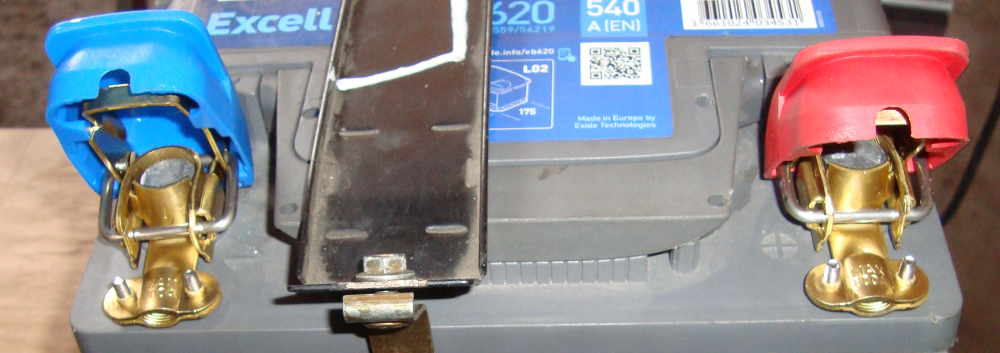
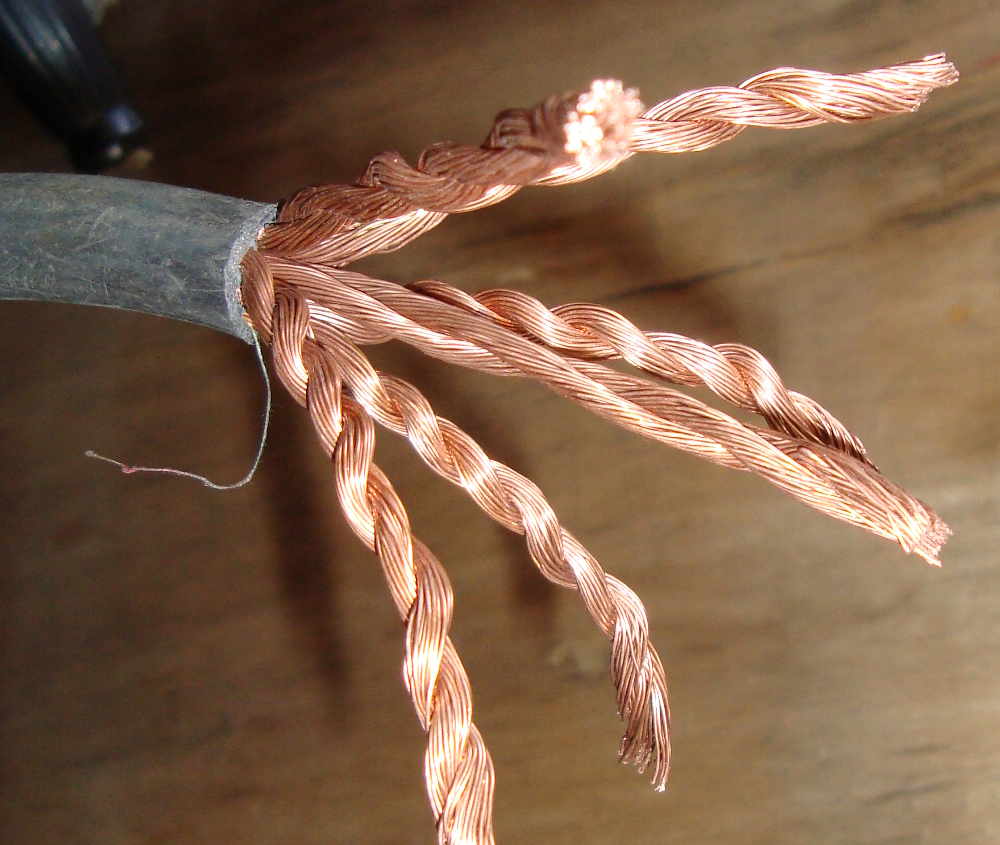
used welder cable, 90mm2, ways too much over the needed, very heavy, but it came for free as it was lying down abandoned at the shop.
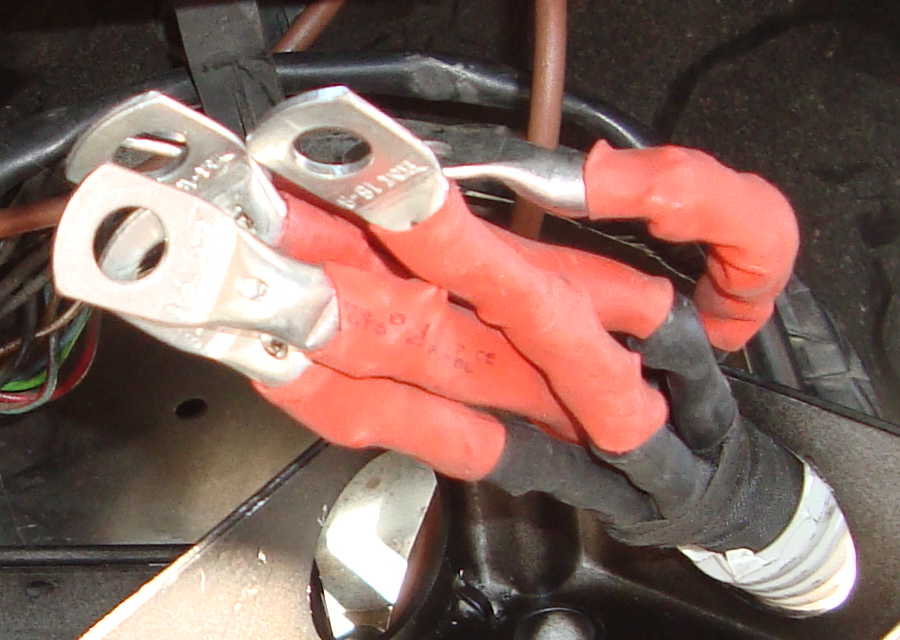
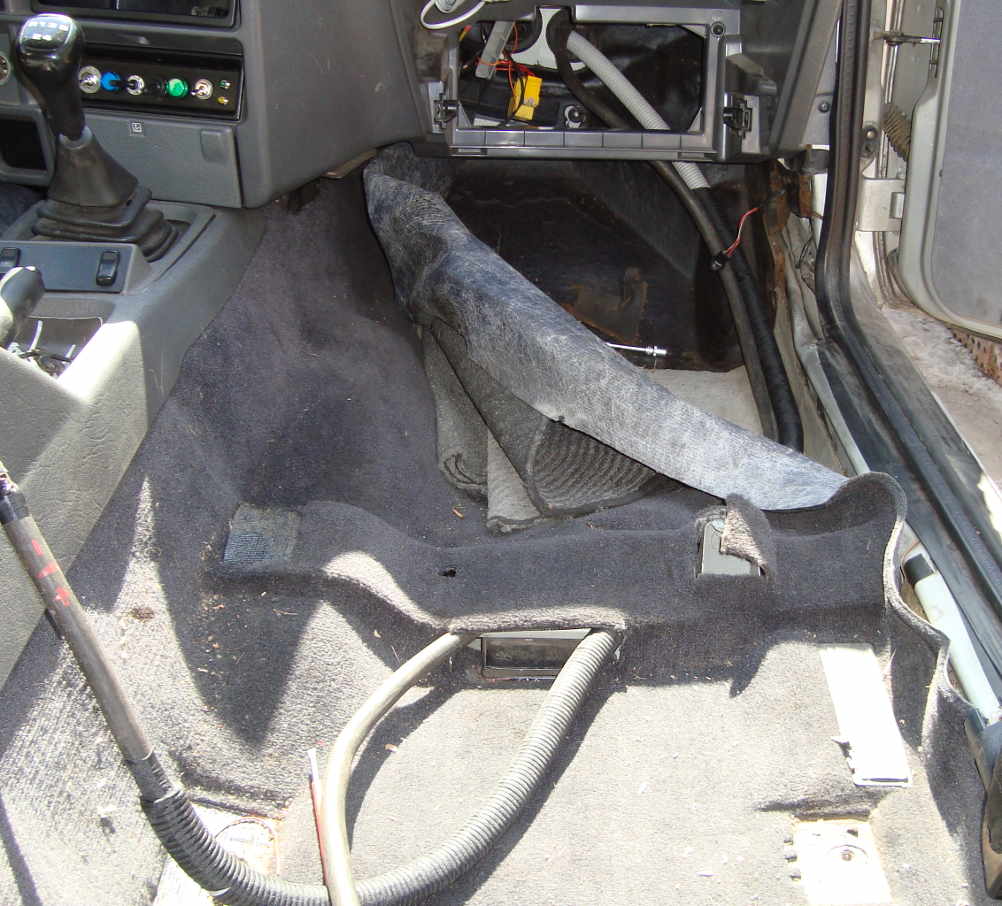
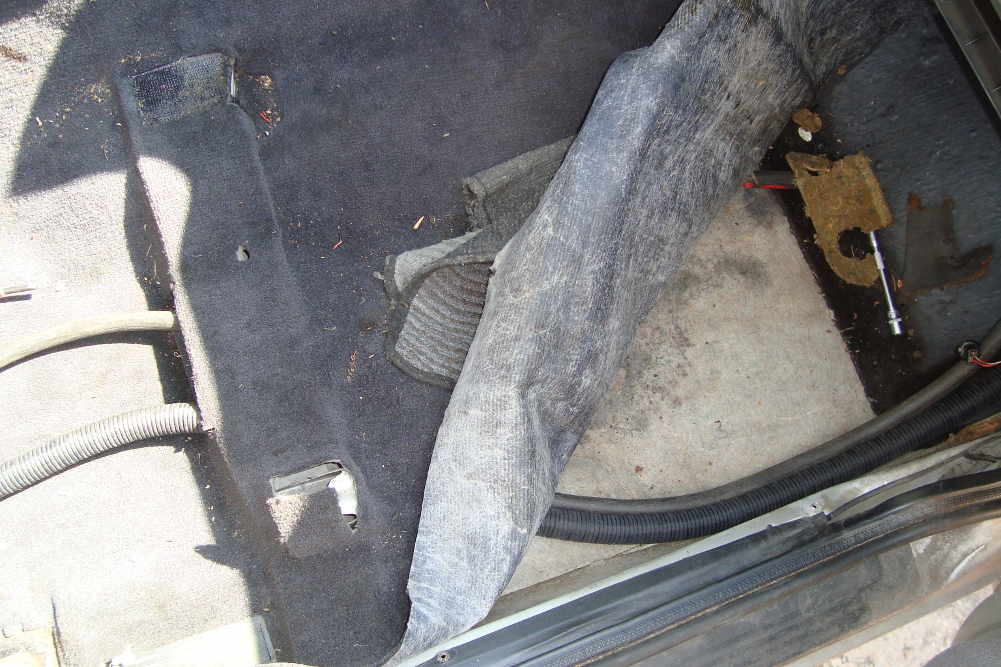
cables has been kept inside the car, and passed through the firewall...
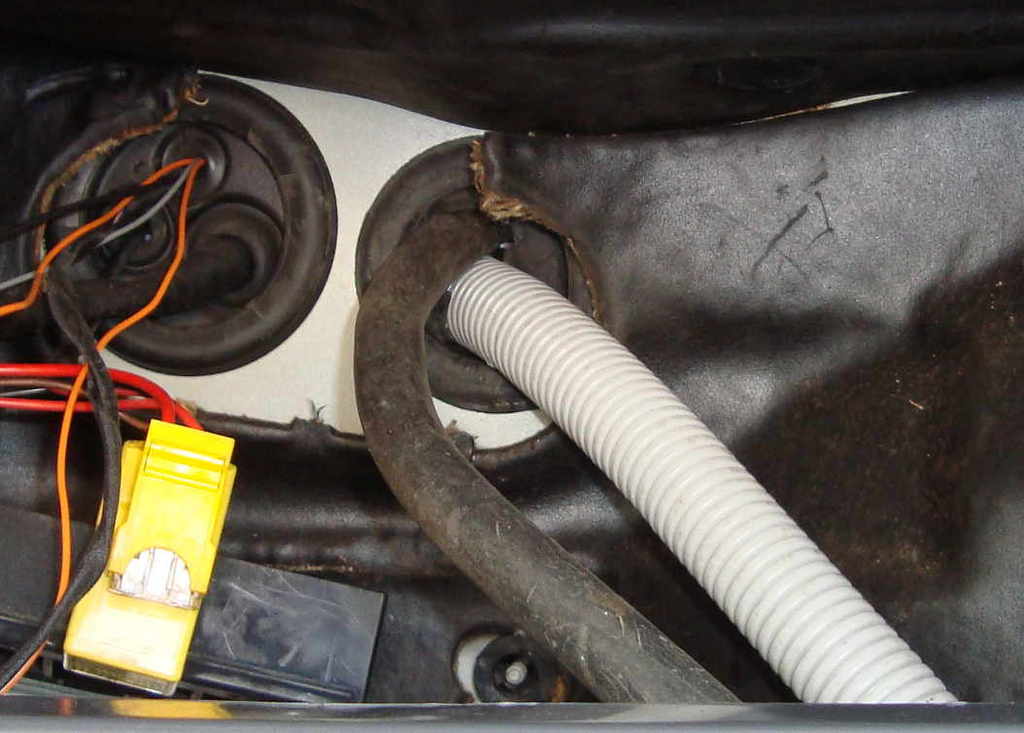
...beneath the upholstery...
..up to the battery plate now bolted in position.
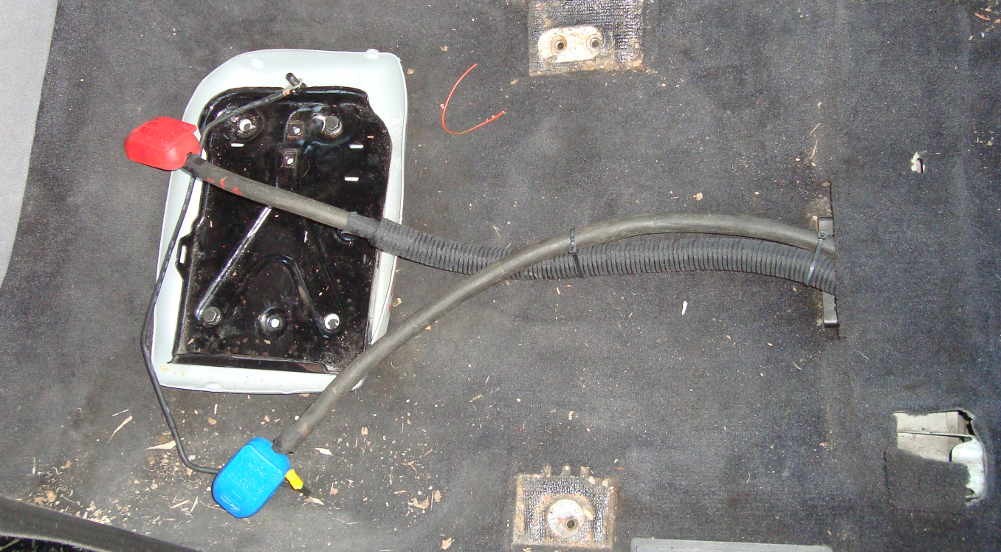
a couple of small electric boxes, to insulate the poles.
black positive pole box above the grey ground box. no screw or metal had been used to fix 'em, just zip ties.
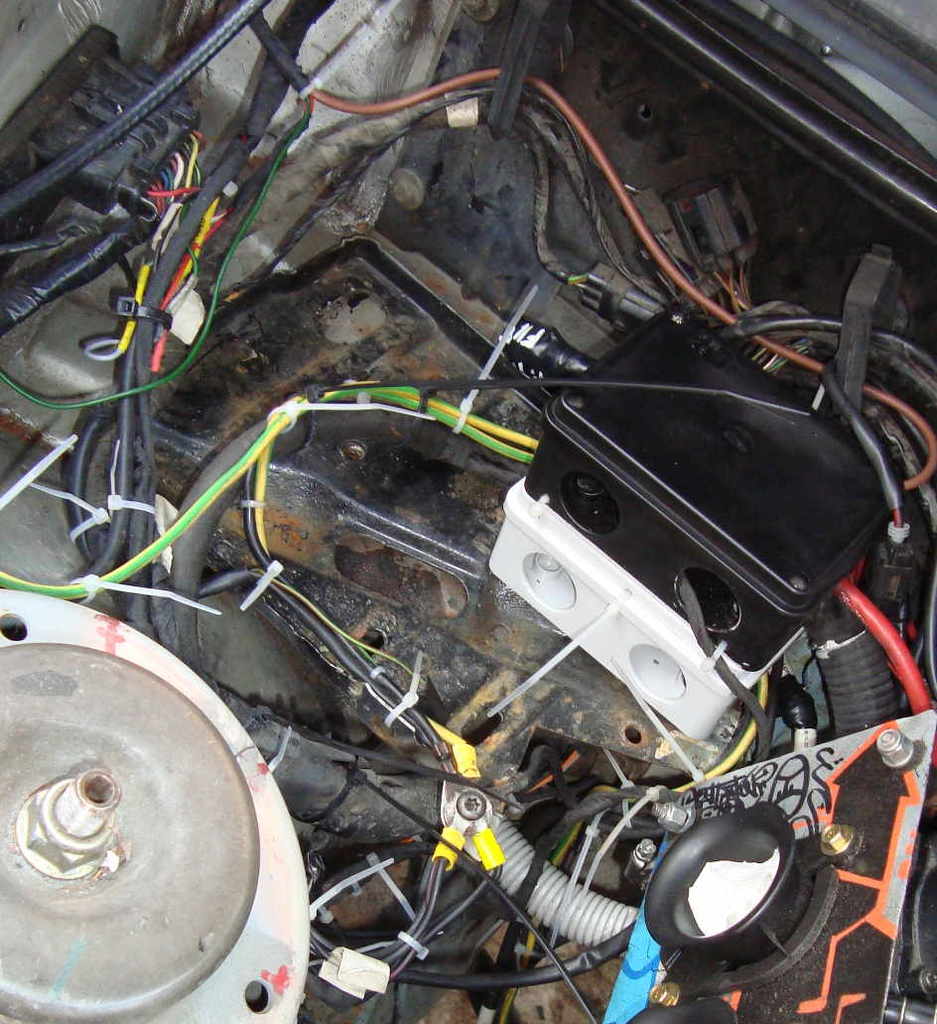
battery place before...
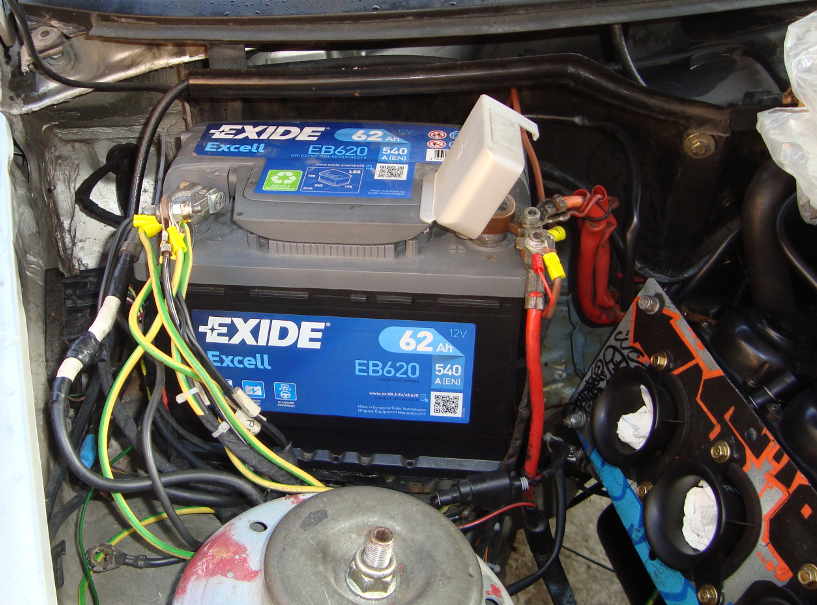
and after...

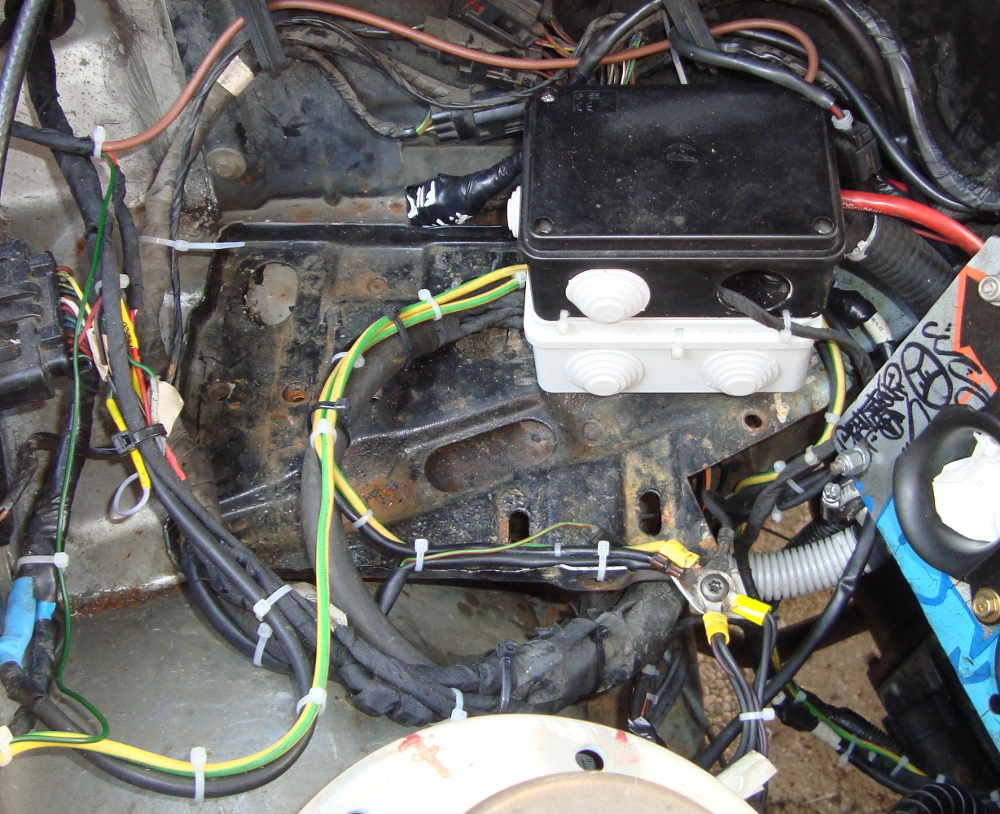
with the battery now inside, in the rear passenger side foot-well.
purpose of this is subtracting weight from the higher part and put it down, in order to lower the center of gravity and balance driver's weight. etc...
bought nautical quick fit pole terminals, (almost no need of an inside battery kill switch...)

used welder cable, 90mm2, ways too much over the needed, very heavy, but it came for free as it was lying down abandoned at the shop.


cables has been kept inside the car, and passed through the firewall...

...beneath the upholstery...


..up to the battery plate now bolted in position.

a couple of small electric boxes, to insulate the poles.
black positive pole box above the grey ground box. no screw or metal had been used to fix 'em, just zip ties.

battery place before...

and after...


with the battery now inside, in the rear passenger side foot-well.
 17-04-2017, 07:00 PM
#140
PassionFord Regular
Thread Starter
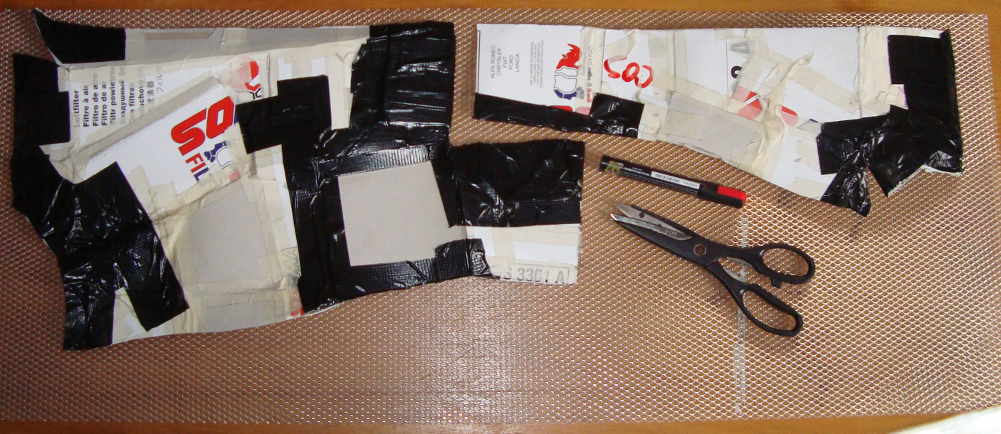
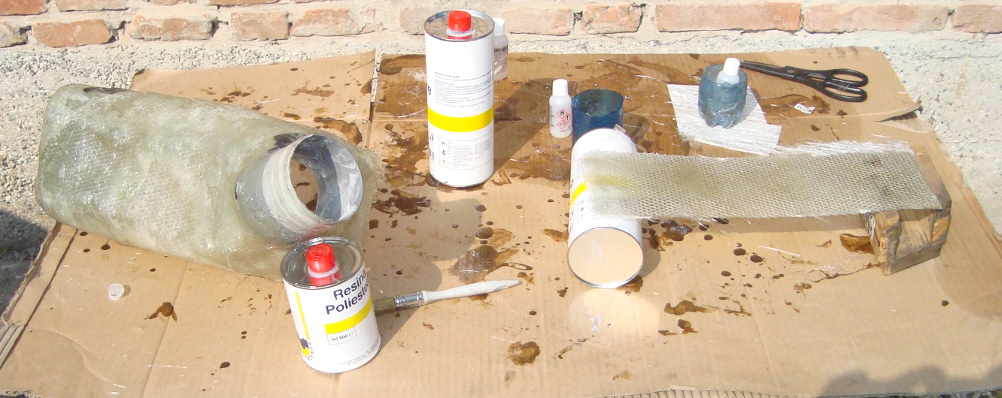
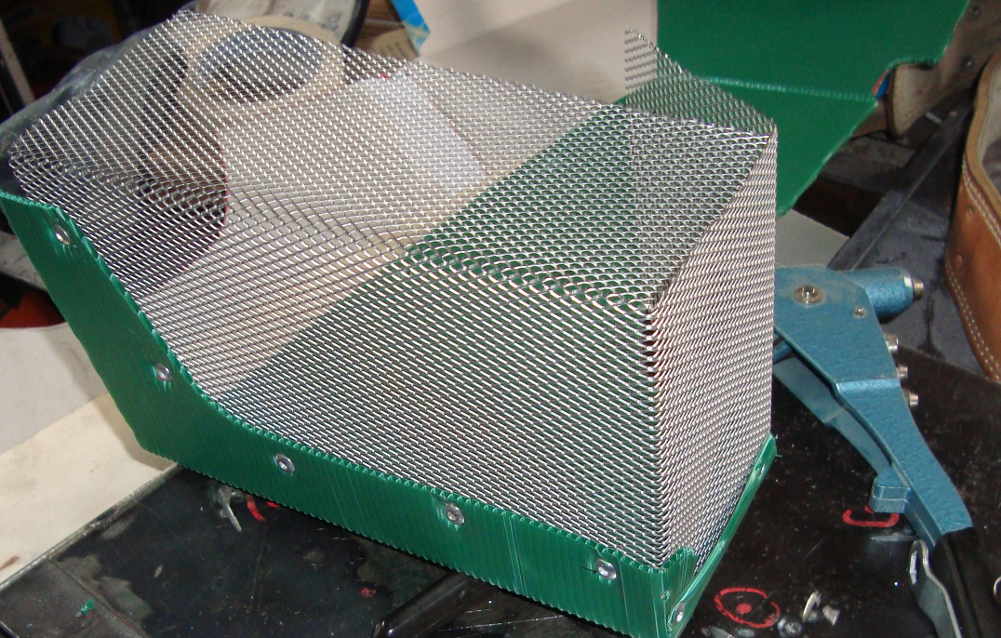
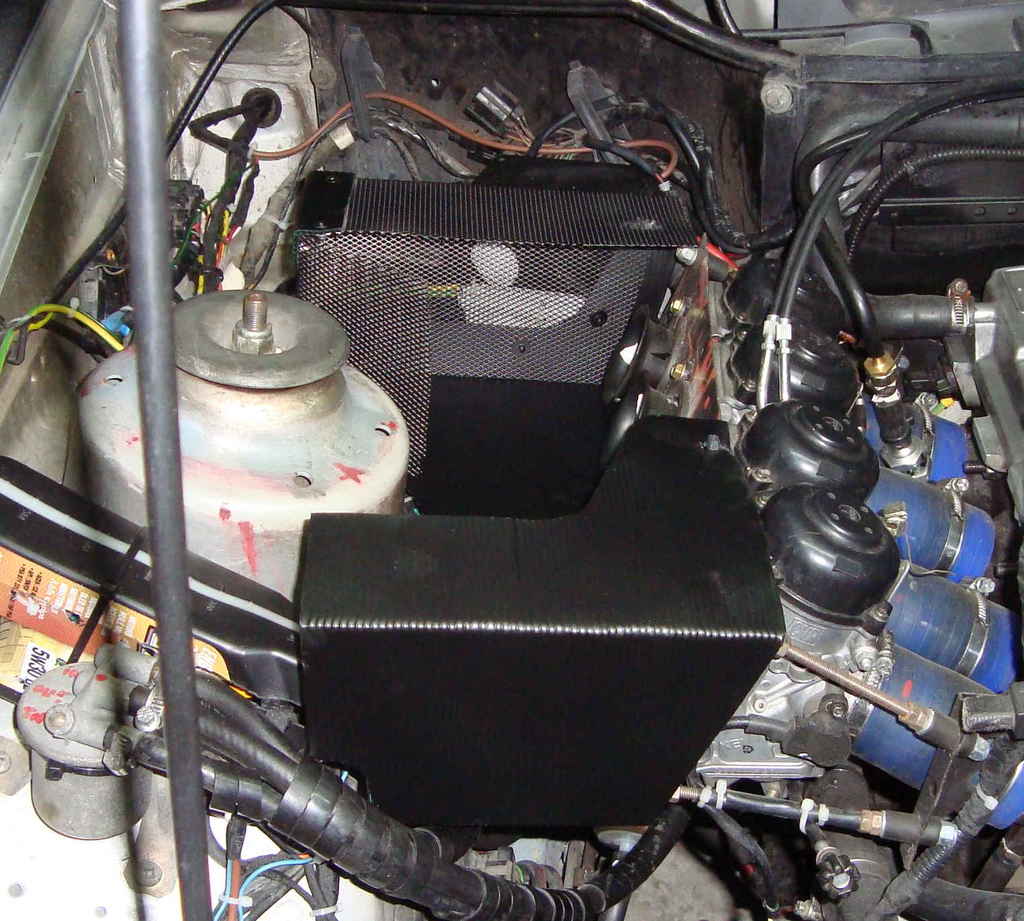
FIBERGLASS AIR BOX pt.I
not a proper airbox, just some box to connect a filter to the carbs....
paper model made...
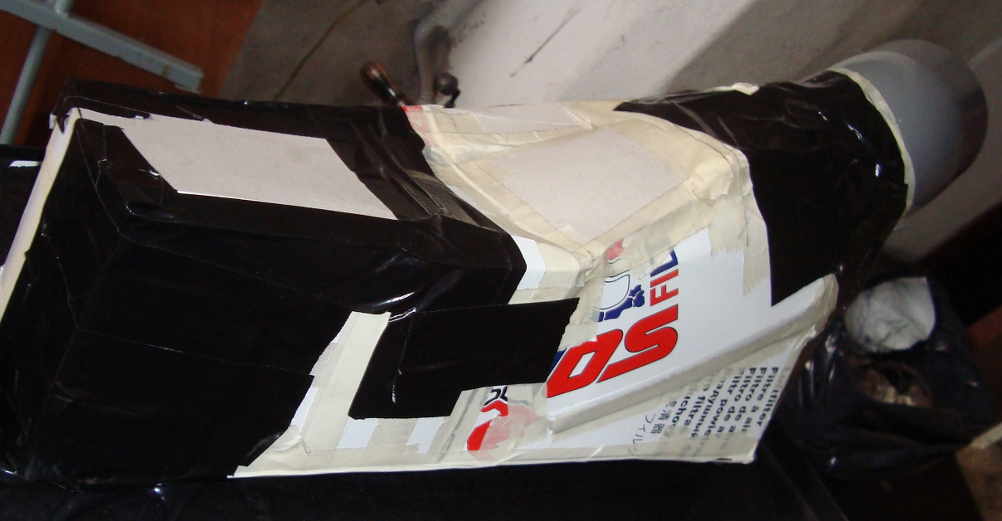
...and dismantled.
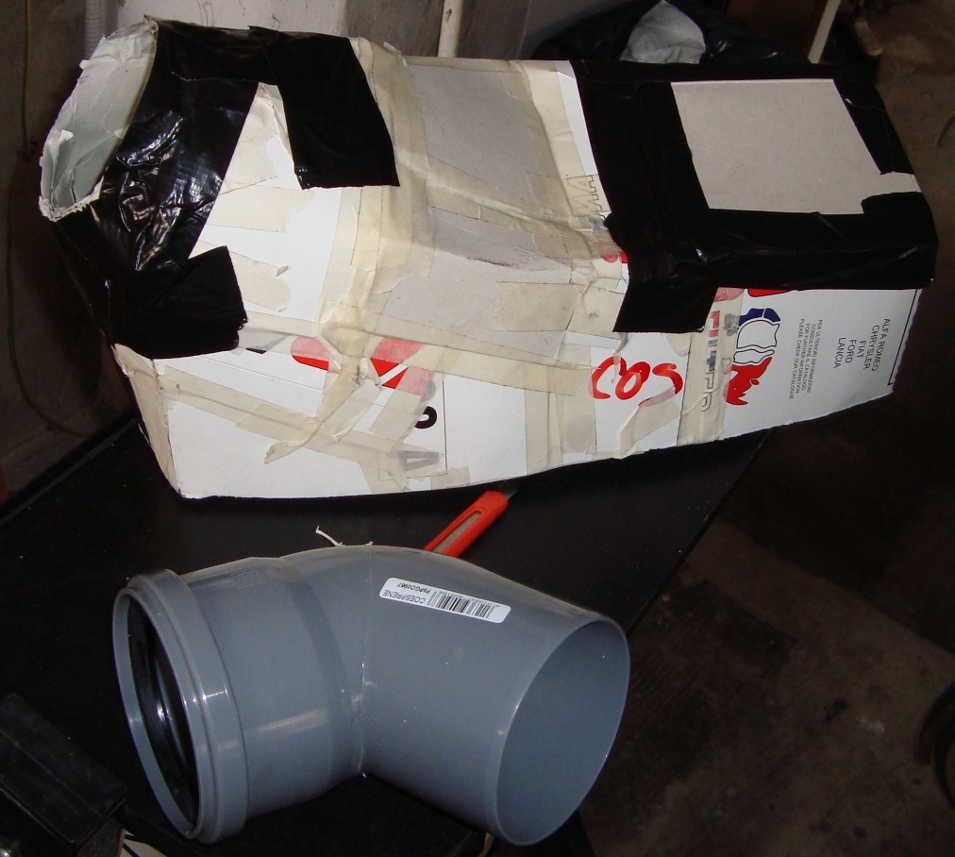
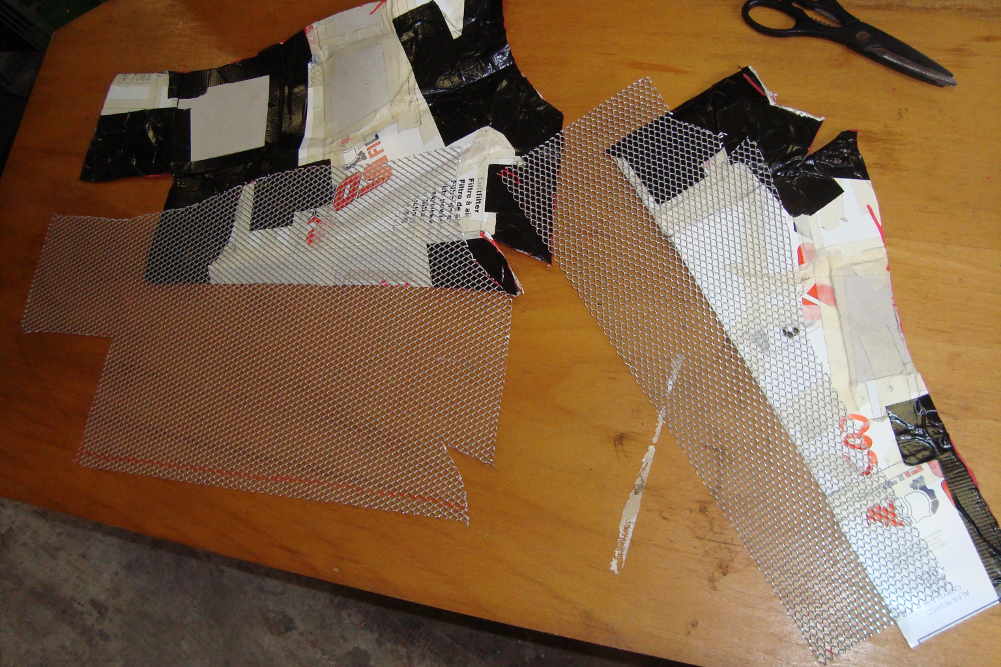
pieces laid on aluminum net to make the support.
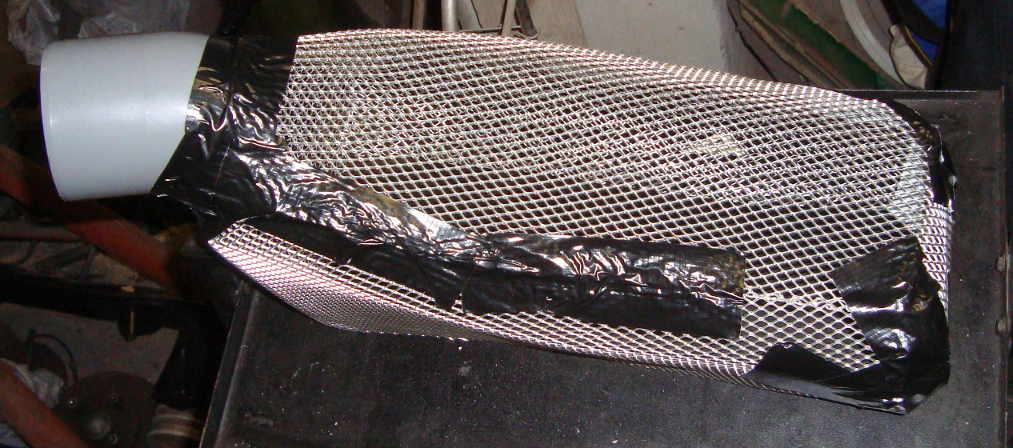
how it should('ve) fit.
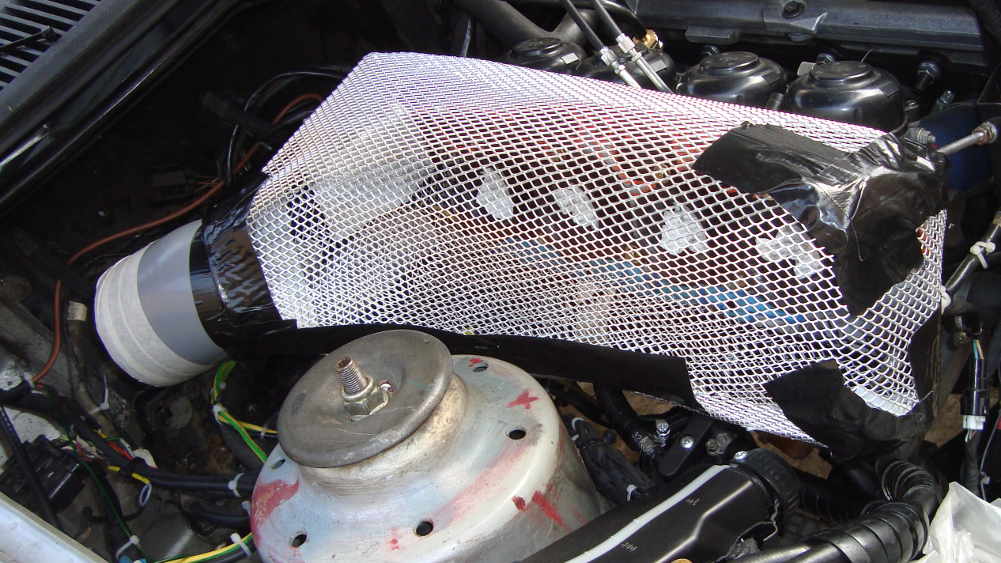
covering it of fiberglass...
then temporarily abandoned project.

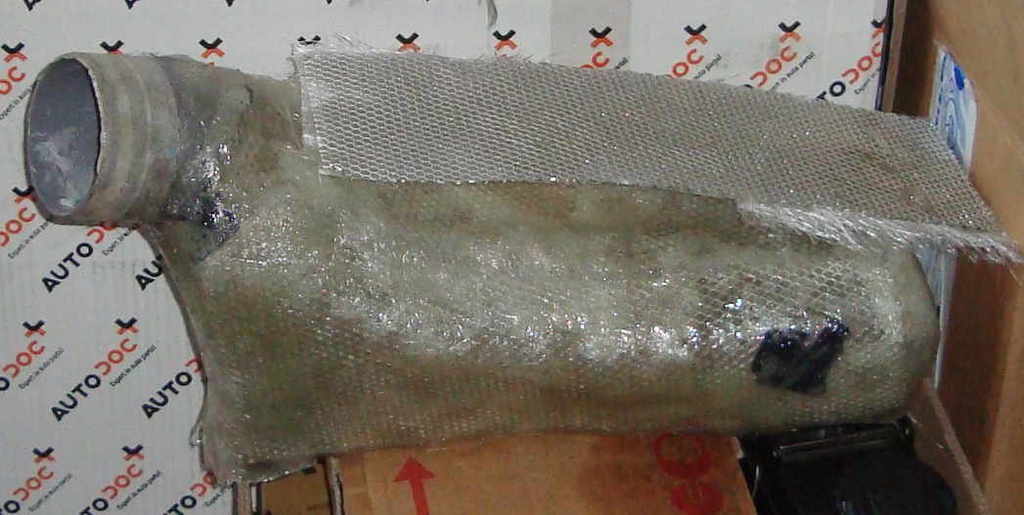
it's starting to become too heavy and don't wanna overload carbs and manifold.
have to figure a way to fix it to the chassis too (with some kinda spring ???)
it's also started to cost me a little fortune; between net, fiberglass, catalyst i paid kinda 30-35eur(25-30gbp) so far for it.
so stopped, just for a while, in order to think about it before going further with idiocy.
not a proper airbox, just some box to connect a filter to the carbs....
paper model made...

...and dismantled.

pieces laid on aluminum net to make the support.


how it should('ve) fit.

covering it of fiberglass...

then temporarily abandoned project.


it's starting to become too heavy and don't wanna overload carbs and manifold.
have to figure a way to fix it to the chassis too (with some kinda spring ???)
it's also started to cost me a little fortune; between net, fiberglass, catalyst i paid kinda 30-35eur(25-30gbp) so far for it.
so stopped, just for a while, in order to think about it before going further with idiocy.
17-04-2017, 07:02 PM
#141
PassionFord Regular
Thread Starter
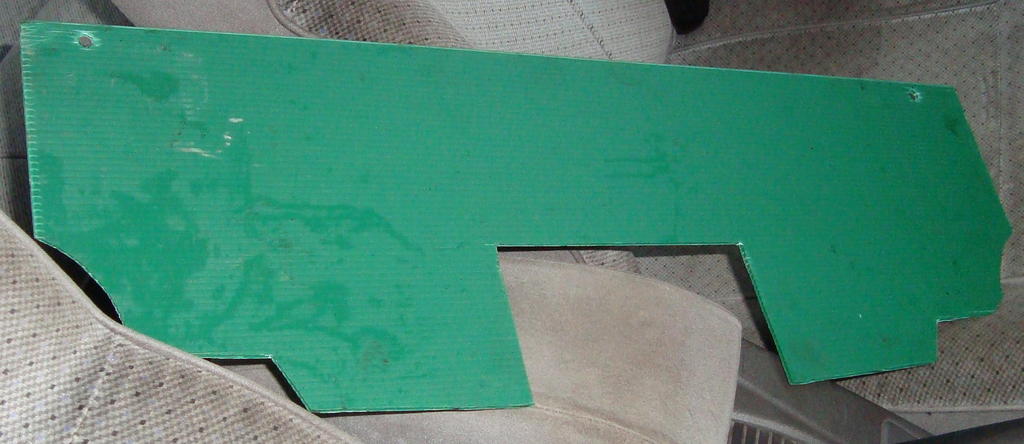
SPLASH SCREEN
decided that simple is better at the moment.
another paper model...
cheap shitty green plastic has been used now.
could've made it of sheet metal, but it would've rubbed badly on the harness, ruining it.
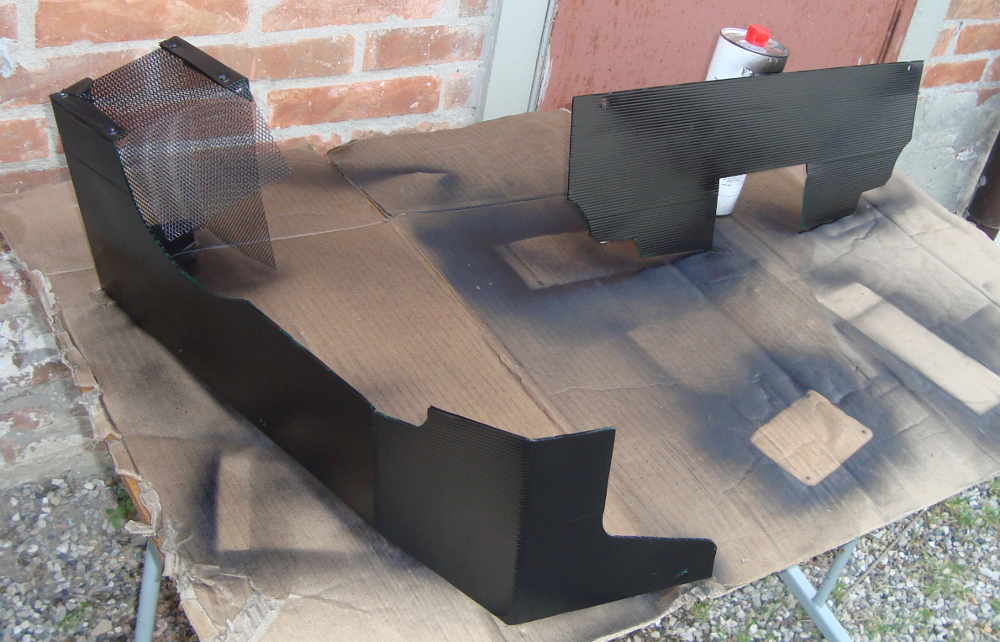
before...
...and after.
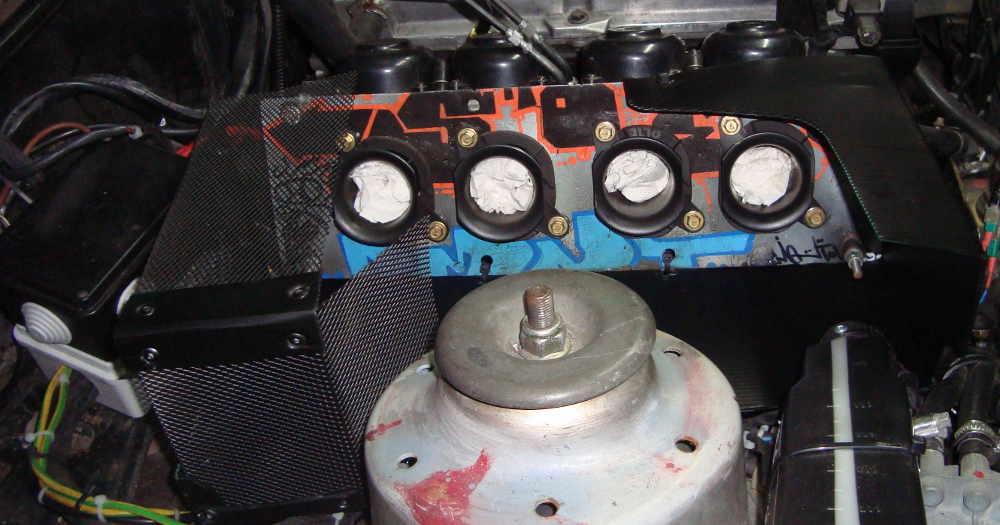
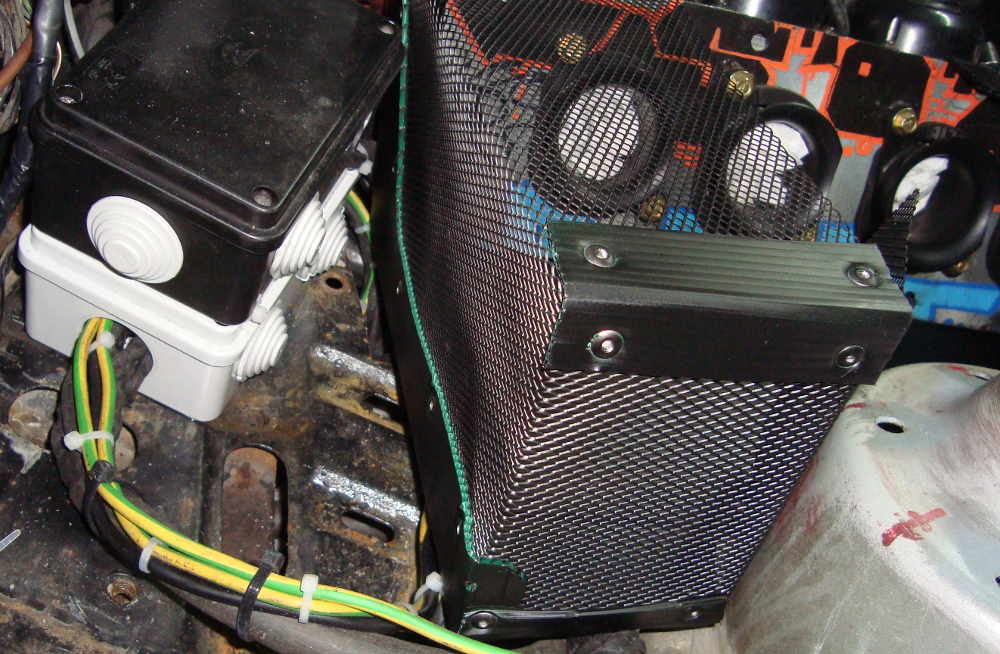
purpose of this is just stop down splashes. it'll work...
the iron net will also prevent leaves, accumulated on the battery plate, to get sucked in the engine.
i'll go on with the air box as soon...
decided that simple is better at the moment.
another paper model...

cheap shitty green plastic has been used now.
could've made it of sheet metal, but it would've rubbed badly on the harness, ruining it.


before...

...and after.


purpose of this is just stop down splashes. it'll work...
the iron net will also prevent leaves, accumulated on the battery plate, to get sucked in the engine.
i'll go on with the air box as soon...
17-04-2017, 07:05 PM
#142
PassionFord Regular
Thread Starter
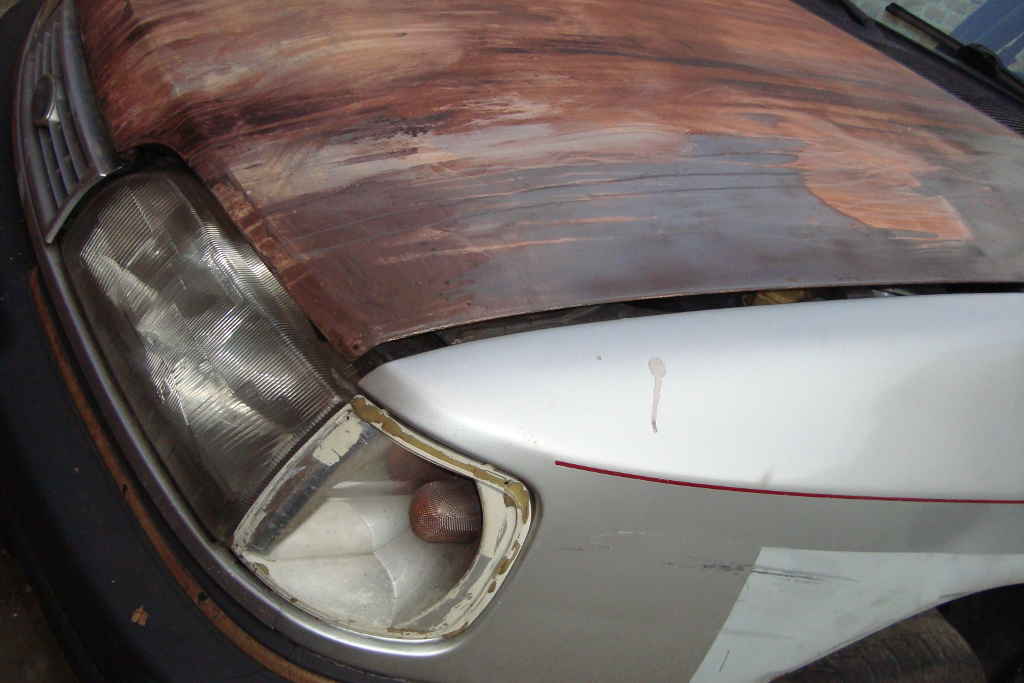
BONNET SPACERS pt.III
had these on before...
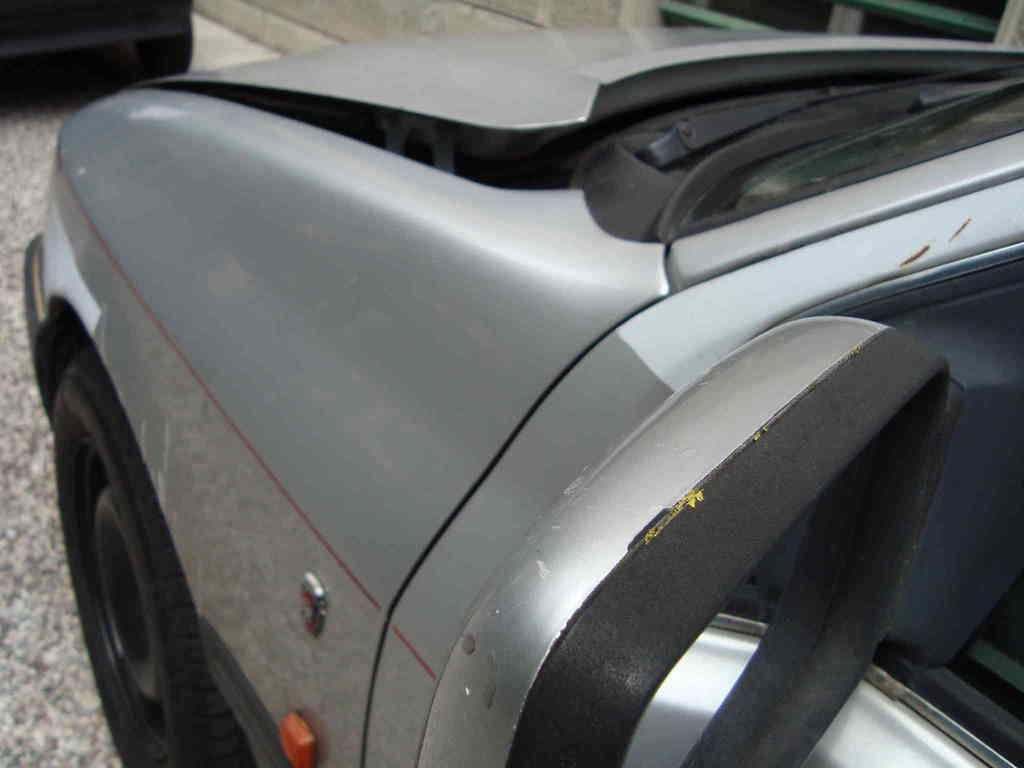
loved 'em spacers. very good for engine bay ventilation, not such pedestrian friendly though.
the first reasons i had to put them off are to protect the (still) unfiltered intake and let 'em crops to see the least possible through the bonnet openings. (it could be risky in here)...
had another knackered bonnet in my stock, so took down the old one...
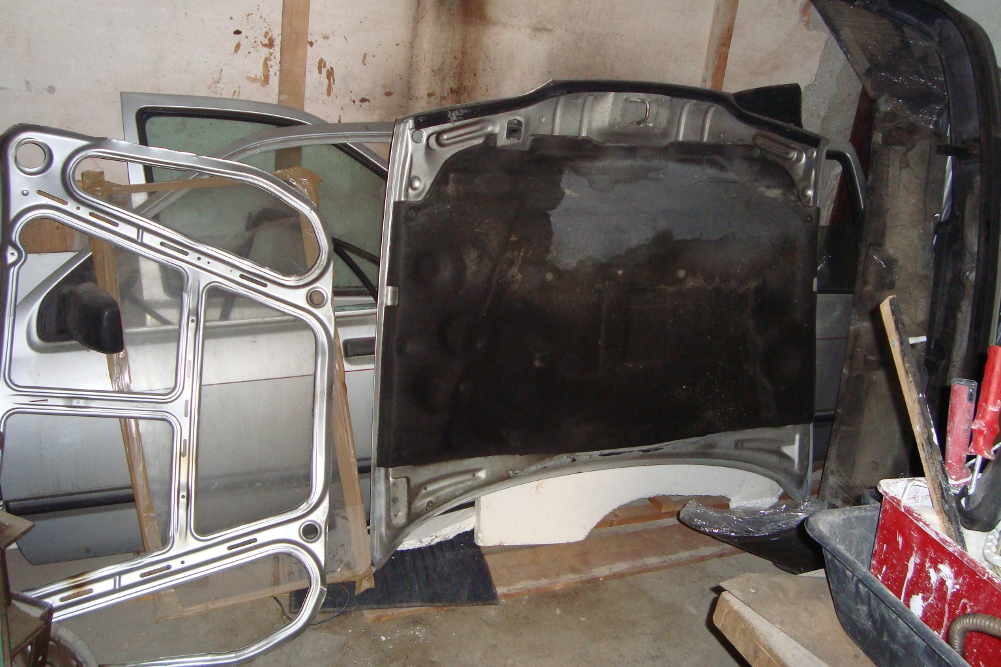
...and modified the shitty one.
(lightweightened too, even though the structure chop doesn't mean too much).
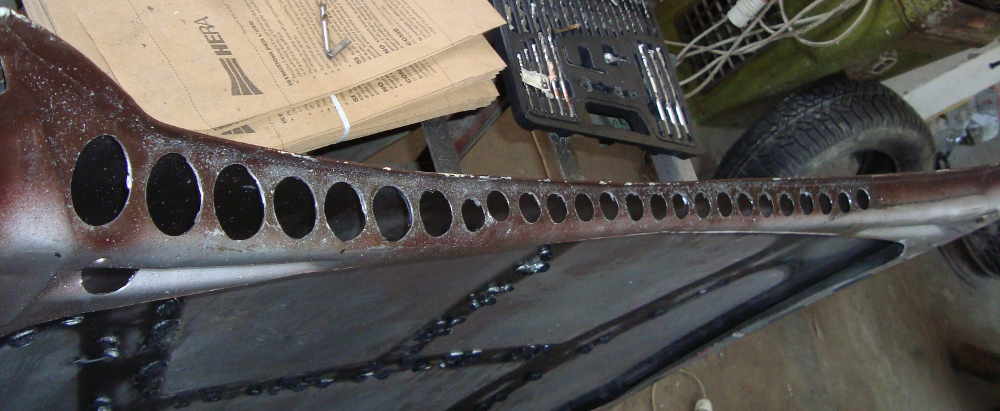
without structure, these holes will keep ventilated the engine bay, through the windshield grill, almost like the bonnet spacers would've done.
many thanks to new1ru who's adviced me to make a couple of holes, to drain the water in what remains of the structure.
thanks mate !!!
it's been warped since the day i bought it, i've never managed to close it properly.
(this isn't due to missing structure). i'll bend it back as soon, don't wanna risk it opens at hi-speeds.
how the whole car looks like now...
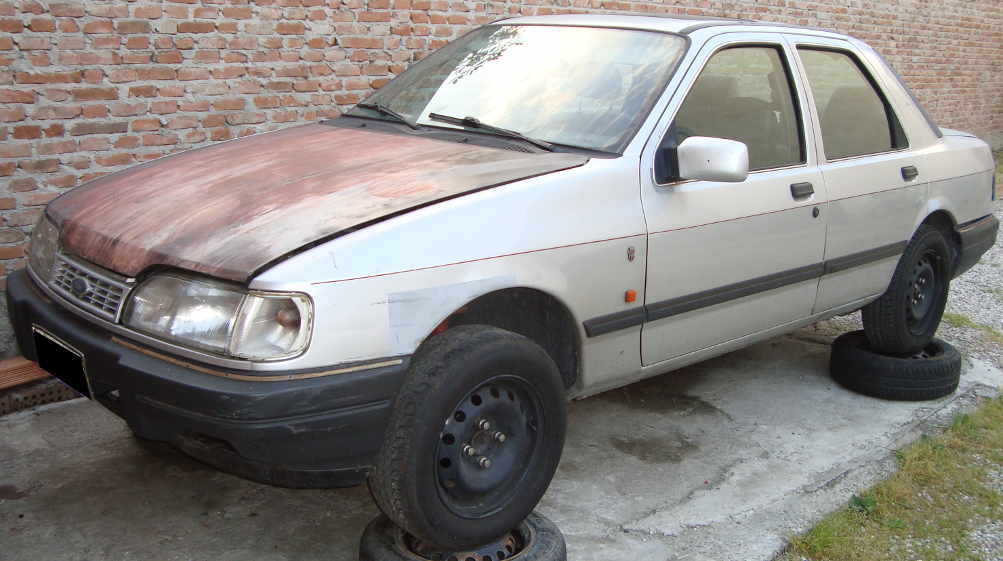
i know what the most of you are thinking, i hate it too. 've never been a "rat-style" bullsh*ts big fan too.
awfully this time it's functional. there's no way i cut a bonnet in good shape just for a dog sh*t made experiment. the old grey bonnet is now safe and sound in my cellar and stays there until further notice.
that's all for now.
thanks for reading.
had these on before...


loved 'em spacers. very good for engine bay ventilation, not such pedestrian friendly though.
the first reasons i had to put them off are to protect the (still) unfiltered intake and let 'em crops to see the least possible through the bonnet openings. (it could be risky in here)...
had another knackered bonnet in my stock, so took down the old one...

...and modified the shitty one.
(lightweightened too, even though the structure chop doesn't mean too much).

without structure, these holes will keep ventilated the engine bay, through the windshield grill, almost like the bonnet spacers would've done.

many thanks to new1ru who's adviced me to make a couple of holes, to drain the water in what remains of the structure.
thanks mate !!!
it's been warped since the day i bought it, i've never managed to close it properly.
(this isn't due to missing structure). i'll bend it back as soon, don't wanna risk it opens at hi-speeds.

how the whole car looks like now...

i know what the most of you are thinking, i hate it too. 've never been a "rat-style" bullsh*ts big fan too.
awfully this time it's functional. there's no way i cut a bonnet in good shape just for a dog sh*t made experiment. the old grey bonnet is now safe and sound in my cellar and stays there until further notice.
that's all for now.
thanks for reading.
Last edited by rooos; 18-04-2017 at 12:56 PM. Reason: baad english, need to go to school a gain
15-06-2017, 12:10 PM
#143
PassionFord Regular
Thread Starter
SOME OTHER UPDATE
not the happiest times of my life lately... so not such motivated in posting nor keeping my camera with me each time i make a bit on the car.
my apologies to the ones who are following this...
however there are some good update...
had the ok from the technical inspection (a bit of an italian job, but we made it nonetheless...).
after i sorted out the advence issues i had, she stopped overheating...
(dodgy connector on the ecu => no tps reading => more than 30 deg advance at 3 krpm, always advanced like she were in throttle release).
my fault but problem solved...
if i managed to keep it fresh with that kind of advance, now it should work fine...
in fact, did 140 km back and forth the shop where i had the inspection made, without touching any bolt or screw in the engine bay...
i'd say it's now good to be driven and abused !
!
done with the "make it work part". started the "improvements part".
so welded diff and broken lens on again for the battle set up...
cut 2 coil off the spare front springs i had laid on the shelf... (drives better, but draws too much crops attention. might change them again soon)
some tin can and light anti rust treat on the sills...
here in "panda" paint scheme:
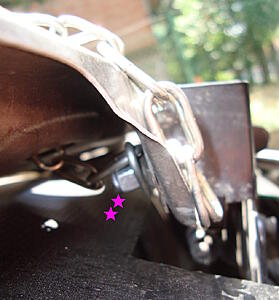
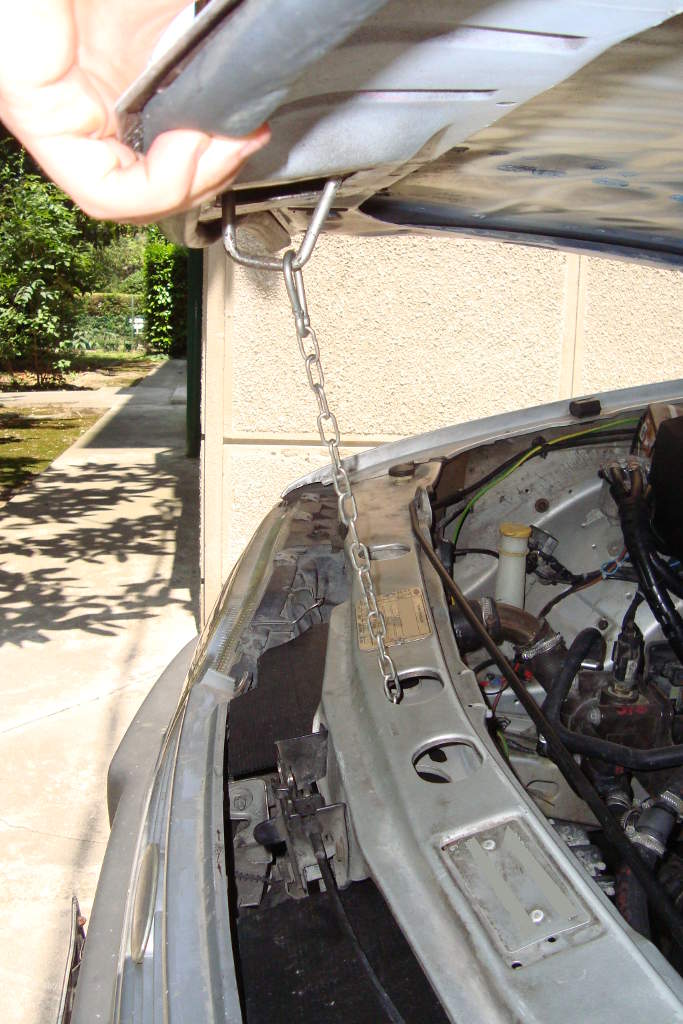
not trusting too much in that bonnet... put on a simple fail safe chain...
(fixed on the "violet stars" bolt)...

not the happiest times of my life lately... so not such motivated in posting nor keeping my camera with me each time i make a bit on the car.
my apologies to the ones who are following this...
however there are some good update...
had the ok from the technical inspection (a bit of an italian job, but we made it nonetheless...).
after i sorted out the advence issues i had, she stopped overheating...
(dodgy connector on the ecu => no tps reading => more than 30 deg advance at 3 krpm, always advanced like she were in throttle release).
my fault but problem solved...
if i managed to keep it fresh with that kind of advance, now it should work fine...
in fact, did 140 km back and forth the shop where i had the inspection made, without touching any bolt or screw in the engine bay...
i'd say it's now good to be driven and abused
done with the "make it work part". started the "improvements part".
so welded diff and broken lens on again for the battle set up...
cut 2 coil off the spare front springs i had laid on the shelf... (drives better, but draws too much crops attention. might change them again soon)
some tin can and light anti rust treat on the sills...
here in "panda" paint scheme:

not trusting too much in that bonnet... put on a simple fail safe chain...
(fixed on the "violet stars" bolt)...


Last edited by rooos; 02-07-2017 at 05:44 AM. Reason: bad english... nedd to go to school agein
15-06-2017, 12:11 PM
#144
PassionFord Regular
Thread Starter
SOME POSITIVE KARMA...
letting the scrappy bonnet to be signed by all the good souls which helped me, giving their contribute to make this thing real.
(marked with red stars)...
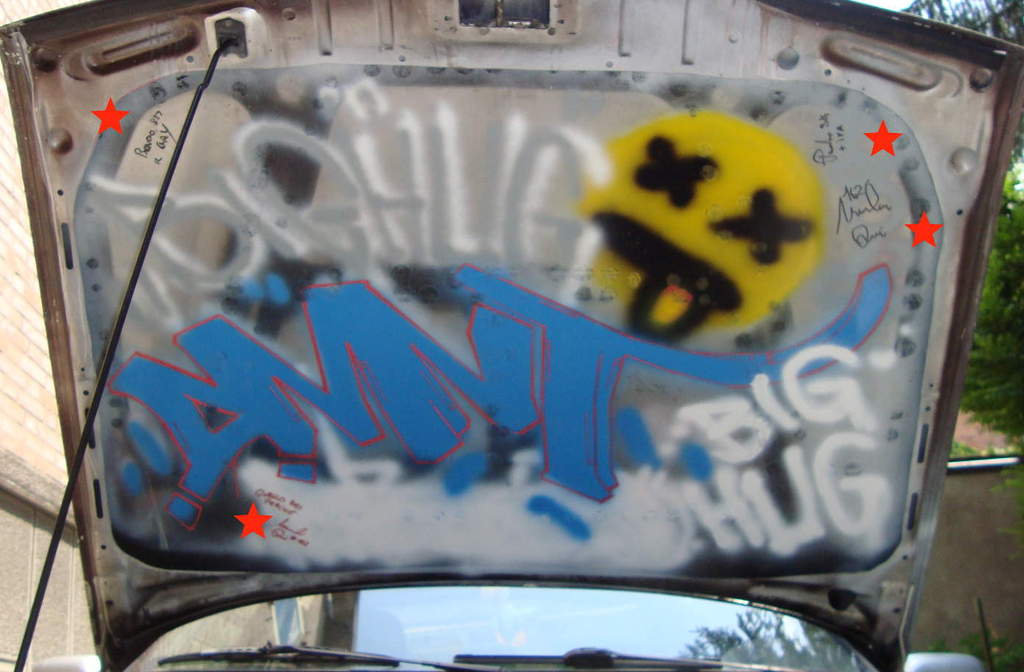
these are just the firsts, there still isn't everybody. hope to get all their signs by the end of the next month... (it's a silly thing, but it means a lot to me).
that's all for now...
thanks for reading.
01-07-2017, 12:18 PM
#145
PassionFord Regular
Thread Starter
!!! THIS THREAD'S BEEN FUCKED BY PHOOTOBUCKET !!!
if i want my photo to be public again, i have to pay a ransom of 400usd per year for a service which once was free. (not the only one in this catch).
nice move, bunch of greedy fucktards...
many thanks for the support, to anyone who's answered on here.
for the ones interested in this, working on a new thread opening soon. just let me the time to copy and paste everything...
thanks for reading.
if i want my photo to be public again, i have to pay a ransom of 400usd per year for a service which once was free. (not the only one in this catch).
nice move, bunch of greedy fucktards...
many thanks for the support, to anyone who's answered on here
.for the ones interested in this, working on a new thread opening soon. just let me the time to copy and paste everything...
thanks for reading.


Thread
Thread Starter
Forum
Replies
Last Post
JoeyBoyden
General Car Related Discussion.
7
07-03-2016 04:54 PM

