Resto of my new 2wd saph, UPDATED 4/9/12
 25-02-2012, 08:23 PM
#1
Too many posts.. I need a life!!

Thread Starter
iTrader: (2)
Join Date: Dec 2006
Location: Warrington
Posts: 556
Likes: 0
Received 0 Likes
on
0 Posts
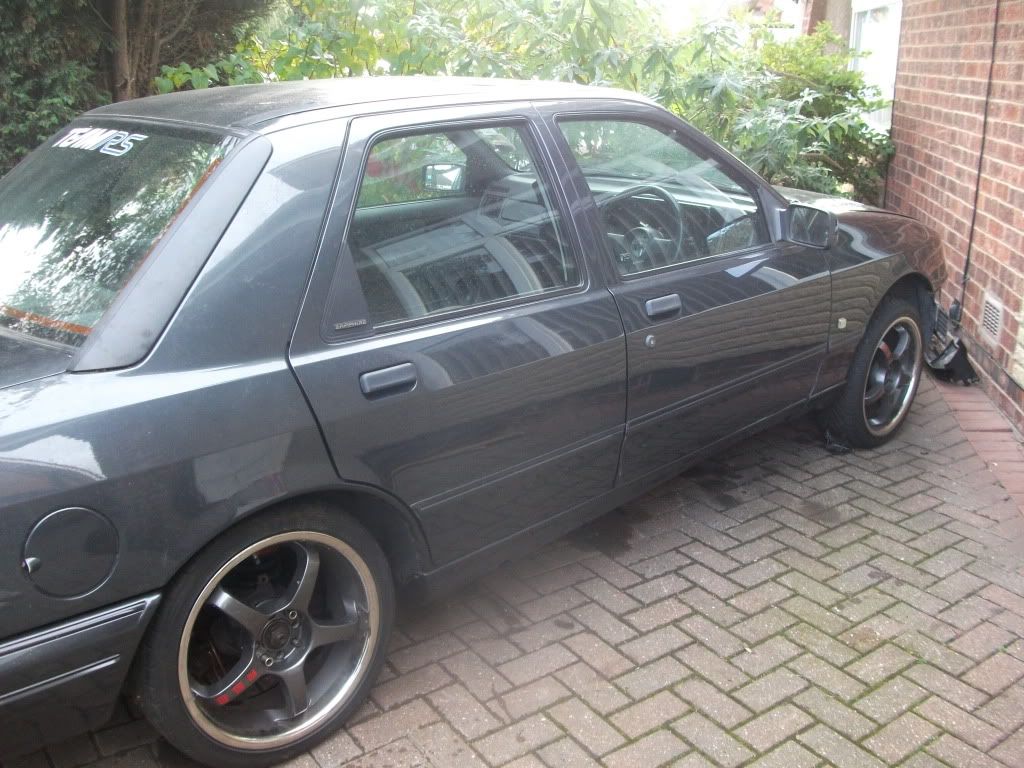
Well after the death of my some what rotten white 2wd saph i found my self a nice clean shell in need of a little T.L.C . I was'nt gonna do a thread but then decided otherwise so theres a few pics missing upto the stage it's at now .
Here goes. I found the shell on ebay from a guy down south who had bought it from his brother, It's been sitting since september last year as he sold the engine to fund another saph .
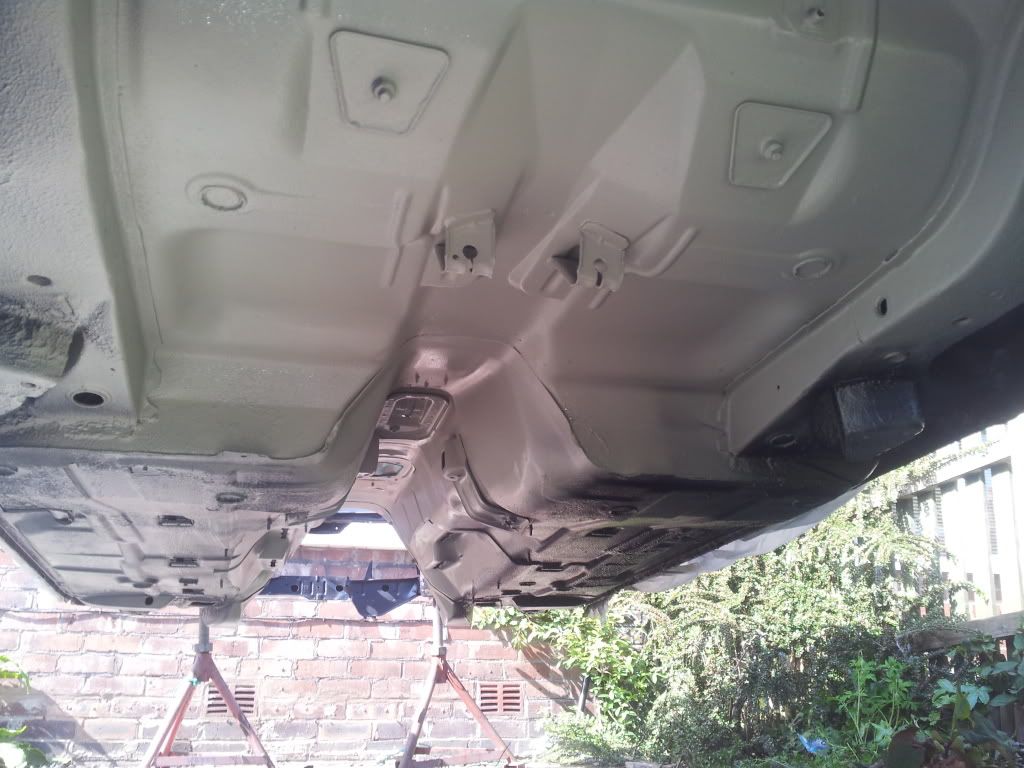
A few pics of it as it was delivered

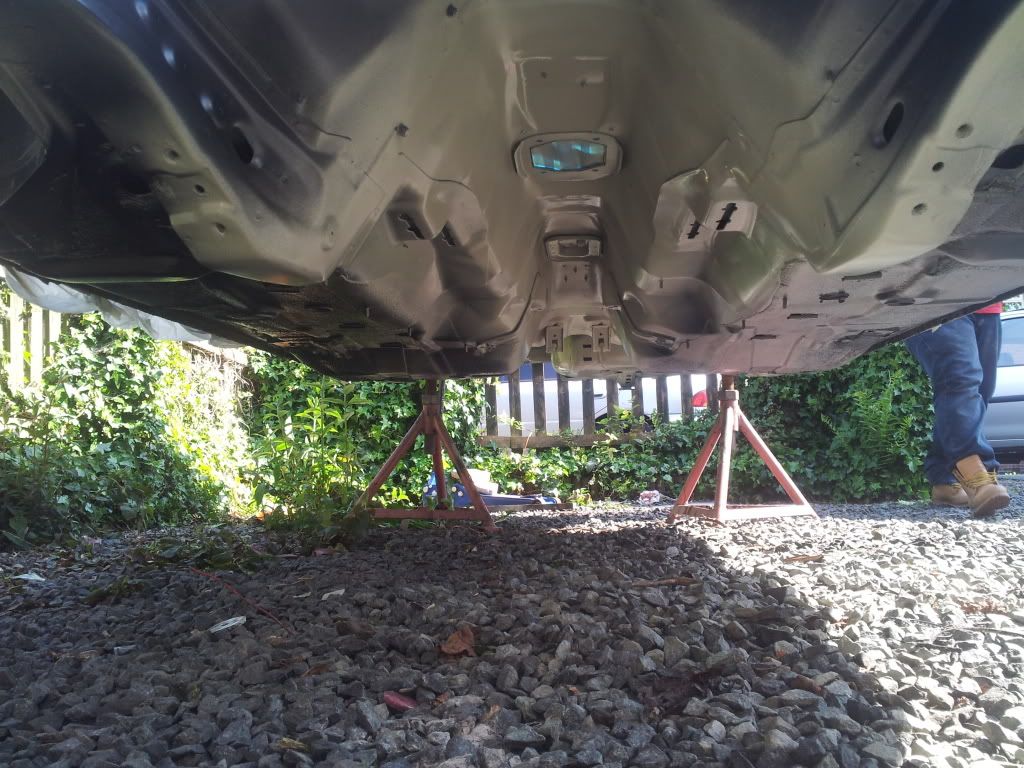
underside

A little grot on the drivers door

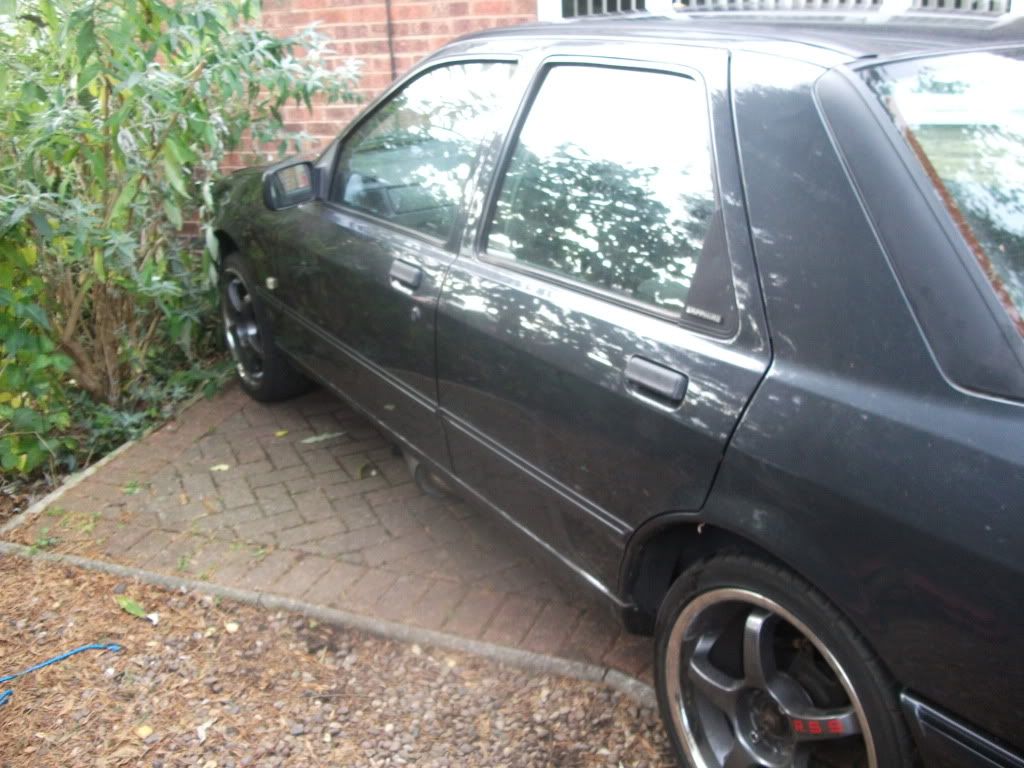
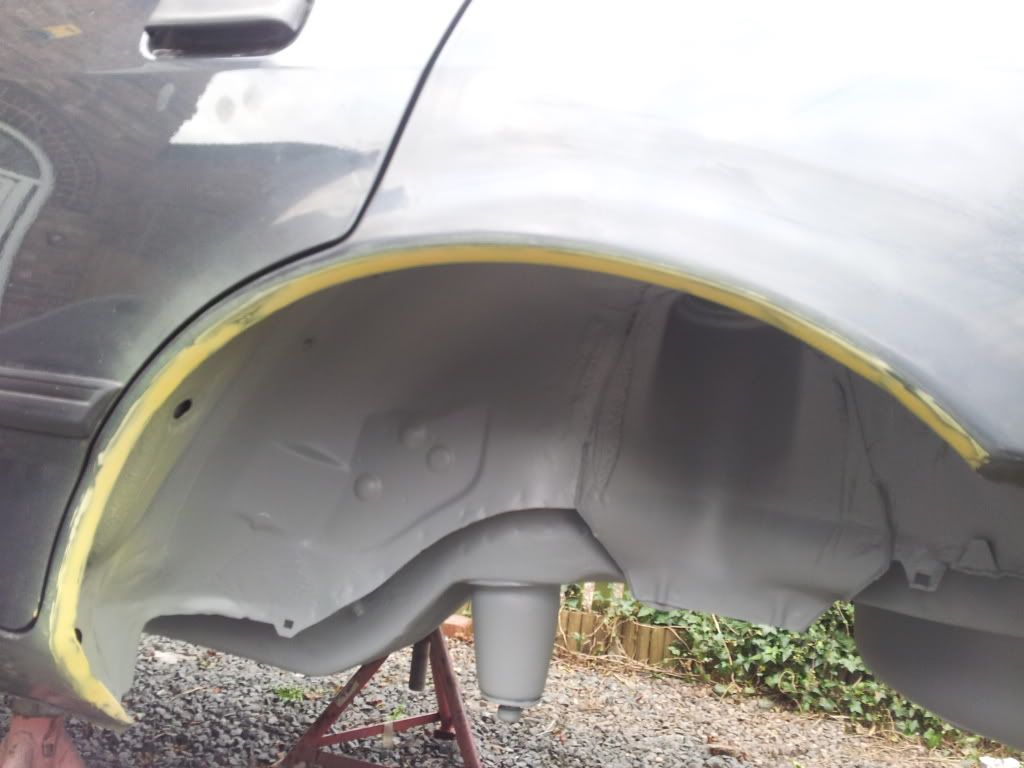
needed a small section or O/S arch , Inners are good though

There's were included with it as well . Not sure of the make as there's only a serial number stamped on the intercooler and on the rad . Answers on a postcard please

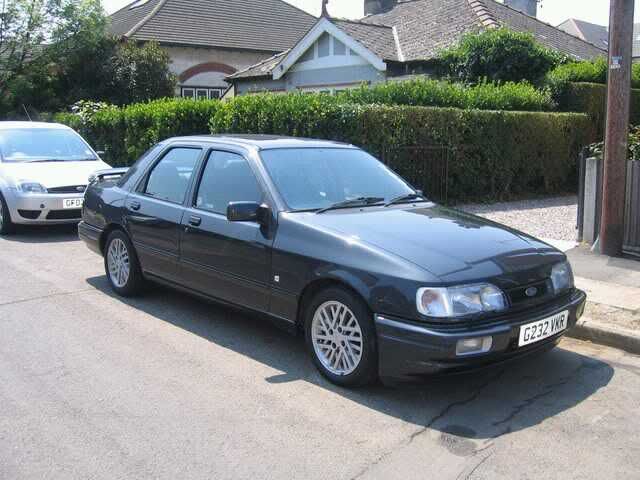
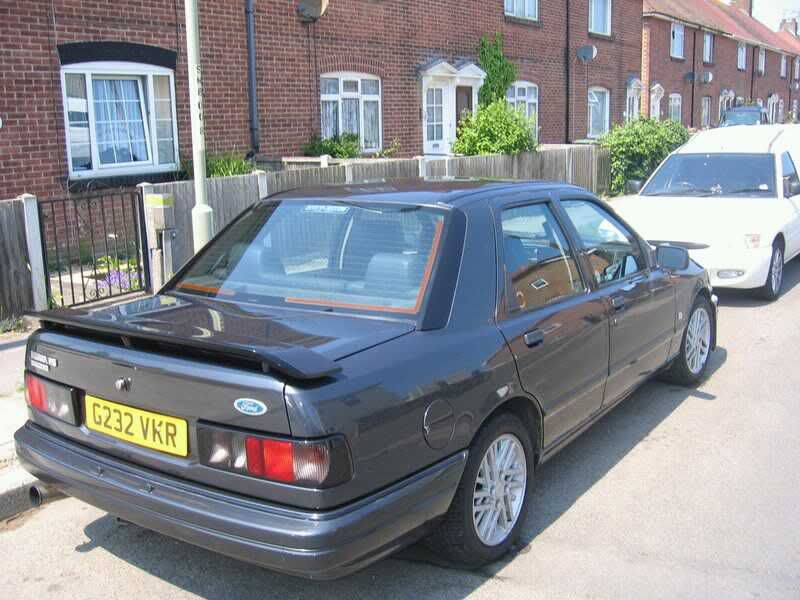
Sadly the history has got a drift somewhere with the last owner but he's still looking so i live in hope . As luck would have it managed to get in contact with 2wdsaph ben who owned the car sometime ago and have passed on a few pic's of her in her hayday looking very nice indeed . Big thanks Ben
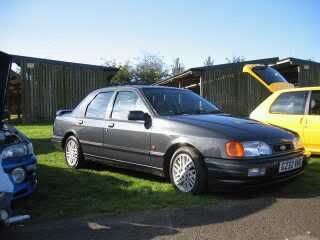
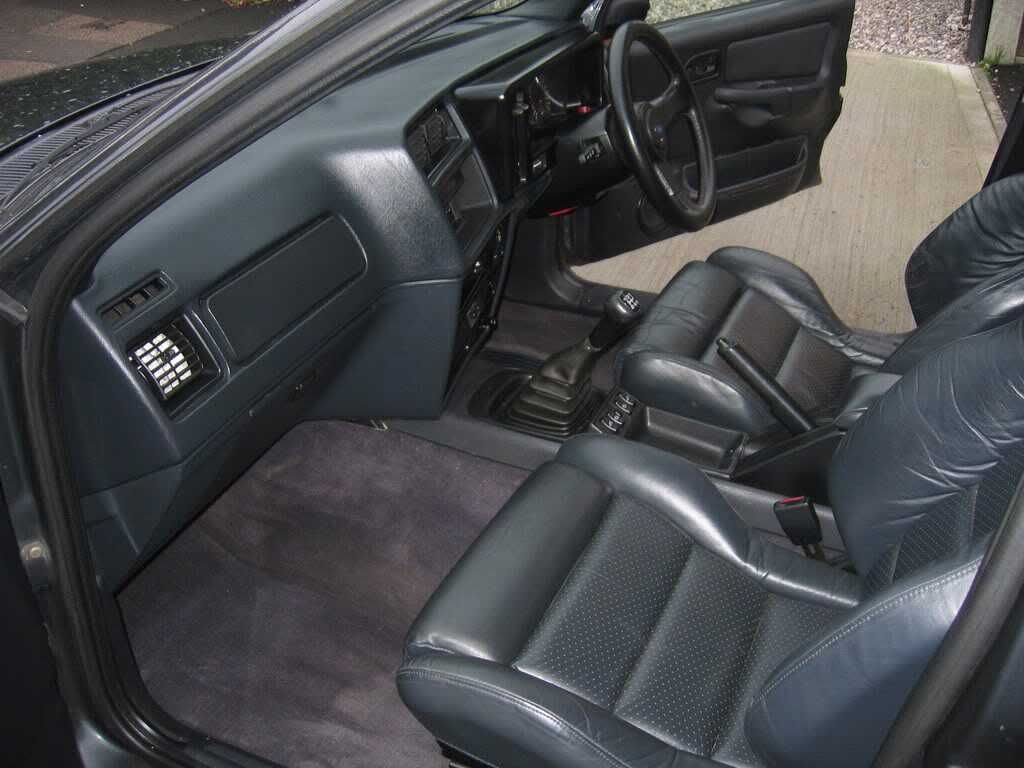
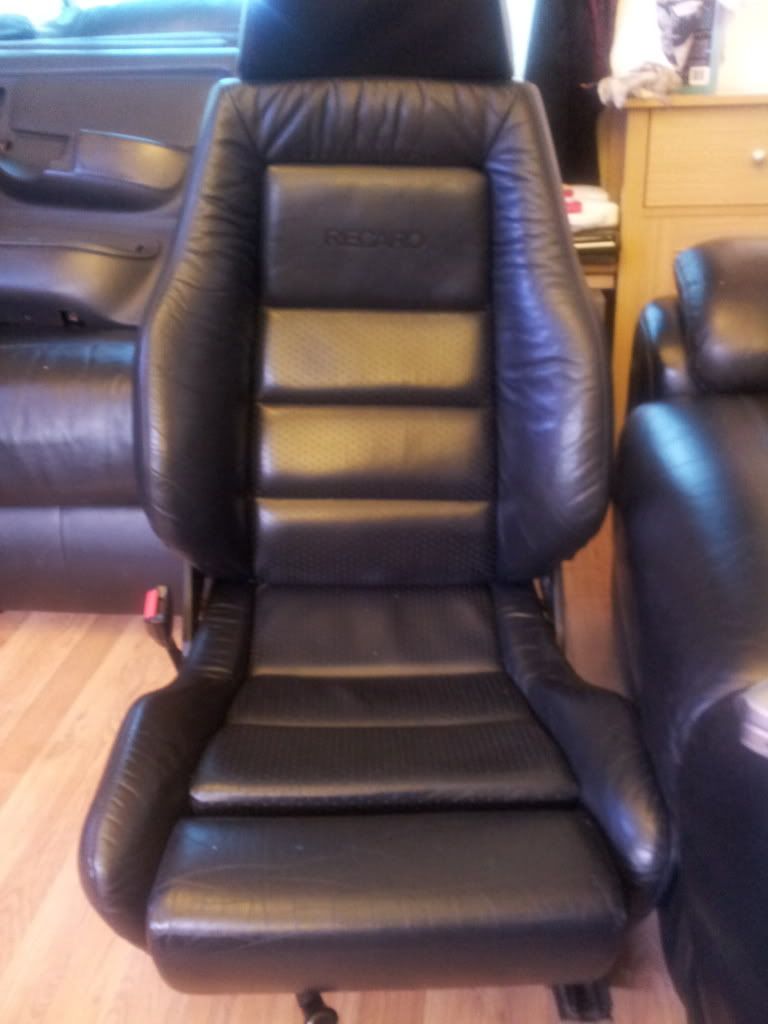
Sadly the leather is no longer with the car but I'll be on the look out for one when she's in build stage
Here goes. I found the shell on ebay from a guy down south who had bought it from his brother, It's been sitting since september last year as he sold the engine to fund another saph .
A few pics of it as it was delivered
underside
A little grot on the drivers door
needed a small section or O/S arch , Inners are good though
There's were included with it as well . Not sure of the make as there's only a serial number stamped on the intercooler and on the rad . Answers on a postcard please
Sadly the history has got a drift somewhere with the last owner but he's still looking so i live in hope . As luck would have it managed to get in contact with 2wdsaph ben who owned the car sometime ago and have passed on a few pic's of her in her hayday looking very nice indeed . Big thanks Ben
Sadly the leather is no longer with the car but I'll be on the look out for one when she's in build stage
Last edited by saph_Al; 04-09-2012 at 07:25 PM.
 25-02-2012, 08:35 PM
#2
Too many posts.. I need a life!!
Thread Starter
iTrader: (2)
Join Date: Dec 2006
Location: Warrington
Posts: 556
Likes: 0
Received 0 Likes
on
0 Posts
Right there a little instant update as i've already started rebuilding bit's and bob's for it .
Fuel pump and Cradle rebuilt


Front calipers rebuilt and repainted

Front hubs rebuilt with new bearings waiting to be drilled for the GRP 4 stud and nut kit

Prop , stripped and painted this afternoon

Thats it as far as pictures for tonight as it's a little dark to see .
However the new arch is in along with a small section on sill as it was looking a little crusty . I'll update tomorrow with some more pic's
Fuel pump and Cradle rebuilt
Front calipers rebuilt and repainted
Front hubs rebuilt with new bearings waiting to be drilled for the GRP 4 stud and nut kit
Prop , stripped and painted this afternoon
Thats it as far as pictures for tonight as it's a little dark to see .
However the new arch is in along with a small section on sill as it was looking a little crusty . I'll update tomorrow with some more pic's
Last edited by saph_Al; 05-07-2012 at 08:32 PM.
26-02-2012, 05:05 PM
#5
Too many posts.. I need a life!!

Looking forward to see how she turns out. looks a right dog when you got hold of her al. Hopefully bump into you and the car at a car show somewhere. Be nice to see the car which basically I spent all my wages on for 2 years lol
26-02-2012, 05:36 PM
#6
Too many posts.. I need a life!!
Thread Starter
iTrader: (2)
Join Date: Dec 2006
Location: Warrington
Posts: 556
Likes: 0
Received 0 Likes
on
0 Posts
Yeah she was a little unloved to say the least ben . I've just been painting bits and bobs again today so no more pics as yet . I'm hoping to have it finished by mid summer ish so hopefully make the back end of show season .

Trending Topics
20-03-2012, 06:47 PM
#8
Too many posts.. I need a life!!
Thread Starter
iTrader: (2)
Join Date: Dec 2006
Location: Warrington
Posts: 556
Likes: 0
Received 0 Likes
on
0 Posts
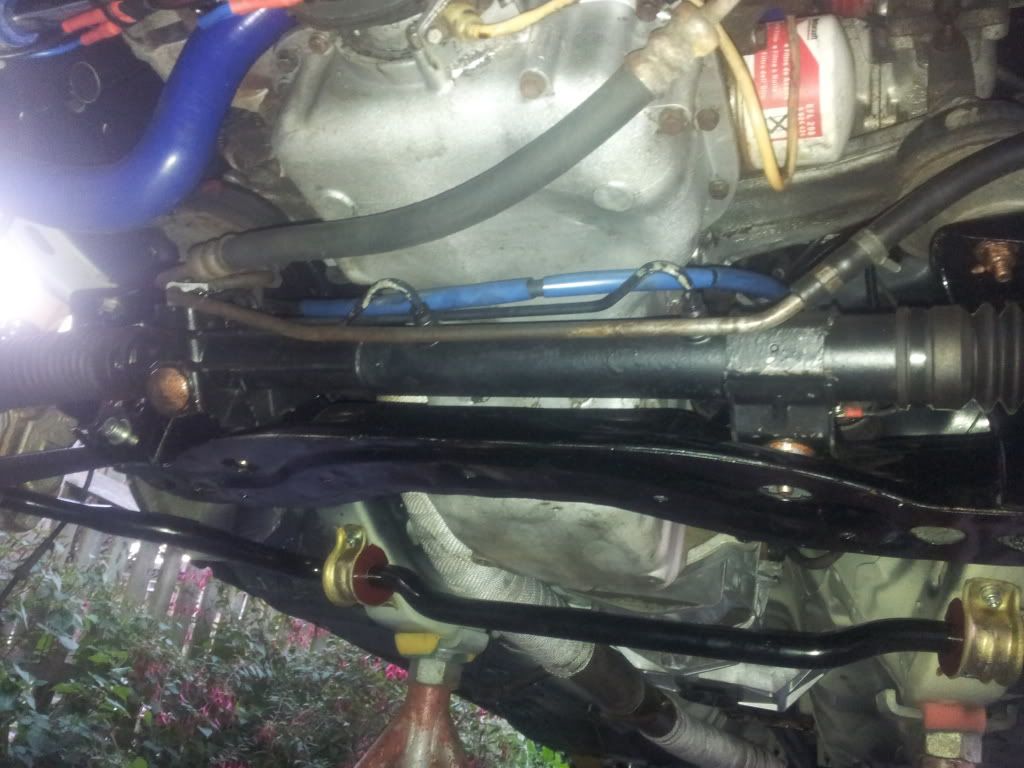
Right it's been a couple of week's since ive had a chance to do much on the saph due to work and the weather ect. So with it being dry and not o chilly over the past couple of days ive finally got under it again.
Started by cleaning a painting the gearbox. The disks only had 1k or so on them and don't need replacing so a splash of silver gave them a new lease of life


Next i tackled that little patch of grot on the arch , Also noticed the sill was a little ropey above the jack point so as i had a saw in my hand and i was cutting the arch anyway i though it was worth hacking out ans replacing it. End result is this .


The rest of the arches were nice and sturdy with only a ver small amount of bubbling here and there so all that was needed was a going over with a knot wheel to rip out any shite that may cause me issues later on and sealing with panel bond and a wipe of stopper to finish off
 .
.
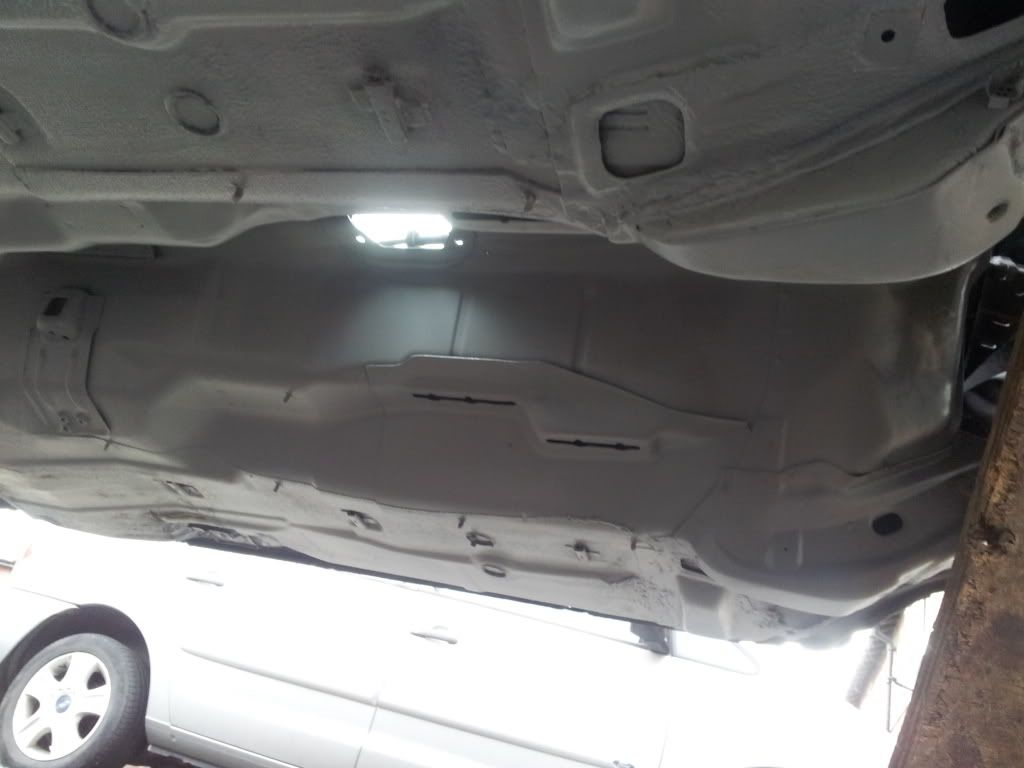
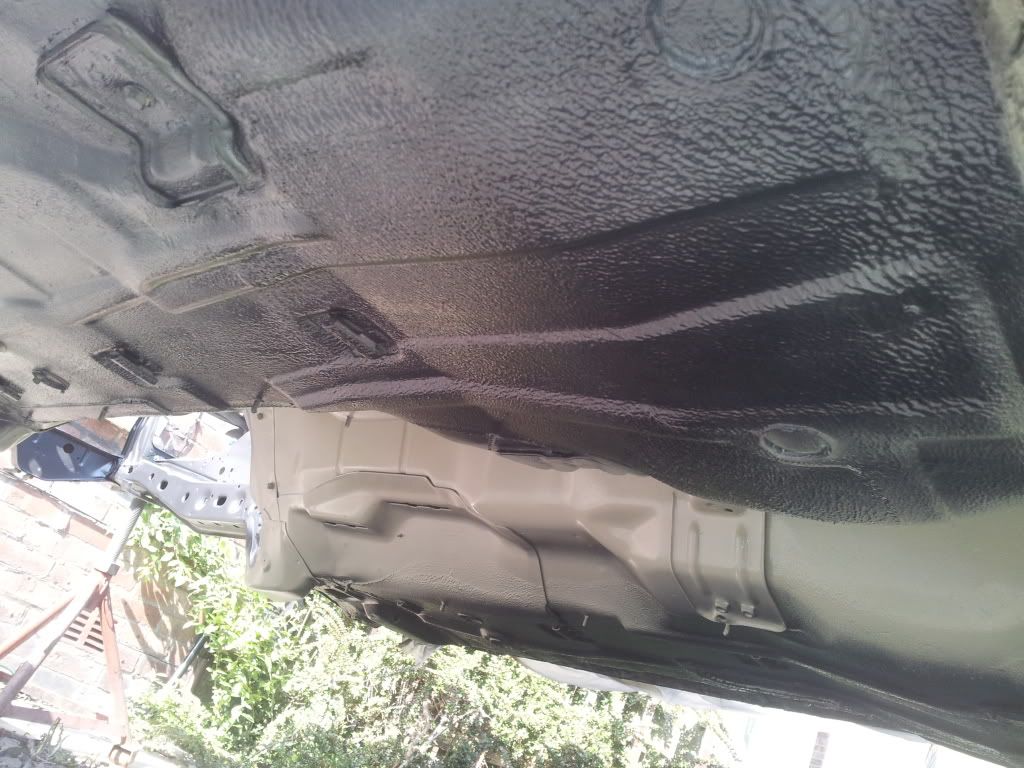
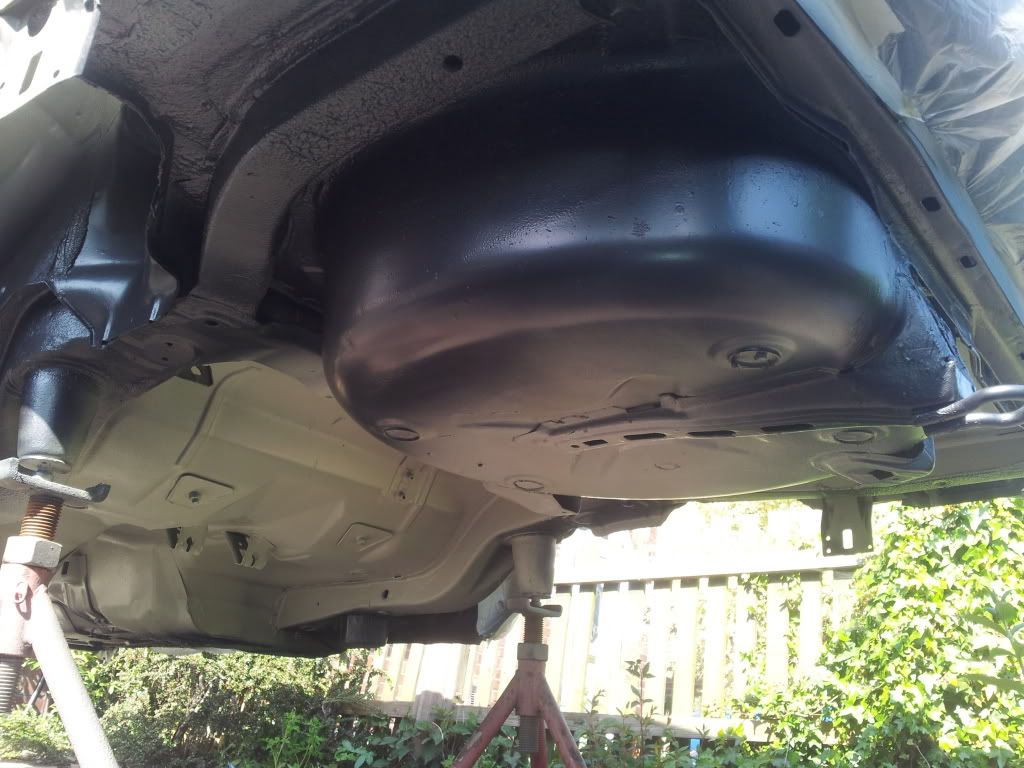
The underside like the rest of the car is solid with a few bits and bobs that need a little attention . I thought when i bough the car it had been stonechipped underneath but apon trying to remove a small secion of it i very quickly found out that it was more like a mix of shultz and waxoil and a total fucker to get off . So 12 hrs with a scotchbright and thinners and it was 99% off. Not to many nasty supprises under therejust some dodgy sealing around a previous repair the N/S outer seat mount. Not to fear my handy blow lamp sorted that out quickly . so a coat of primer later and the underside now looks like this
As with a lot of saph's little secions next to jack point's had been squashed so needles to say there were straghtened ,skimmed and primed and now both look like this . I know there a hole missing but they were a little to fucked to put the hole back in and without making it look a dog's dick

Thats about all i got done but hoping to do a little more tomorrow and next week get the dove grey on the underside .
Oh and one final pic even though it's not on the road yet it needed its group sticked on

Cheers Al
Started by cleaning a painting the gearbox. The disks only had 1k or so on them and don't need replacing so a splash of silver gave them a new lease of life
Next i tackled that little patch of grot on the arch , Also noticed the sill was a little ropey above the jack point so as i had a saw in my hand and i was cutting the arch anyway i though it was worth hacking out ans replacing it
The rest of the arches were nice and sturdy with only a ver small amount of bubbling here and there so all that was needed was a going over with a knot wheel to rip out any shite that may cause me issues later on and sealing with panel bond and a wipe of stopper to finish off
.The underside like the rest of the car is solid with a few bits and bobs that need a little attention . I thought when i bough the car it had been stonechipped underneath but apon trying to remove a small secion of it i very quickly found out that it was more like a mix of shultz and waxoil and a total fucker to get off
As with a lot of saph's little secions next to jack point's had been squashed so needles to say there were straghtened ,skimmed and primed and now both look like this
Thats about all i got done but hoping to do a little more tomorrow and next week get the dove grey on the underside .
Oh and one final pic even though it's not on the road yet it needed its group sticked on
Cheers Al
Last edited by saph_Al; 20-03-2012 at 06:52 PM. Reason: update
23-05-2012, 08:20 PM
#10
Too many posts.. I need a life!!
Thread Starter
iTrader: (2)
Join Date: Dec 2006
Location: Warrington
Posts: 556
Likes: 0
Received 0 Likes
on
0 Posts
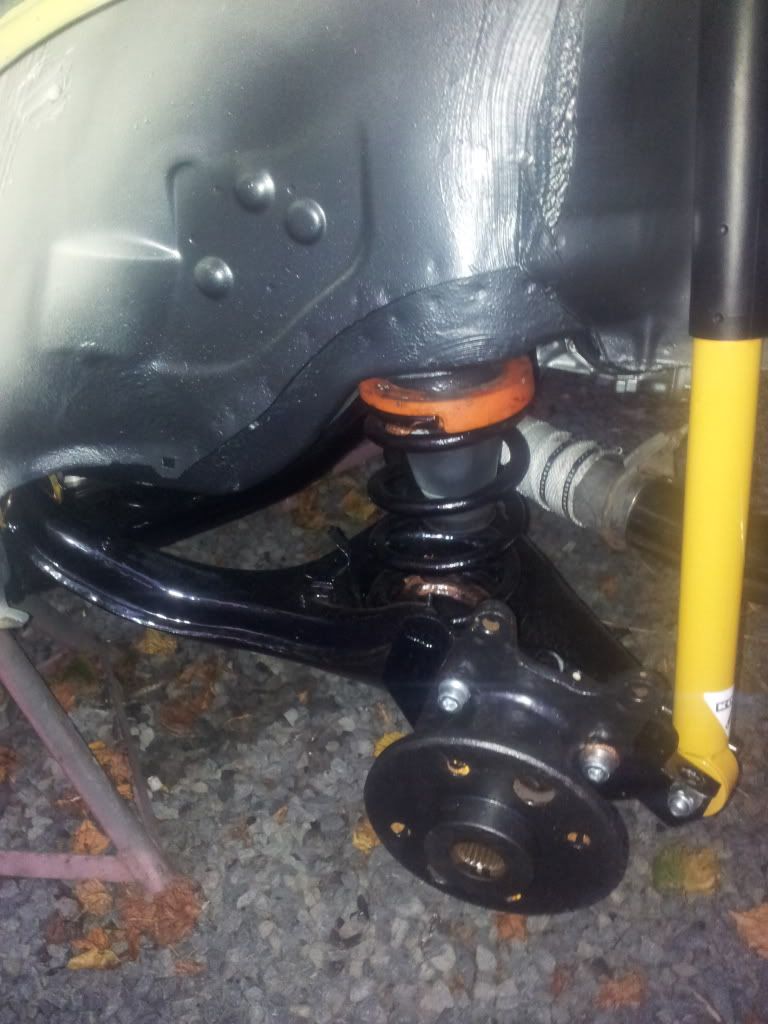
Bit of an update for ya . Firstly wasn't happy with the Painted Calipers so stripped them,Dipped them and zinc plated them . 
Along with the front ARB Mount's

Also sourced a new trim for it which it in really good nick ,Drivers and rear all look like this . No pic's of the door card's but there un shrunk and worth the extra cash
Spent a couple of day's painting the underside and gettin the overspray just right. Three coat's of dove grey and two coats or flint base coat and it now look's a little like this .
Im really pleased with it so far .
Engine bay had a freshen up too 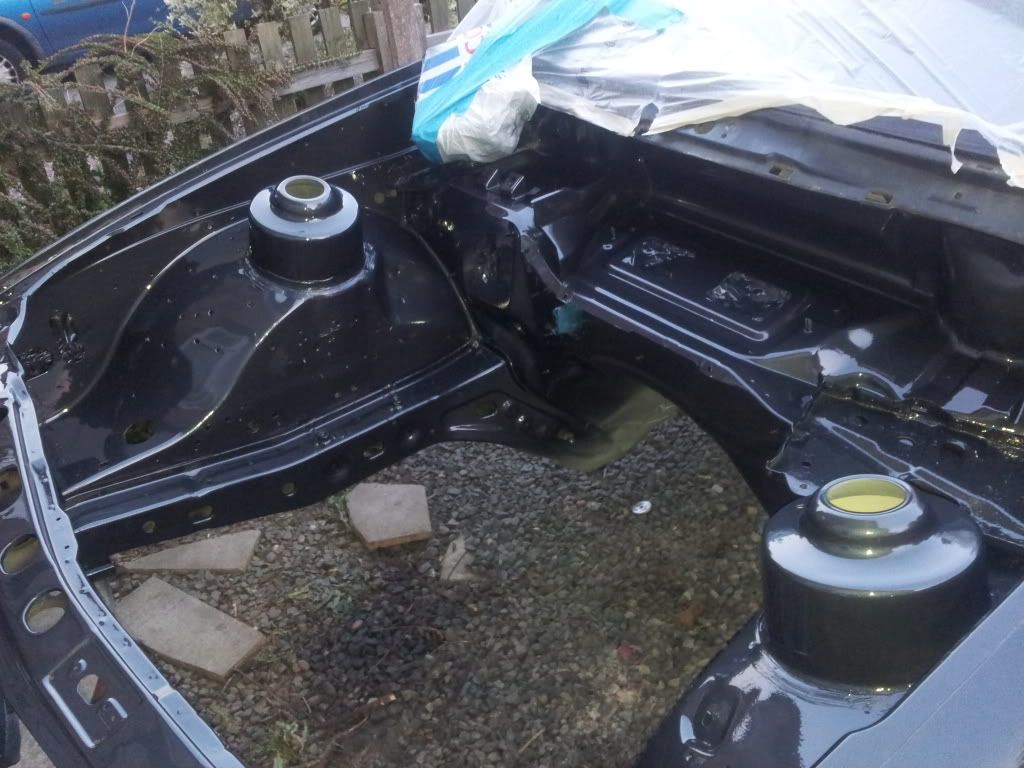
Made a start on putting A few bit's back into the bay but nothin worth photographing.
Along with the front ARB Mount's
Also sourced a new trim for it which it in really good nick ,Drivers and rear all look like this . No pic's of the door card's but there un shrunk and worth the extra cash
Spent a couple of day's painting the underside and gettin the overspray just right. Three coat's of dove grey and two coats or flint base coat and it now look's a little like this .
Im really pleased with it so far .
Engine bay had a freshen up too
Made a start on putting A few bit's back into the bay but nothin worth photographing.


 25-05-2012, 08:44 AM
#21
Advanced PassionFord User
Some kits.......................................
http://www.ebay.co.uk/itm/Zinc-plating-Electroplating-car-and-bike-plating-kit-/261025840477?pt=LH_DefaultDomain_3&hash=item3cc65a 3d5d
http://www.ebay.co.uk/itm/Ultimate-Zinc-plating-Kit-Electroplating-car-bike-/251066033740?pt=LH_DefaultDomain_3&hash=item3a74b3 a64c
http://www.frost.co.uk/automotive-el...ting-kits.html


Last edited by James_RScos; 25-05-2012 at 08:46 AM.
26-05-2012, 06:49 PM
#23
Too many posts.. I need a life!!
Thread Starter
iTrader: (2)
Join Date: Dec 2006
Location: Warrington
Posts: 556
Likes: 0
Received 0 Likes
on
0 Posts
First off once again thatnks for the great comments .
To add to what James said about the plating kits I've got one from Gaterosplatings.co.uk and it's great i also made my self an Electrolytic cleaning tank the strip the rust and years of shit from everythin . I currently have my two rear springs in removing the flakey powder coating . Anyone know of a flexible covering that i can use on my springs so they dont do the same thing ?
To add to what James said about the plating kits I've got one from Gaterosplatings.co.uk and it's great i also made my self an Electrolytic cleaning tank the strip the rust and years of shit from everythin . I currently have my two rear springs in removing the flakey powder coating
 09-06-2012, 07:03 PM
#27
Too many posts.. I need a life!!
Thread Starter
iTrader: (2)
Join Date: Dec 2006
Location: Warrington
Posts: 556
Likes: 0
Received 0 Likes
on
0 Posts
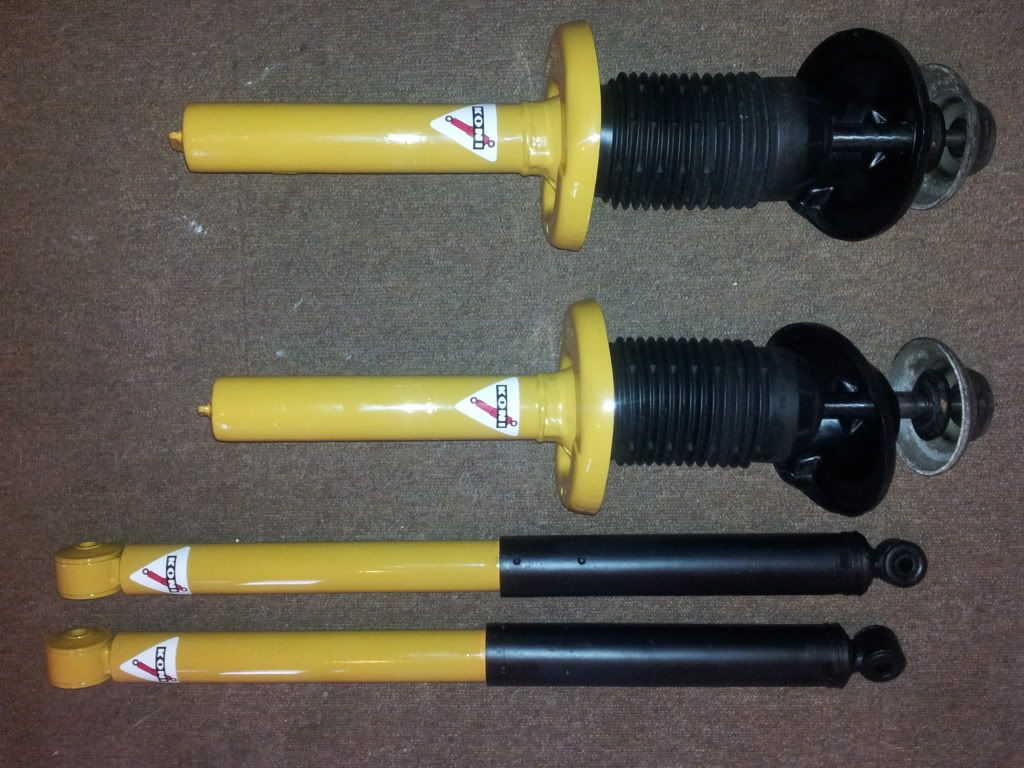
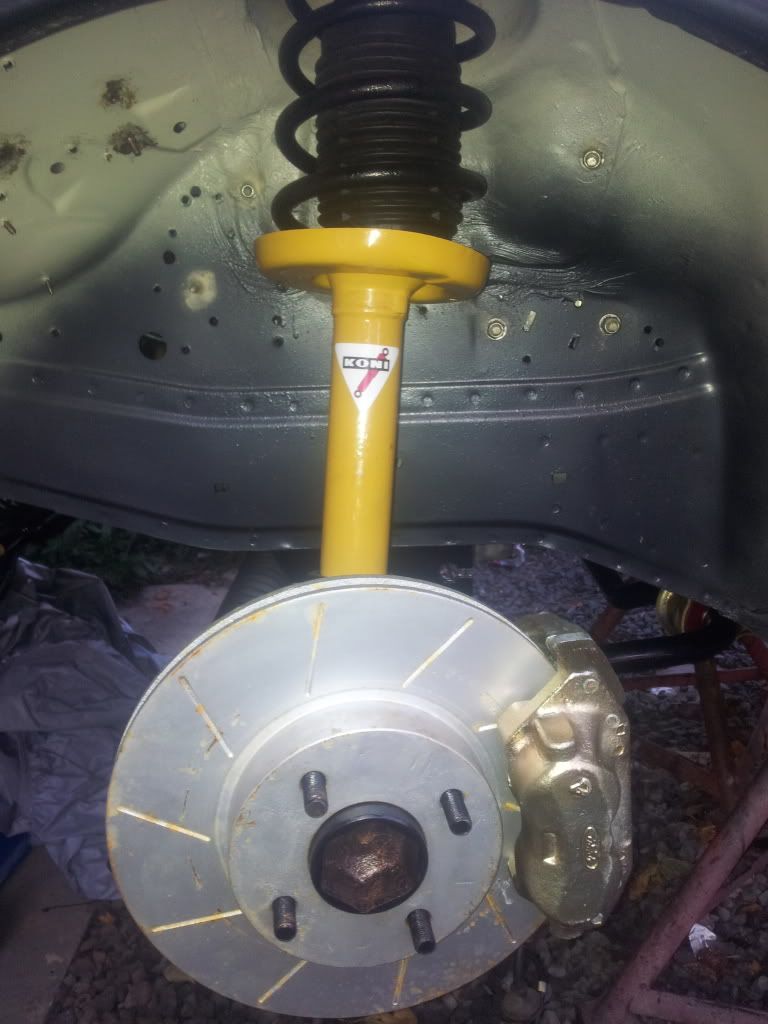
Little update as ive been working a lot and when i havent the weather's been shite . So repainted the koni's . However i may irder so more sticker's and repaint them as i don't think there yellow enough .
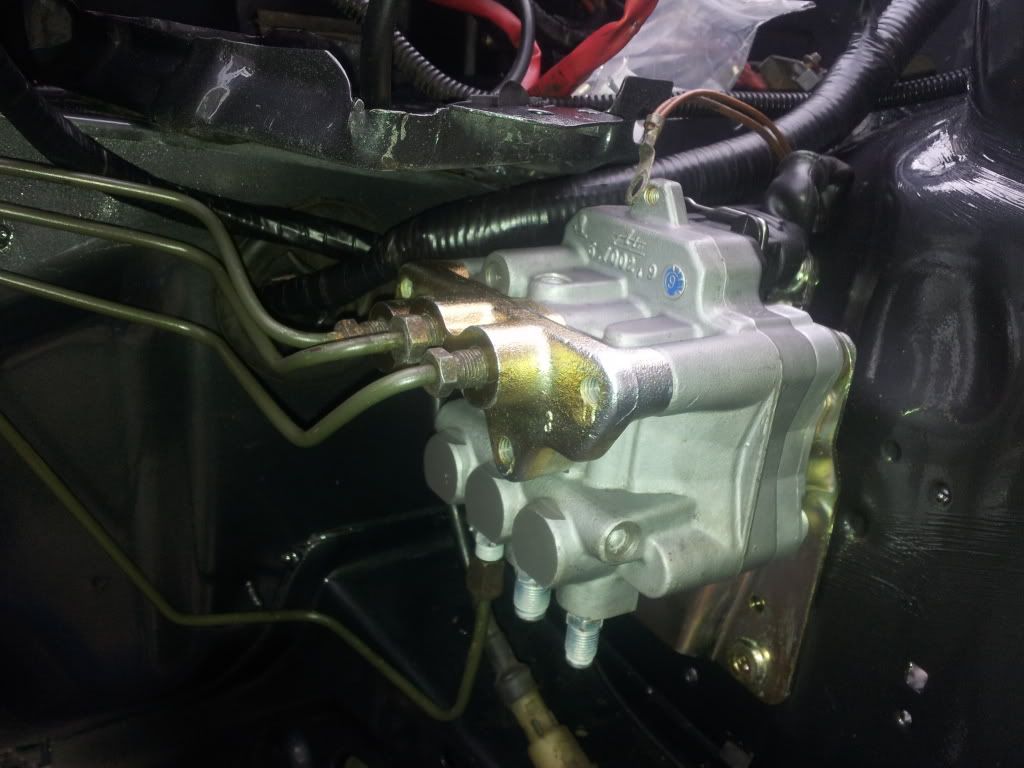
Also spent so time rebuilding and replating my ABS block as the output feed block thingy was shitty and a little rusty . so here it is in all it's yellow glory
started to put some bit's and bob's back in the bay also spent a few hand cramping hours rewrapping my loom's Worth the effort though .

I have a broken wire that i havent got a clue where go to . It's wrapped along with the coil plug on the body loom if anyone can shed any light on it ??

Thats about as far as i've got . hopefully ill get the donkey cleaned and back in soon .
Also spent so time rebuilding and replating my ABS block as the output feed block thingy was shitty and a little rusty . so here it is in all it's yellow glory
started to put some bit's and bob's back in the bay also spent a few hand cramping hours rewrapping my loom's Worth the effort though .
I have a broken wire that i havent got a clue where go to . It's wrapped along with the coil plug on the body loom if anyone can shed any light on it ??
Thats about as far as i've got . hopefully ill get the donkey cleaned and back in soon .
Last edited by saph_Al; 09-06-2012 at 07:05 PM.
05-07-2012, 08:31 PM
#31
Too many posts.. I need a life!!
Thread Starter
iTrader: (2)
Join Date: Dec 2006
Location: Warrington
Posts: 556
Likes: 0
Received 0 Likes
on
0 Posts
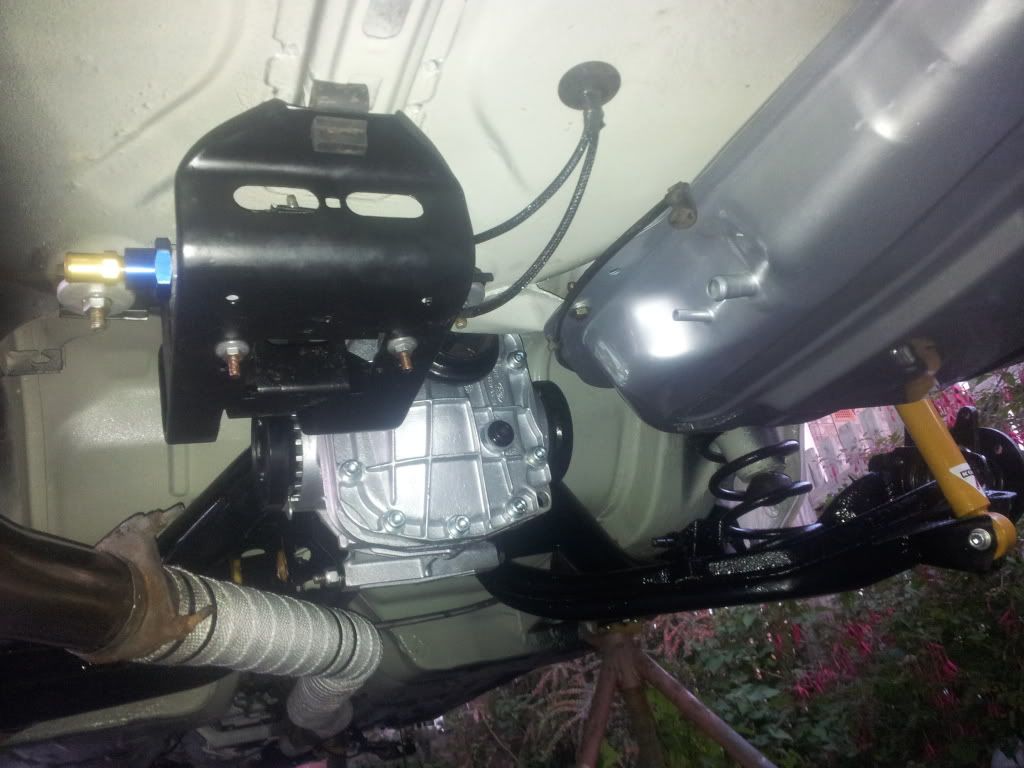
Another little update for you , First off the engine is back in

Gearbox is also back in but needs a little blow in as i scratched it putting it in .
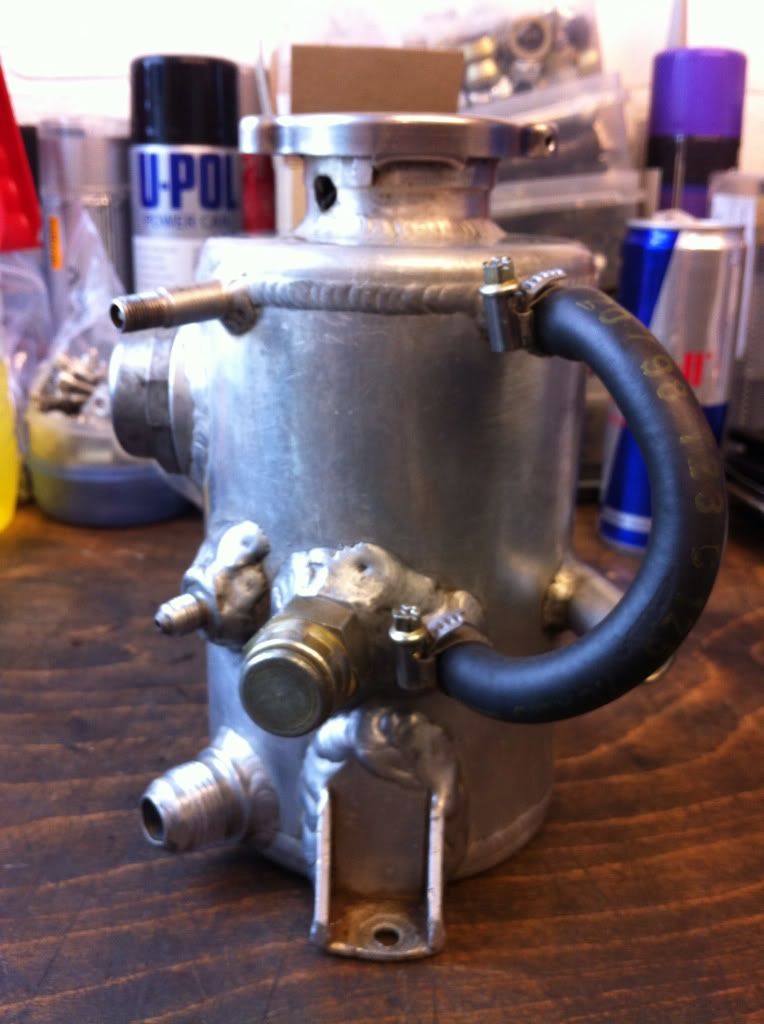
Also bought myself a Grp A header tank from M K (Marc) which looked a little like this
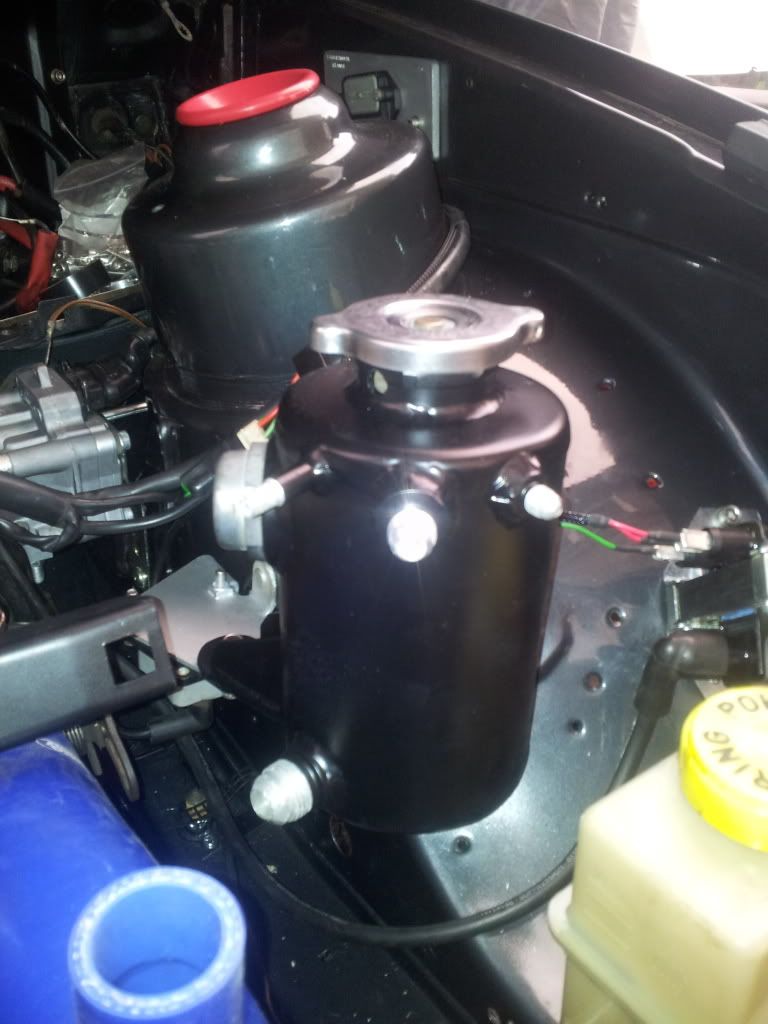
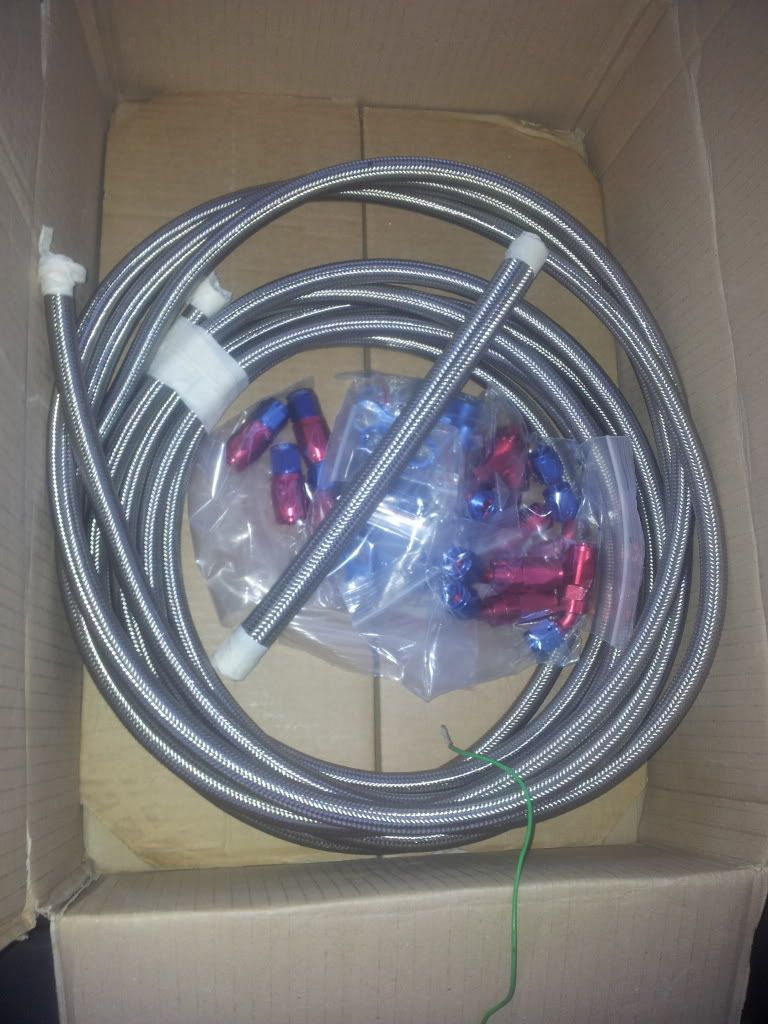
I didnt need all of the AN fittings and wanted some moving and adding . So i ordered some bits from Torques and out with the trusty Tig .Also knocked up a couple of brackets for it . and now it looks a little like this

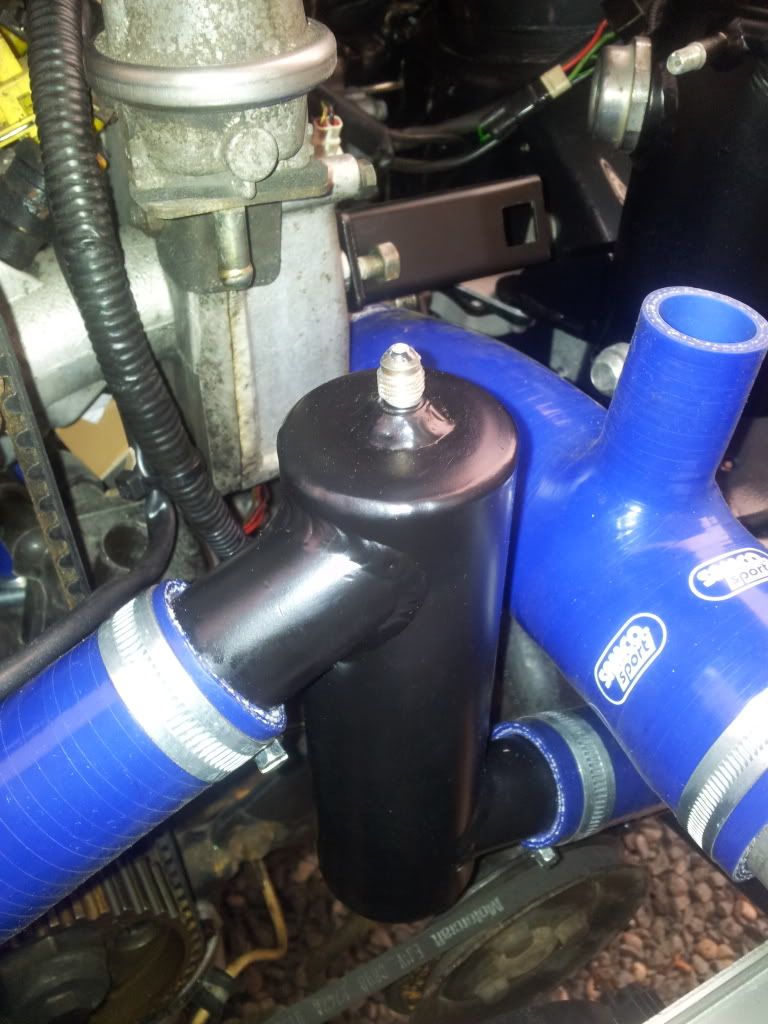
Also changed my Swirl pot to AN-3
Slim line fans fitted . Just need to knock up a beefy loom to run them on as we all know the aging ford one juat an't up to the job

Gearbox is also back in but needs a little blow in as i scratched it putting it in .
Also bought myself a Grp A header tank from M K (Marc) which looked a little like this
I didnt need all of the AN fittings and wanted some moving and adding . So i ordered some bits from Torques and out with the trusty Tig .Also knocked up a couple of brackets for it . and now it looks a little like this
Also changed my Swirl pot to AN-3
Slim line fans fitted . Just need to knock up a beefy loom to run them on as we all know the aging ford one juat an't up to the job
02-09-2012, 08:26 PM
#33
Too many posts.. I need a life!!
Thread Starter
iTrader: (2)
Join Date: Dec 2006
Location: Warrington
Posts: 556
Likes: 0
Received 0 Likes
on
0 Posts
I've got a shi load done ,all the runnin gear is back inalong with the interior and 4spoke wheel, i've just not had a chance to take piccy's . I'll get some taken tomorrow and upadate it
04-09-2012, 07:23 PM
#36
Too many posts.. I need a life!!
Thread Starter
iTrader: (2)
Join Date: Dec 2006
Location: Warrington
Posts: 556
Likes: 0
Received 0 Likes
on
0 Posts
Cheers for your comments chaps , update later than planned but been hard at it doing all the little bits and bobs . Weather hasnt been great when i've been off, Anywho here goes' Firstly all the running gear had 3 coats of highbuild primer flatted and 3 coats of 2k gloss black . Sadly a shed load of pic's from my camera have fucked off on me so you'll just have to take my word for it.
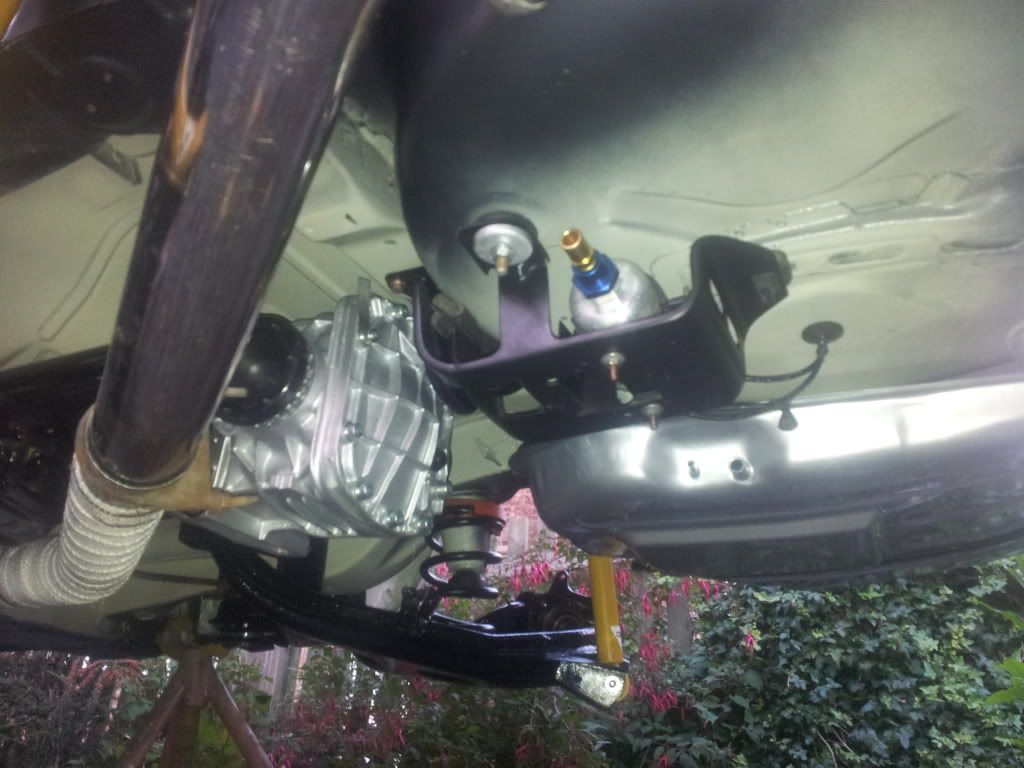
Little piccy of the front xmember . Not done much with the donkey as yet as it'll be coming back out over winter for a freshen up .
rear arms and springs look a little like this now a long with my spanking shiney painted dampers
Wasnt happy with my last attempt at the front hubs so stripped them back and started again . however there hiding behind the disk and caliper . I tknow it looks nice and shiney thats all that matters , (so my mummy tells me ).
Also spent many long and depressing hours cleaning the burn on shite from the many crevases (spelling) in the rear diff. My good friend mr Daniels kept me company whilst this task was being done . You can see her nestled in the cradle back where it shall stay till it shit's it self and is replaced .
Also started to clean up the tank which wasnt that bad due to only being about 5 years old . However lazyness got the better of me and i ordered a new one.This too was primed and painted with silver base and 3 coats of laquer . Again this is one of those piccys that have packed up and fucked off but u know what a ford tank looks like . Now imagine it without the rust 
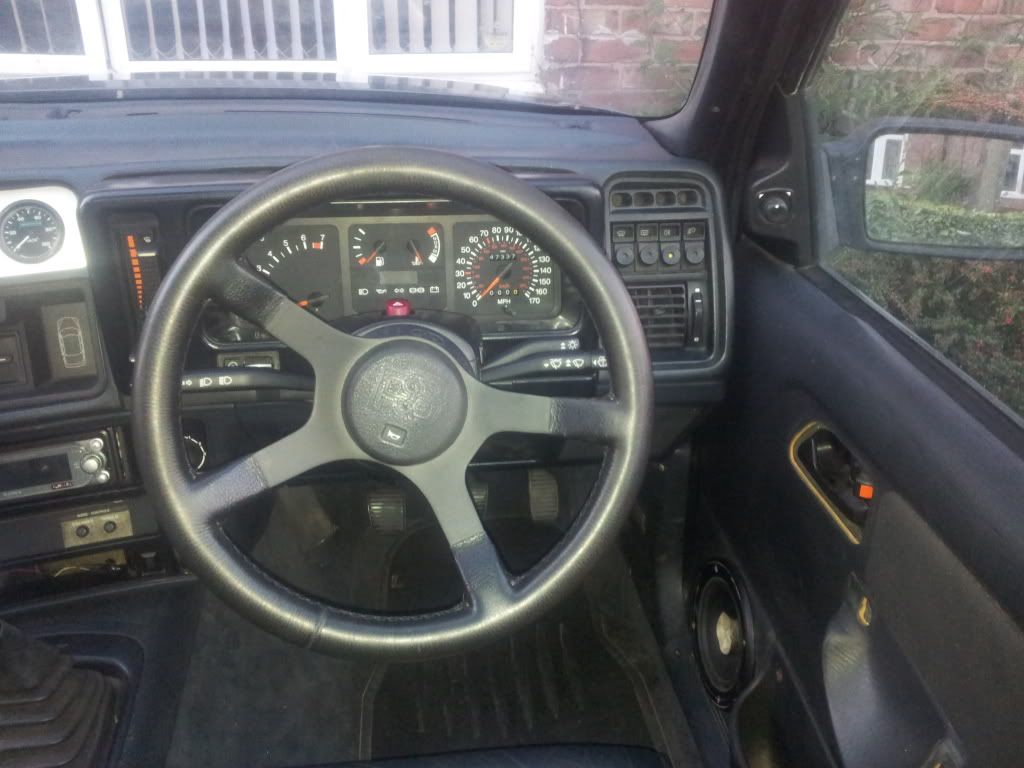
So as it was a little cold and somewhat moist i decided to tackle the interior that i'd picked up . also found a nice straight dash . Sadly it's a later spec one but i don't mind its far straighter than my old one and less holes .
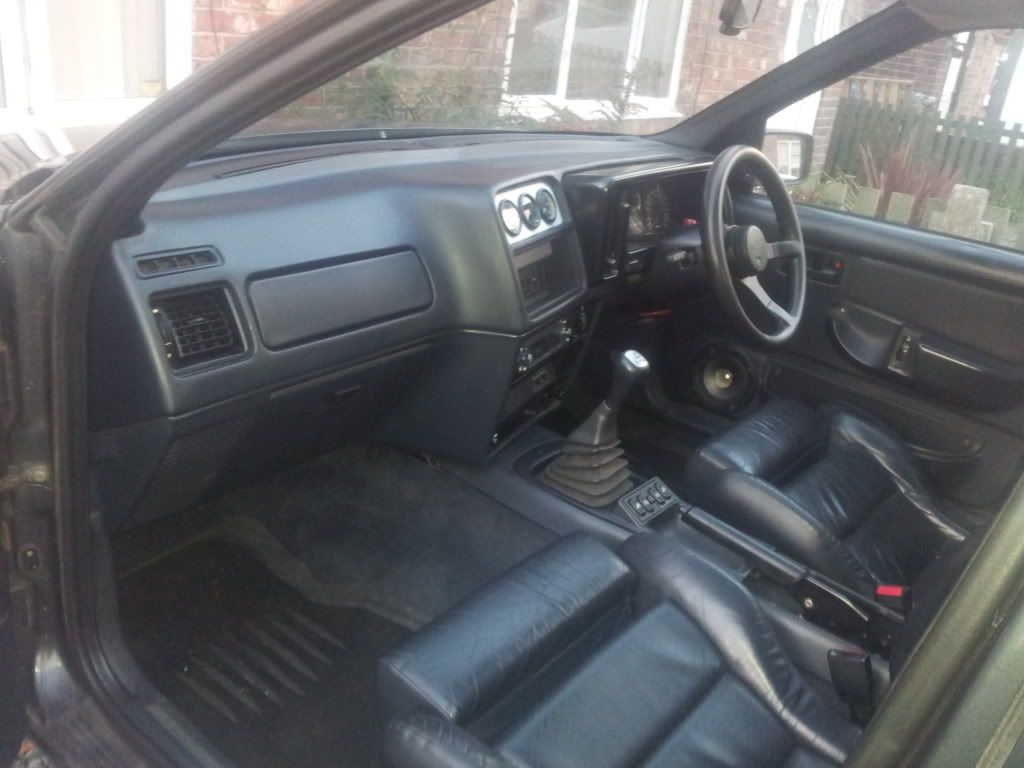
Also picked this sexy clean wheel up from a mate of mine .
Wanted a 3 gauge holder for the centre vent but bein a really tight twat i didnt want to buy one so a scout round at work came up with a peice of 2
mm ali that was ripe for snaffling . A little wizzing,grinding,buzzing and filing later i came up with this.
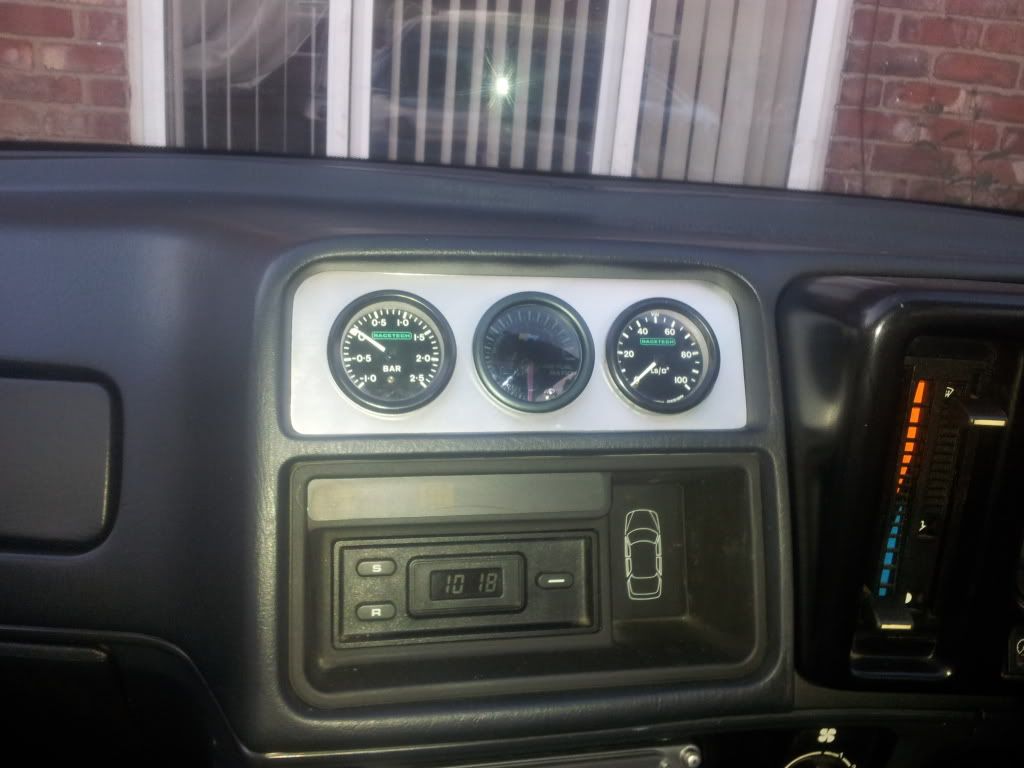
Still not sure about the brushed raw look but it's somthin a little different.
(please excuse that dog shit narrow band guage in the middle it's just filling a space for a while.
Also big thanks to Wheely-Boy (Stephan ) for supplying my next challenge this
little box of tricks
Tis all for now
Little piccy of the front xmember . Not done much with the donkey as yet as it'll be coming back out over winter for a freshen up .
rear arms and springs look a little like this now a long with my spanking shiney painted dampers
Wasnt happy with my last attempt at the front hubs so stripped them back and started again . however there hiding behind the disk and caliper . I tknow it looks nice and shiney thats all that matters , (so my mummy tells me ).
Also spent many long and depressing hours cleaning the burn on shite from the many crevases (spelling) in the rear diff. My good friend mr Daniels kept me company whilst this task was being done . You can see her nestled in the cradle back where it shall stay till it shit's it self and is replaced .
Also started to clean up the tank which wasnt that bad due to only being about 5 years old . However lazyness got the better of me and i ordered a new one
.This too was primed and painted with silver base and 3 coats of laquer . Again this is one of those piccys that have packed up and fucked off but u know what a ford tank looks like . Now imagine it without the rust So as it was a little cold and somewhat moist i decided to tackle the interior that i'd picked up . also found a nice straight dash . Sadly it's a later spec one but i don't mind its far straighter than my old one and less holes .
Also picked this sexy clean wheel up from a mate of mine .
Wanted a 3 gauge holder for the centre vent but bein a really tight twat i didnt want to buy one so a scout round at work came up with a peice of 2
mm ali that was ripe for snaffling . A little wizzing,grinding,buzzing and filing later i came up with this.
Still not sure about the brushed raw look but it's somthin a little different.
(please excuse that dog shit narrow band guage in the middle it's just filling a space for a while.
Also big thanks to Wheely-Boy (Stephan ) for supplying my next challenge this
little box of tricks
Tis all for now
04-09-2012, 10:35 PM
#37
I've found that life I needed.. It's HERE!!
Nice work mate, I wish I could find the enthusiasm to get mine finished.
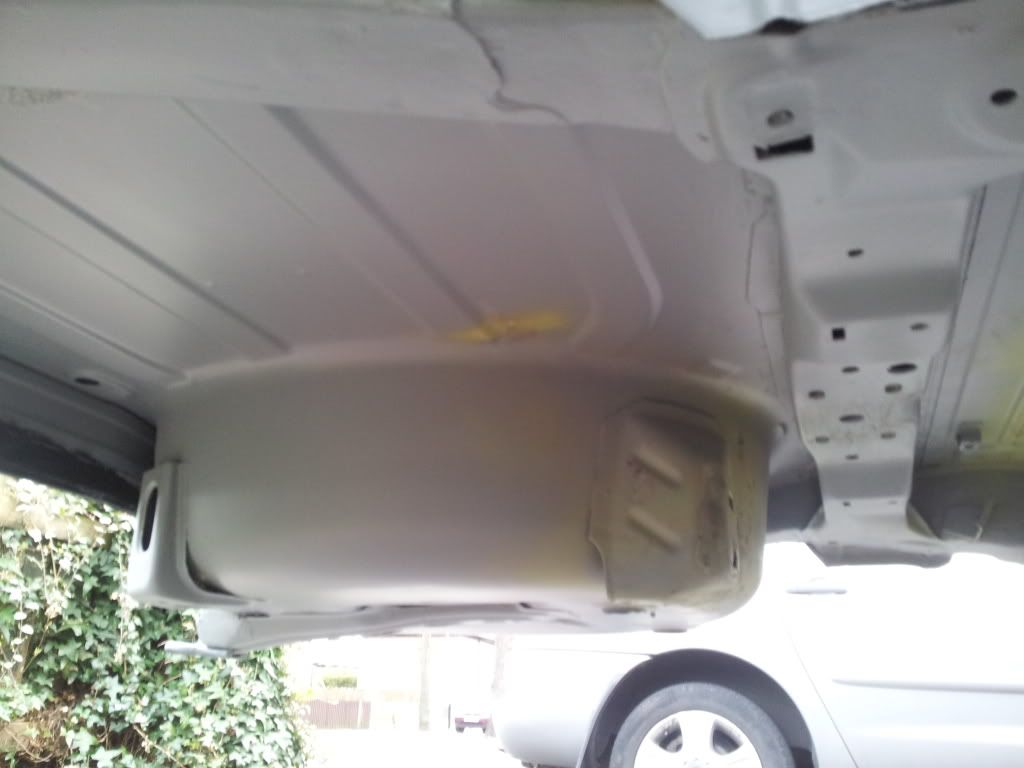
Also need to say with reference to your repaired jack points it might pay to put a hole in the bottom to allow any water to drain out, mine were crushed in as well and the inner foot-well above it was rotten and when I Had the floor cut out while doing the repairs I noticed while it was raining that the sunroof drain pipes drain into the inner sill and also run into the jack points and out the large holes.
I have added the pics to show where I mean, and hopefully someone will confirm this before you go drilling a hole in yours.

This is where I noticed the water running out of mine
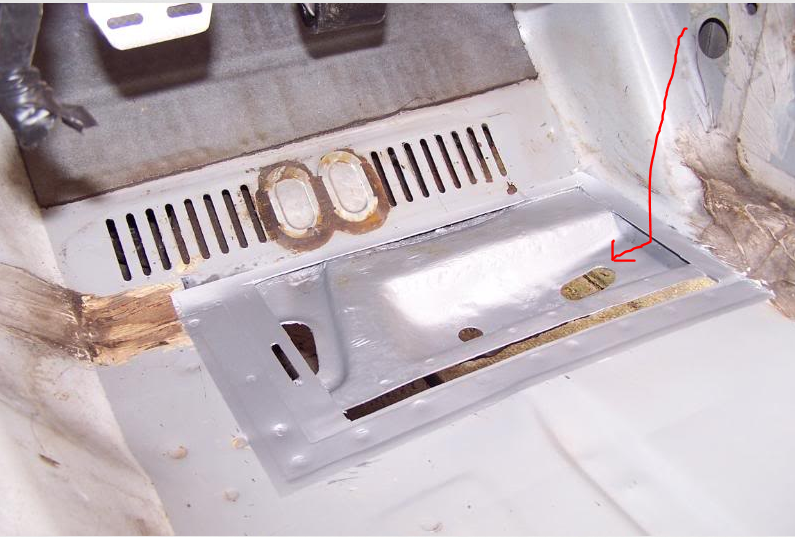
Also need to say with reference to your repaired jack points it might pay to put a hole in the bottom to allow any water to drain out, mine were crushed in as well and the inner foot-well above it was rotten and when I Had the floor cut out while doing the repairs I noticed while it was raining that the sunroof drain pipes drain into the inner sill and also run into the jack points and out the large holes.
I have added the pics to show where I mean, and hopefully someone will confirm this before you go drilling a hole in yours.
This is where I noticed the water running out of mine
05-09-2012, 06:58 AM
#38
PassionFord Post Whore!!
Some fantastic work there mate.
Keep up the great work
Another one saved
Keep up the great work
Another one saved