Ka RS Turbo Track toy
 09-12-2010, 10:42 AM
#1
ST170
Thread Starter
Hello all,
I have been writing a blog for a little while (http://karsturbo.blogspot.com) and have gotten myself around to signing up as a member here now that I have a Ka sorted. See below all my progress thus far.
So it begins..
Well I decided to start seeing as a little progress has been made.
Basically the idea is to take a Mk1 Ford Ka and turn it into a track toy. This would include stripping most, if not all of the standard interior and fitting it with a roll cage, bucket seats and the appropriate dials. It will remain road legal to get to track days with minimal hassle.
As of Saturday the 27th I have the engine from an Escort RS Turbo complete with T3 turbo and gearbox. The bottom end and turbo have both seen better days but it is far from a wreck. With plenty of help from my brother over at WayneAshfordRacing we began taking the engine apart to find the cause.
Once the pistons were out of their cylinders it became apparent what had went wrong. The main bearings had been mixed up and put at the wrong points along the crank which likely would have caused the crank to not run true. The bearings all had score marks with the ocassional small piece of copper bearing still floating around. The crank also has some light scoring which will be sorted before it all goes back together.
The gauze inside the oil return was also clogged with thick black sludge and pieces of bearing which would have caused poor oil pressure. I have spent today cleaning up the pistons, block and oil return before the block itself is hot washed.
I have no photos as of yet but will provide the ebay image to give a rough idea of what we're working with!
The engine will want to be converted to EFi so we can give it the Omex treatment for much greater flexibility.
That's about all I have to say that's interesting and will remember to take some pictures at my next opportunity!
--------------------------------------------------------------------------------------------------------------------------------------------------------------------------------------------------------------------------------------------
Small update...
Just a brief update today. Spent an hour at most just making final preparations to the engine before it goes for a clean. This wont happen until either A) I sell the Puma or B) I come into some money. The former is certainly more likely!
Basically a couple of bolts sheared while we were taking apart the drive pulley/timing pully which we heated up for a couple of minutes using a blow torch and then using grips to twist them out. We also took the water pump off and removed the headgasket.
Another task at some point is to take the head apart to examine the cam and likely give that a clean up too. I took a quick picture of the head today in it's current state - nothing terribly exciting but it makes the page look more interesting until the good stuff starts happening!
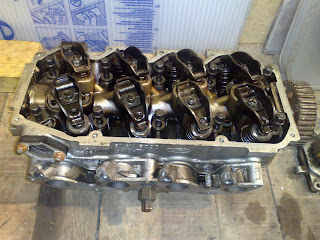
Basically you're looking at the rockers and valve springs. The cam pulley is toward the right of the picture (as is the water pump to the far right).
--------------------------------------------------------------------------------------------------------------------------------------------------------------------------------------------------------------------------------------------
Valvey Goodness
Another small update here. We took the cylinder head apart last night to see what sort of state it was in. Not good is the verdict. We removed the rockers, lifters, valve springs and finally the valves themselves. The lifters whilst looking fairly new - were very coarse around the bottom edge. The barrels/chambers they sit in were also scored (1 quite badly).
All the valves look fine and the stem seals will be replaced when it comes to piecing it back together. Unfortunately the cam also took a bit of a beating and some of the hardened outer has worn away - this will want replacing too.
We may require a new head (it's looking quite likely) though we will get a second opinion from Dave before we do so.
If we do get a new head then we will get an EFi version as this is the route we want to go down.
Valves all lined up after removal:

All in all it was a little disappointing but certainly not the end of the world!
--------------------------------------------------------------------------------------------------------------------------------------------------------------------------------------------------------------------------------------------
Minor Update
Time for another brief update. Well hopefully tomorrow evening the Puma is being picked up buy it's new owner which is good news. In the meantime I picked up a new head for the engine which is shown below. Its been lightly skimmed and pressure tested by the previous owner. Looks very clean and in much better condition for that matter. It needs a new cam which is on the shopping list anyway.
I'll let the pics do the rest of the talking. Hopefully the next update will include the Ka which will be used


---------------------------------------------------
Another brief update!
http://karsturbo.blogspot.com/2010/0...een-while.html
As title really, it's all been a bit slow - but a few things to report while I have a few minutes!
I've been acquiring parts here and there so here goes.
Well the crank has been reconditioned at Ivor Searles and is ready to go with new bearings. When the block was taken in to be washed it appears the bores are worn and needed replacing. We decided to get a different block. I have purchased another from eBay which i'll be receiving shortly. the block is from a non-turbo 1600CVH so the bores should be in good condition (due to turbos running a lot of fuel, this washes oil from the bores and can cause excessive wear).
I picked up some Cobra Clubman seats a couple of weeks ago. These have Fiesta Mk5 subframes already fitted - not sure whether these will fit in the Ka or not. They could do with a little TLC, but the main part is they work!
Still in search of some wheels for the Ka. Ideally going for some 6inch wide steel wheels in 14" diameter. Peugeot wheels may be a good option as these are 4x10⁸ so will fit the stud pattern and also have a lower offset (Ka is approx 30-40mm and Pug is 15-25mm) which will bring the track out and make the car more stable at speed.
Well that's mostly it. Some Pictures for your viewing pleasure of the new bits:


----------------------------------------------------------------------
Nothing massive to report, just spent an hour with a heat gun and scraper getting some of the sound insulation off! Lovely stuff that bichemin.

----------------------------------------------------------------------
Shiny, Dark Wheels.
Another small update. This one is for the aesthetics of the car..
My Dad has very kindly asissted me in spraying the wheels I got a few weeks ago. I decided on Matte black but he also sprayed one in Gloss to compare. I defintely preferred Matte and I'm sure you can see why...

----------------------------------------------------------------------
Here's another small update for you lot :P
My brother very kindly gave the block a final rinse with a pressure washer and gave it a lick of paint in prep for dummy building.
It shouldn't be too long until it all starts going back together again and testing for compression ratio etc.
I'll let the pic do the rest of the talking. It's defintely a bright colour, but in the (unlikely) event of an oil leak, it will make it easier to trace. I only know the colour as "Brunswick Green".

----------------------------------------------------------------------
Hi all quick update and a couple of photos for you lot 
Project is still going ahead but been delayed by my brothers marriage! How inconsiderate :P
Enjoy -
[blockquote]Again it's been a while since anything has happened to the project, but it's still alive. Main delay was my brother Wayne getting married and as a result him being incredibly busy. Unfortunately I don't know alot about this sort of thing so have had to sit tight and do what I can.
Tonight I finally got round to start stripping the new head I got a few updates back. I don't have a valve spring tool so the valves and springs are still in place but everything else has been removed. The head appears to have been rebuilt recently as there was fresh grease and most bolts were little more than hand tight.
All looks good so far and everything looks in good condition. The head will be gas flowed as soon as possible to help everything breathe. Hopefully I can get hold of the valve spring tool soon to get it completed and another task checked off!
A couple of pictures with the progress made. Fortunately it took about half an hour and was compeltely painless![/blockquote]


----------------------------------------------------------------------
I have been writing a blog for a little while (http://karsturbo.blogspot.com) and have gotten myself around to signing up as a member here now that I have a Ka sorted. See below all my progress thus far.
So it begins..
Well I decided to start seeing as a little progress has been made.
Basically the idea is to take a Mk1 Ford Ka and turn it into a track toy. This would include stripping most, if not all of the standard interior and fitting it with a roll cage, bucket seats and the appropriate dials. It will remain road legal to get to track days with minimal hassle.
As of Saturday the 27th I have the engine from an Escort RS Turbo complete with T3 turbo and gearbox. The bottom end and turbo have both seen better days but it is far from a wreck. With plenty of help from my brother over at WayneAshfordRacing we began taking the engine apart to find the cause.
Once the pistons were out of their cylinders it became apparent what had went wrong. The main bearings had been mixed up and put at the wrong points along the crank which likely would have caused the crank to not run true. The bearings all had score marks with the ocassional small piece of copper bearing still floating around. The crank also has some light scoring which will be sorted before it all goes back together.
The gauze inside the oil return was also clogged with thick black sludge and pieces of bearing which would have caused poor oil pressure. I have spent today cleaning up the pistons, block and oil return before the block itself is hot washed.
I have no photos as of yet but will provide the ebay image to give a rough idea of what we're working with!
The engine will want to be converted to EFi so we can give it the Omex treatment for much greater flexibility.
That's about all I have to say that's interesting and will remember to take some pictures at my next opportunity!
--------------------------------------------------------------------------------------------------------------------------------------------------------------------------------------------------------------------------------------------
Small update...
Just a brief update today. Spent an hour at most just making final preparations to the engine before it goes for a clean. This wont happen until either A) I sell the Puma or B) I come into some money. The former is certainly more likely!
Basically a couple of bolts sheared while we were taking apart the drive pulley/timing pully which we heated up for a couple of minutes using a blow torch and then using grips to twist them out. We also took the water pump off and removed the headgasket.
Another task at some point is to take the head apart to examine the cam and likely give that a clean up too. I took a quick picture of the head today in it's current state - nothing terribly exciting but it makes the page look more interesting until the good stuff starts happening!
Basically you're looking at the rockers and valve springs. The cam pulley is toward the right of the picture (as is the water pump to the far right).
--------------------------------------------------------------------------------------------------------------------------------------------------------------------------------------------------------------------------------------------
Valvey Goodness
Another small update here. We took the cylinder head apart last night to see what sort of state it was in. Not good is the verdict. We removed the rockers, lifters, valve springs and finally the valves themselves. The lifters whilst looking fairly new - were very coarse around the bottom edge. The barrels/chambers they sit in were also scored (1 quite badly).
All the valves look fine and the stem seals will be replaced when it comes to piecing it back together. Unfortunately the cam also took a bit of a beating and some of the hardened outer has worn away - this will want replacing too.
We may require a new head (it's looking quite likely) though we will get a second opinion from Dave before we do so.
If we do get a new head then we will get an EFi version as this is the route we want to go down.
Valves all lined up after removal:
All in all it was a little disappointing but certainly not the end of the world!
--------------------------------------------------------------------------------------------------------------------------------------------------------------------------------------------------------------------------------------------
Minor Update
Time for another brief update. Well hopefully tomorrow evening the Puma is being picked up buy it's new owner which is good news. In the meantime I picked up a new head for the engine which is shown below. Its been lightly skimmed and pressure tested by the previous owner. Looks very clean and in much better condition for that matter. It needs a new cam which is on the shopping list anyway.
I'll let the pics do the rest of the talking. Hopefully the next update will include the Ka which will be used
---------------------------------------------------
Another brief update!
http://karsturbo.blogspot.com/2010/0...een-while.html
As title really, it's all been a bit slow - but a few things to report while I have a few minutes!
I've been acquiring parts here and there so here goes.
Well the crank has been reconditioned at Ivor Searles and is ready to go with new bearings. When the block was taken in to be washed it appears the bores are worn and needed replacing. We decided to get a different block. I have purchased another from eBay which i'll be receiving shortly. the block is from a non-turbo 1600CVH so the bores should be in good condition (due to turbos running a lot of fuel, this washes oil from the bores and can cause excessive wear).
I picked up some Cobra Clubman seats a couple of weeks ago. These have Fiesta Mk5 subframes already fitted - not sure whether these will fit in the Ka or not. They could do with a little TLC, but the main part is they work!
Still in search of some wheels for the Ka. Ideally going for some 6inch wide steel wheels in 14" diameter. Peugeot wheels may be a good option as these are 4x10⁸ so will fit the stud pattern and also have a lower offset (Ka is approx 30-40mm and Pug is 15-25mm) which will bring the track out and make the car more stable at speed.
Well that's mostly it. Some Pictures for your viewing pleasure of the new bits:
----------------------------------------------------------------------
Nothing massive to report, just spent an hour with a heat gun and scraper getting some of the sound insulation off! Lovely stuff that bichemin.
----------------------------------------------------------------------
Shiny, Dark Wheels.
Another small update. This one is for the aesthetics of the car..
My Dad has very kindly asissted me in spraying the wheels I got a few weeks ago. I decided on Matte black but he also sprayed one in Gloss to compare. I defintely preferred Matte and I'm sure you can see why...
----------------------------------------------------------------------
Here's another small update for you lot :P
My brother very kindly gave the block a final rinse with a pressure washer and gave it a lick of paint in prep for dummy building.
It shouldn't be too long until it all starts going back together again and testing for compression ratio etc.
I'll let the pic do the rest of the talking. It's defintely a bright colour, but in the (unlikely) event of an oil leak, it will make it easier to trace. I only know the colour as "Brunswick Green".
----------------------------------------------------------------------
Hi all
Project is still going ahead but been delayed by my brothers marriage! How inconsiderate :P
Enjoy -
[blockquote]Again it's been a while since anything has happened to the project, but it's still alive. Main delay was my brother Wayne getting married and as a result him being incredibly busy. Unfortunately I don't know alot about this sort of thing so have had to sit tight and do what I can.
Tonight I finally got round to start stripping the new head I got a few updates back. I don't have a valve spring tool so the valves and springs are still in place but everything else has been removed. The head appears to have been rebuilt recently as there was fresh grease and most bolts were little more than hand tight.
All looks good so far and everything looks in good condition. The head will be gas flowed as soon as possible to help everything breathe. Hopefully I can get hold of the valve spring tool soon to get it completed and another task checked off!
A couple of pictures with the progress made. Fortunately it took about half an hour and was compeltely painless![/blockquote]
----------------------------------------------------------------------

 10-12-2010, 08:09 AM
#3
ST170
Thread Starter
Hey, thanks for the comments Yeah we will likely get hold of a Piper T2 cam - the workshop we do some of the work at is a Piper agent so we can get them a little cheaper
Yeah I really need to get more of the Ka, It's completely stripped at the mo, no wiring loom, or interior just a steering wheel for when it get's pushed around! Should be finishing the crank off this weekend finally so should be able to grab a couple of pictures.
Yeah I really need to get more of the Ka, It's completely stripped at the mo, no wiring loom, or interior just a steering wheel for when it get's pushed around! Should be finishing the crank off this weekend finally so should be able to grab a couple of pictures.
11-12-2010, 01:02 PM
#5

Kent cvh 34 cam is a good one mate! Wouldn't go for a piper!
When I had this engine, I went from piper t2, to kent cvh35, to newman & solid lifters (awesome kit!)
Good luck with it - I certainly had fun with this engine in my Ka.
omex management utterly transformed the car as well..
When I had this engine, I went from piper t2, to kent cvh35, to newman & solid lifters (awesome kit!)
Good luck with it - I certainly had fun with this engine in my Ka.
omex management utterly transformed the car as well..
Last edited by moondustka; 11-12-2010 at 01:05 PM.
14-12-2010, 03:03 PM
#6
ST170
Thread Starter
I've heard mixed stuff with the Piper cams, obviously we need something capable of shifting 230-240bhp's worth of air and fuel - I think they are normally happy with 180bhp. hopefully it wont fail but if it does then we'll be upgrading.
Trending Topics
14-12-2010, 03:23 PM
#8
ST170
Thread Starter
Yeah - joined not long ago - there's a lot of CVH owners on here so should be some help if we get stuck You just drive a Mondeo now? I miss the Puma very much 
14-12-2010, 03:27 PM
#9
Yup - lots of very knowledgeable people over here that will help you out I'm sure.
(As well as a few clowns.. Susan, Warren, I'm looking at you.. )
)
Yeah, got rid of it and got the ST as I do 75+ miles a day commuting now. My back doesn't miss it as it had the suspension of a skateboard! Still get to drive Cherie's Millie though.
(As well as a few clowns.. Susan, Warren, I'm looking at you..
)Yeah, got rid of it and got the ST as I do 75+ miles a day commuting now. My back doesn't miss it as it had the suspension of a skateboard! Still get to drive Cherie's Millie though.
14-12-2010, 03:32 PM
#10
ST170
Thread Starter
Cool, makes alot of sense. Puma's aren't bad on fuel but diesel is the way forward if you travel alot. I currently go around in a 406 2.1TD which is kind of boring but has a decent amount of torque
14-12-2010, 03:39 PM
#11
That's the good thing about the ST - 50-55mpg everyday but 355ftlb of torque for easy overtaking and it handles pretty well for such a big car (compared to the Puma anyway)
Drove my boss's 330D BMW today - christ that thing goes! 0-60 in sub 6 seconds! Might be on the shopping list one day..
Drove my boss's 330D BMW today - christ that thing goes! 0-60 in sub 6 seconds! Might be on the shopping list one day..
14-12-2010, 03:42 PM
#12
ST170
Thread Starter
Yeah I think i get about 45mpg from the 406, nowhere near as powerful as the Mondy, though! Only pushing 110bhp and about 230lb/ft. I still have a weak spot for new Bimmers, particularly the 3 series.
30-12-2010, 09:00 PM
#13
ST170
Thread Starter
No new pics yet I'm afraid, just a little update - not great news though...
I took the crank to the workshop after it had been sat covered in the garage for about a month or two, it had unfortunately began to rust.. we cleaned it up as best we could but a couple of the bearing faces have a crap lumpy feel to them. It's going back to the engine services place we had it done last time and put back into the block as soon after. That will teach me to get lazy with this thing
My brother has made a nice dummy gudgeon pin for us so we can measure up the swept area and figure out the compression and machine pistons as necessary.
Hopefully more to follow in the coming weeks
22-01-2011, 05:27 PM
#14
ST170
Thread Starter
Update 22/1/11:
Today Me and my Brother spent a couple of hours dummy building the bottom end. A matter of putting the main bearings in with the crank and attaching a piston and rod to it so we can make accurate measurements to work out compression. Everything went together nicely and with a little oil everything moved smoothly. Next up we need to get the head to the workshop and measure that too. The pistons are +1.5mm so the overall capactiy will be 1659 - the additional torque over standard 1597 will be very welcome.

Today Me and my Brother spent a couple of hours dummy building the bottom end. A matter of putting the main bearings in with the crank and attaching a piston and rod to it so we can make accurate measurements to work out compression. Everything went together nicely and with a little oil everything moved smoothly. Next up we need to get the head to the workshop and measure that too. The pistons are +1.5mm so the overall capactiy will be 1659 - the additional torque over standard 1597 will be very welcome.
Last edited by fury556; 22-01-2011 at 05:37 PM. Reason: Photo size
 26-02-2011, 09:35 PM
#17
ST170
Thread Starter
Good evening.
Today Me and Wayne spent a few hours making more mess and making more progress.
We measured how much the piston protruded from the block deck at top dead centre. It was approximately 0.75mm so we removed that amount from all 4 pistons. This will give us our 7.68:1 C/R and concludes pretty much all the work that needed doing to the bottom end. All that's left is to assemble it with plenty of oil and then we can begin modifying the cylinder head to accept electronic fuel injection. Hopefully the bottom end will be assembled tomorrow morning and another small update will follow! for now here's the block setup with a DTI guage.
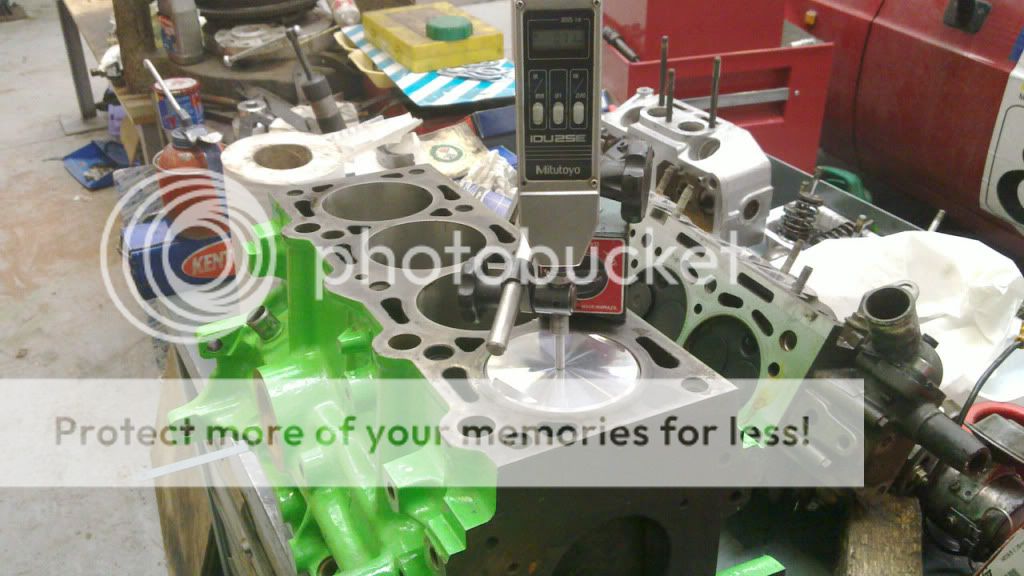
14-03-2011, 03:19 PM
#18
ST170
Thread Starter
Hi all - another quick update, engine is slowly but surely taking shape!
Building up the bottom end was delayed as we decided to have bushes installed into the small ends of the con rods. This aids oil flow and should hopefully prevent premature wear and overheating.
The bottom end was built up on Saturday but took longer than expected due to the spring clips being awkward bastards! Eventually the pistons were attached to their rods and the crank was installed followed by the pistons and rods. Plenty of oil was used in the bores and the bearings to hopefully prevent any premature wear when it comes to starting the engine first time.
All that is left to complete the bottom end is to attach the oil and water pumps to the block.
For now here's a couple of images of the assembly for you
19-03-2011, 09:16 PM
#19
ST170
Thread Starter
Hi all
Another quick update after a few hours spent at the workshop applying the last of the work to the bottom end.
"Today me and Wayne spent a few hours applying the final touches to the bottom end of the engine. We fitted the oil and water pump and also cleaned up and fitted the oil pickup. The oil pickup has attempted to be cleaned before by leaving it to soak in petrol for a couple of days but it didn't fully remove some of the crap oil that had been left to harden inside. We decided to cut it open to properly get at it and the had it Tig welded back up. We then sat the sump gasket in place but the sump itself will likely be fitted tomorrow as it is currently being painted (I'm told it will be pink but I shan't hold my breath).
Here are a couple of images from the end of the building day."


Another quick update after a few hours spent at the workshop applying the last of the work to the bottom end.
"Today me and Wayne spent a few hours applying the final touches to the bottom end of the engine. We fitted the oil and water pump and also cleaned up and fitted the oil pickup. The oil pickup has attempted to be cleaned before by leaving it to soak in petrol for a couple of days but it didn't fully remove some of the crap oil that had been left to harden inside. We decided to cut it open to properly get at it and the had it Tig welded back up. We then sat the sump gasket in place but the sump itself will likely be fitted tomorrow as it is currently being painted (I'm told it will be pink but I shan't hold my breath
Here are a couple of images from the end of the building day."
20-03-2011, 06:25 PM
#21
ST170
Thread Starter
Cheers spent an hour today just getting the sump on to pretty much complete the bottom end, all that's missing is a dipstick tube and dipstick and the bottom crank pulley. We can now start worrying about the head.


20-03-2011, 09:40 PM
#23
ST170
Thread Starter
21-03-2011, 12:24 AM
#24
15000

Join Date: Feb 2011
Location: Gateshead
Posts: 37
Likes: 0
Received 0 Likes
on
0 Posts
What management you going to run this on mate? What you doing for wiring loom??
I'm after an RS engine for my MK5 fiesta but struggling to find one at a decent price.
You going to use the IB5 box??
I'm after an RS engine for my MK5 fiesta but struggling to find one at a decent price.
You going to use the IB5 box??
21-03-2011, 12:29 AM
#25
ST170
Thread Starter
Yeah using the standard Ka gearbox and shafts - according to the internet they should take the abuse.
I'd recommend trying to get an Efi engine if you can, will save a big headache
21-03-2011, 06:11 PM
#26
15000
Join Date: Feb 2011
Location: Gateshead
Posts: 37
Likes: 0
Received 0 Likes
on
0 Posts
I've managed to get hold of an FRST engine for �150, i'll be going for the IB5 box and more than likely run standard management (to start with) but my main problem is the wiring (im crap at it) i've got access to wiring diagrams but could do with an auto electrician to give me a hand tbh
21-03-2011, 06:42 PM
#27
ST170
Thread Starter
That's not too bad. Yeah we got a loom with the Omex but it looks a little messy, we might try and use it or start fresh. I think Omex will do a loom for like 30 quid but obviously is meant for their management.
I hate wiring too! Going to get advice from my Bro's dad who has setup Omex in the past.
I hate wiring too! Going to get advice from my Bro's dad who has setup Omex in the past.
21-03-2011, 06:54 PM
#28
15000
Join Date: Feb 2011
Location: Gateshead
Posts: 37
Likes: 0
Received 0 Likes
on
0 Posts
That's not too bad. Yeah we got a loom with the Omex but it looks a little messy, we might try and use it or start fresh. I think Omex will do a loom for like 30 quid but obviously is meant for their management.
I hate wiring too! Going to get advice from my Bro's dad who has setup Omex in the past.
I hate wiring too! Going to get advice from my Bro's dad who has setup Omex in the past.
21-03-2011, 11:42 PM
#29
ST170
Thread Starter
Cool yeah ask away, might be able to help you out!
Well I have this week off to help get the shell prepped for when the engine is ready and to also have it seam welded and ready for the roll cage to be installed. Task for the day was to remove as much sealant as possible. This was done with a wire brush attachment for a Dremel. If anyone has done this before you will know full well how shitty a job it is. Fortunately the sealant comes away pretty easily revealing bare metal. I called it a day with about 80% of the sealant gone, there are some bits I can't get to with power tools so it will have to be done manually this week when I can bear to look at the stuff again Couple of Images of the Ka itself and the piles of sealant that I collected.


Also the steering wheel appears to be harbouring intelligent life. Daren't touch it without gloves on

Well I have this week off to help get the shell prepped for when the engine is ready and to also have it seam welded and ready for the roll cage to be installed. Task for the day was to remove as much sealant as possible. This was done with a wire brush attachment for a Dremel. If anyone has done this before you will know full well how shitty a job it is. Fortunately the sealant comes away pretty easily revealing bare metal. I called it a day with about 80% of the sealant gone, there are some bits I can't get to with power tools so it will have to be done manually this week when I can bear to look at the stuff again
Also the steering wheel appears to be harbouring intelligent life. Daren't touch it without gloves on
02-04-2011, 04:48 PM
#30
ST170
Thread Starter
Hi all,
Another update for you
New EFi Head and a blasted inlet manifold
As the title suggests I have recently purchased a new cylinder head. We were going to machine the original but this would have required quite a bit of fabrication. We found an EFi conversion kit on eBay and I won that for a very nice price. Came with literally everything we need to get the top end of the engine running all bar the cam we want to run etc. I stripped the head down and then gave it a nice clean up with some lovely smelling solvents everything came out well and I'm very happy with its overall condition. My brother also very kindly grit blasted the EFi inlet manifold down to bare aluminium, looks lovely and I think I'll keep it that way! I want to colour the EFi lettering the same colour as the block to keep things co-ordinated
Here are the pics taken throughout the day, enjoy!


Another update for you
New EFi Head and a blasted inlet manifold
As the title suggests I have recently purchased a new cylinder head. We were going to machine the original but this would have required quite a bit of fabrication. We found an EFi conversion kit on eBay and I won that for a very nice price. Came with literally everything we need to get the top end of the engine running all bar the cam we want to run etc. I stripped the head down and then gave it a nice clean up with some lovely smelling solvents
Here are the pics taken throughout the day, enjoy!
02-04-2011, 11:41 PM
#31
15000
Join Date: Feb 2011
Location: Gateshead
Posts: 37
Likes: 0
Received 0 Likes
on
0 Posts
Nice i picked my engine up on friday night and stripped it down today (will update my project tmo)
what paint did you use to paint the block??
Are the cams followers hydraulic?? What they like to set back up??
what paint did you use to paint the block??
Are the cams followers hydraulic?? What they like to set back up??
03-04-2011, 11:28 AM
#33
ST170
Thread Starter
Yeah standard CVH are hydraulic so should just be a case of dropping them back in and the oil pressure does the rest
03-04-2011, 04:35 PM
#34
15000
Join Date: Feb 2011
Location: Gateshead
Posts: 37
Likes: 0
Received 0 Likes
on
0 Posts
Ah right sound mate cheers, i didnt want to strip the head right down cause i couldnt be arsed with resetting them but if its hydraulic then its allgood, i thought they where tbh cause i turned the head over and after afew minutes all the valves were sitting in the closed position since theres no oil pressure, thought i would check before i strip them for unnecisarry work haha.
Anychance you can take a picture of your Gbox mount so i can see if i can get away with using my standard g/box, not sure if the starter will line up like
Anychance you can take a picture of your Gbox mount so i can see if i can get away with using my standard g/box, not sure if the starter will line up like
04-04-2011, 08:16 AM
#35
ST170
Thread Starter
Cool
We're not that far yet but apparently 2/3 engine mounts are on the IB5 gearbox, just need one made up (possibly from the standard RS turbo mount we have). Not heard of any issues with starter motors personally so might be worth a quick search
We're not that far yet but apparently 2/3 engine mounts are on the IB5 gearbox, just need one made up (possibly from the standard RS turbo mount we have). Not heard of any issues with starter motors personally so might be worth a quick search
04-04-2011, 10:57 AM
#36
15000
Join Date: Feb 2011
Location: Gateshead
Posts: 37
Likes: 0
Received 0 Likes
on
0 Posts
Yeah mate i was hoping to use a standard fiesta box just to use the mounts, i've got a good idea what im going to do for the left hand mount, i have a mate who works for a CNC company who'll cut them for me, i'll try them and if there decent i can problies sort you out for buttons.
Im rebuilding the engine then i'll be mounting it, maybe 2-3 month.
Im rebuilding the engine then i'll be mounting it, maybe 2-3 month.
04-04-2011, 11:06 AM
#38
ST170
Thread Starter
Cool that could be very helpful Yeah let us know how that goes. For simplicity's sake it would be nice to get the Track designs one but for the money they charge it makes more sense to find someone to make one for you as the actual material cost is going to be pretty low I imagine.
Yeah not sure how long it will be until we try and drop the engine in, need to gas flow the head in the next 2 weeks or so but that's pretty much it and then it can all go to together - getting pretty excited about it! If we do get to chopping up a standard mount to make it fit I'll be sure to add some photos to help you and anyone else who does the same
Yeah not sure how long it will be until we try and drop the engine in, need to gas flow the head in the next 2 weeks or so but that's pretty much it and then it can all go to together - getting pretty excited about it! If we do get to chopping up a standard mount to make it fit I'll be sure to add some photos to help you and anyone else who does the same
10-01-2012, 01:55 PM
#40
ST170
Thread Starter
Hi guys, not updated on here in a while so a little bit of reading if you're interested!
September 2011
Been a long time since we've got anything done, should hopefully drop the old engine out next week, which will be nice.
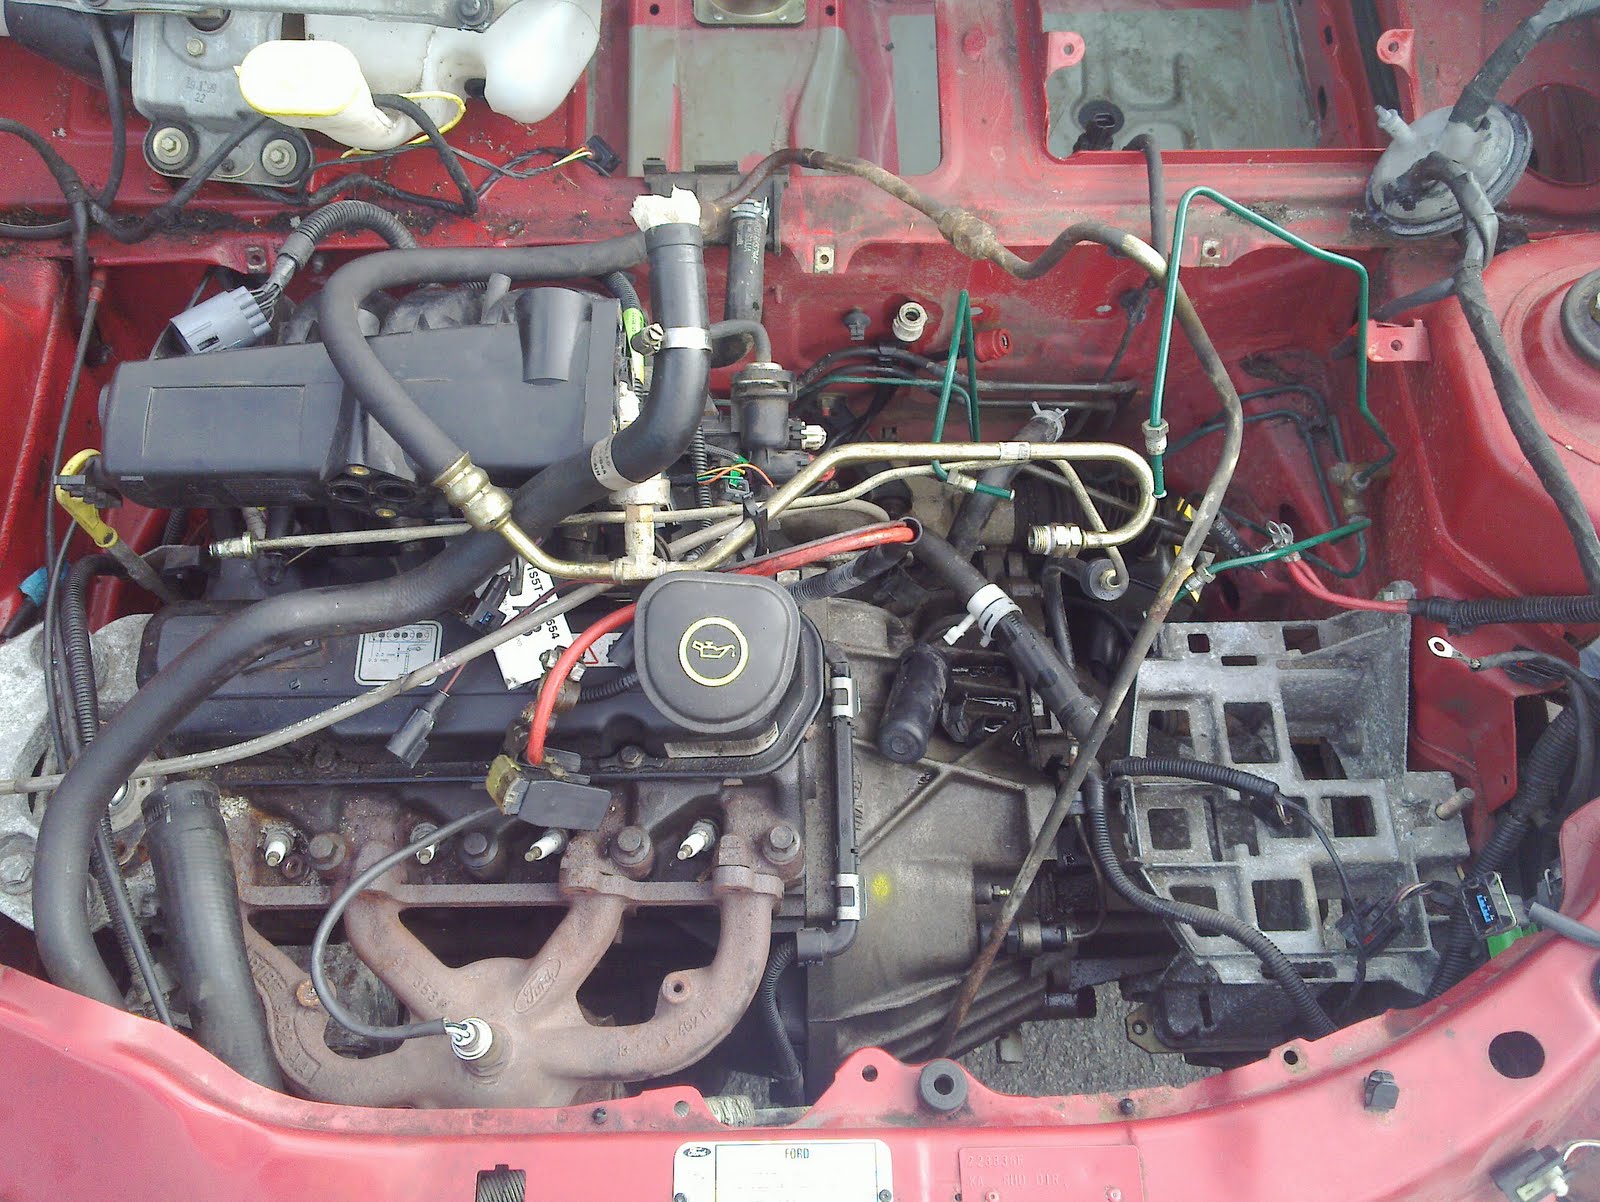
Todays task was to try and get the Ka engine out. We set about removing anything unnecessary from the engine bay and disconnecting the multitude of hoses that would prevent the engine from coming out.
After that the driveshafts were removed and that is where we've had to leave it for now. Next step is to drop the engine off the mounts and then lift the car over the engine.
Quick photo of the engine bay after everything had been removed.
Next up we want to get the car over to the workshop and fit the cage and have the shell painted and the rust sorted out on the sills and around the fuel filler cap.
---------------------------------------------------------------
Thanks
Today we spent a couple of hours finishing off last weeks prep to drop the engine out. Little bit tricky in the confined space but it went without any major problems! Essentially we had a big hoist and some chain secured to the engine and dropped it to the floor and then lifted the shell up and pulled the engine under it and out of the way. It was suprisingly clean in the engine bay but still a little bit grubby so a pressure wash is in order at some point. We can keep both the standard engine mounts in the hope that they will come in handy for mounting the RS lump when the time comes. Here's a couple of photos, nothing fancy and the photo of the Ka pointing to the sky once the engine was removed didn't come out so well but hopefully you'll get the idea


--------------------------------------------------------------------
January 2012
For those of you who have projects on the go I'm sure you feel as frustrated as me when it comes to this time of year! Crap (worse) weather and the holiday season mean that you don't really have any time to get anything done or the conditions just aren't suitable
My brother is in the progress of gas flowing the cylinder head and shouldn't be much longer (hopefully). In the meantime I've bought myself a couple of presents ready for when the head is finished! One Kent CVH36 kit complete with adjustable pulley. The kit comes with new hydraulic lifters, stem seals and valve springs. I love shiny stuff


Also got an ARP head stud and nut kit to help prevent the cylinder head from seperating itself from the block
September 2011
Been a long time since we've got anything done, should hopefully drop the old engine out next week, which will be nice.
Todays task was to try and get the Ka engine out. We set about removing anything unnecessary from the engine bay and disconnecting the multitude of hoses that would prevent the engine from coming out.
After that the driveshafts were removed and that is where we've had to leave it for now. Next step is to drop the engine off the mounts and then lift the car over the engine.
Quick photo of the engine bay after everything had been removed.
Next up we want to get the car over to the workshop and fit the cage and have the shell painted and the rust sorted out on the sills and around the fuel filler cap.
---------------------------------------------------------------
Thanks
Today we spent a couple of hours finishing off last weeks prep to drop the engine out. Little bit tricky in the confined space but it went without any major problems! Essentially we had a big hoist and some chain secured to the engine and dropped it to the floor and then lifted the shell up and pulled the engine under it and out of the way. It was suprisingly clean in the engine bay but still a little bit grubby so a pressure wash is in order at some point. We can keep both the standard engine mounts in the hope that they will come in handy for mounting the RS lump when the time comes. Here's a couple of photos, nothing fancy and the photo of the Ka pointing to the sky once the engine was removed didn't come out so well but hopefully you'll get the idea
--------------------------------------------------------------------
January 2012
For those of you who have projects on the go I'm sure you feel as frustrated as me when it comes to this time of year! Crap (worse) weather and the holiday season mean that you don't really have any time to get anything done or the conditions just aren't suitable
My brother is in the progress of gas flowing the cylinder head and shouldn't be much longer (hopefully). In the meantime I've bought myself a couple of presents ready for when the head is finished! One Kent CVH36 kit complete with adjustable pulley. The kit comes with new hydraulic lifters, stem seals and valve springs. I love shiny stuff
Also got an ARP head stud and nut kit to help prevent the cylinder head from seperating itself from the block