Mk6 JWRC fiesta cosworth
 07-04-2012, 05:53 PM
#2321
Looking good!
You could always paint the visible rivet heads black to blend in a bit.
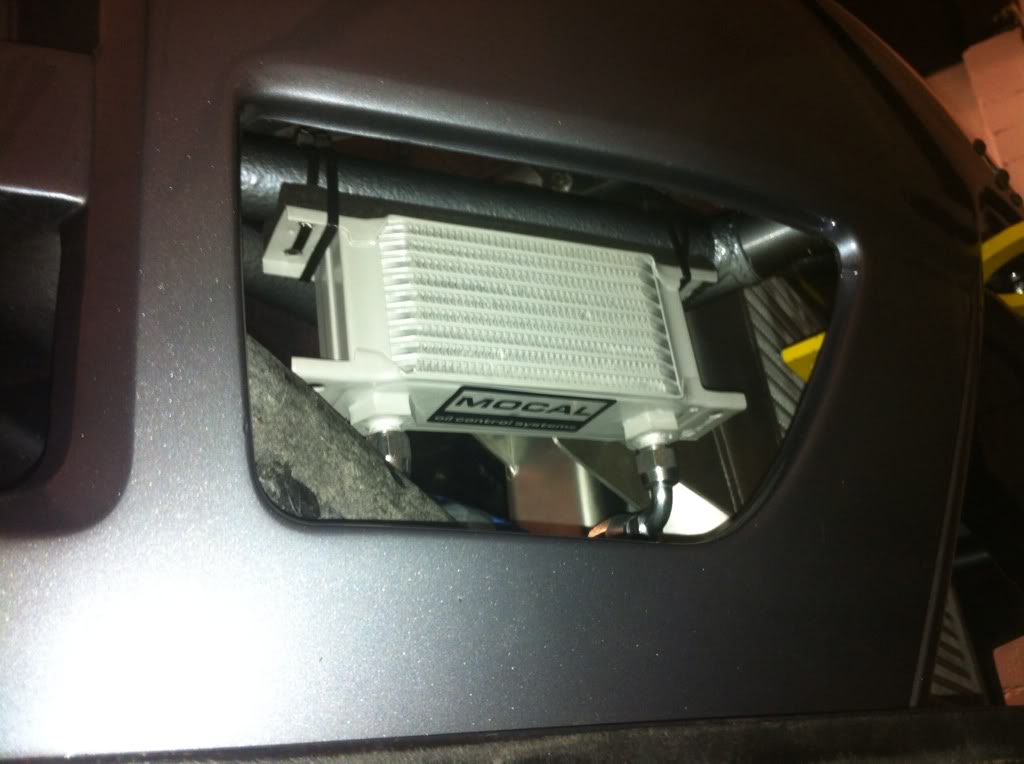
Is your vent cover removable?? If so, id recommend fitting some very fine mesh in the vent to filter off larger particles as the last thing you want is touching the grass or going through the kitty litter (or more likely someone in front doing the same) meaning your car fills with a cloud a dirt or dust while youre still driving at speed!!! Also catches insects and other thrown up debris.
You then just clean the mesh every now and then.
Also dont forget the drain pipe. With a fine mesh you should still be able to drive with the vents open if hot and humid as the mesh will damp down the spray.
You could be really anal and use some foam behind the mesh to catch everything.
You could always paint the visible rivet heads black to blend in a bit.
Is your vent cover removable?? If so, id recommend fitting some very fine mesh in the vent to filter off larger particles as the last thing you want is touching the grass or going through the kitty litter (or more likely someone in front doing the same) meaning your car fills with a cloud a dirt or dust while youre still driving at speed!!! Also catches insects and other thrown up debris.
You then just clean the mesh every now and then.
Also dont forget the drain pipe. With a fine mesh you should still be able to drive with the vents open if hot and humid as the mesh will damp down the spray.
You could be really anal and use some foam behind the mesh to catch everything.
 07-04-2012, 07:15 PM
#2322
PassionFord Post Whore!!
if you do use mesh i would say get a kitchen sieve and use that as its very fine gauze. and for foam, cut up a cheap ebay air filter lol.
when do you think you will finish the car so i can buy it off you? lol
when do you think you will finish the car so i can buy it off you? lol
 08-04-2012, 08:01 PM
#2329
10K+ Poster!!

Looking great Marc. Agree with everything everyone has said, attention to detail is immense!
As for the rivets I think you can get black headed ones which would be a bit kinder on the eye.
As for the rivets I think you can get black headed ones which would be a bit kinder on the eye.
 08-04-2012, 11:00 PM
#2334
10K+ Poster!!
I think the point Tim is getting at is it's IN the cabin unlike any road car I know which has them under the car.
Mine is in the car then incased in a housing, wether I'd class it as a firewall or not is another matter but the tank itself is about 12 inches into the car so it would be a fair whack to crush that area.
Either way it's a good point raised, safety has to be the number one priority when building such a highly specced car.
09-04-2012, 07:55 AM
#2335
Will as James wrote above its the material used as well as the positioning. God forbid should Marc have a decent sized rear shunt, what is to say that the tank wont split with fuel being released inside the car.
If it was a bag tank it would simply adjust its shape and not split, if it was kept aluminium but moved to be inside the confines of the cage it is less likely to get damaged, or if the same location is to be kept, lower it so the tank is not in the cockpit, it would be a much safer setup.
If it was a bag tank it would simply adjust its shape and not split, if it was kept aluminium but moved to be inside the confines of the cage it is less likely to get damaged, or if the same location is to be kept, lower it so the tank is not in the cockpit, it would be a much safer setup.
09-04-2012, 09:38 AM
#2336
I can see what is being said above, and I look at all these people building track cars and buying sparkly alloy tanks at silly money, then have no contigency plan for accidents.
In the world of rallying, if you dont use a bag tank, then the rules stiplulate your fuel cell/tank must be a tank within a tank, so have some sort of cover round it to prevent fuel spillage into the car in the event of a rupture of the tank, some way of directing the fuel out of the car, hence we have vent valves/rollover valves/drains to get the fuel outside the vehicle.
Alloy tanks are the worst for splitting under body flex let alone an accident, I have had this happen to me.
worth noting thats all.
nice car Marc - i bet the cost starts with a 5 by now lol
09-04-2012, 12:32 PM
#2337
I think the same as far as where the tank is positioned, not ideal but it will be firewalled, the cost of a custom bag tank which will be around the 3k mark is not an
Option right now so i am happy having the tank where it is with a fire wall,
The worse thing for rupturing is the aeroquip fittings if stressed during an impact
Option right now so i am happy having the tank where it is with a fire wall,
The worse thing for rupturing is the aeroquip fittings if stressed during an impact
09-04-2012, 12:53 PM
#2338
when my 3dr got rear ended, the rear panel crushed the pump between it and the tank, and split the hose... will and i shut the car off and got the fuck out sharpish lol...
not ideal, but i wasnt planning on being rear ended
if i were to build a car again, id try and have the tank outside the car, or use a bag tank but they can be mega money.
not ideal, but i wasnt planning on being rear ended
if i were to build a car again, id try and have the tank outside the car, or use a bag tank but they can be mega money.
14-04-2012, 08:00 PM
#2339
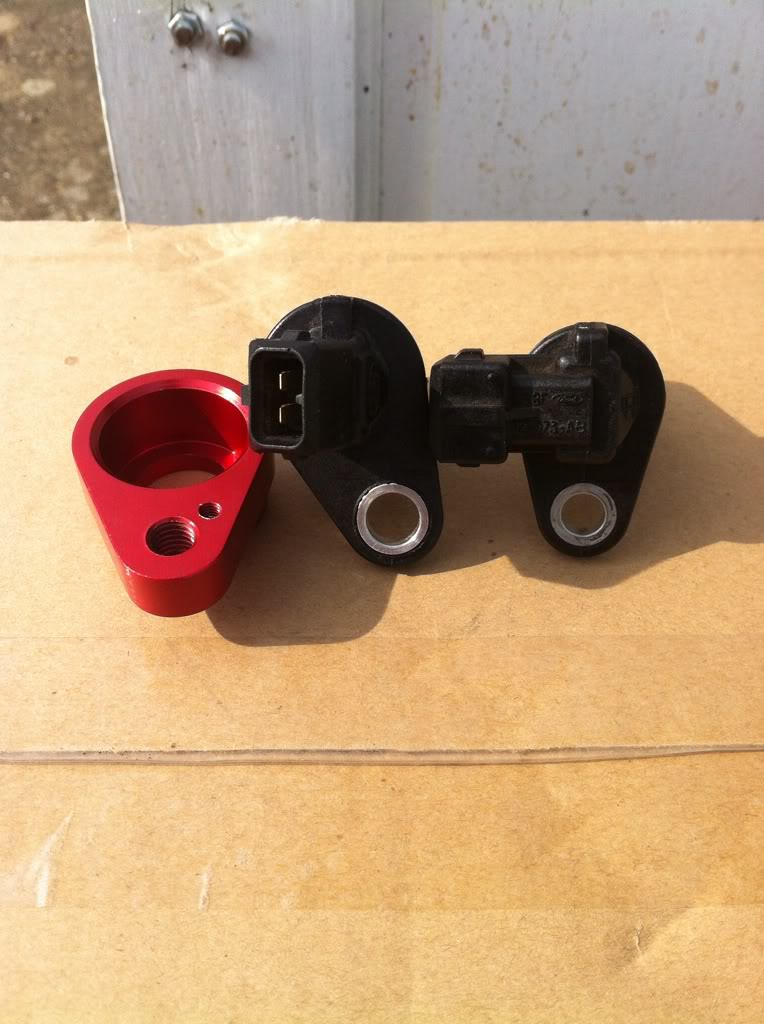
Finally sorted another small lathe as I can't stand not having one as there so handy,
Had the prob of clearance with the wrc cam sensor set up so as advised by coley and whizzisat and a few others I sourced a galaxy sensor which is a more compact 90 degree angle
So rather than sell the wrc sensor bracket I sleeved it to suit the smaller dia galaxy sensor
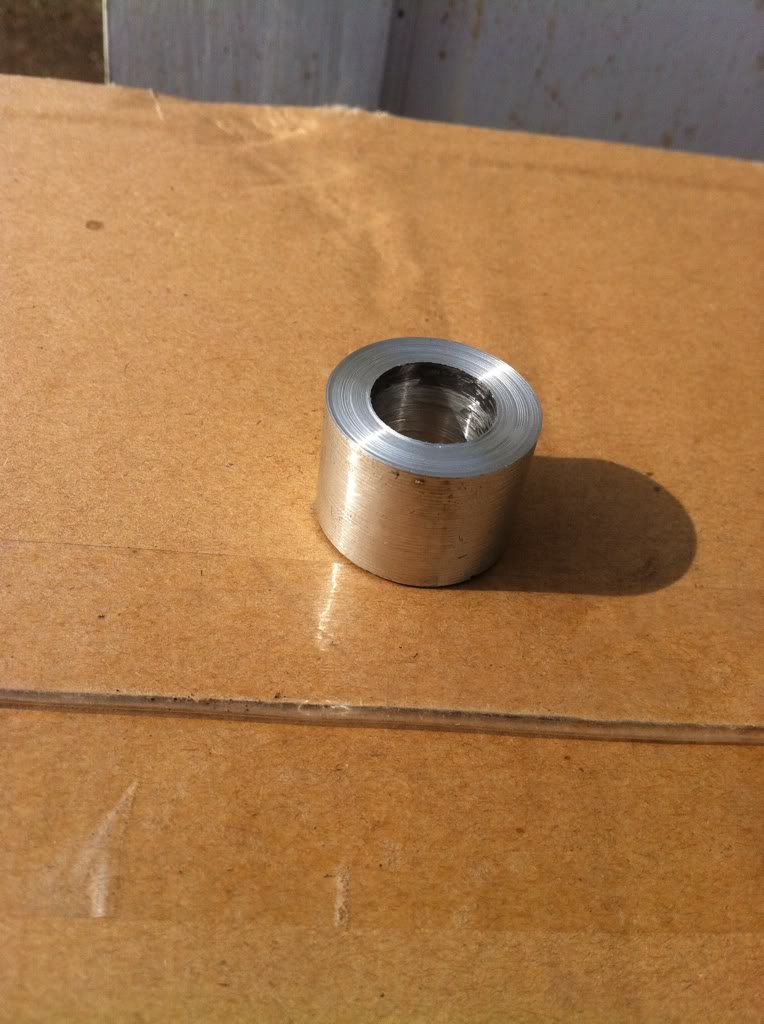
So to start with
Then cut a bit of alloy bar

Drill the center hole out a bit, had to finish by boring as I did not have the correct size drill bit,
After boring to suit sensor and slightly larger the other end for the oring seal, and added a small chamfer
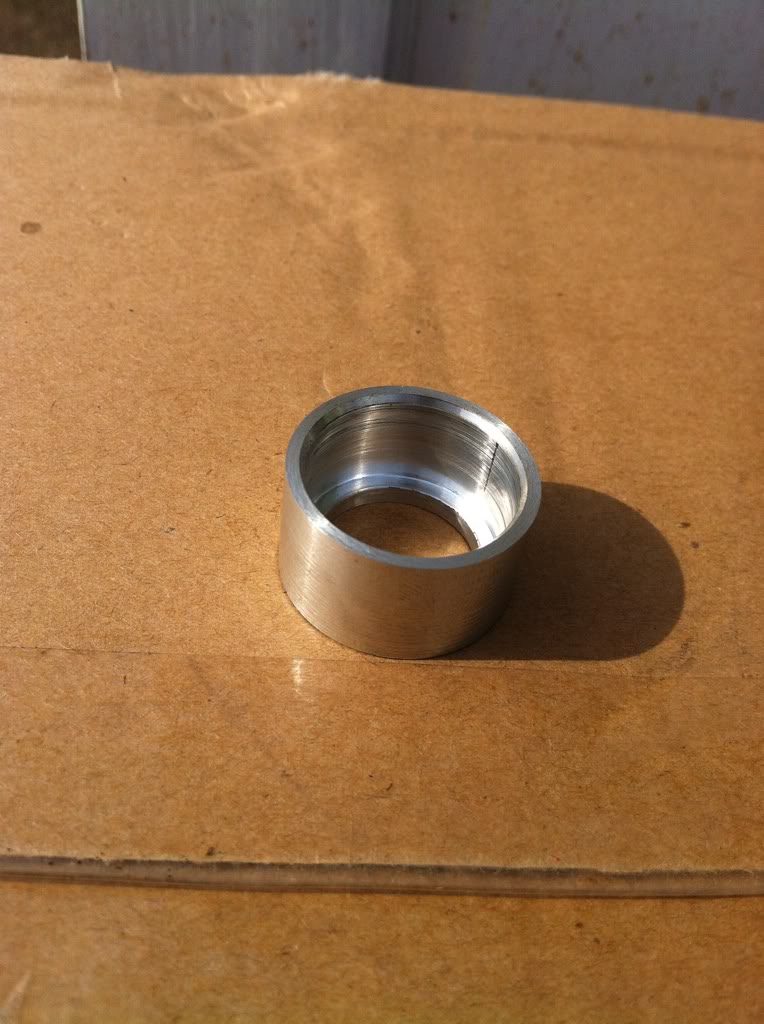
Like a glove

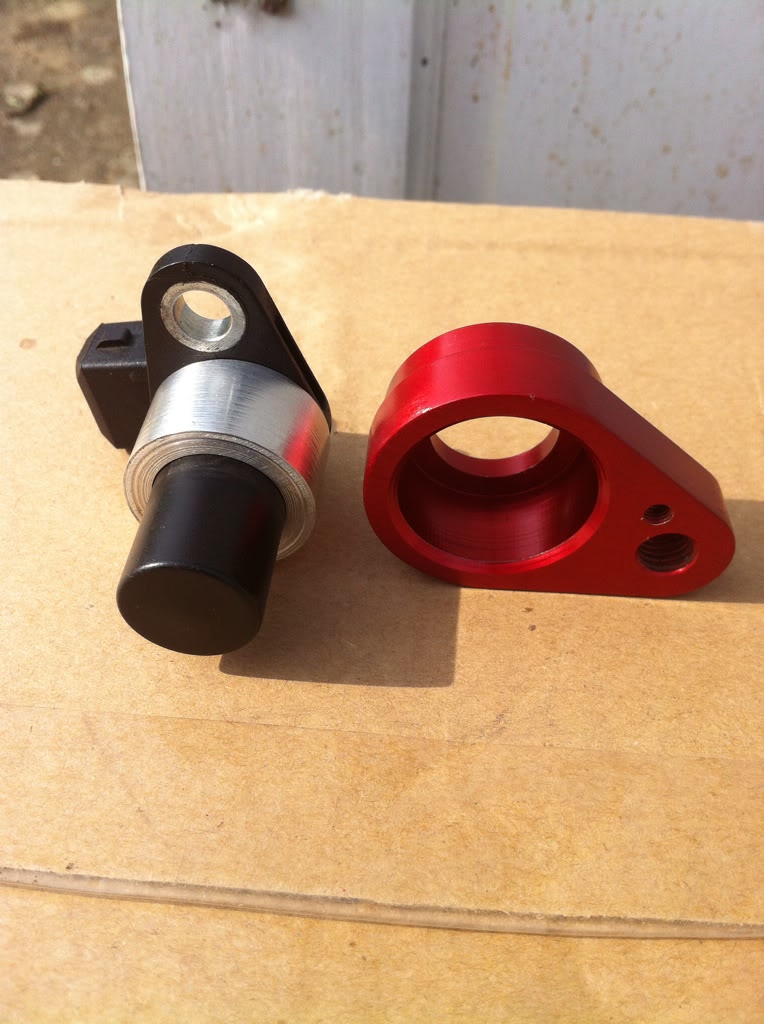
I made the sleeve a real tight fit on purpose and planned to heat the original housing and push in the sleeve, so I left the heat gun on it for 20 minutes and when I went back to it the anodising had come off and it had turned gold!
No idea why as I heated the uprights to 100 degrees and the anodising was fine and by the same firm so I can only assume it was a different alloy but never mind, I will have it done again when I get some more bits done
Anyway, job done
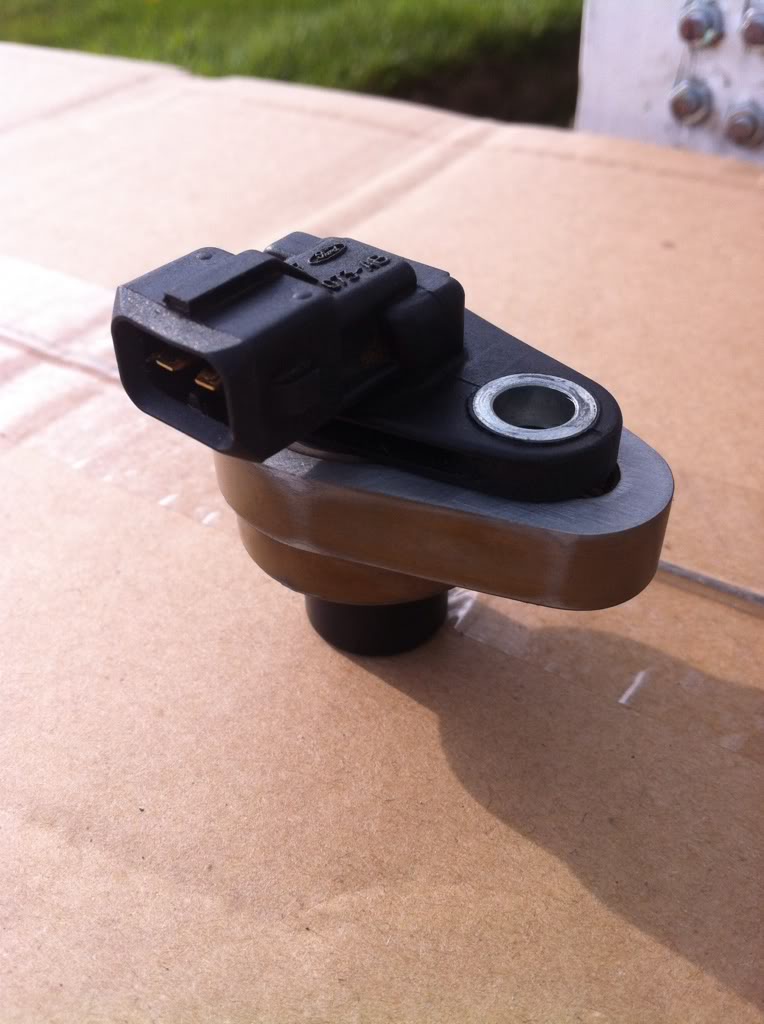
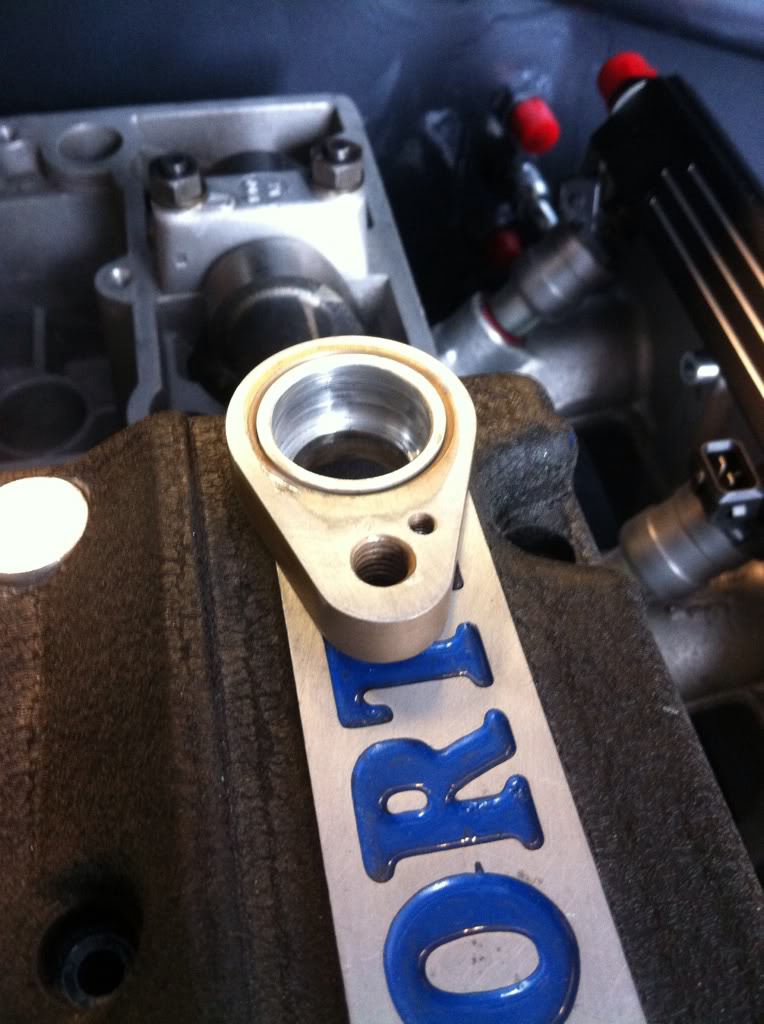
Cam cover can be fitted and removed now but the actual sensor needs to be fitted after cam cover but the sensor housing can stay in so that's perfect,
The one thing you will notice is the securing hole which is for an 8mm bolt overlaps the original threaded hole to suit the bigger sensor so il show you what I done to get round that later in the week

Also got another heel plate as I wanted a bit more under my feet
On the drivers plate
Not bolted in yet but makes the difference I was after
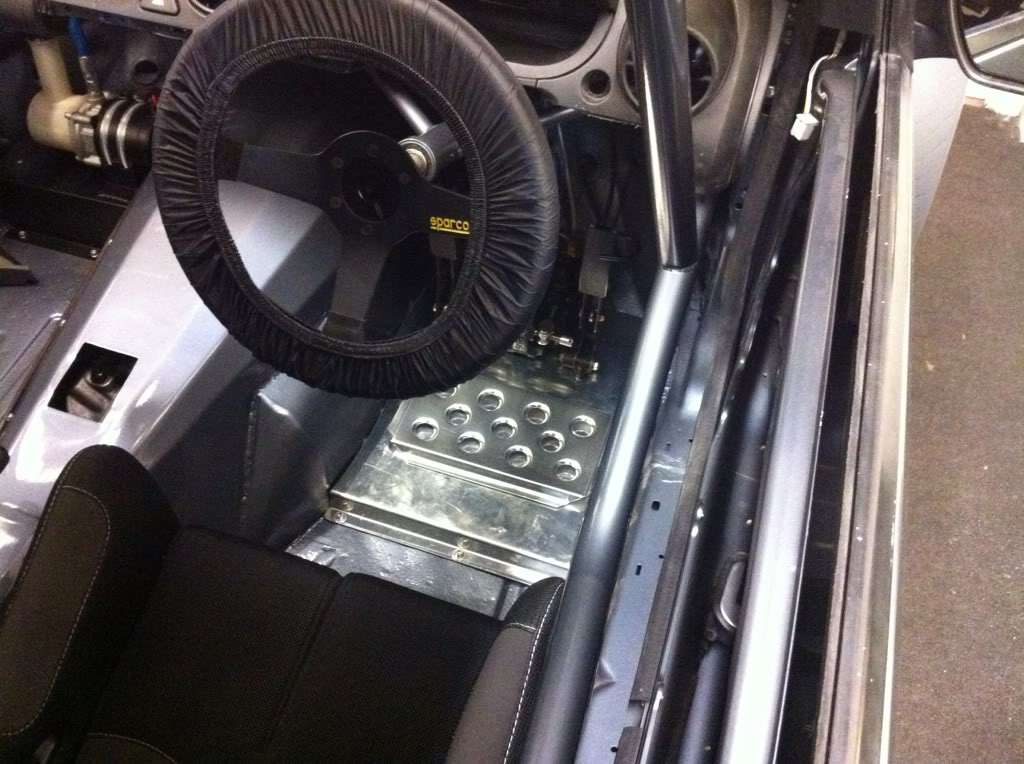
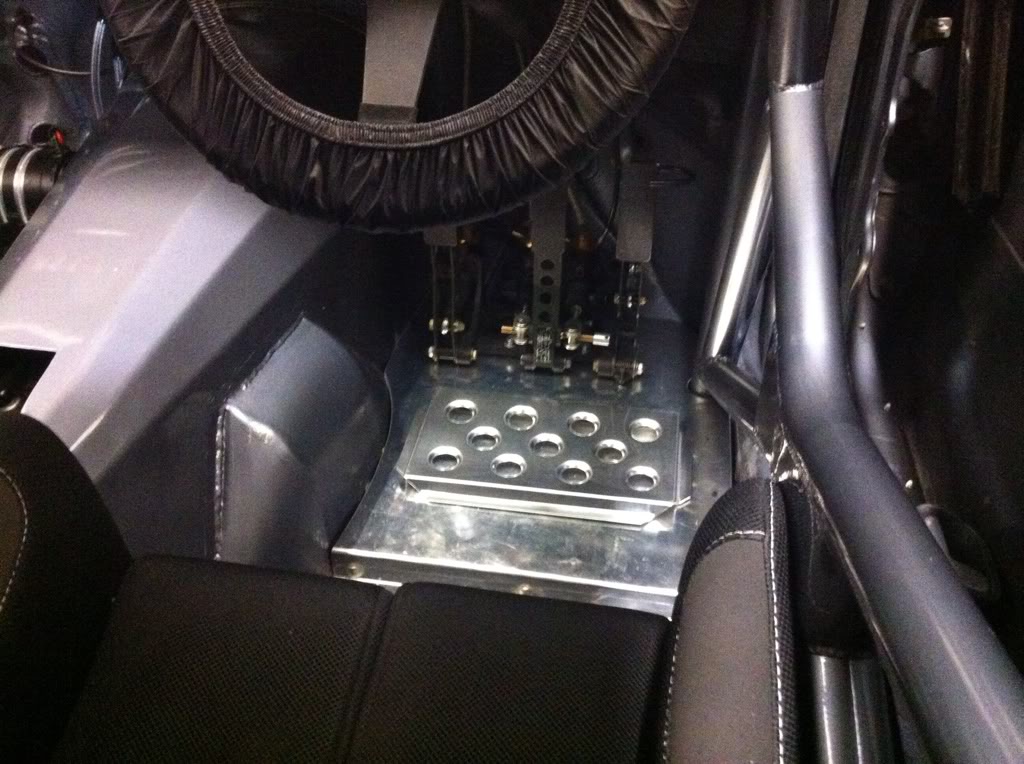
Just need powder coating and some grip tape now
Thanks
Marc
Had the prob of clearance with the wrc cam sensor set up so as advised by coley and whizzisat and a few others I sourced a galaxy sensor which is a more compact 90 degree angle
So rather than sell the wrc sensor bracket I sleeved it to suit the smaller dia galaxy sensor
So to start with
Then cut a bit of alloy bar
Drill the center hole out a bit, had to finish by boring as I did not have the correct size drill bit,
After boring to suit sensor and slightly larger the other end for the oring seal, and added a small chamfer
Like a glove
I made the sleeve a real tight fit on purpose and planned to heat the original housing and push in the sleeve, so I left the heat gun on it for 20 minutes and when I went back to it the anodising had come off and it had turned gold!
No idea why as I heated the uprights to 100 degrees and the anodising was fine and by the same firm so I can only assume it was a different alloy but never mind, I will have it done again when I get some more bits done
Anyway, job done
Cam cover can be fitted and removed now but the actual sensor needs to be fitted after cam cover but the sensor housing can stay in so that's perfect,
The one thing you will notice is the securing hole which is for an 8mm bolt overlaps the original threaded hole to suit the bigger sensor so il show you what I done to get round that later in the week
Also got another heel plate as I wanted a bit more under my feet
On the drivers plate
Not bolted in yet but makes the difference I was after
Just need powder coating and some grip tape now
Thanks
Marc


 09-05-2012, 11:03 AM
#2348
Advanced PassionFord User
Amazing..................!
One hell of a project M K, really coming together well
Quick question, where did you get the fittings that hold your front bumper on? i like!
James
One hell of a project M K, really coming together well
Quick question, where did you get the fittings that hold your front bumper on? i like!
James
10-05-2012, 10:29 AM
#2350
Advanced PassionFord User
 11-05-2012, 09:24 PM
#2352
Advanced PassionFord User

awesome car mark and i cant wait to see it in the flesh i have the tilton 600 series pedals in mine and had a false floor made incorparating a raised area from the pedals to the seat..it may be personal preferance but i found i needed the 'heel' area tight to the pedals other wise every time i pushed a pedal id get my foot stuck between the heel area and the pedals lol
27-05-2012, 08:47 PM
#2353
awesome car mark and i cant wait to see it in the flesh i have the tilton 600 series pedals in mine and had a false floor made incorparating a raised area from the pedals to the seat..it may be personal preferance but i found i needed the 'heel' area tight to the pedals other wise every time i pushed a pedal id get my foot stuck between the heel area and the pedals lol
27-05-2012, 09:32 PM
#2354
Haven't had time for the car or money really over the last month or so due to other things like stag doo's to Puerto Banus and house and dog sitting lol but i finally had a couple of days to get a few things done, only small things but needed doing all the same
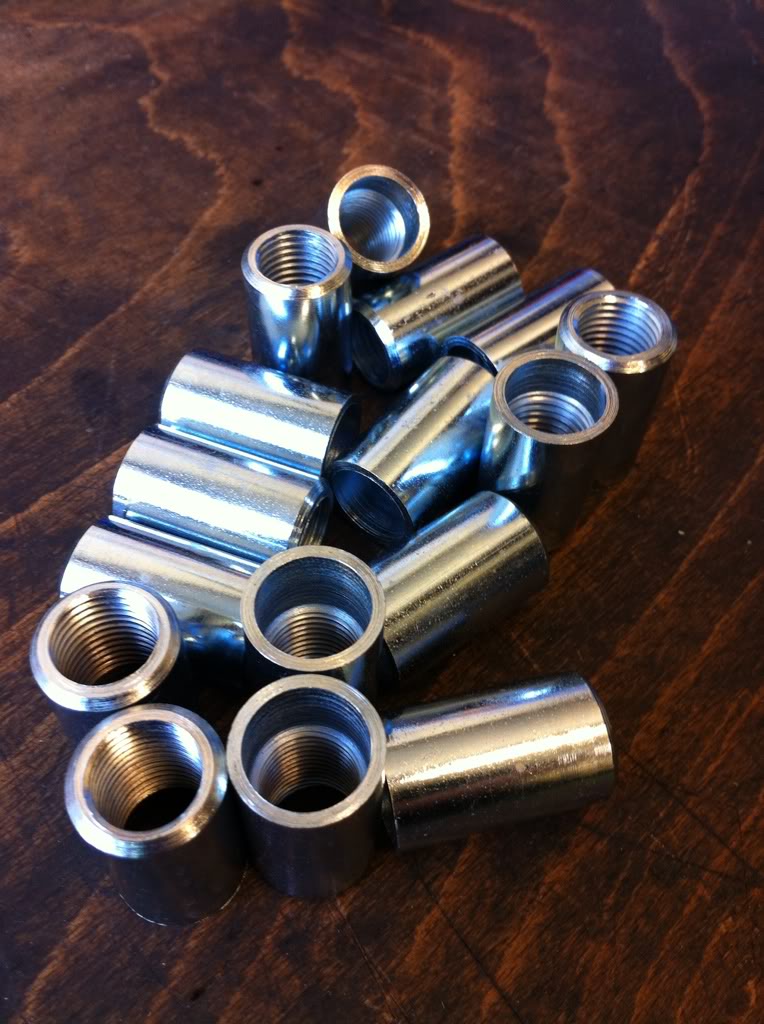
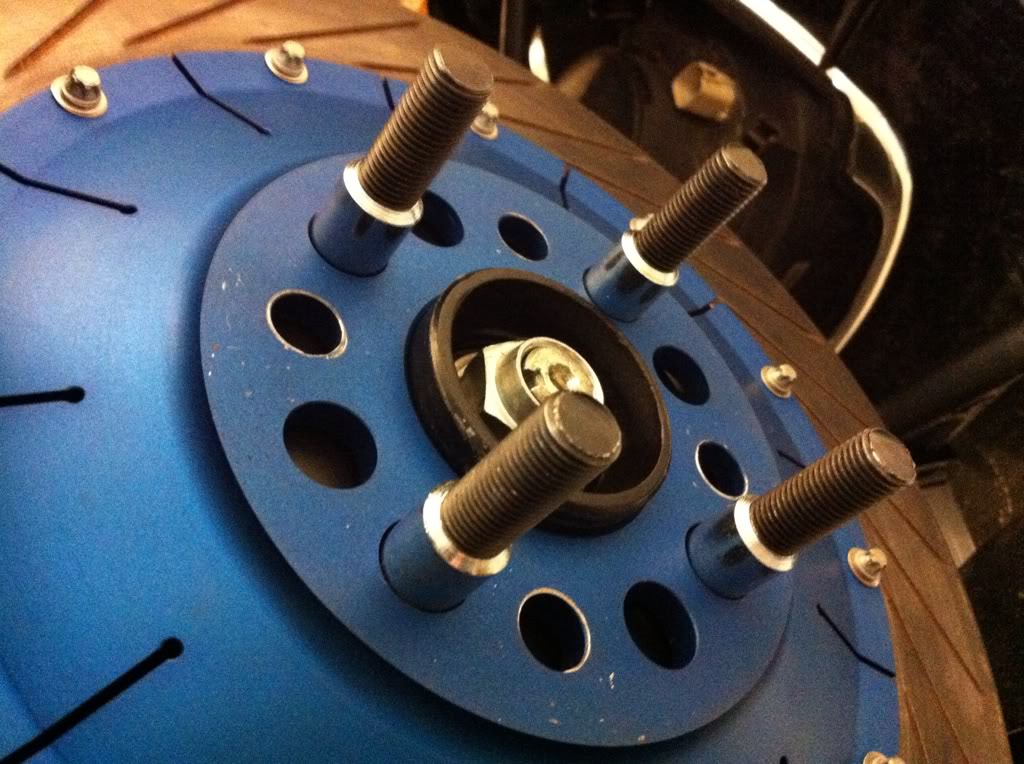
I made my self some wrc/grpa style wheel stud sleeves for strengthening the studs when i had my old lathe but it drilled slightly off center so when fitted the sleeves sat offset on the studs, causing the disc bell holes to need drilling out and the wheels to be fiddly to get on so i was never happy. Well i bought another small lathe as i found i could no longer be without one when doing a build like this or any for that matter, and made myself a new set,
Lathe drilled almost arrow straight, about as good as your get with one of these chinese lathes anyway
So a new set was ready

You can see above they line up nicely when screwed onto these old studs which shows they are drilled as good as dead center,
Then i got them plated, meant to be yellow zinc but he done them silver but looks fine to me,
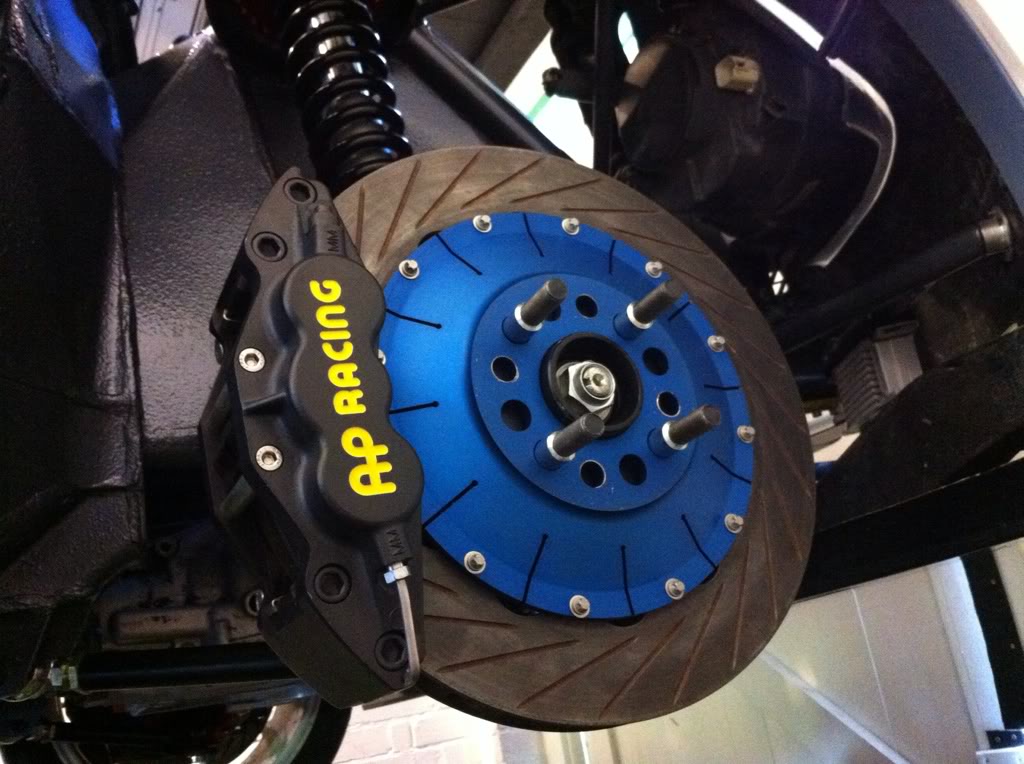
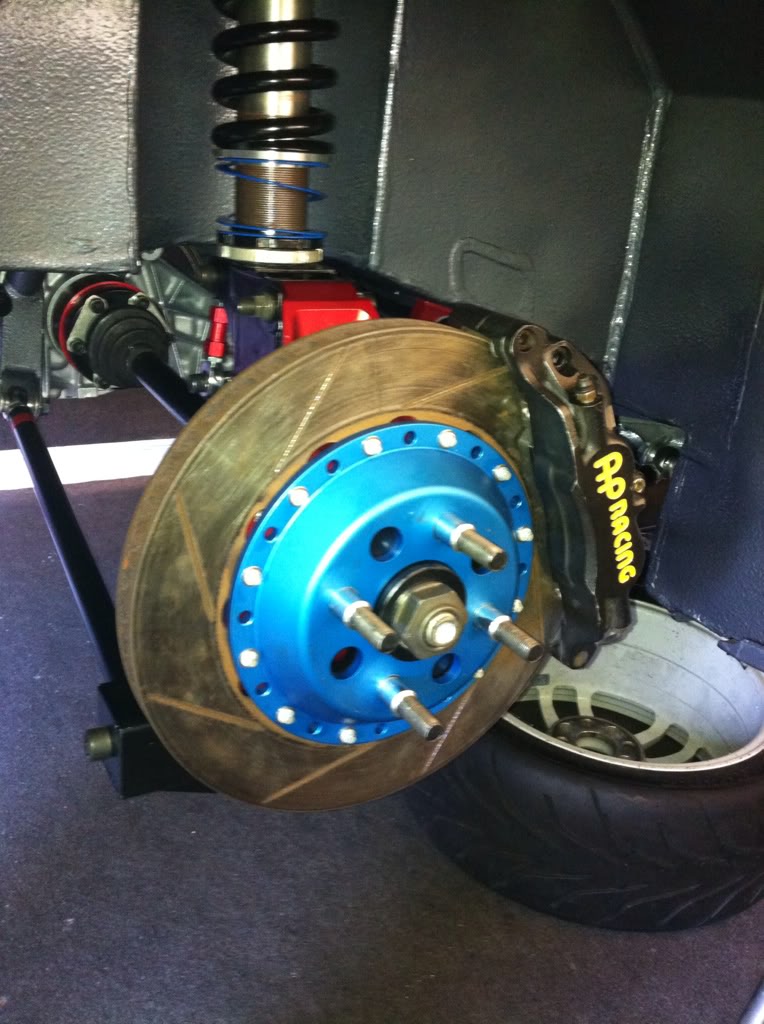
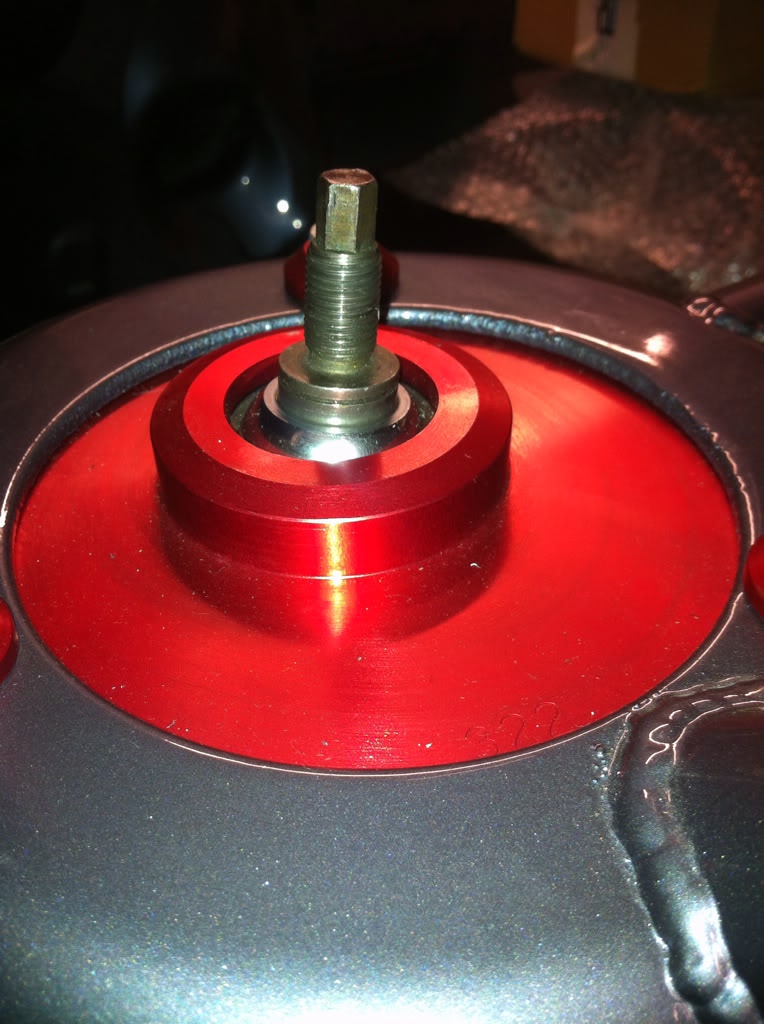
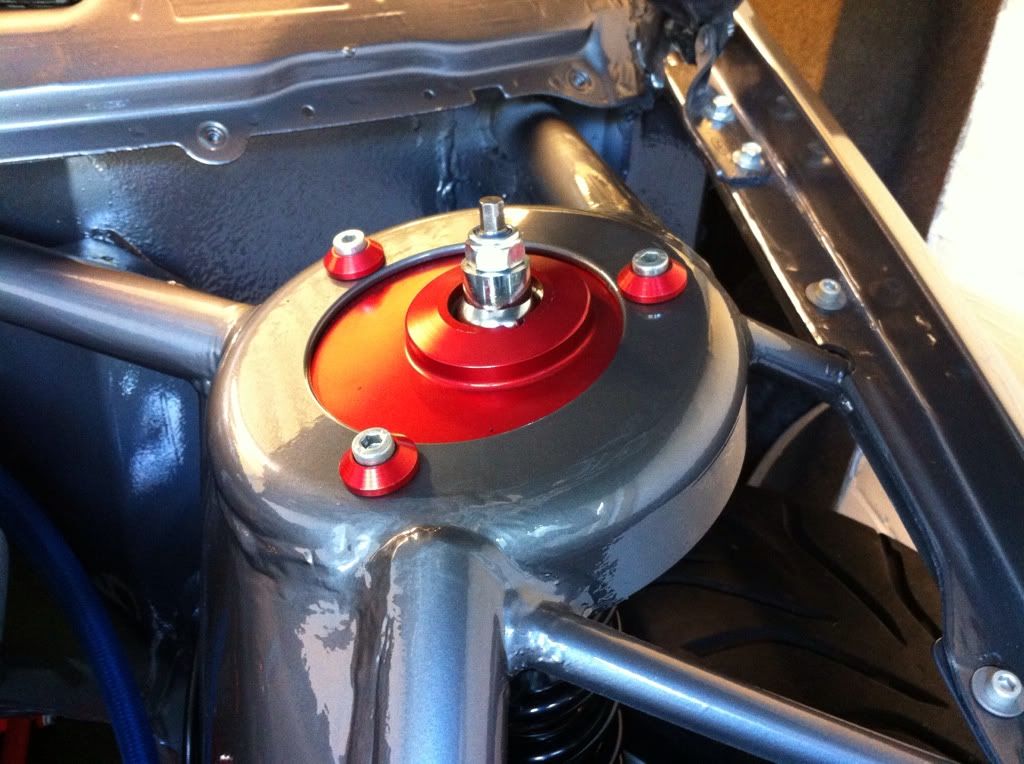
Another thing i got done was the spacers for the top of the bilstein inserts that come through the top mount, needed some counterbored items to clear the shoulder and pull the insert fully up into the mount so knocked these up and had them plated as well
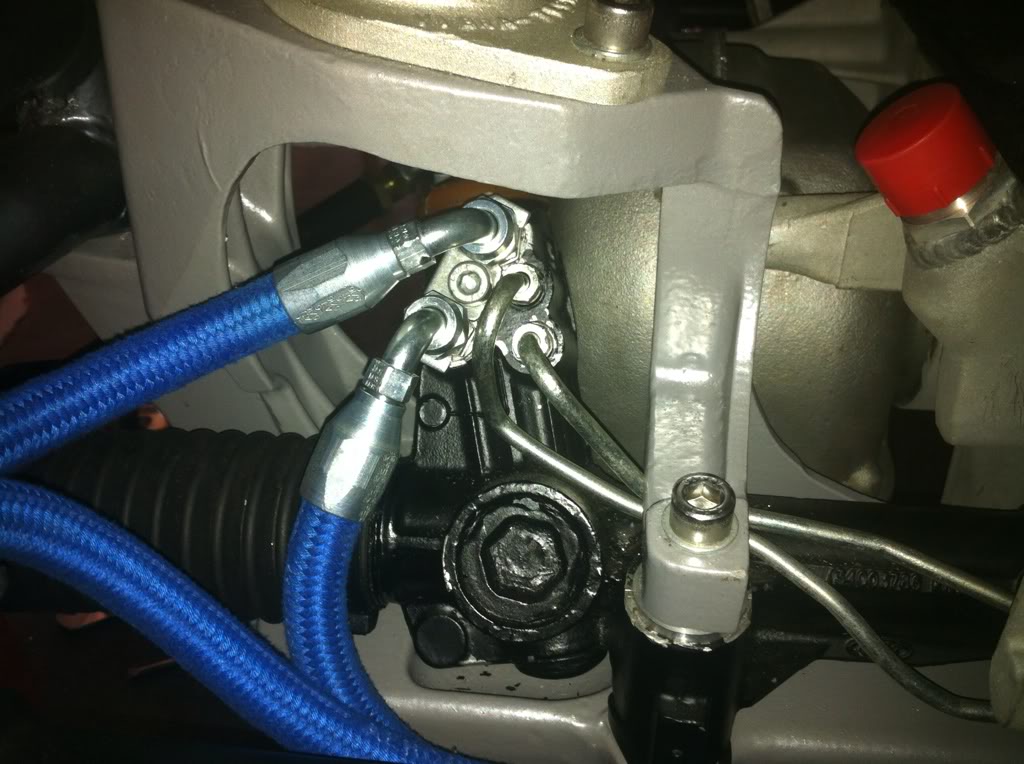
Got the last bit of power steering hose i needed through from earls, i know the high pressure hose is not needed on the return but being fussy i wanted it to match, so fitted the power steering cooler, not in direct full airflow but just having the cooler fitted will be enough regardless, so thats another thing done and off the list
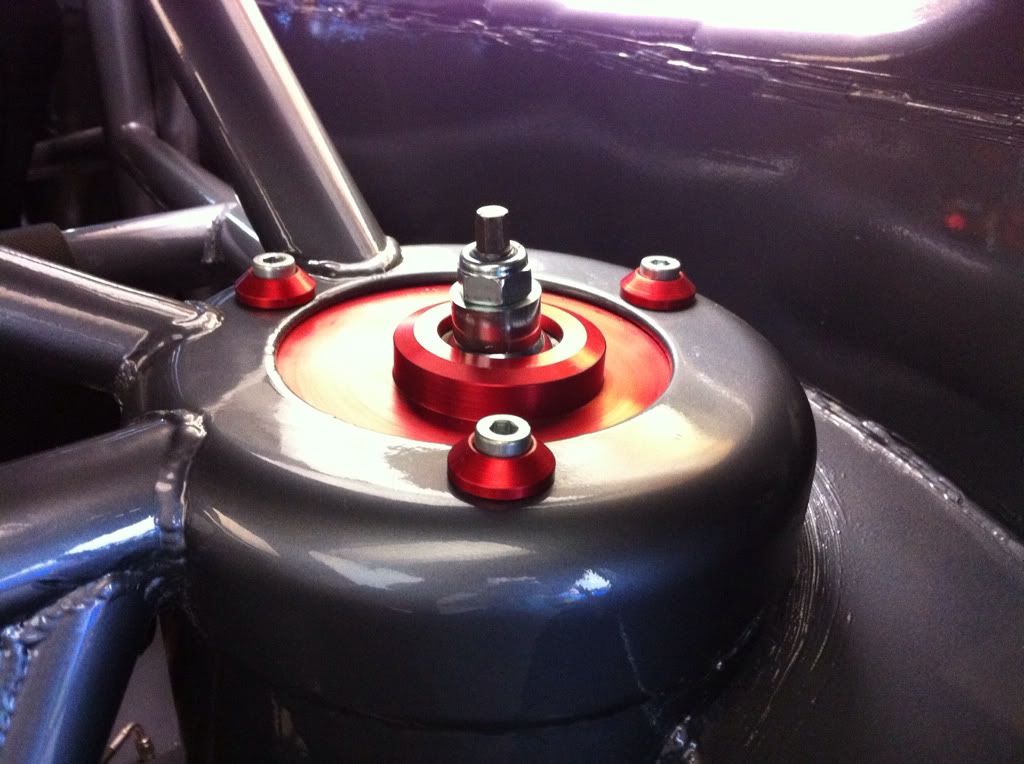
Small job but another one that needed doing was fitting foam to the base of fuel tank and to the straps, don't want any annoying rattles that can be avoided, i also put some in the battery recess and the battery strap but no pics of that
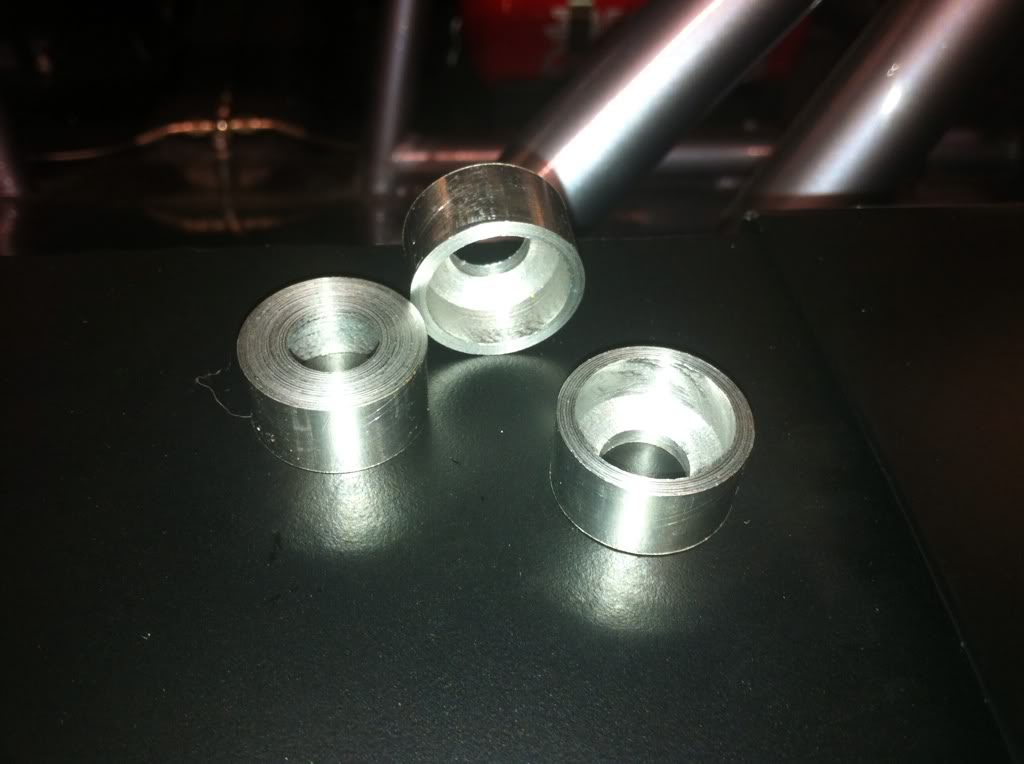
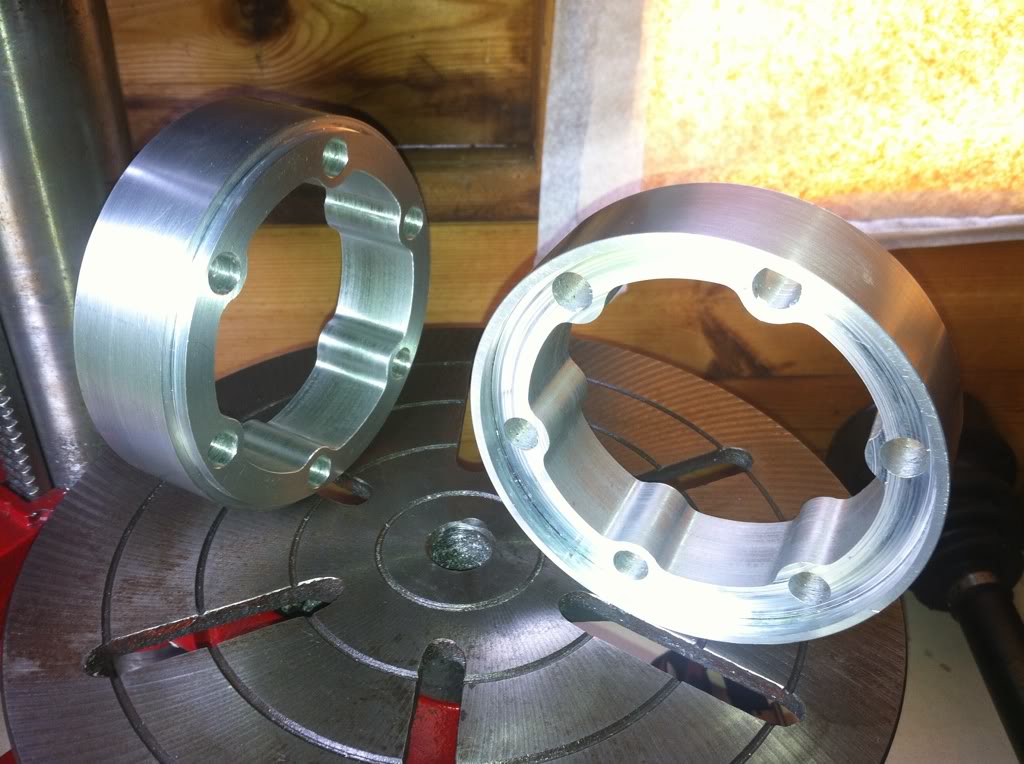
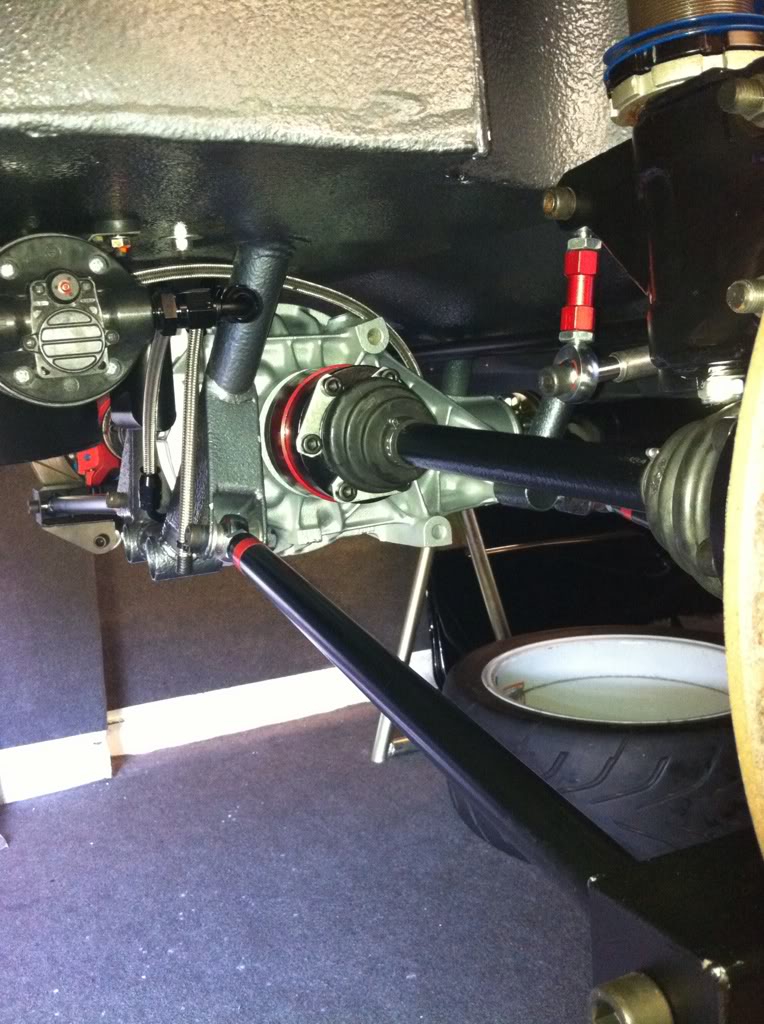
Next up a bit more machining work, as the cars track was widened about 50mm - 60mm i needed to space the rear driveshafts out at the diff flanges so went about getting some custom spacers sorted out of some aircraft spec alloy, due to the pattern i could not do this all myself so i have to make the initial ring then get someone else to mill the pattern i gave them then once that was done i finished them off by turning the inside and outside step so the the driveshaft cv sits into the spacer and the spacer into the flange just like standard, then just get them anodised in my red as per everything else,
I also bought longer 12.9 high tensile cap heads to suit the now widened joints
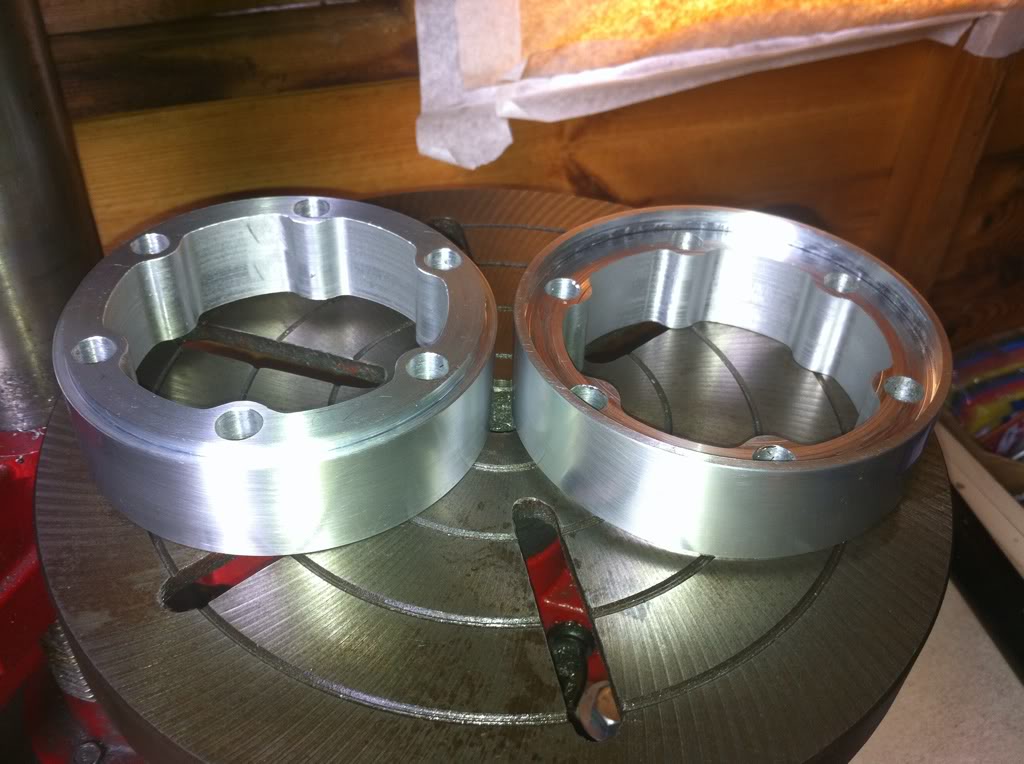
Pattern which clears all ball bearing ways etc, copied from the diff flanges
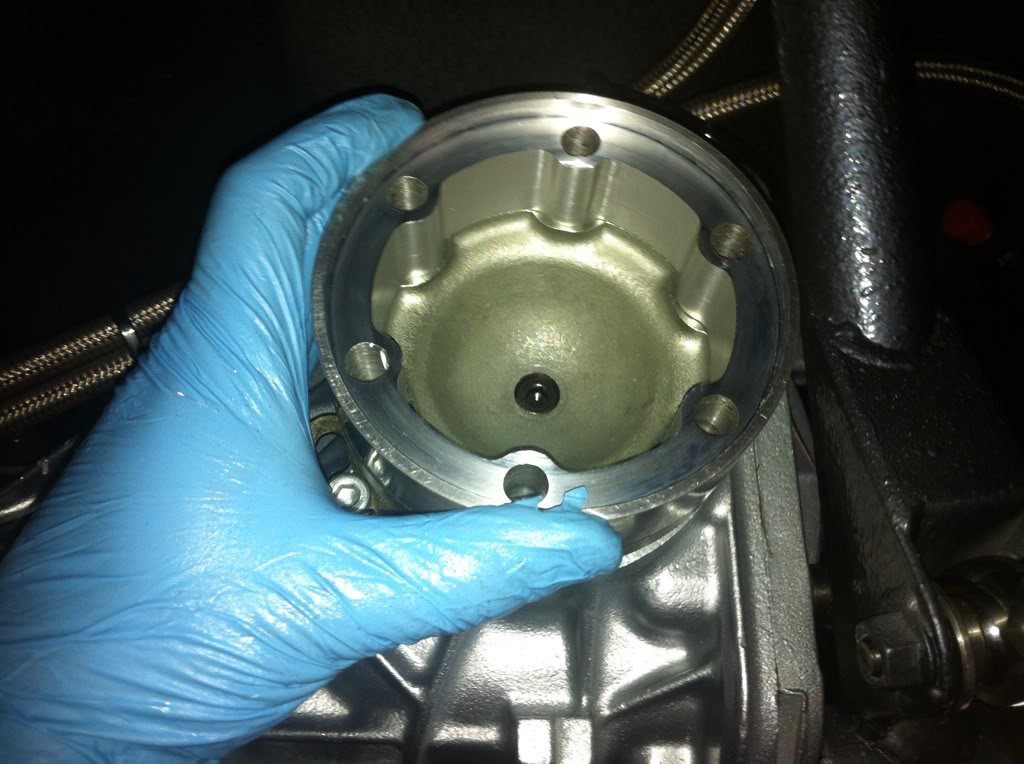
Fits snug into the diff flange due to the turned down step i put on the end
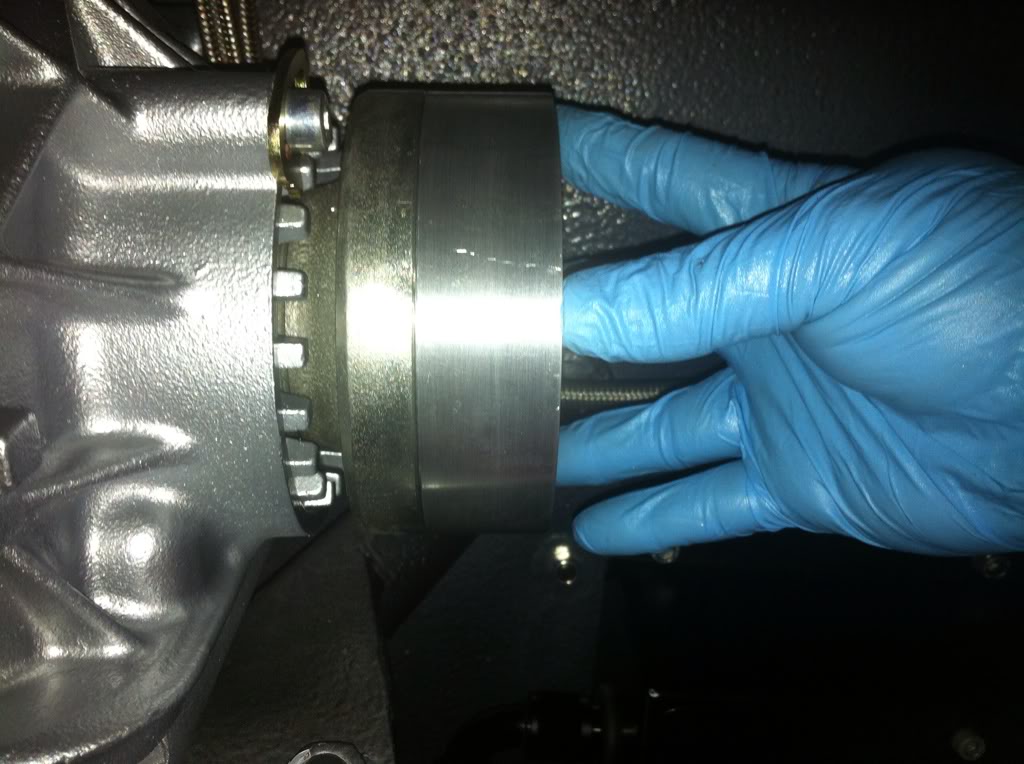
Same with the cv side but this time i machined an internal step so the cv fits snug inside the spacer
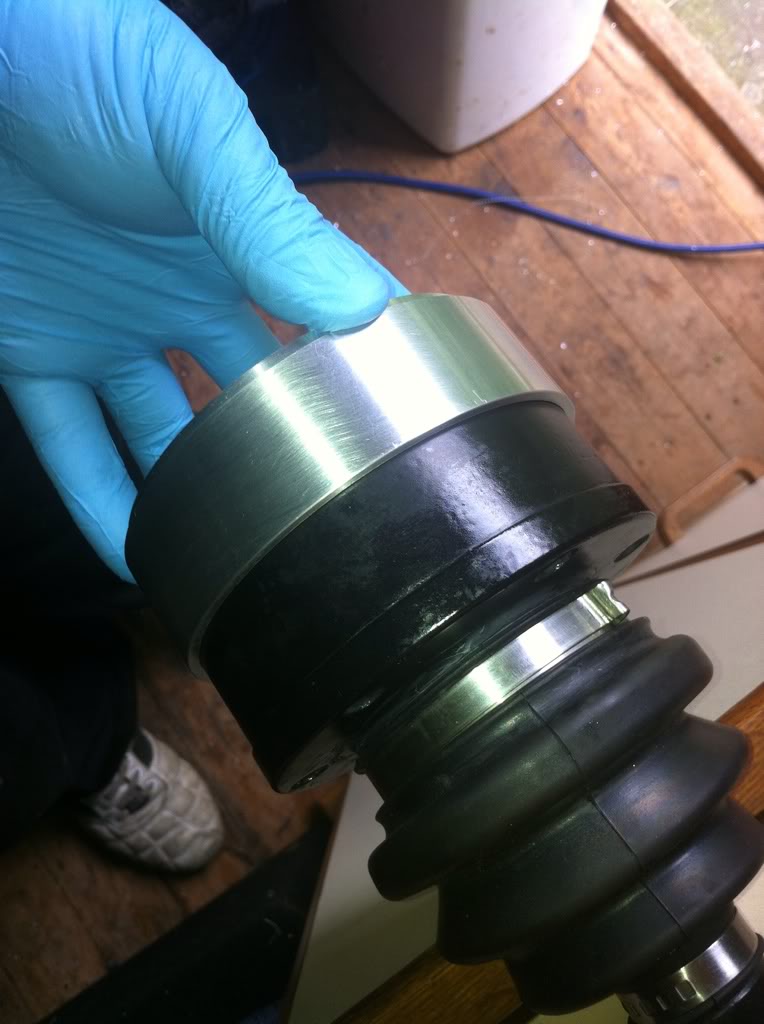
Test fit
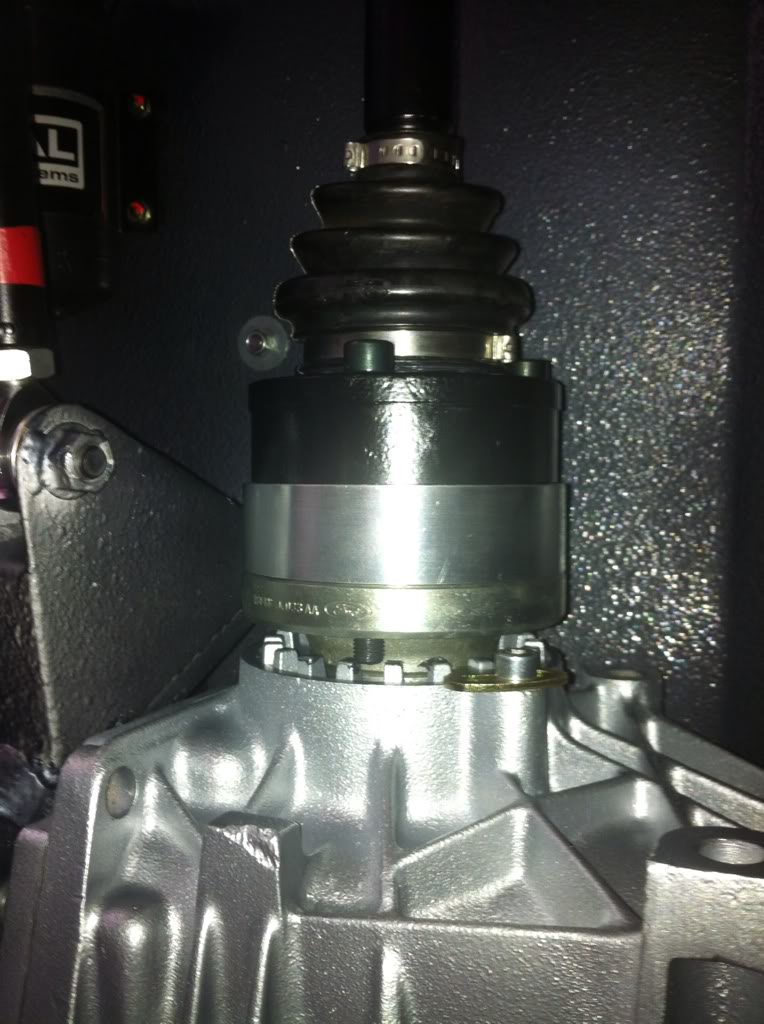
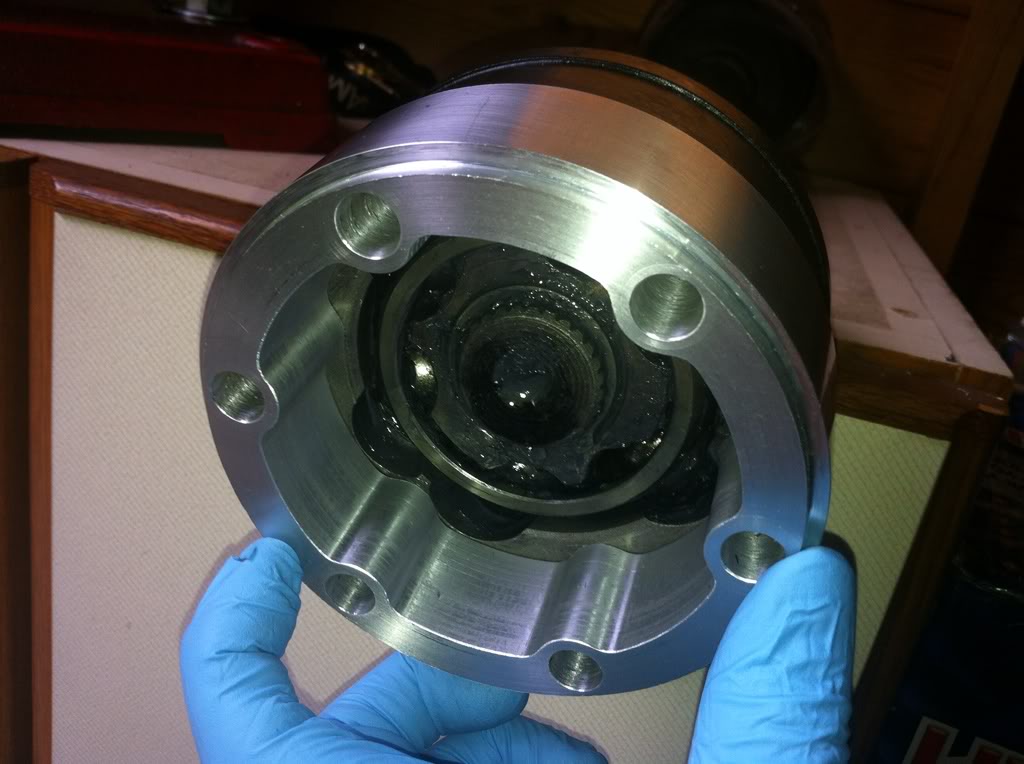
Then anodised and fitted for good, used a load of cv grease though to pack the spacer full with or due to the big gap all the cv would most likely end up in the spacer and none in the joint so packed it to be safe
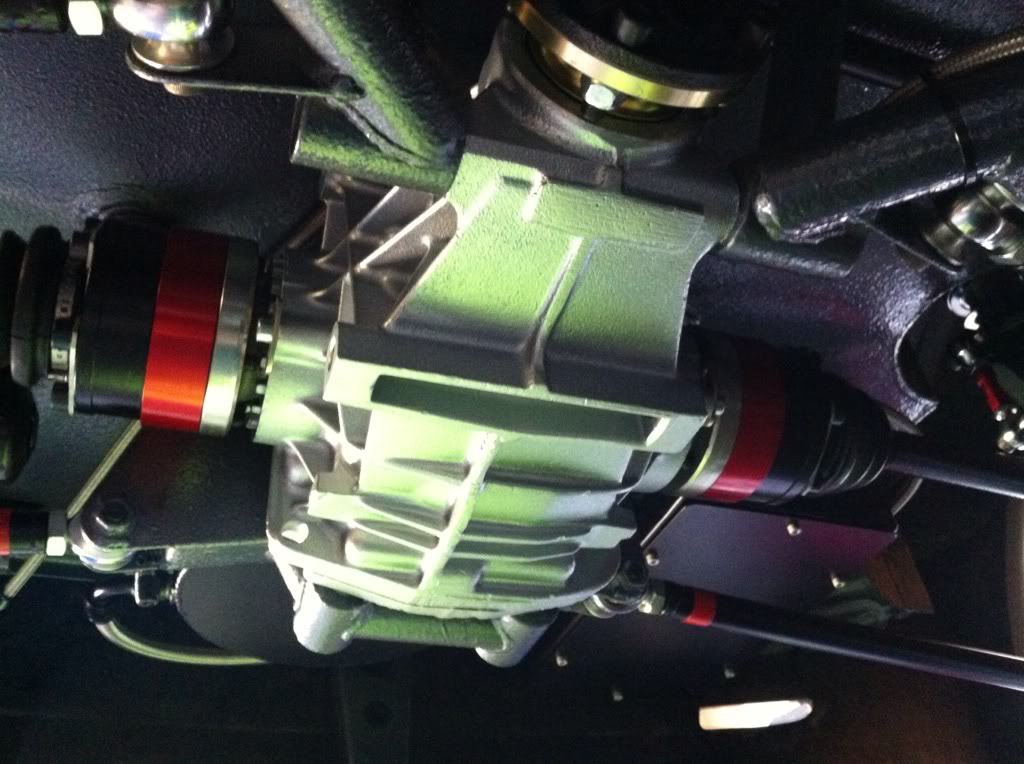
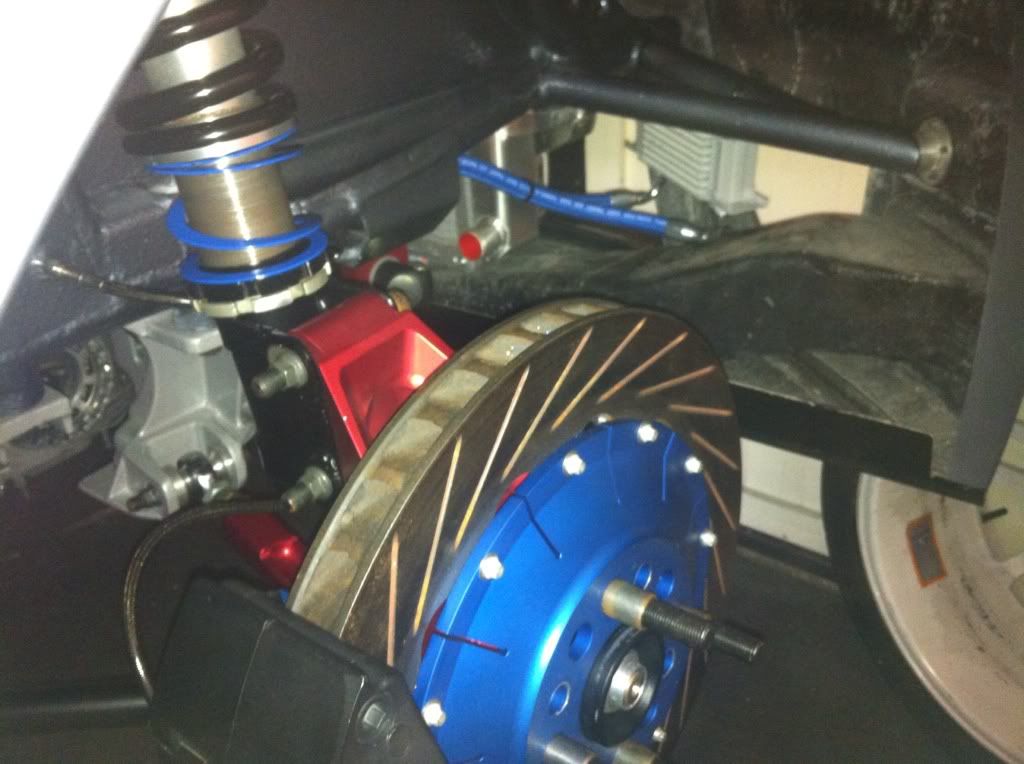
Can also see the new smaller rear drop links i made and had anodised as my last ones were too long and fouled the driveshaft once fitted
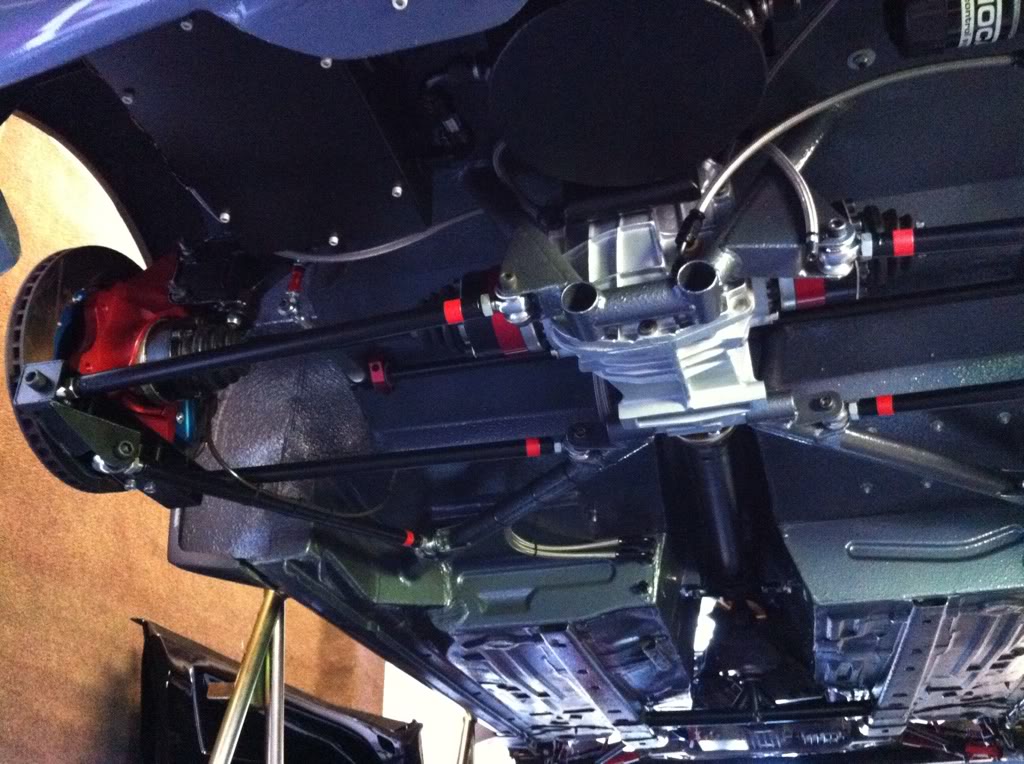

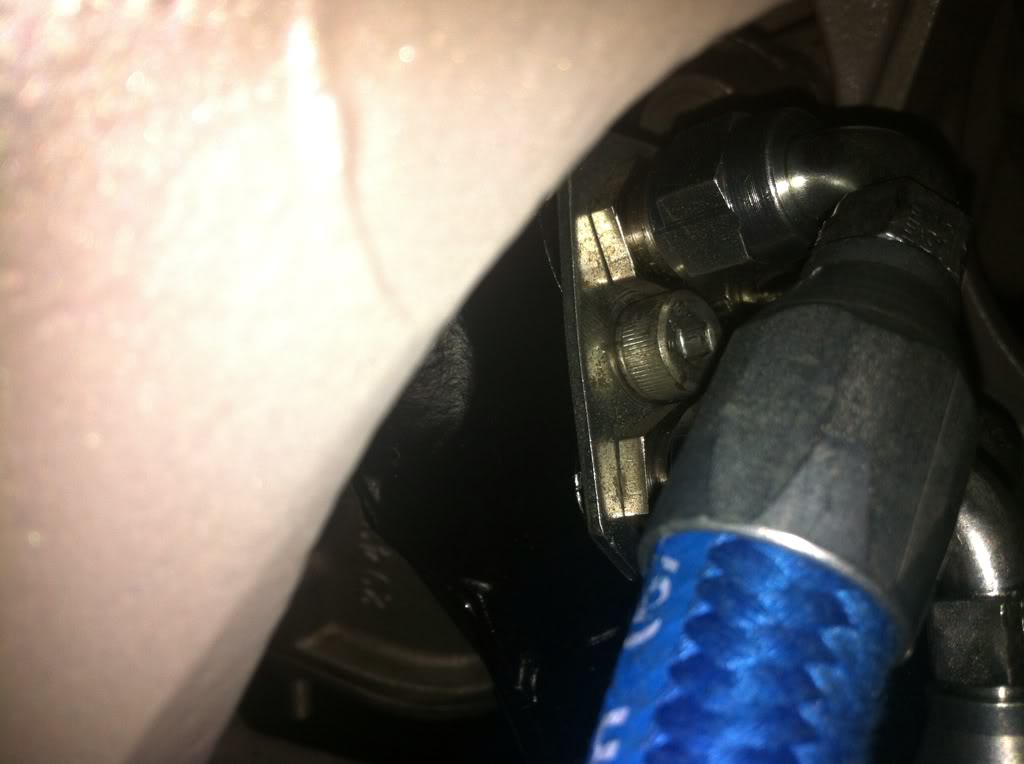
Whilst working on the rear end i fitted the rear diff cooler, got all the fittings i needed from torques as usual apart from one banjo i had to get from think auto as a normal fitting fouled on the boot floor when trying to fit into the top of the diff for the return, got to fit that this week some time so you may notice the un fitted hose in the pics lol
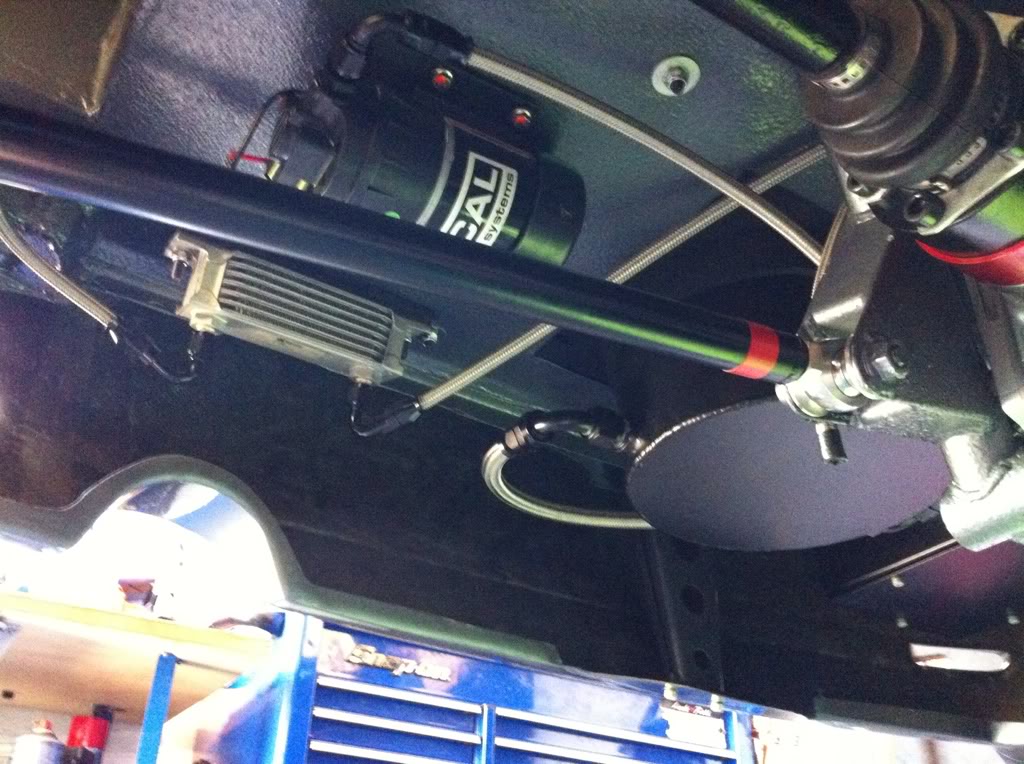
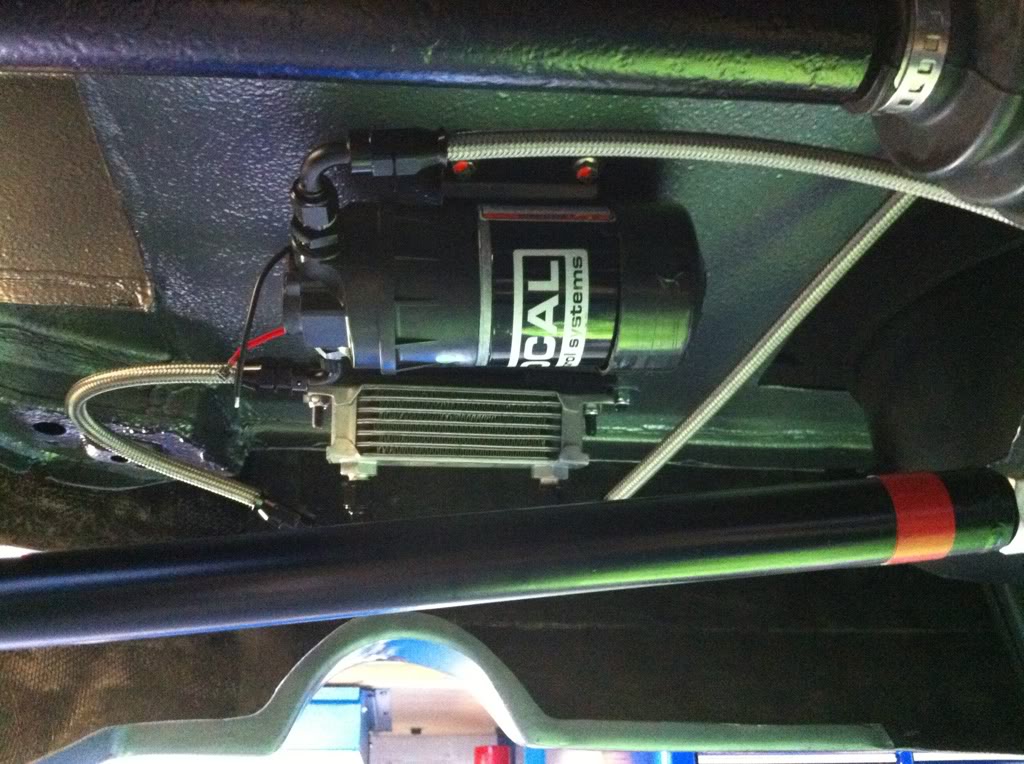
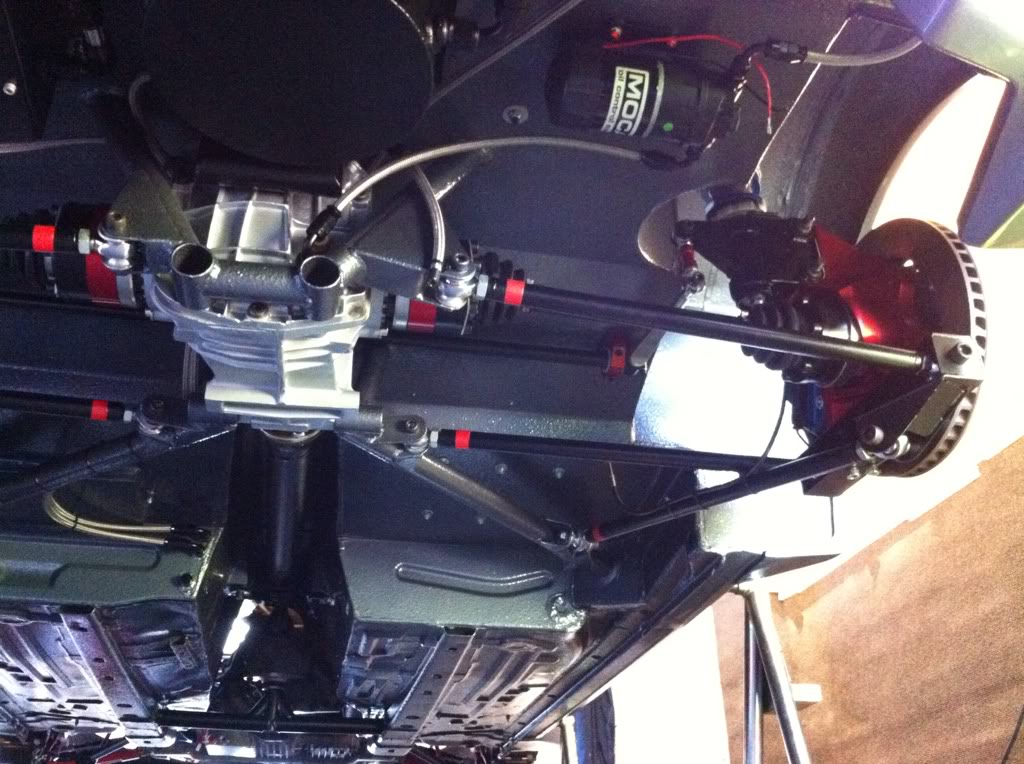
Just need to get a fluid switch to fit into the diff cover where the fitting come out at the bottom so that when the oil reached 87 degrees it turns the pump on and turns off again if it drops to 65 degress, but there is a few weeks wait for that so will be done when it turns up.
And the very last thing i did and have been meaning to do for a while was this
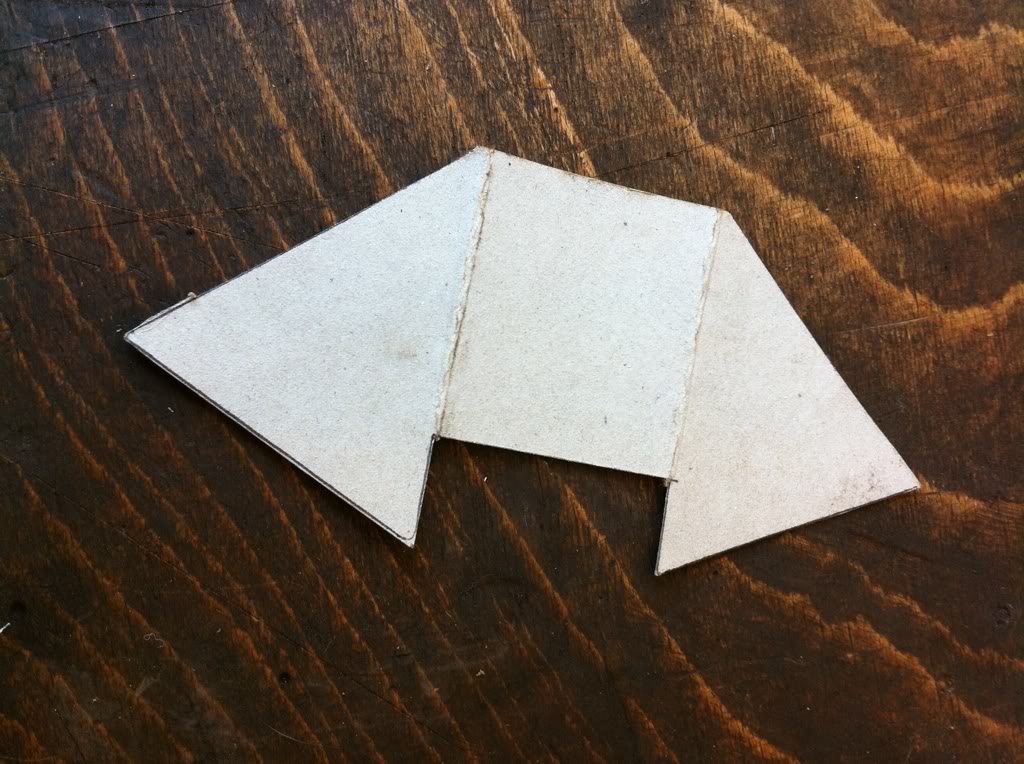
Any ideas what this is the start of???????????????????????????
I made my self some wrc/grpa style wheel stud sleeves for strengthening the studs when i had my old lathe but it drilled slightly off center so when fitted the sleeves sat offset on the studs, causing the disc bell holes to need drilling out and the wheels to be fiddly to get on so i was never happy. Well i bought another small lathe as i found i could no longer be without one when doing a build like this or any for that matter, and made myself a new set,
Lathe drilled almost arrow straight, about as good as your get with one of these chinese lathes anyway
So a new set was ready
You can see above they line up nicely when screwed onto these old studs which shows they are drilled as good as dead center,
Then i got them plated, meant to be yellow zinc but he done them silver but looks fine to me,
Another thing i got done was the spacers for the top of the bilstein inserts that come through the top mount, needed some counterbored items to clear the shoulder and pull the insert fully up into the mount so knocked these up and had them plated as well
Got the last bit of power steering hose i needed through from earls, i know the high pressure hose is not needed on the return but being fussy i wanted it to match, so fitted the power steering cooler, not in direct full airflow but just having the cooler fitted will be enough regardless, so thats another thing done and off the list
Small job but another one that needed doing was fitting foam to the base of fuel tank and to the straps, don't want any annoying rattles that can be avoided, i also put some in the battery recess and the battery strap but no pics of that
Next up a bit more machining work, as the cars track was widened about 50mm - 60mm i needed to space the rear driveshafts out at the diff flanges so went about getting some custom spacers sorted out of some aircraft spec alloy, due to the pattern i could not do this all myself so i have to make the initial ring then get someone else to mill the pattern i gave them then once that was done i finished them off by turning the inside and outside step so the the driveshaft cv sits into the spacer and the spacer into the flange just like standard, then just get them anodised in my red as per everything else,
I also bought longer 12.9 high tensile cap heads to suit the now widened joints
Pattern which clears all ball bearing ways etc, copied from the diff flanges
Fits snug into the diff flange due to the turned down step i put on the end
Same with the cv side but this time i machined an internal step so the cv fits snug inside the spacer
Test fit
Then anodised and fitted for good, used a load of cv grease though to pack the spacer full with or due to the big gap all the cv would most likely end up in the spacer and none in the joint so packed it to be safe
Can also see the new smaller rear drop links i made and had anodised as my last ones were too long and fouled the driveshaft once fitted
Whilst working on the rear end i fitted the rear diff cooler, got all the fittings i needed from torques as usual apart from one banjo i had to get from think auto as a normal fitting fouled on the boot floor when trying to fit into the top of the diff for the return, got to fit that this week some time so you may notice the un fitted hose in the pics lol
Just need to get a fluid switch to fit into the diff cover where the fitting come out at the bottom so that when the oil reached 87 degrees it turns the pump on and turns off again if it drops to 65 degress, but there is a few weeks wait for that so will be done when it turns up.
And the very last thing i did and have been meaning to do for a while was this
Any ideas what this is the start of???????????????????????????
27-05-2012, 10:02 PM
#2355
10K+ Poster!!
This build just gets more epic with every update Marc, I thought your fezzy was impressive but this is in another league.
Not a clue what the plate is going to be though
Not a clue what the plate is going to be though

 28-05-2012, 08:55 AM
#2360
Appreciate your comment mate
Thanks Alan, all you guys praises gives me the motivational boost needed with these projects
No, but good idea lol
They are very close but they clear fine, I may turn them down a few mm to be safe though
Template is not for diff guard, that will be next

