E30 328i turbo w/adjustable suspension geometry
 17-05-2009, 11:59 AM
#1
Too many posts.. I need a life!!
Thread Starter

Join Date: Aug 2005
Location: Oxfordshire
Posts: 757
Likes: 0
Received 0 Likes
on
0 Posts
Hi there not posted for a while on here but thought I'd share my new project, I know from the past that there is a welath of knowledge on here not just Ford based and is a great resource for people finding their feet.
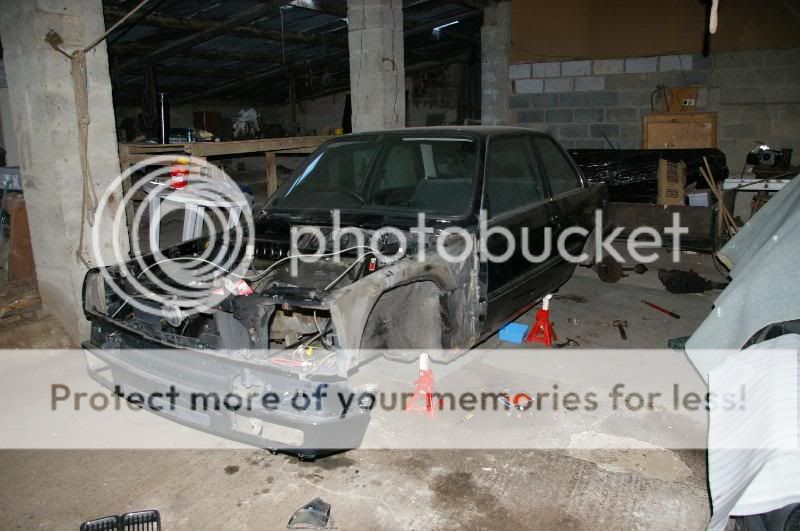
Couple of pics of the new shell...
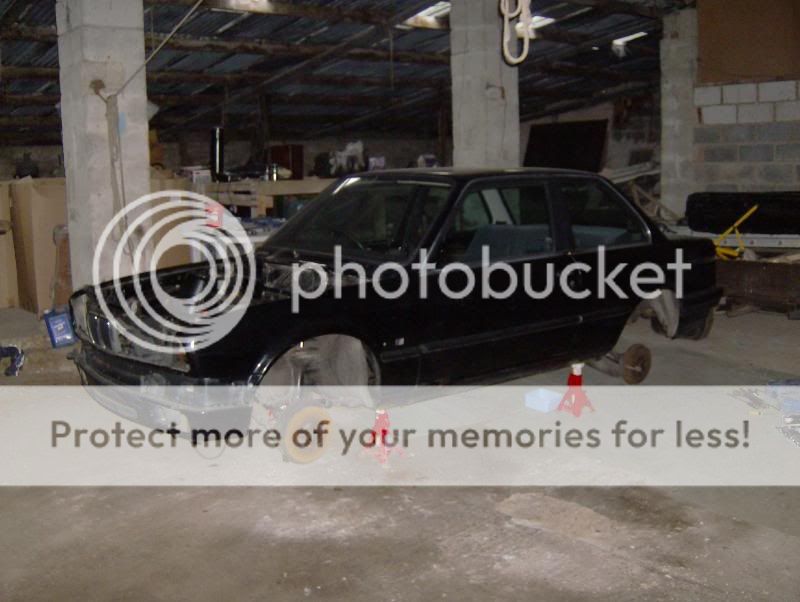

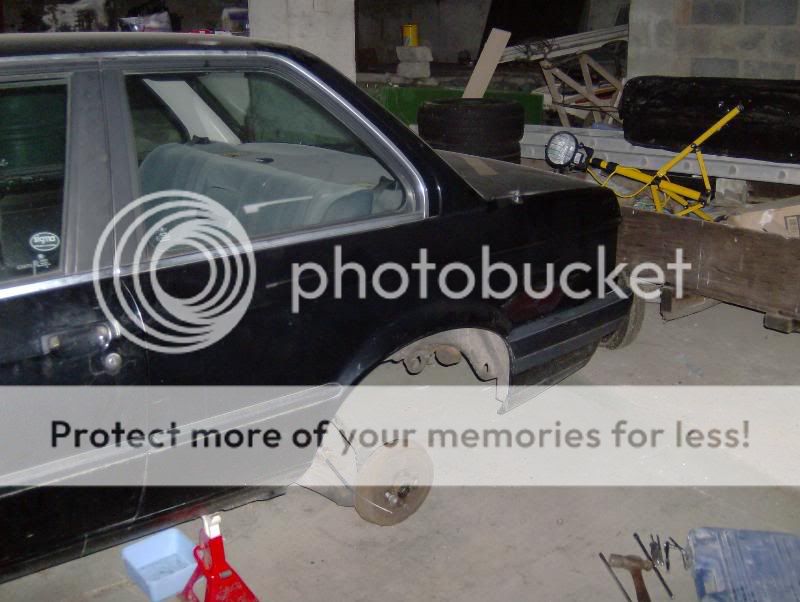
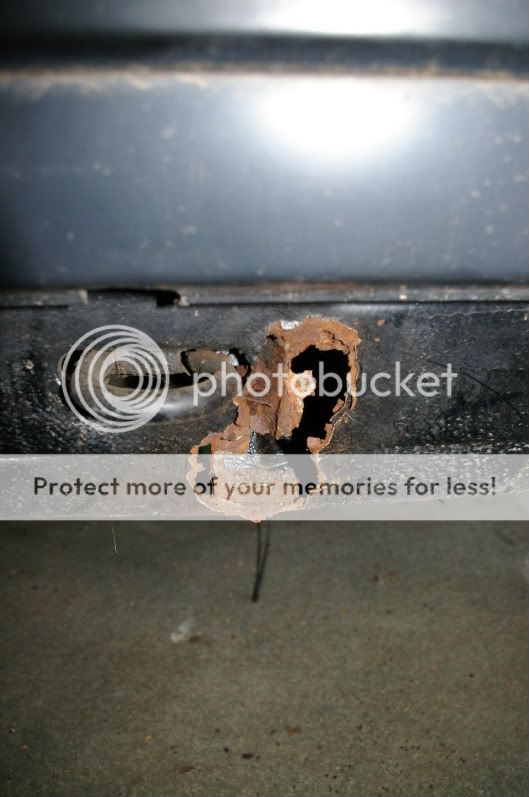
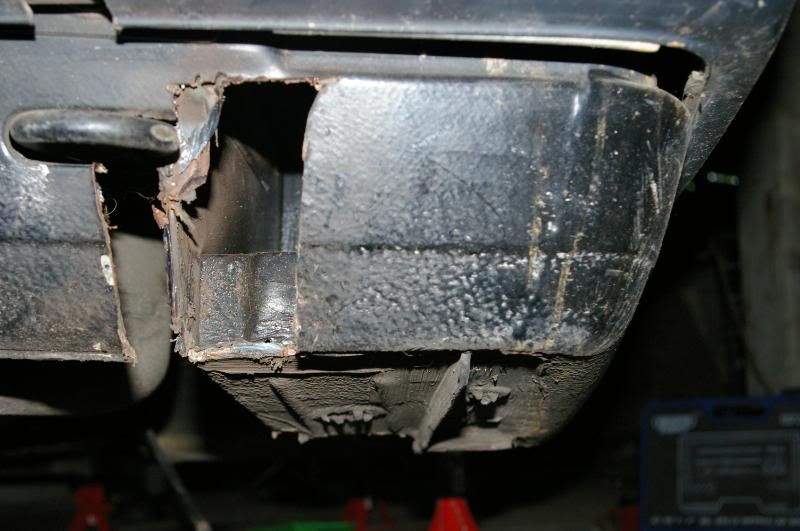
Very tidy shell with very little rust, patch on the rear valence and on the N/S sill where the the front wing has collected a load of crap.
Engine wise I'm hoping to eventually go down the ITB route and a set of cams to open out the powerband. I'm going to see what I can rustle up with bike bodies. I've got a set of GSXR750 ones in the garage. It'll be a faf but got to be miles cheaper than going for bespoke ones.
Not too sure on the cams, they'll probably cost the earth!
Nice thing about the 1UZ on that set up, it should be getting on for high 300'sbhp and simmilar torque. And the engine itself is lighter than the M20. Should make a potent track car.
The main things that I'm going to have to deal with are obviously sorting out the rust issues, converting to 325/touring running gear and then deciding how to get the power from the flywheel to the diff. I'm currently thinking about using a 325 box that I have picked up and making an adaptor plate and having a custom flywheel made.
The wish list includes:
325/touring running gear
Medium cased LSD
Reinforced diff hanger
Fully polybushed
Having thoughts about convirting the front lower arms to allow some castor adjustment
Welded in cage
Turreted rear end
Coil-overs all round
And of course the lexarse engine.
I have just spent the first day, striping off bonnet, wings and have started going to work on the rear subframe.
Have to say that the BM is one of the more stress free cars to work on, everything just seems to be so well thought out and engineered
Going to be a slow project due to financial constraints, but should be good when it's finished
Couple of pics of the new shell...
Very tidy shell with very little rust, patch on the rear valence and on the N/S sill where the the front wing has collected a load of crap.
Engine wise I'm hoping to eventually go down the ITB route and a set of cams to open out the powerband. I'm going to see what I can rustle up with bike bodies. I've got a set of GSXR750 ones in the garage. It'll be a faf but got to be miles cheaper than going for bespoke ones.
Not too sure on the cams, they'll probably cost the earth!
Nice thing about the 1UZ on that set up, it should be getting on for high 300'sbhp and simmilar torque. And the engine itself is lighter than the M20. Should make a potent track car.
The main things that I'm going to have to deal with are obviously sorting out the rust issues, converting to 325/touring running gear and then deciding how to get the power from the flywheel to the diff. I'm currently thinking about using a 325 box that I have picked up and making an adaptor plate and having a custom flywheel made.
The wish list includes:
325/touring running gear
Medium cased LSD
Reinforced diff hanger
Fully polybushed
Having thoughts about convirting the front lower arms to allow some castor adjustment
Welded in cage
Turreted rear end
Coil-overs all round
And of course the lexarse engine.
I have just spent the first day, striping off bonnet, wings and have started going to work on the rear subframe.
Have to say that the BM is one of the more stress free cars to work on, everything just seems to be so well thought out and engineered
Going to be a slow project due to financial constraints, but should be good when it's finished
Last edited by Mongo; 17-10-2010 at 05:24 PM.
 17-05-2009, 12:01 PM
#2
Too many posts.. I need a life!!
Thread Starter
Join Date: Aug 2005
Location: Oxfordshire
Posts: 757
Likes: 0
Received 0 Likes
on
0 Posts
Little update.
I've aquired a donor car. Which will probably go back on the road for a small profit which should help fund a few bits and peices like an actual donor, suspension and a cage. It's too tidy to break and I'll get lynched by the purists lol.
I have also aquired a full set of powerflex bushes, unfortunately including concentric front arm bushes, so it's looking like adjustable ones are going to be sooner rather than later.
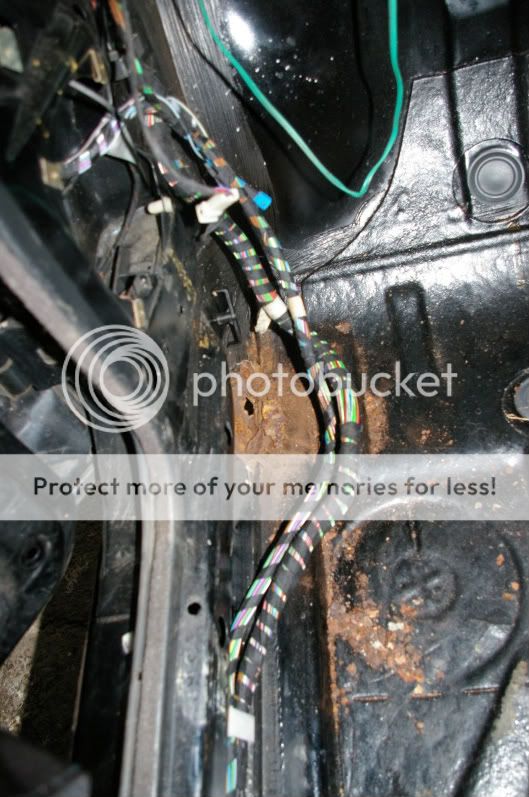
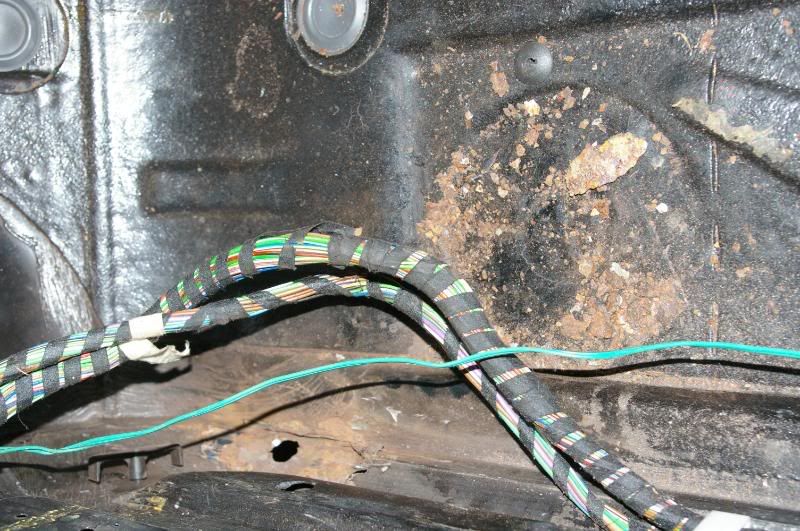
I have spent a little time looking at the rust and ascertaining how far it goes (scraping back with a screwdriver. Next job on that front will be to buy some wire wheels to go on an axle grinder and go to work cleaning and cutting back.
The other job has been removing the rear subframe set-up, which has been problematic, having to drill out hex bolts that have rusted and rounded and the rear bushes siezing to their locating stubs. Simply rectified by spending a day away from the job, coming back to it and realising I had been leavering the wrong bit lol!
Last but not least, I've burnt the troublesome bushes out of the subframe today which felt quite enjoyable!

I've aquired a donor car. Which will probably go back on the road for a small profit which should help fund a few bits and peices like an actual donor, suspension and a cage. It's too tidy to break and I'll get lynched by the purists lol.
I have also aquired a full set of powerflex bushes, unfortunately including concentric front arm bushes, so it's looking like adjustable ones are going to be sooner rather than later.
I have spent a little time looking at the rust and ascertaining how far it goes (scraping back with a screwdriver. Next job on that front will be to buy some wire wheels to go on an axle grinder and go to work cleaning and cutting back.
The other job has been removing the rear subframe set-up, which has been problematic, having to drill out hex bolts that have rusted and rounded and the rear bushes siezing to their locating stubs. Simply rectified by spending a day away from the job, coming back to it and realising I had been leavering the wrong bit lol!
Last but not least, I've burnt the troublesome bushes out of the subframe today which felt quite enjoyable!


Trending Topics
28-05-2009, 04:00 PM
#9
Too many posts.. I need a life!!
Thread Starter
Join Date: Aug 2005
Location: Oxfordshire
Posts: 757
Likes: 0
Received 0 Likes
on
0 Posts
Quick update, just purchased a 325 medium cased LSD and also one of the more expensive parts of the build... A lovely weld-in cage from custom cages. Bought a new one second hand lol. Full weld-in job with additional door diaganols and triangulation to strut tops, which is nice.

Quick pic of the offending item.
Not really done a great deal on the car as i'm getting married very soon so have no time until early july.
Quick pic of the offending item.
Not really done a great deal on the car as i'm getting married very soon so have no time until early july.
28-05-2009, 04:07 PM
#10
Awesome project, dont know how I missed the thread.
If you need to borrow a 1UZ for mocking up with or anything I have one lieing around, only catch is you would need to remove it from the lexus first as its still in there at the moment. lol
If you need to borrow a 1UZ for mocking up with or anything I have one lieing around, only catch is you would need to remove it from the lexus first as its still in there at the moment. lol
28-05-2009, 04:09 PM
#12
PPS
Im so fucking gutted you get to use an E30 and im stuck with it having to be a vauxhall that I put mine in
Your going to kick my arse round track I reckon if you have an E30 and I have an omega!
Im going to do a stealth nitrous install and not tell you, LOL
Im so fucking gutted you get to use an E30 and im stuck with it having to be a vauxhall that I put mine in
Your going to kick my arse round track I reckon if you have an E30 and I have an omega!
Im going to do a stealth nitrous install and not tell you, LOL
Last edited by Chip; 28-05-2009 at 04:23 PM.

 28-05-2009, 05:21 PM
#14
Too many posts.. I need a life!!
Thread Starter
Join Date: Aug 2005
Location: Oxfordshire
Posts: 757
Likes: 0
Received 0 Likes
on
0 Posts
I might take you up on that mate, can give you a hand. I'd like to look at the gearbox side of things mate. I would like to go down the BM box still to save money. I'm thinking of using the 325 box which is used in scandinavia[sp] on big power turbo conversions 500+. From doing a little research the MR2 flywheel bolts on to the engine, so would just be a case of an adaptor plate and re-drilling the flywheel to accomodate the 325 clutch.
28-05-2009, 08:50 PM
#16
Too many posts.. I need a life!!
Thread Starter
Join Date: Aug 2005
Location: Oxfordshire
Posts: 757
Likes: 0
Received 0 Likes
on
0 Posts
Also means that I dont have to bugger around with custom props too.
Have a look at things when we get the engine out of your's, box off and have a look at some adaptor plate possibilities.
Have a look at things when we get the engine out of your's, box off and have a look at some adaptor plate possibilities.
28-05-2009, 09:58 PM
#17
Too many posts.. I need a life!!
Thread Starter
Join Date: Aug 2005
Location: Oxfordshire
Posts: 757
Likes: 0
Received 0 Likes
on
0 Posts
Few pics of what i've been up to..

Couple of bits of rust, either cut or ground out, need to buy a wire brush attachment for the angle grinder to finish off.
All subframes etc off.
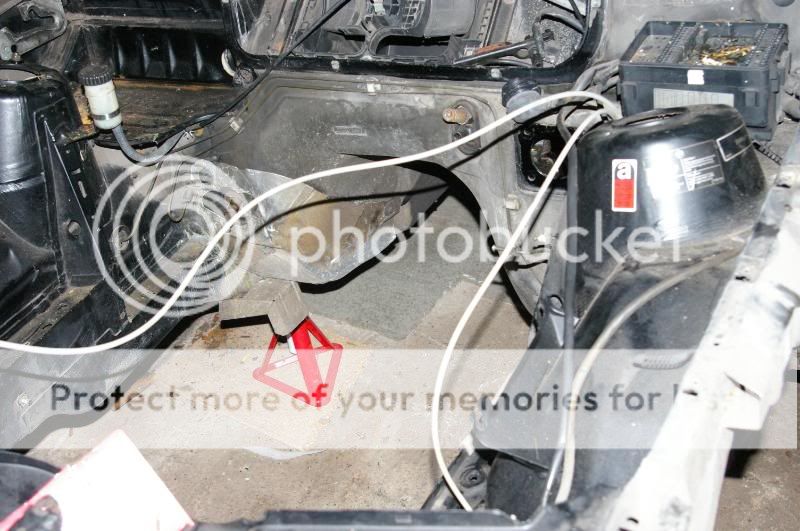
Loads of room in the engine bay, just waiting for the V8

And the 1st bits of the cage.. Got to collect the rest next week with the LSD
Couple of bits of rust, either cut or ground out, need to buy a wire brush attachment for the angle grinder to finish off.
All subframes etc off.
Loads of room in the engine bay, just waiting for the V8
And the 1st bits of the cage.. Got to collect the rest next week with the LSD
 28-10-2009, 10:48 PM
#19
Too many posts.. I need a life!!
Thread Starter
Join Date: Aug 2005
Location: Oxfordshire
Posts: 757
Likes: 0
Received 0 Likes
on
0 Posts
Small update. No progress made really, however been spending a fair bit of time designing (stealing ideas) for the suspension and also running a fair amount of maths on the engine side of the budget.
I have been in the process of looking at the DTM/ Group A rear suspension set-up and feel that it isn't too much hastle to a) replicate the design and b) manufacture. So the rear suspension geometry is going to have hopefully the same level and ease of adjustment as the DTM cars. The rear sub-frame and trailing arms are going to get reinforced, be fully rose jointed and have adjustment to camber, toe and roll centre. I have decided to change the rubber subframe bushes to nylon ones which I will have turned up. Not too sure about the aluminium ones reacting with the bodywork of the car.
The diff will also be welded to the boot floor (Indirectly lol) and cage will be triangulated to it. The cage I have is the custom cages one with one or two extra bits and peices added on, triangulation to strut tops etc. the other bracing that I'd like to add are down to the subframe mounts and poss a couple of other diaganols too.
With the front suspension the DTM system should be fairly easy to replicate, however I do need to consult someone in the know on the geometry of the lower arms in relation to the subframe, lowering the roll centre etc. I'd like to keep it as simmilar as possible and encorporate aspects such as the additional bolt connections on the rearward mounts.
I'm also entertaining the idea of their adjustable ARB's but there is a lot more RnD involved in this due to the way tapered spring steel is used and the weight of the car will have an effect on this. But it's an engineering excercise to play with at a later date.
And the final developmet for now is that I have an engine for the car. I have decided for what I am after i.e 400-450bhp and a little less torque using the 1UZFE is going to be way too expensive. I am now using an M52 B28. I have just bought a 728i with a replaced engine due to nickasil, so is perfect for what I have in store.
So the plan with the engine for now is to install it on the standard management or Megasquirt or vems and have a shade under 200bhp for me to get used to RWD again and at a later date turbo it. I will also do the necessary when the engine's out like installing the .140 MLS gasket and the ARP headstuds and then turboing will be more of a bolt on process.
From the turboing point of view is to use a TD05 20G or a TD06 20G which should do the job nicely. Unless I can save the extra money required for a Holset and external waist gate.
Heres a link to the pics I've been studying http://www.s14.net/jakesdtmtours/suspension.html
12-11-2009, 02:22 PM
#21
Too many posts.. I need a life!!
Thread Starter
Join Date: Aug 2005
Location: Oxfordshire
Posts: 757
Likes: 0
Received 0 Likes
on
0 Posts
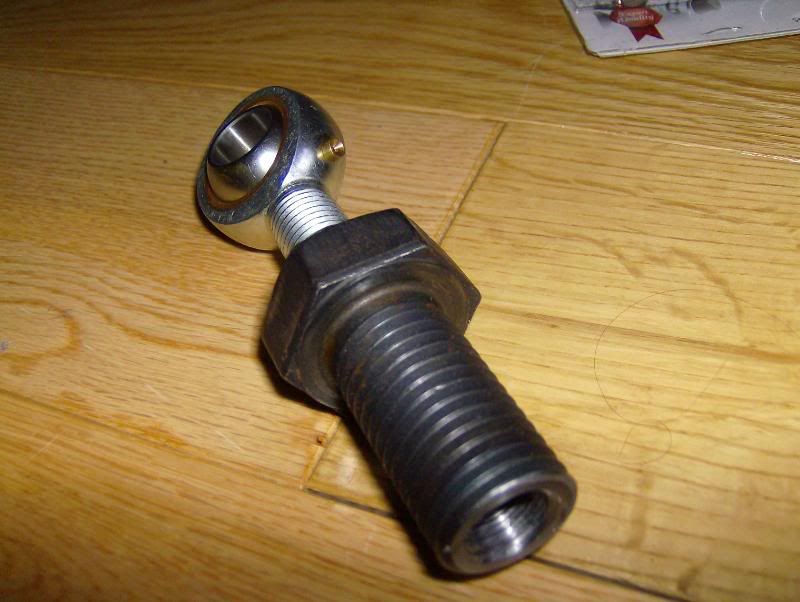
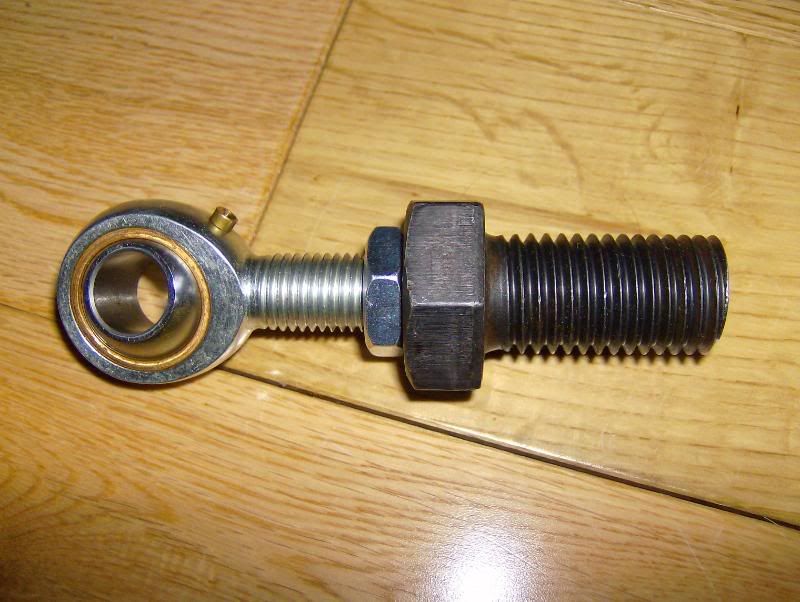
Another small update. No pics as of yet. After a fair bit of planning I've decide that the 1st thing to focus my attentions on the adjustable rear subframe. 1st item of which is in the pic below.

After spending a lot of time looking at the pic trying to figure out how it works (different nuts etc. locking against each other), I have finally decided that the centre 'nut' in the assembly is actually a turnbuckle, but not in the conventional sence. The turnbuckle when taken out of the assembly will look more like a bolt (i'm thinking about using an M20/22), however with a hole bored through the centre and a reverse thread tapped into it. The half nut to the left is a check nut to lock off the rod end and the flanged nut on the right is to lock off the turnbuckle and also to clamp on the camber adjustment barrel (far right). Mocking up something simmilar should provide this item.
Next thing to look at is the camber adjustment barrel. I have decided to simplify what they have done here. What I intend to do is use some tube (i've 48mm od to hand with a wall thickness of 4mm), weld a plate to the top and have 2 circlip grooves turned into the bottom, a lower disk will be located between the two. Inside this barrel will be a solid round bar with tapped holes in the top, bottom and side. The top and bottom to recieve threaded rod, which will allow adjustment of camber and the side one to recieve the toe adjustment assembly. Fairly straight forward when not typed!
This will then be welded to the rear arm in place of the mounting bush assembly. The trailing arms themselves will be braced something simmilar to the early DTM cars with a triangulating bar between the arms and bracing between the main body, hub and lower suspension pick up, simmilar to the pic below.

Not really bought much for this yet bar some L/H threadded M16 rodends and half nuts and some other bits and peices un-related, full set of bearings and bottom ball joints etc.
After spending a lot of time looking at the pic trying to figure out how it works (different nuts etc. locking against each other), I have finally decided that the centre 'nut' in the assembly is actually a turnbuckle, but not in the conventional sence. The turnbuckle when taken out of the assembly will look more like a bolt (i'm thinking about using an M20/22), however with a hole bored through the centre and a reverse thread tapped into it. The half nut to the left is a check nut to lock off the rod end and the flanged nut on the right is to lock off the turnbuckle and also to clamp on the camber adjustment barrel (far right). Mocking up something simmilar should provide this item.
Next thing to look at is the camber adjustment barrel. I have decided to simplify what they have done here. What I intend to do is use some tube (i've 48mm od to hand with a wall thickness of 4mm), weld a plate to the top and have 2 circlip grooves turned into the bottom, a lower disk will be located between the two. Inside this barrel will be a solid round bar with tapped holes in the top, bottom and side. The top and bottom to recieve threaded rod, which will allow adjustment of camber and the side one to recieve the toe adjustment assembly. Fairly straight forward when not typed!
This will then be welded to the rear arm in place of the mounting bush assembly. The trailing arms themselves will be braced something simmilar to the early DTM cars with a triangulating bar between the arms and bracing between the main body, hub and lower suspension pick up, simmilar to the pic below.
Not really bought much for this yet bar some L/H threadded M16 rodends and half nuts and some other bits and peices un-related, full set of bearings and bottom ball joints etc.
01-12-2009, 08:06 PM
#22
Too many posts.. I need a life!!
Thread Starter
Join Date: Aug 2005
Location: Oxfordshire
Posts: 757
Likes: 0
Received 0 Likes
on
0 Posts
Another little update. Been spending more money
Just won on ebay... Some Gaz adjustable inserts, going down the budget coil-over route with the rally design type coil-over conversion jobbies.

A turbo manifold from the states for the princely sum of �46 plus �10 postage

I know they're LH drive only however the plan is to use it upside down to get around that problem. Other issues involving cracking should hopefully sorted out by some decent bracing of the turbo (less strain on the manifold) and these ones also crack due to the the manifold flange being one peice, so will be chopped up to allow for a little differential movement.
Also bought some G60 discs which will require the bore enlarging to suit the BMW hubs. I've also found a drawing of the bracket required to allow the calipers to fit the E30 uprights and it's so simple to make, it's child's play lol.
Just won on ebay... Some Gaz adjustable inserts, going down the budget coil-over route with the rally design type coil-over conversion jobbies.
A turbo manifold from the states for the princely sum of �46 plus �10 postage
I know they're LH drive only however the plan is to use it upside down to get around that problem. Other issues involving cracking should hopefully sorted out by some decent bracing of the turbo (less strain on the manifold) and these ones also crack due to the the manifold flange being one peice, so will be chopped up to allow for a little differential movement.
Also bought some G60 discs which will require the bore enlarging to suit the BMW hubs. I've also found a drawing of the bracket required to allow the calipers to fit the E30 uprights and it's so simple to make, it's child's play lol.

 08-12-2009, 05:54 PM
#28
Too many posts.. I need a life!!
Thread Starter
Join Date: Aug 2005
Location: Oxfordshire
Posts: 757
Likes: 0
Received 0 Likes
on
0 Posts
Just recieved the exhaust manifold, TBH it's quality is pretty good considering it only cost me �50 or so. The mating flange to the head is not perfectly flat, however i'll cut the flange into individual sections per primary and this should mean when torqued up they'll pull flat. It's only a question of .25-.5mm. The welds seem to be tidy and look to have made good penitration, however will need a lot of gringing with a dremil to smooth the way.
Also bought an ebay again lol FMIC for just over �60. The quality is supprising again. The only thing that really lets it down is the fact that the plate/bar design is a lot more open than a more expensive item, thus less cooling capacity. Stupidly bought it without taking any measurements and luckily fits perfectly between the front bumper mounting points
Only other little update, is that the rod end adjusters are now finished thanks to my mate Jon . Simply just an M24x45mm bolt with a L/H thread tapped through the centre. I'll try and get a pic when I've sorted a camera.
So next job is to make up the camber adjustment barrels. Going to be something a little different to the DTM but same basic principal.
Also bought an ebay again lol FMIC for just over �60. The quality is supprising again. The only thing that really lets it down is the fact that the plate/bar design is a lot more open than a more expensive item, thus less cooling capacity. Stupidly bought it without taking any measurements and luckily fits perfectly between the front bumper mounting points
Only other little update, is that the rod end adjusters are now finished thanks to my mate Jon
So next job is to make up the camber adjustment barrels. Going to be something a little different to the DTM but same basic principal.

 22-12-2009, 04:21 PM
#31
Too many posts.. I need a life!!
Thread Starter
Join Date: Aug 2005
Location: Oxfordshire
Posts: 757
Likes: 0
Received 0 Likes
on
0 Posts
Little update Managed to get hold of my new front ARB (dirt cheap lol). Came from prodrive originally, off of one of their GT2 DB9's. Really happy with this as they are like hens teeth and the blades themselves are a couple of hundred each, if you can find them. Theyre going to be a little stiff but hey ho it's not the end of the world.
I'm also hoping to replicate something along the lines of the DTM version with cockpit adjustableness. Ultimate toy eh!


The likelyhood in finding another set is pretty slim, so I'm just going to use a traditional rear one to start with then get an Eibach rear when funds allow. Could anyone tell me what the largest rear ARB is and where to find one
I'm also hoping to replicate something along the lines of the DTM version with cockpit adjustableness. Ultimate toy eh!
The likelyhood in finding another set is pretty slim, so I'm just going to use a traditional rear one to start with then get an Eibach rear when funds allow. Could anyone tell me what the largest rear ARB is and where to find one
 30-12-2009, 02:58 PM
#33
Too many posts.. I need a life!!
Thread Starter
Join Date: Aug 2005
Location: Oxfordshire
Posts: 757
Likes: 0
Received 0 Likes
on
0 Posts
Had a couple of days in the workshop, borrowing my uncles as it's pretty much got everything in it bar a mill, which would be really usefull!
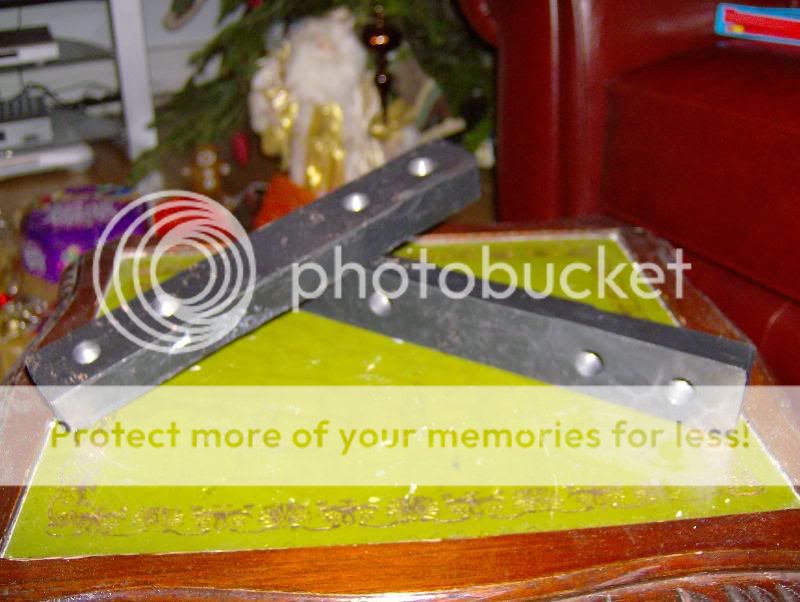
First thing I made up these brackets which are to fit the RX7 calipers to the E30 uprights. Very simple, found the pattern off of the net. They need a couple of coats of paint to tart them up a little, but pretty much ready
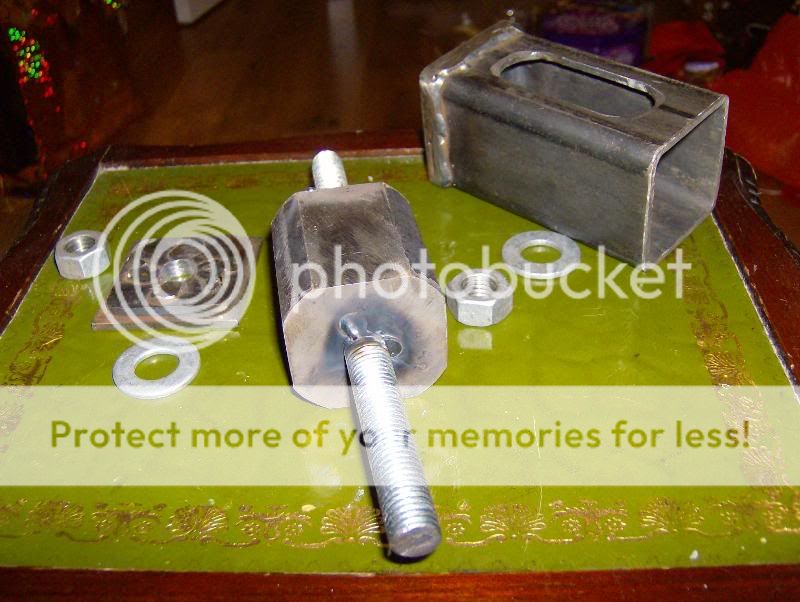
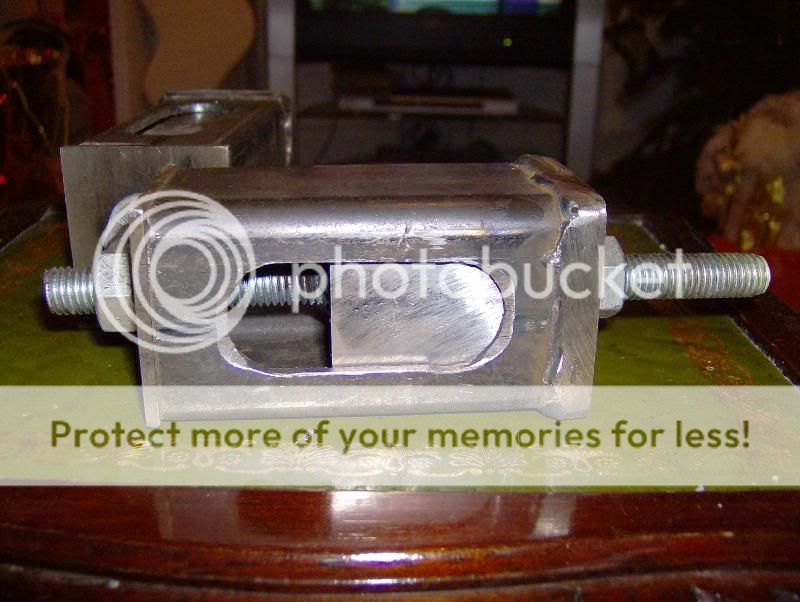
Next thing I looked at were the adjustment barrels. Fairly simple in construction. Basically to a short length of 50mm box section and welded a plate on one end. The plate having a 1/2" hole in the centre for the threadded bar. Then I took a shorter section of 50mm Dia dowel bar and grinded 4 flats on each so that it could be located into the box section. At each end of the dowel bar I tapped M12 threadded holes then made up a bottom cap to enclose it all. This was made from 2 plates spot welded together one smaller than the other to locate it in the bottom of the box section.
That's pretty much it, I need to source a M24 tap and corresponding drill bit so tha I can fit the adjusters that are in a pic above.
First thing I made up these brackets which are to fit the RX7 calipers to the E30 uprights. Very simple, found the pattern off of the net. They need a couple of coats of paint to tart them up a little, but pretty much ready
Next thing I looked at were the adjustment barrels. Fairly simple in construction. Basically to a short length of 50mm box section and welded a plate on one end. The plate having a 1/2" hole in the centre for the threadded bar. Then I took a shorter section of 50mm Dia dowel bar and grinded 4 flats on each so that it could be located into the box section. At each end of the dowel bar I tapped M12 threadded holes then made up a bottom cap to enclose it all. This was made from 2 plates spot welded together one smaller than the other to locate it in the bottom of the box section.
That's pretty much it, I need to source a M24 tap and corresponding drill bit so tha I can fit the adjusters that are in a pic above.
 10-04-2010, 03:08 PM
#38
Too many posts.. I need a life!!
Thread Starter
Join Date: Aug 2005
Location: Oxfordshire
Posts: 757
Likes: 0
Received 0 Likes
on
0 Posts
Sorry not updated for a while. Forgot I was running a thread on here too!
Another update, been mostly spending time transfering parts over from my donor car. The track car came absoloutly bare.
Most importantly, I've now finished modifying the rear beam to accept the adjustable trailing arms. Basically I've pretty much replicated the DTM rear beam that allows control over the roll centre, this was done using some 2" dia tube running through the beam to retain the strength of the beam and to allow access to the head of the M16 retaining bolt. Then on top of that some 50x50 box section with plates welded to the top and bottom to hold the retaining bolt in location.


Effectively the assembly on the left hand side is what I have just fabricated.
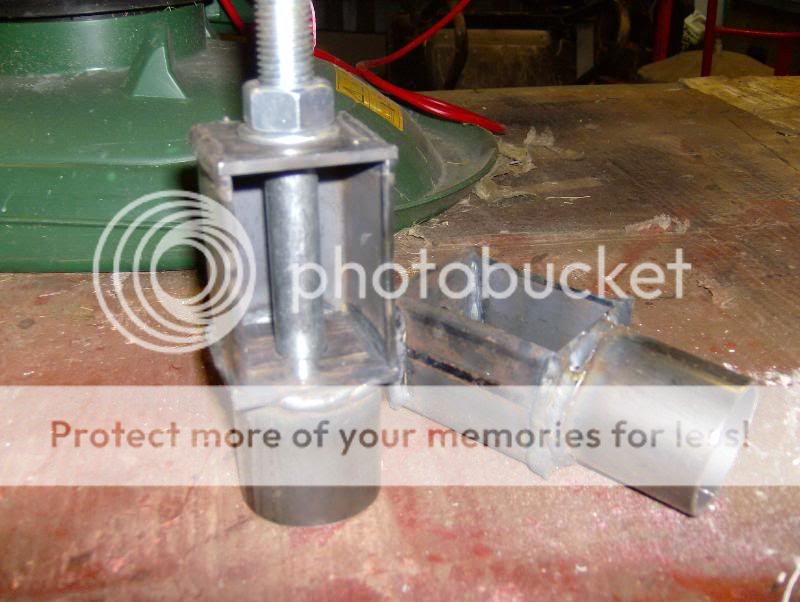
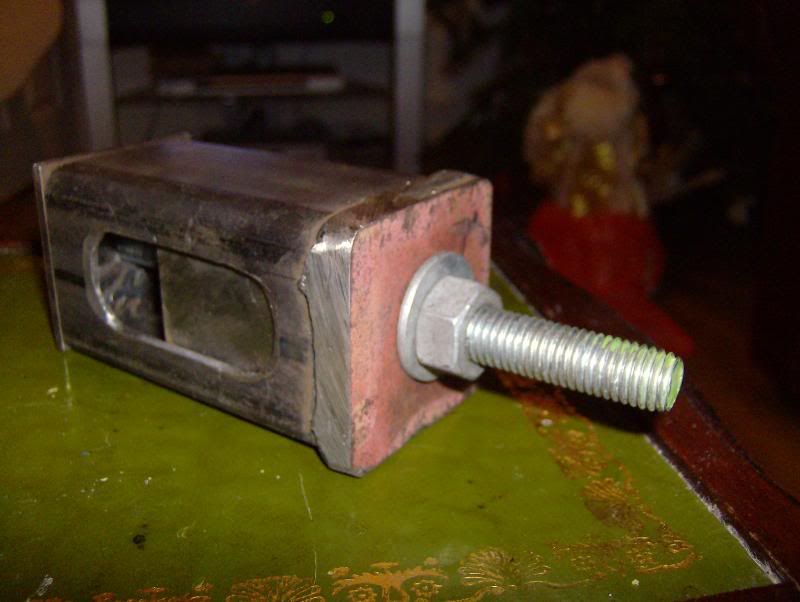
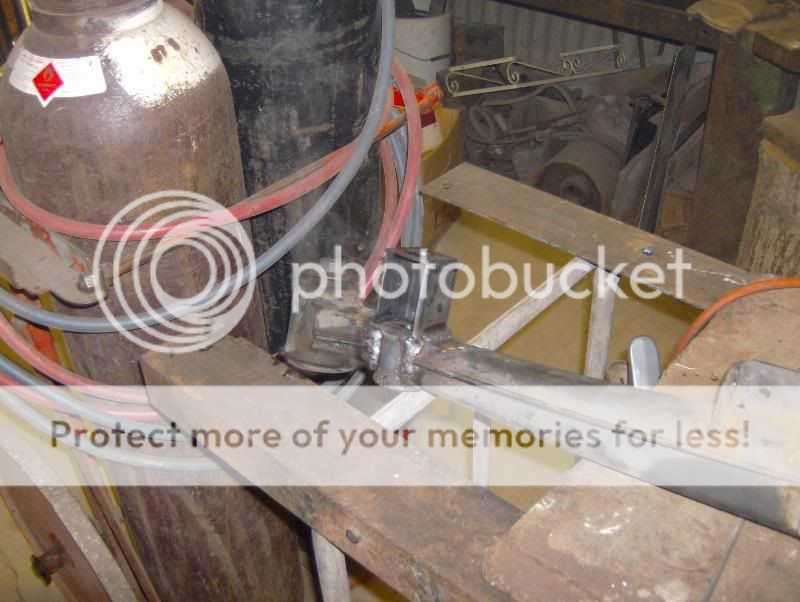
Heres a pic of the inesrts that will run through the modified beam. Made up from some 50x50 boxsection with the front cut out of it two 3mm plates with M16 holes drilled through the centre and then a short section of 50mm dia tube to pass through the beam
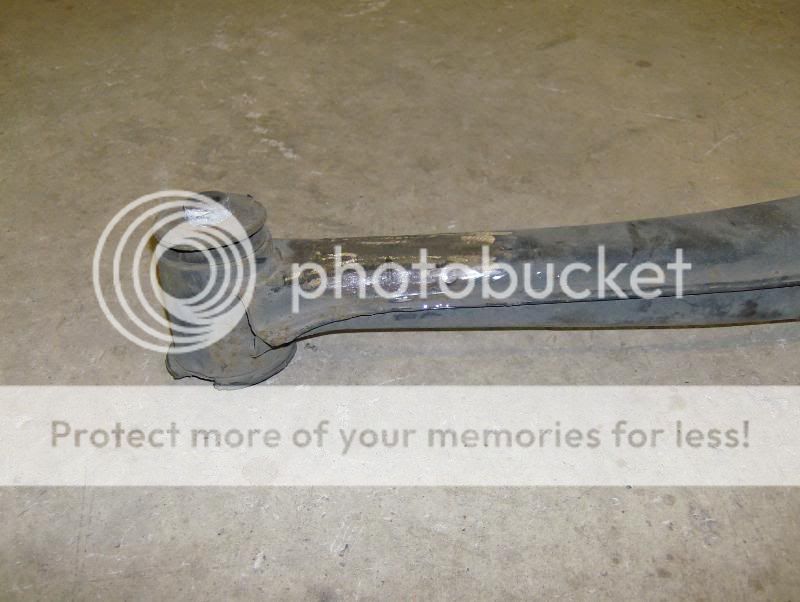
Here's the rear beam with the outer subframe bracket removed and having been cleaned up. A lot of care and attention was taken to measure the spacing of the trailing arms and the previous location of them too. The above sleeves/barrels were then welded back into the stock place. Further adjustment can be made from there.
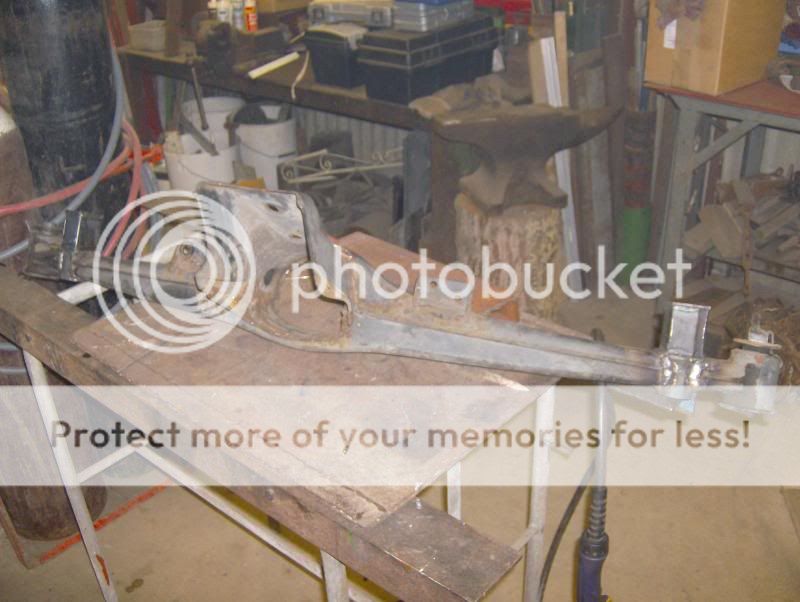
Here's the finnished beam. Just need to press out the bushes and turn up some nylon items to replace them.
Please excuse my untidy welding, great penetration but the tidyness is getting better lol
Another update, been mostly spending time transfering parts over from my donor car. The track car came absoloutly bare.
Most importantly, I've now finished modifying the rear beam to accept the adjustable trailing arms. Basically I've pretty much replicated the DTM rear beam that allows control over the roll centre, this was done using some 2" dia tube running through the beam to retain the strength of the beam and to allow access to the head of the M16 retaining bolt. Then on top of that some 50x50 box section with plates welded to the top and bottom to hold the retaining bolt in location.
Effectively the assembly on the left hand side is what I have just fabricated.
Heres a pic of the inesrts that will run through the modified beam. Made up from some 50x50 boxsection with the front cut out of it two 3mm plates with M16 holes drilled through the centre and then a short section of 50mm dia tube to pass through the beam
Here's the rear beam with the outer subframe bracket removed and having been cleaned up. A lot of care and attention was taken to measure the spacing of the trailing arms and the previous location of them too. The above sleeves/barrels were then welded back into the stock place. Further adjustment can be made from there.
Here's the finnished beam. Just need to press out the bushes and turn up some nylon items to replace them.
Please excuse my untidy welding, great penetration but the tidyness is getting better lol
