
Project Ring-Pug! Updated 04/03/07 - Rear beam rebuilt!


 14-03-2006, 09:15 AM
#83
Jeebus
Thread Starter
iTrader: (1)
Join Date: May 2003
Location: Staffordshire, UK
Posts: 8,663
Likes: 0
Received 0 Likes
on
0 Posts
Well, the new ream beam and solid mounts are on, and I have change the compensator valve so the rear brakes work. Just need a new bumpstop (broke one off fitting the beam) and then it is back for the MOT 
Still no pics though sorry Forgot to take any at the weekend!
Tonight i'm fitting two more solid engine mounts (top and gearbox)
Mr C
Still got the Mk1 although I havent done anything on it recently Once the 205 is finished I will get cracking on it
Still no pics though sorry
Forgot to take any at the weekend!Tonight i'm fitting two more solid engine mounts (top and gearbox)
Mr C
Still got the Mk1 although I havent done anything on it recently
15-03-2006, 09:05 AM
#84
Jeebus
Thread Starter
iTrader: (1)
Join Date: May 2003
Location: Staffordshire, UK
Posts: 8,663
Likes: 0
Received 0 Likes
on
0 Posts
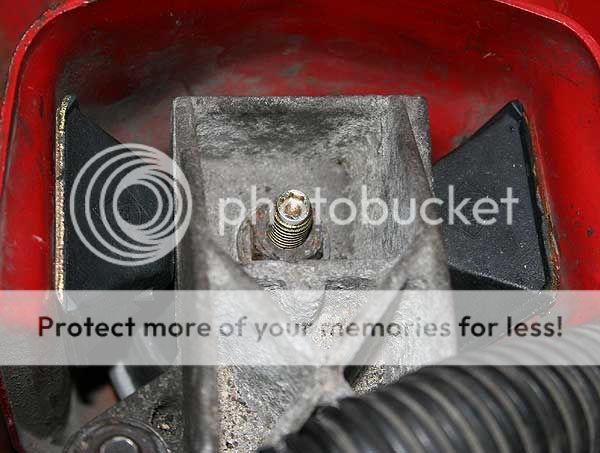
Fitted the engine mounts last night, ok they are not 100% solid but they are mega mega uprated stiffness and 1 million times better than the 18 year old standard rubbish on there!
Gearbox mount
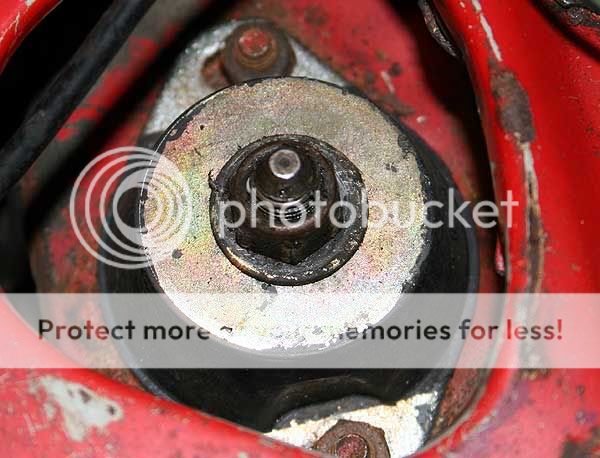
Top engine mount
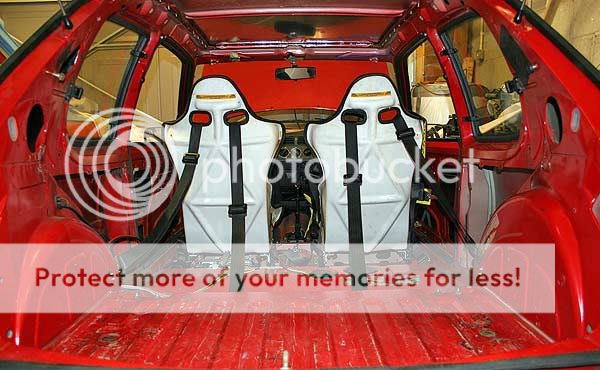
Interior is getting there

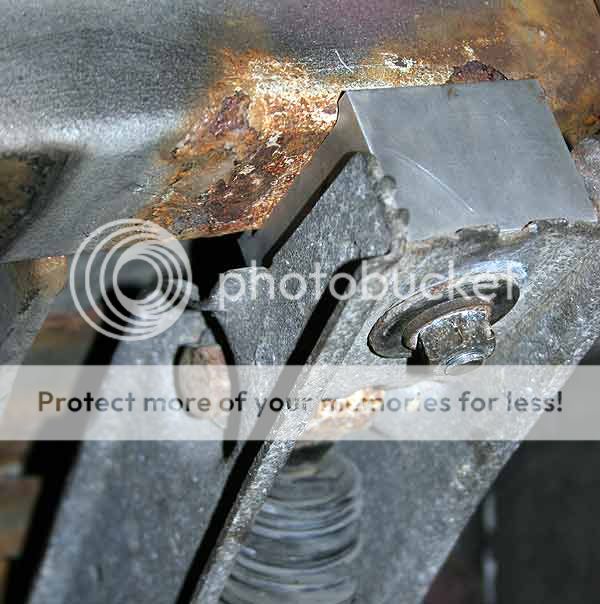
309 GTi rear beam
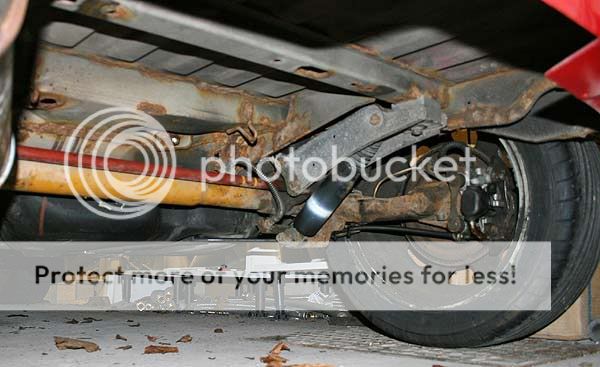
(there is some rust underneath but not to bad for an 18 year old shed IMHO )
Solid beam mounts
I forgot to take pics of the finished sunroof replacement
Next on the to do list is finish the brake system:
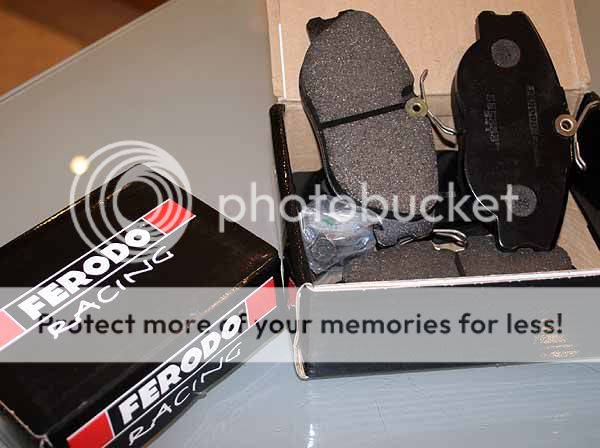
Brake pads (Going for Ferodo DS3000 fronts and either DS3000 or 2500's on the rear when Rainbum gets me some prices )
)
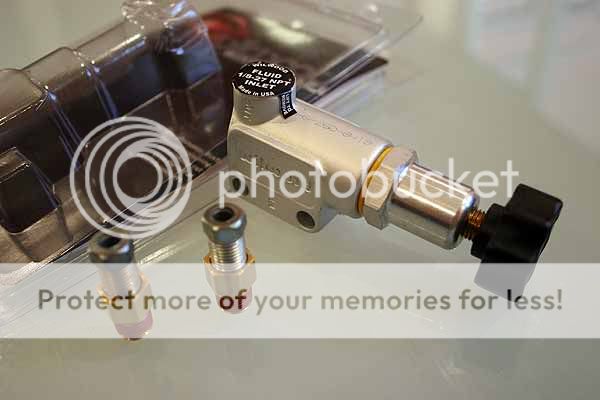
Brake lines running through the car with a Wilwood bias valve for rear bias adjustment (ordered a week ago and still not here )
)
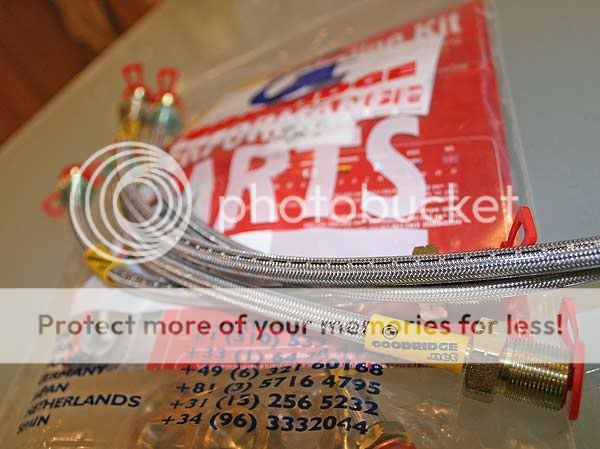
Braided lines to replace any flexi hoses
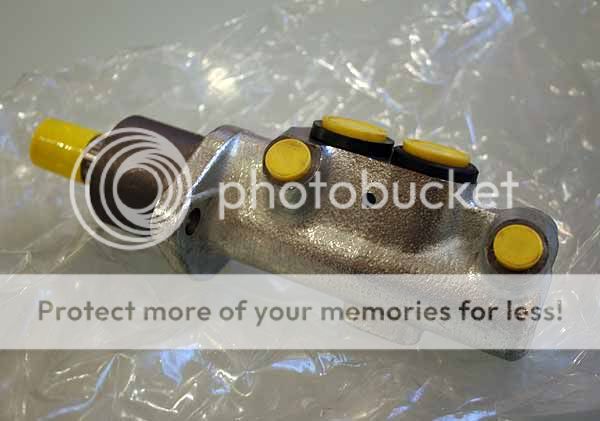
Fit pug 406 master cylinder to compensate for bigger pistons on GTi-6 calipers
And finally fill with some decent brake fluid (SRF or similar)
Gearbox mount
Top engine mount
Interior is getting there
309 GTi rear beam
(there is some rust underneath but not to bad for an 18 year old shed IMHO
Solid beam mounts
I forgot to take pics of the finished sunroof replacement
Next on the to do list is finish the brake system:
Brake pads (Going for Ferodo DS3000 fronts and either DS3000 or 2500's on the rear when Rainbum gets me some prices
)Brake lines running through the car with a Wilwood bias valve for rear bias adjustment (ordered a week ago and still not here
)Braided lines to replace any flexi hoses
Fit pug 406 master cylinder to compensate for bigger pistons on GTi-6 calipers
And finally fill with some decent brake fluid (SRF or similar)

 15-03-2006, 05:54 PM
#88
I'm Finding My Feet Here Now

Join Date: Apr 2005
Posts: 140
Likes: 0
Received 0 Likes
on
0 Posts
sweet mate, how come the 309 beam tho,
loving the slics, wonder how much they go for cos i want some for my fiesta which has gone exactly the same way as your pugsworth
loving the slics, wonder how much they go for cos i want some for my fiesta which has gone exactly the same way as your pugsworth
16-03-2006, 02:24 PM
#89
Jeebus
Thread Starter
iTrader: (1)
Join Date: May 2003
Location: Staffordshire, UK
Posts: 8,663
Likes: 0
Received 0 Likes
on
0 Posts
Woohoo it's passed the MOT at last!!!
Moonstone Mart
I'd rather not let everyone know where I live!! There are some dodgy people on the internet!!
m.d.
The 309 beam is basically stiffer and wider, increasing rear grip and turn-in as well! If you are after slicks, speak to Marco from here as he sells them at a good price
Moonstone Mart
I'd rather not let everyone know where I live!! There are some dodgy people on the internet!!
m.d.
The 309 beam is basically stiffer and wider, increasing rear grip and turn-in as well! If you are after slicks, speak to Marco from here as he sells them at a good price
21-03-2006, 01:03 PM
#90
Jeebus
Thread Starter
iTrader: (1)
Join Date: May 2003
Location: Staffordshire, UK
Posts: 8,663
Likes: 0
Received 0 Likes
on
0 Posts
I'm now collecting parts for this weekends work!
OMP 10 point roll cage is coming tomorrow
Wilwood bias valve has arrived from the USA (upto 57% reduction in pressure to the rear brakes)
Goodridge lines to replace all the flexi hoses are en-route as I type
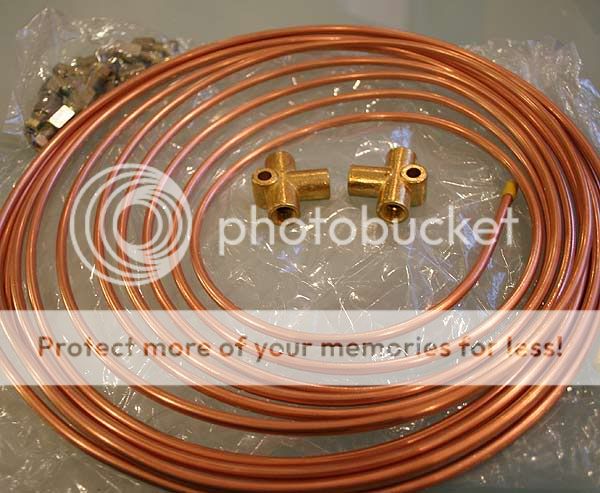
New copper brake lines are here and most of the fittings to run through the car.
Just waiting for the DS3000 pads to arrive from Mike and the Motul RBF600 fluid from my mate.
Should be a busy weekend!
OMP 10 point roll cage is coming tomorrow
Wilwood bias valve has arrived from the USA (upto 57% reduction in pressure to the rear brakes)
Goodridge lines to replace all the flexi hoses are en-route as I type
New copper brake lines are here and most of the fittings to run through the car.
Just waiting for the DS3000 pads to arrive from Mike and the Motul RBF600 fluid from my mate.
Should be a busy weekend!

 24-03-2006, 12:54 PM
#93
Jeebus
Thread Starter
iTrader: (1)
Join Date: May 2003
Location: Staffordshire, UK
Posts: 8,663
Likes: 0
Received 0 Likes
on
0 Posts
Everything has now arrived for a big weekend of fitting
How the cage arrived:
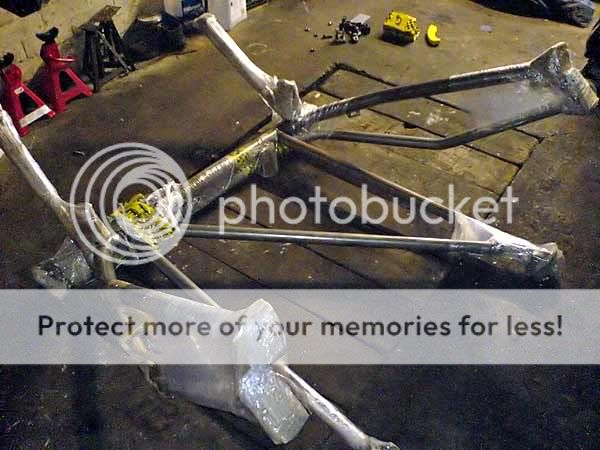
After a quick trial assembley:
Ferodo DS3000's from R&B Motorsport:
Wilwood brake bias valve from the US:
Pug 406 Master cylinder (to compensate for the GTi-6 calipers having much bigger pistons):
Goodridge lines to replace the std. flexi hoses:
Copper lines and fittings to replace all the ole stuff and run through the car to the bias valve and rear brakes:
Wish me luck
How the cage arrived:
After a quick trial assembley:
Ferodo DS3000's from R&B Motorsport:
Wilwood brake bias valve from the US:
Pug 406 Master cylinder (to compensate for the GTi-6 calipers having much bigger pistons):
Goodridge lines to replace the std. flexi hoses:
Copper lines and fittings to replace all the ole stuff and run through the car to the bias valve and rear brakes:
Wish me luck
 01-04-2006, 09:01 PM
#95
Jeebus
Thread Starter
iTrader: (1)
Join Date: May 2003
Location: Staffordshire, UK
Posts: 8,663
Likes: 0
Received 0 Likes
on
0 Posts
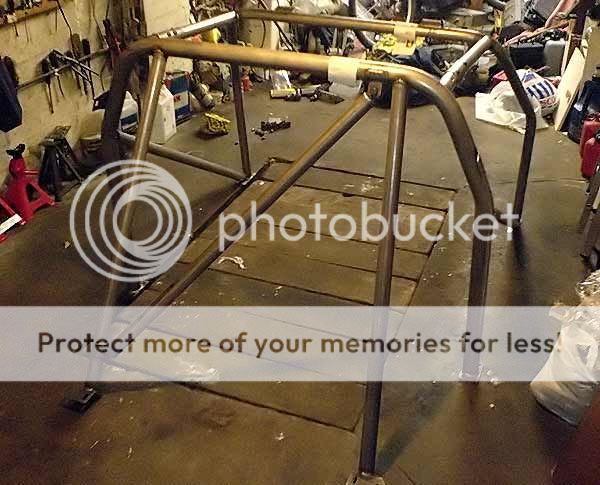
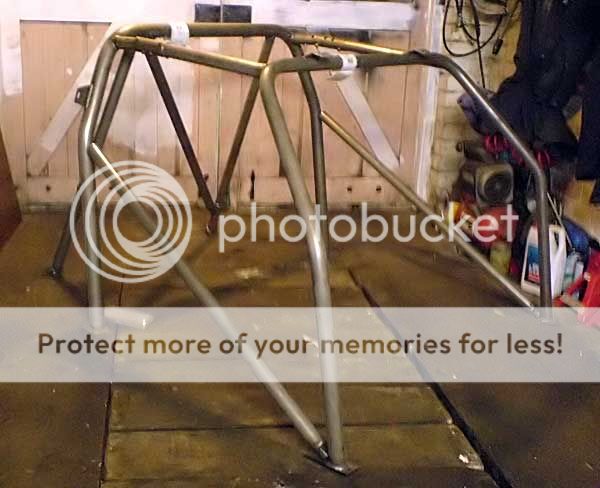
Well, it's taken a week of very hard work and long hours but the cage and brakes are finally done
I broke the windscreen putting the cage in though.. doh! I'm fitting a new one tomorrow anyway! Along with a Peugeot Sport Group N exhaust.
I still need to paint the cage as well!
Pics soon
P.S. Booked it on track at Bedford for the end of April with Bookatrack.. Can't wait
I broke the windscreen putting the cage in though.. doh!
I'm fitting a new one tomorrow anyway! Along with a Peugeot Sport Group N exhaust.I still need to paint the cage as well!
Pics soon
P.S. Booked it on track at Bedford for the end of April with Bookatrack.. Can't wait
02-04-2006, 10:10 AM
#96
Originally Posted by Phil
Well, it's taken a week of very hard work and long hours but the cage and brakes are finally done
I broke the windscreen putting the cage in though.. doh! I'm fitting a new one tomorrow anyway! Along with a Peugeot Sport Group N exhaust.
I still need to paint the cage as well!
Pics soon
P.S. Booked it on track at Bedford for the end of April with Bookatrack.. Can't wait
I broke the windscreen putting the cage in though.. doh!
I'm fitting a new one tomorrow anyway! Along with a Peugeot Sport Group N exhaust.I still need to paint the cage as well!
Pics soon
P.S. Booked it on track at Bedford for the end of April with Bookatrack.. Can't wait
Something to aim for then with a trackday booked, pics soon then.
 09-04-2006, 10:11 PM
#97
Jeebus
Thread Starter
iTrader: (1)
Join Date: May 2003
Location: Staffordshire, UK
Posts: 8,663
Likes: 0
Received 0 Likes
on
0 Posts
Finally, a picture update!
I have now finished the cage (took the best part of evening this week to spray the bugger whilst in the car.. Note for next time, remove it before spraying) Also painted all the weld in mounting points for the cage red to match the floor pan.

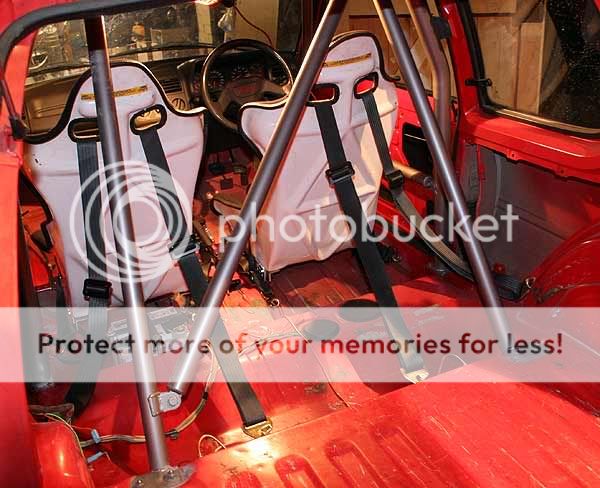
I will take some better pics of the cage when i've cleaned inside the car and its not 9pm on a Sunday
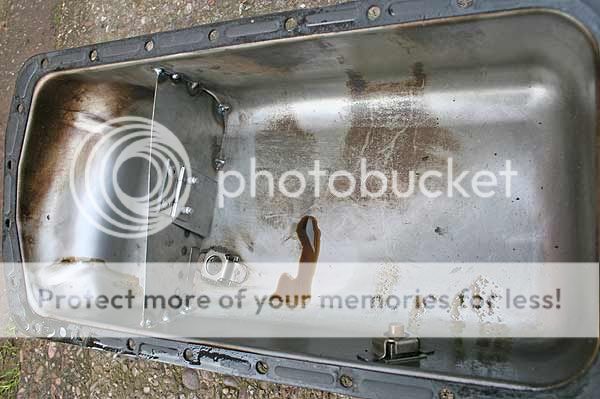
Today I decided I wanted to make a baffled/gated sump as the standard sump is completely empty and this does not go well with slicks! Instead of forking out �150+ for a non-gated baffle I thought in true DIY style i'd have a go myself and see if I could make one that worked using only things I had lying around for free
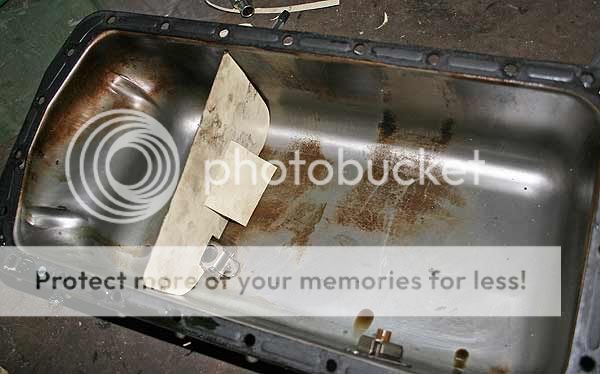
Above is the cardboard template for the gated section in the sump. The flap will only swing one way and will stay closed when the oil presses on it on a right hand bend, and basicaly keeps the oil a lot closer to the strainer to stop surge on bends. I also made a template for a smaller baffle to go on the other side by bolting to the oil pump itself.
I then made them up:
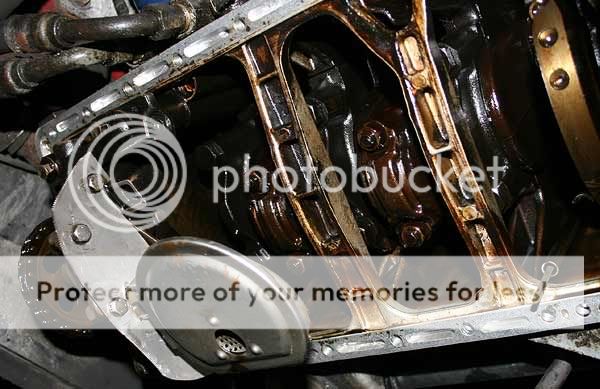
I put the sump on with a new gasket and did an oil change and I got oil pressure so thats a start Time will tell if it stops oil surge though when I get the slicks on at Bedford!
As a bonus, here's a pic of some hail

Nearly there now, ready to get some testing miles in
I have now finished the cage (took the best part of evening this week to spray the bugger whilst in the car.. Note for next time, remove it before spraying
) Also painted all the weld in mounting points for the cage red to match the floor pan.I will take some better pics of the cage when i've cleaned inside the car and its not 9pm on a Sunday
Today I decided I wanted to make a baffled/gated sump as the standard sump is completely empty and this does not go well with slicks! Instead of forking out �150+ for a non-gated baffle I thought in true DIY style i'd have a go myself and see if I could make one that worked using only things I had lying around for free
Above is the cardboard template for the gated section in the sump. The flap will only swing one way and will stay closed when the oil presses on it on a right hand bend, and basicaly keeps the oil a lot closer to the strainer to stop surge on bends. I also made a template for a smaller baffle to go on the other side by bolting to the oil pump itself.
I then made them up:
I put the sump on with a new gasket and did an oil change and I got oil pressure so thats a start
Time will tell if it stops oil surge though when I get the slicks on at Bedford!As a bonus, here's a pic of some hail
Nearly there now, ready to get some testing miles in
09-04-2006, 10:30 PM
#98
I've found that life I needed.. It's HERE!!

Join Date: Jul 2004
Location: Cumbria/Preston
Posts: 1,294
Likes: 0
Received 0 Likes
on
0 Posts
Hail!
Just dropped in on this thread, looks like a cool project Good on your for doing the sump yourself, that'd be a nasty confidence-sapper to have in the back of your mind on every corner...an un-baffled sump as open as that one! Keep it up!
Just dropped in on this thread, looks like a cool project
11-04-2006, 10:36 PM
#102
Jeebus
Thread Starter
iTrader: (1)
Join Date: May 2003
Location: Staffordshire, UK
Posts: 8,663
Likes: 0
Received 0 Likes
on
0 Posts
boy_racer2f2f
The seats were made by a company called Ian Harwood Motorsport (if I remember correctly) I gave them a ring not so long ago and unfortunately he has now retired.
I forgot to mention above that after breaking the first screen putting the cage in, I bought another screen for a fiver from the scrappy and broke it in transit, then got another screen for a fiver (a proper GTi bronze tinted jobby) and broke it putting it in So I gave up and called the insurance company costing me �60 excess
The seats were made by a company called Ian Harwood Motorsport (if I remember correctly) I gave them a ring not so long ago and unfortunately he has now retired.
I forgot to mention above that after breaking the first screen putting the cage in, I bought another screen for a fiver from the scrappy and broke it in transit, then got another screen for a fiver (a proper GTi bronze tinted jobby) and broke it putting it in
So I gave up and called the insurance company costing me �60 excess
12-04-2006, 01:17 AM
#103
Brap!

Join Date: Sep 2005
Location: N-Town
Posts: 5,214
Likes: 0
Received 0 Likes
on
0 Posts
Car looks great mate, i'm in the process of getting just gti's to get me my perfect 205 and then another cheaper one to do much the same as you have.
Your seats look alot like rs200 seats, are they copies of them?
Your seats look alot like rs200 seats, are they copies of them?
 12-04-2006, 05:02 PM
#105
Originally Posted by Phil
boy_racer2f2f
The seats were made by a company called Ian Harwood Motorsport (if I remember correctly) I gave them a ring not so long ago and unfortunately he has now retired.
The seats were made by a company called Ian Harwood Motorsport (if I remember correctly) I gave them a ring not so long ago and unfortunately he has now retired.
are they very comfy atall? thanks again
13-04-2006, 08:59 AM
#107
Jeebus
Thread Starter
iTrader: (1)
Join Date: May 2003
Location: Staffordshire, UK
Posts: 8,663
Likes: 0
Received 0 Likes
on
0 Posts
boy_racer2f2f
The seats a very comfy for what they are! Much comfier than the cheap cobra seats etc from my experience. The reason I have no idea about then is because they came with my Mk1 Escort, but obviously they are no where near bling enough to use in that
I am just waiting for the postman to arrive then i'm going to take it for its first blast... Around the Cat & Fiddle - Britain's most dangerous road
16-04-2006, 10:40 AM
#108
Jeebus
Thread Starter
iTrader: (1)
Join Date: May 2003
Location: Staffordshire, UK
Posts: 8,663
Likes: 0
Received 0 Likes
on
0 Posts
I have returned unharmed from 500 miles of country road blasting in the last couple of days!
The shakedown went well, car ran faultlessly the whole time and it drove like a dream! The handling is spot on and it grips like anything, and the baffled sump works on road tyres (I did about 5 laps round a big roundabout and didn't loose a drop of oil pressure!)
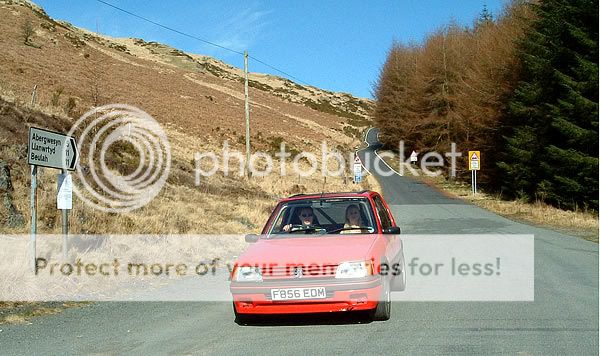
Here are some pics from Wales:
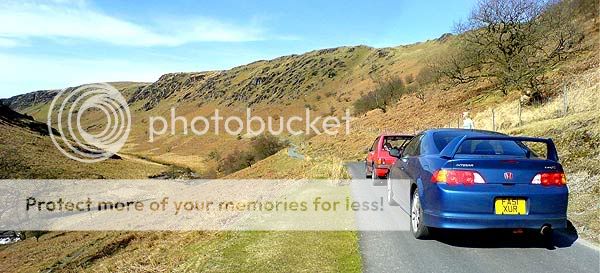
We found this awesome road, it was about 15-20 miles long and all of it like this!

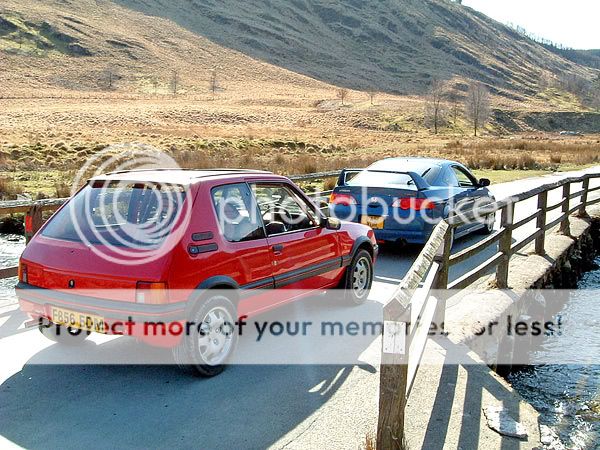
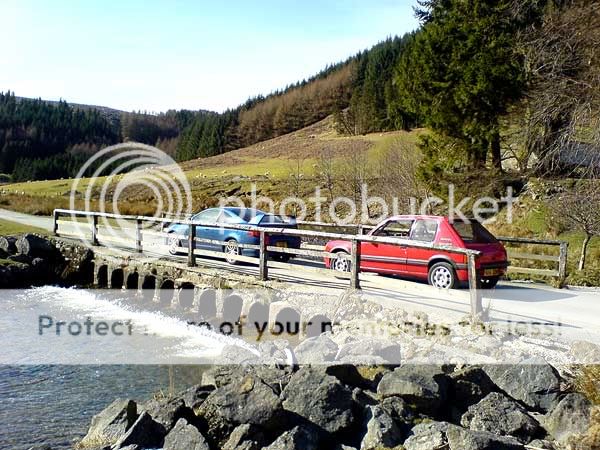
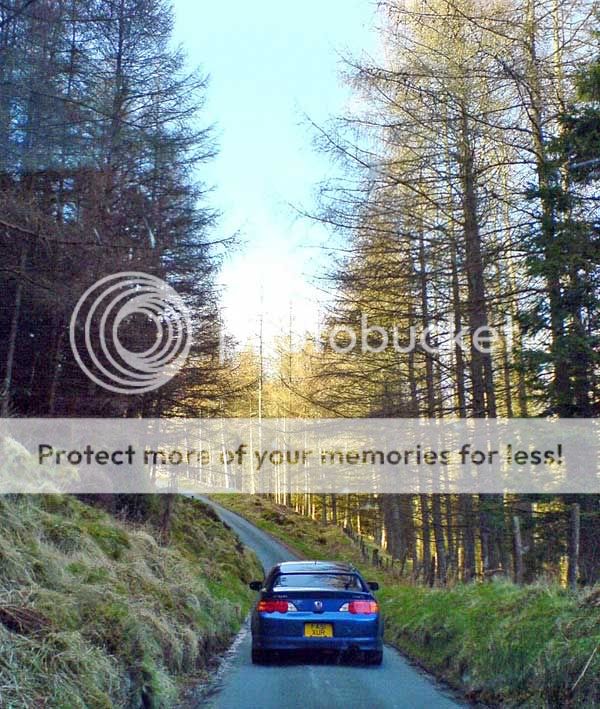


Hair pin bends

And finally one of me and my co-pilot/girlfriend/tihng telling me to slow down all the time

I have some small videos which I will try and convert and upload as well
The shakedown went well, car ran faultlessly the whole time and it drove like a dream! The handling is spot on and it grips like anything, and the baffled sump works on road tyres (I did about 5 laps round a big roundabout and didn't loose a drop of oil pressure!)
Here are some pics from Wales:
We found this awesome road, it was about 15-20 miles long and all of it like this!
Hair pin bends
And finally one of me and my co-pilot/girlfriend/tihng telling me to slow down all the time
I have some small videos which I will try and convert and upload as well
 18-04-2006, 12:23 PM
#111
Jeebus
Thread Starter
iTrader: (1)
Join Date: May 2003
Location: Staffordshire, UK
Posts: 8,663
Likes: 0
Received 0 Likes
on
0 Posts
Matt J
It is really good on the road, the standard suspension is coping better than I thought, there is very little body roll and the ride is firm. When pushing hard into corners it feels so planted it is like it really is on rails, much more predictable than my RWD Saph ever felt and so far I am having much more fun pushing it! However, when not pushing hard it feels a bit floaty and unsure of itself. This may be due to the Quaife diff but I am also going to use solid buses in the front wishbones and change the currently standard top suspensions mounts at the front as I think they may be causing it (They are the only bits I haven't changed yet!)
I will wait till after Bedford now before I change anything major, I just can't stop driving it at the moment going for random blasts down the lanes
 22-04-2006, 11:56 PM
#113
Jeebus
Thread Starter
iTrader: (1)
Join Date: May 2003
Location: Staffordshire, UK
Posts: 8,663
Likes: 0
Received 0 Likes
on
0 Posts
Well, with just one week to go until Bedford I was out testing with the noise meter this afternoon and the engine went pop! Big oily mess under the bonnet and lots of smoke out of the exhaust 
But on the plus side I have started the stripdown already and it should be fixed in time
But on the plus side I have started the stripdown already and it should be fixed in time
24-04-2006, 11:21 PM
#114
Jeebus
Thread Starter
iTrader: (1)
Join Date: May 2003
Location: Staffordshire, UK
Posts: 8,663
Likes: 0
Received 0 Likes
on
0 Posts
Right update time!
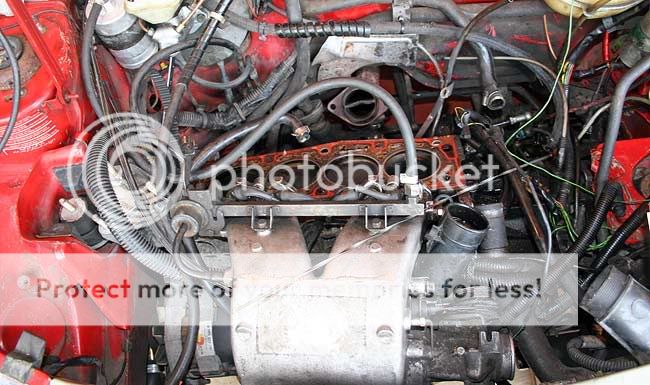
When it first happened I was worried that I had cracked the block or something, as oil was dripping everywhere and the car wouldn't run! Fortunately the oil was attributed to a breather having popped off under pressure and squirted a healthy dose of oil over the entire engine!
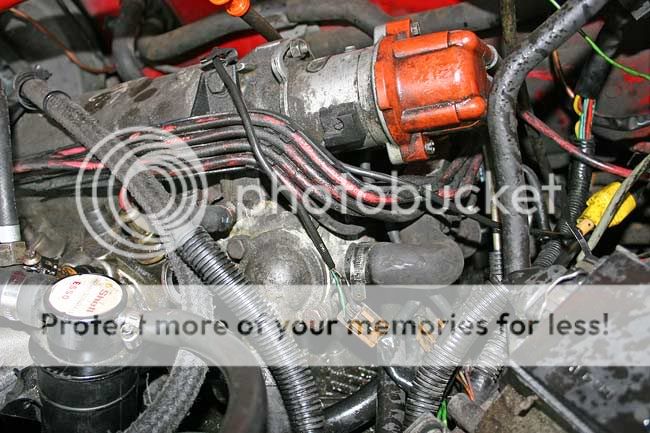
This was the offending pipe, the oil doesn't look so bad in the photos!
All was going well with the stripdown as above until..
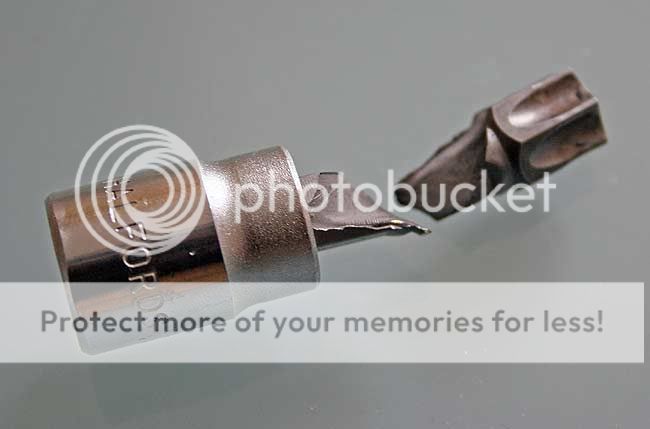
So I managed to borrow another (much stronger looking) one off my girlfriends dad, but this met a similar fate meaning work was over for Saturday night until I could get a new one in the morning.
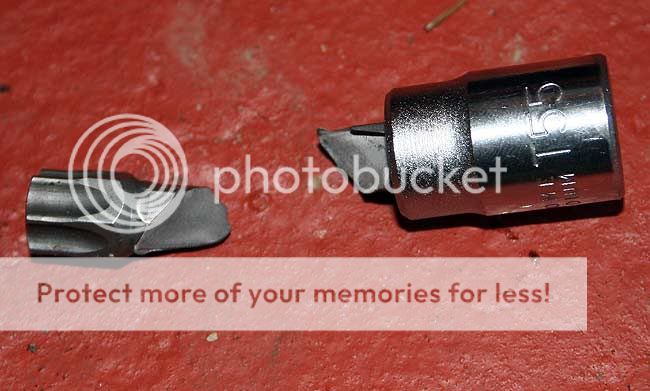
The new one didn't last long either then and Halfords were beginning to ask questions I was wondering if the headbolts would ever come out until I managed to find some hardened ones at a local motorfactors which did the job a treat!
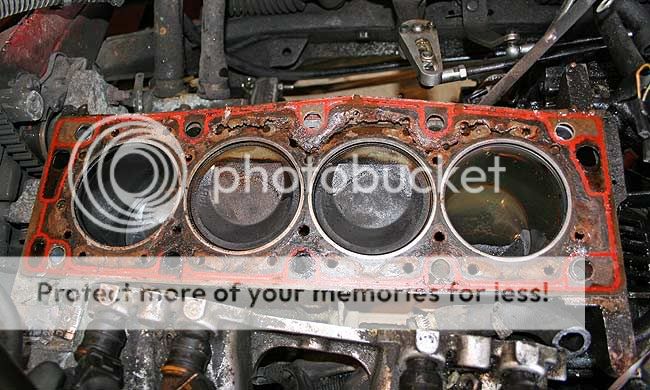
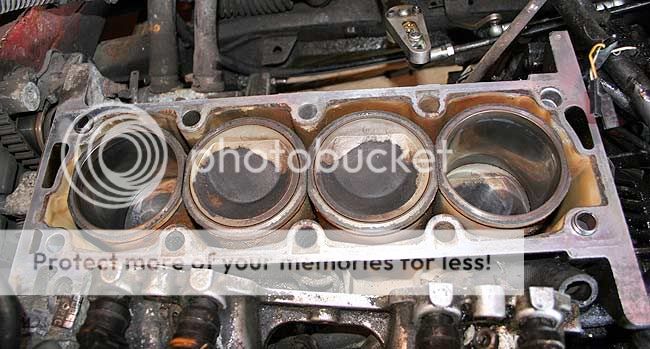
First sight of the old gasket..
I think this would definitely have caused the problems!
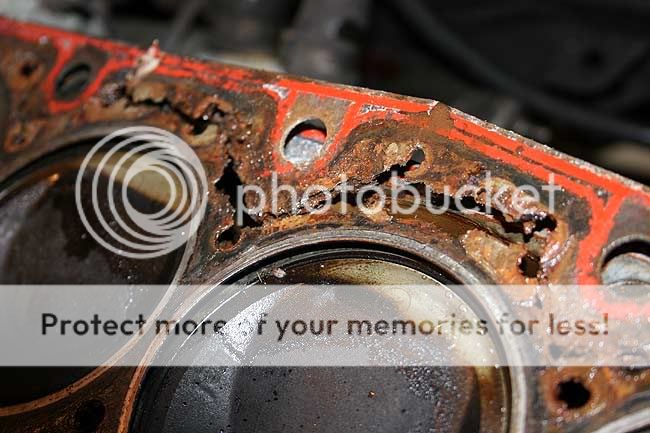

More broken-ness!
A quick run around and some lucky parts finding for a Sunday afternoon left me with a new gasket set and head bolts Things were starting to go my way!
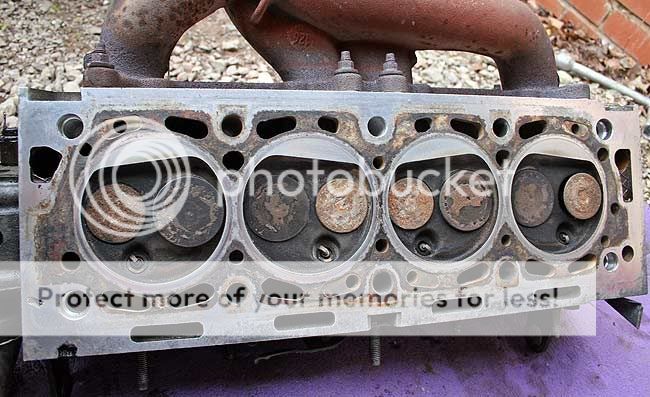
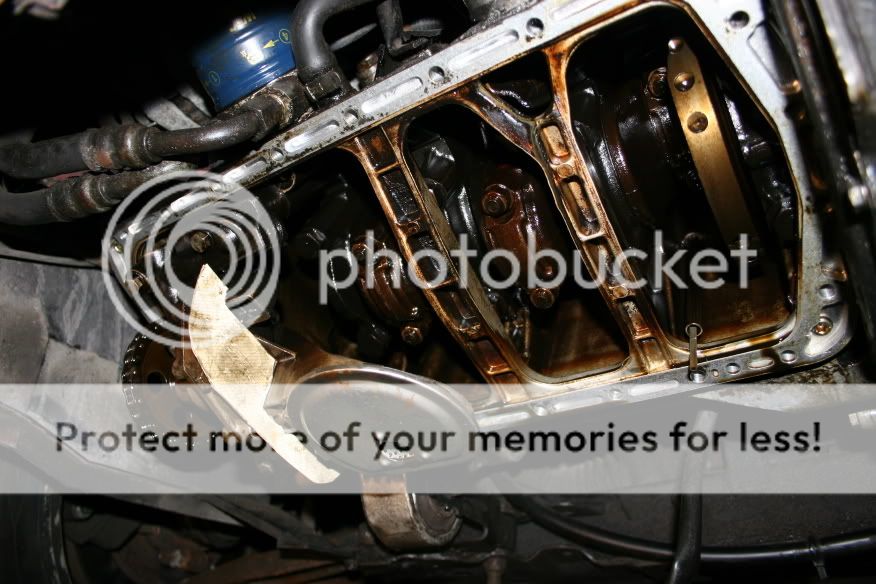
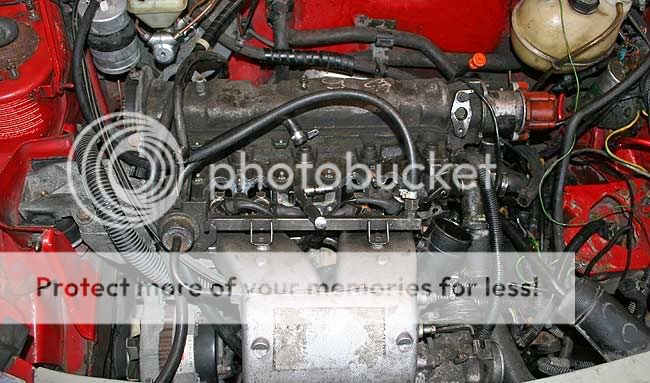
Cleaning up the head and block. As it didn't overheat and following a checkover I decided that the head didn't need a skim so I could press on with the rebuild.
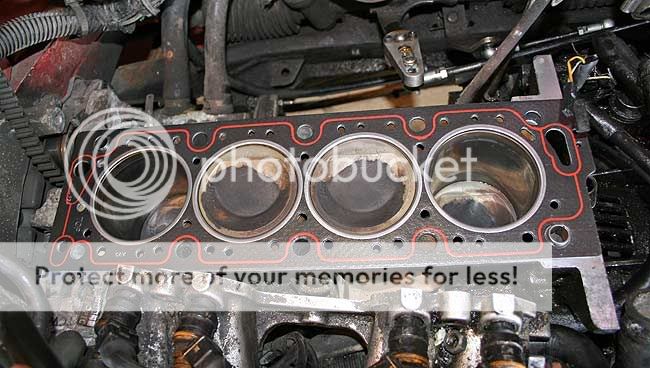
New gasket in place
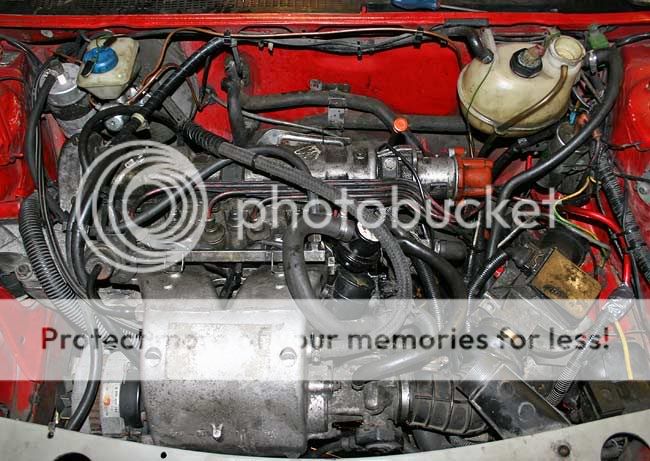
Almost everything back together.
That was all done on Sunday. Tonght I have flushed the coolant and done an oil flush by running it up to temperature with proper flushing oil, and it all seems good so far! The oil is draining overnight so tomorrow all I have to do is refill with the new oil and it is good to go!
When it first happened I was worried that I had cracked the block or something, as oil was dripping everywhere and the car wouldn't run! Fortunately the oil was attributed to a breather having popped off under pressure and squirted a healthy dose of oil over the entire engine!
This was the offending pipe, the oil doesn't look so bad in the photos!
All was going well with the stripdown as above until..
So I managed to borrow another (much stronger looking) one off my girlfriends dad, but this met a similar fate meaning work was over for Saturday night until I could get a new one in the morning.
The new one didn't last long either then and Halfords were beginning to ask questions
I was wondering if the headbolts would ever come out until I managed to find some hardened ones at a local motorfactors which did the job a treat!First sight of the old gasket..
I think this would definitely have caused the problems!
More broken-ness!
A quick run around and some lucky parts finding for a Sunday afternoon left me with a new gasket set and head bolts
Things were starting to go my way!Cleaning up the head and block. As it didn't overheat and following a checkover I decided that the head didn't need a skim so I could press on with the rebuild.
New gasket in place
Almost everything back together.
That was all done on Sunday. Tonght I have flushed the coolant and done an oil flush by running it up to temperature with proper flushing oil, and it all seems good so far! The oil is draining overnight so tomorrow all I have to do is refill with the new oil and it is good to go!
24-04-2006, 11:26 PM
#115
Jeebus
Thread Starter
iTrader: (1)
Join Date: May 2003
Location: Staffordshire, UK
Posts: 8,663
Likes: 0
Received 0 Likes
on
0 Posts
P.S. The headgasket change cost me:
�20 for complete gasket set
�10 stretch bolts
�10 on Torx bits for headbolts
and some oil & coolant.
Bargain
�20 for complete gasket set
�10 stretch bolts
�10 on Torx bits for headbolts
and some oil & coolant.
Bargain
26-04-2006, 09:21 AM
#118
Jeebus
Thread Starter
iTrader: (1)
Join Date: May 2003
Location: Staffordshire, UK
Posts: 8,663
Likes: 0
Received 0 Likes
on
0 Posts
I think it may be the original 120k miles old head gasket! The best thing about doing the rebuild is I managed ot pick up all those parts from the local motorfactors a mile down the road, on a Sunday afternoon, with no ordering or anyhting!
Put a few miles on it last night and it seems ok
Put a few miles on it last night and it seems ok
26-04-2006, 05:34 PM
#120
Jeebus
Thread Starter
iTrader: (1)
Join Date: May 2003
Location: Staffordshire, UK
Posts: 8,663
Likes: 0
Received 0 Likes
on
0 Posts
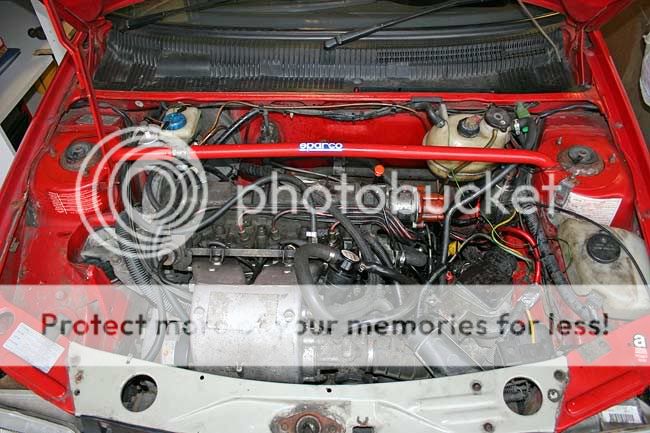
After the cheapness of the headgasket, it has just cost me �25 for a new accelerator cable Fitted that tonight and all is running well, the old cable was down to about 2 strands so I thought i'd better change it
Fitted that tonight and all is running well, the old cable was down to about 2 strands so I thought i'd better change it