Photography 101 - Lesson five – Flash photography
 22-11-2007, 08:11 PM
#1
0-60 in 17 seconds (eek)
Thread Starter
Join Date: Apr 2004
Location: Berkshire
Posts: 6,717
Likes: 0
Received 0 Likes
on
0 Posts
In the previous article (https://passionford.com/forum/viewtopic.php?p=3902873) we talked about ISO and EV, let’s cover flash photography in this one.
So flash photography eh ? What’s that all about then, well, hopefully, this fifth lesson will cover enough ground for you to start using your flash more often, and, if you don’t have one already, make you part with some cash.
First of all, let’s see when we might need a helping hand from a flash.
Generally, at any time when the light conditions are such that it becomes pretty much impossible to take a picture without resorting to a tripod.
As we’ve seen before, light, aperture, shutter speed and ISO are all tied together in achieving perfect exposure. It’s a little dark and you want to take a picture, the available light means you will have to open up the aperture (low F number), lower the shutter speed (1/30s ?) and maybe increase the ISO as high as it goes (with all the drawbacks that this entails in terms of image quality).
You’ve thrown just about everything you’ve got at the problem and the camera still says the picture will be under-exposed , so what do you do ??? Give up ???
I know, you get your tripod out, lower the speed a little more and take a picture.
Great, you have your picture, but upon closer inspection, the people in the picture have moved that little bit while the shutter was open and they look blurred, or, while you were out getting your tripod setup, etc... the moment had passed and you can’t get everyone to pose just the same again...
So, what’s the solution you may ask... a burst of flash, a little extra light that makes all these problems go away
That’s the most obvious reason for using a flash, there are a couple of others you may consider though, some of which I will go into more detail later.
First of all, fill-in, your subject stands in front of a brightly lit window, your camera will assess the overall lighting of the scene, detect that there’s plenty of light there and choose an aperture/speed combination which will correspond to this brightly lit scene. The only problem is that the face you are trying to picture will be very very dark in comparison and will be under-exposed. The end result is a picture which resembles more a shadow of a person, than the fine facial detail you were hoping to capture.
Second scenario you’re at a sports or motorsport event and things are moving pretty fast.
Since a burst of flash is very fast (1/70,000s) , you can use it to freeze motion, sometimes even combine the frozen motion with a little blur to convey speed and motion on an otherwise static image.
Third scenario is a bright sunny day and you’re taking pictures of people, either portraits of full length. Flash on a sunny day, you must be mad, why would I need such a thing when I have the full power of the sun to help me ?
Well, the power of the sun in this case can be an enemy
If your subject is under a tree for example, the sun will shine through the three and each leaf will cast a shadow on your subject’s face or clothes, leaving unsightly shadow marks on the picture.
Likewise, the bride’s mother at a wedding is wearing a rather large hat, the sunlight can create a massive shadow over her face (or even half of it), which will lead to a rather bad picture.
Taking this a little further, inset eyes, nose, chin, etc... can create all sorts of shadows on the face if the sun is in the wrong place.
A little burst of flash will quickly correct these shadows and create a more even picture as a result.
Now, here is when you don’t want to use a flash – at all – because it’s pointless and you’re wasting your time...
In a stadium at a football match, a concert, anywhere where you are standing hundreds of yards away from the subject. Your flash will try its best to project light as far as the other end of the stadium, but believe me, it’s like pissing in the wind... you won’t get your trousers wet, but the picture will be under-exposed.
Always makes me chuckle when I see all these people taking pictures with compact cameras, I can see their flash, but the flash sure as hell isn’t lighting me.
A bit like shining a torch at someone on the moon to help them see in the dark, it just won’t work ! (No need to try, just trust me on that one).
Red eyes
Ah, red eyes, let’s correct a few misconceptions before we go any further.
Red eye is a phenomenon which happens when you take pictures of people in the dark, or in dimly lit environments. If you are taking pictures of cats or dogs, it shows as green eyes for some strange reason which I’ve never been able to fathom
As usual, there is a perfectly simple explanation to this annoyance. Essentially, what you are seeing on the picture, is a photo of the retina which is at the back of the eye.
Why ? Well, first of all, it’s dark, so the eyes’ pupil are wide open to try and gather as much light as possible so as to not bump into people, etc...
If you are using a compact camera, or your SLR’s built in flash, have a look at how close the flash bulb is to the lens. What is important there is how closely aligned they are in the horizontal plane.
Now, let’s turn the tables for the sake of experimenting. Place yourself in front of a mirror (representing your subject’s eyes or retina), and place a lit torch very close to your eye (you are the camera’s sensor or film, the torch is the flash).
Chances are you are being blinded by the torch by now (stop, it’s not good for your eyes !!!)
Well, that’s exactly what happens when you take a picture, the flash fires its ray of light, the light bounces off the back of the eye/retina which is full of blood vessels, hence the red, and your camera therefore records a bright red spot in the middle of each eye. Simple eh !
Quick health tip: There are so many blood vessels on your retina that an optician can detect signs of high blood pressure, diabetes and much more. Well worth a regular visit
Many attempts have been made to somehow prevent this from happening, and have never been very successful, the first is the “anti red-eye” setting in your camera.
All that does, is fire a number of flash bursts before the picture is actually taken, hopefully forcing the subject’s pupils to close as a result so that the retina is no longer clearly visible.
Apart from the discomfort associated with the barrage of light, and the fact that you’re broadcasting the fact that you will be taking a picture in the next second or so, possibly loosing the moment in the process, it’s actually a pretty good solution, but not one that I like for the reasons stated here.
More recently, digital cameras have attempted to do what you would do yourself in photoshop, etc... and that’s detecting symptoms of red eye on the picture and editing the picture automatically before it’s saved.
I don’t know how good this system really is, but it’s not really resolving the problem, merely trying to work around it again.
The only viable solution, is to create some distance between the lens and the flash bulb (again in the horizontal plane) so that the light bouncing off the retina goes towards the floor, rather than the lens and hey presto, problem solved.
Why do I need a flash ? I’ve got one haven’t I ?
You’re quite right, most cameras have a built-in flash, and apart from the red-eye issue they are pretty good as long as you don’t ask too much of them.
What do I mean by asking too much ??? Well, flashes like cars have limited horsepower, and frankly, just like cars, the more the better.
The little flash that’s in your camera is a cheap accessory, it’s not that powerful and that’s why you need a dedicated flash unit to be truthful.
A dedicated flash will have more features (strobe, modelling, wireless, etc... more on which later). It will charge faster between flashes, and won’t drain your camera’s batteries
So, what determines this horsepower I’m on about ?
Flash power is dictated by something called Guide Number or GN. A low number indicates the flash is weak, conversely a high number indicates the flash is powerful.
Typically, a built-in flash has a GN of 5 or thereabouts, while a dedicated unit will have a GN which can range from 30 to over 200, depending on how much you spend
Remember, you can never have too high a GN, the more the better
As ever, these numbers haven’t come about from nowhere, so here’s some techy details on their meaning, some of which is pretty useful if you are going to use your flash in manual mode rather than fully automatic.
Firstly, the GN is rated for ISO 100 film, so if your film (or camera setting) is ISO 200, the flash’s GN will be higher, but not twice a high...
GN is usually expressed as “GN xxx with ISO 100”, beware of any claims made against different ISO settings.
Here’s the formula: GN = flash-to-subject distance (in feet) X F-stop required for correct exposure of the subject at that distance.
Note that shutter speed doesn’t enter the equation, simply because a flash burst is usually much quicker than any camera’s maximum shutter speed.
So, let’s try a few calculations:
-Subject is 20feet away, you want to use F8 at ISO 100.
For correct exposure, you will need a minimum GN of 20*8 = 160.
-Subject is 20feet away, you have a flash with max GN of 100.
For correct exposure, you will need to set your F-Stop to 100/20 = F5 (F5.6 or F4.5 in real terms since F5 doesn’t exist).
Now, let’s look at why increasing ISO from 100 to 200 doesn’t double the GN.
Say we choose F11 at 10feet and ISO 100.
GN = 11 * 10 = 110.
Changing from ISO 100 to 200 would be the equivalent of increasing exposure by one stop, requiring an aperture change to F16 to make up for the one stop difference.
GN = 16 * 10 = 160 in that case.
So from these formulaes, we can work out that:
-GN/distance tells you which F-stop to use (in manual mode)
-GN/F-Stop = max distance the flash will operate at.
So, there you have it, the built-in flash with a GN of 5, at a max aperture of F2.8 will work up to 1.8 ft, as I said, no point using it at a concert
Bear in mind that these calculations are based on the flash giving all it’s got, it is usually possible (in manual mode) to restrict the flash to half/quarter/etc... power so that you have more liberty in choosing the aperture you want without over-exposing the photo.
So, we know how to do this manually, how does the camera work all this out ?
In film cameras, TTL metering is how (Through The Lens metering). You choose an aperture (hopefully within the capabilities of the flash) and the camera sets the flash off.
While the flash burst is going off (very short period of time remember), the camera measures the amount of light reflected off the film using a sensor placed near it, and when it has received enough, it tells the flash to stop firing. This is the reason why sometimes the flash will only give a short/sharp burst and sometimes it will appear to literally explode.
This has been a very successful method for many years, one that unfortunately cannot be replicated in digital SLRs. Why ? Well, the CCD sensor isn’t reflective in nature, not like film was, so TTL metering for digital cameras is pretty much impossible to achieve...
There are two solutions to this problem that I am aware of, Distance Integration and Pre-Flash.
Distance integration uses information from the lens to work out the distance from the subject, based on this information, the camera knows just how much flash to give off before the picture is taken.
Pre-Flash fires a control flash before the mirror is lifted, and measures the result through reflection on the mirror. Based on this control burst, it calculates how much is actually required, lifts the mirror, opens the shutter and fires the flash.
The problem with that last solution (not with all cameras, but certainly one I have noticed on my Minolta) is what’s known as lazy eyes.
The pre-flash effectively makes the subject blink, and when the picture is actually taken, it’s possible for the eyelids to be right across the eyes, making it look like they are half asleep... Great !
Another thing to watch for here, is that if you have a digital SLR, not all flashes will be compatible. A non-compatible flash will receive the pre-flash instruction, think, yey, it’s my go and flood the place with light. The camera will then lift the mirror, open the shutter, ask the flash to fire again, at which point it’s re-charging following its outburst, probably resulting in no flash at all.
Notwithstanding the fact that the camera will have got completely the wrong information from the pre-flash since it was a lot more powerful than it should have been.
Just be careful that you choose a flash which is 100% compatible with your camera, usually, one made by the camera manufacturer, specifically for your camera.
Things to watch for when using a flash (pictures at the end to illustrate)
Too much flash
Too much flash will just kill the ambiance in a dimly lit environment, making it look like it’s daylight.
Too much flash can also “flatten” features, fine hair, fabric, etc... can look flat if flash is too powerful.
Most cameras have a flash compensation capability, this is where you can ask the camera to reduce the amount of flash it introduces in the picture. This is known as flash compensation which you can increase or decrease in ˝ or 1/3 EV depending on the camera.
Shadow cast behind subject
If your subject is close to a wall, it’s likely that the flash will create a nasty shadow behind them. The lighter the background, and the closer the subject is to the background, the more obvious this will be.
Reflections
How many times have you taken a picture of someone with a mirror behind them, or, a window ? You can usually get away with it if you’re not using a flash, but think about the reflection from your flash gun. Will you have a great big bright blob somewhere in the picture where the glass/mirror has bounced all your flash light back at the camera ?
Now let’s look at a few more advanced uses for flash
Using exposure hold to retain ambiance
As I said above, there are cases where a big burst of flash will turn a dimly lit scene into what looks like daylight. Conserving that mood is sometimes necessary which is where exposure hold comes into play.
Most cameras have a button which allows you to take an exposure reading from a scene and hold it while you re-frame then take the picture.
This function, when used in conjunction with a flash will result in a lowered shutter speed and a lower burst of flash.
The end result is that the flash correctly exposes most things, while the camera remains open for 1/30s, sometimes less, allowing the darker part of the scene to be captured on film.
Candle-lit scenes will look a lot warmer as a result for example.
Be careful to watch your shutter speed though, it can drop to 1/4s, making hand-held photography difficult to achieve without blurring, but the results are really worth it.
Rear curtain sync
When a picture is taken, in an SLR, the mirror lifts then the sensor is exposed as the shutter opens. Typically, a flash fires just after the shutter opens, rear curtain sync forces the camera to wait until the very last moment before firing the flash, almost in time with the closure of the shutter.
Say you’re taking a picture of something which moves with a relatively slow speed (say 1/30s), without rear curtain sync, the flash will freeze motion at the start of the picture being taken, and while the shutter remains open, motion will appear blurred. Say, for example that you are taking the picture of someone running left to right.
Without rear-curtain sync, the sharpest, clearest part of the image will be on the left hand side when the flash fired, the right hand side will show the runner blurred as if it carried on running after being frozen (which it did).
With rear curtain sync, you would have blurring on the left hand side, while the sharp part of the image would be on the right, at the end of the movement or motion, resulting in a much more natural looking picture.
It’s not easy to explain in text...
Strobe, modelling, wireless
More advanced flashes have features such as strobe, modelling and wireless, amongst others, let’s have a look at those briefly.
Strobe, enables the flash to fire a number of flash bursts, usually you can set this to a number within a range.
The result on a long-ish exposure would be a series of frozen subjects on the picture, a bit like strobe lighting does in a night club where dancers’ movements look staggered Hope you get what I mean.
Modelling is a feature where the flash can be turned on like a light, showing where shadow might be created by the flash, allowing you to re-position your model/yourself to avoid unwanted shadows.
Particularly useful in macro for example.
Wireless allows the flash to be controlled by the camera without the flash gun being physically attached to the camera. More advanced cameras can control up to 4 individual flash guns at the same time, allowing you to place flashes in a number of different places around your subject (side, behind, front) and accurately controlling the amount of light each flash produces when asked to.
Now some examples to illustrate what I’ve been rambling about:
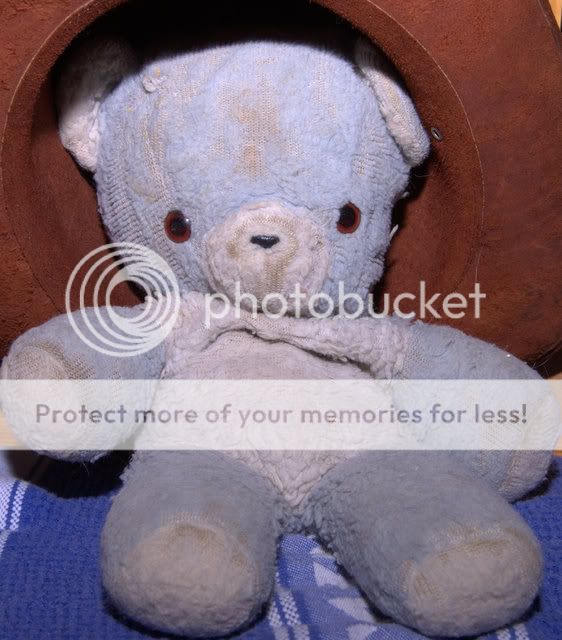
I’ve roped my teddy bear in for this, the cats wouldn’t stand still long enough, and they didn’t take kindly to wearing a hat
Shadows from a hat
Without flash, check out the shadow across the face and belly. Note: The photo itself didn’t need flash to be taken, just like a picture in broad daylight under a strong sun.

With flash, with a little flash to add some light, shadows have gone (possibly a little too much flash here)
Shadow cast behind subject, nice duplicate on white background

Exposure hold
Before, just with flash

Exposure held, see how much warmer the candle is for example. A little blurred as the speed dropped to 1/4s.

I hope this will give you food for thought, maybe an excuse for a Christmas present, or, to go out and try things in the dark nights of winter.
As ever, any questions, please ask ?
As for the next instalment, I am not sure what it will be yet
So flash photography eh ? What’s that all about then, well, hopefully, this fifth lesson will cover enough ground for you to start using your flash more often, and, if you don’t have one already, make you part with some cash.
First of all, let’s see when we might need a helping hand from a flash.
Generally, at any time when the light conditions are such that it becomes pretty much impossible to take a picture without resorting to a tripod.
As we’ve seen before, light, aperture, shutter speed and ISO are all tied together in achieving perfect exposure. It’s a little dark and you want to take a picture, the available light means you will have to open up the aperture (low F number), lower the shutter speed (1/30s ?) and maybe increase the ISO as high as it goes (with all the drawbacks that this entails in terms of image quality).
You’ve thrown just about everything you’ve got at the problem and the camera still says the picture will be under-exposed
I know, you get your tripod out, lower the speed a little more and take a picture.
Great, you have your picture, but upon closer inspection, the people in the picture have moved that little bit while the shutter was open and they look blurred, or, while you were out getting your tripod setup, etc... the moment had passed and you can’t get everyone to pose just the same again...
So, what’s the solution you may ask... a burst of flash, a little extra light that makes all these problems go away
That’s the most obvious reason for using a flash, there are a couple of others you may consider though, some of which I will go into more detail later.
First of all, fill-in, your subject stands in front of a brightly lit window, your camera will assess the overall lighting of the scene, detect that there’s plenty of light there and choose an aperture/speed combination which will correspond to this brightly lit scene. The only problem is that the face you are trying to picture will be very very dark in comparison and will be under-exposed. The end result is a picture which resembles more a shadow of a person, than the fine facial detail you were hoping to capture.
Second scenario you’re at a sports or motorsport event and things are moving pretty fast.
Since a burst of flash is very fast (1/70,000s) , you can use it to freeze motion, sometimes even combine the frozen motion with a little blur to convey speed and motion on an otherwise static image.
Third scenario is a bright sunny day and you’re taking pictures of people, either portraits of full length. Flash on a sunny day, you must be mad, why would I need such a thing when I have the full power of the sun to help me ?
Well, the power of the sun in this case can be an enemy
If your subject is under a tree for example, the sun will shine through the three and each leaf will cast a shadow on your subject’s face or clothes, leaving unsightly shadow marks on the picture.
Likewise, the bride’s mother at a wedding is wearing a rather large hat, the sunlight can create a massive shadow over her face (or even half of it), which will lead to a rather bad picture.
Taking this a little further, inset eyes, nose, chin, etc... can create all sorts of shadows on the face if the sun is in the wrong place.
A little burst of flash will quickly correct these shadows and create a more even picture as a result.
Now, here is when you don’t want to use a flash – at all – because it’s pointless and you’re wasting your time...
In a stadium at a football match, a concert, anywhere where you are standing hundreds of yards away from the subject. Your flash will try its best to project light as far as the other end of the stadium, but believe me, it’s like pissing in the wind... you won’t get your trousers wet, but the picture will be under-exposed.
Always makes me chuckle when I see all these people taking pictures with compact cameras, I can see their flash, but the flash sure as hell isn’t lighting me.
A bit like shining a torch at someone on the moon to help them see in the dark, it just won’t work ! (No need to try, just trust me on that one).
Red eyes
Ah, red eyes, let’s correct a few misconceptions before we go any further.
Red eye is a phenomenon which happens when you take pictures of people in the dark, or in dimly lit environments. If you are taking pictures of cats or dogs, it shows as green eyes for some strange reason which I’ve never been able to fathom
As usual, there is a perfectly simple explanation to this annoyance. Essentially, what you are seeing on the picture, is a photo of the retina which is at the back of the eye.
Why ? Well, first of all, it’s dark, so the eyes’ pupil are wide open to try and gather as much light as possible so as to not bump into people, etc...
If you are using a compact camera, or your SLR’s built in flash, have a look at how close the flash bulb is to the lens. What is important there is how closely aligned they are in the horizontal plane.
Now, let’s turn the tables for the sake of experimenting. Place yourself in front of a mirror (representing your subject’s eyes or retina), and place a lit torch very close to your eye (you are the camera’s sensor or film, the torch is the flash).
Chances are you are being blinded by the torch by now
Well, that’s exactly what happens when you take a picture, the flash fires its ray of light, the light bounces off the back of the eye/retina which is full of blood vessels, hence the red, and your camera therefore records a bright red spot in the middle of each eye. Simple eh !
Quick health tip: There are so many blood vessels on your retina that an optician can detect signs of high blood pressure, diabetes and much more. Well worth a regular visit
Many attempts have been made to somehow prevent this from happening, and have never been very successful, the first is the “anti red-eye” setting in your camera.
All that does, is fire a number of flash bursts before the picture is actually taken, hopefully forcing the subject’s pupils to close as a result so that the retina is no longer clearly visible.
Apart from the discomfort associated with the barrage of light, and the fact that you’re broadcasting the fact that you will be taking a picture in the next second or so, possibly loosing the moment in the process, it’s actually a pretty good solution, but not one that I like for the reasons stated here.
More recently, digital cameras have attempted to do what you would do yourself in photoshop, etc... and that’s detecting symptoms of red eye on the picture and editing the picture automatically before it’s saved.
I don’t know how good this system really is, but it’s not really resolving the problem, merely trying to work around it again.
The only viable solution, is to create some distance between the lens and the flash bulb (again in the horizontal plane) so that the light bouncing off the retina goes towards the floor, rather than the lens and hey presto, problem solved.
Why do I need a flash ? I’ve got one haven’t I ?
You’re quite right, most cameras have a built-in flash, and apart from the red-eye issue they are pretty good as long as you don’t ask too much of them.
What do I mean by asking too much ??? Well, flashes like cars have limited horsepower, and frankly, just like cars, the more the better.
The little flash that’s in your camera is a cheap accessory, it’s not that powerful and that’s why you need a dedicated flash unit to be truthful.
A dedicated flash will have more features (strobe, modelling, wireless, etc... more on which later). It will charge faster between flashes, and won’t drain your camera’s batteries
So, what determines this horsepower I’m on about ?
Flash power is dictated by something called Guide Number or GN. A low number indicates the flash is weak, conversely a high number indicates the flash is powerful.
Typically, a built-in flash has a GN of 5 or thereabouts, while a dedicated unit will have a GN which can range from 30 to over 200, depending on how much you spend
Remember, you can never have too high a GN, the more the better
As ever, these numbers haven’t come about from nowhere, so here’s some techy details on their meaning, some of which is pretty useful if you are going to use your flash in manual mode rather than fully automatic.
Firstly, the GN is rated for ISO 100 film, so if your film (or camera setting) is ISO 200, the flash’s GN will be higher, but not twice a high...
GN is usually expressed as “GN xxx with ISO 100”, beware of any claims made against different ISO settings.
Here’s the formula: GN = flash-to-subject distance (in feet) X F-stop required for correct exposure of the subject at that distance.
Note that shutter speed doesn’t enter the equation, simply because a flash burst is usually much quicker than any camera’s maximum shutter speed.
So, let’s try a few calculations:
-Subject is 20feet away, you want to use F8 at ISO 100.
For correct exposure, you will need a minimum GN of 20*8 = 160.
-Subject is 20feet away, you have a flash with max GN of 100.
For correct exposure, you will need to set your F-Stop to 100/20 = F5 (F5.6 or F4.5 in real terms since F5 doesn’t exist).
Now, let’s look at why increasing ISO from 100 to 200 doesn’t double the GN.
Say we choose F11 at 10feet and ISO 100.
GN = 11 * 10 = 110.
Changing from ISO 100 to 200 would be the equivalent of increasing exposure by one stop, requiring an aperture change to F16 to make up for the one stop difference.
GN = 16 * 10 = 160 in that case.
So from these formulaes, we can work out that:
-GN/distance tells you which F-stop to use (in manual mode)
-GN/F-Stop = max distance the flash will operate at.
So, there you have it, the built-in flash with a GN of 5, at a max aperture of F2.8 will work up to 1.8 ft, as I said, no point using it at a concert
Bear in mind that these calculations are based on the flash giving all it’s got, it is usually possible (in manual mode) to restrict the flash to half/quarter/etc... power so that you have more liberty in choosing the aperture you want without over-exposing the photo.
So, we know how to do this manually, how does the camera work all this out ?
In film cameras, TTL metering is how (Through The Lens metering). You choose an aperture (hopefully within the capabilities of the flash) and the camera sets the flash off.
While the flash burst is going off (very short period of time remember), the camera measures the amount of light reflected off the film using a sensor placed near it, and when it has received enough, it tells the flash to stop firing. This is the reason why sometimes the flash will only give a short/sharp burst and sometimes it will appear to literally explode.
This has been a very successful method for many years, one that unfortunately cannot be replicated in digital SLRs. Why ? Well, the CCD sensor isn’t reflective in nature, not like film was, so TTL metering for digital cameras is pretty much impossible to achieve...
There are two solutions to this problem that I am aware of, Distance Integration and Pre-Flash.
Distance integration uses information from the lens to work out the distance from the subject, based on this information, the camera knows just how much flash to give off before the picture is taken.
Pre-Flash fires a control flash before the mirror is lifted, and measures the result through reflection on the mirror. Based on this control burst, it calculates how much is actually required, lifts the mirror, opens the shutter and fires the flash.
The problem with that last solution (not with all cameras, but certainly one I have noticed on my Minolta) is what’s known as lazy eyes.
The pre-flash effectively makes the subject blink, and when the picture is actually taken, it’s possible for the eyelids to be right across the eyes, making it look like they are half asleep... Great !
Another thing to watch for here, is that if you have a digital SLR, not all flashes will be compatible. A non-compatible flash will receive the pre-flash instruction, think, yey, it’s my go and flood the place with light. The camera will then lift the mirror, open the shutter, ask the flash to fire again, at which point it’s re-charging following its outburst, probably resulting in no flash at all.
Notwithstanding the fact that the camera will have got completely the wrong information from the pre-flash since it was a lot more powerful than it should have been.
Just be careful that you choose a flash which is 100% compatible with your camera, usually, one made by the camera manufacturer, specifically for your camera.
Things to watch for when using a flash (pictures at the end to illustrate)
Too much flash
Too much flash will just kill the ambiance in a dimly lit environment, making it look like it’s daylight.
Too much flash can also “flatten” features, fine hair, fabric, etc... can look flat if flash is too powerful.
Most cameras have a flash compensation capability, this is where you can ask the camera to reduce the amount of flash it introduces in the picture. This is known as flash compensation which you can increase or decrease in ˝ or 1/3 EV depending on the camera.
Shadow cast behind subject
If your subject is close to a wall, it’s likely that the flash will create a nasty shadow behind them. The lighter the background, and the closer the subject is to the background, the more obvious this will be.
Reflections
How many times have you taken a picture of someone with a mirror behind them, or, a window ? You can usually get away with it if you’re not using a flash, but think about the reflection from your flash gun. Will you have a great big bright blob somewhere in the picture where the glass/mirror has bounced all your flash light back at the camera ?
Now let’s look at a few more advanced uses for flash
Using exposure hold to retain ambiance
As I said above, there are cases where a big burst of flash will turn a dimly lit scene into what looks like daylight. Conserving that mood is sometimes necessary which is where exposure hold comes into play.
Most cameras have a button which allows you to take an exposure reading from a scene and hold it while you re-frame then take the picture.
This function, when used in conjunction with a flash will result in a lowered shutter speed and a lower burst of flash.
The end result is that the flash correctly exposes most things, while the camera remains open for 1/30s, sometimes less, allowing the darker part of the scene to be captured on film.
Candle-lit scenes will look a lot warmer as a result for example.
Be careful to watch your shutter speed though, it can drop to 1/4s, making hand-held photography difficult to achieve without blurring, but the results are really worth it.
Rear curtain sync
When a picture is taken, in an SLR, the mirror lifts then the sensor is exposed as the shutter opens. Typically, a flash fires just after the shutter opens, rear curtain sync forces the camera to wait until the very last moment before firing the flash, almost in time with the closure of the shutter.
Say you’re taking a picture of something which moves with a relatively slow speed (say 1/30s), without rear curtain sync, the flash will freeze motion at the start of the picture being taken, and while the shutter remains open, motion will appear blurred. Say, for example that you are taking the picture of someone running left to right.
Without rear-curtain sync, the sharpest, clearest part of the image will be on the left hand side when the flash fired, the right hand side will show the runner blurred as if it carried on running after being frozen (which it did).
With rear curtain sync, you would have blurring on the left hand side, while the sharp part of the image would be on the right, at the end of the movement or motion, resulting in a much more natural looking picture.
It’s not easy to explain in text...
Strobe, modelling, wireless
More advanced flashes have features such as strobe, modelling and wireless, amongst others, let’s have a look at those briefly.
Strobe, enables the flash to fire a number of flash bursts, usually you can set this to a number within a range.
The result on a long-ish exposure would be a series of frozen subjects on the picture, a bit like strobe lighting does in a night club where dancers’ movements look staggered
Modelling is a feature where the flash can be turned on like a light, showing where shadow might be created by the flash, allowing you to re-position your model/yourself to avoid unwanted shadows.
Particularly useful in macro for example.
Wireless allows the flash to be controlled by the camera without the flash gun being physically attached to the camera. More advanced cameras can control up to 4 individual flash guns at the same time, allowing you to place flashes in a number of different places around your subject (side, behind, front) and accurately controlling the amount of light each flash produces when asked to.
Now some examples to illustrate what I’ve been rambling about:
I’ve roped my teddy bear in for this, the cats wouldn’t stand still long enough, and they didn’t take kindly to wearing a hat
Shadows from a hat
Without flash, check out the shadow across the face and belly. Note: The photo itself didn’t need flash to be taken, just like a picture in broad daylight under a strong sun.
With flash, with a little flash to add some light, shadows have gone (possibly a little too much flash here)
Shadow cast behind subject, nice duplicate on white background
Exposure hold
Before, just with flash
Exposure held, see how much warmer the candle is for example. A little blurred as the speed dropped to 1/4s.
I hope this will give you food for thought, maybe an excuse for a Christmas present, or, to go out and try things in the dark nights of winter.
As ever, any questions, please ask ?
As for the next instalment, I am not sure what it will be yet
 22-11-2007, 08:39 PM
#2
0-60 in 17 seconds (eek)
Thread Starter
Join Date: Apr 2004
Location: Berkshire
Posts: 6,717
Likes: 0
Received 0 Likes
on
0 Posts
Another example where a little flash would have done wonders for an already excellent photo:
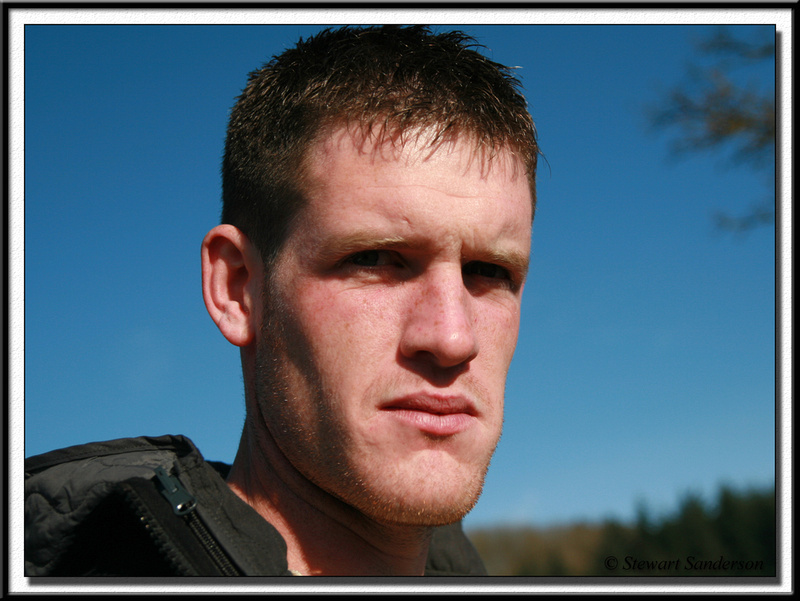
Thanks Stu for letting me use your picture as an example
Now, can you tell me what a burst of flash could have done here ?
Thanks Stu for letting me use your picture as an example
Now, can you tell me what a burst of flash could have done here ?
23-11-2007, 07:45 AM
#3
Advanced PassionFord User

Join Date: Sep 2004
Location: near coventry
Posts: 2,091
Likes: 0
Received 0 Likes
on
0 Posts
Stopped the dark pockets where the eyes are and the shadow cast under the nose and under the chin?
Excellent reading, the formula is very handy, i'll be trying it out whne my flash lands.
Thanks again,
Matt.
Excellent reading, the formula is very handy, i'll be trying it out whne my flash lands.
Thanks again,
Matt.
23-11-2007, 07:58 AM
#4
0-60 in 17 seconds (eek)
Thread Starter
Join Date: Apr 2004
Location: Berkshire
Posts: 6,717
Likes: 0
Received 0 Likes
on
0 Posts
Originally Posted by Muska
Stopped the dark pockets where the eyes are and the shadow cast under the nose and under the chin?
Originally Posted by Muska
Excellent reading, the formula is very handy, i'll be trying it out whne my flash lands.
Thanks again,
Matt.
Thanks again,
Matt.
Just realised I completely forgot to cover bounce flash techniques


Thread
Thread Starter
Forum
Replies
Last Post
nipper.1
Ford KUGA
12
30-05-2022 07:39 PM
van_dogg_pavvy
Technical help Q & A
2
03-03-2016 09:30 AM
101, bad, correcting, eyes, film, flash, inset, lession, lesson, nightclub, photo, photograph, photography, red, ttl