Photography 101 – Lesson Three – Aperture and Depth of field
 17-04-2007, 08:02 PM
#1
0-60 in 17 seconds (eek)
Thread Starter
Join Date: Apr 2004
Location: Berkshire
Posts: 6,717
Likes: 0
Received 0 Likes
on
0 Posts
In the last article (https://passionford.com/forum/viewtopic.php?p=3784722), we looked at exposure and how to achieve correct exposure using the correct choice of speed and aperture to allow sufficient light to reach the film or CCD so that we have a nicely exposed photo.
We also looked at what factors affect the speed you can choose to take a picture, the speed of the subject, the lens you are using, etc… It’s very easy, choose the appropriate speed, then select the aperture that goes with it and off you go…
Remember what I said in the first lesson, photography is about compromises, and in changing the aperture you are making two compromises, one which is the most obvious is depth of field, the other, less obvious is that picture quality may suffer as a result of your aperture choice.
Let’s look at these two in this article then…
Depth of field
What is it then I hear you ask ? Well, it’s “the zone of good focus over a distance from the camera film or CCD”, meaning that unless you are taking a picture of a flat surface and the film is 100% parallel to the surface, some objects in your picture will be more or less close to the camera when you take the picture.
This could range from a meter to tens of meters if you are taking a picture of your kids in the garden, hundreds of meters if you are taking a picture of the same kids by the sea side.
Over the overall distance, some items will be more or less in focus depending on your choice of aperture.
Let’s have a look at a few examples to illustrate this:
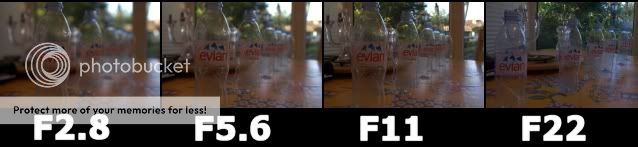
In the above picture, you will see that going from left to right, more bottles and more of the background appear in focus. In each photograph, I focussed on the first bottle, and only changed the aperture to the number shown under each picture.
Here’s another example:
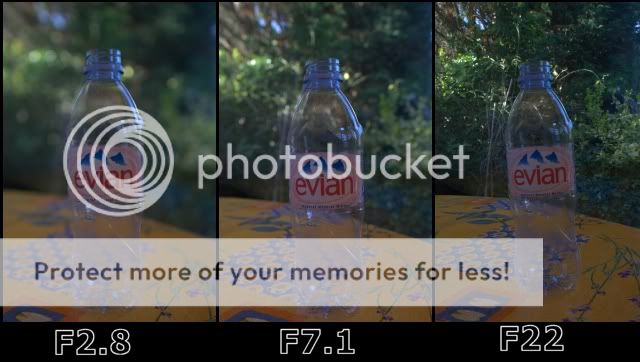
Here, look at the background behind the bottle, in the left hand photo, it’s all a blur, on the right hand one, you can make up the leaves on the trees in the garden behind.
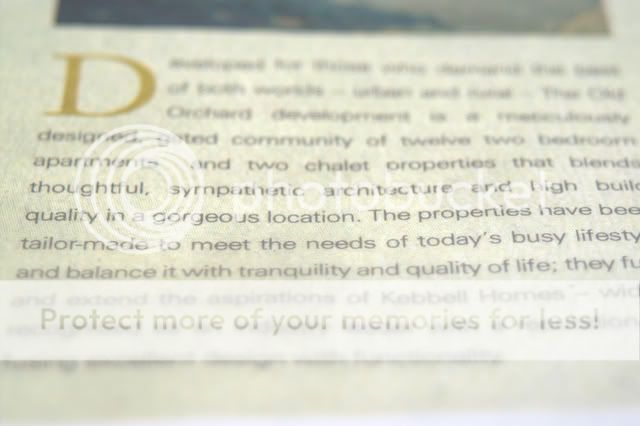
More extreme… these are macro shots of a newspaper advert, notice how quickly the text blurs more and more around the line that is sharp. The further (and closer) from the camera, the blurrier the lines.


So, by simply changing the aperture (and consequently the speed), I have achieved a number of very different photos from the very same subject.
This is very useful in portrait photography for example, where you want to litterally blur the background so that the portrait stands out on top of a blur, ensuring that whoever looks at your picture isn’t distracted by the patterns on the wallpaper behind the subject.
Downside is that if you choose to go for a very shallow depth of field (where the in focus distance is very short), you have to be extremely careful with your focussing, active kids don’t make for an easy subject in this situation I guess there’s another compromise here…
So why is that then ? Well, in simple terms, objects in a picture are only truly in focus if they are exactly at the same distance as the one you have focussed on, from this point forward and back, the objects get blurrier and blurrier, it’s just that we can’t really see the blur until it becomes too much.
Since we are in a sea of compromises here (aperture, speed, depth of field…), let’s look at other factors that affect depth of field.
Distance
Say you choose an aperture for a photo, and walk back while you keep re-focussing on the same subject, the DOF will increase, if you get closer, it will get shallower and shallower, so distance to focussed subject makes a difference too.
Focal Length
Generally a consequence of the fact that a long lens will mean you stand further from your subject, the DOF will usually increase with longer lenses. A 200mm lens will give you a larger DOF than a 28mm at a given aperture value.
In summary, the combination of Aperture, distance to focussed subject and focal length will affect the DOF on your photograph.
Imagine trying to work all this out while taking pictures…. never thought you’d need a degree in mathematics to take pictures did you
Luckily, lens manufacturers come to the rescue (don’t expect a fully fledged rescue boat here, it’s more like a buoy…).
You might have noticed some markings on your lenses, such as the ones below:

Image courtesy of wikipedia
If you take a look at the little window on the lens, it shows how far the subject you have focussed on is in meters and ft (look at the vertical white line below the window), approx. 5ft in this example.
Below the window, you can also see 11, 16 and 22, these are aperture numbers, and they are repeated on the left and right hand side of the focus distance indicator.
This tells you approximately that at F11, subjects between 3 and a little more than 5ft will be in focus.
At F22, the range will be below 3ft and up to infinity
It’s very approximate, but gives an idea.
Zoom lenses sometimes have lines printed on the body of the lens (often blue, red, green, yellow) to show how the DOF changes as you change zoom setting. I can’t unfortunately find a picture of such a lens (fewer and fewer lenses have them these days )
)
If you have a DSLR and the lens wasn’t designed for the APS size sensor which is found in most non-professional DSLRs, ignore all I’ve said on the markings (you’ve still learnt why there’s a window there I hope), they will be wholly inaccurate. For example, a 55mm lens, F16, 10ft from the subject will result in 12.3ft of DOF with a full frame sensor, or, 35mm film SLR, whereas with an APS sensor in a DSLR, the resulting DOF will be a mere 6.6ft
So, how can one make any sense of this… well, there are a few other options available to you.
-Experience: After a while, you’ll get a feel for it all and won’t need to refer to any charts, etc… unless you are dedicated to photography and looking for a very specific result, a good guess is usually pretty good. Remember, digital photos are free too, so why not take two or three at different apertures and keep the one you like
-DOF calculators and charts: I won’t bother giving you the formulaes or replicating the work others have done, take a look at the following links and have a little play, then make a note of the values that are most likely to be useful to you and keep them with your camera just in case you need to refer to them in the future.
http://www.dofmaster.com/dofjs.html - advanced calculator
http://www.dofmaster.com/doftable.html - DOF table, well worth printing a few samples
-DOF preview in your camera: If your camera has one, when you press the button, the lens will set itself to the chosen aperture and show you the picture as it will be taken, you should be able to see what will and won’t be in focus, however, unless you are in a bright environment, the viewfinder can get very dark, making it difficult to see the wood from the trees, worth a try, and worth persevering, it’s something you get used to over time.
-Automatic DOF: Some cameras have a setting which allows you to focus on the near point you want in focus, then focus on the far point you want in focus, and the camera calculates the appropriate aperture for you… brilliant
-Lastly, if you set the aperture on your camera to be the widest the lens can support (e.g. 2.8 or 4.5), then what you see in the viewfinder is what you will get on the picture, this is because the lens is fully open by default and only closes down to a chosen narrower aperture when you press the shutter to take the picture.
Before moving onto the subjective effects of aperture on image quality, let’s just consider one last thing about DOF.
The in-focus part of a picture is not equally spread around the point of focus, it’s usually around 1/3rd of the distance in front of the subject, and 2/3rd behind.
So, if your subject is 1m away from you and your focal distance/aperture combination dictates that you have 3m of DOF, objects that are between 0m (1 – 1/3 of 3) and 3m (1 + 2/3 of 3) away from you will also be in sufficient focus not to be blurred.
This is a very important point to remember when trying to get a number of things in focus over a distance. Focussing on the nearest object may force others further away to be out of focus
Effect of aperture on image quality
Now this is a very subjective discussion, some may not notice any differences, and lens quality has a major impact on what I am about to say here.
Basically, a lens usually performs best away from its extremes of aperture. If for example, you have a lens which has an aperture range of F2.8 to F22, the best images will not be obtained with an aperture of F2.8 or F22, it could be that the best range is something between F5.6 and F16, but as I said above, this is very much dependent on lens quality, the very best lenses will perform much better than the cheaper ones at the extremes.
Why is that then ? Well, at the widest aperture (F2.8), the whole of lens glass is being used and due to manufacturing processes, the edge of lenses are often more imperfect than the center, which leads to aberrations in light paths, resulting in pictures that are not necessarily as sharp as they should be.
At the narrowest aperture (F22), a different effect is noticed. As the light rays go past the diaphragm in the lens, they tend to be broken up as they “hit” the edge of the blades in the diaphragm, at F2.8, there is so much light coming through the lens that this diffraction is barely noticeable, a bit like a mobile phone ringing at a rock concert, you can’t hear it. On the other hand, if the diaphragm is closed, the ratio of diffraction to light increases significantly and therefore becomes visible and affects the picture’s quality, just like the same mobile phone in a library can be heard loud and clear
This may therefore mean that if you wanted the best quality f/2.8 photograph, a f/2.0 or f/1.4 lens would be required to yield a higher quality than a lens with a maximum aperture of f/2.8.
Don’t forget that if the maximum aperture your lens supports is F5.6, the most likely “good” range starts at F8
Whether you choose to use the widest and narrowest aperture of your lenses is up to you, you may notice a difference in which case, bear it in mind, if you can’t see a difference, ignore all this and shoot to your heart’s content
Now go practice and see how changing aperture affects the end result, just remember that as you choose narrower apertures to increase depth of field, speed has to decrease proportionally, and you may find that unless it’s a bright day, the speed may become too low. Didn’t I say photography was about compromises You can’t always have your cake and eat it
Mind you, you could pull your flash out to add the missing light (mmm, I feel another lesson here...).
That’s about it for now, I hope you now understand the very fundamentals of the mechanics behind photography (if not, ask questions please), the rest is very much up to you, time and plenty of practice.
Rest assured, I won’t stop here, and will cover more subjects in subsequent articles
We also looked at what factors affect the speed you can choose to take a picture, the speed of the subject, the lens you are using, etc… It’s very easy, choose the appropriate speed, then select the aperture that goes with it and off you go…
Remember what I said in the first lesson, photography is about compromises, and in changing the aperture you are making two compromises, one which is the most obvious is depth of field, the other, less obvious is that picture quality may suffer as a result of your aperture choice.
Let’s look at these two in this article then…
Depth of field
What is it then I hear you ask ? Well, it’s “the zone of good focus over a distance from the camera film or CCD”, meaning that unless you are taking a picture of a flat surface and the film is 100% parallel to the surface, some objects in your picture will be more or less close to the camera when you take the picture.
This could range from a meter to tens of meters if you are taking a picture of your kids in the garden, hundreds of meters if you are taking a picture of the same kids by the sea side.
Over the overall distance, some items will be more or less in focus depending on your choice of aperture.
Let’s have a look at a few examples to illustrate this:
In the above picture, you will see that going from left to right, more bottles and more of the background appear in focus. In each photograph, I focussed on the first bottle, and only changed the aperture to the number shown under each picture.
Here’s another example:
Here, look at the background behind the bottle, in the left hand photo, it’s all a blur, on the right hand one, you can make up the leaves on the trees in the garden behind.
More extreme… these are macro shots of a newspaper advert, notice how quickly the text blurs more and more around the line that is sharp. The further (and closer) from the camera, the blurrier the lines.
So, by simply changing the aperture (and consequently the speed), I have achieved a number of very different photos from the very same subject.
This is very useful in portrait photography for example, where you want to litterally blur the background so that the portrait stands out on top of a blur, ensuring that whoever looks at your picture isn’t distracted by the patterns on the wallpaper behind the subject.
Downside is that if you choose to go for a very shallow depth of field (where the in focus distance is very short), you have to be extremely careful with your focussing, active kids don’t make for an easy subject in this situation
So why is that then ? Well, in simple terms, objects in a picture are only truly in focus if they are exactly at the same distance as the one you have focussed on, from this point forward and back, the objects get blurrier and blurrier, it’s just that we can’t really see the blur until it becomes too much.
Since we are in a sea of compromises here (aperture, speed, depth of field…), let’s look at other factors that affect depth of field.
Distance
Say you choose an aperture for a photo, and walk back while you keep re-focussing on the same subject, the DOF will increase, if you get closer, it will get shallower and shallower, so distance to focussed subject makes a difference too.
Focal Length
Generally a consequence of the fact that a long lens will mean you stand further from your subject, the DOF will usually increase with longer lenses. A 200mm lens will give you a larger DOF than a 28mm at a given aperture value.
In summary, the combination of Aperture, distance to focussed subject and focal length will affect the DOF on your photograph.
Imagine trying to work all this out while taking pictures…. never thought you’d need a degree in mathematics to take pictures did you
Luckily, lens manufacturers come to the rescue (don’t expect a fully fledged rescue boat here, it’s more like a buoy…).
You might have noticed some markings on your lenses, such as the ones below:
Image courtesy of wikipedia
If you take a look at the little window on the lens, it shows how far the subject you have focussed on is in meters and ft (look at the vertical white line below the window), approx. 5ft in this example.
Below the window, you can also see 11, 16 and 22, these are aperture numbers, and they are repeated on the left and right hand side of the focus distance indicator.
This tells you approximately that at F11, subjects between 3 and a little more than 5ft will be in focus.
At F22, the range will be below 3ft and up to infinity
It’s very approximate, but gives an idea.
Zoom lenses sometimes have lines printed on the body of the lens (often blue, red, green, yellow) to show how the DOF changes as you change zoom setting. I can’t unfortunately find a picture of such a lens (fewer and fewer lenses have them these days
If you have a DSLR and the lens wasn’t designed for the APS size sensor which is found in most non-professional DSLRs, ignore all I’ve said on the markings (you’ve still learnt why there’s a window there I hope), they will be wholly inaccurate. For example, a 55mm lens, F16, 10ft from the subject will result in 12.3ft of DOF with a full frame sensor, or, 35mm film SLR, whereas with an APS sensor in a DSLR, the resulting DOF will be a mere 6.6ft
So, how can one make any sense of this… well, there are a few other options available to you.
-Experience: After a while, you’ll get a feel for it all and won’t need to refer to any charts, etc… unless you are dedicated to photography and looking for a very specific result, a good guess is usually pretty good. Remember, digital photos are free too, so why not take two or three at different apertures and keep the one you like
-DOF calculators and charts: I won’t bother giving you the formulaes or replicating the work others have done, take a look at the following links and have a little play, then make a note of the values that are most likely to be useful to you and keep them with your camera just in case you need to refer to them in the future.
http://www.dofmaster.com/dofjs.html - advanced calculator
http://www.dofmaster.com/doftable.html - DOF table, well worth printing a few samples
-DOF preview in your camera: If your camera has one, when you press the button, the lens will set itself to the chosen aperture and show you the picture as it will be taken, you should be able to see what will and won’t be in focus, however, unless you are in a bright environment, the viewfinder can get very dark, making it difficult to see the wood from the trees, worth a try, and worth persevering, it’s something you get used to over time.
-Automatic DOF: Some cameras have a setting which allows you to focus on the near point you want in focus, then focus on the far point you want in focus, and the camera calculates the appropriate aperture for you… brilliant
-Lastly, if you set the aperture on your camera to be the widest the lens can support (e.g. 2.8 or 4.5), then what you see in the viewfinder is what you will get on the picture, this is because the lens is fully open by default and only closes down to a chosen narrower aperture when you press the shutter to take the picture.
Before moving onto the subjective effects of aperture on image quality, let’s just consider one last thing about DOF.
The in-focus part of a picture is not equally spread around the point of focus, it’s usually around 1/3rd of the distance in front of the subject, and 2/3rd behind.
So, if your subject is 1m away from you and your focal distance/aperture combination dictates that you have 3m of DOF, objects that are between 0m (1 – 1/3 of 3) and 3m (1 + 2/3 of 3) away from you will also be in sufficient focus not to be blurred.
This is a very important point to remember when trying to get a number of things in focus over a distance. Focussing on the nearest object may force others further away to be out of focus
Effect of aperture on image quality
Now this is a very subjective discussion, some may not notice any differences, and lens quality has a major impact on what I am about to say here.
Basically, a lens usually performs best away from its extremes of aperture. If for example, you have a lens which has an aperture range of F2.8 to F22, the best images will not be obtained with an aperture of F2.8 or F22, it could be that the best range is something between F5.6 and F16, but as I said above, this is very much dependent on lens quality, the very best lenses will perform much better than the cheaper ones at the extremes.
Why is that then ? Well, at the widest aperture (F2.8), the whole of lens glass is being used and due to manufacturing processes, the edge of lenses are often more imperfect than the center, which leads to aberrations in light paths, resulting in pictures that are not necessarily as sharp as they should be.
At the narrowest aperture (F22), a different effect is noticed. As the light rays go past the diaphragm in the lens, they tend to be broken up as they “hit” the edge of the blades in the diaphragm, at F2.8, there is so much light coming through the lens that this diffraction is barely noticeable, a bit like a mobile phone ringing at a rock concert, you can’t hear it. On the other hand, if the diaphragm is closed, the ratio of diffraction to light increases significantly and therefore becomes visible and affects the picture’s quality, just like the same mobile phone in a library can be heard loud and clear
This may therefore mean that if you wanted the best quality f/2.8 photograph, a f/2.0 or f/1.4 lens would be required to yield a higher quality than a lens with a maximum aperture of f/2.8.
Don’t forget that if the maximum aperture your lens supports is F5.6, the most likely “good” range starts at F8
Whether you choose to use the widest and narrowest aperture of your lenses is up to you, you may notice a difference in which case, bear it in mind, if you can’t see a difference, ignore all this and shoot to your heart’s content
Now go practice and see how changing aperture affects the end result, just remember that as you choose narrower apertures to increase depth of field, speed has to decrease proportionally, and you may find that unless it’s a bright day, the speed may become too low. Didn’t I say photography was about compromises
Mind you, you could pull your flash out to add the missing light (mmm, I feel another lesson here...).
That’s about it for now, I hope you now understand the very fundamentals of the mechanics behind photography (if not, ask questions please), the rest is very much up to you, time and plenty of practice.
Rest assured, I won’t stop here, and will cover more subjects in subsequent articles
 17-04-2007, 08:38 PM
#2
0-60 in 17 seconds (eek)
Thread Starter
Join Date: Apr 2004
Location: Berkshire
Posts: 6,717
Likes: 0
Received 0 Likes
on
0 Posts
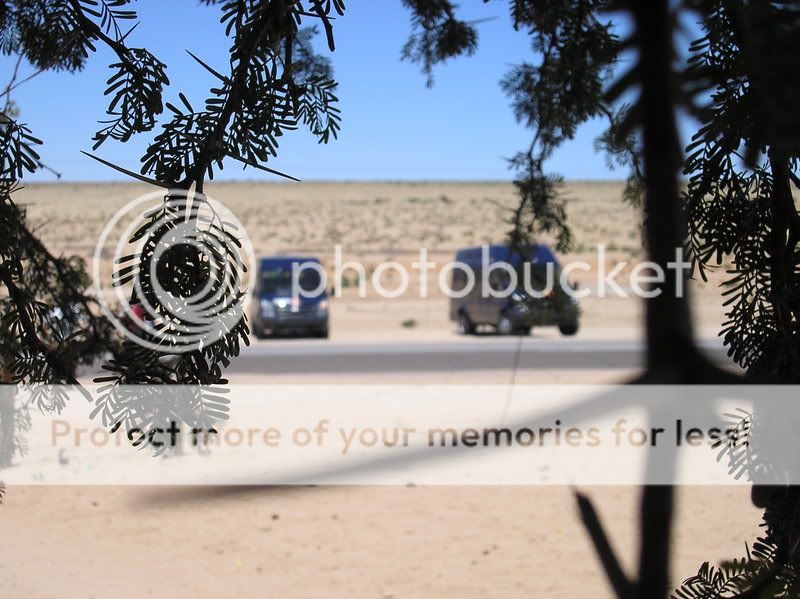
A very good examples where shallow depth of field has been used to great effect to blur the background, hopefully Danja won't mind me using a great picture of his

 18-04-2007, 01:13 PM
#5
Testing the future
agreed, best lesson yet greg
i wondered how that effect was achieved. i have managed to do it on my little compact digicam by using different automatic settings, but didn't understand the fundamentals behind it

i wondered how that effect was achieved. i have managed to do it on my little compact digicam by using different automatic settings, but didn't understand the fundamentals behind it
18-04-2007, 01:44 PM
#6
0-60 in 17 seconds (eek)
Thread Starter
Join Date: Apr 2004
Location: Berkshire
Posts: 6,717
Likes: 0
Received 0 Likes
on
0 Posts
Originally Posted by foreigneRS
i wondered how that effect was achieved. i have managed to do it on my little compact digicam by using different automatic settings, but didn't understand the fundamentals behind it
There may be a mode on your digicam which allows you to set the aperture, otherwise, otherwise "scene" modes will have pre-programmed speed and aperture behaviours to suit the particular photography you are trying to achieve.
18-04-2007, 02:11 PM
#7
Testing the future
thanks greg. yes, there is a program mode where you can set the aperture priority or shuuter speed priority, but i've never understood until now.  i was using some of the pre-programmed scene modes that obviously do just that
i was using some of the pre-programmed scene modes that obviously do just that
Trending Topics

 25-05-2007, 11:18 AM
#9
Wahay!! I've lost my Virginity!!

Join Date: Aug 2003
Posts: 80
Likes: 0
Received 0 Likes
on
0 Posts
outstanding. 
is there any chance of getting all these lessons archived?
this basically inspired me to go and buy a 350d, and get right into photography, theres a million sites out there alledging to tell you how to do it, but so far only these threads have actually been of use to me
is there any chance of getting all these lessons archived?
this basically inspired me to go and buy a 350d, and get right into photography, theres a million sites out there alledging to tell you how to do it, but so far only these threads have actually been of use to me
25-05-2007, 11:50 AM
#10
0-60 in 17 seconds (eek)
Thread Starter
Join Date: Apr 2004
Location: Berkshire
Posts: 6,717
Likes: 0
Received 0 Likes
on
0 Posts
terrytennick
Thanks for the kind comments sir
Glad they've got you up and running - I take no responsibility for the downhill spending spree than may follow though
What do you mean by archived ?
Thanks for the kind comments sir
Glad they've got you up and running - I take no responsibility for the downhill spending spree than may follow though
What do you mean by archived ?
25-05-2007, 02:21 PM
#11
I've found that life I needed.. It's HERE!!
Join Date: Apr 2004
Location: Burnley
Posts: 1,347
Likes: 0
Received 0 Likes
on
0 Posts
Havent read through it all yet but i will.
Just thought I'd post another example that I took a while ago in Victoria Station, Manchester.
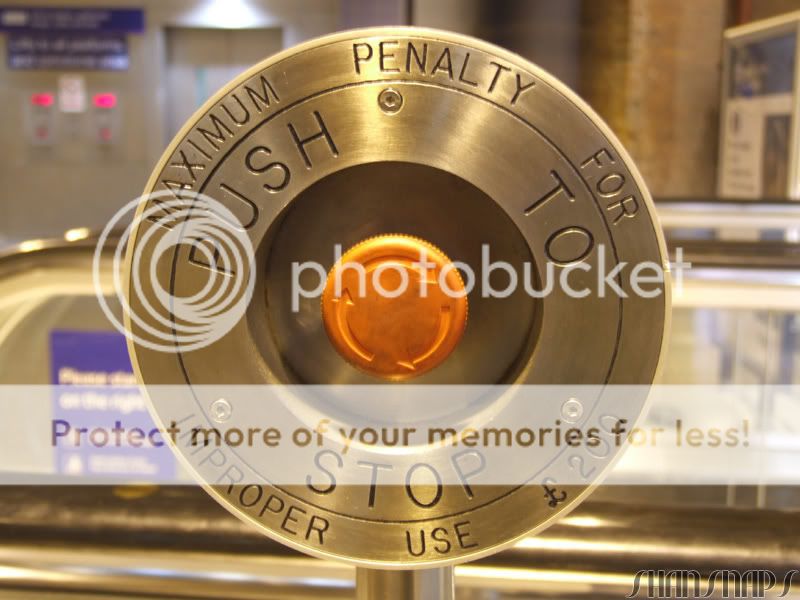
<Edit> sorry for the mahoosive pic
Just thought I'd post another example that I took a while ago in Victoria Station, Manchester.
<Edit> sorry for the mahoosive pic
25-05-2007, 03:13 PM
#12
0-60 in 17 seconds (eek)
Thread Starter
Join Date: Apr 2004
Location: Berkshire
Posts: 6,717
Likes: 0
Received 0 Likes
on
0 Posts
Mr Shannon
Nice picture sir
Oh, and new lesson here: https://passionford.com/forum/viewtopic.php?p=3902873
Nice picture sir
Oh, and new lesson here: https://passionford.com/forum/viewtopic.php?p=3902873
04-12-2007, 04:21 PM
#13
Team HOTHOT!

Originally Posted by Mr Shannon
Havent read through it all yet but i will.
Just thought I'd post another example that I took a while ago in Victoria Station, Manchester.
<Edit> sorry for the mahoosive pic
Just thought I'd post another example that I took a while ago in Victoria Station, Manchester.
<Edit> sorry for the mahoosive pic

Absolutely fantastic tutorials here - simply superb
 19-10-2008, 12:39 AM
#15
Too many posts.. I need a life!!

Join Date: May 2003
Location: nottingham
Posts: 654
Likes: 0
Received 0 Likes
on
0 Posts
great article , i thought i would add a couple of bits if i may,
the small sensors in some (point and shoot and bridge) cameras makes it really hard to throw the background out of focus even at f2.8, this is where the dslr comes into its own.they have bigger sensors and its really easy it blur the BG.
a tip i learned while trying portrait photography was
"always focus on the subjects eyes" the eyes are the most important part of a face (be honest its the first thing you look at) so they should be pin sharp to capture and hold your attention.
the other reason to focus on the eyes is the depth of field rule (as mentioned earlier), 2 thirds behind gets the ears in focus and 1 third in front of the eyes gets the nose in focus,
if you only focussed on the subjects nose 1 third in front would be getting thin air in focus and 2 thirds behind would get the subjects eyes, the ears would be blurred, cheers martyn

Thread
Thread Starter
Forum
Replies
Last Post
mk1turboestate
Pictures, video & Photoshop Forum
20
09-12-2015 12:15 AM
Jack and the Beanstalk
Ford Sierra/Sapphire/RS500 Cosworth
8
15-08-2015 04:27 PM
McPikie
General Car Related Discussion.
9
02-09-2004 12:31 PM