Removing Fuel Tank & Fitting a New pump ???

 26-01-2007, 12:37 AM
#2
Regular Contributor

Join Date: Jan 2007
Location: HK
Posts: 311
Likes: 0
Received 0 Likes
on
0 Posts
This is the instruction I've got from GGR, unfortunately I didn't take any pics when I removed mine, hope it helps 
FUEL PUMP
The Escort Cosworth fuel pump is fitted inside the top of the fuel tank, as an integral assembly with the fuel gauge sender unit. To gain access to this unit the fuel tank must first be removed from the vehicle.
For ease of removal, it is strongly advised that the fuel level in the tank is as low as possible due to the excessive weight.
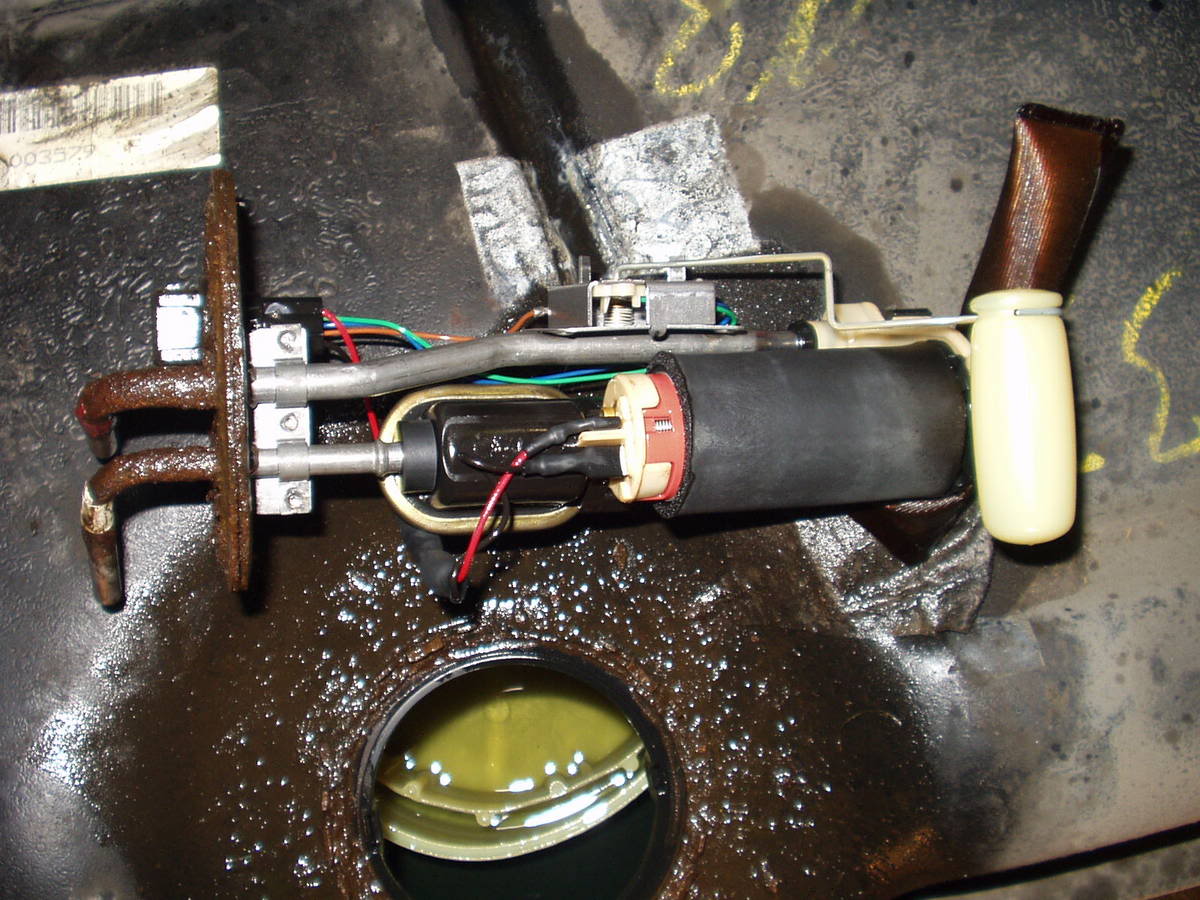
When the fuel tank is removed from the vehicle, the combined fuel pump and gauge sender unit is clearly seen in the top of the tank. The pump unit is retained into the tank by a castellated steel ring that locates in teeth set in the outside of the tank unit, pressing the pump assembly down into the fuel tank.
Before removing the original pump assembly, it is advisable to clean the top of the fuel tank, to prevent any foreign particles from entering the tank when the assembly is removed.
To remove the pump unit from the tank, carefully knock the retaining ring in an anti-clockwise direction, to disconnect it from its retaining teeth. When the ring has been removed, the pump assembly can be carefully lifted out of the fuel tank, taking care not to damage the float assembly on the fuel gauge sender unit.
Fitting the new pump assembly is almost the reverse operation.
Before fitting the new unit, please ensure that the rubber sealing gasket is correctly in place in the top of the tank.
Due to the increased size of the new pump, and the neoprene covering, the new assembly does not drop into the tank as easily as the original unit. Careful use of light force is required to ease the new pump into position. Drop the fuel gauge float assembly side into the tank first, then carefully ease the opening in the tank slightly with a small lever, to allow the pump to lower into the tank. You will notice that there is an arrow marked on the top of the tank, and on top of the pump unit, when these two marks are aligned, you will see that the retaining plate for the unit locates with the top of the fuel tank.
The fuel tank may now be re-fitted to the vehicle, the original fuel return line is fitted to the top of the pump unit as before. A new fuel pressure hose is supplied in the kit to replace the original item from the fuel pump, to the fuel filter. Ensure that this new high pressure hose is safely routed and secured.
FUEL PUMP
The Escort Cosworth fuel pump is fitted inside the top of the fuel tank, as an integral assembly with the fuel gauge sender unit. To gain access to this unit the fuel tank must first be removed from the vehicle.
For ease of removal, it is strongly advised that the fuel level in the tank is as low as possible due to the excessive weight.
When the fuel tank is removed from the vehicle, the combined fuel pump and gauge sender unit is clearly seen in the top of the tank. The pump unit is retained into the tank by a castellated steel ring that locates in teeth set in the outside of the tank unit, pressing the pump assembly down into the fuel tank.
Before removing the original pump assembly, it is advisable to clean the top of the fuel tank, to prevent any foreign particles from entering the tank when the assembly is removed.
To remove the pump unit from the tank, carefully knock the retaining ring in an anti-clockwise direction, to disconnect it from its retaining teeth. When the ring has been removed, the pump assembly can be carefully lifted out of the fuel tank, taking care not to damage the float assembly on the fuel gauge sender unit.
Fitting the new pump assembly is almost the reverse operation.
Before fitting the new unit, please ensure that the rubber sealing gasket is correctly in place in the top of the tank.
Due to the increased size of the new pump, and the neoprene covering, the new assembly does not drop into the tank as easily as the original unit. Careful use of light force is required to ease the new pump into position. Drop the fuel gauge float assembly side into the tank first, then carefully ease the opening in the tank slightly with a small lever, to allow the pump to lower into the tank. You will notice that there is an arrow marked on the top of the tank, and on top of the pump unit, when these two marks are aligned, you will see that the retaining plate for the unit locates with the top of the fuel tank.
The fuel tank may now be re-fitted to the vehicle, the original fuel return line is fitted to the top of the pump unit as before. A new fuel pressure hose is supplied in the kit to replace the original item from the fuel pump, to the fuel filter. Ensure that this new high pressure hose is safely routed and secured.
28-01-2007, 12:54 AM
#5
Regular Contributor
Join Date: Jan 2007
Location: HK
Posts: 311
Likes: 0
Received 0 Likes
on
0 Posts
Use up/pump out as much fuel as possible, the damn thing is really heavy with fuel inside! I think it's just two metal straps holding the tank in place, once u put the car on stand you can see it clearly and it's really simple
01-02-2007, 02:28 PM
#6
PassionFord Post Whore!!
Join Date: Sep 2003
Location: Macclesfield - you'll never leave....!
Posts: 4,519
Likes: 0
Received 1 Like
on
1 Post
red pipe on the pump is return - remember that...
and you'll need to order a new rubber gasket and locking ring more than likely as these perish with age....
also dont forget to replace the fuel filter while you are under there


and you'll need to order a new rubber gasket and locking ring more than likely as these perish with age....
also dont forget to replace the fuel filter while you are under there
Trending Topics
01-02-2007, 06:48 PM
#8
Regular Contributor

Join Date: Oct 2005
Posts: 230
Likes: 0
Received 0 Likes
on
0 Posts
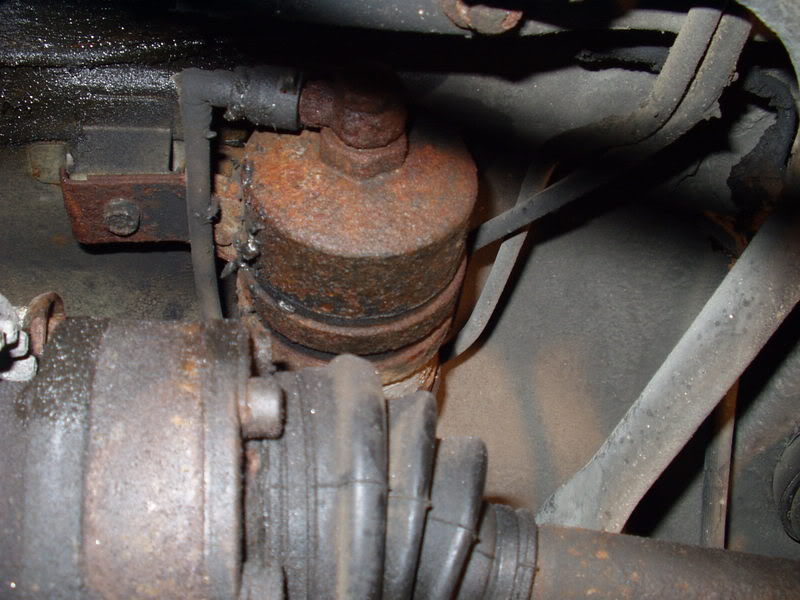
removing the tank is a piece of piss as it is only held in place by 2 straps...
just be sure to give the 2 x 13mm headed bolts a fair dosage of wd40 prior to removal as they are prone to snapping.
make sure the tank is drained , once ya have ya car into the raised working position and secured on axle stands , support the fuel tank on a trolley jack and then remove the 2 securing straps.
once the straps are out of the way , drop the jack a couple of inches to obtain access to all the pipework etc.. on the tank top , there should be 2 pipes on the tank top (a feed and return) which should come off no bother as they are simply a case of pushing in the 2 tabs on the pipe and sliding it off.
also to remove on the tank top is the wiring for the pump , again not a problem as it's just 1 multiplug.
inside the rear wheel arch you will find the filler neck pipes , one large filler pipe and one vent pipe , these are merely held in place with jubilee clips.
once everything is un-done , lower the tank to the ground.
once the tank is out from under the car it is advisable to steam clean the tank top to remove any dust grit or debris.
removal of the tank top is simple , it is held in place by a single locking ring which is easilly removed by knocking it around with a blunt chisel and a hammer (carefully).
RIGHT , ON TO THE PUMP.....
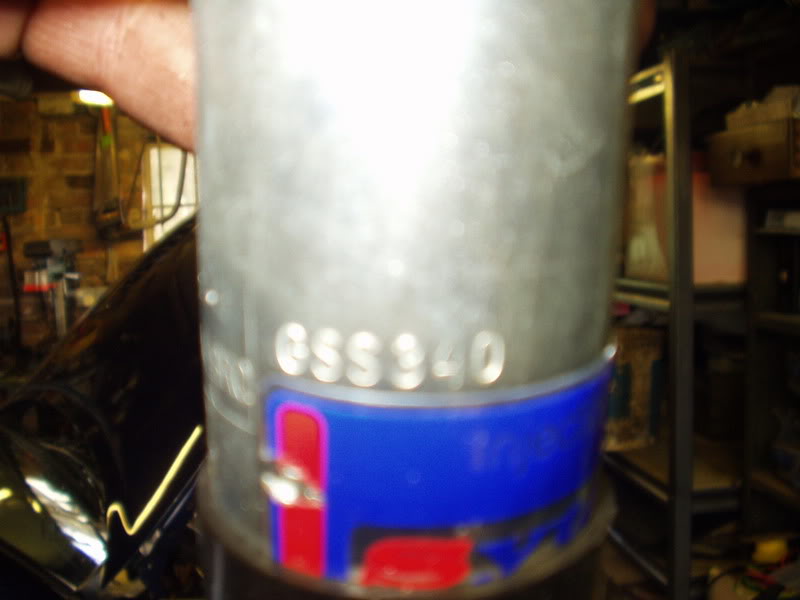
you have to watch the likes of the fse and sytec units , as although these have decent pressure and flow rates they tend to use the original push fittings from the original pump , these fittings cannot deal with the increased pressure and tend to burst the seals under load.... not good if ya on boost at the time eh!!!! could prove quite costly.
i'd stick to the bosch item as these use proper aeroquip fittings and are a much more reliable option!! yes they may be a bit more of a fuk on to fit... but it's definately worth it!!
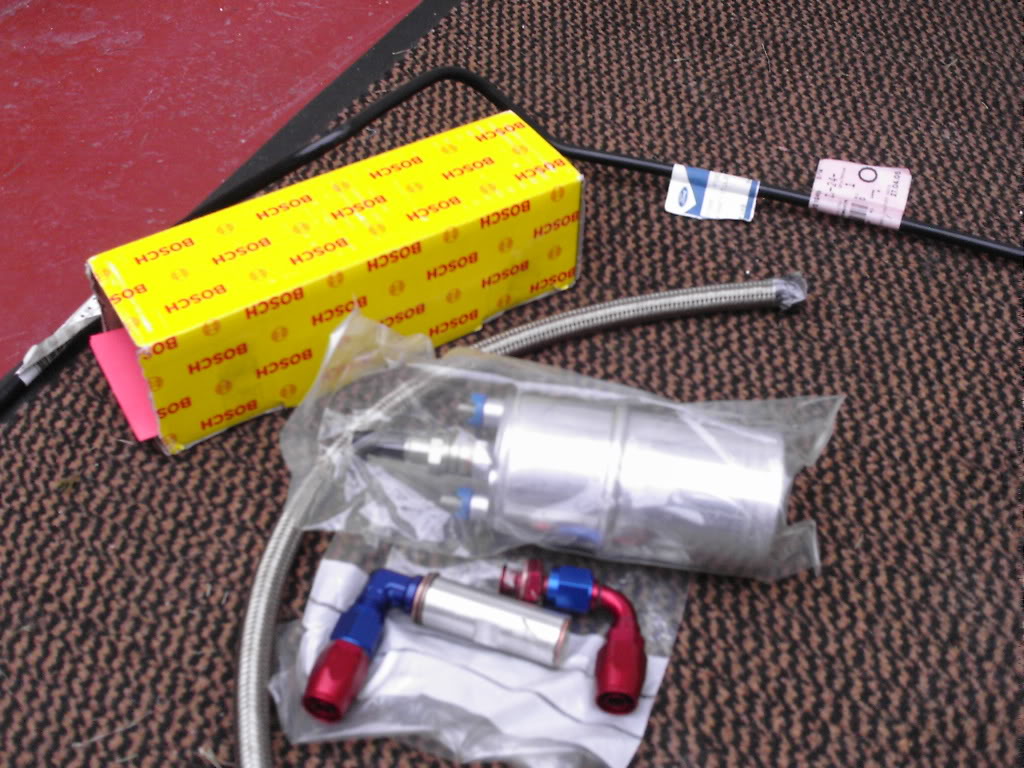
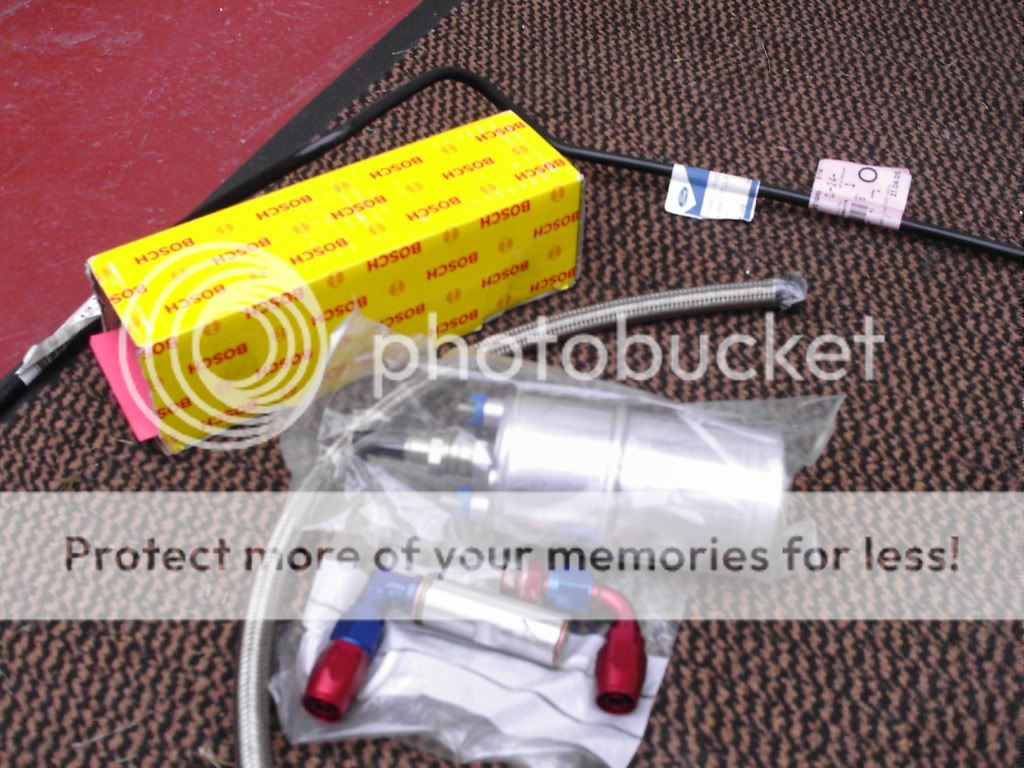
PJ MOTORSPORT can supply you with a kit that includes the bosch pump and more importantly ALL of the aeroquip fittings and pipe required to do the job.......
ya'll need this little lot......

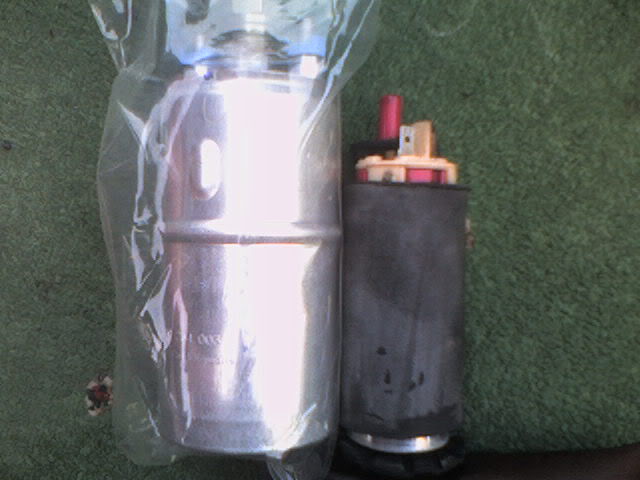
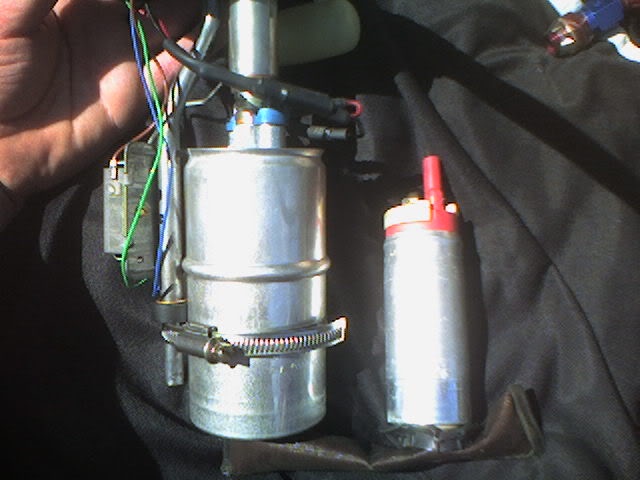
the difference in size to the original is err... fairly noticable!!! lol.......
if you opt for the bosch pump (which i would reccomend as it is definately the safest) then there are modifications which will need to be made to the tank sender/pump mounting unit.
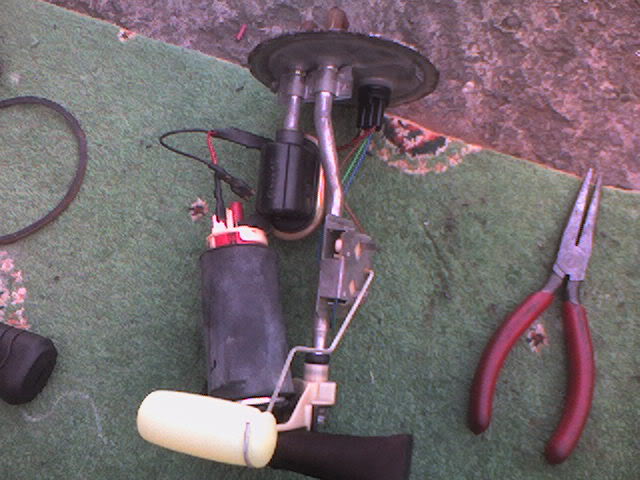
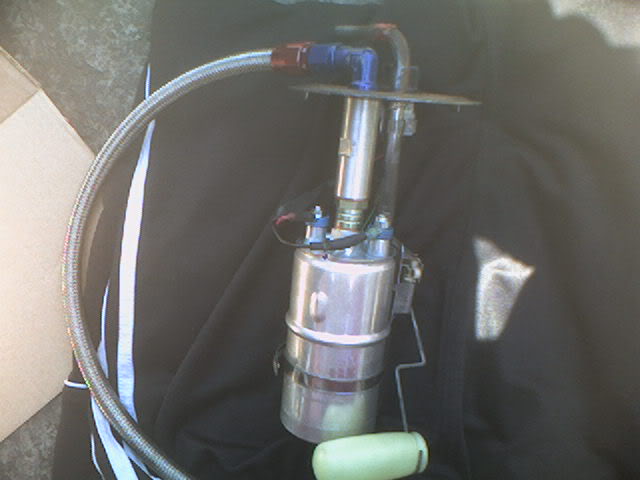
this is how the tank unit should look when first removed from the tank......
the modifications are required due to the obvious difference in size.....
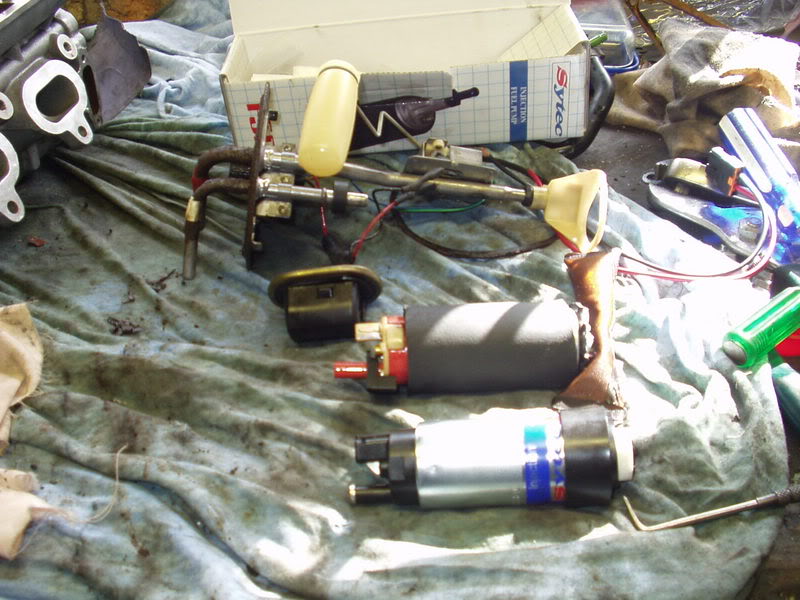
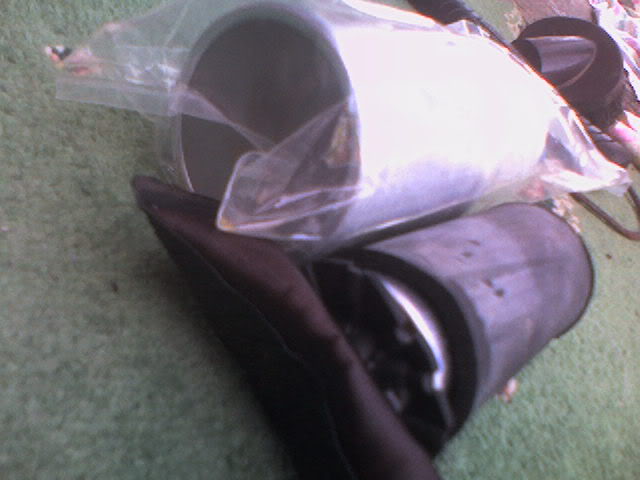
once the old pump is removed from the tank unit you should have something which looks like this.......
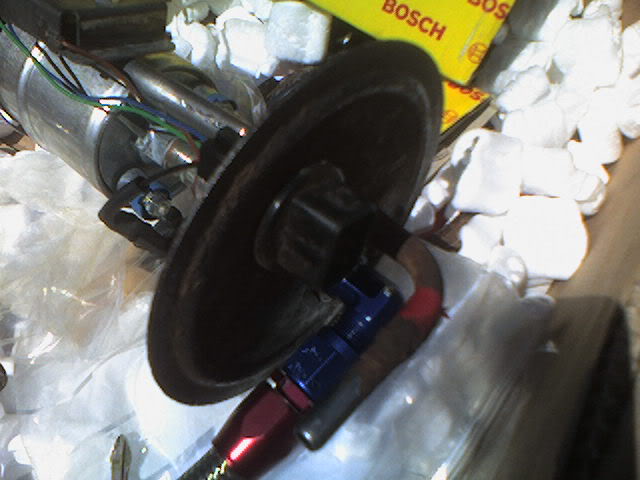
the bottom of the return pipe (on the lower half of the tank unit) has a bracket attached to it which the old pump sat on , this needs chopping off , but be sure to cut away as little of the pipe as possible.
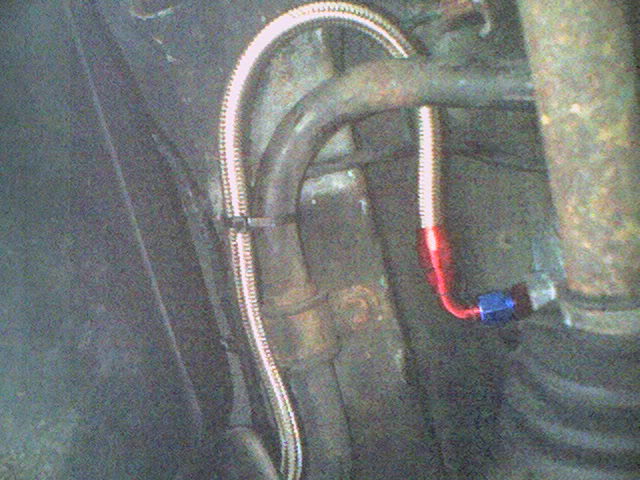
looking closer at the top of the unit you can see the 2 pipes which are brazed into the unit , red = return to tank , white = feed from tank.......
the white pipe needs to be chopped off FLUSH with the unit on both sides.....
once chopped the hole needs to be enlarged to accomodate the aeroquip elbow union supplied with kit.
(note , the underside also has some protrusions which will need to be ground away to leave room for the aeroquip fittings of the new pump)

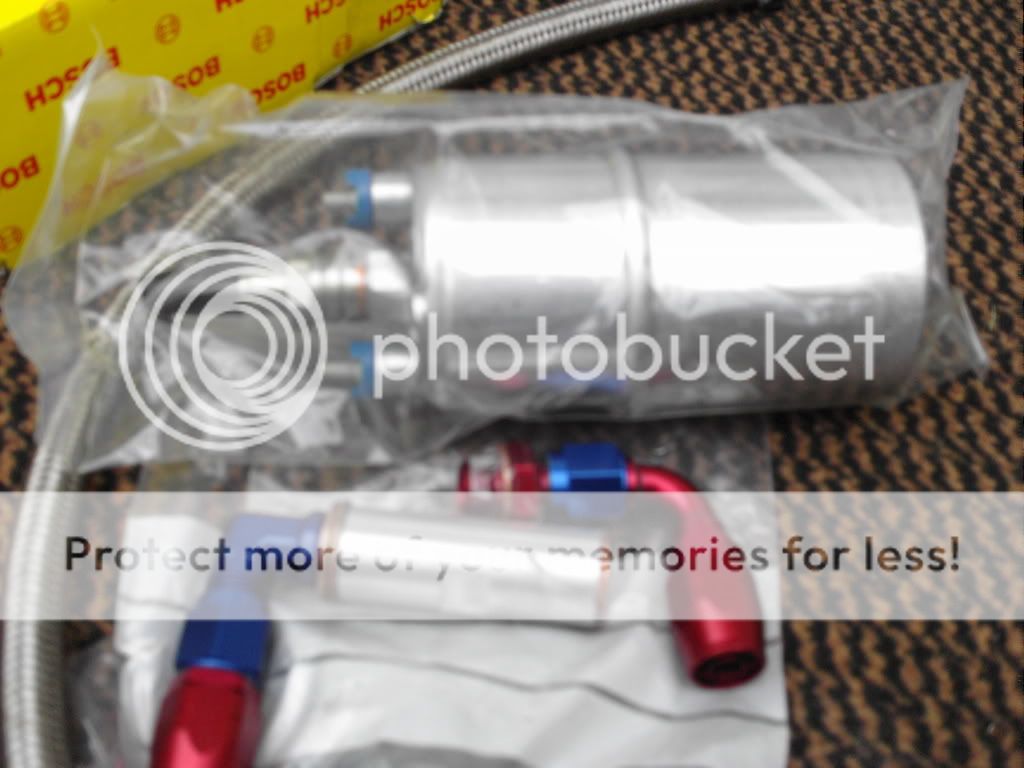
the aeroquip fittings supplied with the kit should be fitted to the new fuel hose as shown in pic.......
the blue elbow in the centre of the pic is what goes through the top of the tank unit where the original pipe was cut off flush
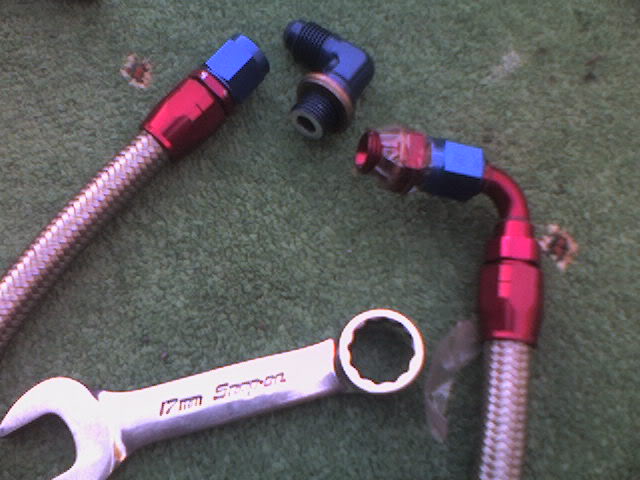
there should also be a silver coloured fitting (around 2" in length) supplied with kit , this is what screws on to the underside of the tank top , attached to the blue elbow... the new pump attaches to this silver fitting......
to give the pump further suppport it is advised that a jubilee clip is wrapped around the pump and the return pipe and tightened in place.....
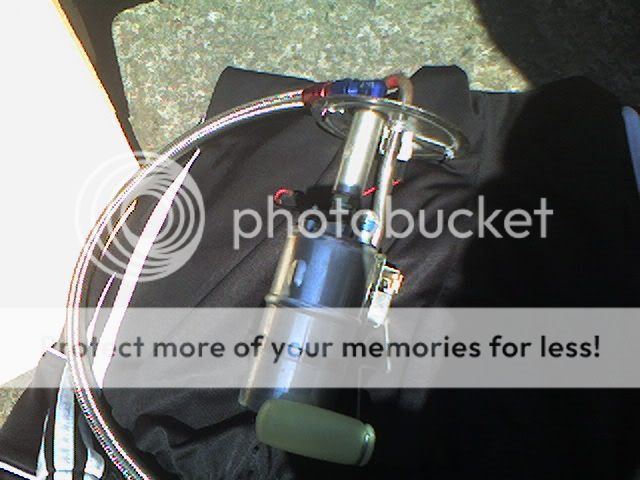
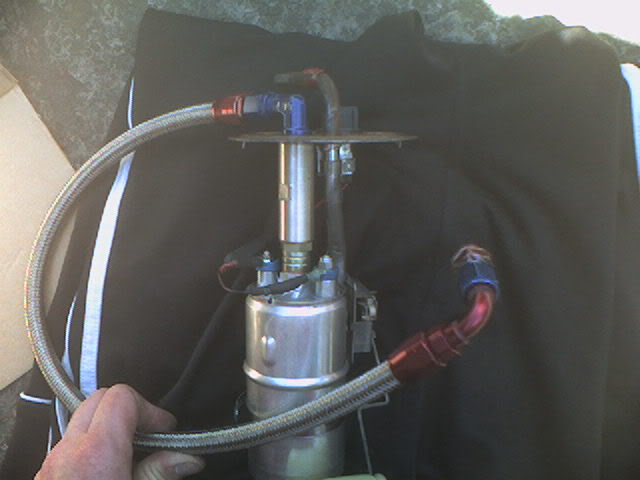
be carefull when replacing the tank unit into the tank , as it will be a tighter fit due to the increase in pump size.
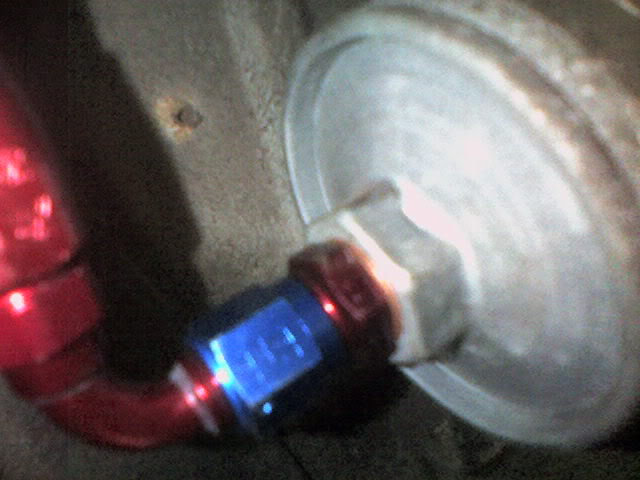
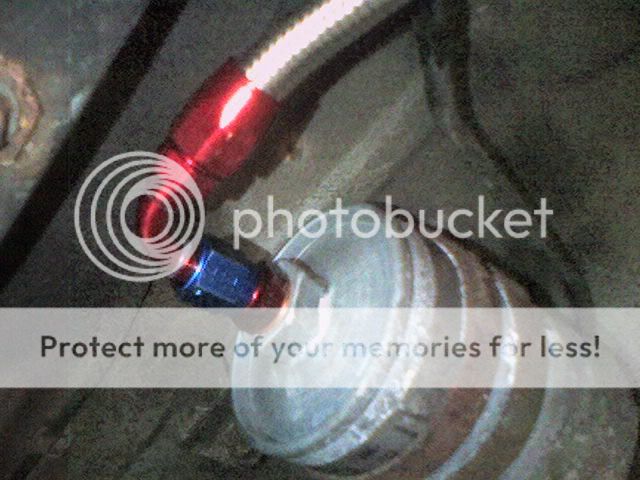
be sure to use a new fuel filter , the new pipework will screw into the standard ford filter no problem if an aeroquip fitting like this one is fitted to the filter......

hope this is of some use to ya fella!!!

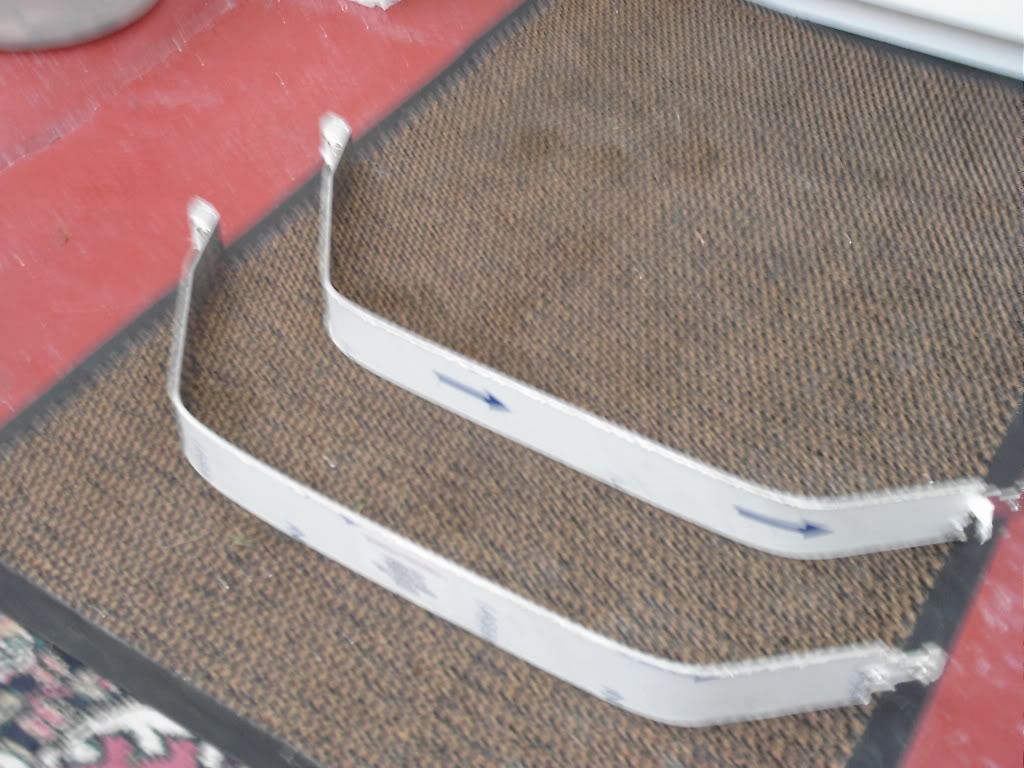
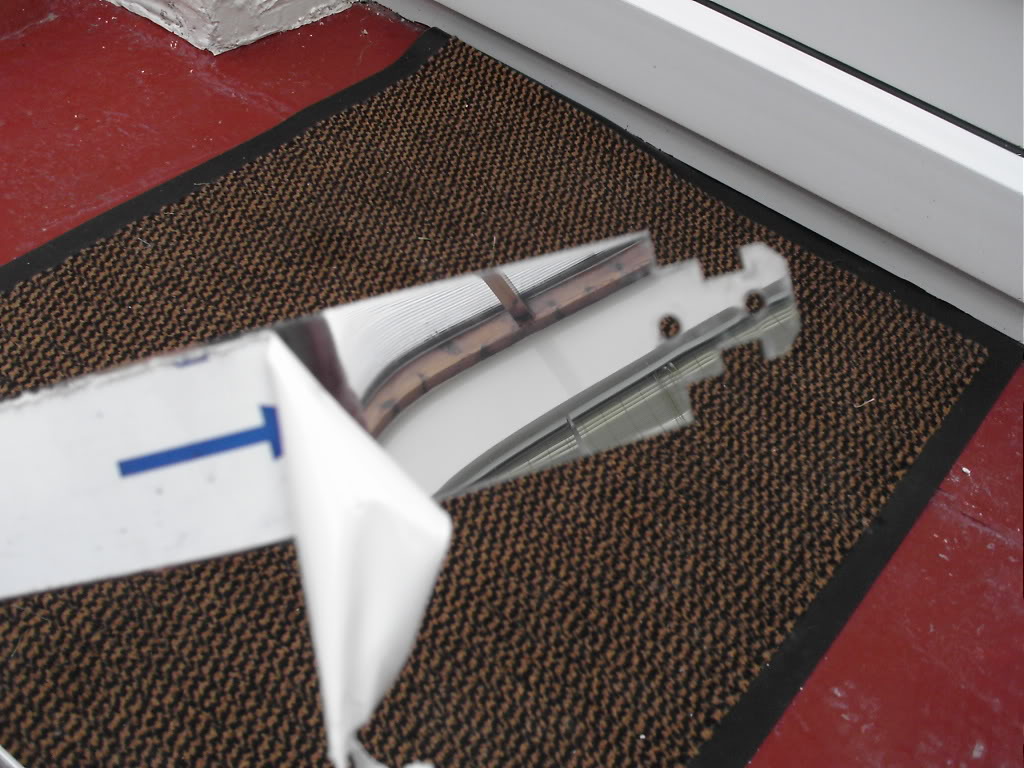
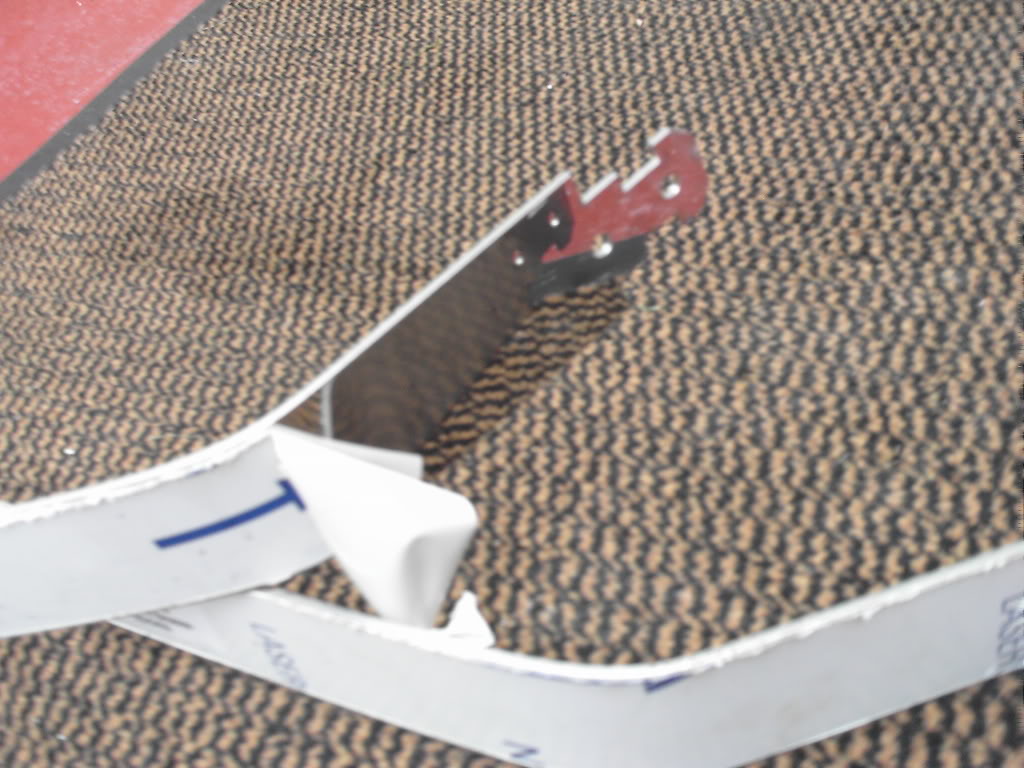
oh yeah , i also used some nice new stainless steel tank brackets when replacing the tank!! ......
just be sure to give the 2 x 13mm headed bolts a fair dosage of wd40 prior to removal as they are prone to snapping.
make sure the tank is drained , once ya have ya car into the raised working position and secured on axle stands , support the fuel tank on a trolley jack and then remove the 2 securing straps.
once the straps are out of the way , drop the jack a couple of inches to obtain access to all the pipework etc.. on the tank top , there should be 2 pipes on the tank top (a feed and return) which should come off no bother as they are simply a case of pushing in the 2 tabs on the pipe and sliding it off.
also to remove on the tank top is the wiring for the pump , again not a problem as it's just 1 multiplug.
inside the rear wheel arch you will find the filler neck pipes , one large filler pipe and one vent pipe , these are merely held in place with jubilee clips.
once everything is un-done , lower the tank to the ground.
once the tank is out from under the car it is advisable to steam clean the tank top to remove any dust grit or debris.
removal of the tank top is simple , it is held in place by a single locking ring which is easilly removed by knocking it around with a blunt chisel and a hammer (carefully).
RIGHT , ON TO THE PUMP.....
you have to watch the likes of the fse and sytec units , as although these have decent pressure and flow rates they tend to use the original push fittings from the original pump , these fittings cannot deal with the increased pressure and tend to burst the seals under load.... not good if ya on boost at the time eh!!!! could prove quite costly.
i'd stick to the bosch item as these use proper aeroquip fittings and are a much more reliable option!! yes they may be a bit more of a fuk on to fit... but it's definately worth it!!
PJ MOTORSPORT can supply you with a kit that includes the bosch pump and more importantly ALL of the aeroquip fittings and pipe required to do the job.......
ya'll need this little lot......
the difference in size to the original is err... fairly noticable!!! lol.......
if you opt for the bosch pump (which i would reccomend as it is definately the safest) then there are modifications which will need to be made to the tank sender/pump mounting unit.
this is how the tank unit should look when first removed from the tank......
the modifications are required due to the obvious difference in size.....
once the old pump is removed from the tank unit you should have something which looks like this.......
the bottom of the return pipe (on the lower half of the tank unit) has a bracket attached to it which the old pump sat on , this needs chopping off , but be sure to cut away as little of the pipe as possible.
looking closer at the top of the unit you can see the 2 pipes which are brazed into the unit , red = return to tank , white = feed from tank.......
the white pipe needs to be chopped off FLUSH with the unit on both sides.....
once chopped the hole needs to be enlarged to accomodate the aeroquip elbow union supplied with kit.
(note , the underside also has some protrusions which will need to be ground away to leave room for the aeroquip fittings of the new pump)
the aeroquip fittings supplied with the kit should be fitted to the new fuel hose as shown in pic.......
the blue elbow in the centre of the pic is what goes through the top of the tank unit where the original pipe was cut off flush
there should also be a silver coloured fitting (around 2" in length) supplied with kit , this is what screws on to the underside of the tank top , attached to the blue elbow... the new pump attaches to this silver fitting......
to give the pump further suppport it is advised that a jubilee clip is wrapped around the pump and the return pipe and tightened in place.....
be carefull when replacing the tank unit into the tank , as it will be a tighter fit due to the increase in pump size.
be sure to use a new fuel filter , the new pipework will screw into the standard ford filter no problem if an aeroquip fitting like this one is fitted to the filter......
hope this is of some use to ya fella!!!
oh yeah , i also used some nice new stainless steel tank brackets when replacing the tank!! ......
 13-02-2007, 10:07 PM
#11
Wahay!! I've lost my Virginity!!

Join Date: Dec 2005
Location: here and there
Posts: 85
Likes: 0
Received 0 Likes
on
0 Posts
l9KOS : when u changed ur feul pump did u have 2 change the breather system.ive got a bosch 023 pump in the tank and have noticed i sometimes get back pressure when i remove the petrol cap but not all of the time.any ideas
14-02-2007, 12:29 AM
#12
Advanced PassionFord User
Originally Posted by PAT@SUPREMES
l9KOS : when u changed ur feul pump did u have 2 change the breather system.ive got a bosch 023 pump in the tank and have noticed i sometimes get back pressure when i remove the petrol cap but not all of the time.any ideas
29-03-2007, 11:18 AM
#15
10K+ Poster!!
iTrader: (2)
Join Date: May 2004
Location: UK
Posts: 11,383
Likes: 0
Received 0 Likes
on
0 Posts
Originally Posted by Dave Henshall
and you'll need to order a new rubber gasket and locking ring more than likely as these perish with age....

My tanks going back in on Saunday (same exact bits L9KOS used
Thanks
Jase
29-03-2007, 12:46 PM
#16
PassionFord Post Whore!!
Join Date: Sep 2003
Location: Macclesfield - you'll never leave....!
Posts: 4,519
Likes: 0
Received 1 Like
on
1 Post
it MIGHT come as part of the new locking ring,
alternatively, you could use a think bead of high modulus black silicone and let it go off before fitting the pump back in..
alternatively, you could use a think bead of high modulus black silicone and let it go off before fitting the pump back in..
 29-03-2007, 09:25 PM
#21
Almost there!

iTrader: (4)
Join Date: Jun 2003
Location: Gatwick (ish)
Posts: 7,434
Likes: 0
Received 0 Likes
on
0 Posts
never had any of this trouble,
all i do is open the tank in the boot to access the 044 fuel pump and swirl pot, and thru the bottom of the tank i can see all the fittings etc on top of the standard fuel tank/pump under the car.
just have to lift up the in boot tank and can have the under car fuel pump assembly out within minutes
all i do is open the tank in the boot to access the 044 fuel pump and swirl pot, and thru the bottom of the tank i can see all the fittings etc on top of the standard fuel tank/pump under the car.
just have to lift up the in boot tank and can have the under car fuel pump assembly out within minutes
30-03-2007, 07:31 AM
#24
10K+ Poster!!
iTrader: (2)
Join Date: May 2004
Location: UK
Posts: 11,383
Likes: 0
Received 0 Likes
on
0 Posts
Originally Posted by Dave Henshall
you got a motorsport shell then...?
as these had a removable access panel in the boot floor.
as these had a removable access panel in the boot floor.
(which means he had A1RS build all his lift pump, swirl pot in a custom box in the boot and a panle added to access the pump from the top......... I think!
 ).
).
 30-03-2007, 12:21 PM
#27
Post Miester !
Thread Starter
iTrader: (3)
Join Date: May 2003
Location: Brizzol! oo'er!
Posts: 4,645
Likes: 0
Received 0 Likes
on
0 Posts
I asked them,I think it was about �80 for all the bits and fittings etc..
I got mine form Mike R then went to a local motorsport outlet to get the
fittings.
I got mine form Mike R then went to a local motorsport outlet to get the
fittings.
02-04-2007, 02:10 PM
#29
10K+ Poster!!
iTrader: (2)
Join Date: May 2004
Location: UK
Posts: 11,383
Likes: 0
Received 0 Likes
on
0 Posts
Originally Posted by Dave Henshall
it MIGHT come as part of the new locking ring,
alternatively, you could use a think bead of high modulus black silicone and let it go off before fitting the pump back in..
alternatively, you could use a think bead of high modulus black silicone and let it go off before fitting the pump back in..
6810424 Gasket - fuel tank sender.
no good to me now!
Aint dropping it again!!
02-04-2007, 04:20 PM
#31
10K+ Poster!!
iTrader: (2)
Join Date: May 2004
Location: UK
Posts: 11,383
Likes: 0
Received 0 Likes
on
0 Posts
Get it from a Car spares Glen, they all do the same thing (not a pikey version though!).
Or have your pants pulled by Frauds!! Still in stock, think they're about 15+ quid
Or have your pants pulled by Frauds!! Still in stock, think they're about 15+ quid
02-04-2007, 05:13 PM
#32
Advanced PassionFord User
Join Date: Oct 2004
Location: Essex
Posts: 1,636
Likes: 0
Received 0 Likes
on
0 Posts
I popped into fords in ilford on way home from work.. The gasket is something like 58p they didnt have the filters in stock, but available for order @ �28, which isnt too sad, plus you get the fancy ford box and receipt so all good in a way... im a bit finiky when it comes to reciepts, would rather a ford receipt than a car spares that no body knows of...
Im ordering a new bracket too, but they wernt readily available, but available from main warehouse, which takes a few days or so...
i will update with FINIS codes of all once i get them on the receipt 2moro.
Im ordering a new bracket too, but they wernt readily available, but available from main warehouse, which takes a few days or so...
i will update with FINIS codes of all once i get them on the receipt 2moro.
04-04-2007, 09:24 PM
#34
Advanced PassionFord User
Join Date: Oct 2004
Location: Essex
Posts: 1,636
Likes: 0
Received 0 Likes
on
0 Posts
Originally Posted by L9KOS
removing the tank is a piece of piss as it is only held in place by 2 straps...
just be sure to give the 2 x 13mm headed bolts a fair dosage of wd40 prior to removal as they are prone to snapping.
make sure the tank is drained , once ya have ya car into the raised working position and secured on axle stands , support the fuel tank on a trolley jack and then remove the 2 securing straps.
once the straps are out of the way , drop the jack a couple of inches to obtain access to all the pipework etc.. on the tank top , there should be 2 pipes on the tank top (a feed and return) which should come off no bother as they are simply a case of pushing in the 2 tabs on the pipe and sliding it off.
also to remove on the tank top is the wiring for the pump , again not a problem as it's just 1 multiplug.
inside the rear wheel arch you will find the filler neck pipes , one large filler pipe and one vent pipe , these are merely held in place with jubilee clips.
once everything is un-done , lower the tank to the ground.
once the tank is out from under the car it is advisable to steam clean the tank top to remove any dust grit or debris.
removal of the tank top is simple , it is held in place by a single locking ring which is easilly removed by knocking it around with a blunt chisel and a hammer (carefully).
RIGHT , ON TO THE PUMP.....
you have to watch the likes of the fse and sytec units , as although these have decent pressure and flow rates they tend to use the original push fittings from the original pump , these fittings cannot deal with the increased pressure and tend to burst the seals under load.... not good if ya on boost at the time eh!!!! could prove quite costly.
i'd stick to the bosch item as these use proper aeroquip fittings and are a much more reliable option!! yes they may be a bit more of a fuk on to fit... but it's definately worth it!!
PJ MOTORSPORT can supply you with a kit that includes the bosch pump and more importantly ALL of the aeroquip fittings and pipe required to do the job.......
ya'll need this little lot......
05-04-2007, 06:49 AM
#35
10K+ Poster!!
iTrader: (2)
Join Date: May 2004
Location: UK
Posts: 11,383
Likes: 0
Received 0 Likes
on
0 Posts
Originally Posted by G1EN
but available for order @ �28, which isnt too sad

The robbing barstwards!!
Mine was 11 inc VAT...... And seeing as i change them yearly, glad i never went to fords!
10-04-2007, 03:03 PM
#37
Advanced PassionFord User
Join Date: Oct 2004
Location: Essex
Posts: 1,636
Likes: 0
Received 0 Likes
on
0 Posts
Originally Posted by L9KOS
L9KOS: How much did you pay for them quip fittings and hose?
But need a little HELP now or advice.
i was contemplating on using my trolley jack with a peice of MDF on the top to cradle the TANK to drop it down. Will this be ok???
I will be making a few grooves in the MDF so its nice and stable on the Trolley Jack. But think i may get a helping hand to steady the tank while it comes down and put a few bricks underneath it either side...
Will this drop the tank down enough to gain access to the PUMP.
10-04-2007, 03:26 PM
#38
Post Miester !
Thread Starter
iTrader: (3)
Join Date: May 2003
Location: Brizzol! oo'er!
Posts: 4,645
Likes: 0
Received 0 Likes
on
0 Posts
You will need to disconnect the fuel filler pipe and breather pipe.
I used a jack to steady the tank untill i had undone evertything.
I had to cut the jubilee clips off the filler pipe, as they were rusted on !.
Also watch the fuel lines as you lower it, there is not much play.

I used a jack to steady the tank untill i had undone evertything.
I had to cut the jubilee clips off the filler pipe, as they were rusted on !.
Also watch the fuel lines as you lower it, there is not much play.
10-04-2007, 09:34 PM
#39
Advanced PassionFord User
Join Date: Oct 2004
Location: Essex
Posts: 1,636
Likes: 0
Received 0 Likes
on
0 Posts
Thanx Alex
Sounds so easy but so much could go wrong me is thinking.
Im going to attack this hopefully on saturday, i will try take photo's to ad this thread.
Sounds so easy but so much could go wrong me is thinking.
Im going to attack this hopefully on saturday, i will try take photo's to ad this thread.
