MA Developments Sapphire Cosworth 600+ HP 4x4
 09-03-2015, 06:27 PM
#1
Hi we are from the Netherlands my dad and me and building 2 Sapphire cosworths one in 2wd (flint grey) and one in 4wd (ebony black)
Both cars are having full restoration which is almost complete over the last 3 years so I already have a lot of photos and text to put up.
Mark Shead from M.A.D did all the engine work and this is all going to be mapped this year also by Mark so another 2 trips to UK
We're looking for around 600hp for both cars which should be no problem with the setup
This is how the cars looking today in my workshop. On top the 2wd and bottom is 4x4

The 4wd was bought in early 2012 it was almost original then only other wheels / exhaust and chip running around 300hp

After having some fun with it for a few weeks in 2012 I stripped it down

Did take the tired engine out of the car including transmission

The body was in good condition


I also started stripping down the interior

Car almost stripped and builded a rolling frame so I could move the body.
The white body is an old project the body was sold and some parts are used for this project of 2 cars

Then we started to remove the original underseal and black wax to get a nice clean underbody to get it ready for a new underseal

Lots of cleaning Don't have any pics when it was all finished and de-greased


Engine all apart. This all went to Mark Shead in May 2013

Started cleaning the greasy subframe with petrol


And cleaned together with new yellow zincplated bolts

Started work on some small rust on the front bumper mountings

Marked the piece that has to be cutted out

CNC milling a new triangle shape hole for the plastic bumper fitting

Tacked into exact place and welded after that

I'll upload more pics and info as soon as I have some more spare time
Both cars are having full restoration which is almost complete over the last 3 years so I already have a lot of photos and text to put up.
Mark Shead from M.A.D
did all the engine work and this is all going to be mapped this year also by Mark so another 2 trips to UK We're looking for around 600hp for both cars which should be no problem with the setup
This is how the cars looking today in my workshop. On top the 2wd and bottom is 4x4
The 4wd was bought in early 2012 it was almost original then only other wheels / exhaust and chip running around 300hp
After having some fun with it for a few weeks in 2012 I stripped it down
Did take the tired engine out of the car including transmission
The body was in good condition
I also started stripping down the interior
Car almost stripped and builded a rolling frame so I could move the body.
The white body is an old project the body was sold and some parts are used for this project of 2 cars
Then we started to remove the original underseal and black wax to get a nice clean underbody to get it ready for a new underseal
Lots of cleaning Don't have any pics when it was all finished and de-greased
Engine all apart. This all went to Mark Shead in May 2013
Started cleaning the greasy subframe with petrol
And cleaned together with new yellow zincplated bolts
Started work on some small rust on the front bumper mountings
Marked the piece that has to be cutted out
CNC milling a new triangle shape hole for the plastic bumper fitting
Tacked into exact place and welded after that
I'll upload more pics and info as soon as I have some more spare time
Last edited by Albertodelgado; 28-12-2015 at 03:31 PM.

The following users liked this post:
SimonGMC (16-03-2015)


Trending Topics
09-03-2015, 08:28 PM
#8
PassionFord Post Troll

Love the colours of them look forward to the updates
 10-03-2015, 04:43 PM
#10
thanks for the replies!
some more pics and info below
Some small rust on the inner arch

Cut out

New plate

New plated shaped like the original shape

Tacked into place with MIG welding

Welded and grinded down

Reproducing original strength piece

Welded together

Trial fitting onto the car

Finalized with 3 welds on each side inner and outer like original


The seat mountings on the floor also had some rust between the floor and strength bracket so I did take off the strength brackets and had them zinc plated. Also welded a new M8 nut onto it before plating.


After trialfitting I welded the plate to the floor again from the inside with some proper spotwelds like original

some more pics and info below
Some small rust on the inner arch
Cut out
New plate
New plated shaped like the original shape
Tacked into place with MIG welding
Welded and grinded down
Reproducing original strength piece
Welded together
Trial fitting onto the car
Finalized with 3 welds on each side inner and outer like original
The seat mountings on the floor also had some rust between the floor and strength bracket so I did take off the strength brackets and had them zinc plated. Also welded a new M8 nut onto it before plating.
After trialfitting I welded the plate to the floor again from the inside with some proper spotwelds like original
10-03-2015, 04:52 PM
#11
- 200 block
- Cp pistons standard size on linered block
- 8mm Longer Carrilo rods
- Ground or polished crank
- Mahle bearings
- Cosworth oil pump
- Balanced engine
- 6 long studs and 4 short studs M.A.D specification higher strength material then others
- Mountune WRC head gasket
- Ported head
- Bronze valve guides
- Isky valve springs
- New lifters
- Cambelt
- Decked block
- Skimmed head
- M.A.D cams
- Piper Pullies
- Twin scroll exhaust manifold
- BW EFR 8374 turbo
- Tial 44mm wastgate
- Vipec Ecu + ignition
- Injector dynamics 1000cc injectors
- Hart inlet
think I also forgot some other parts
I did take out the GT turbo / fuel system / ECU this will all be changed to the same specs as the 4x4 to make it faster/better again and it's easier for me if both cars have the same parts on it if I need to exchange something
I have only those 2 at the moment which is also enough

For me the 2wd feels better in some way, but need to say that I didn't drive to much with the 4x4 yet
10-03-2015, 05:03 PM
#12
cossie fan (unluckerly)
Very nice will be quick! Same sort of spec I'm having done at the moment but with a few different bits think Ill be using 1300cc injectors and solid lifters.
Last edited by ajamesc; 10-03-2015 at 05:05 PM.
 11-03-2015, 05:50 PM
#14
some new pics uploaded with info
End of 2013 the underside was ready for painting and stonechip.
Everything under and around the car was covered with paper


Last stonechip layer drying with the heater underneath it

Happy with the result


Then bought new plastic fittings for in the floor

Heated up the glue and pressed them in

Then I did put a new layer of rubber seal on where the front wings are welded to the front bar

Also did sanded the whole engine bay and get it ready for painting.
On the next picture the final clear coat was drying

I was happy for the result just doing this with normal spray cans by hand


Then the fun part of the restoration could begin. Putting all the new parts back on it. New clips and all new zinc plated bolts

Also started putting parts to the underside


End of 2013 the underside was ready for painting and stonechip.
Everything under and around the car was covered with paper
Last stonechip layer drying with the heater underneath it
Happy with the result
Then bought new plastic fittings for in the floor
Heated up the glue and pressed them in
Then I did put a new layer of rubber seal on where the front wings are welded to the front bar
Also did sanded the whole engine bay and get it ready for painting.
On the next picture the final clear coat was drying
I was happy for the result just doing this with normal spray cans by hand
Then the fun part of the restoration could begin. Putting all the new parts back on it. New clips and all new zinc plated bolts
Also started putting parts to the underside


 13-03-2015, 08:38 PM
#22
Had some spare time again to share some pictures as being home since I'm sick having the flu

When the enginebay was painted I started on some heatshielding in the winter of 2014
First I made a jig out of paper

And then finalized it with some adhesive heatshielding.
By that time I also retaped the original ABS loom which was fitted from the inside

Then I bought some new Ford genuine ventilation parts since the old ones were in pretty tired condition


After that me and my dad said that it was time to get some more important parts on the car so we made a start on that in March 2014
All new brackets and zinc plated bolts getting ready to fit the rear suspension

Powerflex rearbeam bushes pressed in


Trailing arms mounted to the rearbeam ready to lower the car on the lift for easy fitting

First fitted the rear gaz gold coilovers and then the rearbeam


When we decided at the beginning to go for some HP's I already bought a new Quaife rear diff fitted into a refurbished diff housing

Some new genuine Ford diff housing bolts

Finally fitted into the rearbeam so everything from the rear suspension is in the correct place.

Me being a perfectionist I even zinc plated the diff ID label

will upload some more pictures this upcoming weekend
When the enginebay was painted I started on some heatshielding in the winter of 2014
First I made a jig out of paper
And then finalized it with some adhesive heatshielding.
By that time I also retaped the original ABS loom which was fitted from the inside
Then I bought some new Ford genuine ventilation parts since the old ones were in pretty tired condition
After that me and my dad said that it was time to get some more important parts on the car so we made a start on that in March 2014
All new brackets and zinc plated bolts getting ready to fit the rear suspension
Powerflex rearbeam bushes pressed in
Trailing arms mounted to the rearbeam ready to lower the car on the lift for easy fitting
First fitted the rear gaz gold coilovers and then the rearbeam
When we decided at the beginning to go for some HP's I already bought a new Quaife rear diff fitted into a refurbished diff housing
Some new genuine Ford diff housing bolts
Finally fitted into the rearbeam so everything from the rear suspension is in the correct place.
Me being a perfectionist I even zinc plated the diff ID label
will upload some more pictures this upcoming weekend
13-03-2015, 08:41 PM
#23
Hi Mike this was one of the few clips that I re-used on the engine bay and managed to get out without breaking/cracking.
I have good contact with local Ford dealer and can use their Edix parts system at home to search where genuine Ford parts are still in stock around the world when they're NLA.
This clip was not in stock anywhere
I have good contact with local Ford dealer and can use their Edix parts system at home to search where genuine Ford parts are still in stock around the world when they're NLA.
This clip was not in stock anywhere
13-03-2015, 09:47 PM
#24
Hi Mike this was one of the few clips that I re-used on the engine bay and managed to get out without breaking/cracking.
I have good contact with local Ford dealer and can use their Edix parts system at home to search where genuine Ford parts are still in stock around the world when they're NLA.
This clip was not in stock anywhere
I have good contact with local Ford dealer and can use their Edix parts system at home to search where genuine Ford parts are still in stock around the world when they're NLA.
This clip was not in stock anywhere
Thanks for the info on the AP's
 16-03-2015, 03:30 PM
#25

Very nice build and updates you are coming with, this actually makes me even more interrested in sometime down the road, to get a very nicely Sierra. The current one I have is quite rusty, and I dont know if its worth the repairs on it, but it surely makes you more motivated to see something like this.
18-03-2015, 02:28 PM
#26
powercoated rear hubs with new bearings pressed in

Then I mounted these on the trailing arms

Rear brackets from Reyland for the AP rear brake setup. I also zincplated these bolts/washers although you can't see them anymore when everything is fitted


Then it was time to put the rear driveshaft stubs and wheel hubs into the bearings

I milled and welded a tool to hold the wheel hub so I could torque the nuts to the right torque without the need of having the car onto the ground with it wheels


Fitted and done


By that time around the summer of 2013 Mark Shead had the cilinderhead ready, the engineblock was getting it's machinework and also some bottom-end parts were received by Mark.


Carrillo rods to Marks spec


Also some CP pistons to Mark his spec

The 200 engine block was getting some liners machined/fitted to it including the machining for 6 long studs


Then I mounted these on the trailing arms
Rear brackets from Reyland for the AP rear brake setup. I also zincplated these bolts/washers although you can't see them anymore when everything is fitted
Then it was time to put the rear driveshaft stubs and wheel hubs into the bearings
I milled and welded a tool to hold the wheel hub so I could torque the nuts to the right torque without the need of having the car onto the ground with it wheels
Fitted and done
By that time around the summer of 2013 Mark Shead had the cilinderhead ready, the engineblock was getting it's machinework and also some bottom-end parts were received by Mark.
Carrillo rods to Marks spec
Also some CP pistons to Mark his spec
The 200 engine block was getting some liners machined/fitted to it including the machining for 6 long studs
22-03-2015, 07:24 PM
#27
time for some new updates
We did choose for a twinplate clutch setup with hydraulic center push


Also the choice on the fuel setup was ready so made an order for some aeroquip parts and they arrived in March 2014

Proper twinscroll manifolds from Mark Shead to suit the EFR turbo's that are going onto the car


Tial 44mm external wastegate this is going build with screamer pipe

RS500 cooler and radiator with twinspal fans

Then we started to sanding the original fueltank which was in good condition but it needed a new colour to suit the underside

New parts for the fueltank

Painted silver and fitted. The finish came out nicely

Changed the original breather hose from fuel tank directly to atmosphere

We then bought some sound deadening plates

Started to install some of the interior parts back to the location where they should be fitted


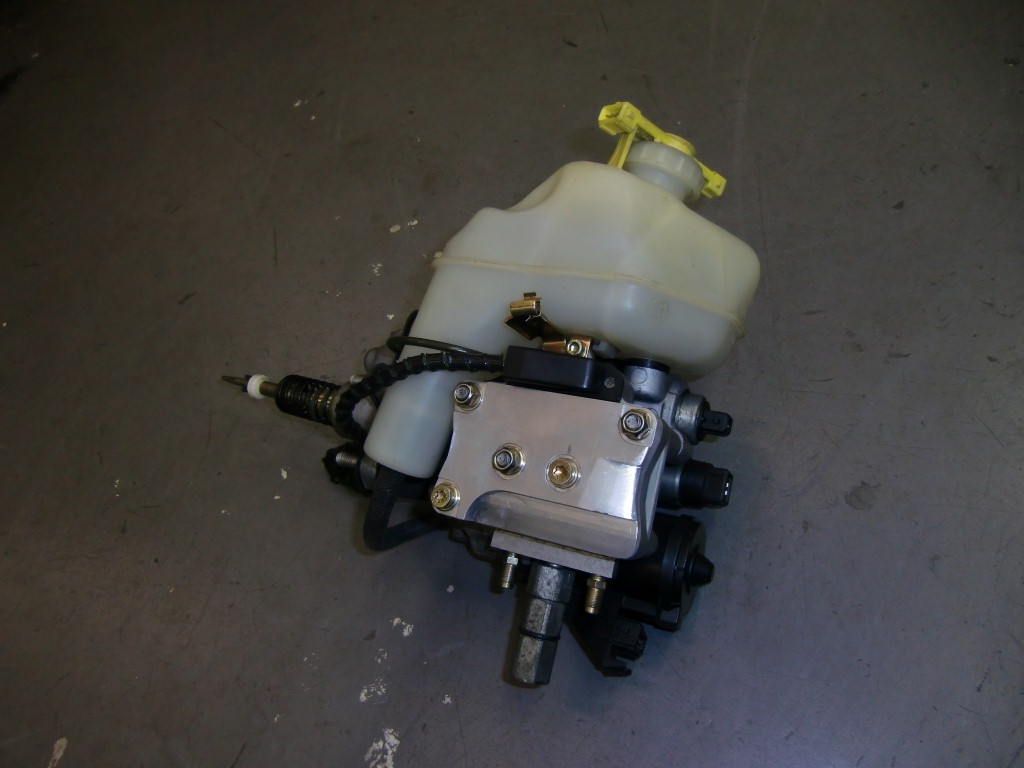
Because we are fitting a Hart inlet and the car is LHD we encountered a problem with the ABS unit from master cylinder touching the inlet slightly.
So I machined a new ABS unit cover from aluminium on the milling machine

Fitted
Hydraulic clutch conversion installed at this time of the project. Now there is still enough space to properly line/up and install the parts

Brake master cylinder also fitted

The old front hun flanges were worn on the diameter that sits in the bearing so I sourced some new Ford genuine ones

New longer wheel studs

All the new wheel studs pressed in (this is on the rear hub flange)

Getting the recently powdercoated front hubs ready to get the flanges pressed into the bearings

Pressing in with some grease all went OK


Then finished the front hubs by fitting the GAZ gold coilovers. These are ready to go on the car now.

We did choose for a twinplate clutch setup with hydraulic center push
Also the choice on the fuel setup was ready so made an order for some aeroquip parts and they arrived in March 2014
Proper twinscroll manifolds from Mark Shead to suit the EFR turbo's that are going onto the car
Tial 44mm external wastegate this is going build with screamer pipe
RS500 cooler and radiator with twinspal fans
Then we started to sanding the original fueltank which was in good condition but it needed a new colour to suit the underside
New parts for the fueltank
Painted silver and fitted. The finish came out nicely
Changed the original breather hose from fuel tank directly to atmosphere
We then bought some sound deadening plates
Started to install some of the interior parts back to the location where they should be fitted
Because we are fitting a Hart inlet and the car is LHD we encountered a problem with the ABS unit from master cylinder touching the inlet slightly.
So I machined a new ABS unit cover from aluminium on the milling machine
Fitted
Hydraulic clutch conversion installed at this time of the project. Now there is still enough space to properly line/up and install the parts
Brake master cylinder also fitted
The old front hun flanges were worn on the diameter that sits in the bearing so I sourced some new Ford genuine ones
New longer wheel studs
All the new wheel studs pressed in (this is on the rear hub flange)
Getting the recently powdercoated front hubs ready to get the flanges pressed into the bearings
Pressing in with some grease all went OK
Then finished the front hubs by fitting the GAZ gold coilovers. These are ready to go on the car now.


 29-03-2015, 08:34 PM
#33
also uploaded some other pics.. starting with the conversion to hydraulic center push clutch
Modifying the nose piece of the gearbox on the lathe


Measuring the inside diameter of the center push cylinder

So it has a perfect fit over the nose piece

The cutting it off on the lathe

Original nose piece vs modified

Then fitted together with a new oil seal

Straight cut gearbox.. hope this holds the power and torque of the EFR turbo

Then I started on the gearbox cradle.. Painted it and did some machine work on the lathe for solid bushes


I then machined a new cross-link piece for the gearshift.. The original one had to big holes in it due it's age and this creates a lot of play in the gearshifter.
Now the pins are tight fit and almost has zero play in it so the gearshifter feels solid again

Zincplated it and fitted

Gearbox almost complete.. please forgot about the rusty rear driveshaft piece

New gearbox mount

And the last part of the gearbox a new startermotor

Modifying the nose piece of the gearbox on the lathe
Measuring the inside diameter of the center push cylinder
So it has a perfect fit over the nose piece
The cutting it off on the lathe
Original nose piece vs modified
Then fitted together with a new oil seal
Straight cut gearbox.. hope this holds the power and torque of the EFR turbo
Then I started on the gearbox cradle.. Painted it and did some machine work on the lathe for solid bushes
I then machined a new cross-link piece for the gearshift.. The original one had to big holes in it due it's age and this creates a lot of play in the gearshifter.
Now the pins are tight fit and almost has zero play in it so the gearshifter feels solid again
Zincplated it and fitted
Gearbox almost complete.. please forgot about the rusty rear driveshaft piece
New gearbox mount
And the last part of the gearbox a new startermotor
29-03-2015, 08:49 PM
#34
Then we got some AP rearbrakes

Installed them on the car

New flexible stainless brake lines

Genuine new Ford handbrake cable

Zincplated handbrake springs on the original rear brake calipers

My dad then primed all new cv joints front and rear as they came blank metal


All painted black and fitted together. Ready for fitting on the car

Sourced new genuine Ford headlights

Trialfitted them. Also had the metal clips gold zincplated that holds the glass

Together with sourcing the new headlights I found some new old stock smoked rearlights at a Dutch Ford dealer so we bought them


Installed the new Spec-R coolant reservoir and powersteering reservoir in the engine bay

I found a new genuine Ford bonnet switch at a local Ford dealer and couldn't resist buying it


Ordered some new engine bay decals from UK and started putting them on the right place


New genuine Ford bonnet rubberstrip


going to put some other pictures up this week of Mark Shead completing the engine and collecting it from the UK and installing it into the car
Installed them on the car
New flexible stainless brake lines
Genuine new Ford handbrake cable
Zincplated handbrake springs on the original rear brake calipers
My dad then primed all new cv joints front and rear as they came blank metal
All painted black and fitted together. Ready for fitting on the car
Sourced new genuine Ford headlights
Trialfitted them. Also had the metal clips gold zincplated that holds the glass
Together with sourcing the new headlights I found some new old stock smoked rearlights at a Dutch Ford dealer so we bought them
Installed the new Spec-R coolant reservoir and powersteering reservoir in the engine bay
I found a new genuine Ford bonnet switch at a local Ford dealer and couldn't resist buying it
Ordered some new engine bay decals from UK and started putting them on the right place
New genuine Ford bonnet rubberstrip
going to put some other pictures up this week of Mark Shead completing the engine and collecting it from the UK and installing it into the car
03-04-2015, 04:51 PM
#35
some new picture hope you all like it
Some zincplating of parts of the doors


The interior is also going to look as a interior again


Some Stack gauges fitted into the dashboard

Genuine Ford stereo & amp

Rear seats back in the car

We did choose for Vipec ECU by the time Mark was building the engine as he is also going to map the engine and it's easier to have an ECU which the engine builder/mapper reccommends

Fitted at the original ECU location. ECU is fitted with the supplied Vipec ECU bracket

Now some pictures of Mark working / finishing the engine in April 2014


Mark his own spec longstuds


All fitted and timed up

Early May 2014 Mark says engine = ready for collection. Planned a trip to the UK for the next weekend to collect the engine from him and take it home with our van.


In the workshop I changed the cam cover for a refurbed one in black and start adding some parts to the engine like the subframe, waterpump etc..


Once that was done we made a start on fitting the lightweight flywheel and twinplate clutch to the engine
Heating up the starter ring for fitment onto the flywheel

Fitted

The fitted the flywheel to the crankshaft and torque up the bolts

Twinplate clutch fitted

We then added the gearbox to the engine and finally we got a complete package so we could lower the car on the car lift

All main bolts fitted and the engine and gearbox is in

At this time is was an easy job of fitting all the transmission / supsension parts around the engine as they were already done

Front driveshafts in

Front hub and main nut ready to set for the correct torque


We also changed the front brakes for bigger ones from AP. 362mm 6 pots calipers


Trialfitted the frontwheel. Very tight fit around the caliper but it fits

Trying to update soon with some new pics.. if you have any questions or comments let me know
Some zincplating of parts of the doors
The interior is also going to look as a interior again
Some Stack gauges fitted into the dashboard
Genuine Ford stereo & amp
Rear seats back in the car
We did choose for Vipec ECU by the time Mark was building the engine as he is also going to map the engine and it's easier to have an ECU which the engine builder/mapper reccommends
Fitted at the original ECU location. ECU is fitted with the supplied Vipec ECU bracket
Now some pictures of Mark working / finishing the engine in April 2014
Mark his own spec longstuds
All fitted and timed up
Early May 2014 Mark says engine = ready for collection. Planned a trip to the UK for the next weekend to collect the engine from him and take it home with our van.
In the workshop I changed the cam cover for a refurbed one in black and start adding some parts to the engine like the subframe, waterpump etc..
Once that was done we made a start on fitting the lightweight flywheel and twinplate clutch to the engine
Heating up the starter ring for fitment onto the flywheel
Fitted
The fitted the flywheel to the crankshaft and torque up the bolts
Twinplate clutch fitted
We then added the gearbox to the engine and finally we got a complete package so we could lower the car on the car lift
All main bolts fitted and the engine and gearbox is in
At this time is was an easy job of fitting all the transmission / supsension parts around the engine as they were already done
Front driveshafts in
Front hub and main nut ready to set for the correct torque
We also changed the front brakes for bigger ones from AP. 362mm 6 pots calipers
Trialfitted the frontwheel. Very tight fit around the caliper but it fits
Trying to update soon with some new pics.. if you have any questions or comments let me know


