V8 Sierra 3dr Track Day Car - Adios!
 08-03-2013, 06:34 PM
#161
PassionFord Regular
Thread Starter

Thanks James.
I don't think there's any other way getting around it. I thought the the tabs that Mat used to push the bottom of the wing out a bit was particularly sneaky
Heaven knows what some of the work teams must have done 'to the letter of the law' to get past the regs is anyone's guess!
Cheers
Iain
I don't think there's any other way getting around it. I thought the the tabs that Mat used to push the bottom of the wing out a bit was particularly sneaky
Heaven knows what some of the work teams must have done 'to the letter of the law' to get past the regs is anyone's guess!
Cheers
Iain
Last edited by IainRS1700T; 08-03-2013 at 06:36 PM.
 11-03-2013, 08:50 AM
#165
PassionFord Regular
Thread Starter
Thanks for your kind words chaps, much appreciated.
Going to raid the recycling bin now to do a bit of a Blue Peter oil catch tank mock up to fit in the engine bay around the cage.
Any suggestions who's worth looking at to build the real catch tank from alloy after I've mocked it up?
Cheers
Iain
Going to raid the recycling bin now to do a bit of a Blue Peter oil catch tank mock up to fit in the engine bay around the cage.
Any suggestions who's worth looking at to build the real catch tank from alloy after I've mocked it up?
Cheers
Iain
11-03-2013, 06:09 PM
#166
PassionFord Regular
Thread Starter
Quick mock up using the cage template I set aside a while ago. How do you like my Blue Peter catch tank then? Tin drum, custard pot, toothpaste top, and two children's dummy caps - and plenty of Sellotape! Cheapest catch tank ever - if only it was this easy 
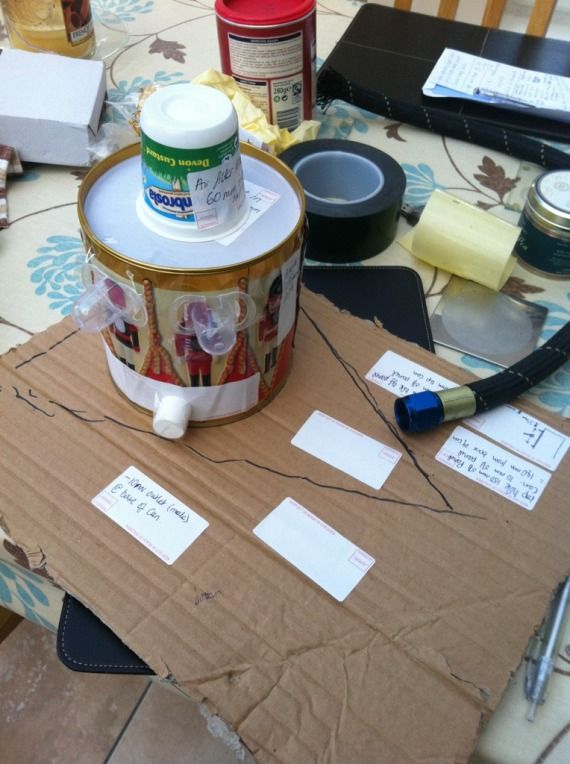
By the time I trialled it I moved a few bits around but I wasn't far off:
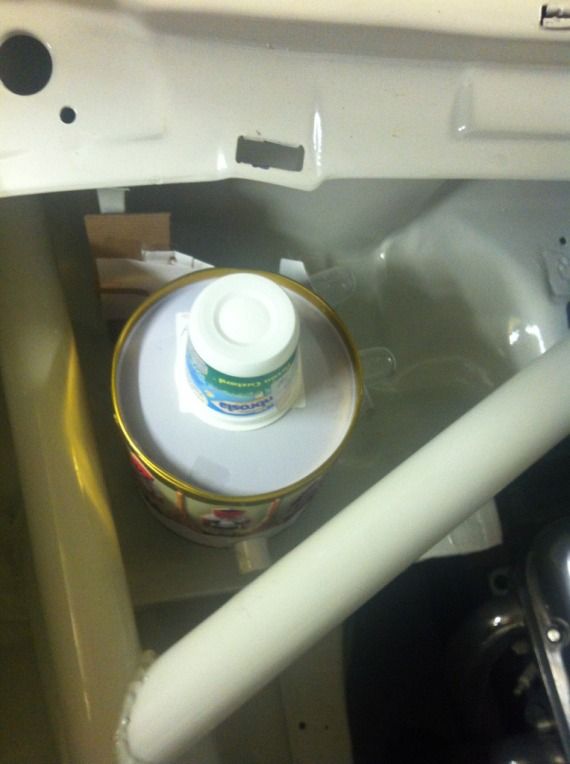
Now all I have to do is somehow get it made up!
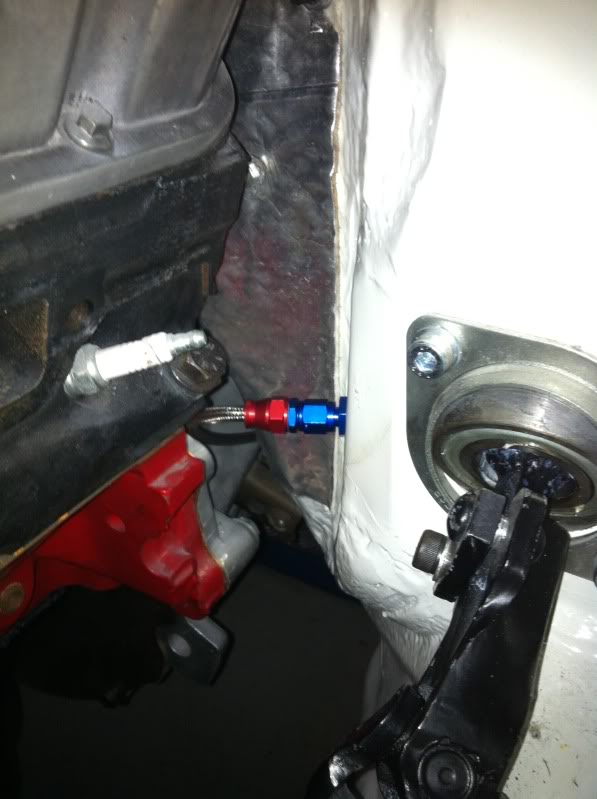
Little adaptor fitted the fuel log nicely. 5/8 to -8 :

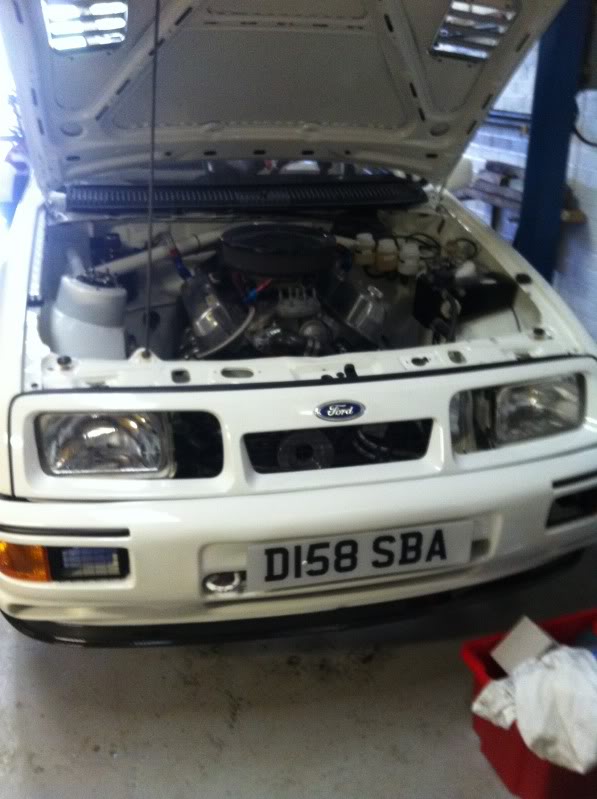
Mat's done the fuel line into the bulkhead adaptor, so just need to cater for the regulator in the engine bay and connect up to the log now. That allows me to stick in another gratuitous engine bay shot;
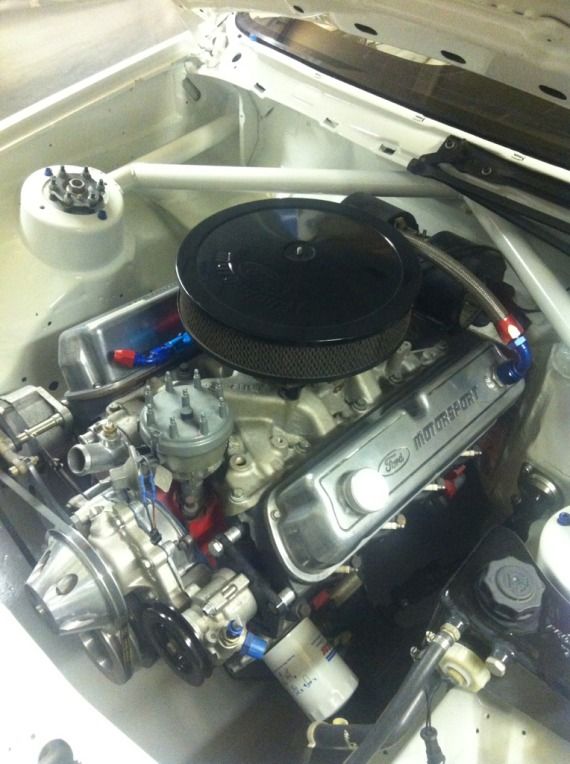
Can't wait to start this up!!!
On a side note, do you remember how the thread started with a toss up between the Sierra and my RWD RS1700T rep? Well I've still got no end of bits I could use in the RS17T and I've not stopped thinking about doing it. It's just that to do it like the Sierra would bankrupt me, so I've been considering doing a budget build as a bit of a rally car-alike, with the Sierra reserved for track days. This weekend saw me buy this;

Along with an entire loom and gearbox. It cost approx a 6th of an equivalent YB package and certainly a small fraction of a BDT original. When I look at equivalent clubman spec Gartrac mk3's I think I can make it work. Once the cage is finished off I think it will be more of a driveway build over a few years tho! I appreciate it won't be huge power but when I blow it up it'll only be a few hundred quid for a new one
Cheers for now,
Iain
By the time I trialled it I moved a few bits around but I wasn't far off:
Now all I have to do is somehow get it made up!
Little adaptor fitted the fuel log nicely. 5/8 to -8 :
Mat's done the fuel line into the bulkhead adaptor, so just need to cater for the regulator in the engine bay and connect up to the log now. That allows me to stick in another gratuitous engine bay shot;
Can't wait to start this up!!!
On a side note, do you remember how the thread started with a toss up between the Sierra and my RWD RS1700T rep? Well I've still got no end of bits I could use in the RS17T and I've not stopped thinking about doing it. It's just that to do it like the Sierra would bankrupt me, so I've been considering doing a budget build as a bit of a rally car-alike, with the Sierra reserved for track days. This weekend saw me buy this;
Along with an entire loom and gearbox. It cost approx a 6th of an equivalent YB package and certainly a small fraction of a BDT original. When I look at equivalent clubman spec Gartrac mk3's I think I can make it work. Once the cage is finished off I think it will be more of a driveway build over a few years tho! I appreciate it won't be huge power but when I blow it up it'll only be a few hundred quid for a new one
Cheers for now,
Iain
Last edited by IainRS1700T; 01-06-2013 at 10:36 AM.

 Looks like you bought your 300mm kit before we introduced the our 320 version
  11-03-2013, 08:23 PM
#168
PassionFord Regular
Thread Starter
320? Bloody hell haven't used these ones yet! Is that a bigger disc and caliper spacer?
If so remember my discount when I order replacement discs
Iain
If so remember my discount when I order replacement discs
Iain
 06-04-2013, 07:38 PM
#172
PassionFord Regular
Thread Starter
Update time!
A bit of progress here and there, but not a lot to show for it just yet.
In the workshop Mat has now finished the other front arch clearance-ing so that's the front end sorted out. In the process though we discovered the Compo's were made for an M14 gp A fitting and the conversion nuts I bought weren't up to the job. Mat's now going to machine up some proper sleeves for the studs to do the job properly.
I'm finding now that as the list of jobs gets smaller a small omission in the parts supply can lead to things slowing down on the car quite a lot. In the past a hold up in one area just mean't that we could crack on with something else instead. Now, there's not many 'something elses' (which is nice..)
Getting hold of these little buggers slowed down work on the pedal box installation for a good couple of weeks;
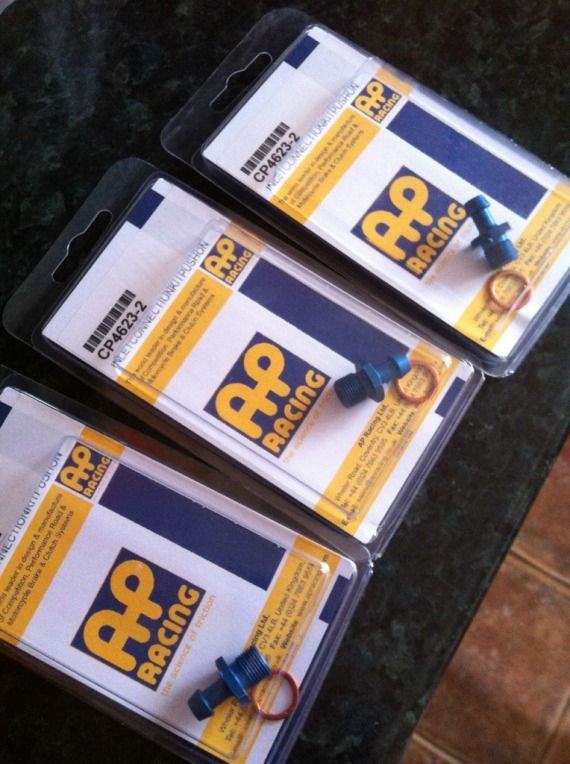
They're M12 adaptors for low pressure brake and clutch reservoir feeds to the m/cylinders. Because my m/cylinders are the CP4623 variety all the threads are metric, and it seemed like all the availability was in imperial threads. These took ages to get to me from AP.
As we went along the brake and clutch line routings and pathways through the car, with bulkhead fittings etc the list continued to grow. The sheer cost of these bits and pieces is staggering. It's a bloody good job they're re-usable! Again, more delays ensued as I tried to gather up all the stuff I needed. Goodridge can be a little frustrating in this regard and I used several different suppliers to get some availability. Even then things like an alloy 3 way -3 T-piece are on back order for 6 months, so in some cases I've had to go with steel variations.
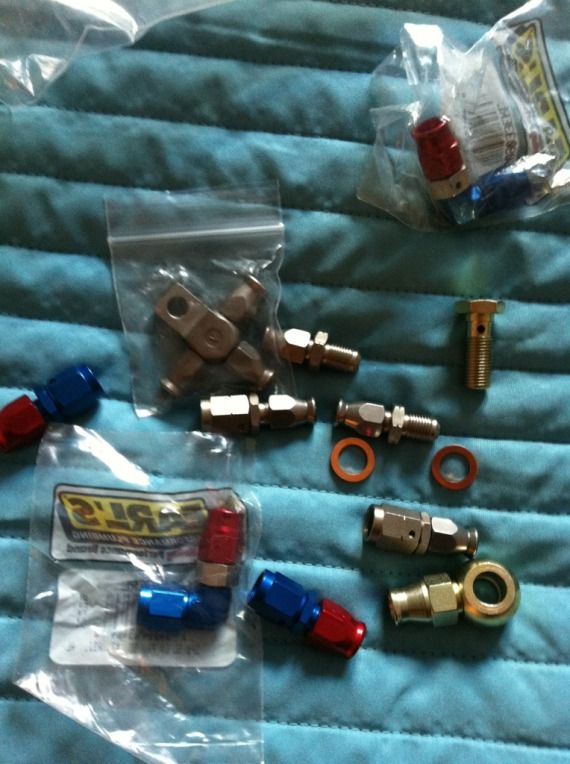
There were also a couple of bits where I was going for different sizes and alloy versions don't exist. So at any rate, last week I dropped the final box of stuff off to MDA and so it will allow them to finish off all the brake and clutch lines, and the pedal box. Yes!
While all this was going on the whole wiring loom thing was lurking in the background like a bad smell. Me and Mat had laid the old one out on the workshop floor and I could see straight away it wasn't great. Alarms had been added in, bits stripped out, and other bits added in over the years.
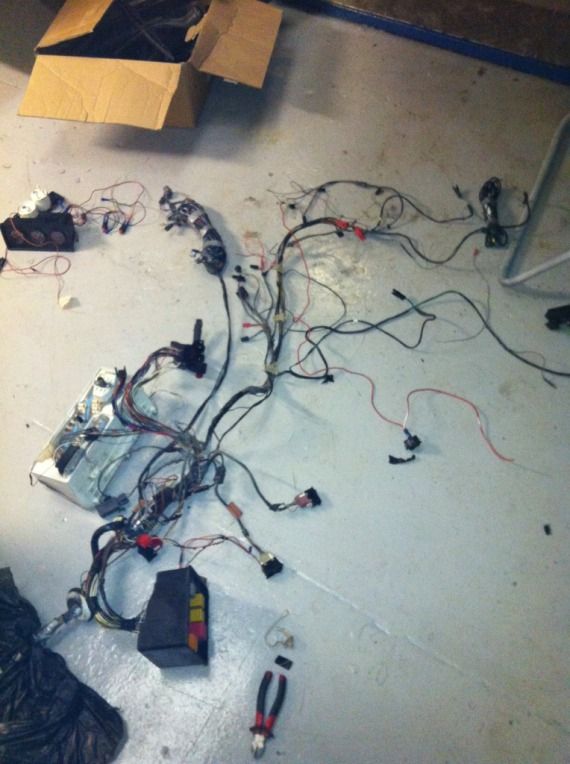
We bagged it all up and I took it home to ponder the best way forward.
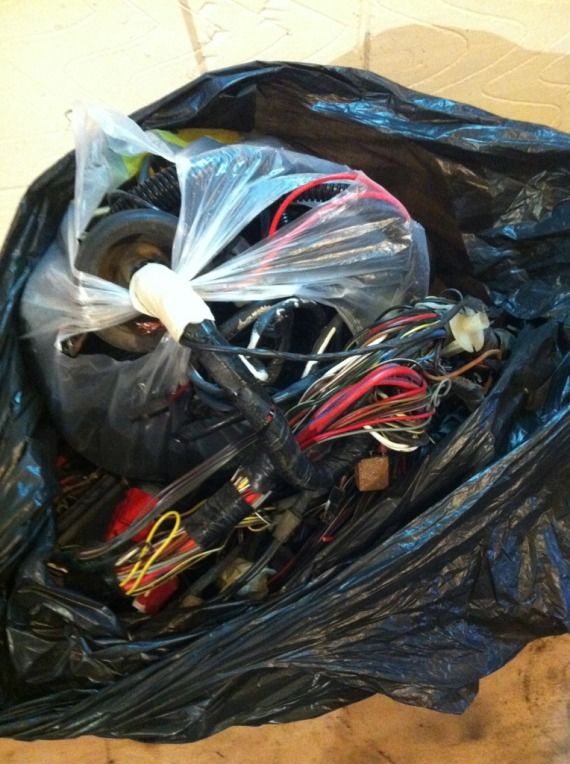
Even a simple loom ends up weighing quite a lot. This one came in at 7kg, and that's obviously without a fair chunk of wiring that a modern car would have, not to mention the ECU etc.
After a morning of a bit more detective work with the loom, I decided that I couldn't put it back in the car even after tidying it up, so I dedicated the rest of the day to nailing down my options. I had some good chats with some capable folk like Hudson wiring, for something motorsport specific, and although the cost looked good, the budget was taking a pounding, so I had to go to something more wallet-friendly.
The kit car and classic car world offered some interesting and cheaper options. The Sierra has been a staple donor car in the kit car world for a long time now, so there's a fair cross over there with my project, especially with the V8 up front. In the end I happened upon Premier Wiring, who is run by a fella now in semi-retirement in Spain, but still turning out Sierra based looms for kit car builders. I had a good chat with him and went through my requirements. He's going to add in a few extra circuits for me and the whole loom is coming in well under Ł200.
I'm not under any illusion of it being a Raychem covered mil-spec loom, but it's a good starting point for getting a new, reliable, glitch free loom. I'll need to wire up my connectors and do a bit of work to get it all fitted up and tidy, but as I'm not great with electrics it will be a good learning opportunity for me.
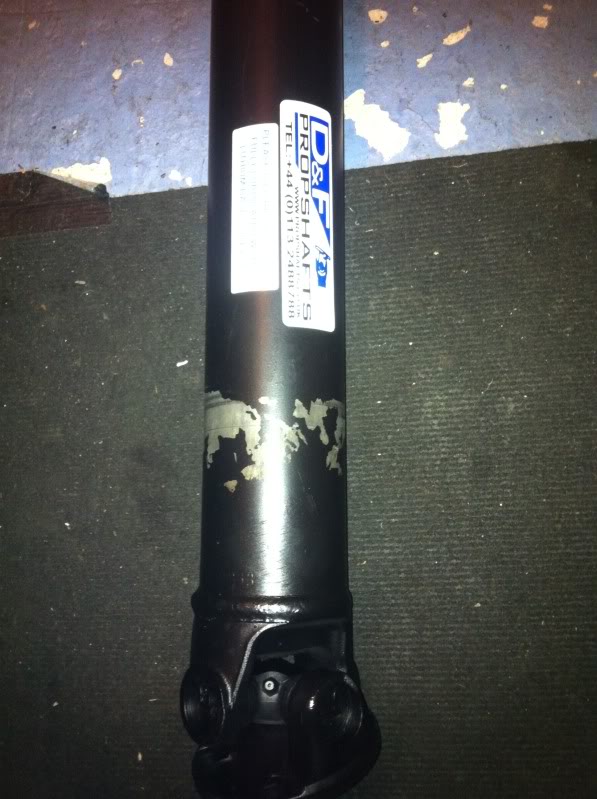
I came out a winner on the prop-shaft too. Some research has led me to Dunning and Fairbank over in Leeds for a one piece prop. I've supplied the Tremec yoke, and work should start on it next week, so I might even have it by next weekend. They were knowledgeable, helpful and not expensive either!
So I wasn't even at the end of the first week of the month and I felt spent up on the budget! Oh, and Pete at Spec R came back to me on the breather/catch tank with a good quote this week, so that really sealed the nail in the coffin of my expenditure! They're going to crack on with that this week. I'll post some pics up when it lands. Now doubt that'll need some fittings I haven't got and will cost me some more..
So the jobs list is gradually getting smaller. The engine oil cooler and PAS system are in our sights next.
I also need to source some sort of centre console panel to mount the fuses and relays. I'm looking for something along these lines - any suggestions bar an alloy panel?
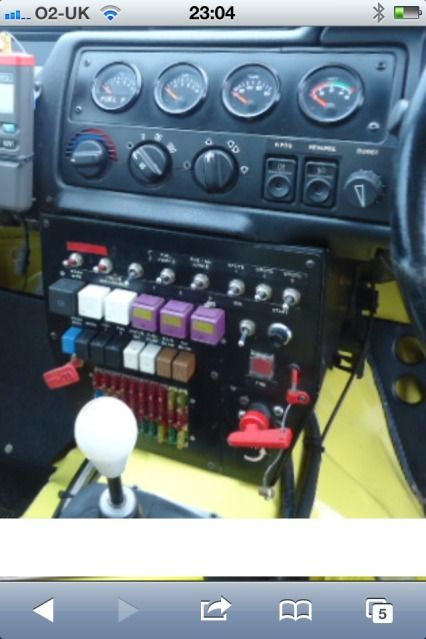
Is anyone out there doing something specific for the job? I'd quite like to angle it towards me, rather than have it flat on the dash, because once I'm strapped in I probably couldn't reach it.
Cheers for now,
Iain
A bit of progress here and there, but not a lot to show for it just yet.
In the workshop Mat has now finished the other front arch clearance-ing so that's the front end sorted out. In the process though we discovered the Compo's were made for an M14 gp A fitting and the conversion nuts I bought weren't up to the job. Mat's now going to machine up some proper sleeves for the studs to do the job properly.
I'm finding now that as the list of jobs gets smaller a small omission in the parts supply can lead to things slowing down on the car quite a lot. In the past a hold up in one area just mean't that we could crack on with something else instead. Now, there's not many 'something elses' (which is nice..)
Getting hold of these little buggers slowed down work on the pedal box installation for a good couple of weeks;
They're M12 adaptors for low pressure brake and clutch reservoir feeds to the m/cylinders. Because my m/cylinders are the CP4623 variety all the threads are metric, and it seemed like all the availability was in imperial threads. These took ages to get to me from AP.
As we went along the brake and clutch line routings and pathways through the car, with bulkhead fittings etc the list continued to grow. The sheer cost of these bits and pieces is staggering. It's a bloody good job they're re-usable! Again, more delays ensued as I tried to gather up all the stuff I needed. Goodridge can be a little frustrating in this regard and I used several different suppliers to get some availability. Even then things like an alloy 3 way -3 T-piece are on back order for 6 months, so in some cases I've had to go with steel variations.
There were also a couple of bits where I was going for different sizes and alloy versions don't exist. So at any rate, last week I dropped the final box of stuff off to MDA and so it will allow them to finish off all the brake and clutch lines, and the pedal box. Yes!
While all this was going on the whole wiring loom thing was lurking in the background like a bad smell. Me and Mat had laid the old one out on the workshop floor and I could see straight away it wasn't great. Alarms had been added in, bits stripped out, and other bits added in over the years.
We bagged it all up and I took it home to ponder the best way forward.
Even a simple loom ends up weighing quite a lot. This one came in at 7kg, and that's obviously without a fair chunk of wiring that a modern car would have, not to mention the ECU etc.
After a morning of a bit more detective work with the loom, I decided that I couldn't put it back in the car even after tidying it up, so I dedicated the rest of the day to nailing down my options. I had some good chats with some capable folk like Hudson wiring, for something motorsport specific, and although the cost looked good, the budget was taking a pounding, so I had to go to something more wallet-friendly.
The kit car and classic car world offered some interesting and cheaper options. The Sierra has been a staple donor car in the kit car world for a long time now, so there's a fair cross over there with my project, especially with the V8 up front. In the end I happened upon Premier Wiring, who is run by a fella now in semi-retirement in Spain, but still turning out Sierra based looms for kit car builders. I had a good chat with him and went through my requirements. He's going to add in a few extra circuits for me and the whole loom is coming in well under Ł200.
I'm not under any illusion of it being a Raychem covered mil-spec loom, but it's a good starting point for getting a new, reliable, glitch free loom. I'll need to wire up my connectors and do a bit of work to get it all fitted up and tidy, but as I'm not great with electrics it will be a good learning opportunity for me.
I came out a winner on the prop-shaft too. Some research has led me to Dunning and Fairbank over in Leeds for a one piece prop. I've supplied the Tremec yoke, and work should start on it next week, so I might even have it by next weekend. They were knowledgeable, helpful and not expensive either!
So I wasn't even at the end of the first week of the month and I felt spent up on the budget! Oh, and Pete at Spec R came back to me on the breather/catch tank with a good quote this week, so that really sealed the nail in the coffin of my expenditure! They're going to crack on with that this week. I'll post some pics up when it lands. Now doubt that'll need some fittings I haven't got and will cost me some more..
So the jobs list is gradually getting smaller. The engine oil cooler and PAS system are in our sights next.
I also need to source some sort of centre console panel to mount the fuses and relays. I'm looking for something along these lines - any suggestions bar an alloy panel?
Is anyone out there doing something specific for the job? I'd quite like to angle it towards me, rather than have it flat on the dash, because once I'm strapped in I probably couldn't reach it.
Cheers for now,
Iain
Last edited by IainRS1700T; 01-06-2013 at 10:47 AM.
06-04-2013, 08:03 PM
#174
Wahay!! I've lost my Virginity!!

Beautiful build.
Here's my budget 302 Merkur XR4Ti build.
It sounds and drives amazingly. You'll love it. I'm just getting ready to put a Supra diff in it.
Here's my budget 302 Merkur XR4Ti build.
It sounds and drives amazingly. You'll love it. I'm just getting ready to put a Supra diff in it.
07-04-2013, 06:38 AM
#175
PassionFord Regular
Thread Starter
Good stuff! I can see you retained fuel injection etc? Was that engine from a fox body mustang?
A Supra diff would be the way to go for sure. You boys were doing it long before we were...
How did you mount the engine?
Cheers
Iain
A Supra diff would be the way to go for sure. You boys were doing it long before we were...
How did you mount the engine?
Cheers
Iain
07-04-2013, 04:53 PM
#176
Wahay!! I've lost my Virginity!!
I made all the mounts myself, bought a mig welder and some stell and had a go.
Yeah the Supra diff is popular over here. The BMW E36 is as well but the Supra is easier to find in the scrap yard.
Ive only driven mine around the block a few times, but a V8 really suits this car, you'll love it.
 07-04-2013, 10:47 PM
#178
Wahay!! I've lost my Virginity!!
08-04-2013, 06:52 AM
#180
PassionFord Regular
Thread Starter
Love it!
Hats off to you for just cracking on a fab-ing your own mounts up. Shame you have to retain all the emissions gubbins tho.
I wonder how many of us have driven a part-finished project up and down our street at home to see if it works!
Cheers
Iain
Hats off to you for just cracking on a fab-ing your own mounts up. Shame you have to retain all the emissions gubbins tho.
I wonder how many of us have driven a part-finished project up and down our street at home to see if it works!
Cheers
Iain
 08-04-2013, 02:55 PM
#182
Wahay!! I've lost my Virginity!!
Driving's testing. Lol!
09-04-2013, 06:29 AM
#183
PassionFord Regular
Thread Starter
17-05-2013, 09:48 PM
#185
PassionFord Regular
Thread Starter
Heh heh! Patience, patience
I've not started a thread yet. Been busy collecting some bits on the sly though so getting there. Got to love some of the bits - ending up with IRS and magnesium rear wheels, 4.1 diff, alloy brake calipers and change from Ł600..
I'll start a thread in due course. Need to get the Sierra finished first. Just about ready for a big update on that this weekend. Things moving on nicely..
Cheers
Iain
19-05-2013, 07:48 AM
#186
PassionFord Regular
Thread Starter
Ok, where to start?
Pedal box is in;
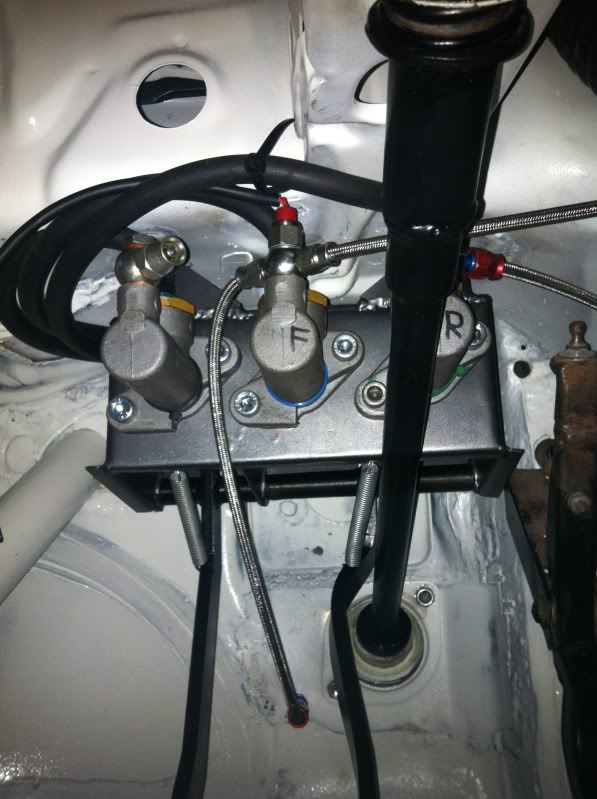
Lines are in;
Then reservoirs were fitted & plumbed in to the master cylinders;
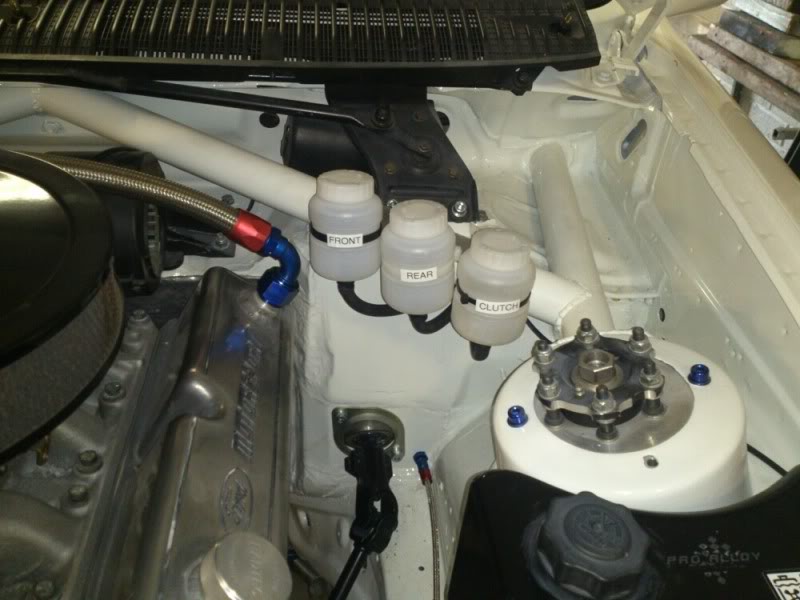
Just clutch line to slave cylinder to go;
Went for -4 on the clutch as I read it gives a better pedal pressure. Time will tell.
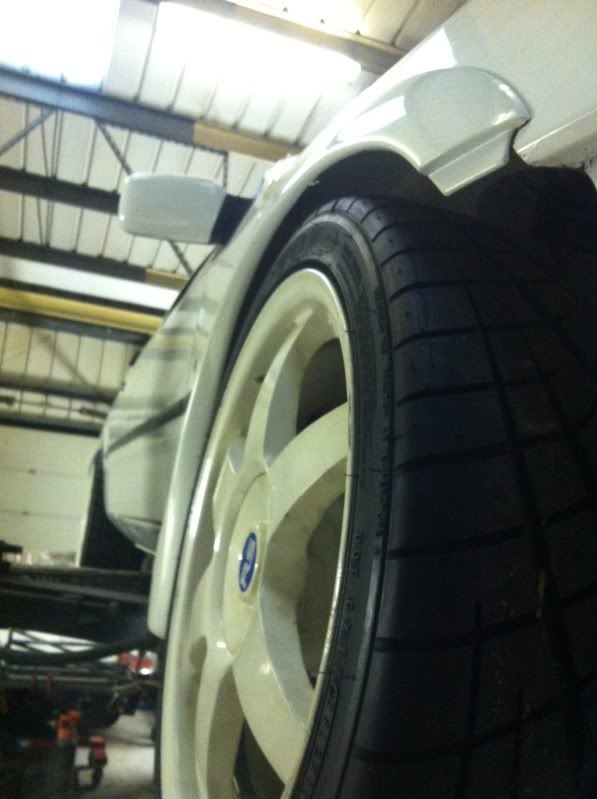
I mentioned before, the clearance of the front arches had been done - this pic shows it well;
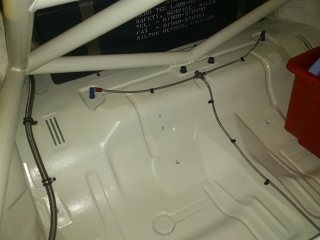
Heater matrix is back in. I lose the side vents due to the cage but Mat has been able to retain the screen demist vents and the central dash vents. I don't want a wet track day or an early start to be spoiled by a fogged up car!
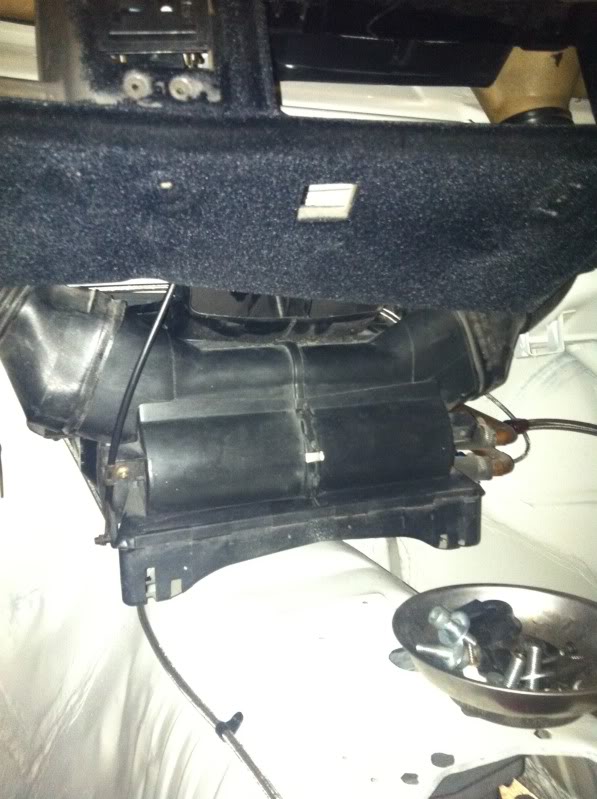
You can see the roll cage behind the dash here;

This means the clocks won't fit back in the binnacle properly - mostly the speedo drive. I had RHD clocks in mine as after doing a very quick mph conversion to pass DVLA inspection originally, I thought I'd swap to some proper clocks. These had the speedo on the right instead of the left, but that wasn't a big problem. Now if I can make up a panel for the clocks I can relocate the speedo to the left, and bring the whole lot forward to help clear the roll cage bar.
I started by disassembling the clocks;
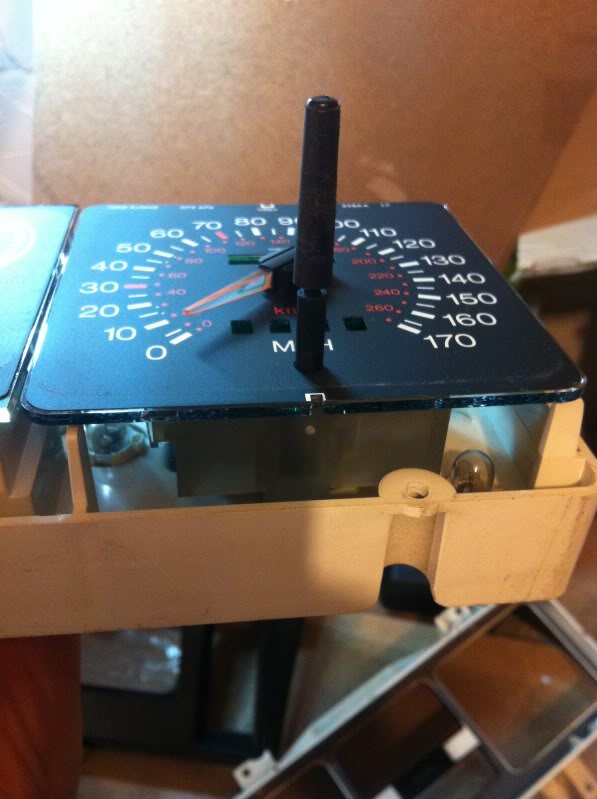
I then cut out a card template and shifted the speedo across.
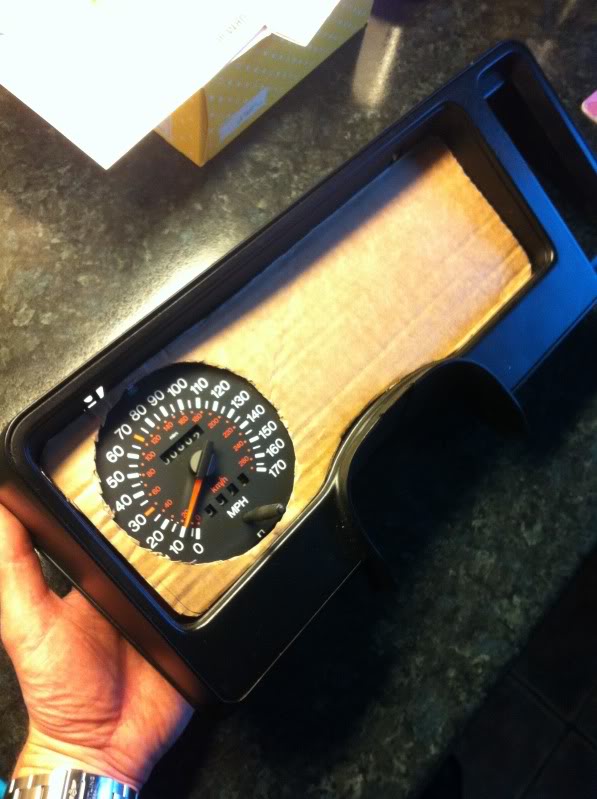
If I can get away with a circular cut out then it'll match up to my VDO stuff well. Seeing the speedo isn't a high priority - just need it functioning for the MOT. I'll then place my rev counter slap bang in the middle. That should live room for some warning lights and maybe oil pressure or coolant temp gauge too.
I'll probably end up doing this in some thin alloy sheet, and fixing it into the binnacle. I've gained about 10cm behind the dash which should be enough to route the speedo cable ok.
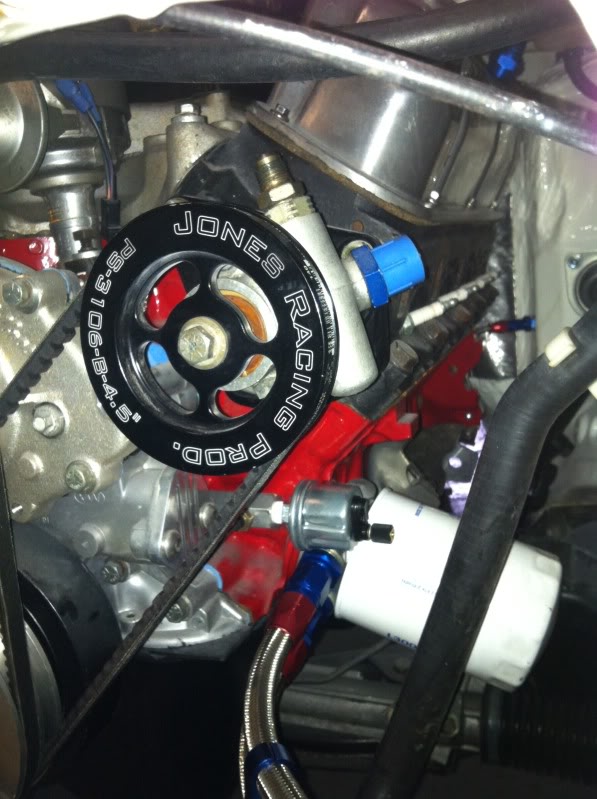
Fuel reg is in;
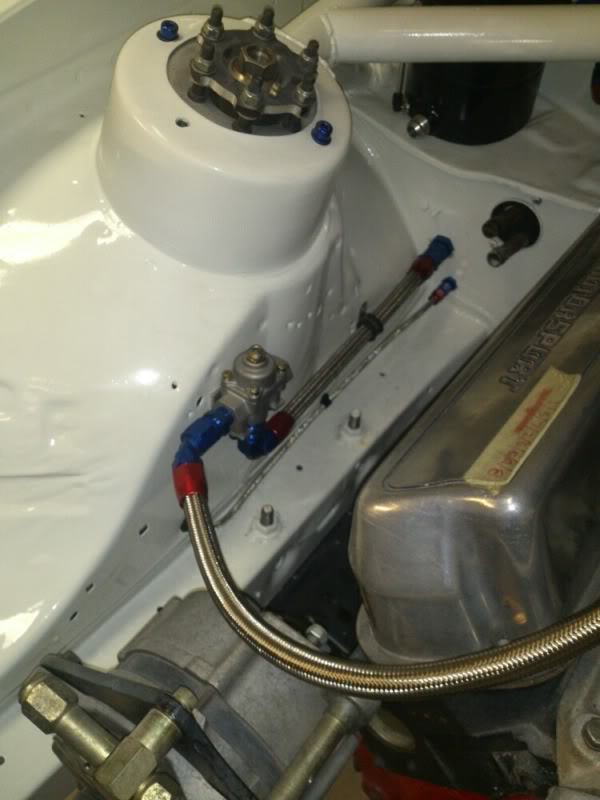
PAS lines are next; need to look at mounting the reservoir somewhere nearby.
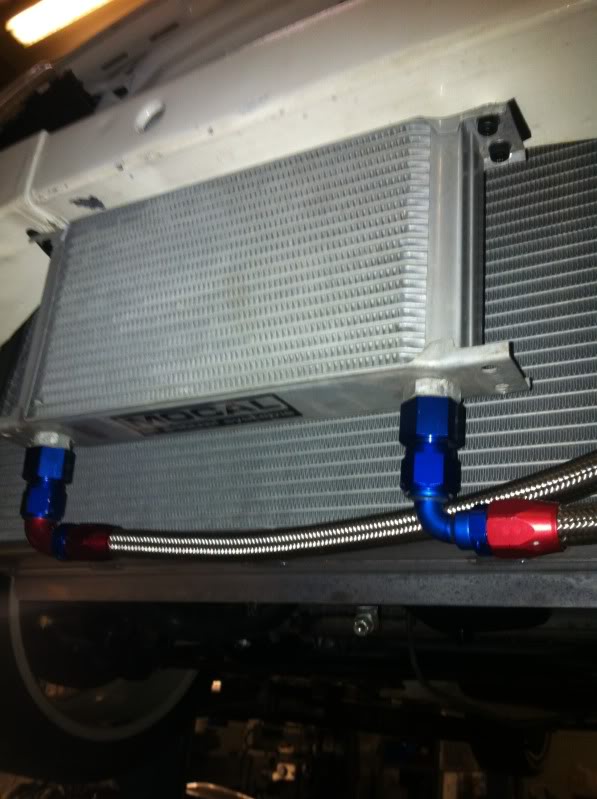
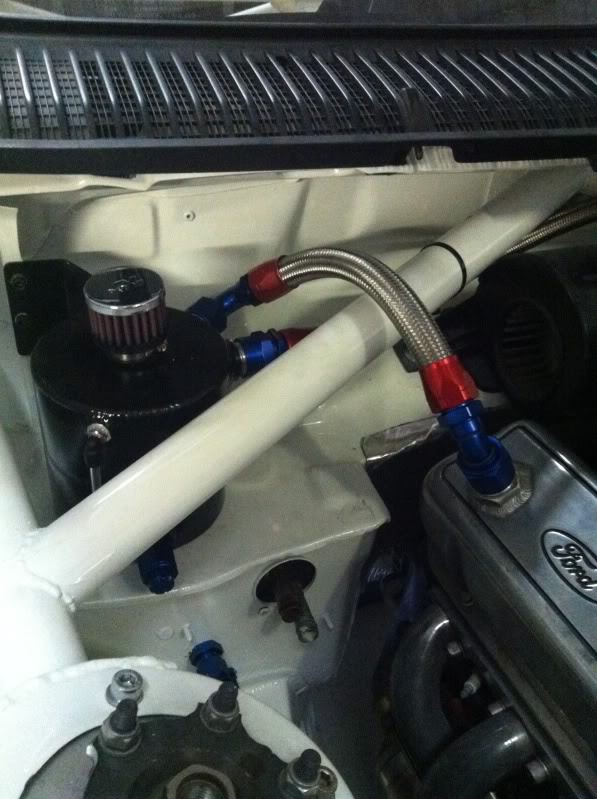
Oil cooler lines;

The new loom has arrived. I've invested in some new wire strippers and crimpers in anticipation!
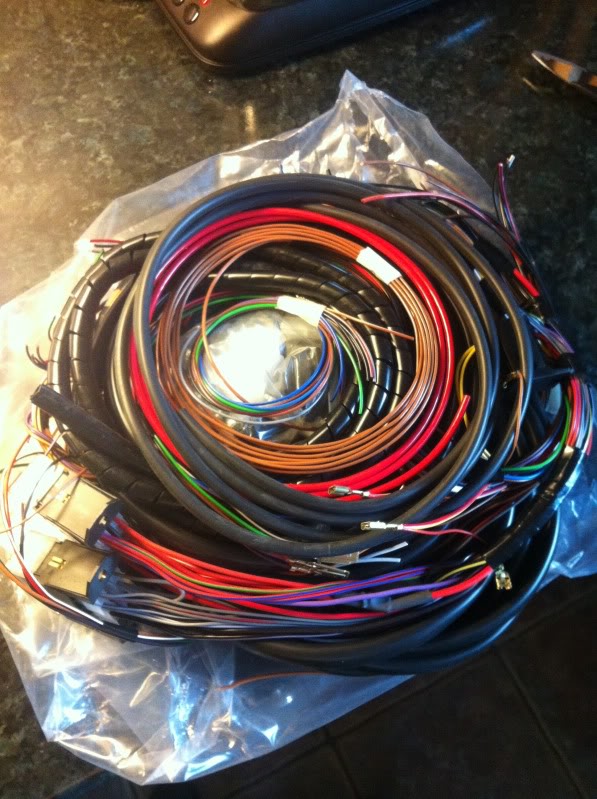
The old loom wasn't that heavy, but this is half the weight again. Hopefully it's all there..
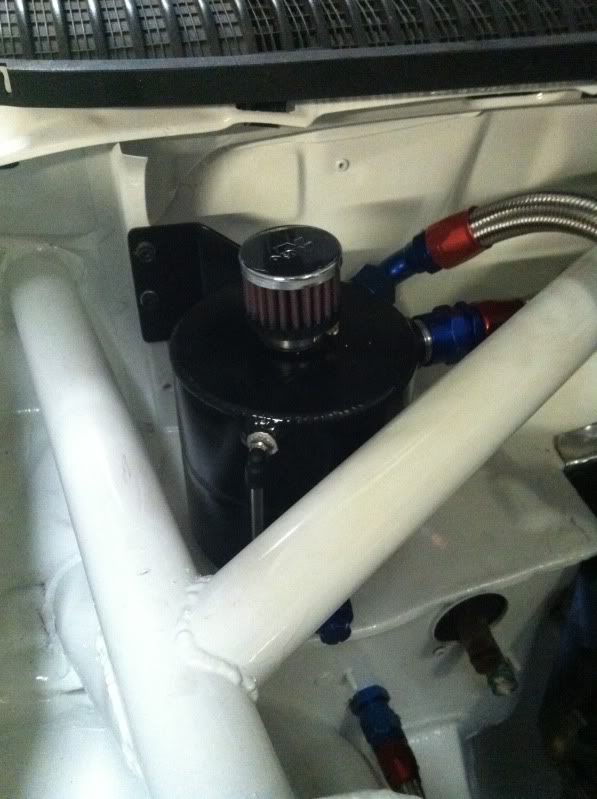
My Spec R oil catch tank has arrived as well! Very nice piece of work it is too
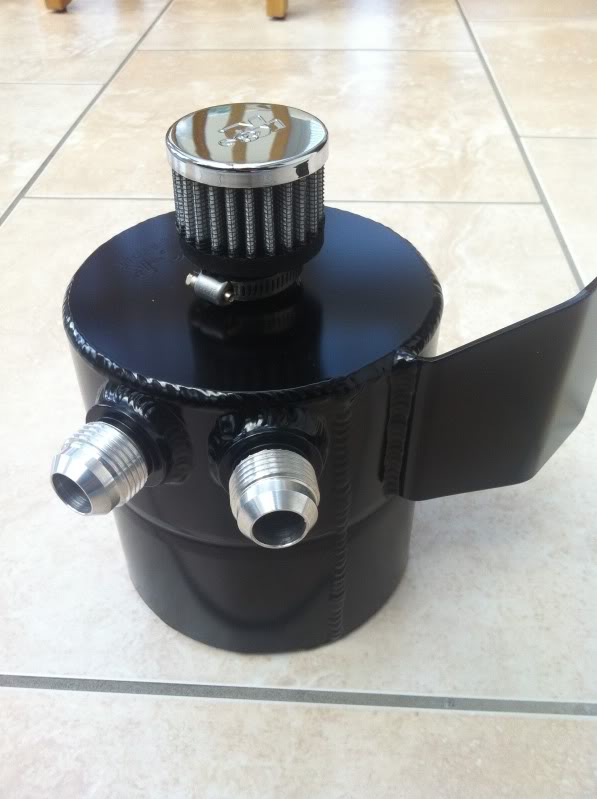
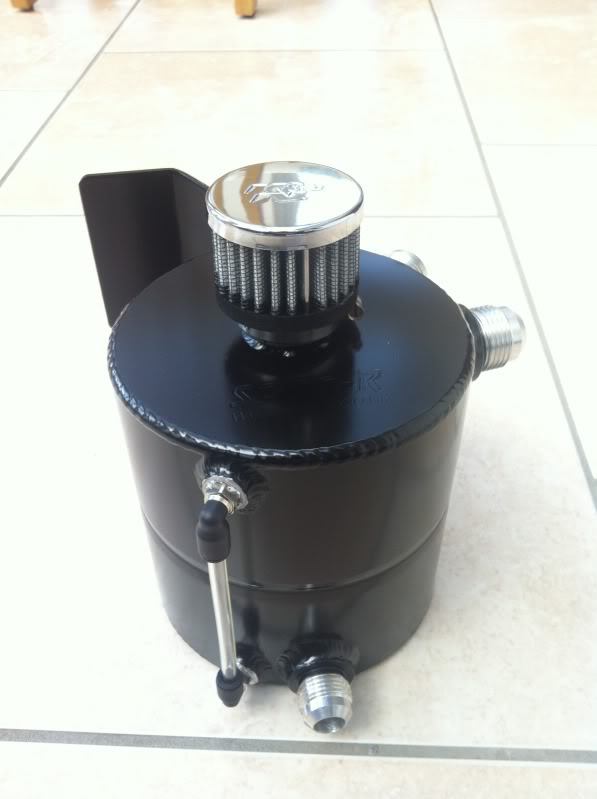
I'm very grateful to Pete at Spec R for his help and attention to detail. He was always willing to have a chat on the phone and his advice was most welcome. Considering the time and effort that went into it, I thought the price was very reasonable too. I can't recommend them highly enough.
As you can see this is 2x -12 inlets (1 per bank) and a -10 outlet for drain. In the future I could use this a sump return also. The tank is baffled and has a mini K&N filter on top. Well chuffed
I'll post some more pics of it when it's installed.
The prop has arrived from Dunning and Fairbank. These guys were also v helpful and cost was very reasonable too. Delivery time slipped a little bit over the quoted two weeks but no big deal. It was a shame they taped some of the packaging material to freshly painted prop tho as it took the paint off when I peeled it off, doh! Still a nice bit of kit though.
Now, with catch tank to go in, and the brake lines done it was time for yet more fittings and purchases to wilt my credit card! -12 stuff is pricey!
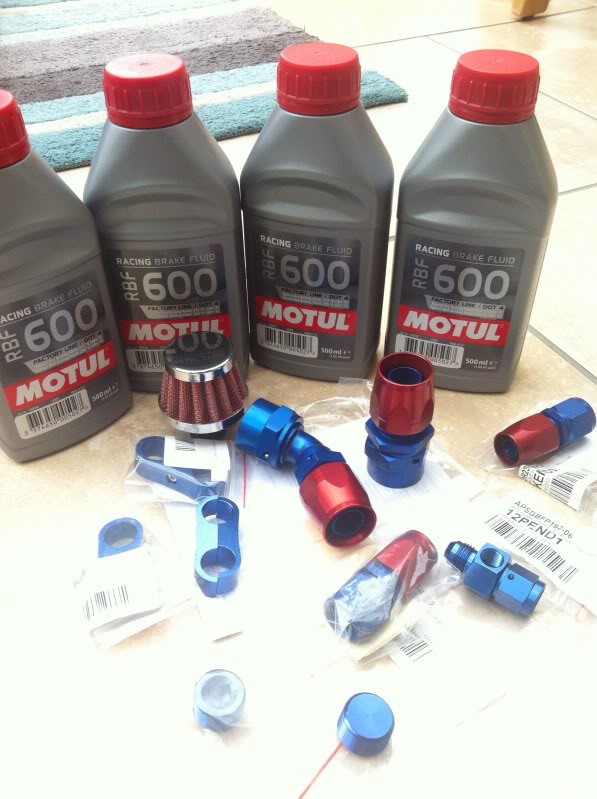
As you can see I plumped for motul RBF as it seems to be well rated and good value in quantities. I've got some -8 line separators for the oil cooler hoses. Some manifold blanks in there (still need to fit heater matrix hoses), there's -12 stuff for the catch tank, and a mini filter for the Jag diff...
I think that's about it for the moment. I hoping to drop some of these bits off with MDA today. I can sense I'm getting ever closer!
So to finish off, we've got to finish off the heater hoses, fuel line to the carb, pas lines, roll the rear arches.. Actually I'll stop writing a list in case it gets longer again!
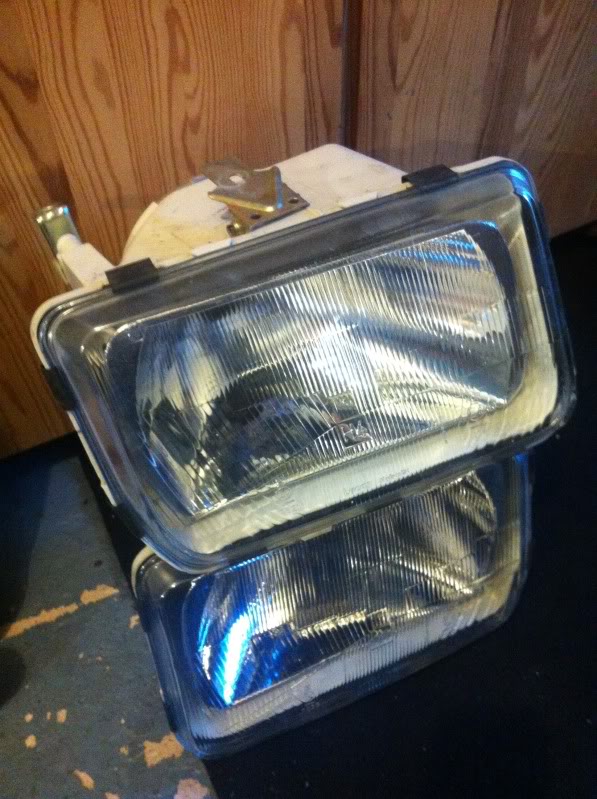
Oh, picked up some as new L model lights (Ł14!) which will allow some more air into the engine bay. In the future I might do some ducting to the air filter too..
Cheers for now,
Iain
Pedal box is in;
Lines are in;
Then reservoirs were fitted & plumbed in to the master cylinders;
Just clutch line to slave cylinder to go;
Went for -4 on the clutch as I read it gives a better pedal pressure. Time will tell.
I mentioned before, the clearance of the front arches had been done - this pic shows it well;
Heater matrix is back in. I lose the side vents due to the cage but Mat has been able to retain the screen demist vents and the central dash vents. I don't want a wet track day or an early start to be spoiled by a fogged up car!
You can see the roll cage behind the dash here;
This means the clocks won't fit back in the binnacle properly - mostly the speedo drive. I had RHD clocks in mine as after doing a very quick mph conversion to pass DVLA inspection originally, I thought I'd swap to some proper clocks. These had the speedo on the right instead of the left, but that wasn't a big problem. Now if I can make up a panel for the clocks I can relocate the speedo to the left, and bring the whole lot forward to help clear the roll cage bar.
I started by disassembling the clocks;
I then cut out a card template and shifted the speedo across.
If I can get away with a circular cut out then it'll match up to my VDO stuff well. Seeing the speedo isn't a high priority - just need it functioning for the MOT. I'll then place my rev counter slap bang in the middle. That should live room for some warning lights and maybe oil pressure or coolant temp gauge too.
I'll probably end up doing this in some thin alloy sheet, and fixing it into the binnacle. I've gained about 10cm behind the dash which should be enough to route the speedo cable ok.
Fuel reg is in;
PAS lines are next; need to look at mounting the reservoir somewhere nearby.
Oil cooler lines;
The new loom has arrived. I've invested in some new wire strippers and crimpers in anticipation!
The old loom wasn't that heavy, but this is half the weight again. Hopefully it's all there..
My Spec R oil catch tank has arrived as well! Very nice piece of work it is too
I'm very grateful to Pete at Spec R for his help and attention to detail. He was always willing to have a chat on the phone and his advice was most welcome. Considering the time and effort that went into it, I thought the price was very reasonable too. I can't recommend them highly enough.
As you can see this is 2x -12 inlets (1 per bank) and a -10 outlet for drain. In the future I could use this a sump return also. The tank is baffled and has a mini K&N filter on top. Well chuffed
I'll post some more pics of it when it's installed.
The prop has arrived from Dunning and Fairbank. These guys were also v helpful and cost was very reasonable too. Delivery time slipped a little bit over the quoted two weeks but no big deal. It was a shame they taped some of the packaging material to freshly painted prop tho as it took the paint off when I peeled it off, doh! Still a nice bit of kit though.
Now, with catch tank to go in, and the brake lines done it was time for yet more fittings and purchases to wilt my credit card! -12 stuff is pricey!
As you can see I plumped for motul RBF as it seems to be well rated and good value in quantities. I've got some -8 line separators for the oil cooler hoses. Some manifold blanks in there (still need to fit heater matrix hoses), there's -12 stuff for the catch tank, and a mini filter for the Jag diff...
I think that's about it for the moment. I hoping to drop some of these bits off with MDA today. I can sense I'm getting ever closer!
So to finish off, we've got to finish off the heater hoses, fuel line to the carb, pas lines, roll the rear arches.. Actually I'll stop writing a list in case it gets longer again!
Oh, picked up some as new L model lights (Ł14!) which will allow some more air into the engine bay. In the future I might do some ducting to the air filter too..
Cheers for now,
Iain
Last edited by IainRS1700T; 01-06-2013 at 11:12 AM.
 28-05-2013, 07:03 AM
#190
PassionFord Regular
Thread Starter
Thanks for your comments Gents, it's always very much appreciated!
I spent the day at the workshop yesterday so I've got an update here.
Mat had been busy in the week looking at front bumper fitment. Here it is mocked up into position.
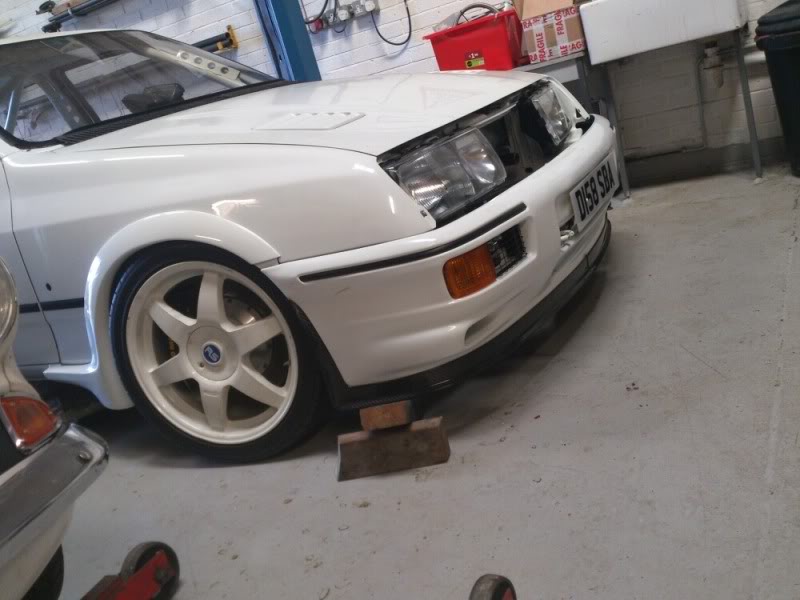
Quite a bit behind the carbon splitter and leading edge of the wheel aperture is trimmed so the tire doesn't hit anything on lock. Looks good now. It's spaced forward at the front too, which helps and is yet another common mod that was applied to the touring cars back in the day!
It will be bolted on at the side externally as the plastic plugs that normally hold it on are now miles away from the sockets that would normally do the job.
Staying at the front end, yesterday I fitted my new lights and the grill. Everything fitted very nicely. I gave the apertures a little polish up first - all nice and shiny in there still;
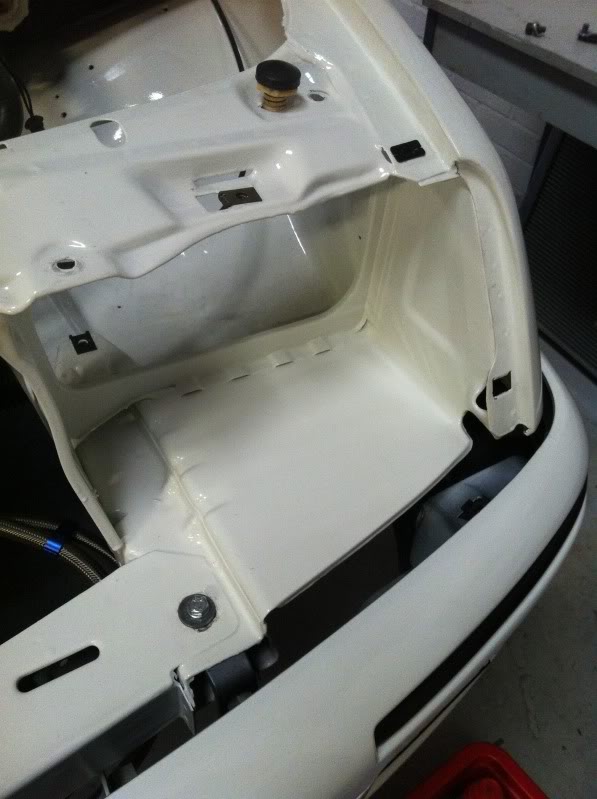
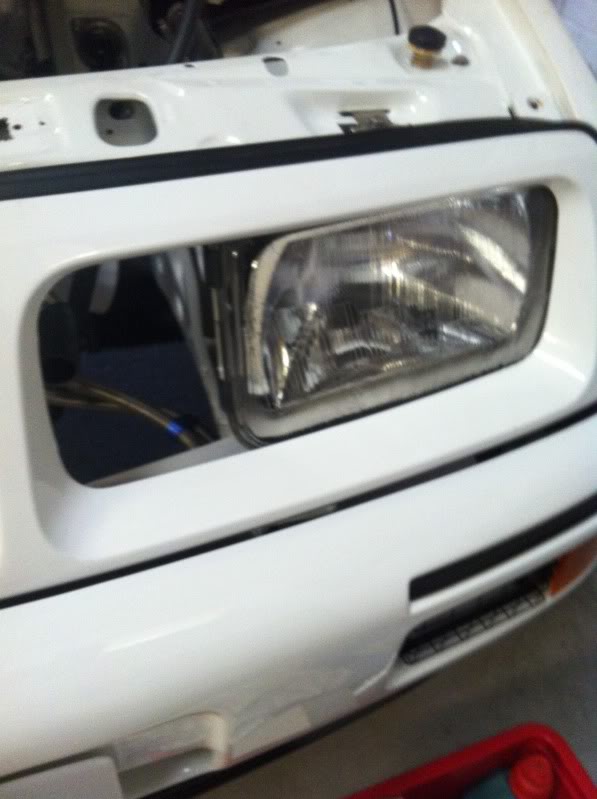
I'm pleased with how that turned out. I'll need to source some mesh to stop anything flying in there tho! Any ideas of appropriate mesh or fitting pls let me know - I've seen it done before but now can't find the info.
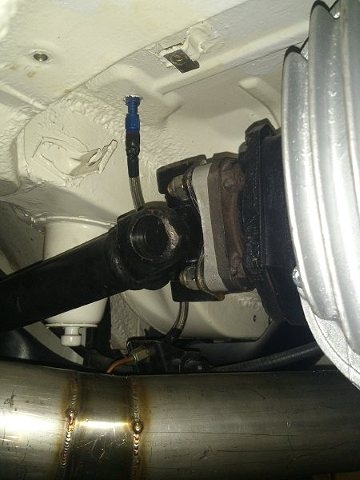
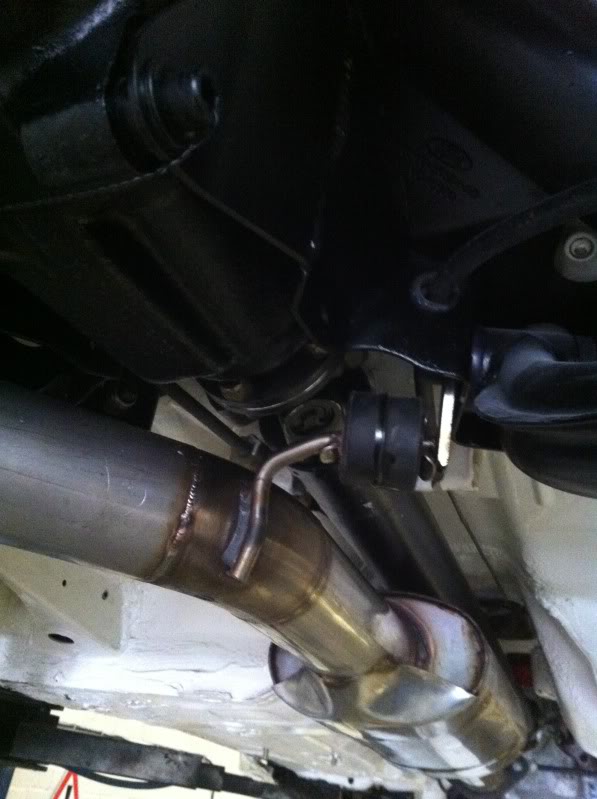
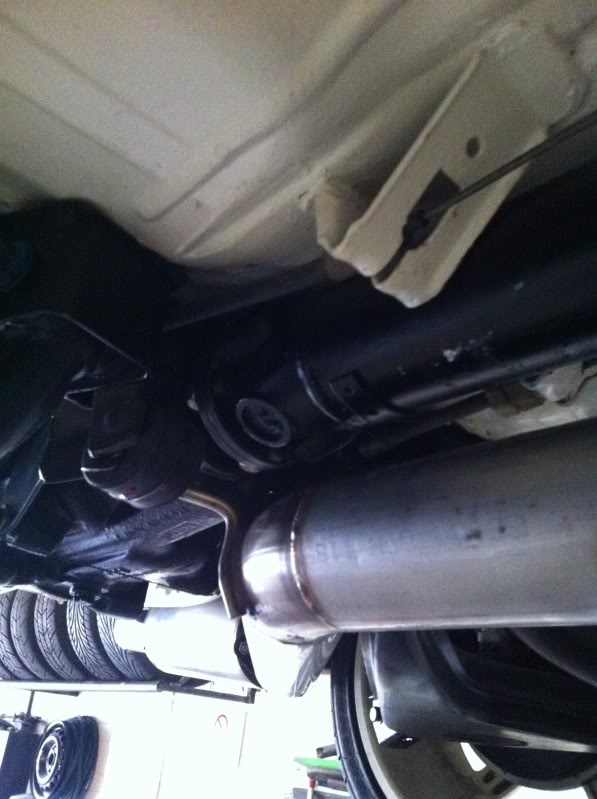
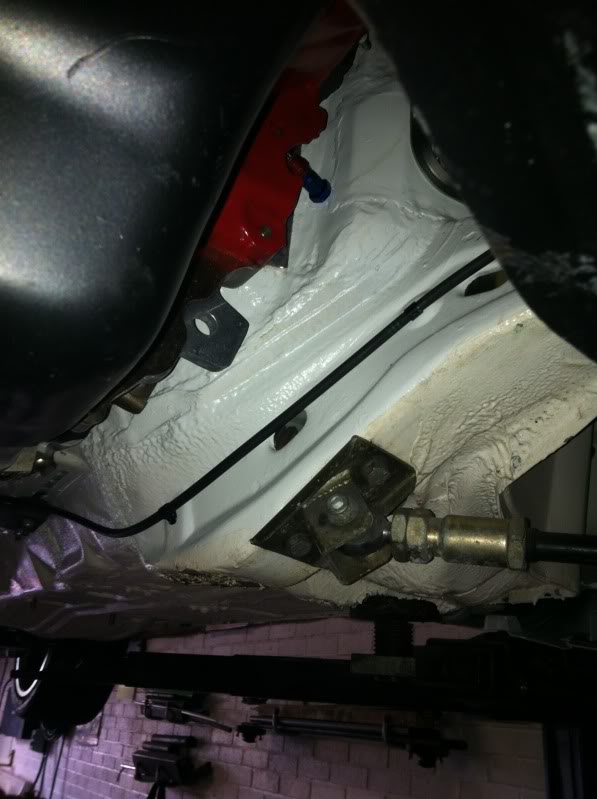
The prop is in:
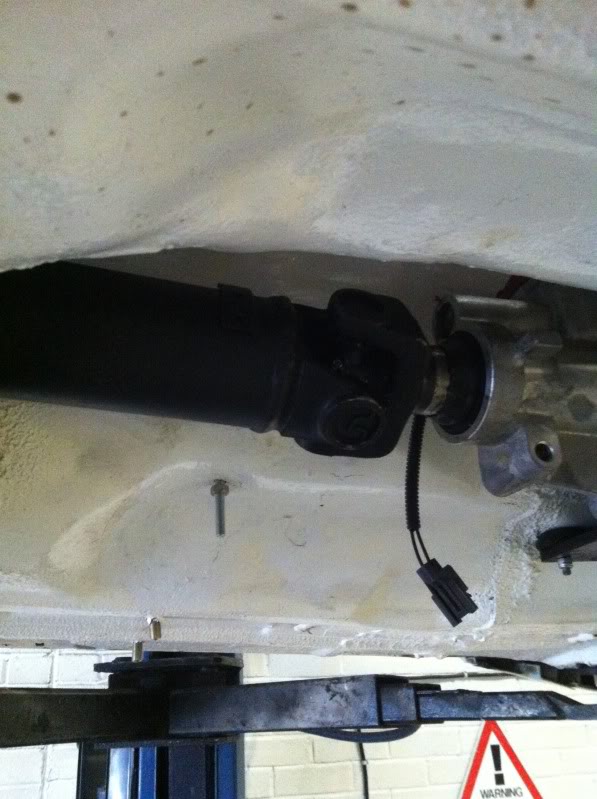
It was a bit of a squeeze above the centre section of the exhaust. Everything misses - just - but it's possible that the centre box might go anyway when the system is tweaked later on.
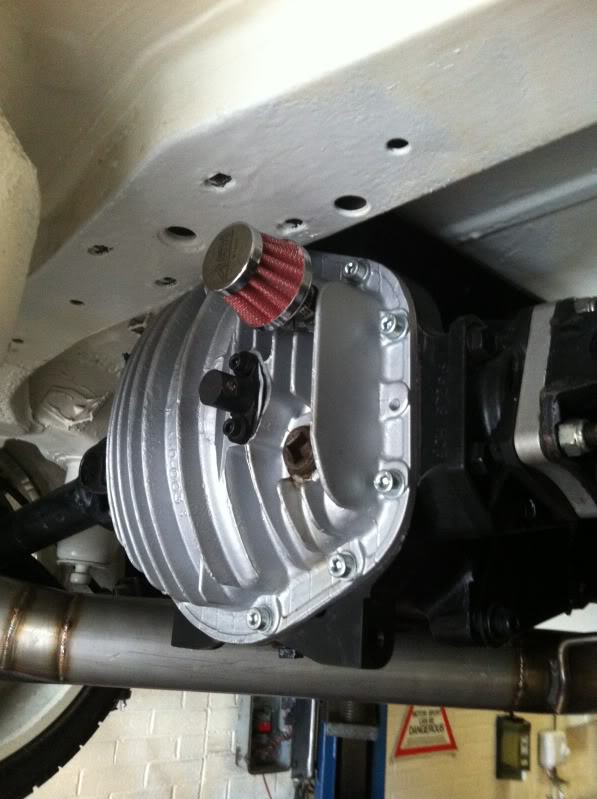
Mini diff breather on;
Fluids getting there;
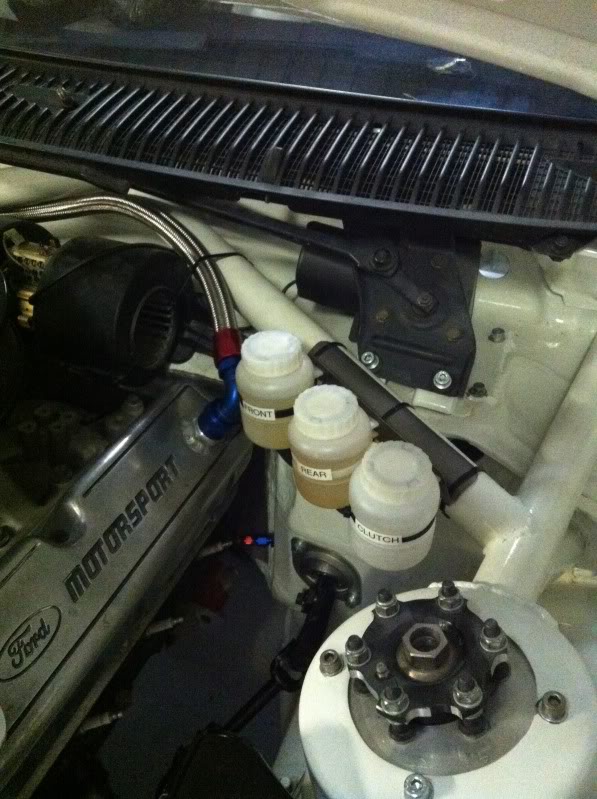
I've got a brake pedal! Yes!
Clutch is nearly there. On the pic above you can see the line into the bulkhead from the slave cylinder. I need to get a 45 deg from the other side to keep the line out of the way of the arms of the pedals en-route to the master cylinder.
My Spec R catch tank is in. S'cuse the picture quality - taking a pic of a black thing on a white background is a bit of a challenge for my phone!
This should give you an idea. You can see the two -12 inlets from the rocker covers; the sight tube; and the -10 blank for the drain. It's fixed on the strut in the bulkhead panel which I think is normally used for the sound insulation panel fixing.
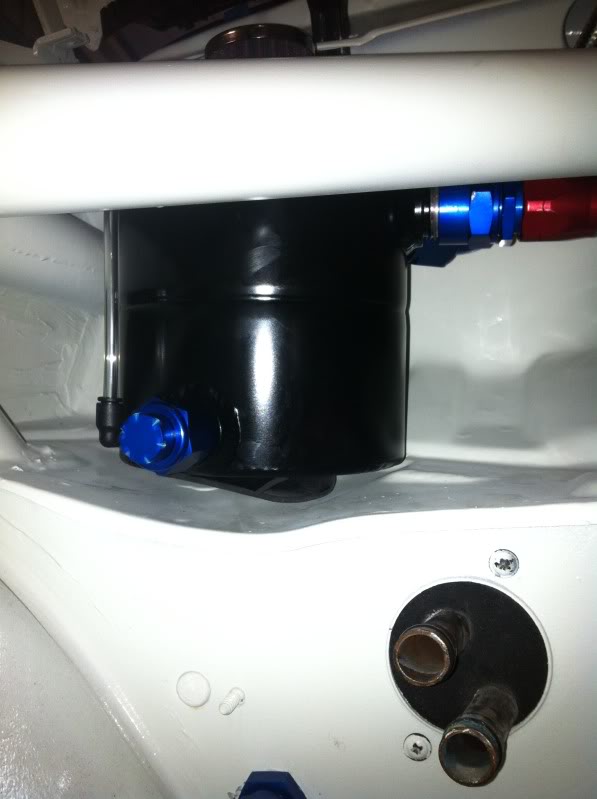
Mat's not ever so keen on the straight -12 you can see here, so we're going to swap it for a 45 deg.
The spare straight, plus another 90deg I've got are going to be recycled in the water/heater hoses. I spent ages yesterday sizing up manifold and water pump adaptors and for only a few pennies more I can make use of these nice fittings and spec things up a bit into the bargain. I'll update my progress on that one next time.
Had a bit of a win (I hope) when my old speedo cable from the C4 box appears to slot straight into the Tremec box. Just need to fab up a hold down clamp to keep it oil tight. We celebrated by clamping it down quick before we changed our minds!
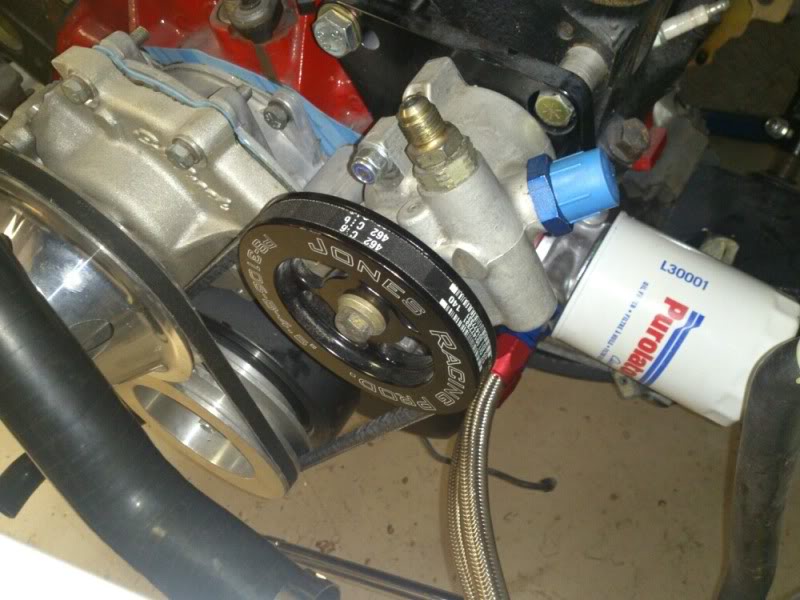
PAS is one of the bigger jobs to tackle. Mat sourced a belt which fits nicely (What was that off Mat?). But, we've found the tall US style fluid reservoir means its outlet is pretty low compared to the pump. We're going to try an OEM reservoir and see how that looks tucked up into the wing. That might lead to going oem on the low pressure feed hoses initially then if it works ok I'll be on the phone to Pete at Spec R again for an alloy one with matching AN fittings.
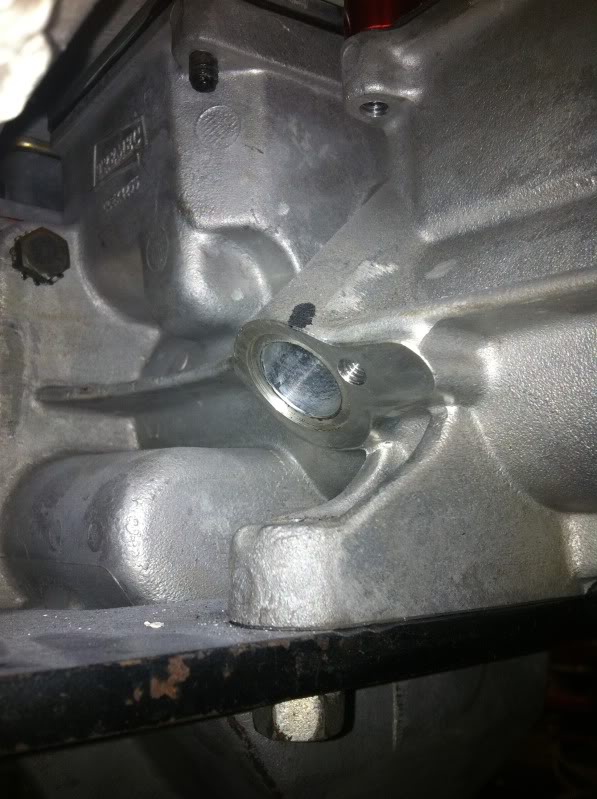
You can also see in this pic here the oil pressure and oil temp sender on the adapter in the block.
And lastly I spent some time playing with my gauge cluster. The template I made shows I can at least see the speedo. The tacho is going slap bang in the middle, so I should have a good view of that too. I'll shove some warning lights down the side and poss another gauge. The pic also shows my little gauge panel fitted from its previous incarnation.
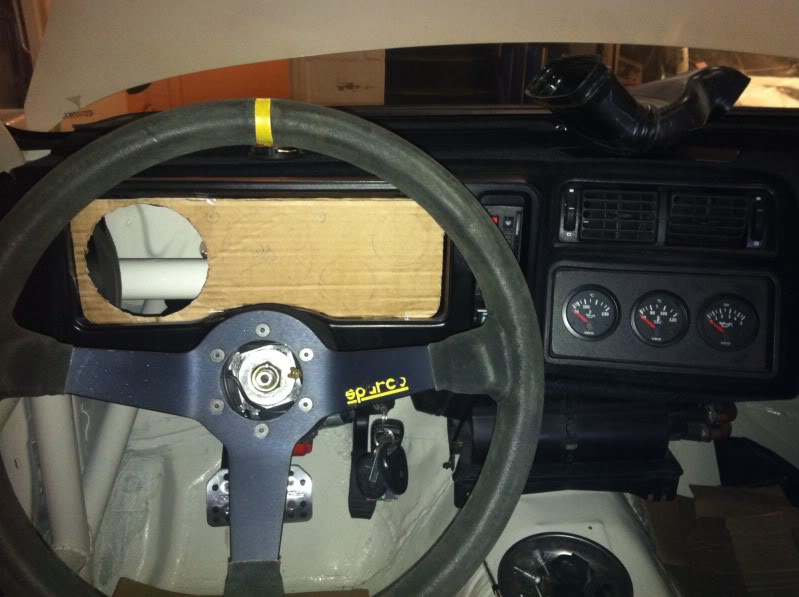
I'm halfway through the alloy panel for the dash so my next job is to finish that off and fit my clocks.
That's it for now. Thanks for reading!
Cheers
Iain
I spent the day at the workshop yesterday so I've got an update here.
Mat had been busy in the week looking at front bumper fitment. Here it is mocked up into position.
Quite a bit behind the carbon splitter and leading edge of the wheel aperture is trimmed so the tire doesn't hit anything on lock. Looks good now. It's spaced forward at the front too, which helps and is yet another common mod that was applied to the touring cars back in the day!
It will be bolted on at the side externally as the plastic plugs that normally hold it on are now miles away from the sockets that would normally do the job.
Staying at the front end, yesterday I fitted my new lights and the grill. Everything fitted very nicely. I gave the apertures a little polish up first - all nice and shiny in there still;
I'm pleased with how that turned out. I'll need to source some mesh to stop anything flying in there tho! Any ideas of appropriate mesh or fitting pls let me know - I've seen it done before but now can't find the info.
The prop is in:
It was a bit of a squeeze above the centre section of the exhaust. Everything misses - just - but it's possible that the centre box might go anyway when the system is tweaked later on.
Mini diff breather on;
Fluids getting there;
I've got a brake pedal! Yes!
Clutch is nearly there. On the pic above you can see the line into the bulkhead from the slave cylinder. I need to get a 45 deg from the other side to keep the line out of the way of the arms of the pedals en-route to the master cylinder.
My Spec R catch tank is in. S'cuse the picture quality - taking a pic of a black thing on a white background is a bit of a challenge for my phone!
This should give you an idea. You can see the two -12 inlets from the rocker covers; the sight tube; and the -10 blank for the drain. It's fixed on the strut in the bulkhead panel which I think is normally used for the sound insulation panel fixing.
Mat's not ever so keen on the straight -12 you can see here, so we're going to swap it for a 45 deg.
The spare straight, plus another 90deg I've got are going to be recycled in the water/heater hoses. I spent ages yesterday sizing up manifold and water pump adaptors and for only a few pennies more I can make use of these nice fittings and spec things up a bit into the bargain. I'll update my progress on that one next time.
Had a bit of a win (I hope) when my old speedo cable from the C4 box appears to slot straight into the Tremec box. Just need to fab up a hold down clamp to keep it oil tight. We celebrated by clamping it down quick before we changed our minds!
PAS is one of the bigger jobs to tackle. Mat sourced a belt which fits nicely (What was that off Mat?). But, we've found the tall US style fluid reservoir means its outlet is pretty low compared to the pump. We're going to try an OEM reservoir and see how that looks tucked up into the wing. That might lead to going oem on the low pressure feed hoses initially then if it works ok I'll be on the phone to Pete at Spec R again for an alloy one with matching AN fittings.
You can also see in this pic here the oil pressure and oil temp sender on the adapter in the block.
And lastly I spent some time playing with my gauge cluster. The template I made shows I can at least see the speedo. The tacho is going slap bang in the middle, so I should have a good view of that too. I'll shove some warning lights down the side and poss another gauge. The pic also shows my little gauge panel fitted from its previous incarnation.
I'm halfway through the alloy panel for the dash so my next job is to finish that off and fit my clocks.
That's it for now. Thanks for reading!
Cheers
Iain
Last edited by IainRS1700T; 01-06-2013 at 11:28 AM.
 28-05-2013, 09:36 AM
#192
PassionFord Regular
Thread Starter
Hi Mark,
Cheers mate.
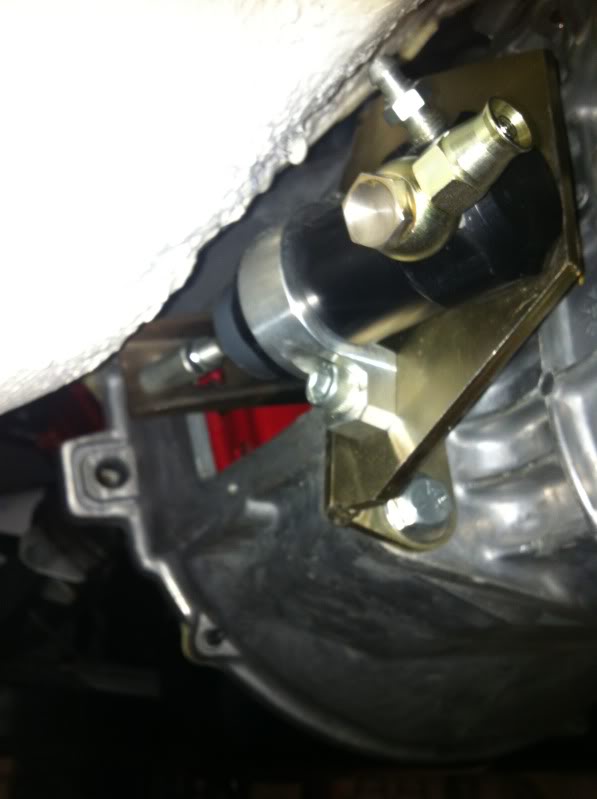
There's not a diff mount in the Cosworth sense (off the back of the diff cover). If you check out some of the earlier pics you'll see it's fixed through the floor to the roll cage via the four big bolts on top of the diff case (and of course to the rear beam.)
Most of the associated components are solid mounted through there (beam, gearbox etc).
I don't need any road car comfort, (nvh) and circuit use will mean not so much in terms of launches etc.
Cheers
Iain
Cheers mate.
There's not a diff mount in the Cosworth sense (off the back of the diff cover). If you check out some of the earlier pics you'll see it's fixed through the floor to the roll cage via the four big bolts on top of the diff case (and of course to the rear beam.)
Most of the associated components are solid mounted through there (beam, gearbox etc).
I don't need any road car comfort, (nvh) and circuit use will mean not so much in terms of launches etc.
Cheers
Iain
29-05-2013, 10:41 AM
#194
PassionFord Regular
Thread Starter
Thanks Si. The end is in sight - well at least until I get some crimpers in my hands and attempt to put some electrics in - the timeline might shift a bit then..!
Any joy with your search for your next project?
Cheers
Iain
Any joy with your search for your next project?
Cheers
Iain
29-05-2013, 07:09 PM
#195
Wahay!! I've lost my Virginity!!

love this iain mate you no ya stuff, why the rs look tho. im picking up me xr4i tommorow but im turning it into a base model look wise as i love the standard 3dr look with a proper set of wheels and some lows. too many 3 door cossies about now, every show i go to now is swamped in 3 doors. great build anyway bro love it
30-05-2013, 10:49 AM
#197
PassionFord Regular
Thread Starter
love this iain mate you no ya stuff, why the rs look tho. im picking up me xr4i tommorow but im turning it into a base model look wise as i love the standard 3dr look with a proper set of wheels and some lows. too many 3 door cossies about now, every show i go to now is swamped in 3 doors. great build anyway bro love it
I went for the Cossie look because I love homologated gp A and gp B cars. Anything from circuit racers like the Sierra, to M3's and 190 evo's; and the rally car stuff too. I've been fortunate to own an Integrale in the past as well. If I ever hit the lottery jackpot I'd have a collection of the lot of them for certain!
There's a cracking red 3dr with a 302 v8 in it, done in a base model style which looks great. As I'm now in track day mode I'm pushed in certain directions tho: bigger wheels to accommodate bigger brakes; they need arches to cover them and so on. And here I am. I think a sleeper would look great on the road, but I'm happy going the cossie route on track.
Cheers
Iain
30-05-2013, 10:54 AM
#198
PassionFord Regular
Thread Starter
That side of things depends on two things at this point; I need to modify the driver's side manifold to avoid the steering column linkage, and I need to sort some electrics out otherwise I'll be lacking in the fuel and spark department!
That last bit might take me a while as I'll be back on the driveway by then I reckon. When MDA have finished with it, we'll whizz it up to JP Exhausts in Macclesfield to sort the manifold out. Then when it's back with me it'll be wiring and trim to finish.
How's it going with yours?
Cheers
Iain