H686 ODA Sapphire Cosworth Fast road/Track
 23-09-2010, 10:13 AM
#1
Advanced PassionFord User
Thread Starter
Well!!!!!!!!!!!!!
Im bored of H380 TBV!
https://passionford.com/forum/restor...or-2010-a.html
So im starting work on my new toy H686 ODA, its another Sapphire Cosworth! YES I DO LOVE THEM.
The plan is fast road/ track, cossie power.
It a 4x4 shell but im going to run it RWD,
I have bags full of ideas for it but the main aim is :
Rally styling and prep.
Striped out stitch welded, cage
arches rolled and flared like rally sapphires
polly brushed and coilovers
polly windows
two bucket seats + harniesses
escort cosworth monte rims 16"
colour scheme frozen white and piano black on the plastics
running in 2wd form with a mix and full cossie setup IE suspenion and running gear!
Pic to follow!
Last edited by James_RScos; 09-11-2011 at 11:47 AM.
 23-09-2010, 10:13 AM
#2
Advanced PassionFord User
Thread Starter
Car as it stands full rolling but striped out ready for prepping.

Door are getting cut out for lightness, will have some nice covers to go over them + polly windows with sliders

Engine bay stripped out ready for prep!

Inside stripped out ready to remove sound deadening

Bucket seat

Thats all for now!!
Iv got some engine bits coming this week!!
2L pinto engine
205 bottom end
205 pinto efi + engine loom and ecu
type 9 gearbox!!
watch this space!!
James.
Door are getting cut out for lightness, will have some nice covers to go over them + polly windows with sliders
Engine bay stripped out ready for prep!
Inside stripped out ready to remove sound deadening
Bucket seat
Thats all for now!!
Iv got some engine bits coming this week!!
2L pinto engine
205 bottom end
205 pinto efi + engine loom and ecu
type 9 gearbox!!
watch this space!!
James.
23-09-2010, 11:27 AM
#3
Part of the Furniture

Join Date: Nov 2008
Location: x
Posts: 197
Likes: 0
Received 0 Likes
on
0 Posts
You can't fool me James - that IS H380 TBV, you just tinkered and messed with it so much, not knowing when to stop, went too far and made a right mess of it (think Father Ted when he tries to tap that small dent out LOL!)
Only joking bud - I can visualise the car from what you've said in the plans for it and it sounds superb mate. Best of luck and look forward to seeing it progress. If your other Saph is anything to go my it'll be fantastic
Only joking bud - I can visualise the car from what you've said in the plans for it and it sounds superb mate. Best of luck and look forward to seeing it progress. If your other Saph is anything to go my it'll be fantastic
24-09-2010, 01:02 PM
#7
Too many posts.. I need a life!!
iTrader: (3)

Join Date: Nov 2009
Location: suffolk
Posts: 566
Likes: 0
Received 0 Likes
on
0 Posts
Welcome to the slipply slop in to the money pit 
Tell me more about the "arches rolled and flared like rally sapphires" got any pics
I'm going to national day mite bump in to you
brett
Tell me more about the "arches rolled and flared like rally sapphires" got any pics
I'm going to national day mite bump in to you
brett
Trending Topics
24-09-2010, 02:12 PM
#8
Advanced PassionFord User
Thread Starter


U like?
Im not sure weather its more a tarmac spec thing!! a friend of mine has an EX RED shell and that has the same done to the arches!!
i must looks hard as FOOOOOOK!!!
James.
27-09-2010, 09:28 AM
#10
Advanced PassionFord User
Thread Starter
Update.
Sorry about the picture quality i will start using my camrera again, but its so easy to pick up the iphone HA!
Saturday was a great day for playing with the shell, my mate Mark popped down and wanted to help and asked if he could remove the sound deadening HAHA so i said crack on know what a crap job it is to do, WELL three hours later WELL DONE Mark is all im saying!


I attended to finishing off the cutting out of the door and removing the glass.


The doors are cut out rough for now, when i remove them for painting i will put the side by side and profile them so they are cut out the same and look right!!
Plan for the doors is cleaned inside and painted white like the rest of the car then i will run a rubber bead round the edges to smarten them up, and poly windows.
I also started smoothing the back bumper with Fibre filler, so i roughed all the areas to be filled and started filling and sanding, next will be a skim of filler then stopper over that ready for paint.
Thats all for now.
James.
Sorry about the picture quality i will start using my camrera again, but its so easy to pick up the iphone HA!
Saturday was a great day for playing with the shell, my mate Mark popped down and wanted to help and asked if he could remove the sound deadening HAHA so i said crack on know what a crap job it is to do, WELL three hours later WELL DONE Mark is all im saying!
I attended to finishing off the cutting out of the door and removing the glass.
The doors are cut out rough for now, when i remove them for painting i will put the side by side and profile them so they are cut out the same and look right!!
Plan for the doors is cleaned inside and painted white like the rest of the car then i will run a rubber bead round the edges to smarten them up, and poly windows.
I also started smoothing the back bumper with Fibre filler, so i roughed all the areas to be filled and started filling and sanding, next will be a skim of filler then stopper over that ready for paint.
Thats all for now.
James.
28-09-2010, 07:46 AM
#12
Advanced PassionFord User
Thread Starter
04-10-2010, 02:55 PM
#13
Advanced PassionFord User
Thread Starter
Update time!
This weekend i did alot of body work, and collected some parts!
So lots of smoothing going on!
Roof strippes


Rear quarter plastics


Panels in Stopper


Started flatting the car down


Bumper being smoothed

Bonnet vents being rubbed down

On Sunday i collected some 2wd rear end components
2wd LSD 7 1/2" diff and drive shafts

2wd beam

Hubs and Flanges

Diff opened and teeth checked, all good

Drive shafts stripped down in bits ready to be broken down more fdor refurb

Battery tray cut out

Where the tray was, battery will be in rear of car now behind passenger

All scuttle wall brackets removed and bolt studs and clips removed!

All studs and brackets removed from the insdie of the car too

Got a new DA this morning as the other one was playing up so will finished flatting the car down!!
Also removed more waxoil from inside the doors
Ordered some Polycarbinate sheets to make my side windows out of yes that plastic windows
More to come later this week.
James.
This weekend i did alot of body work, and collected some parts!
So lots of smoothing going on!
Roof strippes
Rear quarter plastics
Panels in Stopper
Started flatting the car down
Bumper being smoothed
Bonnet vents being rubbed down
On Sunday i collected some 2wd rear end components
2wd LSD 7 1/2" diff and drive shafts
2wd beam
Hubs and Flanges
Diff opened and teeth checked, all good
Drive shafts stripped down in bits ready to be broken down more fdor refurb
Battery tray cut out
Where the tray was, battery will be in rear of car now behind passenger
All scuttle wall brackets removed and bolt studs and clips removed!
All studs and brackets removed from the insdie of the car too
Got a new DA this morning as the other one was playing up so will finished flatting the car down!!
Also removed more waxoil from inside the doors
Ordered some Polycarbinate sheets to make my side windows out of yes that plastic windows
More to come later this week.
James.
 no messing about james
 12-10-2010, 02:27 PM
#17
Advanced PassionFord User
Thread Starter
Cheers all
Update time!!
I had the 7th - 10th off work and all four days where hard on the project.
Lots done, i will let the photos do most the talking.
We have Polycarbinate windows, made them myself, easy as....


Finished flatting the car in 400 ready for paint

Bonnet not far off

Other side little more work to do

Boot prepped but a little work to do around the spoiler holes

Boot lid off and boot cleaned out ready for de-seem sealering

Started cleaning the engine bay up and smoothing it off

Front Screen out

Dash keyed up

My first go at welding, not bad i think!! slam panel getting smoothed


Petrol Filler cap plated and smoothed(first skim)

Bumper smoothing


Slam panel smoothing

Battery tray welded up ready for grinding

Dash skimmed with stopper

Started cleaing the seem sealer off the seems for stitch welding

More to come soon, James.
Update time!!
I had the 7th - 10th off work and all four days where hard on the project.
Lots done, i will let the photos do most the talking.
We have Polycarbinate windows, made them myself, easy as....
Finished flatting the car in 400 ready for paint
Bonnet not far off
Other side little more work to do
Boot prepped but a little work to do around the spoiler holes
Boot lid off and boot cleaned out ready for de-seem sealering
Started cleaning the engine bay up and smoothing it off
Front Screen out
Dash keyed up
My first go at welding, not bad i think!! slam panel getting smoothed
Petrol Filler cap plated and smoothed(first skim)
Bumper smoothing
Slam panel smoothing
Battery tray welded up ready for grinding
Dash skimmed with stopper
Started cleaing the seem sealer off the seems for stitch welding
More to come soon, James.
 13-10-2010, 09:36 AM
#20
Advanced PassionFord User
Thread Starter
Cheers All,
Just thougth people maybe interested in my thinking and inspiration behind this project!
Well most of them are restless nights and sweet dreams, but the other 80% is my love of Fords Sierra's of course, and also my love of Rallying and Sierra's mixed into the bag.
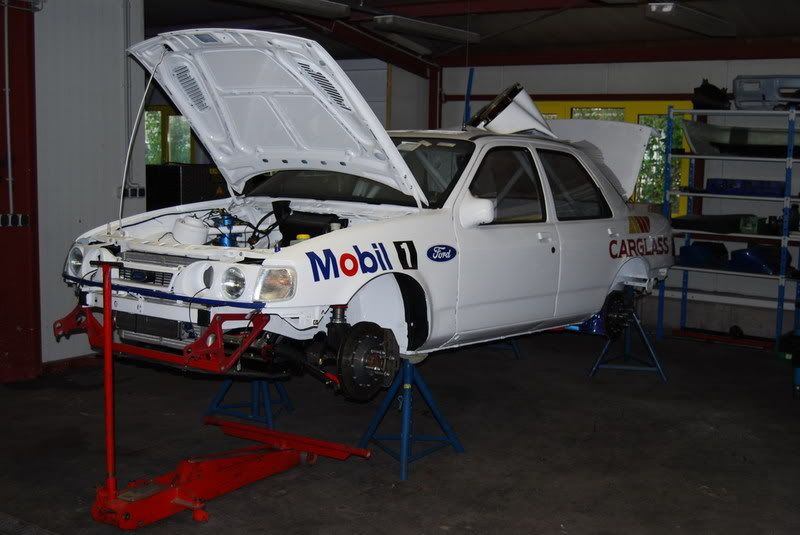
Couple of famous Ford Sapphire Cosworth Rally cars for you all.
The Q8 Car

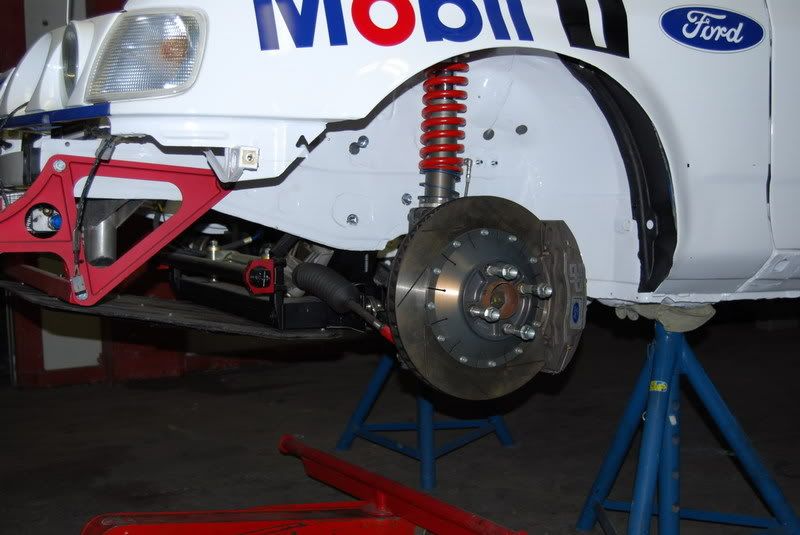
The Carglass Car


On the second photo of the carglass car, notice the front arch is rolled and flared, that is what i would like to achieve with mine.
These are insane cars and my wildest dreams, my inspirations i love to just look at rally cars that have been build properly and by Engineers, some of the details and the engineering that goes into the cars is mind blowing, Ford are good but Audi are proberbly one of the best i would say!
For anyone interested this video is very informative about Fords production of the Q8 and Autoglass cars in the 1990 season and there driver line ups with some interesting info!
YouTube - Ford Works Rally Team 1990....[/url]
James.
Just thougth people maybe interested in my thinking and inspiration behind this project!
Well most of them are restless nights and sweet dreams, but the other 80% is my love of Fords Sierra's of course, and also my love of Rallying and Sierra's mixed into the bag.
Couple of famous Ford Sapphire Cosworth Rally cars for you all.
The Q8 Car
The Carglass Car
On the second photo of the carglass car, notice the front arch is rolled and flared, that is what i would like to achieve with mine.
These are insane cars and my wildest dreams, my inspirations
For anyone interested this video is very informative about Fords production of the Q8 and Autoglass cars in the 1990 season and there driver line ups with some interesting info!
YouTube - Ford Works Rally Team 1990....[/url]
James.

 19-10-2010, 12:20 PM
#22
Advanced PassionFord User
Thread Starter
UPDATE TIME!
Ok borrowed an arch roller this weekend, and iv master the dark art of arch rolling and flaring.
Back arch wearing an Escort Cosworth Monte Carlo Alloy

Front


Welded all the small holes up in the front inner arch and ground back

Same on Battery tray but this may get cut out and a new bit of metal welded in yet!
My mate Lee continued removing the Seam Sealer bloody stuff!


Gunked and jet washed me block!

More soon :+
Ok borrowed an arch roller this weekend, and iv master the dark art of arch rolling and flaring.
Back arch wearing an Escort Cosworth Monte Carlo Alloy
Front
Welded all the small holes up in the front inner arch and ground back
Same on Battery tray but this may get cut out and a new bit of metal welded in yet!
My mate Lee continued removing the Seam Sealer bloody stuff!
Gunked and jet washed me block!
More soon :+


 09-02-2011, 10:17 AM
#29
Advanced PassionFord User
Thread Starter
Right!
This projects been moving forward, just havent had time to write it up sadly.
My workshop has had a bit of a cleanup and a lick of paint (white) so everythings looking clean again
Ok, first of all, my roll cage is on order from Rollcentre in cambrigde

That is the design iv gone for with one little mod! the main hoop has a horizontal bar in it, iv gone for a diagnol.
Its a full weld in 8 point cage and comes with all the mounting plates for the floor.
Hoping it will be here in the next couple of weeks.
The porject its self is coming together, the shell is now fully stitch welded in the cockpit, engine bay and boot, me and some mates that also have project have just made a spit between us at a cost of �40, its made from 40mm box so very strong.


On the car, Xmas day i got bored and felt like crap layed around the house, so i popped down the workshop for a couple of hours and cut my boot floor out as you do ha!

Couple of repairs around that area, i then made the new flat boot floor.

This is placed in and spot welded.

The spot where half an inch from the edge and 2 inches with an 8mm drill bit used to make the holes, once the floor had cooled i primed the bare metal and ran seam sealer round the edge then primed again once dry.
Iv started work on part of the firewall, this is the pacel shelf part.

The hindges for the boot come up into this area so some small recesses where made for the hindges to go in, i also had a problem that the hindges bolted on from the top so if i ever needed to remove them i would have to start taking all my firewall apart! so i reversed the captive nut to the top and the hindges now bolt on from below.


These have since been ground down and a small smeer of stopper ran round the edges, just need to sand it back.
I have cut out my slam panel, the ends have now got a plate welded on and smoothed, just need to get a bit of box to fill it and fit it up, for easy engine removal!
My battery try has been cut out again as i wanted happy with it at all!
Finished all the filling!
I hope to be having a carbon fibre roof made up so i can cut my sunroof and metal roof cut, this will also help the centre of gravity, and bring the side to side pitch of the car right down to a minimum.
Front doors are off and being de-greased in the final stages before paint.
Floor has been repaired where holes where and ground back.
Next big step is to turn the car on the spit and clean the underneath of and fix anything untoward.
More updates soon, its getting interresting now
James.
This projects been moving forward, just havent had time to write it up sadly.
My workshop has had a bit of a cleanup and a lick of paint (white) so everythings looking clean again
Ok, first of all, my roll cage is on order from Rollcentre in cambrigde
That is the design iv gone for with one little mod! the main hoop has a horizontal bar in it, iv gone for a diagnol.
Its a full weld in 8 point cage and comes with all the mounting plates for the floor.
Hoping it will be here in the next couple of weeks.
The porject its self is coming together, the shell is now fully stitch welded in the cockpit, engine bay and boot, me and some mates that also have project have just made a spit between us at a cost of �40, its made from 40mm box so very strong.
On the car, Xmas day i got bored and felt like crap layed around the house, so i popped down the workshop for a couple of hours and cut my boot floor out as you do ha!
Couple of repairs around that area, i then made the new flat boot floor.
This is placed in and spot welded.
The spot where half an inch from the edge and 2 inches with an 8mm drill bit used to make the holes, once the floor had cooled i primed the bare metal and ran seam sealer round the edge then primed again once dry.
Iv started work on part of the firewall, this is the pacel shelf part.
The hindges for the boot come up into this area so some small recesses where made for the hindges to go in, i also had a problem that the hindges bolted on from the top so if i ever needed to remove them i would have to start taking all my firewall apart! so i reversed the captive nut to the top and the hindges now bolt on from below.
These have since been ground down and a small smeer of stopper ran round the edges, just need to sand it back.
I have cut out my slam panel, the ends have now got a plate welded on and smoothed, just need to get a bit of box to fill it and fit it up, for easy engine removal!
My battery try has been cut out again as i wanted happy with it at all!
Finished all the filling!
I hope to be having a carbon fibre roof made up so i can cut my sunroof and metal roof cut, this will also help the centre of gravity, and bring the side to side pitch of the car right down to a minimum.
Front doors are off and being de-greased in the final stages before paint.
Floor has been repaired where holes where and ground back.
Next big step is to turn the car on the spit and clean the underneath of and fix anything untoward.
More updates soon, its getting interresting now
James.
 11-02-2011, 01:21 PM
#32
Advanced PassionFord User
Thread Starter
Little update:
last night i visited one of my inspirational friends!
We talked at lengh on the suspension setup of my car, the setup has been choosen.
4 point linked rear end with diff frame.
Ajustable front end with a single link from the ARB mounts.
So along the lines of WRC spec.
This is going to be fun
Working on the project this sunday, so updates monday i hope.
Cheers all.
14-02-2011, 11:17 AM
#33
Advanced PassionFord User
Thread Starter
Right!
Update time, wasnt an overly active weekend on the road, just a nice steady pace!
My mate Mr Ward was on hand to help out, cheers mate.
Did a bit of sanding of filter in the engine bay and on the firewall shelf.


Still a little more work to do there!
Made a strenghening bar to support the firewall.

Started cutting out the main part of the firewall, still need to fine tune the shape at the bottom, then when the cage is installed i will cut the firewall in half, once i have the measurements for where the rear stays are coming through from the rear struts to the main hoop, this will then allow me to cut out half moons on the firewall and fit it around the cage perfectly, that why there is a massive overhang at the top of the firewall, so i can overlap the two peaces of the firewall and pop rivet them together.

View from the side of the firewall, i have left the holes at the side for running fuel lines and loom through.

Started cleaning up the insdie of the door for painting and also matching the shape of the cut out so they look the same.
Thats all for this week, going to try and measure car up for the spit tonight and make the supports to clap to the car, next weekend im hoping to have the car on its side!
James.
Update time, wasnt an overly active weekend on the road, just a nice steady pace!
My mate Mr Ward was on hand to help out, cheers mate.
Did a bit of sanding of filter in the engine bay and on the firewall shelf.
Still a little more work to do there!
Made a strenghening bar to support the firewall.
Started cutting out the main part of the firewall, still need to fine tune the shape at the bottom, then when the cage is installed i will cut the firewall in half, once i have the measurements for where the rear stays are coming through from the rear struts to the main hoop, this will then allow me to cut out half moons on the firewall and fit it around the cage perfectly, that why there is a massive overhang at the top of the firewall, so i can overlap the two peaces of the firewall and pop rivet them together.
View from the side of the firewall, i have left the holes at the side for running fuel lines and loom through.
Started cleaning up the insdie of the door for painting and also matching the shape of the cut out so they look the same.
Thats all for this week, going to try and measure car up for the spit tonight and make the supports to clap to the car, next weekend im hoping to have the car on its side!
James.
14-02-2011, 03:34 PM
#35
PassionFord Post Whore!!
Fantastic matey, plenty of neat work done there
16-02-2011, 11:37 AM
#38
Advanced PassionFord User
Thread Starter