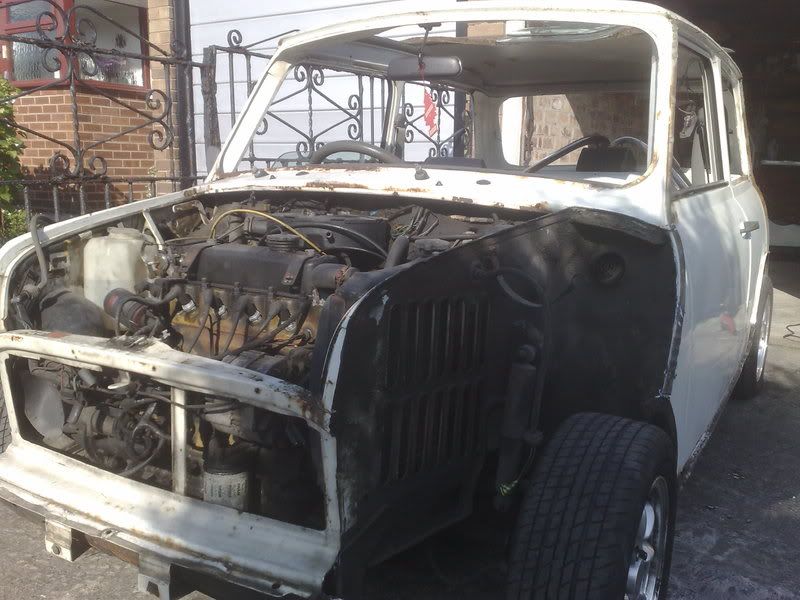
1.8 Vauxhall Powered Mini Track Car Build- Engine in 24-10
 23-05-2008, 10:52 AM
#1
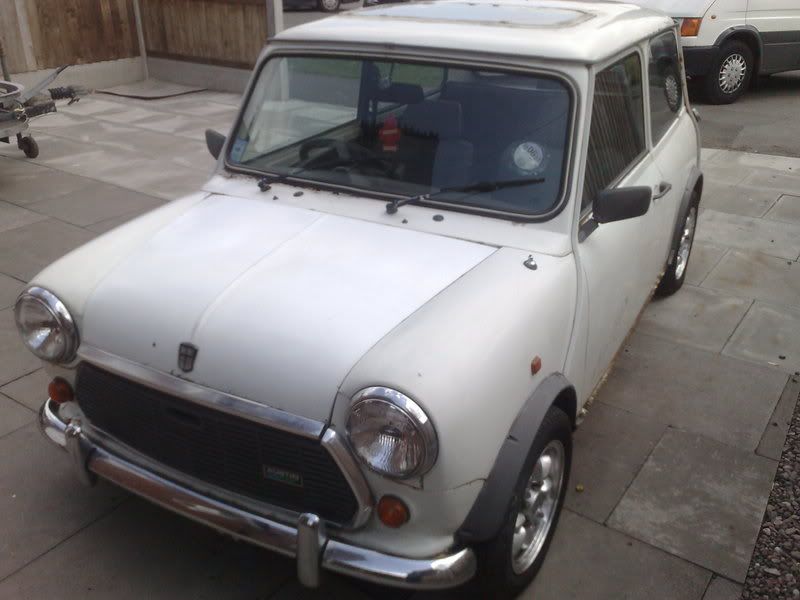
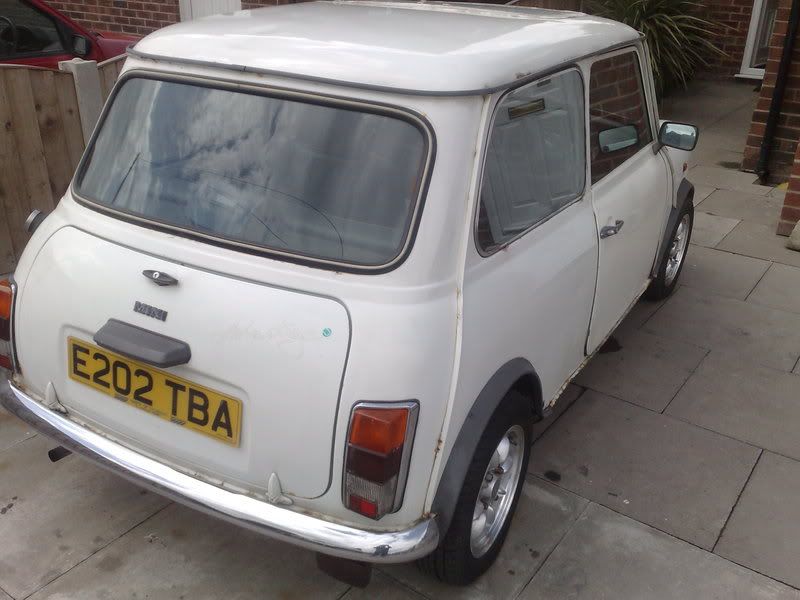
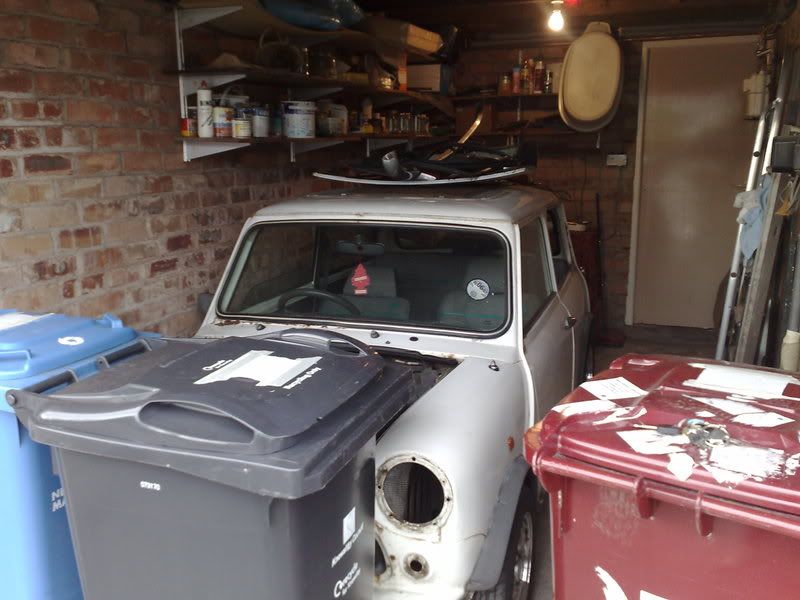
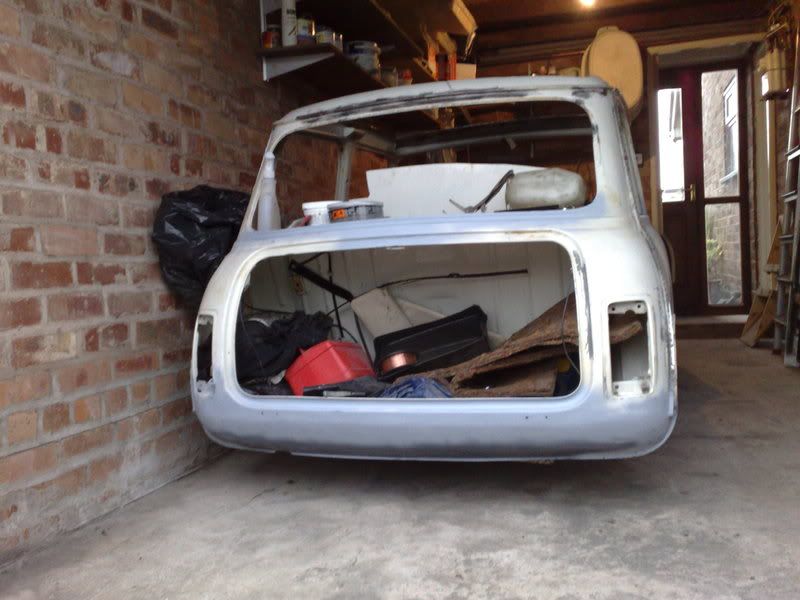
Had a tiny amount of spare cash burning a hole in my pocket so i had a rummage round ebay and picked this little beauty up from Bolton on Saturday, Its going to be a slow going project as it is just to keep me entertained when we have a quiet/cheap spell with the rallying.
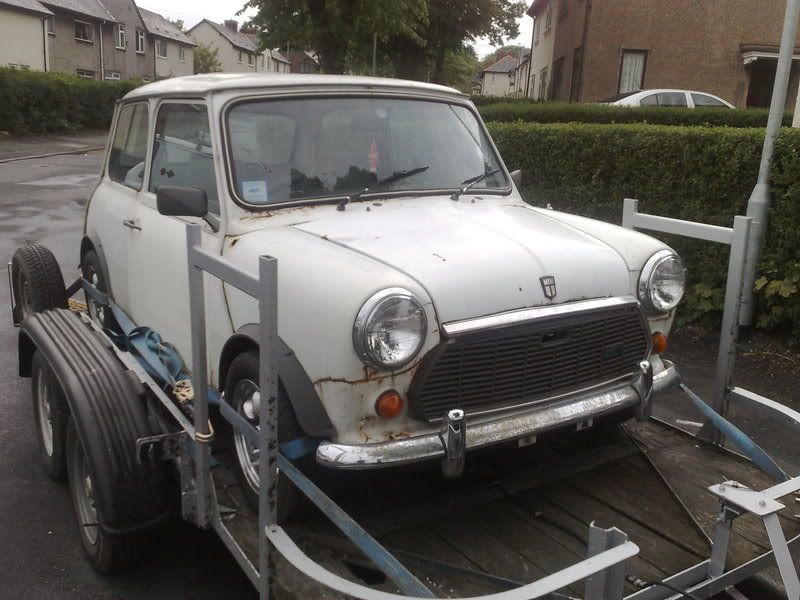
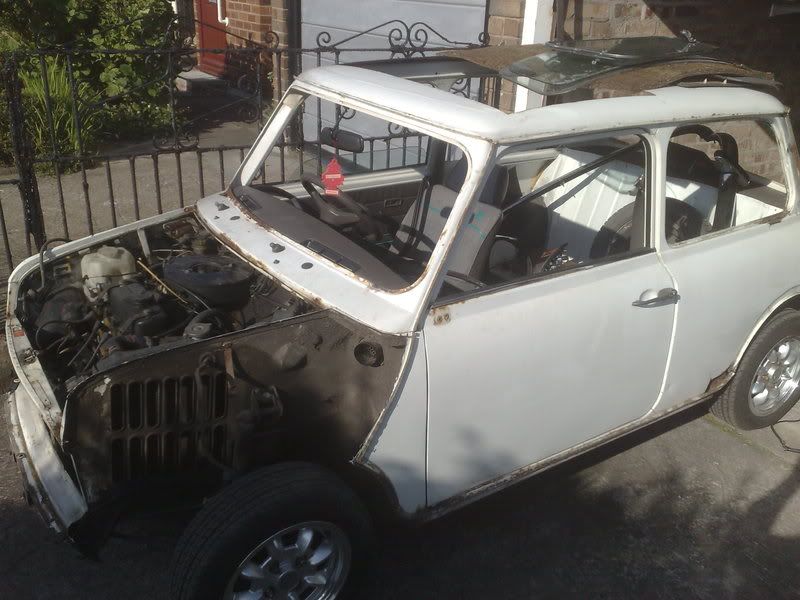
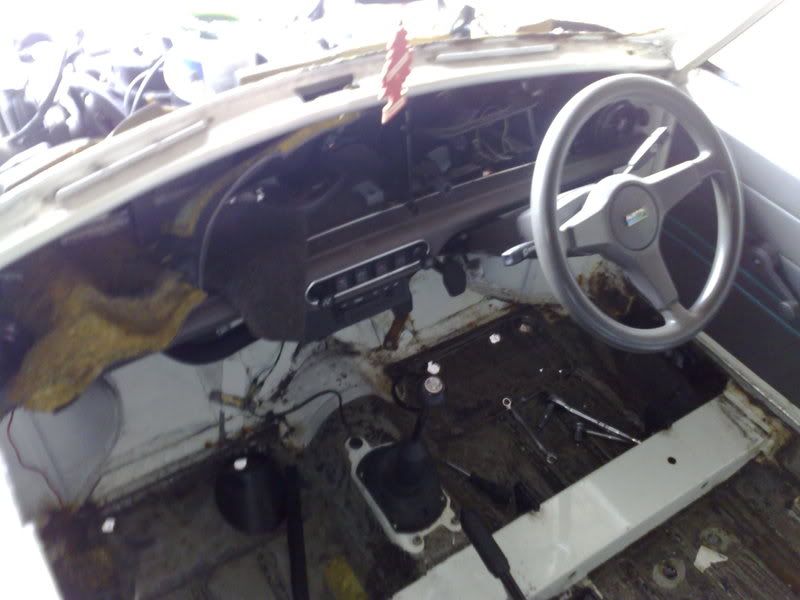
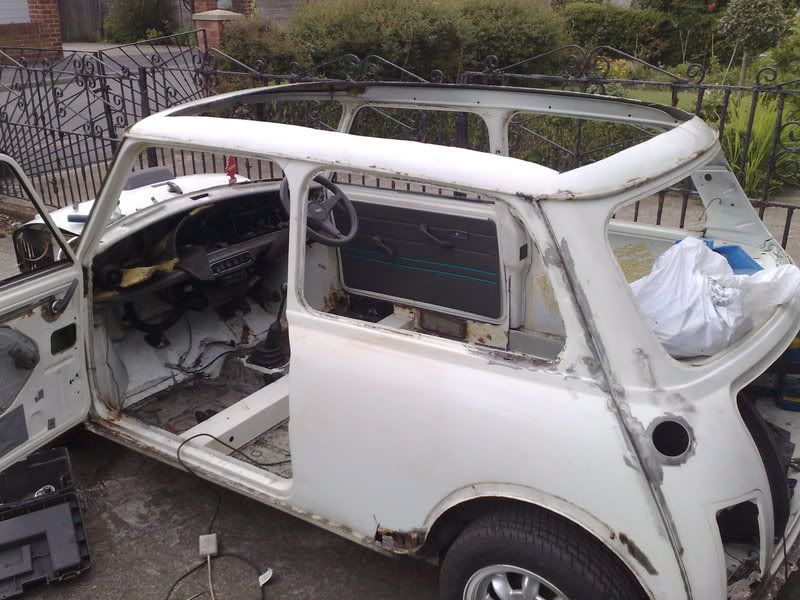
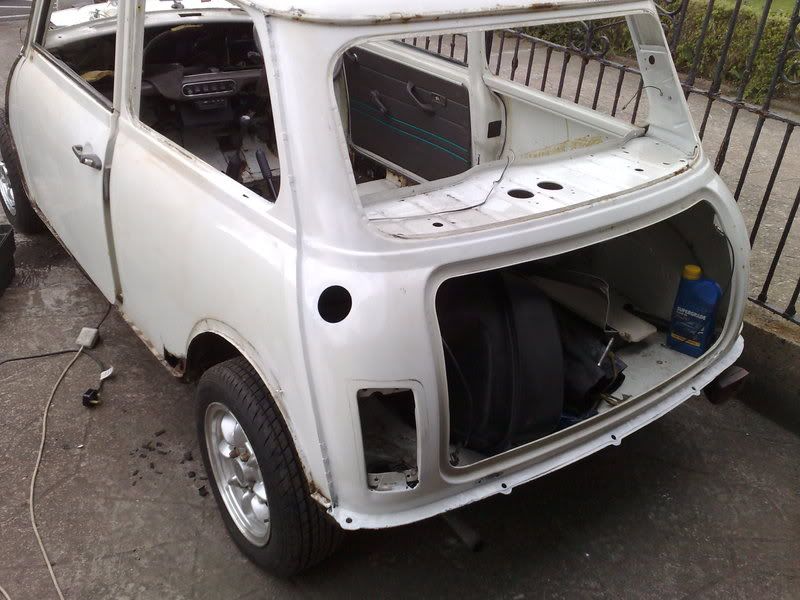
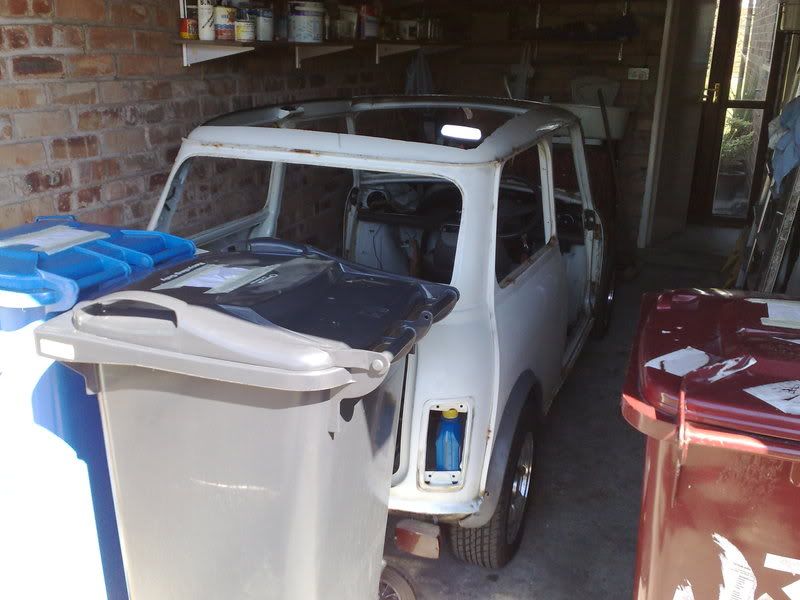
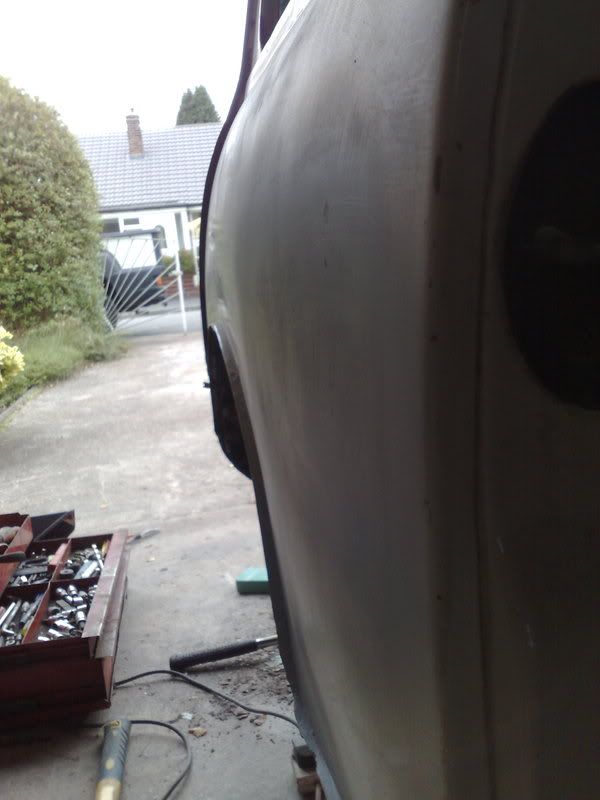
gave it a good clean and a bit of a tcut today so i can see what i have to deal with. it had been stood for near 2 years outside and was absoutely filthy!
now for the good bits!

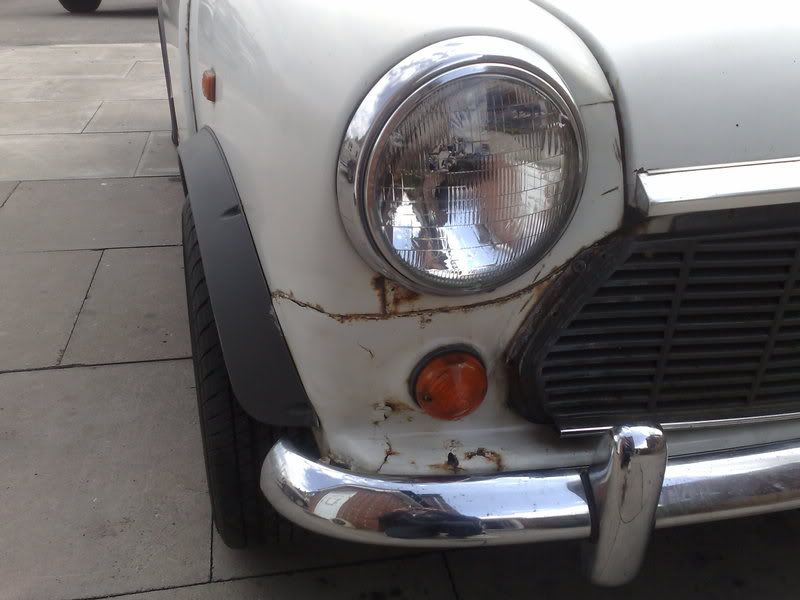
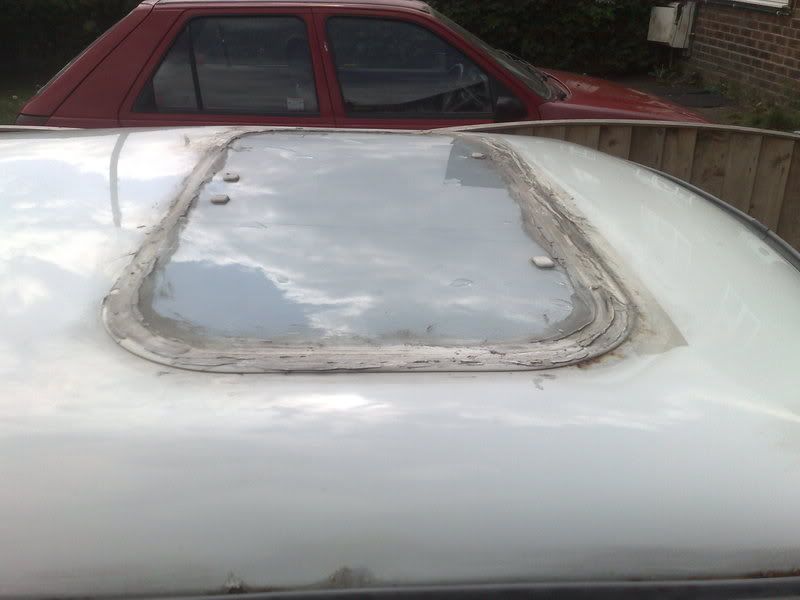
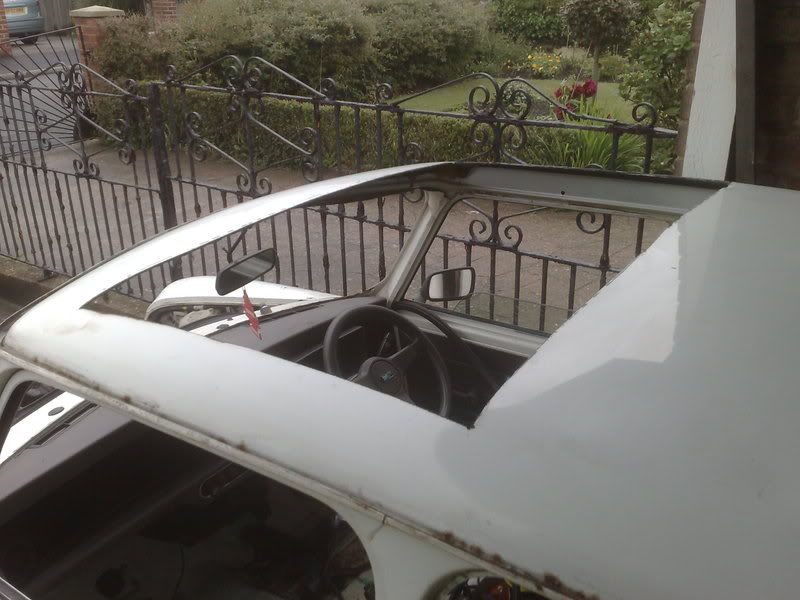
the selotape was on the roof to stop the water pouring in when i washed it! :cyy:
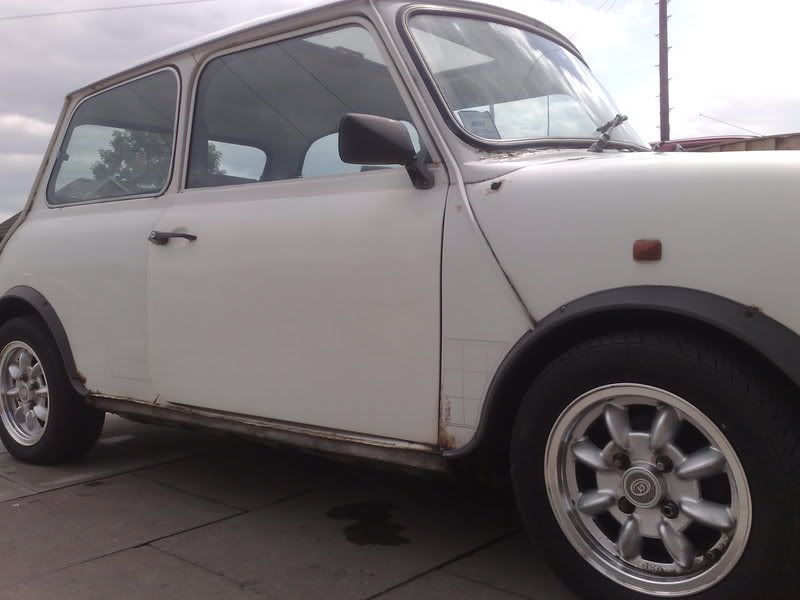
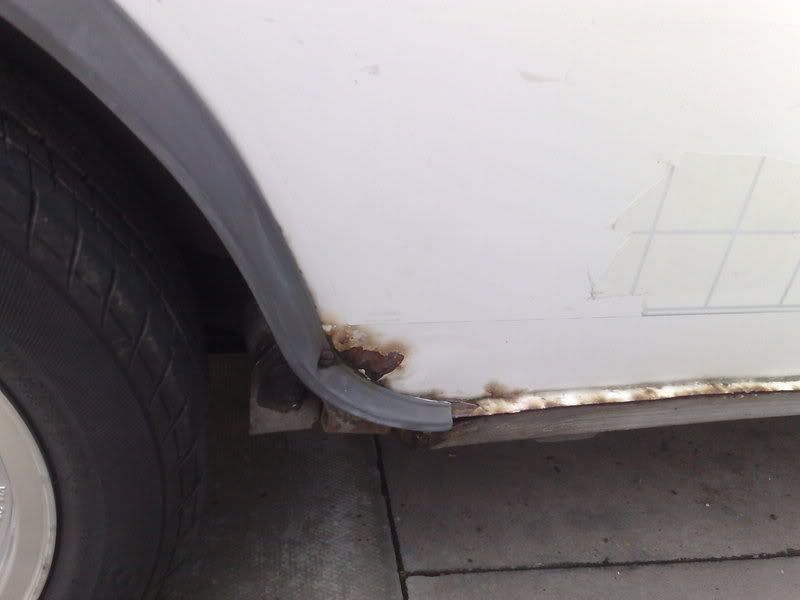
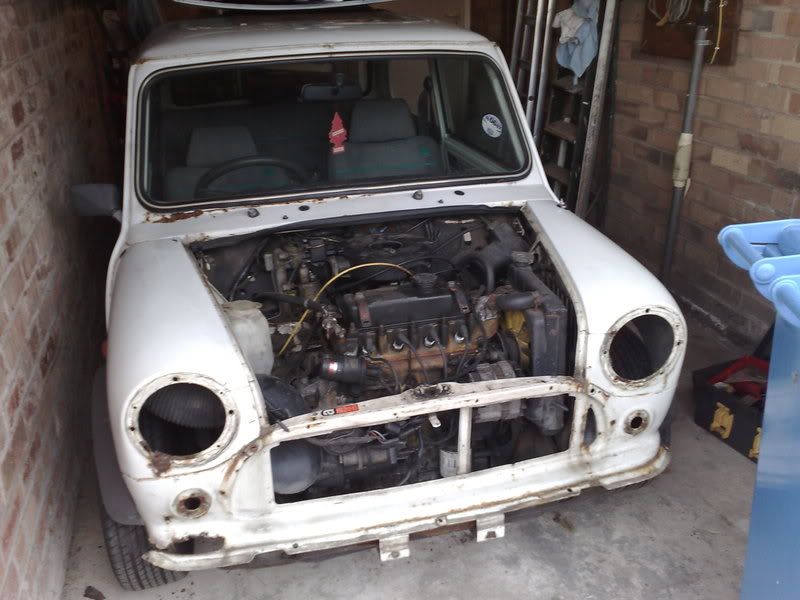
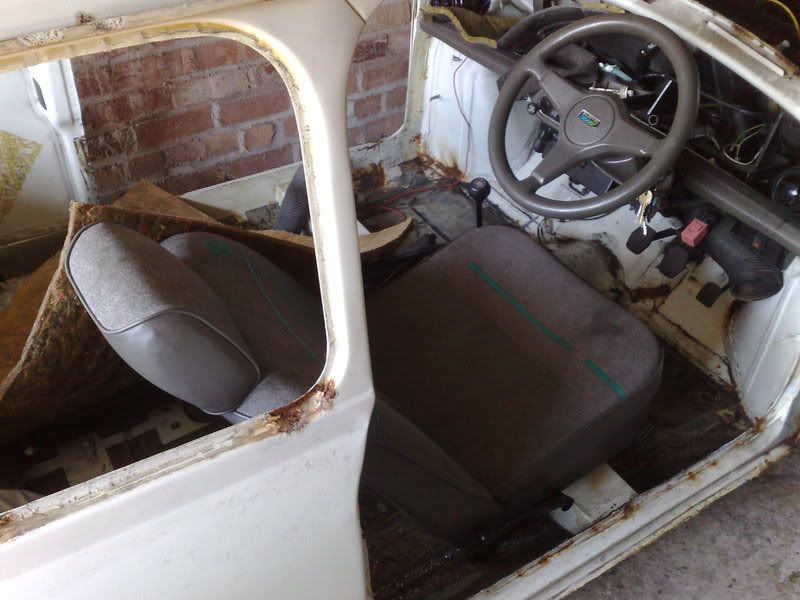
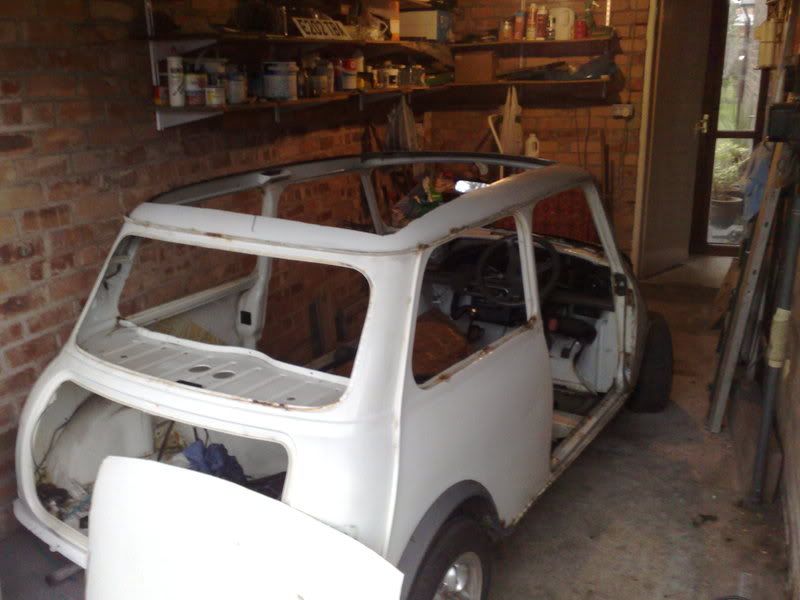
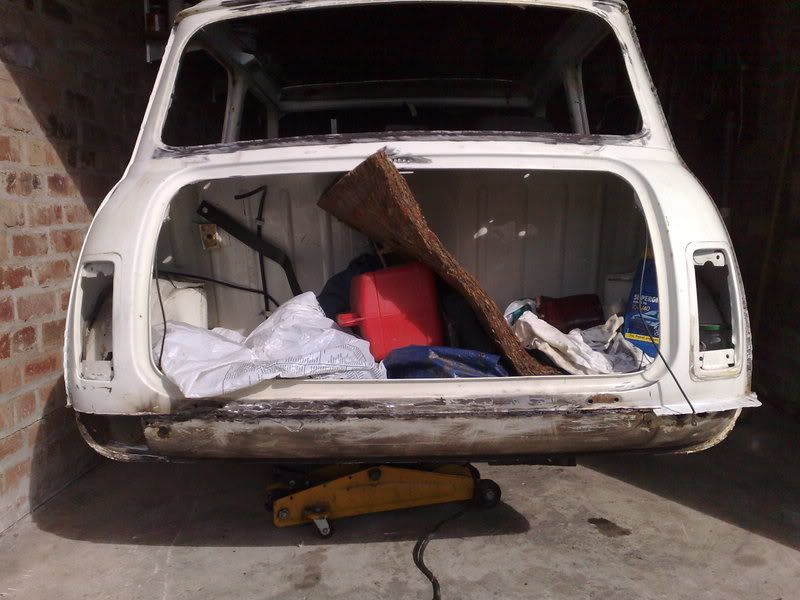
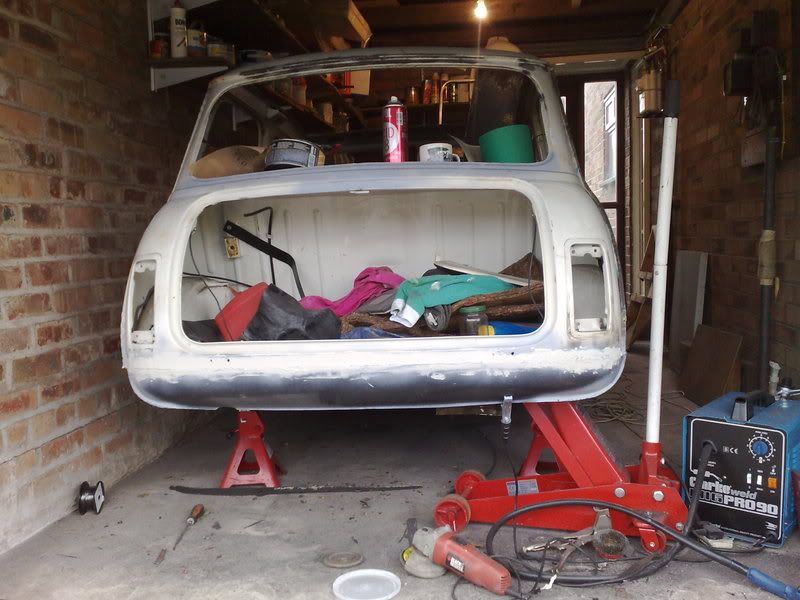
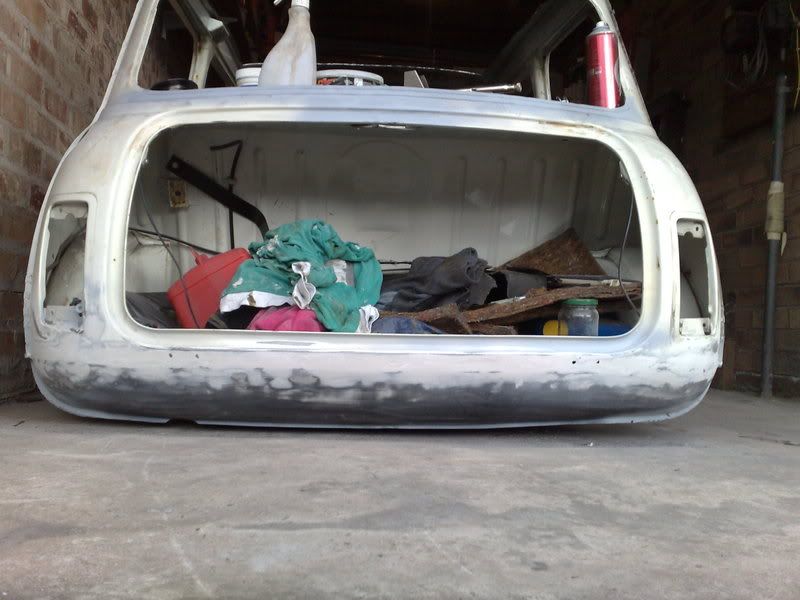
the good news though, is that all the major structural bits are solid, its covered in little scabs, needs a new scuttle and a fibreglass front end, a patch on the inner sill and the front of the rear arches, but its got front and rear 2k miles old subframes, the sills and jack points have been done, the boot floor is mint, the doors are damn near mint, the little 998cc engine is like brand new (66k) and, i didnt realise until today it has AP 4 pots on the front!!!
plan is to tidy up the bodywork, cut the rot out and rivit a plate over the sunroof, fibreglass front end, some nice cobra cream leather classic bucket seats, carbon fibre dash and door cards, rollcage and maybe a stage 1 kit (exhaust, rockers, and airfilter = 50 bhp ) until i can afford to build a really nice 1275 with straight cut box. 4 pin diff, +40 thou rebore etc (aiming for (110 bhp).
bodywork wise i am unsure, i was originaly thinking just rattle can in matt black and debumper it as its gonna be ragged every time its driven and tracked when i can, but now i'm thinking maybe ford olimpic blue??? (this kinda colour -> ) with a black roof with silver union jack and a few bits of chrome. i'm not spendind mega money on the paint as at the end of the day its there to keep the rust off!
what do you think then? ideas for the colour scheme?
gave it a good clean and a bit of a tcut today so i can see what i have to deal with. it had been stood for near 2 years outside and was absoutely filthy!
now for the good bits!
the selotape was on the roof to stop the water pouring in when i washed it!
:cyy: the good news though, is that all the major structural bits are solid, its covered in little scabs, needs a new scuttle and a fibreglass front end, a patch on the inner sill and the front of the rear arches, but its got front and rear 2k miles old subframes, the sills and jack points have been done, the boot floor is mint, the doors are damn near mint, the little 998cc engine is like brand new (66k) and, i didnt realise until today it has AP 4 pots on the front!!!
plan is to tidy up the bodywork, cut the rot out and rivit a plate over the sunroof, fibreglass front end, some nice cobra cream leather classic bucket seats, carbon fibre dash and door cards, rollcage and maybe a stage 1 kit (exhaust, rockers, and airfilter = 50 bhp
) until i can afford to build a really nice 1275 with straight cut box. 4 pin diff, +40 thou rebore etc (aiming for (110 bhp). bodywork wise i am unsure, i was originaly thinking just rattle can in matt black and debumper it as its gonna be ragged every time its driven and tracked when i can, but now i'm thinking maybe ford olimpic blue??? (this kinda colour ->
) with a black roof with silver union jack and a few bits of chrome. i'm not spendind mega money on the paint as at the end of the day its there to keep the rust off! what do you think then? ideas for the colour scheme?
Last edited by fraser9764; 24-10-2009 at 06:50 PM.
 23-05-2008, 10:59 AM
#2
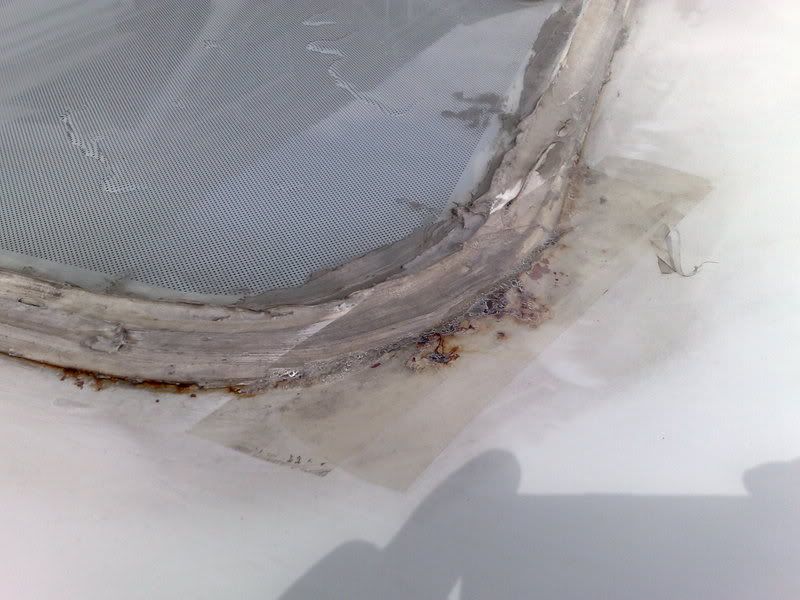
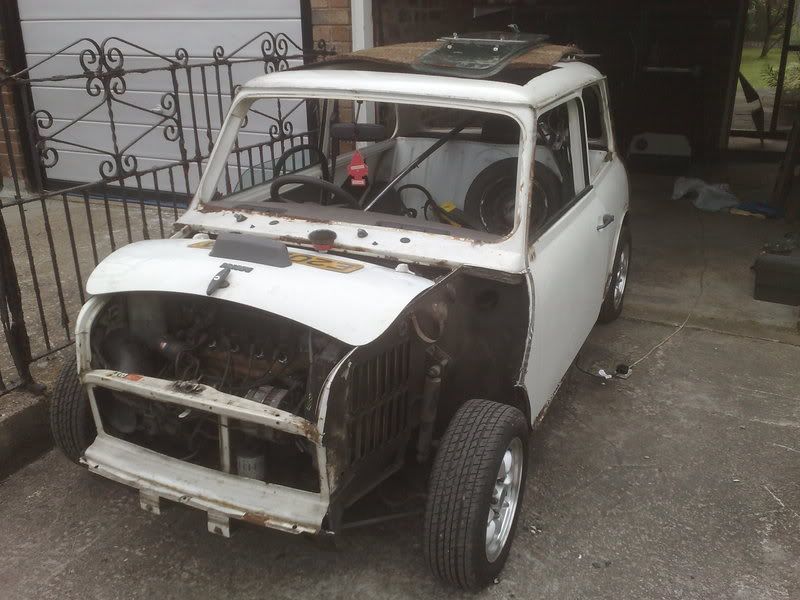
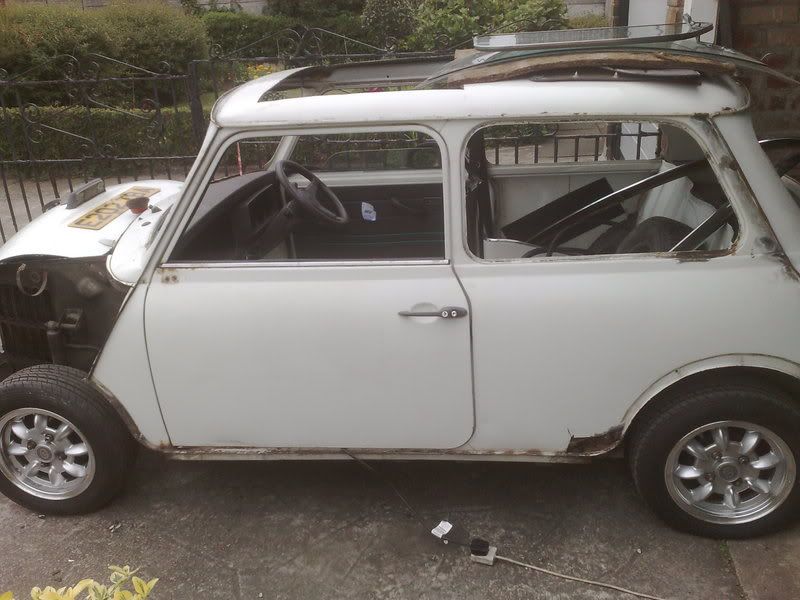
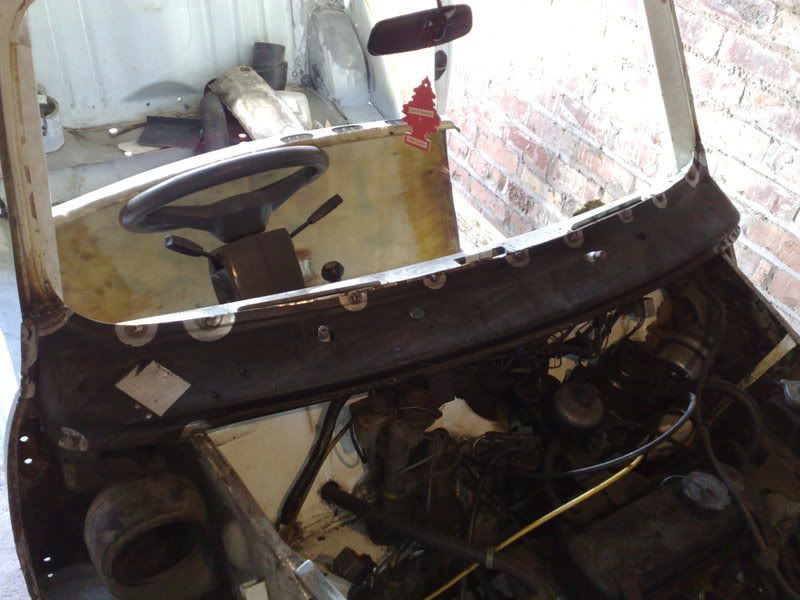
First major hurdle to overcome was the roof, i was initialy going to rivet a plate over the sunroof and blend it in a bit but i decided it wouldn't look right
i started a thread on it here...
https://passionford.com/forum/general-car-related-discussion/240259-fitting-a-new-roof-skin.html
i have since found carbon roofs for �250 and fibreglass for �100 so i'm thinking it might be a fancy bit of carbon
I am going to go and have a natter to these guys
http://www.mini-metro.co.uk/
tomorrow, and see what sorta price i can get hold of a second hand steel roof skin for, have a look at some wider wheels and arches and order my scuttle and maybe a fibreglass front end for next payday.
25-05-2008, 11:08 AM
#3
Yoon

Join Date: Oct 2005
Location: Norwich
Posts: 6,844
Likes: 0
Received 0 Likes
on
0 Posts
Brave man taking that little lot on. 
Sounds like you have Metro brakes on the front. Also, 110bhp from an A Series isn't going to be cheap...
Still, looks like a good little project to me.
http://www.theminiforum.co.uk/forums/index.php?act=idx
Sounds like you have Metro brakes on the front. Also, 110bhp from an A Series isn't going to be cheap...
Still, looks like a good little project to me.
http://www.theminiforum.co.uk/forums/index.php?act=idx
25-05-2008, 01:51 PM
#4
I'm Finding My Feet Here Now

Join Date: May 2008
Posts: 103
Likes: 0
Received 0 Likes
on
0 Posts
Looks like a nice project fella!
My first two cars were minis although i converted one to a 1.8 K-series VVC engine track car which was pretty fun!
As for the roof, i didnt check that link but curley carbonfibre make carbon fibre roofs for the minis as well as fiberglass ones, i bought a fiberglass one from them but never got around to fitting it. The front can be replaced fairly cheaply with a flip front (i have a steel 2pc one sat in my garage unused and brand new if you are intrested) or if its a steel front you can just weld the pannels on normaly. Thankfully i have never replaced a scuttle, although they look like a lot of "fun" to say the least.
Strip it all out because there is usualy a bit of rot around the heelboard and the boot floors and valance like a bit of tin worm aswell.
but good luck with the project! Minis are very trying!
EDIT
also forgot to mention... The mini forum is an ace site as well as minifinity.com
Last edited by Tomm; 25-05-2008 at 01:52 PM.
25-05-2008, 04:07 PM
#5
Advanced PassionFord User

Join Date: Jul 2006
Posts: 2,416
Likes: 0
Received 0 Likes
on
0 Posts
I've a mini, the whole car is sitting at the end of the garage on my bench. Ive given up on mine though, (all hassle-hassle-hassle)
By the way, did you buy/or build your trailer? i'm looking something smaller than my 5 meter long landrovered wheeled trailer.
cheers.
By the way, did you buy/or build your trailer? i'm looking something smaller than my 5 meter long landrovered wheeled trailer.
cheers.
26-05-2008, 08:09 PM
#6
I've found that life I needed.. It's HERE!!

so thi is the mini that the roof thread was about looks like its gonna be fun for you i always wanted to get a mini as a project when i was younger but the lack of money wouldnt allow keep us updated on what happens
26-05-2008, 09:06 PM
#7
Thanks for the replies
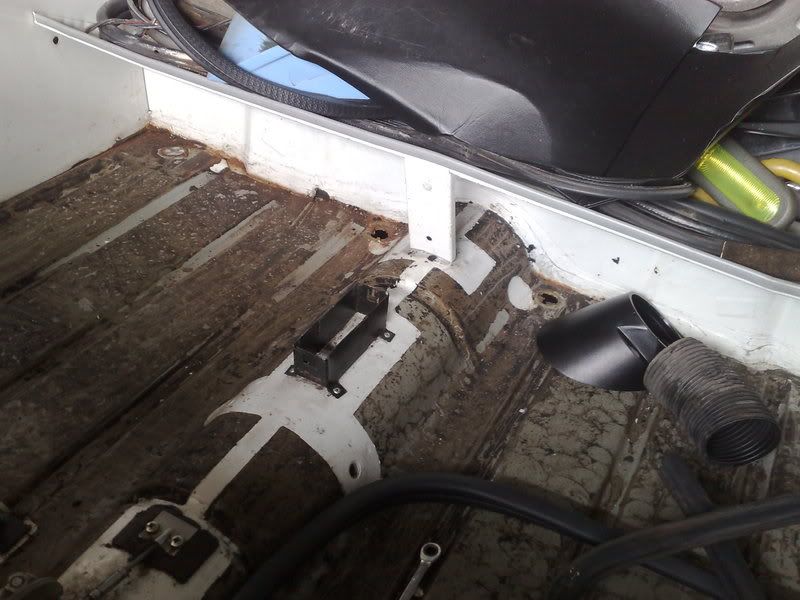
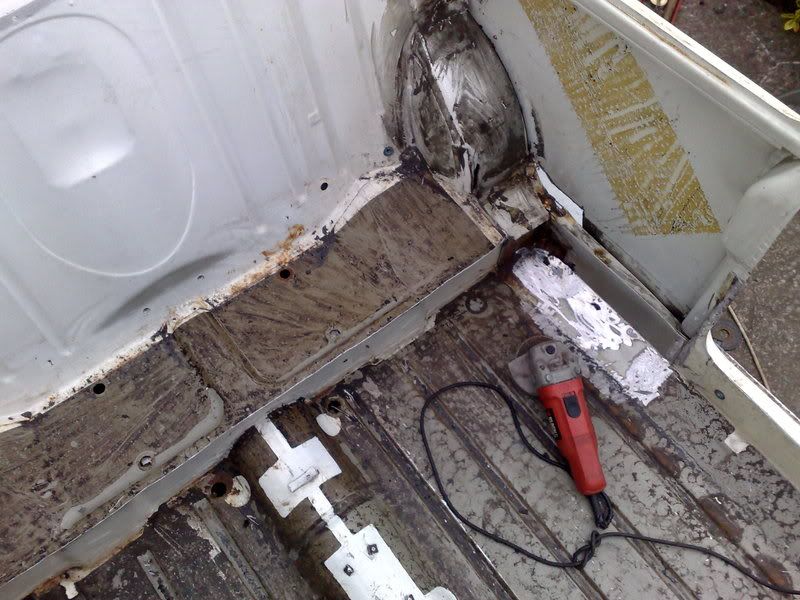
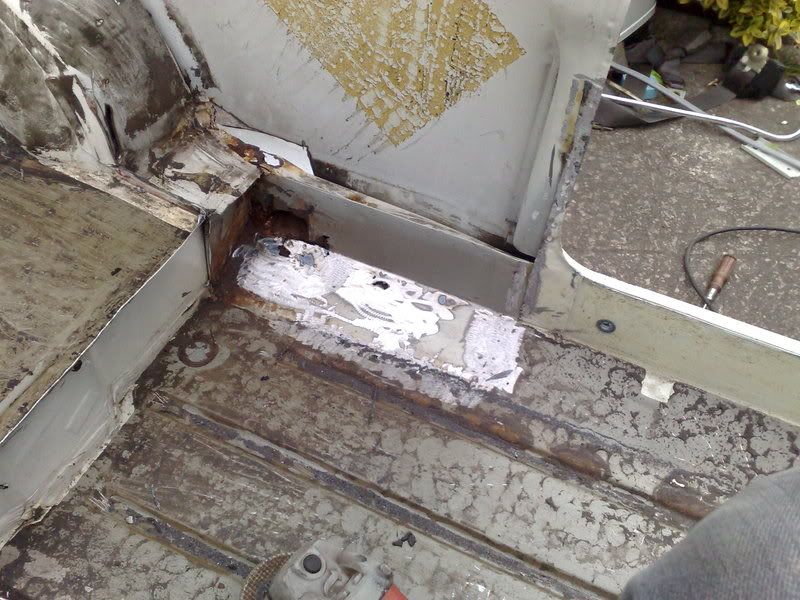
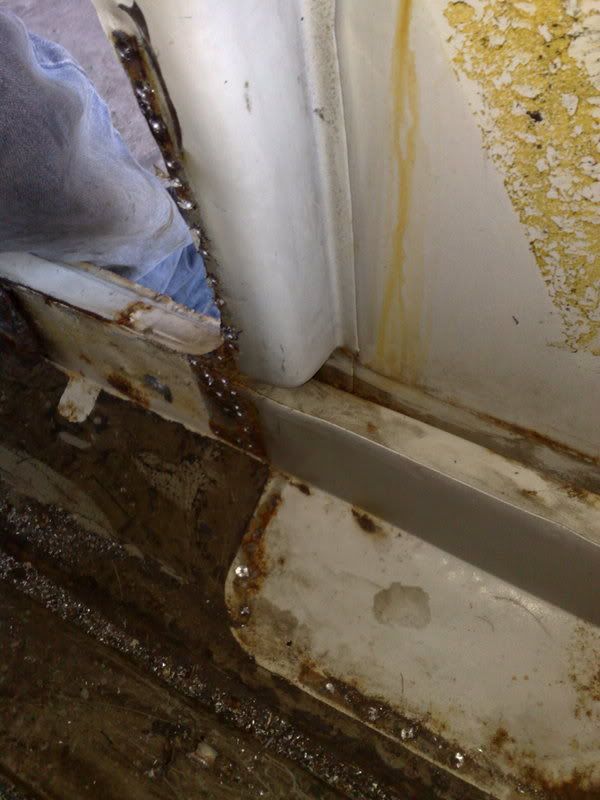
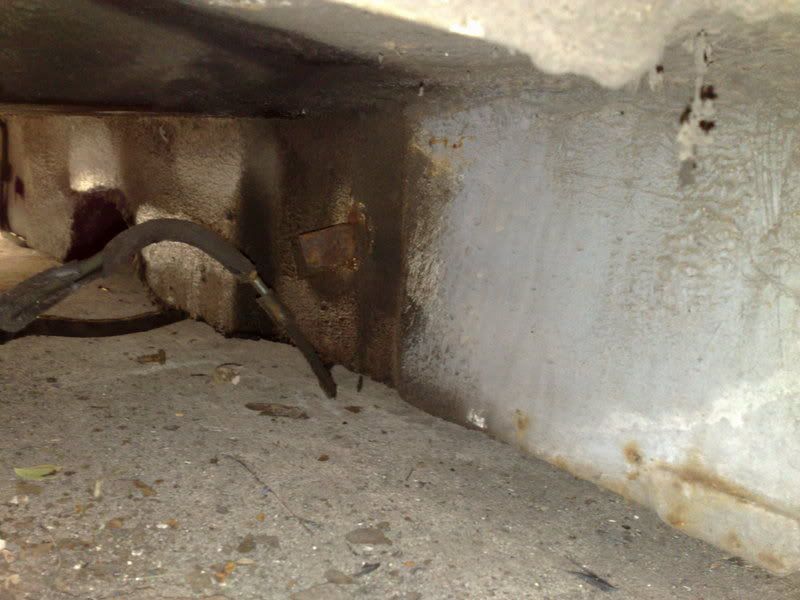
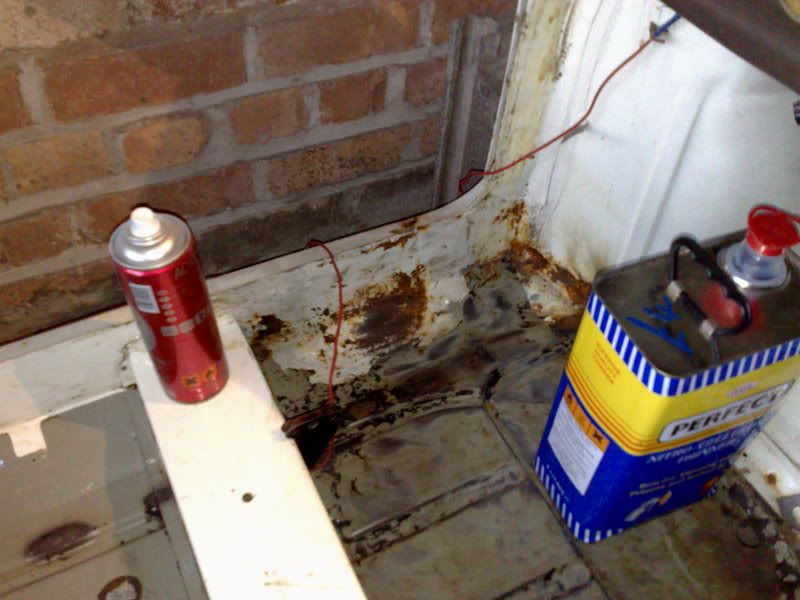
Tomm: i've pulled all the carpets back and had a good look underneath and it all looks solid, the drivers side inner sill needs some work as its been plated twice before but not very well, and its now gone between the plates so it will all be coming off and done properly
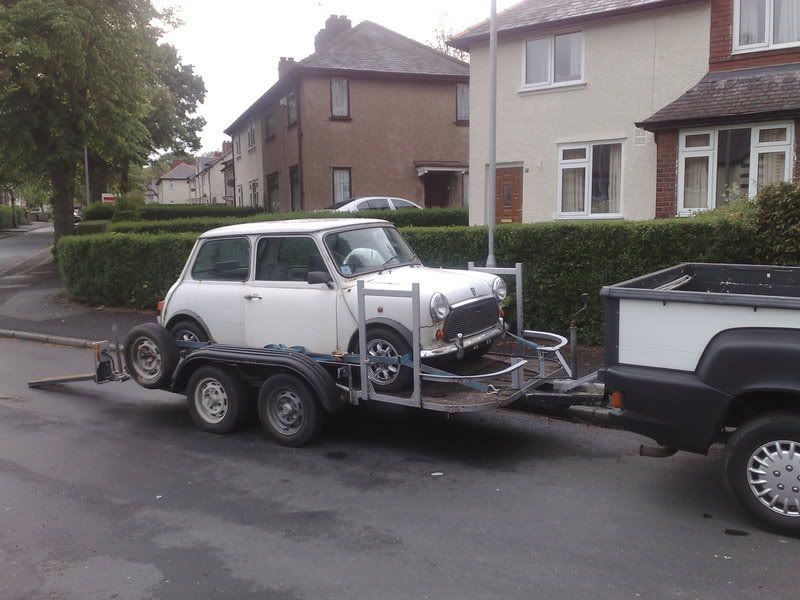
Pob: i was given the trailer by a bloke i work with when i started the rallying, he used to race xr2's and made the trailer from an old rice horsebox of his wifes, needed a lot of work when i got it, all new brakes and nearly every weld had cracked and it still could do with re boarding but it will last a bit yet.
anyway this weekends progress report!!
saturday morning i went over to mini and metro spares at warrington bright and early and had a natter to them and a mooch round their shop and workshop, i can get a freshly rebuilt 1275 for �450 which sounds to be a good base for a fruity engine build! they can also do second hand mint condition roof skins for �65 plus vat but i want this carbon one now
then went to smallwood vintage rally for a wander round coz my dad was there with his landrover on show, had a walk round the autojumble and got a fwe supplies such as flapper discs etc.
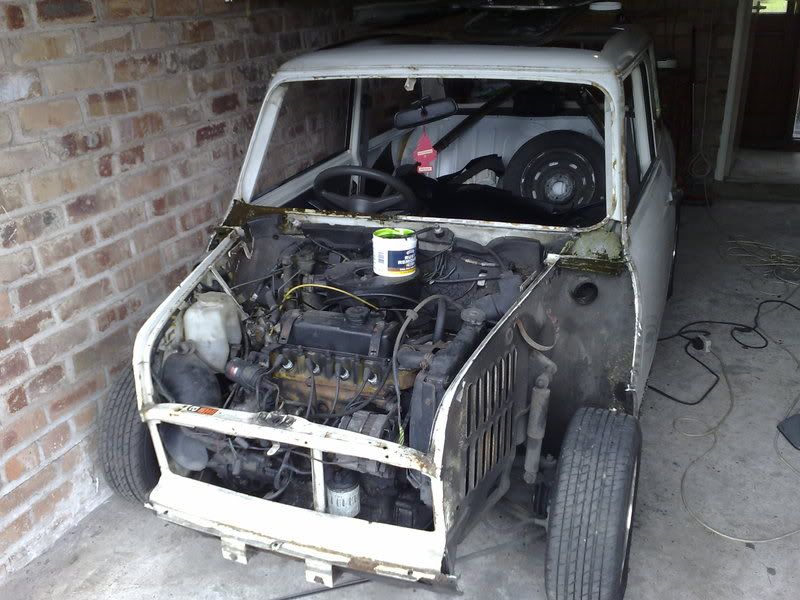
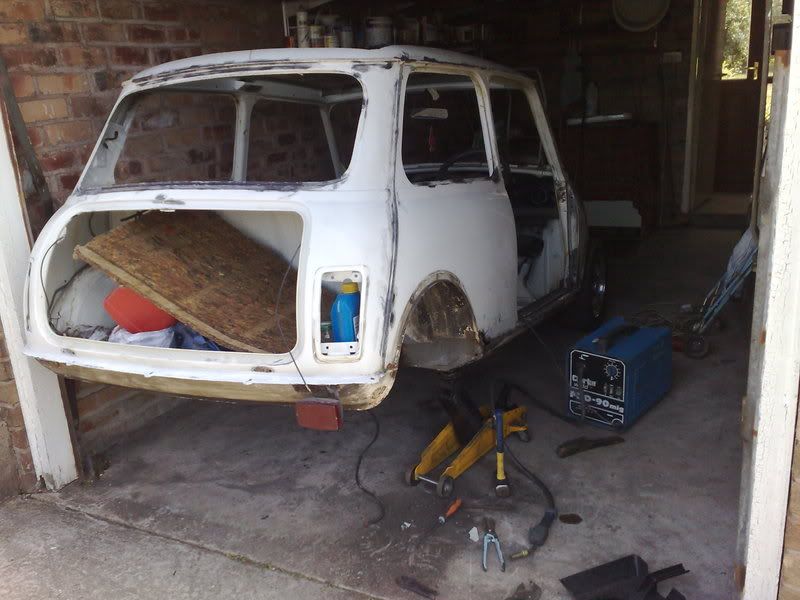
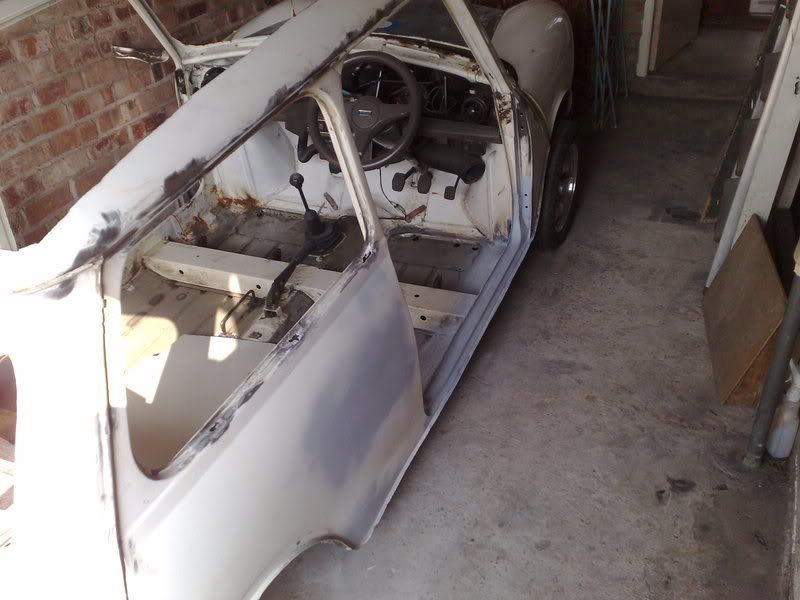
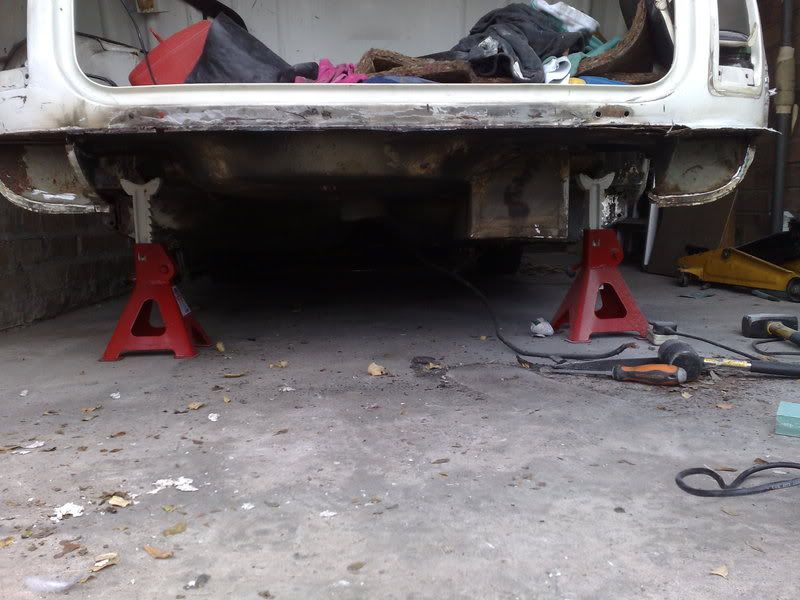
Sunday i stuck the car back on the trailer and took it over to my nans to put it in her garage, had to clean it out first as it was a right mess and take a loada stuff to the tip, finally got the car in and set about dismantling,
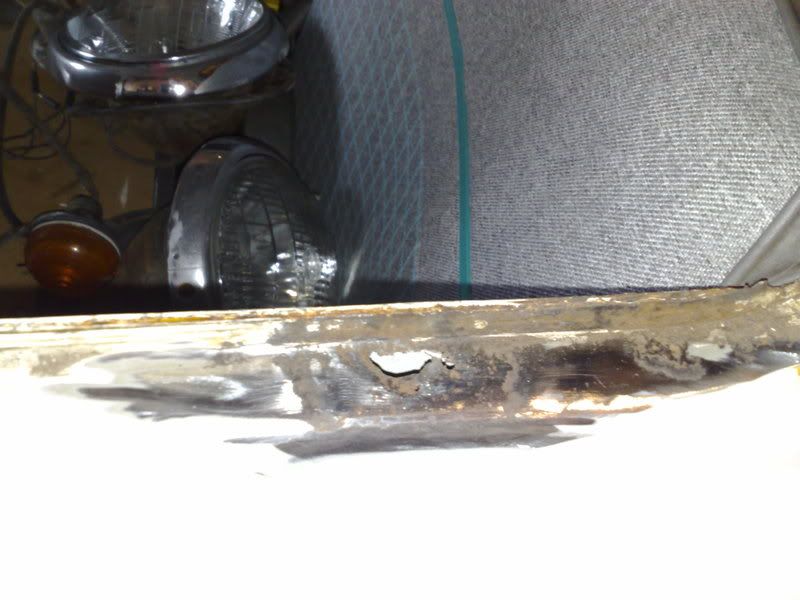
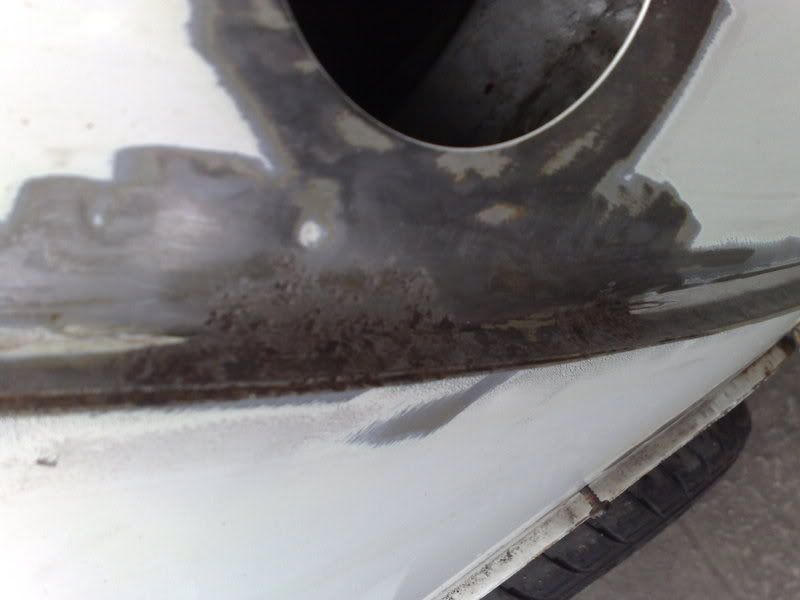
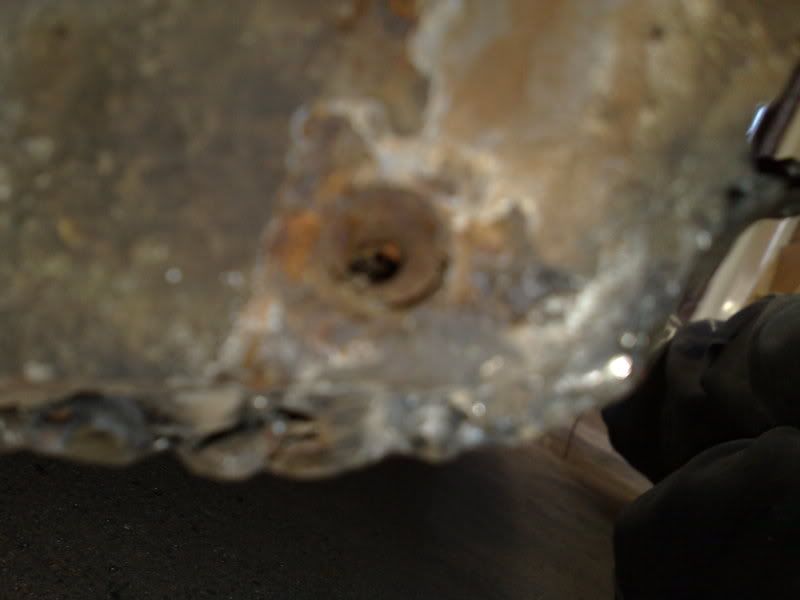
front bumper, lights, bonnet off, and n/s rear window glass out to have a look at the little patch of rust where they all seem to go, not good...
t'will be sorted though.
tucked up for the week

then today its been rally car time, dismantling the old "sheila's wheels" that was rolled at mamby around 2 months ago, dont worry a new car has been built since!!! it never stops
i know the threads about the mini but i thought the photo's were comedy!!
engine, boc, suspension and subframe out in under 2 hours on my own! not bad i didn't think as its the first time i've done any major engine and suspension work on 205's
then off came the roof
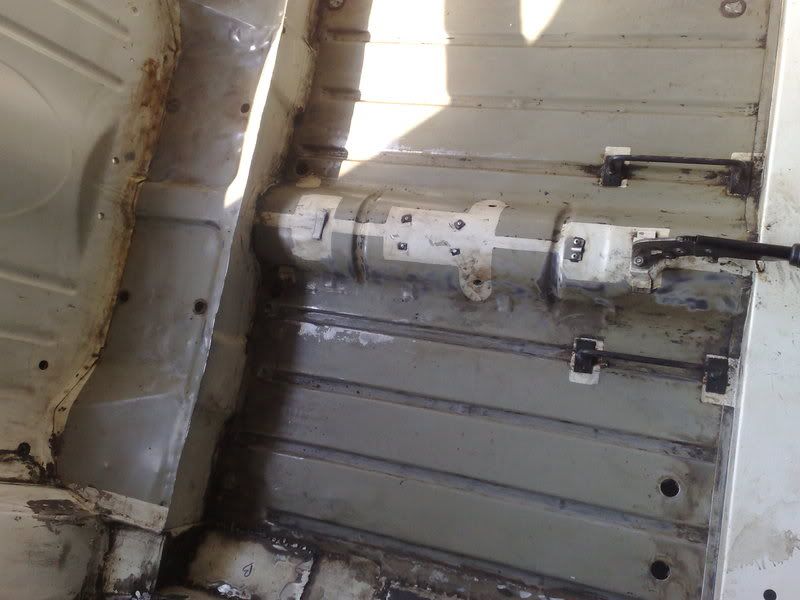
then tiped it over to take the tank out
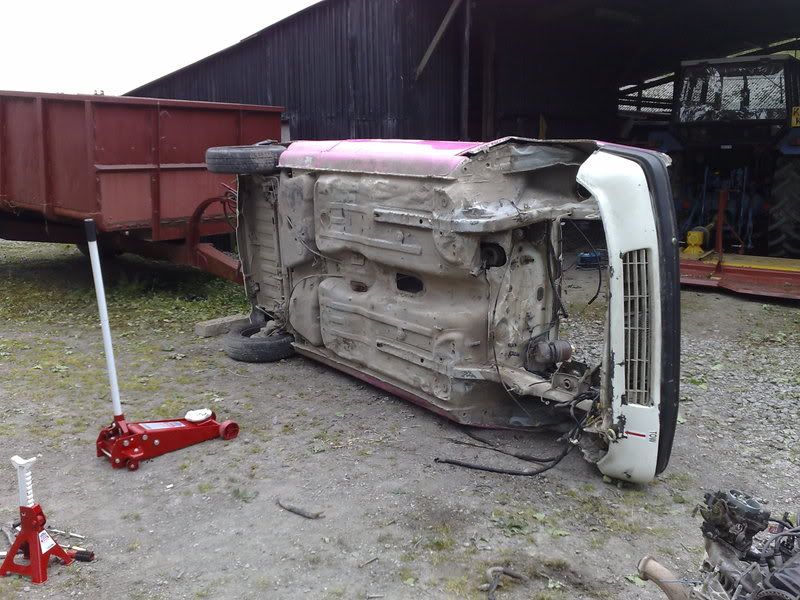
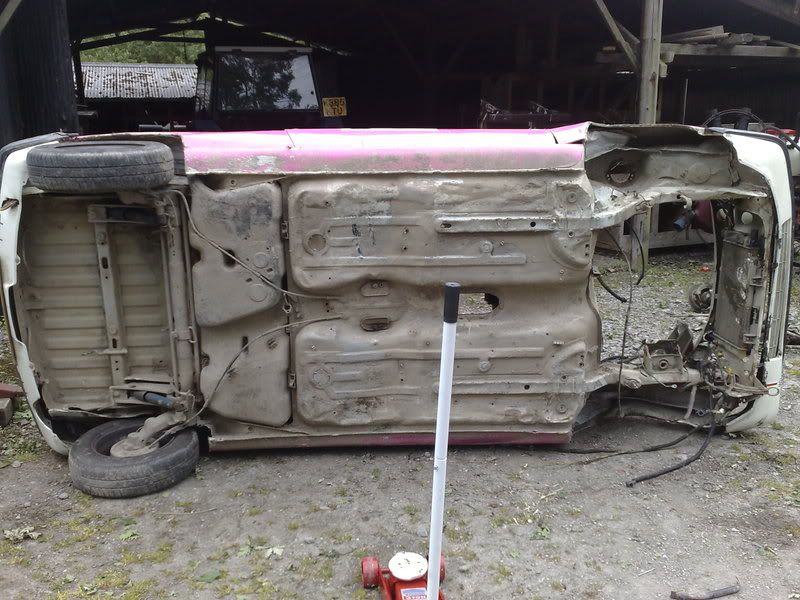
just noticed that the rear beam doesn't look straight
then my mate finished work and came to prat about, onto its roof to lift the rear beam off
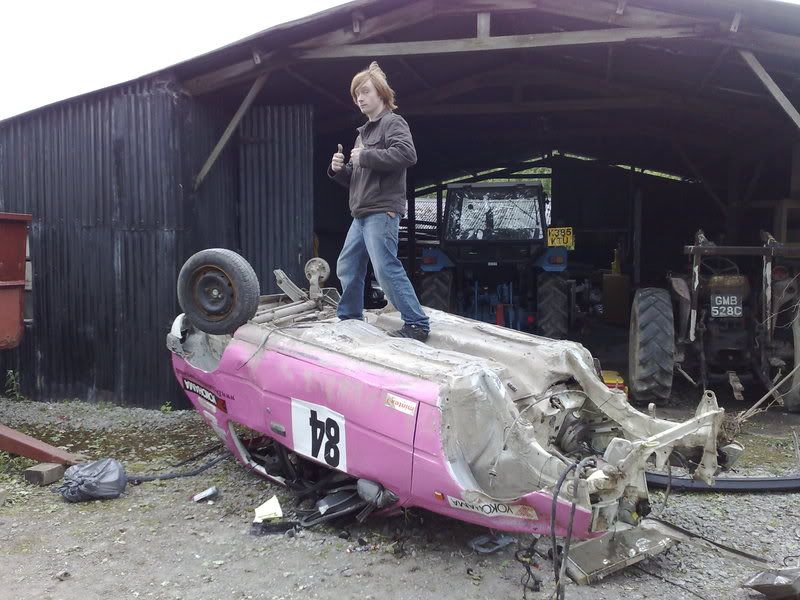
then back over for the obligatory driving pose

thats all folks, more next week...
Tomm: i've pulled all the carpets back and had a good look underneath and it all looks solid, the drivers side inner sill needs some work as its been plated twice before but not very well, and its now gone between the plates so it will all be coming off and done properly
Pob: i was given the trailer by a bloke i work with when i started the rallying, he used to race xr2's and made the trailer from an old rice horsebox of his wifes, needed a lot of work when i got it, all new brakes and nearly every weld had cracked and it still could do with re boarding but it will last a bit yet.
anyway this weekends progress report!!
saturday morning i went over to mini and metro spares at warrington bright and early and had a natter to them and a mooch round their shop and workshop, i can get a freshly rebuilt 1275 for �450 which sounds to be a good base for a fruity engine build! they can also do second hand mint condition roof skins for �65 plus vat but i want this carbon one now
then went to smallwood vintage rally for a wander round coz my dad was there with his landrover on show, had a walk round the autojumble and got a fwe supplies such as flapper discs etc.
Sunday i stuck the car back on the trailer and took it over to my nans to put it in her garage, had to clean it out first as it was a right mess and take a loada stuff to the tip, finally got the car in and set about dismantling,
front bumper, lights, bonnet off, and n/s rear window glass out to have a look at the little patch of rust where they all seem to go, not good...
t'will be sorted though.
tucked up for the week
then today its been rally car time, dismantling the old "sheila's wheels" that was rolled at mamby around 2 months ago, dont worry a new car has been built since!!! it never stops
i know the threads about the mini but i thought the photo's were comedy!!
engine, boc, suspension and subframe out in under 2 hours on my own! not bad i didn't think as its the first time i've done any major engine and suspension work on 205's
then off came the roof
then tiped it over to take the tank out
just noticed that the rear beam doesn't look straight
then my mate finished work and came to prat about, onto its roof to lift the rear beam off
then back over for the obligatory driving pose
thats all folks, more next week...
Last edited by fraser9764; 28-05-2008 at 09:36 PM.
Trending Topics
28-05-2008, 07:49 PM
#8
had a few spare hous today so did a bit more, seems to be flying along at the mo but i can assure you it will slow down once it involves spending money!
first off i dismantledthe back end, lights, bumper, bootlid, and whos fucking stupid idea was it to put the fuel tank in the way of the rear light holder nuts?! luckilly only one bolt and the entire thing moves out of the way but still?!
then took the front and rear glass out with the aid of one of my nans kitchen knives
next were the seats and carpets, nice easy job.
then this happened...

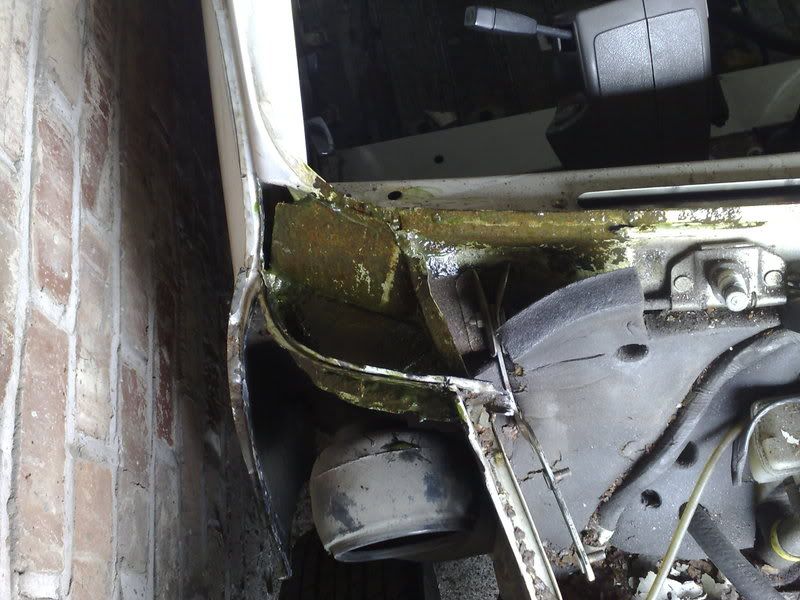
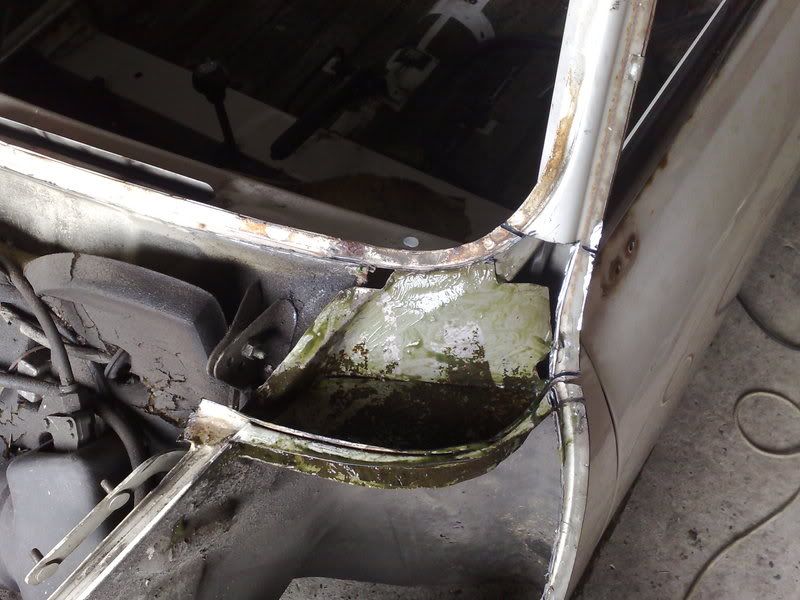
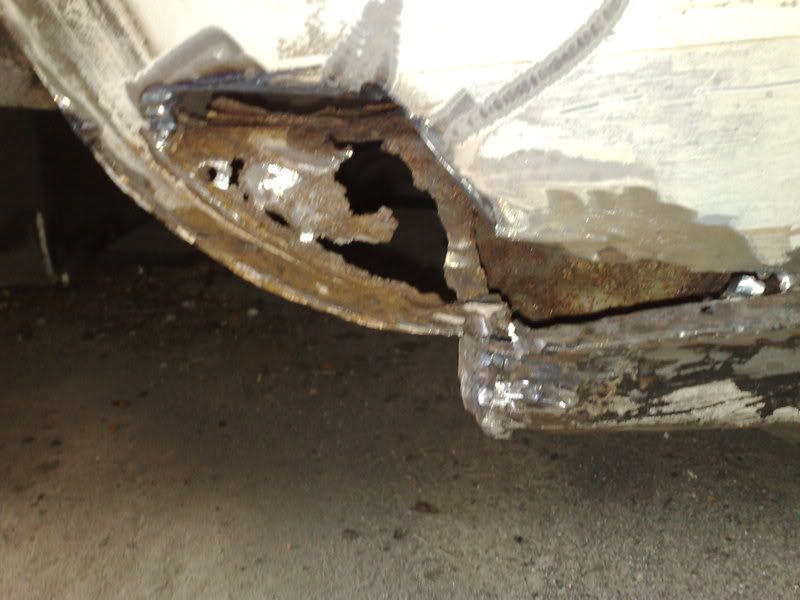
then decided to chop awat at the hole infront of the n/s rear wheel...
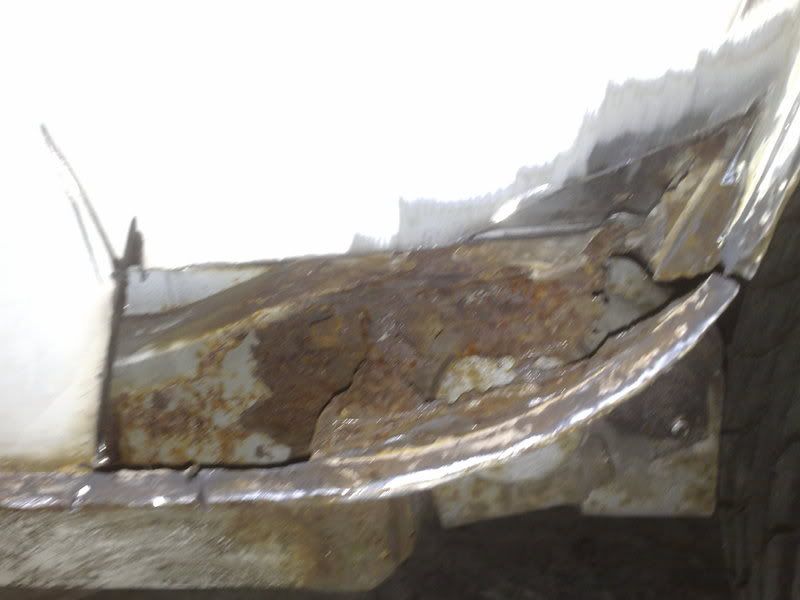
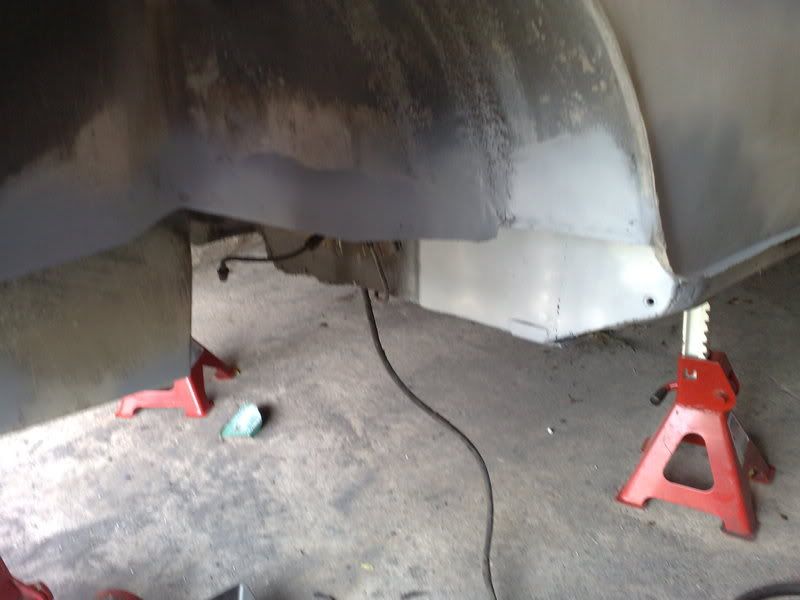
needs both inner and outer skins plating, its not actually as bad as it looks but will probably mean the rear subframe off which i was going to do anyway to give it a good clean and paint.
then started this, why oh why do i start these jobs...
more next weekend!
first off i dismantledthe back end, lights, bumper, bootlid, and whos fucking stupid idea was it to put the fuel tank in the way of the rear light holder nuts?! luckilly only one bolt and the entire thing moves out of the way but still?!
then took the front and rear glass out with the aid of one of my nans kitchen knives
next were the seats and carpets, nice easy job.
then this happened...
then decided to chop awat at the hole infront of the n/s rear wheel...
needs both inner and outer skins plating, its not actually as bad as it looks but will probably mean the rear subframe off which i was going to do anyway to give it a good clean and paint.
then started this, why oh why do i start these jobs...
more next weekend!
01-06-2008, 01:54 PM
#9
PassionFord Post Troll

Join Date: May 2004
Location: Robin Hood Country!!
Posts: 3,038
Likes: 0
Received 0 Likes
on
0 Posts
great little cars, used to hate them, but since i started my missus', i love em, check my resto out for pic n stuff, its in here somewhere under 'winnie the mini resto'  looks very similar to hers!
01-06-2008, 08:30 PM
#11
K3V HA: thanks, ill have a look in a min.
Tomm: found that out today, used a big chisel and a heat gun in the end,
anyway, Updates!
Saturday 31st May
woke up late, couldn't be bothered doing owt as i forgot to order some solid front subframe mounts and mini and metro spares didn't have any in, finally talked myself into it though and got a fair bit done
started off with the damn sound deadening again, i forgot my heat gun so it was taking ages,then i tried the bit that had been in the sun and it was a lot easier so i gave up untill the next time
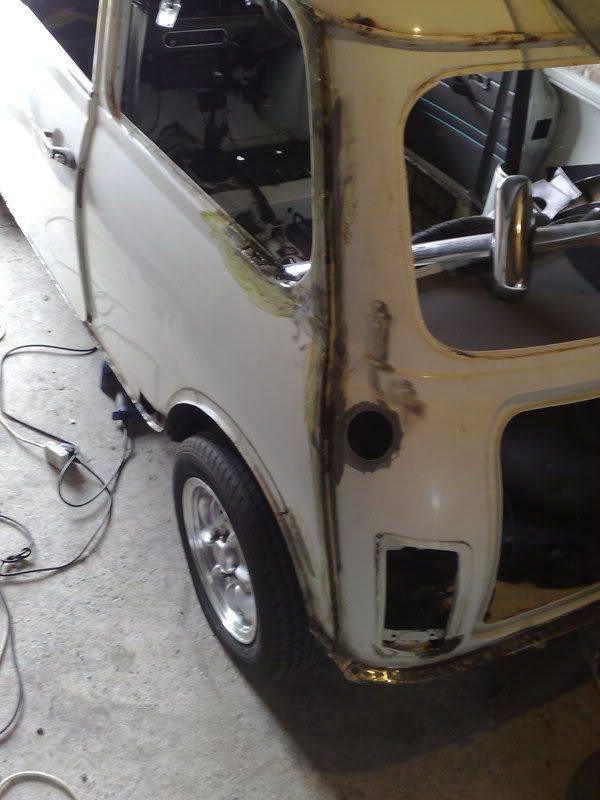
then got bored and started looking at the front end and realised i can chop the front wings of easily without stuff going floppy, so out came the grinder
then my nans carbon monoxide alarm started going off so i had to calm her down, call the gas board etc. engineer came out and made safe and another was coming between 8 and 12 today to test all the appliences so i had to be back there at 8 this morning, oh well, another day on the mini
Sunday 1st June
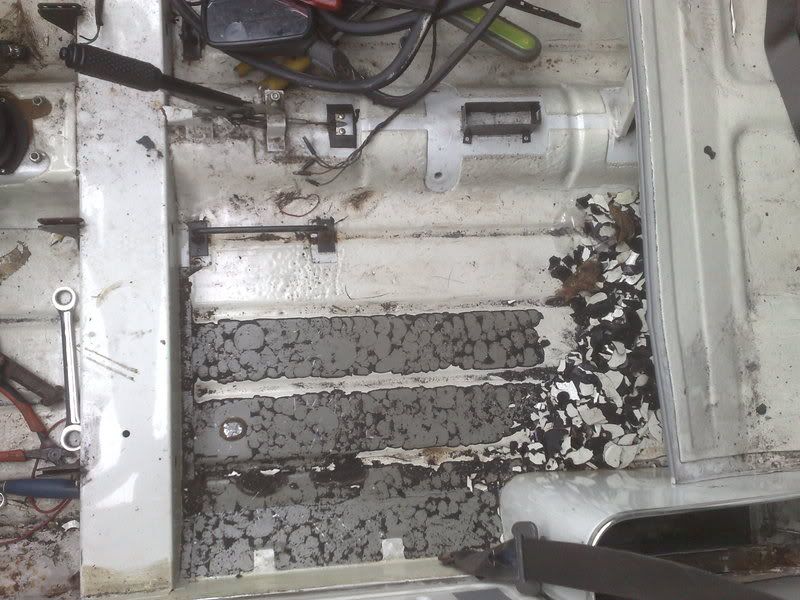
got there early but had to wait for the gas man and show him round etc so didnt get started till 11,
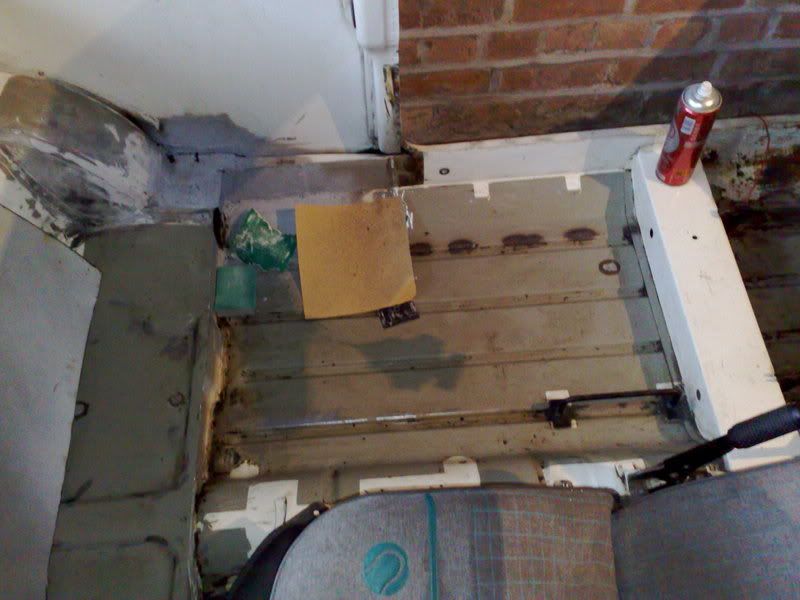
remembered my heat gun today so i got all the sound deadening off, reckon this little lot weighs 15 kilos and theres still the big piece on the back seat but im not sure wheter i am going to cut that out yet so i haven't touched it.
just need to get some thinners or old petrol now to clean the residue up
also got the top half of the dash out
aparently they are bad for going here but all good
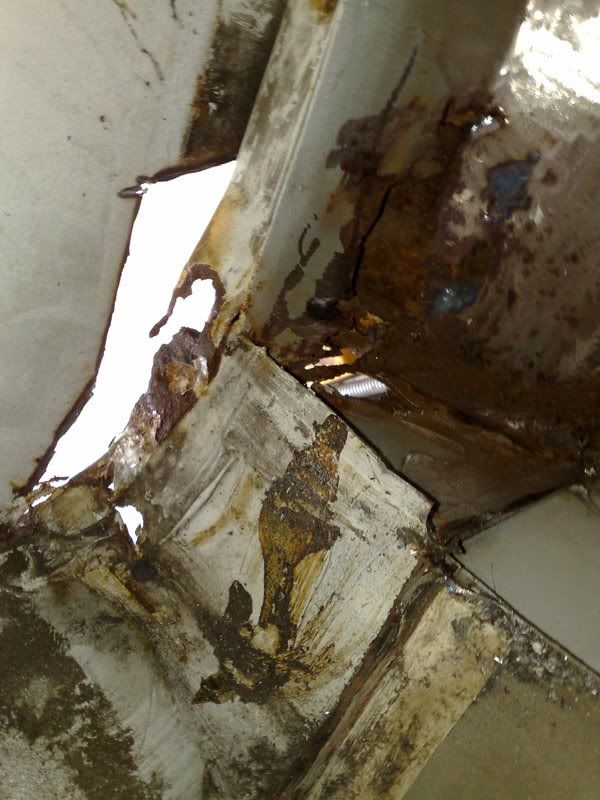
now the wings were off i could take the scuttle off, bit of a mess behing but fortunatly all solid, gave it a good coat of rust remover gel before i left, i'll let that do its job and probably pop back over wednesday afternoon to clean up and re-coat.
cleaned up and treated all the scabs it the rear n/s corner aswell after removing the trim off the seam.
another normal place for rot aswell

thats all folks, more soon
Tomm: found that out today, used a big chisel and a heat gun in the end,
anyway, Updates!
Saturday 31st May
woke up late, couldn't be bothered doing owt as i forgot to order some solid front subframe mounts and mini and metro spares didn't have any in, finally talked myself into it though and got a fair bit done
started off with the damn sound deadening again, i forgot my heat gun so it was taking ages,then i tried the bit that had been in the sun and it was a lot easier so i gave up untill the next time
then got bored and started looking at the front end and realised i can chop the front wings of easily without stuff going floppy, so out came the grinder
then my nans carbon monoxide alarm started going off so i had to calm her down, call the gas board etc. engineer came out and made safe and another was coming between 8 and 12 today to test all the appliences so i had to be back there at 8 this morning, oh well, another day on the mini
Sunday 1st June
got there early but had to wait for the gas man and show him round etc so didnt get started till 11,
remembered my heat gun today so i got all the sound deadening off, reckon this little lot weighs 15 kilos and theres still the big piece on the back seat but im not sure wheter i am going to cut that out yet so i haven't touched it.
just need to get some thinners or old petrol now to clean the residue up
also got the top half of the dash out
aparently they are bad for going here but all good
now the wings were off i could take the scuttle off, bit of a mess behing but fortunatly all solid, gave it a good coat of rust remover gel before i left, i'll let that do its job and probably pop back over wednesday afternoon to clean up and re-coat.
cleaned up and treated all the scabs it the rear n/s corner aswell after removing the trim off the seam.
another normal place for rot aswell
thats all folks, more soon
Last edited by fraser9764; 01-06-2008 at 08:38 PM.
 01-06-2008, 08:58 PM
#13
Lucifer II - 666
Very kool 
01-06-2008, 09:20 PM
#16
thats what i was thinking, am i right in saying you can only lose half of the actual bench though? how about the rear map pockets? i can't see an obvious way of losing them and keeping it looking tidy, maybe just cut them down level wih the rear bench?
07-06-2008, 09:23 PM
#18
Well i got a bit more done today, late starting due to a handgover from a bbq last night.
I had been thinking about alexF's suggestion about the rear bench and looking at hoe the rollcages fit, i had a look, got the grinder out and did this...
just needs a small plate in the corner which i knew it would anyway.
then had another go at cleaning up little scabs of rust, not amazingly impressed with this hammerite rust remover gel but it beats hours with the wire brush
then slapped a bit of paint on the bare metal to try and stop any surface rust formng.
will make another post about paint in a sec.
more tommorow but i am running out of jobs i can do without spending money
07-06-2008, 09:30 PM
#19
right, a bit of advice needed here?
i have been treating all the little scabs of rust with hammerite rust remover gel after wire brushing them with the angle grinder attatchment.
this still leaves little bits of rust in the bottom of the pits.
Can i use a paint that will stop these little tiny bits coming back or have i got to get them perfect?
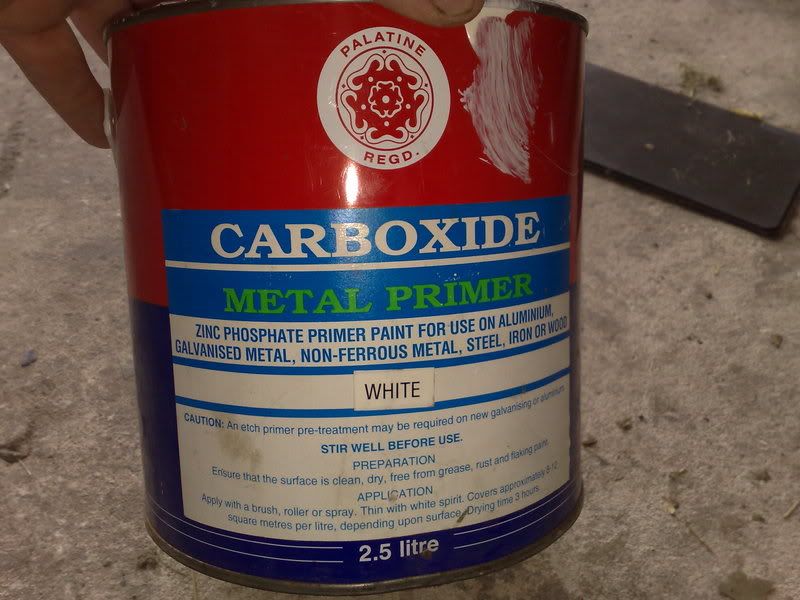
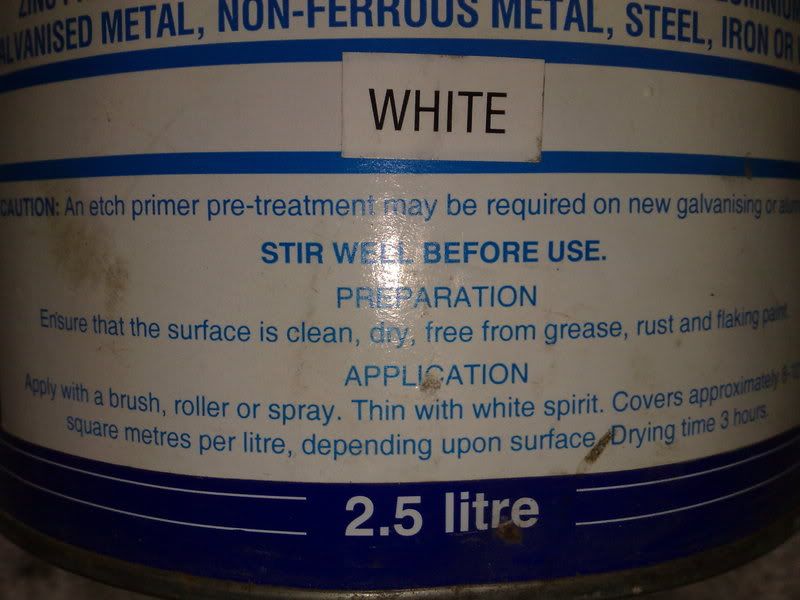
the paint i have used so far is this stuff, i got it from a vintage rally on the autojumble from a place selling tractor paints.
i really don't want to paint it then 6 mnths later it start to bubble up again.
i have been treating all the little scabs of rust with hammerite rust remover gel after wire brushing them with the angle grinder attatchment.
this still leaves little bits of rust in the bottom of the pits.
Can i use a paint that will stop these little tiny bits coming back or have i got to get them perfect?
the paint i have used so far is this stuff, i got it from a vintage rally on the autojumble from a place selling tractor paints.
i really don't want to paint it then 6 mnths later it start to bubble up again.

 08-06-2008, 01:31 PM
#22
10K+ Poster!!
Only solution to pitting is to get a recirculating shot blast gun...
eg
http://www.northerntooluk.com/produc...artno=1804560E
eg
http://www.northerntooluk.com/produc...artno=1804560E
08-06-2008, 08:33 PM
#23
Only solution to pitting is to get a recirculating shot blast gun...
eg
http://www.northerntooluk.com/produc...artno=1804560E
eg
http://www.northerntooluk.com/produc...artno=1804560E
think thats another thing for payday
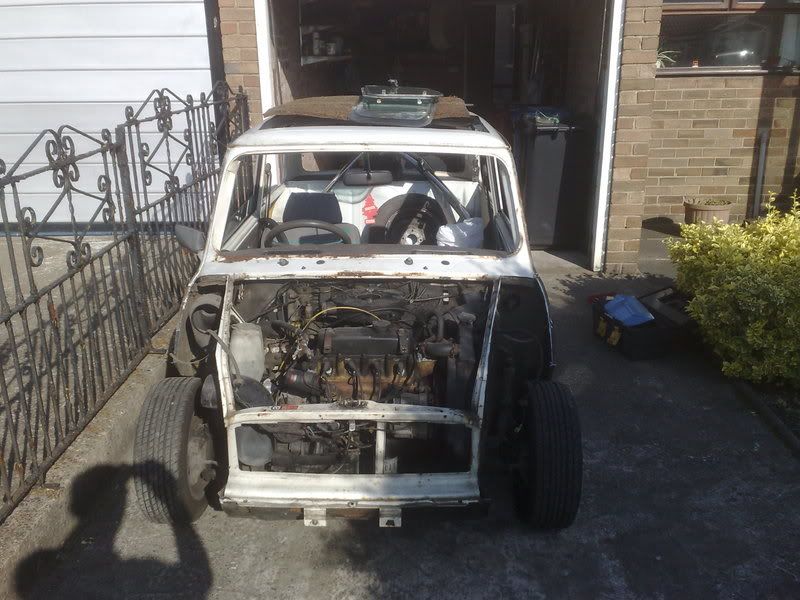
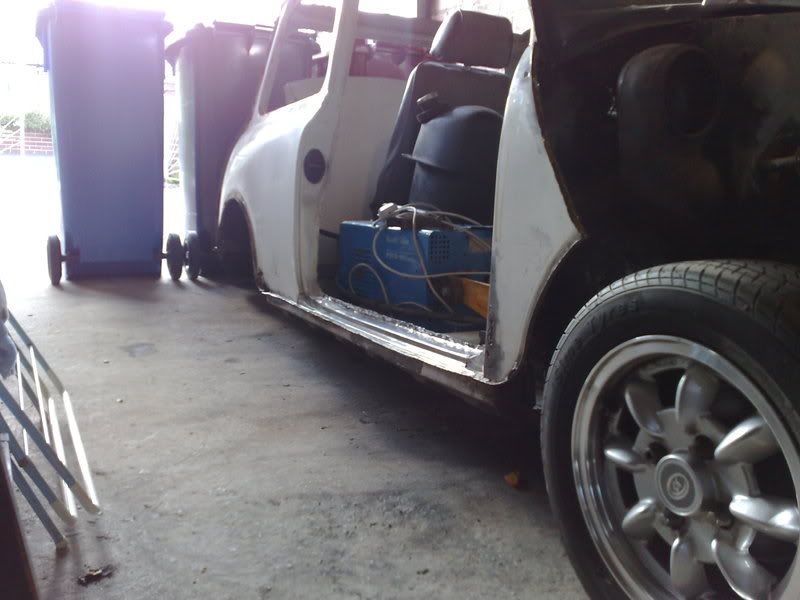
Anyway, Couldn't be bothered with it today, too hot. got the doors off so i can work on them in the evenings at home, going to have a bit of weight loss treatment
Bought myself a spot weld remover drill bit, what a crock of shite, better off with a grinding disk, quicker, easier, and makes a nicer job.
I bolted the drivers seat back in so i could give the engine a run and turn it round to have a look at the other side. Only pulled out onto the (quiet little) road, 3 pt turn and back in, but its bloody nippy with so little weight on
a few pics
Won't be able to do anything for a while now, out testing with the pug next weekend at sweet lamb in wales then its payday so should be getting me a carbon roof, fiberglass 1 piece front, scuttle, solid front subframe mounts and a sandblasting kit
theres my wages spent already
 21-06-2008, 09:38 PM
#24
well it was payday on tuesday so we have progress 
started off by offering up the new scuttle and inner sill, all looks well
then came the solid front subframe mounts

dont wory that isn't rust in the last pic its flakes of rusty metal from the rotten old scuttle above.
this meant i could finish removing the front

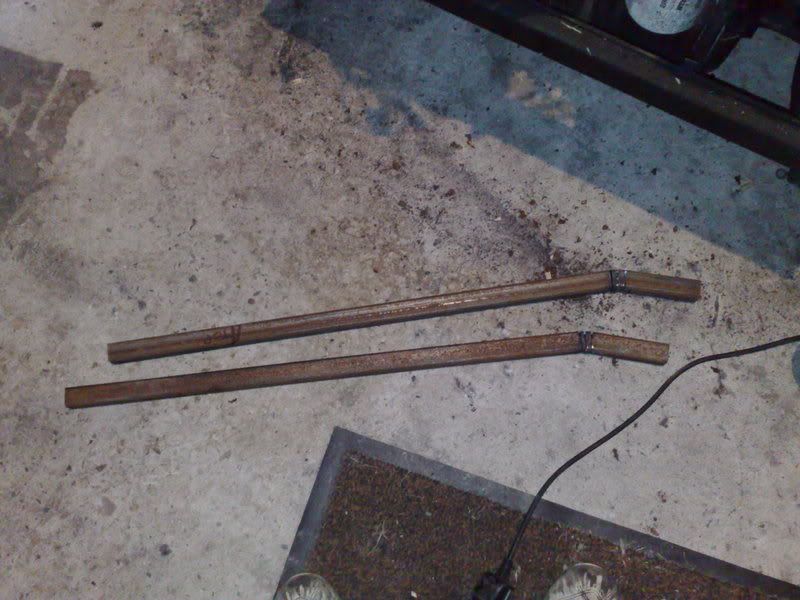
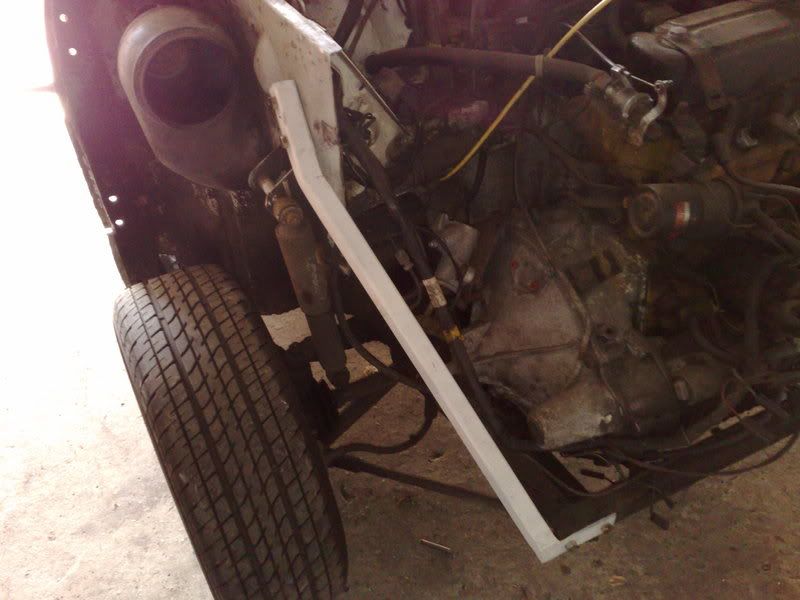
then i made a start on the front brace bars, bent and marked them out so i can finish them at home
then back to bed till monday
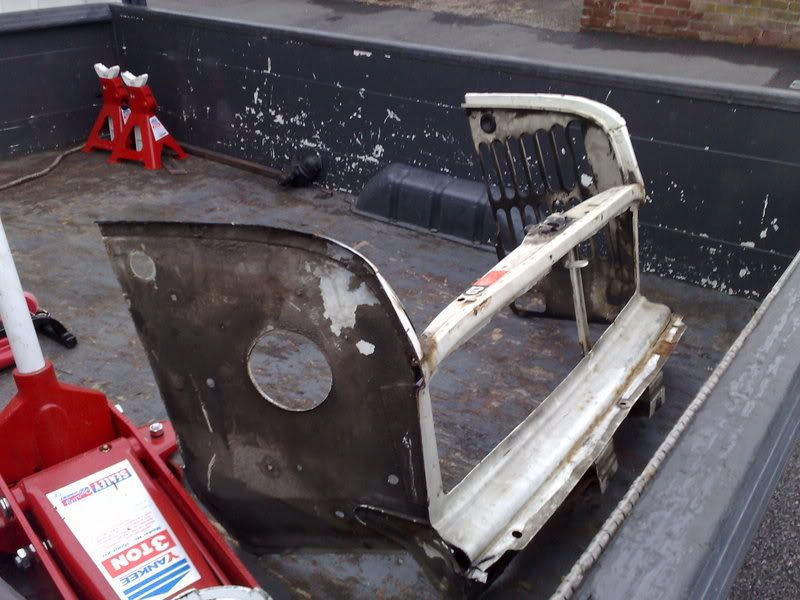
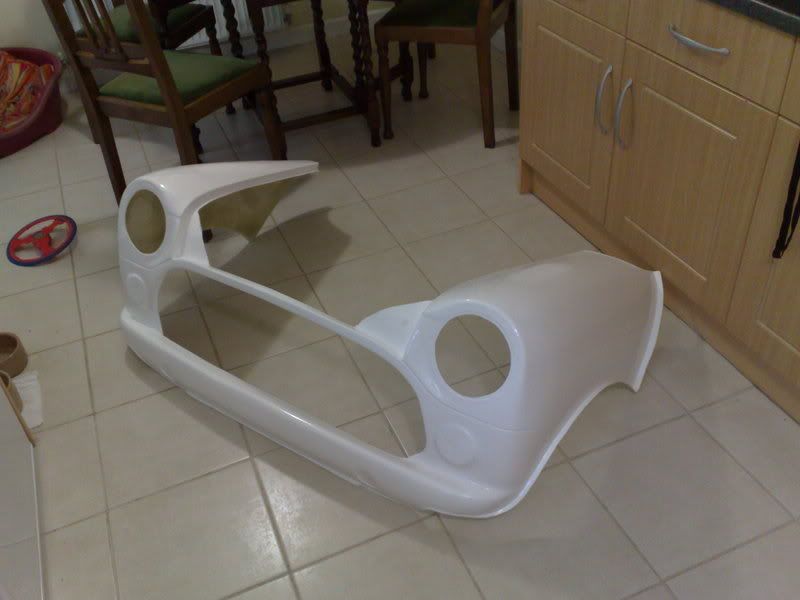
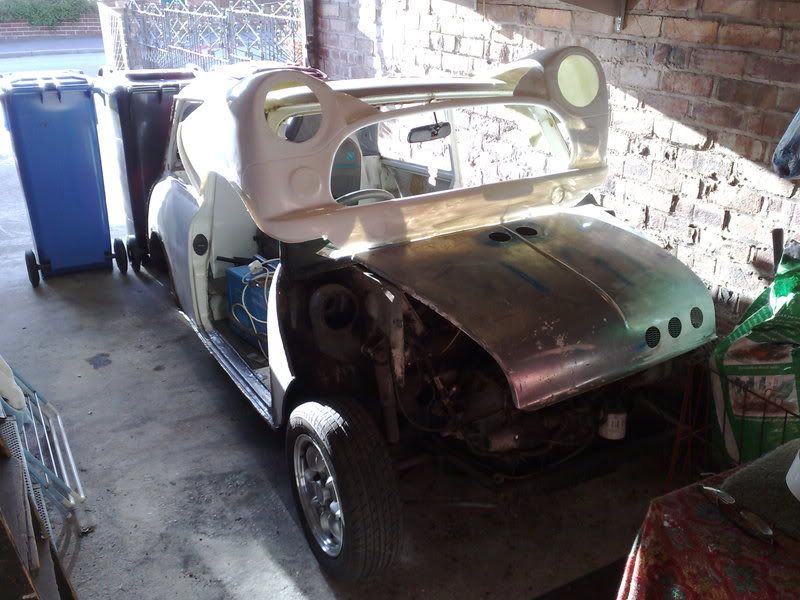
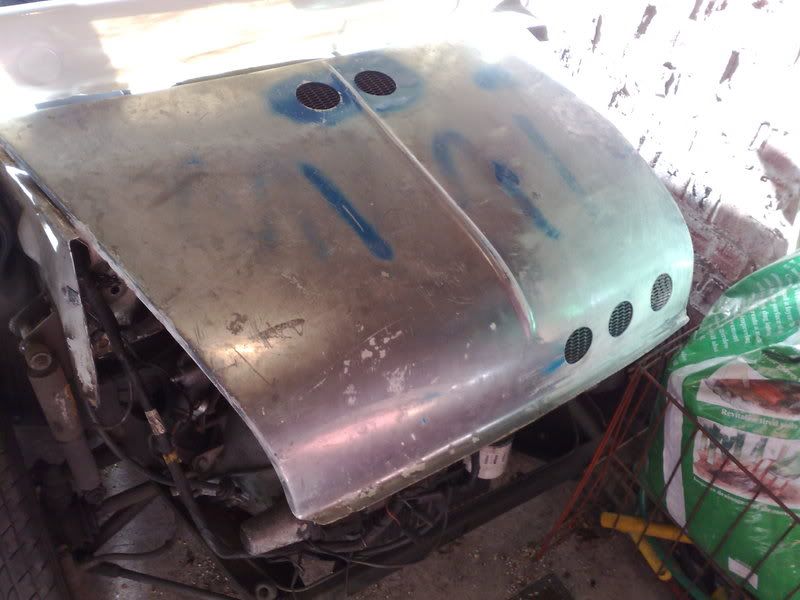
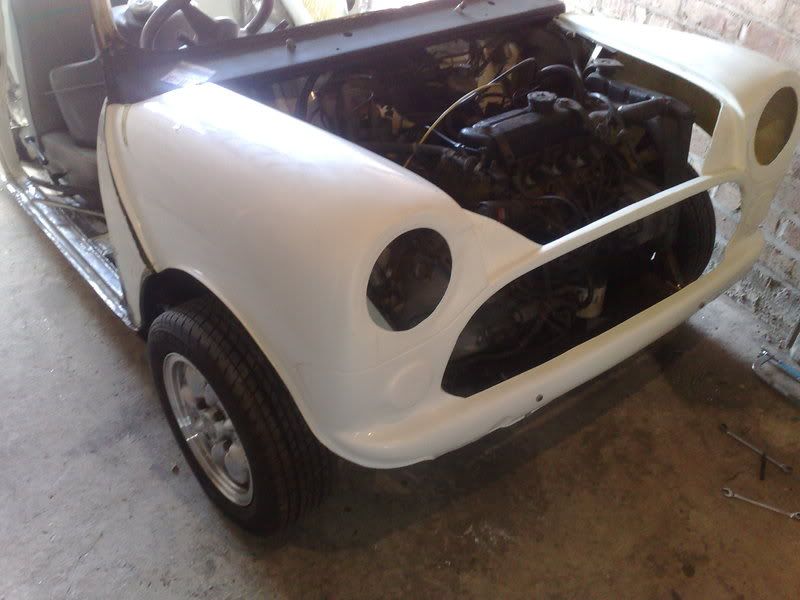
I'm off to coventry tomorrow afternoon to pick up the new front end, decided to go with a 2 piece front with a semi permenant bonnet so i can have 2 bonnets painted, one vented and one with a lamp pod
got a days holiday on mon so more updates then! and hopefully my sand blasting kit will have arrived so i can have a play with that!
started off by offering up the new scuttle and inner sill, all looks well
then came the solid front subframe mounts
dont wory that isn't rust in the last pic its flakes of rusty metal from the rotten old scuttle above.
this meant i could finish removing the front
then i made a start on the front brace bars, bent and marked them out so i can finish them at home
then back to bed till monday
I'm off to coventry tomorrow afternoon to pick up the new front end, decided to go with a 2 piece front with a semi permenant bonnet so i can have 2 bonnets painted, one vented and one with a lamp pod
got a days holiday on mon so more updates then! and hopefully my sand blasting kit will have arrived so i can have a play with that!
 18-07-2008, 05:16 PM
#26
not getting much interest in this but i'll carry on updating anyway.
Had a busy few weeks with shutdown at work, 65 hours overtime in 12 days so not much time to work on the mini, but plenty of pennys to spend on it next month
Saturday i started by getting used to the welder, not touched a MIG in about 3 yrs and was never much good, found a nice setting although it still didn't look very neat
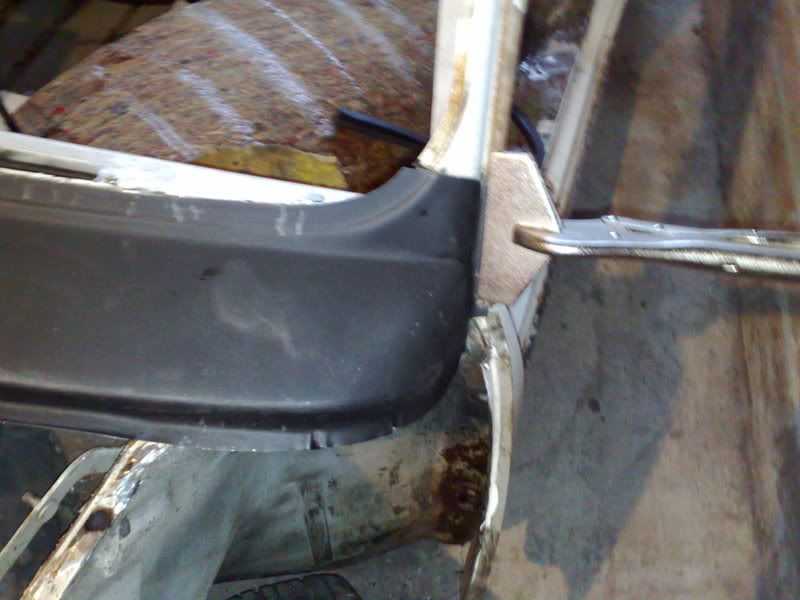
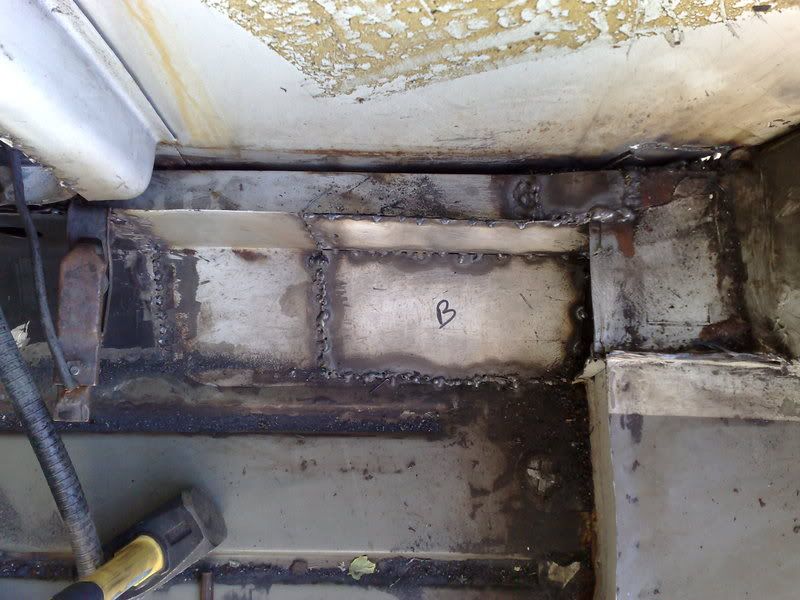
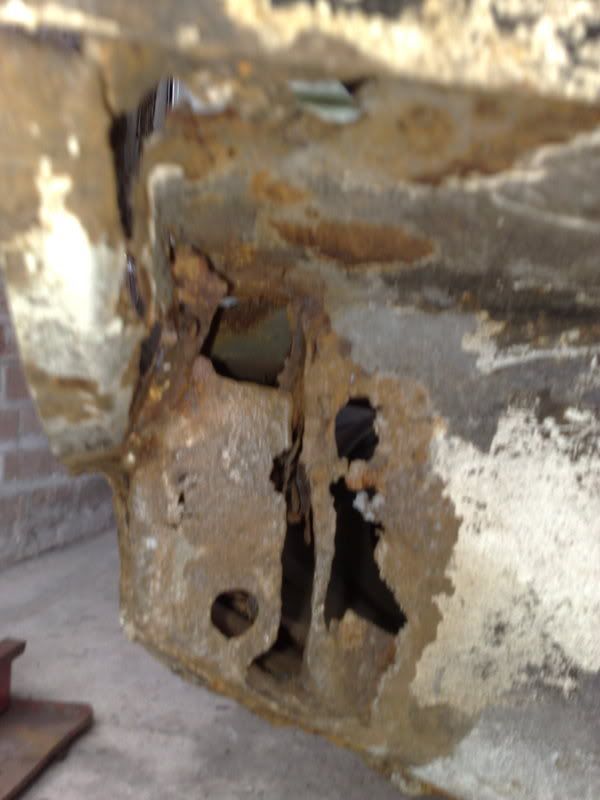
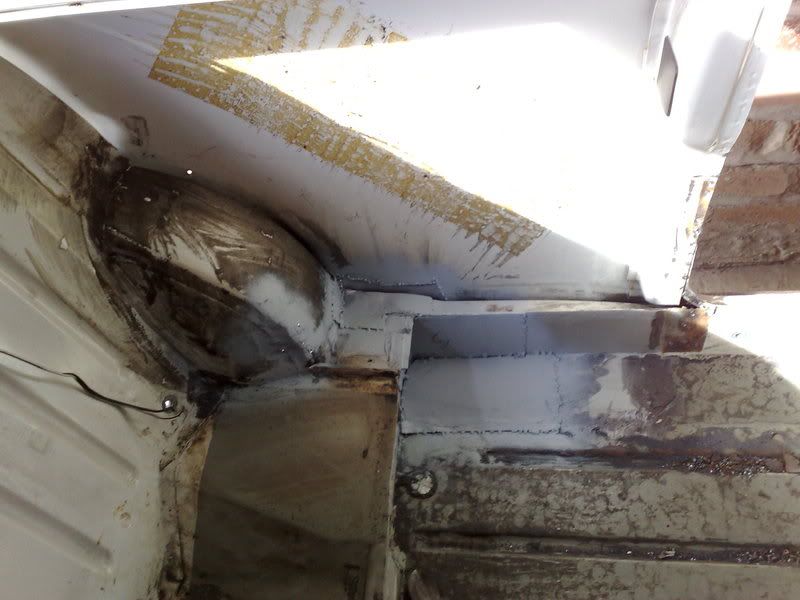
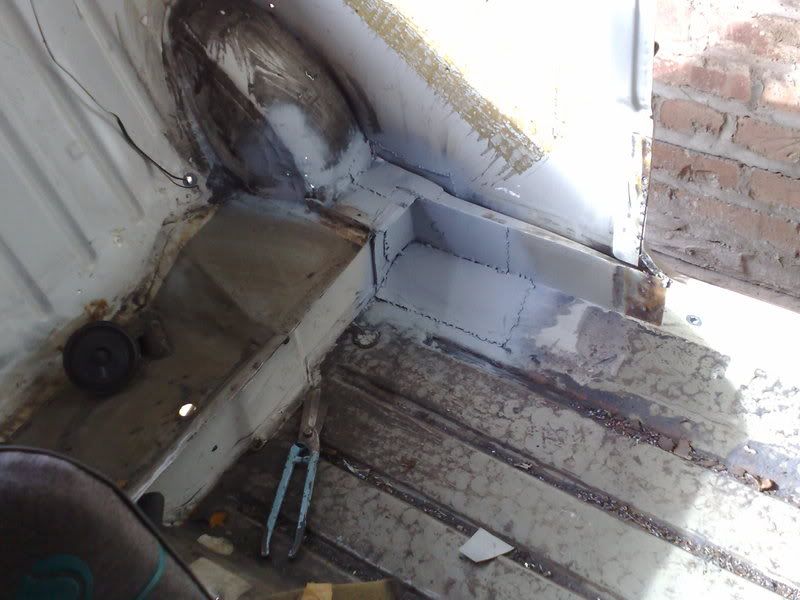
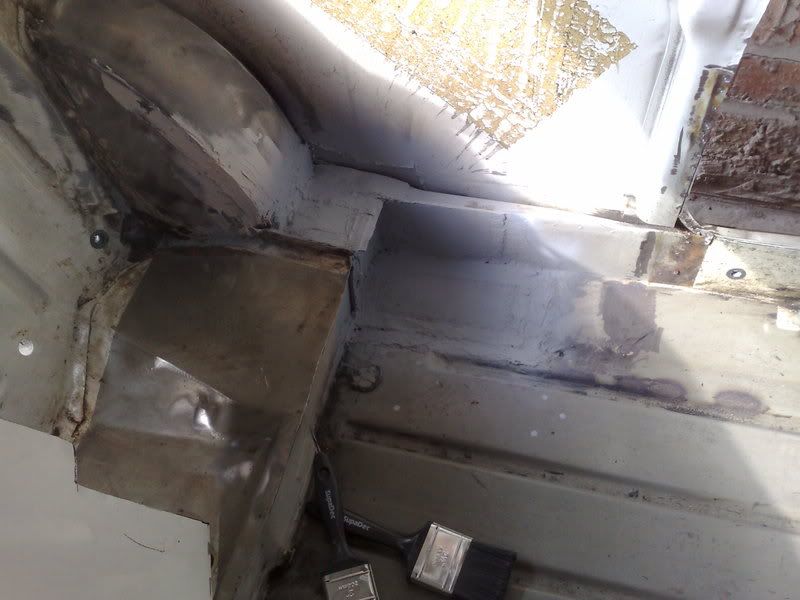
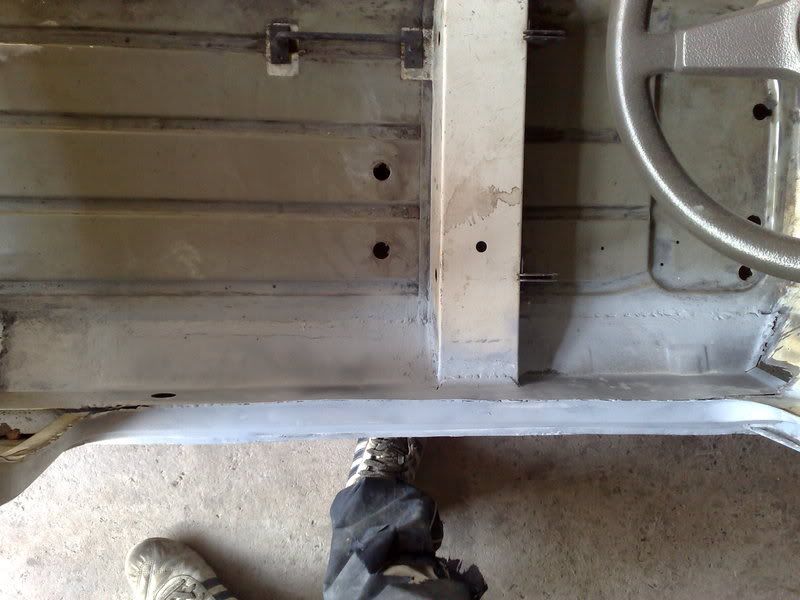
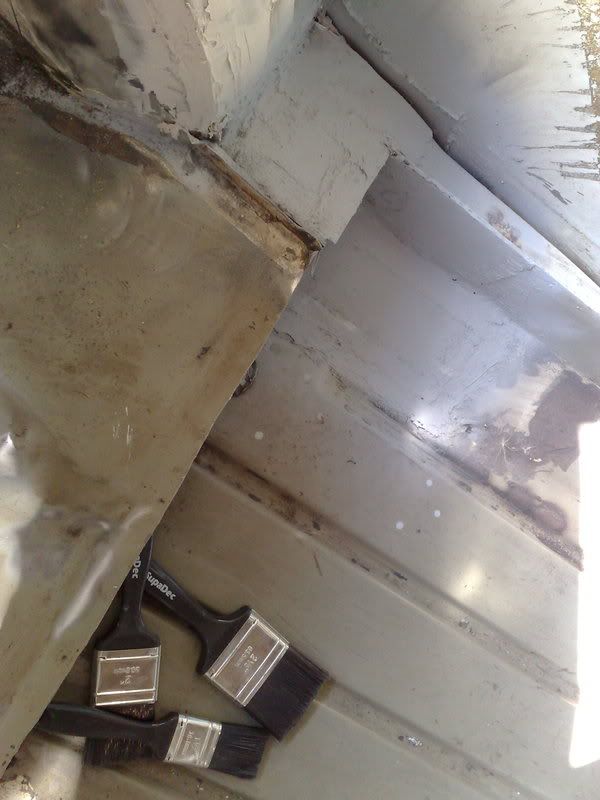
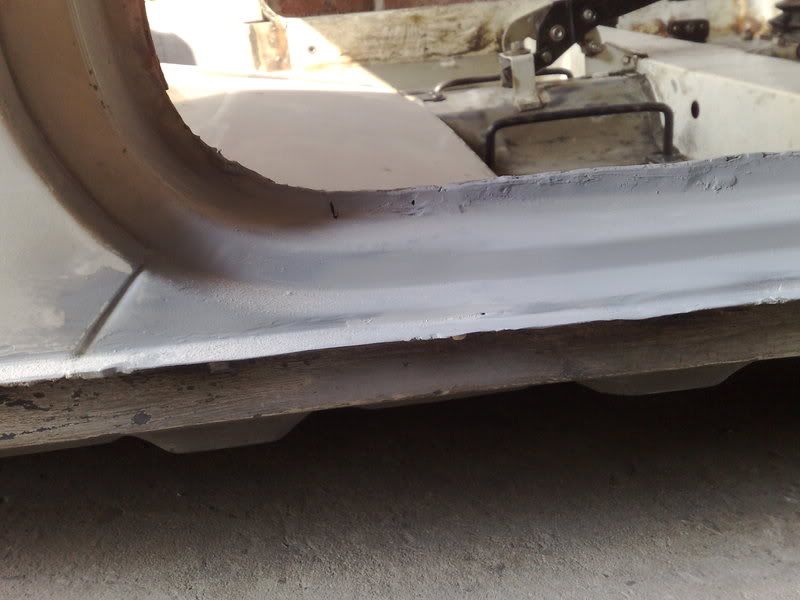
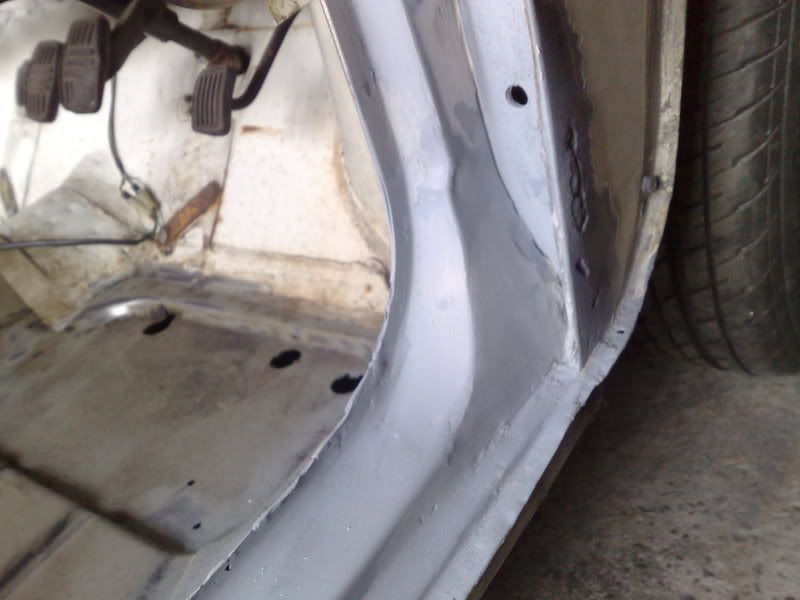
first off, i welded inner sill in, it was onlyt �7 and a damn good fit, might do the other side although it doesn't really need it. also repaired to door step and tacked the scuttle on
then i decided to have a look t the rear corners, i knew i would have to lower the rear subframe but didn't expect to find what i did!! it looks like when its had a new subframe 2 yrs ago 2 of the 4 trunion bolts in the front of the rear subby had sheared off, one looks to have been drilled out smaller (presumably to use an easy out) but then left, the other side had a head but no thread, it looks like someone has glued a bolt head on to keep the MOT tester happy
i ended up taking the entire back end out from underneath, quite an easy job in itself but getting it into the back of my pickup on my own was a different story!!
i was a bit nervous of getting the mini back into the garage against the wall but its so light i just picked it up and wheelbarrowed it in!!!!

1 nearly new standard exhaust for sale btw, its being replaced by a stainless RC40 2" side exit!!!
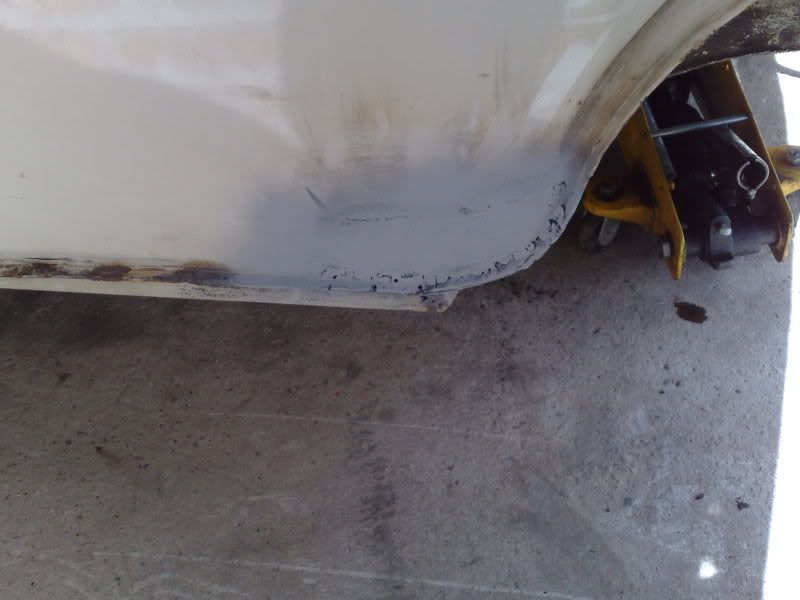
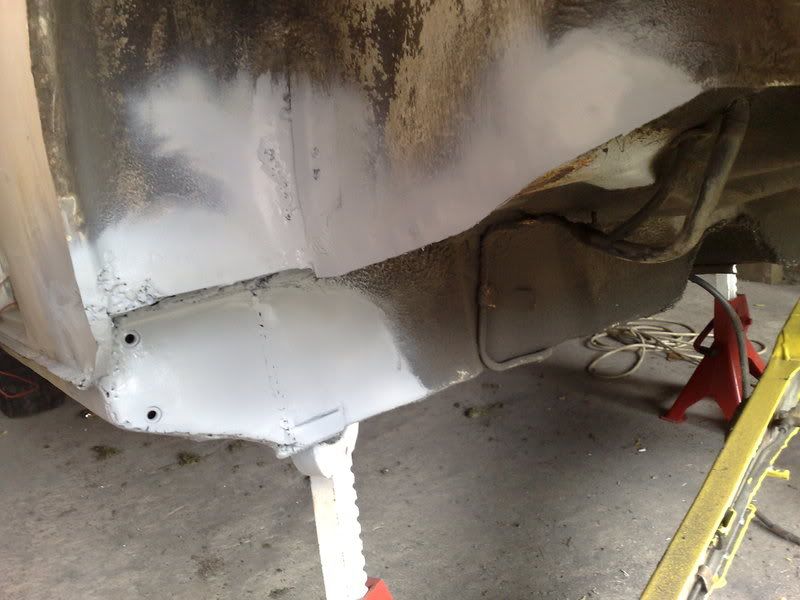
Sunday i started welding up the rear corners cut out the rot and made up an outside and inside edge
from this
to this
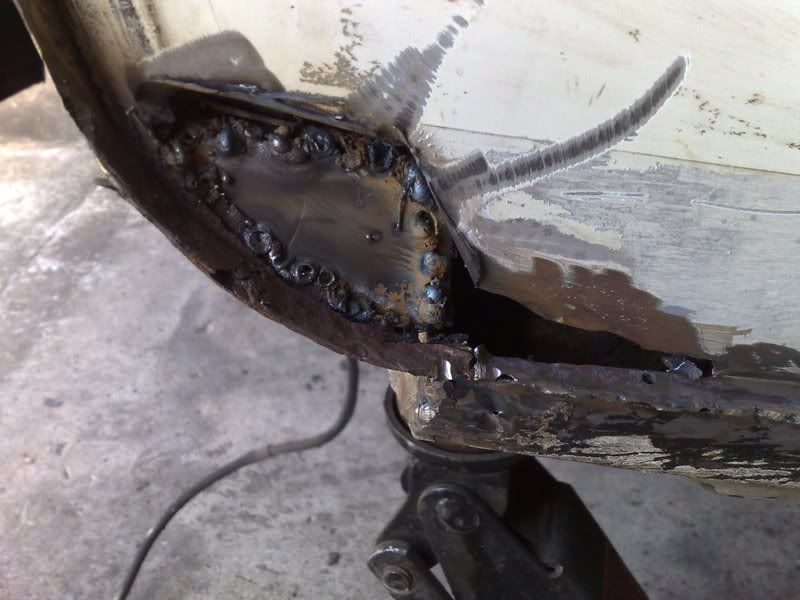
to this (needs a skim of filler and a little more grinding)
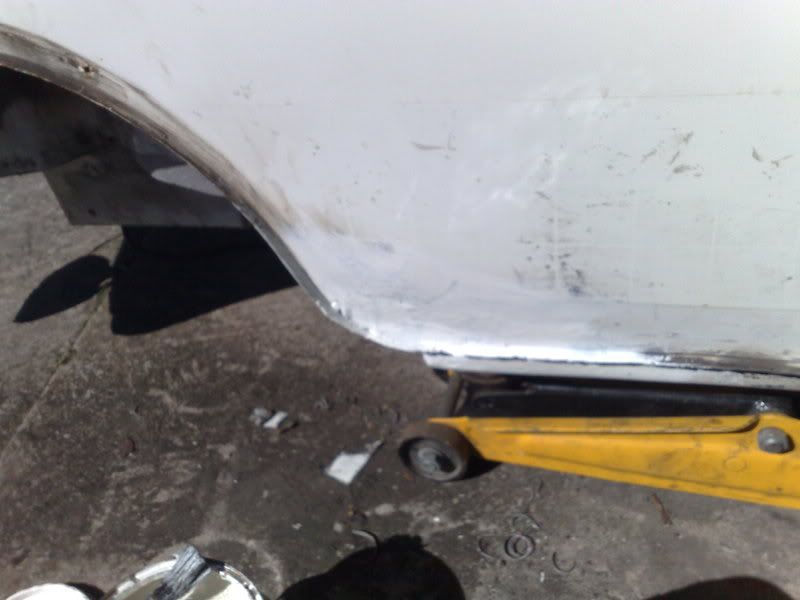
told you my welding wasn't very neat!!!
offered up the front end and my bonnet (only cost us �15 but i think it will be getting skipped)
then cut out any rot and repaired the back end inside
and a few random pics,
the 'slammed' look
nice and clean underneath
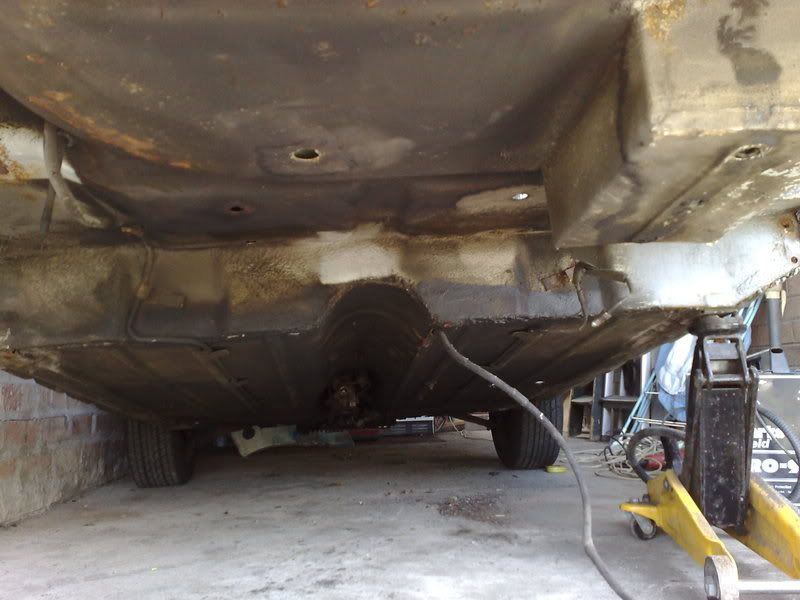
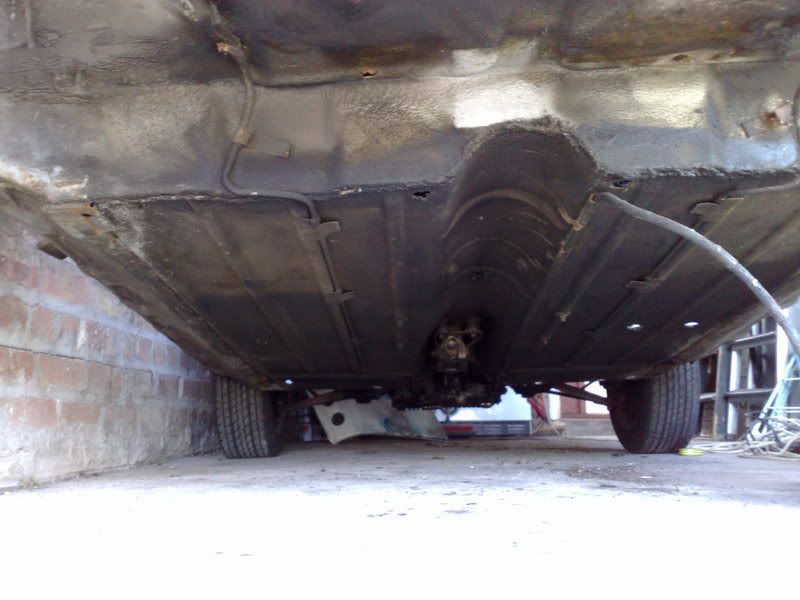
innocent little standard 998, wont be stopping for long!!
Thats all for now folks, more on sunday hopefully got some work to do on the pug tomorrow as it snapped an engine mount, driveshaft and filed half way through the cambelt a few weeks ago at a test day and its got to be fixed and rear beam serviced by 12th august for oulton park track day!!
Had a busy few weeks with shutdown at work, 65 hours overtime in 12 days so not much time to work on the mini, but plenty of pennys to spend on it next month
Saturday i started by getting used to the welder, not touched a MIG in about 3 yrs and was never much good, found a nice setting although it still didn't look very neat
first off, i welded inner sill in, it was onlyt �7 and a damn good fit, might do the other side although it doesn't really need it. also repaired to door step and tacked the scuttle on
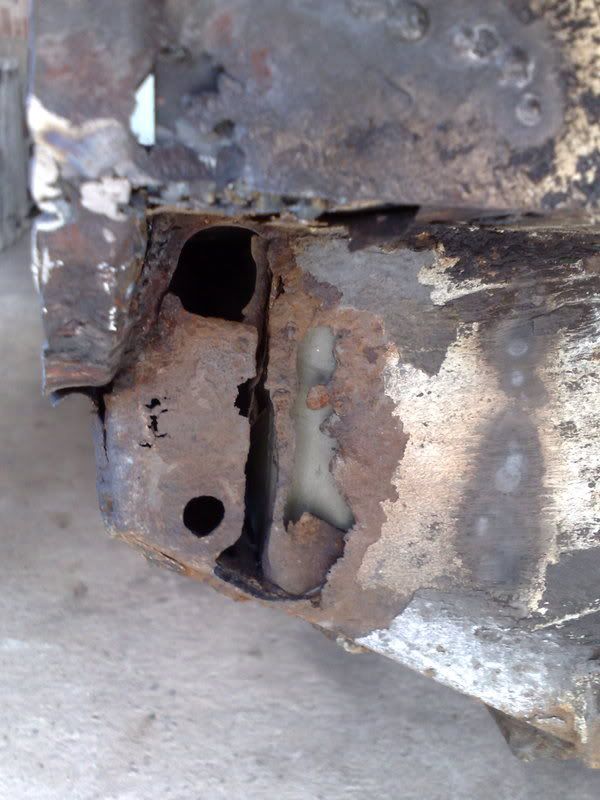
then i decided to have a look t the rear corners, i knew i would have to lower the rear subframe but didn't expect to find what i did!! it looks like when its had a new subframe 2 yrs ago 2 of the 4 trunion bolts in the front of the rear subby had sheared off, one looks to have been drilled out smaller (presumably to use an easy out) but then left, the other side had a head but no thread, it looks like someone has glued a bolt head on to keep the MOT tester happy
i ended up taking the entire back end out from underneath, quite an easy job in itself but getting it into the back of my pickup on my own was a different story!!
i was a bit nervous of getting the mini back into the garage against the wall but its so light i just picked it up and wheelbarrowed it in!!!!
1 nearly new standard exhaust for sale btw, its being replaced by a stainless RC40 2" side exit!!!
Sunday i started welding up the rear corners cut out the rot and made up an outside and inside edge
from this
to this
to this (needs a skim of filler and a little more grinding)
told you my welding wasn't very neat!!!
offered up the front end and my bonnet (only cost us �15 but i think it will be getting skipped)
then cut out any rot and repaired the back end inside
and a few random pics,
the 'slammed' look
nice and clean underneath
innocent little standard 998, wont be stopping for long!!
Thats all for now folks, more on sunday hopefully got some work to do on the pug tomorrow as it snapped an engine mount, driveshaft and filed half way through the cambelt a few weeks ago at a test day and its got to be fixed and rear beam serviced by 12th august for oulton park track day!!
18-07-2008, 09:23 PM
#27
I'm Finding My Feet Here Now

Join Date: Dec 2007
Posts: 125
Likes: 0
Received 0 Likes
on
0 Posts
20-07-2008, 09:15 PM
#28
not a great day today, got the Near side rear corner repaired, my welding was getting better, started to de seam the rear as i'm not having bumpers, then found the rear valance is rotten at the ends, also found some rot in the boot floor where the grommit goes through for the rear fog wiring, although i may be able to fix that with an oversized grommet, also found i need a pass side inner sill,
Then the welder packed up, i'm hoping its just a broken earth strap because i can't afford another one yet,
then when i was tidying up it fell off the jack, put a nice big dent in the rear bench with the top of the jack, but thats hammered out pretty well, so i picked it up and pushed it over my bonnnet was a bit of a mess anyway probably would have ended up getting another one ... mmm carbon
anyhow, pictures
started out looking like this
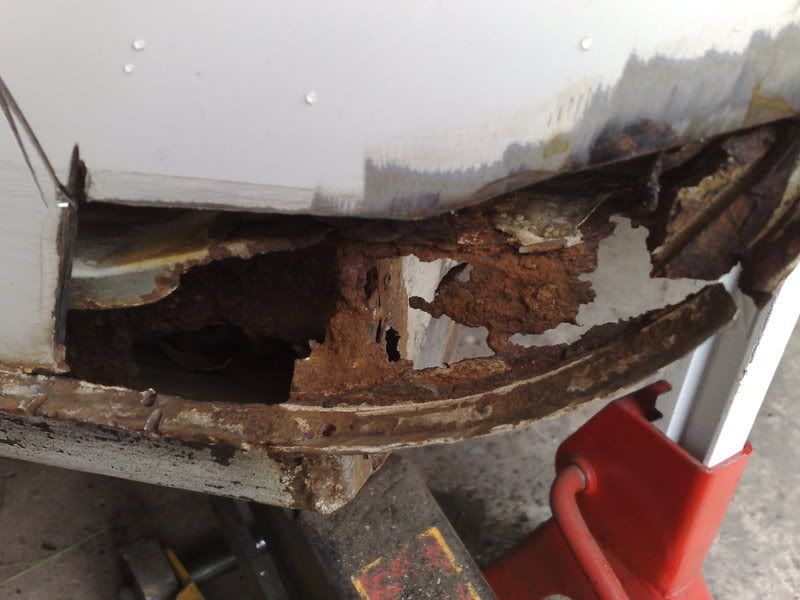
then just to prove my welding is actually welding not just bird poop, this was welded from the other side

now looks like this
still the view from behind because i'm still waiting for repair panels to arrive
partly de seamed rear and rot cut out, this is where i got to when the welder stopped playing
i Borrowed some bolts to fit my home made front brace bars from work 3 weeks ago but i have forgotten them every time i've been to the car, had some other M8 bolts in my tool box this time though so managed to bolt up one of them
unfortunatly no pics of any damage or newly found rot because i was in a bad mood
more soon
Then the welder packed up, i'm hoping its just a broken earth strap because i can't afford another one yet,
then when i was tidying up it fell off the jack, put a nice big dent in the rear bench with the top of the jack, but thats hammered out pretty well, so i picked it up and pushed it over my bonnnet
was a bit of a mess anyway probably would have ended up getting another one ... mmm carbon anyhow, pictures
started out looking like this
then just to prove my welding is actually welding not just bird poop
, this was welded from the other sidenow looks like this
still the view from behind because i'm still waiting for repair panels to arrive
partly de seamed rear and rot cut out, this is where i got to when the welder stopped playing
i Borrowed some bolts to fit my home made front brace bars from work 3 weeks ago but i have forgotten them every time i've been to the car, had some other M8 bolts in my tool box this time though so managed to bolt up one of them
unfortunatly no pics of any damage or newly found rot because i was in a bad mood
more soon
22-07-2008, 10:03 PM
#29
PassionFord Post Whore!!
iTrader: (3)

Join Date: Jun 2003
Location: Maldon, Essex!
Posts: 4,186
Likes: 0
Received 0 Likes
on
0 Posts
Great work fella, keep it up. Where did u get that front end from for �80? was it 2nd hand. Infact, dont tell me coz im getting ideas for a mini project after seeing yours, which is naughty thoughts lol.
28-09-2008, 09:27 PM
#33
Cheers for the replies guys, i stopped updating it on here as nobody seemed interested but i'll do a huge update in a bit
http://www.tdkracing.co.uk/
go on... you know you want to
go on... you know you want to
28-09-2008, 09:51 PM
#35
another week another update
been trying to diagnose the problem with my welder all week, after a loada messing about i decided its fucked s'pose it'll teach me for buying cheap crap out of the buy'n'sell
a new welder should be here mid week coz its my birthday on thursday so theres all my birthday money out of the window
not too much to update this week, its been to hot but got a bit done
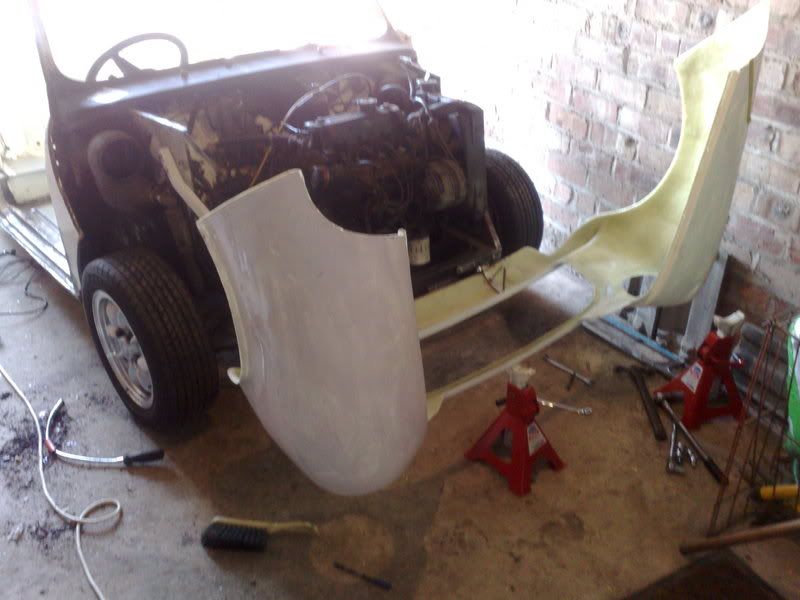
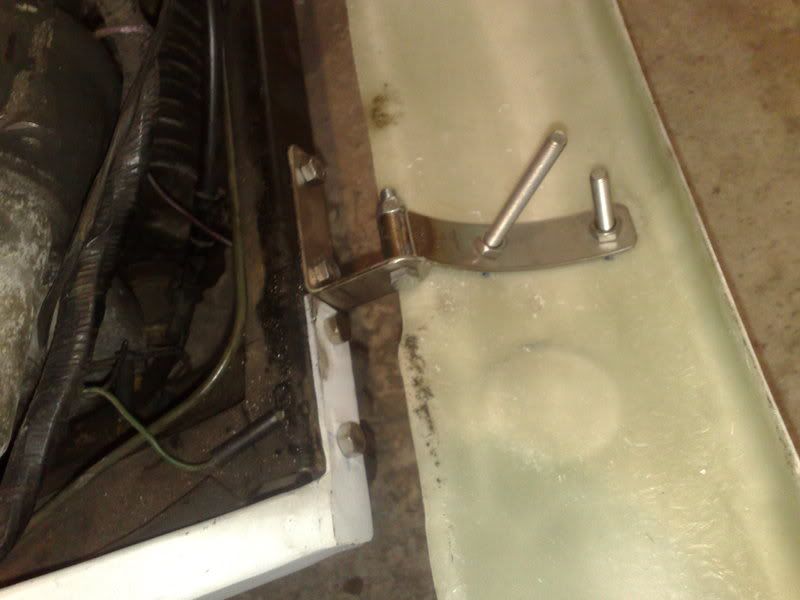
fitted up the flip front but found that the flamin hinges from minispeed make the front end sit too high, an easy enugh fix (make some more in work when no-ones looking but not im not impressed with them at all
fitted my other brace bar aswell,
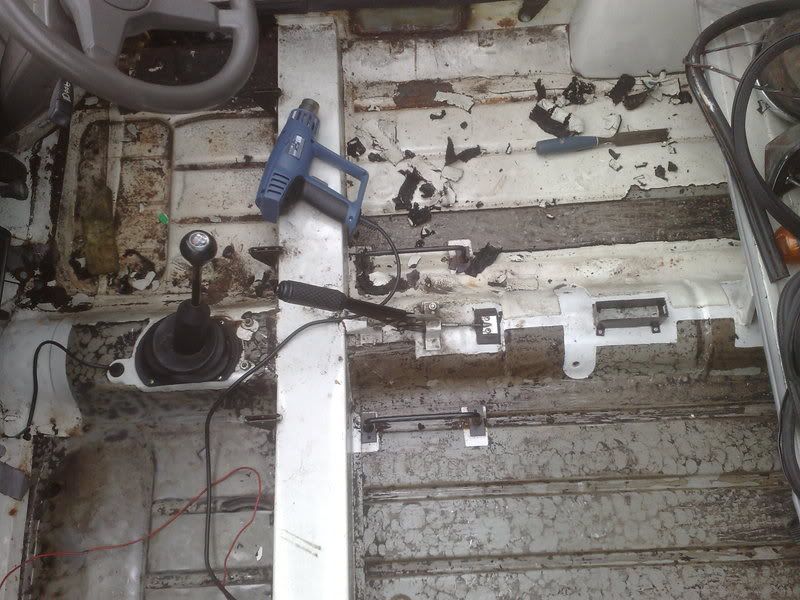
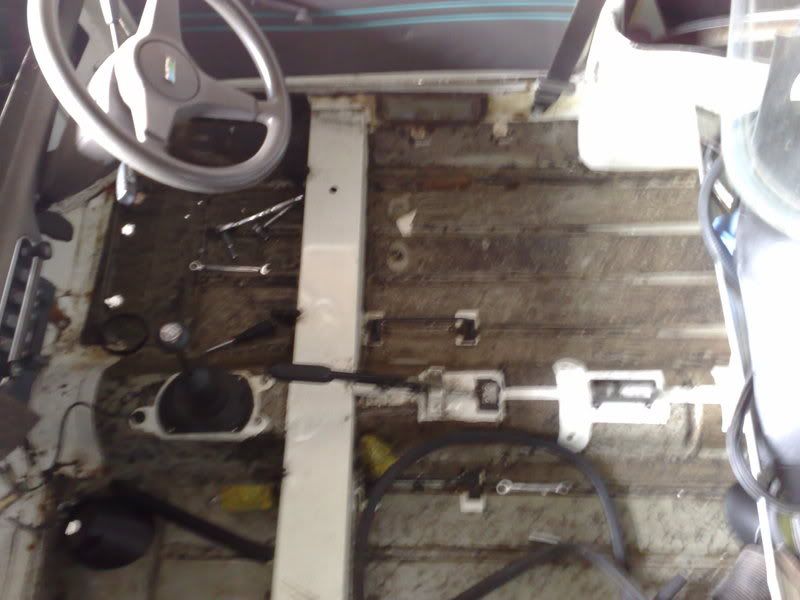
then gave the floor another clean, still trying to get all the reminants of the sound deadening off
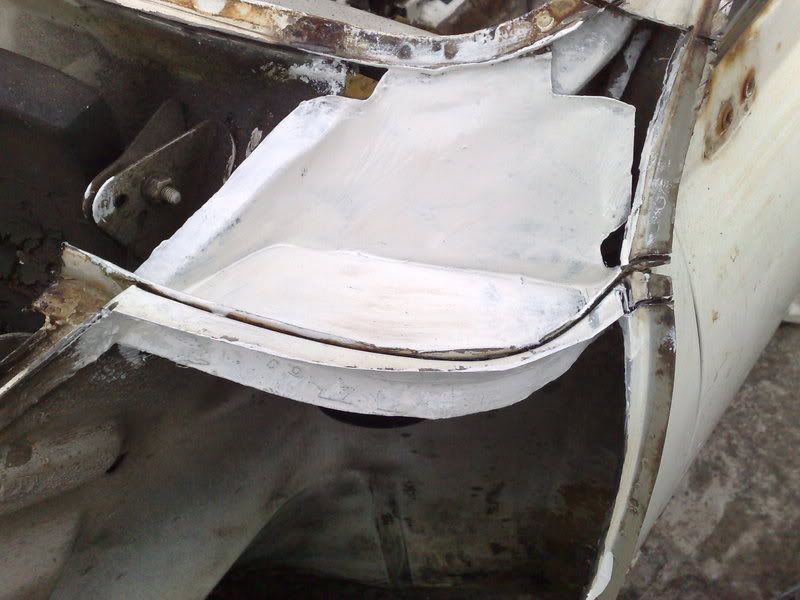
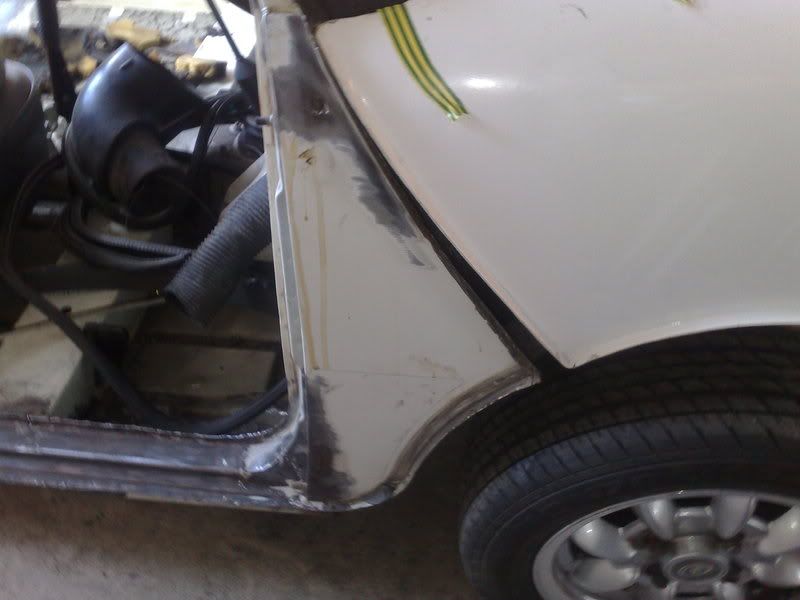
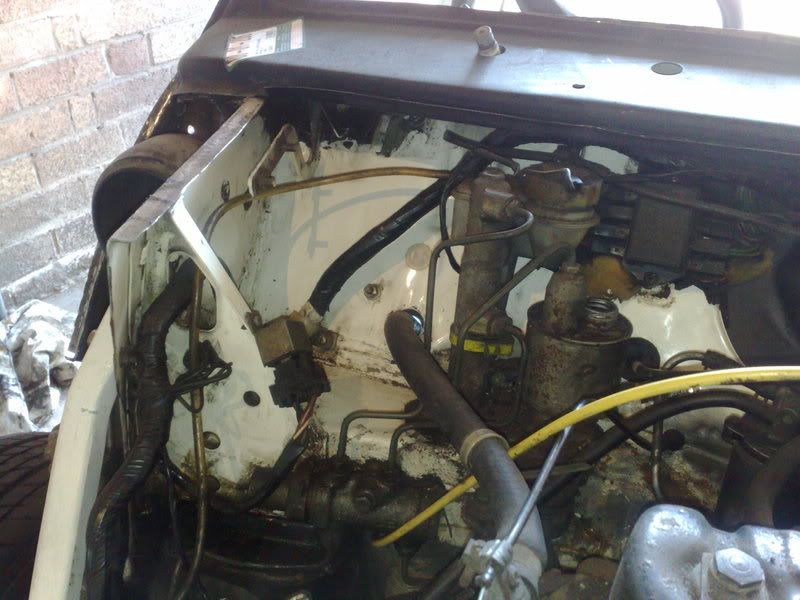
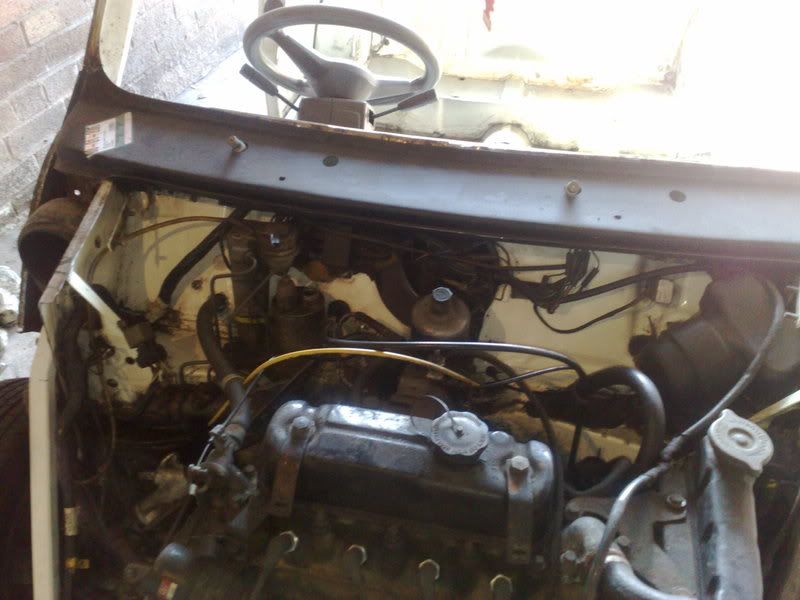
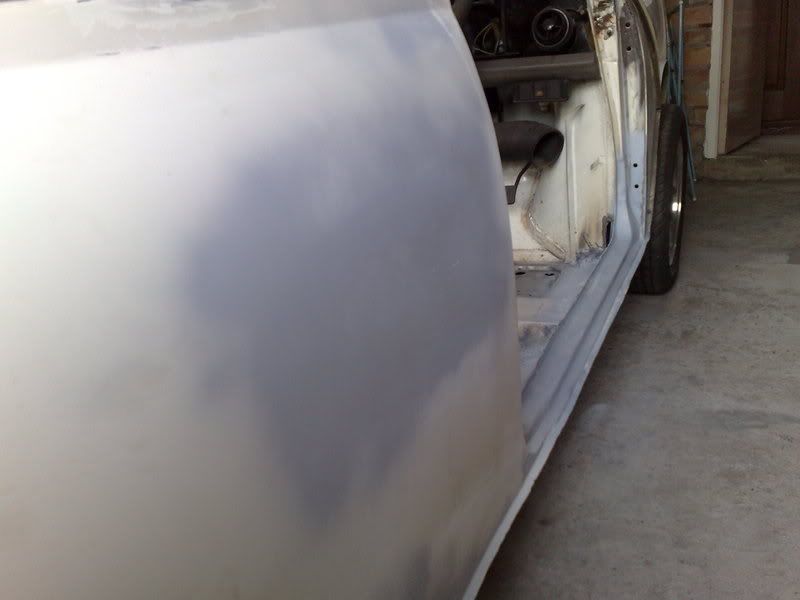
gave the bulkhead a quick wipe with some degreaser, it was black, but it came up nice and shiny! the engine bay is staying white btw, makes it far nicer to work on as its lighter and it is easier to spot leaks
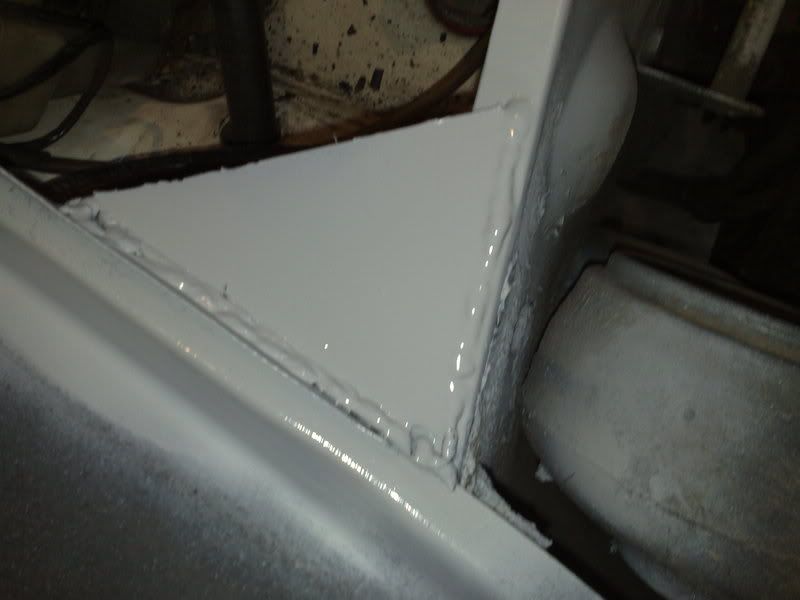
then put some seam sealer on the bits i had finished
i had nothing left really i could be getting on with so i started on the one job i hate, filling, sanding, filling, sanding, its just sooooo boring
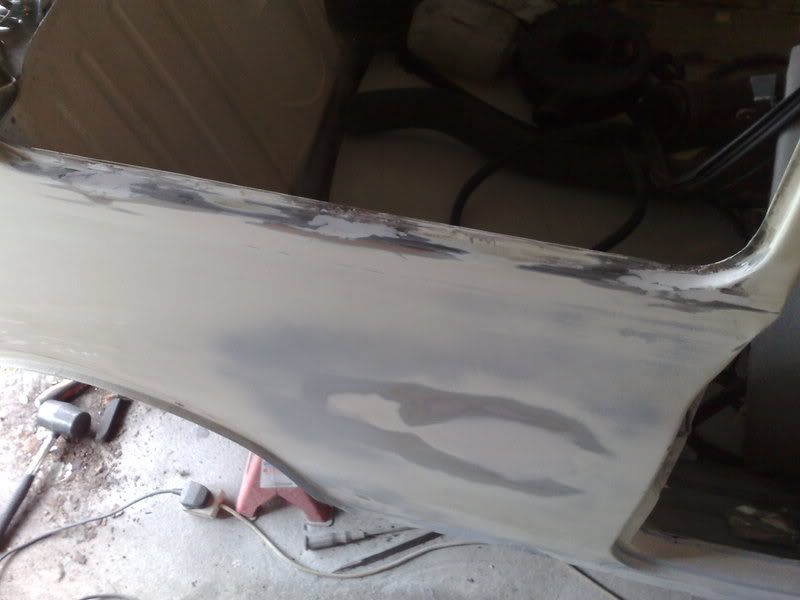
smoothed out a small dent in the rear quater
smooothed in the rear corner repair, pretty happy with this, the lip will be covered and the rest is pretty much spot on
door step repair
a previous repair that had been skimmed over and i only realised it was there when i caught it with the grinder and dissapeared in a cloud of white dust, i had to clean off the filler to see the quality of the repair, was great so skimmed it over again.
thats it for now, as it sits at the mo
should be a welding upate mid week coz i've got a few days off work
been trying to diagnose the problem with my welder all week, after a loada messing about i decided its fucked
s'pose it'll teach me for buying cheap crap out of the buy'n'sell a new welder should be here mid week coz its my birthday on thursday so theres all my birthday money out of the window
not too much to update this week, its been to hot but got a bit done
fitted up the flip front but found that the flamin hinges from minispeed make the front end sit too high, an easy enugh fix (make some more in work when no-ones looking but not im not impressed with them at all
fitted my other brace bar aswell,
then gave the floor another clean, still trying to get all the reminants of the sound deadening off
gave the bulkhead a quick wipe with some degreaser, it was black, but it came up nice and shiny! the engine bay is staying white btw, makes it far nicer to work on as its lighter and it is easier to spot leaks
then put some seam sealer on the bits i had finished
i had nothing left really i could be getting on with so i started on the one job i hate, filling, sanding, filling, sanding, its just sooooo boring
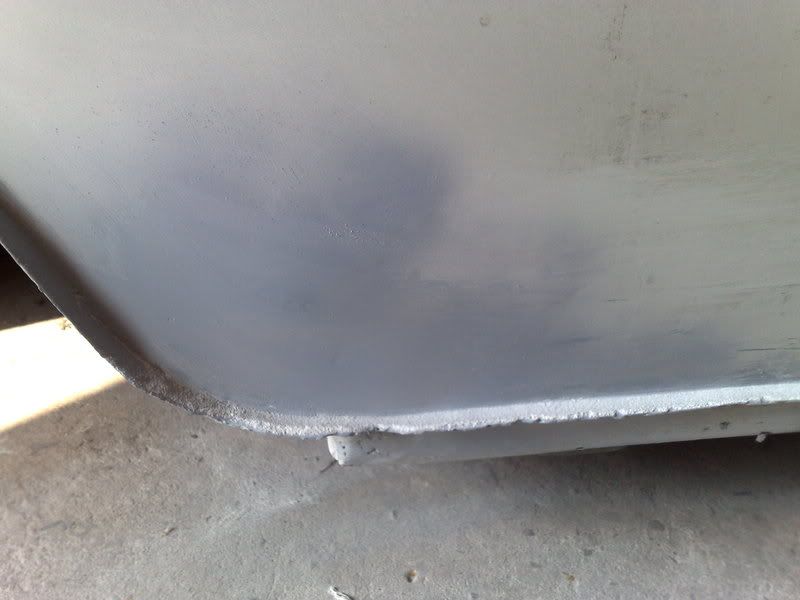
smoothed out a small dent in the rear quater
smooothed in the rear corner repair, pretty happy with this, the lip will be covered and the rest is pretty much spot on
door step repair
a previous repair that had been skimmed over and i only realised it was there when i caught it with the grinder and dissapeared in a cloud of white dust, i had to clean off the filler to see the quality of the repair, was great so skimmed it over again.
thats it for now, as it sits at the mo
should be a welding upate mid week coz i've got a few days off work
28-09-2008, 09:55 PM
#36
had a few days holiday so i did a bit yesterday, i finally got my new welder so repaired the 3 holes found the O/S rear window, also decided i wasn't 100% happy with the dent repair
started on the back end
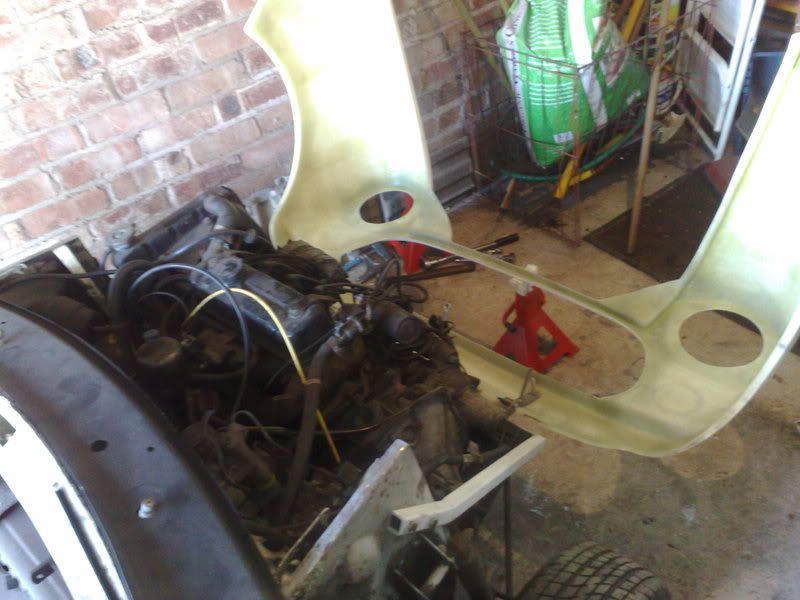
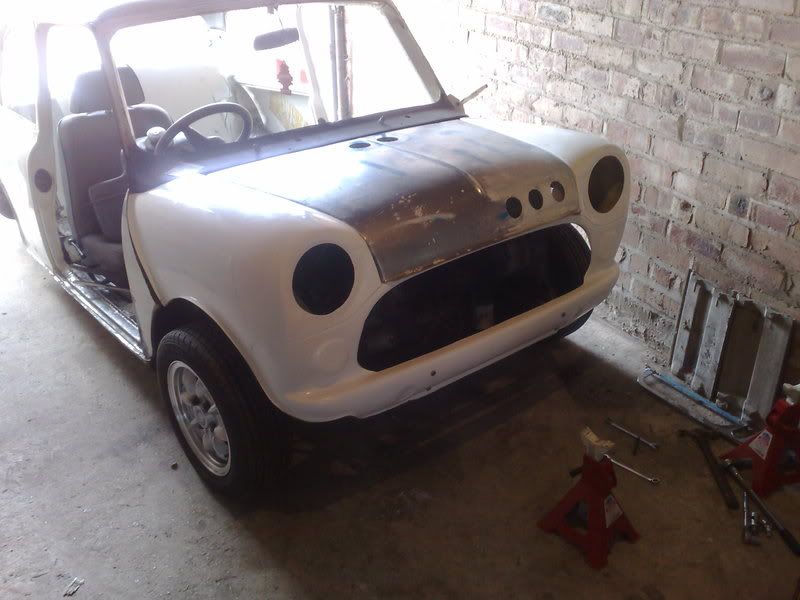
got the front to kinda line up, needs more work yet though as it should just drop into position

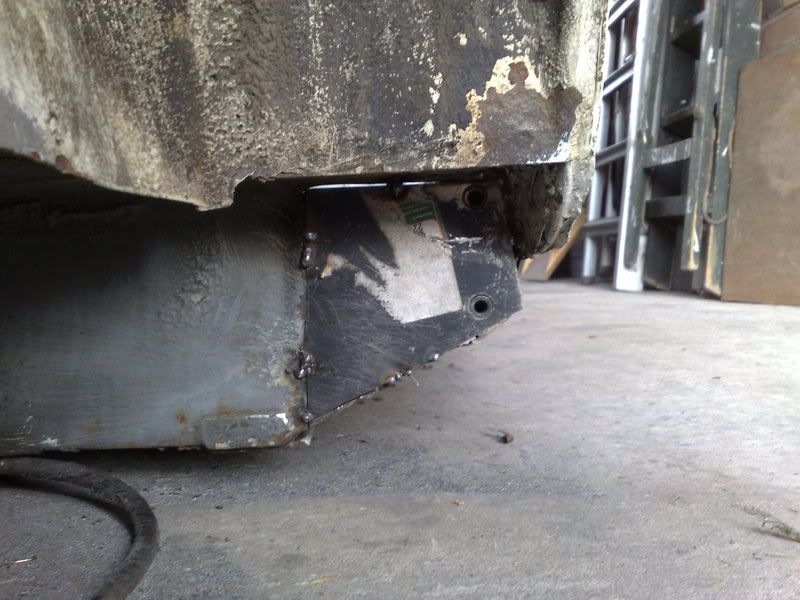
chopped the rear valance off coz i decided it was too thin to mess about repairing
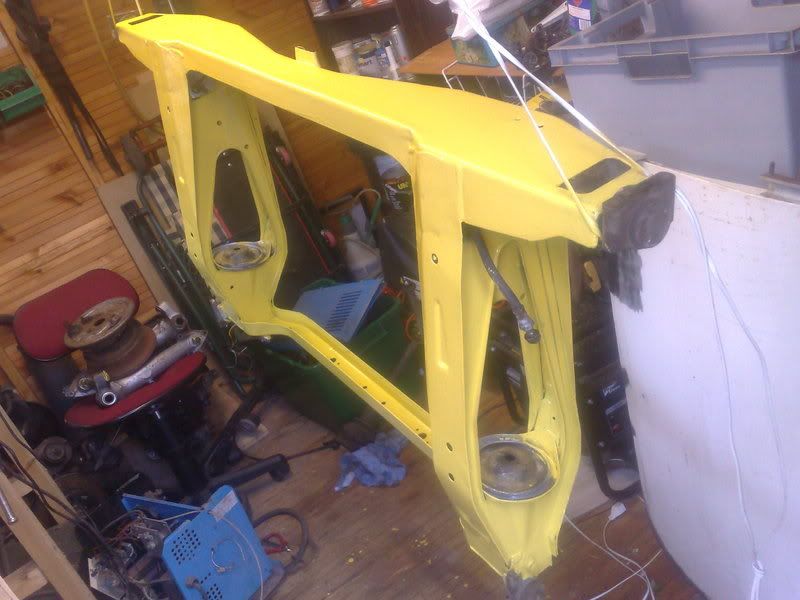
and a sneaky peak at the rear subby, the bufty in me is showing through going to be yellow black and silver sll freshly painted up ith a nice clean shiny black flooorpan
started on the back end
got the front to kinda line up, needs more work yet though as it should just drop into position
chopped the rear valance off coz i decided it was too thin to mess about repairing
and a sneaky peak at the rear subby, the bufty in me is showing through
going to be yellow black and silver sll freshly painted up ith a nice clean shiny black flooorpan
28-09-2008, 09:58 PM
#37
got a bit more done this weekend,
picked up a new rear valance, cut the lip off and welded it on
nice smooth bum (although there is a bit of a line across the back end thatts going to take a fair bit of work to recreate)
got the scuttle on propperly, just got to flapper wheel the welds off to make sure the windscreen seals
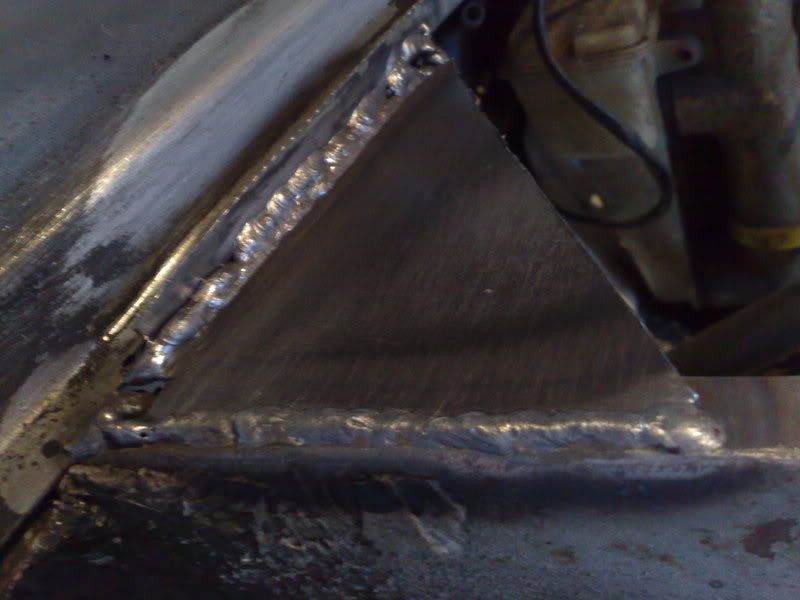
welded some triangles on for the bonnet pins, gettting better at this welding lark now
splash of etch primer
got the rear subby mount tacked on, going to take the subframe back over next time and check its right befor i weld it fully,took friggin ages as a was scared of getting it out of line
Sorted out my rollcage aswell, going for an FIA approved OMP 6 point bolt in (�330 from demon theives) with 4 extra attatchment points to the top ofthe screen and the B pillar same as the Pug and an extra couple of lengths of CDS welded in, one below the dash and one for the harnesses. The extra welding will mean it loses its Homolgolation but it doesn't need to be FIA approved, its never going near a rally stage!! THe welding to the cage will be done by Ellis welding at northwich, they do a lot of work for us at work so i'm hoping for a decent price
picked up a new rear valance, cut the lip off and welded it on
nice smooth bum (although there is a bit of a line across the back end thatts going to take a fair bit of work to recreate)
got the scuttle on propperly, just got to flapper wheel the welds off to make sure the windscreen seals
welded some triangles on for the bonnet pins, gettting better at this welding lark now
splash of etch primer
got the rear subby mount tacked on, going to take the subframe back over next time and check its right befor i weld it fully,took friggin ages as a was scared of getting it out of line
Sorted out my rollcage aswell, going for an FIA approved OMP 6 point bolt in (�330 from demon theives) with 4 extra attatchment points to the top ofthe screen and the B pillar same as the Pug and an extra couple of lengths of CDS welded in, one below the dash and one for the harnesses. The extra welding will mean it loses its Homolgolation but it doesn't need to be FIA approved, its never going near a rally stage!!
THe welding to the cage will be done by Ellis welding at northwich, they do a lot of work for us at work so i'm hoping for a decent price
28-09-2008, 10:04 PM
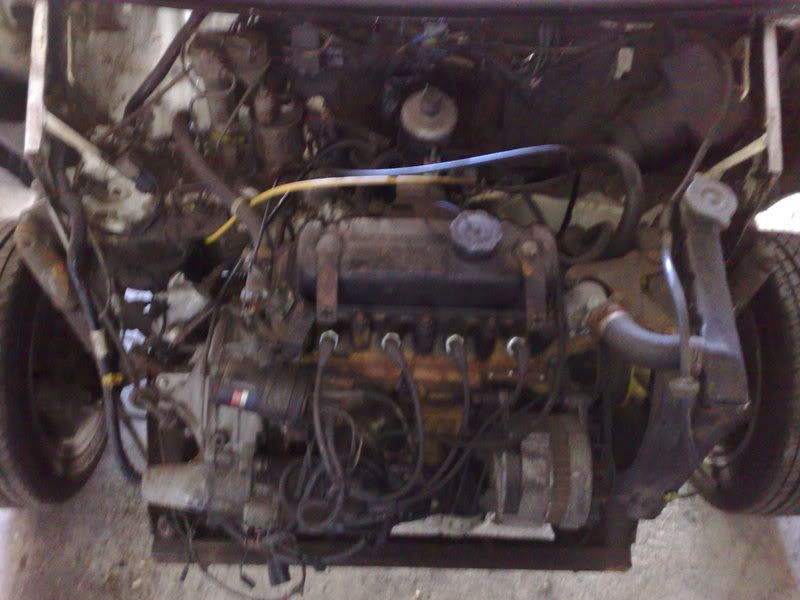
#38
then picked up my new engine
i bought the engine with very low compression accross all 4 cylinders, aparently it was fine, then stood for 6 months, then wouldn't run, well anyway, i've been fiddling!
so far the spec of the engine looks like
1380cc built by MED back in 1992
Original engine was a cooper 'S'
hence: double valve springs
and 11 stud head
keith dodd forged 1.5:1 roller rockers
kent 286 cam
stage 3 MED head, fully ported and polished.
omega pistons
standard but freshly rebuilt gearbox (work done by guessworks)modified oil take of from the pump
electronic dizzy but missing the control module
started work tonight by attatching my adapter made in work and hooking up the compressor, got to 40 psi and started leaking out of the inlet port so either shot valve seats or sticking valves.
since the engine was built so long ago i decided it probably wants a freshen up anyway so i whipped the head off, bores look good, popped a couple of valves out and it just seems like everythings just a bit tight, next step i think will be off to crewe engines or similar to have a little bit of a freshen up.
then i'll drop the g'box off, inspect the crank, and stick her back together again, easy as that
just got to find a HIF44 now if anyone knows of anything going cheap?
resisting the temptation to stick some lower compression ratio pistons in and a turbo
anyway, some pics
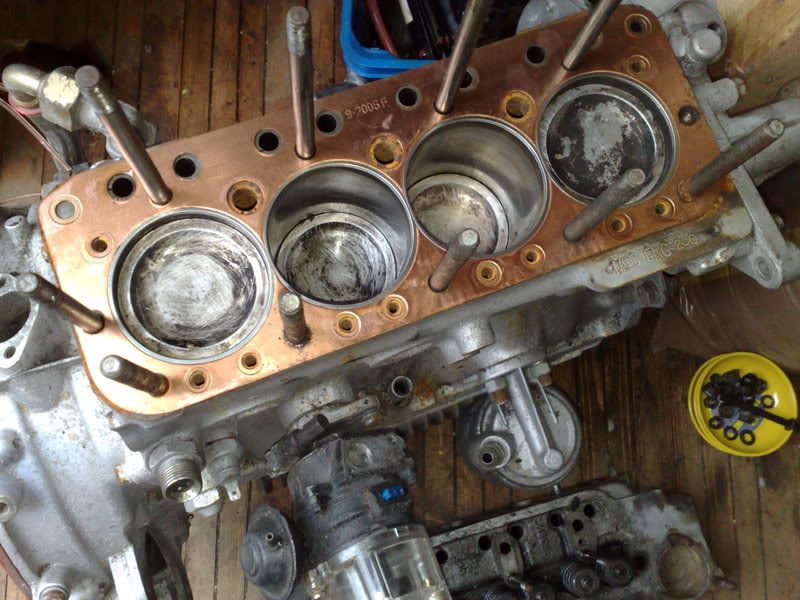
how on earth head gaskets don't pop every 2 mins i dont know
i bought the engine with very low compression accross all 4 cylinders, aparently it was fine, then stood for 6 months, then wouldn't run, well anyway, i've been fiddling!
so far the spec of the engine looks like
1380cc built by MED back in 1992
Original engine was a cooper 'S'
hence: double valve springs
and 11 stud head
keith dodd forged 1.5:1 roller rockers
kent 286 cam
stage 3 MED head, fully ported and polished.
omega pistons
standard but freshly rebuilt gearbox (work done by guessworks)modified oil take of from the pump
electronic dizzy but missing the control module
started work tonight by attatching my adapter made in work and hooking up the compressor, got to 40 psi and started leaking out of the inlet port so either shot valve seats or sticking valves.
since the engine was built so long ago i decided it probably wants a freshen up anyway so i whipped the head off, bores look good, popped a couple of valves out and it just seems like everythings just a bit tight, next step i think will be off to crewe engines or similar to have a little bit of a freshen up.
then i'll drop the g'box off, inspect the crank, and stick her back together again, easy as that
just got to find a HIF44 now if anyone knows of anything going cheap?
resisting the temptation to stick some lower compression ratio pistons in and a turbo
anyway, some pics
how on earth head gaskets don't pop every 2 mins i dont know
28-09-2008, 10:06 PM
#39
Looks like the engine is gonna have to go on hold for a little while until i have got the funds, pretty much everything i have looked at is scrap [:^(]
so far i need:
valves
valve guides
double valve springs
seats re-cutting
new rockers (discoverd today mine are FUBAR!)
probably a new 286 cam
timing chain
oil cooler and pipework
radiator & fan
fuel pump and press regulator
oil pump
bearings
piston rings
diff
rocker cover
full gasket set
clutch release bearing
ignition system
hif44 or twin SU carb
inlet manifold
full exhaust including LCB manifold
Engine mounts
Rolling road set up
and probably more (hopefully not a new crank!!)
a bit gutted as i was hoping it was a simple fix but i suppose its the gamble you take.
28-09-2008, 10:10 PM
#40
had an afternoon on it on sunday, took my freshly painted subframe back over, and it now needs painting again!
thought i'd get the subframe mounts done, wasn't looking forward to this as i knew it was going to be a trial and error job, luckily it only took 3 attempts and its spot on, not easy getting the subframe back into position and bolts in on your own!!! i had to operate the jack with my feet
Pictures:
Quite chuffed really
also got the boot floow cleaned up of any loose waxoyl, and any bits of surface rust treated so that can be undersealed next week ready for the subframe as that just needs hi-los now and its ready for refitting!
also had a bit more of a go on the floorpans. nearly there!
also i had a bit of a go with tidying up the de-seamed rear, its getting there but still far from happy with it
so apart from tubbing the rear arches and some tabs on the A pillars for the flip front i THINK this is the only bit left to sort out
----------------------------------
decided to stop being a big girls blouse and get on with the engine build
had a look around spares for sale on TMF and came up with these beautys!!!
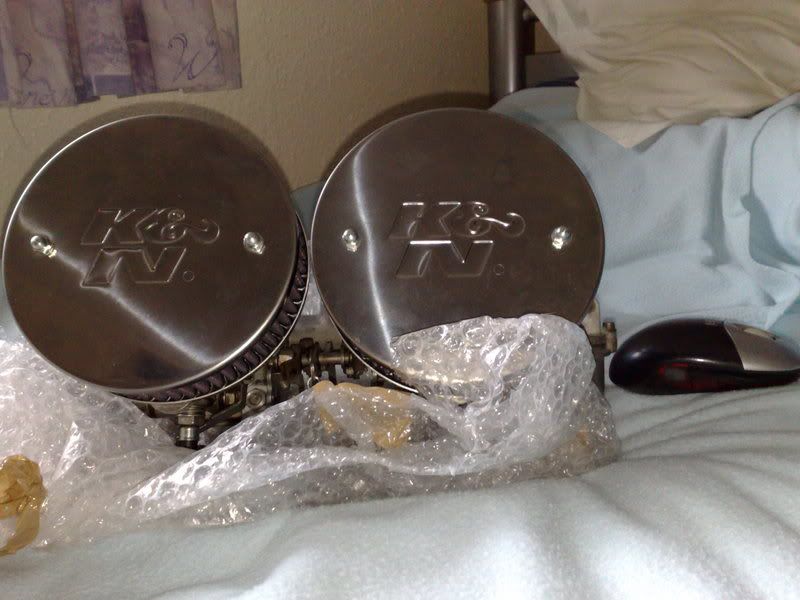
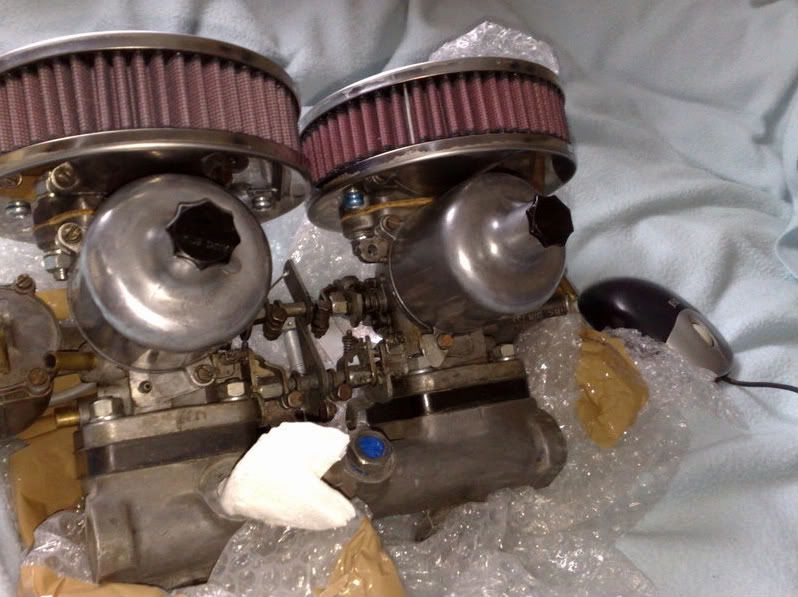
Twin 1 3/4" SU HS6's with 2 brand new K&N's and a nice smooth inlet manifold too, although i will be port matching this to the head and the gasket
check the computer mouse for size comparion
�570 new at minispares, these have done about 5 miles since a full rebuild and are absolutly mint! i payed a hell of a lot less than �570 lol
so today i have been to Derby, then up to sale to pick up a grill and rocker cover, although the grill will only be used to get everything cut and lined up coz its external bonnet release and i really want a MK1 cooper grille.
I'll take a few pics of the grill and rocker cover in a bit, its a metro (i think) slanted top one, should look the dogs danglies painted up and on the car
----------------------------------
did a bit more tonight, went a bit bufty on my new rocker cover with the brasso (need to get some autosol) needs a lot more work yet but not bad for a fiver [ ]
]
did a quick mock up with the carbs and head
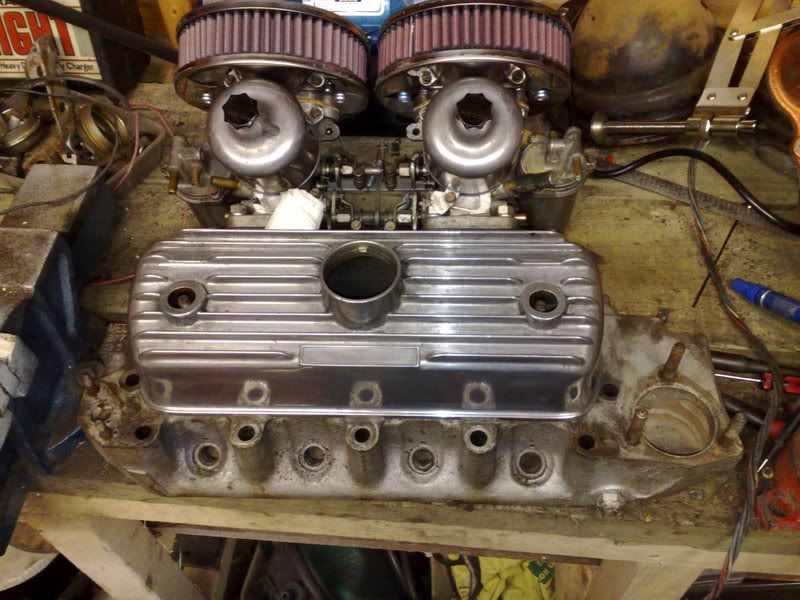
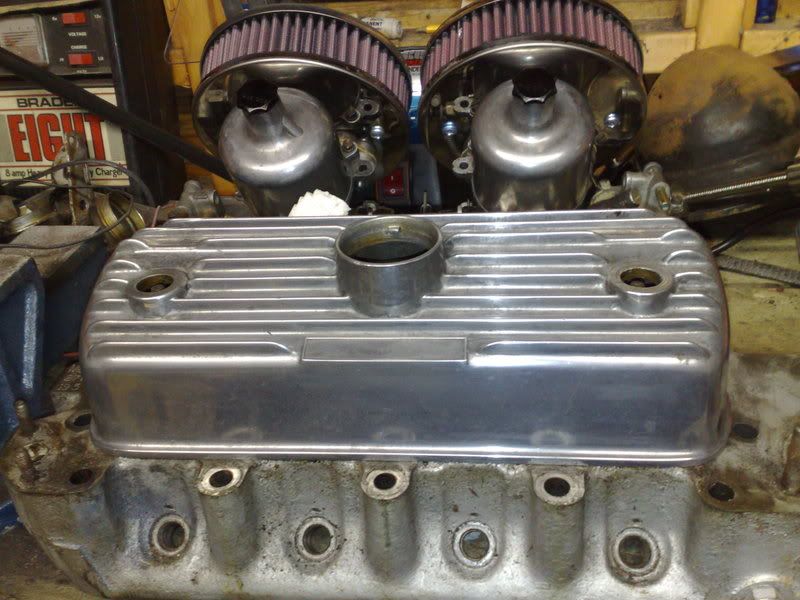
love it []
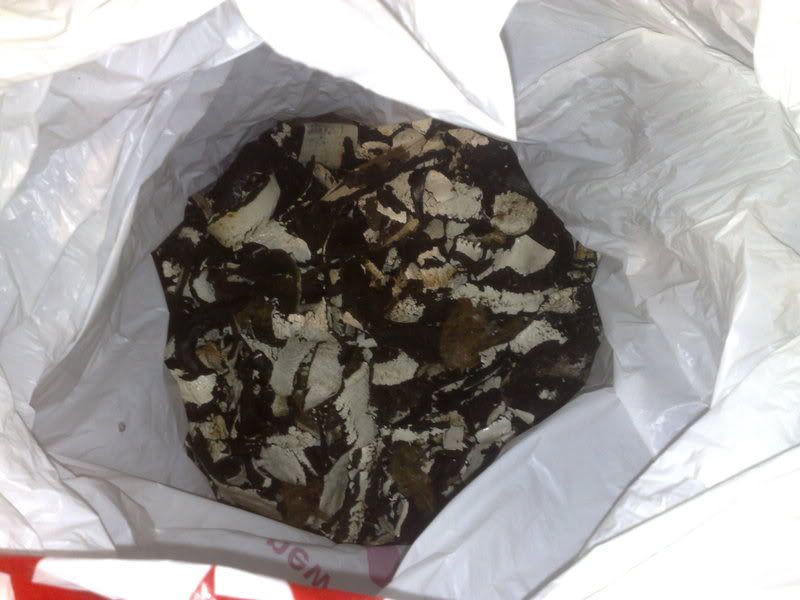
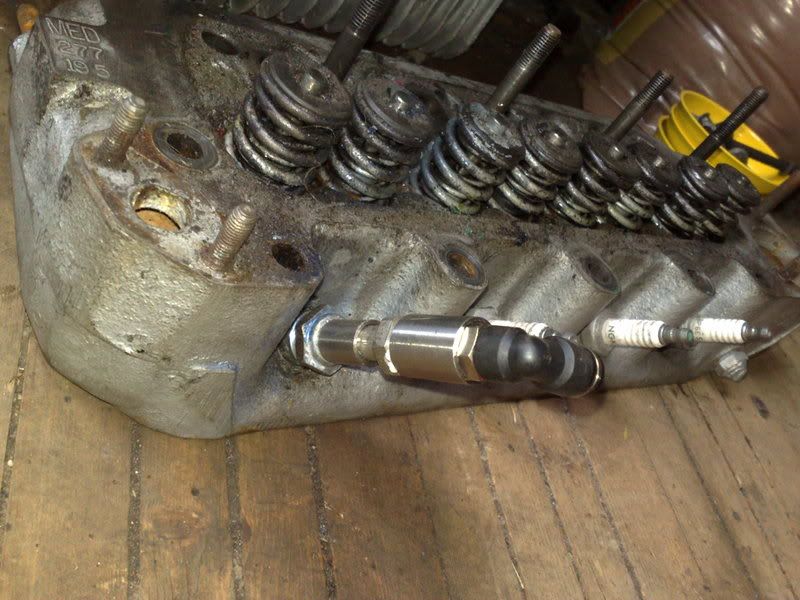
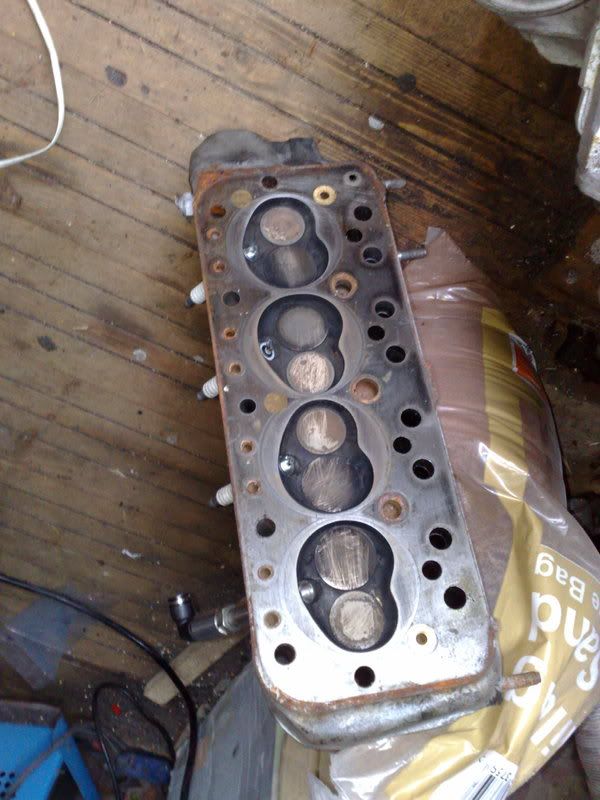
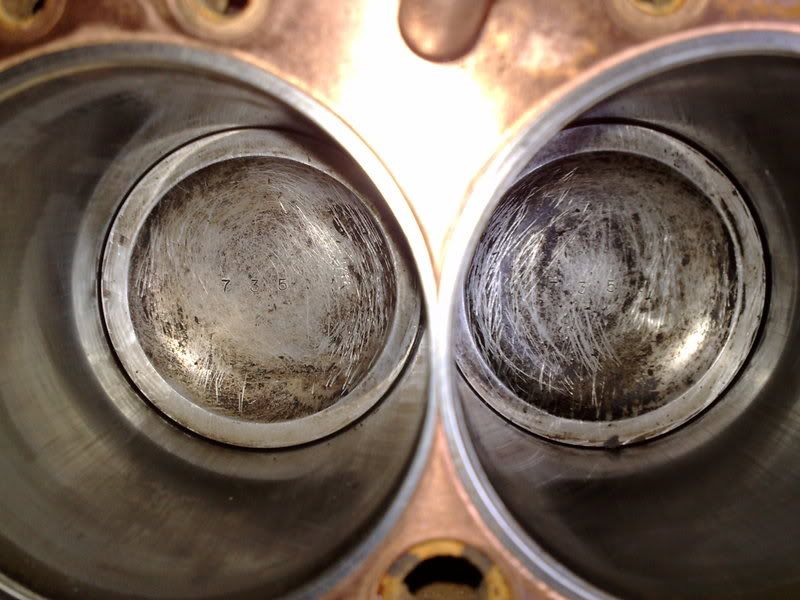
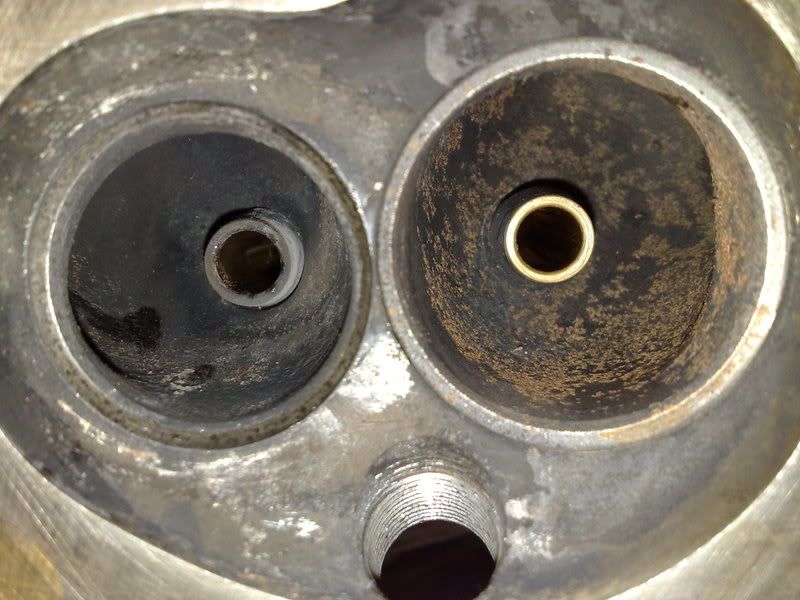
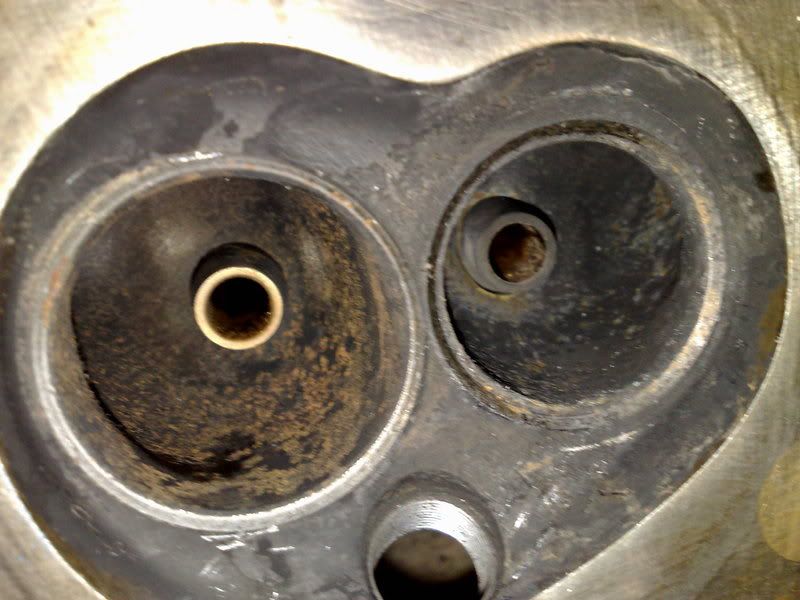
finished stripping the head, all valves and old valve guides out.
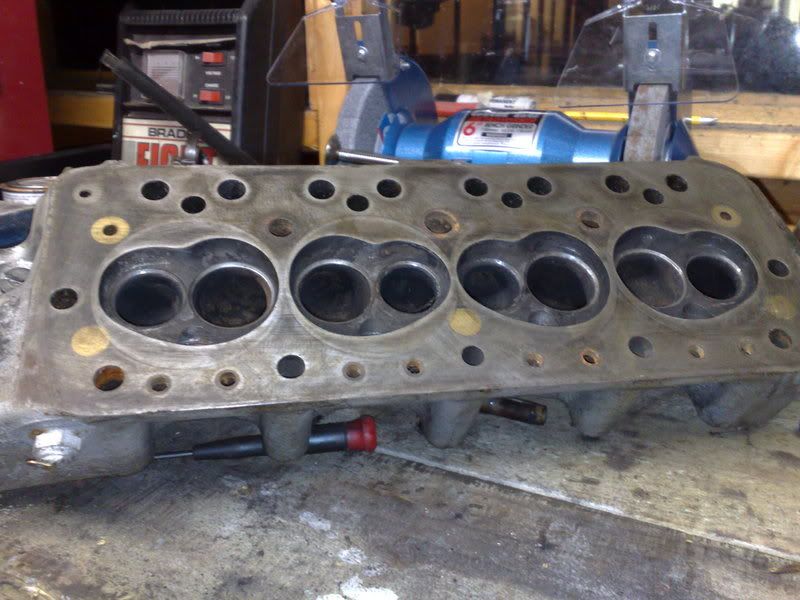
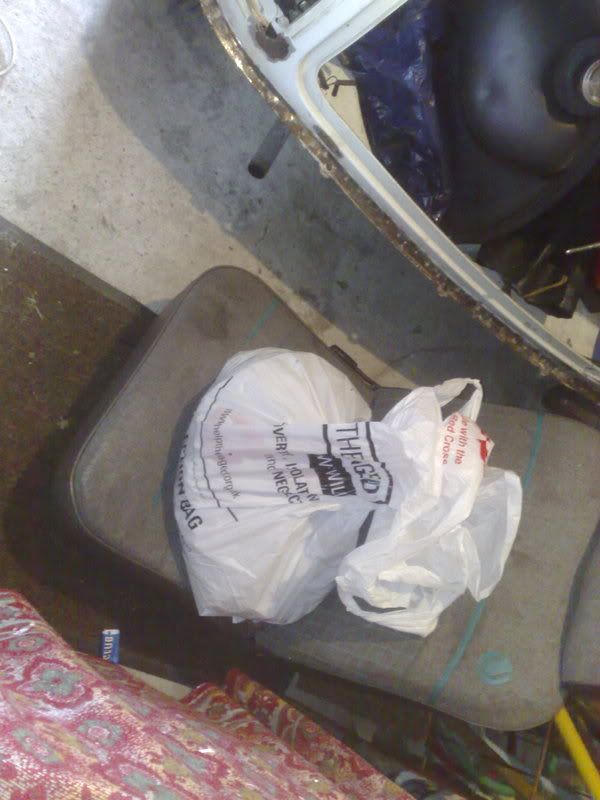
checked the head to see if it needs a skim
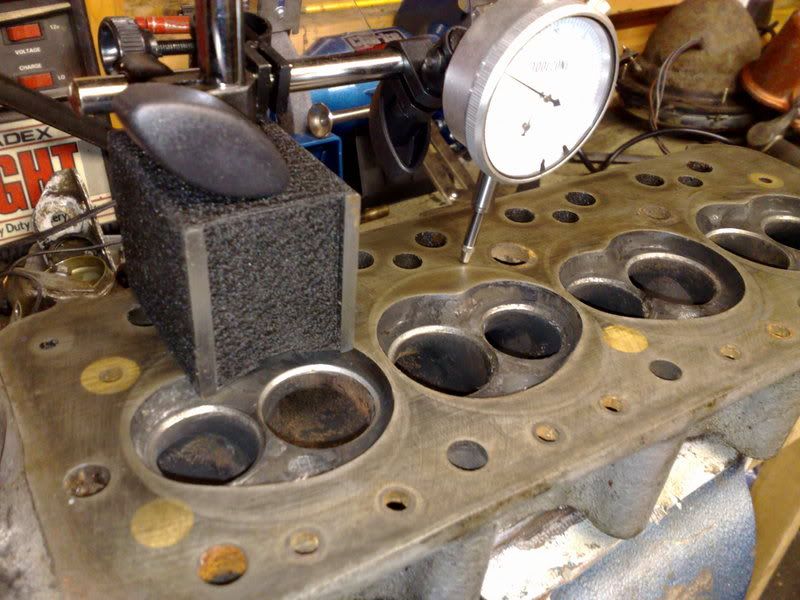
never known a head so true, absolutly bang on []
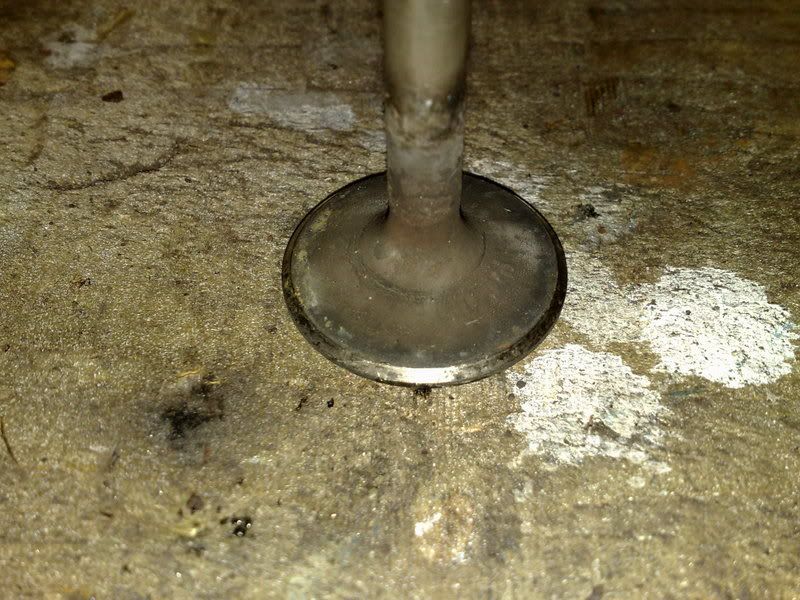
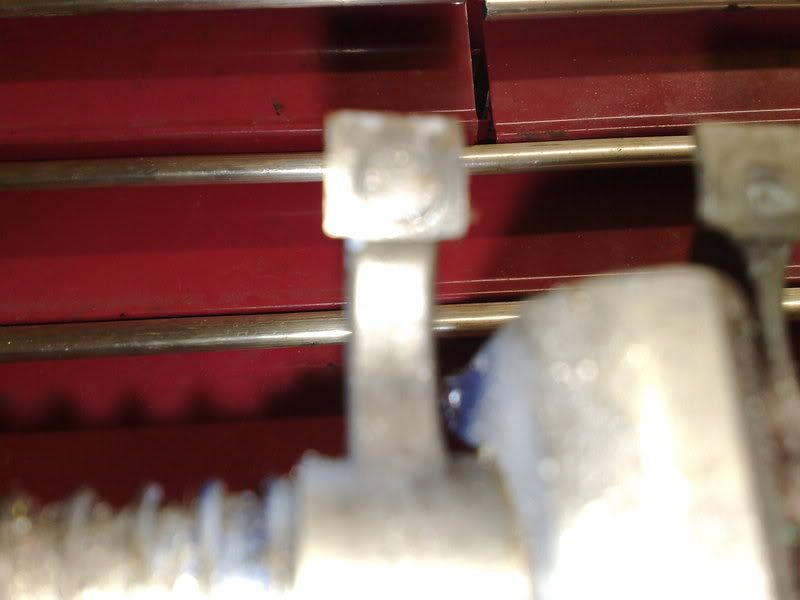
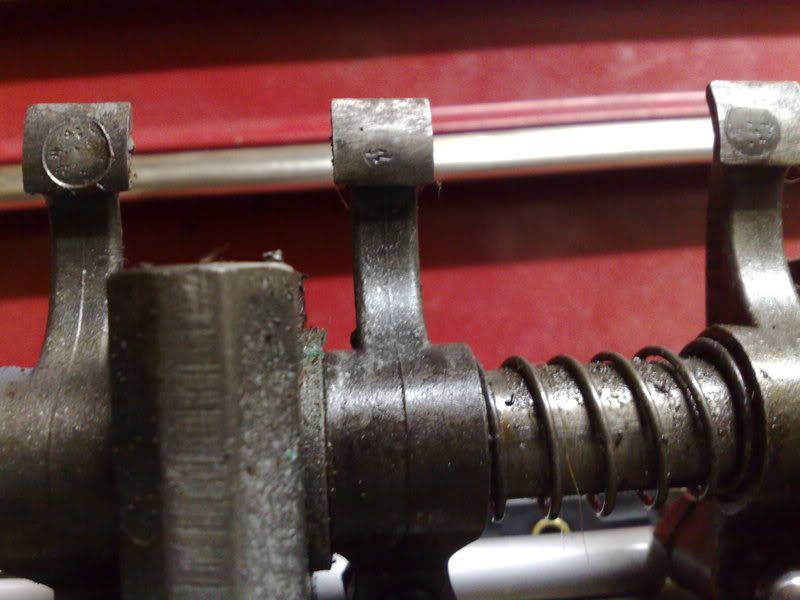
took a pic of the rocker arms i promised a while back [:^(]
more soon []
thought i'd get the subframe mounts done, wasn't looking forward to this as i knew it was going to be a trial and error job, luckily it only took 3 attempts and its spot on, not easy getting the subframe back into position and bolts in on your own!!! i had to operate the jack with my feet
Pictures:
Quite chuffed really
also got the boot floow cleaned up of any loose waxoyl, and any bits of surface rust treated so that can be undersealed next week ready for the subframe as that just needs hi-los now and its ready for refitting!
also had a bit more of a go on the floorpans. nearly there!
also i had a bit of a go with tidying up the de-seamed rear, its getting there but still far from happy with it
so apart from tubbing the rear arches and some tabs on the A pillars for the flip front i THINK this is the only bit left to sort out
----------------------------------
decided to stop being a big girls blouse and get on with the engine build
had a look around spares for sale on TMF and came up with these beautys!!!
Twin 1 3/4" SU HS6's with 2 brand new K&N's and a nice smooth inlet manifold too, although i will be port matching this to the head and the gasket
check the computer mouse for size comparion
�570 new at minispares, these have done about 5 miles since a full rebuild and are absolutly mint! i payed a hell of a lot less than �570 lol
so today i have been to Derby, then up to sale to pick up a grill and rocker cover, although the grill will only be used to get everything cut and lined up coz its external bonnet release and i really want a MK1 cooper grille.
I'll take a few pics of the grill and rocker cover in a bit, its a metro (i think) slanted top one, should look the dogs danglies painted up and on the car
----------------------------------
did a bit more tonight, went a bit bufty on my new rocker cover with the brasso (need to get some autosol) needs a lot more work yet but not bad for a fiver [
did a quick mock up with the carbs and head
love it [
finished stripping the head, all valves and old valve guides out.
checked the head to see if it needs a skim
never known a head so true, absolutly bang on [
took a pic of the rocker arms i promised a while back [:^(]
more soon [
Last edited by fraser9764; 28-09-2008 at 10:14 PM.