Renault 21 Cosworth RWD - Updated 1st June 2008 - 6 selectable gears!!
 12-04-2008, 09:00 PM
#1
PassionFord Post Whore!!
Thread Starter
iTrader: (1)

Join Date: May 2004
Location: Liverpool :o)
Posts: 4,715
Likes: 0
Received 0 Likes
on
0 Posts
Hopefully this project might interest some people on here as its a little different.....
Background to it is - I like Renault 21 Turbos (no harsh comments please lol) - I also have alot of respect & awe for the Cosworth scene as well. Got a lot of mates with them etc. So I thought - instead of struggling like fuck to get a genuine reliable 300bhp out of the Renault 8v Turbo engine - lets do it properly & fit a 400-450bhp Cosworth Engine...and make it RWD...so here it goes....
Proper fabrication started today on her .....
My modified sump (from a MK2 cosworth) came last week so I was able to get cracking!!
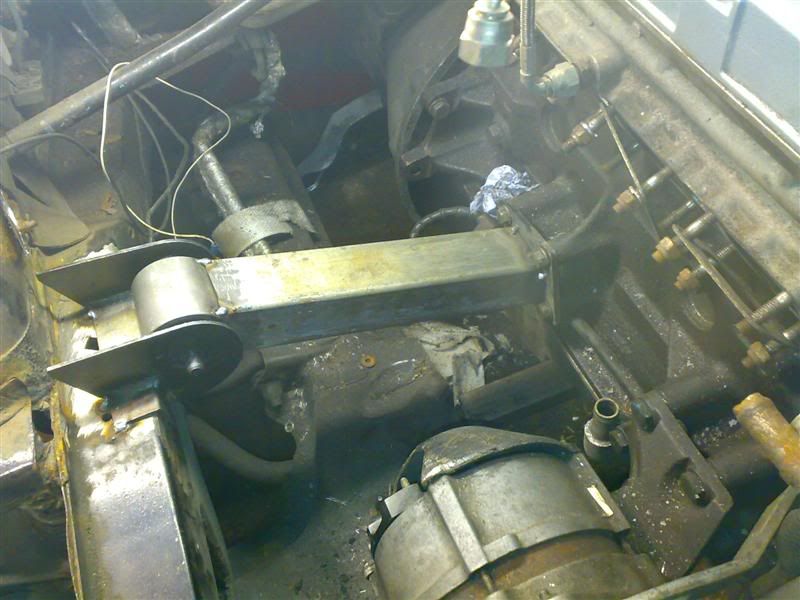
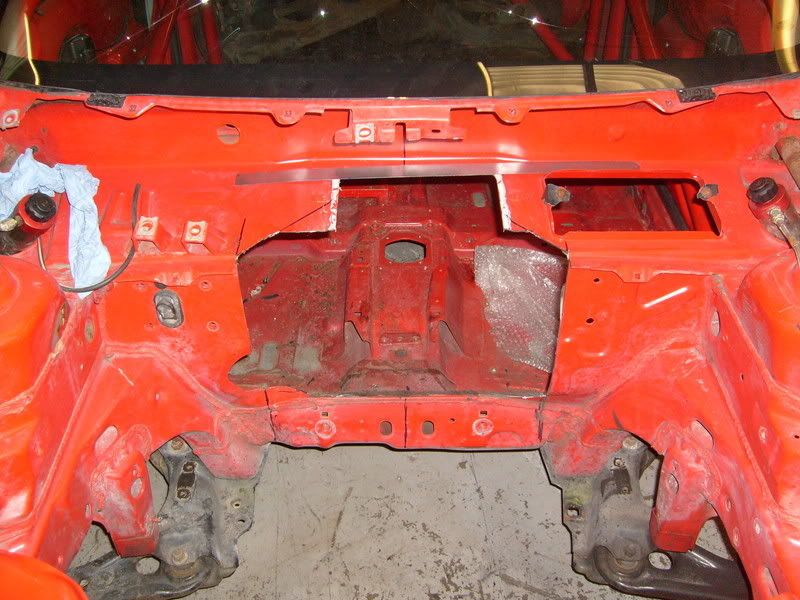
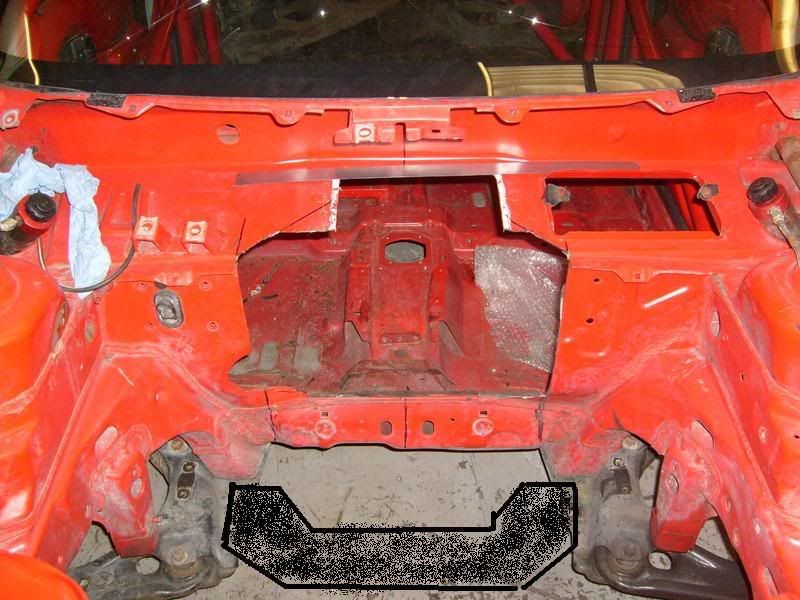
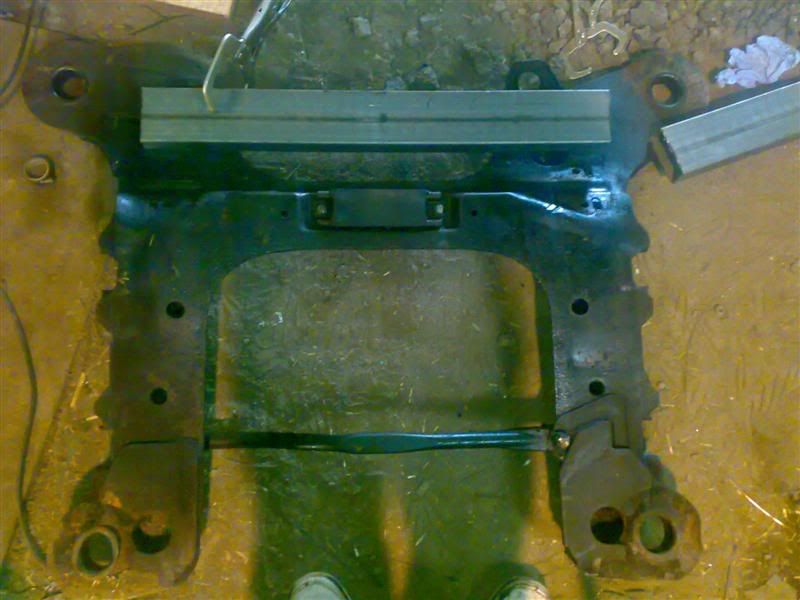
Started off by chopping out the subframe which was causing me issues....
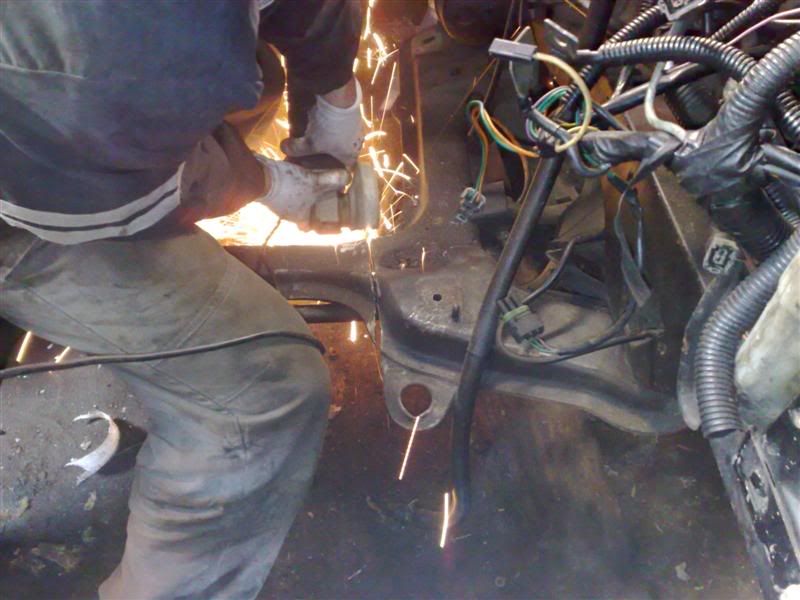

Dont worry.....the subframe will be getting redesigned properly & strengthened again.
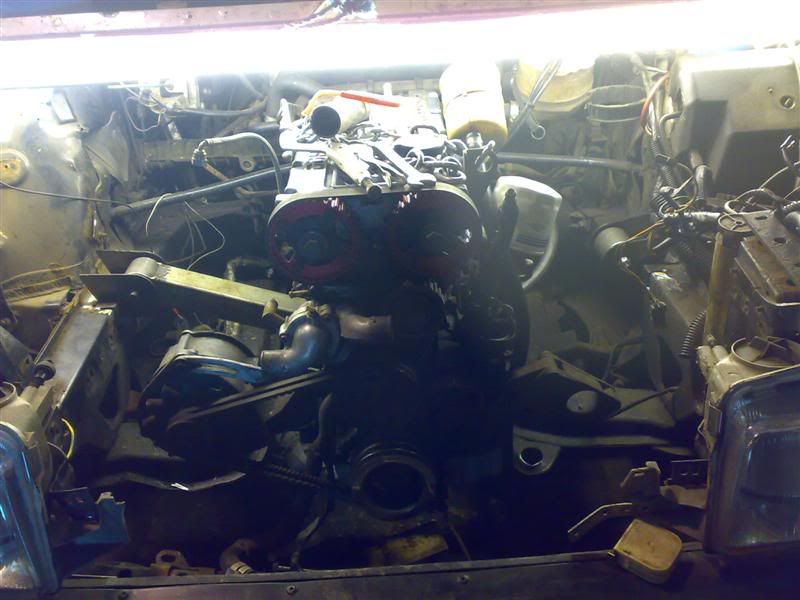
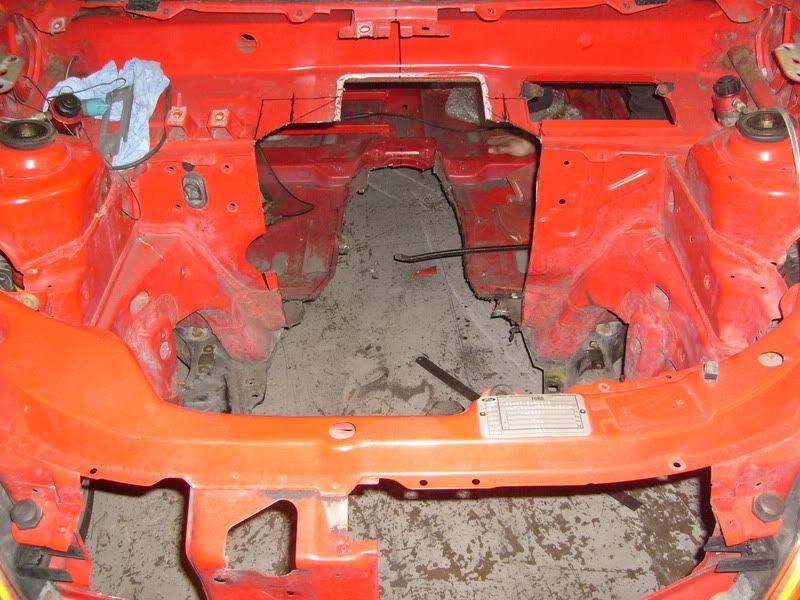
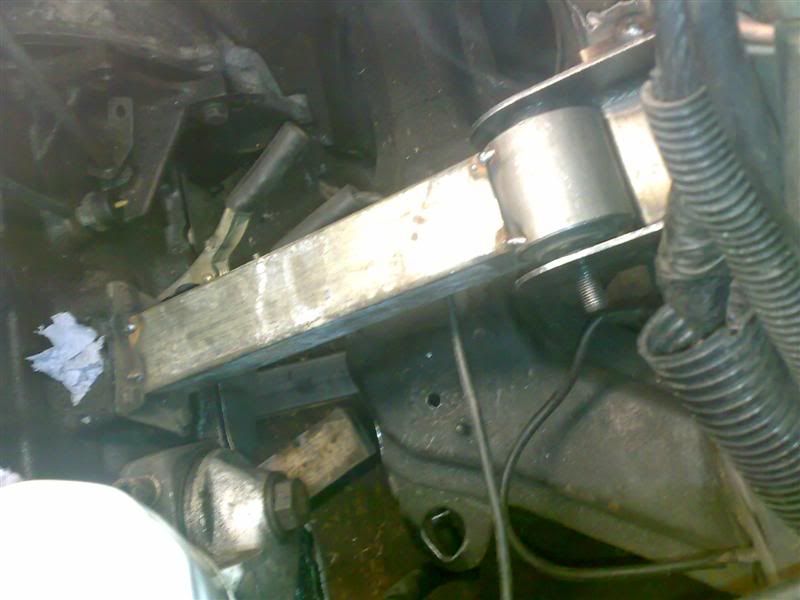
Then with that out the way I was able to get the engine in its proper position all central so that I could start getting jiggy with fabbing up the engine mounts....
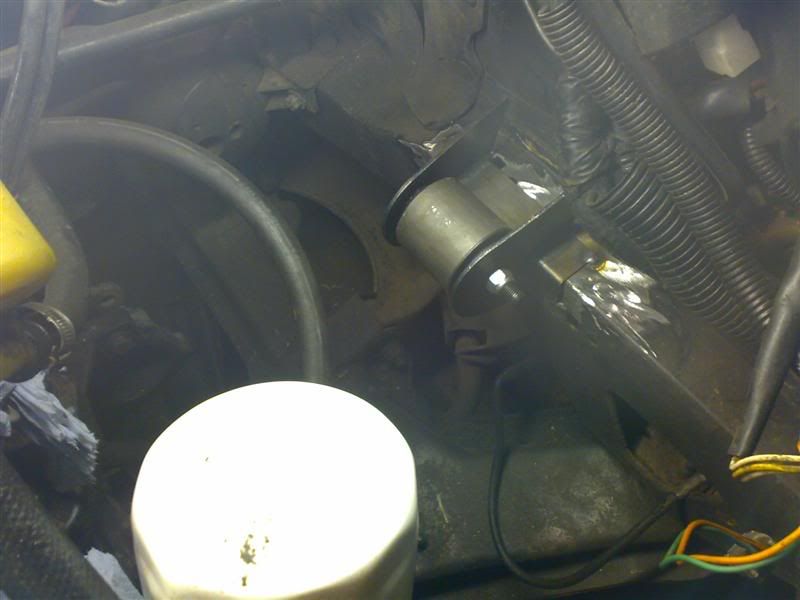
How the engine currently lines up & fits around everything...
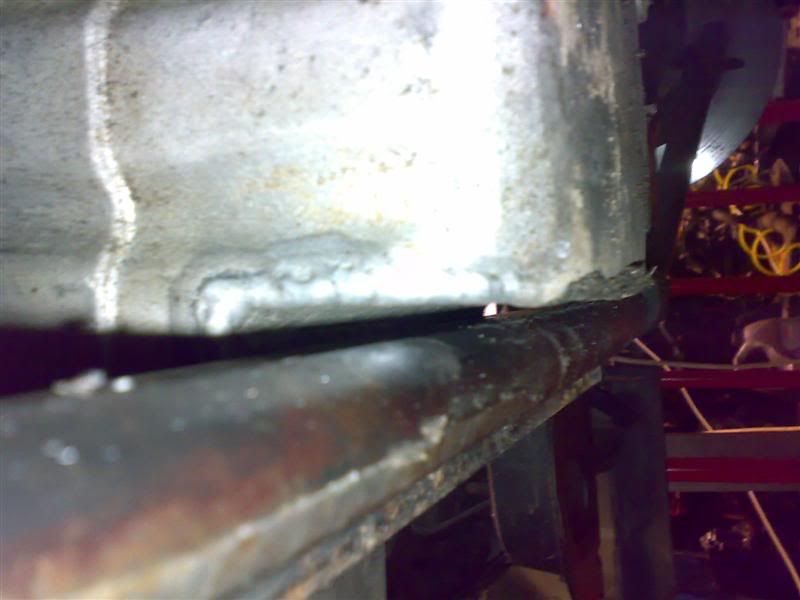
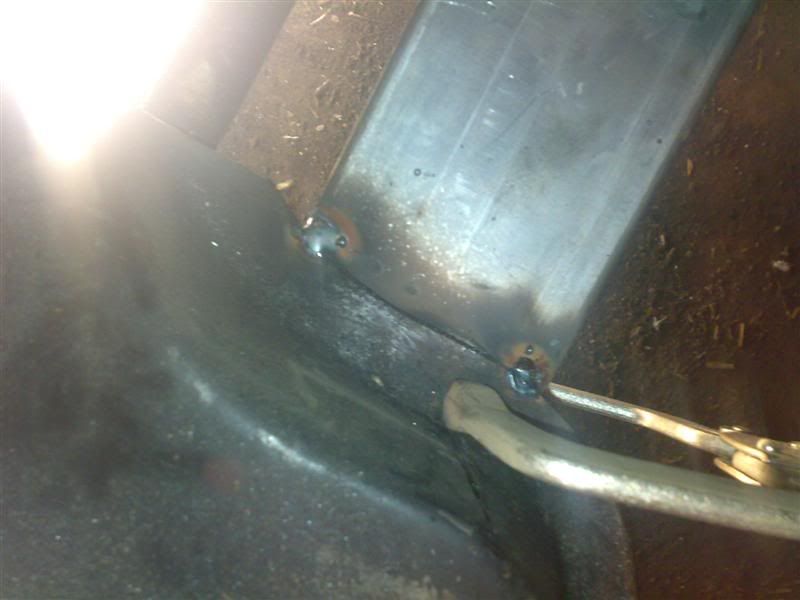
Back of head - about 1cm from steering assembly..
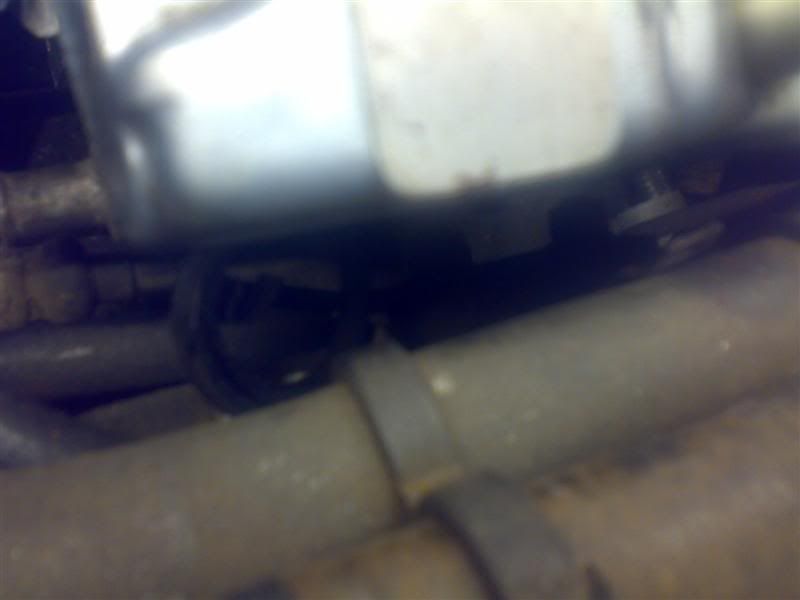
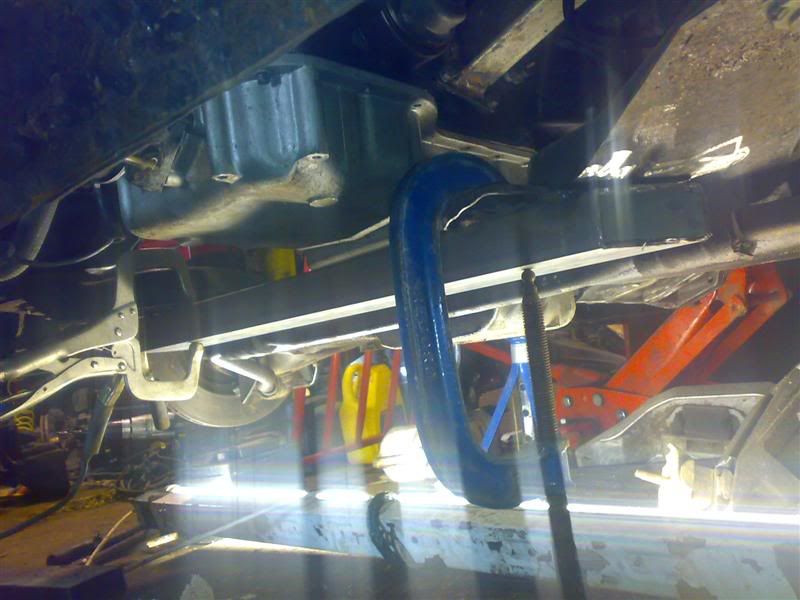
Sump & Anti Roll Bar...When I get the sump big winged I might get this altered a little more to give more clearance - not 100% sure how much the engine will move/shift under acceleration yet so just to be sure.....
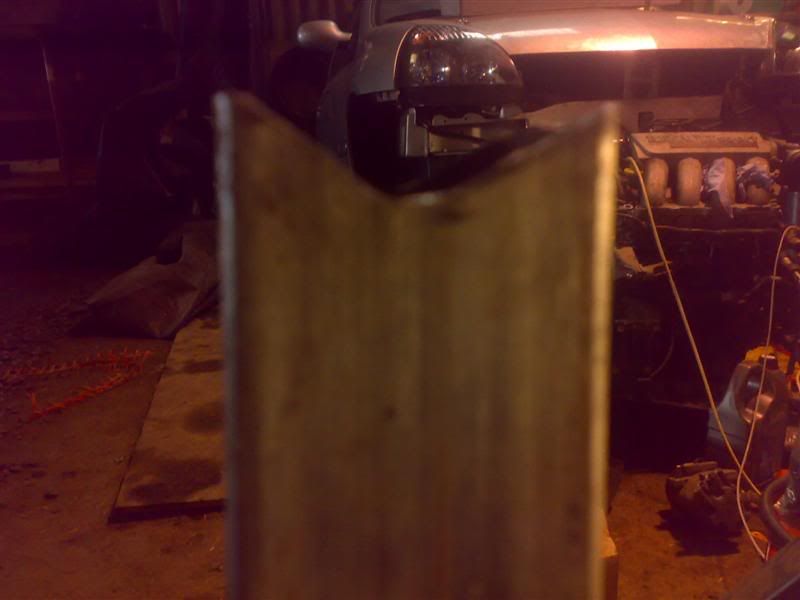
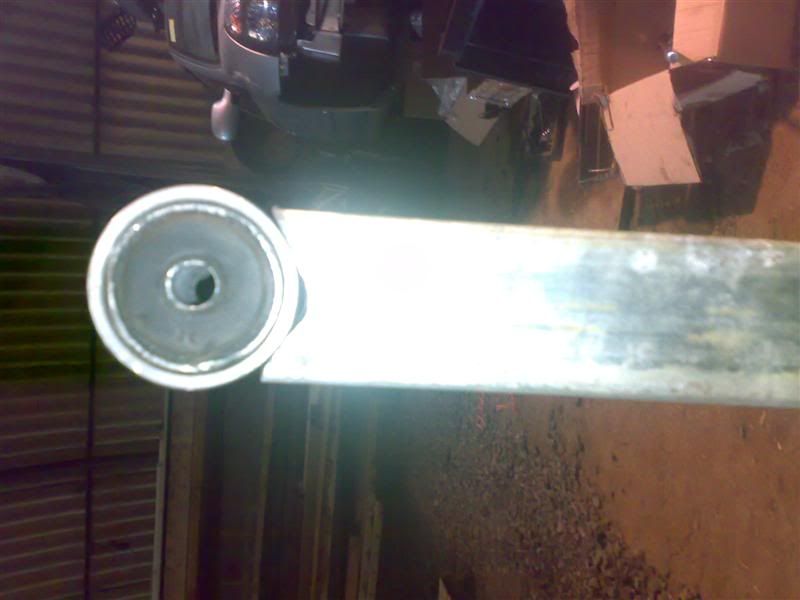
I'm using a kit thats designed for Pinto lumps in MK1/2 Escorts but obviously can be adapted for other uses like mine - the tube that is supposed to attach between the engine & the chassis mount I got with the kit was too short by approx 2cm so I improvised & used some 2" box section instead..
Chassis mounts tacked in place...
Box section roughly shaped for the mount..

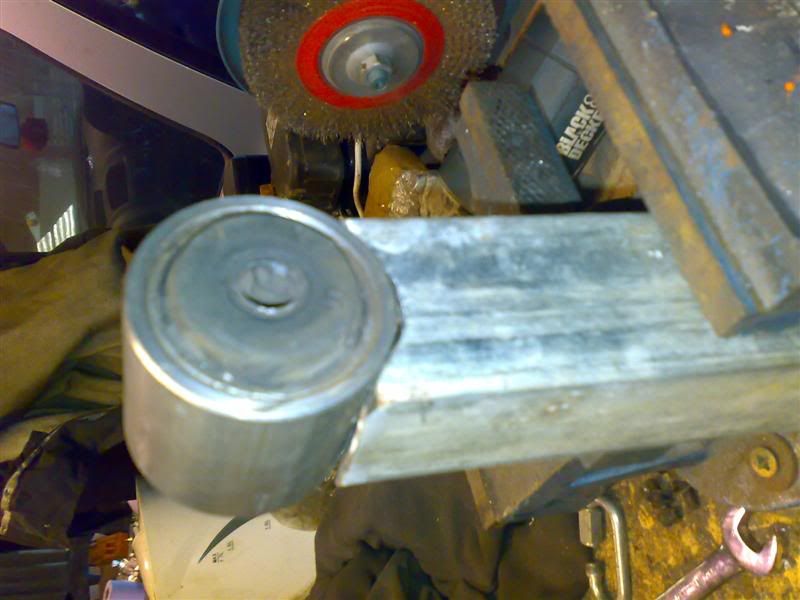
Mount all measured up & tacked in place on one side...
I took my time for the first time ever so I've only got this far so far today unfortunately....but its coming along really well & I'm happy with my progress - the real test will be when I come to do do all the proper welding as to how neat I can do it lol....
How I left it tonight...
More tomorrow hopefully......comments....suggestions or anything else welcomed!!

Background to it is - I like Renault 21 Turbos (no harsh comments please lol) - I also have alot of respect & awe for the Cosworth scene as well. Got a lot of mates with them etc. So I thought - instead of struggling like fuck to get a genuine reliable 300bhp out of the Renault 8v Turbo engine - lets do it properly & fit a 400-450bhp Cosworth Engine...and make it RWD...so here it goes....
Proper fabrication started today on her .....
My modified sump (from a MK2 cosworth) came last week so I was able to get cracking!!
Started off by chopping out the subframe which was causing me issues....
Dont worry.....the subframe will be getting redesigned properly & strengthened again.
Then with that out the way I was able to get the engine in its proper position all central so that I could start getting jiggy with fabbing up the engine mounts....
How the engine currently lines up & fits around everything...
Back of head - about 1cm from steering assembly..
Sump & Anti Roll Bar...When I get the sump big winged I might get this altered a little more to give more clearance - not 100% sure how much the engine will move/shift under acceleration yet so just to be sure.....
I'm using a kit thats designed for Pinto lumps in MK1/2 Escorts but obviously can be adapted for other uses like mine - the tube that is supposed to attach between the engine & the chassis mount I got with the kit was too short by approx 2cm so I improvised & used some 2" box section instead..
Chassis mounts tacked in place...
Box section roughly shaped for the mount..
Mount all measured up & tacked in place on one side...
I took my time for the first time ever so I've only got this far so far today unfortunately....but its coming along really well & I'm happy with my progress - the real test will be when I come to do do all the proper welding as to how neat I can do it lol....
How I left it tonight...
More tomorrow hopefully......comments....suggestions or anything else welcomed!!
Last edited by Lee_R21Turbo; 01-06-2008 at 09:12 PM.


 12-04-2008, 09:35 PM
#4
PassionFord Post Whore!!
Thread Starter
iTrader: (1)
Join Date: May 2004
Location: Liverpool :o)
Posts: 4,715
Likes: 0
Received 0 Likes
on
0 Posts
Scott.....not as much as you probably think tbh matey!! I decided against doing what you've just suggested (I did think about it) because the Renault wishbones bolt to the subframe etc etc so it would mean buggering about with the suspension too!!
 12-04-2008, 10:51 PM
#6
Nice project
What exhaust manifold are you going to use ???
That engine mounting arm looks like it will be in the way especially if you use a standard 2wd one.
Good idea on the mounts though, thats what i'm using for the Ka so i can keep standard Ka wishbones/subframe at the front.
May be make a bolt in brace for the front subframe like the SportKa uses. Means you would be able to drop the sump of in need be.

Trending Topics

 12-04-2008, 11:03 PM
#9
PassionFord Post Whore!!
Thread Starter
iTrader: (1)
Join Date: May 2004
Location: Liverpool :o)
Posts: 4,715
Likes: 0
Received 0 Likes
on
0 Posts
Rich....I did wonder about the exhaust manifold/engine mount clearance to be honest - I'm picking one up at Central Day off RsNissan so will be able to try it then - if it catches it slightly then I might notch it out - failing that if its too close then I'll fit a 4x4 jobbie - I'm only after 400-450bhp anyway so should be cool.
As much as a bolt on brace jobbie sounds tempting...I think I'm gonna go down the welding route because I'll be removing the subframe as some point 2 change the bushes so if I need to remove the sump at anytime it should be easy really just to lower the subframe on its bolts.

As much as a bolt on brace jobbie sounds tempting...I think I'm gonna go down the welding route because I'll be removing the subframe as some point 2 change the bushes so if I need to remove the sump at anytime it should be easy really just to lower the subframe on its bolts.
12-04-2008, 11:07 PM
#11
Rich....I did wonder about the exhaust manifold/engine mount clearance to be honest - I'm picking one up at Central Day off RsNissan so will be able to try it then - if it catches it slightly then I might notch it out - failing that if its too close then I'll fit a 4x4 jobbie - I'm only after 400-450bhp anyway so should be cool.
As much as a bolt on brace jobbie sounds tempting...I think I'm gonna go down the welding route because I'll be removing the subframe as some point 2 change the bushes so if I need to remove the sump at anytime it should be easy really just to lower the subframe on its bolts.
As much as a bolt on brace jobbie sounds tempting...I think I'm gonna go down the welding route because I'll be removing the subframe as some point 2 change the bushes so if I need to remove the sump at anytime it should be easy really just to lower the subframe on its bolts.
Got a 4x4 manifold with a small crack in it if you need to borrow one. Let me know and i'll take it to Central Day
Far enough on the subframe
The SportKa brace one is an addition over the standard Ka. A �88 piece of steel from Ford  12-04-2008, 11:11 PM
#12
PassionFord Post Whore!!
Thread Starter
iTrader: (1)
Join Date: May 2004
Location: Liverpool :o)
Posts: 4,715
Likes: 0
Received 0 Likes
on
0 Posts
Yeh....subframe was the trickiest part of this build so far - I just prefer overkill
rather than 'your not sure' type of approach! lol. Have you have to remove the centre section of your subframe in the Ka too??
 12-04-2008, 11:17 PM
#14
PassionFord Post Whore!!
Thread Starter
iTrader: (1)
Join Date: May 2004
Location: Liverpool :o)
Posts: 4,715
Likes: 0
Received 0 Likes
on
0 Posts
sapph1 - AFAIK this will be the first ever Cosworth powered Renault 21 Turbo in the world lol.
....and to be honest its not really a whole lot of work to pull it off.....well so far anyway! LOL!
....and to be honest its not really a whole lot of work to pull it off.....well so far anyway! LOL!
12-04-2008, 11:18 PM
#15
Nice one mate.....whack it in your car anyway if you dont mind...that way I've got both to experiment with if need be.
Yeh....subframe was the trickiest part of this build so far - I just prefer overkill
rather than 'your not sure' type of approach! lol. Have you have to remove the centre section of your subframe in the Ka too??
Yeh....subframe was the trickiest part of this build so far - I just prefer overkill
rather than 'your not sure' type of approach! lol. Have you have to remove the centre section of your subframe in the Ka too??
No the front wishbones bolt into seperate subframes on each side. The brace is added to the Sportka/StreetKa as they have a wider track and bigger tyres than the the standard Ka.
12-04-2008, 11:37 PM
#17
Cross member there
And gone
The brace bolts between the two 'black' subframe assemblies.
Last edited by Richie.; 12-04-2008 at 11:42 PM. Reason: Extra pic added


 13-04-2008, 10:51 PM
#28
PassionFord Post Whore!!
Thread Starter
iTrader: (1)
Join Date: May 2004
Location: Liverpool :o)
Posts: 4,715
Likes: 0
Received 0 Likes
on
0 Posts
Cheers for the comments guys......
Right.....onto todays updates - had a really good day actually again - things working out very well indeed.
Here are the pics from today.....
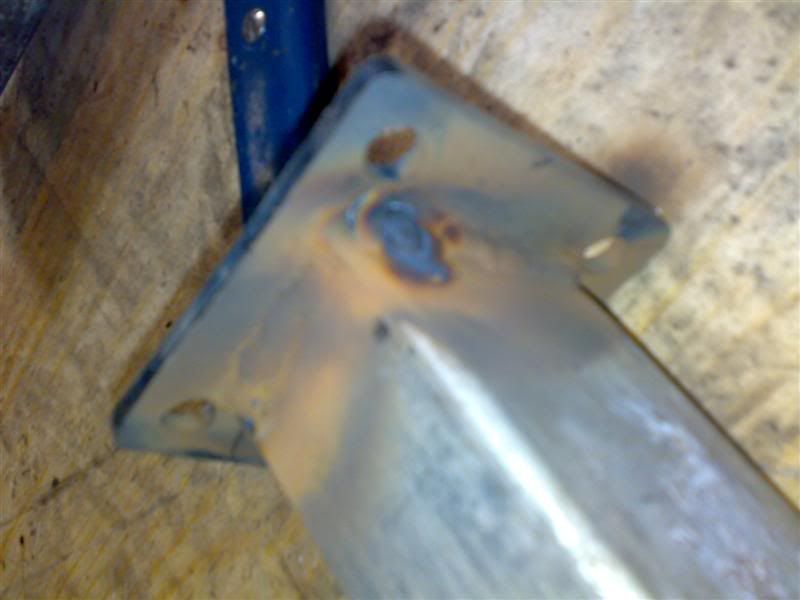
Starting passenger side engine mount...
Both mounts tacked up & ready to be welded...
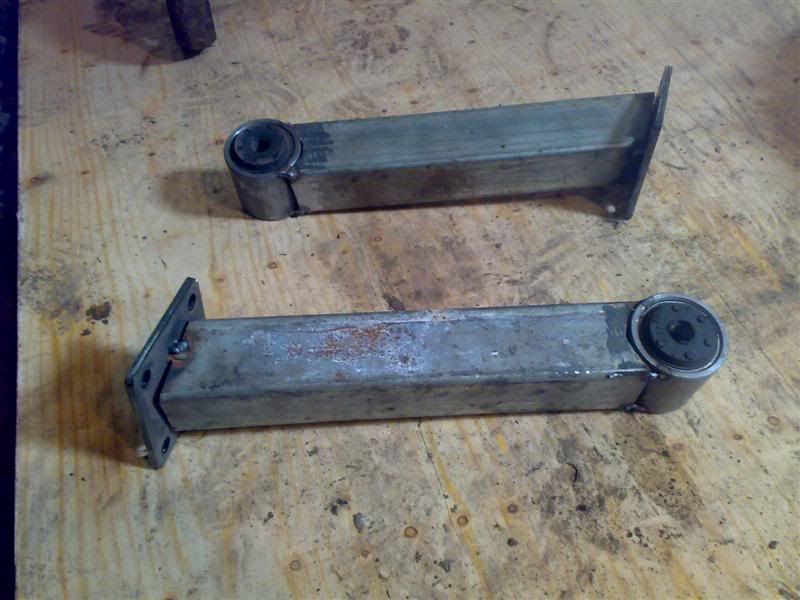
I then removed the bushes before welding
Now the nerve racking bit......doing a whole load of welding, trying to get it strong & look half decent...the metal is 2 and 3mm thick so I did a few practice lines to get the settings right....
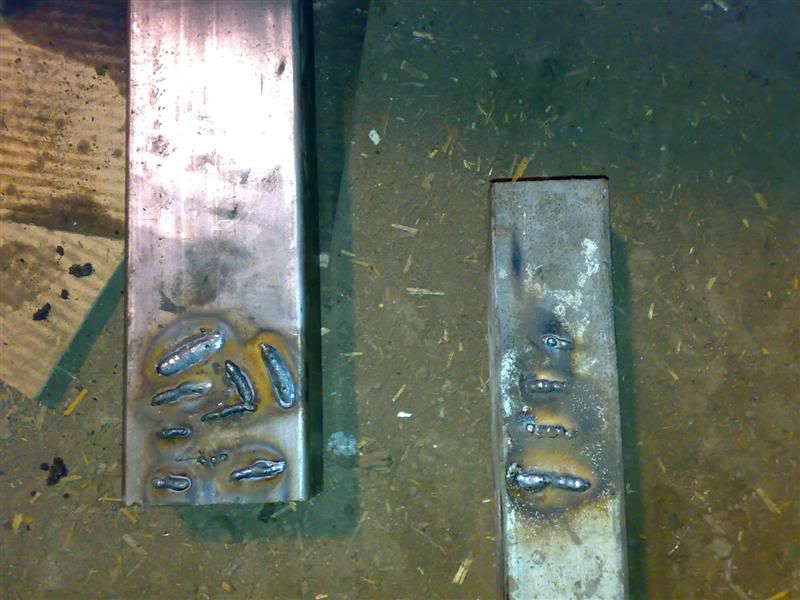
I'll be honest here & say that I have never called myself a decent welder so this was going to be interesting to say the least - I was more concerned with proper penetration to make them as strong as possible as I dont want the engine suddenly falling out of the car! lol I think I did reasonably well to be truthful - the welds between the 2mm box section and the 3mm plate where the hardest I must admit - I might grind the ugly welds down & re-weld before I get them powdercoated black.
....and here's how they turned out

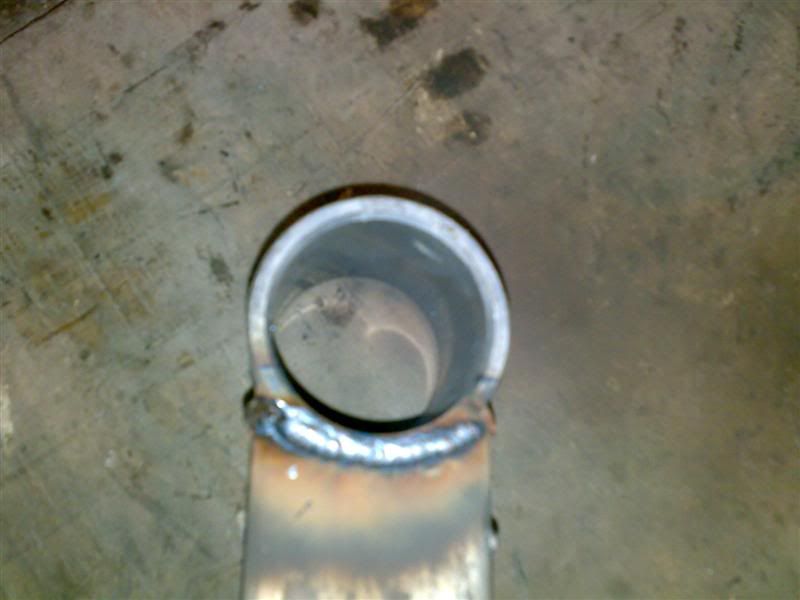

Good penetration....
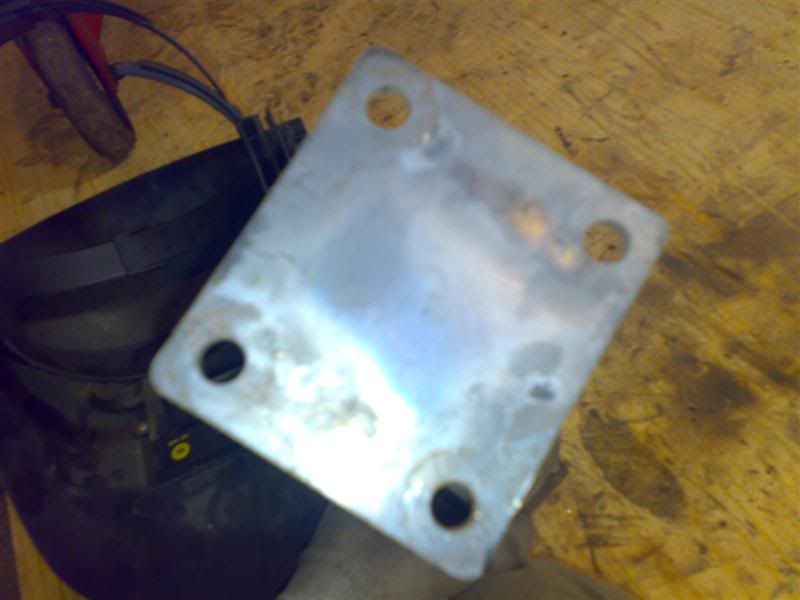
Re-fitted the bushes...

Finished articles

Re-attached to the engine to make sure they hadnt moved whilst welding which they hadnt..

Then I welded as much of the chassis mounts as I could with the engine still in place

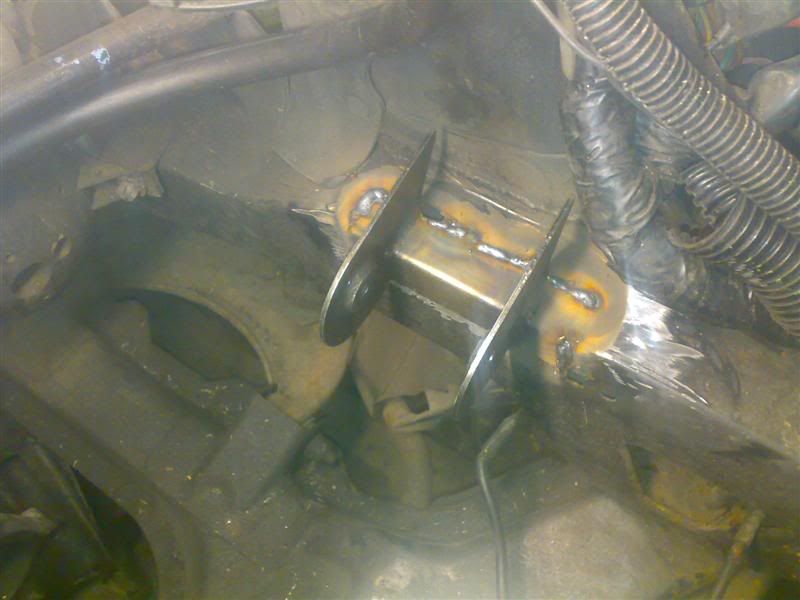
Re-attached the mounts again - tightened everything up properly this time...then checked clearances with the engine now supported by its new mountings...
Around the anti-roll bar - loads of clearance


I am very impressed with how little movement there is....and as in little I mean nothing...I cant rock it at all - mounts seem to be VERY strong...
Next onto bracing the cut subframe...
Using another spare subframe I measured up & cut a length of 8cm x 4cm box section..
Then c clamped it in place & tacked it..


Basically thats all I got done today - still I'm very pleased with what I have achieved so far and everything is going according to plan.
Next time I'm down I will fab up the gearbox mountings.
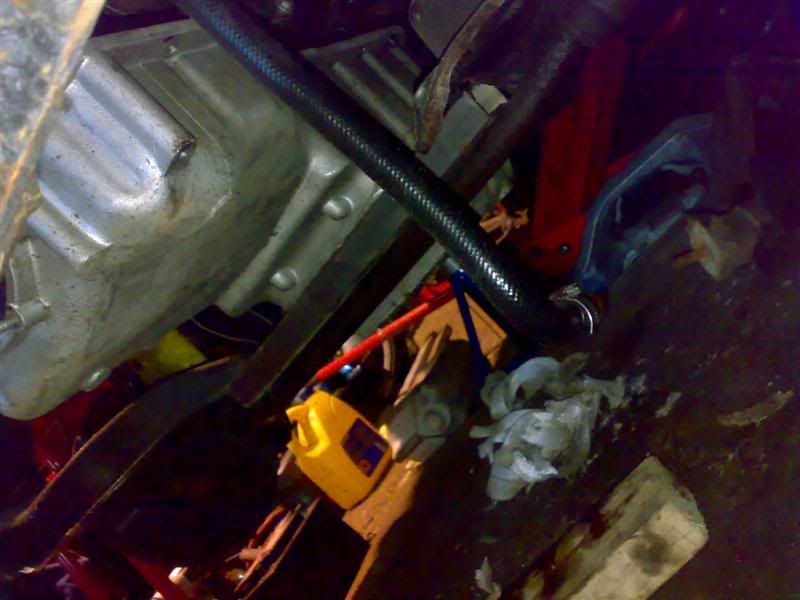
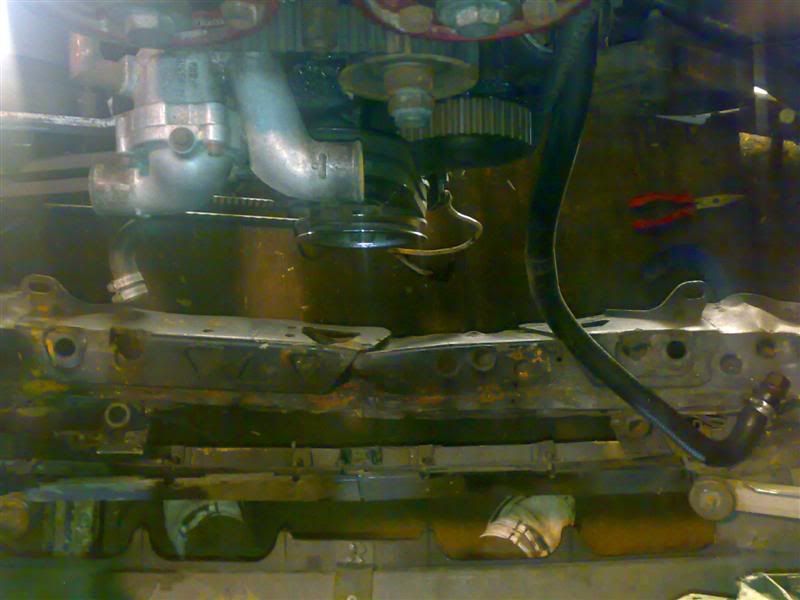
Clearance is excellent towards the front of the engine too - it sits further back than the standard engine so I've got 10cm between the front pulley & the front crossmember - lots of room for a decent sized rad & intercooler etc.
Ignore the fact that its bent - its going to get replaced...seems that alot of people seem to think that towing using the crossmember is a wise idea!! LOL
Right.....onto todays updates - had a really good day actually again - things working out very well indeed.
Here are the pics from today.....
Starting passenger side engine mount...
Both mounts tacked up & ready to be welded...
I then removed the bushes before welding
Now the nerve racking bit......doing a whole load of welding, trying to get it strong & look half decent...the metal is 2 and 3mm thick so I did a few practice lines to get the settings right....
I'll be honest here & say that I have never called myself a decent welder so this was going to be interesting to say the least - I was more concerned with proper penetration to make them as strong as possible as I dont want the engine suddenly falling out of the car! lol I think I did reasonably well to be truthful - the welds between the 2mm box section and the 3mm plate where the hardest I must admit - I might grind the ugly welds down & re-weld before I get them powdercoated black.
....and here's how they turned out
Good penetration....
Re-fitted the bushes...
Finished articles
Re-attached to the engine to make sure they hadnt moved whilst welding which they hadnt..
Then I welded as much of the chassis mounts as I could with the engine still in place
Re-attached the mounts again - tightened everything up properly this time...then checked clearances with the engine now supported by its new mountings...
Around the anti-roll bar - loads of clearance
I am very impressed with how little movement there is....and as in little I mean nothing...I cant rock it at all - mounts seem to be VERY strong...
Next onto bracing the cut subframe...
Using another spare subframe I measured up & cut a length of 8cm x 4cm box section..
Then c clamped it in place & tacked it..
Basically thats all I got done today - still I'm very pleased with what I have achieved so far and everything is going according to plan.
Next time I'm down I will fab up the gearbox mountings.
Clearance is excellent towards the front of the engine too - it sits further back than the standard engine so I've got 10cm between the front pulley & the front crossmember - lots of room for a decent sized rad & intercooler etc.
Ignore the fact that its bent - its going to get replaced...seems that alot of people seem to think that towing using the crossmember is a wise idea!! LOL
13-04-2008, 11:13 PM
#31
PassionFord Post Whore!!
Thread Starter
iTrader: (1)
Join Date: May 2004
Location: Liverpool :o)
Posts: 4,715
Likes: 0
Received 0 Likes
on
0 Posts
Well to be honest matey....timescale wise probably a couple of months before it will move under its own steam - well hopefully anyway!!!


 14-04-2008, 10:56 AM
#38
PassionFord Post Whore!!
Thread Starter
iTrader: (1)
Join Date: May 2004
Location: Liverpool :o)
Posts: 4,715
Likes: 0
Received 0 Likes
on
0 Posts
Ryan - I was bored one day!!!
Naah...the clutch went at Donington in February...the easiest way to change the clutch is by dropping the whole lot out the bottom. Gearbox is currently away getting a gripper diff fitted. Getting a paddle clutch for it because standard ones arent much cop anyway,they overheat too much, and I'm planning ahead for when the throttle bodies go on!! Also got a load of other goodies waiting to be fitted as well.
Naah...the clutch went at Donington in February...the easiest way to change the clutch is by dropping the whole lot out the bottom. Gearbox is currently away getting a gripper diff fitted. Getting a paddle clutch for it because standard ones arent much cop anyway,they overheat too much, and I'm planning ahead for when the throttle bodies go on!! Also got a load of other goodies waiting to be fitted as well.
14-04-2008, 11:10 AM
#39
20K+ Super Poster.

Join Date: Jun 2003
Location: Local, when i'm home...
Posts: 22,888
Likes: 0
Received 0 Likes
on
0 Posts
Ryan - I was bored one day!!!
Naah...the clutch went at Donington in February...the easiest way to change the clutch is by dropping the whole lot out the bottom. Gearbox is currently away getting a gripper diff fitted. Getting a paddle clutch for it because standard ones arent much cop anyway,they overheat too much, and I'm planning ahead for when the throttle bodies go on!! Also got a load of other goodies waiting to be fitted as well.
Naah...the clutch went at Donington in February...the easiest way to change the clutch is by dropping the whole lot out the bottom. Gearbox is currently away getting a gripper diff fitted. Getting a paddle clutch for it because standard ones arent much cop anyway,they overheat too much, and I'm planning ahead for when the throttle bodies go on!! Also got a load of other goodies waiting to be fitted as well.

 will be keeping an eye on this one