Our Saff Cossie...NOW BREAKING
 20-08-2007, 05:47 PM
#1
I've found that life I needed.. It's HERE!!
Thread Starter
Join Date: May 2004
Location: West Sussex
Posts: 1,058
Likes: 0
Received 0 Likes
on
0 Posts
This will now be kept updated with any things done to the car 
Hi guys,
Some of you, not many though I should think, may have followed my engine build thread,( https://passionford.com/forum/viewtopic.php?t=97964) well now I'm doing the rear end of my Saff
I started today and I've got the rest of the week off work so will keep the updates coming, will add pics tonight
Cheers,
Charlie
Last edited by CharlieSaff; 27-09-2012 at 06:46 AM.
 20-08-2007, 06:35 PM
#2
I've found that life I needed.. It's HERE!!
Thread Starter
Join Date: May 2004
Location: West Sussex
Posts: 1,058
Likes: 0
Received 0 Likes
on
0 Posts
I'm unsure whether to just waxoyl it all black underneath or paint it magenta? Can you paint the magenta on just on top of the underseal?
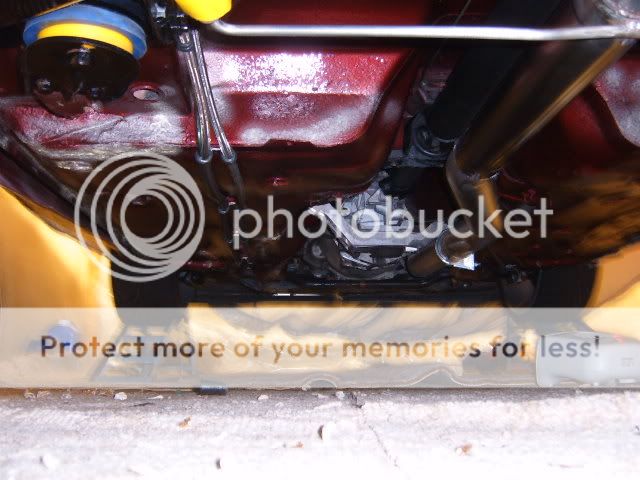
This is how the car sits at the moment:

A few quick shots of underneath:


Things I've bought so far:
Not got a picture as I don't have it anymore, but I bought a spare rear beam, driveshafts and diff from Kelv
The rear diff painted silver:

4x4 Rear Calipers that I've refurbed with all new seals etc and painted black. I've bought some rear pads from Mike Rainbird also:


Comp Brake 300mm rear brake kit with anodised black bells and brackets:


Complete poly bush set (apart from rear trailing arms as advised by Mike R) courtesy of my son James (smidsy). Maybe if a lot of your were a bit older then and had older kids your children may buy you things like this well chuffed
  :
:

Because he said if I buy this then he'd buy all the bushes:
A 6� rear beam and trailing arms from Danny @ Adrenaline Racing, and a huge thanks to Danny for sorting me the beam at such short notice, and Les for bringing it to National Day for him. This really is a work of art :
:


Things I've done so far:
I've taken the exhaust off, hubs off and drive shafts out
Roll on tomorrow
Today has been more about organising things, i.e powder coating etc. I also had a Doctors appointment. Eeverything underneath will be powder coated silver and then the petrol tank will be painted black
Thanks for looking, more updates tomorrow
And a big thanks to Mark (markyd3) for lending me his decent trolley jack and axle stands (again)
This is how the car sits at the moment:
A few quick shots of underneath:
Things I've bought so far:
Not got a picture as I don't have it anymore, but I bought a spare rear beam, driveshafts and diff from Kelv
The rear diff painted silver:
4x4 Rear Calipers that I've refurbed with all new seals etc and painted black. I've bought some rear pads from Mike Rainbird also:
Comp Brake 300mm rear brake kit with anodised black bells and brackets:
Complete poly bush set (apart from rear trailing arms as advised by Mike R) courtesy of my son James (smidsy). Maybe if a lot of your were a bit older then and had older kids your children may buy you things like this
:Because he said if I buy this then he'd buy all the bushes:
A 6� rear beam and trailing arms from Danny @ Adrenaline Racing, and a huge thanks to Danny for sorting me the beam at such short notice, and Les for bringing it to National Day for him. This really is a work of art
Things I've done so far:
I've taken the exhaust off, hubs off and drive shafts out
Roll on tomorrow
Today has been more about organising things, i.e powder coating etc. I also had a Doctors appointment. Eeverything underneath will be powder coated silver and then the petrol tank will be painted black
Thanks for looking, more updates tomorrow
And a big thanks to Mark (markyd3) for lending me his decent trolley jack and axle stands (again)
 21-08-2007, 07:34 AM
#6
I've found that life I needed.. It's HERE!!
Thread Starter
Join Date: May 2004
Location: West Sussex
Posts: 1,058
Likes: 0
Received 0 Likes
on
0 Posts
bud-weis
Cheers mate
StickerPaul
Thanks Paul, saw yours at Rockingham, hows it handle with the 18s?
Twins
Shame as I would have liked to do it magenta, was gonna have the proper paint made up and everything as a mate runs a spray shop
Cheers mate
StickerPaul
Thanks Paul, saw yours at Rockingham, hows it handle with the 18s?
Twins
Shame as I would have liked to do it magenta, was gonna have the proper paint made up and everything as a mate runs a spray shop
21-08-2007, 07:51 AM
#7
I did see you at Rockingham mate but you was busy talking.
It's actually not that bad now on the 18's, it was more the coilover's i had the issue with. There all set up perfectly now & it's no worse than having Koni's set on hard. I still want to get it back on the 17's soon thou.
It's actually not that bad now on the 18's, it was more the coilover's i had the issue with. There all set up perfectly now & it's no worse than having Koni's set on hard. I still want to get it back on the 17's soon thou.
Trending Topics
21-08-2007, 05:28 PM
#13
I've found that life I needed.. It's HERE!!
Thread Starter
Join Date: May 2004
Location: West Sussex
Posts: 1,058
Likes: 0
Received 0 Likes
on
0 Posts
Rightyho,
Thanks for all your replys and words of encouragement
Here's todays update:
Stripped everything out, it will require welding, and has had welding before (i knew about this). At the end of the day it is nearly 17 years old and unless its been well kept from the factory what else can you expect. But hey, thats the whole point of this resto isn't it? Welder is coming tomorrow at about 11ish to have a look!
You can also see where I've started to clean up the underside, what is best to use for this?


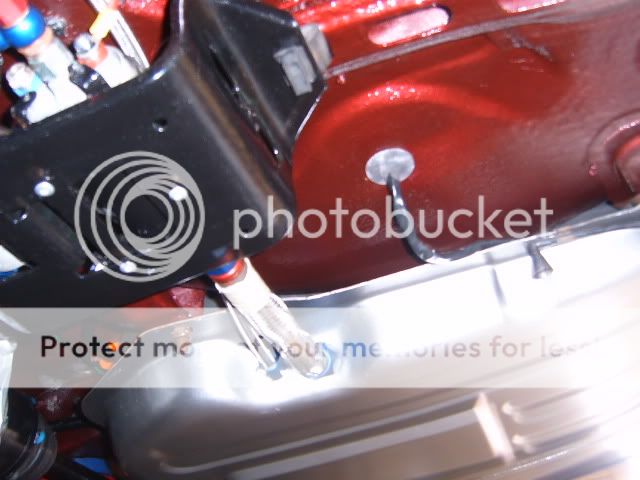
Fuel pump and filter cradle will be powdercoated silver:

Old beam, arms and calipers out anyone interested in the bare beam or calipers (2wd) drop me a PM:

Petrol tank out, I'm going to be putting this back in, rub it all down a bit and paint it black:

I'm also going to repaint the konis yellow and the springs powdercoating silver
Twins
I don't have a week to let the stoneguard dry Can you get some that drys overnight?
Forgive me for being thick BUT, if you stoneguard, then paint over the top. If a stone hits the paint then surely it will just chip the paint off and you'll just be left to the stoneguard? Or is the purpose of it just to stop it stone chipping the bare metal?
Thanks for your PM's and answers mate, a great help
Are there any other routes I could take i.e underseal, magenta, laquor?
My mate at the spray shop has suddenly become very unhelpful for absolutely no reason so will all be hand painted.
StickerPaul
You should have stopped for a chat anyway mate, would be good to catch up
Charlie Chalk
Cheers mate, as you say it really is good
KSA-Cossie
Thanks, I hope I'll be pleased they cost enough
Brian
James_RScos
There are plenty of resto threads to give you guidance on here mate 
Thanks for all your replys and words of encouragement
Here's todays update:
Stripped everything out, it will require welding, and has had welding before (i knew about this). At the end of the day it is nearly 17 years old and unless its been well kept from the factory what else can you expect. But hey, thats the whole point of this resto isn't it?
You can also see where I've started to clean up the underside, what is best to use for this?
Fuel pump and filter cradle will be powdercoated silver:
Old beam, arms and calipers out anyone interested in the bare beam or calipers (2wd) drop me a PM:
Petrol tank out, I'm going to be putting this back in, rub it all down a bit and paint it black:
I'm also going to repaint the konis yellow and the springs powdercoating silver
Twins
I don't have a week to let the stoneguard dry
Can you get some that drys overnight?Forgive me for being thick BUT, if you stoneguard, then paint over the top. If a stone hits the paint then surely it will just chip the paint off and you'll just be left to the stoneguard? Or is the purpose of it just to stop it stone chipping the bare metal?
Thanks for your PM's and answers mate, a great help
Are there any other routes I could take i.e underseal, magenta, laquor?
My mate at the spray shop has suddenly become very unhelpful for absolutely no reason
StickerPaul
You should have stopped for a chat anyway mate, would be good to catch up
Charlie Chalk
Cheers mate, as you say it really is good
KSA-Cossie
Thanks, I hope I'll be pleased they cost enough
Brian
James_RScos
There are plenty of resto threads to give you guidance on here mate
21-08-2007, 06:02 PM
#15
I've found that life I needed.. It's HERE!!
Thread Starter
Join Date: May 2004
Location: West Sussex
Posts: 1,058
Likes: 0
Received 0 Likes
on
0 Posts
Cool I'll do that then Then primer and get some magenta made up without the metallic in, and then laquor it
Thanks a lot mate
Then primer and get some magenta made up without the metallic in, and then laquor it Thanks a lot mate
21-08-2007, 08:25 PM
#17
I've found that life I needed.. It's HERE!!
Thread Starter
Join Date: May 2004
Location: West Sussex
Posts: 1,058
Likes: 0
Received 0 Likes
on
0 Posts
Originally Posted by CosKev3
Looking good so far
But your week off will soon go,and the rear end will still be in bits!!!!!!
Time flys when your having fun
But your week off will soon go,and the rear end will still be in bits!!!!!!
Time flys when your having fun
Everything is going to powder coaters tomorrow will have it back by the end of the week
Just got to get the welding done thats the biggest pain, I hope to have that done by the end of the week with luck, but you never know
22-08-2007, 04:45 PM
#18
I've found that life I needed.. It's HERE!!
Thread Starter
Join Date: May 2004
Location: West Sussex
Posts: 1,058
Likes: 0
Received 0 Likes
on
0 Posts
Not much progreess today due to the welder taking ages to turn up
I ended up having a day off.
Although I did take everything to the powdercoaters today
I also looked and found some spray stone chip stuff so I'll buy some of that once I've cleaned everything underneath
I hope to start cleaning tomorrow and take the rear bumper off
Charlie
I ended up having a day off.
Although I did take everything to the powdercoaters today
I also looked and found some spray stone chip stuff so I'll buy some of that once I've cleaned everything underneath
I hope to start cleaning tomorrow and take the rear bumper off
Charlie
23-08-2007, 08:57 PM
#20
I've found that life I needed.. It's HERE!!
Thread Starter
Join Date: May 2004
Location: West Sussex
Posts: 1,058
Likes: 0
Received 0 Likes
on
0 Posts
Update for those still interested - Pictures have just been taken I'm afraid as I was so busy today that I forgot to take any
Today I have removed rear bumper:

Cleaned up all the underneath, I still think there is about another 1-2 hours worth of cleaning to get it to the stage where its ready to weld and then paint. This took a LOT of work:

Just infront of the wheel well

Boot floorpan

Chassis rail

Very rear of the boot floor

Beginning of the wheel well

End of the transmission tunnel

Spring cup where it's been previously welded

It's not being welded until next wednesday, but in the mean time I can:
Keep cleaning underneath
Paint shocks yellow again
Paint tank black
Paint hubs (unsure to do black or silver)
I am very pleased with my progress today as it may not seem it, but to get the underneath looking like that took a LOT of work and I am happy
Today I have removed rear bumper:
Cleaned up all the underneath, I still think there is about another 1-2 hours worth of cleaning to get it to the stage where its ready to weld and then paint. This took a LOT of work:
Just infront of the wheel well
Boot floorpan
Chassis rail
Very rear of the boot floor
Beginning of the wheel well
End of the transmission tunnel
Spring cup where it's been previously welded
It's not being welded until next wednesday, but in the mean time I can:
Keep cleaning underneath
Paint shocks yellow again
Paint tank black
Paint hubs (unsure to do black or silver)
I am very pleased with my progress today as it may not seem it, but to get the underneath looking like that took a LOT of work and I am happy
23-08-2007, 09:34 PM
#22
I've found that life I needed.. It's HERE!!

Join Date: Feb 2005
Posts: 1,142
Likes: 0
Received 0 Likes
on
0 Posts
Looking good, am going to my rear end over the winter so will keep an eye on this to help me avoid any problems, I was going to do it last year but ran out of time, only problem I can see with mine is the bolts holding the beam plates on as they were really tight when I tried last year, but have left WD40 on all the summer so may be easier this year.
23-08-2007, 09:45 PM
#23
I've found that life I needed.. It's HERE!!
Thread Starter
Join Date: May 2004
Location: West Sussex
Posts: 1,058
Likes: 0
Received 0 Likes
on
0 Posts
Originally Posted by daz1968
Looking good, am going to my rear end over the winter so will keep an eye on this to help me avoid any problems, I was going to do it last year but ran out of time, only problem I can see with mine is the bolts holding the beam plates on as they were really tight when I tried last year, but have left WD40 on all the summer so may be easier this year.
Yeah I've watched other people's resto's closely as a guide for doing my own
there are plenty on here too which is the good thing
Luckily everything on mine came undone ok
23-08-2007, 09:57 PM
#24
PassionFord Post Whore!!

Join Date: Apr 2004
Location: Waterlooville....near Portsmouth
Posts: 4,047
Likes: 0
Received 0 Likes
on
0 Posts
Very nice, done this to my old saff a couple of years ago. nasty work cleaning all that crap off isnt it Looking great so far though


 23-08-2007, 10:06 PM
#26
Too many posts.. I need a life!!
iTrader: (4)

Join Date: Sep 2004
Location: scotland, under my cossie!
Posts: 630
Likes: 0
Received 0 Likes
on
0 Posts
The aerosol tins of brake cleaner take the waxoil type stuff off a treat........
Helps if you know someone in a main dealers that can acquire a box of cans though......it don't last long!
Its a messy job painting under there....but when its finished you'll be glad you did it.
Helps if you know someone in a main dealers that can acquire
Its a messy job painting under there....but when its finished you'll be glad you did it.
24-08-2007, 06:59 AM
#28
I've found that life I needed.. It's HERE!!
Thread Starter
Join Date: May 2004
Location: West Sussex
Posts: 1,058
Likes: 0
Received 0 Likes
on
0 Posts
lamb chops
Yes mate not a nice job lots of hard work but I'm glad I've got to this point 
Yours looks lovely mate, you shouldn't have sold it, I remember that now
jake-cos
The brake cleaner makes my hands all irritant
I used gunk in the end and it works a treat I'll be well glad when its done
NUTS RuS
Tony,
Cheers mate, and thanks for the PM Hopefully you've got your head round that now!
Cheers,
Lewis... er I mean Charlie
Yes mate not a nice job
lots of hard work but I'm glad I've got to this point Yours looks lovely mate, you shouldn't have sold it, I remember that now
jake-cos
The brake cleaner makes my hands all irritant
I used gunk in the end and it works a treat
I'll be well glad when its done NUTS RuS
Tony,
Cheers mate, and thanks for the PM
Hopefully you've got your head round that now! Cheers,
Lewis... er I mean Charlie
24-08-2007, 07:38 AM
#31

i did mine magenta 2 years ago and is still looking good now..
http://i10.photobucket.com/albums/a1...newones012.jpg
condensation kept making the bolts go rusty over time so most changed for stainless allen key ones...
http://i10.photobucket.com/albums/a1...newones012.jpg
condensation kept making the bolts go rusty over time so most changed for stainless allen key ones...
 s015.jpg[/IMG]
24-08-2007, 04:41 PM
s015.jpg[/IMG]
24-08-2007, 04:41 PM
#34
ive sprayed some waxoyle over some places to try to help protect it and changed all the bolts with mostly stainless ones or just new ford ones..
i stripped most of the underside with a wire whel on the grinder then painted with zink primer.. then the rubber stonechip all over then primer, paint and laquer and even 2 years on just takes a wipe over with some bug wipes...
 24-08-2007, 07:08 PM
#39
I've found that life I needed.. It's HERE!!
Thread Starter
Join Date: May 2004
Location: West Sussex
Posts: 1,058
Likes: 0
Received 0 Likes
on
0 Posts
Update!
Today I finished cleaning underneath, boot well:

Arch:

Started painting the top half of the fuel tank, and the hubs, think I might do the hubs silver now though


I also got everything back from the powdercoaters tonight
6� rear beam and arms:


Everything else:


I've decided to paint the underneath with Epoxy mastic 121 (Cheers mark rs):
http://rust.co.uk/epoxy-mastic-more-info.cfm
http://rust.co.uk/filestore/epoxy.pdf
Then I've found some outdoor paint in do it all that is almost a perfect match for magenta
Today I finished cleaning underneath, boot well:
Arch:
Started painting the top half of the fuel tank, and the hubs, think I might do the hubs silver now though
I also got everything back from the powdercoaters tonight
6� rear beam and arms:
Everything else:
I've decided to paint the underneath with Epoxy mastic 121 (Cheers mark rs):
http://rust.co.uk/epoxy-mastic-more-info.cfm
http://rust.co.uk/filestore/epoxy.pdf
Then I've found some outdoor paint in do it all that is almost a perfect match for magenta
24-08-2007, 07:12 PM
#40
I've found that life I needed.. It's HERE!!
Thread Starter
Join Date: May 2004
Location: West Sussex
Posts: 1,058
Likes: 0
Received 0 Likes
on
0 Posts
KSA-Cossie
Yeah it is a shame but I know he will do a great job
NORTH YORKS RS SPARES
Cheers Paul, I hope I'll be pleased with it after all this Sorry I didn't get to speak to you on Sunday
doggpk
Thanks mate
Yeah it is a shame but I know he will do a great job
NORTH YORKS RS SPARES
Cheers Paul, I hope I'll be pleased with it after all this
Sorry I didn't get to speak to you on Sunday doggpk
Thanks mate