Ford Sierra DOHC 4x4 16V build
 13-08-2007, 05:57 PM
#1
Virgin
Thread Starter

Join Date: Dec 2005
Location: Warsaw, Poland
Posts: 7
Likes: 0
Received 0 Likes
on
0 Posts
Hi there everyone!
This topic is about my daily driver Ford Sierra build. The pictures will be in a more or less chronological way, my english is bad, thats why the comments under the pictures wont be too long. If someone has a question, please ask it, its actually much easy for me to answer questions and have a discussion than to write about something in advance as a comment. The car is build on a budget (meaning im the only fabricator and worker with the help of my friends, especially Lukasz "Feluke" i would like to thank the most.
The car started its life as a old stock Sierra 4x4 DOHC in the most basic version.
The disassembly started because of a failed con rod bearing, after i began it i found a lot of other reasons to do it. The most fearsome was a lot of rust and the fact that the chassis is starting to flex.
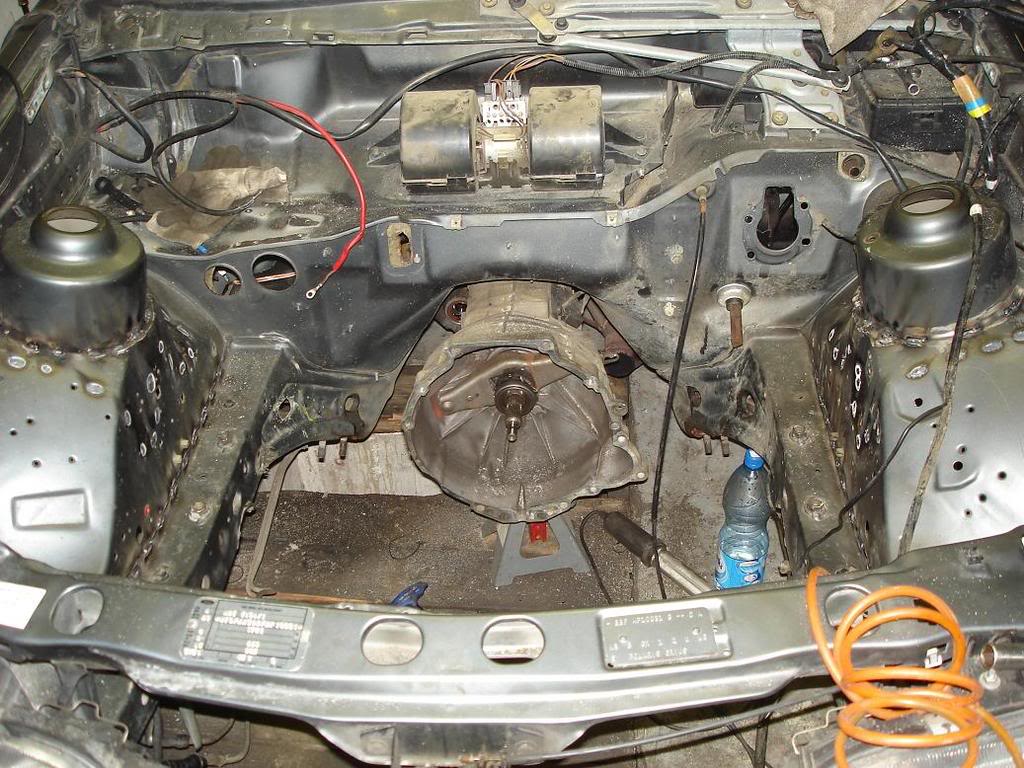
Engine out.
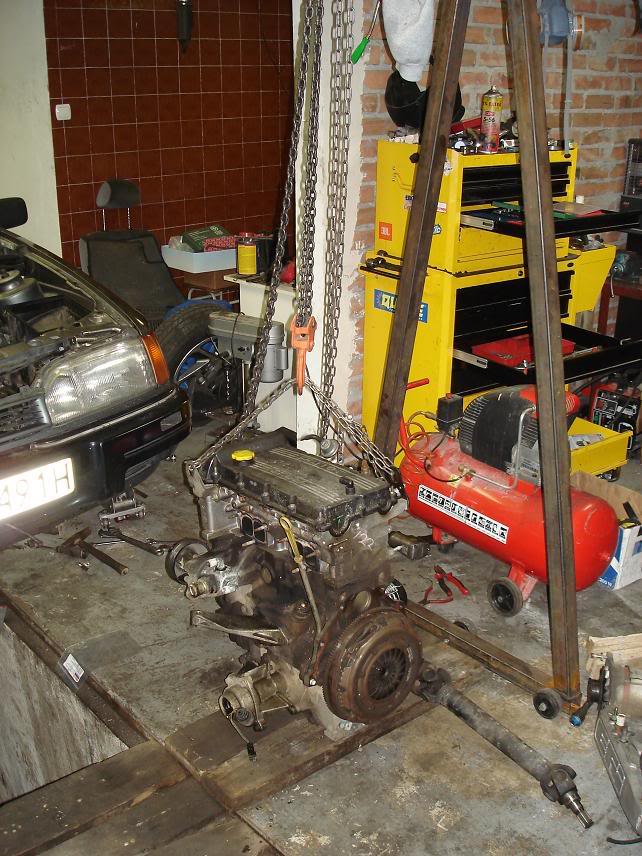
Engine on its crane. There is a lot of parts to be sourced from there, im not dumping it yet. I have to say its a heavy f***** compared to the 4 litre Toyota V8.
The main problems:
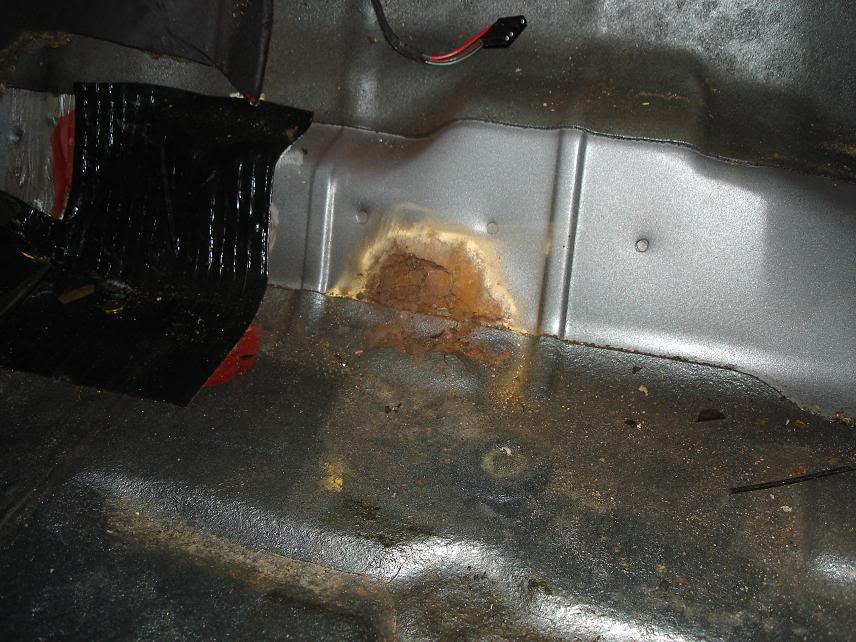
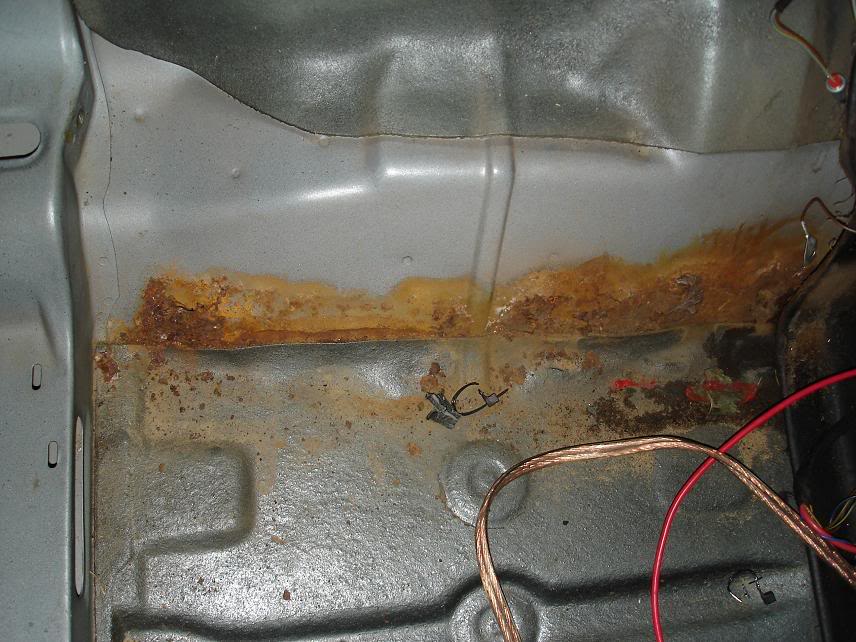
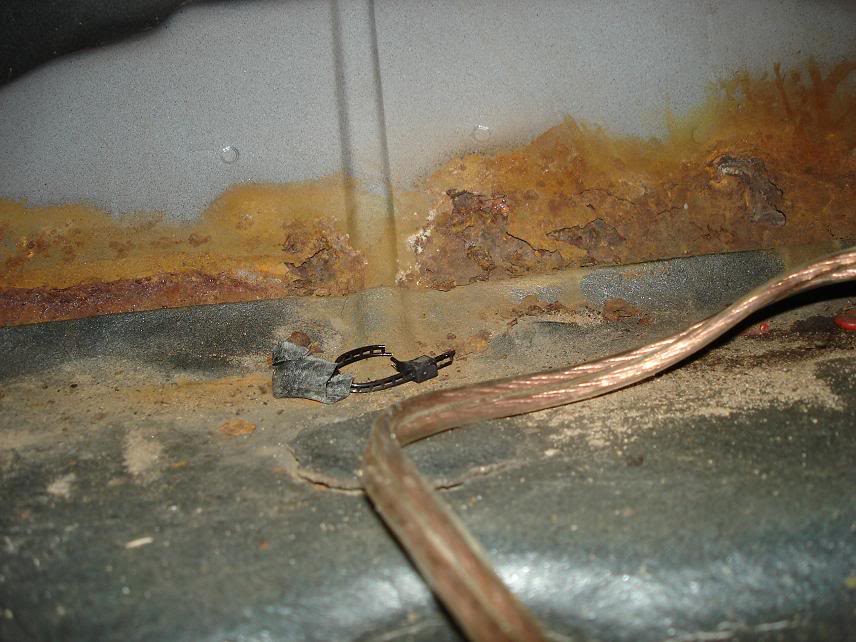

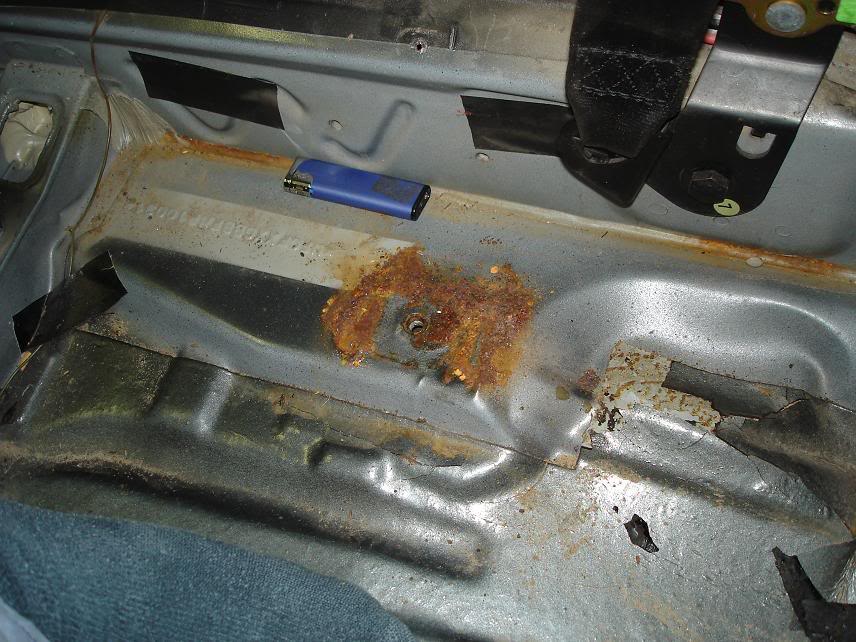
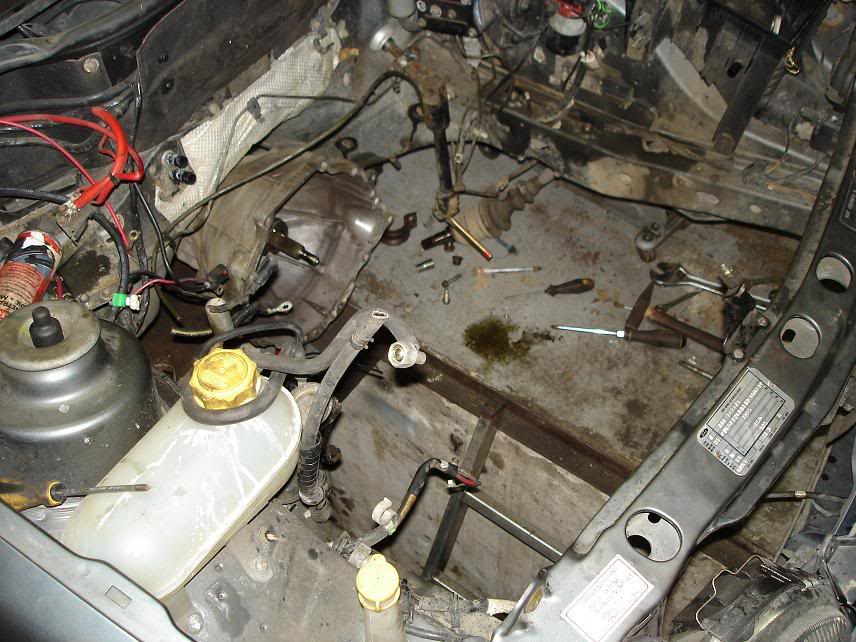
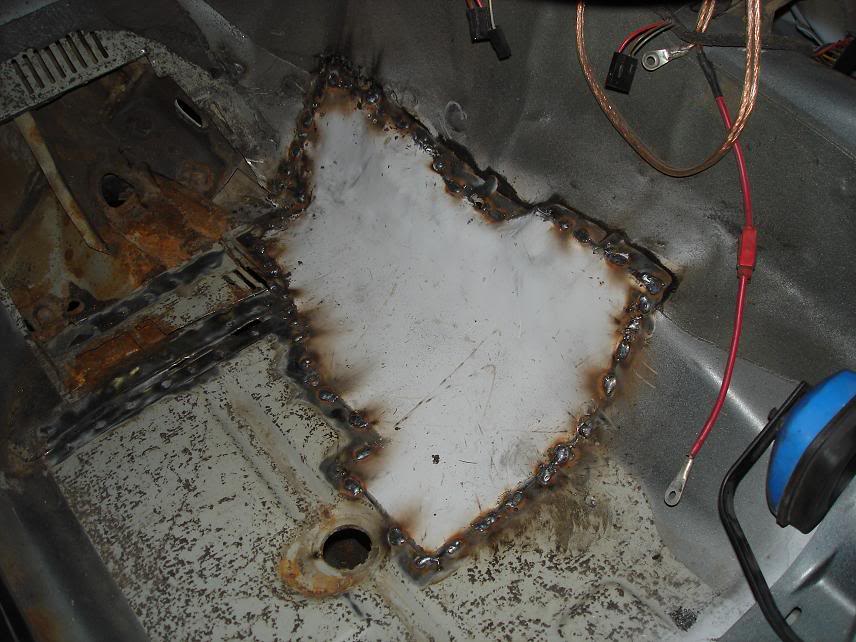
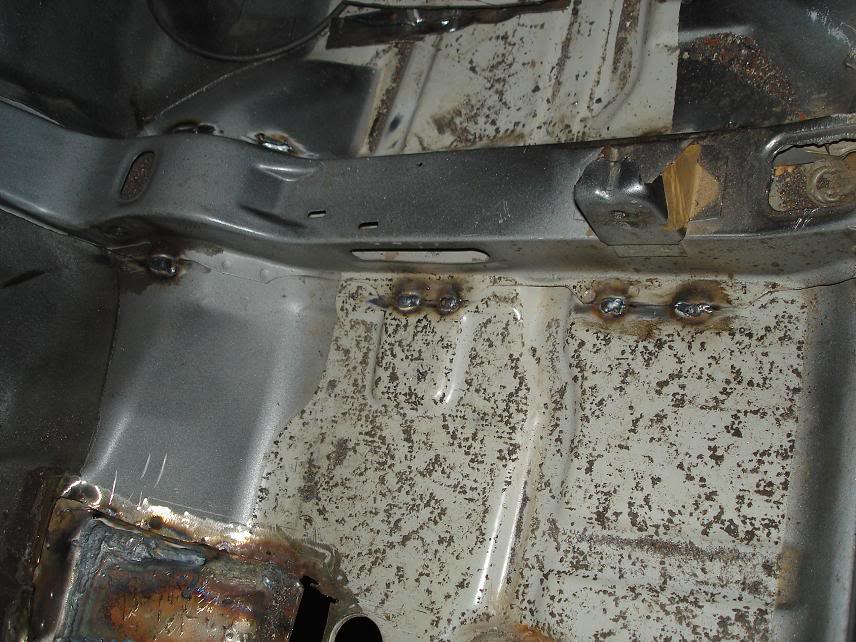
The central tunnel is completely rotten, including the 3mm armor around the gearbox. Seat mountings too, as well as the floor near the rear rust right through.
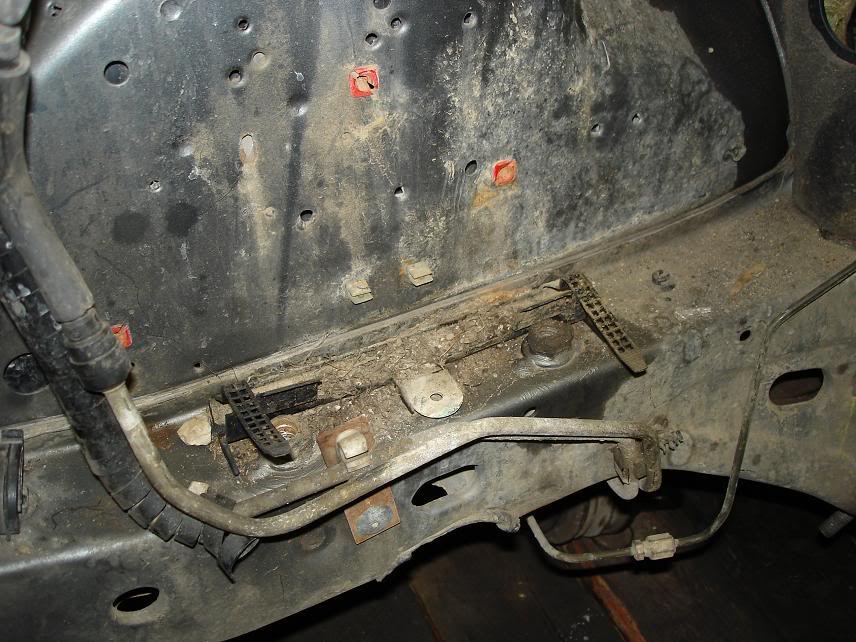
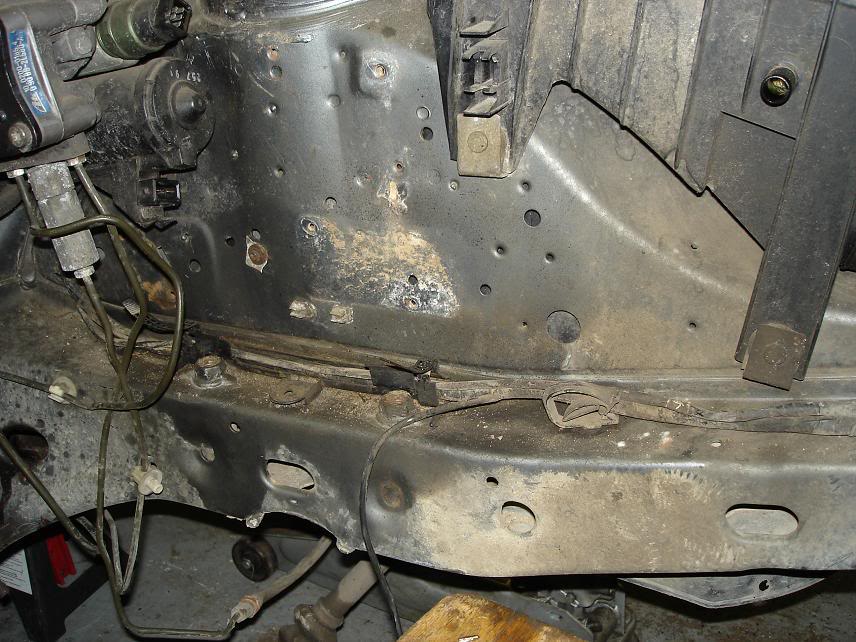
The chassis rails were in good condition except for the main bolts connecting the front swat bar.
After some cleaning:
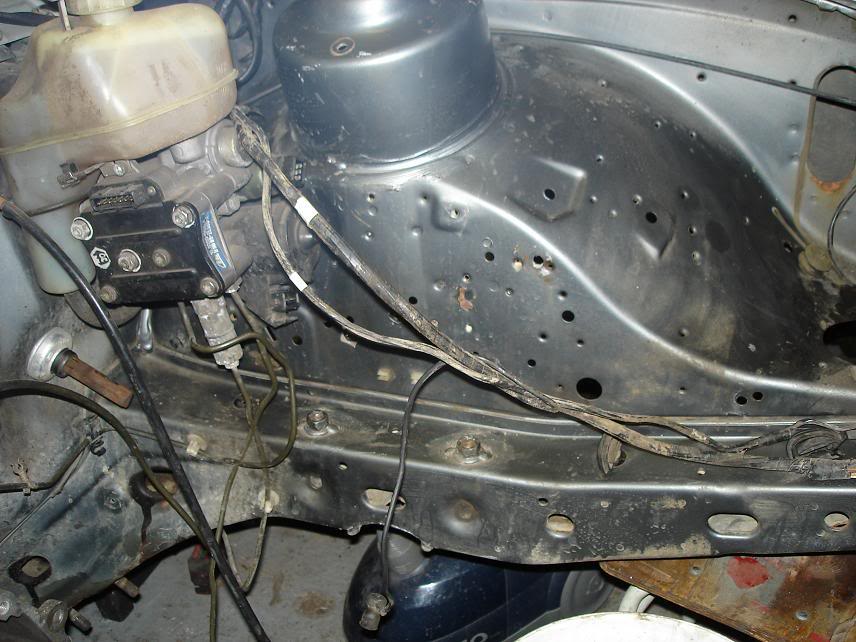
The battery had to go somewhere else, the front end it too heavy for my taste... :/ This car needs to handle well.
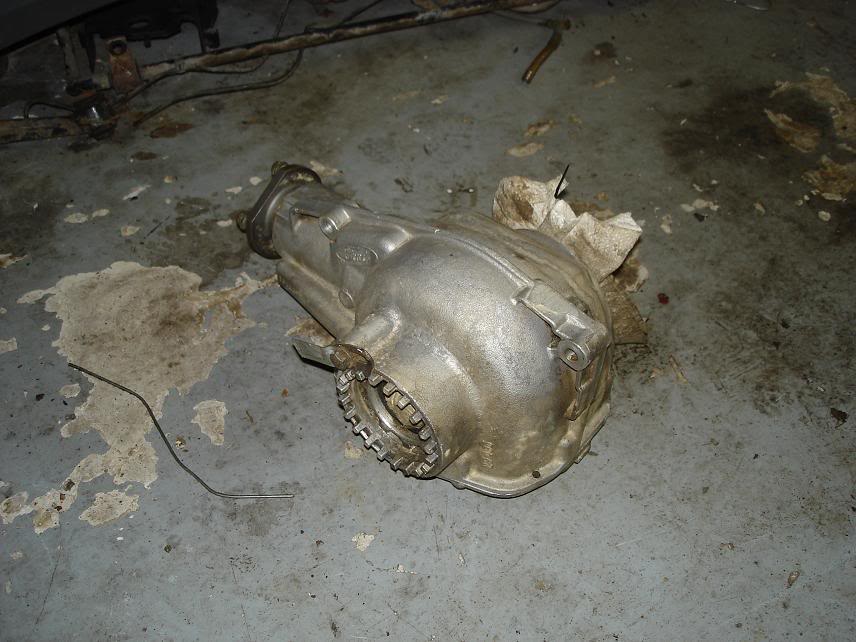
In the mean time i decided to clean a few parts. The front diff. Its a 3.92 type.
Now for some more important stuff:

Chassis welding. The front suspension mounts and rails welded.

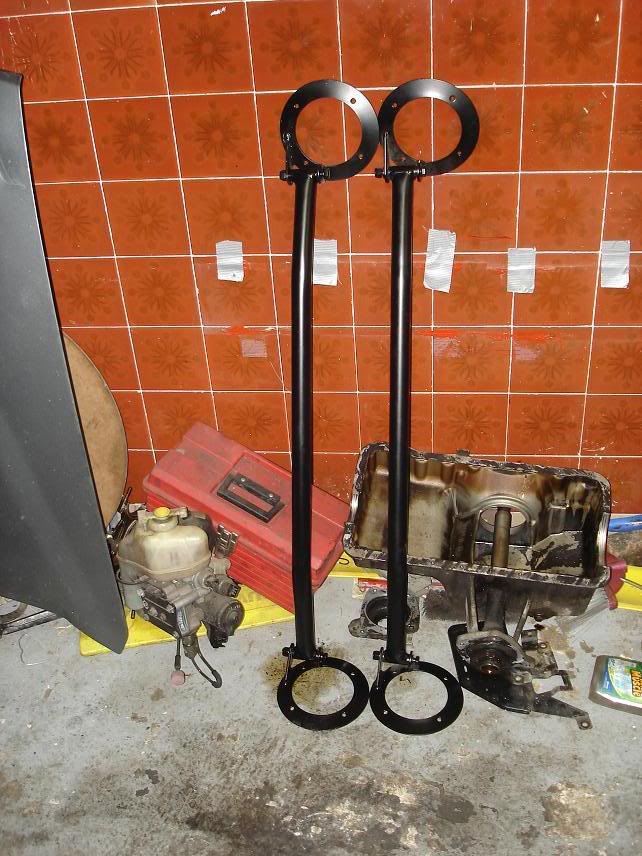
I think this will help a lot too:
 Back to work:
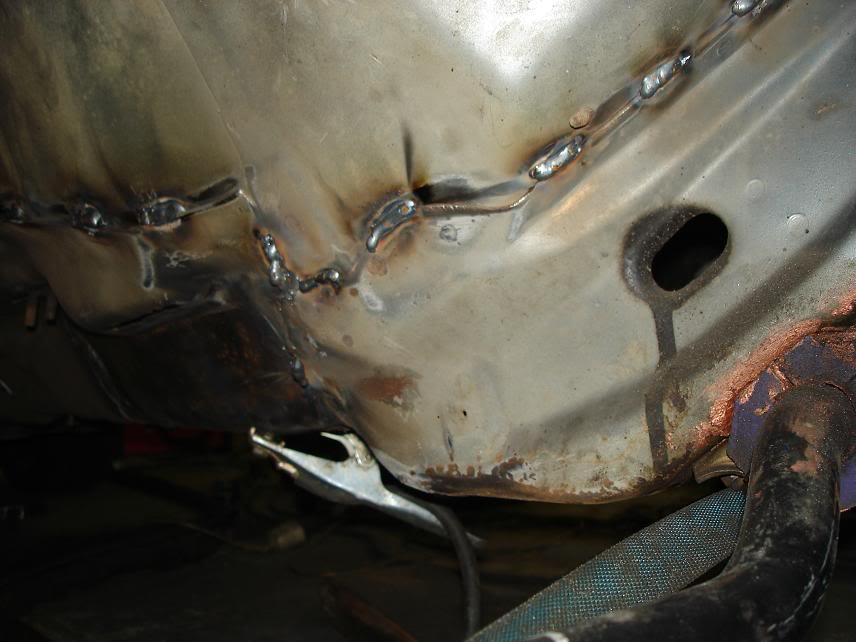
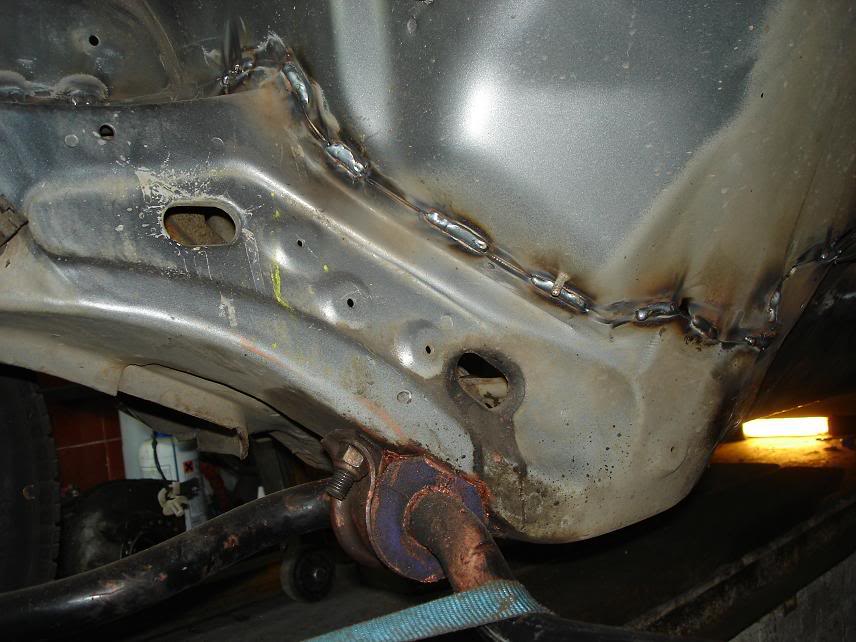
Main chassis rails seam welded. Now it was time for the interior but first...:
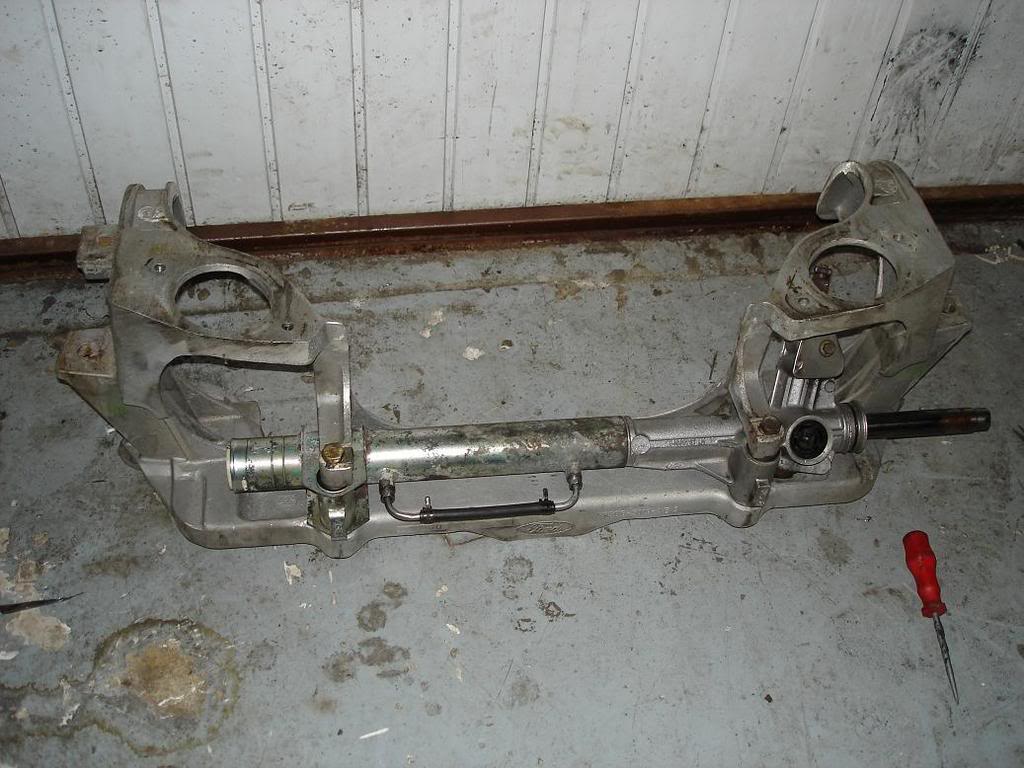
The steering rack modded to a manual. Yes, its hard to steer now while parking.
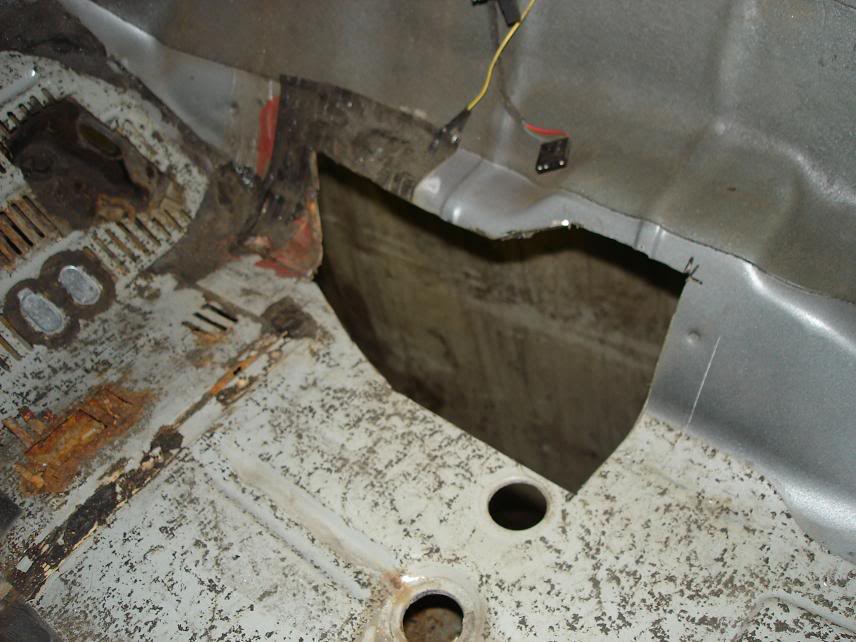
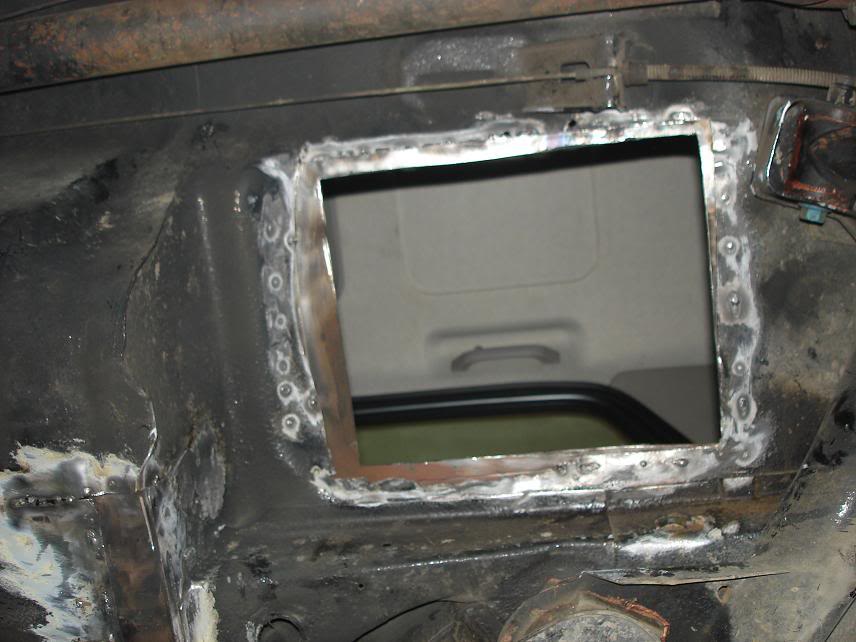
I had to cut a few holes inside:
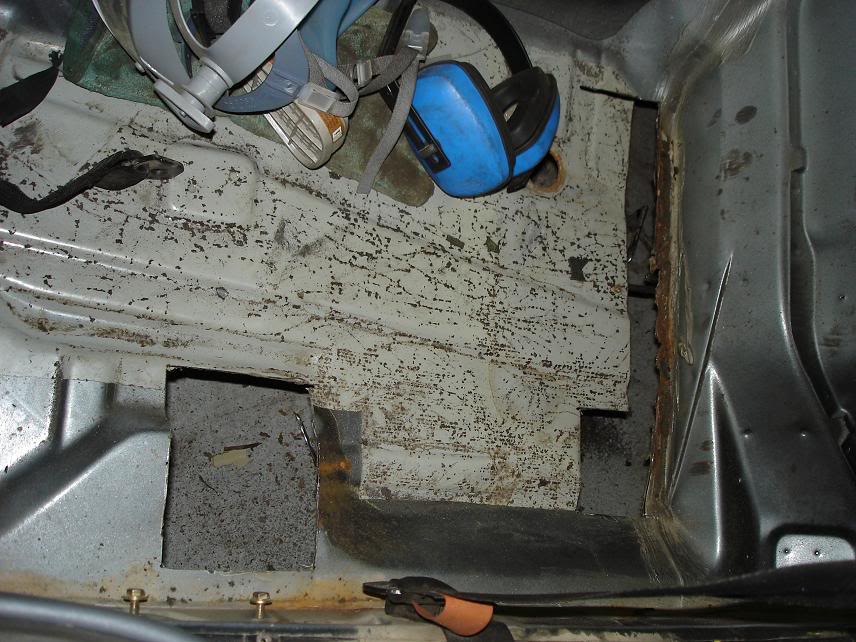
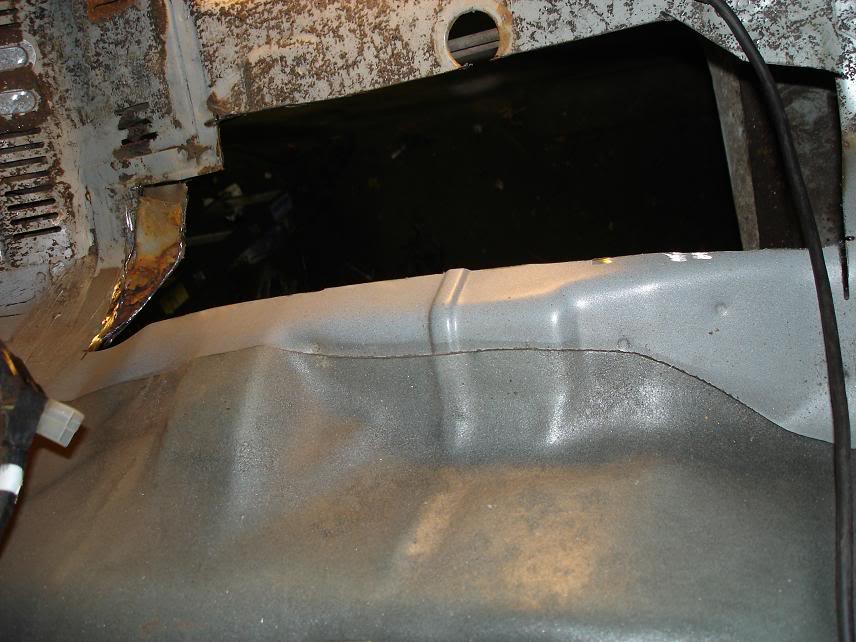
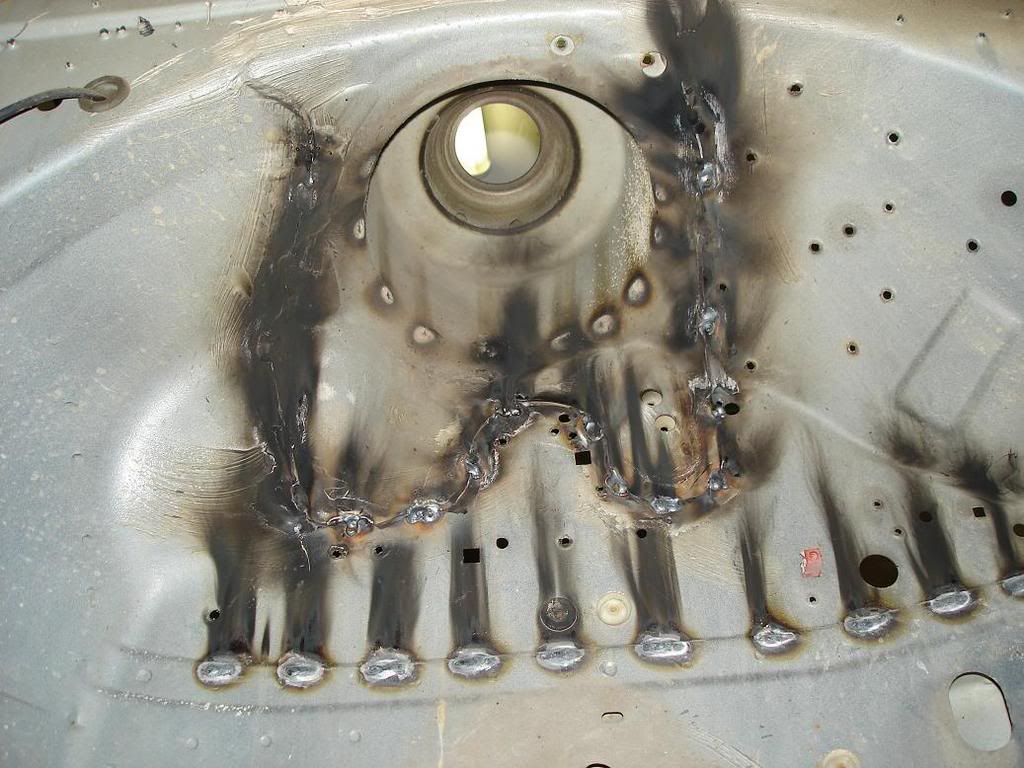
Here you can see how bad it was. Some patching is in order.
Done
That was easy
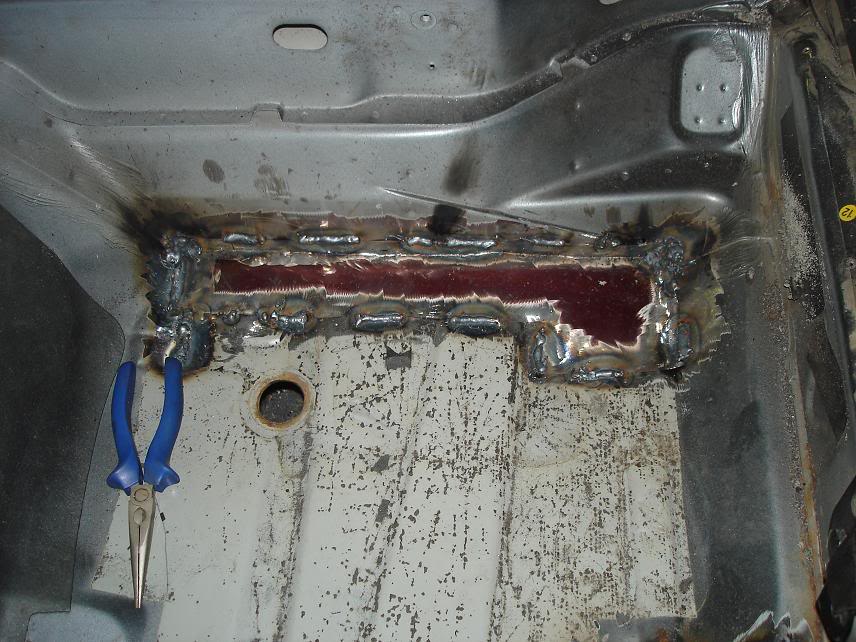
That aint. The 3mm armor plate TIG welded with the remains of the original one.
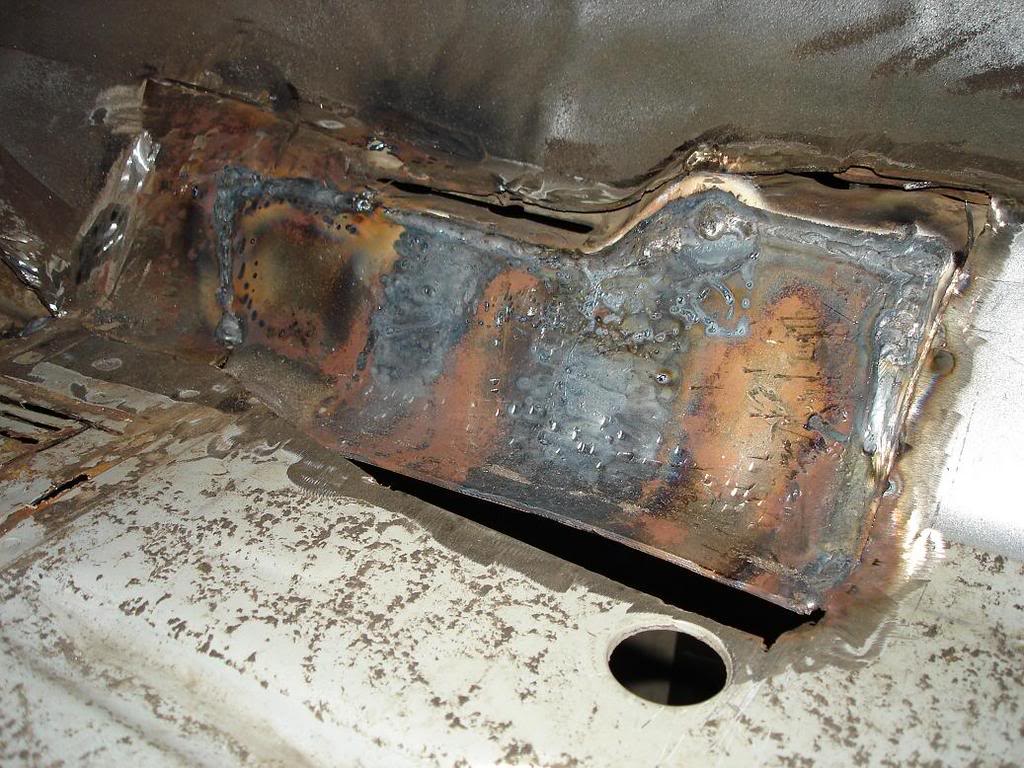
Shaping the thing was a horror.
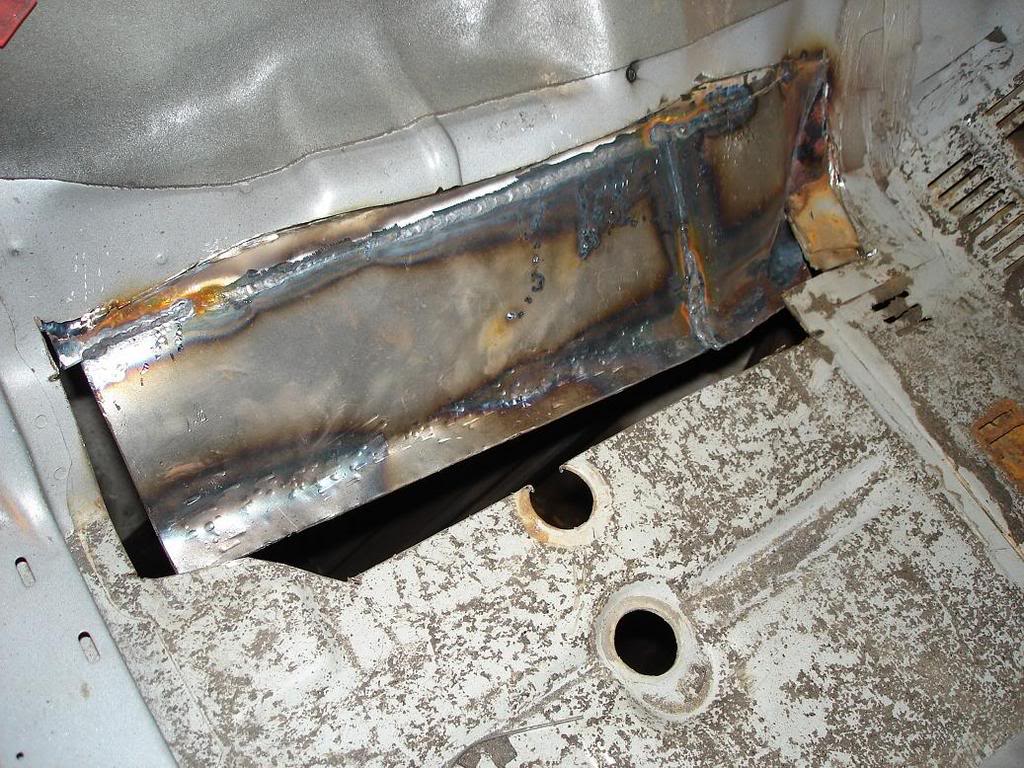
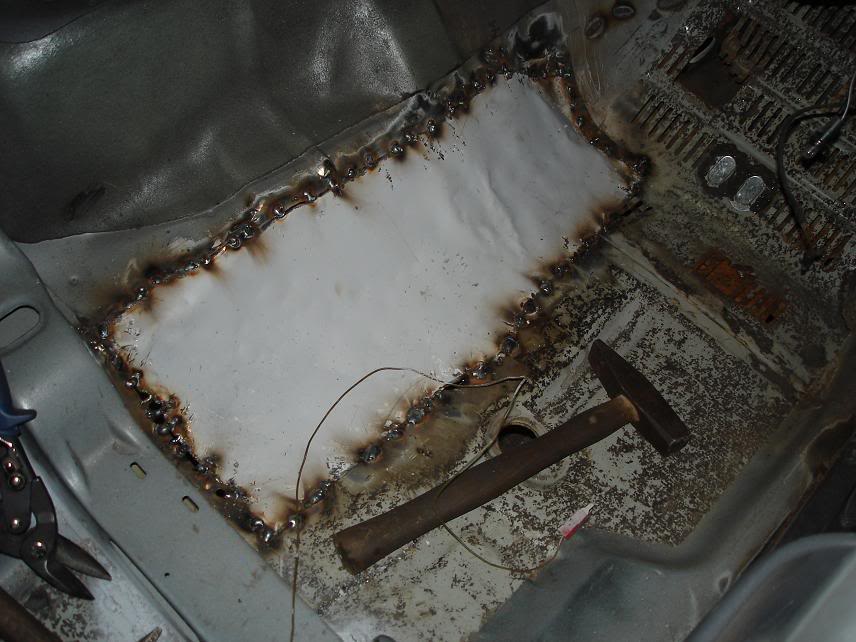
The other side. This was even harder, i had to use 2 patches.

This is how it looked on the other side.
Now thats a mess.
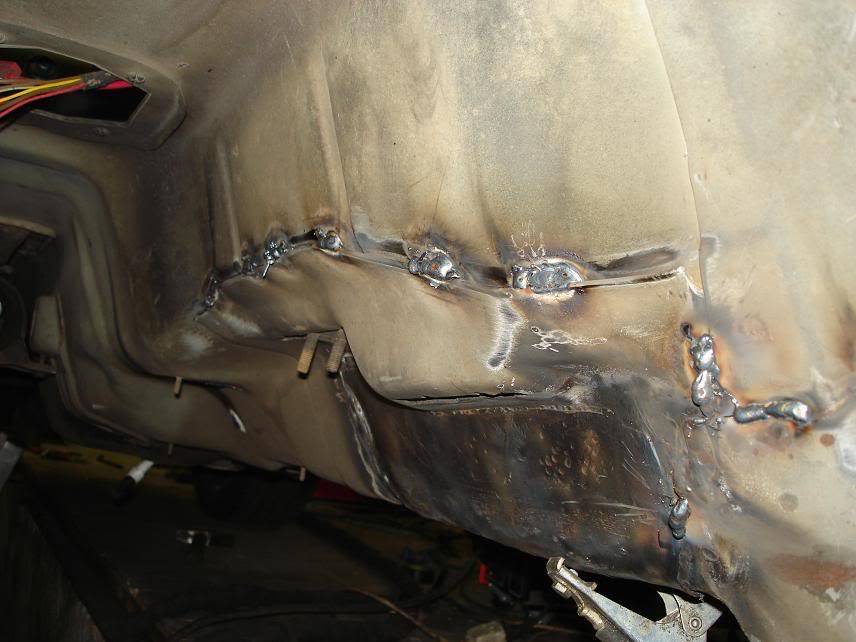
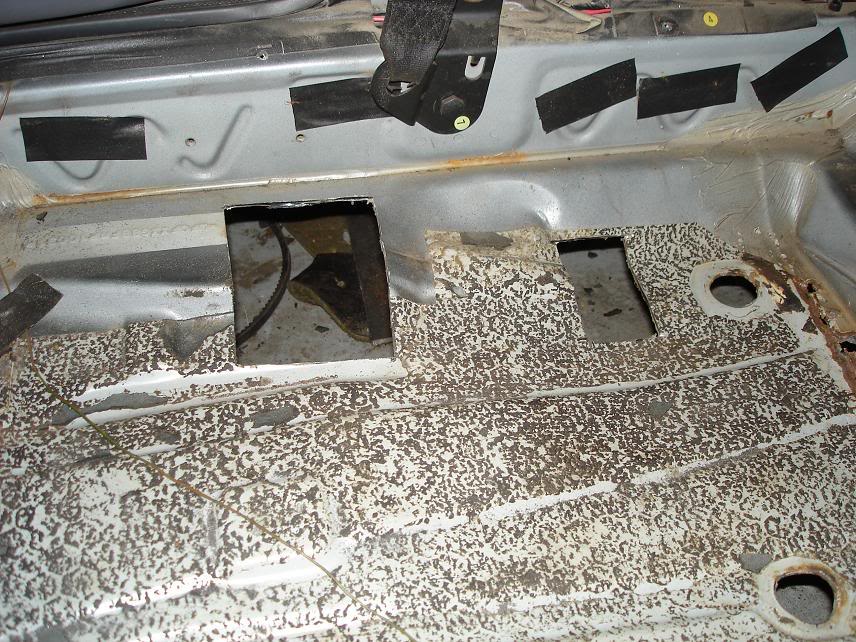
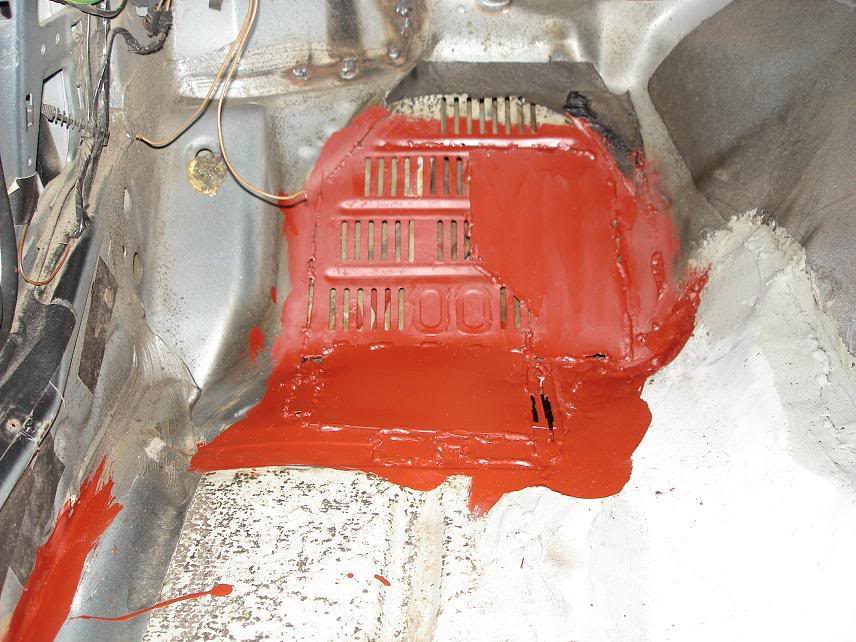
Both sides of the tunnel fixed and seam welded. Time to try some painting.
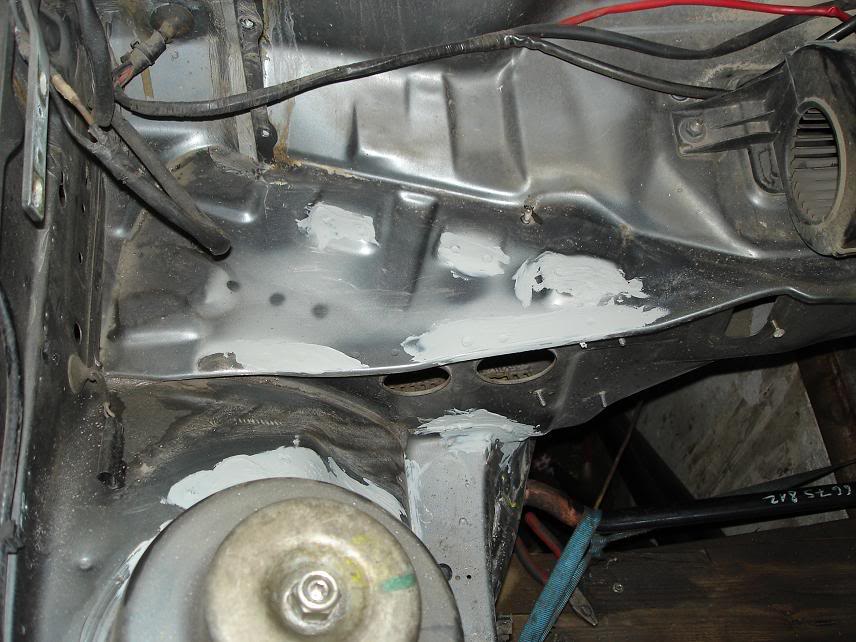
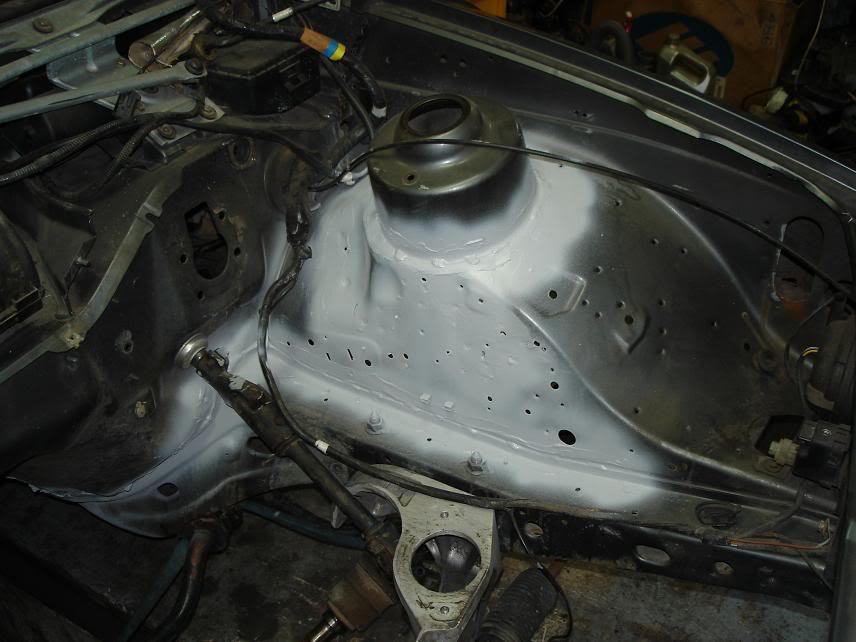
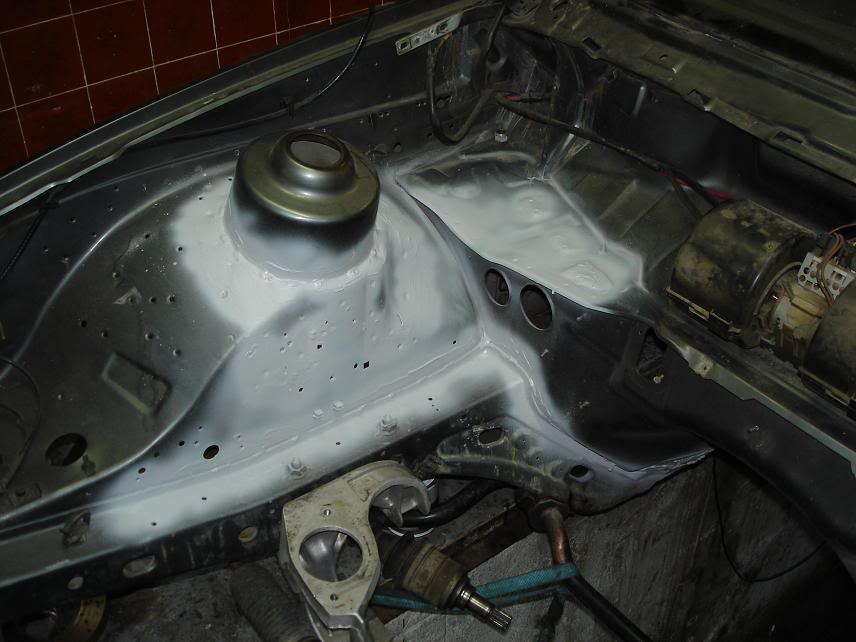
Will receive some color later. Now its time to patch up the interior.
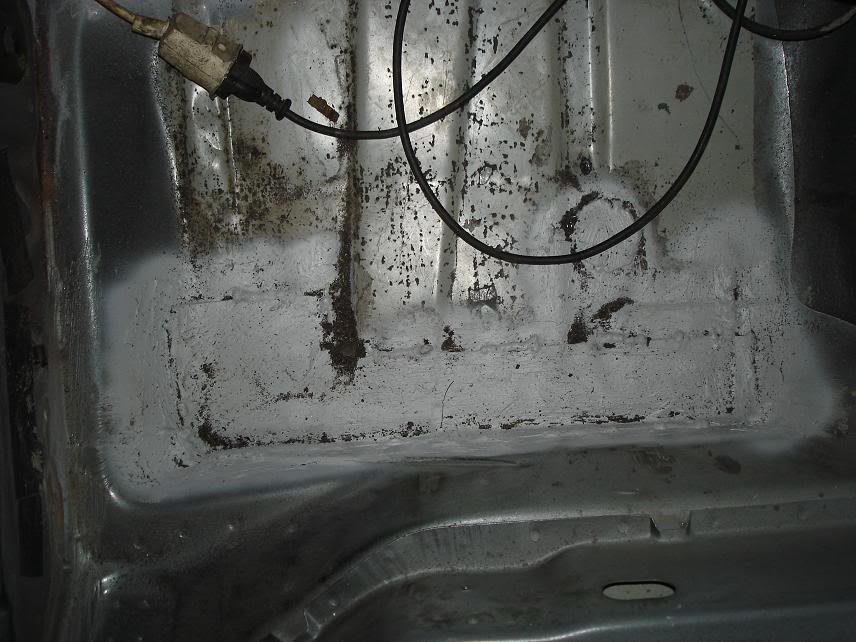
Ouch.
And a picture of my best friend and tool, the russian high precision surface analyzer and molder.
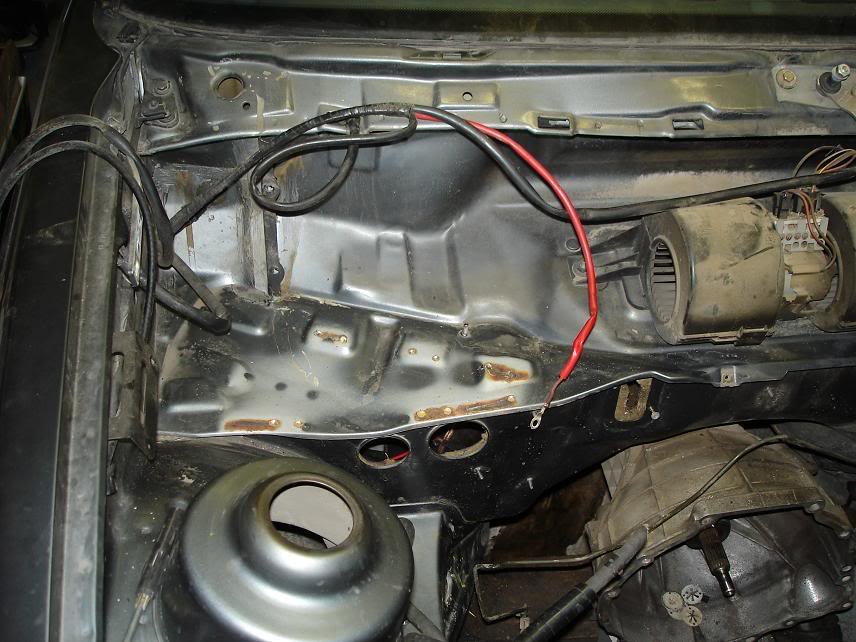
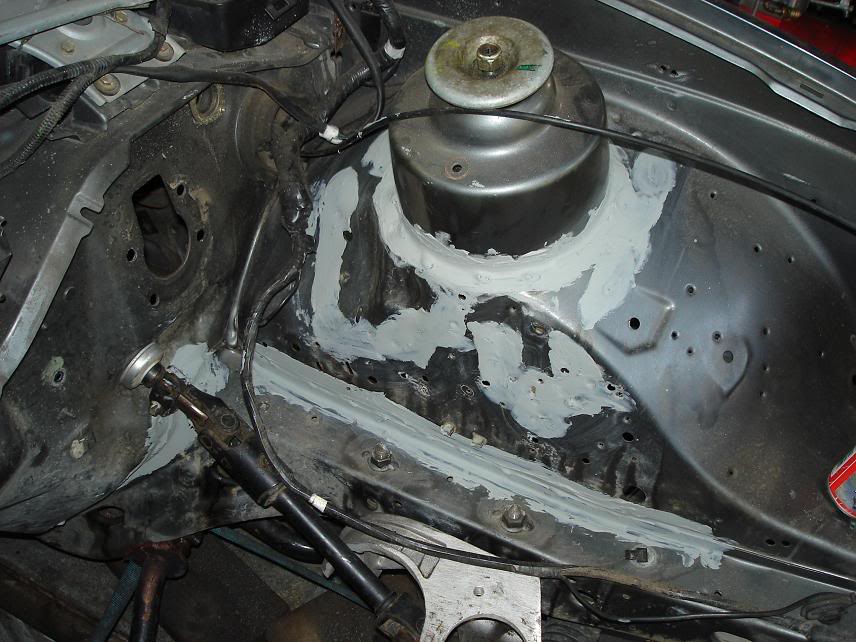
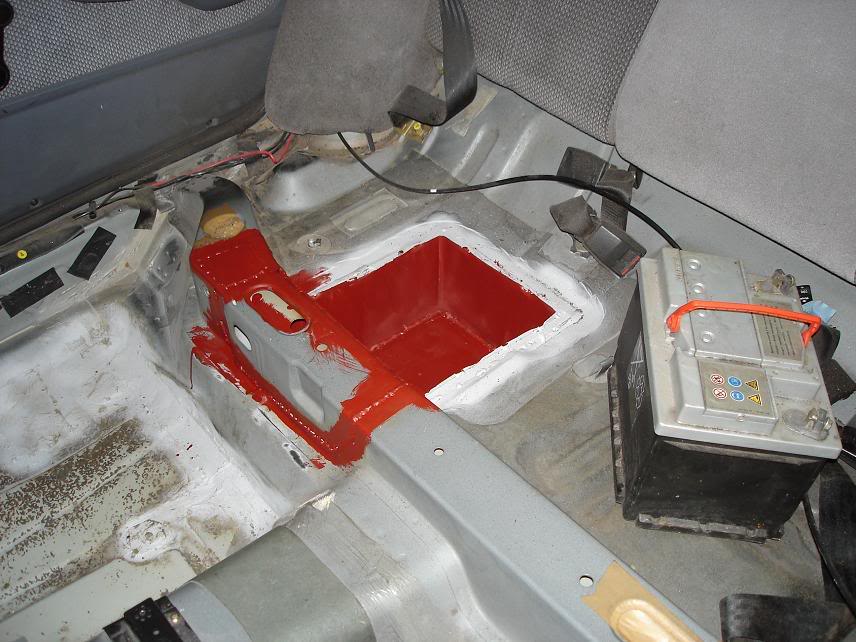
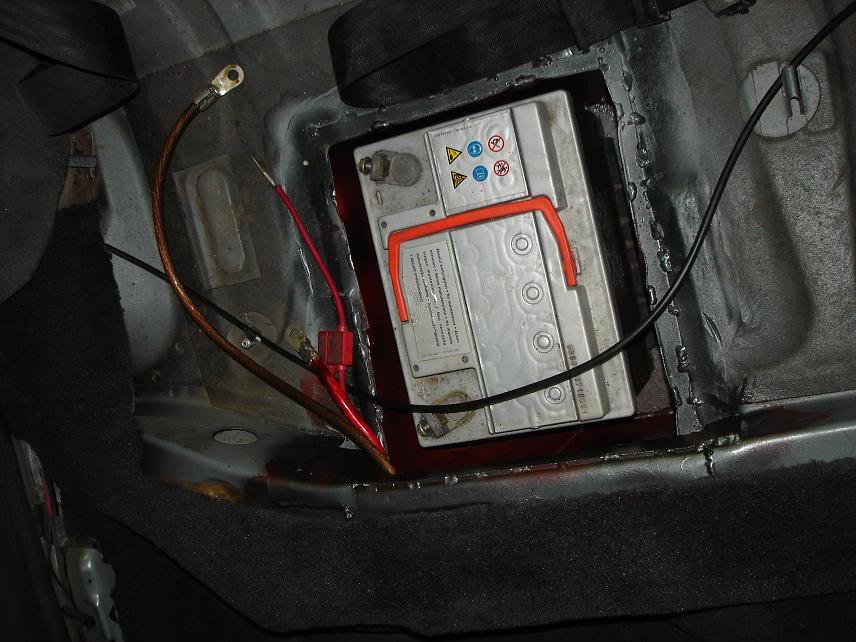
Tada. I wish life was so easy as it seems on these pics. Now, its time to find a new home for the battery.
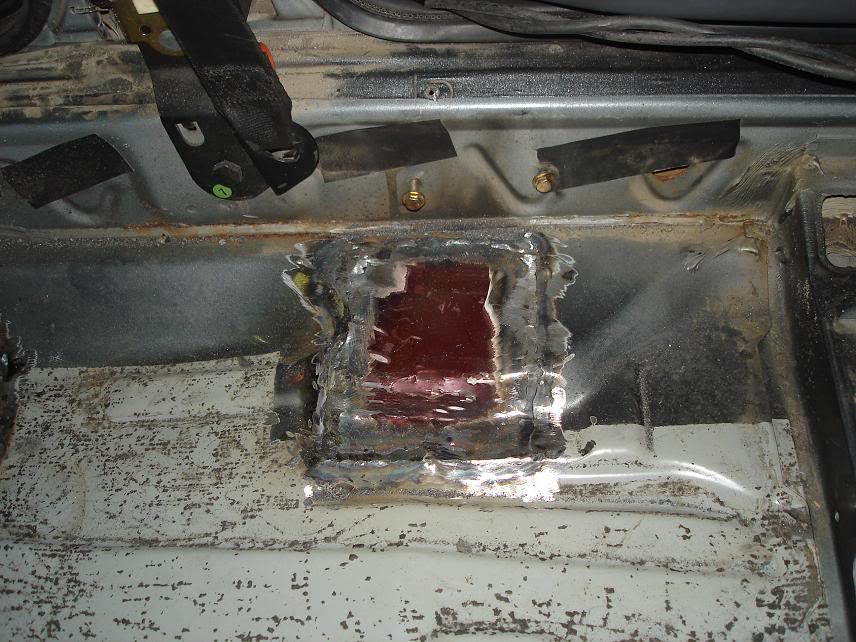
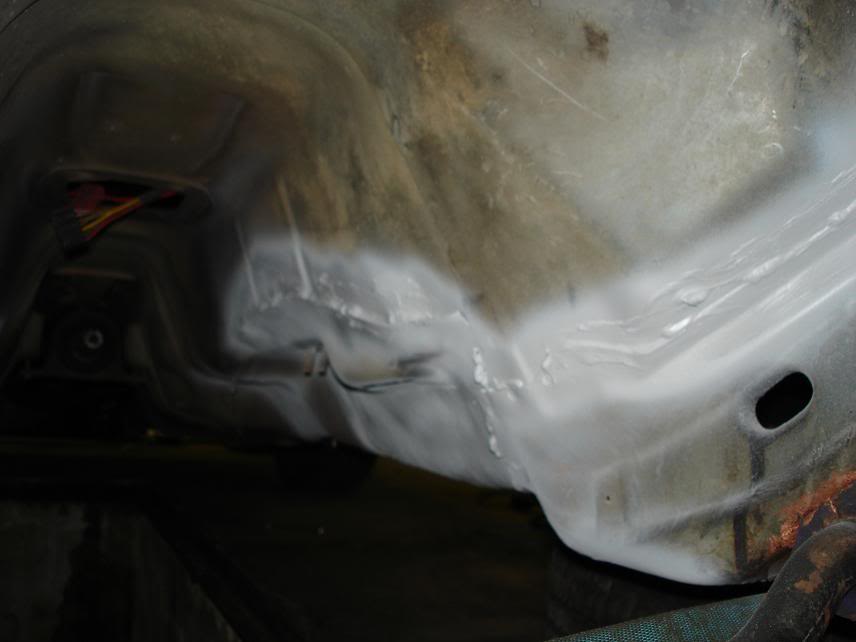
A hole Right side, under the rear seat.
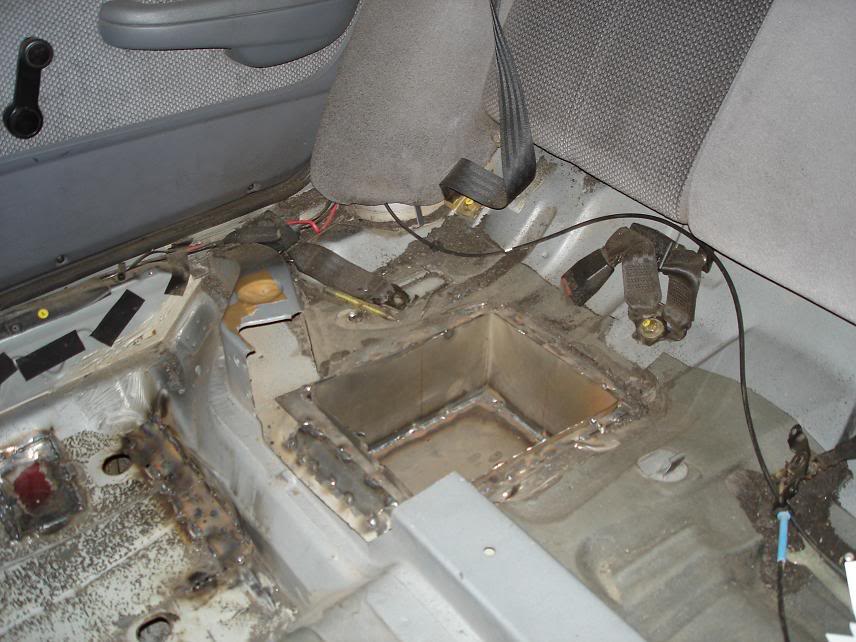
Looks comfortable
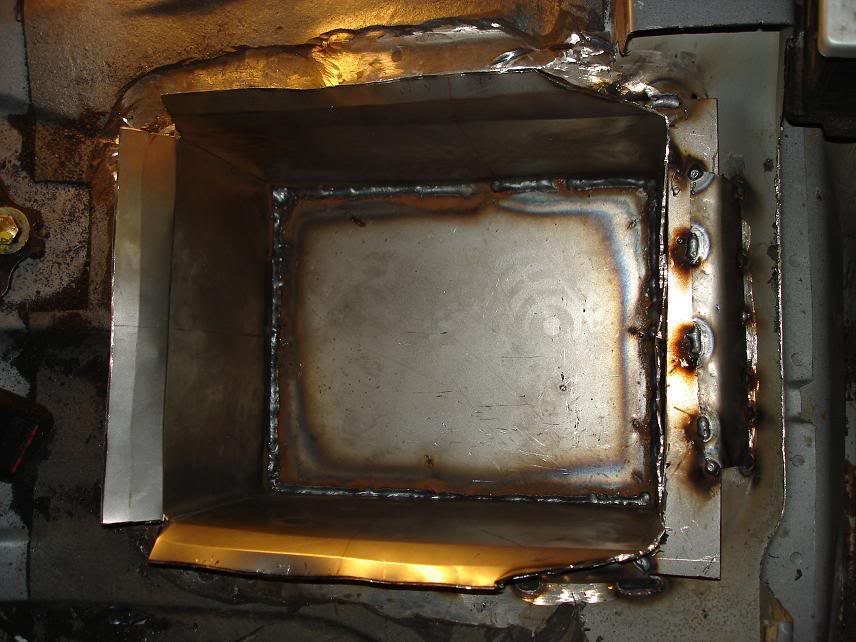

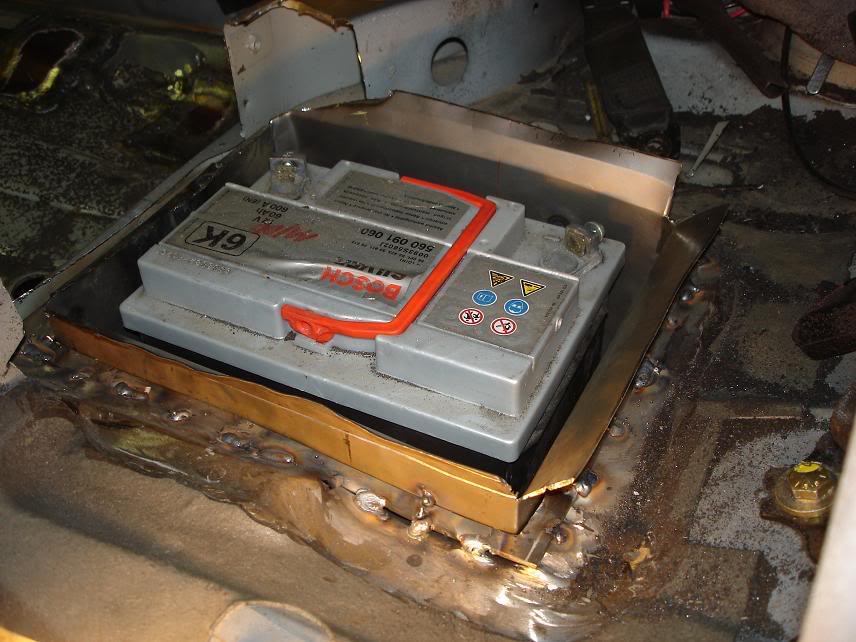
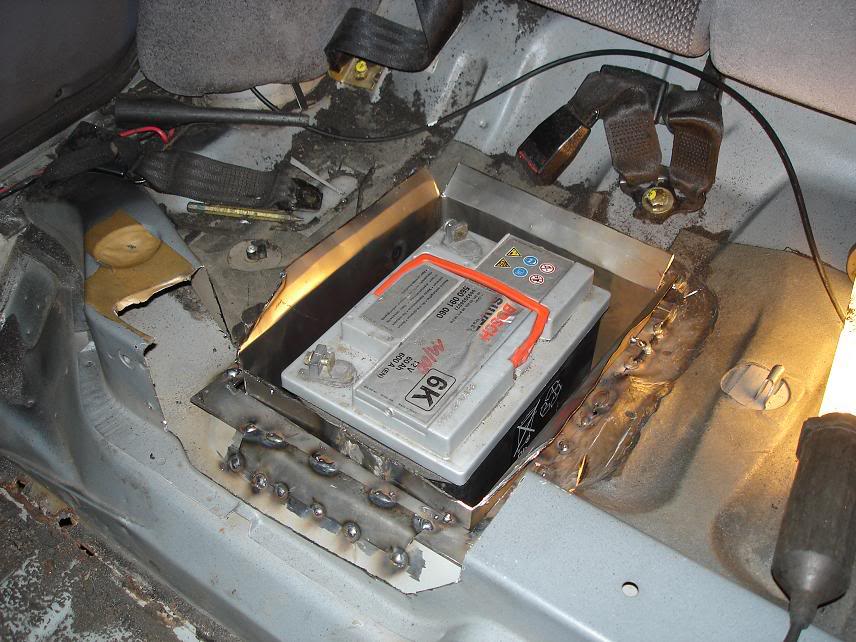
The baseplate is 3mm thick, the walls are 1mm thick steel, the reinforcement where the box joins the floorpan is 3mm. Everything mig welded.
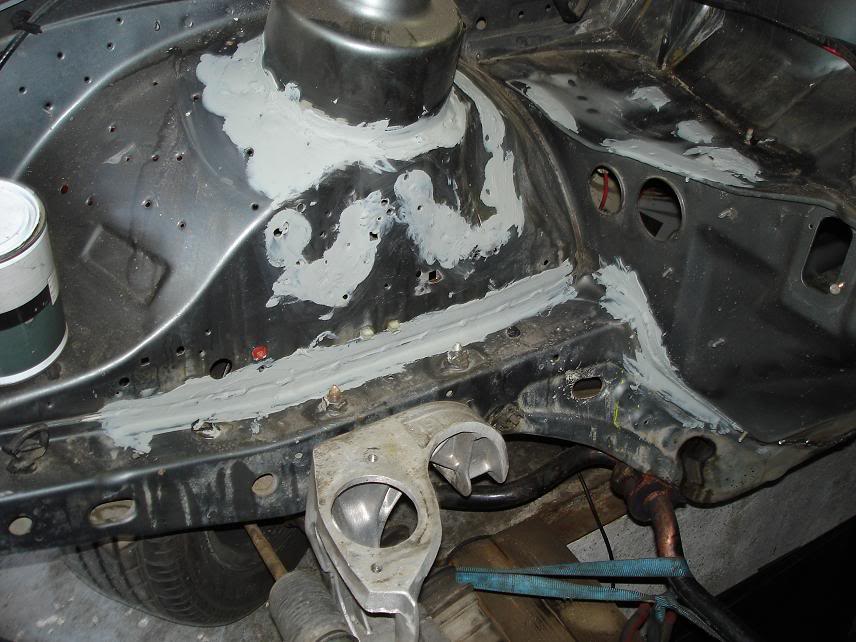
Almost done...
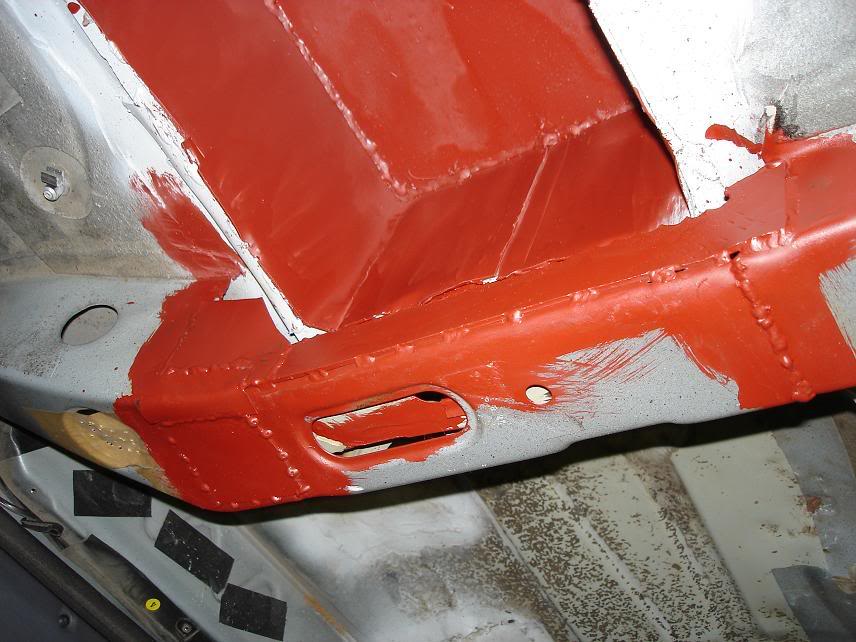
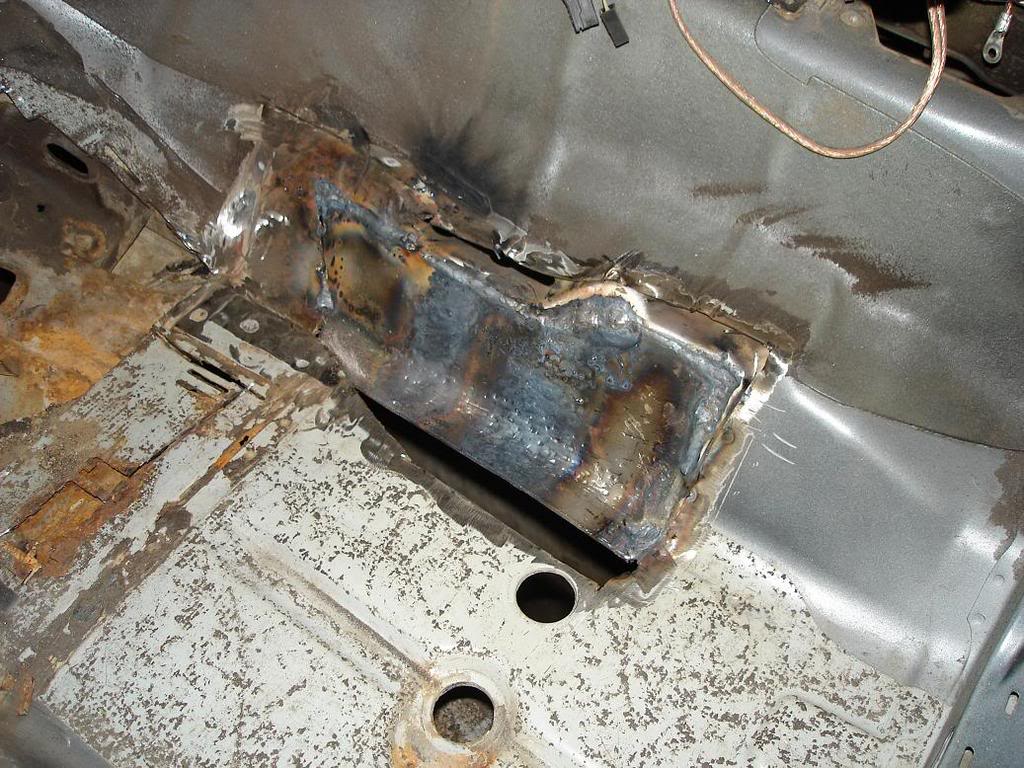
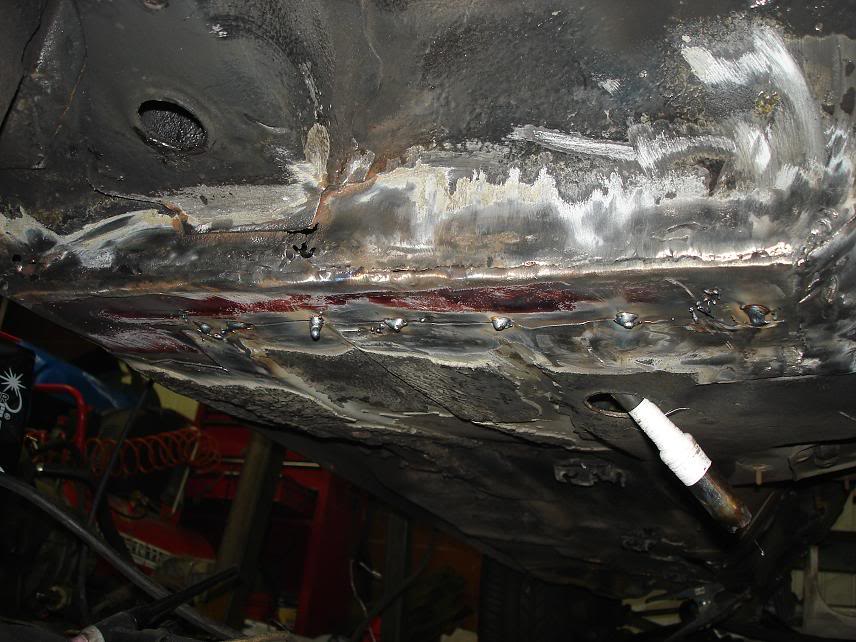
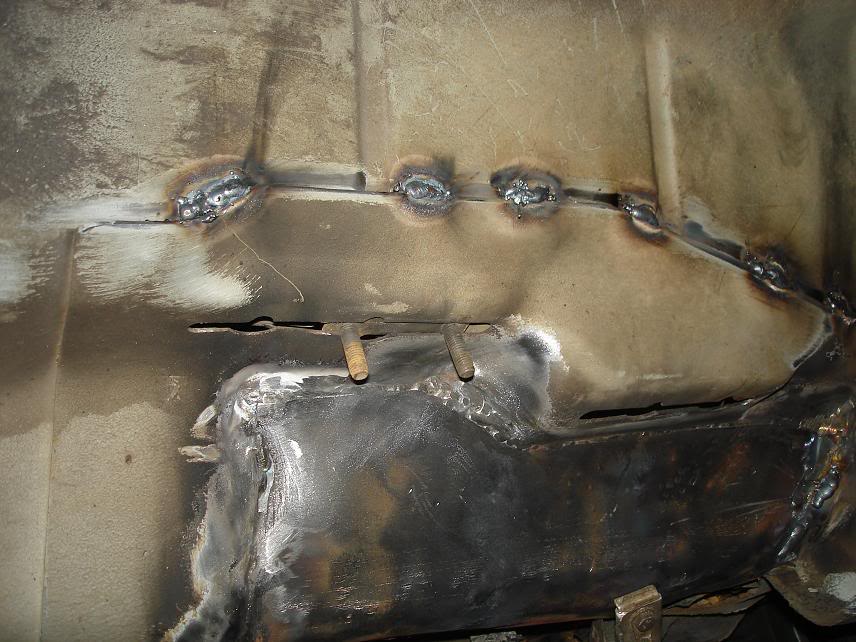
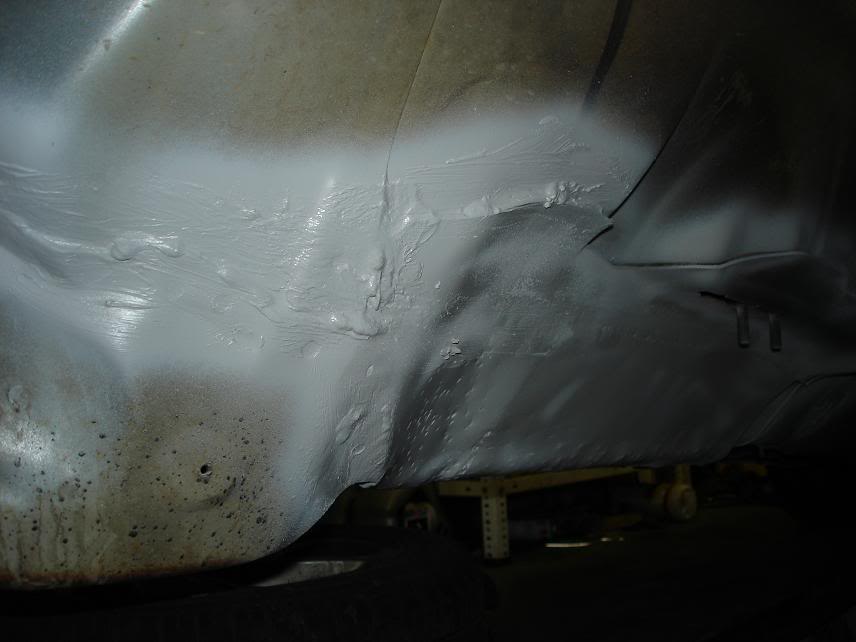
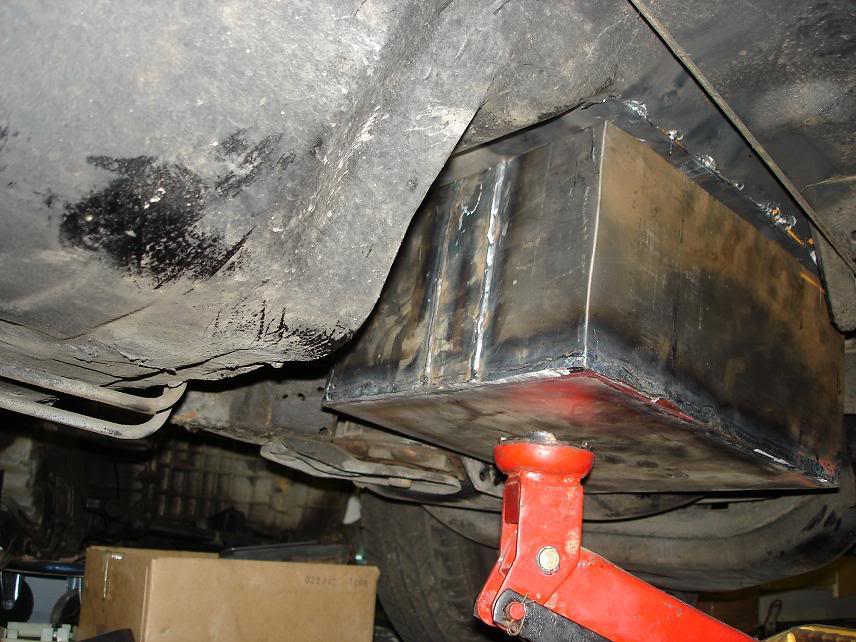
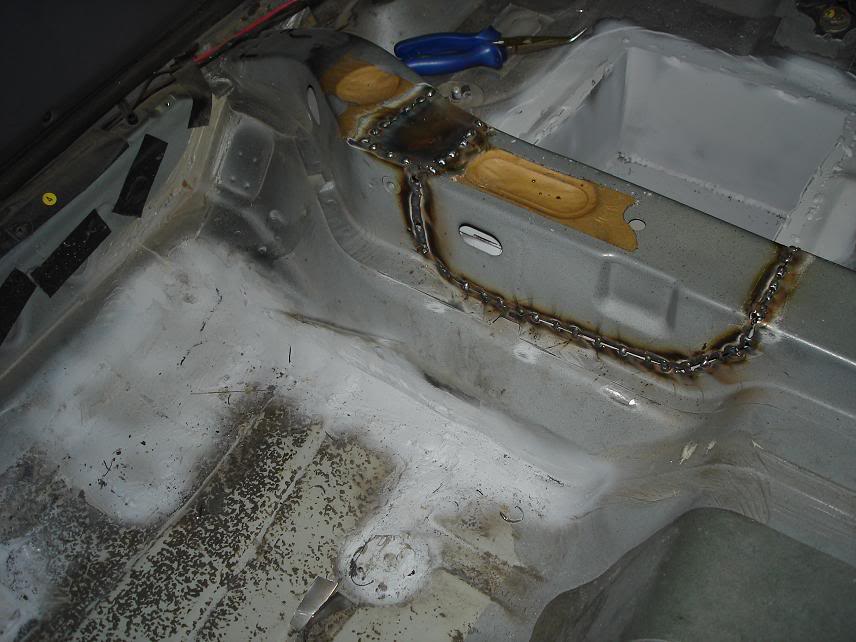
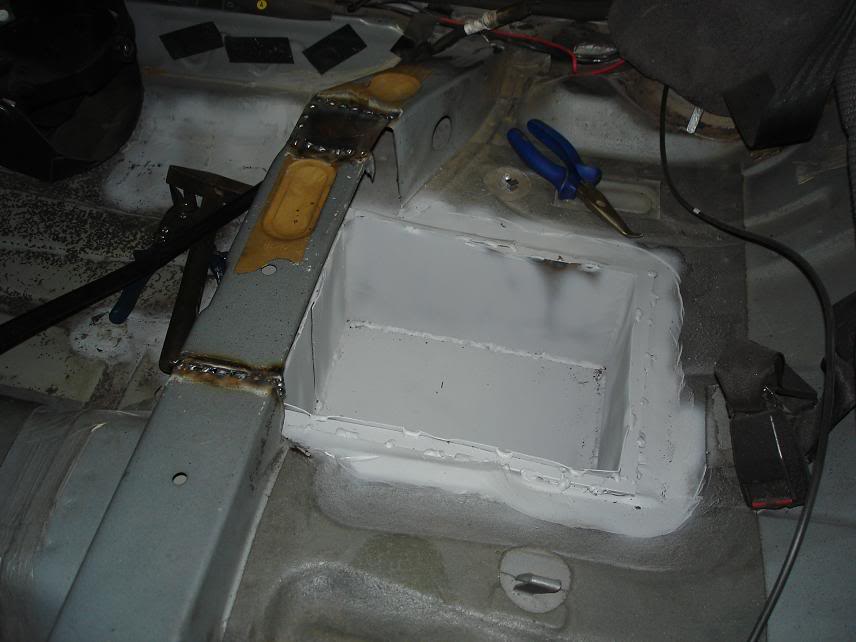
The rail is reinforced with 3mm steel, TIG and MIG welded. Time for the finishing touch on the inside:
The chassis rails seam welded. Yes i know the pictures are not chronological.
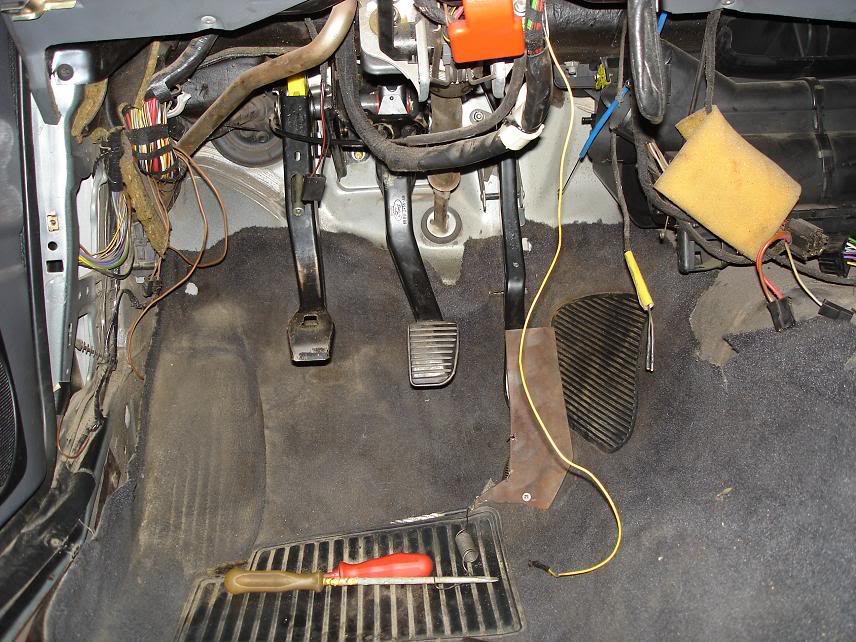
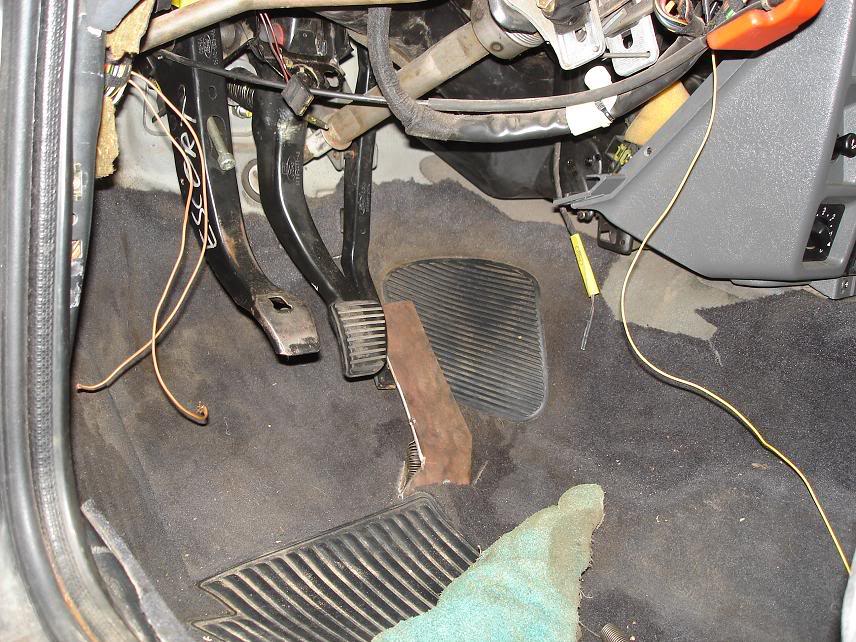
A new throttle pedal is made so i can heel and toe easylly. The throttle linkage needs to be connected. To be continued in a while. Chapter 2 - engine build and installation. The car is still under construction.
Tomas "berkut"
This topic is about my daily driver Ford Sierra build. The pictures will be in a more or less chronological way, my english is bad, thats why the comments under the pictures wont be too long. If someone has a question, please ask it, its actually much easy for me to answer questions and have a discussion than to write about something in advance as a comment. The car is build on a budget (meaning im the only fabricator and worker with the help of my friends, especially Lukasz "Feluke" i would like to thank the most.
The car started its life as a old stock Sierra 4x4 DOHC in the most basic version.
The disassembly started because of a failed con rod bearing, after i began it i found a lot of other reasons to do it. The most fearsome was a lot of rust and the fact that the chassis is starting to flex.
Engine out.
Engine on its crane. There is a lot of parts to be sourced from there, im not dumping it yet. I have to say its a heavy f***** compared to the 4 litre Toyota V8.
The main problems:
The central tunnel is completely rotten, including the 3mm armor around the gearbox. Seat mountings too, as well as the floor near the rear rust right through.
The chassis rails were in good condition except for the main bolts connecting the front swat bar.
After some cleaning:
The battery had to go somewhere else, the front end it too heavy for my taste... :/ This car needs to handle well.
In the mean time i decided to clean a few parts. The front diff. Its a 3.92 type.
Now for some more important stuff:
Chassis welding. The front suspension mounts and rails welded.
I think this will help a lot too:
Main chassis rails seam welded. Now it was time for the interior but first...:
The steering rack modded to a manual. Yes, its hard to steer now while parking.
I had to cut a few holes inside:
Here you can see how bad it was. Some patching is in order.
Done
That was easy
That aint. The 3mm armor plate TIG welded with the remains of the original one.
Shaping the thing was a horror.
The other side. This was even harder, i had to use 2 patches.
This is how it looked on the other side.
Now thats a mess.
Both sides of the tunnel fixed and seam welded. Time to try some painting.
Will receive some color later. Now its time to patch up the interior.
Ouch.
And a picture of my best friend and tool, the russian high precision surface analyzer and molder.
Tada. I wish life was so easy as it seems on these pics. Now, its time to find a new home for the battery.
A hole
Looks comfortable
The baseplate is 3mm thick, the walls are 1mm thick steel, the reinforcement where the box joins the floorpan is 3mm. Everything mig welded.
Almost done...
The rail is reinforced with 3mm steel, TIG and MIG welded. Time for the finishing touch on the inside:
The chassis rails seam welded. Yes i know the pictures are not chronological.
A new throttle pedal is made so i can heel and toe easylly. The throttle linkage needs to be connected. To be continued in a while. Chapter 2 - engine build and installation. The car is still under construction.
Tomas "berkut"

 14-08-2007, 12:27 AM
#4
Virgin
Thread Starter
Join Date: Dec 2005
Location: Warsaw, Poland
Posts: 7
Likes: 0
Received 0 Likes
on
0 Posts
Now, the engine.
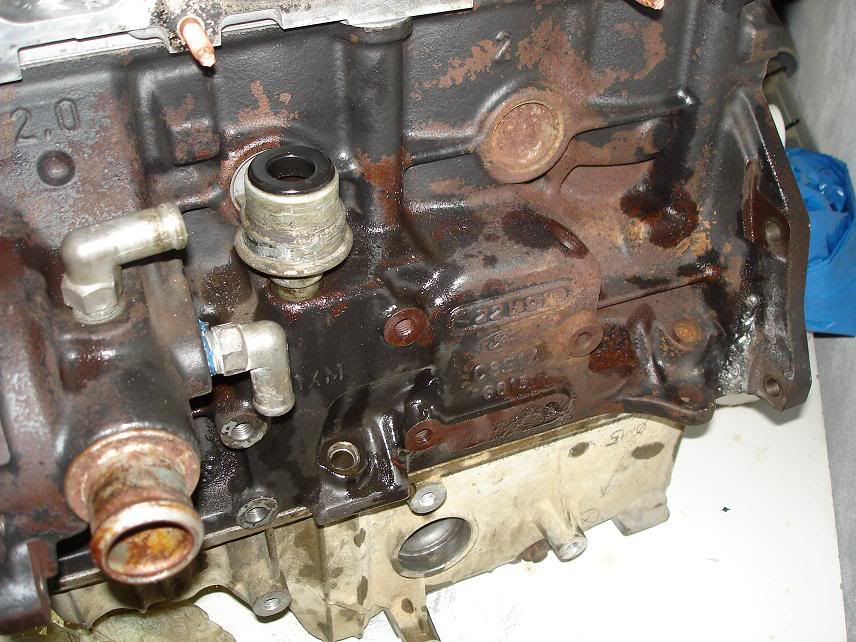
The engine comes from a Escort RS2000, rated at 150bhp. A engine overhaul was performed with new 0.5mm oversize Mahle pistons and bearings. The pistons dont poses the standart steel insert and beacause of that and the new design are lighter.
The RS2000 block is almost identical to the Sierra DOHC one exept for power steering and alternator mounting and oil dip and breather pipe parts.
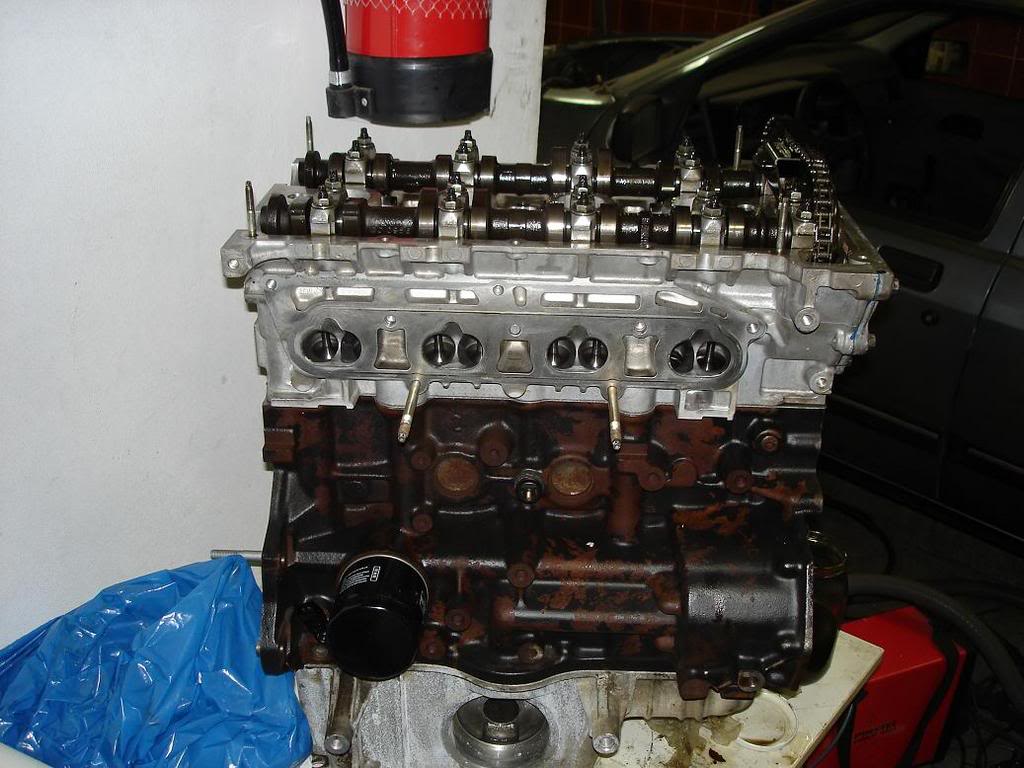
The head has been slightly ported, finished with 80 grit. If the current modifications will show results good enough i will make a "evo" head, heavily ported and prepared for high rpm operation.
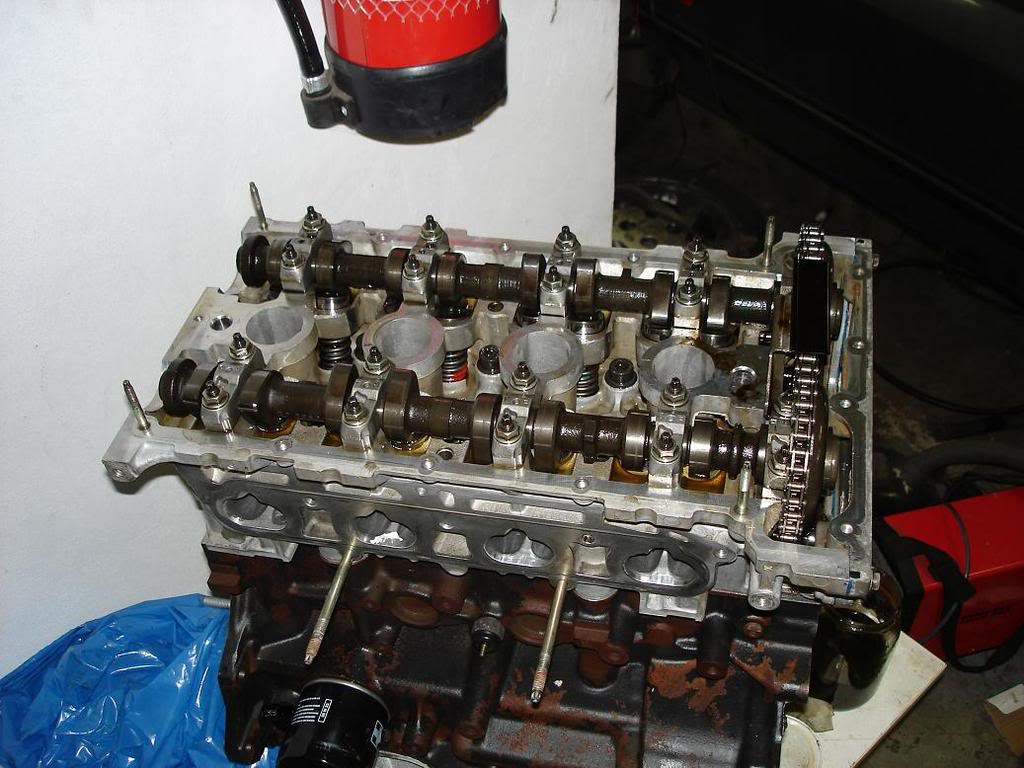
The cams are stock Ford units. The wheels, chain, chain guides, oil pump have about 10000 on them, new tensioner,
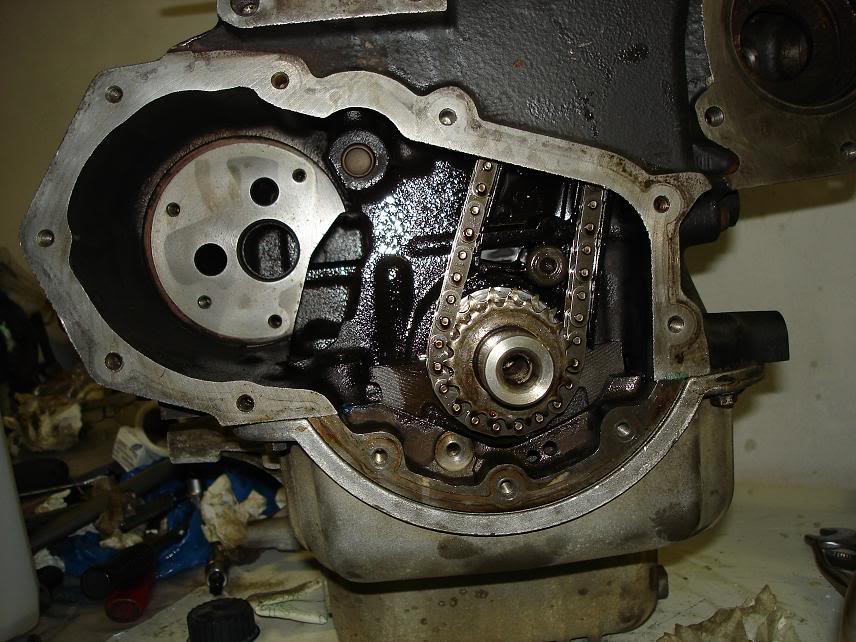
The bottom end is balanced, lightened, ready for higher rpm operation. I would like to rev the engine to 7000-7500.
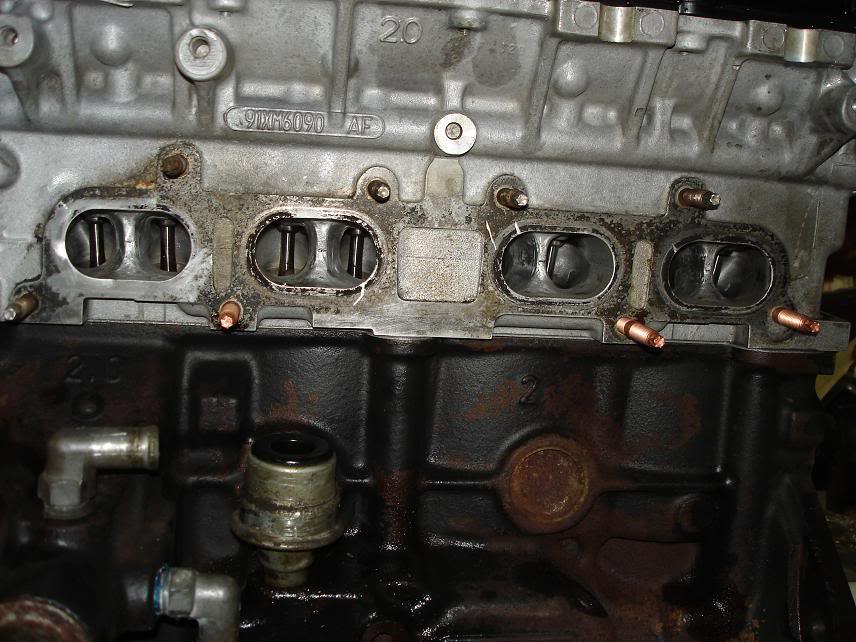
You can see the old dipstick in the middle of the engine, it needs to be plugged and machined to be flush with the block in order to mate with a 4x4 sump. Sierra dipstick hole plugged on the right.
I really enjoy this view.
This one will be even better later.
Now, some more improvements.
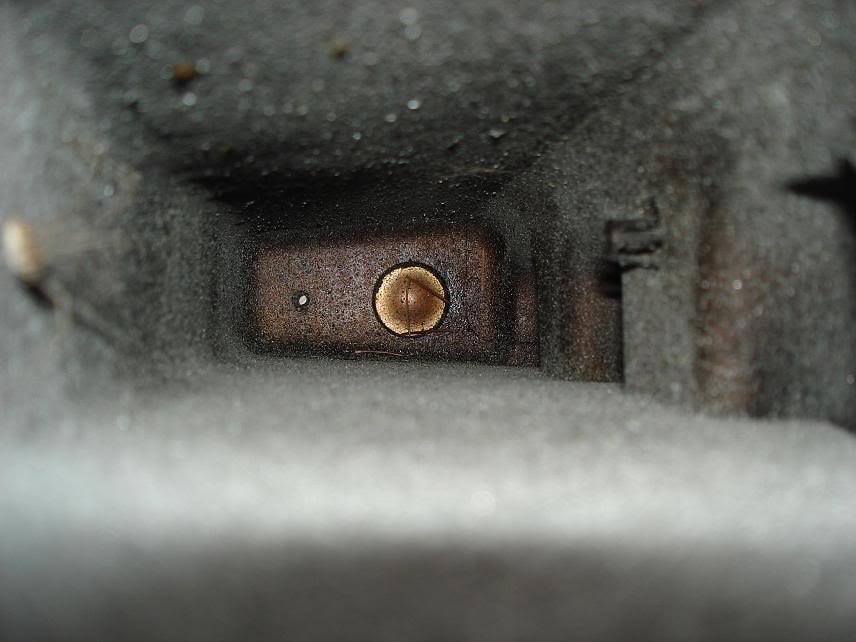
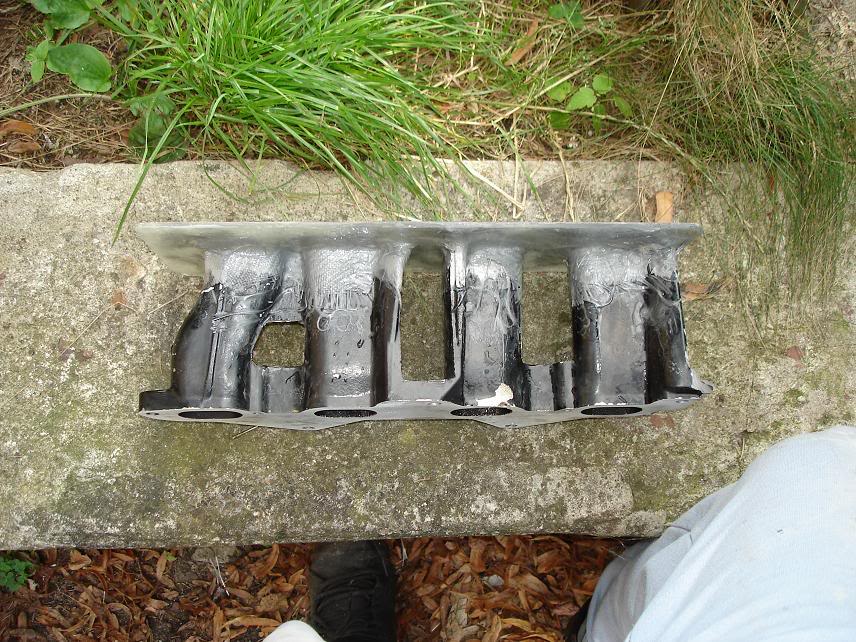
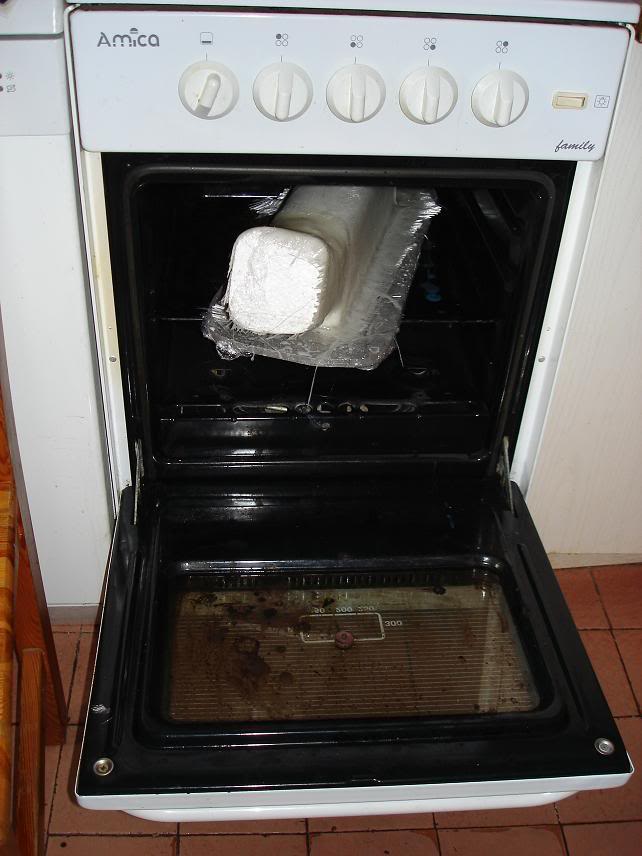
The stock inlet manifold. Sad really. I imagine air flow to be terrible over there, especially at the entrance of the port.
Ooops something bad must have happened here...
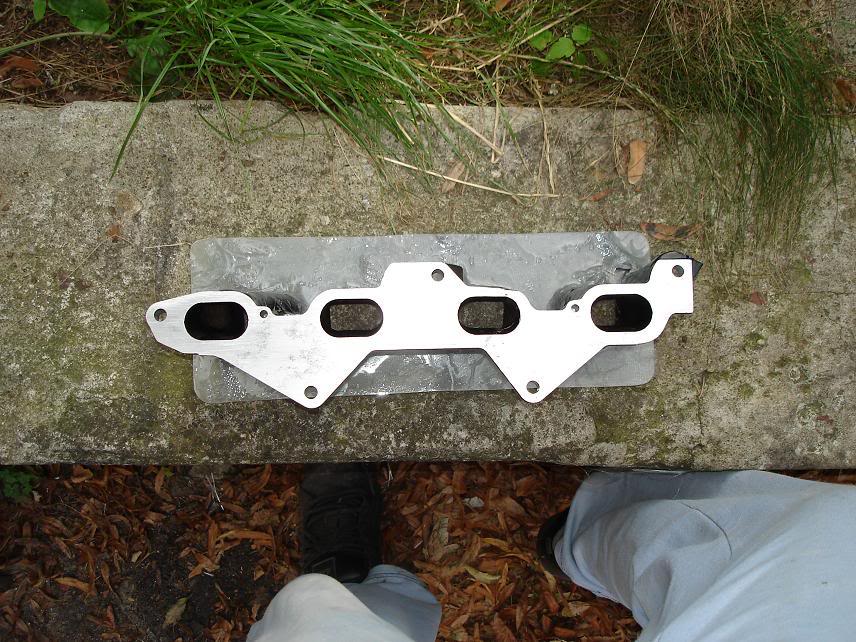
The manifold is 1200mm long, including the fuel rail, plastic spacer and port the inlet tract is 270mm long from the inlet to the valve.
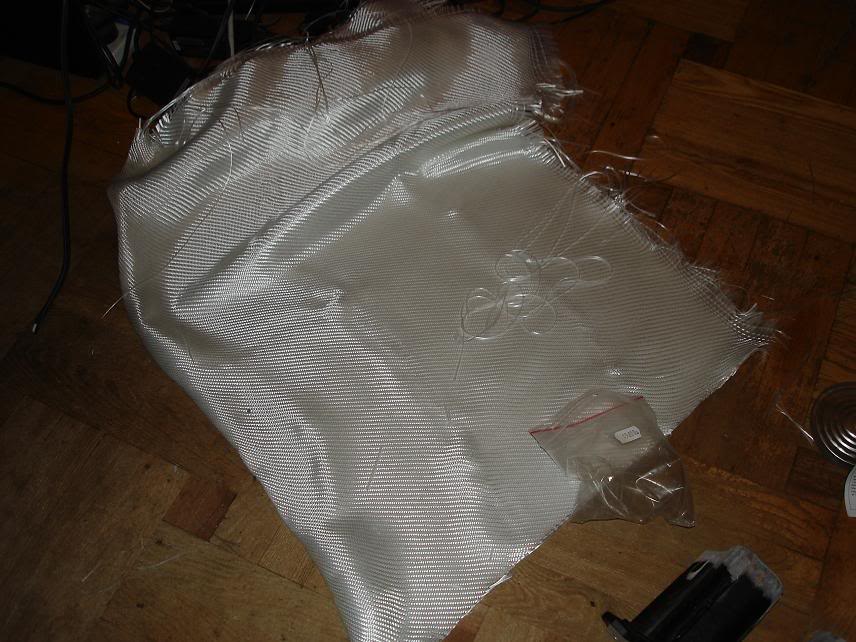
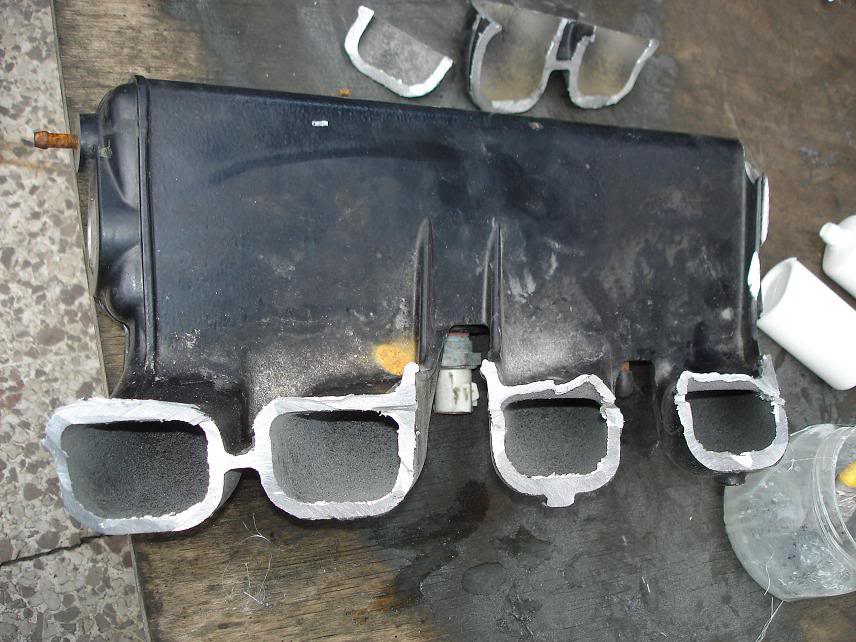
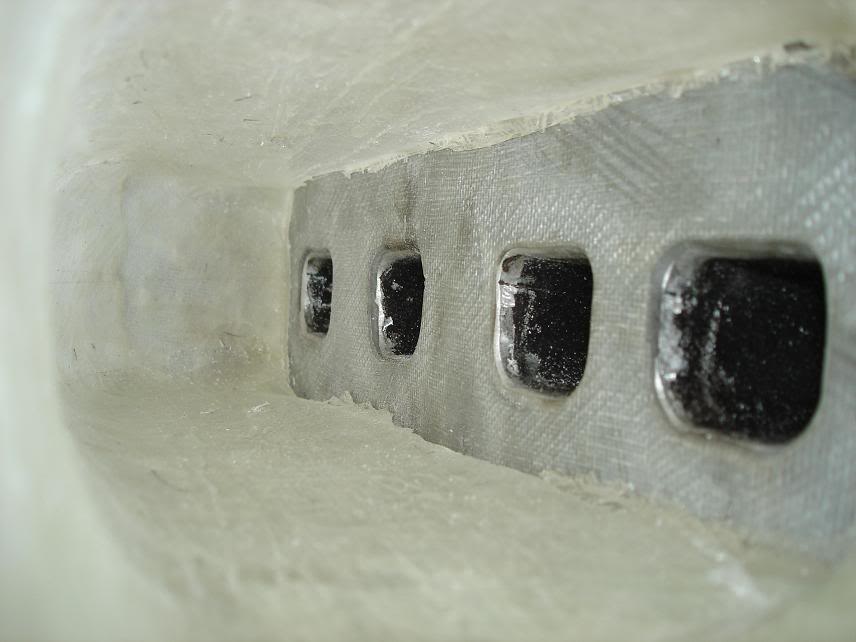
Glass fiber...
Some more toys...

Engine side of the manifold...

After being taken off...
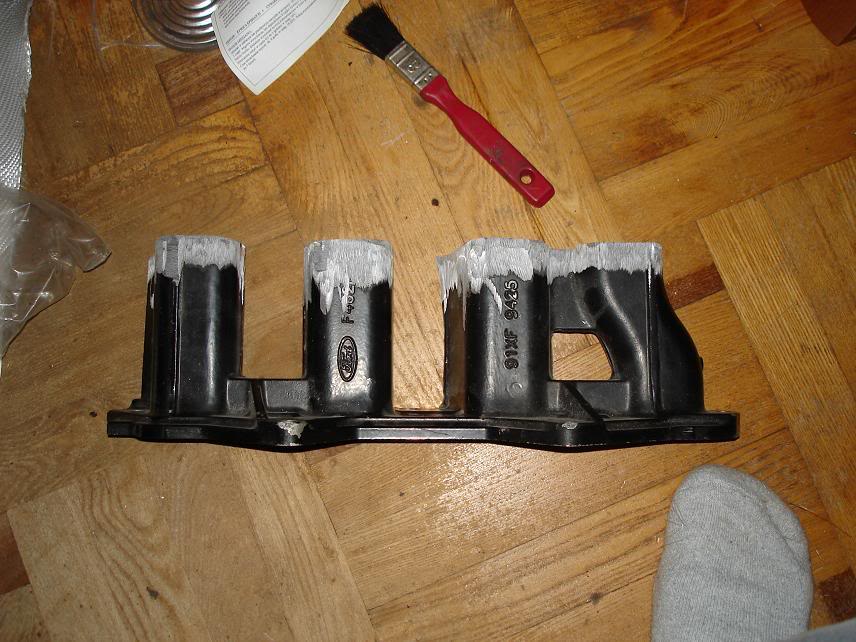
Trimmed
Ready, now i only need to drill some holes.

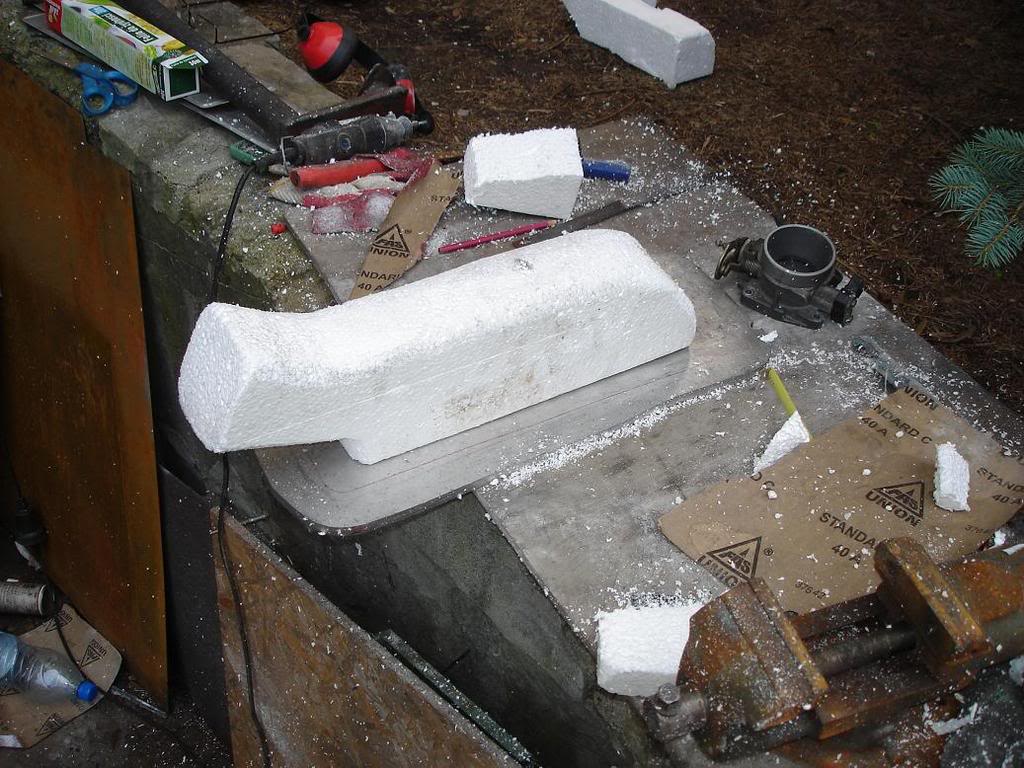
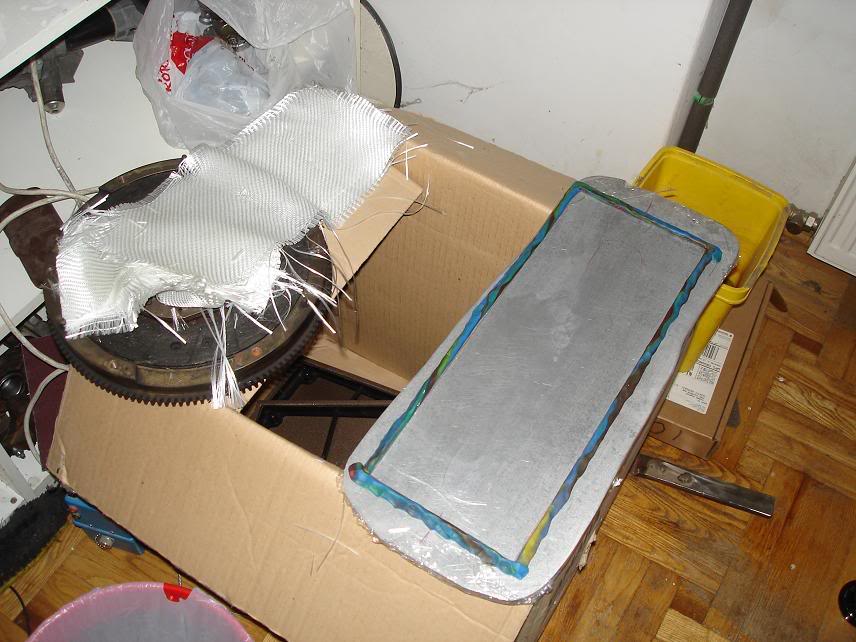
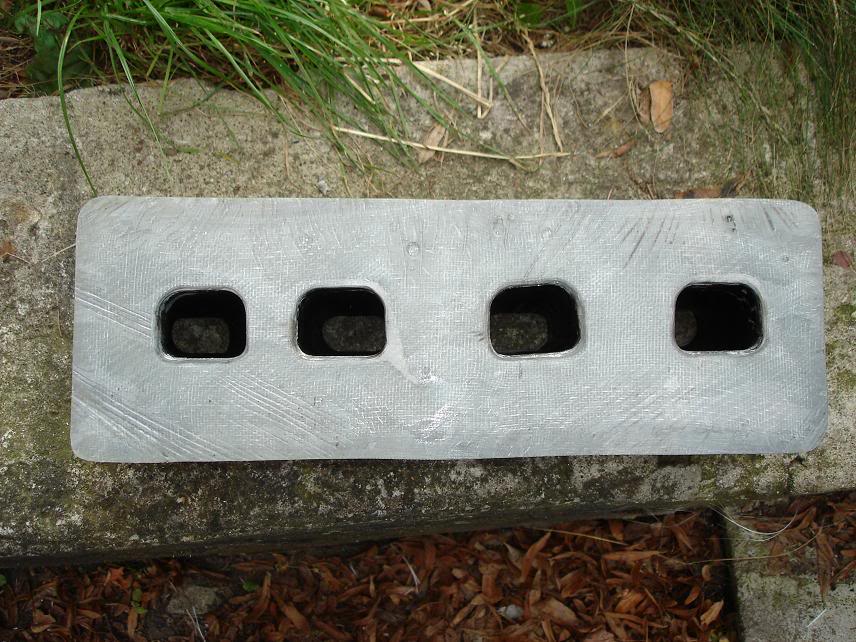
Plenum shape, beacause it will be covered in kitchen foil it will have a more aerodynamic shape...
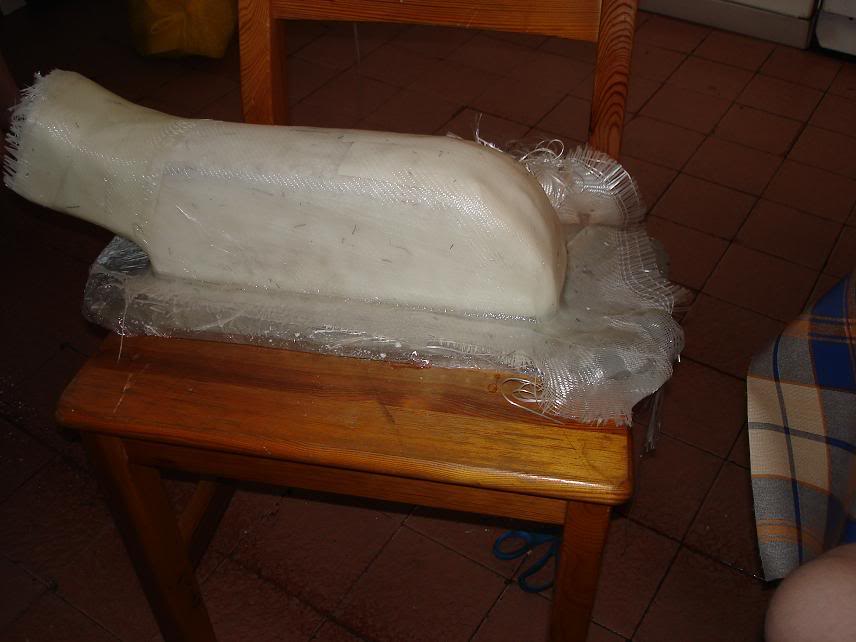
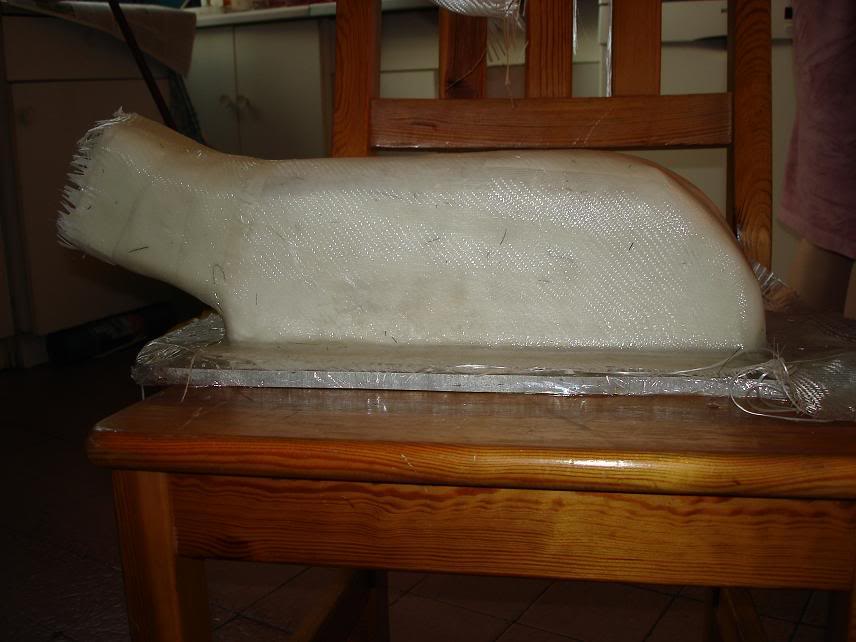
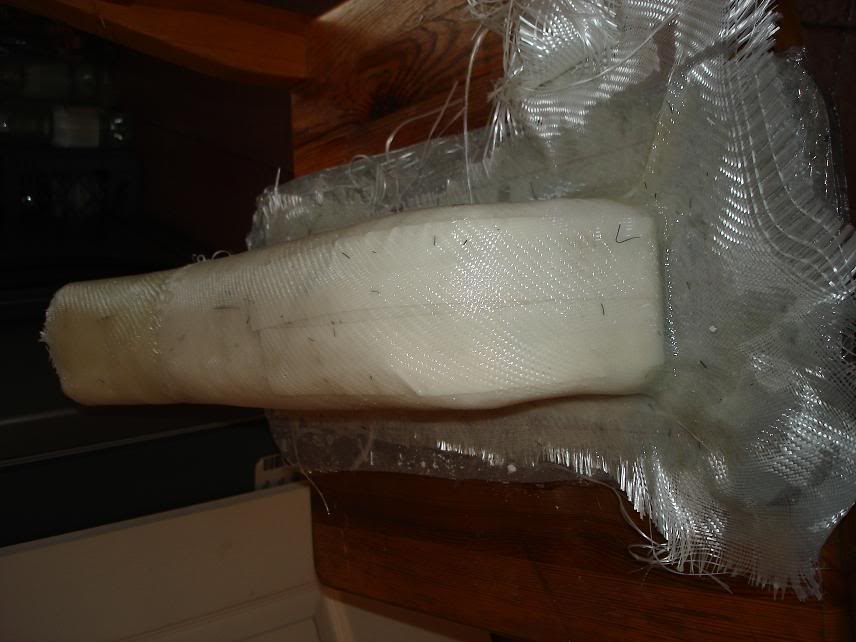
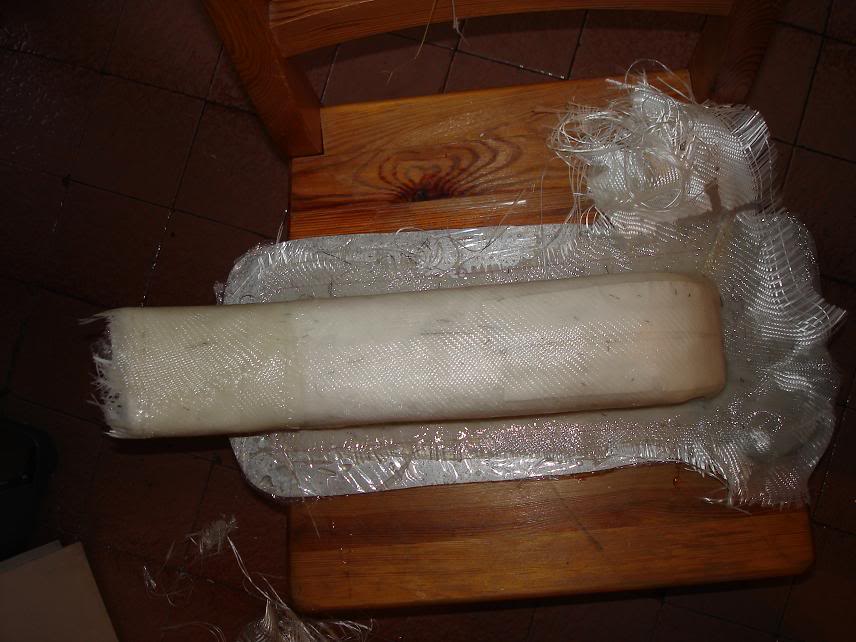
The first 2 layers.You can still see the tape inside.
Trial fitting...
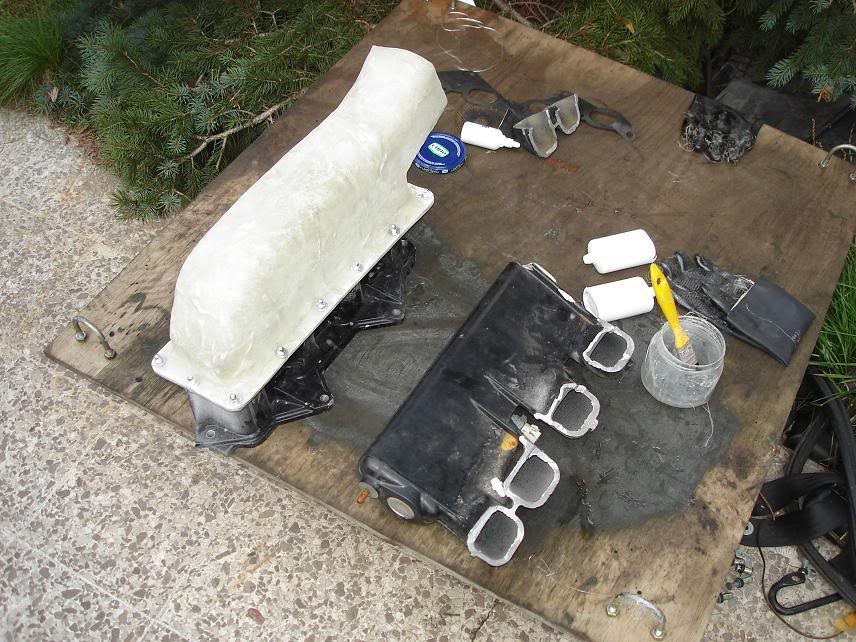
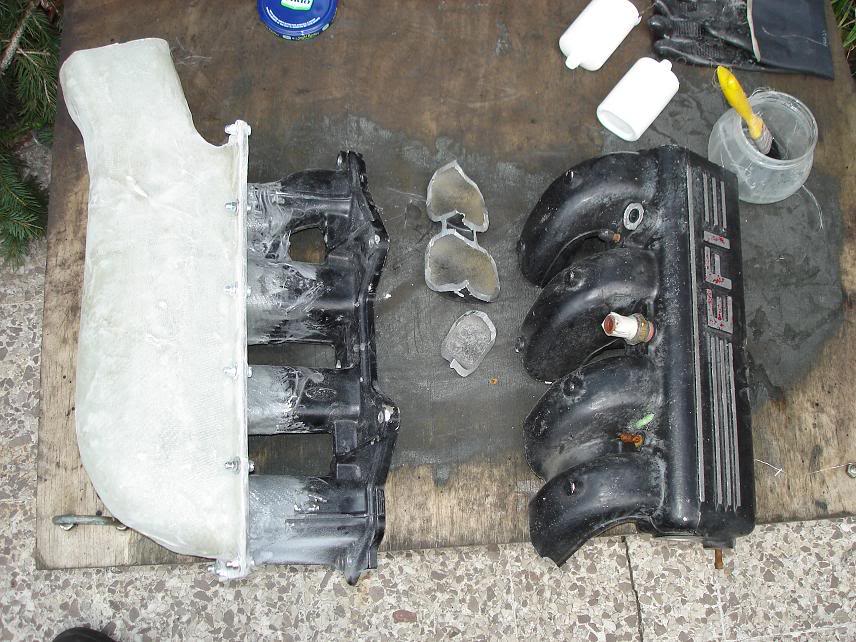
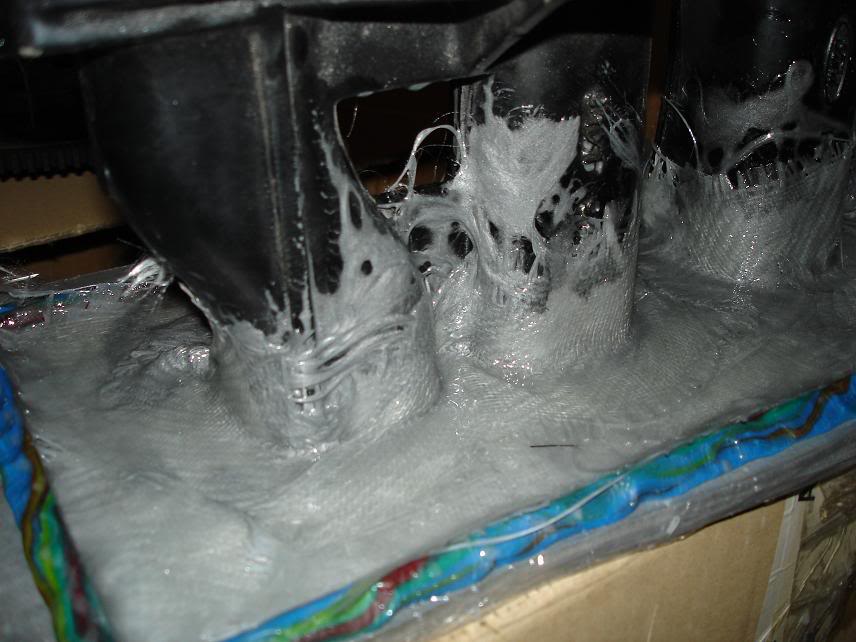
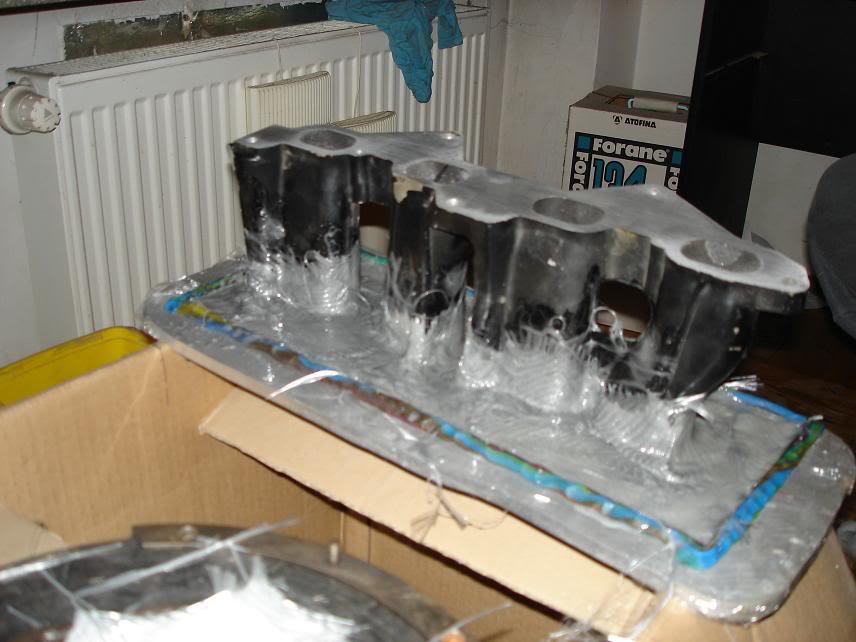
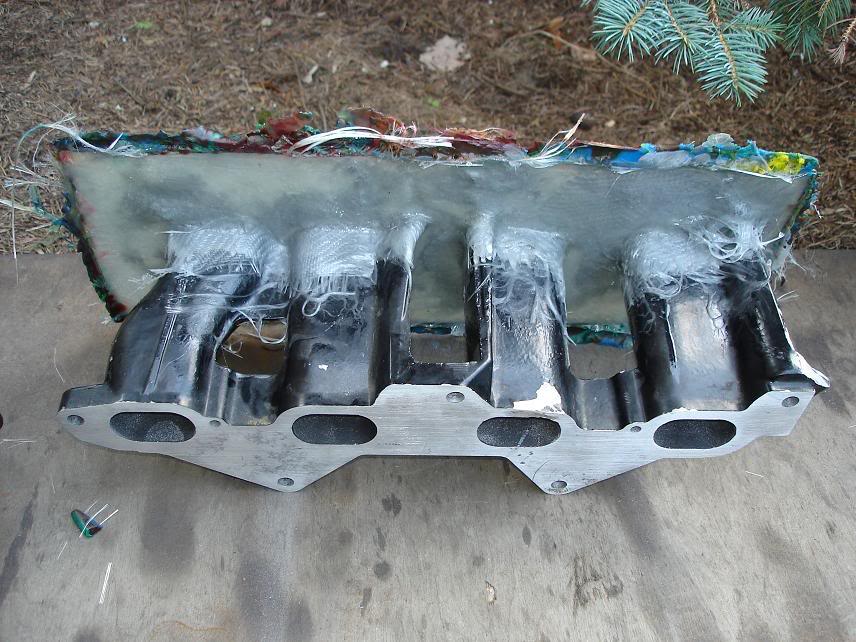
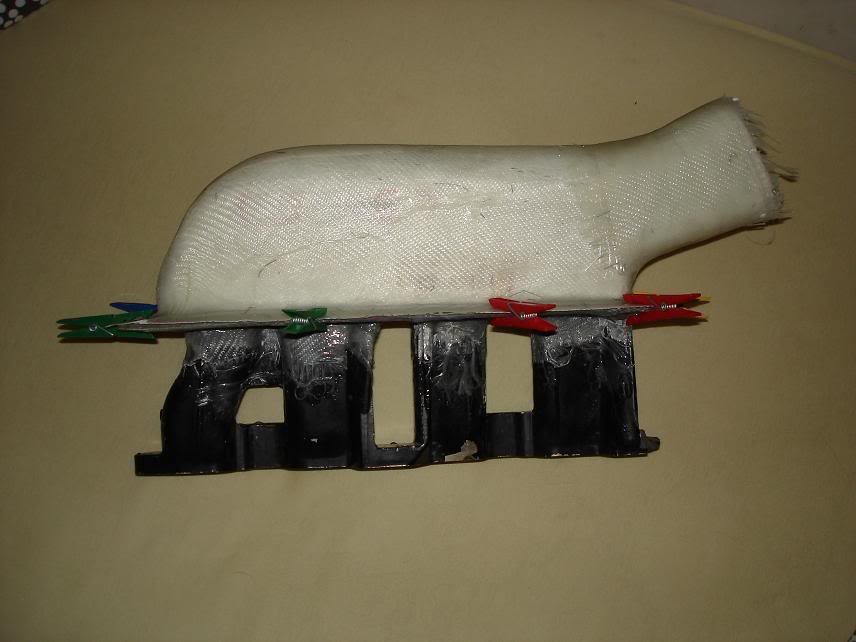
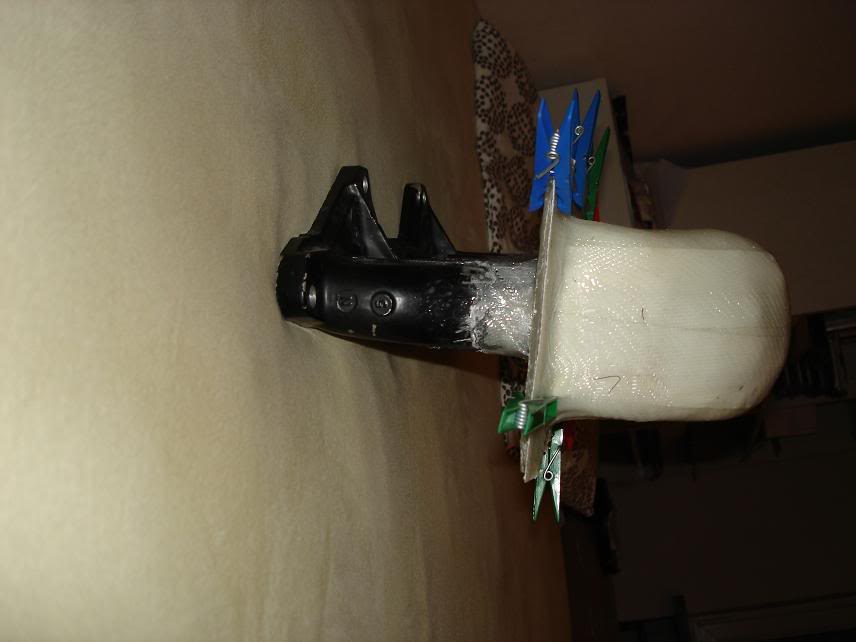
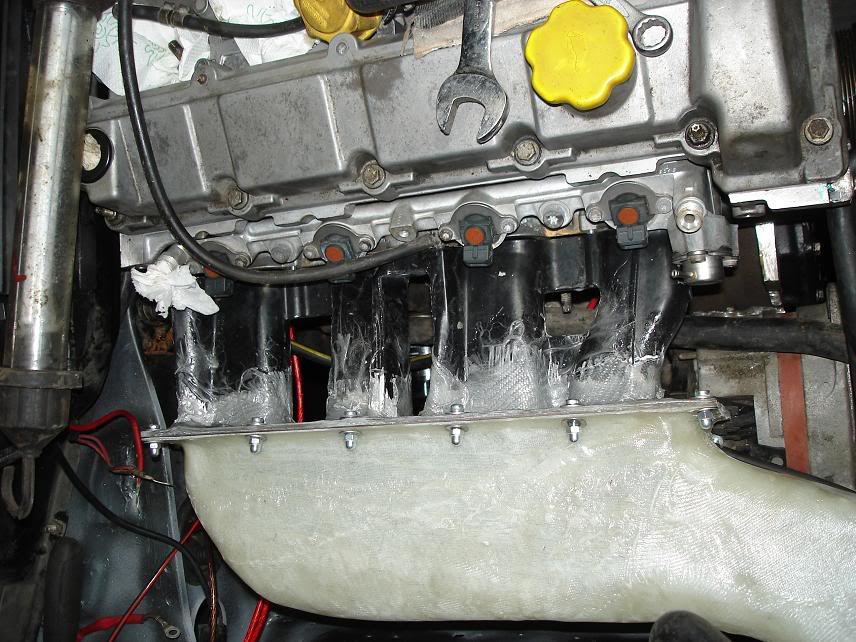
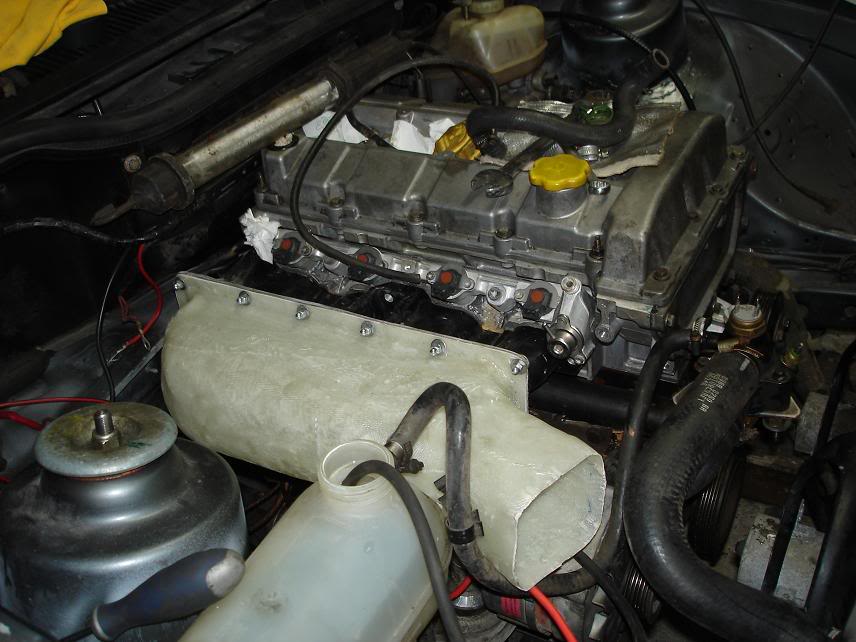
The manifold after 5 to 7 more layers compared to the old one. This is a single throttle body manifold.
The manifold is still being build, updates soon.
Now, lets continue.
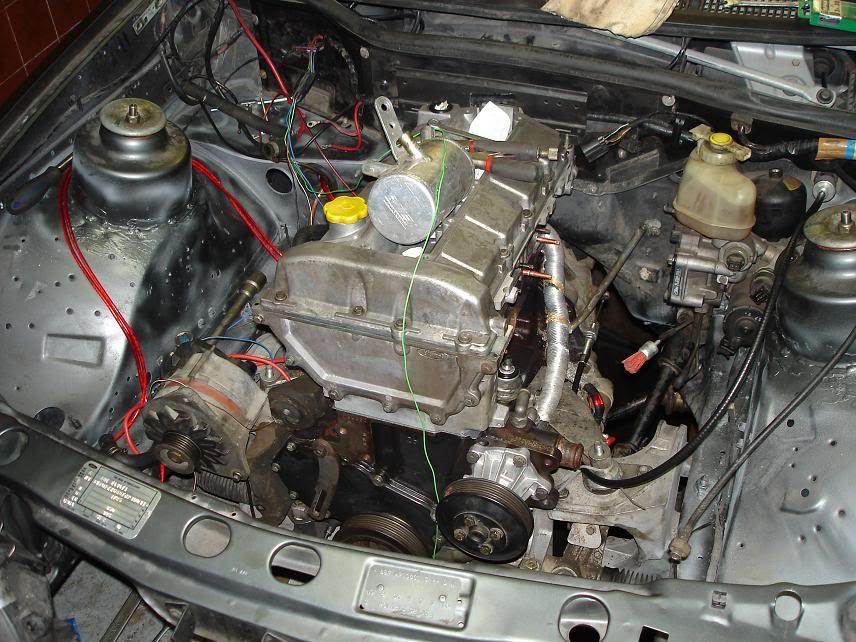
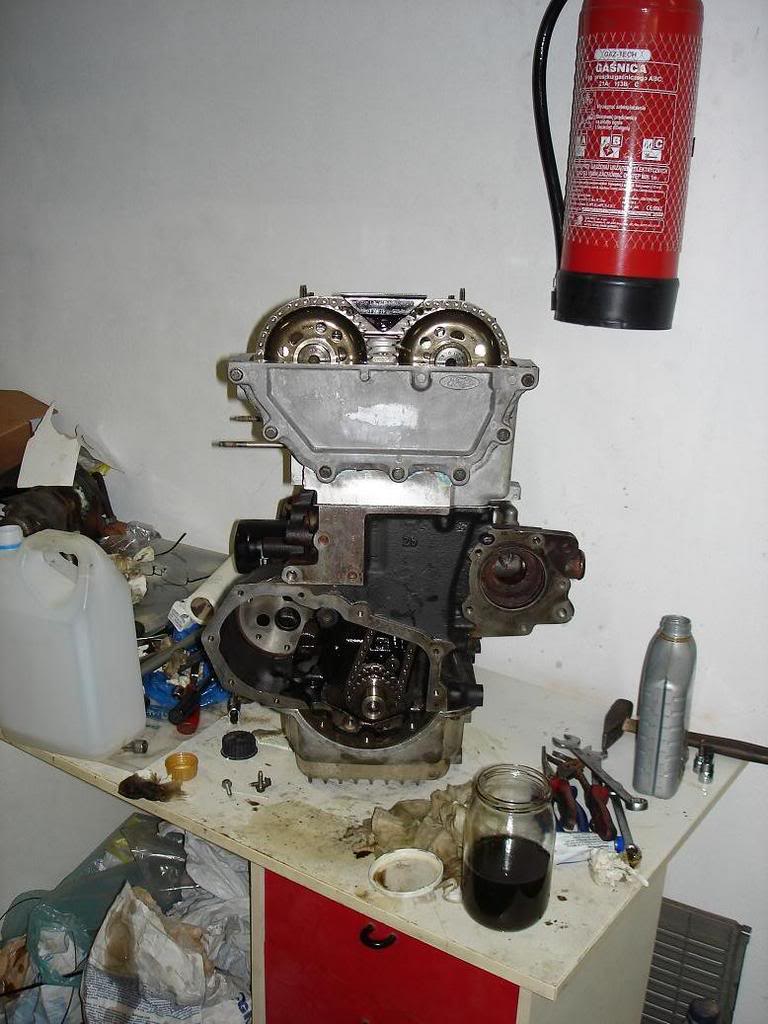
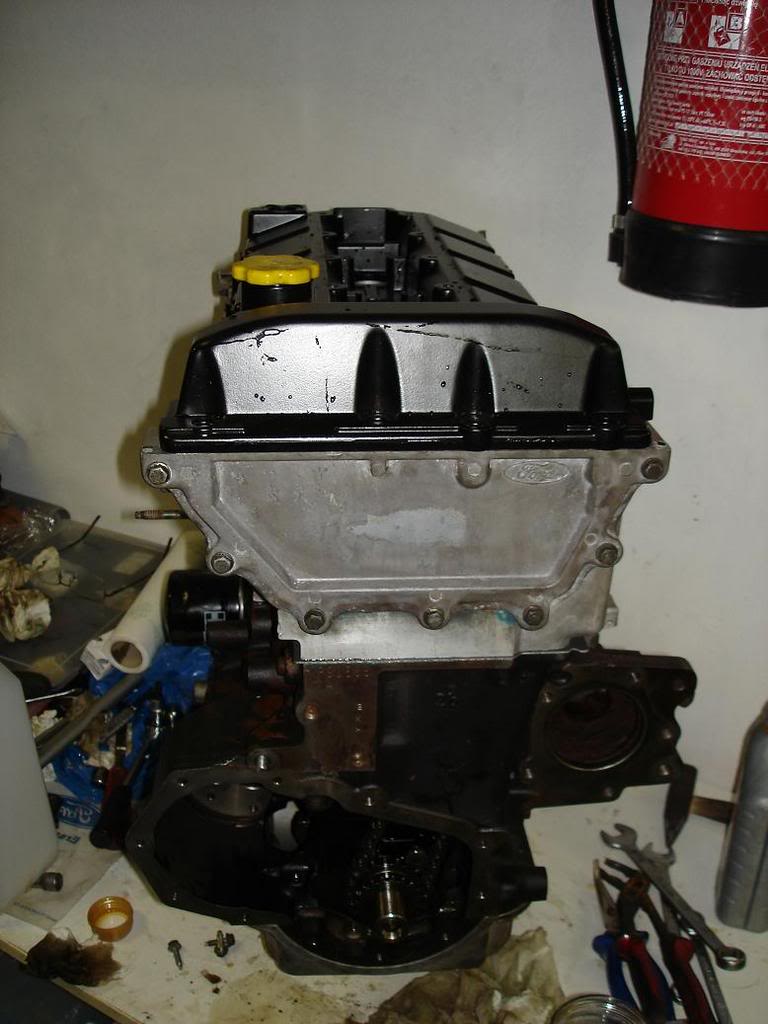
The engine inside, unfortunately the black cam cover had to be ditched. Still, dirty aluminum like is nice, im in to the sleeper look.
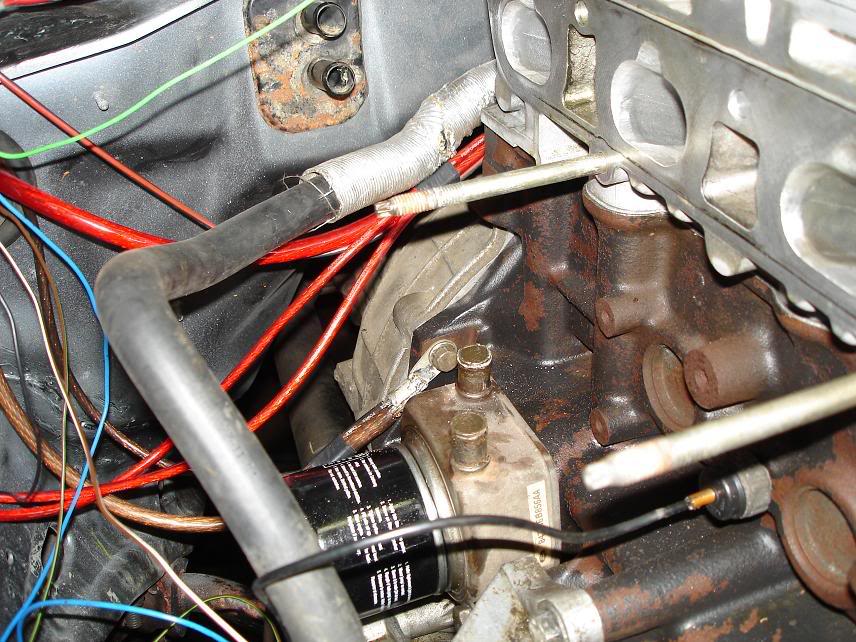
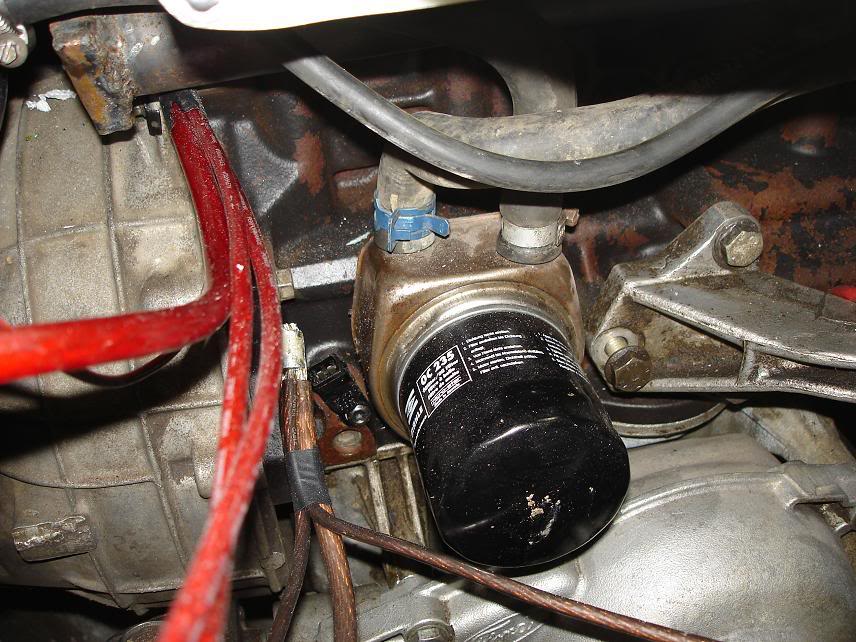
A Escort RS Turbo oil cooler. I didnt seem to have any serious problems with oil overheating before, but after a good spin on the snow or 15min of autocross runs the oil overheated. This engine will generate much more horsepower and i think the oil cooler will be enough for now. You can also see the power cables and ground.
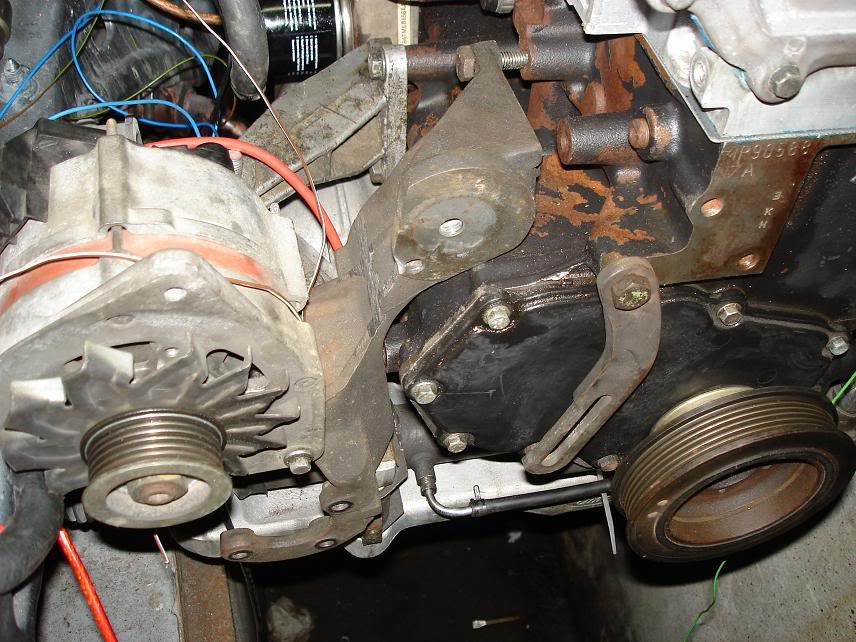
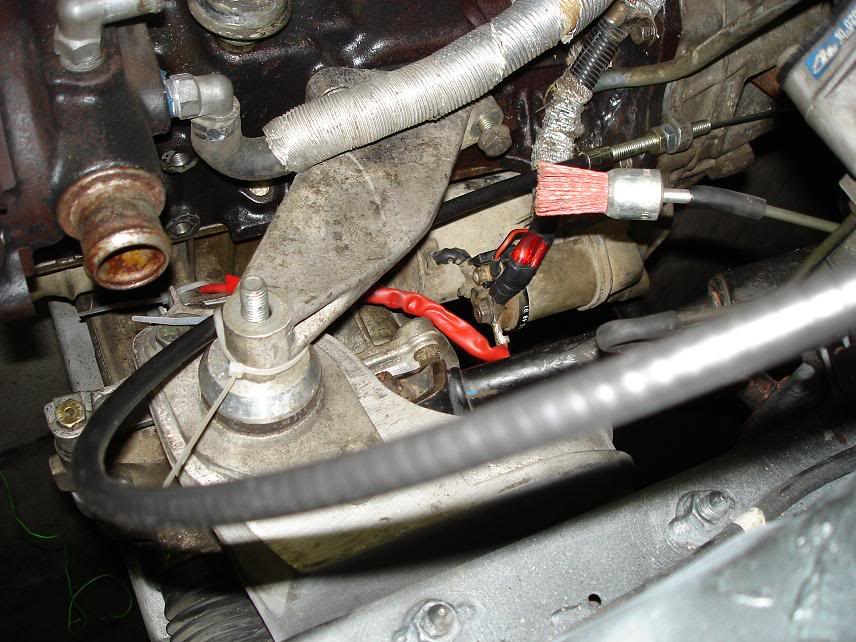
Alternator tensioner from a Escort RST. The mounting system is modified.
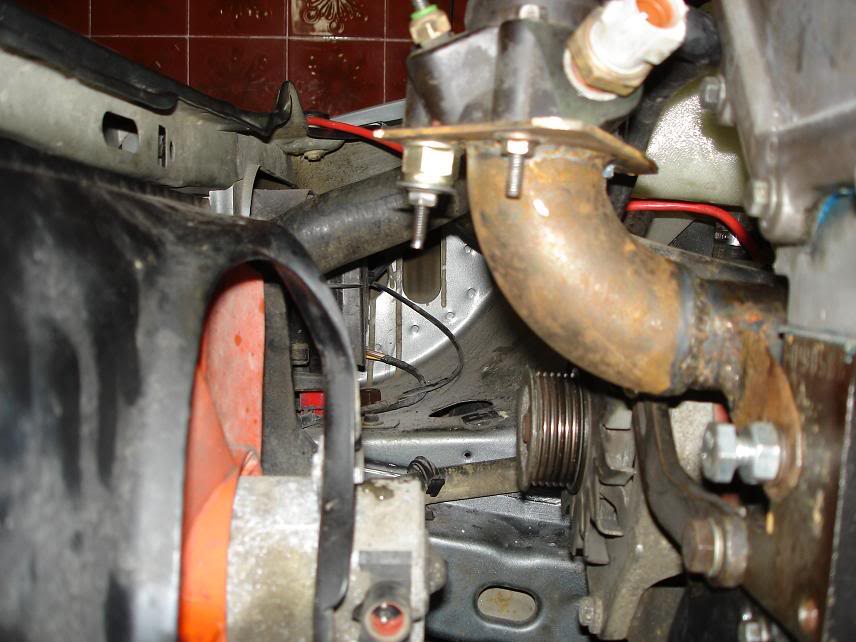
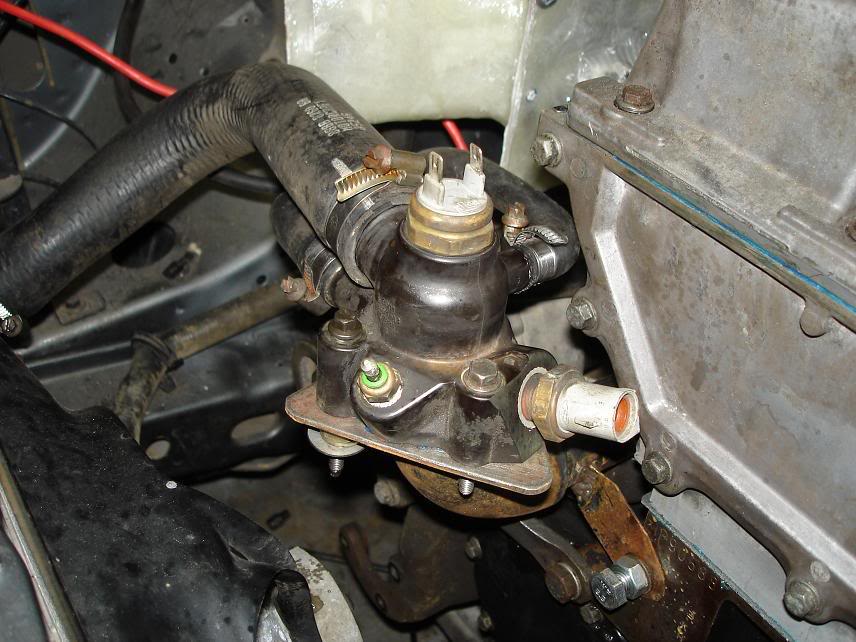
The cooling rail is made by me, TIG welded from steel. It simply routes water from the back of the head to the front and has a additional air vent fitting. Now there is one for the engine and a second one for the radiator.
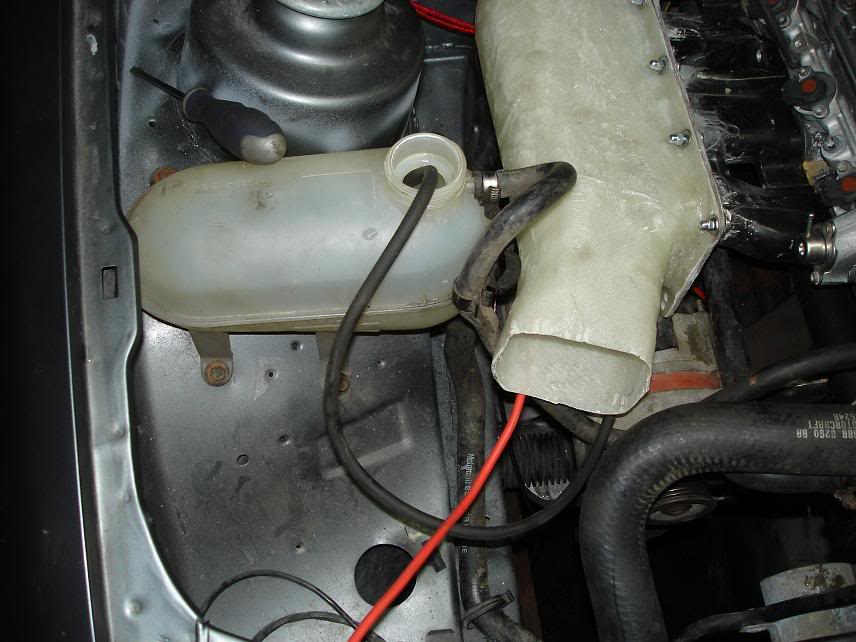
Fits like a glove, im really happy how it went out.
The exhaust will be a custom 4-1 item or the stock 4-2-1 modified.
I really cant even guesstimate the power and torque the engine will produce. Hoping for 170++. The figures are too optimistic to even speak about.
Thats gonna hurt....
No Simon, its going to be a daily driven street car. Its used mostly by me to drive to school, girlfriend, autocross, but my family sometime uses it for bigger baggages .
Thank you for your kind words.
Tomas
The engine comes from a Escort RS2000, rated at 150bhp. A engine overhaul was performed with new 0.5mm oversize Mahle pistons and bearings. The pistons dont poses the standart steel insert and beacause of that and the new design are lighter.
The RS2000 block is almost identical to the Sierra DOHC one exept for power steering and alternator mounting and oil dip and breather pipe parts.
The head has been slightly ported, finished with 80 grit. If the current modifications will show results good enough i will make a "evo" head, heavily ported and prepared for high rpm operation.
The cams are stock Ford units. The wheels, chain, chain guides, oil pump have about 10000 on them, new tensioner,
The bottom end is balanced, lightened, ready for higher rpm operation. I would like to rev the engine to 7000-7500.
You can see the old dipstick in the middle of the engine, it needs to be plugged and machined to be flush with the block in order to mate with a 4x4 sump. Sierra dipstick hole plugged on the right.
I really enjoy this view.
This one will be even better later.
Now, some more improvements.
The stock inlet manifold. Sad really. I imagine air flow to be terrible over there, especially at the entrance of the port.
Ooops something bad must have happened here...
The manifold is 1200mm long, including the fuel rail, plastic spacer and port the inlet tract is 270mm long from the inlet to the valve.
Glass fiber...
Some more toys...
Engine side of the manifold...
After being taken off...
Trimmed
Ready, now i only need to drill some holes.
Plenum shape, beacause it will be covered in kitchen foil it will have a more aerodynamic shape...
The first 2 layers.You can still see the tape inside.
Trial fitting...
The manifold after 5 to 7 more layers compared to the old one. This is a single throttle body manifold.
The manifold is still being build, updates soon.
Now, lets continue.
The engine inside, unfortunately the black cam cover had to be ditched. Still, dirty aluminum like is nice, im in to the sleeper look.
A Escort RS Turbo oil cooler. I didnt seem to have any serious problems with oil overheating before, but after a good spin on the snow or 15min of autocross runs the oil overheated. This engine will generate much more horsepower and i think the oil cooler will be enough for now. You can also see the power cables and ground.
Alternator tensioner from a Escort RST. The mounting system is modified.
The cooling rail is made by me, TIG welded from steel. It simply routes water from the back of the head to the front and has a additional air vent fitting. Now there is one for the engine and a second one for the radiator.
Fits like a glove, im really happy how it went out.
The exhaust will be a custom 4-1 item or the stock 4-2-1 modified.
I really cant even guesstimate the power and torque the engine will produce. Hoping for 170++. The figures are too optimistic to even speak about.
Thats gonna hurt....
Excellent. Confus Is this going to be a track car?
Your English is ALOT better than most of the English people's English on PassionFord!
Tomas

 04-11-2007, 09:21 AM
#6
Advanced PassionFord User
iTrader: (1)

Join Date: Jun 2003
Location: new milton, hampshire
Posts: 2,121
Likes: 0
Received 0 Likes
on
0 Posts
great work mate, i wish fords had put this 16v I4 engine in the sierras in the first place as the old 8v er`s just dont cut it 
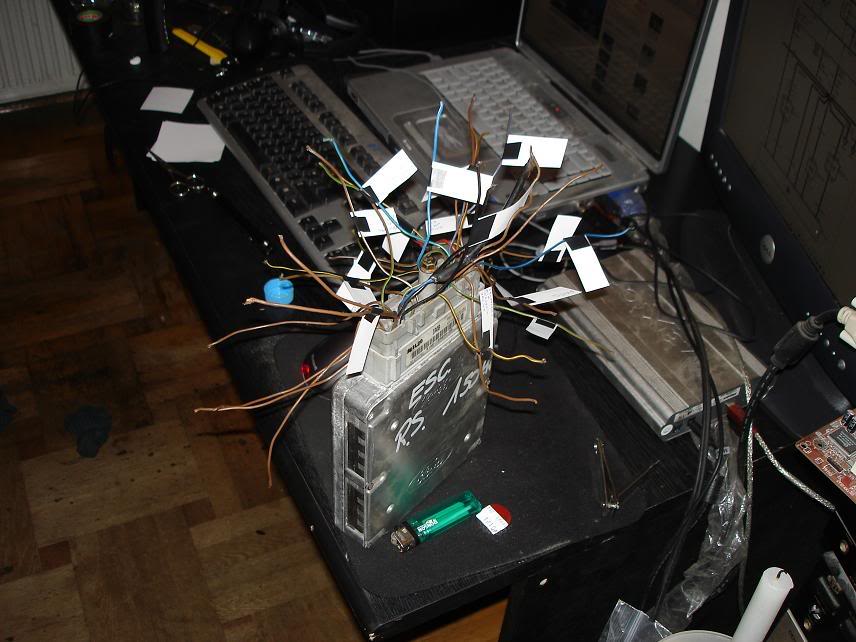
what ecu code have you got mate as i have a superchipped ecu if interested???
what ecu code have you got mate as i have a superchipped ecu if interested???
10-10-2011, 07:41 PM
#7
PassionFord Regular

Just one question while i was looking at this thread. My sapphire got hit on the left wheel and pushed the front chassis sideways to the left. I got fixed up on a budget and very poor job still haveing the whole front out of phase and nothing bolted straight. The front bumper had to be custom positioned to make the front look staight. I only noticed this after i bought the car.
Anyone of you would give me any advice ? I thoght of changing the front chassis legs and straightenin the inner wheel arches and wheel wells.
Could this be done ? Anyone done this before ?
Cheers
Anyone of you would give me any advice ? I thoght of changing the front chassis legs and straightenin the inner wheel arches and wheel wells.
Could this be done ? Anyone done this before ?
Cheers
Trending Topics
10-10-2011, 08:26 PM
#9
PassionFord Post Whore!!


 .Very interesting build keep the pics coming
 16-11-2011, 09:23 AM
#12
Too many posts.. I need a life!!
Join Date: Dec 2009
Location: England
Posts: 810
Likes: 0
Received 0 Likes
on
0 Posts
what ignition wiring/setup are you using for this? everything from a scorpio? or something custom? im guessing you will have to use something fomr a scorpio as you no longer have the distributor form the 8v head? something ive always wondered about when puting one of these engines into a sierra
16-11-2011, 10:57 AM
#13
PassionFord Regular

Nice. Thought about doing something similar a while ago but ended up just learning to heel & toe with the original pedal configuration lol.
Nice project especially liking the home made intake.
20-11-2011, 05:41 PM
#16
Regular Contributor

Hi , the project looks intersesting, as I have a 16v engine in my saff also. I have to ask, why did you make the water rail that way? If you'd used a Scorpio head and manifold it'd all be done for you.
31-10-2018, 09:58 AM
#18
jgijon59

Join Date: Oct 2018
Location: Barcelona
Posts: 3
Likes: 0
Received 0 Likes
on
0 Posts
Now, the engine.
The engine comes from a Escort RS2000, rated at 150bhp. A engine overhaul was performed with new 0.5mm oversize Mahle pistons and bearings. The pistons dont poses the standart steel insert and beacause of that and the new design are lighter.
The RS2000 block is almost identical to the Sierra DOHC one exept for power steering and alternator mounting and oil dip and breather pipe parts.
Attachment 105359
Attachment 105360
The head has been slightly ported, finished with 80 grit. If the current modifications will show results good enough i will make a "evo" head, heavily ported and prepared for high rpm operation.
Attachment 105361
The cams are stock Ford units. The wheels, chain, chain guides, oil pump have about 10000 on them, new tensioner,
Attachment 105362
The bottom end is balanced, lightened, ready for higher rpm operation. I would like to rev the engine to 7000-7500.
Attachment 105363
You can see the old dipstick in the middle of the engine, it needs to be plugged and machined to be flush with the block in order to mate with a 4x4 sump. Sierra dipstick hole plugged on the right.
Attachment 105364
I really enjoy this view.
Attachment 105365
This one will be even better later.
Now, some more improvements.
Attachment 105366
The stock inlet manifold. Sad really. I imagine air flow to be terrible over there, especially at the entrance of the port.
Attachment 105367
Ooops something bad must have happened here...
Attachment 105368
The manifold is 1200mm long, including the fuel rail, plastic spacer and port the inlet tract is 270mm long from the inlet to the valve.
Attachment 105369
Glass fiber...
Attachment 105370
Some more toys...
Attachment 105371
Attachment 105372
Attachment 105373
Engine side of the manifold...
Attachment 105374
Attachment 105375
After being taken off...
Attachment 105376
Trimmed
Attachment 105377
Attachment 105378
Ready, now i only need to drill some holes.
Attachment 105379
Attachment 105380
Plenum shape, beacause it will be covered in kitchen foil it will have a more aerodynamic shape...
Attachment 105381
Attachment 105382
Attachment 105383
Attachment 105384
Attachment 105385
The first 2 layers.You can still see the tape inside.
Attachment 105386
Attachment 105387
Attachment 105388
Trial fitting...
Attachment 105389
Attachment 105390
The manifold after 5 to 7 more layers compared to the old one. This is a single throttle body manifold.
The manifold is still being build, updates soon.
Now, lets continue.
Attachment 105391
The engine inside, unfortunately the black cam cover had to be ditched. Still, dirty aluminum like is nice, im in to the sleeper look.
Attachment 105392
Attachment 105393
Attachment 105394
A Escort RS Turbo oil cooler. I didnt seem to have any serious problems with oil overheating before, but after a good spin on the snow or 15min of autocross runs the oil overheated. This engine will generate much more horsepower and i think the oil cooler will be enough for now. You can also see the power cables and ground.
Attachment 105395
Alternator tensioner from a Escort RST. The mounting system is modified.
Attachment 105396
Attachment 105397
The cooling rail is made by me, TIG welded from steel. It simply routes water from the back of the head to the front and has a additional air vent fitting. Now there is one for the engine and a second one for the radiator.
Attachment 105398
Attachment 105399
Attachment 105400
Fits like a glove, im really happy how it went out.
The exhaust will be a custom 4-1 item or the stock 4-2-1 modified.
I really cant even guesstimate the power and torque the engine will produce. Hoping for 170++. The figures are too optimistic to even speak about.
Attachment 105401
Thats gonna hurt....
No Simon, its going to be a daily driven street car. Its used mostly by me to drive to school, girlfriend, autocross, but my family sometime uses it for bigger baggages .
Thank you for your kind words.
Tomas
The engine comes from a Escort RS2000, rated at 150bhp. A engine overhaul was performed with new 0.5mm oversize Mahle pistons and bearings. The pistons dont poses the standart steel insert and beacause of that and the new design are lighter.
The RS2000 block is almost identical to the Sierra DOHC one exept for power steering and alternator mounting and oil dip and breather pipe parts.
Attachment 105359
Attachment 105360
The head has been slightly ported, finished with 80 grit. If the current modifications will show results good enough i will make a "evo" head, heavily ported and prepared for high rpm operation.
Attachment 105361
The cams are stock Ford units. The wheels, chain, chain guides, oil pump have about 10000 on them, new tensioner,
Attachment 105362
The bottom end is balanced, lightened, ready for higher rpm operation. I would like to rev the engine to 7000-7500.
Attachment 105363
You can see the old dipstick in the middle of the engine, it needs to be plugged and machined to be flush with the block in order to mate with a 4x4 sump. Sierra dipstick hole plugged on the right.
Attachment 105364
I really enjoy this view.
Attachment 105365
This one will be even better later.
Now, some more improvements.
Attachment 105366
The stock inlet manifold. Sad really. I imagine air flow to be terrible over there, especially at the entrance of the port.
Attachment 105367
Ooops something bad must have happened here...
Attachment 105368
The manifold is 1200mm long, including the fuel rail, plastic spacer and port the inlet tract is 270mm long from the inlet to the valve.
Attachment 105369
Glass fiber...
Attachment 105370
Some more toys...
Attachment 105371
Attachment 105372
Attachment 105373
Engine side of the manifold...
Attachment 105374
Attachment 105375
After being taken off...
Attachment 105376
Trimmed
Attachment 105377
Attachment 105378
Ready, now i only need to drill some holes.
Attachment 105379
Attachment 105380
Plenum shape, beacause it will be covered in kitchen foil it will have a more aerodynamic shape...
Attachment 105381
Attachment 105382
Attachment 105383
Attachment 105384
Attachment 105385
The first 2 layers.You can still see the tape inside.
Attachment 105386
Attachment 105387
Attachment 105388
Trial fitting...
Attachment 105389
Attachment 105390
The manifold after 5 to 7 more layers compared to the old one. This is a single throttle body manifold.
The manifold is still being build, updates soon.
Now, lets continue.
Attachment 105391
The engine inside, unfortunately the black cam cover had to be ditched. Still, dirty aluminum like is nice, im in to the sleeper look.
Attachment 105392
Attachment 105393
Attachment 105394
A Escort RS Turbo oil cooler. I didnt seem to have any serious problems with oil overheating before, but after a good spin on the snow or 15min of autocross runs the oil overheated. This engine will generate much more horsepower and i think the oil cooler will be enough for now. You can also see the power cables and ground.
Attachment 105395
Alternator tensioner from a Escort RST. The mounting system is modified.
Attachment 105396
Attachment 105397
The cooling rail is made by me, TIG welded from steel. It simply routes water from the back of the head to the front and has a additional air vent fitting. Now there is one for the engine and a second one for the radiator.
Attachment 105398
Attachment 105399
Attachment 105400
Fits like a glove, im really happy how it went out.
The exhaust will be a custom 4-1 item or the stock 4-2-1 modified.
I really cant even guesstimate the power and torque the engine will produce. Hoping for 170++. The figures are too optimistic to even speak about.
Attachment 105401
Thats gonna hurt....
No Simon, its going to be a daily driven street car. Its used mostly by me to drive to school, girlfriend, autocross, but my family sometime uses it for bigger baggages .
Thank you for your kind words.
Tomas
I'd like to ask you if you have info about wiring diagram of RS2000 ecu,
thanks for your help
best regards!

Thread
Thread Starter
Forum
Replies
Last Post
charliecosworth
Ford Sierra/Sapphire/RS500 Cosworth
3
19-08-2015 02:00 PM
Jack and the Beanstalk
Ford Sierra/Sapphire/RS500 Cosworth
8
15-08-2015 04:27 PM