Refurbing Morette Lights? *** PICS ADDED ***
 26-09-2006, 02:36 PM
#1
Regular Contributor
Thread Starter

Join Date: Jul 2006
Location: Oldham
Posts: 208
Likes: 0
Received 0 Likes
on
0 Posts
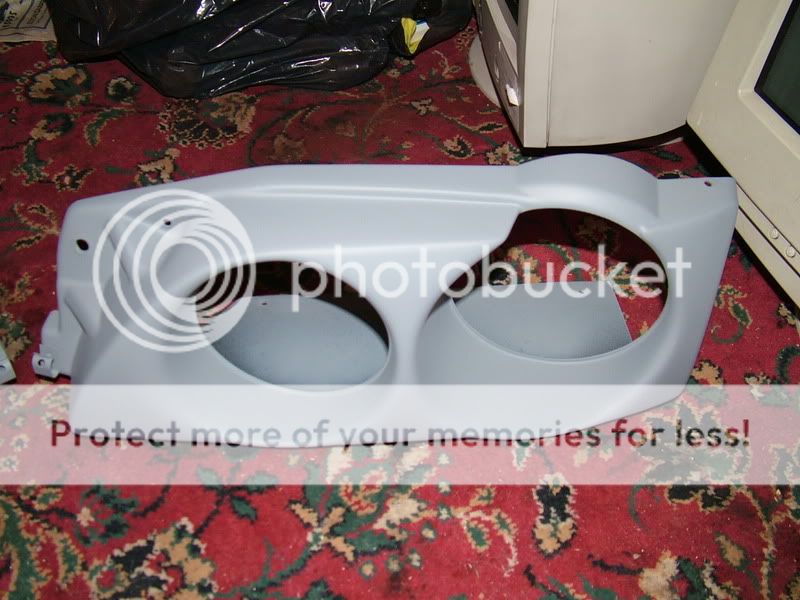
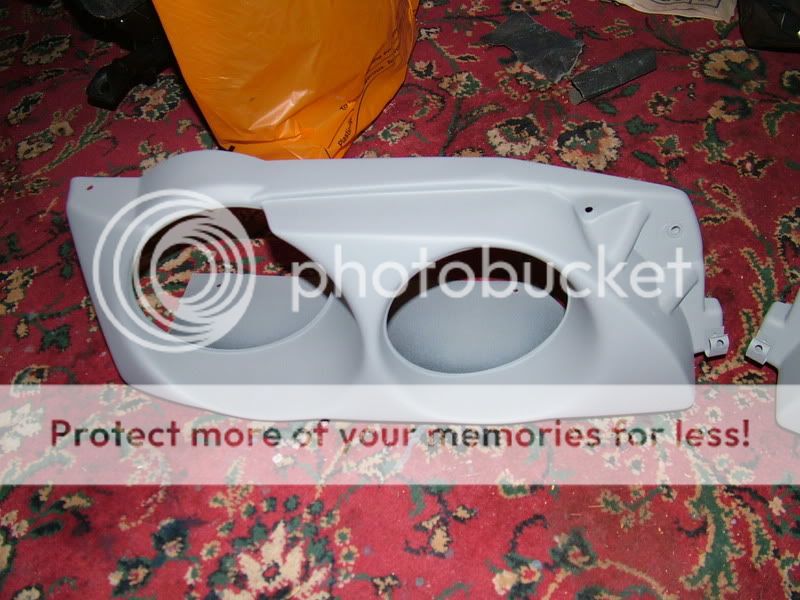
Just received my new lights. I need to change them from purple to black. Just de greased them and washed them down with some soapy water.
Am I right in thinking....
1, Rub down with a rough grade of wet n dry.
2, Rub down with a finer grade of wet n dry.
3, Prime these babies up, leave for a few hours maybe overnight to set.
4, Rub down with fine wet n dry.
5, Paint black, leave to set rub down again.
6, Another coat of black, rub down again.
7, Laquer, leave to set maybe a few days.
8, Rub down, re laquer when set polish.
Am I going to be ok doing this or am I doing it wrong?
Sorry for the dumb post but its the first time I've needed to spray something that has to be as perfect as it can.
 26-09-2006, 02:46 PM
#2
Advanced PassionFord User

Join Date: Jan 2006
Location: gt yarmouth Drives: Escort RS replica
Posts: 1,929
Likes: 0
Received 0 Likes
on
0 Posts
thats all fine just dont put any polish or wax on them straight away give em a couple of weeks first so they have a good chance to breath and completley set 
26-09-2006, 03:10 PM
#4
Grey Mk4 Early XR3I

also please note that when sading plastic do not sand with any grit coarser than 500 (eg dont use 40 grit!) as this will damage the strength of the plastic
also when rubbing down befor laqour only use 1500 grit wet n dry paper or finer asto hide any scratch marks 2000 grit is best preferd
also when rubbing down befor laqour only use 1500 grit wet n dry paper or finer asto hide any scratch marks 2000 grit is best preferd
26-09-2006, 05:59 PM
#5
Regular Contributor
Thread Starter
Join Date: Jul 2006
Location: Oldham
Posts: 208
Likes: 0
Received 0 Likes
on
0 Posts
Bout another 15 minutes on the left hand side one to do. 
Thanks for the help so far.
I am best to leave it rough before priming aint I?
Also do I need to get rid of everybit of paint before priming? I mean theres only odds and sodds here and there in the hard to reach areas.
Thanks again, cant wait till there done and on the car.
Thanks for the help so far.
I am best to leave it rough before priming aint I?
Also do I need to get rid of everybit of paint before priming? I mean theres only odds and sodds here and there in the hard to reach areas.
Thanks again, cant wait till there done and on the car.
27-09-2006, 12:13 AM
#6
Regular Contributor
Thread Starter
Join Date: Jul 2006
Location: Oldham
Posts: 208
Likes: 0
Received 0 Likes
on
0 Posts
I removed as much paint as I felt needed removing.
I didnt smooth it down any more than the 280 did that I used to remove all the paint. Though it would have give the primer something decent to grip. Next time I'll deff use some slight rougher paper to remove paint.
Primer went on well and is just a little rough, nothing a sand down with some 1500 wont solve. Do I need to add more primer at this point? or can I give it a lick of black and another rub down with 2000???
Heres How I got them.

Rubbed down

Primed
I didnt smooth it down any more than the 280 did that I used to remove all the paint. Though it would have give the primer something decent to grip. Next time I'll deff use some slight rougher paper to remove paint.
Primer went on well and is just a little rough, nothing a sand down with some 1500 wont solve. Do I need to add more primer at this point? or can I give it a lick of black and another rub down with 2000???
Heres How I got them.
Rubbed down
Primed
Trending Topics
 27-09-2006, 12:47 PM
#10
Regular Contributor
Thread Starter
Join Date: Jul 2006
Location: Oldham
Posts: 208
Likes: 0
Received 0 Likes
on
0 Posts
Give them a slight rub down with 1500 wet n dry.
Smooth.
Painted them black. However Ive managed to get some runs on one of the lights
How long should I leave this before sanding the runs out?
Also why does the paint seem to be going on sort of dusty. Its flat in some areas and very shiney but in others it feels a tad sort of dusty???
All in all I suppose they will look ok once smoothed out with some more 1500.
27-09-2006, 03:45 PM
#12
Advanced PassionFord User
Join Date: Jan 2006
Location: gt yarmouth Drives: Escort RS replica
Posts: 1,929
Likes: 0
Received 0 Likes
on
0 Posts
yup give it a few hours then get a wet piece of 1000-1500 grit paper then rubb gently any runs out and whille your doing it sand the hole thisg lightly, then get some wet compound rubbed onto it a couple of times, then take a smoother compound and go over it with that a couple of times. then degrease it and give em a coat of laque then thell look perfect


 27-09-2006, 07:40 PM
#21
Advanced PassionFord User
Join Date: Jan 2006
Location: gt yarmouth Drives: Escort RS replica
Posts: 1,929
Likes: 0
Received 0 Likes
on
0 Posts
Originally Posted by nath69uk
13 pcs sat there. 2 Laptops. and 3 monitors.
Will I still have to sand themn down again and compund them before laquer?
Will I still have to sand themn down again and compund them before laquer?
28-09-2006, 11:37 AM
#22
Regular Contributor
Thread Starter
Join Date: Jul 2006
Location: Oldham
Posts: 208
Likes: 0
Received 0 Likes
on
0 Posts
I rubbed the lights down again last night before laquering them. Laquered them and they seem to be dusty again, I'm going to use Halfords rubbing compound this time flatten them down and laquer again.
I wish I'd have just laquered straight onto the paint now, however even the can says remove the glossy finish before laquering.
I wish I'd have just laquered straight onto the paint now, however even the can says remove the glossy finish before laquering.
28-09-2006, 12:27 PM
#24
Regular Contributor
Thread Starter
Join Date: Jul 2006
Location: Oldham
Posts: 208
Likes: 0
Received 0 Likes
on
0 Posts
No, I'm gunna sell em and pay for someone to show me how to paint.
Rubbed them down again and laquered them, finish is not as nearly has good as when it was just paint on. Learn by ya mistakes dont ya I suppose.
On the tin it says the glossy finish must be removed for the laquer to take. This right or should I have just painted right over them?
This must be going on for a record taking time to paint two pieces of plastic.
28-09-2006, 12:55 PM
#25
Regular Contributor
Thread Starter
Join Date: Jul 2006
Location: Oldham
Posts: 208
Likes: 0
Received 0 Likes
on
0 Posts
Well, I've just put the last coat of laquer on them. So I suppose thats it now. Any imperfections will hopefully polish out.
Thanks for all your help.
Thanks for all your help.


Thread
Thread Starter
Forum
Replies
Last Post
JoeyBoyden
Restorations, Rebuilds & Projects.
26
04-01-2024 02:36 PM
borboyous
Cars for Sale
6
22-08-2015 11:17 AM