How to fit a 4x4 quickshift
 18-12-2005, 05:05 PM
#1
Virgin
Thread Starter

Join Date: Jul 2005
Location: Blackburn
Posts: 7
Likes: 0
Received 0 Likes
on
0 Posts
Has anybody fitted a quickshift to a 4x4 sapphire before i am just after a few tips on what i have to do before i start. Any advice would be greatly appreciated. Cheers Ste
 20-12-2005, 11:10 AM
#2
Part of the Furniture
iTrader: (1)

Join Date: Dec 2005
Location: SPAIN
Posts: 191
Likes: 0
Received 0 Likes
on
0 Posts
i find this https://passionford.com/forum/viewto...ht=quick+shift
and i make another question � it is necessary to change the gear selector bushings ?
any pics of the process to fit the quick shift?
thanks
and i make another question � it is necessary to change the gear selector bushings ?
any pics of the process to fit the quick shift?
thanks

 21-12-2005, 09:50 PM
#7
i found that if you drop the back end of the box you can just about get to everything you need to get to to undo it all
as i mentioned in the other thread, it took me 5 hours with a broken wrist start to finish, so it's not that difficult
i'll be buying a camera soon so pics of the whole job start to finish coming up
as i mentioned in the other thread, it took me 5 hours with a broken wrist start to finish, so it's not that difficult
i'll be buying a camera soon so pics of the whole job start to finish coming up
Trending Topics
25-01-2006, 04:18 PM
#11
well, they would have been had i been able to get the shell moved from the mechanicals
as it is, i've had to drag the engine out with another car (which has bent the rad) and the prop has twisted up against the axle stand
tomorrow i've got to strip a granada so if i get time i'll roll the shell over to get to the box
as it is, i've had to drag the engine out with another car (which has bent the rad) and the prop has twisted up against the axle stand
tomorrow i've got to strip a granada so if i get time i'll roll the shell over to get to the box
 30-01-2006, 07:54 PM
#13
ok, here's the score, i did the pin swap yesterday, in wind chill factors of the minus degrrees and still can't feel my fingers properly
the upside is that it only took 5 hours because nothing wanted to go back together again
the REAL upside is that i now have, in the garden, a 4wd box AND a cradle which i can disect at leasure and not within the confines of underneath the car
tou need patience, lots of it, and i have found that the best way to do it is to remove the pin from the lower part of the cradle, rather than the pin from elsewhere, as it requires perfect alignment to ge through all the way
and you also don't run the risk of breaking the pin
a replacement pin required a 100 mile round trip on saturday night
i'll put up other pics for now and then tomorrow i'll get everything up, but don't hold me to that because my wife is struggling to keep junior inside her at the moment
30-01-2006, 09:19 PM
#15
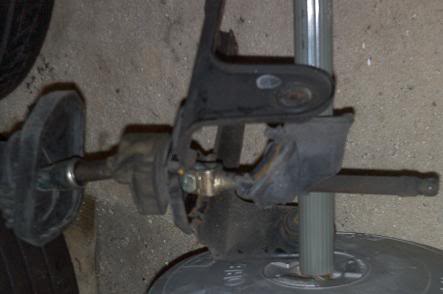
right then, lets get started
this is a gearbox
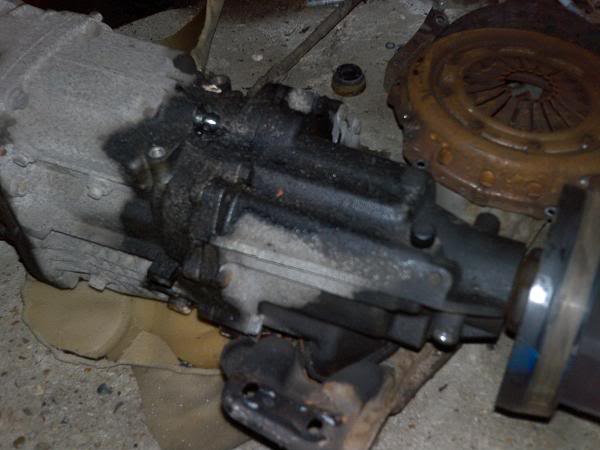
but it ain't got the cradle on it, because thats here
remember though, all this has got to be done underneath the car if you haven't already removed it so it'll look a little something like this
for the sake of ease in the pics, the gearstick does not get removed from the little bit you cant to change until the end, but you will need to remove it before you get the box out, or indeed, before you undo the cradle as there will be nothing to stop the shaft from moving when you try to get the pin out
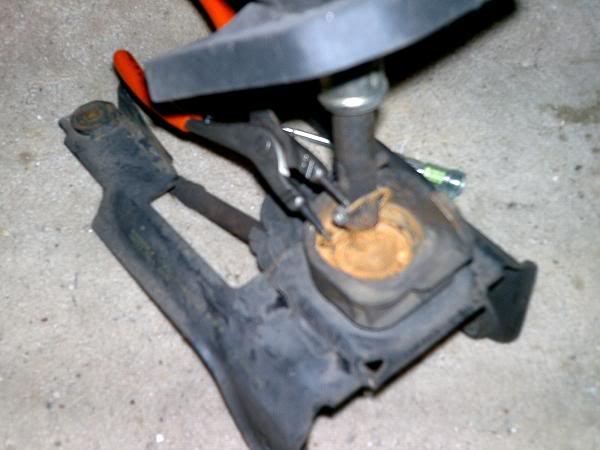
right then, so you've undone the 4 bolts and now you need to get the rest of it in bits, here is where you start
you need to poke these little bits of rubber off to get the dust cover off, haven't got a dust cover? why not? it's there to stop all the shit from gettign into the joint, as well as keeping it nice and clean with grease etc, so make sure you've got one to put back on, otherwise you will have to go through all of this all over again
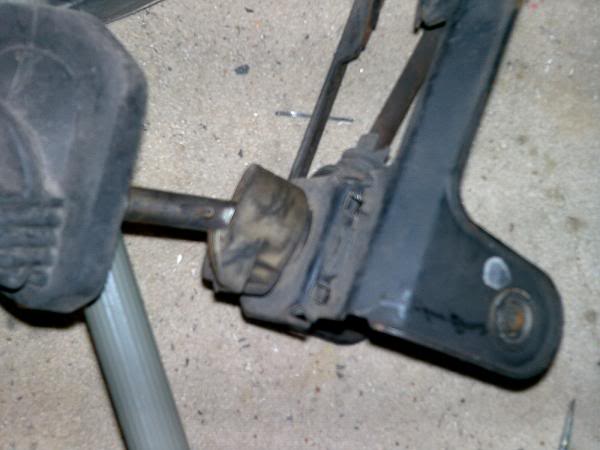
so, you've got the cover off and now you can see this

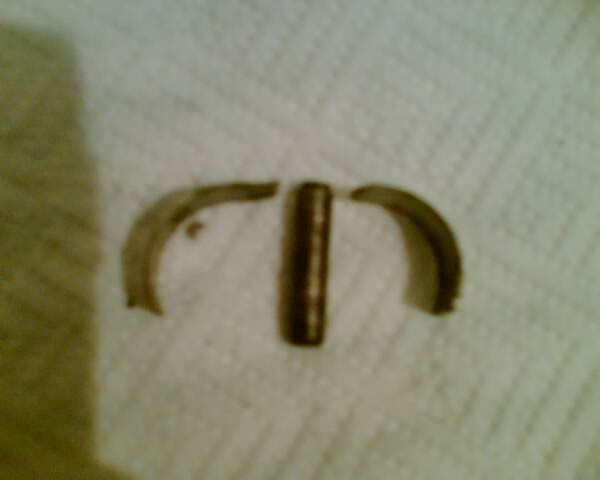
this is the pin that holds the bottom of the balljoint (which is attached to the gearstick) to the selector (which is in turn attached to the gearbox via another set of pins)
what you need to do is to undo the locking tab washer so you can undo the nut (13mm), don't worry about it turning, it won't
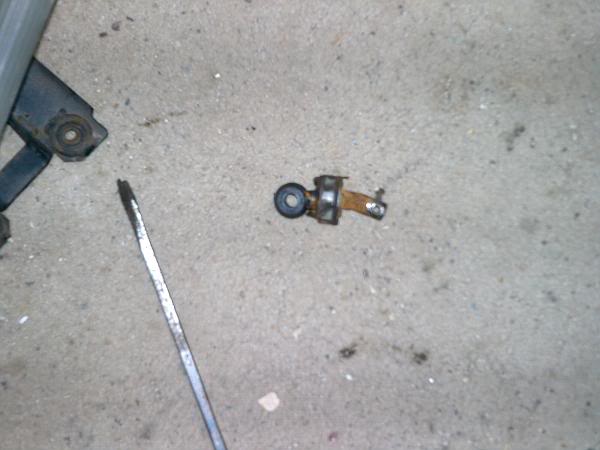
and it won't becaues the other end of the pin looks a little osmething like this
then comes the task of getting the pin out, which will need some careful taping because it's normally covered in a bit of crap
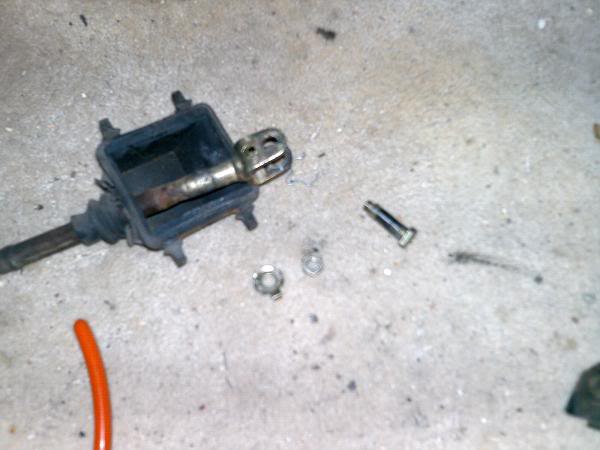
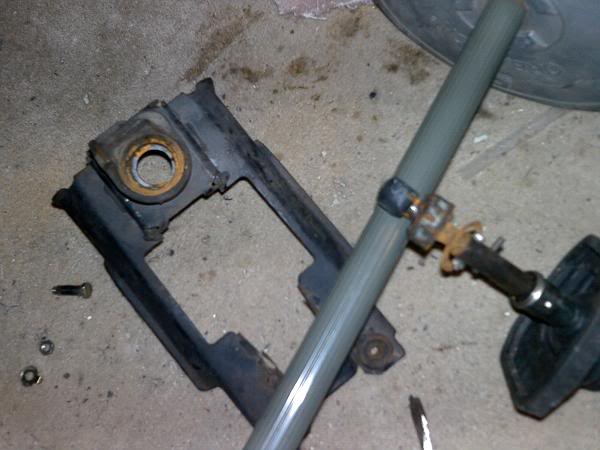
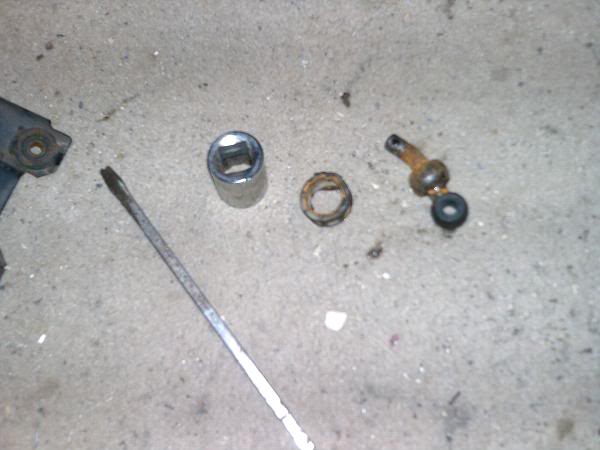
here are all the bits once they have been taken apart, notice that there is a hole in the side of the selector rod in which the locking washer slots in, when putting it back together again, htis is possibly the hardest part to get right due to the limited amount of space available
no goback into the car to get a view of this
ok, so it's a bit blurry, but you should be able to see a circlip in there somewhere
remove this clip like so
there is also a washer in the way, but we'll get to that later
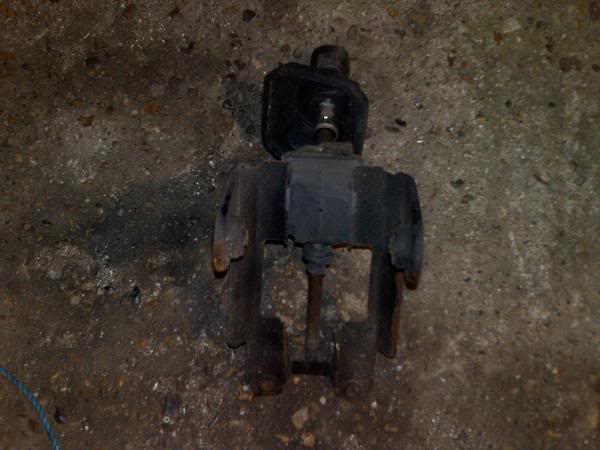
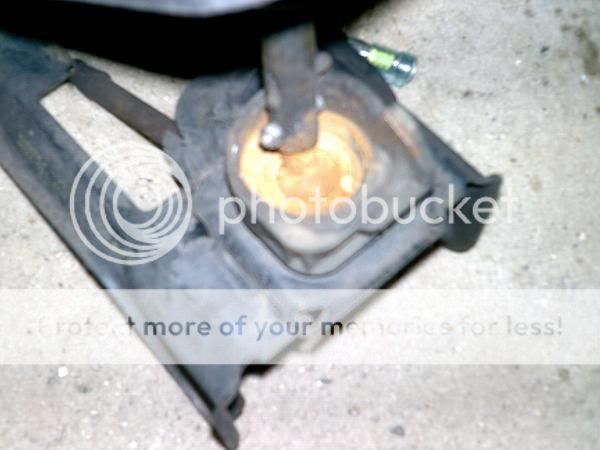
once this is done, get back underneath the car and get hammering at the bottom of the cradle to get the plastic carrier out of the base of the cradle, use a block of wood or something so you don't bend the bottom of the shifter mechanism (if you are replacing it you really needn't worry about bending it, but just in case things go tits up, it's worth taking the precaution)
you should end up with something a little like this
notice the washer dangling in the stick
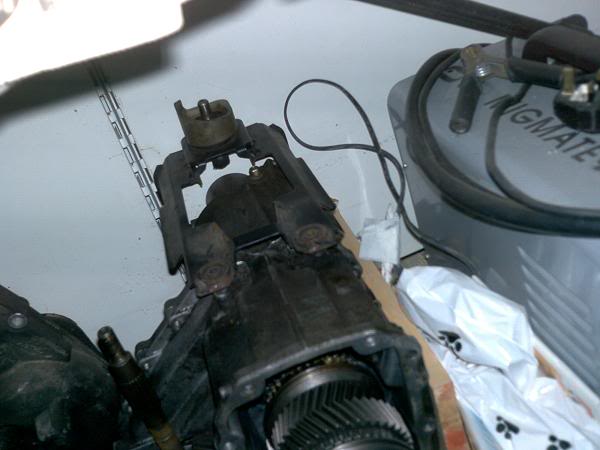
if you haven't removed the top of the gearstick, now is the time, and then you end up with something a bit like this
all you need to do now is find yourself a big vice and, to be perfectly honest, you would also benifit from a 27mm 3/4 drive socket
put the socket on the top of the stick (remember you should be able to see one edge of the plastic a series of spreadable bits of plastic which is the end that will expand NOT the other way around, so push the expandable bit over the ball)
now you can replace the original ball joint thing you have, with the new quickshift bit of kit you've boguht fomr somewhere
put it all back together again in reverse order
along the way i have made a few mental notes as to what the best course of action is if you are under the car, and the best way is probably to remove the prop so you can attempt to slide the whole cradle over the end and get it out into the open
you obviously need to remove the gearbox crossmember and the rear prop mount to enable you to get the gearbox down enough to get access, but just remember that the exhaust might get in the way as well
any questions?
this is a gearbox
but it ain't got the cradle on it, because thats here
remember though, all this has got to be done underneath the car if you haven't already removed it so it'll look a little something like this
for the sake of ease in the pics, the gearstick does not get removed from the little bit you cant to change until the end, but you will need to remove it before you get the box out, or indeed, before you undo the cradle as there will be nothing to stop the shaft from moving when you try to get the pin out
right then, so you've undone the 4 bolts and now you need to get the rest of it in bits, here is where you start
you need to poke these little bits of rubber off to get the dust cover off, haven't got a dust cover? why not? it's there to stop all the shit from gettign into the joint, as well as keeping it nice and clean with grease etc, so make sure you've got one to put back on, otherwise you will have to go through all of this all over again
so, you've got the cover off and now you can see this
this is the pin that holds the bottom of the balljoint (which is attached to the gearstick) to the selector (which is in turn attached to the gearbox via another set of pins)
what you need to do is to undo the locking tab washer so you can undo the nut (13mm), don't worry about it turning, it won't
and it won't becaues the other end of the pin looks a little osmething like this
then comes the task of getting the pin out, which will need some careful taping because it's normally covered in a bit of crap
here are all the bits once they have been taken apart, notice that there is a hole in the side of the selector rod in which the locking washer slots in, when putting it back together again, htis is possibly the hardest part to get right due to the limited amount of space available
no goback into the car to get a view of this
ok, so it's a bit blurry, but you should be able to see a circlip in there somewhere
remove this clip like so
there is also a washer in the way, but we'll get to that later
once this is done, get back underneath the car and get hammering at the bottom of the cradle to get the plastic carrier out of the base of the cradle, use a block of wood or something so you don't bend the bottom of the shifter mechanism (if you are replacing it you really needn't worry about bending it, but just in case things go tits up, it's worth taking the precaution)
you should end up with something a little like this
notice the washer dangling in the stick
if you haven't removed the top of the gearstick, now is the time, and then you end up with something a bit like this
all you need to do now is find yourself a big vice and, to be perfectly honest, you would also benifit from a 27mm 3/4 drive socket
put the socket on the top of the stick (remember you should be able to see one edge of the plastic a series of spreadable bits of plastic which is the end that will expand NOT the other way around, so push the expandable bit over the ball)
now you can replace the original ball joint thing you have, with the new quickshift bit of kit you've boguht fomr somewhere
put it all back together again in reverse order
along the way i have made a few mental notes as to what the best course of action is if you are under the car, and the best way is probably to remove the prop so you can attempt to slide the whole cradle over the end and get it out into the open
you obviously need to remove the gearbox crossmember and the rear prop mount to enable you to get the gearbox down enough to get access, but just remember that the exhaust might get in the way as well
any questions?
27-02-2006, 08:23 PM
#16
Virgin

Join Date: Jun 2005
Posts: 6
Likes: 0
Received 0 Likes
on
0 Posts
I need some help fitting thoose two bolts (closest to the engine) at the gearshift support bracket.
I'am working with the gearbox still in the car and I've got the shortshift in place. Now when I should fit everything back togheter again, I can't get thoose bolts secured
Any tips? what type of tool is best for this? How much pressure do i need to give the bolts?
Thanks!
btw, thanks for the guide dojj
27-02-2006, 08:46 PM
#17
Advanced PassionFord User
iTrader: (6)
Join Date: Apr 2004
Location: plymouth
Posts: 2,358
Likes: 0
Received 0 Likes
on
0 Posts
cant beleive you did it with the box on the floor you should have spent hours struggling under the car like I did. What do people who have done this think of it? I find its a nice short and positive movement but seems you cant hurry the box after the conversion.
28-02-2006, 12:19 PM
#18
the bolts can be done, but you need to put them in first before you put in the rears
to tighten them up, you should really be investing in a ratchet spanner
the other thing you need to watch out for is that there are 2 sizes of bolts, front and sides, they are longer and shorter
i found that the shift was a lot better, but i can change quicker than the box allows
to tighten them up, you should really be investing in a ratchet spanner
the other thing you need to watch out for is that there are 2 sizes of bolts, front and sides, they are longer and shorter
i found that the shift was a lot better, but i can change quicker than the box allows
28-02-2006, 05:30 PM
#19
Virgin
Join Date: Jun 2005
Posts: 6
Likes: 0
Received 0 Likes
on
0 Posts
Originally Posted by dojj
the bolts can be done, but you need to put them in first before you put in the rears
to tighten them up, you should really be investing in a ratchet spanner
the other thing you need to watch out for is that there are 2 sizes of bolts, front and sides, they are longer and shorter
i found that the shift was a lot better, but i can change quicker than the box allows
to tighten them up, you should really be investing in a ratchet spanner
the other thing you need to watch out for is that there are 2 sizes of bolts, front and sides, they are longer and shorter
i found that the shift was a lot better, but i can change quicker than the box allows
A ratchet spanner looks like a handy tool, it would be perfect for this, so I should definitely buy one.
Thanks for your help m8
28-02-2006, 08:34 PM
#20
Virgin
Join Date: Jun 2005
Posts: 6
Likes: 0
Received 0 Likes
on
0 Posts
What bolt should I use, the longer or the shorter? For now I'am using the shorter one.
The bolt wont stuck, it seems that the bolt isn't the right size or something beacuse when I tighten the bolt it gives pressure in about a half turn then it just loses it's pressure and the bolt can be released.
Sorry for my bad English, I hope you get it right
The bolt wont stuck, it seems that the bolt isn't the right size or something beacuse when I tighten the bolt it gives pressure in about a half turn then it just loses it's pressure and the bolt can be released.
Sorry for my bad English, I hope you get it right
28-02-2006, 08:58 PM
#21
small bolts at the front, i think they are black ones and the ones in the rear are blue
if thats the case then it sounds like you may have striped the threads in the ali casing
to fix it properly you would really need to get a helicoil to go in there, assuming you have the space to slot it in
otherwise box out and see what happens
i wouldn't recommend leaving it with just 3 bolts to hold it as this makes for a bit of a shaky gear change
what does the bolt look like when you remove it? has it got slivers of thread on it?
01-03-2006, 10:39 AM
#22
Virgin
Join Date: Jun 2005
Posts: 6
Likes: 0
Received 0 Likes
on
0 Posts
Ok, then it sounds if I have striped the threads like you said. I think the easiest way to find out is to take the box out and then use a helicoil to fix them if the threads are broken.
Thanks again for your help
Thanks again for your help

Thread
Thread Starter
Forum
Replies
Last Post
mrmann
Restorations, Rebuilds & Projects.
1
20-08-2015 11:24 PM